

Page 1
Chamfer
2 SLICE TOASTER
Model - RHCT1
Instructions and Guarantee
Page 2

IMPORTANT SAFEGUARDS
Read these instructions before using your toaster. Keep this in a safe place for future
reference.
When using electrical appliances, basic safety precautions should always be followed,
including the following:
1. To protect against electrical hazards do not immerse the power cord,
plug or stand toaster in water or any other liquid.
2. Do not use in the bathroom or near any source of water. Do not use outdoors.
3. Always use the appliances handles as some parts may be hot.
4. This appliance is not intended for use by persons (including children) with reduced
physical, sensory or mental capabilities, or lack of experience and knowledge, unless
they have been given supervision or instruction concerning use of the appliance by a
person responsible for their safety.
5. Always turn o and unplug from the power outlet before cleaning the appliance.
6. Do not operate this appliance with a damaged cord/plug or after the appliance has
been dropped, damaged or has malfunctioned in any manner. Contact Customer Service
for examination, adjustment, repair or replacement.
7. There are no user serviceable parts. If power cord or appliance is damaged, it must be
replaced by the manufacturer or similarly qualied person in order to avoid a hazard.
8. Do not use on an inclined plane or unstable surface.
9. Do not operate the toaster unless there is bread/similar content inside.
10. Do not move the toaster while it is switched on.
11. Do not cover the toaster when in use.
12. Always take care when removing toast after toasting as it is hot.
13. Bread may burn. Always monitor when using this appliance.
14. Do not use the toaster near or below any curtains or other combustible materials.
15. Always take care when removing food from the toaster, accessible surfaces may become
hot during operation.
16. Do not toast items that do not t into the toasting slots.
17. Keep the toaster and the power cord away from the edge of tables or countertops and
out of reach of children and inrmed persons.
18. To disconnect, turn o the wall power outlet, then grasp the plug and remove from wall
power socket. Never pull by the cord.
19. Ensure the toaster is switched o before removing toast.
20. Do not cook food wrapped in plastic lm or polythene bags or aluminum foil. It will
cause a re hazard.
21. Do not place on or near any heat sources.
22. Do not leave the toaster unattended when in use.
23. Follow the instructions when cleaning this appliance.
24. Do not use appliance for other than its intended purpose.
25. Clean the crumb tray regularly. If not cleaned it may be a re hazard.
26. This appliance is not a toy. Children should be supervised to ensure they do not play with
the appliance.
27. This appliance is not intended to be operated by means of an external timer or separate
remote control system.
SAVE THESE INSTRUCTIONS
THIS APPLIANCE IS FOR HOUSEHOLD USE ONLY
2
Page 3
3
Page 4

Before Use:
Read these instructions before using your toaster and keep them safe for future reference. If
you pass the toaster on to anyone else, you should also pass on the instructions.
Remove all packaging before using the product, but keep the packaging until you are
satised that the product is operating correctly.
You may nd a plastic label on the outside of the product listing its features. This must be
peeled o before use.
Before making toast for the rst time, operate the toaster without bread and with the
browning control set at the maximum setting. This will help to burn o any dust etc. which
may have accumulated on the elements. The new elements may give o an unpleasant smell
but this should not be a cause for alarm. Ensure the room is well ventilated while doing this.
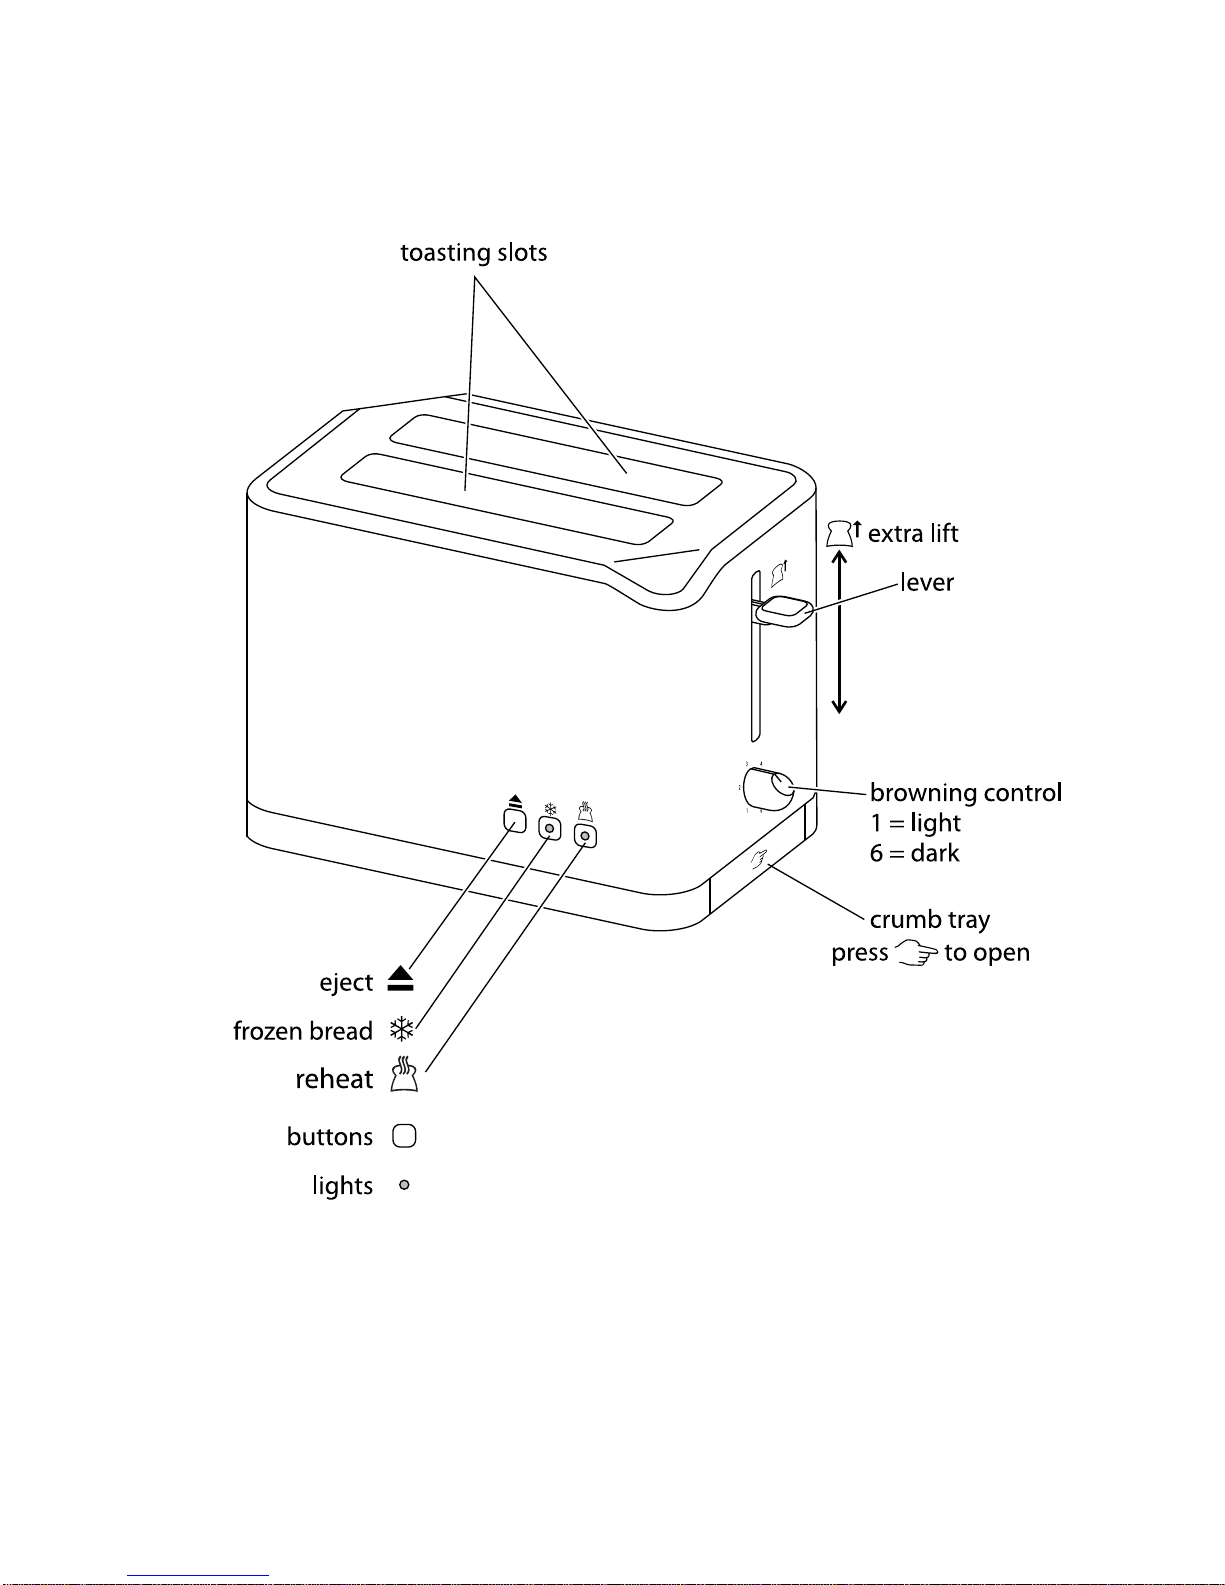
How to use your toaster
1. Position your toaster on a rm, level, heat-resistant surface, clear of curtains, drapes and
other combustible materials. Do not place the toaster on or near items that may become
damaged even by moderate sources of heat. Keep it out of reach of children.
2. Shorten the power cord by wrapping the excess cord around the clips underneath the
toaster.
3. Plug the power cord into the electrical outlet.
Toasting
1. Set the browning control to the degree of browning required. The control is electronic;
moving the browning control after toasting has started will not change the degree of
browning.
2. Place bread centrally into the toasting slots (maximum thickness of bread is 26mm)
3. Press the bread carriage handle down fully - the handle will not lock down unless the
toaster is connected to the electrical outlet.
4. When the toasting cycle is completed, the toast will pop up.
Extra lift facility
After toasting small items (crumpets, muns, etc) the bread carriage handle may be raised
further to allow easier removal.
Cancel button
If you wish to stop the toasting cycle before it is complete, press the CANCEL button.
The elements will be turned o and the toast will pop up.
Frozen bread
This feature takes the guesswork out of toasting frozen bread.
Leave the browning control at your desired setting, put the frozen bread into the toasting
slots, lower the bread carriage handle and then press the FROZEN button.
The FROZEN light will come on and will stay on until toasting is complete. The toasting
time will be altered automatically to give the same degree of browning you get with unfrozen
bread.
Caution: You cannot use the toaster to defrost frozen bread.
4
Page 5

Reheating
This feature allows you to reheat toasted bread.
Put the toast into the slots, lower the bread carriage handle and then press the
REHEAT
button. The
REHEAT light will glow; the toast will be given a short burst of heat to reheat
the toast.
Caution: You may only reheat plain, “unbuttered” toast.
Hints and tips
1. When toasting more than one slice of bread, use slices of similar size, thickness and
freshness.
2. Old or thin bread will cook faster than fresh or thick bread, so use a lower setting.
3. Do not use torn, curled up, or misshapen slices of bread as these may jam the ejection
mechanism and could catch re.
4. Sweet bread products (tea cakes, fruit loaf, etc.) brown much quicker than ordinary bread,
so should be toasted on a lighter setting.
5. Should the bread carriage handle become jammed during the toasting cycle, do not
attempt to release it. Unplug the toaster and allow it to cool down before carefully
removing the bread. Do not use a knife, fork or similar sharp instrument as these may
damage the elements.
Crumbs
Crumbs will collect in the base of the toaster. Letting them build up could cause a re hazard,
so remove them frequently. Unplug the toaster from the electrical outlet and push the centre
of the crumb tray to release it. Pull out the crumb tray and empty out the crumbs, then
wipe it clean with a damp cloth. Dry it thoroughly before sliding it back into the base of the
toaster.
Care and maintenance
Unplug the toaster from the electrical outlet and let it cool down naturally before attempting
any cleaning operation or storing away.
Wipe the outer surfaces with a soft damp cloth. If necessary, use a little mild liquid soap.
Do not allow anything to enter the slots, as this might damage the elements.
D not use harsh or abrasive cleaning agents or solvents.
Do not immerse the toaster in water or any other liquid.
5
Page 6

6
NOTES:
Page 7

7
NOTES:
Page 8

Russell Hobbs 2 Year Warranty
Nothing in this guarantee or the instructions relating to the product excludes, restricts or
otherwise aects your statutory rights under the Trade Practices Act 1974 and other relevant
legislation.
In addition to your statutory rights, Salton (Aust) Pty Ltd and Salton NZ Ltd (hereafter referred
to as “Salton”) provide a LIMITED 2 YEAR WARRANTY for this product. Salton warrants
this product free from defects in material and workmanship for two (2) years from the date
of purchase. Within this warranty period Salton will repair or replace defective parts at no
charge. Defective products may be returned to Salton or the place of purchase. Salton
recommends you keep your receipt as proof of purchase. If distance prevents you from taking
the product to the place of purchase, please call the Salton customer service department
freecall within Australia 1800 427 842, or freecall within New Zealand 0508 629 777.
The warranty does not cover improper installation, misuse, abuse or neglect of the product.
This warranty also does not cover any product taken apart, altered or serviced by an
unauthorised repairer.
Registration of your warranty card is not compulsory, but entitles you to receive these
benets:
t*OGPSNBUJPOPOTQFDJBMQSJDFPòFSTBOEQSPNPUJPOT
t/PUJöDBUJPOPGBOZJTTVFTDPODFSOJOHZPVSQSPEVDU
To register your product please:
t7JTJUwww.salton.com.au/warranty OR
t'JMMJOUIFXBSSBOUZDBSEBOETFOEJUUPUIFBEESFTTTIPXO
CUSTOMER SERVICE
AUSTRALIAN CUSTOMER SERVICE
Salton (Aust) Pty. Ltd.
P.O. Box 683
Braeside Victoria 3195
Australia
Freecall: 1800 427 842
Hours: 9am - 5pm (EST) Mon - Fri
NEW ZEALAND CUSTOMER SERVICE
Salton NZ Limited
P.O. Box 300 201
Albany, Auckland
New Zealand
Freecall: 0508 629 777
Hours: 9am - 5pm Mon - Fri
 Loading...