

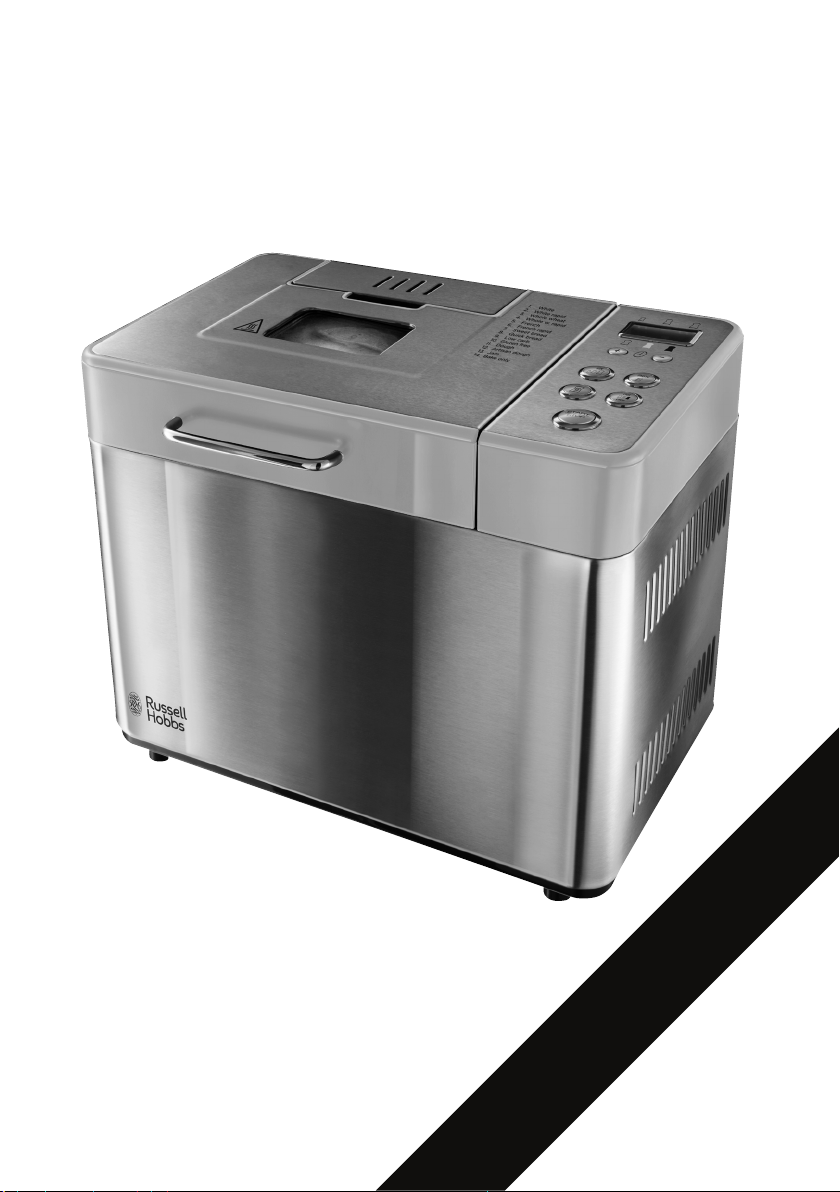
Russell Hobbs 22720 Instructions Manual
r
i
nstructions
EXTRA year guarantee
£10,000 prize draw
FREE rewards gallery
www.russellhobbs.co.uk/productregister/
Register online now!
details
See back for

A IMPORTANT SAFEGUARDS
• This appliance can be used by children aged from 8 years and above
and persons with reduced physical, sensory or mental capabilities or
lack of experience and knowledge if they have been supervised/
instructed and understand the hazards involved. Children shall not
play with the appliance. Cleaning and user maintenance shall not be
done by children.
• Keep the appliance and cable out of reach of children under 8.
• Don’t connect the appliance via a timer or remote control system.
• Do not use the appliance if the power cable is damaged.
• H The surfaces of the appliance will get hot.
• ` Don’t put the Breadmaker in liquid, don’t use it in a bathroom, near
water, or outdoors.
• Don’t touch internal surfaces till the Breadmaker has cooled down fully.
• Keep clear of the hot air vents in the sides and back of the Breadmaker
and the top of the dispenser.
• Don’t plug the Breadmaker in till after you’ve loaded the bread pan
(with the ingredients), into it.
• Sit the Breadmaker on a stable, level, heat-resistant surface.
• Leave a clear space of at least 5cm all round the Breadmaker when in
use.
• Don’t use the Breadmaker near or below curtains or other combustible
materials.
• Don’t cover the Breadmaker or put anything on top of it.
• Unplug the Breadmaker when not in use, before inserting or removing
the bread pan and before cleaning.
• Don’t use accessories or attachments other than those we supply.
• Don’t use the Breadmaker for any purpose other than those described
in these instructions.
• Don’t use metal or sharp tools on the bread pan or paddle – they will
scratch the non-stick surfaces.
• Don’t use the Breadmaker if it’s damaged or malfunctioning.
• The Breadmaker is for household use only.
2
C Introduction
Thank you for choosing a Russell Hobbs breadmaker. Your Breadmaker is designed to make
breadmaking really easy - you simply insert the ingredients, select the programme you want
and the breadmaker then does the mixing, kneading and baking for you. It has a time delay
function that allows you to set it to have your loaf ready as soon as you get up or get in from
work. It also has adjustable crust control so you can have bread as well done as you like.
And the breadmaker doesn’t stop at making just bread – you can also make dough for pizzas,
cakes, even fruit loaves and jam.
We have provided you with this manual to help you get the most from your new product. It
contains operating instructions and important advice of how to use the product safely. It is very
important that all users read and understand this instruction manual before operating or
cleaning this appliance.
1
2
3
5
4
6
m
l
4
2
0
3
60
7
3
0
0
2
4
0
180
1
2
0
6
0
8
9
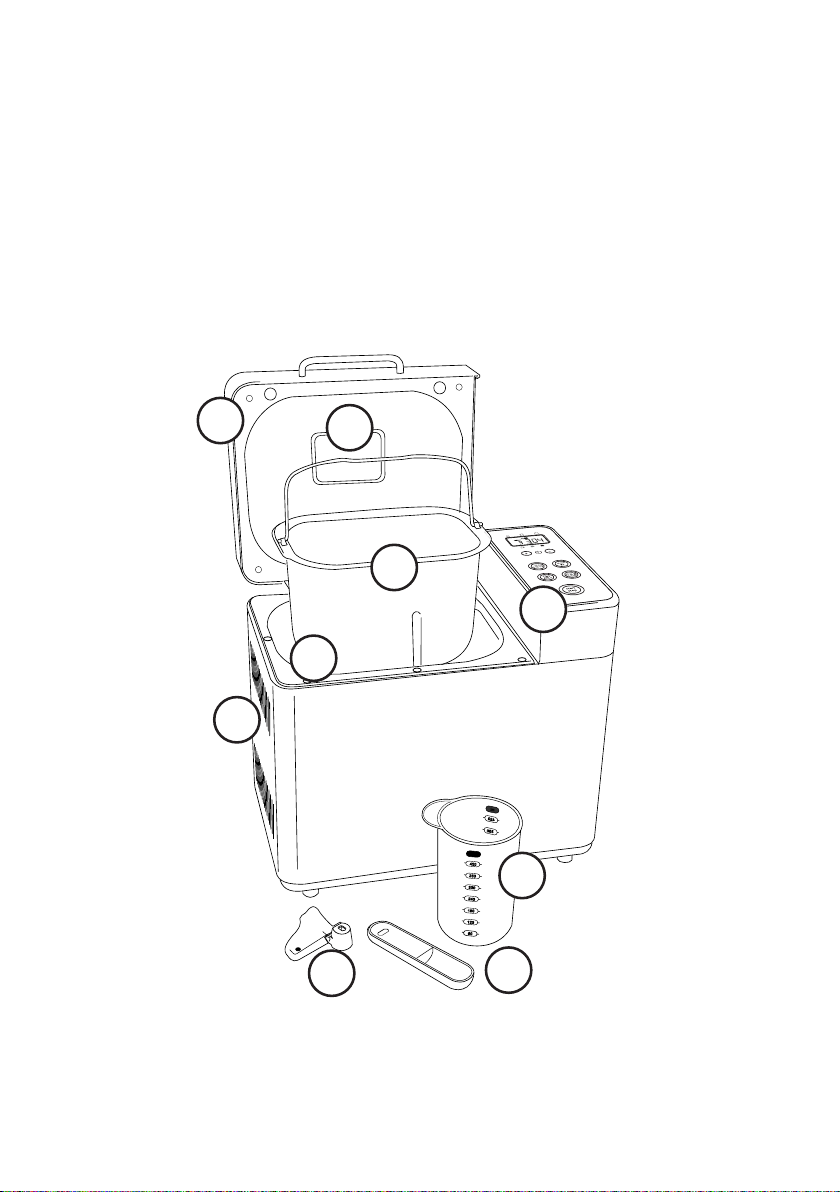
1. Removable Lid 4. Baking Chamber 7. Measuring Cup
2. Viewing Window 5. Control Panel 8. Kneading Paddle
3. Bread Pan 6. Hot Air Vents 9. Measuring Spoon
3

C Before you use your breadmaker
Loaf Size IndicatorTimer
Programs:
1. Remove all packing materials and any stickers.
2. Place the breadmaker on a dry, stable, level surface away from heat and areas where cooking
grease or water may splatter on to it. Do not place it near the edge of the work surface.
3. Operate the breadmaker on the BAKE program without adding any ingredients for 10-15
minutes. This will burn o any manufacturing oils (the breadmaker may smoke and/or emit
an oily odour. This is normal).
4. Wash the bread pan and paddle thoroughly.
C Breadmaker controls
TIMER
MENU
MENU
TIMER
Adjust
Timer
Program Selection Crust Colour Indicator
1White
2WhiteRapid
3WholeWheat
4WholeWheatRapid
5 French
6 French Rapid
7 Sweet
8 Quick Bread
9 Low Carb
10 Gluten –Free
11 Dough
12 Artisan Dough
13 Jam
14 Bake Only
Loaf Size
Bake Only
Program
Select
Crust
Colour
Start/Stop
Buttons
When you press any Button, you should hear a beep. This lets you know you’ve pressed hard
enough to activate your selection.
Adjust Timer UP and DOWN Buttons - Use this pair of Buttons to set the TIMER. Use this pair of
Buttons to add or subtract time displayed in the Display Window. Each time you press these
buttons, the TIMER increases or decreases by 10 minutes.
Loaf Size - Select the LOAF size: 500, 750g or 1000g. The Breadmaker is preset to 1000g.
MENU Select - allows you to select from 13 dierent breadmaker programs:
1. White. The White program is used for breads that primarily use white our, although
some recipes may include small amounts of whole wheat our.
2. White Rapid. Used to decrease time to approximately 1 hour. Choose recipe, then
simply add ½ tsp. to amount of yeast listed for a 1000g. loaf. Bread may be shorter and
denser than bread made using the longer program.
3. Whole Wheat. Used for recipes with signicant amounts of whole wheat or rye our,
oats or bran. Whole wheat cycle begins with rest period during which ours or grains
4

absorb liquid ingredients. Soaking causes our or grain to soften and helps ingredients to
combine. Generally, whole wheat and multi-grain breads are shorter and denser than
white, French or sweet.
4. Whole Wheat Rapid. Used to decrease time to approximately 1 hour. Choose recipe,
then simply add ½ tsp. to amount of yeast listed for a 1000g. loaf. Bread may be shorter
and denser than bread made using the longer program.
5. FRENCH. Traditionally, French bread has a crispier crust and lighter texture than white
bread. Recipes usually do not include oils, butter, margarine, or milk.
6. French Rapid. Used to decrease time to approximately 1 hour. Choose recipe, then
simply add ½ tsp. to amount of yeast listed for a 1000g. loaf. Bread may be shorter and
denser than bread made using the longer program.
7. Sweet. Used for recipes that contain eggs, fruit juice, additional sugar or added sweet
ingredients such as coconut akes, raisins, dried fruit or chocolate. Baking temperature is
reduced to prevent burning.
8. Quick Bread. Used for recipes that contain baking powder or baking soda, rather than
yeast, to make bread rise. Cake recipes made from scratch must be specially designed for
this cycle.
9. Low Carb. Used for recipes that are lower in carbohydrates.
10. Gluten –Free. Used for gluten-free recipes.
11. Dough. Use to prepare dough for making bread, rolls or pizza which are shaped and
allowed to rise before baking in a conventional oven. This setting blends and kneads the
dough and takes it through the rst rise.
12. Artisan Dough. Artisan breads (or country breads) represent the best in bread baking.
They use the freshest ingredients, usually including fresh herbs and interesting seed and
nut additions. The longer rising time (the entire cycle in the bread machine is 5:15 hours) at
cooler temperature settings (preset in the machine) allow the avor of the our to
dominate. Consider using ingredients such as, organic ours, unrened sea salt and spring
water. Sugar and fat are often not used in these breads. The nal shaping, rising and
baking of the bread allow for your creativity and bring a very personal touch to the results.
13. Jam. Use to prepare preserves, marmalade, chutneys and ketchup. Add fruit, sugar
and lemon juice for homemade preserves – a great topping for homemade bread, waes
and ice cream.
Bake Only - Selects Program 14. Used to give extra time if the crust is too light, or you wish to
bake pre-made dough. Bake only is especially useful if your bread is not quite done. Check
every few minutes. Bakes for up to 1 hour, 30 minutes.
Crust Colour - Select the crust colour: Light, Medium or Dark . The Breadmaker is
preset to Medium.
START/STOP - Press this Button to start the chosen program and to begin the TIMER
countdown. Press this Button for a full second to reset the program’s TIMER setting or to cancel
the program in progress.
5

C Breadmaking basics
Bread making is both a science and an art. It’s a science because it requires precise measurement
and control of quantities, temperatures and times in order to work. It’s an art because there is an
almost unlimited number of variations of sweet or savoury ingredients that can be added to a
basic bread mix. This means, once you have mastered the basics, you have unlimited freedom
to explore the creative possibilities of producing bread just the way that you like it.
Your breadmaker will help you because it takes care of the precise measurements of
temperature and time. All you have to do is ensure that you measure the ingredients accurately
and it will allow you to bake a perfect loaf every time.
Preparation
Before you begin make sure you gather all of the equipment and ingredients you need. This
includes containers for ingredients, a cooling tray, oven gloves, and if you have one available, a
digital kitchen scale.
This last item is not essential, but it will help you measure both liquid and dry ingredients
accurately and, as we have already explained, that is a large part of the secret of success.
The room temperature can aect the outcome of your baking. The breadmaker works best in a
temperature between 15°C and 34°C (59°F and 93°F).
Measuring
It’s important that ingredients are measured accurately.
• Use the same measuring spoons for all the ingredients.
• Use the back of a knife to level all spoons for measurements given in spoons.
• Electronic scales are much more accurate than measuring jugs when measuring water. If
you’re using a recipe from elsewhere, 1 millilitre of water = 1 gram (g).
Choosing ingredients
Flour. Ordinary plain or self raising our is not suitable for making bread. It is important to
choose a our with “Strong” or “Bread” in its name. Strong or bread ours contain more gluten
than ordinary baking our. Gluten is the protein that gives the bread its structure and texture. It
retains the carbon dioxide produced by the yeast, putting the elasticity, the bounce, into the
dough.
You can choose from strong white, strong brown or “Farmhouse” our, strong wholemeal, and
whole wheat bread making ours. Wholemeal ours provide an excellent source of dietary bre,
but contain lower levels of gluten than strong white our. This means that brown loaves tend to
be smaller and denser than white loaves. Try substituting strong white our for half of the
brown our in the recipe to make bread with a “brown bread” avour and a “white bread”
texture.
For those on a gluten free diet it is possible to substitute a mixture of rice and potato starch our
to make gluten free bread. See the details for the Gluten Free breadmaker program later in this
manual.
Yea st. Yeast is a living organism. Given moisture, food, and warmth, the yeast will grow and
release carbon dioxide gas. This forms bubbles which are trapped in the dough, making it rise.
Choose a dried yeast, marked “suitable for bread makers”. These are usually sold in sachets and
don’t have to be dissolved in water rst. Only use fresh, recently opened yeast (Check the “best
before” date on the sachet) – yeast that is stored can quickly lose its ability to rise.
Liquid. The liquid ingredient is normally water or milk, or a mixture of the two. Water makes a
crispier crust. Milk gives a softer crust with a velvety texture. Water should be slightly warm, in
6
 Loading...