

Russell Hobbs 21850 Instructions Manual
r
instructions
EXTRA year guarantee
£10,000 prize draw
FREE rewards gallery
Register online now!
www.productregister.co.uk/rhobbs
details
See back for
2

Read the instructions, keep them safe, pass them on if you pass the appliance on. Remove all
packaging before use.
A IMPORTANT SAFEGUARDS
Follow basic safety precautions, including:
1 This appliance can be used by persons with reduced physical,
sensory or mental capabilities or lack of experience and
knowledge if they have been supervised/instructed and
understand the hazards involved.
•Children must not use or play with the appliance.
•Keep the appliance and cable out of reach of children.
2 Use the appliance only with the connector and cable supplied,
and vice versa.
3 If the connector or cable are damaged, they must be replaced by
a special assembly available from the manufacturer or its service
agent.
4 Don’t connect the appliance via a timer or remote control system.
` Don’t immerse the appliance in liquid.
¬ The surfaces of the appliance will get hot. Residual heat will keep
the surfaces hot after use.
3 Don’t put frozen meat or poultry in the appliance – defrost fully before use.
4 Cook meat, poultry, and derivatives (mince, burgers, etc.) till the juices run clear. Cook fish till
the flesh is opaque throughout.
5 Don’t try to cook anything in the body of the cooker – cook only in the removable bowl.
6 Don’t fill the bowl above max.
7 Don’t reach over the appliance, and keep hands, arms, face, etc. clear of the escaping steam.
8 Don’t cover the appliance or put anything on top of it.
9 Don’t cook foods that foam when heated (like laver, Chinese cabbage, kelp, corn grits, pasta),
they may block the filter, and overwhelm the appliance.
10 Attach the connector to the appliance before plugging the cable into the power socket.
11 Unplug the appliance when not in use.
12 Don’t use accessories or attachments other than those we supply.
13 Don’t use the appliance for any purpose other than those described in these instructions.
14 Don’t use the appliance if it’s damaged or malfunctions.
household use only
U BEFORE USING FOR THE FIRST TIME
Hand wash the removable parts.
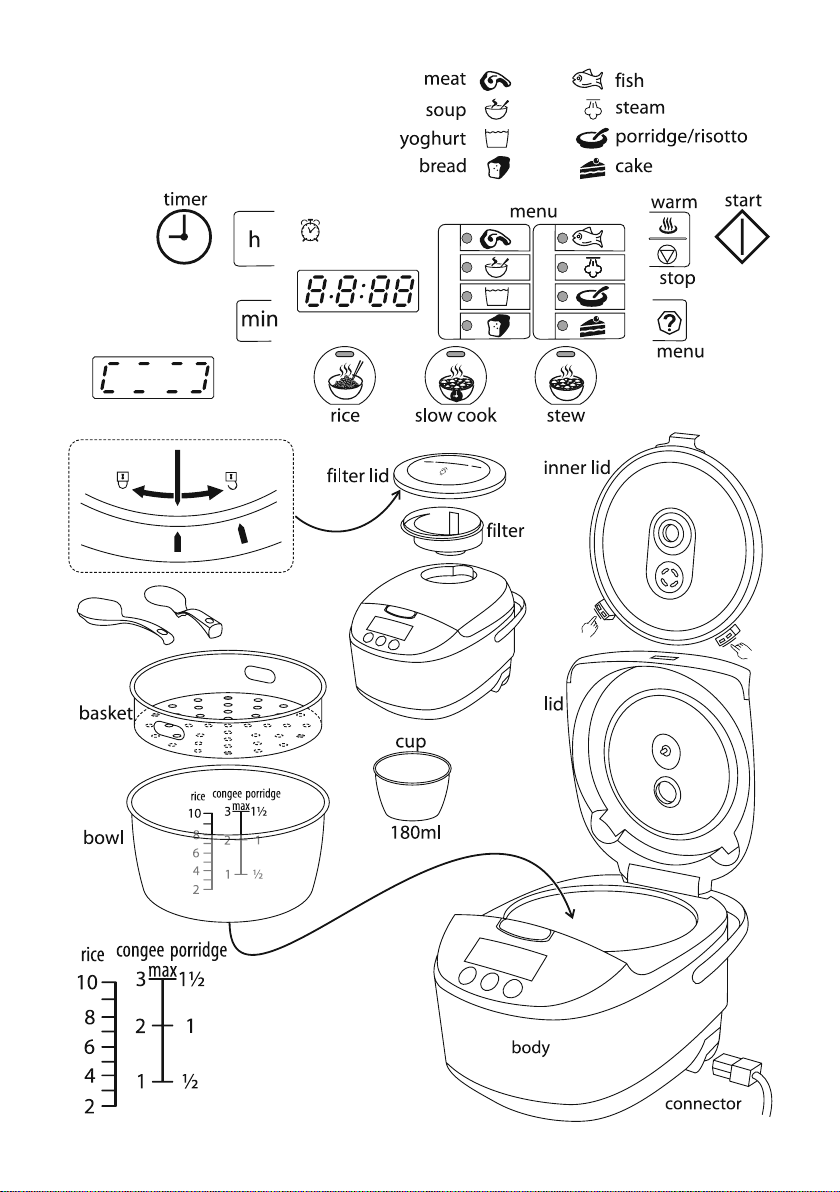
d HOW IT WORKS
• Measure the ingredients into the bowl.
• Give the bowl quarter of a turn each way, to ensure the bottom of the bowl makes good
contact with the element.
• Close the lid.
• Use the menu button ] to select the program you want.
• The three big buttons at the bottom, h rice cooking, i slow cooking, and j stewing,
3

over-rule the menu and the start button.
• Set the timer T, if appropriate.
• Press the start button v.
• To stop the appliance, press stop w once if the display is not counting down, or twice if the
display is counting down.
• After using the appliance, let it rest for 15 minutes before using it again.
C PREPARATION
1 Sit the appliance on a stable, level, heat-resistant surface.
2 Don’t use the appliance near or below curtains, shelves, cupboards, or anything else likely to
be damaged by the escaping steam.
3 Have oven gloves (or a cloth) to hand, and a heat-resistant mat or dinner plate to put the
bowl on after cooking.
4 Put the bowl inside the cooker.
5 Give the bowl quarter of a turn each way.
C POWER UP
6 Put the lid on the bowl.
7 Put the connector into the plug into the power socket.
8 The display will light up briefly.
9 The k light will blink.
h RICE COOKING
1 Use the cup to put rice into the bowl.
2 Don’t use more than 10 cups of rice.
3 The scale on the left inside the bowl is marked from 2 to 10.
4 Fill the bowl with water up to the number corresponding to the number of cups of rice.
5 Close the lid.
6 Press h .
7 The h light will glow.
8 The outer segments of the display will blink while the food heats up.
9 The display will then show the remaining cooking time (13 minutes), and count down.
10 At the end of the cooking time, the appliance will go into “keep warm” mode.
11 The W light will glow.
12 Open the lid.
13 Lift out the bowl and set it down on a heat-resistant mat or dinner plate.
14 Press stop w .
15 Use the spatula to turn and mix the rice, to let all the steam escape.
16 Sometimes the layer of rice in contact with the bowl will form a crust.
17 If you don’t want it you can remove it with the spatula, after you’ve served the rice.
i SLOW COOKING
1 Brown meat and vegetables (see “BROWN/SAUTE/SOFTEN/BOIL” on page 9).
2 Boil the cooking liquid (see “BROWN/SAUTE/SOFTEN/BOIL” on page 9).
3 Put the solid ingredients into the bowl, then add the cooking liquid.
4 Close the lid
5 Press i .
6 The i light will glow.
7 The display will show 8 hours, and count down.
9 At the end of the cooking time, the appliance will go into “keep warm” mode.
10 The W light will glow.
11 Open the lid, remove the food, then press stop w .
4

j STEWING
1 Brown meat and vegetables (see “BROWN/SAUTE/SOFTEN/BOIL” on page 9).
2 Boil the cooking liquid (see “BROWN/SAUTE/SOFTEN/BOIL” on page 9).
3 Put the solid ingredients into the bowl, then add the cooking liquid.
4 Close the lid
5 Press j .
6 The j light will glow.
7 The display will show 1 hour, and count down.
8 At the end of the cooking time, the appliance will go into “keep warm” mode.
9 The W light will glow.
10 Open the lid, remove the food, then press stop w .
] USING THE MENU
menu range default
meat 10 min-1 h 20 min
k
soup 1-5 h 1 h
X
yoghurt 6-10 h 8 h
g
bread 1-3 h 3 h
n
menu range default
fish 10 min-1 h 20 min
R
steam 30 min-2 h 30 min
S
porridge/risotto 1-4 h 1 h
m
cake 30 min-2 h 40 min
o
k MEAT
1 Rub the meat all over with cooking oil.
2 Rub any seasonings over the surface of the meat.
3 Put a tablespoon of cooking oil in the bowl.
4 Lay the meat in the centre of the bowl.
5 Close the lid.
cooking time
6 Cooking time will depend on the type and weight of food.
7 Don’t cook more than about 500g at a time.
8 We suggest cooking times of 10 minutes + 10 minutes per 100g of weight for beef.
9 Don’t cook pork or poultry for less than 30 minutes.
10 Cook meat, poultry, and derivatives (mince, burgers, etc.) till the juices run clear.
11 Cook fish till the flesh is opaque throughout.
12 Use the menu button ] to select k .
13 The default time is 20 minutes.
14 You can use the h and min buttons while the display time is blinking.
15 Use the min button to move the display through the options, 10, 15, 20, 25, 30, 35, 40, 45, 50,
and 55.
16 If you want to cook for 1 hour, press the h button.
17 To undo the 1 hour setting, press the h button again, while the display time is blinking.
, If you do nothing for 2 minutes, the appliance will revert to standby mode.
18 When you have chosen the cooking time, press start v .
19 The display will count down.
20 At the end of the cooking time, the appliance will go into “keep warm” mode.
21 The W light will glow.
22 Open the lid, remove the food, then press stop w .
5

T TIMER
• You may use the delay timer with the soup X , yoghurt g , bread n , steam S , and
porridge m programs.
• Do this immediately after setting the cooking time, and before pressing start v :
a) Press T .
b) The c light will glow, to remind you that you are using the delay timer.
c) Decide when you want your food to be ready.
d) For example, if it is 2.00 now, and you want it to be ready at 9.00, you must set the ready
time to 7 hours.
e) Use the h and min buttons to set the ready time
f) Press start v .
X SOUP
1 Brown meat and vegetables (see “BROWN/SAUTE/SOFTEN/BOIL” on page 9).
2 Put the solid ingredients into the bowl, then add the cooking liquid.
3 Close the lid.
4 Use the menu button ] to select X .
5 Choose the cooking time.
6 The default time is 1 hour.
7 You can use the h and min buttons while the display time is blinking.
8 Use the min button to move the display through the options, 10, 15, 20, 25, 30, 35, 40, 45, 50,
and 55 .
9 Use the h button to move the display through the options, 1, 2, 3, 4, and 5.
10 To undo the 5 hour setting, press the h button again, while the display time is blinking.
, If you do nothing for 2 minutes, the appliance will revert to standby mode.
11 You have the option of using the timer with this program (see TIMER).
12 Press start v .
13 The display will count down.
14 At the end of the cooking time, the appliance will go into “keep warm” mode.
15 The W light will glow.
16 Open the lid, remove the food, then press stop w .
g YOGHURT
yoghurt culture
1 You may use 30ml (2 tablespoons) of:
a) Unflavoured live yoghurt – it must be fresh (look for a long expiry date).
• Different brands will give different results.
b) Yoghurt you made previously.
• The bacteria weaken over time, so you can only do this 10 times before using another new
culture.
c) Freeze-dried yoghurt culture from a pharmacy or health food shop
• If the instructions on the culture package differ from this guide, follow those on the
package.
milk
2 You will need 1 litre of milk.
3 Whole milk gives thicker yoghurt than low fat milk.
4 To make it even thicker, you may add up to 8 tablespoons of powdered milk.
5 You may also use reconstituted powdered milk, or tinned evaporated milk.
making yoghurt
6 You need to kill the bacteria in the milk, to prevent them competing with the bacteria in the
yoghurt culture.
6
 Loading...