

Russell Hobbs 20350-56 Instructions And Warranty
INSTRUCTIONS AND WARRANTY
MODEL NO. 20350-56
DESIRE KITCHEN MACHINE

Congratulations on purchasing our Russell Hobbs Desire Kitchen Machine. Each unit is
manufactured to ensure safety and reliability. Before using this appliance for the first time,
please read the instruction manual carefully and keep it for future reference.
FEATURES OF THE RUSSELL HOBBS DESIRE KITCHEN MACHINE
700W of power and planetary mixing action for optimum results
4.5 litre capacity stainless steel bowl
Transparent splash guard with window for adding ingredients
Incudes aluminium creamer-beater and dough hook as well as stainless steel balloon
whisk
Electronic variable speed control
Tilting head for easy access of bowl and attachments
Integrated cord storage for added convenience and non-slip feet
IMPORTANT SAFEGUARDS
When using any electrical appliance, basic safety precautions should always be followed
including the following:
1. Please read the instructions carefully before using any appliance.
2. Always ensure that the voltage on the rating label corresponds to the mains voltage
in your home.
3. Incorrect operation and improper use can damage the appliance and cause injury to
the user.
4. The appliance is intended for household use only. Commercial use invalids the
warranty and the supplier cannot be held responsible for injury or damage caused
when using the appliance for any other purpose than that intended.
5. Avoid any contact with moving parts.
6. This appliance is not intended for use by persons (including children) with reduced
physical, sensory or mental capabilities, or lack of experience and knowledge, unless
they have been given supervision or instruction concerning use of the appliance by a
person responsible for their safety.
7. Children should be supervised to ensure that they do not play with the appliance.

8. Check the power cord and plug regularly for any damage. If the cord or the plug is
damaged, it must be replaced by the manufacturer or a qualified person in order to
avoid an electrical hazard.
9. Do not use the appliance if it has been dropped or damaged in any way. In case of
damage, take the unit in for examination and/or repair by an authorised service
agent.
10. To reduce the risk of electric shock, do not immerse or expose the motor assembly,
plug or the power cord to water or any other liquid.
11. Never immerse the full unit in water or any other liquid for cleaning purposes.
12. Remove the plug from the socket by gripping the plug. Do not pull on the cord to
disconnect the appliance from the mains. Always unplug the unit when not in use,
before cleaning or when adding or removing parts.
13. The use of accessory attachments that are not recommended or supplied by the
manufacturer may result in injuries, fire or electric shock.
14. Do not put any accessories containing metal in a microwave oven.
15. Do not touch the whisk, mixer blade or kneading hook while the appliance is in
operation.
16. Only use one attachment at a time.
17. Do not operate the appliance for more than 7 minutes at one time. Allow 30 minutes
rest before next use.
18. A short cord is provided to reduce the hazards resulting from becoming entangled in
or tripping over a longer cord.
19. Do not let the cord hang over the edge of a table or counter. Ensure that the cord is
not in a position where it can be pulled on inadvertently.
20. Do not allow the cord to touch hot surfaces and do not place on or near a hot gas or
electric burner or in a heated oven.
21. Do not use the appliance on a gas or electric cooking top or over or near an open
flame.
22. Use of an extension cord with this appliance is not recommended. However, if it is
necessary to use an extension lead, ensure that the lead is suited to the power
consumption of the appliance to avoid overheating of the extension cord, appliance
or plug point. Do not place the extension cord in a position where it can be pulled on
by children or animals or tripped over.
23. This appliance is not suitable for outdoor use. Do not use this appliance for anything
other than its intended use.
24. DO NOT carry the appliance by the power cord.
25. Do not leave this appliance unattended during use. Always unplug the unit when not
in use or before cleaning.
26. Always operate the appliance on a smooth, even, stable surface. Do not place the
unit on a hot surface.
27. Ensure that the switch is in the “Off” position after each use.
28. The manufacturer does not accept responsibility for any damage or injury caused by
improper or incorrect use, or for repairs carried out by unauthorised personnel.
29. In case of technical problems, switch off the machine and do not attempt to repair it
yourself. Return the appliance to an authorised service facility for examination,
adjustment or repair. Always insist on the use of original spare parts. Failure to
comply with the above mentioned pre-cautions and instructions, could affect the safe
operation of this machine.
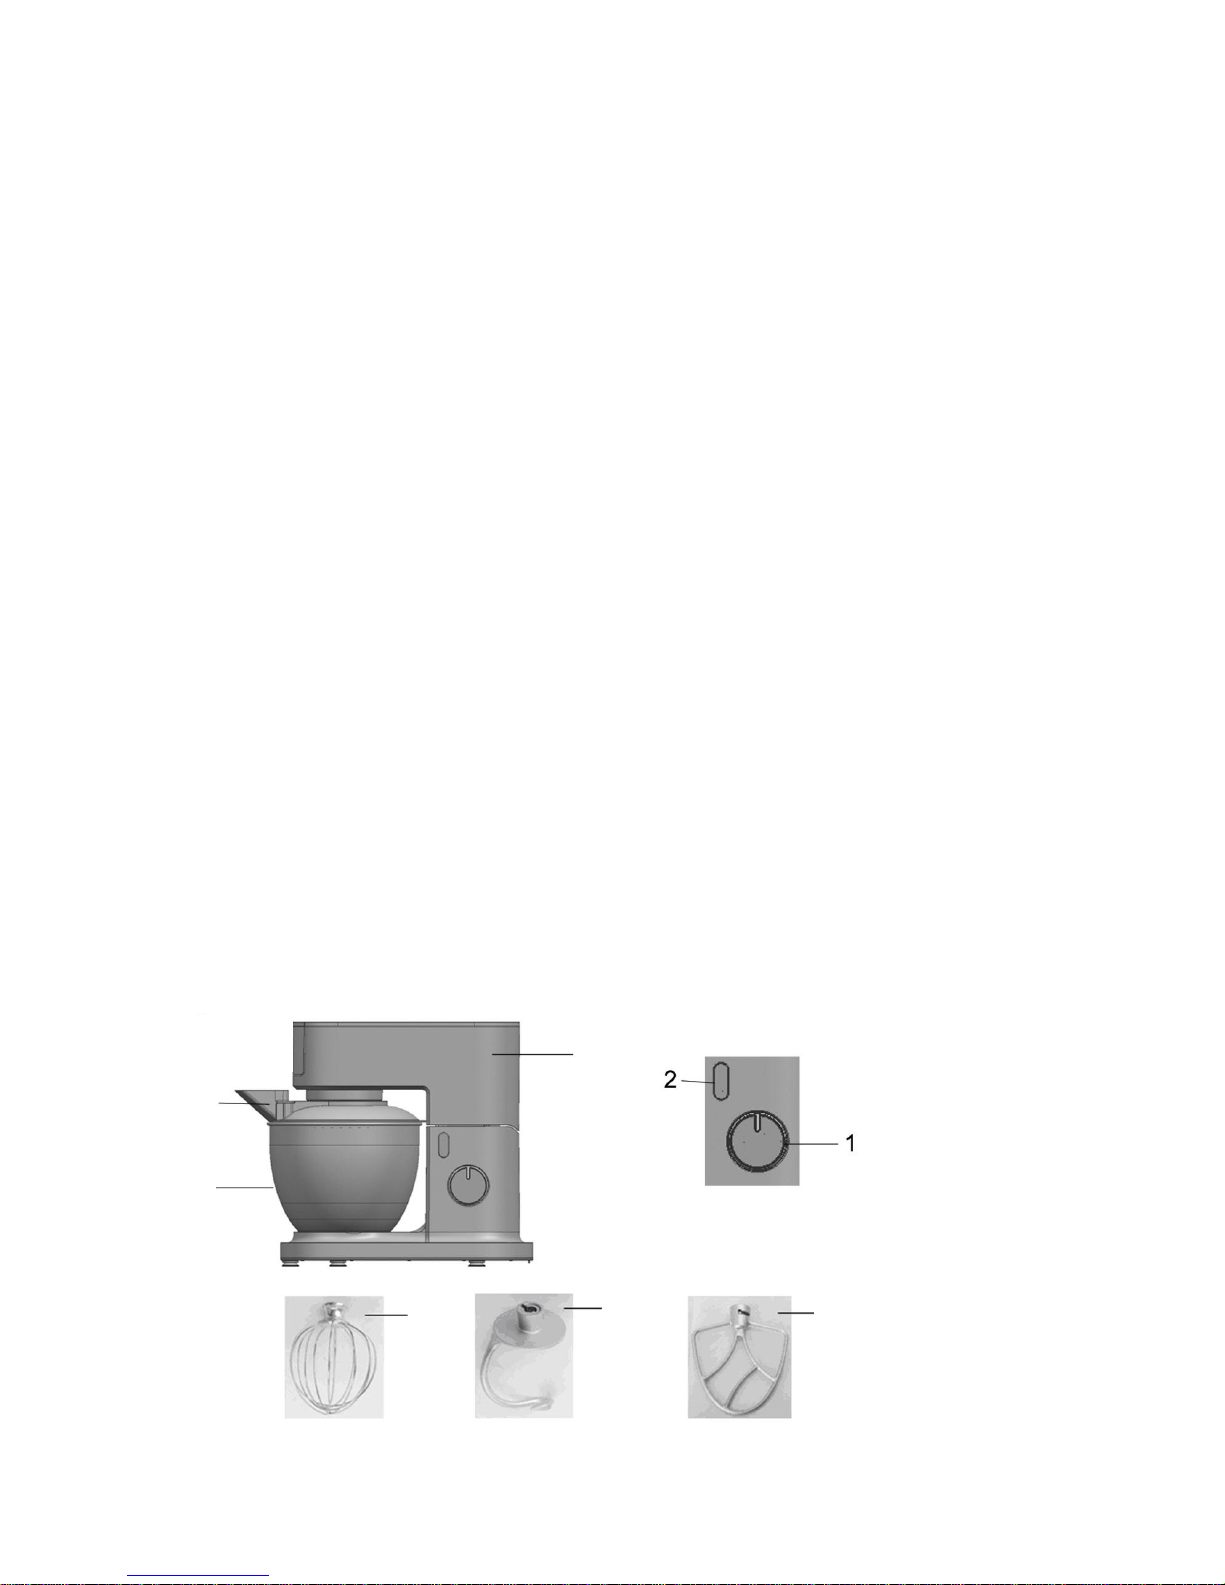
PARTS DIAGRAM
1. Speed control switch
2. Release button for multifunction head
3. Bowl cover
4. Stainless steel bowl
5. Multifunction head
6. Balloon Whisk
7. Dough hook
8. Creamer-Beater
3 4 5
6 7 8

BEFORE USING THE APPLIANCE FOR THE FIRST TIME
Remove all protective packaging and clean all parts as recommended in the CLEANING
AND MAINTENANCE section.
OPERATING INSTRUCTIONS
Kneading/ Beating/ Whisking
Refer to figure A in the Parts Diagram
Depending on the nature of the ingredients, the bowl (7) with its cover can be used to
prepare up to 2kg of dough.
1. Press button (2) to the release the multifunction head (8) and raise it to a vertical
position.
2. Fit the bowl (7) onto the appliance by turning until it locks in position and place the
ingredients in it, weighing them as indicated in your chosen recipe.
3. Position the cover on the bowl with the splashguard window at the front of the
appliance.
4. Fit the desired accessory (9),(10) or (11) into the power outlet, pushing the shaft of the
accessory into the drive and turning it a quarter turn towards you in order to lock it into
position.
5. Lower the multifunction head of the appliance to a horizontal position and press the
button (2) again (a click should be heard).
6. Place the appliance on a flat, clean and dry surface and then plug in your appliance.
7. To being operation of the appliance, simply select your desired speed by turning the
speed control dial counter clockwise from the OFF (0) position.
 Loading...