


USER GUIDE
I. Unpack your A-ZONE
RUSHWORKS has created your layout and set up your A-ZONE unit prior to shipping. Here’s what is included:
A-ZONE Hardware
AC Adapter
3.5mm to RCA adapter
Input Module
USB Cable
SDHC Card preloaded with your layout
USB Drive with software and documentation
II. A-ZONE Setup Instructions
1. Connect Video
2. Connect Audio
3. Connect USB to Input Module*
4. Connect Source to Input Module*
5. Connect Network
6. Connect Power
*Connect only if you intend to display an external source. Please see Appendix A for detailed connection instructions.
When power is connected your system will boot up. This will generally take between one to two minutes. We
preloaded some test content that will appear on the screen when your layout starts to run.
Note: For the best viewing experience standard definition (SD) video should be viewed on a CRT (tube) monitor, and high definition (HD) video
should be viewed on an LCD or Plasma with an HDMI input.
III. Control PC Setup
A USB drive is included with your A-ZONE system. The contents of that drive include:
A backup of your SDHC card’s setup
Installer for BrightAuthor - the program used for Layout and Playlist editing
Photoshop files used to create your layout
Documentation

The first thing you should do is determine what computer you will use for managing your A-ZONE content. Next,
Once that is done you will need to install
proceed with the instructions below.
Go to Edit then Preferences. There are
as the defaults for all future projects.
decide where on that system’s hard drive you would like to store your project files and media. Finally, insert the
included USB drive into a USB port on that system and copy the folder named “A-ZONE Projects” to the location
you have chosen. This is different from the Publish folder, which we will cover later. This is the location of your
working files and should be on your local machine. Any future changes to layouts and playlists will be stored here.
BrightAuthor. The setup file is located on the
root of the USB drive. It is named “setup”
followed by the version number.
To install simply double click this file and
proceed through the dialogs.
As soon as installation is complete launch the
program. The first thing you will see is a prompt
to create a new project. Click Cancel and
IV. Software Setup
Once BrightAuthor is running the first thing you will need to do is edit the configuration and default settings.
seven tabs; we’ll take them in order,
covering only the settings you’ll need to
understand. Once set, these will be used

Tab 1: Sign
Tab 2 Top: Video
Tab 2 Bottom: Video
RSS Update Frequency: This
determines how often your AZONE will fetch data from the
RSS source.
Time zone: Sets the default time
zone that will be used for future
projects.
Background screen color: This
color will fill areas not covered
by images or text.
Recommended Settings:
RSS: Every 5 minutes
Time zone: Set to your local
Background: Black
View Mode: Adjusts the stretch
mode for video.
Audio Output: Sets the connector
that audio will be output on.
Audio Mode: Determines how
multichannel audio will be handled.
Volume: This sets the default level
for clips and input.
Video: Letterboxed & Centered
Audio Output: Analog (Unless HD)
Audio Mode: Mix down to Stereo
Volume: 100
Input: Changes the input between
composite or S-Video.
Video Standard: Switches input mode
between NTSC and PAL formats.
Adjustments: These settings
(Brightness, Contrast and so on) adjust
the proc amp for the video input
module.
Input: Most devices use Composite
Standard: North America is NTSC-M
Adjustments: Best set by using a test
signal on the input
Tab 3: Images
Tab 4 Top: Ticker
Tab 4 Bottom: Ticker
Image Mode: Determines how
images will stretch (or scale) to
fill the image zone.
Slide Transition: Changes the
default transition new slides
will use.
Slide Delay Interval: Sets the
default duration of slides.
Image: Scale to Fill
Number of Lines: Determines
how many lines of text will be
on screen at one time.
Time to Display Each Line:
Number of seconds the last line
will display.
Rotation: 0 degrees for
landscape monitor orientation,
90 for portrait.
Alignment: Set the justification
for Ticker text.
Lines: 2 or more
Time: 5 seconds minimum
Text Appearance: Animated – writes on the
text one character at a time. Static – writes
on text by entire line.
Colors: Set the default colors used by the
Ticker.
Transparency: Adjust the default
transparency of the Ticker.
Font: Chose the default font used by the
Ticker. (Font file must be in project folder)
Text Appearance: Animated

Tab 4 Advanced: Ticker
Tab 5: Clock
Tab 6: Interactive
Background Bitmap: Select the image to
be used as a background behind the
Ticker, and chose to stretch the image
or not.
Safe Text Region: Set the start position
(X, Y) and the size (W, H) of the area to
be used to display Ticker text.
Safe Text Region: X and Y values should
be used to pad the region, with Width
and Height values set to do the same
on the right and bottom.
Clock: Settings types match
those of the Ticker.
Interactive: Not used unless a
touch screen controller is
configured.
Tab 7: Networking
Enable: BrightSign Network is a paid service. Only Simple Networking
should be enabled.
There are a few more settings that must be changed before you can update your presentation with content. These
settings are located on the Publish tab. NOTE: Your A-ZONE system has already been set up by the RUSHWORKS
staff. A document called “A-ZONE Publish Settings for BrightAuthor” has been provided on your USB Drive. Settings
MUST match that document for automatic content transfer to function properly.
On this configuration screen you will need to copy the settings EXACTLY from the document provided. If you ever
need to change this configuration please refer to the supplemental materials provided on the included USB drive.
Please contact us if any assistance is needed during this crucial phase of your setup.

V. Opening and Editing Your Presentation
Once the software is properly configured, open the project RUSHWORKS has created for your system. Go to File
then Open Presentation. Now browse to your “A-ZONE Projects” folder and open the “ZONE” presentation inside.
The screen layout is divided into zones, each of which displays different content. We have included two
presentations, one named “FULL” and the other “ZONE”. “FULL” will simply play a list of files full screen. Once the
“ZONE” version is open it should look similar to this:
On the Edit tab you will see Layout and Playlist. Click on Playlist and then select the Video zone (it might already
be selected). To the right you will see the order of the files that will play in your Video Zone.
On the left - below the Zone display - you will see the Media Library
and a Browse button. This will be used to browse to the location
where your slides and videos are stored.
Once you browse to the desired folder you can drag files over to
the right to complete the Playlist for that Zone. These can be
rearranged at any time so the order you drag them in is not
important. If you add a file to the folder while in this view you can
hit the Refresh button to the right of the Browse button.
Note: Only supported file types will be shown in this window. If your file does not
appear, it is likely that there is an issue with the format of the file. See Appendix B
for details on what file types are supported.
The two other tabs, other and events, contain commands that allow further customization
of your Playlists. The most commonly used item is found on the other tab. The Live Video
item can be dragged to the Playlist just like a file. The duration of the item can be set by
double clicking the item in the Playlist. You can also adjust the volume and specify duration.
All Playlist items can be customized by double clicking them in the list and changing the
options. The list can also be rearranged by dragging the items from one place to another.

VI. Saving and Publishing Your Presentation
After you have completed editing your Playlist you must save the presentation. Go to File > Save or Save As… if
you want to change the name. Any time you change an image or video, or change the order of the list you must
also Publish the list so the A-ZONE system will play the changes.
To do this click the Publish tab (1) and then click the Publish button (2) at the bottom left of the window. You will
see a window asking if you wish
to overwrite the contents of the
folder. If you haven’t made
changes to any of the content,
and only changed the order, you
should check the box Do this for
the remaining XX conflicts and
then click the button Don’t
Copy. If you have changed some
of the images or video then
Copy and Replace instead of
Don’t Copy.

VII. Editing the Schedule
The right portion of the Publish tab is dedicated to the schedule. Changes to
the schedule can be made by dragging one of the available presentations
from the Presentations List (1) to the Schedule Grid (2). Here they can be
moved, lengthened or shortened just by dragging. Alternately you can double
click any day or item and edit the desired options on the pop up. Available
options include:
A. Endless looping of a single presentation
B. Specific start and end times for each presentation
C. Recurring Events, daily, weekly, or a pattern of days
D. Specific start and end dates for time specific material
The same rule applies to schedule editing as with content editing – whenever
you change the schedule, you must publish it to your A-ZONE by clicking the
Publish button.
More information on the BrightAuthor software can be found in the
BrightAuthor_UserGuide.pdf file located in the PDF folder on the USB drive included with your system.
There are many advanced features not covered in this guide. Details on these can be found in
the A-ZONE Supplemental Documentation in the PDF folder on the USB drive included with your
system. If you have any questions about the performance or operation of your A-ZONE system,
please contact RUSHWORKS Support at 888.894.7874 x2.
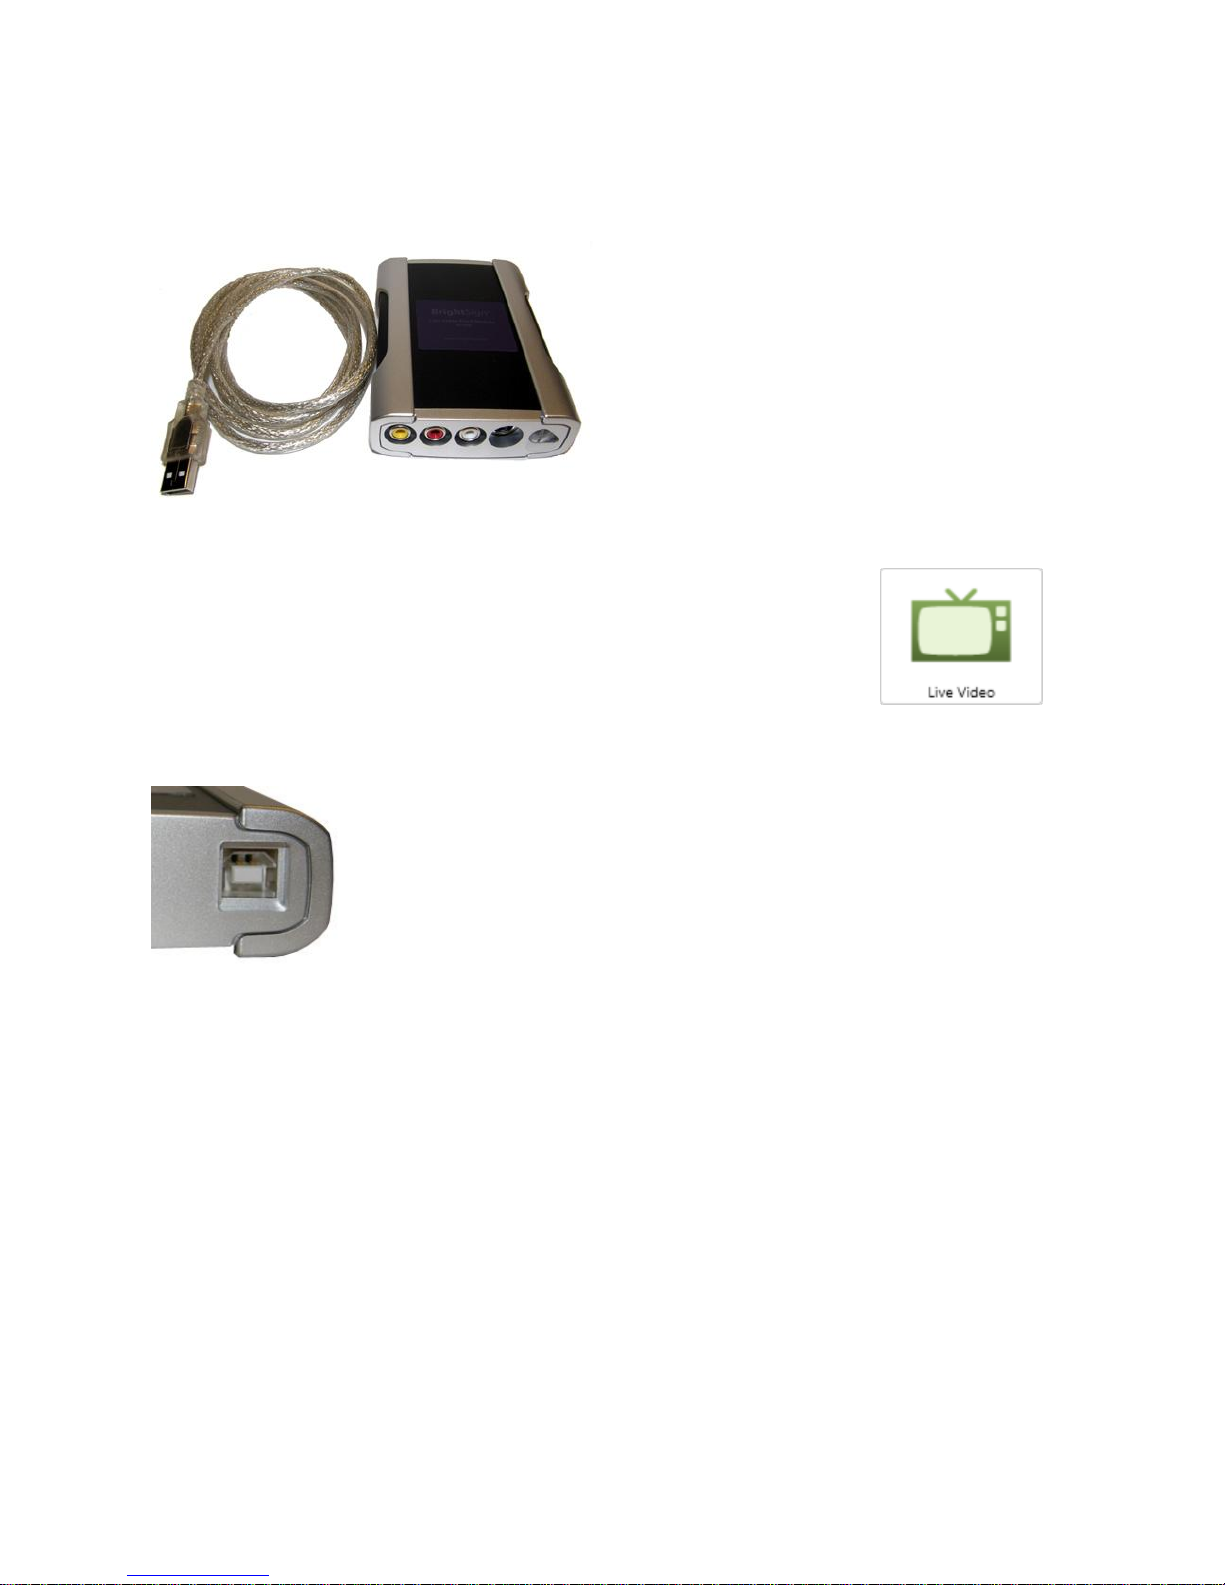
Appendix A: Optional Input Module
The input module has both audio and video
connections:
S-Video
Composite Video
Unbalanced Audio
There is also a USB connection and a power
button. If you intend to display an external
source the unit must be connected to your A-ZONE and powered on before the A-ZONE boots
up. If at any time the connection is broken or the unit is turned off the AZONE must be rebooted for the input to be seen again. Each time you
schedule the item “Live Video” you can edit the properties and choose
either S-Video or Composite, and specify the audio volume level. Simply
double click the item in the playlist to edit these properties.
IMPORTANT NOTE: The USB connection is a very tight fit. The connector
must be inserted with a large amount of force to be seated properly. If
it is not inserted correctly the device will not show as powered on, or it
will show up briefly but lose connectivity. Once inserted properly the
tight fit will keep it connected securely.

Appendix B: Supported File Format List
SUPPORTED FILE PLAYBACK FORMATS
Video Formats
Images
Extention
Specs
.MPG
V:
MPEG-2 Program Stream
.PNG
Max size 1920x1080
A:
MPEG Layer 2 @ 48 or 44.1 KHz
May include transparency
.VOB
V:
MPEG-2 Program Stream
.JPG
Max size 1920x1080
A:
MPEG Layer 2 @ 48 or 44.1 KHz
.TS
V:
H.264/AVC - MPEG-4 Transport Stream
.BMP
Max size 1920x1080
A:
AAC @ 48kHz
A-ZONE does NOT support PCM or AC3 audio. Please convert your audio to MPEG Layer 2.
The maximum bitrate for video files is 25Mbp/s
Your BrightAuthor presentations can include the following types of media files:
Video files. You can use a single file as a loop, or multiple files. Video files can be MPEG-
2 files that are saved as transport or program streams, MPEG-1 files that are saved as
system streams, or H.264 files that are saved as transport streams. Supported file
extensions: TS, VOB, and MPG
Audio files. Any MP3 audio (in a video or mp3 file) must have a sample rate of 48 kHz,
44.1 kHz, or 32 kHz.
Image files. For still images, use BMP, PNG, and JPEG files. The maximum supported
resolution is 1920x1080.
While the system is capable of playing many different resolutions and frame rates, it is best that
your footage match the output resolution of your A-ZONE. This is most likely 720x480i@29.97,
1280x720p@59.94, or 1920x1080i@59.94. If your video will be played in a window, it will look
best as progressive scan even if your output is interlaced. For more information on video
quality refer to the VideoQualityTechnote.pdf included on your USB drive.
For instructions on creating MPEG-4 Transport Streams see Appendix C
For instructions on creating MPEG-2 Program Streams see Appendix D
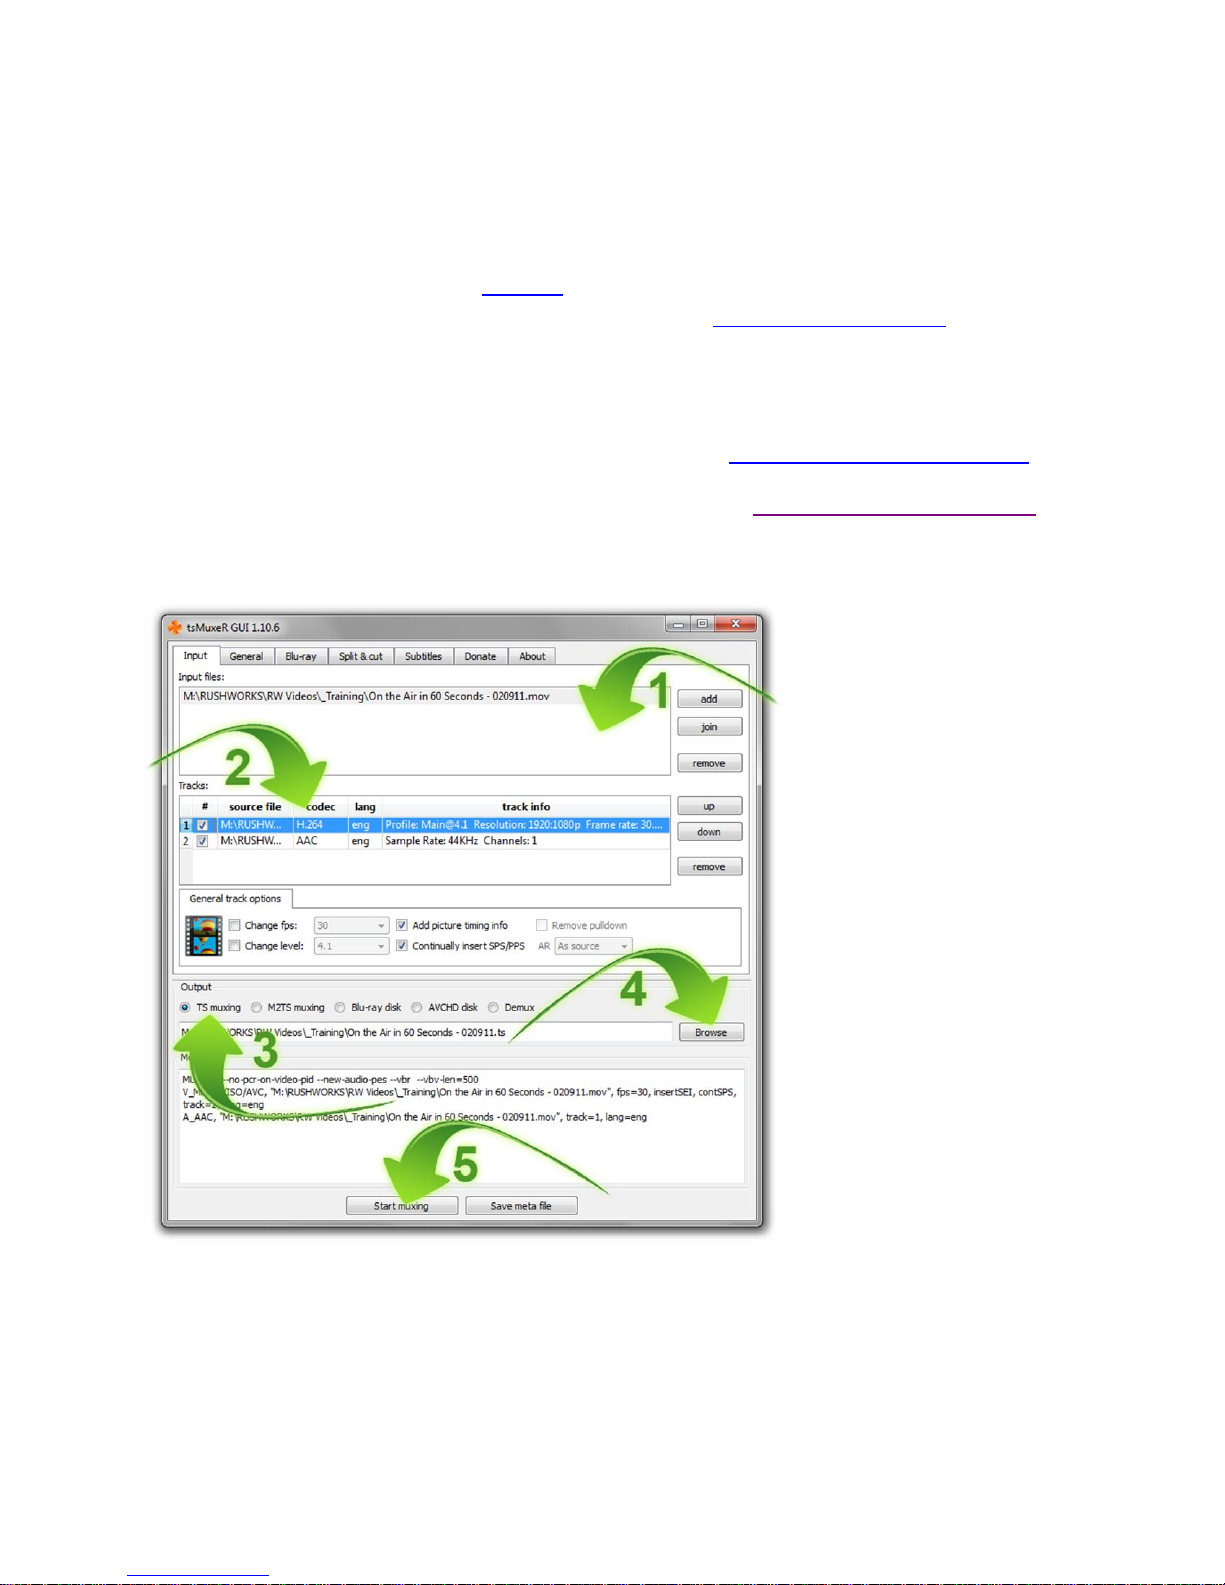
Appendix C: Creating Compatible MPEG-4 Transport Streams
To create a compatible MPEG-4 Transport Stream it is recommended that you first export a QuickTime
or MP4 file using the H.264 video codec, and AAC audio codec. Once that is done you can repackage the
file into a .ts (transport stream) using tsMuxeR. This is a free utility that will allow you to verify the video
is in the correct format before scheduling it. Please refer to the chart on playback formats for
specifications.
Step 1 – Create an MOV or MP4 with H.264 video and AAC audio:
Using Apple’s Compressor (included with Final Cut Pro) – Compressor Manual Chapter 20.2
Using Adobe Media Encoder (included with Premiere Pro) – Media Encoder Manual Page 19
Step 2 – Remux the file to an MPEG-4 Transport Stream using tsMuxeR:
1. Drag the desired file
to the Input files box
2. Verify the codecs
used:
a. MUST BE
H.264 and AAC
3. Click TS muxing
4. Click Browse and
select the location and name
where you want to save the
new file
5. Click Start muxing –
once complete the file is
ready to be scheduled.

Appendix D: Creating Compatible MPEG-2 Program Streams
For MPEG-2 there is no need to create an interim file as with MPEG-4. Every major editing program and
transcoding software can create MPEG-2 Program Streams that your A-ZONE can play. Please refer to
the chart on playback formats for specifications.
Using Apple’s Compressor (included with Final Cut Pro) – Compressor Manual Chapter 18.26
- Compressor typically uses the extension .mpeg when creating MPEG-2 files. These must be renamed
to .mpg to be compatible with BrightAuthor.
Using Adobe Media Encoder (included with Premiere Pro) – Media Encoder Manual Page 19
After these files are created you can browse to the folder with BrightAuthor and schedule them for
playback.
 Loading...