


User Guide v1.0
WARNING
As with all electrical items caution must be taken when installing and handling this system. It is
recommended that all connections be made before connecting the power cable and powering up the
system. Whenever working on computer systems a grounding strap is recommended.
All content copyright © RUSHWORKS 2018
Subject to change without notice. All rights reserved

Introduction to A-LIST STREAMSTER
A playlist is a simple, useful mechanism that lets you
specify WHAT you want to happen … and WHEN it
happens. Once a Playlist is created, automation takes
over, following the rules you’ve defined in the playlist.
In general, A-LIST Broadcast Automation utilizes Drag-and-
Drop and Cut, Copy and Paste to build your playlists.
Your presentation can be as simple as repeating the
contents of one or more folders … or as complex as
scheduling Events with playback accuracy down to the
second while communicating with other devices over your
network.
A-LIST supports a myriad of formats, styles, and schedule
types, letting you manage and produce the content
presentation that best fits your information display
requirements and visual style.
A-LIST Prep is an included utility that simultaneously runs
on the system and lets you create and/or edit playlists at
any time, except for the one that’s currently running with
the Streamster AUTOMATION ON. You can make changes
on the Streamster playlist up to about 15 seconds before
the next item or Event is scheduled to occur.
Traditional automation content typically includes two types of sources: (1)
MEDIA FILES: file playback of locally stored digital media,both clips and graphics
(e.g. mp4, MPEG-2, JPG, BMP, PNG), and (2) “LIVE” signals from a production
source such as a studio or remote venue.
Since there are no ‘baseband’ (BNC, HDMI) inputs or outputs on the Streamster, it uses a
network connection for sources other than the clips and graphics stored internally on the Solid
State Drive.
When you play clips accessible via a URL link (such as YouTube), you are essentially
playing back selected files over a network – the Internet. As with all networks there
is some latency to be expected, and the quality and continuity of your playback very
much depends on the quality and speed of your network connection to the
Internet.
And remote servers DO go down from time to time, and when they do you’ll not have access to
certain files for as long as your connection is disrupted. That said, let’s jump into the
Streamster!

QUICK START GUIDE
The A-LIST Streamster is a network-attached computer.
Connect the keyboard, mouse, monitor and network switch
before connecting the power cables.
With power connected and the Streamster connected to
your network switch, press the POWER button and the
system will boot up.
Connect1.
Power Up2.
Configure3.
After the system boots, the A-LIST software application will
automatically start. The default output resolution is 720p.
Click the Configure button to see your operating options.
Add Media4.
Copy clips and graphics into the AUTO-LOOP folder … OR …
organize files in subfolders in the D:\Media folder, then drag
and drop your clips, pictures and input selections into a Playlist.
Start Automation5.
Click the “START/STOP” button and start sending your stream
to your destination. The output can be set to 480p, 720p or
1080p, and be NDI, HLS or MPEG-DASH … with more to come.

CONTENTS
Hardware Overview1
Hardware Connections - Front2
Hardware connections - Rear2
The User Interface3
Main A-LIST Screen3
File Browser Window3
Text/Icon View3
Browse Button3
Find: full text search entry3
Media Sub-Folders3
Preview Window4
Motion Controls4
File Lock Status Indicator4
Playlist Window4
Header Information4
Automation Auto-Run & Auto-Load4
Media Item Color Codes5
Drag-and-Drop Playlist Items5
Drag-and-Drop Secondary Items6
Drag-and-Drop Manual Trigger6
Playlist File Menu6
Playlist Edit Menu7
Playlist Help Menu8
Program Window8
Program / Preview Audio Monitoring8
Bug On / Off (manual)8
Bug Selection9
Crawl 1 & 2 Controls9
MANUAL File Player Controls9
Automation Clock10
Audio Window10
DSK Window10
Settings Panel10
A-LIST Tab10
Audio Tab11
Encode Tab11
Stream Tab11
Configure Button (on the Settings Panel) 11
INPUT/OUTPUT Tab12
INTERFACE Tab12
CRAWLS Tab12
TEXT Tab14
Input Selection15
Using NDI sources as Inputs15
Using HLS and MPEG-DASH streams as Inputs15
Configuring and Naming a Virtual Router Input15
Playlist Naming and Rules16
Choosing a Playlist Template16
Setting Your Playlist Preferences17
AUTO-BUG17
AUTO-LOOP17
AUTO-LOOP Options17
AUTO-LOOP File Naming Tips18
AUTO-LOOP Rules18
AUTO-LOOP Example18
Adding Events to the Playlist19
Adding Events19
Editing Events19

CONTENTS (cont’d)
Adding Items Between Events20
Adding Clips and Pictures20
from the File Browser20
Finding Files in the File Browser20
Saving WEB Clips to the File Browser20
Select, Drag and Drop Files into Playlists21
Show File Location22
Scheduling LIVE Content23
Dragging an INPUT (live) Item 23
into a Playlist23
Specifying FIXED or FLEX 23
Input Segment Duration23
Using Folders in Playlists24
Scheduling and Managing Folders24
Normal Folders24
Slideshow Folders24
FILL Folders24
Edit Folders24
Managing Short & Long Events25
Managing Short & Long Events25
EVENT OK25
EVENT SHORT25
EVENT LONG25
Filling Unscheduled Time25
Adding Graphic Overlays to Playlists26
Manually Displaying a BUG26
Using AUTO-BUG26
Scheduling a BUG26
BUG Options27
Advanced BUG Options27
Editing existing BUG Properties27
Creating Multiple BUGS27
Extend a BUG over Multiple Items27
Manually Displaying a Crawl28
Scheduling a Crawl29
The Add Crawl Window29
Auto-Update Crawl from Text File30
EXTEND the Crawl over Multiple Items30
Setting the Crawl ON and OFF Times30
Editing Existing Crawl Properties30
Adding a Crawl Separator Image31
Scheduling a Text Overlay31
Drag and Drop31
Select and Click31
Right-Click Menu31
Creating Text and Timing32
Recording in A-LIST Streamster33
Record Scheduled Events33
Manual Recording34
Useful Markup Tags34
Defining a Play Length for Pictures34
Play Background Audio under Video Clips34

Hardware Overview
The standard A-LIST Streamster bundle includes the following:
A-LIST SystemFull HD MonitorKeyboard & Mouse
The A-LIST Streamster System
is configured in a Dell Micro
Workstation with a three-year
ProSupport warranty that
provides next business day
on-site service as/if required.
Monitor Cable
The system includes one
Display Port cable for
connecting the chassis to the
monitor.
The system includes a 22”
1920x1080 monitor with the
latest Display Port connection
for stunning digital clarity.
10’ Ethernet Cable
This is used to connect the
chassis to your network
switch as the data portal for
both output and input
signals.
Also included is the standard
Dell USB keyboard and
mouse.
You will need …
Internet access with enough
bandwidth to support the
level of streaming quality you
want to generate.
A-LIST Streamster is a turn-key scheduling and playback system. Should you need any
additional components or require a replacement part, please contact RUSHWORKS at
888.894.7874.
1

The A-LIST Streamster system features a Dell Optiplex 7060 Micro with a Xeon processor
and a single 512GB SSD. (1TB SSD optional)
Hardware Connections - Front
Power Button
Universal Audio Jack
Line Out Audio
USB 3.1 Gen 2 Type C
USB 3.1 Gen 1 Port
Hardware connections - Rear
RJ-45 Network
USB 3.1 Gen 1 (4 ports)
Display Ports
Power Connection
Power Connection
2
Hardware subject to change without notice.

SOFTWARE
Main A-LIST Screen
2
1
There are nine (9) windows in the A-LIST User Interface.
The following pages describe these windows, their features and functions.
(1) File Browser
(2) PREVIEW Window
(3) Playlist Window
(4) PROGRAM Window
(5) Automation Clock
(6) Audio Window
3
5
4
6
9
7
File Browser Window
1
8
File Browser Window
(7) DSK Window
(8) Settings Panel
(9) Virtual Input Selection
Text/Icon View
By clicking the Text or Icon view buttons, the files
will be displayed according to your preference.
Browse & UP Buttons
When you click the BROWSE button, a Browse For
Folder window will open to assist in locating files.
You can use the UP button to move vertically
upwards through hierarchical folders as you
browse.
Find: full text search entry
The A-LIST File Browser supports a fast, full-text
search engine that lets you quickly locate files with
matching search criteria as you enter each new
letter. The backspace key will delete a character
and widen the search again. Click the X button to
clear the entry window.
Media Sub-Folders
The A-LIST File Browser works very much like
Explorer or any other file browser. However, there
is a specific folder structure included as the
default, with a Media folder at the root of the D
drive (D:\Media).
Inside that folder are six sub-folders, with four
accessible by the button shortcuts: CLIPS, PICS,
CGS and WEB. Two more sub-folders, BUGS and
CRAWLS, are also included in the Media folder for
your convenience. You can add as many sub-
folders as you wish to the D:\Media folder
structure at any time. This file structure is generally
useful as a starting point for organizing your media
library.
NOTE: The search is confined to the folder contents
currently displayed in the window, and NOT the entire drive.
NOTE: For optimal system stability the minimum
duration of a clip scheduled for playback should be
three seconds (:03).
3

SOFTWARE
Preview Window
2
Preview Window
Motion Controls
This window is used to preview video clips and image files without
alpha channels when they are selected in the File Browser or Playlist.
When a clip or graphic is selected, it turns GREEN in the
Browser/Playlist and is loaded into this window. Use the motion
controls to Play, Fast Forward, Fast Rewind, Go To File Beginning
and Go To File End.
The shuttle slider handle is used to scrub the video forward and
backward. This control is disabled while Automation is turned ON.
The current frame of the selected file’s LOCATION and its total
DURATION are displayed in the timecode boxes. The Preview player’s
status is also displayed in this area.
NOTE: CG files (PNG with transparency) are NOT previewed in this window,
but rather in the DSK (Down Stream Keyer) display in the User Interface.
File Lock Status Indicator
Since this window is associated with Playlist file cueing, it is unavailable
for user interaction seven seconds prior to the playback of the next file
in theplaylist. During that period of time, the graphic padlock will show
‘closed’. When it is open as shown here, files can be previewed at any
time.
Playlist Window
3
Playlist Window
Header Information
The Playlist header tells you everything you need to know at a glance:
• The number of items in the list
• The currently playing file name
• The file path (location) of the playing file
• The duration, current time code and time remaining of the
playing file
• Time until the Next Event
• AUTO-LOOP on/off status
• AUTOMATION ON/OFF status
Automation Auto-Run & Auto-Load
The system Default is to automatically open and run A-LIST when the
system is started up. The Auto-Load function locates the appropriate
Playlist (DAY or DATE) and jumps to the exact point where the system
should be automating relative to the system clock. This feature is called
“Resume In Progress (RIP)”, so if Automation is turned off for any reason
and then turned back on, RIP will start playing at precisely the
appropriate time.
If Auto-Run Playlist at Startup is NOT checked, the application will open
and load the appropriate list, but will wait for operator instructions.
4
SOFTWARE
PLAYLIST Window (cont’d)
Media Item Color Codes
A-LIST utilizes colors to help you identify processes, procedures and
status indicators as the automation progresses.
Blue text on black background: The file is longer than two minutes
and two seconds (00:02:03)
Indented with White text on black background: The file is shorter
than two minutes and two seconds (00:02:03)
Red Background: The currently playing file.
Green Background: The currently cued file (a few seconds prior to
playing)
Gray Background: The file has already played in the Playlist.
Yellow text on black Background: File Error. Generally indicates the
file is MISSING or has been RENAMED.
Indented Files under a Folder Item: Files played/playing in an AUTO-
LOOP, AUTO-FILL, or any scheduled folder.
Drag-and-Drop Playlist Items
EVENT: Drag the clock icon into the list and drop it where you want a
new time Event to be created. A window will open where you specify its
properties.
INPUT: Drag the INPUT icon in the list where you want to insert a
network-available signal. At that point the input will pass through
(closed captioning included if present). You can add branding graphics
or other overlays to the INPUT signal.
FOLDER: Drag the FOLDER icon in the list, and you’ll be presented with
the option of inserting two types of FOLDERS:
(1) NORMAL – Any combination of video clips and graphics.
(2 SLIDESHOW – Folder containing graphics and audio files (mp3
and/or WAV).
FILL: Drag this icon to the end of a SHORT Event, and browse to any
folder you choose. The contents of that folder, including clips and
pictures, will fill remaining time with playout (looping if necessary) of its
content.
NOTE: if AUTO-LOOP is active and displaying the AUTO-LOOP folder
icon at the end of events, if you drag and drop a FILL folder above the
AUTO-LOOP folder, it will replace the AUTO-LOOP function FOR THAT
EVENT ONLY.
5

SOFTWARE
PLAYLIST Window (cont’d)
Drag-and-Drop Secondary Items
Secondary Items must anchor to a File or Input item (the “parent”
item). When you add these items to the Playlist they will appear as icons
to the right of the duration display on the parent item.
BUG: Drag this icon above the clip or input item over which you want to
display a graphic. This will need to be a PNG with alpha channel. A
dialog lets you enter Start and End offsets.
CRAWL: Drag this above the item where you want to display a crawling
message. An entry window lets you determine if it is Crawl 1 or Crawl 2,
and lets you enter Start and End offsets and # of repeats.
UP NEXT: Drag this on a file or input item to automatically display the
EVENT NAME and TIME text from the next upcoming Event header.
TEXT: When dragged on top of a file or input item you can manually
enter one or more lines of text to overlay the item. You can specify the
offset when the text appears and disappears and how long it displays.
See Creating and Adding TEXT in this Guide
for instructions on how to use this feature.
Drag-and-Drop Manual Trigger
The MANUAL BREAK button, typically used to start playback of one or
more files (a “BREAK”) during a ‘live’ event, is active and waiting for a
user click during an INPUT event. After the files in the BREAK have
played, the LIVE pass-through resumes.
Playlist File Menu
New Empty Playlist creates a playlist with NO Events or items.
New 24 Event Playlist (Hour) and New 48 Event Playlist (Half-Hour)
both load templates for creating new schedules. They are populated with
Events but no content. These are a great place to start when creating a
schedule from scratch.
Add to Playlist … opens the D:/Media folder and lets you browse for files
and/or folders you wish to add.
Open Playlist … Brings up a file browser window for you to select a
playlist to load. The system must STOP AUTOMATION to do so.
Save Playlist Brings up a file browser window for you to select a playlist
to load. The system must STOP AUTOMATION to do so.
Save As Playlist … Brings up a file browser window for you to select a
playlist to load. The system must STOP AUTOMATION to do so.
Show Item Duration flyout opens a menu that lets you select if you want
to show the Duration of the item, the Time the item will play, or both Time
and Duration.
6

SOFTWARE
PLAYLIST Window (cont’d)
PLAYLIST File Menu (cont’d)
Show Missing/Error Files … scans the current playlist for any missing
items or items containing errors, then creates and opens a text file
containing that list.
Reload and Restart Playlist… loads the most recently active playlist
and starts playing at the current Time of Day.
Open A-LIST Prep launches a separate application named A-LIST Prep.
This application enables editing of future playlists while A-LIST runs
your current playlist.
Playlist Edit Menu
All these operations are supported in A-LIST, along with their keyboard
shortcuts. These include Windows system standards:
Undo: Ctrl+Z
Redo: Ctrl+Y
Cut: Ctrl+X
Copy: Ctrl+C
Paste: Ctrl+V
Delete: Del
Repeat Untimed Playlist runs the current list of files in loop mode
when there are no scheduled Events. A-LIST will continue to play the list
in a loop until automation is turned off manually.
Configure… opens the Configure panel.
Auto-Run Playlist at Startup When checked (default), the automation
will automatically begin when the application is started. Uncheck this
selection and you’ll need to click START AUTOMATION when you’re
ready.
Set default Duration for Playlist Graphics … opens a window where
you set the duration for how long a graphic is visible in a playlist. The
default is ten seconds (:10).
NOTE: You can override the default duration on a graphic file (BMP, JPG,
TIF) by renaming the individual file - usually residing in the PICS folder in
the D:\Media partition.
Example:
Sunrise.jpg(default duration during playback = 10 seconds)
Sunrise[15].jpg(specific duration during playback = 15 seconds)
Use left and right brackets [ ] before the .extension.
This applies to renamed graphics in any folder, including AUTO-LOOP,
as well as files scheduled in the playlist.
7

SOFTWARE
NOW PLAYING indicates the video and audio
sources for what is currently playing in the
Program window (Streamster output)..
PLAYLIST Window (cont’d)
Playlist Help Menu
Show User Guide … Select this option to open the User Guide PDF
Visit RUSHWORKS on the Web … Select this to go to the RUSHWORKS
Web site, www.RUSHWORKS.tv, if you are connected to the Internet.
About A-LIST STREAMSTER … Select this for information about the
currently installed application Version.
Program Window
4
A-LIST features a large and versatile Program Display that is used for
monitoring the Program output, and for an operator to initiate several
manual real-time functions without having to make changes to the
Playlist. These include a BUG, two independent Crawls and two
independent Text layers.
Program / Preview Audio Monitoring
The Program audio from A-LIST will always be present on the output
you’ve selected, which will be either an NDI or RTMP stream.
Program Window
In addition, you can monitor both Program and Preview output using
the system sound Line Out connector along with any other audio
present on the system’s (Windows) Volume Mixer. It’s generally useful to
connect headphones or powered speakers to the Line Out for flexibility
in monitoring the signals. Click once on the icon to open the menu.
When No Computer Audio is selected, the headphones icon is GRAYED
OUT, and no audio is sent to the Line Out connector.
When Program to Computer Audio is selected, the headphones icon
turns RED indicating that the output is monitoring the Program audio.
When Preview to Computer Audio is selected, the headphones icon
turns GREEN indicating that the output is monitoring the Preview audio.
Note: after you’ve selected Program or Preview to Computer Audio, you can
then toggle back and forth by clicking on the red or green headphone icon.
Bug On / Off (manual)
You can display a BUG (usually a ‘branding graphic’) at any time by
clicking once on the BUG button. It will illuminate (glow RED) and the
currently selected graphic - a PNG file - will fade on. Click again to turn
off the BUG. The button will dim out, and the currently displayed
graphic will fade off.
Note: If AUTO-BUG is enabled it will automatically control the selection and
lumination of this button.
8

SOFTWARE
Bug Selection
To select the graphic associated with the BUG, right-click on the BUG
button. This bug will also be used for AUTO-BUG.
Select Logo Bug … A browser window will open, revealing the contents
of the BUGS folder. Select the desired graphic, and click OK. When you
click the Bug button to activate it, the attached graphic will fade on.
Reset Logo Bug … removes the current bug file association, so nothing
will be displayed with you click the Bug button.
Open File “file name” … opens the currently selected Bug graphic file
for verification.
Crawl Controls (3 Crawls Available)
Just like the BUG control, a left-click will display the corresponding Crawl
on the Program Output, and a right-click will bring up a context menu
for editing the crawl. To enter crawl text associated with Crawl 1 (Main
Crawl), right-click on the Crawl 1 icon.
Edit Crawl 1…
Reset Crawl
Select Message Logo…
Select Edit Crawl 1 … and enter the text you want to display, and enter
the number of repetitions of the crawl message you want to display (1-
50), or enter 0 to crawl continuously until you manually click on the
Crawl 1 icon on the Program Display to deactivate it.
Reset Crawl will clear the currently entered crawl text.
Select Message Logo … to open the CG folder where you should keep
your branding logos – both large and small. When selected, the Message
Logo can appear between lines in crawls.
Crawl 2 is a completely independent crawl layer, so just follow the
procedures above for Crawl 1. You can display either or both Crawl 1
and Crawl 2 at any time.
MANUAL File Player Controls
When Automation is OFF, you can manually select and play any file in
the Preview bus to the Program output (PVW to PGM).
Select (click) a file (clip or picture) in the
Playlist OR the File Browser and it will
cue (green). You’ll see the cued file in
the Preview window. The Play arrow on
the PROGRAM Window will become
active (blue). Click the arrow (PLAY) and
the file will play.
While the file is playing (red) you can
stop playback at any time by clicking
the square button (STOP).
When Automation is ON, these controls
are grayed out and not available.
9

SOFTWARE
Automation Clock
5
This clock reflects the current computer system clock time. Delivered
systems are set to synchronize to Internet time (NIST) once every hour.
You can toggle between 24 hour time (military) and AM/PM by simply
left-clicking on the yellow time display.
The clock also has a ‘stopwatch’ style timer for convenience. Just click
the Start Timer button to start, click it again to Stop… and click Reset
to set the timer back to zero.
Audio Window
6
This control actively changes the Output level of the Program audio.
(Input levels are controlled on the Audio tab in the Settings window.)
The two vertical LED-style meters show the current audio output level.
If you click the Mute button, the Program output will no longer be sent
to the system outputs.
The default output level is -12dBFS. To restore the Master Fader to that
level, just double-click on the sliding fader button.
Automation Clock
Audio Window
DSK Window
7
All PNG graphic files with transparency are displayed as ‘overlays’ to the
PGM stream, and are loaded into and generated by the DSK (Down
Stream Keyer) window.
Supported graphic file format for the DSK is PNG with Alpha.
While Automation is ON, open the CGS folder in the File Browser and
select a graphic. It will appear in the DSK PVW window. Click the AUTO
TO AIR (fade on) or TAKE TO AIR (cut on) … and that graphic will be
placed over the Program output.
When a CG graphic is being displayed over Program output, the ON AIR
indicator will glow RED, and the graphic will show in the DSK PGM
window. To remove the graphic, click AUTO OFF (fade out) or TAKE OFF
(cut out).
Settings Panel
8
There are FOUR tabs on this panel: A-LIST, Audio, Encode and Stream.
DSK Window
Settings Panel
A-LIST Tab
The default display is the A-LIST tab. On this tab you can quickly verify
the currently running program Version (lower right), click the Show
User Guide button to open that document, and click the Configure…
button to open the System Configuration set up window.
10

Stream
SOFTWARE
Stream
Record Duration
Audio Tab
Click the Audio tab to display the audio mixer.
LIVE controls the input level of audio on a selected virtual input source.
PLAY controls the playback level of actual or Web clips. Green indicates
the clip is playing on the PVW buss. Red indicates it is playing on the
PGM buss.
BGND controls the playback level of the MP3 or WAV audio files in the
D:\Audio folder OR a second audio-only input (CD, MP3, satellite music,
etc) if such a device is connected and you have selected external audio
as the BGND source.
Encode Tab
Click the Encode tab to open a window where you define parameters
for manually encoding anything on the Program output of the A-LIST
system. The system automatically stores all recordings in the
D:\Recordings folder. You can change that path if you wish using the
browse button at the right of the Recording Path field.
Enter a Program Name, select a File Format, and enter a Bit Rate. The
system defaults to mp4 (H.264) @ 12Mbps. There is also a display for
the approximate remaining space available on the drive and the
duration of the current recording. A-LIST will automatically add a time
stamp to the file name so that it is impossible to accidentally overwrite
a recording.
Your Name
Your Password
Stream Tab
Click the CONFIGURE button to open the Steaming Setup page, and
click the START and STOP buttons to turn STREAMING on and off.
Although there are several parameters to enter on the Streaming Setup
window, they are absolutely required when you’re setting up your
streaming output. Since you’ll likely be delivering your signal to a
Content Delivery Network (CDN), first select your provider by clicking
the arrow for the dropdown. Your two choices are ANYSCREEN™,
RUSHWORKS’ subscription hosting service,
or Manual Setup.
Copy each field from your CDN’s detailed settings page and paste into
the matching field on the CONFIGURE STREAM window. If Video Bitrate
and Audio Bitrate suggestions are not provided, then use the default
values.
For more specific information, please refer to the
Setup Streaming single sheet.
Configure Button (on the Settings Panel)
To access the Configure window click on the Configure... button on the
A-LIST Tab of the Settings window (also available on the Playlist Edit
Menu).
This opens a new window with FOUR tabs on the left side: INTERFACE,
INPUT/OUTPUT, CRAWLS, and TEXT.
11

SOFTWARE
Options
INPUT/OUTPUT Tab
The INPUT/OUTPUT Tab opens first by default. These settings are critical
in configuring your Streamster for operation.
Enable NDI Output, when checked, identifies your Streamster as an NDI
source on a connected network. Enter the NDI Name you wish people to
see after “Streamster” as the network node identifier.
Output Video Resolution choices are 480p, 720p and 1080p.
Background Audio Source selects the audio you want to use when
playing graphics. Choose internal Audio Folder or Chassis Input.
STATUS displays list of current connections, frame rates and other
parameters associated with your Streamster settings.
INTERFACE Tab
On the INTERFACE Tab you’ll find checkboxes for various Interface
Options.
Lock Panels
DSK Auto-Clear
Confirm Close Program
Windows Sort Order (Max 3000 items)
Lock Panels prevents users from moving any of the A-LIST interface
windows.
DSK Auto-Clear is a preference for file workflow through the DSK (Down
Stream Keyer). It clears DSK selections after taking them to air.
Confirm Close Program asks you for confirmation that you really want
to close A-LIST after clicking the X to close the program.
Windows Sort Order uses Windows file sorting order in the File Browser.
Note that performance degrades when displaying a folder that contains
more than 3000 items. In that case, uncheck this box.
CRAWL Tabs
A-LIST supports three independent crawls: Crawl 1, Crawl 2 and Crawl
3. Click the associated tab to review/change your preferences for each.
Streamster ships with default parameters for all three crawls. But you
can change those at any time by clicking any of the three CRAWLS tabs
on the Configuration page. Since there are a lot of display options to
consider, the following descriptions focus on the four sections you’ll
work with: SCREEN POSITION, FONT, MESSAGE FORMAT, and BANNER
OPTIONS.
The currently selected Crawl tab displays the associated Configuration
page. As a design aid when creating and positioning the three crawls,
you can check the preview boxes above the Crawl Preview screen to
confirm all the crawl properties.
Note: There is an Emergency Crawl (white text on a red banner)
that appears only when you enter and save text in the
EmergencyCrawl.txt file.
12

SOFTWARE
SCREEN POSITION
These controls are used to position the crawl (text and banner) vertically
on the screen. You can enter/modify the Offset from Bottom (default
for Crawl 1 is 15%), or you can click the Up and Down arrows to move
the position. You’ll see the result in the Crawl Preview window. You can
also use the keyboard Up and Down arrow keys to change the crawl
position.
FONT SELECTION
Click the menu button to the right of the Name field. It will open the
Windows Font selection panel.
Choose the Font, Font style, Size and Color using this menu. When you
click OK, you’ll see the values appear in the respective fields in the
Streamster FONT section.
Custom Color Selection
If you want to work with a wider range of color choices, click the menu
to the right of the Color field in the FONT section. This window will
appear, and you can pick from these Basic colors or click the Define
Custom Colors button.
That expands the window to provide thousands of color choices, or let
you enter RGB or HSL values to select a color.
You can Save that color by clicking the Add to Custom Colors button.
MESSAGE FORMAT
Set the Crawl Speed according to your preference. Message Spacing is
the number of blank characters that appear between each line of text
you enter in the Text Box when creating a crawl.
You can also add Text as a separator. To add a “Bullet” in addition to or
instead of the Message Spacing value, click the Use Bullet • button to
add it to the Text Message Separator. You can also enter any text or
character value in that field.
To use a Graphic (usually a small branding logo) as a separator, click the Graphic radio button, then click the
browse button to the right. Locate and select the PNG file you wish to use. Force ALL CAPS, when checked,
changes mixed upper/lower case to all uppercase for your crawls. This automatically adjusts the banner height.
REVERSE Text & Direction, when checked, changes the crawl to Left To Right for use with several international
character sets.
BANNER OPTIONS
Click the Background Banner checkbox to make it visible.
Select the Height of the banner, which defaults to the same size as the
font you’ve selected (in percentage). To make the banner larger than the
font, just enter a value greater than 100.
Click the browse button to the right of the Color display box to open the
same Color picker used for the font, and make your selection.
Enter a value for the Opacity of the banner in percent. The higher the
value, the less you can see the video behind the banner.
You can Indent the Left and Right Edges of the banner by entering a value representing a percent of the total
screen width. You can also ‘soften’ the Left and Right Edges of the banner by entering a Fade value in pixels.
13

SOFTWARE
TEXT Tab
The TEXT tab is where you configure the text and position properties of
text messages.
FONT SELECTION
Click the menu button to the right of the Name field. It will open the
Windows Font selection panel.
Choose the Font, Font style, Size and Color using this menu. When you
click OK, you’ll see the values appear in the respective fields in the
Streamster FONT section. Check the Drop Shadow box if you prefer.
Custom Color Selection
If you want to work with a wider range of color choices, click the menu
to the right of the Color field in the FONT section. This window will
appear, and you can pick from these Basic colors or click the Define
Custom Colors button.
That expands the window to provide thousands of color choices, or let
you enter RGB or HSL values to select a color.
You can Save that color by clicking the Add to Custom Colors button.
SCREEN POSITION
These controls are used to position the text on the screen. Use the top
three radio buttons to position the text vertically (Bottom, Middle, Top),
and the second row of radio buttons to position the text horizontally
(Left, Center, Right).
Or click the Custom radio button and move the text anywhere on the
screen using the Up and Down arrows. You’ll see the result in the Crawl
Preview window. You can also use the keyboard Up, Down, Left and
Right arrow keys to change the text position.
TEXT PREVIEW
When you select the TEXT tab it automatically shows a preview of your
text preferences for that layer in the Text Preview window.
Top Line Size and Line Spacing
It’s possible to automatically display the first line (top line) of multi-line
text in a different size. This can be used, for example, to show the title of
a music video larger than the artist name, which would be on the
second line of text. The default is 100%.
Line spacing, often called ‘leading’, can be adjusted by changing the
value in the entry field. Both numbers are based on a percentage of the
Font Size selected in the text layer configuration.
14

SOFTWARE
Input Selection
9
Streamster supports TWO types of network inputs:
1) NDI sources
2) HLS and MPEG-DASH live streams (with more types likely to be added)
Input Selection
Using NDI sources as Inputs
In addition to playing locally stored video clips and picture files, you can also define and select defined and
configured inputs to use as “on-air” sources in your playlists. You can configure up to EIGHT different sources
you can choose from for any given INPUT item.
NDI ‘streams’ can originate from devices connected to your network, including other computers and even video
cameras with NDI output capability. There are also several brands of NDI converters that can accept SDI sources
and convert them into NDI streams on your network. As such, NDI is a versatile and effective way to support a
variety of input sources for your Streamster.
Using HLS and MPEG-DASH streams as Inputs
The once-favored RTMP and Flash-based video are no longer considered optimal or appropriate for delivering
video to end users. The two currently favored stream types are both supported by Streamster.
HLS stands for HTTP Live Streaming, and is a protocol for sending live video over the Internet using standard
HTTP web servers. It will play video encoded with the H.264 or HEVC/H.265 codecs. It also features embedded
closed captions.
DASH is an open-source standard which is “codec agnostic”, supporting H.264, HEVC/H.265, VP9, and many more.
Configuring and Naming a Virtual Router Input
Click once on any non-configured router input button (None).
The New Input (Input #1-8) window will open.
For the Input Type select NDI, WEB Feed, or None. The Source Window
below will show the available sources for NDI and WEB Feed,
respectively. With NDI radio button active, select available sources from
the list. With WEB Feed active, copy and paste the URL of the HLS or
DASH live stream into the window, always starting with http:// or https://.
Enter a descriptive Button Name, and click OK to save.
The button will update with the name displayed.
New Virtual Input 1
New Virtual Input 1
15
New Virtual Input 1

SOFTWARE
Playlist Naming and Rules
A-LIST uses a simple yet powerful naming hierarchy that can handle
special events, holidays, any many other special exceptions with ease.
1. Single List Mode: This is a single, endlessly looping, 24-hour playlist.
This is useful for channels with mainly AUTO-LOOP content.
2. Weekly mode: This features seven daily playlists, one for each day of
the week. These are named monday through sunday (the full name of
each day) with the extension .rwpls. These lists automatically load at
midnight. This mode is great for channels where the schedule is
basically the same each week, with new “episodes” (recurring programs)
replacing those from the previous week.
Playlist filenames are YELLOW. Why?
If you see file names in your playlist that display in
yellow, followed by an an indication that the
scheduled file is in ERROR or MISSING, it’s likely
that the file has been renamed, moved or deleted
from the D:\Media drive (or from wherever it was
when you added it to
the playlist.)
Click the File tab and
select:
It will automatically create a .txt file and place it in
the Playlist folder. This will provide you with a list
of the files you need to locate and restore to the
D:\Media folder.
__<Playlist Name> MISSING OR ERROR.txt
3. Daily Mode (DATED Playlist): This supports playback of a new list
every day. These are formatted YYYY-MM-DD.rwpls. You can create
these as far into the future as you like.
NOTE: If you use Weekly Mode, you can create DATED
playlists to override the DAY NAME playlist. When the
system automatically loads the next day’s Playlist, it will
automatically ‘look’ in the Playlists folder for a DATED
list before loading a DAY NAME list. This allows you to
maintain a repetitive weekly schedule that runs
indefinitely, but also to create “special” playlists for
Holidays or other dates where you want a different
playlist to run.
Choosing a Playlist Template
If your operations model is more closely aligned with traditional Time of
Day (TOD) scheduling – such a broadcast TV station – there are two
templates you can use to create playlists. One of them features 24 one-
hour Events, and the other provides 48 half-hour Events.
In A-LIST, EVENTS are defined as Time-of-Day markers. You can
automate using only a single Event if you wish ... starting at midnight
every day. Or you can create as many Events as you wish at any times
you choose.
In A-LIST, ITEMS are defined as a files, folders, graphics, or “LIVE” input
segments inserted under an Event banner. A playlist generally consists
of one or more EVENTS, each with multiple ITEMS between them.
You can Add, Delete or Modify any of the time-specific Events at any
time after you’ve opened and named a Playlist file from a template, so
these templates simply provide an appropriate starting point for adding
content to your schedule.
From the dropdown menu select New 24 Event Playlist or New 48
Event Playlist. The selected template will open a new, unsaved Playlist.
Click the File menu again and select Save or Save As. When the dialog
box opens just name the list. It will automatically be saved in the
D:\Playlists folder.
16

SOFTWARE
AUTO-BUG(Automatic Channel Branding)
That little logo at the bottom corner of a television program that tells
you what channel you are watching is called a “bug” - or branding logo.
We’ve made it as easy as possible to add yours to A-LIST.
Turn on AUTO-BUG and A-LIST will automatically overlay your BUG over
any program length (> 2:03) clip or input segment. Three seconds after
the item begins the bug will fade up, and three seconds before the end
it will fade out. Set it once and forget it. You can schedule exceptions any
time you don’t want it displayed.
AUTO-LOOP
Drop some content in the AUTO-LOOP folder, enable the AUTO-LOOP
folder (click to turn on), then turn AUTOMATION ON and you’ll start
playback without scheduling a single item!
This feature is designed to fill any unscheduled time with an endless
loop of however many files you want to add. With AUTO-LOOP enabled
you will ALWAYS be playing content, 24/7/365.
If your content consists primarily of looping playback of clips and/or
graphics – with relatively few videos that need to be scheduled to play at
specific times – this feature makes managing your Playlist virtually
effortless.
The AUTO-LOOP folder is at the root of the D drive. You can also open it
by right-clicking on the AUTO-LOOP button at the top of the Playlist
window and selecting Open AUTO-LOOP Folder. Drag and drop clips
and graphics you want to play into this folder, or sub-folders within it.
The order in which the content plays is based on the normal Windows
sort order of the file and folder names.
(Automatic Unscheduled Time Filler)
AUTO-LOOP Options
Right click the AUTO-LOOP folder to (1) Open the AUTO-LOOP Folder to
view the contents, (2) check or uncheck the Play All Before Repeating
function, and (3) check or uncheck the Random Order playback function.
Play All Before Repeating means that automation ‘remembers’ what
has played in the AUTO-LOOP folder, and the next instance where
AUTO-LOOP plays files will resume with the file after the last played file.
If Random Order is checked, it will pick another previously unplayed
file.
NOTE: The Playlist changes WILL NOT BE SAVED until you click the SAVE icon at the top of the
Playlist header. It will automatically be highlighted in YELLOW when you’ve made any changes
and haven’t saved them.
Click on the AUTO-LOOP icon to activate it. If you have NO Events in the playlist … or any number
of Events with no files or segments … when you click the AUTOMATION ON ‘keyless ignition’
button, the contents of the AUTO-LOOP folder will play continuously, 24/7.
17

SOFTWARE
cont’d
AUTO-LOOP File Naming Tips
If you prefer to control the order in which the files and subfolders play,
you can use standard Windows file-naming techniques to assign leading
numbers to each of the content items.
This example is a hierarchical arrangement for playback of files, sub-
folders and various graphics in the AUTO-LOOP folder, and is based on a
user-defined numbering structure. Graphic files have a default duration
of ten seconds (:10) which can be changed under the Edit menu > Set
default Duration for Playlist Graphics.
You can override the default on individual graphics by adding a markup
tag to the end of the file before the extension in [brackets], e.g.
vincente[12].jpg, where 12 inside [brackets] indicates the duration, in
seconds, that the graphic will display.
AUTO-LOOP Rules
When the contents of the AUTO-LOOP folder are playing, the individual
files cue and play in order, appearing sequentially as indented playlist
items under the AUTO-LOOP folder placeholder.
The currently playing file is indicated in RED. The next file always cues
seven seconds (:07) before it plays, and will be displayed as GREEN while
it is cued.
Note: You can NOT make changes to the active playlist
when a file is in the ‘cued state’ for seven seconds.
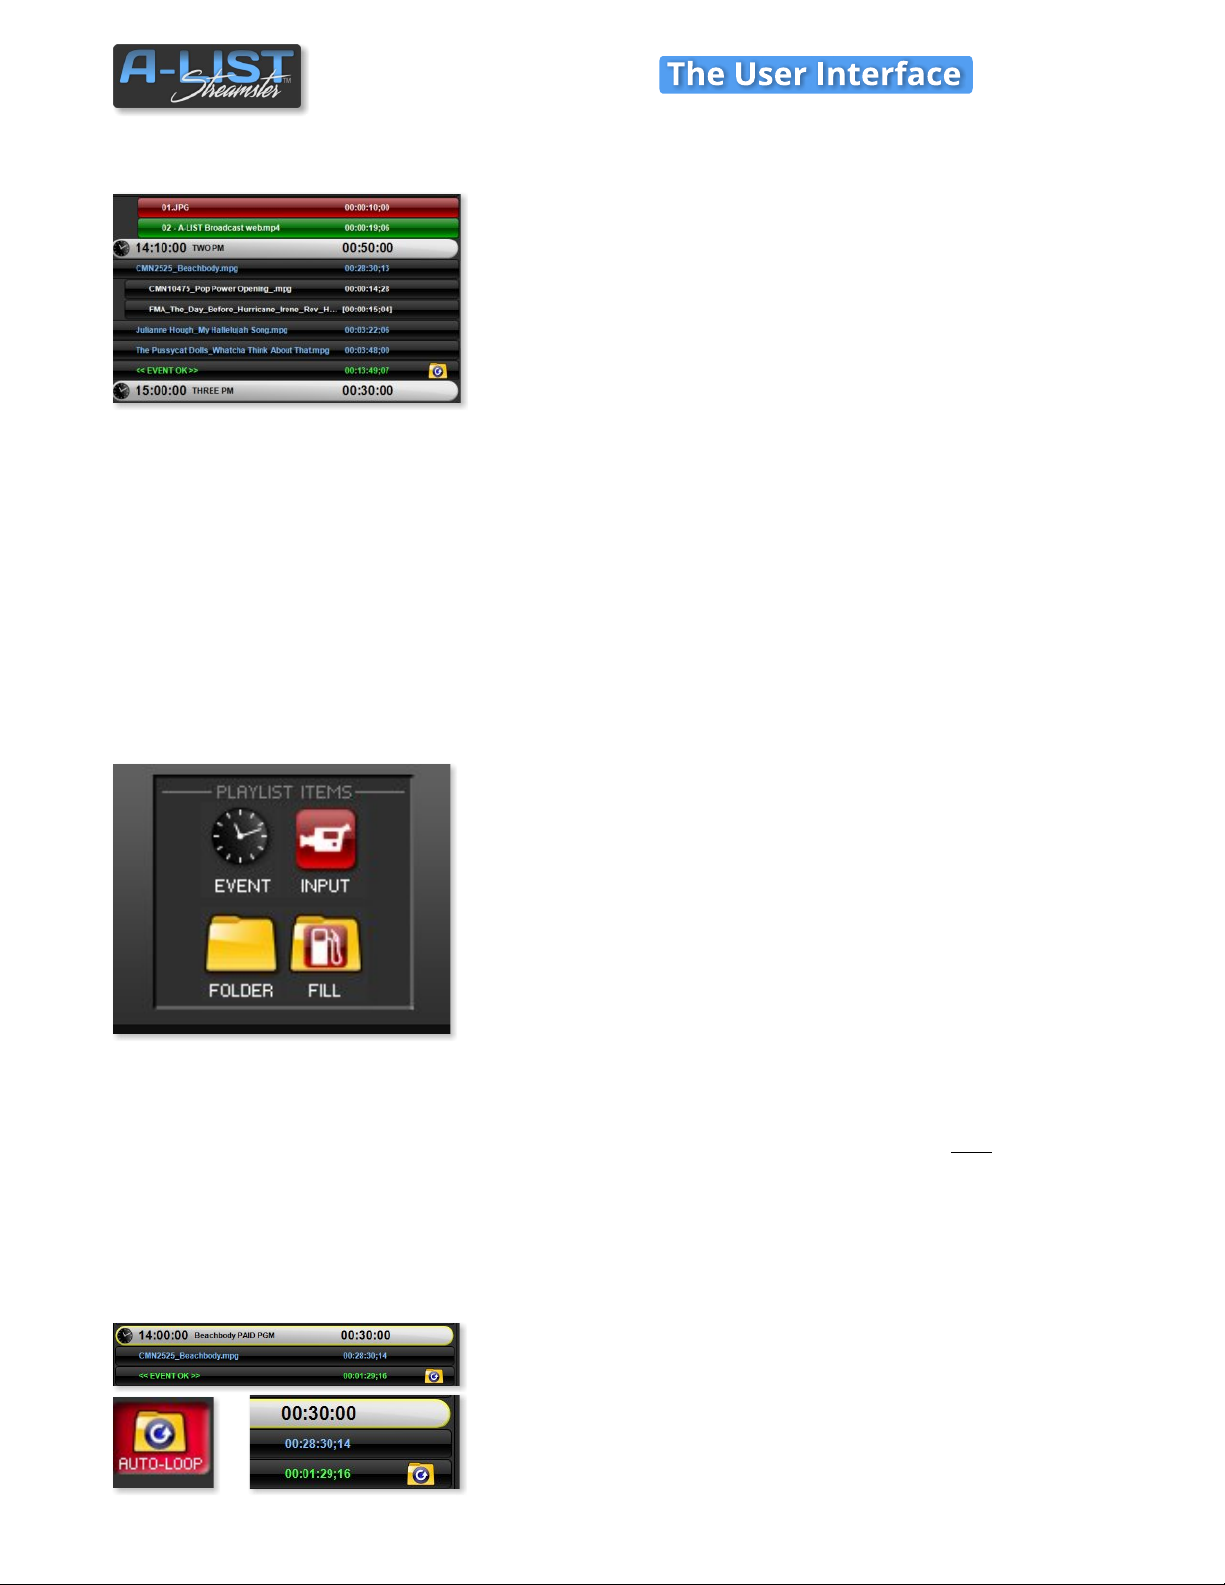
AUTO-LOOP Example
In this example, a program was scheduled at 2PM, with a duration of
00:28:30;14. With AUTO-LOOP not enabled, the Playlist reports EVENT
SHORT by 00:01:29;16. The result would be the system would revert to
Black output for that period of time.
The same scenario but with AUTO-LOOP enabled the Playlist reports
EVENT OK and indicates the time will be filled by AUTO-LOOP, as
depicted by the AUTO-LOOP folder icon in the status line.
After the scheduled clip plays, the AUTO-LOOP function will
automatically initiate.
If Play All Before Repeating is checked, the system will scan the folder
for the next clip in order and start playing there and continue until the
next Event time. Whatever clip or graphic file is playing at 7PM will fade
out the video and audio one second (:01) before the beginning of the
next Event.
SUGGESTION: You may find it helpful to keep a shortcut to the
AUTO-LOOP folder (D:\AUTO-LOOP) on the Streamster desktop so
you can add or delete AUTO-LOOP files quickly.
18

SOFTWARE
Adding Events
If you’re building a playlist “from
scratch”, you can start with one of
the templates in the File Menu …
New 24 Event Playlist (Hour) or
New 48 Event Playlist (half-
Hour). Then add, delete, or modify
Events whenever you wish.
To add individual scheduled Events to an Empty Playlist, just select
New Empty Playlist from the File Menu, then click-
and-drag the EVENT icon from the PLAYLIST ITEMS
section into the Playlist. A red line appears as the
‘drop point’ for anything you drag and drop into a
Playlist. The New Event item menu will appear.
Enter the Start Time and a Name that describes the
Event.
You can also add Events BETWEEN existing Events. Be sure to specify
a time between the preceding and following Events.
If you already have content in your list you can
drag the Event into the middle of an existing
Event. This will create a new Event at this location.
This example indicates the Event (11:15 SPORTS
FLASH) you inserted between two previous Events
(11:00:00 MUZIK MUSIC and 11:30:00 STOCK UP!)
Editing Events
To change or edit the Event Type, right-click on the Event banner you
want to change (or double-click the banner) and select Event
Properties… from the drop-down menu. The window will open, and you
can change either or both the Start Time and the Name. Click OK to Save
the changes. Those changes will be reflected in both the Event Name
and the position in the Playlist (if you’ve changed the Start Time).
19

SOFTWARE
Playlists consists of EVENTS (which have Start Times and a Name), and
ITEMS, which are typically video clips and/or picture files that are
inserted between EVENT “headers”. Items also include Folders, Fill
Folders, and Inputs.
A-LIST keeps track of the total amount of time used by ITEMS in an
Event. Clips have definite lengths, and pictures have a default time they
display in the Playlist. The default is :10, but you can change that to as
little as :03 in the program configuration.
Adding Clips and Pictures
from the File Browser
Use the File Browser to locate the file(s) you want to drag into the
Playlist. The default Folder links are CGS, CLIPS, PICS and WEB. These
are all located at the root of the D:\Media drive in Streamster.
NOTE: You can add as many folders and sub-folders as you wish,
but it is strongly recommended that you keep those WITHIN these
four default folders to let you quickly search for and select
appropriate file types.
https://www.youtube.com/watch?v=eWdMbQgquDc
LONNY
Finding Files in the File Browser
The Find field supports full-text searching for file names, but it’s
important to understand that the search is limited to the FILES being
displayed in a currently open Folder or Sub-Folder, and NOT WITHIN ALL
THE FOLDERS.
In this example, only the Files (in white) will be searched, and none of
the files within the Folders at the top of the list.
Saving WEB Clips to the File Browser
When you click on the WEB button, it opens the contents of that folder,
and displays the Add New WEB Clip … button. WEB Clips are URL links
you’ve saved and named, and placed in the WEB Clip folder. To create a
New WEB Clip, click the Add New … button, and it opens the WEB Clip
Properties window.
After you’ve located a WEB clip (using a Web browser) you’d like to Save
into the File Browser, copy the URL … and paste it into the WEB Clip
Source URL window. Be sure the link starts with http:// or https://
Enter a Name for the WEB Clip and click OK.
The clip is added to the D:\Media\WEB folder, from which you can drag
and drop Web clips into Playlists the same as clips that are stored locally
on the D:\Media\Clips folder on the hard drive. So you are essentially
using the Web as your RUSHWORKS Virtual Network Attached
Storage server (VNAS™).
You can always recognize a WEB clip in the File Browser or Playlist by the
extension: .rwweb.
20

SOFTWARE
cont’d
Select, Drag and Drop Files into Playlists
For this example we’ll be ‘populating’ the first half-hour of a Playlist
created by selecting the New 48 Event Playlist from the File Menu.
Click once on any file in the File Browser and it will be cued in the
Preview Window, turning green when the file is cued.
Hold down the Ctrl key and click on multiple, contiguous or non-
contiguous files to select as many as you wish. The file you click on first
will cueand turn green.
Click on a file then hold down the Shift key and click a file below to
select all the files in that range. The file you click on first will cue and
turn green..
files longer than 2:03 display in blue
In this example we’ve selected THREE non-contiguous files in the File
Browser, then dragged and dropped them into the playlist just beneath
the MIDNIGHT Event.
Note: you can move items within a playlist by left-clicking and holding the mouse down while you move the file
up and down in the list. You’ll see the red line indicating the ‘drop position’ as you hold and drag the mouse.
We then went to the D:\Media\CLIPS\SPOTS sub-folder and selected two
commercials - one at a time - and dragged them between the three
music videos. So the playlist will play a music video, a spot, another
music video followed by a spot, and the third music video.
You can also see at the bottom of the Event the words <<EVENT
SHORT>> showing you need 16:35:06 to fill up the Event.
21

SOFTWARE
cont’d
There are THREE ways to fill the remaining time in the Event.
1) Enable the AUTO-LOOP folder, as shown here. After the third music
video the contents of that folder will play until the next Event - in this
case for 16:35:06.
2) Drag in a FILL folder from the PLAYLIST
ITEMS section at the bottom of the playlist.
When this window opens you can select a
specific folder to play rather than the more
‘global’ AUTO-LOOP folder.
3) Continue selecting, dragging and
dropping clips and pictures into the playlist after the third music video
… monitoring the total amount of time left to fill in the Event.
In this example we’ve added more music videos, spots and a picture file
to fill the half-hour Event with content.
NOTE: If you see the << EVENT SHORT >> notification at the
end of the Event, when the scheduled content has completed
playing, the system will output one of THREE choices: Black,
Virtual Router Input, or Picture (JPG, BMP, PNG).
NOTE: If you see the << EVENT LONG >> notification at the end
of the Event, system playback will move to the next Event Time,
regardless of whether one or more files haven’t played prior to
the Next Event.
Show File Location
To show the location of a selected file, right-click the item in the playlist
and select Show File Location. It will open a browse window to the
containing folder.
22

SOFTWARE
Dragging an INPUT (live) Item
into a Playlist
The Streamster processing engine supports both input and output
(network sources and destinations), with graphic overlays on both “live”
pass-through and file/Web file playback.
The Virtual Routing Switcher in Streamster supports up the eight (8)
streaming input sources (NDI, HLS or DASH) that can be output as NDI
or RTMP, including Facebook Live and YouTube Live.
Drag and drop the INPUT icon where you want it to occur within an
Event. When the Virtual Router entry window appears, select any source
you’ve saved as an ‘input crosspoint’ on the Virtual Router.
Specifying FIXED or FLEX
Input Segment Duration
In the window for creating an Input item you can also enter a NAME for
the segment, and a DURATION.
If you specify a FIXED Input, that amount of time is added to the total
duration of the segment, so all the rules of LONG, SHORT, AUTO-LOOP
and AUTO-FILL will apply, just as if it were a file duration.
If you specify one or more FLEX Inputs with Manual Triggers within an
Event, the length of the FLEX input segments adjusts to the time of the
clips/pictures you’ve dropped before, after or between FLEX inputs.
Unlike the AUTO-FILL folder that can only be placed at the end of a
SHORT Event, an INPUT segment with no specified duration (FLEX) can
be placed anywhere in the Event, and can be dragged up or down
between other Event elements.
In the 5AM MORNING NEWS Event example on the left, a FIXED
DURATION input has been created. Notice that no Segment identifier
(e.g. SEG 1) is in the description – and that there are no parentheses
around the displayed duration.
In the 5:30 DRIVE TIME Event example, notice the Segment identifier
(SEG 1) is shown – along with the name (STREAM 1) of the router cross
point. The duration can FLEX as indicated by the parentheses around the
duration. And the DTMF icon indicates the segment is waiting for a
satellite delivered tone signal to trigger playback of any subsequent
clips.
Notice that since there are three FLEX inputs, their respective durations
add up to the Total Event Time minus the Total Clip Time.
23

SOFTWARE
Scheduling and Managing Folders
When organizing content it’s convenient to use a large number of folders
to organize groups of files before scheduling them in a Playlist. There are
three ways to add a folder (and its sub-folders, if any) to a Playlist.
1. From the File Browser window, locate the folder you want to add to the
playlist, and drag it to the desired position in the list.
2. Drag the normal Folder button from the PLAYLIST ITEMS group beneath the
Playlist.
3. Drag a folder in from Windows Explorer and drop it in the schedule.
In any case, when you drop in the Folder, a dialog opens where you
define the folder characteristics and behavior. Choose Folder ... Click to
open the “Browse for Folder” window and select the folder you want to
insert in the playlist, then click OK.
Normal Folders
This is the default selection, which means that all files will be played
using a Windows alphanumeric sort from the top down. The Total
Duration of the folder contents is displayed at the bottom right of the
window.
Note: If picture files have custom markup
lengths, those lengths will be observed, using
the total remaining time to create lengths for
the other files in the folder.
In the playlist these are displayed as a plain yellow folder with the
duration shown.
Slideshow Folders
This is an easy way to automatically display a collection of pictures with a
specific audio track or song playing under them. As indicated in yellow,
these folders are restricted to audio files and pictures, and NO video clips.
Place one or more audio files (.wav or .mp3) into a folder with any
number of images (JPG or BMP), and the total length of the audio clip(s) is
divided by the number of graphics to create a display duration for each
graphic. These items are displayed as folder with pictures and a music
note on top. Here’s a simple example of slideshow folder contents and
the resulting timing:
Audio file(s) = :60
10 x graphic files
:60 / 10 = :06 display per ‘slide’
When audio playback starts, the first graphic
fades from black, with dips to and from black
between each of the remaining graphics. The
Slideshow fades out the last graphic at the end of
audio playback.
FILL Folders
Use FILL Folders to fill unscheduled time at the end of Events. If your
Event is Short (total item time < Event time), drag a FILL Folder into that
area of the playlist. Much like the AUTO-FILL folder, the contents of the
selected FILL Folder will play until the Start Time of the next Event,
fading out audio and video before the next Event item plays.
If you have AUTO-LOOP on, you can drag a FILL Folder on top of the
AUTO-LOOP icon and replace that instance of AUTO-LOOP with the FILL
Folder. This lets you control specific content for the duration of the FILL.
Editing Folders
To edit Folders already in the Playlist, right-click and select Folder
Properties … or just double-click the Folder item in the playlist.
24

SOFTWARE
When scheduling content in your Events you will see a line as the last
item before the next Event indicating how much unscheduled time is
remaining. What happens during this time is determined by a
combination of settings.
<< EVENT OK >>
This means that you are less than two seconds SHORT… or two seconds
LONG. In general this is an acceptable window. In these cases, if you are
short, the system will play BLACK for that period of time. If you are long,
the last file will fade out before it completes, with the playlist advancing
to the Next Scheduled Event. When AUTO-LOOP is enabled, Events
will always indicate this status.
<< EVENT SHORT >>
While dragging content into an Event the available remaining time
displays in a placeholder at the bottom of the Event. As long as the total
duration of the content is shorter than the duration of the Event, the
placeholder will indicate << EVENT SHORT>> in yellow, as well as the
amount of time needed to exactly fill the Event. The far right of the
placeholder indicates what will show on air during this time. In this
example it will show whatever source is currently selected for the
Streamster input.
Managing Short & Long Events
EVENT OK
EVENT SHORT
<< EVENT LONG >>
By adding a few more items to the schedule we can see the total file
duration is now longer than the Event time, and the placeholder
indicates << EVENT LONG >> in red, as well as the amount of time that
exceeds the total time of the Event.
If you do NOT shorten the total file duration that exceeds the Event
duration (LONG), playback of the currently playing file will automatically
be terminated at the end of the Event, fading video and audio to black
one second before the beginning of the next Event.
EVENT LONG
Filling Unscheduled Time
If the total file duration is less than the Event time, the remaining time
will be filled based on the following user actions:
1) The screen will display either the default Input signal or Black. You can
specify a default Virtual Router cross point to be selected and
automatically displayed if an Event is short.
2) If AUTO-LOOP is enabled, the content will automatically play, fading
out the video and audio one second (:01) before the next Event begins.
3) Drag and drop the FILL icon at the end of the Event and select any
folder the contents of which you want to play during a ‘short’ condition.
Playback will fade out one second (:01) before the next Event begins.
NOTE: You can NOT add an AUTO-FILL folder to an Event that is displaying << EVENT LONG >>
If AUTO-LOOP is enabled, the AUTO-LOOP icon and functionality will disappear if an Event is displaying << EVENT LONG >>
25

SOFTWARE
Manually Displaying a BUG
Right-click the BUG icon on the Program monitor bezel, and choose
Select Logo Bug. This opens a dialog where you can select the graphic
you want to use for the primary BUG. Most often this will be a branding
graphic that’s typically displayed in the lower right corner of the screen.
Once that association is made, click the BUG icon it lights up, and the
selected graphic fades on. Click the bug icon again to deactivate it (fade
off). When you click the BUG icon again the graphic will fade off.
NOTE: For Bugs (and other graphics with transparency)
use PNG files with a size of 720 x 480 for Standard Definition (SD),
and 1920 x 1080 for 1080HD and 1280x720 for 720 HD.
Using AUTO-BUG
To enable or disable AUTO-BUG, just click on the AUTO-BUG button at
the top of the playlist window. When the AUTO-BUG feature is active, the
selected graphic will fade on and be displayed over any file or Event
duration over two minutes and three seconds long (>00:02:03:00).
It will automatically fade off when the next file or event is less than that
duration. When the graphic is being displayed, the BUG icon on the
Program monitor bezel will glow red. Manually turn off the bug at any
time by clicking on the icon.
Scheduling a BUG
Whereas AUTO-BUG fades the main Bug on and off over files that are
longer than 00:02:03:00, a scheduled Bug is associated with a specific
file or files. You can schedule multiple bugs (but not overlapping) over
the duration of an item, or extend them over multiple items. There are
three ways to schedule a Bug relative to a file.
1) Drag the BUG icon above the item where you want the bug to appear.
The red line indicates the drop point. When dropped into the list, the
Add BUG window opens. Click the Choose ... button to open the
D:\Media\Bugs folder where you can select the desired Bug graphic.
2) Click on the file you want to associate with the Bug … then click the
BUG icon at the bottom of the playlist. The Add BUG window will open
where you can select the desired Bug graphic, as well as the display
properties of that graphic.
3) Right-click the file you want to associate with the Bug. A fly-out menu
will appear. Select Add Bug … and the Add BUG window will open for
output selection.
To remove a Bug … select No Bug from the right-click fly-out menu.
26

SOFTWARE
cont’d
BUG Options
Click the Choose … button to open the
BUGS folder. That’s where you should place
ALL your BUG graphic files. Select the BUG
file you want to use and click Open.
Set the Bug ON and Bug OFF times,
selecting the From Start or From End radio
buttons for each.
The Default Bug is the one you have
currently selected by right-clicking the Bug
icon on the PGM monitor and selecting a
manual Bug graphic. Click the checkbox to
use it as a scheduled Bug.
Advanced BUG Options
Editing existing BUG Properties
To review and/or edit a currently scheduled Bug, right-click on the file to
open the Properties drop-down menu. Select the Bug fly out menu and
select Edit Bugs … to open the Edit Bug Properties window. You can also
select No Bug to remove it from the schedule.
This window is identical to the Add BUG window except for the title. It
lets you make changes to an already scheduled Bug graphic assignment.
Just follow the procedures in the preceding paragraphs to Clear, Choose,
or change the Bug ON and OFF timing properties relative to the
associated file.
Creating Multiple BUGS
If you’ve defined a Default Bug by right-clicking the Bug icon on the PGM
monitor then selecting a Bug graphic, that will also be the Default for
multiple Bug display. To use that same graphic just be sure the Use
Default Bug checkbox is checked.
Otherwise click the Choose ... button and select the appropriate Bug
graphic for each Bug you schedule. To add more than one Bug, after
you’ve specified the ON/OFF relative times for the first Bug, click the Add
button in the upper right. Enter the ON/OFF relative times for the 2nd
Bug, and use either the Default Bug or Choose another one.
Continue to click the Add button to add as many Bugs as you wish. If any
of the Bugs happen to overlap, you will receive a notification. You’ll need
to correct that condition before adding another or clicking OK to save the
Bug information. Click the Previous and Next buttons to review other
instances of the bug you’ve created. You can also Delete instances.
Extend a BUG over Multiple Items
Check this box and select EITHER the number of items over which you
want to display the Bug ... OR display the Bug until the next timed Event.
Once you’ve selected your Bug graphic and entered the desired display
and ON / OFF properties, click OK. The Bug icon will appear on the right
of the file display.
27

SOFTWARE
cont’d
Manually Displaying a Crawl
A-LIST supports THREE independent crawl layers. Crawl 1, Crawl 2 and
Crawl 3. Any can be turned on at any time by clicking their
corresponding buttons on the Program Window.
To prepare your first crawl message, right-click
on the Crawl 1 button. Choose Edit Crawl 1 and
the EDIT CRAWL window will appear.
You have three radio button selections options
for your Crawl Source:
Choose the Source you want to use for your Crawl display. Following is a
description of the functions of each of Crawl Source entry windows.
The default Crawl Source is Text Entry. Place the cursor in the scrolling
text box and enter your message.
Edit Crawl 1…
Reset Crawl
Select Message Logo…
NOTE: When you press the Enter key you create a line break
that the software interprets as a separator between messages.
Depending on your crawl configuration setting, the separator
can be spaces, a bullet (•), a small logo, or any combination of
characters. So to create a continuous crawl comprised of
several messages, just press Enter to create separators
between multiple messages.
The default number of Repetitions is 3. Change this value to the number
you wish, or enter 0 to create a Continuous crawl that will display until
you click the active Crawl icon on the Program bezel to deactivate it.
If you select Txt File in the Crawl Source drop-down, the window
changes slightly. To browse for the text file you want to use for your
crawl, click the Text from File ... button at the right.
The file path of the selected text file displays in the line at the top, and
the text appears in the scrolling window as formatted in the text
document. If you want the crawl to constantly check the text file for
changes and update the crawl after the current repetition, check the
Auto-Update Crawl from Text File box.
If you select RSS Feed in the Crawl Source drop-down, the window
displays a single entry box where you can paste a copied URL for an RSS
feed. If you want to save that address for later use, click the Save button
after you’ve pasted in the link. To recall that or other addresses at any
time just click the Load button. It will open a folder of saved addresses
for your selection. To enter a new address, click the Clear button to
clear the entry field so you can paste in a new link address or Load an
existing one.
To review or make changes to current Crawl Source selections and text,
right-click the crawl icon, select Edit Crawl 1… and make desired
changes on the Edit Main Crawl form.
28

SOFTWARE
cont’d
Scheduling a Crawl
You can schedule a crawl to be associated with a specific file or files.
There are three ways to schedule a Crawl relative to a file.
1. Drag the CRAWL icon above the item where you want the trigger
to ‘fire’. The red line indicates the drop point. When dropped into the
list, the Add CRAWL window opens, where you can select the desired
Bug graphic.
2. The second way to schedule the Crawl is to select the file you
want to associate with the Crawl … then click the CRAWL button at
the bottom of the playlist. The Add CRAWL window will open where
you can manually enter text you want to use for your Crawl message
… or select the desired CRAWL text file, as well as the display
properties of that crawl message.
3. The third way to schedule a Crawl is to right-click the file you want
to associate with the Crawl. A fly-out menu will appear. Select Add
Crawl … and the Add CRAWL window will open for output selection.
The Add Crawl Window
Use this window to manually enter a Crawl message or select text
from an existing text file. You will also enter the offset times when you
want the Crawl to appear and disappear relative to the file you are
associating with the Crawl display, and how many repetitions of the
message you want to display.
In the following example, what we’ve manually entered in the Crawl text
field will actually be displayed using the description as written.
1. You can enter up to 5000 characters in a single entry, allowing the
text to ‘wrap’ in the display. That message will display in its entirety
as entered.
2. When you press the ENTER key after a line of text, the next text
entry will follow the previous entry in the scrolling message, with
the two messages separated by a user-defined number of spaces.
The default is four (4) spaces.
Note: specify if you want to Use Text or Use Graphic in the CRAWLS
Tab of the Configure menu. The Bullet is the default Message
Separator.
You can also browse to and display text from any number of Text Files
that have previously been prepared.
Or paste RSS feed links for crawl display, with the option to Save and
Load links for your convenience.
29

SOFTWARE
cont’d
Auto-Update Crawl from Text File
When this box is checked, the system constantly monitors this file for
changes, and will update the displayed message even while it’s active. If
a change is made to the file (and Saved) while the file is active, the text
will update after the last displayed repetition.
EXTEND the Crawl over Multiple Items
When the EXTENDED CRAWL is checked, the Crawl duration is NOT
limited to the length of the file with which it’s associated. The crawl
message (manual or from a text file) will continue to display until (a) the
next scheduled Event in the playlist, or (b) until the number of specified
files has been played … whichever happens first.
Since the files and folders are managed in the standard Windows file
system you can store your text files in the Crawls folder … or create
sub-folders that are associated with your unique automation content
management.
In this example we’ll select the Emergency.txt file, and then click Open
… or double-click the file.
Setting the Crawl ON and OFF Times
The default setting is to fade the Crawl ON three seconds after Start of
file playback … and fade the Crawl OFF three seconds from the End of
file playback.
You can set the ON time and OFF time relative to the Start or End of the
file. Enter a number in the Repetitions field to specify how many times
you want the text message to repeat before going off. The default is 1. If
you set it to 0, it will display continuously until the next Event scheduled
in the playlist.
Once you’ve selected your Crawl text and entered the desired ON, OFF,
Repetitions and EXTEND properties, click OK. The red Crawl icon will
appear on the right of the item display.
NOTE: Enter EITHER the number of repetitions you want to display
OR a Crawl OFF time. 3 seconds is the minimum offset for each in
order to preserve automation system operation integrity
Editing Existing Crawl Properties
To review and/or edit a currently scheduled Crawl, right-click on the file
to open the Properties drop-down menu. Select the Crawl flyout menu
and select Edit Crawl … to open the Edit CRAWL Properties window. You
can also select No Crawl to remove it from the schedule.
30

SOFTWARE
Edit Crawl 1…
cont’d
Editing Existing Crawl Properties (cont’d)
This window is identical to the Add CRAWL window except for the title. It
lets you make changes to an already scheduled Crawl text or text file
assignment.
Just follow the procedures in the preceding paragraphs to Clear, Choose,
or change the Crawl ON, OFF, Repetitions and EXTEND timing properties
relative to the associated file.
Adding a Crawl Separator Image
You can select a Message Logo to use instead of a BULLET separator.
This is a global setting that applies to manually initiated crawls (from the
Program bezel on A-LIST) as well as to scheduled crawls. Right-click the
CRAWL 1 (or CRAWL 2) icon and choose Select Message Logo…
The BUGS folder will open in Windows Explorer, where you can browse
for the logo you wish to use. Use the BUGS sub-folder in the D:\Media
folder to keep graphics you want to use for branding or crawl Message
Logos.
Once you’ve assigned a Message Logo to the Main and/or Auxiliary
Crawl, the “Show BULLET …” changes to “Show LOGO” in the Add
CRAWL or Edit CRAWL properties window.
To clear the logo assignment, right click the Main or Auxiliary Crawl icon
and select Reset Message Logo.
NOTE: Unlike a full screen BUG, a “Message Logo” is a small PNG graphic. In
general, it’s recommended that you keep the vertical size of this image no
more than twice the font size you’ve specified for your crawls. This
assures an appropriate appearance relative to the height of the banner. You
can experiment with creating these small PNG logos and find what works
best for you. (Example: font size = 36, graphic = 72 pixels high MAX)
Scheduling a Text Overlay
Use the TEXT feature to display one or several lines of user-defined or
imported text over a clip or live input … or at the beginning AND end, as
is typical of a music video. There are three ways to add TEXT to a playlist:
Drag and Drop
Drag and drop the TEXT button on top of the clip or input you want the
text to appear over. This opens the text entry window where you can
enter the desired message you wish to display.
Select and Click
Single-click to select the desired file or input item and then click the TEXT
button at the bottom of the playlist to open the text entry window.
Right-Click Menu
The third way is to right-click on the file or input event, choose the TEXT
fly out and select Add Text.
31

SOFTWARE
cont’d
Creating Text and Timing
Once the text entry window is open, type one or more lines of text, using
the Enter key to start a new line. You’ll see the text appear in the Video
Preview window as you type. This window simulates the actual system
output to a TV screen. There is no limit to the number of lines you can
enter. However, if a line length extends past “title safe” on the video
display, a warning will appear below the entry window.
You can also specify a background image (PNG) that will be composited
with the text for enhanced visual effect. Just click the Choose… button to
browse for a desired image. When selected, the image immediately
displays in the Video Preview window. (Click No Image to remove it.)
If you click Preload Text, the image will be loaded into the DSK PVW
window, where you can AUTO to AIR or TAKE to AIR as you wish. Here is
the text with background displayed on the DSK PGM output after an
AUTO to AIR or TAKE to AIR.
This shows the composited DSK on the PGM (output) screen. If you are
passing a LIVE signal or playing a clip and use a PNG that doesn’t fill the
screen, you’ll see the LIVE or clip video behind the text - and PNG if
chosen.
Here are the rules for TEXT visibility. Short clips have text at the
beginning only. Longer clips display text at the beginning and at the end:
Single Text Clip Minimum - “00:00:15;00” duration
FrameOn “00:00:05;00” from start
FrameOff “00:00:12;00” from start
Dual Text Clip Minimum - “00:01:02;00” duration
FrameOn1 “00:00:10;00” from start
FrameOff1 “00:00:17;00” from start
FrameOn2 “00:00:20;00” from end
FrameOff2 “00:00:13;00” from end
NOTE: You can define the font, font size 1, font size 2, font
style, font color, horizontal screen position, vertical screen
position, and vertical line spacing for font 1 and font 2 on the
configuration window.
This playlist example shows a BUG is scheduled over the BEST
BUY clip; a CRAWL is scheduled over the Rock Steady clip; and a
TEXT file is scheduled over the Pop Power Opening clip. After
those three files play, the contents of the AUTO-LOOP folder will
play for the remainder of the half-hour Event (25:18:10).
32

SOFTWARE
Record Scheduled Events
You can record any scheduled Event, regardless of the contents of that Event. The Event may include any
combination of clips, graphics, or LIVE input segments. By definition, LIVE segments are those where a video
stream is configured as an input for the system, and passed through the automation engine to the output
stream for a specified duration. Sources can be NDI, HLS or MPEG-DASH formats.
To record a scheduled Event, right-click the Event banner and select
Event Properties … or double-click the Event banner to open the
Change Event Properties window.
Click the Record Event checkbox.
Click OK, and you’ll notice the RECORD LED indicator appears on the
Event banner next to the Event locked icon.
Record Duration
The recording will automatically start about a half second before the
Event playback begins. You’ll see the RECORD LED indicator glow bright
red to indicate record-in-progress.
The Settings panel in the lower right will also be outlined in red with the
file name of the currently recording file displayed in the upper right of
the window title bar.
If you click the Encode tab in the Settings window, you’ll see the name of
the file being recorded, a glowing red RECORD button, and a green timer
that indicates how long the file has been recording.
The file prefix is automatically copied from the Program Name of the
scheduled Event … followed by a date/time stamp in the complete file
name. The encoding parameters, such as file type and data rate, are
taken from the settings you have previously selected on the user-
defined fields on the Encode tab.
33

Manual Recording
Stream
Record Duration
You can record the PROGRAM signal at any time without having to
schedule the recording. Here’s what you do:
1. Click the Encode tab on the Settings window.
2. Verify the Recording Path. The default is D:\Media\Recordings
3. Enter a Name that describes what you’re going to record.
4. Select the desired Bit Rate.
5. Click the RECORD Button.
The duration counter will activate, and the name of the file will appear in
the upper right of the title bar. Recording can be stopped at any time.
Clicking stop will make the currently recording file available for playback.
Clicking Record again will start a new file with a new timestamp.
Note: You can select either MPEG-2 or MPEG-4 as the recording format.
The recommended settings for high-quality recordings are:
MPEG-225Mbps
MPEG-412Mbps
MPEG-4 files are much smaller than MPEG-2, so this is the
recommended recording format. That is the default when you open the
Encode tab.
Useful Markup Tags
A-LIST uses “markup tag” characters that are file specific, and which give
you added control in your content display and management. You use
brackets [ ] as part of the file name to ‘tell’ the software it is a special
instruction.
[ ]
Defining a Play Length for Pictures
When you use pictures in playlists (BMP, JPG, TIF) they have a default
‘global’ duration that applies to all such files (:10). But there may be
situations where you want to change how long a picture item is visible in
the playlist. (You can change the default duration under the Edit Menu.)
Example: Your picture is named “WhataDog.jpg”, but you want it to
display for 15 seconds instead of the global default of 10 seconds.
Presuming you keep your pictures in the PICS folder in the D:\Media
folder, open that folder, then right-click and select Rename from the
menu … or left-click once to select the picture then left-click again on the
name. The file name (but not the extension) will highlight. Place your
cursor at the end of the selected (blue) area and enter a Left
Bracket, the number 15, and a Right bracket - [15|.
Click anywhere outside the picture and it will be renamed. Whenever
that file is used in a playlist it will observe that specific play time.
Play Background Audio under Video Clips
The other useful markup tag is useful when you want to play
background audio files when video clips are playing while
AUTO-LOOP is active. Use the same procedure to rename the
video file, but add [bga] at the end of the file name but before
the extension: roadrace[bga].mp4
NOTE: BE SURE TO ENTER BRACKETS [ ] AND NOT PARENTHESES ( ) OR CURLY MARKS { }. THESE WILL NOT WORK!
34

for Technical Support:
888.894.7874 ext 2
support@RUSHWORKS.tv
www.YouTube.com/RUSHWORKS101
KEEPING IT SUPER SIMPLE!
35
 Loading...