

Page 1
XP-50
XP-65
High Definition, 1080p Flat Panel Plasma Displays
with
I NSTALLATION/OPERATION MANUAL
Page 2

Page 3

RuncoCare™ Standard Two Year Limited
Warranty
Congratulations on your purchase of a Runco® product! With proper installation, setup and care, you should enjoy many years
of unparalleled video performance.
This RuncoCare Standard Limited Warranty is provided free of charge by Runco International with the purchase of a covered
Runco product. The following sets forth Runco’s Standard Limited Warranty applicable to all Runco projectors, processors,
LCD and plasma display products, with the exception of the following models: XP-103DHD, SC-1, SC-1a and VW-100HD1.
The following terms and conditions of the RuncoCare Standard Limited Warranty represent a contract between us, Runco
International and you, the customer who has purchased a Runco product. This contract applies to purchases of covered
Runco products occurring on or after September 1, 2008. Runco reserves the right to change the terms of this contract, and
such changes shall apply to purchases of covered Runco products that occur on or after any future effective date.
RuncoCare Standard Features
• Two-year protection from defects in material and workmanship
• Access to 24x7 phone support
• Complimentary, second-day one-way shipping
Warranty Coverage
Y
Runco warrants its products to be free from defects in material and workmanship during the warranty period provided below.
If, in Runco’s determination, a product proves to be defective in material or workmanship during the warranty period, Runco
will repair the product, replace the product with a similar new or like new product, or refund a prorata share of the purchase
price (calculated based on the remainder of the warranty period and the then-current MSRP2 of a similar product), if repair or
replacement of the product is determined by Runco to not be feasible.
Length of Warranty
Runco products are warranted for two (2) years from the date of shipment from Runco. Lamps are warranted six (6) months
from the date of shipment or 1000 hours, whichever comes first. All other accessories, which includes, but is not limited to,
cables, remotes, carrying cases, lens cap and other peripherals sold with the Runco product, are warranted for ninety (90)
days from the date of shipment. Repaired product or replacement lamp is subsequently warranted for the remaining portion (if
any) of the original warranty term or 90 days from the date the product was shipped to you, whichever is longer.
Eligibility
This RuncoCare Standard Limited Warranty is valid only for the first customer who purchases the covered product from an
authorized Runco dealer or distributor. This warranty is not transferable. You may be required to provide proof of purchase in
order to receive warranty services.
PRE
IMINAR
L
1. Runco may update this list of products excluded from this warranty from time to time at Runco’s sole discretion, but updates to
the list of covered products will not apply on a retroactive basis.
2. MSRP is defined as the most recent product price listed on Runco’s price list.
CinemaWall XP-50/XP-65 Installation/Operation Manual iii
Page 4

RuncoCare Claim Procedure
In the event of a product defect, please follow the warranty claim procedure provided below:
1. The Customer is required to contact a Runco dealer or Runco Technical Support via E-mail at support@runco.com or via
phone at (toll free) 800-23RUNCO (800-237-8626). If the customer is located outside North America, call +3589 4200 554
in Europe for product service.
2. Be prepared to provide the date of purchase, the place of purchase, serial number, product model number, description of
the problem and troubleshooting steps already attempted.
3. Runco Technical Support staff will attempt to correct any minor issues that may be causing the problem. If Runco is
unable to fix the problem to the customer’s satisfaction, Runco will issue a Return Material Authorization (RMA) if it is
determined that the claim was made within the coverage period of the Standard Limited Warranty.
4. The customer will need to return the defective product to the Runco repair depot location specified by the Runco technical
support representative. The customer will need to properly package the defective product, consisting of the product only,
and not include any accessories (e.g., cables, remotes, carrying cases, lens, lens cap and other peripherals) and return it
to the Runco repair depot specified by the technical support representative. It is the customer’s responsibility to properly
package the hardware, include all appropriate materials, and return it to the location specified by the Runco technical
support department. The customer will need to address and resolve any shipping damage claims directly with the shipping
company.
5. The customer is responsible for providing a suitable box to ship the defective product to an authorized Runco repair depot.
Boxes may be purchased from a Runco technical support representative.
6. The customer is responsible for paying freight charges to ship the defective product to an authorized Runco repair depot.
7. Runco will pay freight charges to return the repaired/replacement product to the customer from the Runco repair depot.
8. Once an RMA has been created, the customer may contact serviceorders@runco.com for follow-up questions or
confirmation status of the claim process.
IMINAR
L
Y
Warranty Exclusions
This RuncoCare Standard Limited Warranty does not include or is limited by the following:
1. Products not purchased from an authorized Runco dealer
2. Rental costs incurred by the customer in the event of product defect or failure
3. Any product with a defaced, modified, or removed serial number
4. Damage, deterioration, or malfunction resulting from:
a Accident, abuse, misuse, neglect, improper ventilation, fire, water, disaster, lightning, or other acts of nature, smoke
exposure (cigarette or otherwise), unauthorized product modification (including use of an unauthorized mount), or failure
to follow instructions supplied with the product
b Repair or attempted repair by anyone not authorized by Runco
c Any damage to the product due to shipment
d Removal or installation of the product
e Causes external to the product, such as electric power fluctuations or failure
f Use of supplies or parts not meeting Runco’s specifications
g Normal wear and tear
h Expected lamp degradation and normal decrease in lamp output over a period of time or as the lamp is consumed
i Customer caused defects, including but not limited to, scratched/defaced/altered plastics
PRE
iv CinemaWall XP-50/XP-65 Installation/Operation Manual
Page 5

j Failure to follow maintenance procedures as outlined in the product’s user guide where a schedule is specified for
regular cleaning of the product
k Opening the product and/or tampering with internal circuitry
l Products lost, stolen or discarded
m Any damage or dissatisfaction associated with latent images, “burnin,” or any other damage determined by Runco to be
the result of customer use patterns
n Any other cause, which does not relate to a product defect in material or workmanship
5. Removal, installation, and setup service charges are excluded from this Standard Limited warranty
6. Runco’s warranty does not cover black uniformity issues or other LCD issues associated with usage outside the Runco
recommended guidelines and specifications for the product
7. Second day shipment delivery time and availability may vary based on origin and destination and Runco is unable to deliver
to PO Box and FPO Box addresses
Extended Service Options
Runco offers extended and expanded service plans. For information on additional product protection, please E-mail
serviceorders@runco.com or call (toll free) 800-23RUNCO (800-237-8626).
Online Product Registration
Y
Please visit http://www.runco.com/info.html to register product.
IMINAR
Limitation of Implied Warranties
L
RUNCO PROVIDES NO WARRANTIES, EXPRESS OR IMPLIED, EXCEPT THOSE EXPRESSLY PROVIDED HEREIN. RUNCO
EXPRESSLY DISCLAIMS ALL OTHER WARRANTIES, INCLUDING THE IMPLIED WARRANTIES OF MERCHANTABILITY AND
FITNESS FOR A PARTICULAR PURPOSE.
PRE
CinemaWall XP-50/XP-65 Installation/Operation Manual v
Page 6

Exclusion of Damages
RUNCO’S MAXIMUM AGGREGATE LIABILITY HEREUNDER IS LIMITED TO THE COST OF REPAIR OR REPLACEMENT OF
THE PRODUCT.
1. RUNCO SHALL NOT BE LIABLE FOR DAMAGE TO OTHER PROPERTY CAUSED BY ANY DEFECT IN THE PRODUCT,
DAMAGES BASED UPON INCONVENIENCE, LOSS OF USE OF THE PRODUCT, LOSS OF TIME, LOSS OF PROFITS,
LOSS OF BUSINESS OPPORTUNITY, LOSS OF GOODWILL, INTERFERENCE WITH BUSINESS RELATIONSHIPS, OR
OTHER COMMERCIAL LOSS, EVEN IF THE CUSTOMER HAS BEEN ADVISED OF THE POSSIBILITY OF SUCH DAMAGES.
2. RUNCO SHALL NOT BE LIABLE FOR ANY CONSEQUENTIAL, INCIDENTAL, INDIRECT, SPECIAL, OR PUNITIVE
DAMAGES ANY OTHER DAMAGES, WHETHER INCIDENTAL, INDIRECT, CONSEQUENTIAL OR OTHERWISE.
3. RUNCO SHALL NOT BE LIABLE FOR ANY CLAIM AGAINST THE CUSTOMER BY ANY OTHER PARTY.
Y
Effect of Local Law
This warranty gives you specific legal rights, and you may have other rights, which vary from locality to locality. Some localities
do not allow limitations on implied warranties and/or do not allow the exclusion of incidental or consequential damages, so the
above limitations and exclusions may not apply to you.
COPYRIGHT AND TRADEMARKS:
© Copyright 2008 Runco International, LLC (“Runco”). This document contains proprietary information protected by copyright,
trademark and other intellectual property laws. All rights are reserved. No part of this manual may be reproduced by any
mechanical, electronic or other means, in any form, without prior written permission of Runco.
IMINAR
The trademarks reproduced in this Runco Owner’s Manual and used on the Runco Products are either owned by Runco or are
licensed by Runco. You may not reproduce or use the trademarks without the prior written consent of Runco.
Runco Products are manufactured under one or more of the following patents: US. Patent 6755540 and Other Patents
Pending.
L
PRE
vi CinemaWall XP-50/XP-65 Installation/Operation Manual
Page 7
Important Safety Instructions
Thank you for your purchase of this quality Runco product! For best performance, please read this manual carefully as it is your
guide through the menus and operation.
WARNING
CAUTION
RISK OFELECTRIC SHOCK
DO NOTOPEN
TO REDUCE THE RISK OF ELECTRIC SHOCK
DO NOT REMOVE COVER (OR BACK)
NO USER SERVICEABLE PARTS INSIDE.
REFER SERVICING TO QUALIFIED
1. Read these instructions.
2. Keep these instructions.
3. Heed all warnings.
4. Follow all instructions.
5. Do not use this apparatus near water.
6. Clean only with a dry cloth.
7. Do not block any of the ventilation openings. Install in accordance with the manufacturer’s instructions.
CAUTION:
SERVICE PERSONNEL.
This symbol is intended to alert the user to the presence of
uninsulated “dangerous voltage” within the product’s enclosure
that may be of sufficient magnitude to constitute a risk of electric
shock.
This symbol is intended to alert the user to the presence of
important operating and maintenance (servicing) instructions in the
literature accompanying the appliance.
Y
IMINAR
L
8. Do not install near any heat sources such as radiators, heat registers, stoves, or other apparatus (including amplifiers) that
produce heat.
9. Do not defeat the safety purpose of the polarized or grounding type plug. A polarized plug has two blades with one wider
than the other. A grounding type plug has two blades and a third grounding prong. The wide blade or the third prong is
provided for your safety. When the provided plug does not fit into your outlet, consult an electrician for the replacement of
the obsolete outlet.
PRE
10. Protect the power cord from being walked on or pinched particularly at plugs, convenience receptacles and the point
where they exit from the apparatus.
11. Only use the attachments/accessories specified by Runco.
12. Use only with a cart, stand, tripod, bracket or table specified by the manufacturer or sold with the apparatus.
When a cart is used, use caution when moving the cart/apparatus to avoid injury from tip-over.
13. Unplug this apparatus during lightning storms or when unused for long periods of time.
14. Refer all servicing to qualified service personnel. Servicing is required when the apparatus has been damaged in
any way, such as power supply cord or plug is damaged, liquid has been spilled or objects have fallen into the apparatus,
the apparatus has been exposed to rain or moisture, does not operate normally, or has been dropped.
CinemaWall XP-50/XP-65 Installation/Operation Manual vii
Page 8

Compliance Information
DECLARATION OF CONFORMITY:
Manufacturer’s Name: Runco International, LLC
Manufacturer’s Address: 1195 NW Compton Drive, Beaverton, OR 97006-1992
hereby declares that the products Model Numbers:
XP-50 and XP-65
conform with the provisions of:
Council Directive 2004/108/EC on Electromagnetic Compatibility;
EN 55022 “Limits and methods of measurements of radio interference characteristics of information technology equipment”
1998;
EN 55024 “Limits and methods of measurements of immunity characteristics of information technology equipment” 1998;
Including:
• EN 61000-4-2 “Electromagnetic compatibility (EMC) Part 4: Testing and measurement techniques Section 2:
Electrostatic discharge immunity test”
• EN 61000-4-3 “Electromagnetic compatibility (EMC) Part 4: Testing and measurement techniques Section 3: Radiated,
Radio-Frequency, Electromagnetic Field Immunity Test”
• EN 61000-4-4 “Electromagnetic compatibility (EMC) Part 4: Testing and measurement techniques Section 4: Electrical
fast transient/burst immunity test”
• EN 61000-4-5 “Electromagnetic compatibility (EMC) Part 4: Testing and measurement techniques Section 5: Surge
immunity test”
• EN 61000-4-6 “Electromagnetic compatibility (EMC) Part 4: Testing and measurement techniques Section 6: Conducted
disturbances induced by radio-frequency fields immunity test”
• EN 61000-4-8 “Electromagnetic compatibility (EMC) Part 4: Testing and measurement techniques Section 8: Conducted
disturbances induced by power frequency magnetic fields immunity test”
• EN 61000-4-11 “Electromagnetic compatibility (EMC) Part 4: Testing and measurement techniques Section 11: Voltage
dips, short interruptions and voltage variations immunity tests”
PRE
IMINAR
L
Y
And:
• EN 61000-3-2 “Electromagnetic compatibility (EMC) Part 3, Section 2: Limits for harmonic current emissions (equipment
input current up to and including 16 A per phase)” 2000;
• EN 61000-3-3 “Electromagnetic compatibility (EMC) Part 3, Section 3: Limitations of voltage changes, voltage
fluctuations and flicker in public low-voltage supply systems, for equipment with rated current up to and including 16 A
and not subject to conditional connection” 1995;
Council Directive 2006/95/EC and amended by M1 and C1 on Low Voltage Equipment Safety;
EN 60950 “Safety of information technology equipment, including electrical business equipment”
The Technical Construction file required by this Directive is maintained at the corporate headquarters of Planar Systems, Inc.,
1195 NW Compton Drive, Beaverton, OR 97006.
Date of Declaration: March 2009
viii CinemaWall XP-50/XP-65 Installation/Operation Manual
Page 9
FCC PART 15:
NOTE: This equipment has been tested and found to comply with the limits for a Class B digital device, pursuant to Part 15 of
the FCC Rules. These limits are designed to provide reasonable protection against harmful interference in a residential
installation.
This equipment generates, uses and can radiate radio frequency energy and, if not installed and used in accordance with the
instructions, may cause harmful interference to radio communications. However, there is no guarantee that interference will not
occur in a particular installation. If this equipment does cause harmful interference to radio or television reception, which can be
determined by turning the equipment off and on, the user is encouraged to try to correct the interference by one or more of the
following measures:
• Reorient or relocate the receiving antenna.
• Increase the separation between the equipment and receiver.
• Connect the equipment into an outlet on a circuit different from that to which the receiver is connected.
• Consult the dealer or an experienced radio/TV technician for help.
INDUSTRY CANADA (ICES-003):
This Class B digital apparatus complies with Canadian ICES-003.
Cet appareil numérique de la classe B est conforme à la norme NMB-003 du Canada.
Y
IMPORTANT RECYCLE INSTRUCTIONS
IMINAR
Lamp(s) inside this product contain mercury. This product may contain other electronic waste that can be
hazardous if not disposed of properly. Recycle or dispose in accordance with local, state, or federal Laws.
For more information, contact the Electronic Industries Alliance at WWW.EIAE.ORG.
For lamp specific disposal information check WWW.LAMPRECYCLE.ORG.
DISPOSAL OF OLD ELECTRICAL AND ELECTRONIC EQUIPMENT (Applicable throughout the European
Union and other European countries with separate collection programs)
This symbol found on your product or on its packaging, indicates that this product should not be treated as
household waste when you wish to dispose of it. Instead, it should be handed over to an applicable collection
point for the recycling of electrical and electronic equipment. By ensuring this product is disposed of correctly,
you will help prevent potential negative consequences to the environment and human health, which could
otherwise be caused by inappropriate disposal of this product. The recycling of materials will help to conserve
natural resources. This symbol is only valid in the European Union. If you wish to discard this product, please
contact your local authorities or dealer and ask for the correct method of disposal.
PRE
L
CinemaWall XP-50/XP-65 Installation/Operation Manual ix
Page 10

Notes:
Y
IMINAR
L
PRE
x CinemaWall XP-50/XP-65 Installation/Operation Manual
Page 11

1Table of Contents
RuncoCare™ Standard Two Year Limited Warranty ................................................... iii
Important Safety Instructions ....................................................................................... vii
Compliance Information .............................................................................................. viii
1. Introduction ............................................................................................................... 1
About This Manual ....................................................................................................... 1
Target Audience ..................................................................................................... 1
If You Have Comments About This Manual... .......................................................... 1
Textual and Graphic Conventions ...........................................................................1
Using This Manual ........................................................................................................ 2
Description, Features and Benefits ...............................................................................3
Key Features and Benefits ...................................................................................... 3
Parts List ...............................................................................................................4
2. Controls and Functions ............................................................................................5
CinemaWall at a Glance ............................................................................................... 5
Controls and Indicators ...........................................................................................5
Connectors.............................................................................................................7
CinemaWall Remote Control ........................................................................................9
3. Installation ...............................................................................................................11
Remote Control ..........................................................................................................11
Notes on Batteries ................................................................................................11
IMINAR
L
Y
PRE
Quick Setup ............................................................................................................... 12
Installation Considerations ..........................................................................................13
High-Altitude Operation ........................................................................................ 13
Mounting the CinemaWall on a Wall or Table Stand .............................................. 13
Ambient Light .......................................................................................................14
Ventilation ............................................................................................................. 14
Other Considerations ............................................................................................15
Connections to the CinemaWall ................................................................................. 16
Connecting Source Components to the CinemaWall............................................. 16
RS-232 Controller Connection .............................................................................. 19
Connecting External Speakers (Optional) .............................................................. 19
Connecting AC Power .......................................................................................... 20
CinemaWall XP-50/XP-65 Installation/Operation Manual xi
Page 12

4. Operation .................................................................................................................21
Turning on the Power .................................................................................................21
Changing the OSD Language .....................................................................................21
Setting the Day and Time ........................................................................................... 21
Setting the Computer Display Properties ....................................................................22
Selecting an Input Source ..........................................................................................23
Changing the Aspect Ratio ......................................................................................... 23
Using Picture-In-Picture (PIP) .....................................................................................26
Activating PIP ....................................................................................................... 26
Swapping the Main and PIP Images .....................................................................26
Selecting a PIP Target Screen or Input Source...................................................... 27
Changing the PIP Window Position ....................................................................... 27
Using the On-Screen Menus ......................................................................................27
Menu Navigation...................................................................................................27
PICTURE .............................................................................................................. 30
POS./SIZE ............................................................................................................ 35
SOUND ................................................................................................................ 37
SET UP................................................................................................................. 38
OPTIONS.............................................................................................................. 46
Using Digital Zoom .....................................................................................................51
5. Maintenance and Troubleshooting ........................................................................ 53
Cleaning .....................................................................................................................53
Cleaning the Display Panel Body and Remote Control ..........................................53
Cleaning the Screen.............................................................................................. 53
PRE
Cleaning the Vents................................................................................................ 53
Troubleshooting Tips .................................................................................................. 54
IMINAR
L
Y
6. Serial Communications ..........................................................................................55
RS-232 Connection and Port Configuration ...............................................................55
Serial Command Syntax ............................................................................................. 55
Examples..............................................................................................................55
7. Specifications .......................................................................................................... 59
CinemaWall Specifications ......................................................................................... 59
CinemaWall Dimensions ............................................................................................. 60
Supported Timings ..................................................................................................... 62
APPENDIX A. Default Settings ................................................................................... A-1
xii CinemaWall XP-50/XP-65 Installation/Operation Manual
Page 13

1List of Figures
2-1. CinemaWall XP-50 Front-Panel Controls and Indicators ...............................................5
2-2. CinemaWall XP-65 Front-Panel Controls and Indicators ...............................................5
2-3. CinemaWall Rear Panel ................................................................................................ 7
2-4. CinemaWall Remote Control.........................................................................................9
3-1. Ventilation Requirements for Enclosure Mounting ....................................................... 14
3-2. HDMI Source Connections .........................................................................................16
3-3. RGB and Component Video Connections .................................................................. 17
3-4. Analog RGB Connections........................................................................................... 18
3-5. RS-232 Control System Connection........................................................................... 19
3-6. External Speaker Connection .....................................................................................19
3-7. AC Power Connection ................................................................................................ 20
4-1. OSD Menu Structure for CinemaWall.......................................................................... 28
4-2. Typical Gray Bar Pattern for Adjusting Picture Level (Contrast) ................................... 31
4-3. Typical PLUGE Pattern for Adjusting Brightness .........................................................32
4-4. Typical Color Bar Pattern for Adjusting Color Saturation and Tint................................ 33
4-5. Typical Test Pattern for Adjusting Sharpness..............................................................34
7-1. CinemaWall Model XP-50 Dimensions (with Optional Table Stand) .............................60
7-2. CinemaWall Model XP-65 Dimensions (with Optional Table Stand) .............................61
IMINAR
L
Y
PRE
CinemaWall XP-50/XP-65 Installation/Operation Manual xiii
Page 14

List of Figures
Notes:
Y
IMINAR
L
PRE
xiv CinemaWall XP-50/XP-65 Installation/Operation Manual
Page 15

1. Introduction
Note
This Owner’s Manual describes how to install, set up and operate a Runco CinemaWall
XP-50/XP-65 Flat-Panel Plasma Display Monitor.
Throughout this manual, the Runco CinemaWall XP-50/XP-65 Flat-Panel Plasma Display
Monitor are referred to collectively as the “CinemaWall.” Except where otherwise
indicated, the information in this manual applies to both CinemaWall models.
Y
most out of the CinemaWall.
Runco has made every effort to ensure that this manual is accurate as of the date it was
printed. However, because of ongoing product improvements and customer feedback, it
may require updating from time to time. You can always find the latest version of this and
other Runco product manuals on-line, at www.runco.com.
Runco welcomes your comments about this manual. Send them to techpub@runco.com.
Text Conventions: The following conventions are used in this manual, in order to clarify
the information and instructions provided:
• Remote control button identifiers are set in upper-case bold type; for example, “Press
EXIT to return to the previous menu.”
• Computer input (commands you type) and output (responses that appear on-screen) is
shown in monospace (fixed-width) type; for example: “To change the aspect ratio to
Letterbox, send the command DAM:ZOOM.”
• All keys with functional names are initial-capped, set in bold type and enclosed in angle
brackets. These keys are the following: <Enter>, <Spacebar>, <Control>, <Esc>
and <Tab>.
• <Enter> indicates that you may press either the RETURN or ENTER key on your
computer keyboard if it has both keys.
PRE
IMINAR
L
1.1 About This Manual
Target AudienceRunco has prepared this manual to help home theater installers and end users get the
If You Have Comments About This Manual...
Textual and Graphic Conventions
In addition to these conventions, underlining, boldface and/or italics are occasionally used
to highlight important information, as in this example:
A carriage return must be used after each command or string.
CinemaWall XP-50/XP-65 Installation/Operation Manual 1
Page 16
Introduction
Note
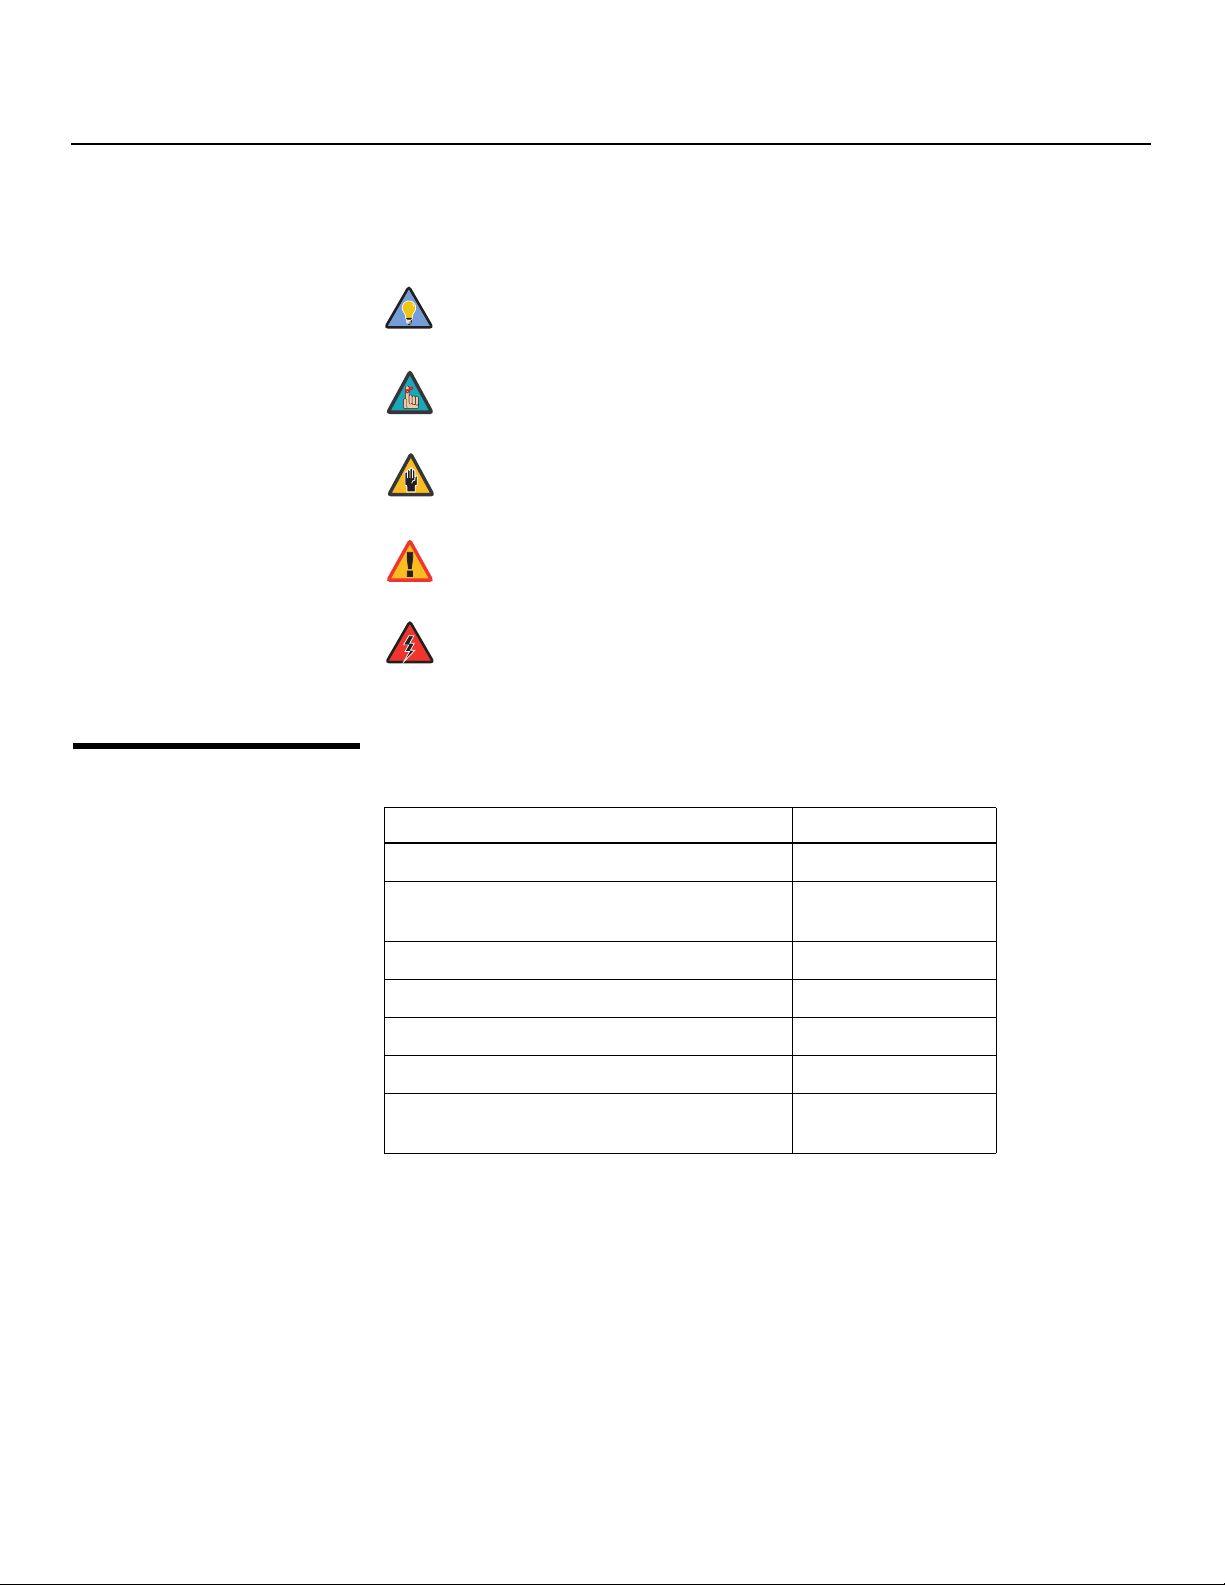
Caution
WARNING
DANGER!
Graphic Conventions: These symbols appear in numerous places throughout the
manual, to emphasize points that you must keep in mind to avoid problems with your
equipment or injury:
TIPS highlight time-saving short cuts and helpful guidelines for using
Tip
certain features.
NOTES emphasize text with unusual importance or special
significance. They also provide supplemental information.
CAUTIONS alert users that a given action or omitted action can
degrade performance or cause a malfunction.
Y
WARNINGS appear when a given action or omitted action can result
in damage to the equipment, or possible non-fatal injury to the user.
DANGER appears when a given action can cause severe injury or
death.
1.2
Using This Manual
Use the following table to locate the specific information you need in this manual.
IMINAR
Information about obtaining service iv
General information about the CinemaWall
XP-50/XP-65 Flat-Panel Plasma Display Monitor
Installation instructions 11
First-time configuration instructions 21
L
PRE
Advanced configuration instructions 38
Troubleshooting tips 54
Specifications for the CinemaWall XP-50/XP-65
Flat-Panel Plasma Display Monitor
If you need... ... Turn to page:
3
59
2 CinemaWall XP-50/XP-65 Installation/Operation Manual
Page 17

Introduction
The CinemaWall XP-50/XP-65 Flat-Panel Plasma Display Monitor takes picture quality to a
whole new level, boasting our brightest picture, best contrast ratio, deepest black levels
and most spot-on high definition colorimetry ever! In addition, sophisticated 16-bit digital
video processing, a new milestone, results in 4096 steps of graduation for seamless
images completely devoid of the primitive “solarization” and “stair stepping”
characteristics previously plaguing digital flat panel displays.
The CinemaWall features all of the Runco technologies you have come to expect from the
World's Finest Home Theater Products. Discrete, multiple aspect ratio control includes
VirtualWide™ for viewing 4:3 content in widescreen without appreciable picture
degradation, as well as ISF(ccc) calibration modes to easily maintain ISF standards. The
automation interface includes RS-232 control with discrete aspect ratio, input and power
on/off selection.
The CinemaWall not only represents a leap forward in high definition flat-panel technology,
but our engineering advances in plasma design ensure that it will enjoy a long life in any
installation, with operation extending to as much as 60,000 hours. At less than 4-1/4
inches thin, the CinemaWall provides unlimited installation flexibility as well.
• 16:9 Native Resolution: 1920 x 1080
• Multiple Aspect Ratios with VirtualWide™ Mode
• Less than 4-1/4 inches thin
• High-altitude compliant to 9,000 feet
• Exceptional detail and artifact-free video enhancement
• ViVix™ video processing with 3:2 film detection circuitry
IMINAR
L
Y
1.3 Description, Features and Benefits
Key Features and BenefitsThe CinemaWall offers these key features and benefits:
PRE
CinemaWall XP-50/XP-65 Installation/Operation Manual 3
Page 18

Introduction
➤
Parts List Your CinemaWall is shipped with the following items. If any items are missing or damaged,
please contact your Runco dealer or Runco Customer Service at (800) 23-RUNCO.
• CinemaWall XP-50/XP-65 Flat-Panel Plasma Display Monitor
• AC Power Cord
• Remote Control Unit and two (2), AA-size batteries
• CinemaWall XP-50/XP-65 Installation/Operation Manual (this document)
Optional Accessories – XP-50:
• Wall Mount Kit (part number 956-0081-00)
• Table Stand (part number 956-0082-00)
Optional Accessories – XP-65:
• Wall Mount Kit (part number 956-0103-00)
• Table Stand (part number 956-0105-00)
Y
IMINAR
L
PRE
4 CinemaWall XP-50/XP-65 Installation/Operation Manual
Page 19
(behind
1
2
3 4
(behind
front bezel)
2
front bezel)
3
2. Controls and Functions
2.1 CinemaWall at a Glance
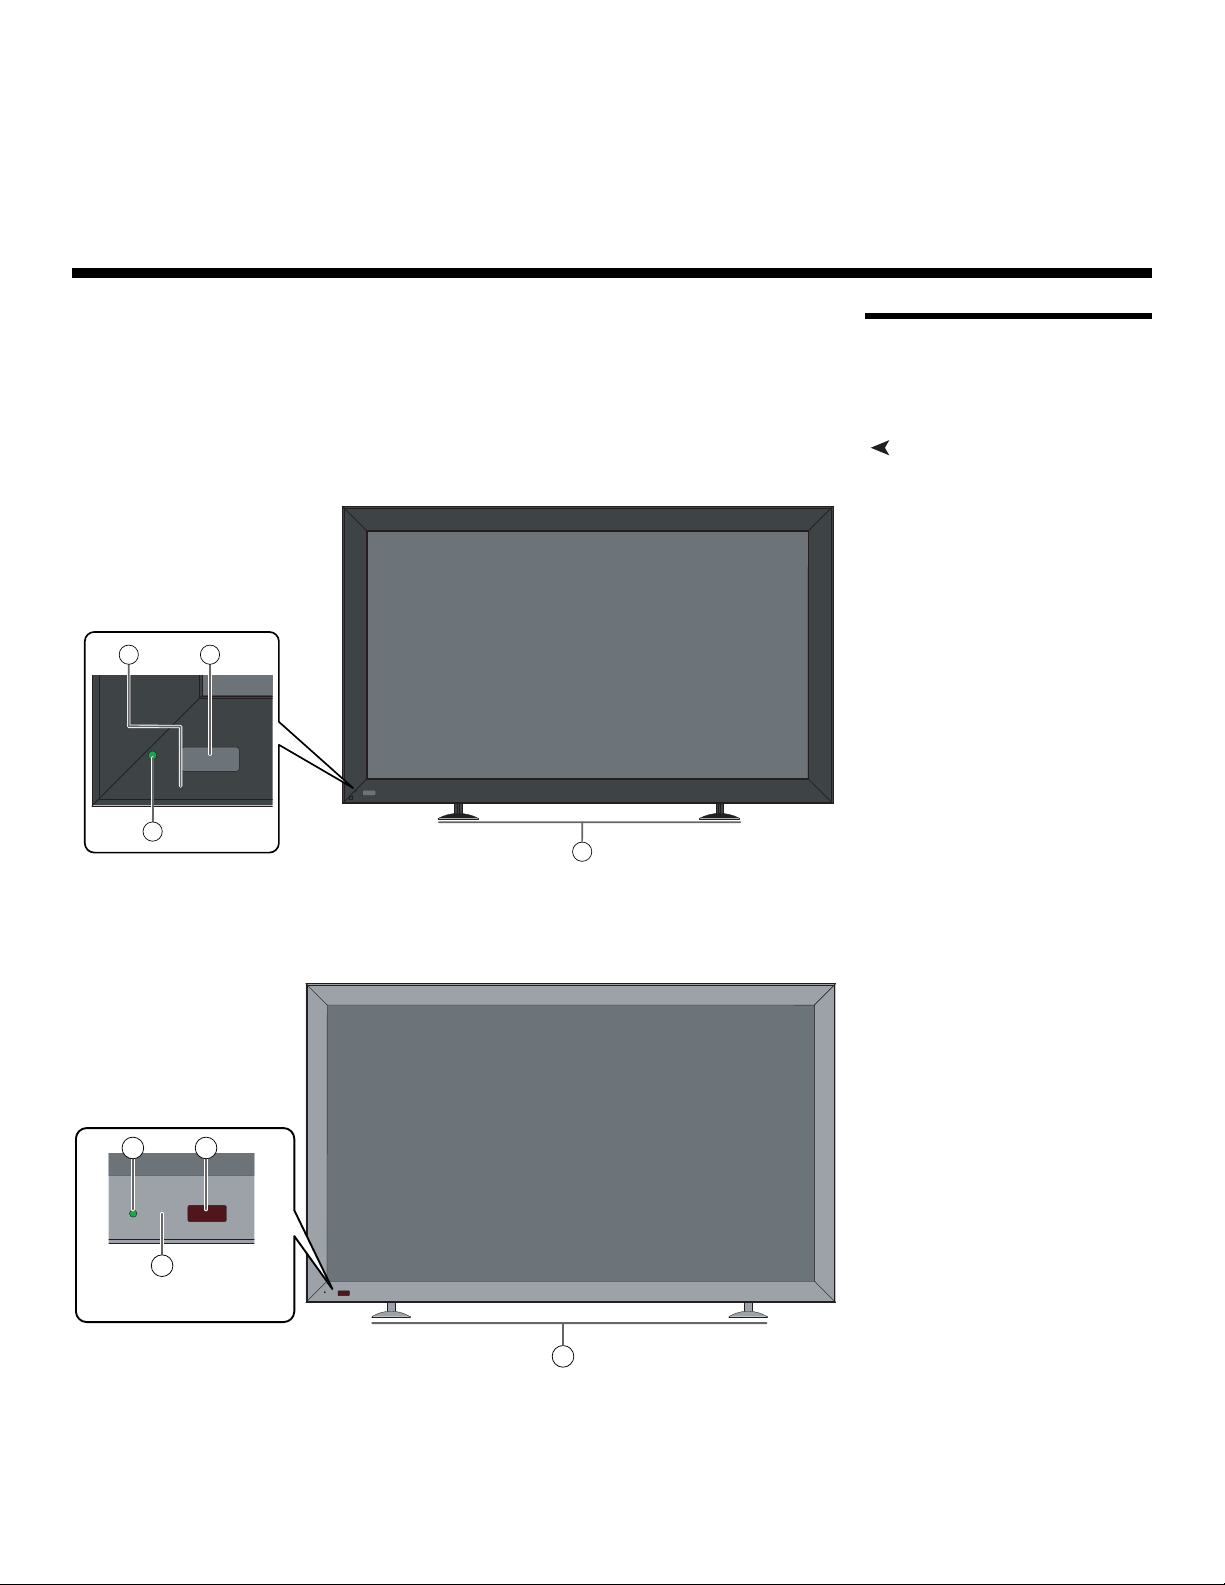
Controls and IndicatorsFigure 2-1 and Figure 2-2 show the CinemaWall front-panel controls and indicators.
Y
4
IMINAR
L
1
Figure 2-1. CinemaWall XP-50 Front-Panel Controls and Indicators
PRE
Figure 2-2. CinemaWall XP-65 Front-Panel Controls and Indicators
CinemaWall XP-50/XP-65 Installation/Operation Manual 5
Page 20

Controls and Functions
1. DISPLAY STAND
Optional accessory for table-top installations.
2. POWER BUTTON
Connects or disconnects the display panel from the AC power source.
3. STANDBY/ON INDICATOR
- Lights solid green to indicate normal operation;
- Flashes green to indicate that a Power-On Screen delay has been set (waiting to
power up);
- Lights orange to indicate that the PC INPUT is currently selected and the power
management function is active (no signal present);
- Lights red to indicate that the CinemaWall is in standby mode.
4. REMOTE CONTROL SENSOR
Receives the signals from the remote control.
Y
IMINAR
L
PRE
6 CinemaWall XP-50/XP-65 Installation/Operation Manual
Page 21
Controls and Functions
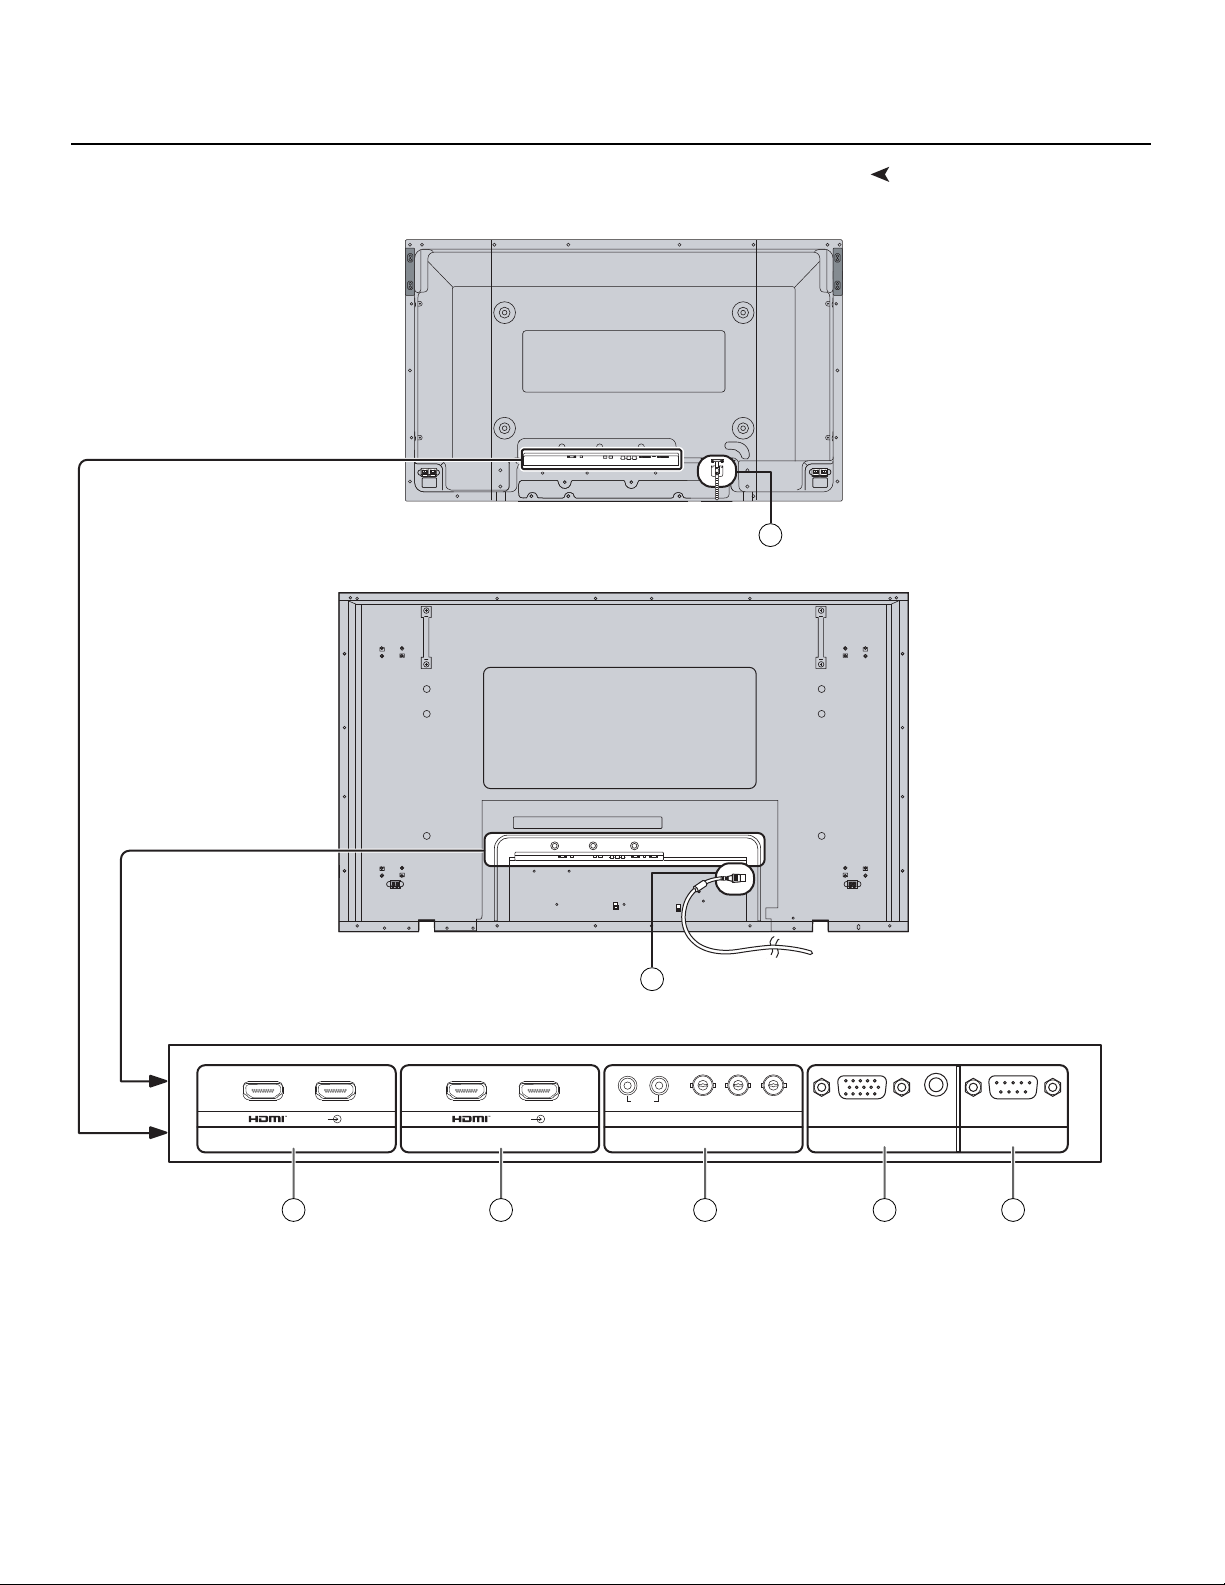
ConnectorsFigure 2-3 shows the rear-panel connector locations on the CinemaWall.
XP-50
IMINAR
L
XP-65
PRE
Y
6
6
AB
AV IN
SLOT1
1 2 3 4 5
Figure 2-3. CinemaWall Rear Panel
1. SLOT 1 (Dual HDMI input)
Two, HDCP-compliant digital video inputs.
2. SLOT 2 (Dual HDMI input)
Two, HDCP-compliant digital video inputs.
CinemaWall XP-50/XP-65 Installation/Operation Manual 7
AB
AV IN
SLOT2 SLOT3
AUDIO
RL
PR/CR/R PB/CB/B
COMPONENT/RGB IN
Y/G
AUDIO
SERIALPC IN
Page 22

Controls and Functions
3. SLOT 3 (COMPONENT/RGB input)
Video/audio input (3 x BNC, 2 x RCA) for connecting either RGB (with sync on green)
or component high-definition television signals.
4. PC IN
Provides a 15-pin VGA connection and a 3.5-mm, stereo audio connection to a
personal computer. The CinemaWall automatically detects the signal resolution.
5. SERIAL
A male, 9-pin D-sub connector for interfacing with a PC or home theater
automation/control system.
6. POWER INPUT
Connect the CinemaWall to AC power here.
Y
IMINAR
L
PRE
8 CinemaWall XP-50/XP-65 Installation/Operation Manual
Page 23
Controls and Functions
SURROUND button
Press the SURROUND button to turn surround-sound mode on or off.
Note:
The surround settings are memorized separately for each AUDIO MENU setting
(STANDARD, DYNAMIC, CLEAR).
ON OFF
ACTION button
Press ACTION to confirm a menu
selection.
ASPECT button
Press this button repeatedly to select an
aspect ratio.
POWER button
The CinemaWall must first be plugged into
the wall outlet and turned on at the power
switch.
Press this button to turn the CinemaWall
on from Standby mode. Press it again to
put the CinemaWall into Standby mode.
POS./SIZE button
Press this button to display the
POS./SIZE menu.
PICTURE button
Press this button to display the PICTURE
menu.
MUTE
Press this button to mute the sound.
Press again to reactivate sound.
Sound is also reactivated when power is
turned off or volume level is changed.
RESET button
Press this button to restore settings for
the current menu to their factory- default
values.
Adjustment/Selection buttons
Use these buttons to select menu items
and adjust settings.
INPUT button
Press to select INPUT1A, INPUT1B,
INPUT2A, INPUT 2B, INPUT3 and PC
input slots sequentially.
MULTI PIP buttons
Use these buttons to control various
aspects of multi-PIP (picture-in-picture)
operation.
OFF TIMER button
The CinemaWall can be preset to
switch to stand-by after a fixed
period. The setting changes to
30 minutes, 60 minutes, 90 minutes
and 0 minutes (off timer cancelled)
each time the button is pressed.
When three minutes remain,
“OFF TIMER 3” appears on-screen.
The off timer is cancelled if a power
interruption occurs.
SET UP button
Press this button to display the
SET UP menu.
SOUND button
Press this button to display the
SOUND menu.
Volume Adjustment buttons
Press + or – to increase or decrease
the sound volume level.
RETURN button
Press RETURN
to return to the
previous menu screen.
RECALL button
Press RECALL to display the
current operating status:
Input
Aspect Ratio
Off timer
The off timer indicator is displayed
only when the off timer has been set.
Clock display
Digital Zoom
Press this button to display the
digital image zoom controls.
Figure 2-4 shows the CinemaWall remote control and describes its functionality.
Figure 2-4. CinemaWall Remote Control
CinemaWall XP-50/XP-65 Installation/Operation Manual 9
PRE
RESET RETURN
L
2.2 CinemaWall Remote Control
SURROUND
ON
Y
30 60
IMINAR
1
2
3
4
10:00
4
OFF TIMER 90
90
0
1
PC
4:3
2
3
Page 24

Controls and Functions
Notes:
Y
IMINAR
L
PRE
10 CinemaWall XP-50/XP-65 Installation/Operation Manual
Page 25
3. Installation
Note
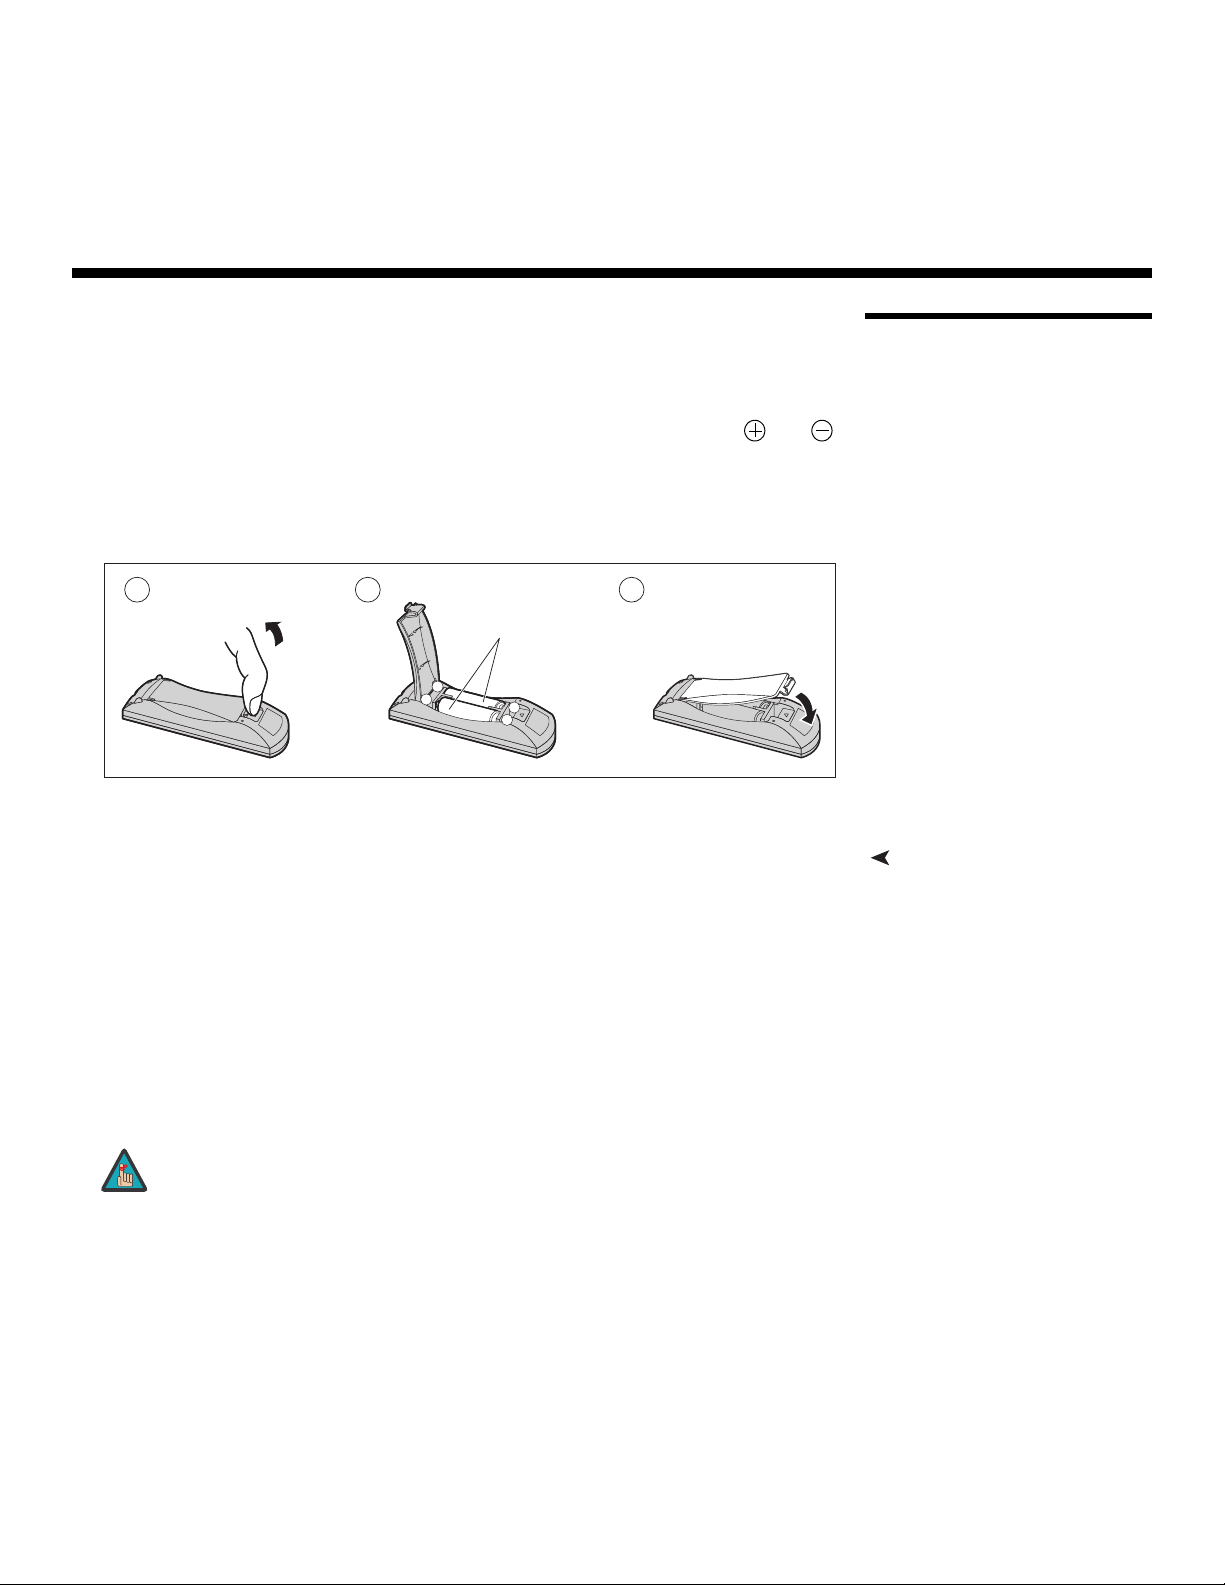
To install batteries in the remote control:
1. Press on the tab on the battery compartment cover and lift the cover in the direction
of the arrow.
2. Insert the included batteries. Ensure that the polarities correctly match the and
markings inside the battery compartment.
3. Close the battery compartment cover and press the tab on the cover until it clicks in
place.
12
“AA” size
-
+
+
-
3
Y
IMINAR
L
• Do not mix an old battery with a new one or different types of batteries.
• If you will not use the remote control for a long time, remove the batteries to avoid
damage from battery leakage.
• Do not drop the remote control or expose it to moisture or high temperature.
• The remote control may malfunction under a fluorescent lamp. If that occurs, move the
plasma display away from the fluorescent lamp.
• Make sure that there is nothing obstructing the infrared beam between the remote
control and the IR receiver on the plasma display.
PRE
3.1 Remote Control
Notes on Batteries• When installing batteries, make sure that the battery polarities are correct.
The signal from the remote control can be reflected by walls or
other surfaces.
• If the effective range of the remote control decreases, or it stops working, replace the
batteries with new ones.
• Ambient conditions may possibly impede the operation of the remote control. If this
happens, point the remote control at the plasma display and repeat the operation.
CinemaWall XP-50/XP-65 Installation/Operation Manual 11
Page 26

Installation
Note
3.2
Quick Setup
Table 3-1 gives a quick overview of the CinemaWall installation process. The sections
following this one provide detailed instructions.
Installation should be performed by a qualified custom video
installation specialist.
Table 3-1. Installation Overview
Step Procedure
Y
1 Mount the CinemaWall on a wall or table stand 13
2 Connect signal sources to the CinemaWall 16
3 Connect external controller to CinemaWall SERIAL port
(optional)
4 Apply power to the CinemaWall 21
5 If using the CinemaWall with a computer, adjust computer
display properties
6 Display calibration: adjust the following for each input:
IMINAR
• Aspect ratio
• Picture Level
L
• Brightness
• Color level
• Tint
• Sharpness
• White Balance
For Details, refer to
page...
19
22
23
PRE
12 CinemaWall XP-50/XP-65 Installation/Operation Manual
Page 27

Installation
Note
Proper installation of your CinemaWall will ensure the highest possible picture quality.
Whether you are installing the CinemaWall temporarily or permanently, you should take
the following into account to ensure that it performs optimally.
interaction between ambient air pressure and the plasma gases contained inside of the
panel, reliable operation of your plasma display cannot be assured during operation at
certain high-altitude locations.
At higher elevations, each panel may react differently, depending upon the altitude, air
pressure, humidity and other meteorological factors. If you are planning to use this
product at a high-altitude location (above 9,000 feet), please contact Runco technical
support for further information.
To install the CinemaWall, you will need either an optional table stand or wall-mounting kit.
If you do decide to wall-mount the CinemaWall, ensure that the wall-mount bracket is
installed according to the instructions included with it. The wall must be capable of
supporting a redundant weight factor five (5) times the weight of the display, or be
reinforced.
Runco recommends that this be done by a custom installation specialist.
Use only a Runco-approved wall-mount kit, table stand or floor
pedestal that is specifically designed for your display. Refer to
Parts List on page 4 for ordering information.
IMINAR
Y
3.3 Installation Considerations
High-Altitude OperationDue to the design of all plasma glass panels made by every manufacturer, and the
Mounting the CinemaWall on a Wall or Table Stand
L
You can attach your optional mounts or stand to the CinemaWall in either of two ways:
• While it is upright.
PRE
CinemaWall XP-50/XP-65 Installation/Operation Manual 13
Page 28

Installation
➤
➤
• As it lies flat with the screen face
down. Place the protective sheet,
which was wrapped around the
plasma monitor when it was
packaged, between the screen and
your work surface to avoid
scratching or otherwise damaging
the screen surface.
Ambient Light In general, minimize or eliminate light sources directed at the display. Contrast ratio in your
images will be noticeably reduced if light directly strikes the display, such as when a shaft
of light from a window or floodlight falls on the image. Images may then appear washed
out and less vibrant.
Ventilation If you are mounting the CinemaWall in an enclosure, leave sufficient space on all sides
between it and surrounding objects, as shown in
maintaining the proper operating temperature.
Y
Figure 3-1. This allows heat to disperse,
50mm (2")
IMINAR
L
PRE
Figure 3-1. Ventilation Requirements for Enclosure Mounting
Wall
50mm (2")
(2")
mm
(2") 50
mm
50
Wall
50mm (2")
14 CinemaWall XP-50/XP-65 Installation/Operation Manual
Page 29

damage and prolong operating life:
• Keep the ambient temperature constant and below 35°C (95°F). Keep the display away
from heating and/or air conditioning vents. Changes in temperature may cause drifts in
the display circuitry, which may affect performance.
• Keep the CinemaWall away from devices that radiate electromagnetic energy such as
motors and transformers. Common sources of these include slide projectors,
speakers, power amplifiers and elevators.
• Handle the unit carefully when installing or carrying it. Use the built-in handles; DO NOT
touch or hold the screen face.
• Set the unit away from heat, excessive dust, and direct sunlight.
• Protect the inside of the unit from liquids and small metal objects. In case of accident,
unplug the power cord and have it serviced by an authorized Service Center.
• Do not hit or scratch the panel surface as this causes flaws on the surface of the
screen.
• For correct installation and mounting it is strongly recommended to use a trained,
authorized dealer.
• To avoid sulfurization, it is strongly recommended not to place the unit in a dressing
room in a public bath or hot spring bath.
Y
Installation
Other ConsiderationsHere are some other considerations and tips that can help improve your installation, avoid
IMINAR
L
PRE
CinemaWall XP-50/XP-65 Installation/Operation Manual 15
Page 30

Installation
➤
3.4
Connections to the CinemaWall
Connecting Source
Components to the
CinemaWall
Proceed as follows to connect the CinemaWall to your video sources, external controller(s)
– if present – and AC power.
When connecting your equipment:
• Turn off all equipment before making any connections.
• Use the correct signal cables (sold separately) for each source.
• Ensure that the cables are securely connected. Tighten the thumbscrews on
connectors that have them.
Connect your video sources to the CinemaWall as shown and described in the sections
that follow.
HDMI Connections: The CinemaWall has four (4) HDMI video inputs for connecting a
BD/DVD player, DTV decoder or any other device with a DVI or HDMI output. Connect
such devices as shown in
Tip
Figure 3-2.
Use the HDMI inputs whenever possible. This ensures the highest
video quality because the signal is carried in the digital domain
throughout the entire signal path, from source component output
into the display.
Y
IMINAR
L
SLOT1 SLOT2 SLOT3
PRE
HDMI
AV O UT
HDMI sources (BD, DVD, DTV Set-Top Box etc.)
HDMI
AV O UT
AUDIO
RL
COMPONENT/RGB IN
HDMI
AV O UT
PR/CR/R PB/CB/B
Y/G
AV O UT
PC
HDMI
Figure 3-2. HDMI Source Connections
16 CinemaWall XP-50/XP-65 Installation/Operation Manual
Page 31

RGB and Component Video Connections: See Figure 3-3.
Note
COMPONEN T VIDEO OUT
P
DVD
DTV-Set-Top Box
(DTV-STB)
Y , P
OUT
AUDIO
B , P R
OUT
R
P
B
,
Y
L
R
Installation
RCA-BNC
adapter
plug
Y
AUDIO
RL
COMPONENT/RGB IN
Computer RGB Camcorder
or
Figure 3-3. RGB and Component Video Connections
IMINAR
L
PRE
1. Change the “COMPONENT/RGB-IN SELECT” setting in the
SET
UP menu to “COMPONENT” or “RGB” according to the color
space used by the source.
2. The CinemaWall supports only “sync-on-green” RGB signals on
this input. If your source outputs composite sync or separate
horizontal and vertical sync, connect it to the PC input.
PR/CR/R PB/CB/B
SLOT3
Y/G
CinemaWall XP-50/XP-65 Installation/Operation Manual 17
Page 32

Installation
Note
Analog (Computer) RGB Connections: The CinemaWall has an RGB input and a
stereo audio input for connecting a personal computer; see
1. Refer to Supported Timings on page 62 for a list of computer
signals compatible with the CinemaWall. Use with signals other
than those listed may cause some functions not to work.
2. Some Macintosh computers may require a Macintosh video
adapter. Contact your nearest authorized service center or dealer.
3. The PC input supports the VESA Display Data Channel (DDC 2B)
standard. This standard provides “Plug and Play” capability; the
display and a VESA DDC-compatible computer communicate their
setting requirements, allowing for quick and easy setup.
In order for Plug and Play to work correctly, you must turn on the
CinemaWall before you turn on the connected computer.
4. This CinemaWall may not be able to display images from some
notebook computers in simultaneous (CRT/LCD) mode. Should
this occur, switch the notebook computer to “CRT only” mode. If
you are unsure how to do this, refer to your notebook computer’s
user manual.
Y
Figure 3-4.
IMINAR
L
PRE
Figure 3-4. Analog RGB Connections
Conversion adapter
(if necessary)
Connect a cable which matches
the audio output terminal on the computer.
Audio
RGB
PC cable
(Female)
AUDIO
PC IN
Mini D-sub 15p
(Male)
Stereo plug
18 CinemaWall XP-50/XP-65 Installation/Operation Manual
Page 33

Installation
Connector Pin Assignments:
2 Receive Data
3Transmit Data
5Ground
1, 4, 6, 9 Not Connected
7, 8 (shorted together)
Use a straight-through RS-232 cable with a 9-pin male connector to connect a PC or
home theater control/automation system (if present) to the RS-232 port on the
CinemaWall; see
For more information about using this connection, refer to Serial Communications on
page 55.
Personal Computer
(or Control/Automation System)
13452
6789
Figure 3-5.
RS-232C Straight Cable
9-pin
(Male)
SERIAL
RS-232 Controller Connection
Y
IMINAR
Figure 3-5. RS-232 Control System Connection
Connect the (positive) and (negative) speaker wires to the SPEAKER-R and
SPEAKER-L terminals; see Figure 3-6. Maintain the correct polarity. For more
information, refer to the owner’s manual for your speakers.
L
PRE
1
2
Speaker
Speaker Terminal (R)
Figure 3-6. External Speaker Connection
CinemaWall XP-50/XP-65 Installation/Operation Manual 19
Terminal (R)
2
Connecting External Speakers (Optional)
1
Page 34

Installation
➤
XP-50
XP-65
Connecting AC Power Plug the female end of the power cord into the AC receptacle on the rear of the
CinemaWall. Connect the other end to your AC power source.
Y
IMINAR
L
Figure 3-7. AC Power Connection
PRE
20 CinemaWall XP-50/XP-65 Installation/Operation Manual
Page 35

4. Operation
1. Turn on your source components.
2. Press the main power switch on the CinemaWall (see Figure 2-1 or Figure 2-2). The
standby/on indicator lights green.
3. After a brief warm-up period (approximately five seconds), the CinemaWall will display
an image.
4. Press the POWER button on the remote
control to put the CinemaWall into standby
mode. The power indicator lights solid red.
5. Press the POWER button again to return to
normal operation.
The CinemaWall OSD language is initially set to English, but can also display the menus in
Russian, German, French, Italian or Spanish. To change the OSD language:
1. Press SET UP on the remote control unit.
2. Press repeatedly until OSD LANGUAGE is highlighted.
3. Press or to select the desired language. The change takes effect immediately.
IMINAR
L
Y
4.1 Turning on the Power
4.2 Changing the OSD Language
You can program the CinemaWall to perform various actions, such as turning on or off, at
specific times of the day and days of the week. In order to take advantage of this
capability, the CinemaWall internal clock must be set correctly. To do this:
1. Press SET UP on the remote control unit.
2. Press or repeatedly until PRESENT TIME SETUP is highlighted.
3. Press the ACTION ( ) button.
4. Press or repeatedly to highlight DAY
in the menu.
5. Press or to select the current day of
the week.
6. Repeat Steps 4 and 5 to set the current
time of day.
7. Press or repeatedly to highlight SET
in the menu, then press the ACTION ( )
button.
CinemaWall XP-50/XP-65 Installation/Operation Manual 21
PRE
DAY TUE
PRESENT TIME OF DAY 10:00
PRESENT TIME SETUP
PRESENT TIME OF DAY MON 99:99
SET
SELECT
RETURN
SET
4.3 Setting the Day and Time
Page 36

Operation
4.4
Setting the Computer Display Properties
PRE
To maximize image quality when using the CinemaWall with a personal computer, you
may need to adjust the display properties of your computer’s video card. To do this on a
Microsoft® Windows®-based PC:
1. Choose Settings from the Windows Start
Menu and click on “Control Panel.”
2. Double click on the Display icon.
3. Click the Settings tab on the display dialog
box.
4. Set the Screen area to 1024x768 pixels.
IMINAR
L
Y
5. Click the Advanced button and click the
Monitor tab on the dialog box. Set the
Refresh Frequency to 60Hz and click
OK.
22 CinemaWall XP-50/XP-65 Installation/Operation Manual
Page 37

1. The native resolution of the CinemaWall is 1920 x 1080. Other
Note
WARNING
Note
horizontal or vertical resolutions may be scaled upward or
downward to fit the display.
2. With most computers, you can get the best picture at
1024
x 768 @ 60Hz.
To prevent image retention (burn) on your display, ALWAYS use a
screen saver and set it to the shortest possible time.
Operation
To select an input source, press the INPUT button on
the remote control repeatedly.
To change the aspect ratio (size and shape) of the
displayed image, press the ASPECT (
repeatedly on the remote control.
Select the appropriate aspect ratio for the type of
program material being viewed; refer to
Note that some aspect ratios are unavailable and/or not useful with certain types of
source material. The optimal setting depends on a number of factors, such as:
• The aspect ratio of the source material, as broadcast or encoded on the playback
medium.
• The “display type” (16:9 or 4:3) and output resolution settings at the source
component. Most modern DVD/BD players and set-top boxes have such controls.
• Viewer preference (original aspect ratio with “black bars,” or a full-screen presentation
with some distortion or cropping).
The aspect ratio selection is saved independently for each input.
) button
Table 4-1.
IMINAR
L
PRE
Y
4.5 Selecting an Input Source
4.6 Changing the Aspect Ratio
CinemaWall XP-50/XP-65 Installation/Operation Manual 23
Page 38

Operation
Table 4-1. Aspect Ratio Settings
Aspect Ratio Setting
(Note)
All Aspect
= ON
16:9 16:9
14:9 –
All Aspect
= OFF
IMINAR
L
VIRTUAL-
WIDE1
VIRTUAL-
WIDE
PRE
Input Image -> Displayed Image Description
16:9 linearly scales the
source active image horizontally and vertically to fill a
16:9 screen.
With standard-definition
Y
(SD) signals, 4:3 images are
stretched horizontally to fill
the screen.
Letterbox pictures with a
14:9 aspect ratio are
enlarged vertically and hori
zontally so that they fill the
screen vertically and are
slightly smaller than the
screen horizontally. The top
and bottom edges of the
image are cut off. Side pan
els appear at the left and
right edges of the screen.
VIRTUALWIDE and
VIRTUALWIDE1 scale a 4:3
image NON-linearly (more
on the sides than in the
center) to fit a 16:9 screen.
With 16:9 images, the cen
ter area is horizontally compressed by a small amount.
-
-
-
VIRTUALWIDE2 scales a
16:9 image NON-linearly
VIRTUAL-
WIDE2
Note: To make all of the aspect ratio selections listed here available to the viewer, set All Aspect in
the OPTIONS menu (described on page 51) to On.
–
24 CinemaWall XP-50/XP-65 Installation/Operation Manual
(more on the sides than in
the center) to fit a 16:9
screen. The left and right
edges of the image are cut
off.
Page 39

Table 4-1. Aspect Ratio Settings (continued)
Aspect Ratio Setting
(Note)
All Aspect
= ON
4:3(1) 4:3
4:3(2) –
All Aspect
= OFF
Input Image -> Displayed Image Description
4:3 (4:3(1)) linearly scales
the source image horizon
tally and vertically to fill a 4:3
screen. Side panels are displayed at the left and right
edges of the screen.
4:3(2) displays a 16:9
source image in its original
aspect ratio and masks the
left and right sides.
-
Operation
Y
FILL FILL
LETTER-
BOX1
LETTER-
BOX2
LETTER-
FILL is similar to
VIRTUALWIDE2 (see
above), but employs a linear, horizontal stretch.
IMINAR
L
BOX
– LETTERBOX2 scales
PRE
Note: This setting is not
available with SD signals.
LETTERBOX
(LETTERBOX1) scales
(zooms in on) a 4:3 image
linearly (by the same
amount on all sides) to fill a
16:9 display, cropping the
top and bottom of the
image.
16:9 images are vertically
scaled by a factor of
approximately 1.33, but the
width is unchanged.
(zooms in on) a 16:9 image
linearly (by the same
amount on all sides) to fill a
16:9 display, cropping the
image on all sides.
Note: To make all of the aspect ratio selections listed here available to the viewer, set All Aspect in
the OPTIONS menu (described on page 51) to On.
CinemaWall XP-50/XP-65 Installation/Operation Manual 25
Page 40

Operation
➤
➤
Table 4-1. Aspect Ratio Settings (continued)
Aspect Ratio Setting
(Note)
All Aspect
= ON
All Aspect
= OFF
Input Image -> Displayed Image Description
4.7
Using Picture-In-Picture (PIP)
LETTER-
BOX3
CINEMA CINEMA
Note: To make all of the aspect ratio selections listed here available to the viewer, set All Aspect in
the OPTIONS menu (described on page 51) to On.
– LETTERBOX2 scales
(zooms in on) a 2.35:1
image linearly (by the same
amount on all sides) to fill a
16:9 display, cropping the
image on all sides.
Y
Select CINEMA to view
2.35:1 source material in its
native aspect ratio.
CINEMA masks the upper
and lower portions of the
screen to create a viewable
area with a 2.35:1 aspect
ratio.
The geometry of the active
image area is unchanged.
IMINAR
L
Use PIP to display an image from two sources at the same time in a variety of ways.
For more information on setting up PIP and how it works, refer to MULTI PIP SETUP on
page 43.
Activating PIP To activate PIP, press the MULTI PIP ( ) remote control button.
Swapping the Main and
PIP Images
PRE
Press SWAP ( ) to replace the main image with the secondary sub-image and vice
versa.
[Picture and Picture] [Picture in Picture]
Main picture Sub picture
A B
B A
[Picture out Picture]
Main picture Sub picture Main picture Sub picture
A
B
26 CinemaWall XP-50/XP-65 Installation/Operation Manual
B
A
A
B
B
A
Page 41

Operation
RESET RETURN
Press SELECT ( ) to choose a target
screen (main or sub) for PIP operations.
The audio signal associated with the target
screen is heard through the speakers.
Press INPUT ( ) to select an input to
display on the target screen (main or sub).
To change the PIP window position, press
MOVE/ZOOM (
the desired position.
The CinemaWall On-Screen Display (OSD) controls are
grouped into five (5) menus: POS./SIZE, PICTURE,
SOUND, SET
) repeatedly until the window is in
UP and OPTIONS.
Main picture label is bright Sub picture label is bright
Input modes switching is possible
Main picture label is changed
Picture is changed
IMINAR
The PICTURE, ADVANCED SETTINGS (in the
PICTURE menu), SET
consist of multiple “pages,” to limit the amount of space
those menus occupy on the screen.
UP and OPTIONS menus
L
A
C
INPUT1A
PC
B
INPUT1B
PC
B
INPUT1A
PC
A
B
Sub picture label is changed
INPUT1A
INPUT3
A
D
Y
Selecting a PIP Target Screen or Input Source
Changing the PIP Window Position
4.8 Using the On-Screen Menus
To access the POS./SIZE, PICTURE, SOUND or
SET
UP menus, press the remote control button
corresponding to that menu. Press that same button
again to hide the menu.
To access the OPTIONS menu:
1. Press SET UP.
2. Press or repeatedly until OSD LANGUAGE is highlighted.
3. Press and hold the SURROUND ( ) button until the page 1 of the OPTIONS menu
appears (approximately four seconds).
• When navigating a multi-page menu (PICTURE,
SET
UP or OPTIONS), the button takes you from
the bottom of one menu page to the top of the next
one. Likewise, the
one menu page to the bottom of the previous one.
• Press or to change the selected setting.
• Some menu items lead to sub-menus containing
more options. Press the ACTION (
access a sub-menu. To return to the previous menu, press RETURN.
CinemaWall XP-50/XP-65 Installation/Operation Manual 27
PRE
button takes you from the top of
) button to
Menu Navigation• Press or to highlight a menu item.
Page 42

Operation
POS./SIZE
H-POS
-124, -123 ... 0 ... 123, 124H-SIZE
V-POS
V-SIZE -62, -61 ... 0 ... 61, 62
DOT CLOCK
(INPUT3/PC INPUT only)
-32, -31 ... 0 ... 31, 32
CLOCK PHASE
(INPUT3/PC INPUT only)
-16, -15 ... 0 ... 15, 16
1:1 PIXEL MODE
(1080i/1080p signals only)
ON / OFF
PICTURE
PICTURE MENU STANDARD, ISF DAY, ISF NIGHT or MONITOR
PICTURE
-30, -29 ... 0 ...29, 30
BRIGHTNESS
COLOR
TINT
SHARPNESS -15, -14 ... 0 ... 14, 15
COLOR TEMP NORMAL, COOL or WARM
COLOR MANAGEMENT ON/OFF
ADVANCED SETTINGS
(OFF)
--
ADVANCED SETTINGS
(ON)
BLACK EXTENSION 0, 1, 2 ... 8
INPUT LEVEL -32, -31, -30 ... 0 ... 30, 31, 32
GAMMA 2.0, 2.2, 2.5 or S-CURVE
AGC OFF/ON
R/G/B GAIN
-30, -29 ... 0 ...29, 30
R/G/B OFFSET
SOUND
AUDIO MENU STANDARD, DYNAMIC or CLEAR
BASS
-15, -14, -13 ... 0 ... 13, 14, 15MID
TREBLE
BALANCE -30, -29, 28 ... 0 ... 28, 29, 30
SURROUND ON/OFF
AUDIO OUT (PIP) MAIN or SUB
SET UP
(1/2)
SIGNAL
SYNC
(PC INPUT only)
AUTO, ON G or VBS
3:2 PULLDOWN OFF/ON
XGA MODE
(INPUT3/PC INPUT only)
1024x768, 1280x768 or 1366x768
NOISE REDUCTION OFF, MIN, MID or MAX
NOISE REDUCTION - ADVANCED
VIDEO NR (OFF, MIN, MID or MAX)
BLOCK NR (OFF, MIN, MID or MAX)
MOSQUITO NR (OFF, MIN, MID or MAX)
SCREENSAVER
START
FUNCTION
SCROLLING BAR ONLY, OVERLAY SCROLLING
BAR, WHITE SCREEN or NEGATIVE IMAGE
MODE ON, OFF, INTERVAL or TIME OF DAY
START TIME/SHOW DURATION 0:00 ... 23:59 / 0:00, 0:15, 0:30 ... 23:45
FINISH TIME/SAVER DURATION 0:00 ... 23:59 / 0:00, 0:15, 0:30 ... 23:45
SIDE BAR ADJUST OFF, DARK, MID or BRIGHT
WOBBLING OFF, ON1 or ON2
PEAK LIMIT OFF/ON
COMPONENT/RGB IN SELECT COMPONENT or RGB
INPUT LABEL
INPUT[n], VIDEO[n], COMPONENT[n], RGB[n],
DIGITAL [1A/1B/2A/2B], PC[n], DVD[n],
CATV[n], VCR[n], STB[n]
POWER SAVE
OFF/ON
STANDBY SAVE
POWER MANAGEMENT
AUTO POWER OFF
OSD LANGUAGE
ENGLISH (US), Русский (RUSSIAN), Deutsch
(GERMAN), Français, (FRENCH), italiano
(ITALIAN) or Español (SPANISH)
• The OSD menu closes after 60 seconds of inactivity.
The CinemaWall OSD menus are arranged hierarchically, as shown in Figure 4-1.
Depending on the selected input source and signal characteristics, some menu options
may not be available.
Figure 4-1. OSD Menu Structure for CinemaWall
PRE
IMINAR
L
28 CinemaWall XP-50/XP-65 Installation/Operation Manual
Y
Page 43

Operation
SET UP
(2/2)
MULTI DISPLAY SETUP
(Note: Must set
MULTI PIP SETUP -> DISPLAY
MODE to “-” (normal)
MULTI DISPLAY SETUP ON/OFF
HORIZONTAL SCALE x2, x3, x4 or x5
VERTICAL SCALE x1, x2, x3, x4 or x5
SEAM HIDES VIDEO ON/OFF
LOCATION A1, A2, A3, A4, A5, B1, B2 ... E3, E4, E5
AI SYNCHRONIZATION ON/OFF
MULTI PIP SETUP
MULTI PIP PIP, ADVANCED PIP, BLEND PIP
DISPLAY MODE
MULTI PIP = PIP:
- (normal), P IN P, P AND P, P OUT P
MULTI PIP = ADVANCED PIP:
- (normal) or 1-8
MULTI PIP = BLEND PIP:
- (normal), P IN P, FULL
TRANSPARENCY ON/OFF
TRANSPARENCY LEVEL 0%, 5%, 10%, 15% ... 95%, 100%
INSERT ON/OFF
INSERT LEVEL 1%, 2%, 3% ... 10%
PORTRAIT SETUP
(Note: Must set
MULTI PIP SETUP -> DISPLAY
MODE to “-” (normal)
PORTRAIT SETUP ON/OFF
SEAM HIDES VIDEO ON/OFF
VIEWING AREA 4:3 (SD sources only) or 16:9
LOCATION 1, 2, or 3
AI SYNCHRONIZATION ON/OFF
SET UP TIMER
POWER ON FUNCTION ON/OFF
POWER ON TIME 0:00, 0:01, 0:02... 23:58, 23:59
POWER OFF FUNCTION ON/OFF
POWER OFF TIME 0:00, 0:01, 0:02... 23:58, 23:59
PRESENT TIME SETUP
DAY MON, TUE, WED, THU, FRI, SAT or SUN
PRESENT TIME OF DAY 0:00, 0:01, 0:02... 23:58, 23:59
OPTIONS
Weekly Command Timer
Function On/Off
Monday, Tuesday ... Sunday ---, Program1, Program2, Program3 ... Program7
Program Edit
Program Select (1, 2 ... 7)
Command Select (01, 02, 03 ... 64)
Time (--:-- or 0:00 ... 23:59)
Command Assign
(refer to Table 6-1)
Onscreen Display On/Off
Initial INPUT
Off, PC, INPUT1A, INPUT1B, INPUT2A,
INPUT2B or INPUT3
Initial VOL level
On (0, 1, 2 ... 63) or Off
Maximum VOL level
INPUT lock
Off, PC, INPUT1A, INPUT1B, INPUT2A,
INPUT2B or INPUT3
Button lock Off, MENU&ENTER, On (n/a)
Remocon User level Off, User1, User2 or User3
Off-timer function Enable/Disable
Initial Power Mode Normal, On or Standby
ID select 0, 1, 2, 3 ... 99, 100
Remote ID
On/Off
Serial ID
Display size
Studio W/B
Studio Gain
Slot power Off, Auto or On
Power On Screen Delay Off or 1 ... 30 seconds
Clock Display
On/OffAll Aspect
Rotate
Serial Slot Select Slot1, Slot2 or Slot3
PRE
Figure 4-1. OSD Menu Structure for CinemaWall (continued)
CinemaWall XP-50/XP-65 Installation/Operation Manual 29
L
Y
IMINAR
Page 44

Operation
➤
PICTURE Use the controls in the PICTURE menu to calibrate your CinemaWall for optimum picture
quality.
The CinemaWall has been designed to incorporate setup and calibration standards
established by the Imaging Science Foundation (ISF). The ISF has developed carefully
crafted, industry-recognized standards for optimal video performance and has
implemented a training program for technicians and installers to use these standards to
obtain optimal picture quality from Runco video display devices. Accordingly, Runco
recommends that setup and calibration be performed by an ISF-certified installation
technician.
All signal types require separate processing. Therefore, you need to calibrate each input
separately.
Although it may be possible to obtain satisfactory picture quality using the naked eye and
regular program material, Runco recommends using the following calibration tools for best
results:
• External test pattern source – Ovation Multimedia, Video Essentials or AVIA test DVD
(or equivalent).
• A blue filter (provided with many test DVDs), for color level and tint adjustments.
Y
Connect your test pattern source to the input that you are calibrating and proceed as
follows. Perform the adjustments in the order listed here.
PICTURE
RESET NORMAL
PICTURE MENU STANDARD
PICTURE 26
BRIGHTNESS 0
COLOR 0
TINT 0
SHARPNESS 5
IMINAR
L
PRE
PICTURE
COLOR TEMP NORMAL
COLOR MANAGEMENT OFF
ADVANCED SETTINGS OFF
ESET
ADJUST
SELECT
1/2
RETURN
2/2
ESET
CHANGE
SELECT
30 CinemaWall XP-50/XP-65 Installation/Operation Manual
RETURN
Page 45

PICTURE MENU: The CinemaWall provides four picture memories per input for storing
Note
and recalling image quality settings. To store settings in a picture memory, highlight
PICTURE MENU in the PICTURE menu and select STANDARD, ISF DAY, ISF NIGHT or
MONITOR. The CinemaWall “remembers” any adjustments you make when you switch to
a different picture memory, then switch back.
Select the MONITOR mode to disable the CinemaWall’s
Tip
“brightness variation” function, which automatically controls the
display brightness according to the average brightness level and
peak brightness level of the input signal. MONITOR mode is useful
to content creators and viewers who prefer to see content as it was
created, without any brightness enhancement.
Operation
PICTURE: On your external test pattern source, select a stepped, gray-bar pattern like
the one shown in
Figure 4-2.
Y
IMINAR
L
Figure 4-2. Typical Gray Bar Pattern for Adjusting Picture Level (Contrast)
Select PICTURE from the PICTURE menu. Using the left- and right-arrow ( ) buttons,
adjust the Picture level (contrast) to a point just below which the white rectangle starts to
increase in size.
PRE
This control is not available when PICTURE MENU is set to
MONITOR.
CinemaWall XP-50/XP-65 Installation/Operation Manual 31
Page 46

Operation
A
Note
BRIGHTNESS: On your external test pattern source, select a PLUGE pattern. (PLUGE is
an acronym for “Picture Line-Up Generation Equipment.”)
PLUGE pattern.
Figure 4-3 shows a typical
Below Black
bove Black
Figure 4-3. Typical PLUGE Pattern for Adjusting Brightness
PLUGE patterns vary but generally consist of some combination of black, white and gray
areas against a black background. The example above includes two vertical bars and four
shaded boxes.
Select BRIGHTNESS from the PICTURE menu. Using the left- and right-arrow ( )
buttons, adjust the brightness so that:
• The darkest black bars disappear into the background.
• The dark gray areas are barely visible.
• The lighter gray areas are clearly visible.
• The white areas are a comfortable level of true white.
• The image contains only black, gray and white (no color).
IMINAR
L
PRE
Y
Brightness and Picture level controls are interactive. A change to
one may require a subtle change to the other in order to achieve
the optimum setting.
32 CinemaWall XP-50/XP-65 Installation/Operation Manual
Page 47

COLOR: On your external test pattern source, select a color bar pattern like the one
gray
yellow
cyan
green
magenta
red
blue
Note
shown in
Figure 4-4.
Operation
Y
Figure 4-4. Typical Color Bar Pattern for Adjusting Color Saturation and Tint
Select COLOR from the PICTURE menu. While looking at the color bar pattern through a
blue filter, adjust the color saturation level until the outermost (gray and blue) color bars
appear to be a single shade of blue:
IMINAR
L
gray
yellow
cyan
green
red
magenta
blue
PRE
TINT: Tint or “hue” is essentially the ratio of red to green in the color portion of the image.
When tint is decreased, the image appears redder; when it is increased the image
appears greener. To set the tint, select
color bar pattern through a blue filter, adjust the tint level until the cyan and magenta color
bars (on either side of the green bar) appear to be a single shade of blue.
Like the brightness and contrast controls, the color and tint controls
are interactive. A change to one may require a subtle change to the
other in order to achieve the optimum setting.
TINT from the PICTURE menu. While looking at the
CinemaWall XP-50/XP-65 Installation/Operation Manual 33
Page 48

Operation
SHARPNESS: “Sharpness” is the amount of high-frequency detail in the image. To adjust
sharpness, select
source, select a pattern like the one shown in Figure 4-5. Adjust as needed, looking for
white edges around the transitions from black to gray and different sized lines in the
“sweep” patterns at the top and bottom. Lower the sharpness setting to eliminate them.
SHARPNESS from the PICTURE menu. On your external test pattern
Y
IMINAR
Figure 4-5. Typical Test Pattern for Adjusting Sharpness
L
COLOR TEMP: To choose a color temperature setting, select COLOR TEMP from the
PICTURE menu. (Color temperature defines the “color of gray.”) The choices are
NORMAL, COOL or WARM.
For most situations, the appropriate setting is NORMAL. COOL produces a “bluer”
picture; WARM a “warmer” picture with more pronounced red and orange hues.
PRE
COLOR MANAGEMENT: Select COLOR MANAGEMENT from the PICTURE menu and
set it to ON to have the CinemaWall automatically manage color balance. For more direct
control of color balance, set it to OFF.
ADVANCED SETTINGS: Set ADVANCED SETTINGS to ON, then press to perform
the following picture quality adjustments:
• BLACK EXTENSION: Use the BLACK EXTENSION control to adjust the black level
“floor” (lower limit). If blacks appear too gray, set BLACK EXTENSION to a higher value.
• INPUT LEVEL: Use the INPUT LEVEL control to adjust the overall, apparent
brightness of the displayed image. Its effect is similar to a backlight control on an LCD.
If parts of the image are extremely bright and hard to see, lower the
compensate.
INPUT LEVEL to
34 CinemaWall XP-50/XP-65 Installation/Operation Manual
Page 49

• GAMMA: The default gamma setting (2.2) is correct for almost all signals and
Note
H-POS 0
H-SIZE 0
V-POS 0
V-SIZE 0
DOT CLOCK 0
CLOCK PHASE -16
1:1 PIXEL MODE
POS./SIZE
ADJUST
SELECT
RETURN
NORMAL
conditions. If excess ambient light washes out the image and it becomes difficult or
impossible to see details in dark areas, lower the gamma setting to compensate. This
will improve contrast while maintaining good details for blacks. Conversely, if the image
is washed out and unnatural, with excessive detail in black areas, increase the setting.
Again, good gamma improves contrast while maintaining good details for blacks and
whites.
• AGC (Automatic Gain Control): AGC increases the brightness of dark signals
automatically. To enable AGC, set it to ON. To disable it, set it to OFF.
• R/G/B GAIN: Use the Gain controls in the ADVANCED SETTINGS sub-menu to
correct color imbalances in the bright areas of the image. A good way to do this is to
use a test pattern consisting mostly of solid white areas, such as an 80 IRE “window”
pattern. If the white areas contain traces of red or blue, decrease the Gain for that
color.
• R/G/B OFFSET: Use the Offset controls in the ADVANCED SETTINGS sub-menu to
correct color imbalances in the dark areas of the image. A good way to do this is to use
a test pattern consisting mostly of dark gray areas, such as a 30 IRE “window” pattern.
If the gray areas contain traces of red or blue, decrease the Offset for that color.
Operation
Y
size.
To return all POS./SIZE menu settings to their factory-default values, press RESET on the
remote control unit with the menu on-screen. Or, press or repeatedly to highlight
RESET in the menu, then press the ACTION ( ) button.
The CinemaWall memorizes position and size settings separately
for different input signal formats. Adjustments for component
signals are memorized for 525 (480) / 60i · 60p, 625 (575) / 50i ·
50p, 1125 (1080) / 60i · 50i · 60p · 50p · 24p · 25p · 30p · 24sF,
1250 (1080) / 50i, 750 (720) / 60p · 50p each. RGB/PC/Digital
signals are memorized for each frequency.
ESET
AUTO SETUP
POS./SIZEUse the controls in the POS./SIZE menu to fine-tune the displayed image position and
IMINAR
L
PRE
CinemaWall XP-50/XP-65 Installation/Operation Manual 35
ESET
Page 50

Operation
Note
Note
AUTO SETUP (PC INPUT only): To automatically adjust the position, size, clock and
phase of incoming computer signals for optimum picture quality, press
to highlight AUTO SETUP in the menu, then press the ACTION ( ) button.
H-POS/V-POS: Select H-POS or V-POS and use the or buttons to fine-tune the
displayed image position.
H-SIZE/V-SIZE: Select H-SIZE or V-SIZE and use the or buttons to fine-tune the
display device aspect ratio.
You cannot adjust H-SIZE or V-SIZE when Display size (in the
OPTIONS menu; refer to page 50) is set to On.
or repeatedly
DOT CLOCK (INPUT3/PC INPUT only): Use this control to adjust the frequency of the
pixel sampling clock, indicated by the number of incoming pixels per line, so that all pixels
generated by a particular source are sampled.
Steady flickering or several soft vertical stripes or bands across the entire image indicates
poor pixel tracking. Proper pixel tracking helps ensure that the image quality is consistent
across the screen, that aspect ratio is maintained and that pixel phase (see below) can be
optimized.
CLOCK PHASE (INPUT3/PC INPUT only): This control adjusts the phase of the pixel
sampling clock relative to the incoming signal. Adjust the phase when an RGB or
Component image still shows shimmer or “noise” after DOT CLOCK has been optimized.
PRE
For best results, use a good test pattern such as a smooth gray consisting of a clear
pattern of black and white pixels, or a similar “half on, half off” graphic image. Adjust the
slidebar until the image stabilizes and each pixel is clearly defined. You may notice that
you can stabilize the image at more than one point. Use either setting in such cases.
IMINAR
L
Tip
Y
DOT CLOCK cannot be adjusted if the incoming signal pixel clock
frequency is 108 MHz or greater.
Adjust the Phase after adjusting DOT CLOCK (see above). If some
shimmer from a video or HDTV source persists, use the NOISE
REDUCTION controls (described on page 39) to remove
high-frequency noise from the signal.
1:1 PIXEL MODE (1080i/1080p signals only): Select 1:1
PIXEL MODE from the POS./SIZE menu and set it to On to have
the CinemaWall map a 1920x1080 input signal to 1080p HD
panel pixels, displaying 100% of the original content. By
skipping the scaling process, the CinemaWall can produce
high-definition images in their original, 1:1 pixel form.
When 1:1 PIXEL MODE mode is Off, the picture source is
scaled for over-scanning and 97% of the original is displayed.
Use this setting to minimize or eliminate image flicker.
36 CinemaWall XP-50/XP-65 Installation/Operation Manual
1:1 PIXEL MODE = ON
1:1 PIXEL MODE = OFF
Page 51

1. 1:1 PIXEL MODE is available only when the input signal is 1080i
Note
AUDIO MENU DYNAMIC
BASS 0
MID 0
TREBLE 0
BALANCE 0
SURROUND ON
AUDIO OUT (PIP) MAIN
SOUND
ADJUST
SELECT
RETURN
RESET
L
or 1080p and the Aspect Ratio is set to 16:9 (refer to page 23).
2. You cannot adjust H-SIZE, V-SIZE or DOT CLOCK when 1:1
PIXEL MODE is enabled.
To return all SOUND menu settings to their factory-default values, press RESET on the
remote control unit with the menu on-screen. Or, press or repeatedly to highlight
RESET in the menu, then press the ACTION ( ) button.
RMA
Operation
SOUNDUse the controls in the SOUND menu to adjust the CinemaWall audio settings.
Y
ESET
IMINAR
L
AUDIO MENU: The CinemaWall provides three audio memories for storing and recalling
sound quality settings. To store settings in an audio memory, highlight
the SOUND menu and select STANDARD, DYNAMIC or CLEAR. The CinemaWall
“remembers” any adjustments you make when you switch to a different audio memory,
then switch back.
BASS/MID/TREBLE: Use these controls to boost or cut the low, mid-range and high
frequencies respectively in the audio signal.
BALANCE: To adjust the left/right speaker balance, select BALANCE from the SOUND
menu. Use the or buttons to make one channel louder than the other.
SURROUND: The CinemaWall has a “surround sound” mode that simulates a
multi-channel sound system. To use the surround mode, select
SOUND menu and set it to ON.
AUDIO OUT (PIP): To swap the main and PIP audio programs when using the
MULTI
PIP feature, select AUDIO OUT (PIP) from the SOUND menu and set it to either
MAIN or SUB. For more on MULTI PIP mode, refer to MULTI PIP SETUP on page 43.
CinemaWall XP-50/XP-65 Installation/Operation Manual 37
PRE
AUDIO MENU in
SURROUND from the
Page 52

Operation
➤
SET UP Use the controls in the SET UP menu to perform advanced image quality adjustments and
access various other CinemaWall features.
SET UP
SIGNAL
SCREENSAVER
COMPONENT/RGB-IN SELECT
COMPONENT
INPUT LABEL DVD3
POWER SAVE ON
STANDBY SAVE OFF
POWER MANAGEMENT ON
AUTO POWER OFF ON
OSD LANGUAGE ENGLISH (US)
SELECT
SET UP
MULTI DISPLAY SETUP
IMINAR
L
MULTI PIP SETUP
PORTRAIT SETUP
SET UP TIMER
PRESENT TIME SETUP
Y
RETURN
ACCESS
1/2
2/2
PRE
SIGNAL: Select SIGNAL from the SET UP menu to display information about the current
signal and to adjust the following settings:
• SYNC: Select the sync method used by the PC or other RGB source using the PC
INPUT.
In most cases, the AUTO setting works well. However, if you know that your source
outputs an RGB with sync-on-green signal and the AUTO setting does not produce a
stable image, select ON
composite sync signal.
• 3:2 PULLDOWN: To smooth out moving images from interlaced, standard-definition
(SD) sources, select
CinemaWall attempts to reproduce a more natural interpretation of sources such as
movie pictures, which are recorded at 24 frames per second. If the image is not stable,
set
3:2 PULLDOWN to OFF.
RETURN
SELECT
G. Likewise, select VBS for a source that outputs an RGB with
3:2 PULLDOWN and set it to ON. With this setting, the
38 CinemaWall XP-50/XP-65 Installation/Operation Manual
ACCESS
Page 53

• XGA MODE (INPUT3/PC INPUT only): You can force the CinemaWall to use a
WARNING
Note
specific output resolution with RGB PC sources. To do this select
SIGNAL menu and set it to 1024x768, 1280x768 or 1366x768.
• NOISE REDUCTION: To apply noise reduction to the source signal, select NOISE
REDUCTION from the SIGNAL menu. Noise Reduction is useful for clearing up noisy
images from interlaced SD sources. Set it to OFF, MIN, MID or MAX as needed. Or, if
you need more precise control over noise reduction, set it to ADVANCED, then press
to access the following controls:
• Video NR: Video NR is temporal and spatial noise reduction for all types of inputs.
The scene is analyzed for differences from frame to frame and reduces those
differences that are not determined to be motion.
• Block NR: Use this control to reduce or eliminate so-called “block artifacts” in
MPEG-compressed video signals (digital broadcasts or DVDs). Set it as needed to
minimize distortion within horizontal and vertical block boundaries.
• Mosquito NR: Use this control to reduce or eliminate so-called “mosquito noise” in
MPEG-compressed video signals. Set it as needed to minimize distortion around the
edges of moving objects, moving artifacts around edges and/or blotchy noise
patterns superimposed over the objects.
XGA MODE from the
Operation
Y
SCREENSAVER: Select SCREENSAVER from the SET UP menu to configure the image
burn-in prevention settings on the CinemaWall.
To prevent image retention (burn) on your display, ALWAYS use a
screen saver and set it to the shortest possible time.
IMINAR
• FUNCTION: Select MODE from the SCREENSAVER menu and choose one of the
following burn-in prevention methods:
• NEGATIVE IMAGE: An inverse image is displayed on the screen.
• SCROLLING BAR ONLY: The source image is replaced by a white bar scrolling
from left to right.
• OVERLAY SCROLLING BAR: The source image is dimmed and a white bar
scrolling from left to right is superimposed on it.
L
PRE
OVERLAY SCROLLING BAR cannot be selected when MULTI PIP
is active.
• WHITE SCREEN: The source image is replaced by a white screen.
• MODE: Select MODE from the SCREENSAVER menu to specify when the screen
saver function becomes active.
• OFF: The screen saver is disabled.
• INTERVAL: The screen saver function becomes active after the selected SHOW
DURATION and remains active for the selected SAVER DURATION (see below). This
cycle repeats indefinitely.
• TIME OF DAY: The CinemaWall activates the screen saver function daily at the
selected START TIME and returns to normal operation at the selected FINISH TIME
(see below).
• ON: Select ON to activate the screen saver on demand. Then, press or
repeatedly to highlight START in the menu and press the ACTION ( ) button.
CinemaWall XP-50/XP-65 Installation/Operation Manual 39
Page 54

Operation
Note
RETURN
• START TIME/SHOW DURATION: When the screen saver MODE is TIME OF DAY,
set START TIME to the time of day that you want the screen saver to activate. When
the screen saver
presentation” interval (no screen saver).
Press or to change the SHOW DURATION interval in 15-minute increments, or to
change the START TIME in one-minute increments. Press and hold or to change
the START TIME interval in 15-minute increments.
• FINISH TIME/SAVER DURATION: When the screen saver MODE is TIME OF DAY,
set FINISH TIME to the time of day that you want the screen saver to deactivate. When
the screen saver
saver interval.
Press or to change the SAVER DURATION interval or FINISH TIME in one-minute
increments. Press and hold or to change the SAVER DURATION interval or
FINISH TIME in 15-minute increments.
MODE is INTERVAL, set SHOW DURATION to the “normal
MODE is INTERVAL, set SAVER DURATION to the desired screen
Y
1. To deactivate the screen saver at any time, press RETURN ( )
on the remote control unit, or cycle power to the CinemaWall.
2. You must set the day and time in order to use the INTERVAL or
TIME OF DAY screen saver mode; refer to
Time on page 21.
Setting the Day and
• SIDE BAR ADJUST: Do not display
an image in 4:3 mode for an extended
period, as this can cause image
retention in the inactive areas of the
display. The same is true of P OUT P
and P AND P multi-screen modes.
To help prevent this, select SIDE BAR
ADJUST from the SCREENSAVER
menu and set it to BRIGHT. (Other
choices are OFF, DARK and MID.)
PRE
• WOBBLING/PEAK LIMIT: These functions, when enabled, provide additional
protection against image retention.
• WOBBLING: WOBBLING automatically shifts the display image (in a manner
unnoticeable to the eye) to prevent image retention. ON1 shifts the image every 30
seconds; ON2 shifts the image at a dot level pitch depending on screen detection.
• PEAK LIMIT: PEAK LIMIT suppresses image contrast (peak brightness).
COMPONENT/RGB IN SELECT: Select COMPONENT/RGB IN SELECT from the
SET UP menu to choose the color space of the for RGB and component source signals.
IMINAR
L
side bars
4:3 mode
image
retention
Inactive areas
P OUT P P AND P
INPUT LABEL: You can give each CinemaWall input a descriptive name, to indicate the
type of component connected to it (for example, “DVD3” instead of “INPUT3”). To do this,
select
INPUT LABEL from the SET UP menu and choose one from the list.
40 CinemaWall XP-50/XP-65 Installation/Operation Manual
Page 55

POWER SAVE: Select POWER SAVE from the SET UP menu and set it to ON to reduce
Note
Note
the overall image intensity by a small amount, thereby reducing power consumption.
STANDBY SAVE: Select STANDBY SAVE from the SET UP menu and set it to ON to
minimize power consumption during standby mode.
POWER MANAGEMENT: Select POWER MANAGEMENT from the SET UP menu and
set it to ON to activate the power management function for the PC INPUT. This feature,
when enabled, operates as follows:
• When no video or sync signals are detected on the PC INPUT for approximately 30
seconds, the power is turned off (standby) and the power indicator lights orange.
• When a signal is subsequently detected, power is restored and the power indicator
lights green.
Operation
AUTO POWER OFF: Select AUTO POWER OFF from the SET UP menu and set it to ON
to have the CinemaWall power itself off after 10 minutes when no signal is present on the
PC INPUT.
OSD LANGUAGE: Refer to Changing the OSD Language on page 21.
MULTI DISPLAY SETUP: You can create a video wall consisting of up to 25 (5x5)
CinemaWall displays and display an enlarged image across all of them. To do this, select
MULTI DISPLAY SETUP from the SET UP menu and press the ACTION ( ) button.
Then, configure each display in the video wall as follows:
• MULTI DISPLAY SETUP: Select MULTI DISPLAY SETUP from the MULTI DISPLAY
SETUP menu, the set it to ON to activate multi-display mode.
• HORIZONTAL SCALE: Select HORIZONTAL SCALE from the MULTI DISPLAY
SETUP menu to specify the number of displays in each row of the video wall.
• VERTICAL SCALE: Select VERTICAL SCALE from the MULTI DISPLAY SETUP menu
to specify the number of displays in each column of the video wall.
POWER MANAGEMENT and AUTO POWER OFF operate only on
the PC INPUT and only under the following conditions:
• SYNC is set to AUTO.
• COMPONENT/RGB IN SELECT is set to RGB.
• MULTI PIP is off.
IMINAR
L
In order to activate multi-display mode, you must first set the
MULTI-PIP
MODE on page 43.
DISPLAY MODE to “-” (normal). Refer to DISPLAY
PRE
Y
CinemaWall XP-50/XP-65 Installation/Operation Manual 41
Page 56

Operation
• SEAM HIDES VIDEO: Select SEAM HIDES VIDEO from the MULTI DISPLAY SETUP
menu and set it to ON when displaying moving images on a video wall.
SEAM HIDES VIDEO joins the edges of adjacent displays in a video wall together in
such a way as to compensate for the gap between them. This causes moving objects
to appear to move “behind” the gap, for better continuity of motion across the wall:
ON hides joints between displays:
OFF shows joints between displays:
Y
(suitable for moving image display)
• LOCATION: Select LOCATION from the MULTI DISPLAY SETUP menu to specify the
CinemaWall’s position in the video wall. This determines which segment of the enlarged
image this panel will display.
Columns are numbered left to right from 1 to 5; rows are numbered top to bottom from
A to E:
2 × 32 × 1 4 × 44 × 2 5 × 5
IMINAR
L
(suitable for still image display)
A1 A2 A3 A4 A5
B1 B2 B3 B4 B5
C1 C2 C3 C4 C5
D1 D2 D3 D4 D5
E1 E2 E3 E4 E5
• AI SYNCHRONIZATION: Set AI SYNCHRONIZATION to ON to apply the same
PRE
brightness setting to all CinemaWall displays in the video wall. Set it to OFF if you want
the ability to adjust the brightness of each display independently of the others.
OFF allows the brightness of each
display to be adjusted independently.
ON equalizes the
brightness of all displays.
42 CinemaWall XP-50/XP-65 Installation/Operation Manual
Page 57

MULTI PIP SETUP: The CinemaWall can display an image from two sources at the same
A B
A
B
A A
B
[Picture out Picture]
Main picture Sub picture
[Picture and Picture] [Picture in Picture]
Main picture Sub picture Main picture Sub picture
[NORMAL]
Sub screen Main screen
[NORMAL] [1] [2] [3] [4]
[8] [7] [6] [5]
A B C D
B C D
Note
time in a variety of ways. To set up this feature, select
menu and press the ACTION ( ) button.
• MULTI PIP: Select one of the following to define the behavior of the MULTI PIP
function. To switch to a different multi-PIP display mode, press the MULTI
control button repeatedly.
• PIP: With PIP, three multi-PIP display modes are available:
MULTI PIP SETUP from the SET UP
PIP remote
Y
• ADVANCED PIP: Advanced PIP provides eight different multi-PIP display modes:
Operation
IMINAR
L
• BLEND PIP: Use Blend PIP to create a composite image from two sources. For
example, you can use a computer to display a caption over a movie or still image, in
either full-screen or picture-in-picture display mode:
[FULL][NORMAL] [Picture in Picture]
PRE
Be aware that if you install the CinemaWall in a public place for
commercial purposes or a public showing, using Blend
create a composite image may violate copyright laws. It is
prohibited to show or alter copyrighted materials for commercial
purposes without the copyright owner’s permission.
• DISPLAY MODE: Select DISPLAY MODE from the MULTI PIP SETUP menu to
choose one of the multi-PIP display modes shown above. (This control has the same
effect as pressing the MULTI
PIP remote control button repeatedly.)
PIP to
CinemaWall XP-50/XP-65 Installation/Operation Manual 43
Page 58

Operation
A B C D
A B C D
Note
Note
• TRANSPARENCY/TRANSPARENCY LEVEL: If you are using the Blend PIP feature,
you can make the overlay (sub) image transparent so that the main (background) image
shows through.
To do this, select TRANSPARENCY from the MULTI PIP SETUP menu and set it to ON.
Then, select TRANSPARENCY LEVEL from the MULTI PIP SETUP menu to control the
degree to which you want the main image to show through.
TRANSPARENCY = 50%TRANSPARENCY = 0% TRANSPARENCY = 90%
A B C D
Y
TRANSPARENCY cannot be used when INSERT is set to ON.
• INSERT/INSERT LEVEL: If you are using the Blend PIP feature, you can divide the
overlay (sub) image into transparent and non-transparent areas. The CinemaWall then
“inserts” only the non-transparent areas of the overlay image into the main
(background) image.
To use this feature, select INSERT from the MULTI PIP SETUP menu and set it to ON.
Then, select INSERT LEVEL from the MULTI PIP SETUP menu to set the brightness
level threshold for distinguishing between the transparent and non-transparent areas of
the overlay image.
IMINAR
L
A B C D A B C A B C D
PRE
INSERT LEVEL = 5%INSERT LEVEL = 1% INSERT LEVEL = 10%
INSERT cannot be used when TRANSPARENCY is set to ON.
44 CinemaWall XP-50/XP-65 Installation/Operation Manual
Page 59

PORTRAIT SETUP: You can create a video wall consisting of three (3x1) CinemaWall
1 2 3
Note
Note
displays in “portrait” mode and display an enlarged image across all of them.
Y
To do this, select PORTRAIT SETUP from the SET UP menu and press the ACTION ( )
button. Then, configure each display in the video wall as follows:
• PORTRAIT SETUP: Select PORTRAIT SETUP from the PORTRAIT SETUP menu, the
set it to ON to activate portrait mode.
Operation
In order to activate portrait mode, you must first set the MULTI-PIP
DISPLAY MODE to “-” (normal). Refer to DISPLAY MODE on
page 43.
• SEAM HIDES VIDEO: Refer to SEAM HIDES VIDEO on page 42.
• VIEWING AREA: If you are displaying SD images with a 4:3 aspect ratio in portrait
mode, select
• LOCATION: Select LOCATION from the PORTRAIT SETUP menu to specify the
CinemaWall’s position in the video wall. This determines which segment of the enlarged
image this panel will display. Select 1 for the left portion of the image, 2 for the center
portion or 3 for the right portion.
• AI SYNCHRONIZATION: Refer to AI SYNCHRONIZATION on page 42.
SET UP TIMER: To program the CinemaWall to turn on and/or off at specific times each
day, select SET UP TIMER from the SET UP menu and press the ACTION ( ) button.
• POWER ON FUNCTION/POWER ON TIME: To enable automatic, time-of-day
power on, set
TIME.
Press or to change the POWER ON TIME in one-minute increments. Press and
hold or to change the POWER ON TIME in 15-minute increments.
• POWER OFF FUNCTION/POWER OFF TIME: To enable automatic, time-of-day
shutdown, set
TIME.
VIEWING AREA from the PORTRAIT SETUP menu and set it to 4:3.
PRE
You cannot use the SET UP TIMER if you enable the Weekly
Command Timer (refer to page 47).
POWER ON FUNCTION to ON. Then, press to select POWER ON
POWER OFF FUNCTION to ON. Then, press to select POWER OFF
IMINAR
L
Press or to change the POWER OFF TIME in one-minute increments. Press and
hold or to change the POWER OFF TIME in 15-minute increments.
PRESENT TIME SETUP: Refer to Setting the Day and Time on page 21.
CinemaWall XP-50/XP-65 Installation/Operation Manual 45
Page 60

Operation
➤
OPTIONS Use the controls in the OPTIONS menu to set up the Weekly Command Timer and
perform other advanced, installation-related tasks.
To access the OPTIONS menu:
1. Press SET UP.
2. Press or repeatedly until OSD LANGUAGE is highlighted.
3. Press and hold the SURROUND ( ) button until the page 1 of the OPTIONS menu
appears (approximately four seconds).
Opons
Onscreen display On
Inial INPUT DVD3
Inial VOL level Off 0
Maximum VOL level Off 0
INPUT lock INPUT1A
Buon lock Off
Remocon User level User1
IMINAR
Opons
L
Off-mer funcon Enable
Inial Power Mode Normal
ID select 0
Remote ID Off
Display size Off
PRE
Studio W/B On
Studio Gain
Weekly Command Timer
Y
RETURN
SELECT
ACCESS
1/3
2/3
RETURN
CHANGE
SELECT
Opons
Slot power On
Power On Screen Delay Off
Clock Display Off
All Aspect On
Rotate Off
Serial Slot Select Slot1
RETURN
CHANGE
SELECT
46 CinemaWall XP-50/XP-65 Installation/Operation Manual
3/3
Page 61

Weekly Command Timer: You can program the CinemaWall to perform a series of
Note
actions at specific times of the day and days of the week. To do this, you create
command sequences or “programs” consisting of a series of up to 64 individual
commands. You can create up to seven such programs and specify when they are
executed.
For example, you can store the following command sequence as a program:
1. 8:00 - Power On
2. 8:01 - Select INPUT1A
3. 8:01 - Set Volume to 30
4. 8:15 - Enable Multi-PIP
5. 8:20 - Activate Screen Saver
6. 8:30 - Deactivate Screen Saver
7. 9:00 - Power Off
To configure the Weekly Command Timer, select it in the OPTIONS menu and press the
ACTION ( ) button.
• Function: This is the “master switch” for the Weekly Command Timer feature. Set it to
On to use this method to automate CinemaWall operation.
Y
Operation
If you enable the Weekly Command Timer, you cannot use the SET
UP TIMER, nor can you use the INTERVAL or TIME OF DAY screen
saver modes.
IMINAR
• Monday, Tuesday ... Sunday: For each day of the week, select a program
(Program1
select “---” for manual operation.
... Program7) that you want to use that day to control the CinemaWall. Or,
L
PRE
CinemaWall XP-50/XP-65 Installation/Operation Manual 47
Page 62

Operation
RETURN
Note
• Program Edit: To edit the seven timer programs, press or repeatedly to highlight
Program Edit and press the ACTION ( ) button. Then, proceed as follows:
a Program: Press or to select a
program to edit.
b To define the first command in the
program, press
press the ACTION ( ) button.
to select “01” and
Weekly Command Timer
Program 1
01 6:30 PON
02 6:30 IMS:SL1A
03 6:35 OMS:SCR1
04 --:-- --05 --:-- --06 --:-- --07 --:-- --08 --:-- ---
CHANGE
SELECT
RETURN
1/8
c Press to select “Time.”
d Press or to change the time of day
at which you want the CinemaWall to
execute the command, in one-minute
increments. Or, press and hold
to change the time in 15-minute
increments.
e Press to select “Command.”
f Press or to select the command to be executed at the time you set in Step d.
Refer to Table 6-1 for a description of these commands.
g Press RETURN ( ).
h Repeat Steps b through g for commands 2 through 8 in the program.
i To define additional commands, press repeatedly to access them in the Program
Edit menu. Or, to move between “pages” of the command list (there are eight
commands per page), press or .
Repeat this procedure as needed to create additional programs.
Onscreen Display: Select Onscreen Display from the OPTIONS menu and set it to On to
enable the display of the following on-screen indications:
PRE
• Current input and aspect ratio on power-up
• Input switch
• No signal display
• Mute and the remaining time on the off-timer when RECALL ( ) remote control
button is pressed twice.
IMINAR
L
or
Y
Weekly Command Timer
Program 1
Command No 01
Time 6:30
Command IMS:SL1A
RETURN
CHANGE
SELECT
To prevent the display of these items, set Onscreen Display to OFF.
Initial INPUT: Select Initial INPUT from the OPTIONS menu to have the CinemaWall
switch to a specific input every time it is turned on. Set it to Off to have the CinemaWall
display whichever input was active when it was turned off.
In order to select an initial input, you must set INPUT lock to Off
(refer to page 49).
48 CinemaWall XP-50/XP-65 Installation/Operation Manual
Page 63

Initial VOL level: Select Initial VOL level from the OPTIONS menu to set the desired
Note
Note
Caution
Note
sound volume level upon power-up.
Press or to set it to On, then use the VOL- or VOL+ ( ) button to set the desired
initial volume level. When you do, the volume changes so you can preview your selection
before exiting the menu.
Maximum VOL level: Select Maximum VOL level from the OPTIONS menu to prevent
the sound volume from being set higher than a preferred threshold.
You cannot set the Initial VOL level higher than the Maximum VOL
level (see below).
Operation
Press or to set it to On, then use the VOL- or VOL+ ( ) button to set the
maximum volume level. When you do, the volume changes so you can preview your
selection before exiting the menu.
1. If you set the Maximum VOL level lower than the Initial VOL level
(see above), the Maximum VOL level is set automatically set
equal to the Initial VOL level.
2. The volume display can go up to 63 regardless of the Maximum
VOL level setting. However, increasing the volume setting
beyond the Maximum VOL level has no effect.
INPUT lock: Select INPUT lock from the OPTIONS menu to allow only the selected input
to be displayed and prevent the others from being selected. Set it to Off to allow any input
to be selected.
Button lock: This menu option does not currently apply to the CinemaWall.
Remocon User level: Select Remocon User level from the OPTIONS menu to restrict
OSD menu access via the remote control. Choose one of the following:
•Off: No restriction. All remote control buttons are functional.
•User1: Only the POWER, INPUT, RECALL, SURROUND, MUTE, VOL- and VOL+
remote control buttons are functional.
•User2: Only the POWER button is functional.
•User3: Disables the remote control altogether.
IMINAR
L
PRE
Y
Use this feature with caution. Once you select User3, the only
way to change it to something other than User3 is via the serial
command OSP:RCM0, OSP:RCM1 or OSP:RCM2. Refer to
Communications on page 55 for more information.
Off-timer function: Select Off-timer function from the OPTIONS menu to enable or
disable the OFF TIMER ( ) remote control button (see Figure 2-4).
Setting Off-timer function to Disable cancels the Off-timer if it is
currently active.
CinemaWall XP-50/XP-65 Installation/Operation Manual 49
Serial
Page 64

Operation
Note
Note
Note
Note
Initial Power Mode: Select Initial Power Mode from the OPTIONS menu to control how
the CinemaWall recovers from a power interruption (resulting either from a power failure or
from being unplugged, then plugged back in):
• Normal: The CinemaWall returns to whatever power-on state it was in before the
power interruption.
• Standby: The CinemaWall comes on in standby mode. The power indicator lights red
or orange.
• On: The CinemaWall returns to “power on” mode. The power indicator lights green.
When using multiple displays – such as in a video wall – Runco
recommends setting this to “Standby” in order to minimize power
load.
Y
ID select/Remote ID/Serial ID: These menu options do not currently apply to the
CinemaWall.
Display size: Select Display size from the OPTIONS menu and set it to On to reduce the
size of the displayed image by approximately five percent (5%).
Studio W/B: Select Studio W/B from the OPTIONS menu and set it to On to set the color
IMINAR
temperature to a level appropriate for television broadcast applications.
Studio Gain: Select Studio Gain from the OPTIONS menu and set it to On to sharpen the
PRE
contrast for a better view when a part of the image is too light to see.
Slot power: Select Slot power from the OPTIONS menu to control when power is
transmitted to the terminal boards installed in SLOT1, SLOT2 and SLOT3. Choose one of
the following:
•Off: Power is not transmitted to the slot power.
•Auto: Power is transmitted to the slot power only when main power is on.
•On: Power is transmitted to the slot power when main power is on or in the standby
state.
L
1. This setting is not available when MULTI-PIP, Digital Zoom or
MULTI-DISPLAY is active.
2. When Display size is set to On, the H-SIZE/V-SIZE controls (in
the POS./SIZE menu) are not available and only the 16:9 and 4:3
aspect ratios can be selected.
Setting Studio W/B to On has no effect unless the COLOR TEMP
(in the PICTURE menu) is set to WARM.
In some cases, power is transmitted to the slot when the
CinemaWall is on or in the standby state regardless of the
power setting.
50 CinemaWall XP-50/XP-65 Installation/Operation Manual
Slot
Page 65

Power On Screen Delay: In a large video wall installation, it may be advisable to turn the
Note
Note
RETURN
displays on one at a time rather than all at once, so as not to overload the power source.
To make this easier, you can set the CinemaWall to wait up to 30 seconds after you press
the POWER button to turn itself on. To do this, select
OPTIONS menu. Select from 1 to 30 seconds of delay. For example, in a 2x2 video wall
you might set a 4-second delay on display “A1,” an 8-second delay on display “A2,” a
12-second delay on display “A3” and no delay (Off) on display “A4.”
During the delay period, the power indicator flashes green.
Power On Screen Delay from the
Operation
Clock Display: To have the CinemaWall display the time of day (in addition to the current
input and aspect ratio) when the RECALL button is pressed, select
the OPTIONS menu and set it to On.
Until you set the day and time (refer to Setting the Day and Time
on page 21), the Clock Display setting has no effect.
All Aspect: This option controls which aspect ratio selections are available to the viewer.
Set it to On to allow the viewer to select all of the aspect ratios described in
the viewer does not need that level of aspect ratio control, set it to Off for the sake of
simplicity.
Rotate: If the CinemaWall is suspended from a ceiling, you may want to mount it upside
down and run the cables upward (toward the ceiling) to make them less visible. If you do,
select
Rotate from the OPTIONS menu and set it to On to rotate the displayed image and
OSD menus 180 degrees.
Serial Slot Select: This menu option does not currently apply to the CinemaWall.
The CinemaWall allows you to zoom in on a
portion of the displayed image. To use this
feature:
1. Press the MOVE/ZOOM ( ) button.
2. An on-screen guide appears. Press the
ACTION (
(x1, x2, x3 or x4).
3. Press , , or to select an area of the
image to enlarge. The on-screen guide
shows you the selected area as you do this.
4. To return to normal viewing mode, press RETURN ( ) or MOVE/ZOOM ( ).
) button to select a zoom level
PRE
IMINAR
L
Clock Display from
Table 4-1. If
Y
EXIT
1
4.9 Using Digital Zoom
CinemaWall XP-50/XP-65 Installation/Operation Manual 51
Page 66

Operation
Notes:
Y
IMINAR
L
PRE
52 CinemaWall XP-50/XP-65 Installation/Operation Manual
Page 67

5. Maintenance and Troubleshooting
Regular cleaning will extend the life and performance of the CinemaWall. Before cleaning,
be sure to unplug the power cord from the power outlet.
Do not under any circumstances use solvents such as benzene or thinner to clean the
CinemaWall. Doing so may cause deterioration or peeling of paint from the display or
remote control unit.
Wipe the display and remote control gently with a soft cloth. In the case of excessive dirt
buildup, dampen a soft cloth with a diluted neutral cleaning detergent and after wringing
the cloth thoroughly, wipe the component and then dry it with a dry soft cloth.
tissue or a rough cloth. The screen surface is easily scratched; do not rub it or hit it with a
hard object.
If you clean the surface of the screen with a wet cloth, water droplets on the surface may
enter into the product and cause a malfunction.
rear panel of the display of dust buildup (set the vacuum cleaner to its weakest setting
when doing this). If not removed, accumulated dust can cause the internal temperature to
increase, resulting in possible breakdown or fire.
IMINAR
Y
L
5.1 Cleaning
Cleaning the Display Panel Body and Remote Control
Cleaning the ScreenAfter dusting, wipe the screen gently using a soft cloth (cotton, flannel etc.). Do not use
Cleaning the VentsAs a general rule, use a vacuum cleaner about once a month to clean the vents on the
PRE
CinemaWall XP-50/XP-65 Installation/Operation Manual 53
Page 68

Maintenance and Troubleshooting
5.2
Troubleshooting Tips
Table 5-1 provides some general guidelines for troubleshooting problems you may
encounter with the CinemaWall. If the suggested solutions fail to resolve the problem or if
you encounter an issue not described here, please contact your Runco dealer or Runco
Technical Support.
Table 5-1. Troubleshooting Chart
Symptom Possible Cause(s) Solution
The display does not turn on
after initial installation.
The display is on and menus
appear, but there is no
picture.
Image is too bright and/or
lacks definition in the bright
areas of the image.
Image appears “washed out”
and/or dark areas appear too
bright.
L
• The CinemaWall is not
plugged in or the AC outlet
is not active.
•The remote control
batteries have run out.
• Incorrect source selection.
• Source component is not
turned on.
• Source component is
connected incorrectly or
not at all.
• Picture level (contrast) is
set too high.
IMINAR
• Brightness is set too high. • Lower the brightness
Y
• Ensure that the
• Replace the batteries.
• Select the correct source.
• Turn on the source
• Check connections from
• Lower the contrast setting
CinemaWall is plugged in
and that the AC outlet is
active.
component.
source component to
CinemaWall.
(refer to page 31).
setting (refer to
page 32).
Colors in the image are
swapped; for example, reds
appear blue or vice versa.
PRE
RGB-HD images appear
“noisy.”
Computer images do not display correctly.
The image is too large, too
small or positioned incor
rectly.
• The Red/Pr, Green/Y or
Blue/Pb outputs from the
source are connected to
the wrong inputs on the
CinemaWall.
• Clock and Phase settings
need adjustment.
• The resolution and
frequency of the video
card in the computer are
not compatible with the
CinemaWall.
• Image size and/or position
-
needs adjusting.
• Ensure that the source
outputs are connected to
the correct CinemaWall
input.
• Adjust Clock and Phase
settings (refer to
on page 38).
• Select a compatible
resolution and vertical
frequency (refer to
Supported Timings on
page 62).
• Adjust the image size
and/or position (refer to
POS./SIZE on page 35).
SIGNAL
54 CinemaWall XP-50/XP-65 Installation/Operation Manual
Page 69

6. Serial Communications
To interface the CinemaWall with a home theater automation/control system or a PC
running terminal emulation software, connect it to your control system or PC as shown in
Figure 3-5. Use a straight-through cable.
Configure the RS-232 controller or PC serial port as follows:
• 9600 baud
• No parity
• Eight (8) data bits
• One (1) stop bit
• No flow control
Serial commands to the CinemaWall take the following form:
• You can send commands in either hexadecimal or ASCII format.
• ASCII commands are case-sensitive and must be in UPPERCASE.
• Commands begin with the “Start of Text” (STX) character (02h or <Ctrl> B in ASCII),
followed by the command data, the colon character (3Ah or : in ASCII), command
parameter (1
or <Ctrl> C in ASCII). Not all commands require parameters to be sent with them;
examples of such commands are PON (power on), POF (power off) and IMS (toggle
input selection).
• You do not need to send a carriage return after the command.
• When sending multiple commands, be sure to wait for a response to the first command
to come from the CinemaWall before sending the next command.
• When you send a valid command, the CinemaWall executes it and echoes the
command (without the parameter) back to the controller.
• If you send an invalid command, the CinemaWall sends ER401 back to the controller.
to 6 bytes; refer to Table 6-1) and the “End of Text” (ETX) character (03h
IMINAR
L
PRE
Y
6.1 RS-232 Connection and Port Configuration
6.2 Serial Command Syntax
STX Command (3 bytes) Parameter (3 bytes) ETX
Hex
ASCII
To set the Picture Level (contrast) to its highest possible level (+30), send the following
sequence:
Hex
ASCII
CinemaWall XP-50/XP-65 Installation/Operation Manual 55
02 49 4D 53 3A 50 43 31 03
<Ctrl> B I M S : P C 1 <Ctrl> C
STX Command (3 bytes) Parameter (6 bytes) ETX
02 56 50 43 3A 50 49 43 30 33 30 03
<Ctrl> B V P C : P I C 0 3 0 <Ctrl> C
ExamplesTo select the PC input, send the following sequence:
Page 70

Serial Communications
Table 6-1 lists the CinemaWall serial command set.
Table 6-1. Serial Commands
ASCII Hex Description
AAC:MENCLR 41 41 43 3A 4D 45 4E 43 4C 52 Audio Menu (Clear)
AAC:MENDYN 41 41 43 3A 4D 45 4E 44 59 4E Audio Menu (Dynamic)
AAC:MENSTD 41 41 43 3A 4D 45 4E 53 54 44 Audio Menu (Standard)
AAC:SURMON 41 41 43 3A 53 55 52 4D 4F 4E Surround (ON)
AAC:SUROFF 41 41 43 3A 53 55 52 4F 46 46 Surround (OFF)
AMT:0 41 4D 54 3A 30 Audio Mute (OFF)
AMT:1 41 4D 54 3A 31 Audio Mute (ON)
ASO:M 41 53 4F 3A 4D Audio out when PIP mode (Main Pic-
ture)
ASO:S 41 53 4F 3A 53 Audio out when PIP mode (Sub Pic-
ture)
AVL:00 41 56 4C 3A 30 30 Audio Volume (00)
AVL:10 41 56 4C 3A 31 30 Audio Volume (10)
AVL:20 41 56 4C 3A 32 30 Audio Volume (20)
AVL:30 41 56 4C 3A 33 30 Audio Volume (30)
AVL:40 41 56 4C 3A 34 30 Audio Volume (40)
AVL:50 41 56 4C 3A 35 30 Audio Volume (50)
AVL:60 41 56 4C 3A 36 30 Audio Volume (60)
DAM:FULL 44 41 4D 3A 46 55 4C 4C Aspect (16:9)
DAM:JUST 44 41 4D 3A 4A 55 53 54 Aspect (VIRTUALWIDE)
RELI
DAM:NORM 44 41 4D 3A 4E 4F 52 4D Aspect (4:3)
P
DAM:ZOOM 44 41 4D 3A 5A 4F 4F 4D Aspect (LETTERBOX)
DAM:CINE 44 41 4D 3A 43 49 4E 45 Aspect (CINEMA)
DWA:OFF 44 57 41 3A 4F 46 46 Dual Picture mode (OFF)
DWA:OVL1 44 57 41 3A 4F 56 4C 31 Advanced PIP mode (1)
DWA:OVL2 44 57 41 3A 4F 56 4C 32 Advanced PIP mode (2)
DWA:OVL3 44 57 41 3A 4F 56 4C 33 Advanced PIP mode (3)
INARY
M
DWA:OVL4 44 57 41 3A 4F 56 4C 34 Advanced PIP mode (4)
DWA:OVL5 44 57 41 3A 4F 56 4C 35 Advanced PIP mode (5)
DWA:OVL6 44 57 41 3A 4F 56 4C 36 Advanced PIP mode (6)
DWA:OVLOF 44 57 41 3A 4F 56 4C 4F 46 Advanced PIP mode (OFF) (normal
two screen display mode)
56 CinemaWall XP-50/XP-65 Installation/Operation Manual
Page 71

Table 6-1. Serial Commands
ASCII Hex Description
DWA:OVLON 44 57 41 3A 4F 56 4C 4F 4E Advanced PIP mode (ON)
DWA:PIN0 44 57 41 3A 50 49 4E 30 The location of the sub picture (lower
right)
DWA:PIN1 44 57 41 3A 50 49 4E 31 The location of the sub picture (lower
left)
DWA:PIN2 44 57 41 3A 50 49 4E 32 The location of the sub picture (upper
left)
DWA:PIN3 44 57 41 3A 50 49 4E 33 The location of the sub picture (upper
right)
DWA:PIP 44 57 41 3A 50 49 50 Dual Picture mode (Picture in Picture)
DWA:POP 44 57 41 3A 50 4F 50 Dual Picture mode (Picture out Pic-
ture)
DWA:SWP 44 57 41 3A 53 57 50 Swap main picture and sub picture
when PIP mode
Serial Communications
Y
DWA:TWN 44 57 41 3A 54 57 4E Dual Picture mode (Picture and Pic-
ture)
IMS:PC1 49 4D 53 3A 50 43 31 Input select (PC1) (Main Picture when
PIP mode)
IMINAR
IMS:SL1A 49 4D 53 3A 53 4C 31 41 Input select (SLOT1A) (Main Picture
L
IMS:SL1B 49 4D 53 3A 53 4C 31 42 Input select (SLOT1B) (Main Picture
IMS:SL2A 49 4D 53 3A 53 4C 32 41 Input select (SLOT2A) (Main Picture
IMS:SL2B 49 4D 53 3A 53 4C 32 42 Input select (SLOT2B) (Main Picture
IMS:SL3 49 4D 53 3A 53 4C 33 Input select (SLOT3) (Main Picture
ISS:PC1 49 53 53 3A 50 43 31 Sub Picture Input Select (PC1)
ISS:SL1A 49 53 53 3A 53 4C 31 41 Sub Picture Input Select (SLOT1A)
ISS:SL1B 49 53 53 3A 53 4C 31 42 Sub Picture Input Select (SLOT1B)
ISS:SL2A 49 53 53 3A 53 4C 32 41 Sub Picture Input Select (SLOT2A)
ISS:SL2B 49 53 53 3A 53 4C 32 42 Sub Picture Input Select (SLOT2B)
PRE
when PIP mode)
when PIP mode)
when PIP mode)
when PIP mode)
when PIP mode)
ISS:SL3 49 53 53 3A 53 4C 33 Sub Picture Input Select (SLOT3)
OSP:RCM0
OSP:RCM1
OSP:RCM2
OSP:RCM3
CinemaWall XP-50/XP-65 Installation/Operation Manual 57
4F 53 50 3A 52 43 4D 30
4F 53 50 3A 52 43 4D 31
4F 53 50 3A 52 43 4D 32
4F 53 50 3A 52 43 4D 33
Remote Control User Level = Off
Remote Control User Level = User1
Remote Control User Level = User2
Remote Control User Level = User3
Page 72

Serial Communications
Table 6-1. Serial Commands
ASCII Hex Description
OSP:SCR0 4F 53 50 3A 53 43 52 30 Screen Saver SCROLLING BAR
ONLY (OFF)
OSP:SCR1 4F 53 50 3A 53 43 52 31 Screen Saver SCROLLING BAR
ONLY (ON)
POF 50 4F 46 Power OFF
PON 50 4F 4E Power ON
SSC:FNC0 53 53 43 3A 46 4E 43 30 Screen Saver function (SCROLLING
BAR ONLY)
SSC:FNC1 53 53 43 3A 46 4E 43 31 Screen Saver function (NEGATIVE
IMAGE)
SSC:MOD0 53 53 43 3A 4D 4F 44 30 Screen Saver (Mode (OFF))
SSC:MOD3 53 53 43 3A 4D 4F 44 33 Screen Saver (Mode (ON))
VMT:0 56 4D 54 3A 30 Picture Mute (OFF)*
VMT:1 56 4D 54 3A 31 Picture Mute (ON)*
VPC:PIC-30 56 50 43 3A 50 49 43 2D 33 30 Picture = -30
VPC:PIC000 56 50 43 3A 50 49 43 30 30 30 Picture = 0
VMT 56 4D 54 Picture Mute (toggle)
VPC:MENSTD 56 50 43 3A 4D 45 4E 53 54 44 Picture Menu = Standard
VPC:MENDYN 56 50 43 3A 4D 45 4E 44 59 4E Picture Menu = ISF Day
VPC:MENCNM 56 50 43 3A 4D 45 4E 43 4E 4D Picture Menu = ISF Night
VPC:MENMON 56 50 43 3A 4D 45 4E 4D 4F 4E Picture Menu = Monitor
RELI
P
INARY
M
58 CinemaWall XP-50/XP-65 Installation/Operation Manual
Page 73

7. Specifications
Table 7-1 lists the CinemaWall specifications.
Table 7-1. CinemaWall Specifications
Native Resolution: 1920 x 1080
Screen Size: XP-50:
43.50 in. W x 24.50 in. H (1106.0 x 622.0 mm)
50 in. (1270.0 mm) diagonal
XP-65:
56.50 in. W x 31.80 in. H (1434.0 x 807.0 mm)
65 in. (1646.0 mm) diagonal
Screen Aspect Ratio: 16:9
Available Aspect Ratios: Refer to Table 4-1
DTV Compatibility: 480p, 720p, 1080i, 1080p
Contrast Ratio: 30,000:1 maximum
Data/Graphics Compatibility: VGA, SVGA, XGA, SXGA, UXGA (compressed)
Horiz. scan frequency = 15 to 110 kHz
Vert. scan frequency = 48 to 120 Hz
IMINAR
Video Inputs: (4) Digital Video (HDMI 1.2A with HDCP)
(1) Component/RGB (BNCx3) with Stereo Audio (RCAx2)
(1) PC (15-pin D-Sub)
(1) RS-232 (9-pin, D-sub male)
L
7.1 CinemaWall Specifications
Y
Audio System Internal amplifier
Output Power = 10W RMS x 2 at 8Ω
Power Requirements: 100 to 240 VAC, 50/60Hz
Power Consumption: XP-50: 605 W (0.9 W in standby), maximum
Operating Environment: 40ºF to 95ºF (5ºC to 35ºC);
Dimensions: XP-50: See Figure 7-1
Weight
(panel only, without stand):
Regulatory Approvals: Complies with FCC Part 15 Class B, ICES-003, UL6500
Specifications are subject to change without notice.
PRE
XP-65: 755 W (1.0 W in standby), maximum
20% to 80% humidity (non-condensing)
Ambient air pressure = 720 hPa, minimum
Altitude = up to 9,100 feet (2,774 meters)
XP-65: See Figure 7-2
XP-50: 93.0 lbs. (42.18 kg)
XP-65: 163.1 lbs. (73.98 kg)
Ver.2
CinemaWall XP-50/XP-65 Installation/Operation Manual 59
Page 74

Specifications
7.2
CinemaWall Dimensions
Figure 7-1 and Figure 7-2 show the CinemaWall dimensions (all dimensions are in inches).
50.26
29.98
Y
6.88
15.50
4.06
IMINAR
5.07
L
1.75
1.17
0
PRE
8.48
29.57
21.08
29.57
25.98
48.81
Figure 7-1. CinemaWall Model XP-50 Dimensions (with Optional Table Stand)
60 CinemaWall XP-50/XP-65 Installation/Operation Manual
Page 75

Specifications
0
7.81
12.31
1.98
2.35
3.69
62.45
54.64
50.14
0
2.83
37.69
1.34
IR RECEIVER &
LED INDICATOR
1.26
2.49
all around
66.13
17.00
0
.55
61.90
62.45
10.09
2.07
4.07
6.02
0
2.83
33.86
37.69
37.16
.59
1.50
4.50
0
10.06
52.39
62.45
38.10
16.95
61.90
.55
0
8.90
2X 11.01
2X 24.01
33.86
37.69
37.16
4X MOUNTING HOLES
MARKED 'A'
A
A
A
A
L
IMINAR
Y
PRE
Figure 7-2. CinemaWall Model XP-65 Dimensions (with Optional Table Stand)
CinemaWall XP-50/XP-65 Installation/Operation Manual 61
Page 76

Specifications
7.3 Supported Timings
Table 7-2. Supported Signal Timings by Input
Format Resolution
640x480 640x480
800x600 800x600
Table 7-2 lists the signal types supported by each input on the CinemaWall.
Refresh Rate
(Hz)
60.00 31.469 25.175 √ √ –
66.67 35.000 30.240 √ – –
72.00 37.861 31.500 √ – –
75.00 37.500 31.500 √ – –
85.00 43.269 36.000 √ – –
56.00 35.156 36.000 √ – –
60.00 37.879 40.000 √ – –
72.00 48.077 50.000 √ – –
75.00 46.875 49.500 √ – –
85.00 53.674 56.250 √ – –
Horizontal
Frequency
(kHz)
IMINAR
Pixel Frequency
(MHz)
Supported? (√ = Yes, – = No)
HDMI 1A
PC IN
HDMI 1B
HDMI 2A
HDMI 2B
Y
COMPONENT
/RGB
832x624 832x624 74.54 49.720 57.283 √ – –
852x480 852x480 60.00 31.726 34.010 √ – –
60.00 48.363 65.000 √ – –
1024x768 1024x768
PRE
1152x864 1152x864 75.00 67.500 108.000 √ – –
1152x870 1152x870 75.06 68.680 100.330 √ – –
1280x960 1280x960
1280x1024 1280x1024
1366x768 1366x768 60.00 48.360 80.000 √ – –
1600x1200 1600x1200
1920x1080 1920x1080 60.00 67.470 148.550
70.00 56.476 75.000 √ – –
75.00 60.023 78.750 √ – –
85.00 68.677 94.500 √ – –
60.00 60.000 108.000 √ – –
85.00 85.938 148.500 √ – –
60.00 63.981 108.000 √ – –
75.00 79.976 135.000 √ – –
85.00 91.146 157.500 √ – –
60.00 75.000 161.200 √ – –
65.00 81.250 162.000 √ – –
L
(displays at
1125/60p)
– –
62 CinemaWall XP-50/XP-65 Installation/Operation Manual
Page 77

Table 7-2. Supported Signal Timings by Input (continued)
Supported? (√ = Yes, – = No)
Format Resolution
480/60i 720x487 59.94 15.734 13.500 √ – √
480/60p 720x483 59.94 31.469 27.000 √ √ √
576/50i 720x576 50.00 15.625 14.750 √ – √
576/50p 720x576 50.00 31.250 29.000 √ √ √
Refresh Rate
(Hz)
Horizontal
Frequency
(kHz)
Pixel Frequency
(MHz)
PC IN
HDMI 1A
HDMI 1B
HDMI 2A
HDMI 2B
Specifications
COMPONENT
/RGB
720/50p 1280x720 50.00 37.500 75.250 √ √ √
720/60p 1280x720 60.00 45.000 74.250 √ √ √
1080/50i 1920x1080 50.00 28.125/31.250 74.250/72.000 √ √ √
1080/60i 1920x1080 59.94/60.00 33.716/33.750 74.175/74.250 √ √ √
1080/24p 1920x1080 23.98/24.00 26.978/27.000 74.175/74.250 √ √ √
1080/24sF 1920x1080 47.92 27.000 74.175/74.250 √ √ √
1080/50p 1920x1080 50.00 56.250 148.500 √ √ √
1080/60p 1920x1080 59.94/60.00 67.433/67.500 148.350/148.500 √ √ √
Y
IMINAR
L
PRE
CinemaWall XP-50/XP-65 Installation/Operation Manual 63
Page 78

Specifications
Notes:
Y
IMINAR
L
PRE
64 CinemaWall XP-50/XP-65 Installation/Operation Manual
Page 79

Appendix A. Default Settings
Table A-1 lists the CinemaWall factory-default image settings. All of these settings are in
the PICTURE menu except for 1:1 PIXEL MODE, which is in the POS./SIZE menu.
Table A-1. Runco Factory Default Settings for CinemaWall
Model XP-50 Model XP-65
Menu Setting
ISF Night STANDARD ISF DAY MONITOR ISF Night STANDARD ISF DAY MONITOR
PICTURE 30 30 30 – 30 30 30 –
BRIGHTNESS -5 -2 -2 0 -6 -4 -4 0
COLOR -2 -2 -2 0 -2 -2 -2 0
TINT 0 0 0 0 0 0 0 0
SHARPNESS 3 3 3 0 5 5 5 0
COLOR TEMP NORMAL NORMAL NORMAL WARM NORMAL NORMAL NORMAL WARM
COLOR
MANAGEMENT
OFF OFF OFF OFF OFF OFF OFF OFF
IMINAR
PICTURE MENU Setting
Y
L
ADVANCED SETTINGS ON ON ON OFF ON ON ON OFF
BLACK EXTENSION 0 0 0 – 0 0 0 –
INPUT LEVEL 0 0 0 – 0 0 0 –
GAMMA 2.2 S-Curve S-Curve – 2.2 S-Curve S-Curve –
PRE
AGC OFF OFF OFF – OFF OFF OFF –
R GAIN 3 3 3 – -2 -2 -2 –
G GAIN 0 0 0 – 0 0 0 –
B GAIN -18 -18 -18 – -14 -14 -14 –
R OFFSET -11 -11 -11 – -1 -1 -1 –
G OFFSET -7 -7 -7 – -2 -2 -2 –
B OFFSET 0 0 0 – 0 0 0 –
1:1 Pixel Mode
(
POS./SIZE menu)
CinemaWall XP-50/XP-65 Installation/Operation Manual A-1
On On On Off On On On Off
Page 80

Default Settings
Notes:
Y
IMINAR
L
PRE
A-2 CinemaWall XP-50/XP-65 Installation/Operation Manual
Page 81

Page 82

Runco International • (800) 23RUNCO • Fax (503) 748-8161 • www.runco.com
SERIAL NUMBER
020-0970-00 Rev. B
March 2009
 Loading...