

Page 1

OWNER’S OPERATING MANUAL
VX-1000c Projector
& PFP™ Controller
Widescreen Digital Light Processing™ Projector &
Pixel For Pixel™ Controller with Vivix™ Technology
Page 2

Page 3

Table of Contents
1
Introduction ........................................................................................................ 3
Warnings and Safety Precautions .................................................................... 4
Warning .......................................................................................................... 5
Safety Tips ...................................................................................................... 5
Limited Warranty ................................................................................................ 6
Features and Benefits ........................................................................................ 8
Projector Description ........................................................................................ 9
Top View.......................................................................................................... 9
Input Panel...................................................................................................... 9
Projector Placement and Offset Information ................................................ 10
Ceiling Mount Configuration.......................................................................... 10
Floor Mount Configuration ............................................................................ 10
PFP Controller Description.............................................................................. 11
Front Panel.................................................................................................... 11
Rear Panel .................................................................................................... 12
Remote Control Description............................................................................ 13
Quick Set-up Guide .......................................................................................... 14
Connection Example .................................................................................... 14
Overall Functional Description ........................................................................ 15
Menu Description and Navigation .................................................................. 16
Menu Tree .................................................................................................... 16
Main Menu .................................................................................................... 16
Picture Quality Adjustments ............................................................................ 18
Main Menu .................................................................................................... 18
Installation Menu................................................................................................21
Installation Menu............................................................................................21
Lamp Mode ....................................................................................................21
Keystone ........................................................................................................21
Picture Orientation..........................................................................................22
IR Code Set .................................................................................................. 22
Lamp Hours....................................................................................................22
System Reset ................................................................................................22
Quick Menu ...................................................................................................... 23
Basic Troubleshooting Tips..............................................................................25
RS-232 Communications ..................................................................................27
RS-232 Commands........................................................................................28
Dimensions........................................................................................................ 30
Specifications.................................................................................................... 32
Page 4

2
Page 5

3
Introduction
The VX-1000c is the latest addition to Runco's acclaimed GEN2 line of products. This DLP™-based
system is the first true home theater system based on Texas Instruments' new 16:9 DMD (Digital
MicroMirror Device). This system includes not only VX-1000 projector, but also the PFP™ Controller,
which converts all NTSC or PAL signals to the native resolution of the projector. In addition, the
Controller performs all aspect ratio control, controls all image quality adjustments and even keeps
track of the projector lamp hours. To add versatility to the installation, the projector is equipped with
electronic keystone correction and vertical lens shift to provide the needed versatility that today's complex installations require.
• Native 16:9 DMD; designed exclusively for 16:9 aspect screens
• 1500 ANSI lumens of light output
• Multiple aspect ratios (on 16:9 screens)- Anamorphic, Letterbox, 4:3
• Electronic Keystone correction
• Vertical lens shift
• DTV capable (via an outboard DTV decoder); 720p (native), 1080i, 480p, 540p
• PAL compatible
• 3:2 pulldown detection
Features
• Remote Control with 2 AAA batteries
• Rack Mount hardware
• The Installer friendly “Slam Dunk” cable, which includes VGA to RGB adaptor
and mini D-SUB9 to RJ-11 adaptor
• Power cables (one for Projector, one for PFP Controller)
• 50’ RJ-11 cable
• Lens adjustment tool
• User’s Manual
• Warranty information
Included Accessories
Page 6

Warnings and Safety Precautions
CAUTION:
To turn off main power, be sure to remove the plugs from power outlets. The power outlet socket
should be installed as near to the equipment as possible, and should be easily
accessible.
REMARQUE:
Pour mettre l’appareil hors circut, s’assurer de retirer la fiche de la prise d’alimentation.
La prise d’alimentation doit être installé aussi proche que possible de l’appareil et doit être facile d’
accès.
TO PREVENT FIRE OR SHOCK HAZARDS, DO NOT EXPOSE THIS UNIT TO RAIN OR MOISTURE.
ALSO DO NOT USE THIS UNIT’S POLARIZED PLUG WITH AN EXTENSION CORD RECEPTACLE
OR OTHER OUTLETS, UNLESS THE PRONGS CAN BE FULLY INSERTED. REFRAIN FROM OPENING THE CABINETAS THERE ARE HIGH-VOLTAGE COMPONENTS INSIDE. REFER SERVICING
TO QUALIFIED SERVICE
PERSONNEL.
POUR EVITER UN FEU OU UN RISQUE D’ELECTROCUTION NE PAS EXPOSER CET ENSEMBLE
A LA PLUIE OU A L’HUMIDITE; DE MEME, NE PAS BRANCHER LA PRISE POLAIRE AVEC UNE
RALLONGE AMOINS QUE LES DENTS DE LA PREMIERE NE S’Y INSERENT PLEINEMENT.
EVITER D’OUVRIR LE COFFRET CAR IL Y A, A L’INTERIEUR, DES COMPOSANTS SOUMIS A
UNE HAUTE-TENSION; POUR LES REPARATIONS, S’ADRESSER A UN PERSONNEL QUALIFIE.
WARNING
AVERTISSEMENT
4
Page 7

5
WARNING
SAFETY TIPS
This equipment has been tested and found to comply with the limits for a Class B digital device, pursuant to Part 15 of the FCC Rules. These limits are designed to provide reasonable protection against
harmful interference when the equipment is operated in a commercial environment. This equipment
generates, uses, and can radiate radio frequency energy and, if not installed and used in accordance
with the installation manual, may cause harmful interference to radio communications. Operation of
this equipment in a residential area is likely to cause harmful interference, in which case, the user will
be required to correct the interference at his own expense.
DOC compliance Notice
This Class B digital apparatus meets all requirements of the Canadian Interference-Causing
Equipment Regulations.
DOC avis de conformation
Cet appareil numérique de la classe B respecte toutes les exigences du Réglement sur le Matériel
D’interférence du Canada.
Please read and follow the safety precautions listed below to ensure the equipment is free from
damage, and to ensure that no injury will occur as a result of improper use.
· Do not insert any object, especially metal or liquids, into the Projector or PFP Controller.
· Do not place any objects containing water or any other liquid on top of the Projector
or PFP Controller.
· Do not place the units in direct sunlight, near heaters or in extremely dusty or humid
locations.
· Do not install this system outdoors or otherwise exposed to the elements.
· Do not place heavy objects on top of the Projector or Controller.
· If the power cord is damaged or frayed in any way, electrical shock and/or fire may result.
Please do not place objects on the power cord, and keep the cord away from heat-emitting
devices. Should the power cord become damaged in any way, please contact your Runco
dealer for a replacement cord.
· Do not remove the cover of the Projector or PFP Controller for any reason. If any problems
arise with the unit, please contact a Runco dealer or Runco International for service.
Removing the covers will void the warranty.
Page 8

6
LIMITED WARRANTY
Congratulations on your purchase of a Runco video product and welcome to the Runco family! We
believe Runco produces “The World’s Finest Home Theater Products”. With proper installation, setup
and care, you should enjoy many years of unparalleled video performance. Please read this consumer
protection plan carefully and retain it with your other important documents.
This is a LIMITED WARRANTY as defined by the U.S. Consumer Product Warranty and Federal
Trade Commission Improvement Act.
WHAT IS COVERED
UNDER THE TERMS OF THIS WARRANTY:
SERVICE LABOR: Runco will pay for service labor by an approved Runco service center when needed as a result of manufacturing defect for a period of two (2) years from the effective date of delivery
to the end user.
PARTS (Not including projector lamp): Runco will provide new or rebuilt replacement parts for the
parts that fail due to defects in materials or workmanship for a period of two (2) years from the effective date of the warranty. Such replacement parts are then subsequently warranted for the remaining
portion (if any) of the original warranty period.
LAMP: Six months or 1000 hours (which ever comes first).
WHAT IS NOT
COVERED UNDER THE TERMS OF THIS WARRANTY:
This warranty only covers failure due to defects in materials and workmanship that occur during normal use and does not cover normal maintenance. This warranty does not cover cabinets or any
appearance item; any damage to laser discs; failure resulting from accident, misuse, abuse, neglect,
mishandling, misapplication, faulty or improper installation or setup adjustments; improper maintenance, alteration, improper use of any input signal; damage due to lightning or power line surges,
spikes and brownouts; damage that occurs during shipping or transit; or damage that is attributed to
acts of God. In the case of remote control units, damage resulting from leaking, old, damaged or
improper batteries is also excluded from coverage under this warranty.
CAUTION: DAMAGE RESULTING DIRECTLY OR INDIRECTLY FROM IMPROPER INSTALLATION
OR SETUP IS SPECIFICALLY EXCLUDED FROM COVERAGE UNDER THIS WARRANTY. IT IS
IMPERATIVE THAT INSTALLATION AND SETUP WORK BE PERFORMED ONLY BY AN AUTHORIZED RUNCO DEALER TO PROTECT YOUR RIGHTS UNDER THIS WARRANTY. THIS WILL
ALSO ENSURE THAT YOU ENJOY THE FINE PERFORMANCE YOUR RUNCO PRODUCT IS
CAPABLE OF PROVIDING WHEN INSTALLED AND CALIBRATED BY RUNCO AUTHORIZED PERSONNEL.
RIGHTS, LIMITS AND EXCLUSIONS:
Runco limits its obligations under any implied warranties under state laws to a period not to exceed
the warranty period. There are no express warranties. Runco also excludes any obligation on its part
for incidental or consequential damages related to the failure of this product to function properly.
Some states do not allow limitations on how long an implied warranty lasts, and some states do not
allow the exclusion or limitation of incidental or consequential damages. So the above limitations or
exclusions may not apply to you. This warranty gives you specific legal rights, and you may also have
other rights that vary from state to state.
Limited Warranty
Page 9

7
EFFECTIVE WARRANTY DATE:
This warranty begins on the effective date of delivery to the end user. For your convenience, keep the
original bill of sale as evidence of the purchase date.
IMPORTANT: WARRANTY REGISTRATION:
Please fill out and mail your warranty registration card. It is imperative that Runco knows how to reach
you promptly if we should discover a safety problem or product update for which you must be notified.
TO OBTAIN SERVICE, CONTACT YOUR RUNCO DEALER:
Repairs made under the terms of the Limited Warranty covering your Runco International video product will be performed at the location of the product, during usual working hours, providing location of
product is within normal operating distance from a Runco Authorized Service Center. If, solely in
Runco’s judgement, location of product to be repaired is beyond normal operating distance of the
closest Runco Authorized Service Center, it is the owner’s responsibility to arrange for shipment of the
product for repair. These arrangements must be made through the selling Runco dealer. If this is not
possible, contact Runco directly for a return authorization number and shipping instructions. Runco
will return product transportation prepaid in the United States, unless no product defect is discovered.
In that instance, shipping costs will be the responsibility of the owner.
ADDITIONAL INFORMATION:
To locate the name and address of the nearest Runco Authorized Service location, or for additional
information about this warranty, please call, write or visit our website:
CUSTOMER SERVICE DEPARTMENT
RUNCO INTERNATIONAL
2463 Tripaldi Way
Hayward, CA 94545
Ph: (510) 293-9154 / Fax: (510) 293-0201
www.runco.com
Page 10

Features and Benefits
The VX-1000c system is a very unique system and has many important features, including:
• Full control of the Projector via the PFP Controller. This control includes all image quality
adjustments as well as Projector adjustments such as image configuration.
• 1500 ANSI lumens light output.
• Reliable lamp with 1000 hour life span.
• Native 16:9 DMD™ with a resolution of 1280 x 720.
• An adaptive two-dimensional comb filter that greatly reduces artifacts when using Composite video.
• A Luma edge enhancement circuit makes the edges of objects appear sharper without the
ringing and noise associated with traditional sharpness circuits.
• A Chroma edge enhancement circuit is included to compensate for lower chroma resolution
found in composite and S-Video.
• Inverse telecine (3:2 pulldown) detection and processing allows the scaler to almost
completely eliminate interlace artifacts associated with other scalers.
• ATime Base corrector circuit is provided for unstable sources such as VCRs.
• 12v outputs for drop screens and screen masking.
• Automatic switching between NTSC and PAL signals.
• Fully RS-232 controllable, with direct access to sources and aspect ratios.
• Asimple remote controls all aspects of operation, and includes discreet on/off, aspect ratio
and source selection commands.
8
Page 11

9
Projector Description
Input Panel
Top View
Exhaust Vents
Vertical Lens Shift
Zoom Tab
Focus Ring
Intake Vents
Power
Lamp
Temp
Focus Ring: Turn this ring to focus the
image.
Zoom T
ab:
Turn this tab to make the
image larger or smaller.
V
ertical Lens Shift: Using the provided
adjustment tool, turn this to move the
lens up and down.
Power:
Led is red when unit is in
standby, blue when it is in operation.
Lamp:
When the lamp is on, this LED is
blue. When the lamp is off, this LED is
off.
T
emp: If the Projector has overheated
and shut down, this will light red.
Int
ake Vents: This is where cooler air
enters the Projector. Ensure that it is
never blocked or overheating will result.
Exhaust V
ents: This is where hot air
exits the Projector.This air can be quite
hot. Ensure that there are no heat-sensitive objects near it and that it is never
blocked.
AC Power In
(100-240 VAC)
RGB Input
(from PFP Controller)
Computer
Input only
ComLink
Connect the ComLink cable
from the PFP Controller here
Bottom Vents
Bottom
Intake Vents
Page 12
10
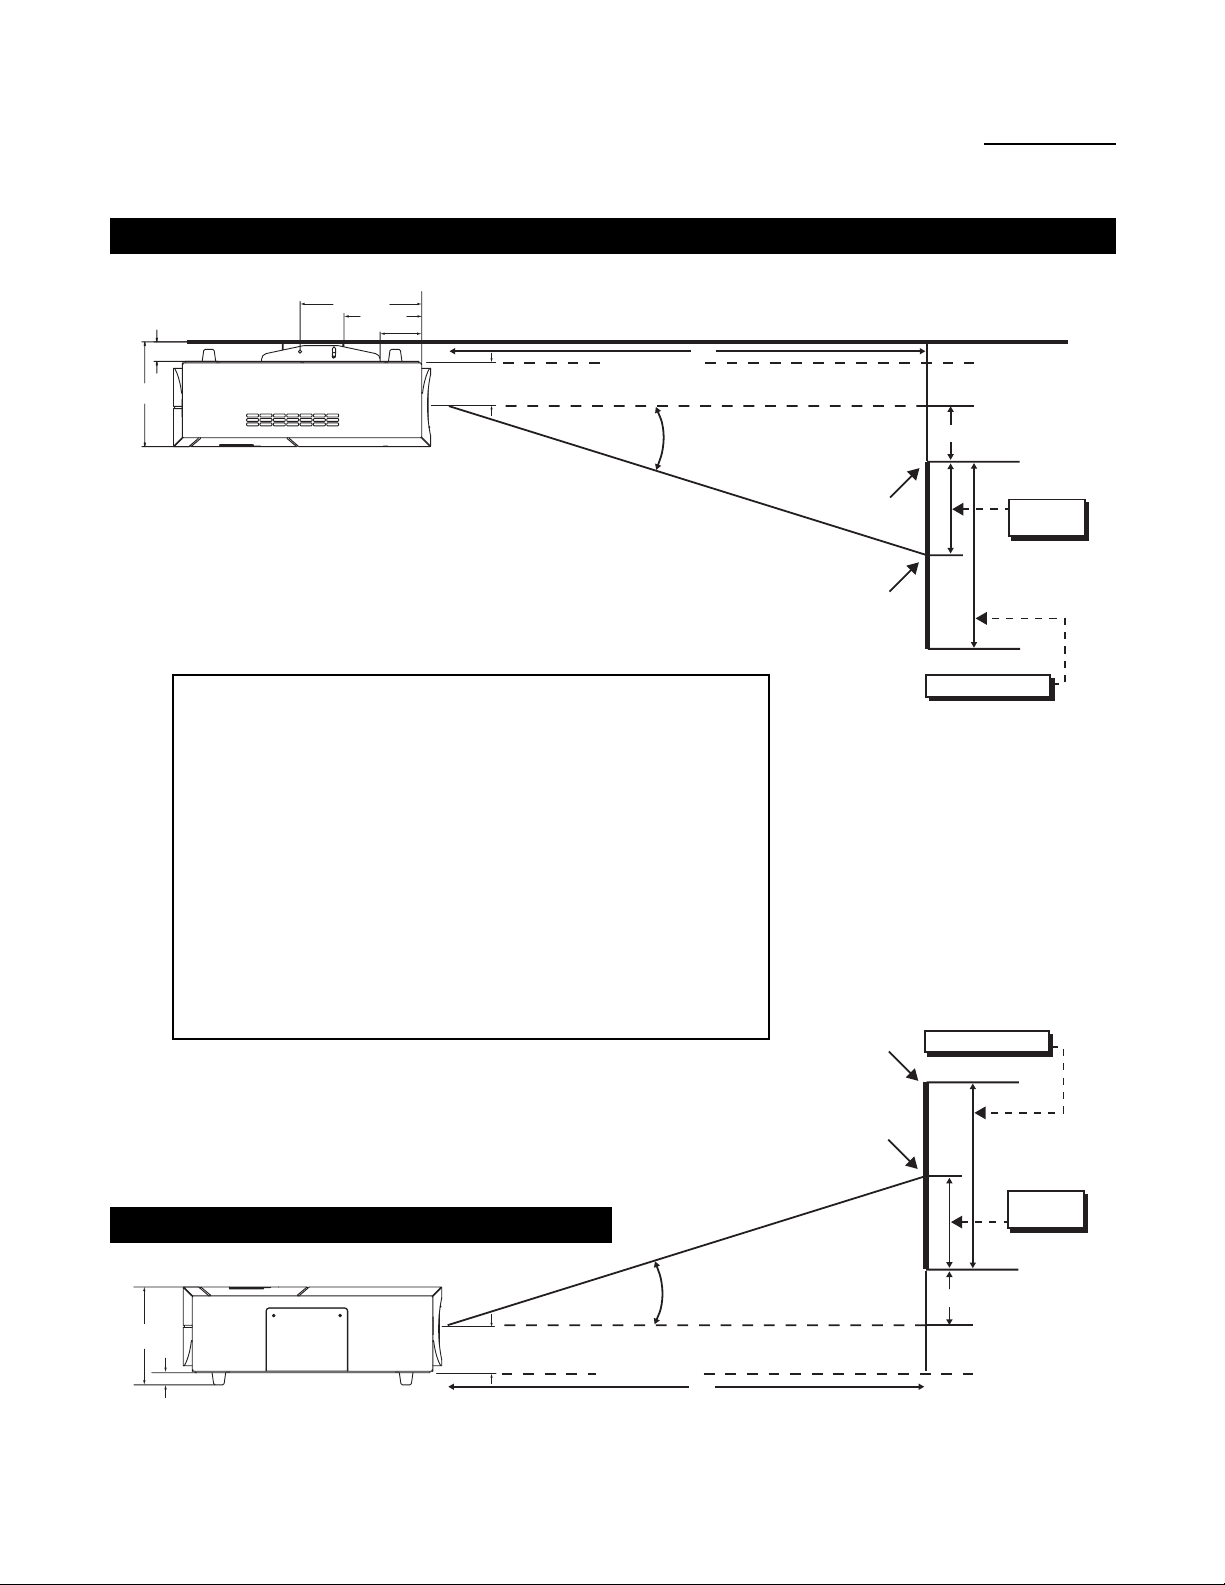
Projector Placement and Offset Information
Ceiling Mount Configuration
NOTE: These figures are
the same for both ceiling
and floor configurations.
Floor Mount Configuration
SCREEN __________ (H) x __________ (W)
B) THROW DISTANCE FOR 16 x 9 SCREENS:
Minimum: = (screen width x 1.85) = __________ inches
Maximum: = (screen width x 2.4) = __________ inches
C) VERTICAL OFFSET:
Distance between lens center and top edge of viewing area
(bottom edge for floor mount): Between 0 and (0 - screen height)
10.250
6.546
1.645
8.830
3.500
3.500
Base plate to center of lens
Projector Base
B
angle
A
C
Screen Top
Screen Center
Full Screen Length
Half Screen
Length
8.200
1.015
angle
3.500
Base plate to center of lens
Projector Base
Screen Top
Screen Center
A
B
Full Screen Length
Half Screen
Length
C
Page 13

11
PFP Controller Description
Front Panel
4 5 6 7 8 9 10
1. IR RECEIVER
Receives the infrared signal from the remote control.
2. POWER BUTTON
Turns the unit ON or OFF. The Main Power switch on the rear of the unit must be on first for this button to be active.
3. POWER INDICATOR
When the PFP Controller is ON, this LED will illuminate GREEN. When the unit is OFF or in STANDBY, this LED will
illuminate RED. A flashing red light indicates a fault. If this happens, unplug the unit for 2 minutes and re-try. Ayellow
LED indicates a communication problem; double check that the ComLink cable is connected properly (page 12).
4. LED DISPLAY
Indicates the model number, current source, resolution and aspect ratio.
5. UP BUTTON
When no menu is present on-screen, this button will toggle you through the different aspect ratios.
When the menu is on-screen, the UP button will move the cursor up within a menu.
When an adjustment item has been selected (i.e. brightness), the UP button will increase the value of that function.
6. LEFT BUTTON
When no menu is present on-screen, the LEFT button will toggle you through the five different sources, in the order of:
RGB HD Component HD Component S-Video Composite
7. ENTER BUTTON
When an item is highlighted on the On-Screen Display, the ENTER button will select the item. When no menus are
active (on screen), the ENTER button will enable the ‘Quick Menu’ on the front panel (see page 23).
8. DOWN BUTTON
When no menu is present on-screen, this button will toggle you through the different aspect ratios.
When the menu is on-screen, the DOWN button will move the cursor down within a menu.
When an adjustment item has been selected (i.e. brightness), the DOWN button will decrease the value of that function.
9. RIGHT BUTTON
When no menus are present on-screen, the RIGHT button will toggle you through the five different sources, in the order of:
Composite S-Video Component Component HD RGB HD
10. MENU BUTTON
The MENU button brings up the main adjustment menu. After making adjustments, the MENU button will bring you back to
the sub-menu, then to the main menu. The menu will then either time-out after approximately 10 seconds, or pressing the
MENU button will remove the menu immediately.
1 2 3
ratio
<
e
t
n
r
e
>
<
<
ratio
n
e
u
i
m
n
p
u
t
PIXEL FOR PIXEL
TM
Page 14

Rear Panel
12
1. 12v FUSE
This fuse protects the 12v outputs from the MASK and SCREEN jacks.
(Screen Fuse: 5mm x 25mm, AGC, 0.5A, 250V, Fast Blow)
2. MASK
This is a 12V output that can be used to trigger curtains, lifts, etc. (1/4Amaximum load).
3. SCREEN
This is a 12V output that can be used to trigger curtains, lifts, etc. (1/4Amaximum load).
4. RS-232 IN
This is for systems using serial (RS-232) to control the PFP Controller.
Please refer to page 27 for RS-232 protocol and information.
5. COMLINK OUT
The output of this jack must be connected to the ComLink input of the VX-1000c. If this is not connected, neither
the PFP Controller or the Projector can operate and the power indicator on the front panel will stay yellow.
6. RGB OUTPUT
This is the main output of the PFP Controller. The RGB Signal goes directly to the Projector. If
Component is used through the RGB/Component, then only the R (Pr), G(Y) and B(Pb) jacks will be active.
Individually, the jacks are: V=vertical sync, H=horizontal sync, B=Blue, G=Green, R=Red.
7. RGB/COMPONENT
Anything input to this port will by-pass the processing of the PFP Controller and be sent straight to the display. This is useful for computer graphics and HDTV signals which do not require processing.
8. COMPONENT INPUT
This is the input for Component Video from sources such as DVD players.
Note: The component output from a DTV decoder or a progressive-scan DVD cannot
be used with this port;
it must be used with the
RGB/Component port.
9. S-VIDEO INPUT
This is the input for S-Video from sources such as satellite receivers, S-VHS VCR’s and DVD players.
10. COMPOSITE VIDEO INPUT
This is the input for Composite Video from sources such as laser disc players, VCRs and other misc. sources.
11. POWER INPUT
Plug in Main Power here.
12. 115 VAC FUSE 13. MAIN POWER SWITCH
This is the main AC Input fuse (.5A/250V). Disconnects or applies main power to the Controller.
12V FUSE
MASK
12V TRIGGER
SCREEN
COMLINK OUT
RS-232 IN
5
RGB OUTPUT VIDEO INPUTS
B G R Y Pr Pb
H
RGB/COMPONENT COMPOSITEV
6 7 8 9 1042 31
S-VIDEO
CAUTION
RISK OF ELECTRIC SHOCK
DO NOT OPEN
AVIS: RISQUE DE CHOC ELECTRIQUE-NE PAS OUVRIR
CAUTION: TO REDUCE THE RISK OF ELECTRIC
SHOCK, DO NOT REMOVE COVER. NO USERSERVICEABLE PARTS INSIDE. REFER SERVICING
TO QUALIFIED SERVICE CENTER.
WARNING: TO REDUCE THE RISK OF FIRE
OR ELECTRIC SHOCK, DO NOT EXPOSE
THIS APPLIANCE TO RAIN OR MOISTURE.
!
AC 100-240V, 50/60 Hz, 15W
11 1 2
RUNCO INTERNATIONAL
HAYWARD, CA
MADE IN USA
MADE IN USA
13
Page 15

13
Remote Control Description
A. IR OUTPUT INDICATOR
Illuminates when a button is pressed, indicating that an IR signal is being
transmitted.
B. POWER BUTTON
Toggles the power on and off. For a discrete on or off command, you can
use the direct access buttons (see 'J'). Note: When the main AC power
switch is first turned ON, the PFP Controller will go through an initiation
cycle for approximately 15 seconds. The PFP Controller cannot be turned
on or operated until the initialization is complete.
C. UP BUTTON
When no menus are present on-screen, the UP button will toggle you
through aspect ratios in the following order:
Letterbox Standard (4:3) Anamorphic
When the menu is on-screen, the UP button will move the cursor up within
the menu. When an adjustment item has been selected (i.e. brightness),
the UP button will increase the value of that function.
D. LEFT BUTTON
When no menus are present on-screen, the LEFT button will toggle you
through the five different sources in the following order:
RGB HD Component HD Component S-Video Composite
E. DOWN BUTTON
When no menus are present on-screen, the DOWN button will toggle you
through aspect ratios in the following order:
Anamorphic Standard (4:3) Letterbox
When the menu is on-screen, the DOWN button will move the cursor
down within the menu. When an adjustment item has been selected (i.e.
brightness), the DOWN button will decrease the value of that function.
F. RIGHT BUTTON
When no menus are present on-screen, the RIGHT button will toggle you
through the five different sources in the following order:
Composite S-Video Component Component HD RGB HD
G. MENU BUTTON
Pressing the MENU button will bring up the main menu. If no action is
taken within approximately 10 seconds, the menu will time-out (disappear).
Also, if you are in an adjustment mode or function, pressing MENU will
bring the menu back one level.
H. ENTER BUTT
ON
When an item is highlighted on a menu, pressing ENTER will select that
item.
I. PROGRAM BUTTON
If the remote control loses its 'memory' as a result of weak or dead batteries, it must be re-programmed for the PFP Controller's code set.
To reprogram the remote to the default IR Code Set, press the PROGRAM
button followed by 0,1,3. If you have set the Controller for a different Code
Set (see pg. 22), enter that number instead of 0,1,3. Note: Pressing Enter
after typing in the code is not necessary.
J.
DIRECT ACCESS BUTTONS
These buttons will allow you to directly
access an aspect ratio, source, or turn the
unit on or off without having to go through
any menus. These buttons are:
1: Selects COMPOSITE video
2: Selects S-VIDEO
3: Selects COMPONENT video
4: Selects COMPONENT HD
5: Selects RGB HD
6: Enables or disables the Installation
Menu (see page 21)
7: Selects the ANAMORPHIC aspect ratio
8: Selects the STANDARD (4:3) aspect ratio
9: Selects the LETTERBOX aspect ratio
0: Turns the PFP Controller ON.
OFF: Also known as the button left of '0',
this turns the PFP Controller OFF.
OFF
ON
A
C
I
D
E
N
P
U
T
I
12 3
45 6
78 9
R
M
0
UNCO
B
PWR
G
I
N
P
U
T
F
H
J
Page 16

14
Quick Set-up Guide
Connection Examples
A
While there are many different ways to connect your source equipment to your PFP Controller, the
examples shown above are the most common and are recommended by Runco.
• COMPOSITE VIDEO INPUT
Composite video is the most common type of signal used, but is also the lowest in picture quality.
Many sources have outputs that are limited to Composite video, such as some VCR’s and
camcorders. Others, such as laser disc players, actually produce slightly better results when using
Composite video. While the PFP Controller has an excellent decoder for Composite video, it is
recommended that Composite video be used only if necessary.
• S-VIDEO INPUT
S-Video is the second-best type of signal that can be used, but is MUCH better than Composite video.
Using such sources as satellite receivers, high-quality VCRs and DVD players (with no Component
output) will produce a MUCH cleaner and sharper signal. Decoder artifacts that are associated with
Composite video (dot crawl and ‘rainbows’) are non-existent when using S-Video.
• COMPONENT INPUT
Component video is the best type of signal that can be used. The most common sources that use
Component outputs are DVD players, and it is highly recommended that Component be used when
possible. Component video goes one step beyond S-Video in picture quality; chroma (color)
information is more resolved and the overall picture appears more well-defined.
• RGB/COMPONENT INPUT
This port is where all high-resolution signals (such as computers, DTV decoders and progressive
DVD players) must be input. The signal type can be either RGBHV or Component and is not
processed by the PFP Controller.
12V FUSE
MASK
12V TRIGGER
utomation
System
SCREEN
COMLINK OUT
RS-232 IN
To VX-1000c
RGB OUTPUT VIDEO INPUTS
B G R Y Pr Pb
H
DTV decoder,
RGB/COMPONENT COMPOSITEV
DVD Player
Progressive DVD
or Computer
S-VIDEO
CAUTION
RISK OF ELECTRIC SHOCK
DO NOT OPEN
AVIS: RISQUE DE CHOC ELECTRIQUE-NE PAS OUVRIR
CAUTION: TO REDUCE THE RISK OF ELECTRIC
SHOCK, DO NOT REMOVE COVER. NO USERSERVICEABLE PARTS INSIDE. REFER SERVICING
TO QUALIFIED SERVICE CENTER.
WARNING: TO REDUCE THE RISK OF FIRE
OR ELECTRIC SHOCK, DO NOT EXPOSE
THIS APPLIANCE TO RAIN OR MOISTURE.
!
VCR, Laser
disc player,
camcorders
RUNCO INTERNATIONAL
HAYWARD, CA
MADE IN USA
AC 100-240V, 50/60 Hz, 15W
MADE IN USA
Projector
Sattelite
receiver or
SVHS player
Page 17

15
Overall Functional Description
The VX-1000c system consists of the PFP Controller and the VX-1000c Projector. This system is
unique in the way it is controlled; the control center for this system is located within the PFP
Controller. The PFP Controller tells the Projector to turn on or off, controls its brightness, contrast,
color temperature and more. All of this is accomplished by Runco's unique ComLink, which is the
transfer of information between the PFP Controller and the Projector via their ComLink ports on a
CAT5 cable (or similar) with RJ-11 ends. Therefore, only the PFP Controller's remote control is
necessary to control all aspects of this system.
Besides being the system's control center, the PFP Controller is also a high-quality scaler, which
outputs all signals in the native resolution of the VX-1000c Projector. The Composite, S-Video and
Component (non-progressive) signals are sent through the PFP Controller's 10-bit decoder, de-interlaced, then scaled to the native resolution of the Projector. In the case of HDTV or progressive DVD
signals, these are input to the RGB/Component port.
In the next chapter, the menu system will be described in detail. There are many adjustments
available to perfect the VX-1000c's image, including typical 'front-panel controls' as well as color
temperature and other image-quality controls.
Page 18

Lamp Mode
Keystone
Picture Orientation
IR Code Set
Lamp Hours 20
16
Menu Description and Navigation
Menu Tree
Anamorphic
Standard 4:3
Letterbox
Tint
Color
Brightness
Contrast
Sharpness
Luma Enhance*
Chroma Enhance*
Color Temperature*
Color Balance*
The menu tree above is an overall glance at the menu system in the VX-1000c. This menu is shown
with the installation mode enabled.
* These menu items will only appear if the installation mode is enabled (pg. 21).
The main menu includes three main sections: Source Selection (Composite, S-Video, Component
and High Definition (either RGB or Component and the Computer Input on the Projector), Aspect
Ratio and Installation. Highlight an item on the screen using the green selection cursor and press
ENTER on the remote or front panel to select and make adjustments.
Main Menu
INPUT SELECT
Standard:
Composite
S-Video
Component
High Definition:
Component
RGB
Projector Input:
Computer
Aspect Ratio Select
Installer Adjust
Page 19

Source Selection is done by highlighting the desired source with the up or down arrows and
pressing ENTER. Sources may also be selected by pressing the left or right arrows on the front panel
or remote, or by one of the direct access buttons on the remote (page 13). Picture adjustments such
as color, tint, brightness, etc, are unique per source. To select a high-resolution source (input to the
RGB/Component 15PIN input on the PFP Controller), select either RGB HD or Component HD as
appropriate. If you wish to use the Computer input on the Projector, select Computer. The Controller
will switch the Projector’s inputs accordingly.
Aspect R
atio selection is done by highlighting 'Aspect Ratio' on the main menu and pressing enter.
The Aspect Ratio menu will then appear; and either ANAMORPHIC, LETTERBOX or 4:3 may be
selected. Aspect ratios may also be selected by pressing either the up or down arrow buttons, or by
one of the direct access buttons on the remote.
Installa
tion is used for adjustments usually made during the initial installation. This includes Lamp
Mode, Keystone and Picture Orientation. Lamp Mode allows you to select between ‘Normal’ (full light
output) and ‘Low’ (80% of full light output). Keystone allows the adjustment of trapezoidal distortion
caused by angling the Projector; picture for ceiling or floor, front or rear installations. IR Code Set
allows the Controller to be set to one of four different IR Code Sets. This is useful if one of the Code
Sets has commands that are conflicting with other equipment, or other manufacturer’s IR Codes are
conflicting with the Controller. Lamp Hours may be checked in the Installation Menu as well.
17
Page 20

18
Picture Quality Adjustments
Main Menu
TINT
COLOR
BRIGHTNESS
CONTRAST
SHARPNESS
LUMA ENHANCE*
CHROMA ENHANCE*
COLOR TEMPERATURE*
COLOR BALANCE*
Picture quality adjustments (also known as "Front Panel Controls") are the controls that change different parameters of the image such as the amount of color, black level, etc. While these adjustments
can be set to suit the needs of the user, there is a way to set these properly. This section will describe
what each function does and how to adjust them properly.
To access the Picture Quality Adjustments, press MENU, highlight the active source (indicated by the
arrow) and press ENTER. The picture quality sub-menu will then appear (see above).
To make an adjustment to a particular function, highlight the function with the up or down arrow
buttons and press ENTER. Once the function is on-screen (i.e. brightness), pressing the UP arrow
button on the remote or front panel will increase the value of that function; pressing the DOWN arrow
on the remote or front panel will decrease the value of that function.
While each of the picture quality adjustments can be set to suit the needs of the user, there is a
'proper' way to set the adjustments. For setting TINT and COLOR, please refer to the color bar test
pattern below.
NOTE: A BLUE FILTER must be used so only the blue color bars can be seen; if no blue color filter is
available, see if the display device has the ability to mute (turn off) the red and green colors via its
menu structure (most CRT Projectors have this feature). Blue filters are provided with the Video
Essentials or AVIA test DVDs.
sub-menu
* Active only when the installation mode is
enabled (pg. 21).
Input Select
Standard:
Composite
S-Video
Component
High Definition:
Component
RGB
Projector Input:
Computer
Aspect Ratio Select
Installer Adjust
white
cyan
yellow
green
magenta
red
blue
Tall color bars
Short color bars
Tint
Color
Page 21

19
TINT (also known as 'hue') is essentially the ratio of red to green in the color portion of the image.
If TINT is decreased, the image will appear redder, and increasing it will cause the image to appear
greener. To set TINT properly, look at the color bar pattern through a blue filter (or mute the red and
green outputs). Adjust TINT until the middle two tall color bars match the middle short color bars
(see color bar drawing).
COLOR
(also known as 'saturation') increases or decreases the amount of color in the image.
To set COLOR properly, look at the color bar pattern through a blue filter (or mute the red and green
outputs). Adjust COLOR until the outer two tall color bars match the outer short color bars (see color
bar drawing).
For setting CONTRAST and BRIGHTNESS, please refer to the PLUGE pattern below:
CONTRAST adjusts the white level of the image.Adjust contrast until there is a distinct definition
between the two brightest bars.
NOTE: For best results, Runco recommends that CONTRAST be set to '0' or very close to it.
BRIGHTNESS
adjusts the black level of the image. To adjust this properly, adjust BRIGHTNESS
until the 'below black' bar JUST disappears, but the 'above black' bar is still barely visible.
NOTE: Some DVD players cannot pass the 'blacker than black' bar (they won't pass PLUGE),
and that bar will never be visible. In a case like this, adjust the 'above black' bar until it is slightly
brighter than the background that surrounds it.
A
Increase contrast until this
bar no longer gets visibly
brighter, then decrease
contrast slightly until a
small change in intensity
occurs.
Below black
bove black
Page 22

20
SHARPNESS adjusts the amount of high-frequency detail in the image. This can be adjusted to the
preference of the user. Keep in mind that when SHARPNESS is decreased, fine details in the image
will become 'soft'; when it is increased, fine details will become sharper but will also make the picture
appear 'noisy' if adjusted too high.
LUMA
ENHANCE* acts as an edge enhancement, especially around black to white transitions in the
image. Essentially, this has the same characteristics as sharpness but affects the edges of objects far
more that the rest of the image.
FREQUENCIES HIGH/LOW affect the overall range of the LUMA ENHANCE feature. For example, if
using a lower-quality video source such as a VCR, the FREQUENCIES should be set to LOW. For a
good quality source such as a DVD player, set FREQUENCIES to HIGH. To set FREQUENCIES,
press ENTER while LUMA ENHANCE is on-screen.
CHROMA
ENHANCE* acts as an edge enhancement, especially around color transitions in the
image. Essentially, this has the same characteristics as sharpness but affects the edges of objects
far more that the rest of the image.
FREQUENCIES HIGH/LOW affect the overall range of the CHROMA ENHANCE feature.
For example, if using a lower-quality video source such as a VCR, the FREQUENCIES should be set
to LOW. For a good quality source such as a DVD player, set FREQUENCIES to HIGH.
To set FREQUENCIES, press ENTER while CHROMA ENHANCE is on-screen.
COLOR
TEMPERATURE* sets the overall color temperature of the image. The range is from -3 to 3.
The negative values provide a lower (Redder) color temperature, 0 is 6500 (neutral gray), and the
positive values provide a higher (Bluer) color temperature.
COLOR
BALANCE* adjusts the actual grey scale of the image. You may adjust the amount of Red or
Blue in the image as needed.
* Active only when the Installation mode is enabled (page 21).
Page 23

21
The Installation menu is where you can adjust the Picture Orientation,
Keystone, Lamp Output, and even check the age of the lamp in the
Projector.
When the PFP Controller is turned on for the first time, the INSTALLATION item will not appear in the main menu. To enable the INSTALLATION menu, there are two options:
· With the processor ON and no menus on-screen, simultaneously press
the ENTER, UP and LEFT buttons (you don't need to hold them down).
Release the three buttons and press MENU, ensure INSTALLATION is
now on the bottom of the main menu.
· With the remote control, press button 6 (with no menus on-screen).
After pressing '6', press MENU and ensure INSTALLATION is now on the
bottom of the main menu.
After INSTALLATION has been accessed, press MENU, highlight
INSTALLATION and press ENTER. This will bring up the INSTALLATION
MENU, shown on the right:
Installation Menu
INSTALLATION
Lamp Mode
Keystone
Picture Orientation
IR Code Set
Lamp Hours 20
Installation Menu
Lamp Mode
The Lamp Mode enables the installer to set the lamp for full brightness (normal) or Low (20% lower).
If a small screen is being used in a dark area or the image is otherwise too bright, it may be a good
idea to set the Lamp Mode to LOW. When the Lamp Mode is set to LOW, the lamp will last longer as
a result of the lower current setting.
Keystone
KEYSTONE: Corrects the trapezoidal distortion that results from projecting at an angle:
A correctly adjusted image
An image with Keystone error
This may occur in installations where the projector needed to be angled as a result of a larger vertical
offset. This keystone feature will correct for trapezoidal distortion for as much as a 15° projector angle.
Page 24

22
System Reset
In the event that your PFP Controller appears to have a software problem, or adjustments have been
made so far out of range that the image is no longer on-screen or discernable, you can reset it back
to factory values. This sets ALL settings back to factory values, so any adjustments made previously
will be lost.
T
o reset your VX-1000c PFP Controller, follow this procedure:
• Turn off the MAIN POWER switch on the back of the processor
• Hold down the DOWN ARROW button, and turn the MAIN POWER SWITCH back on. Continue
holding the down arrow button until the LED on the front panel blinks, then release the down arrow
button.
Once this is done, your processor has been completely reset to factory values. After resetting the unit,
Composite video will be the active source.
Note: If a system reset is performed, the IR Code Set will default to 013.
Picture Orientation
This will set the orientation of the image for your installation. If the Projector will be mounted on a
table, set this for Floor. If mounting it on the ceiling, select Ceiling. For two-mirror or ‘straight-shot’
rear-screen applications, select floor rear or ceiling rear as appropriate.
Lamp Hours displays the number of hours the lamp has been on. With the VX-1000c, the lamp life is
around 1000 hours. This should be checked periodically to keep track of the lamp's age, and when
the lamp is around 1000 hours old, a new one should be installed to prevent lamp failure, including
implosion.
Lamp Hours
IR Code Set
IR Code Set allows the installer to choose from one of four different sets of IR codes. If the default
code has commands that are conflicting other equipment, try using one of the other code sets.
When IR CODE SET is selected in the menu, you will get four code set options- 013, 215, 510 and
918. These numbers correspond to the number that is programmed into the remote control itself (see
pg. 13). For example, if you wish to use IR code set 510, you would first select '510 code set' from the
menu, then program the remote for code 510 (as described on pg. 13). You may also disable the IR
receiver on the Controller all together by selecting 'Deactivated'. In the event the Controller has
been reset (see 'system reset' below), the IR code set will default to 013.
'Menu/Enter' invert allows the menu and enter buttons on the remote to reverse their functions; if
'YES' is selected, the menu button will become the enter button, and the enter button will become the
menu button. This affects the remote ONLY.
Page 25

23
The 'Quick Menu' allows you to make adjustments to the displayed image without having to go
through the standard menu.
The Quick Menu allows the adjustment of Brightness, Contrast, Color, Tint, Sharpness and
Image Shift with any of the three standard inputs (Composite, S-Video, Component) or
Component HD. In RGB HD or Computer, only Brightness, Contrast and Shift are available.
To use the quick menu, press ENTER on the front panel, and observe the front panel display.
The following will be displayed:
Quick Menu
The first mode of the Quick Menu is BRIGHTNESS. When this is displayed, press the up or down
arrows to adjust the brightness. For all of the adjustments, the quick menu will time-out 10 seconds
from the last button press, so ensure that you make the adjustments within that time.
If you do not need to make any brightness adjustments or you have completed making them, press
ENTER again to display the next mode of the shift menu, which is for CONTRAST:
To adjust CONTRAST, press the up or down arrow buttons. Once the adjustments have been
completed, or no adjustment was needed, press ENTER. The next mode of the quick menu will be
displayed, which is for COLOR (except RGB and Computer inputs):
To adjust COLOR, press the up or down arrow buttons. Once the adjustments have been completed,
or no adjustment was needed, press ENTER to display the next mode of the Quick Menu, which is
TINT (except RGB and Computer inputs).
Quick Menu: BRIGHTNESS
Press arrows or enter...
Quick Menu: CONTRAST
Press arrows or enter...
Quick Menu: COLOR
Press arrows or enter...
Page 26

24
To adjust TINT, press the up or down arrows. Once the adjustment has been completed or no adjustment was needed, press ENTER to display the next mode of the Quick Menu, which is SHARPNESS
(except the RGB and Computer inputs).
Quick Menu: TINT
Press arrows or enter...
Quick Menu: SHARPNESS
Press arrows or enter...
To adjust SHARPNESS, press the up or down arrows. Once the adjustment has been completed or
no adjustment was needed, press ENTER to display the final mode of the Quick Menu, which is
SHIFT.
Quick Menu: SHIFT
Press arrows or enter...
To adjust SHIFTING, press the up, down, left or right arrows to shift the image in the desired direction.
When the adjustments have been made, press ENTER to exit the Quick Menu, If you need to touch
up any of the Quick Menu items, press ENTER to re-enter the Quick Menu.
Page 27

25
Basic Troubleshooting Tips
The following is a basic troubleshooting guide that can assist you in resolving typical problems may
result in normal operation. If you have encountered problems that are not listed in this guide, please
contact your Runco dealer for assistance.
The projector does not turn on
after initial installation. The
Power LED on the front of the
PFP Controller stays yellow
after the power button is
pressed.
The projector and PFP
Controller are both on, but
there is no video image onscreen.
The projector is producing a
'split screen' or an otherwise
scrambled image.
The image appears too bright,
and there is a loss of definition
in the brightest areas of the
image.
· The RJ-11 (ComLink) cable is
not connected between the PFP
Controller and Projector, or is
made improperly.
· The projector is not plugged in,
or its AC outlet is not active.
Look at its power LED and see if
it is illuminated.
· The PFP Controller is on the
wrong source.
· The PFP Controller is on the
correct source, but the source
itself is off.
· A progressive scan DVD is
plugged into Component input
rather than the RGB/Component
input.
· Contrast is set too high.
· The DVD player is set for a
high-level output.
· The video signal has not been
terminated properly somewhere
in the system.
· Use a standard RJ-11
phone-type cord. Ensure it is
firmly plugged into both the
Controller and the Projector.
· Ensure there is good continuity in the RJ-11 cable.
· Verify that the AC outlet is
active, or that the Projector is
plugged in.
· Press MENU on the
Projector's remote, and look
to see which source is active
(the arrow will be pointing to
the active source). Select the
correct source as appropriate.
· Turn on the source. It is recommended that all sources be
turned on first BEFORE the
VX-1000c.
· Only NTSC/PAL can be input
to the Component input.
Progressive scan must go into
RGB/Component.
· Turn down the CONTRAST
level on the PFP Controller.
Mid-range is 127; it is recommended to keep it below 140
to prevent this problem.
· Set the DVD player for a
nominal output (no boost or
gain).
· Ensure all video signals are
terminated in 75 Ohms.
PROBLEM POSSIBLE CAUSE SOLUTION
Page 28

The image appears too
'washed out', or the darkest
areas of the image appear too
bright.
The colors of the image
appear abnormal
The image appears keystoned
(trapezoidal).
The Projector will not turn on,
and the power LED on the
front of the PFP Controller is
blinking red.
The Projector will not turn
back on after it was powereddown, or the image disappears during operation.
· Brightness is set too high.
· The DVD player may be set
for too high of a brightness
level.
· The Red, Green and/or Blue
outputs of the PFP Controller or
inputs to the Projector are
reversed.
· The Pr and Pb inputs on the
Component input on the PFP
Controller are reversed
· The Projector has been
mounted too high or too low in
respect to its vertical
offset.
· The PFP Controller may have
'locked-up'.
· The Projector will not turn on
for two minutes after powerdown to protect its bulb.
· The bulb has failed
· Turn down the BRIGHTNESS
level on the Controller. If possible, use a PLUGE pattern to set
the brightness level properly.
· Set the DVD player for a nominal output (no boost or gain).
· Check the cable connections
on the back of the PFP
Controller or on the Projector.
· Adjust Keystone, see page 21.
· Unplug the Controller for 2
minutes; plug it back in a re-try.
· Perform a system reset on the
Controller (see page 22), and
then re-try.
· Wait two minutes until the LED
on the front of the PFP
Controller turns red.
26
Page 29

27
RS-232 Communications
Baud rate: 9600 (fixed)
Bits: 8
No Parity
All protocol in ASCII format
RS-232 input connector pin numbers: TxD= Pin# 2, RxD= Pin# 3, GnD= Pin# 5
Command format (single command): command value (i.e. brightness 30).
NO
TE: A space (not an underscore) or comma may be used between the command and its value.
Command string format: command,command value, command etc.
(i.e. COMPOSITE,BRIGHTNESS 30,ANAMORPHIC,<CR>)
NO
TE: In between commands, a comma must be used; a comma or space may be used in between
a command and its value.
NO
TE: A carriage return must be used after each command or string.
Other notes:
• For command strings, a maximum of 255 characters can be used in a single string.
• If it is necessary to input multiple commands, they should all be together in a single string. Inputting
commands one at a time requires a 15 second delay between commands, as the information is
stored into non-volatile memory after each command.
• For values not automatically stored (see next paragraph), the command "!STORE" must be sent
in order for the PFP Controller to keep the settings. Otherwise, the values will be considered
temporary and will revert to their stored settings upon source change or power-up.
• The "Value stored" column refers to a command that is either automatically stored or if it must be
manually stored with the "!STORE" command.
• PARAMETER min/max refers to a function's minimum and maximum value range. Inputting
values above or below their range may cause unpredictable (but not fatal) results.
• When connecting RS-232 to the Controller, you may have to add a delay in between characters.
For example in an AMX system you would add the following line:
(***********************************************************)
(* STARTUP CODE GOES BELOW *)
(***********************************************************)
DEFINE_START
SEND_COMMAND PFP,'SET BAUD 9600,N,8,1'
SEND_COMMAND PFP,'HSOFF'
SEND_COMMAND PFP,"'CHARD-200'" (* SETS DELAY IN MICROSECONDS BETWEEN CHARACTERS *)
This will increase the reliability in receiving the code. For other systems you may have to contact the
manufacturer to find out how to set the delay.
General Information
Page 30

28
COMMAND PARAMETER (min/max) Value stored? DESCRIPTION
ON NA NA Turns PFP Controller on
OFF NA NA Turns PFP Controller off
COMPOSITE NA YES Selects the Composite video
input
SVIDEO NA YES Selects the S-Video input
COMPONENT NA YES Selects the Component input
HDRGB NA YES Selects the RGB HD input
HDCOMPONENT NA YES Selects the Component HD input
COMPUTER NA YES Selects the Computer input on
the Projector
ANAMORPHIC NA YES Selects the anamorphic
aspect ratio
STANDARD NA YES Selects the standard (4:3)
aspect ratio
LETTERBOX NA YES Selects the letterbox aspect ratio
TINT -127/127 (HD-30/30)* NO Sets a value for tint
COLOR -127/127 (HD-30/30)* NO Sets a value for color
AGCCOLOR 0/1 NO 0=Disable Color AGC
1=Enable Color AGC
BRIGHTNESS -30/30 NO Sets a value for brightness
CONTRAST -30/30 NO Sets a value for contrast
AGCCONTRAST 0/1 NO 0=Disable Contrast AGC
1=Enable Contrast AGC
SHARPNESS 0/255 (HD-30/30)* NO Sets a value for sharpness
CHROMAHIGH 0/127 NO Sets a value for high-frequency
chroma edge enhancement
CHROMALOW 0/127 NO Sets a value for low-frequency
chroma edge enhancement
LUMAHIGH 0/127 NO Sets a value for high-frequency
luminance edge enhancement
LUMALOW 0/127 NO Sets a value for low-frequency
luminance edge enhancement
TEMPERATURE -3/3 NO Selects the Projector ’s color
temperature
RS-232 Commands
* These parameters are applicable only in the HD Component mode.
Page 31

29
COMMAND PARAMETER (min/max) Value stored? DESCRIPTION
!STORE NA YES Stores the current set of values
(all values) into non-volatile
memory
!RESTORE NA YES Restores the stored values
!FACTORY NA YES Restores all values to factory
default levels
!STATUS NA NA Asks the Controller to provide
the hardware information,
current values and system status
to the automation system
!RESTART NA NO Restarts the PFP Controller
(same as turning it on and off)
!ECHO NA NO Enables the Controller to echo
back commands and values to
the automation system
!NOECHO NA NO Disables the PFP Controller's
character echoing
!INSTALLMODEOFF NA NA Disables the Installation menu
(removes it from the main menu)
!INSTALLMODEON NA NA Enables the Installation menu
(enables it on the main menu)
!SERVICEMODEON NA NA Enables the service mode
!SERVICEMODEOFF NA NA Disable the service mode
RGAIN -30/30 NO Adjust the Red level of image
GGAIN -30/30 NO Adjust the Green level of image
IRCODE 013 NO Changes the IR Code Set of the
Controller to 013
IRCODE 215 NO Changes the IR Code Set of the
Controller to 215
IRCODE 510 NO Changes the IR Code Set of the
Controller to 510
IRCODE 918 NO Changes the IR Code Set of the
Controller to 918
IRCODE 0 NO Disables the IR receiver
Page 32

VX-1000c Projector Dimensions
30
6.435
7.185
7.450
Top View
Front View
Bottom View
Temp
Lamp
Power
Page 33

PFP Controller Dimensions
Front Panel
Rear Panel
Top Panel
Side Panel
31
17.45"
3.5"
17"
ratio
<
t
e
n
r
e
<
<
ratio
n
e
i
u
m
n
p
>
u
t
TM
PIXEL FOR PIXEL
3.025"
16"
MASK
12V TRIGGER
12V FUSE
SCREEN
COMLINK OUT
RS-232 IN
RGB VIDEO OUTPUT VIDEO INPUTS
B G R Y Pr Pb
H
RGB/COMPONENT COMPOSITEV
17"
S-VIDEO
CAUTION
RISK OF ELECTRIC SHOCK
DO NOT OPEN
AVIS: RISQUE DE CHOC ELECTRIQUE-NE PAS OUVRIR
CAUTION: TO REDUCE THE RISK OF ELECTRIC
SHOCK, DO NOT REMOVE COVER. NO USERSERVICEABLE PARTS INSIDE. REFER SERVICING
TO QUALIFIED SERVICE CENTER.
WARNING: TO REDUCE THE RISK OF FIRE
OR ELECTRIC SHOCK, DO NOT EXPOSE
THIS APPLIANCE TO RAIN OR MOISTURE.
!
RUNCO INTERNATIONAL
HAYWARD, CA
MADE IN USA
AC 100-240V, 50/60 Hz, 15W
MADE IN USA
3.5"
17.45"
Page 34

32
Specifications
Projector Type: Digital Light Processing™ (DLP)™
Native Resolution: 1280 x 720 (Designed for 16:9 screens only)
Input Standards: NTSC (NTSC/PAL International version); HDTV @ 480p, 1080i and
720p (via RGB/Component input)
Lamp: 250W NSH
Lamp Life: 2000 hours
Light Output: 1500 ANSI lumens
Picture Size: 40" to 200" wide (16:9 screens only)
Throw Distance: Minimum= 1.85 x screen width
Maximum= 2.4 x screen width
Vertical offset: Between 0 and (0 - screen height)
Inputs: RGB/Component (from PFP Controller only), Computer
(via HD15 connector)
Aspect Ratio: 16:9, 4:3, Letterbox (on a 16:9 screen)
Contrast Ratio: 1000:1
Dimensions: Width: 20 7/8 in. (530 mm)
Depth: 21 5/8 in. (550 mm)
Height: 8 1/4 in. (208 mm)
Weight: 50 lbs. (23 kg)
Input Voltage: 115VAC, 60Hz (100-240VAC. 50/60Hz International Version)
Power Consumption: 365W
Thermal Dissipation: 1250 BTU's
Operating Environment: 41°-95°F (5°-35°C); 0-90% humidity (non-condensing)
Regulatory Approvals: Complies with FCC Class 'B', CE, C-Tick
Projector Warranty: Service Labor and Parts (except lamp):
Runco warrants the product for two (2) years from the date of delivery to
the end user.
Lamp Warranty: 6 months or 1000 hours, whichever comes first
VX-1000c Projector:
Page 35

33
PFP Controller:
Supplied Accessories
• Remote Control with 2 AAA batteries
• Rack Mount hardware
• The Installer friendly “Slam Dunk” cable, which includes VGA to RGB adaptor
and mini D-SUB9 to RJ-11 adaptor
• Power cables (one for Projector, one for PFP Controller)
• 50’ RJ-11 cable
• Lens adjustment tool
• User’s Manual
• Warranty information
Inputs: Composite, S-Video, Component, RGB/Component HD
Input standards: NTSC (NTSC/PAL International Version)
Aspect Ratios: Anamorphic, 4:3, Letterbox (16:9 screens only)
Control Options: RS-232, Infrared, Front Panel
Bandwidth: 5.5 Mhz (Composite, S-Video, Component inputs);
100Mhz (pass-through)
Operating Environments: 41°-95°F (5°-35°C); 0-90% humidity (non-condensing)
Dimensions: Width: 17 7/16" (443.23 mm)
Depth: 16" (406.4 mm)
Height: 3 ½" (88.9 mm)
Weight: 16 lbs (7.26 Kg)
Power Requirements: 100-120 VAC (200-240VAC Export version); 15W
Regulatory Approvals: Complies with FCC Class 'B', CE, C-Tick
Included Accessories: Rack mounting brackets, Remote control, Owner's manual
Controller Warranty: Service Labor and Parts:
Runco warrants the product for two (2) years from the date of delivery to
the end user.
Page 36

Page 37

RUMA-009325 rev 12-01
Runco International • 2463 TripaldiWay • Hayward, CA 94545 • ph (510) 293-9154 • fax (510) 293-0201 • www.runco.com
 Loading...