

Runco DV-300 Owner's Manual

OWNER’S OPERATING MANUAL
DR-300
Digital Light Processing™ Projector


Table of Contents
1
INTRODUCTION
Overall Description.......................................................................................... 2
Features and Benefits .................................................................................... 2
Safety Precautions.......................................................................................... 3
Limited Warranty ............................................................................................ 4
GETTING STARTED: DR-300 PROJECTOR
Input Panel Description .................................................................................. 6
Remote Control Description............................................................................ 7
Projector Placement and Offset Info .............................................................. 8
OPERATION: DR-300 PROJECTOR
Menu Tree ...................................................................................................... 9
Aspect Ratios ................................................................................................ 10
Source Select................................................................................................ 12
Picture Controls ............................................................................................ 12
Image Options .............................................................................................. 14
Color Management ........................................................................................ 16
Projector Options .......................................................................................... 17
TROUBLESHOOTING................................................................................ 22
RS-232 CONTROL CODES / CABLE CONNECTION.................... 23
DIMENSIONS................................................................................................ 24
SPECIFICATIONS ...................................................................................... 25

2
Introduction
OVERALL DESCRIPTION
Congratulations on your purchase of the DR-300 projector! The projector is a single-chip DLP™ projector with native XGA (1024 x 768) resolution. It includes a bright 135W NSH lamp as its light source,
and requires very little maintenance. It is capable of displaying all currently available DTV formats (via
an external DTV decoder, not included), as well as computer resolutions from VGAto UXGA.
The projector is packed full of important features that are necessities in a home theater. For example,
the projector has aspect ratio control built-in, and can be configured for 4:3 or 16:9 screens, and can
also be configured for use with an anamorphic lens. Also, it can sense whether a high-resolution input
signal is RGB or component and adjust itself automatically, making this projector very user-friendly.
This manual will guide you through the operation of your DR-300 projector. Please read through it
before operating your projector, and keep it as a reference for the future.
FEATURES AND BENEFITS
The DR-300 projector has many unique and important features. They include:
• Built-in aspect ratio control for 16:9 or 4:3 screens
• Projector can be configured for use with an anamorphic lens
• Native 1024 x 768, Widescreen 1024 x 576
• 135W NSH lamp
• 1000 ANSI lumens light output
• Electronic keystone correction
• Manual Zoom and Focus
• DTV capable (via outboard DTV decoder); 480p, 540p, 720p and 1080i formats
• NTSC/PAL/SECAM compatible
• Capable of displaying computer resolutions from VGA to UXGA
• Ceiling or floor, front or rear projection
• Expanded color balance controls
• Auto-switching between RGB and component
• Optimized for use with progressive DVD players

3
SAFETY PRECAUTIONS
Please read and observe the following safety precautions when operating your DR-300 projector.
• NEVER UNPLUG THE PROJECTOR WHILE IT IS STILL RUNNING!
The lamp MUST have time to cool- always place the unit in STANDBY and let the fans cool
the bulb before unplugging the unit. Failing to let the lamp cool properly can result in lamp
failure and possible implosion.
• Do not insert any object, especially metal or liquids, into the projector
• Do not place any objects containing water or any other liquid on top of the projector
• Do not place the projector in direct sunlight, near heaters or in extremely dusty or humid
locations
• Do not install the projector outdoors or otherwise exposed to the elements
• Do not place heavy objects on top of the projector
• If a power cord is damaged or frayed in any way, electrical shock and/or fire may result.
Please do not place objects on the power cord, and keep the cord away from heat-emitting
devices. Should a power cord become damaged in any way, please contact your Runco
dealer for a replacement cord.
• Do not remove the cover of the projector for any reason. If any problems arise, please
contact a Runco Dealer or Runco International for service. Removing the cover will void the
warranty.

4
LIMITED WARRANTY
Congratulations on your purchase of a Runco video product and welcome to the Runco family! We
believe Runco produces “The World’s Finest Home Theater Products”. With proper installation, setup
and care, you should enjoy many years of unparalleled video performance. Please read this consumer
protection plan carefully and retain it with your other important documents.
This is a LIMITED WARRANTY as defined by the U.S. Consumer Product Warranty and Federal
Trade Commission Improvement Act.
WHAT IS COVERED
UNDER THE TERMS OF THIS WARRANTY:
SERVICE LABOR: Runco will pay for service labor by an approved Runco service center when needed as a result of manufacturing defect for a period of two (2) years from the effective date of delivery
to the end user.
PARTS (Not including projector lamp): Runco will provide new or rebuilt replacement parts for the
parts that fail due to defects in materials or workmanship for a period of two (2) years from the effective date of the warranty. Such replacement parts are then subsequently warranted for the remaining
portion (if any) of the original warranty period.
LAMP: Six months or 1000 hours (which ever comes first).
WHAT IS NOT
COVERED UNDER THE TERMS OF THIS WARRANTY:
This warranty only covers failure due to defects in materials and workmanship that occur during normal use and does not cover normal maintenance. This warranty does not cover cabinets or any
appearance item; any damage to laser discs; failure resulting from accident, misuse, abuse, neglect,
mishandling, misapplication, faulty or improper installation or setup adjustments; improper maintenance, alteration, improper use of any input signal; damage due to lightning or power line surges,
spikes and brownouts; damage that occurs during shipping or transit; or damage that is attributed to
acts of God. In the case of remote control units, damage resulting from leaking, old, damaged or
improper batteries is also excluded from coverage under this warranty.
CAUTION: DAMAGE RESULTING DIRECTLY OR INDIRECTLY FROM IMPROPER INSTALLATION
OR SETUP IS SPECIFICALLY EXCLUDED FROM COVERAGE UNDER THIS WARRANTY. IT IS
IMPERATIVE THAT INSTALLATION AND SETUP WORK BE PERFORMED ONLY BY AN AUTHORIZED RUNCO DEALER TO PROTECT YOUR RIGHTS UNDER THIS WARRANTY. THIS WILL
ALSO ENSURE THAT YOU ENJOY THE FINE PERFORMANCE YOUR RUNCO PRODUCT IS
CAPABLE OF PROVIDING WHEN INSTALLED AND CALIBRATED BY RUNCO AUTHORIZED PERSONNEL.
RIGHTS, LIMITS AND EXCLUSIONS:
Runco limits its obligations under any implied warranties under state laws to a period not to exceed
the warranty period. There are no express warranties. Runco also excludes any obligation on its part
for incidental or consequential damages related to the failure of this product to function properly.
Some states do not allow limitations on how long an implied warranty lasts, and some states do not
allow the exclusion or limitation of incidental or consequential damages. So the above limitations or
exclusions may not apply to you. This warranty gives you specific legal rights, and you may also have
other rights that vary from state to state.
Limited Warranty

5
EFFECTIVE WARRANTY DATE:
This warranty begins on the effective date of delivery to the end user. For your convenience, keep the
original bill of sale as evidence of the purchase date.
IMPORTANT: WARRANTY REGISTRATION:
Please fill out and mail your warranty registration card. It is imperative that Runco knows how to reach
you promptly if we should discover a safety problem or product update for which you must be notified.
TO OBTAIN SERVICE, CONTACT YOUR RUNCO DEALER:
Repairs made under the terms of the Limited Warranty covering your Runco International video product will be performed at the location of the product, during usual working hours, providing location of
product is within normal operating distance from a Runco Authorized Service Center. If, solely in
Runco’s judgement, location of product to be repaired is beyond normal operating distance of the
closest Runco Authorized Service Center, it is the owner’s responsibility to arrange for shipment of the
product for repair. These arrangements must be made through the selling Runco dealer. If this is not
possible, contact Runco directly for a return authorization number and shipping instructions. Runco
will return product transportation prepaid in the United States, unless no product defect is discovered.
In that instance, shipping costs will be the responsibility of the owner.
ADDITIONAL INFORMATION:
To locate the name and address of the nearest Runco Authorized Service location, or for additional
information about this warranty, please call, write or visit our website:
CUSTOMER SERVICE DEPARTMENT
RUNCO INTERNATIONAL
2900 Faber Street
Union City, CA 94587
Ph: (510) 324-7777 / Fax: (510) 324-9300
www.runco.com
6
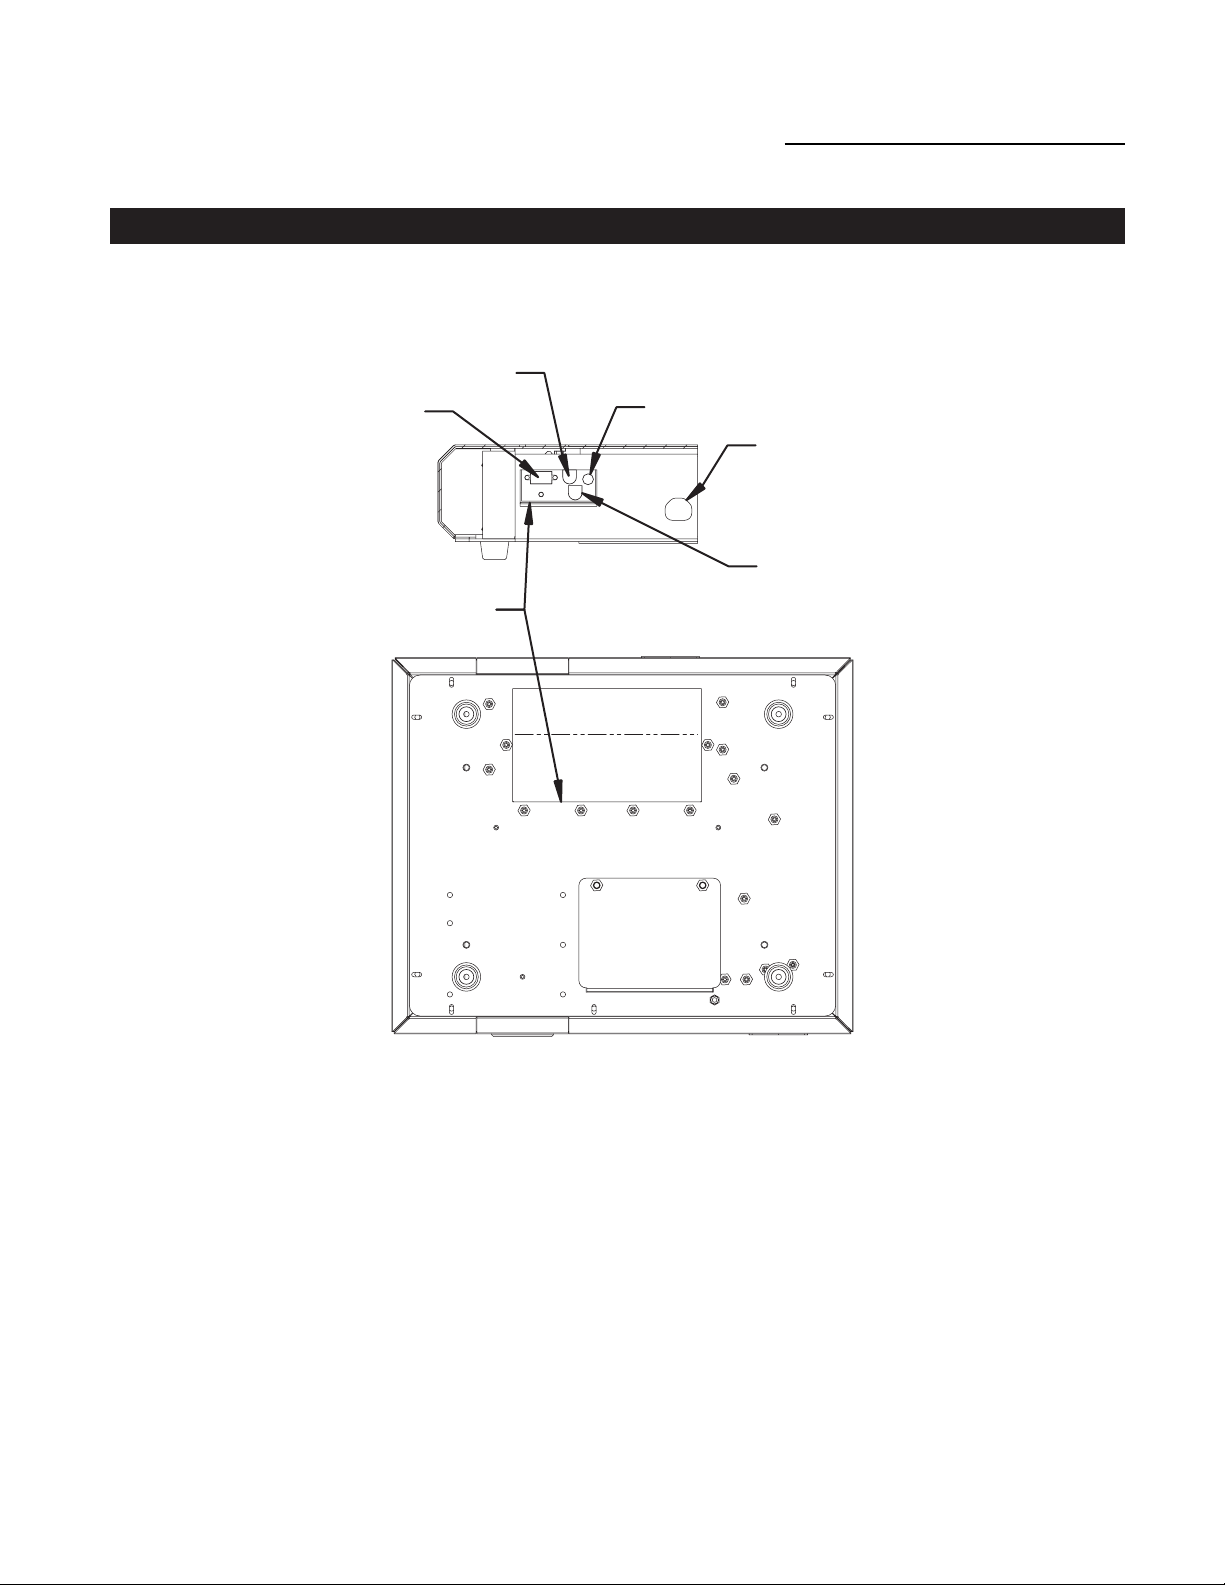
INPUT PANEL DESCRIPTION
All connections are located on the underside of the unit. Please refer to the following drawing:
Getting Started: DR-300 Projector
1. RGB/Component/HD Input
Connect RGB or component output from a high resolution source (computer, DTV decoder,
progressive DVD player, etc.) here.
2. S-Video Input
Connect an S-video signal here.
3. Composite Video Input
Connect a Composite video signal here
.
4. AC Input
Connect AC power here.
5. ComLink (RS-232 Control)
Connect the RS-232 output of a control system here (AMX, Crestron, etc.) see page 23.
4. AC Input
5. ComLink
INPUT PANEL
2. S-Video
1. RGB/Component/HD
3. Composite Video
7
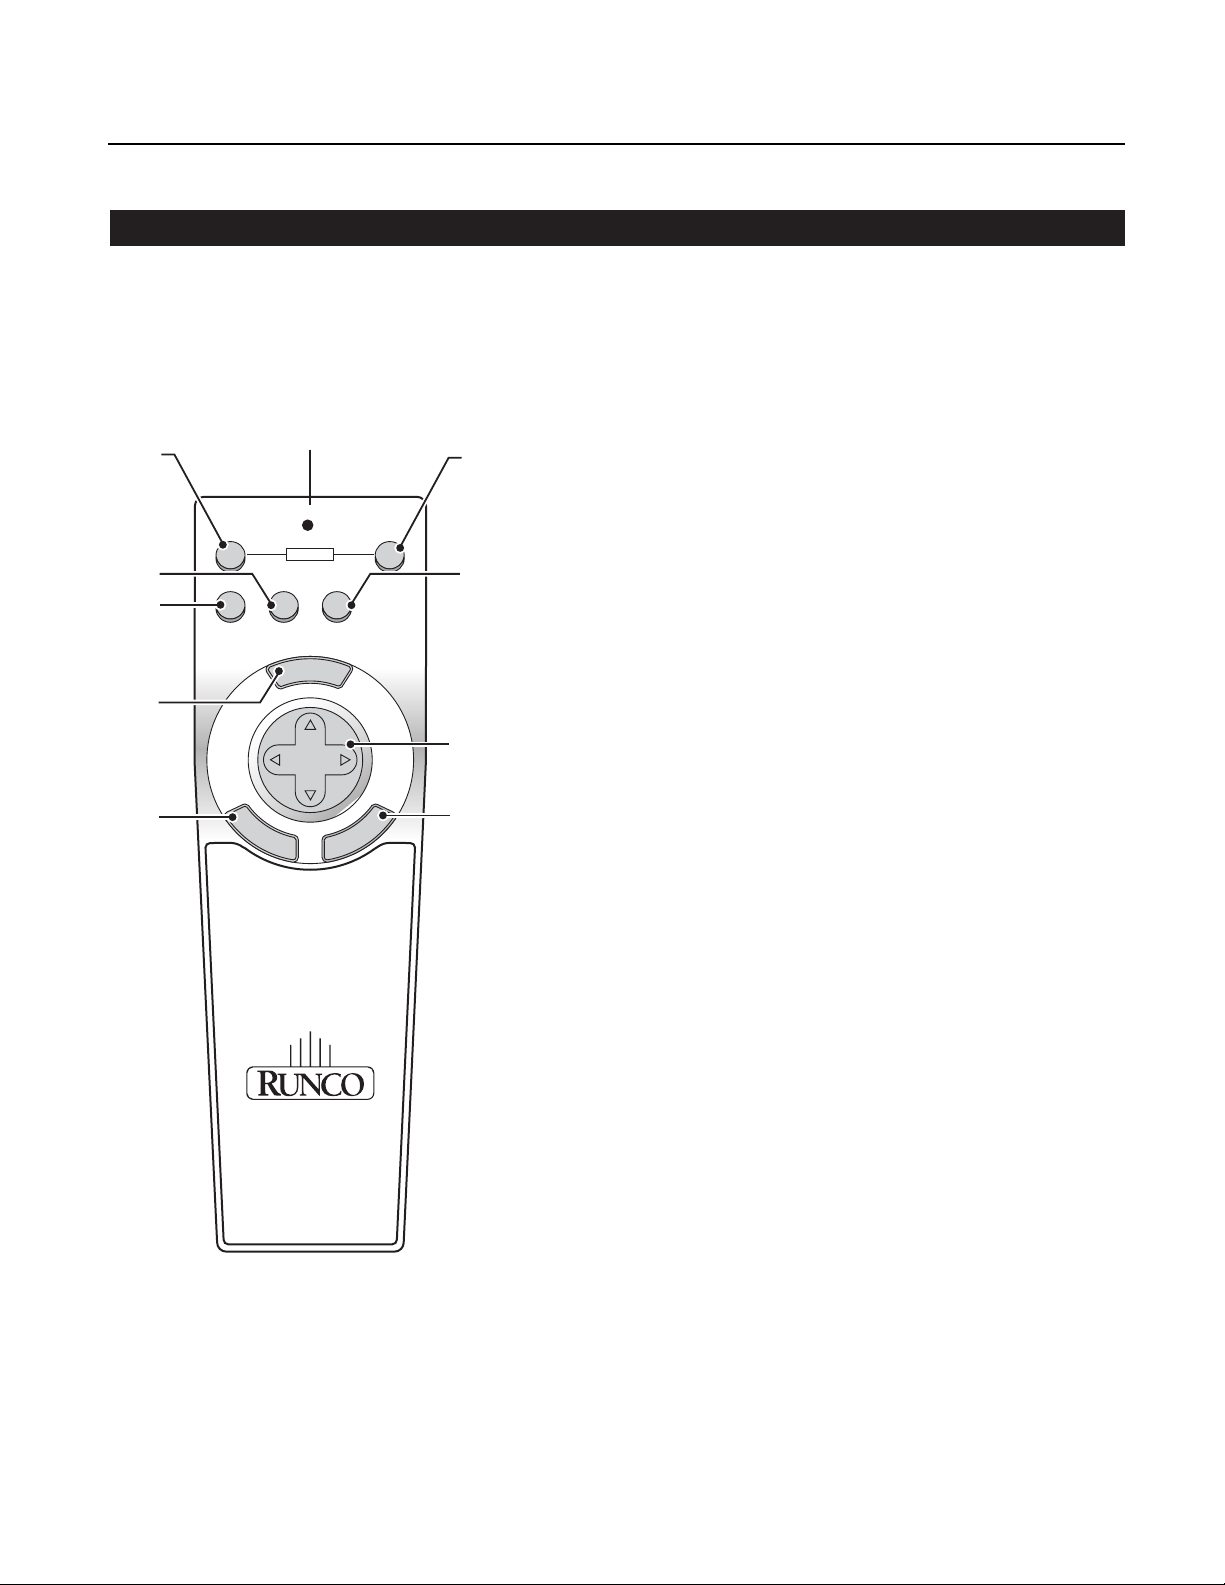
REMOTE CONTROL
The remote control controls all operations of the DR-300. It uses discreet On/Off commands, discrete
source selection commands and other simple controls.
1. OFF: Turns the projector off.
2. ON: Turns the projector on.
3. VIDEO: Selects Composite Video
as the source.
4. S-Video: Selects S-video as the source.
5. RGB/HD/Component: Selects
RGB/Component (DB15 input) as the source.
6. Menu Button: Displays the On-screen menu
for making adjustments or changing settings.
7. Select (arrow buttons): When the menu is
displayed, the arrow buttons allow you to select
the menu item you wish to adjust; when in an
adjustment mode, the arrow buttons will allow
you to adjust the level of the selected item.
8. Enter Button: Selects the highlighted menu
item.
9. Cancel Button: Exits the menu(s), or cancels
an adjustment (returns it to its previous value).
10. IR Output LED: Blinks when an infrared
signal is being transmitted.
1
2
3
4
5
6
8
10
OFF
POWER
VIDEO S-VIDEO RGB/HD
COMPONENT
N
E
U
M
ON
SELECT
E
N
T
E
R
L
E
C
N
A
C
7
9
 Loading...