

Page 1
PA201S/203S
Rumble Tuff
Electric Breast Pump
Instructions & Assembly
C2.indd 1 2011/11/25 下午 05:01:36
Page 2
C2.indd 2 2011/11/25 下午 05:01:36
Page 3
Congratulations
Congratulations on your new Rumble Tuff® Electric Breast Pump! The Rumble Tuff® Electric Breast Pump is perfect for
many occasions.
● Collecting breast milk while you're away from your baby
○ for example: when you're at work
● Relieving engorgement
○ for example: when your baby's feeding habits change because they're eating more solids
● Maintaining your milk supply if you have to temporarily stop breast feeding
○ for example: to protect your baby from the milk made while using anesthesia for surgery
The Rumble Tuff® Electric Breast Pump provides many of the features busy moms love.
● 2 cycles of expression to mimic babies sucking action
○ Stimulation - let down
○ Expression - optimal milk ow
● Milk back-up protection
● Quiet motor for discretion
● Small and lightweight
● Two power options to t your needs
○ AC Adapter
○ AA Alkaline battery (PA203) OR Li-Ion Rechargeable battery (PA201)
English 0
C2.indd 3 2011/11/25 下午 05:01:36
Page 4
English 1
Table of Contents
Congratulations
Important Safeguards
● DANGER
● WARNING
Parts Guide
● Electrical Pump Main Unit
● LCD Screen Guide
● Expression Collection Kit
● Manual-Pump Diaphragm Kit
Electric Pump Assembly Instructions
Manual Pump Assembly Instructions
Power Options
● Using your AC Adaptor (included)
● Using the Li-Ion Rechargeable Battery (for PA201 only)
● Install the Battery: (Li-Ion Rechargeable)
● Using 4 AA Alkaline Batteries (for PA203 only) (Batteries not included)
● Install the Batteries (AA Alkaline)
Pumping Instructions
Using the Manual Pump
Suction Level
M Botton
Setting the Time
● How to Adjust the Clock
Alarm Clock Mode
● How to Adjust the Alarm
Cleaning Instructions
● Sanitize Prior to First Use
● Before Each Use
.......................................................................................................................
.............................................................................................................
................................................................................................................................
...............................................................................................................................
.............................................................................................................................
.............................................................................................................
.....................................................................................................................
..............................................................................................................
.........................................................................................................
......................................................................................
......................................................................................
........................................................................................................................
....................................................................................................
..........................................................................
...........................................................................................
.........................................................
.....................................................................................................
..............................................................................................................
.........................................................................................................
..........................................................................................................................
.................................................................................................................................
......................................................................................................................
...............................................................................................................
..................................................................................................................
...............................................................................................................
..............................................................................................................
.............................................................................................................
.......................................................................................................................
0
3
3
3
4
5
5
6
6
7
12
16
16
17
18
20
21
23
27
29
29
31
31
33
33
35
35
35
C2.indd 4 2011/11/25 下午 05:01:36
Page 5
● Cleaning Instructions
Breastmilk Storage Guidelines
● Important Notes
Tips
● Pumping Tips
● Battery Storage
● Breastfeeding Tips
Troubleshooting
● Interruption of Electrical Service
● Radio Frequency Energy
● Decreased Suction
● Breastmilk Buildup in the Breast Shield Body
● Where to get Replacement Parts
● Where to get Additional Accessories
● What Additional Accessories are Available
Technical Data
● Power Requirements
Warranty
..................................................................................................................
...............................................................................................
.........................................................................................................................
.........................................................................................................................................
............................................................................................................................
.........................................................................................................................
......................................................................................................................
......................................................................................................................
......................................................................................................
..............................................................................................................
.....................................................................................................................
.......................................................................................
.....................................................................................................
.................................................................................................
..........................................................................................
........................................................................................................................
...................................................................................................................
.................................................................................................................................
35
36
36
38
38
39
39
40
40
40
40
41
41
41
41
42
42
43
English 2
C2.indd 5 2011/11/25 下午 05:01:36
Page 6
English 3
Important Safeguards
The Rumble Tuff® Electric Breast Pump is designed for a single user and should never be shared
or resold; doing so will void the warranty.
READ ALL INSTRUCTIONS BEFORE USING
DANGER: To reduce the risk of electrocution:
● Always unplug this product immediately after using.
● Do not use while bathing.
● Do not place or store this product where it can fall or be pulled into a tub or sink.
● Do not place or drop into water or other liquid.
● Do not reach for an electrical product that has fallen into water. Unplug immediately.
WARNING: To reduce the risk of burns, electrocution, re, or injury to persons:
● This product should never be left unattended when plugged in.
● Close supervision is necessary when this product is used near children or invalids.
● Use this product only for its intended use as described in this manual. Do not use attachments not recommended by
Rumble Tuff®.
● Never operate this product if it has a damaged cord or plug, if it is not working properly, if it has been dropped or damaged,
or if it has been dropped in water.
● Keep the cord away from heated surfaces.
● Never use while sleeping or drowsy.
● Never drop or insert any other object into any opening or tubing.
● Do not use outdoors with the AC adaptor or operate where aerosol spray products are being used, or where oxygen is being
administered.
● Make sure the voltage of the power cord is compatible with the power source.
● Plug the power cord into your Rumble Tuff® Electric Breast Pump, then into the electrical outlet.
● Only use the electrical cord and/or Li-Ion battery pack that comes with your Rumble Tuff® Electric Breast Pump.
● If you are infected with Hepatitis A, Hepatitis B, or have HIV (Human Immunodeciency Virus): pumping breast milk does not
reduce or remove the risk of transmitting the virus to your baby through breast milk.
● Wash the Expression Collection Kit parts before each use.
● Do not operate a motor vehicle while using the Rumble Tuff® Electric Breast Pump.
● The AC plug is served to disconnect the device, not to position the equipment to make it difcult to operate the disconnection
device.
● Do not allow users to modify the product.
SAVE THESE INSTRUCTIONS
along with your receipt for future reference.
C2.indd 6 2011/11/25 下午 05:01:36
Page 7
Parts Guide
English 4
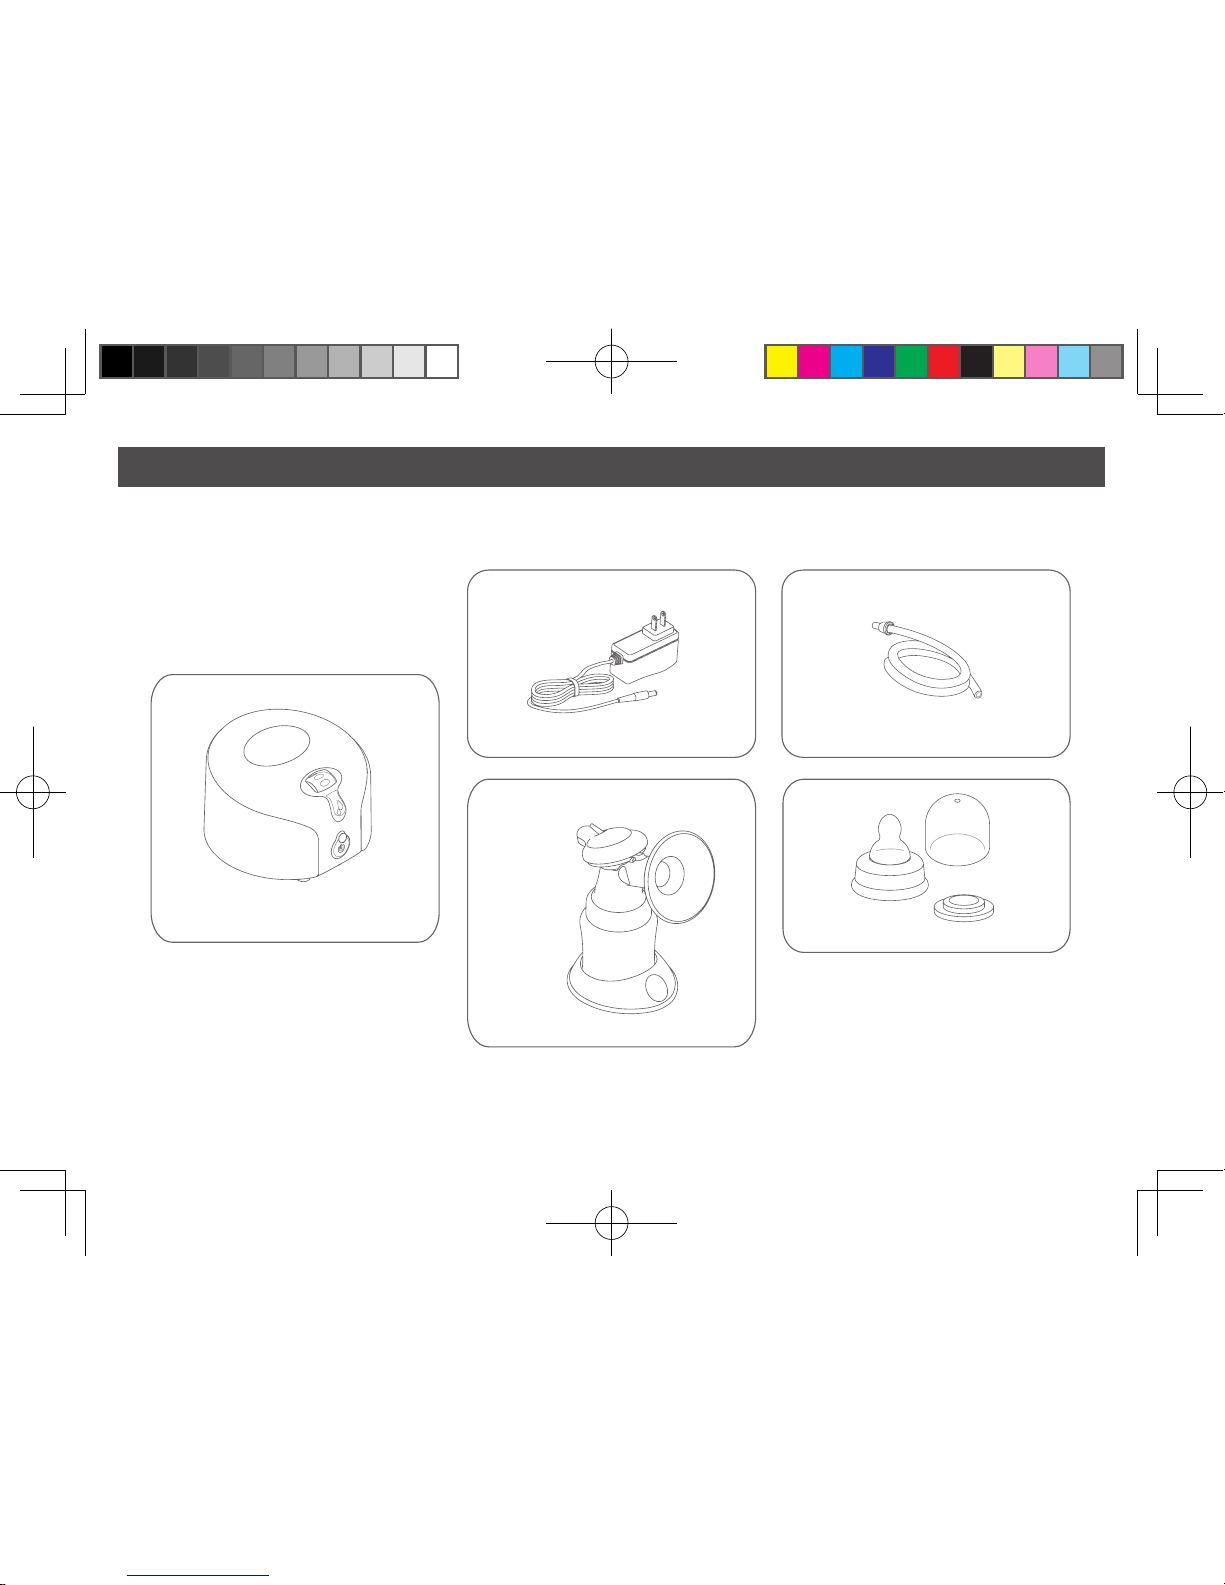
Breast Pump Main Unit
AC Adapter
Electric-Pump Diaphragm Kit
Vacuum Tube with Adaptor
Bottle Adapter Kit
C2.indd 7 2011/11/25 下午 05:01:36
Page 8
English 5
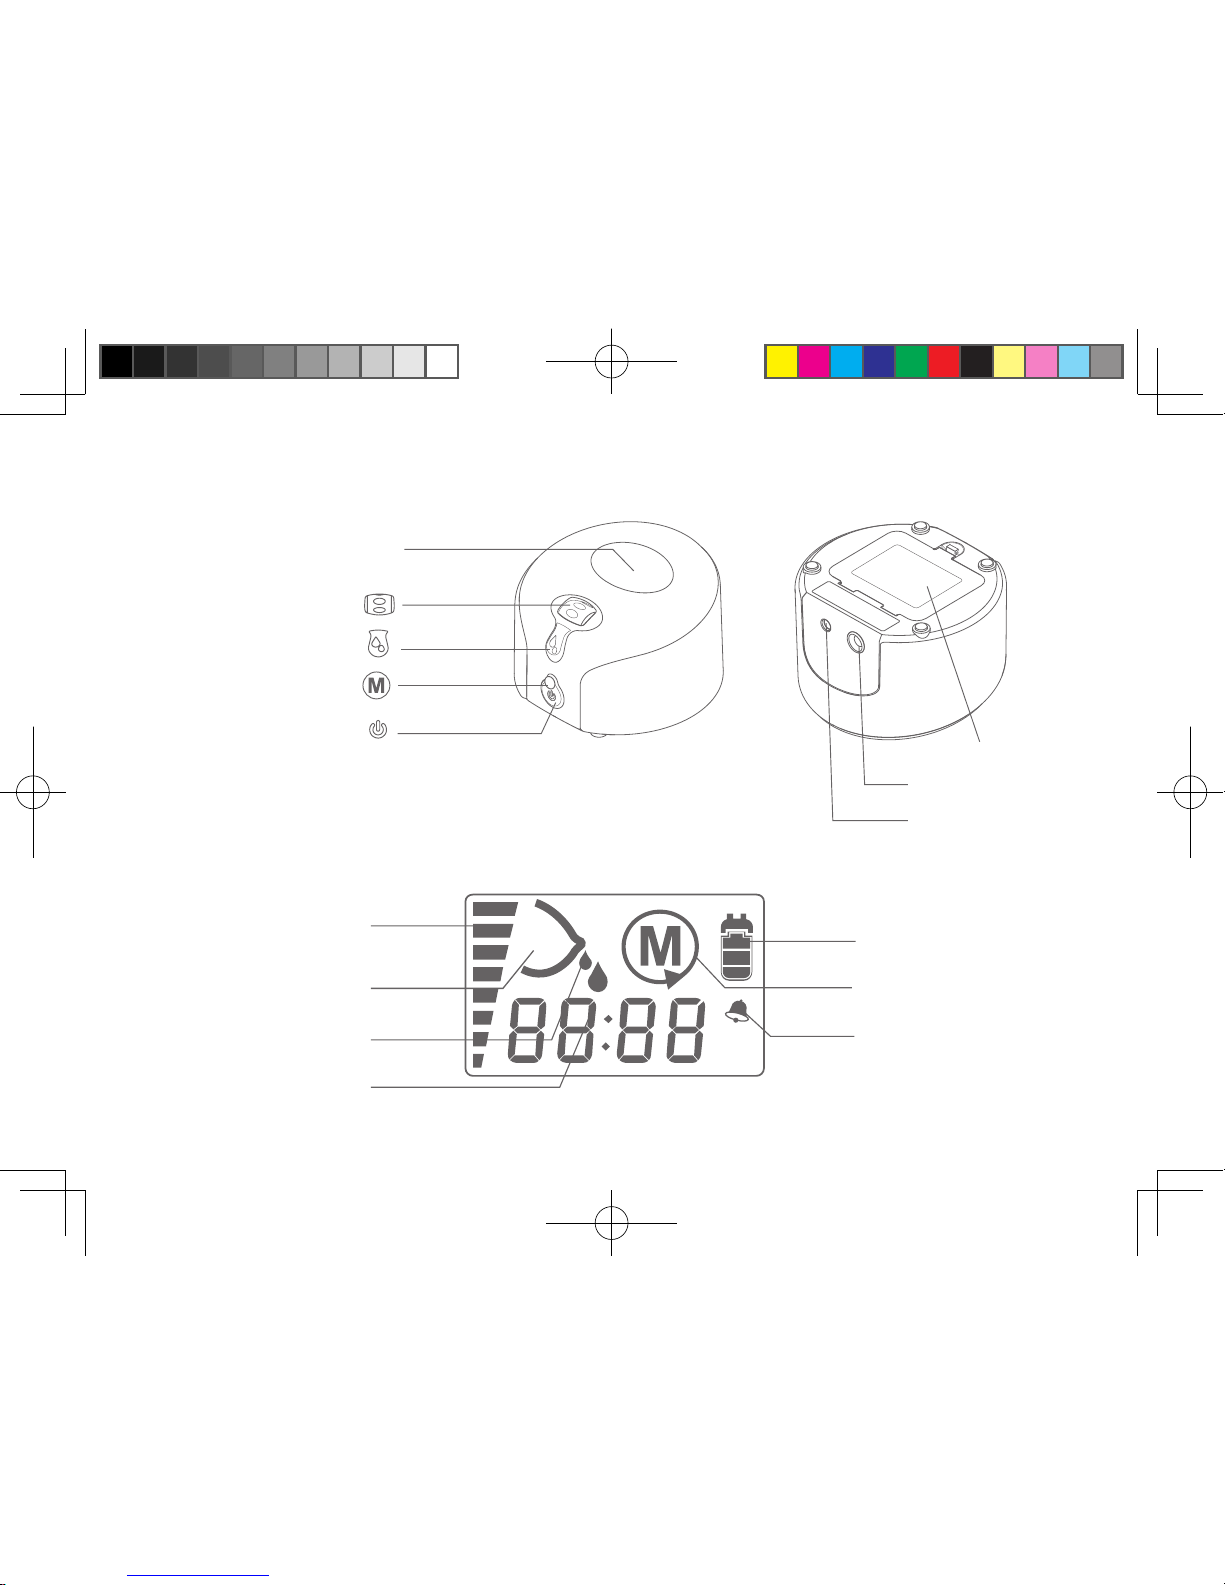
● Electrical Pump Main Unit
● LCD Screen Guide
Suction level indicator
Power indicator
Memory function indicator
Alarm
Stimulation Cycle indicator
Expression Cycle indicator
Time indicator
AM
PM
LCD Screen
Vacuum Adjusting Wheel
Let-Down Button
M Button
On/ Off Button & Power LED
Battery Cover
Tubing Adapter Inlet
AC Adapter Inlet
TOP VIEW BOTTOM VIEW
C2.indd 8 2011/11/25 下午 05:01:36
Page 9
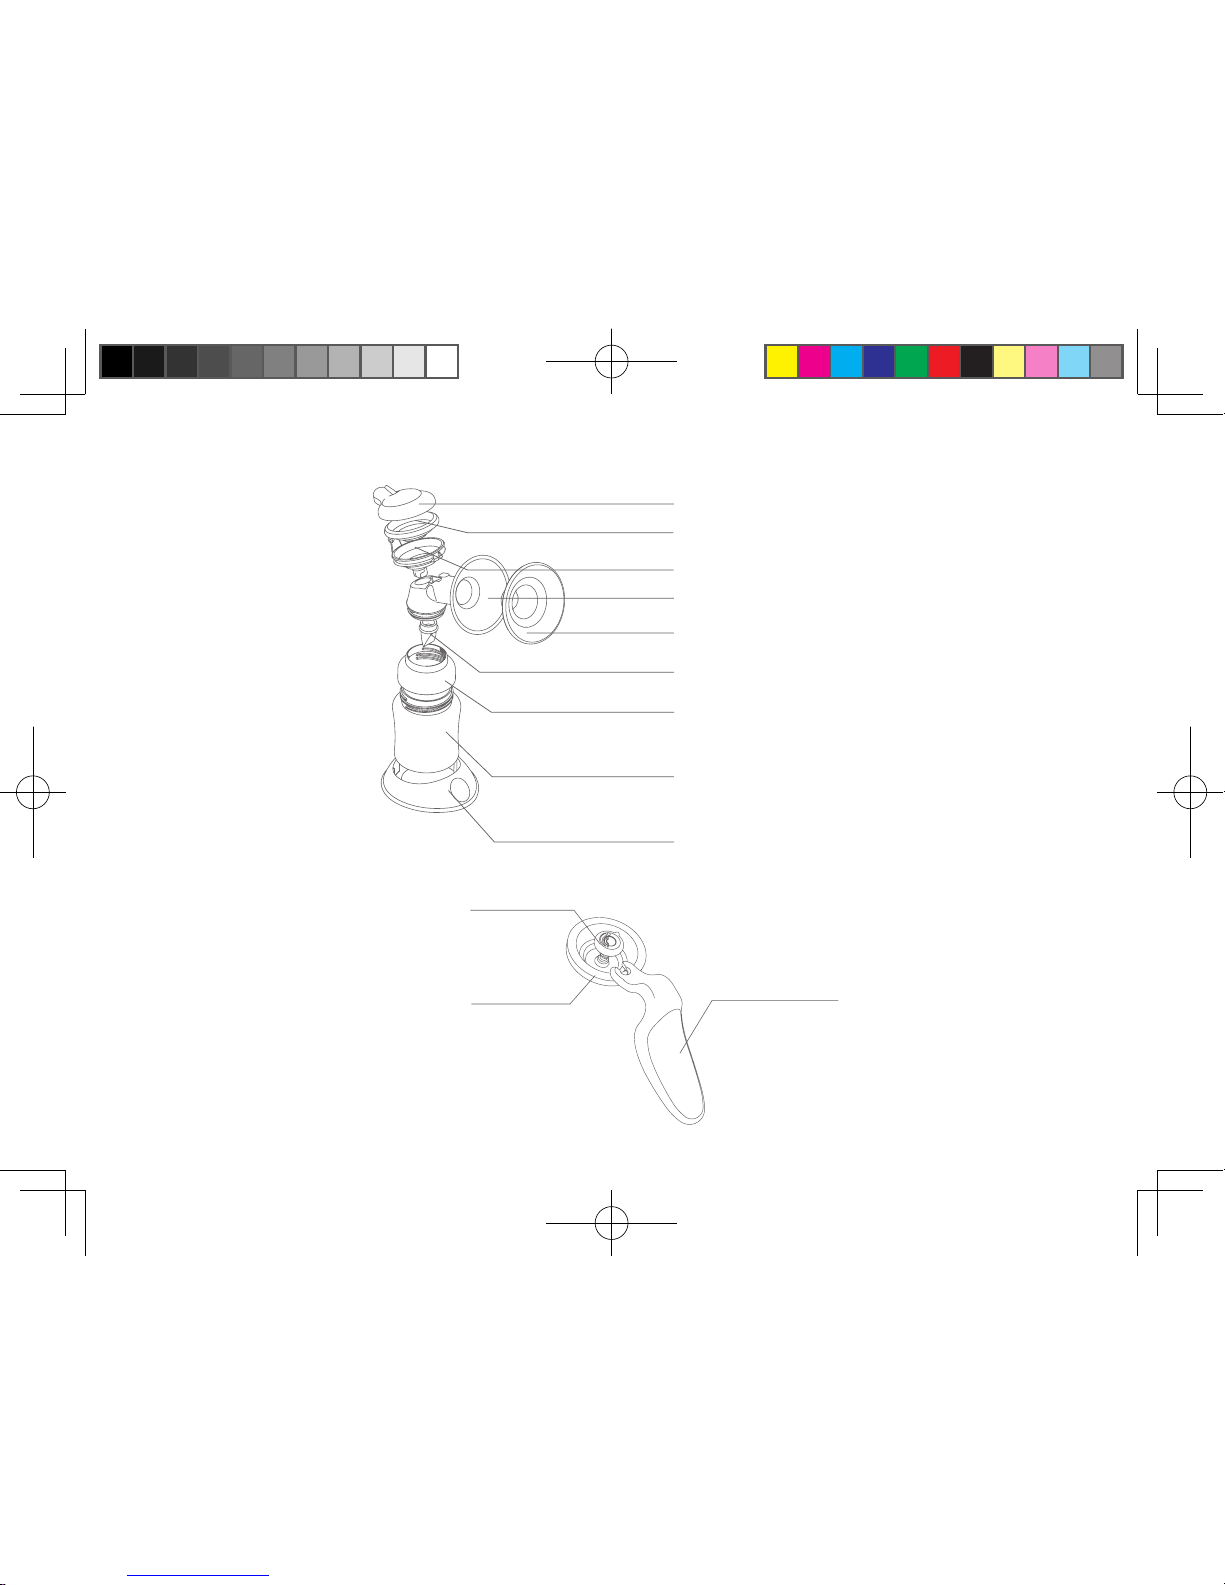
● Expression Collection Kit
● Manual-Pump Diaphragm Kit
English 6
Cap
Diaphragm
Cup with O-Ring
Breastshield Body
One-Way Valve
Bottle Adapter
Bottle
Bottle Base
Let-down Silicone Cushion
Handle
Manual Diaphragm
Valve Stem
C2.indd 9 2011/11/25 下午 05:01:36
Page 10
English 7
Electric Pump Assembly Instructions
Your Rumble Tuff® Electric Breast Pump comes pre-assembled; however, you will need to re-assemble after each
cleaning. (For cleaning instructions, see page 35) Below is a step-by-step guide for assembling the Expression
Collection Kit:
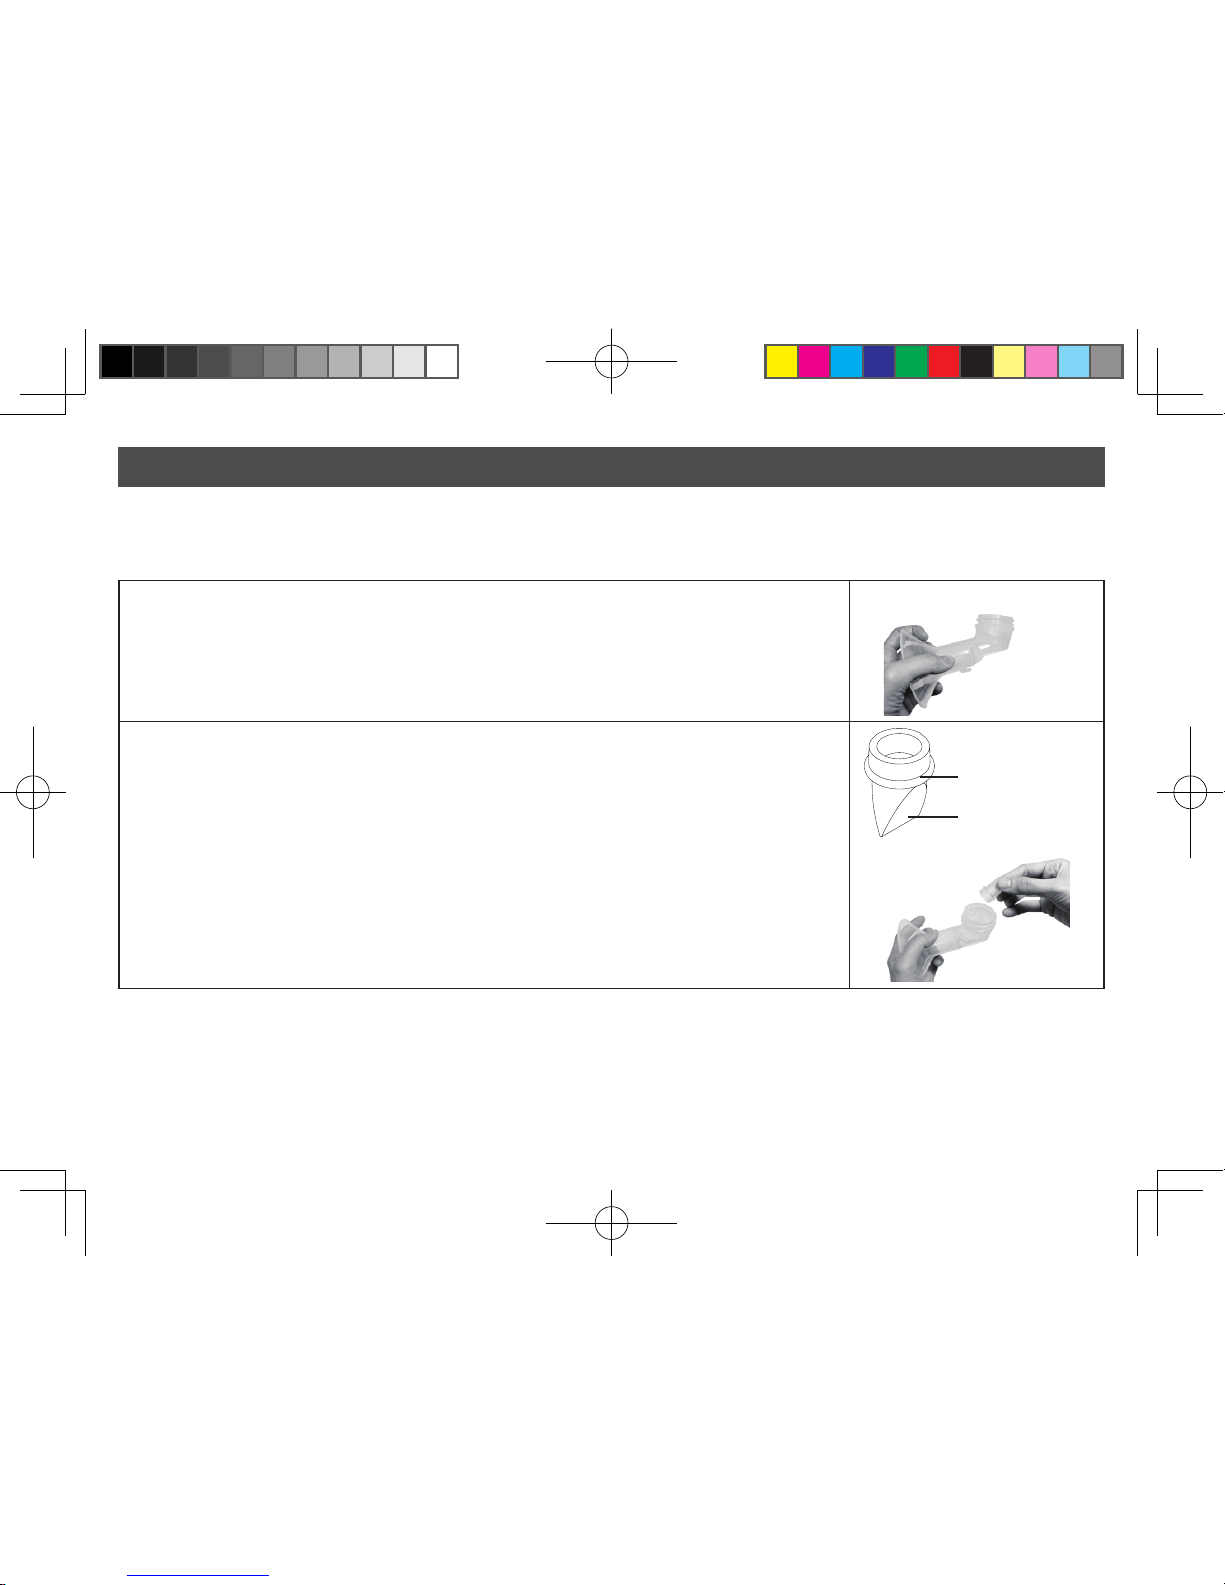
1. Hold the "horn" of the Breastshield Body in one hand. Make sure the bottle-thread side opening is
facing up.
2. With the thumb and fore-nger of the other hand, hold the tip of the One-Way Valve and place
the at circular bottom into the opening. Be sure not to stretch, bend, or twist the tip of the One Way Valve. Seal all the edges rmly.
Note: The One-Way Valve tip does not have to align with anything, as long as all the edges are
securely sealed.
Flat circular bottom
Tip
C2.indd 10 2011/11/25 下午 05:01:37
Page 11
English 8
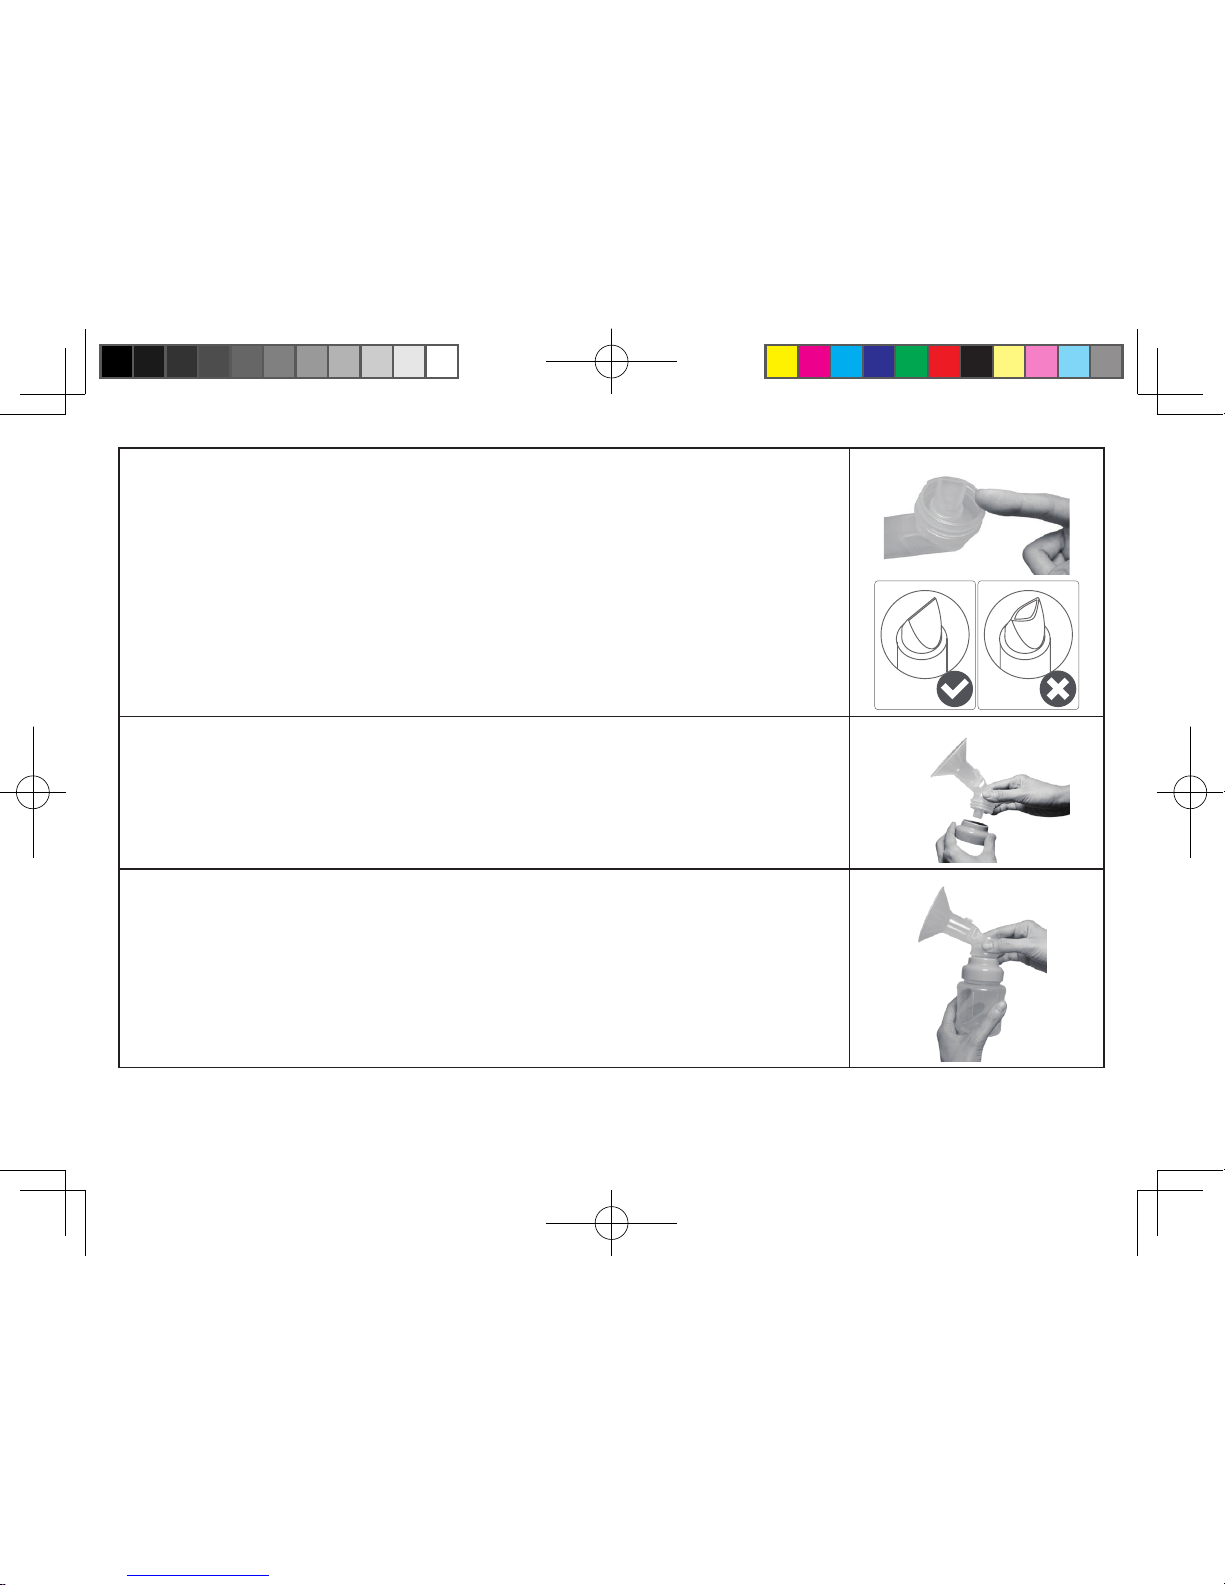
3. With your thumb and fore-nger, gently seal any openings on the tip of the One-Way Valve and
shape into a straight line.
Note: This is critical to the optimal performance of the Pump.
4. Carefully twist the Bottle Adapter to the Breastshield Body for a secure t.
Note: Be sure not to bump the One-Way Valve when twisting the Breastshield Body & the Adapter
pieces together. If you bump the One-Way Valve, repeat step 3.
5. With the Bottle Adapter in one hand, twist the Collection Bottle for a secure t. Set aside.
C2.indd 11 2011/11/25 下午 05:01:37
Page 12
Assembly Instructions Continued (Electric Pump)
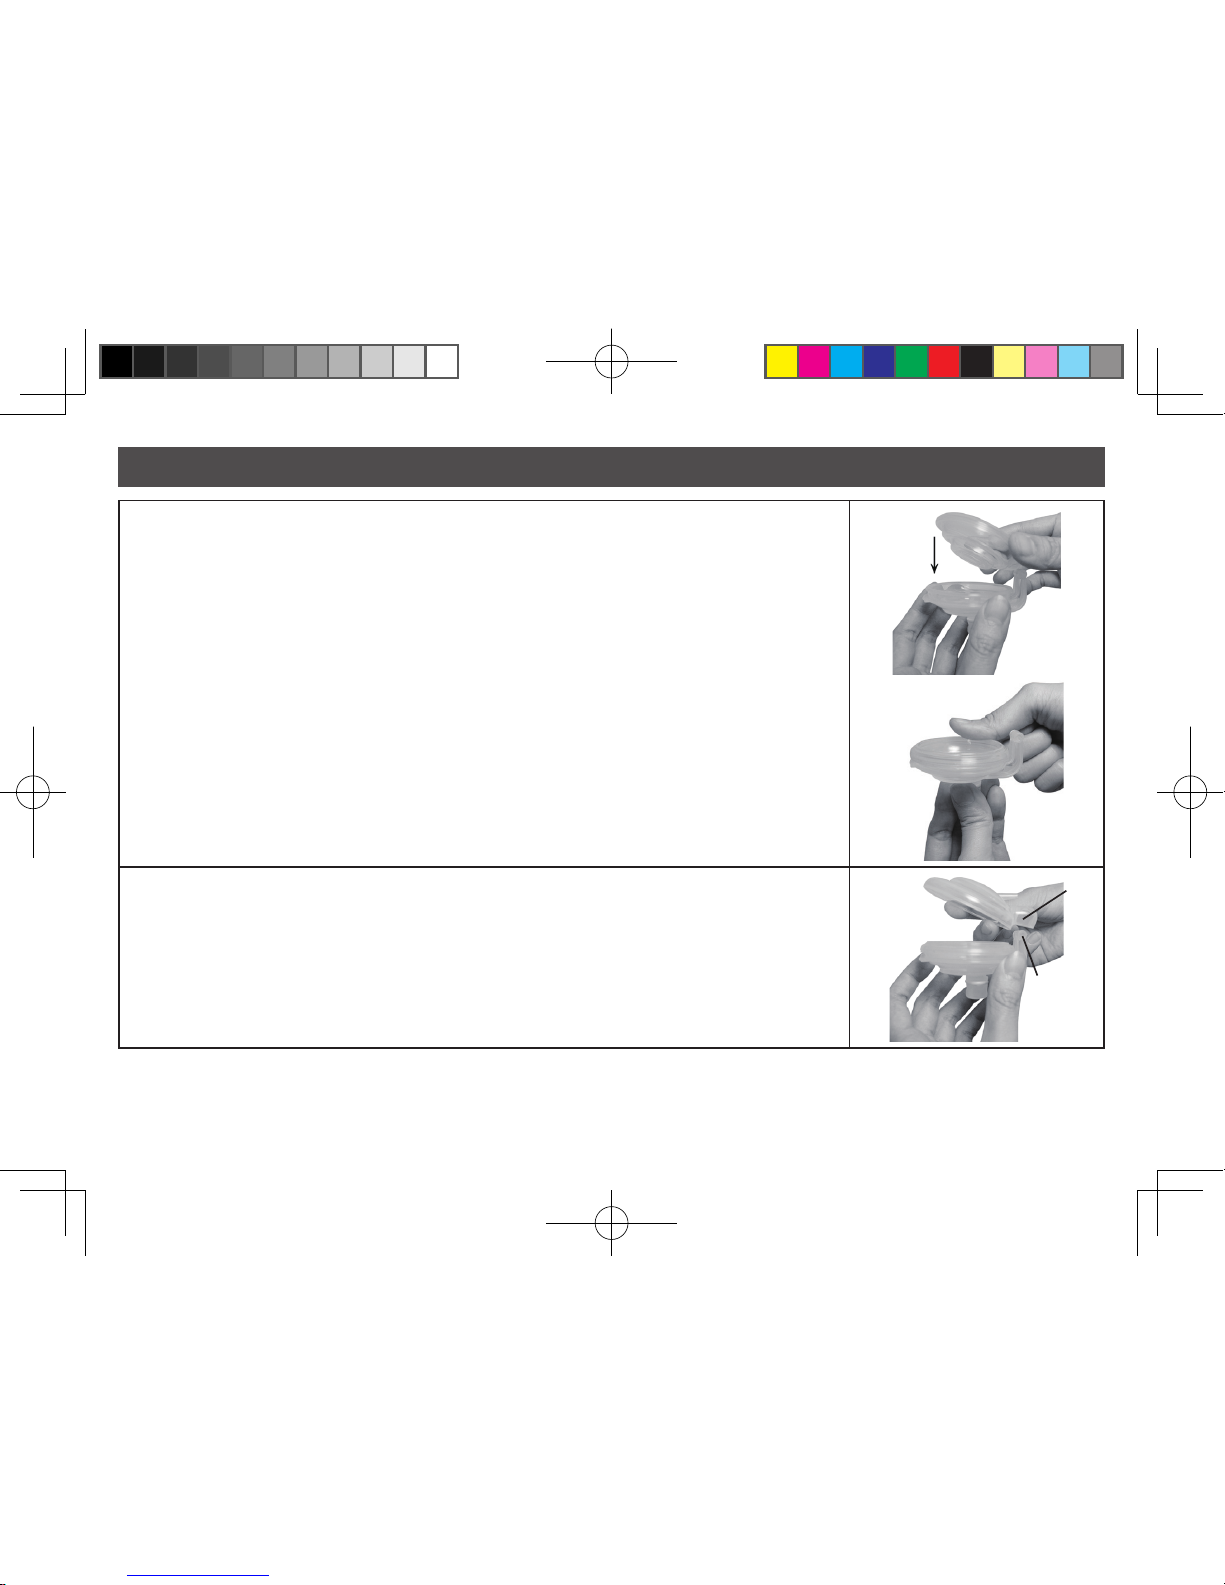
6. With the Cup in one hand, place the Silicone Diaphragm in the Cup (matching the shape of the
Cup). Press around the edges of the Diaphragm for a secure t. Make sure the Diaphragm is
evenly mounted on the Cup and there are no gaps in between them.
7. Place the Cap on the Cup & Diaphragm. (Be sure to align the hinge and hinge cover.) Press tightly
to seal.
English 9
Hinge cover
Hinge
C2.indd 12 2011/11/25 下午 05:01:38
Page 13
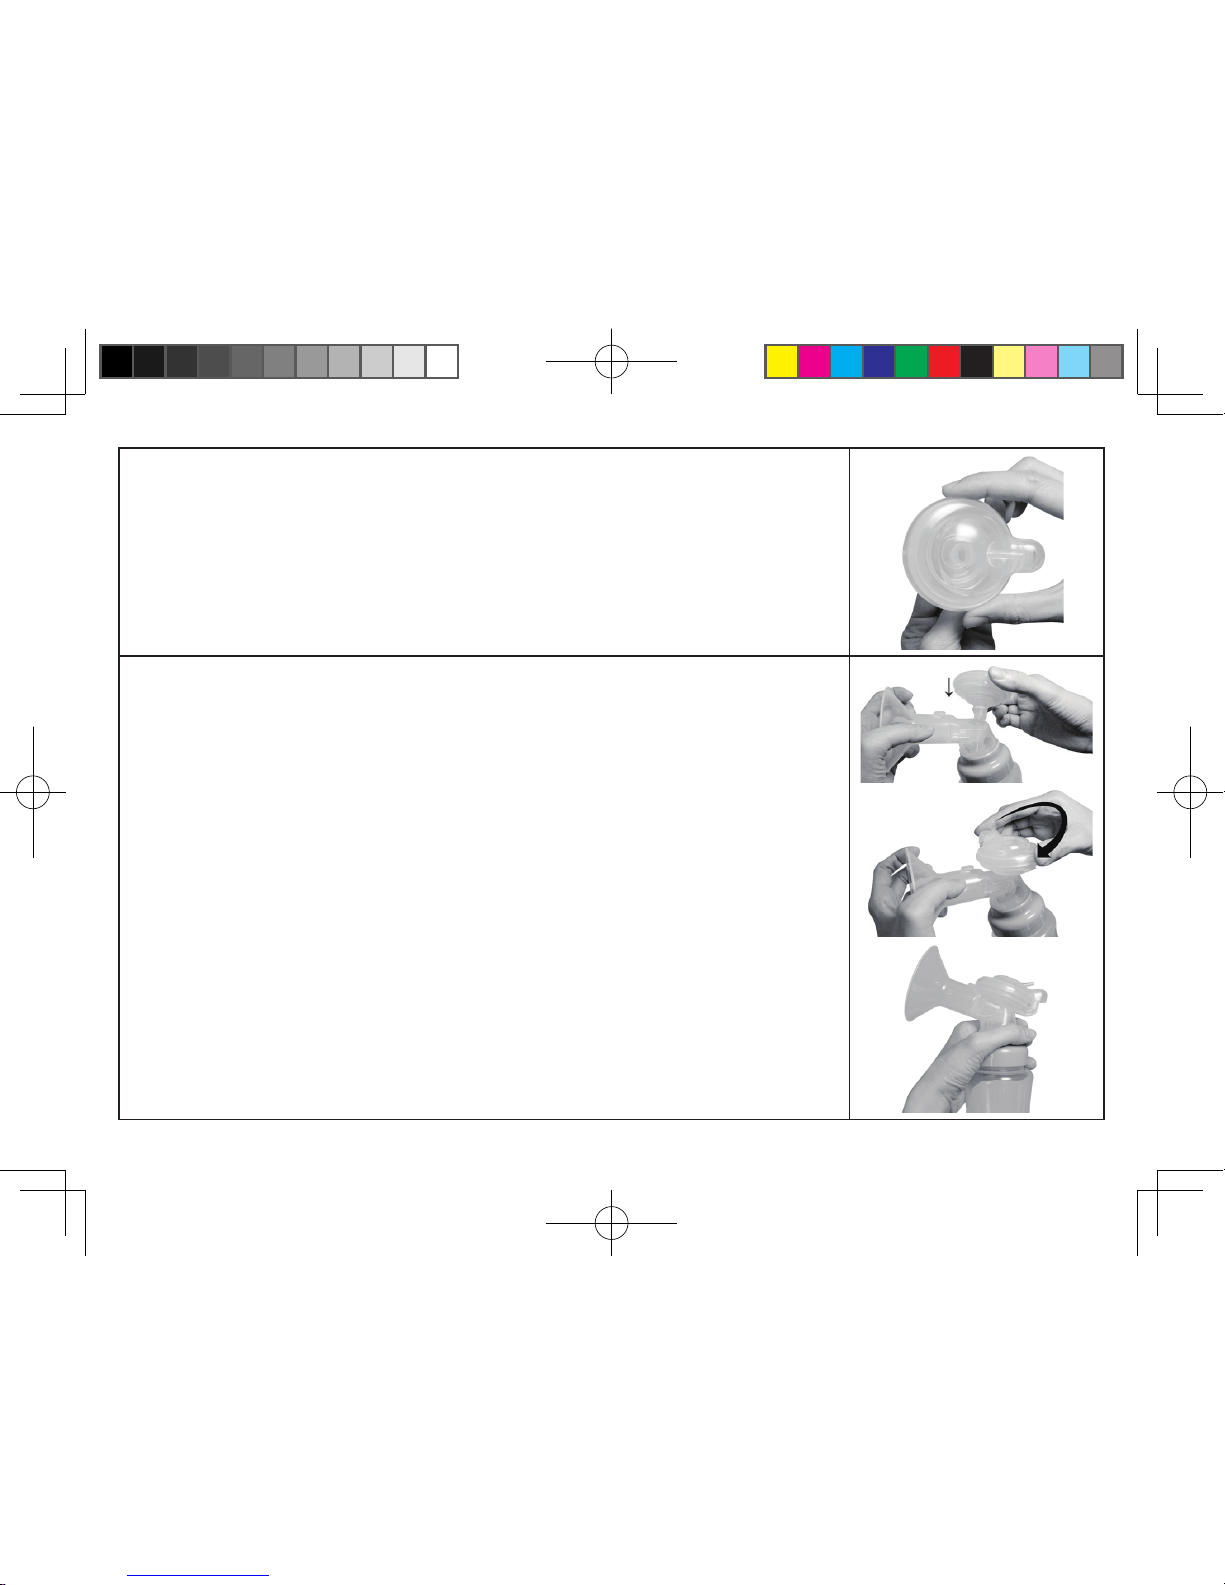
8. Twist the Cup clockwise into the Breastshield Body until it locks.
English 10
C2.indd 13 2011/11/25 下午 05:01:39
Page 14
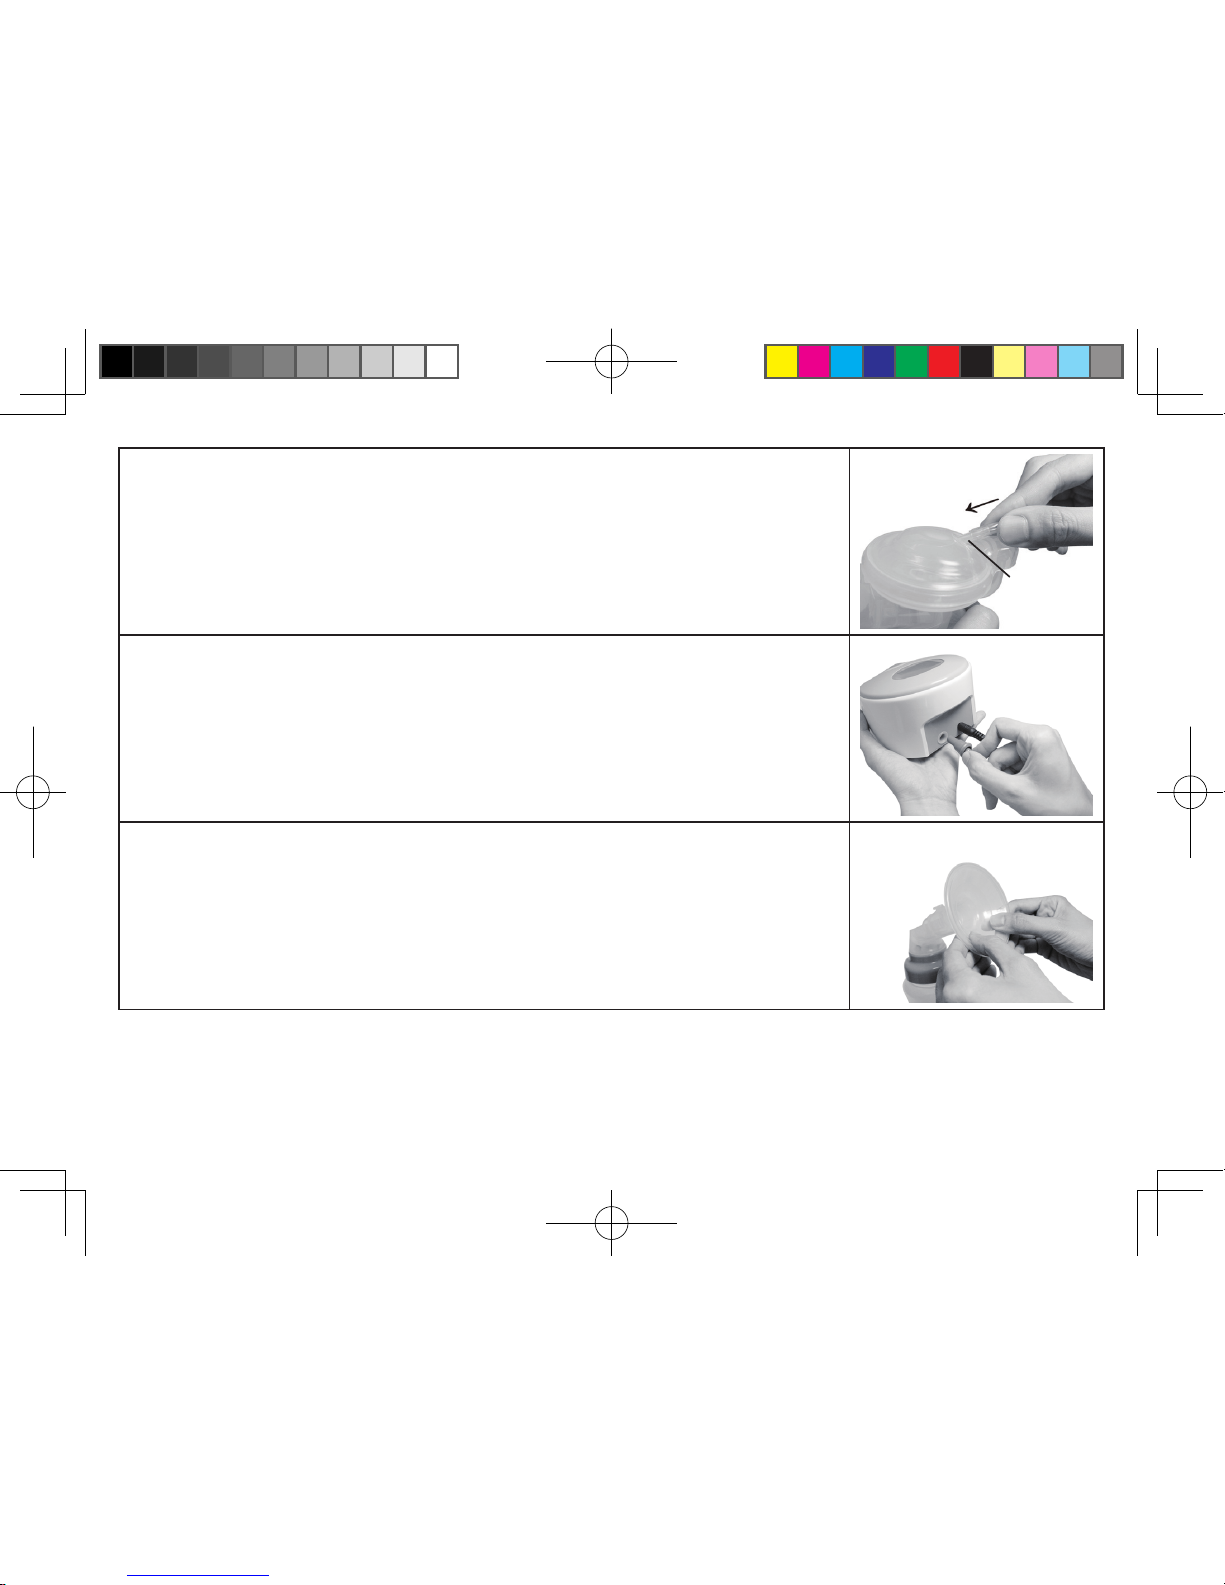
English 11
9. With the assembled Expression Collection Kit in one hand (Cap on top, Bottle on bottom), take the
open-end of tubing and connect to the Tubing Connector (on the Cap). Push together rmly for a
tight seal.
Note: Make sure there is no moisture in the tubing.
10. Securely attach the other end of the tubing into the Electric Pump Base (on the back).
11. With the Breastshield Body in one hand, place the Silicone Cushion in the Breastshield Body
(matching the shape of the ange). Secure the lip of the Cushion around the edges of the ange.
Your Electric Breast Pump will work with or without the Silicone Cushion. Your comfort depends
on your preference.
Tubing
Connector
C2.indd 14 2011/11/25 下午 05:01:40
Page 15
English 12
Manual Pump Assembly Instructions
Your Rumble Tuff® Manual Breast Pump comes pre-assembled; however, you will need to re-assemble after each
cleaning. (For cleaning instructions, see page 35) Below is a step-by-step guide for assembling the Expression
Collection Kit:
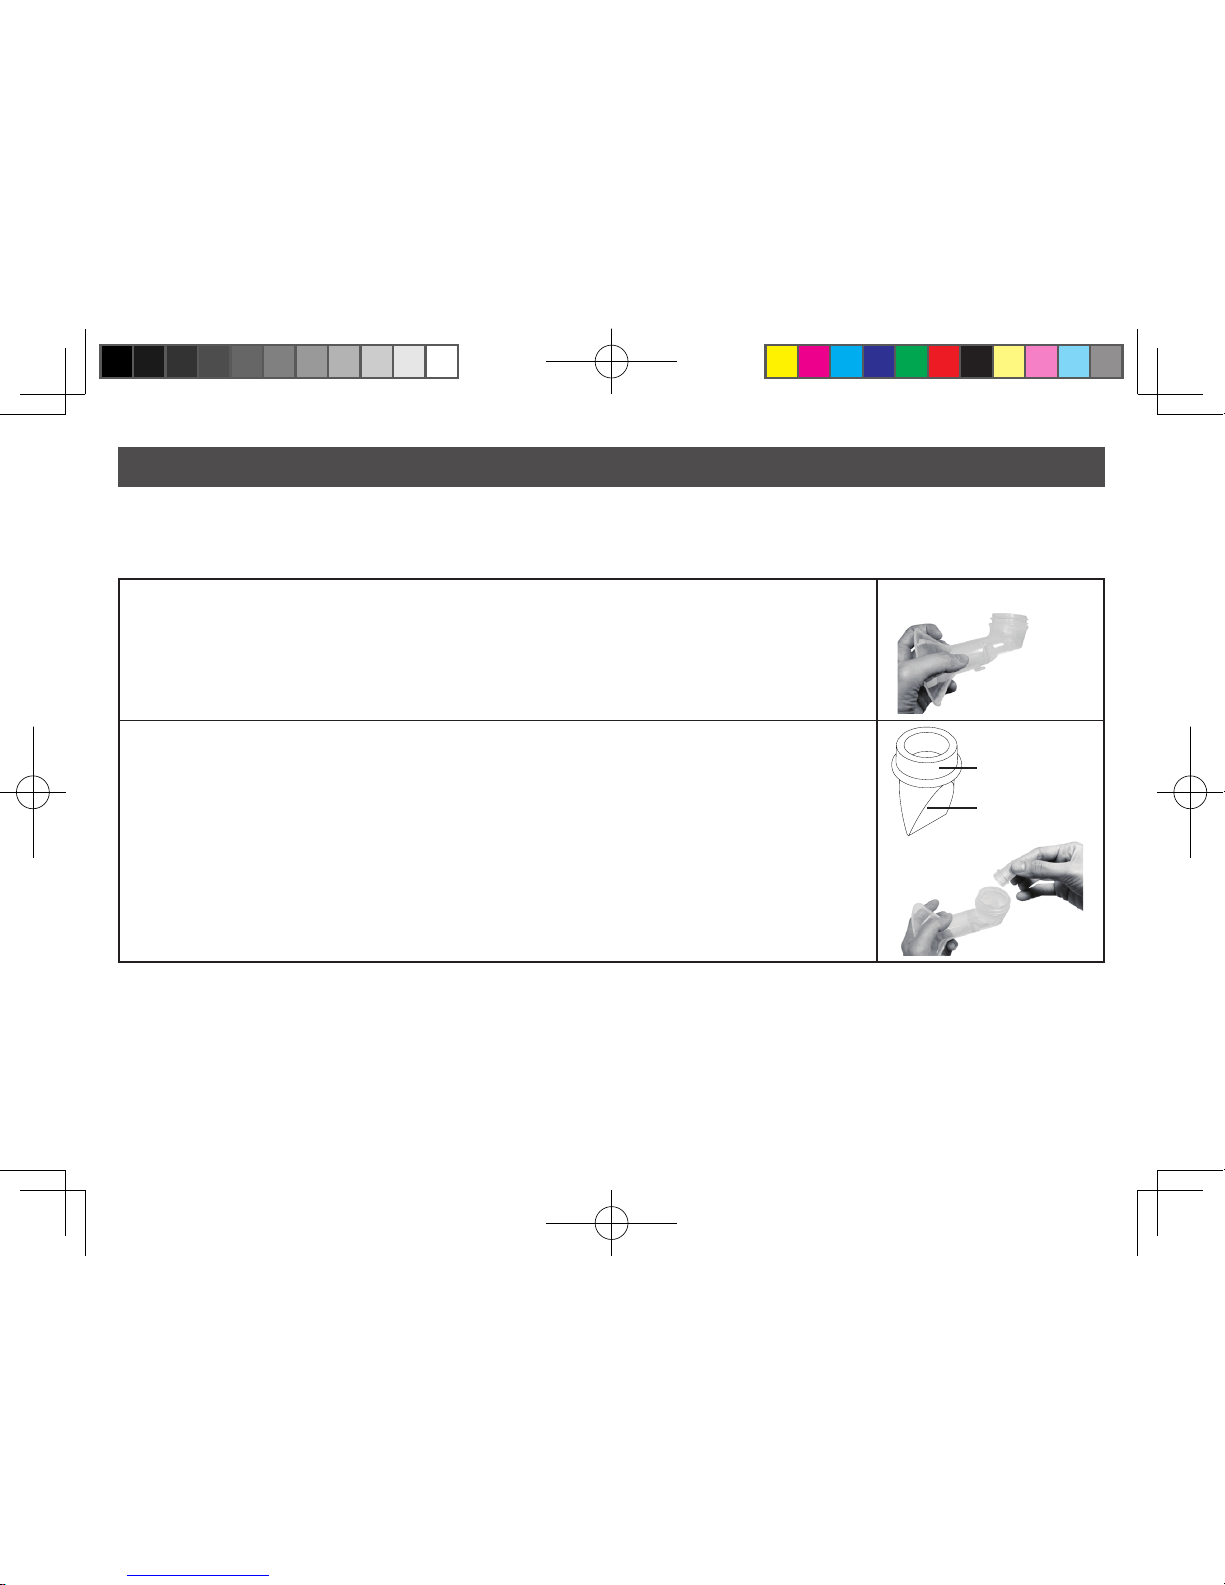
1. Hold the "horn" of the Breastshield Body in one hand. Make sure the bottle-thread side opening is
facing up.
2. With the thumb and fore-nger of the other hand, hold the tip of the One-Way Valve and place the at
circular bottom into the opening. Be sure not to stretch, bend, or twist the tip of the One-Way Valve.
Seal all the edges rmly.
Note: The One-Way Valve tip does not have to align with anything, as long as all the edges are securely
sealed.
Flat circular bottom
Tip
C2.indd 15 2011/11/25 下午 05:01:40
Page 16
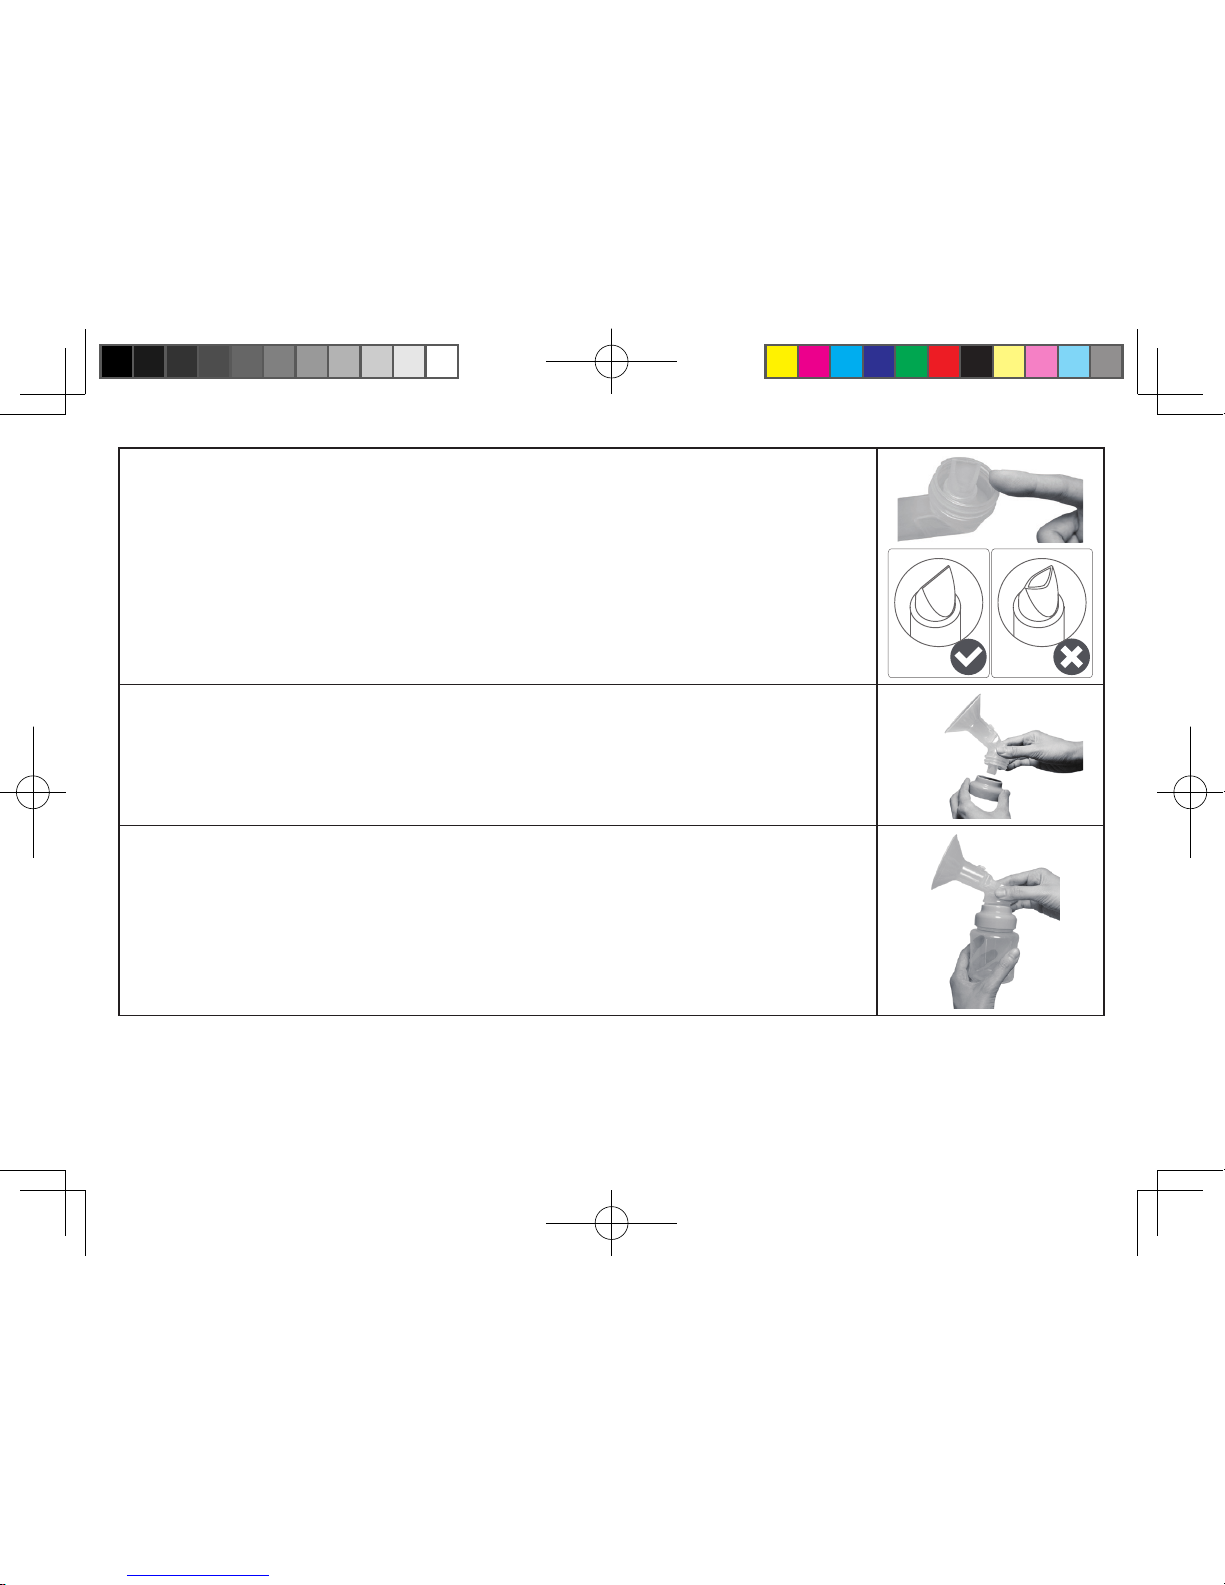
3. With your thumb and fore-nger, gently seal any openings on the tip of the One-Way Valve and shape
into a straight line.
Note: This is critical to the optimal performance of the Pump.
4. Carefully twist the Bottle Adapter to the Breastshield Body for a secure t.
Note: Be sure not to bump the One-Way Valve when twisting the Breastshield Body & the Adapter pieces
together. If you bump the One-Way Valve, repeat step 3.
5. With the Bottle Adapter in one hand, twist the Collection Bottle for a secure t. Set aside.
English 13
C2.indd 16 2011/11/25 下午 05:01:41
Page 17
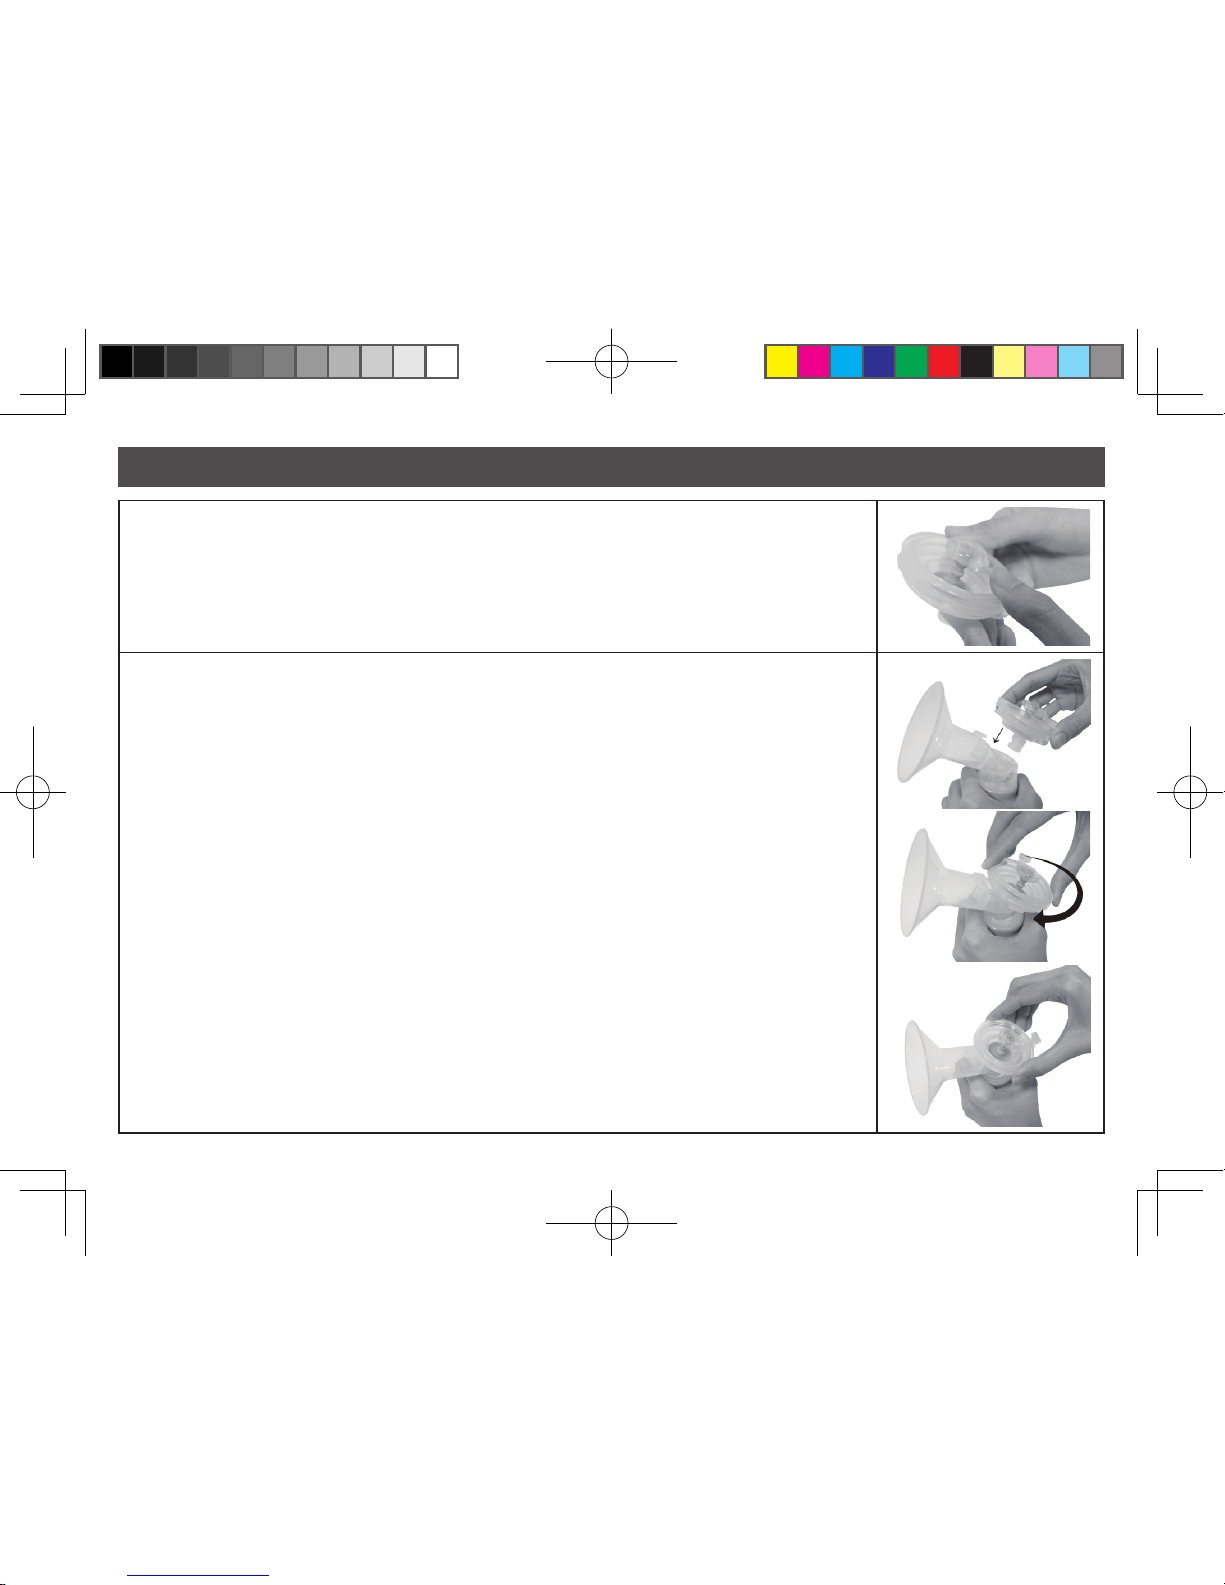
Assembly Instructions Continued (Manual Pump)
1. With the Cup in one hand, place the Manual Silicone Diaphragm in the cup (matching the shape of
the Cup). Press around the edges of the Diaphragm for a secure t. Make sure the Diaphragm is
evenly mounted on the Cup and there are no gaps in between them.
2. Twist the Cup clockwise into the Breastshield Body until it locks.
English 14
C2.indd 17 2011/11/25 下午 05:01:42
Page 18
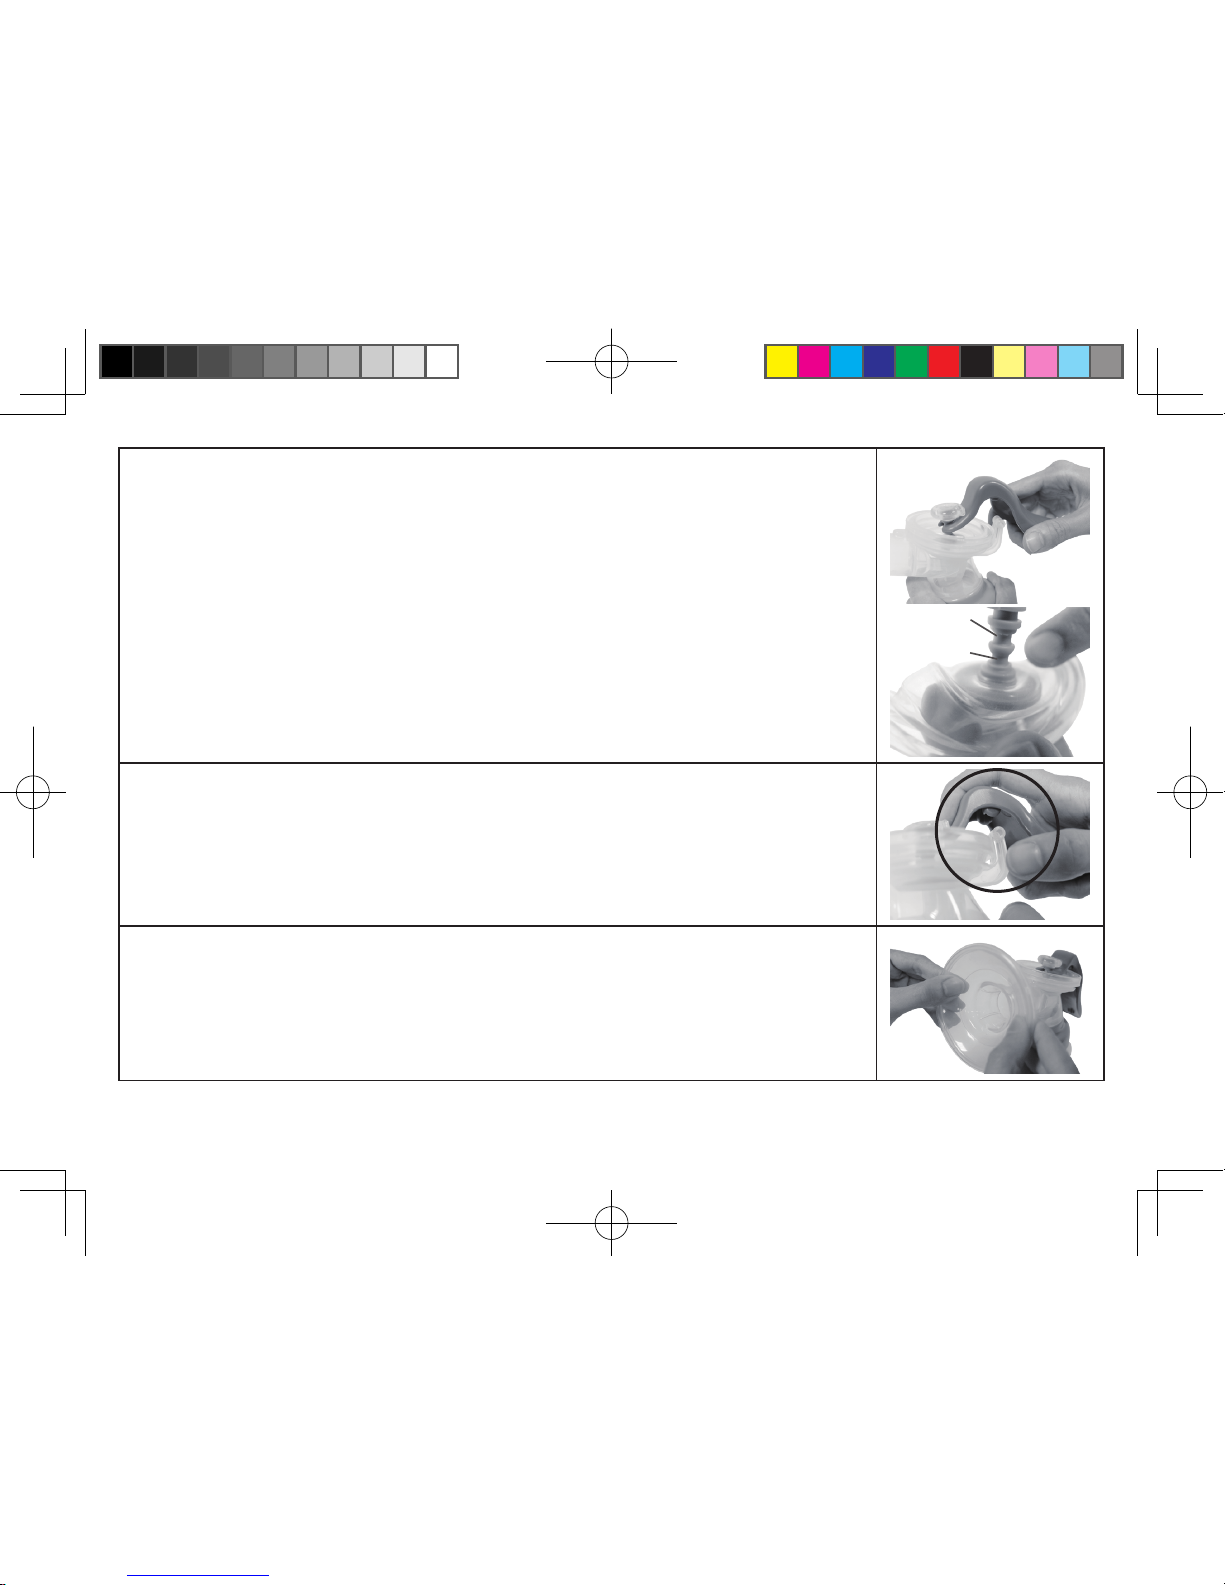
3. Place the "U" shape slot of the Handle onto the recess of the Valve Stem. (There are 2 recesses on
the Valve Stem. The upper one replicates Stimulation setting, and the bottom one replicates
Expression setting.)
4. Push down the Handle onto the hinge of the Cup until it snaps into place.
5. With the Breastshield Body in one hand, place the Silicone Cushion in the Breastshield Body (matching
the shape of the ange). Secure the lip of the Cushion around the edges of the ange. Your Manual
Breast Pump will work with or without the Silicone Cushion. Your comfort depends on your preference.
Stimulation
Expression
English 15
C2.indd 18 2011/11/25 下午 05:01:44
Page 19
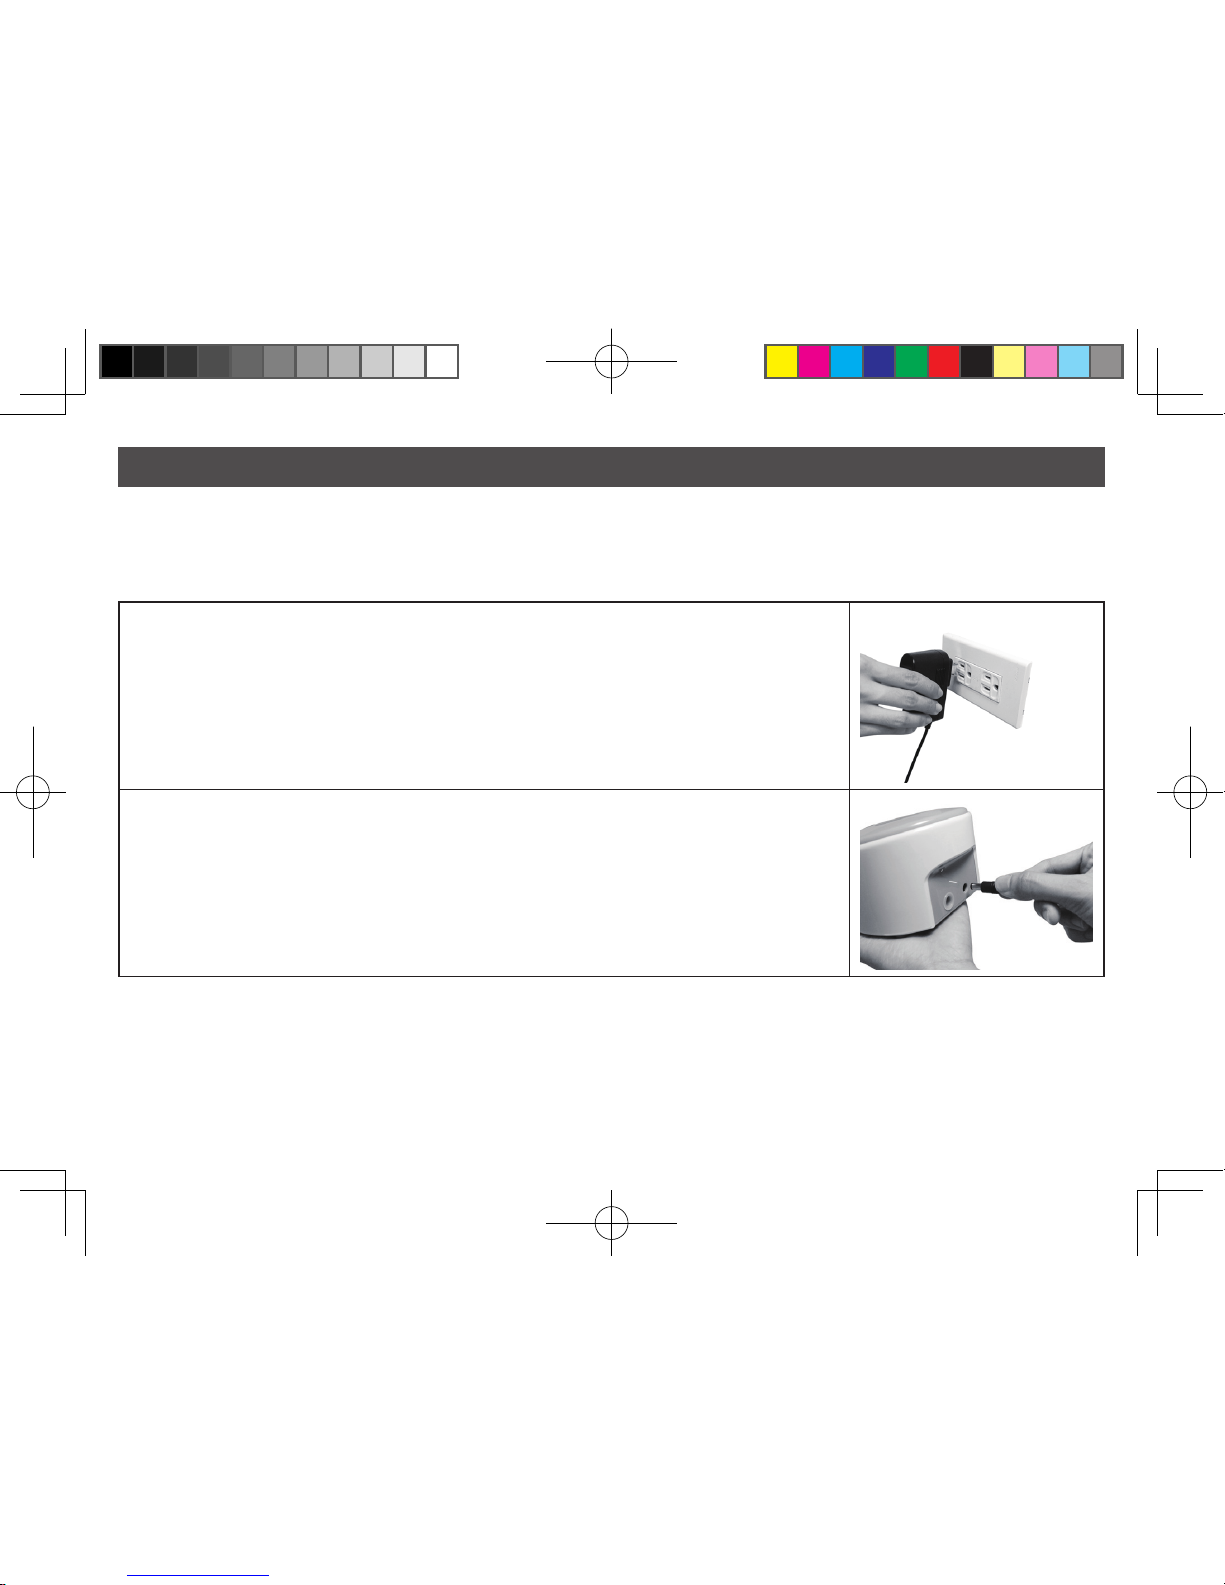
Power Options
1. Plug the AC adapter into an electrical socket.
2. Attach the AC adapter to the Electric Pump Base.
Your Electric Breast Pump may be operated under any of the following power supply modes:
Using your AC Adaptor (included):
● Electrical safety can only be achieved when using the AC Adaptor which was provided with the Pump. Use of any
another Adaptors causes concern for the safety of the product and/or user and voids the warranty.
English 16
C2.indd 19 2011/11/25 下午 05:01:44
Page 20
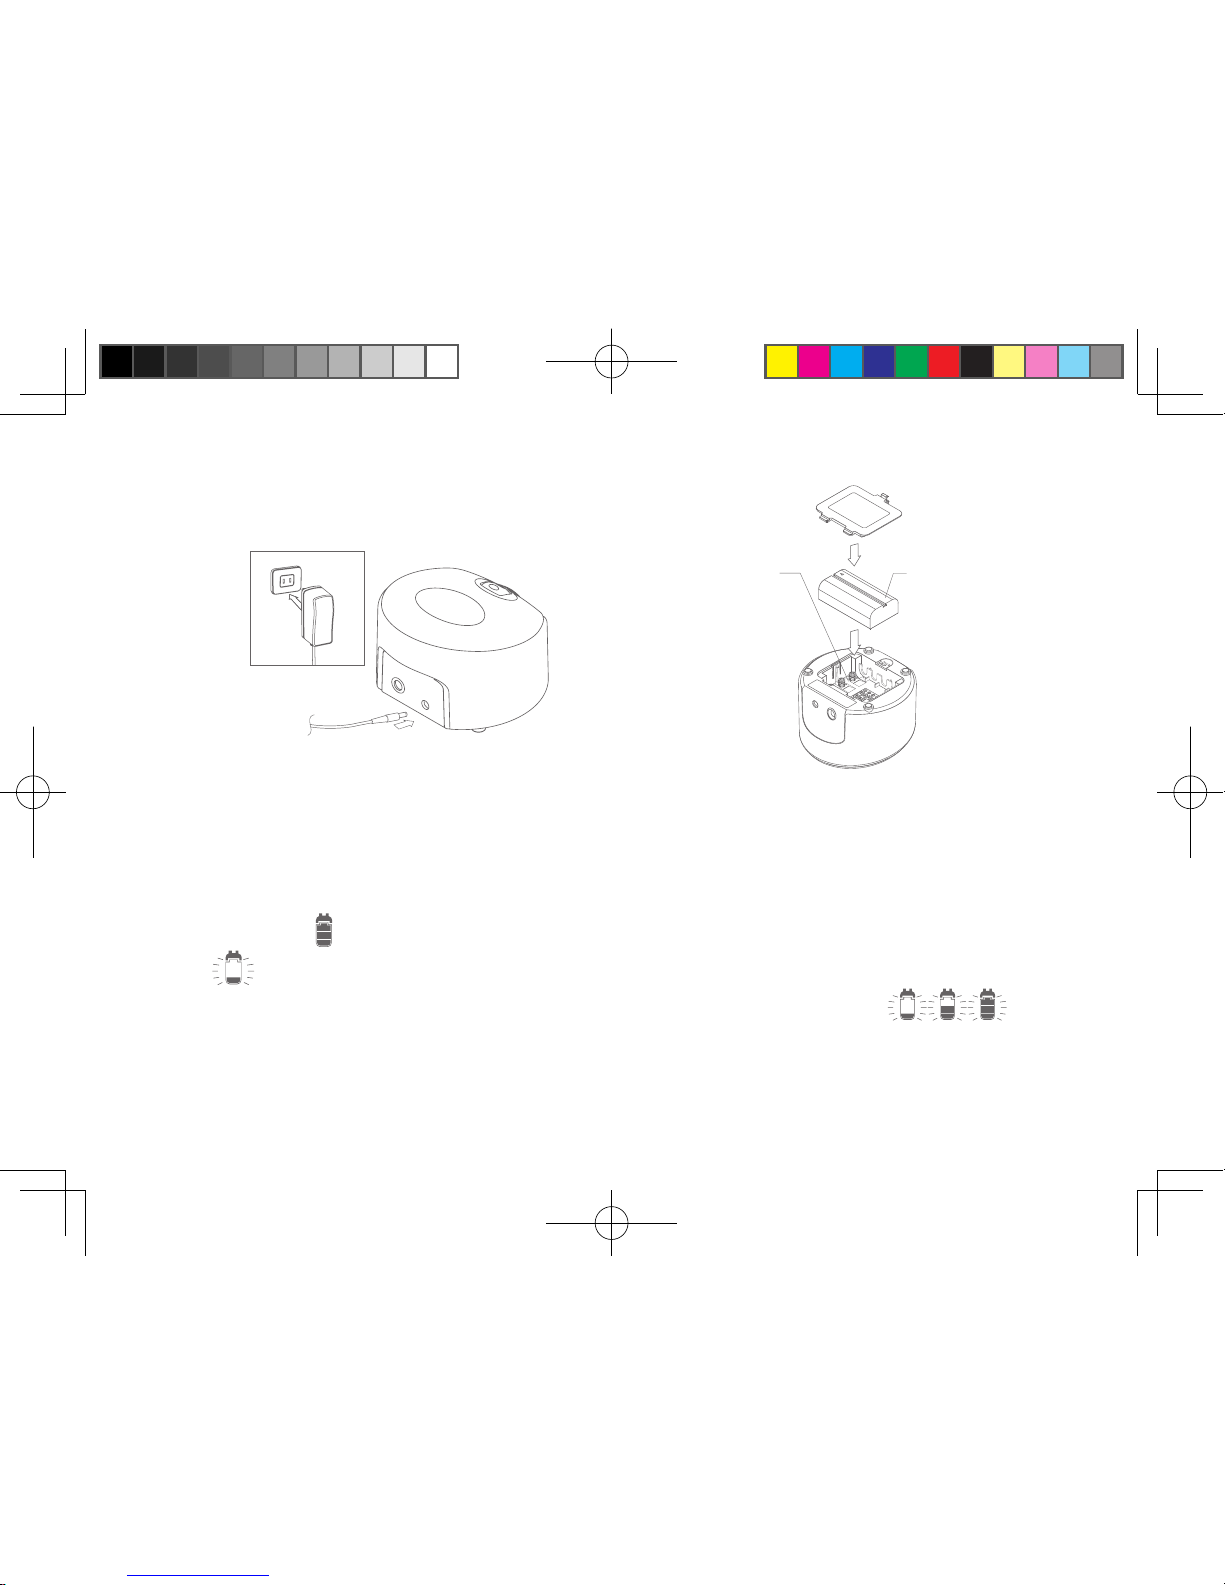
Using the Li-Ion Rechargeable battery (for PA201 only):
● Prior to rst use, charge the battery for 24 hours. If necessary, your Electric Breast Pump can be used during this
period with the power cord only. For best results, allow the Pump to initially charge uninterrupted for 24 hours.
● After the initial charge, subsequent charges will take approximately 4 hours. Once charged, you should not need to
remove the battery unless replacing or when storing.
● The Li-Ion Rechargeable battery will charge every time the AC Adaptor is plugged in; however, it will not charge while
your Electric Breast Pump is in use.
● The Power Indicator
on the LCD screen shows how much battery power is left. If it starts to ash, showing only
one bar
, there is only enough power left for approx. one 20-minute pumping session.
● When charging, the power indicator should show charging animation on the display screen
. If you do
not see charging animation, please check to see if the battery has been installed correctly.
● The Li-Ion Rechargeable battery used in this device may present a risk of re or chemical burn if mistreated. Do
NOT disassemble the battery. Do NOT place battery near heat source or re. Dispose of used battery properly.
Do NOT dispose of battery in re. For long term storage, keep battery within the following temperature range: 32°F to
77°F (0°C to 25°C) Keep away from children.
English 17
Li-on Battery Compartment Li-on Battery
C2.indd 20 2011/11/25 下午 05:01:44
Page 21
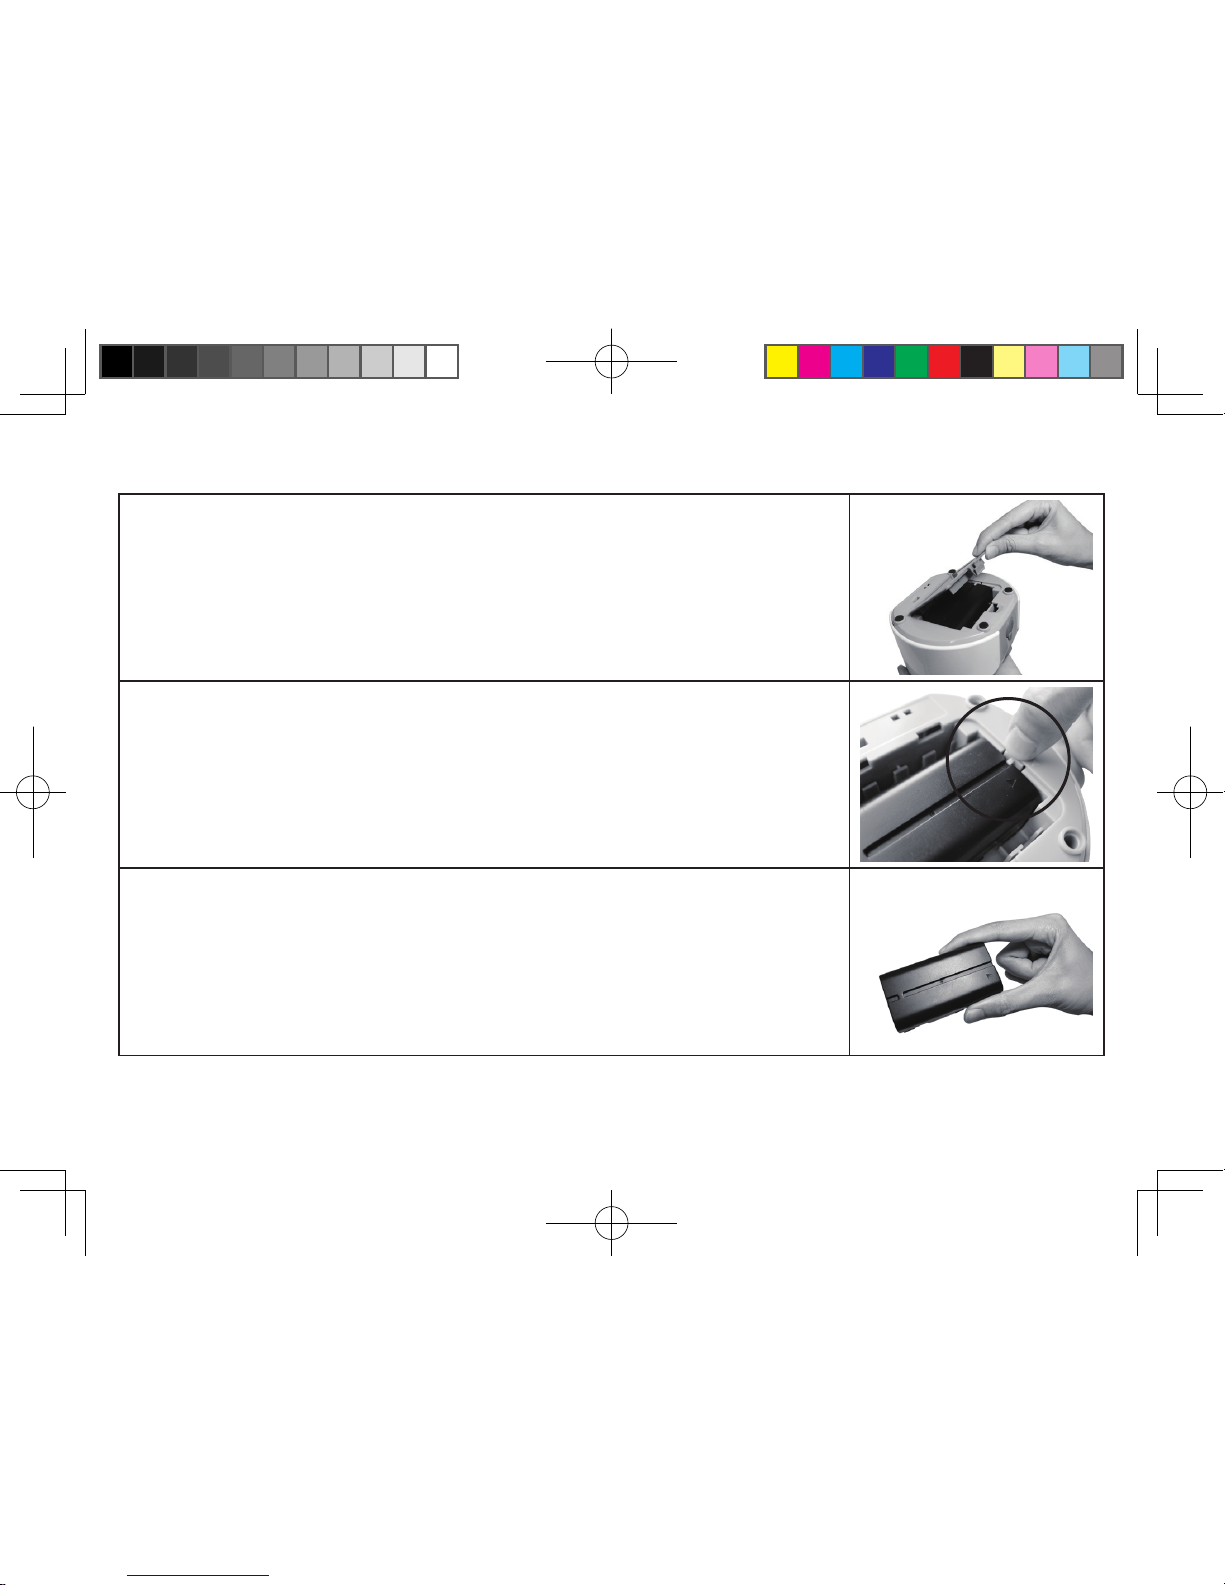
1. Open the Battery Cover.
2. Remove the old Li-Ion Rechargeable battery by releasing the locking hook. The Battery pops out
automatically.
3. Insert the new Li-Ion Rechargeable battery and push the Battery into compartment until the Battery
is locked.
Note: Make sure triangle makes (on both the Battery and the bottom of main unit) are aligned
together.
Install the Battery: (Li-Ion Rechargeable)
English 18
C2.indd 21 2011/11/25 下午 05:01:46
Page 22
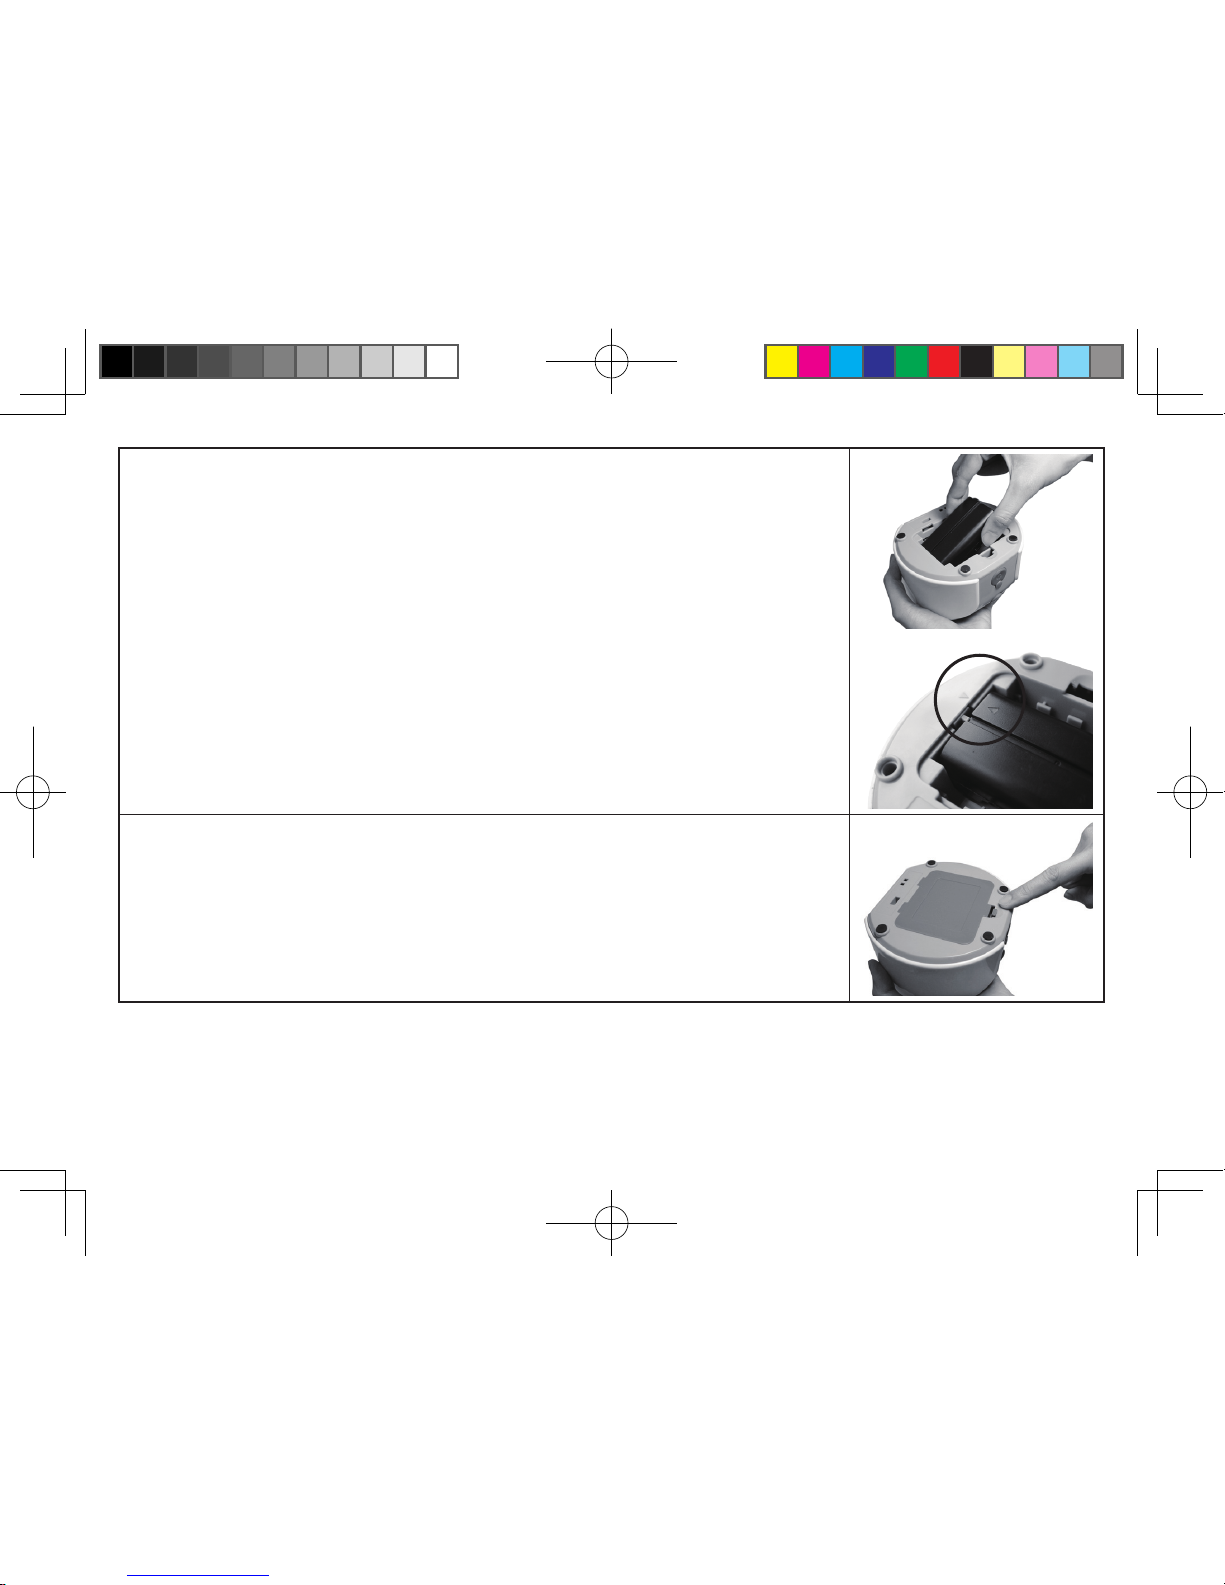
English 19
4. Close the Battery Cover, making sure it "snaps" into place.
C2.indd 22 2011/11/25 下午 05:01:46
Page 23
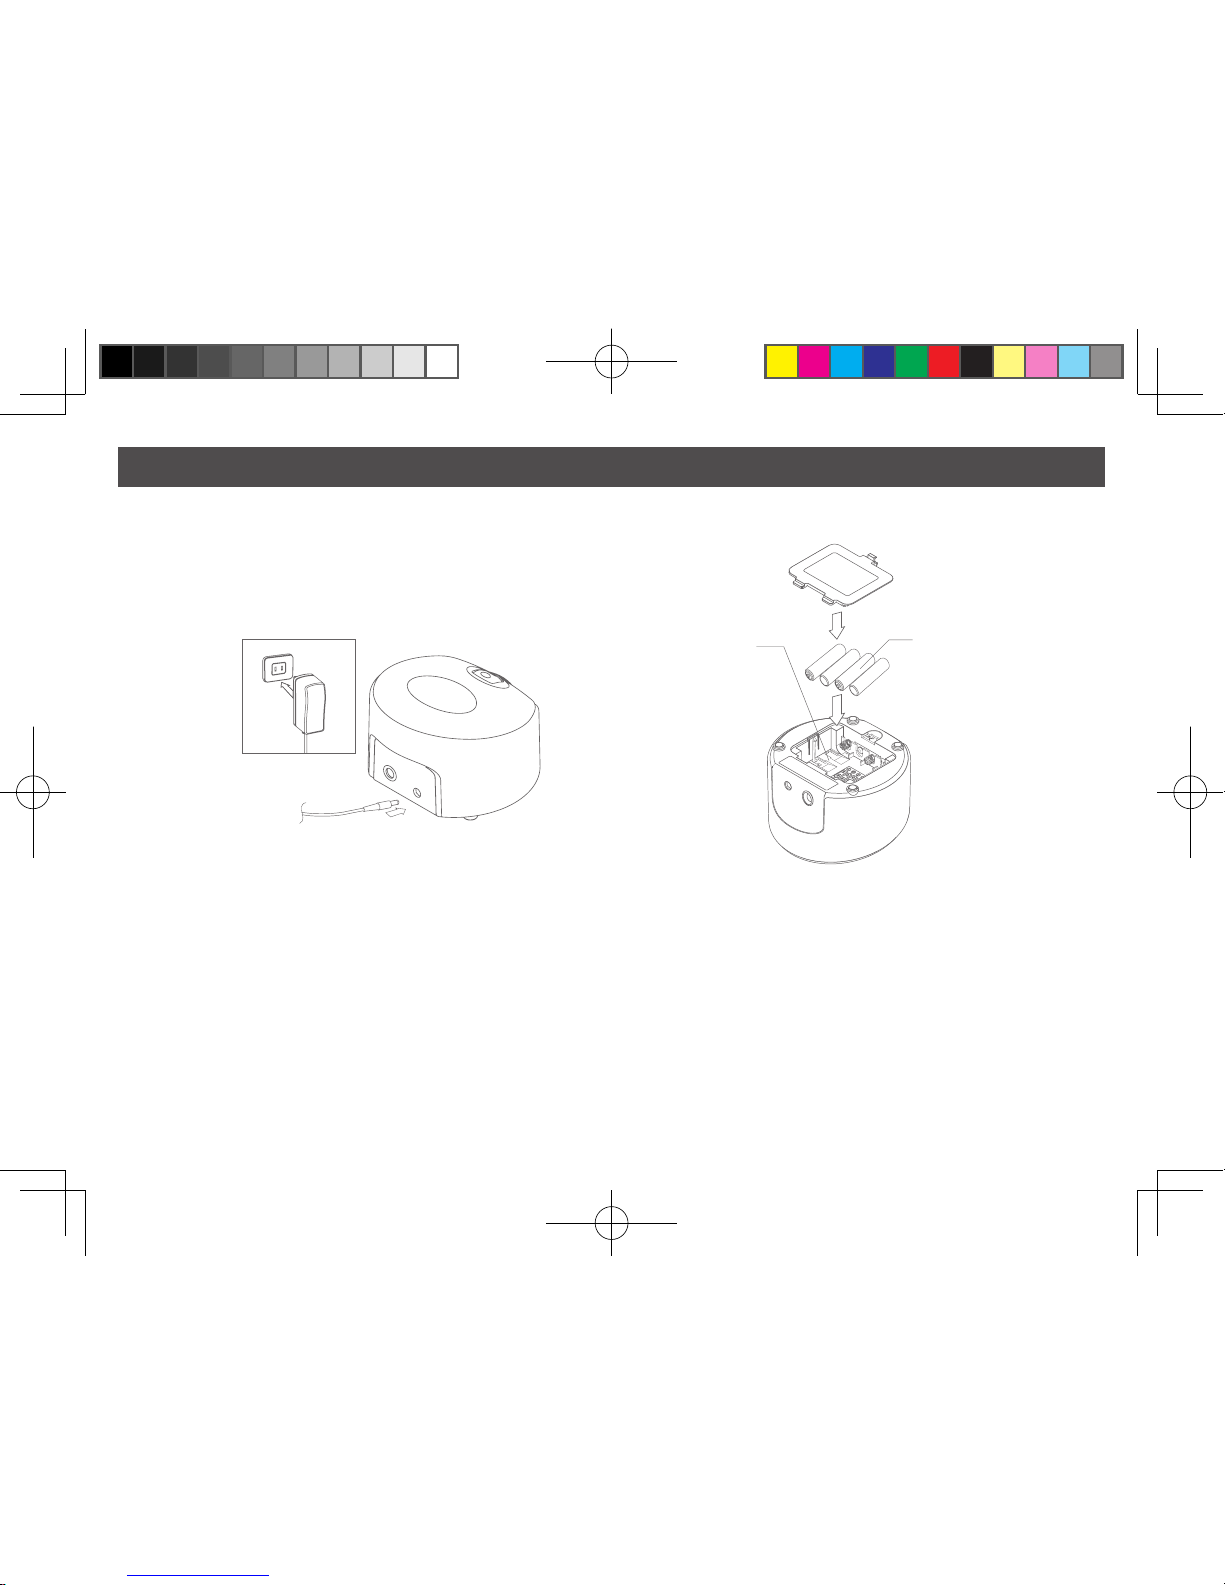
English 20
Power Options Continued
● Always replace all 4 batteries at the same time.
● Remove all batteries from the Electrical Pump Base if the Rumble Tuff® Electric Breast Pump is not going to be used
for extended periods of time.
● Properly dispose of all batteries, according to regulations for environmental protection and recycling.
● Alkaline batteries may present a risk of re or chemical burn if mistreated. Do NOT disassemble any battery. Do NOT
place batteries near heat source or re. Dispose of used batteries properly. Do NOT dispose of batteries in re. Keep
away from children.
AA Battery Compartment
4AA Batteries
(not included)
Using 4 AA Alkaline batteries (for PA203 only):
C2.indd 23 2011/11/25 下午 05:01:47
Page 24
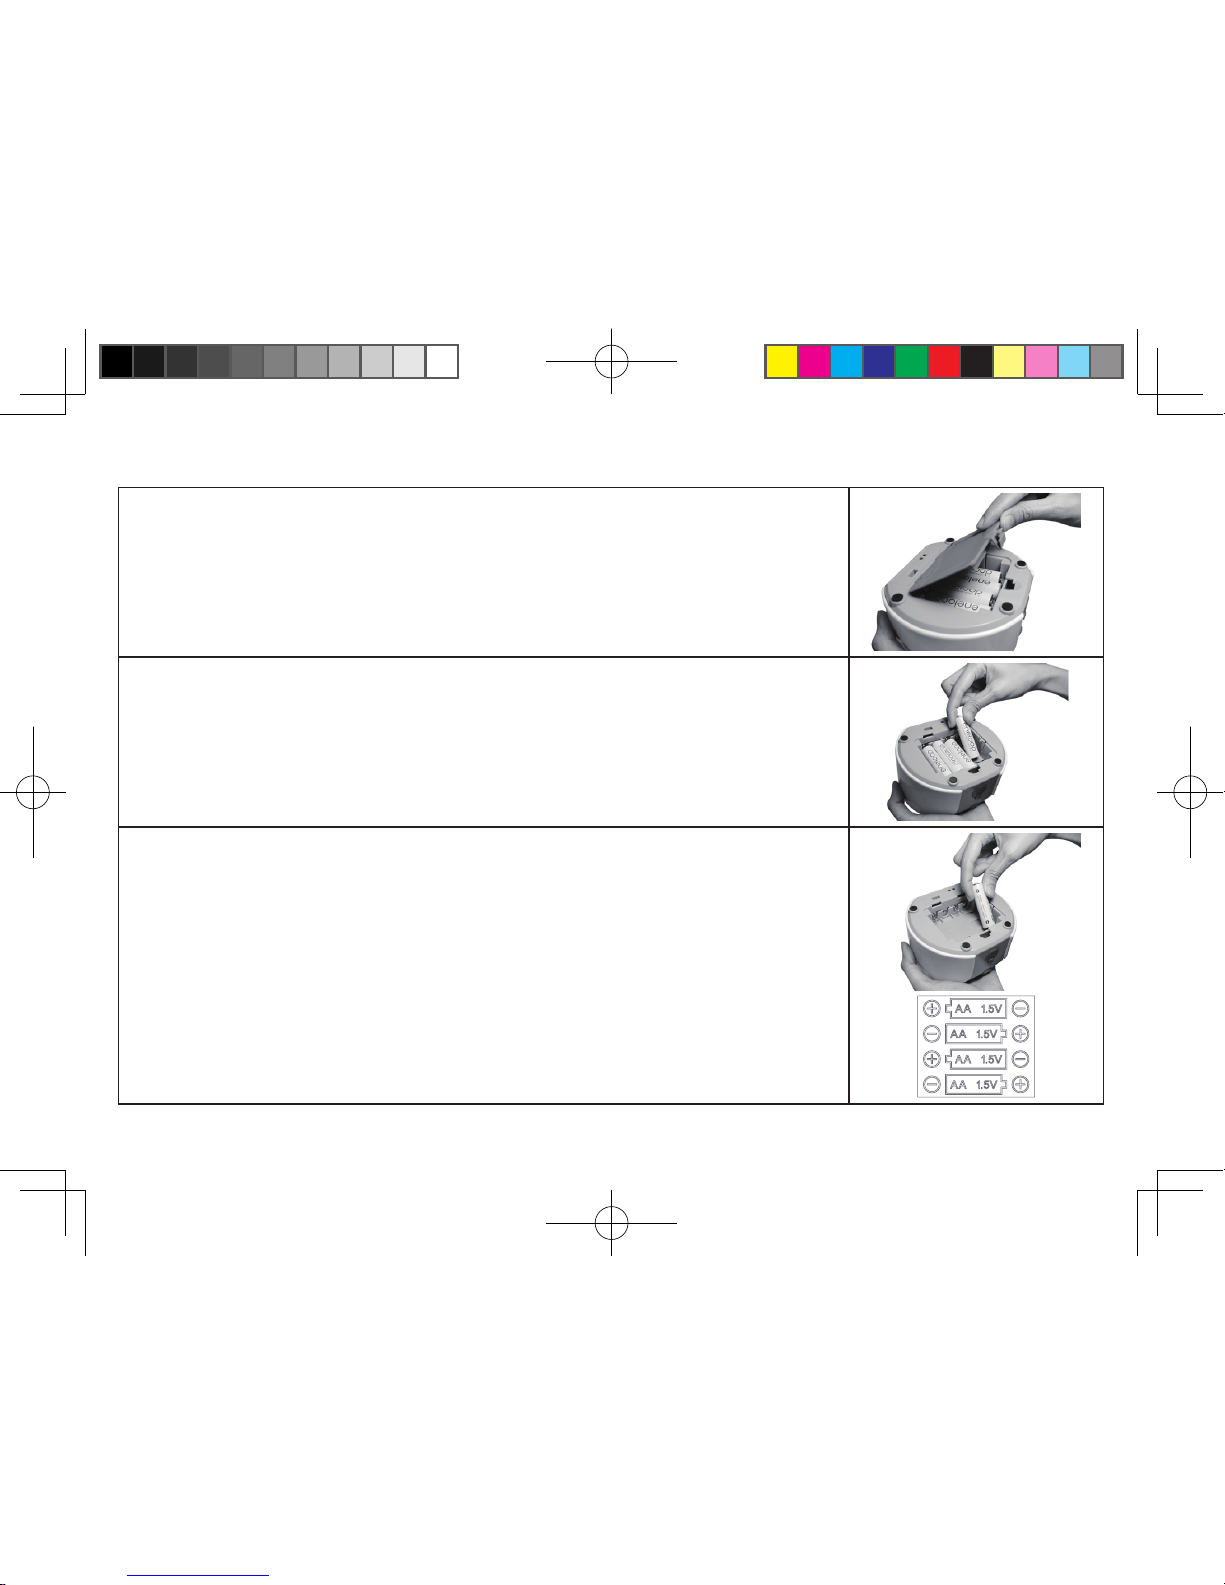
1. Open the Battery Cover.
2. Remove the old batteries if you are replacing them.
3. Insert 4 new AA Alkaline batteries.
Note: Make sure the polarity is correct as indicated.
English 21
Install the Batteries(AA Alkaline):
C2.indd 24 2011/11/25 下午 05:01:47
Page 25
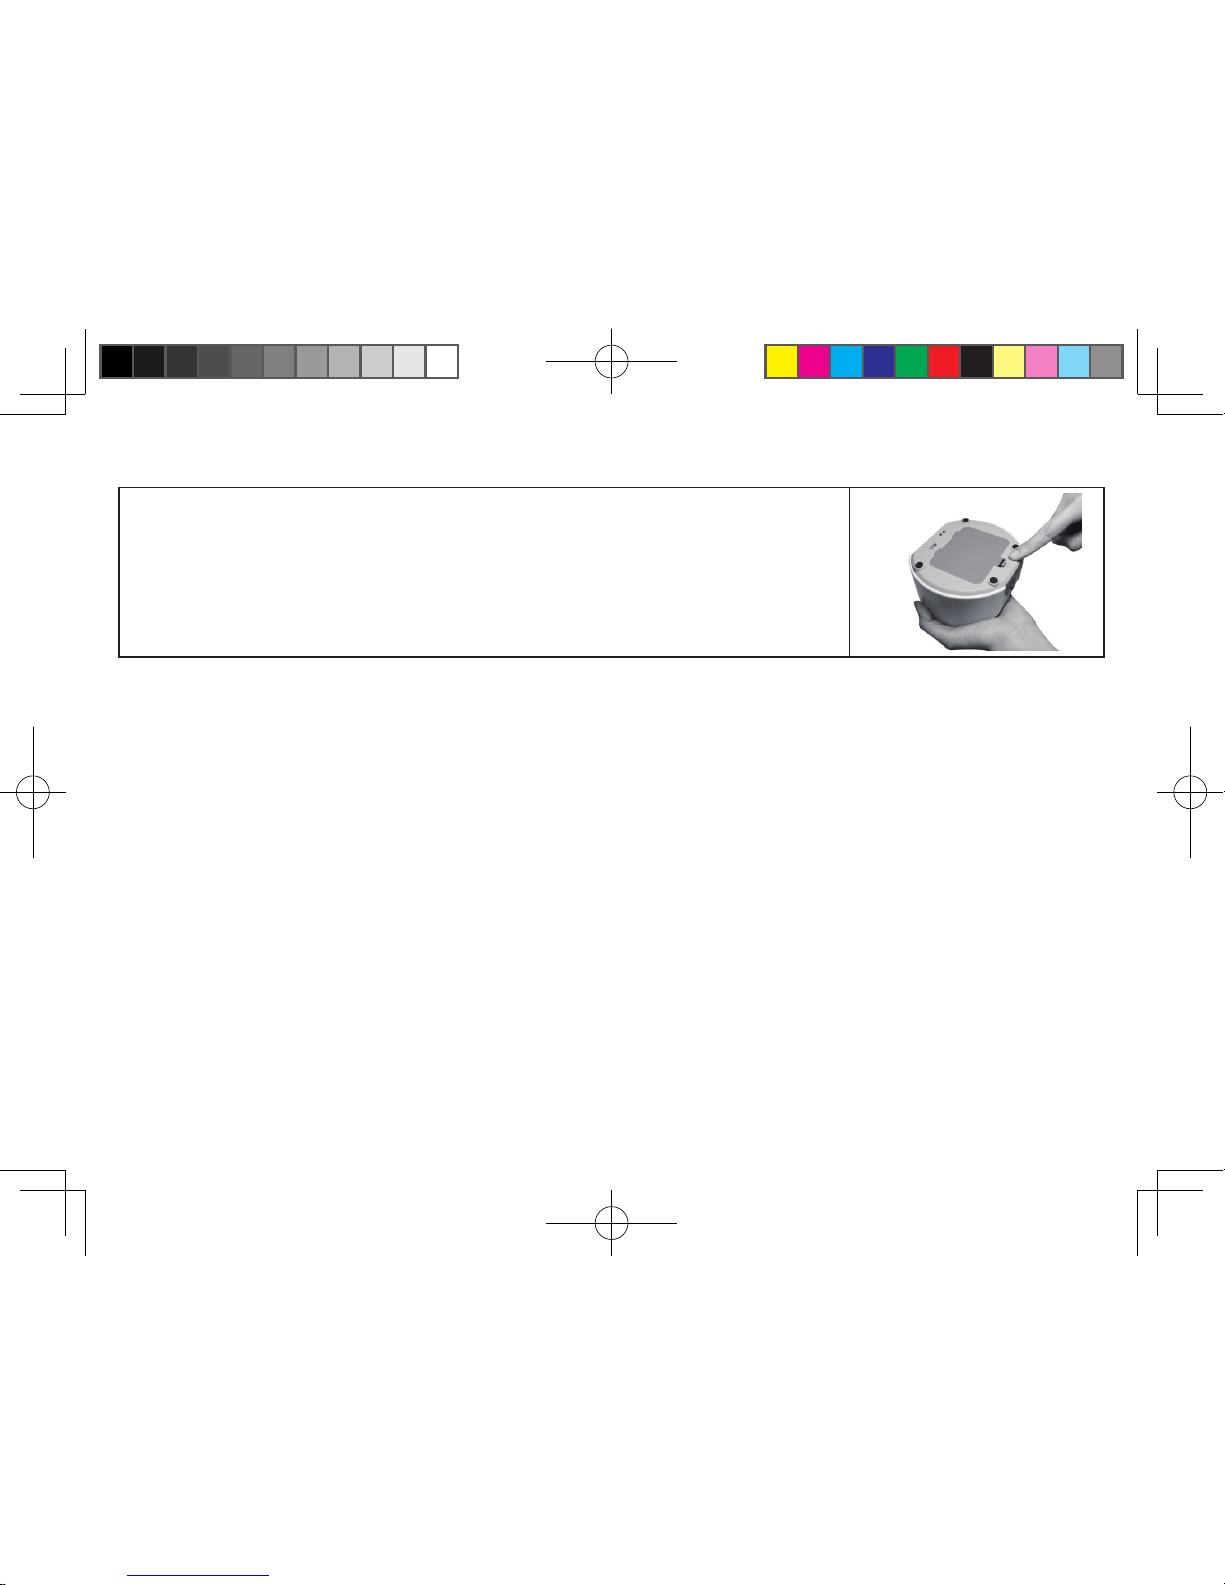
4. Close the Battery Cover, making sure it "snaps" into place.
English 22
C2.indd 25 2011/11/25 下午 05:01:47
Page 26
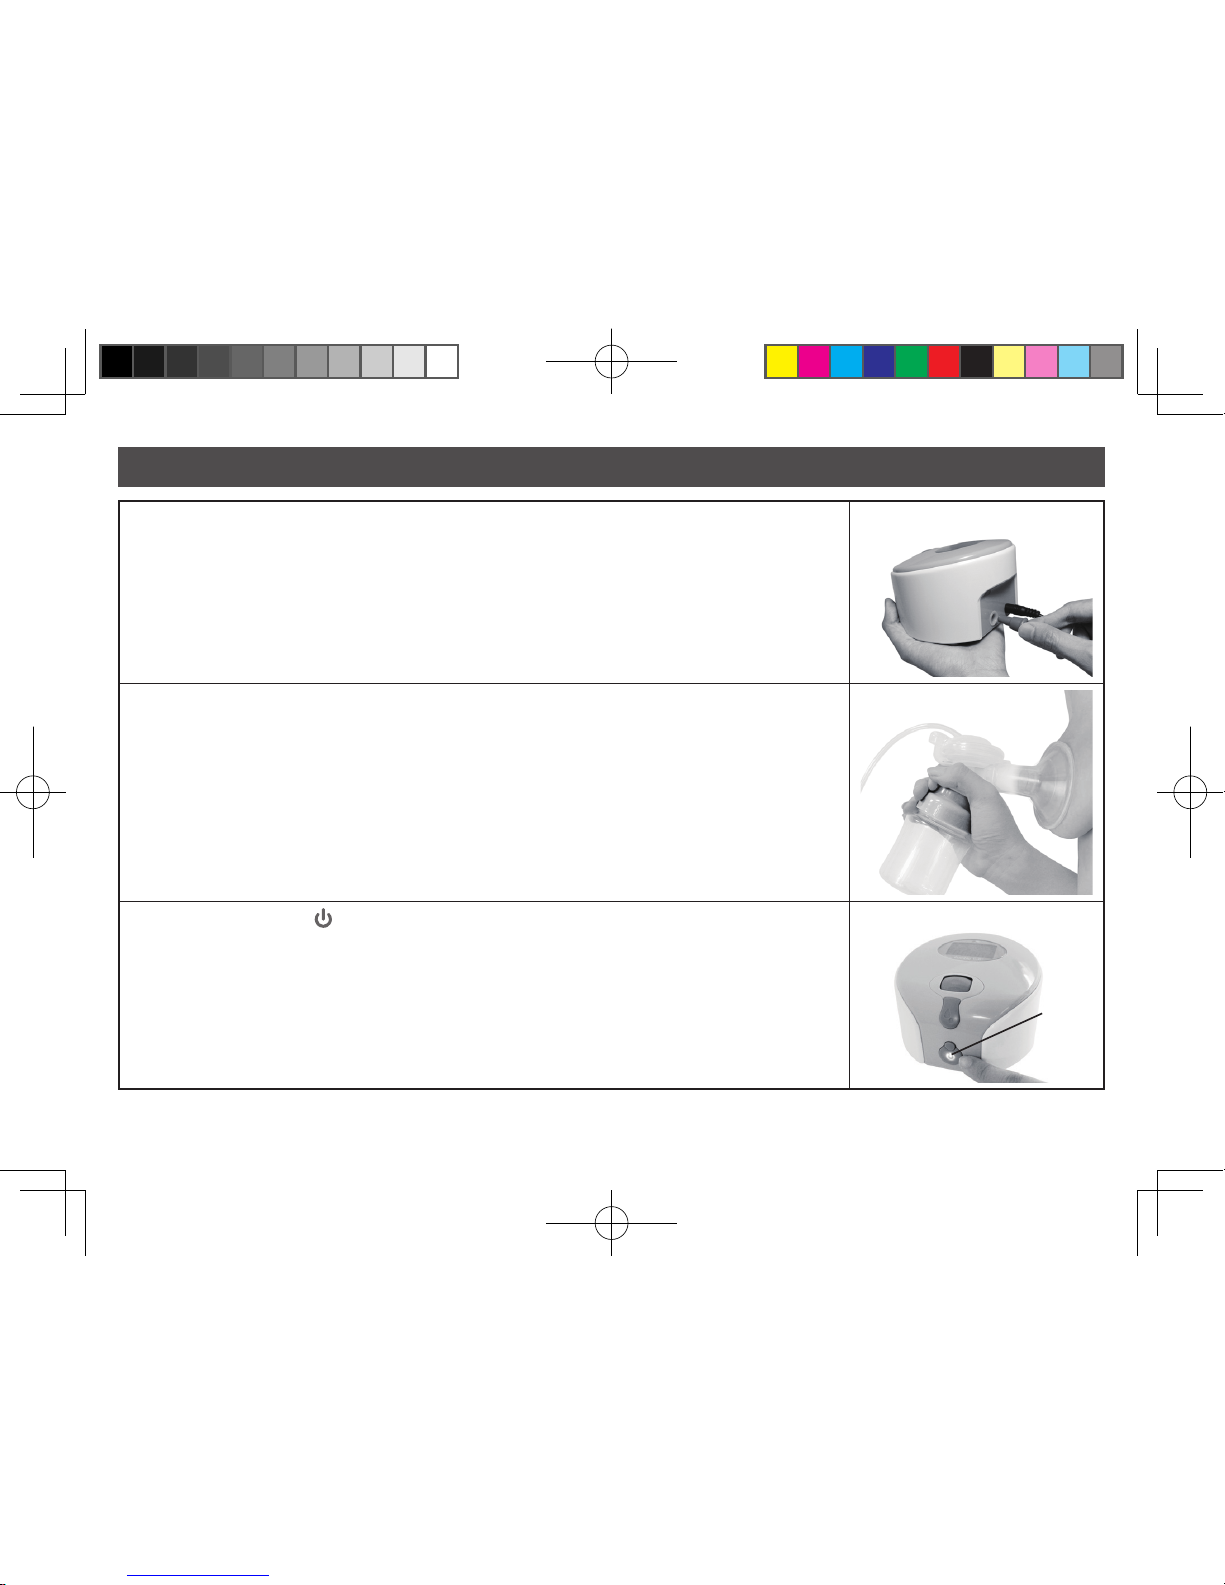
1. Make sure the tubing connector is properly inserted into the Electric Pump Base.
2. Hold the Expression Collection Kit to your breast so that your nipple(s) are centered inside the
Breast Shield.
3. Press the On/Off Button to begin pumping.
English 23
Pumping Instructions
On/Off
C2.indd 26 2011/11/25 下午 05:01:48
Page 27
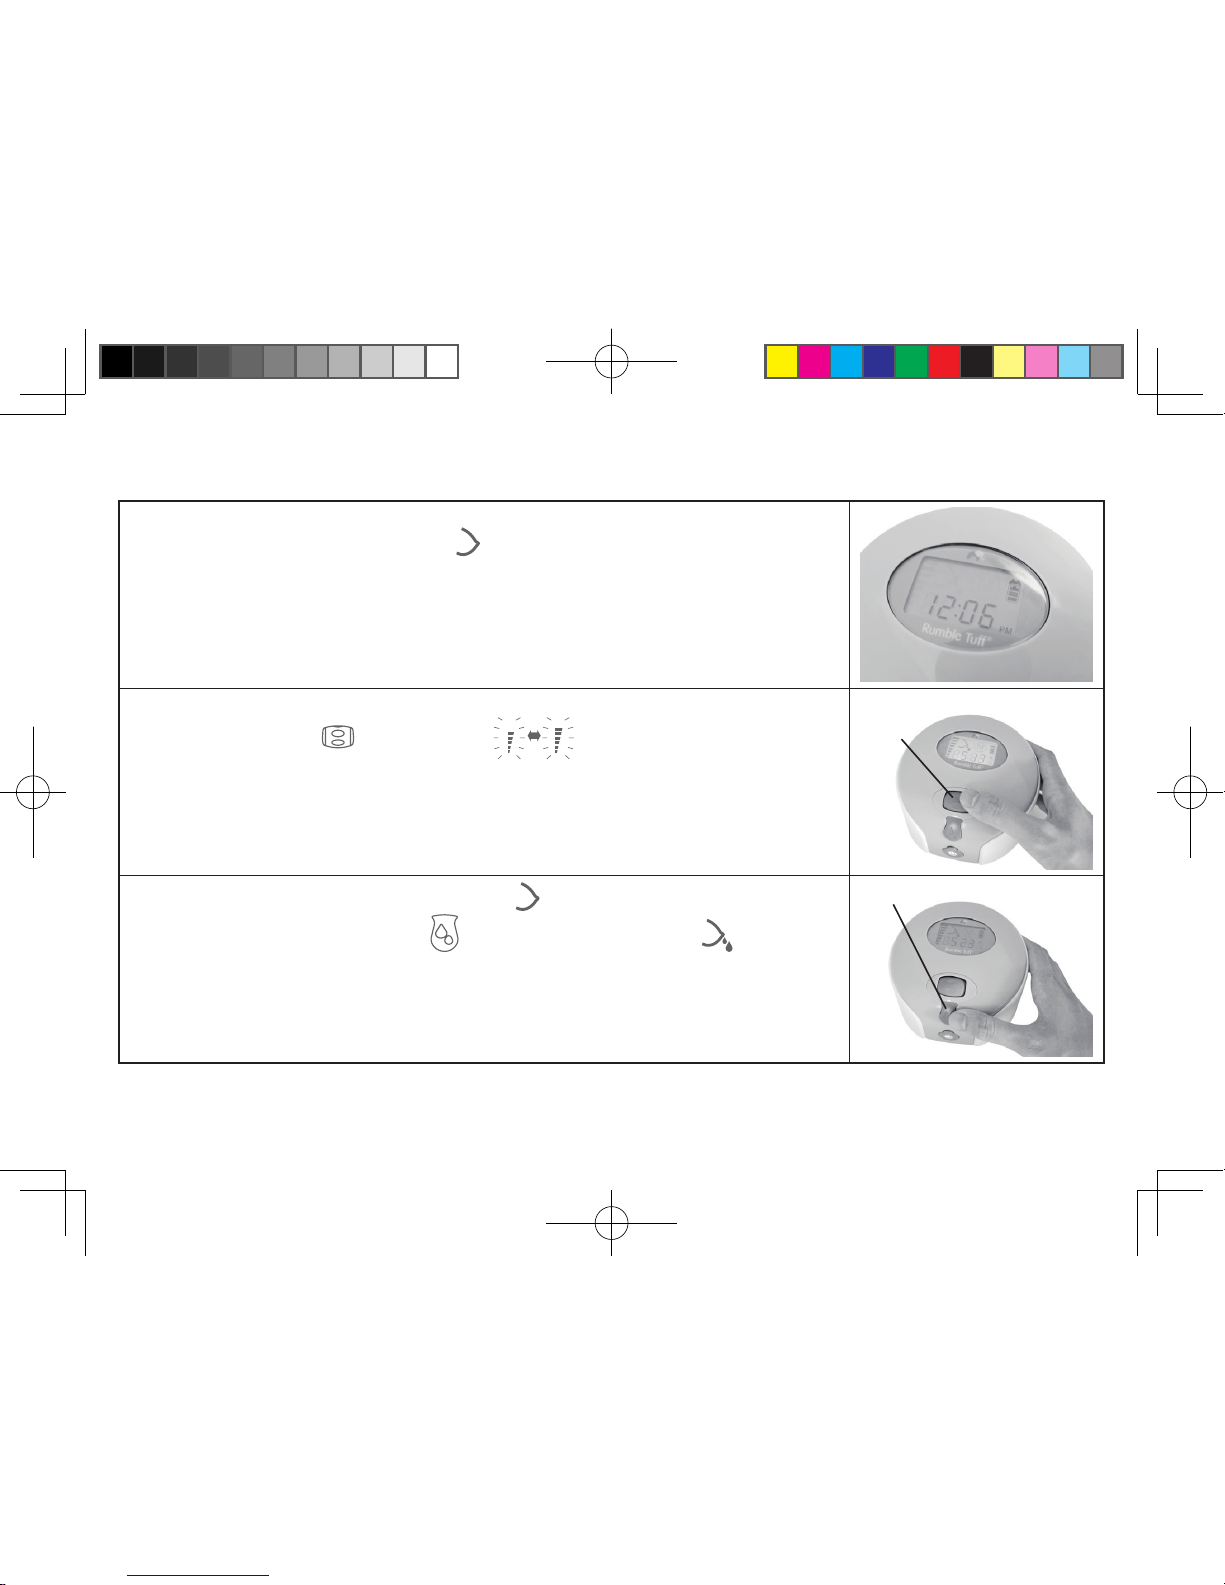
4. The LCD screen shows the time of your last pumping session for a few seconds, The Pump will
automatically begin in the Stimulation Cycle
.
5. Adjust the suction in the Stimulation Cycle to your comfort level while pumping by rolling the
Vacuum Adjusting Wheel
up (+) or down (-).
6. If you prefer to bypass the pre-set Stimulation Cycle or your milk lets down sooner than 2
minutes, just press the Let-Down Button
to switch to the Expression Cycle .
English 24
Vacuum Adjusting
Wheel
Let-Down Button
C2.indd 27 2011/11/25 下午 05:01:49
Page 28
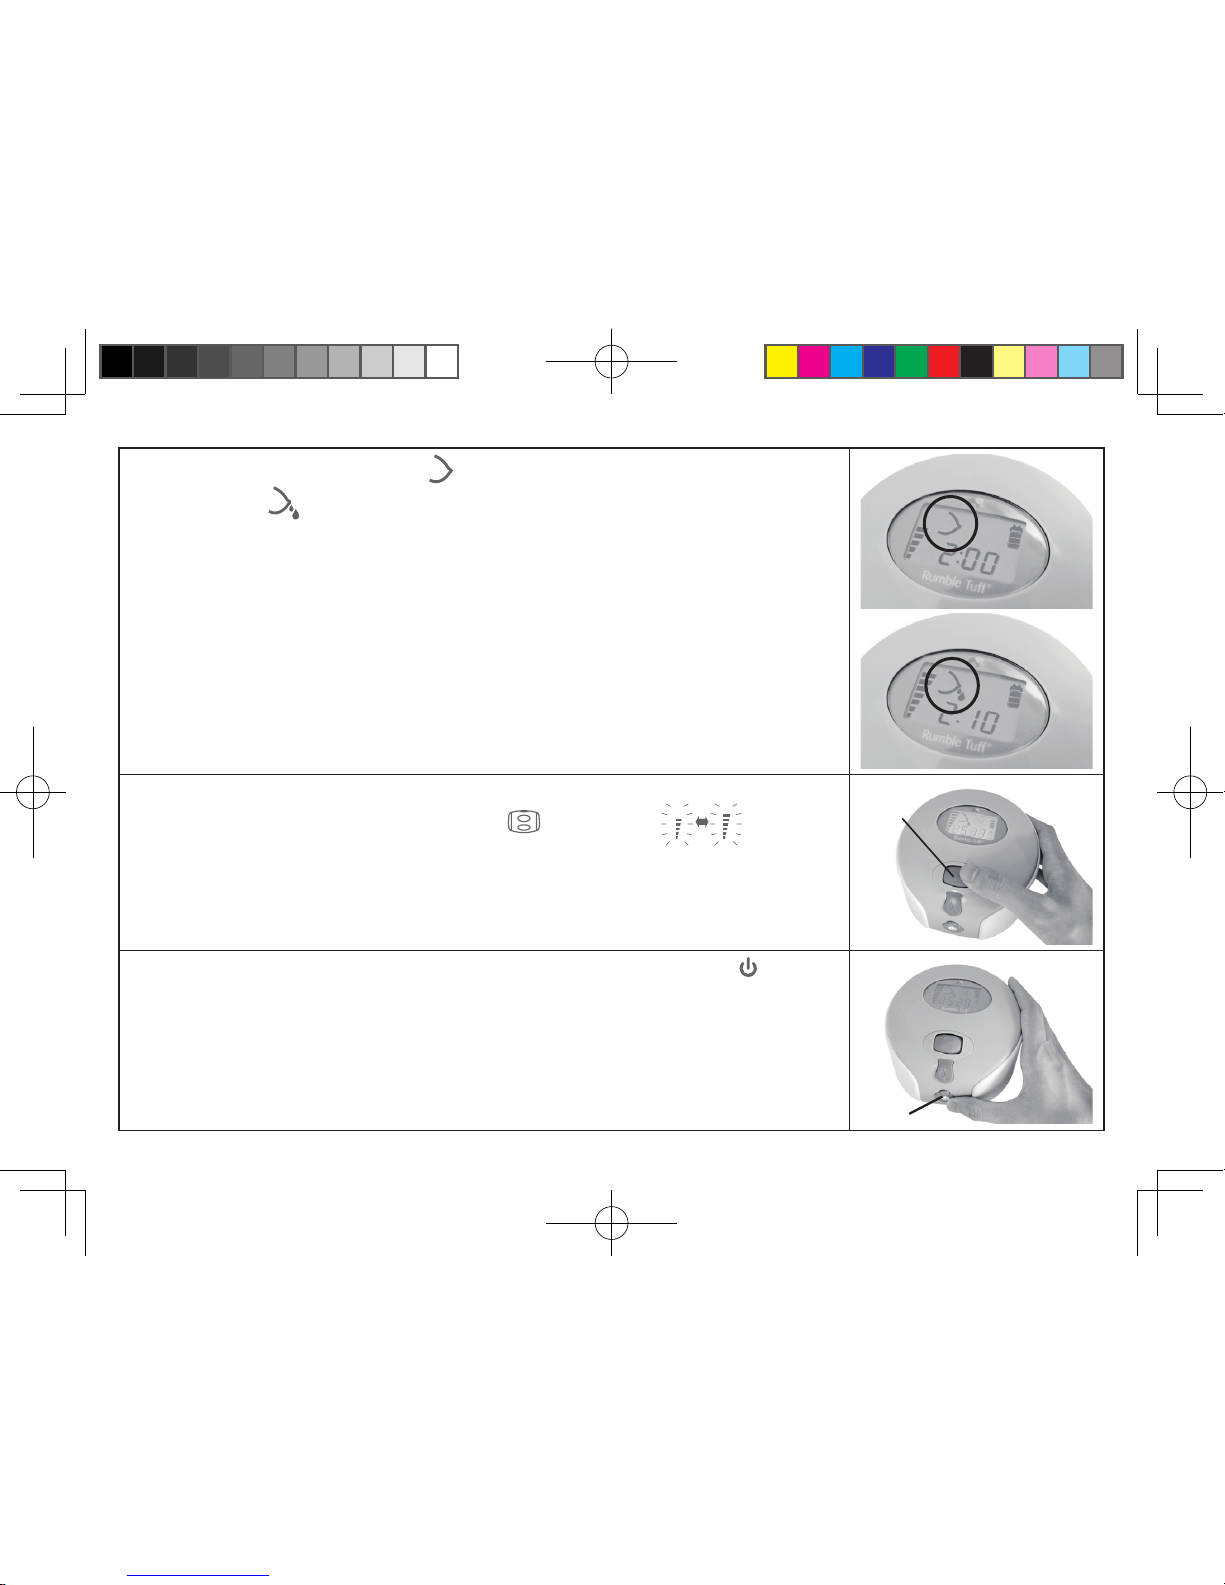
7. After two minutes, the Stimulation Cycle will be ended and automatically switches to the
Expression Cycle
. The Expression icon will appear to indicate that you are in the Expression
Cycle.
8. Adjust the suction in the Expression Cycle to the most comfortable and effective level while
pumping by rolling the Vacuum Adjusting Wheel up
(+) or down (-) .
9. When pumping session is nished, turn the Pump off by pressing the On/Off Button .
English 25
Stimulation Cycle
Expression Cycle
Vacuum Adjusting
Wheel
On/Off
C2.indd 28 2011/11/25 下午 05:01:50
Page 29
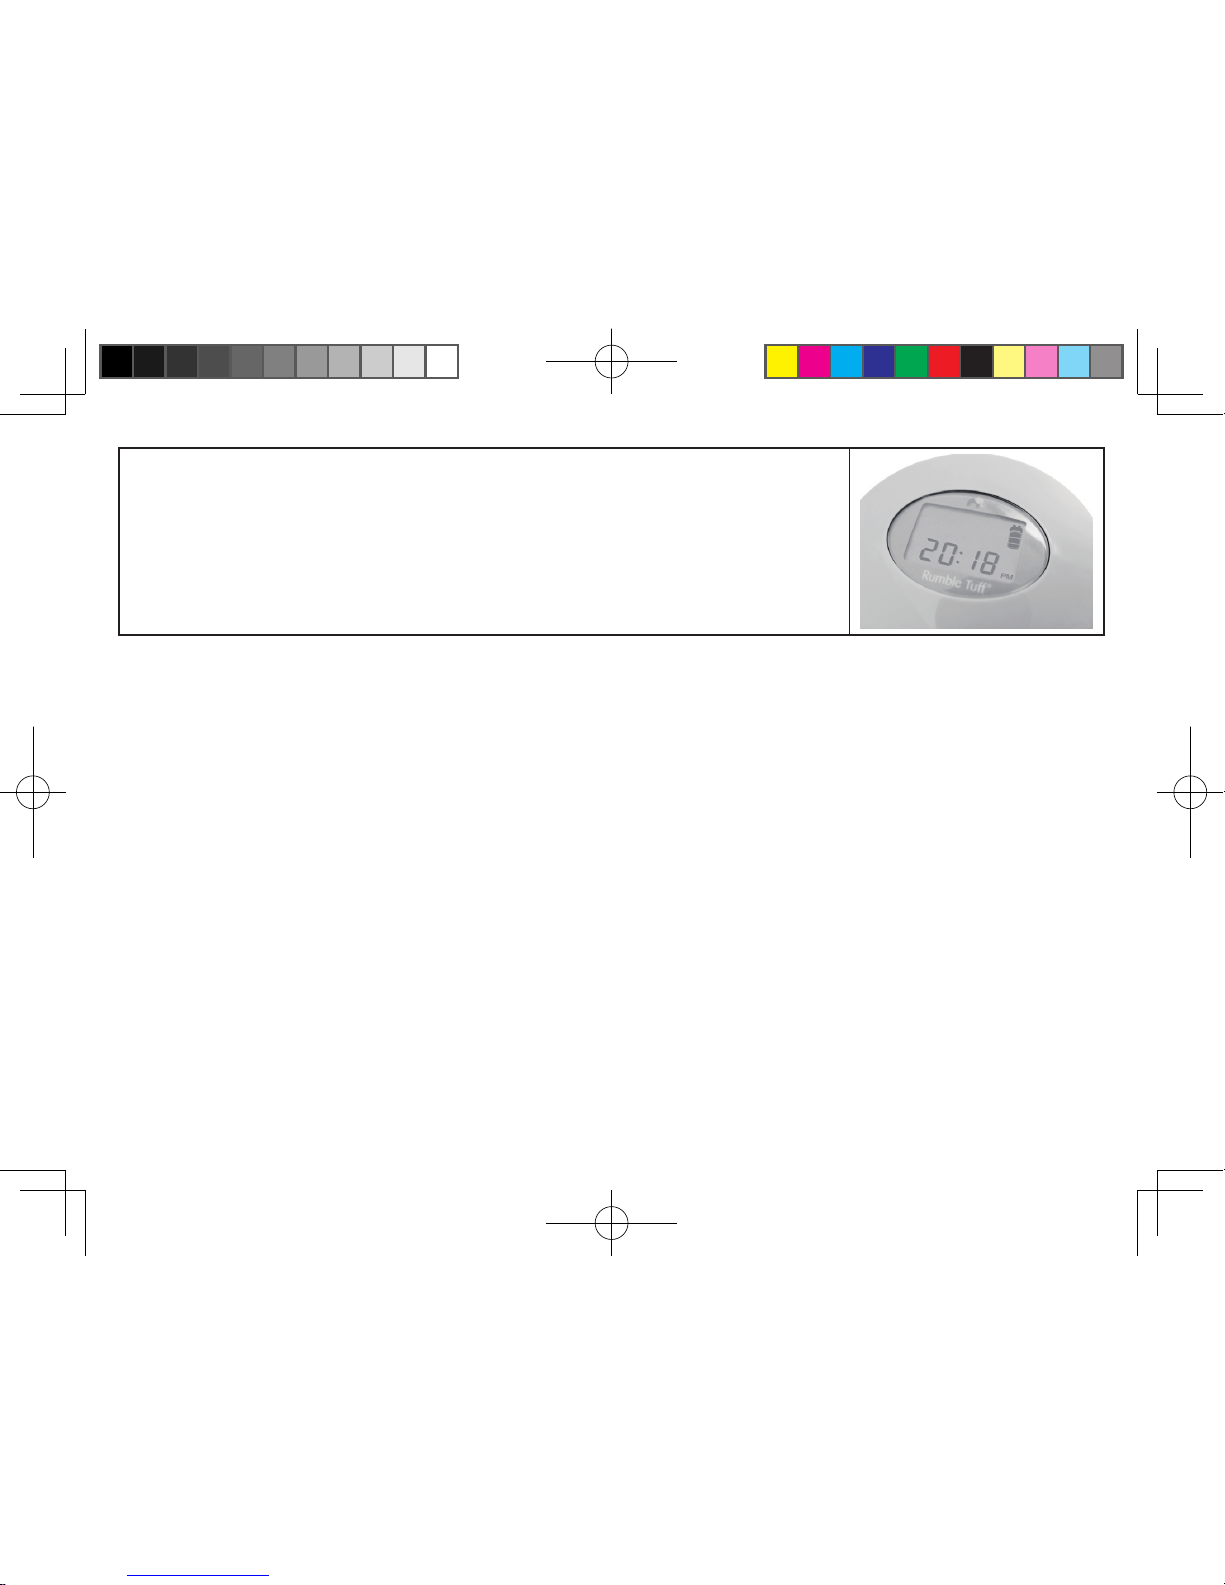
10. After the Pump has been turned off, the display will remain on for a few seconds. The display will
show the total amount of pumping time, then automatically switch to Standby/Clock mode, or
Alarm Clock Mode if alarm was turned on.
Note: Make sure there is no suction on the nipple(s) before removing the Breast Shield. If necessary,
break the suction by inserting a nger between the Breast Shield and the breast, similar to the way
you break away from your baby's suction.
English 26
Note: If the Rumble Tuff® Electric Breast Pump is left on, but unattended for more than 30 minutes, the
Pump will automatically shut-off.
C2.indd 29 2011/11/25 下午 05:01:50
Page 30
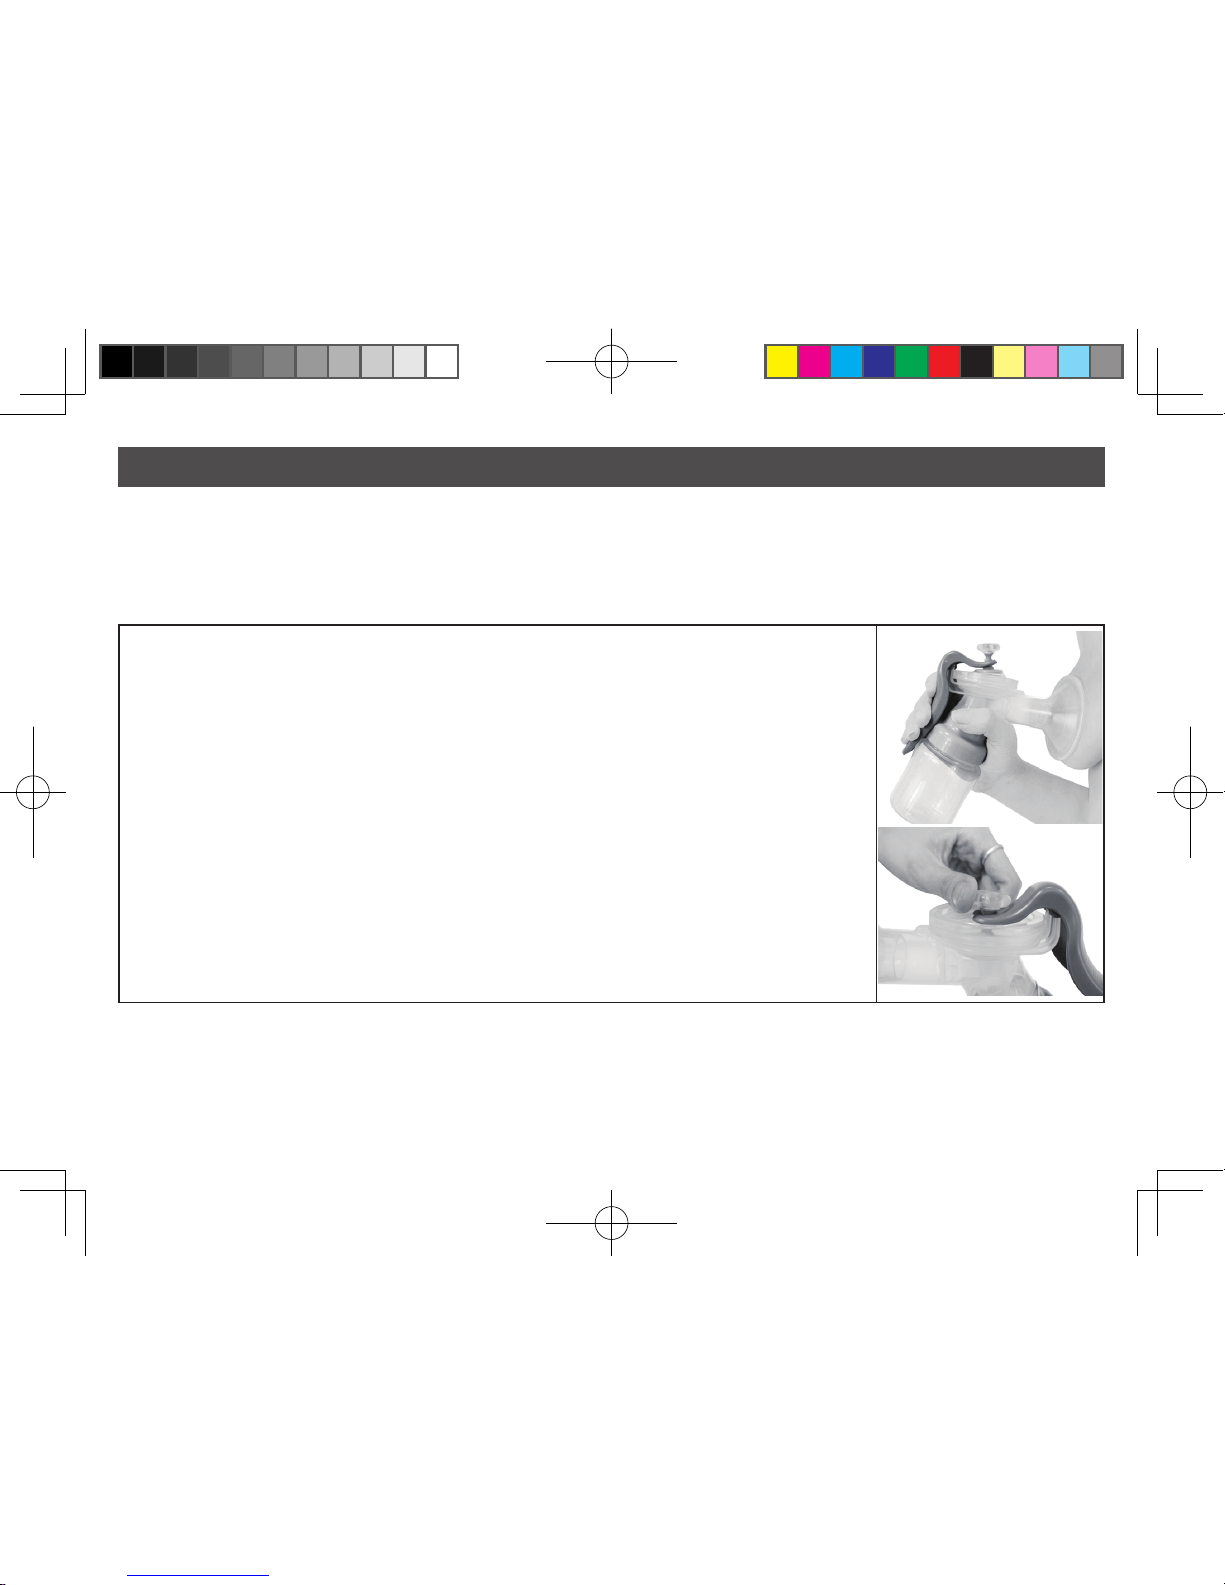
Using the Manual Pump
Note: There are two recesses for attaching the handle to the Manual Pump. You can toggle between these two settings
by pressing the Valve Stem away from the “U” shape tip of the Handle to dislocate the connection. Then reattach the Tip
to the Stem in different recess.
● The upper recess of the Valve Stem replicates the Stimulation Cycle.
● The lower recess of the Valve Stem replicates the Expression Cycle.
1. Hold the Manual Breast Pump to your breast so that your nipple is centered inside the Breastshield.
Then squeeze the handle toward the bottle to test the suction.
Not e: If an adjustment is necessary, tu rn the ro und knob of the Val ve Stem u ntil the suction is
comfortable.
English 27
C2.indd 30 2011/11/25 下午 05:01:51
Page 31
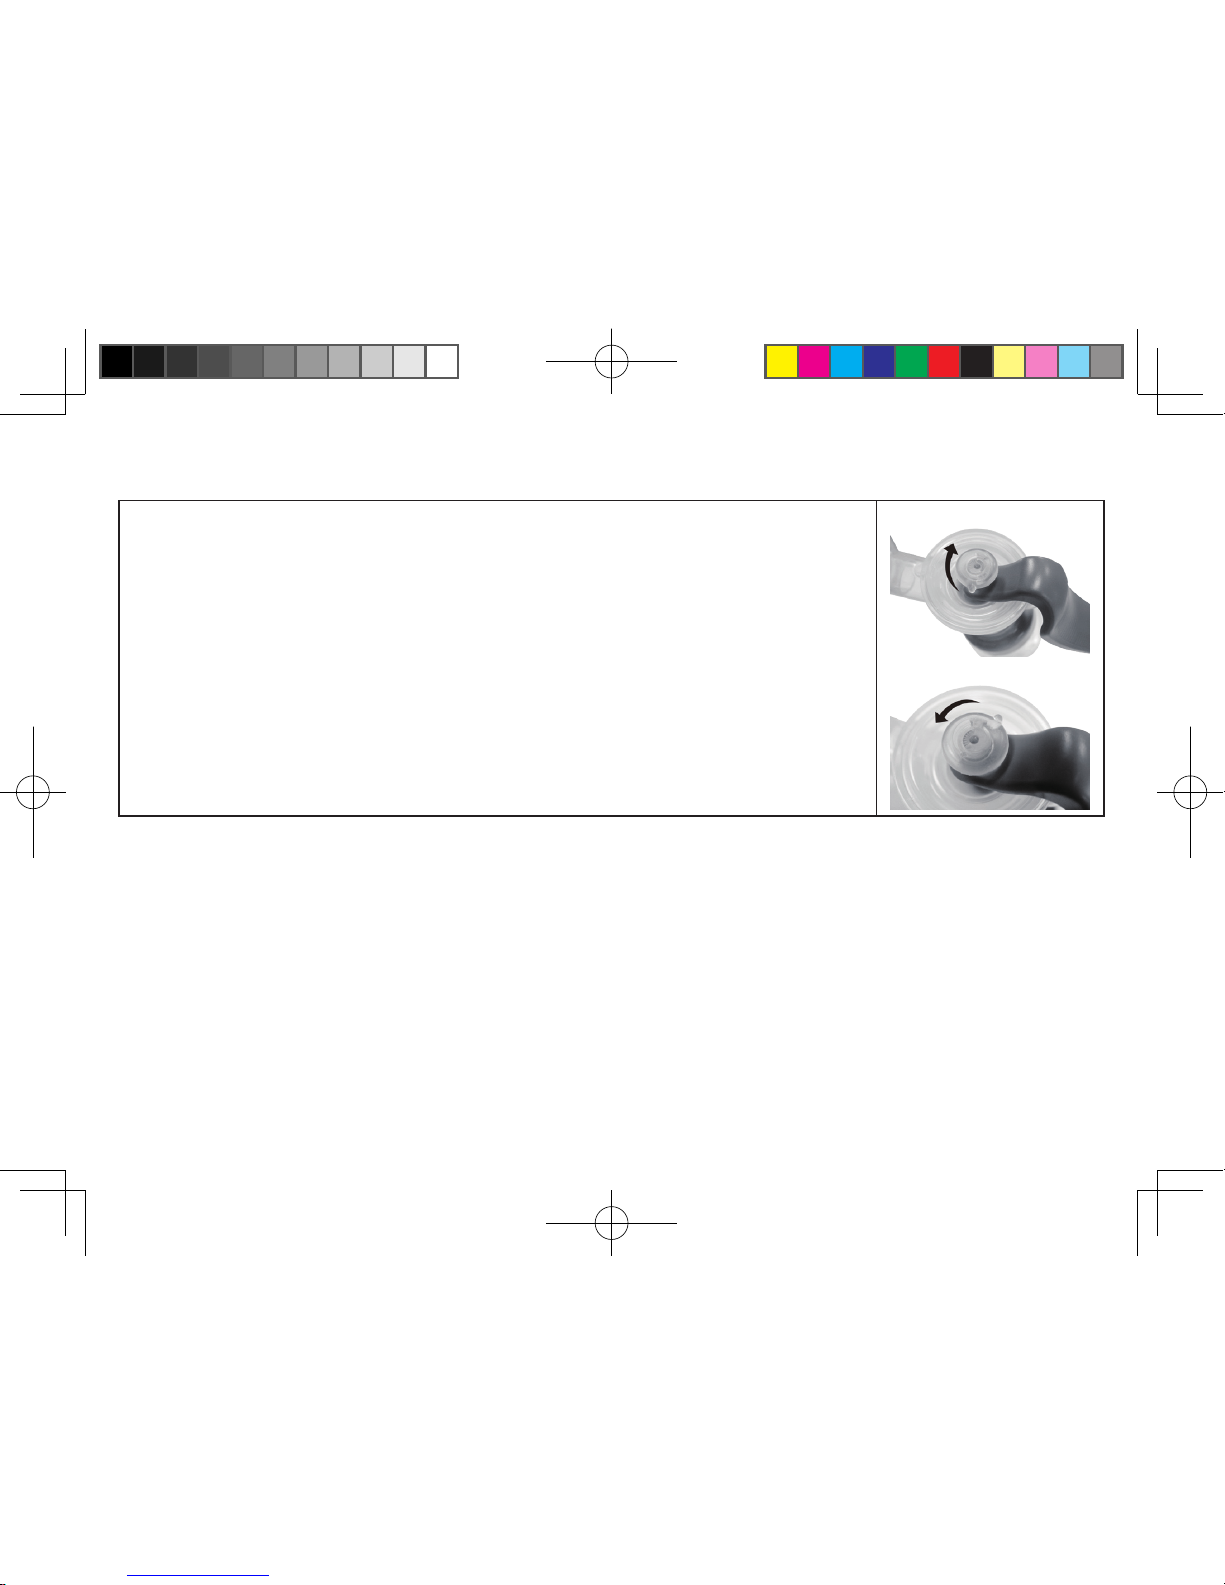
2. You can adjust the suction level by turning the round knob on the top of the Valve Stem. Turning
clockwise to increase the suction and counter-clockwise to reduce it.
Emişi artır
Emişi azalt
English 28
C2.indd 31 2011/11/25 下午 05:01:52
Page 32
English 29
Suction Level
M Button (My Favorite Mode)
Whenever you select a Suction Level (in both Stimulation & Expression Cycle), your Rumble Tuff® Electric Breast Pump
remembers until you change it next time. This feature becomes useful after you are familiar with this pump. Your Rumble
Tuff® Electric Breast Pump keeps your previous pumping level without having to reset your preferred level each time you
pump.
To set your preferred Suction Level:
1. In Stimulation Cycle, adjust the Stimulation suction to the level you nd most comfortable by rolling the Vacuum
Adjusting Wheel
up (+) or down (-).
2. In Expression Cycle, adjust the Expression suction level to the highest effective, yet still comfortable level by rolling
the Vacuum Adjusting Wheel
up (+) or down (-).
One of the great features of your Rumble Tuff
®
Electric Breast Pump is the M Button (My Favorite Mode). You can easily
set your personal Let-down time by press the M Button.
To set your personal Let-down time:
1. After few times of pumping, you nd your let-down time about the same in every pumping session.
2. Start pumping as you normally do. Your pump starts in Stimulation Cycle with your last preferred Stimulation Level.
3. Press the Let-Down Button
when your milk starts to ow to begin the Expression Cycle with your last preferred
Expression Level.
4. Press and hold the M Button
for three seconds, until the M icon ashes . Your personal Let-down time
has been set.
5. Continue Expressing and nish your pumping cycle.
To pump with your personal Let-down time:
1. Turn the Pump on.
2. Press the M Button . (Do NOT hold more than 3 seconds)
C2.indd 32 2011/11/25 下午 05:01:52
Page 33
English 30
3. Your pump automatically switches from Stimulation Cycle to Expression Cycle at your personal Let-down time.
NOTE: You CANNOT adjust the suction level or switch between Stimulation Cycle and Expression Cycle while in
Custom Mode. If you have to, stop My Favorite Mode by pressing the M Button.
C2.indd 33 2011/11/25 下午 05:01:52
Page 34
English 31
Setting the Time
How to Adjust the Clock:
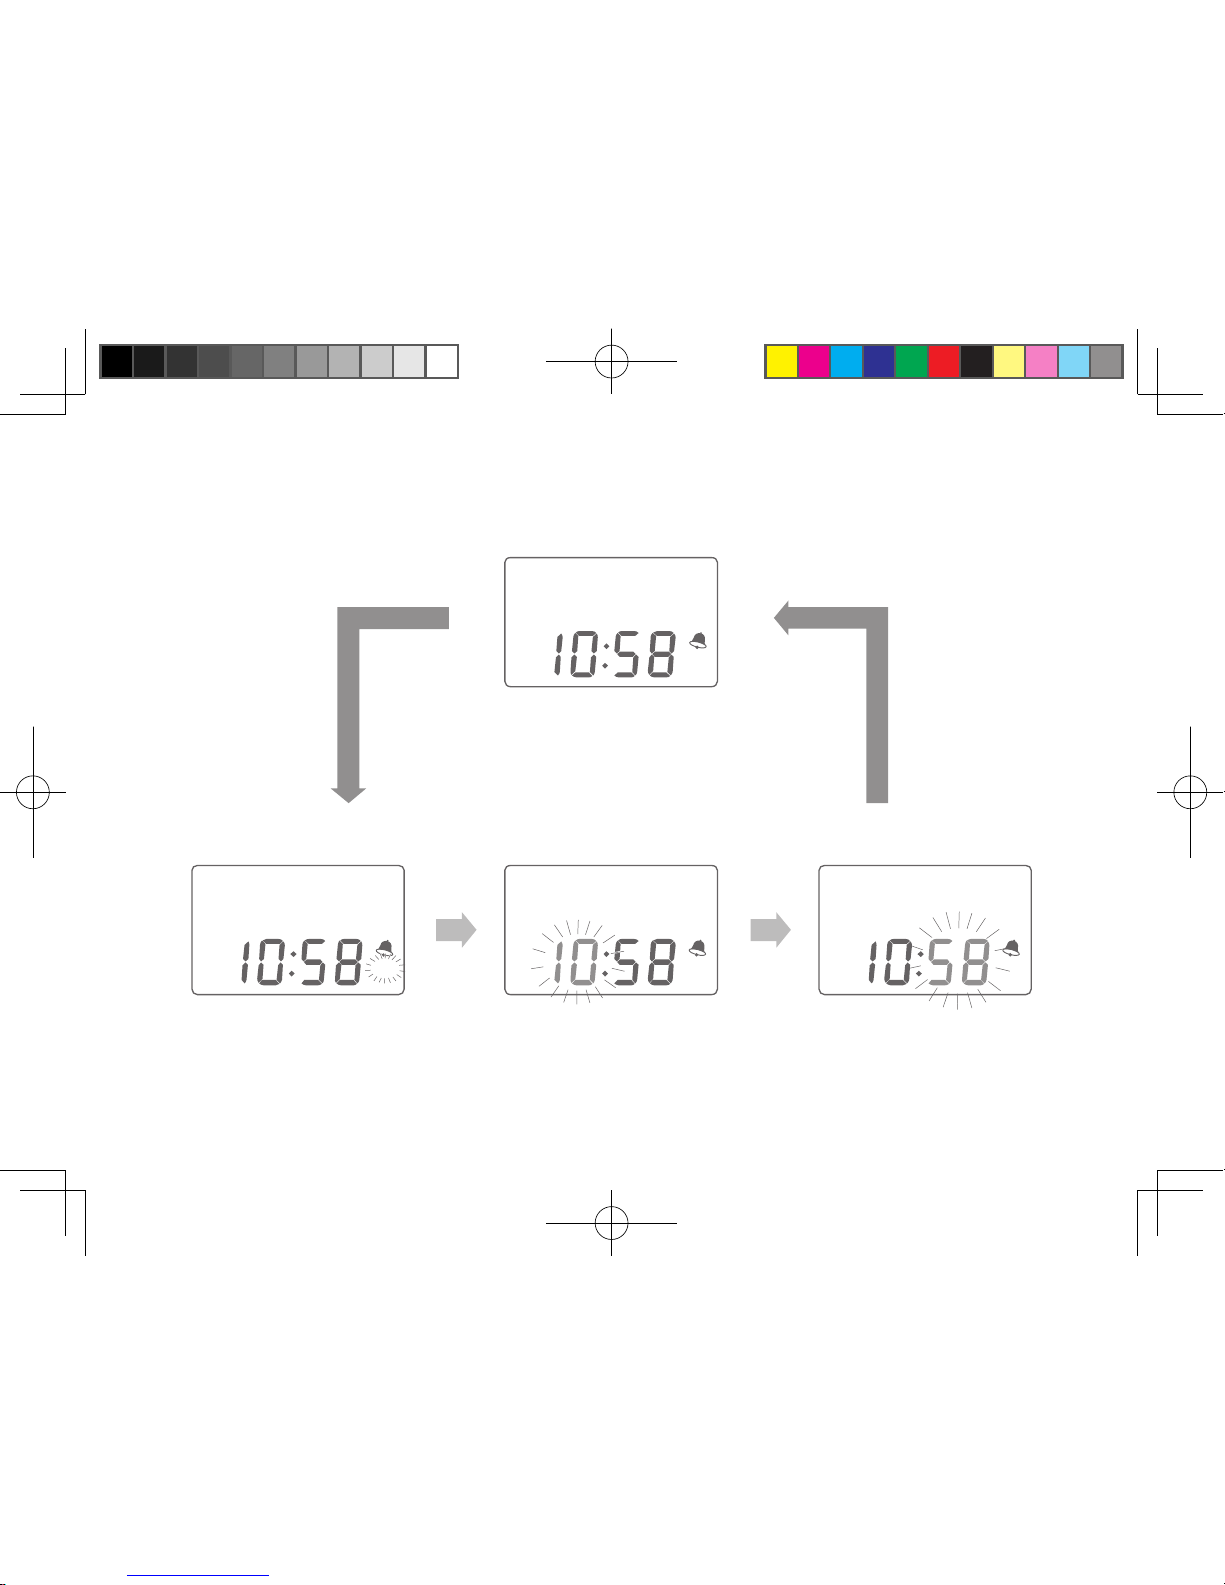
1. While in the Clock/Standard by Mode, press and hold the M Button for 3 seconds to go into Clock Setting mode.
A beep will sound and the AM/PM icon will ash.
2. To change between AM/PM, use the Vacuum Adjustment Wheel
up (+) or down (-).
3. Press the Let-Down Button
once to change from AM/PM to the Hour. The Hour number will ash.
4. To change the Hour, use the Vacuum Adjustment Wheel
to increase (+) or decrease (-) the hour.
5. Press the Let-Down Button
again to change the minutes. The Minute number will ash.
6. To change the Minutes, use the Vacuum Adjustment Wheel
to increase (+) or decrease (-) the minutes.
7. Press the Let-Down Button one last time to save your settings
.
NOTE: While in any Clock Setting mode, if no adjustments are made within 10 seconds, the setting will automatically
save and the pump will return to Clock/Standby Mode .
C2.indd 34 2011/11/25 下午 05:01:52
Page 35
English 32
AM
AM
AM
AM
Press
Memory
Button
for more
than 3 sec
Press
Let-down
Button
Press
Let-down
Button
Press
Let-down
Button
** Roll Adjusting Wheel to adjust.
AM / PM Adjusting "Hour" Adjusting "Min" Adjusting
Clock
C2.indd 35 2011/11/25 下午 05:01:52
Page 36
Alarm Clock Mode
It is advised to pump regularly in order to maintain a good milk supply from your body. The Alarm Clock Mode is
designed to maintain a regular Expression Cycle, by reminding you when it's time for your next pumping cycle. After
setting the time interval between each pumping, the alarm countdown will automatically start after the previous pumping
cycle has stopped. An alarm will sound then the pre-set time has passed.
How to Adjust the Alarm:
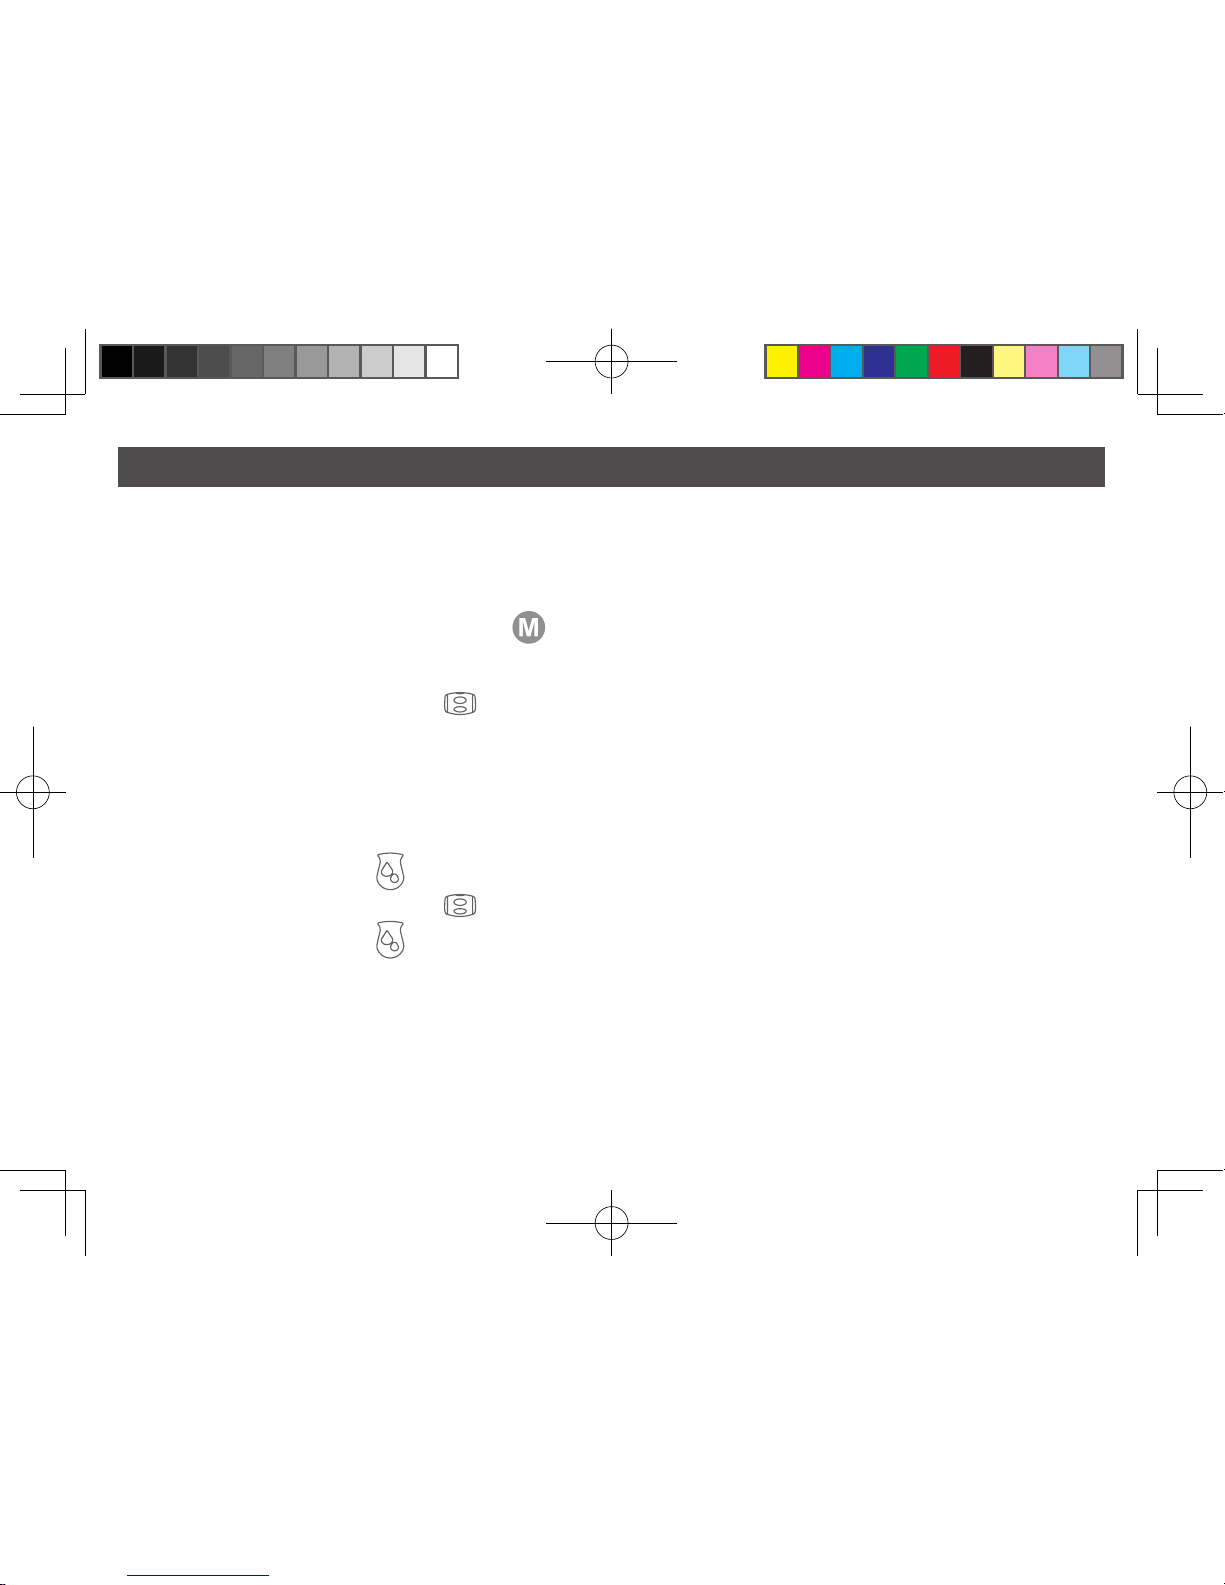
1. In Clock/Standby Mode, press the M Button
once to go into Alarm Adjusting mode.
2. 2 sets of time will display alternately, the Alarm Interval Time (the time between each Expression Cycle) and the Next
Alarm Time.
3. Roll the Vacuum Adjustment Wheel
up(+) or down (-) to adjust the Alarm Interval Time. The adjustment
increases (+) or decreases (-) in 15 minute increments. The Next Alarm Time will be adjusted automatically
according to the last time the pump was used.
NOTE: The Alarm Interval Time is the time from the beginning of one expression cycle to the next expression cycle. It is
not the time from the ending of one expression cycle to the next one.
4. Press the Let-Down Button
to switch to the Alarm On/Off setting.
5. Roll the Vacuum Adjustment Wheel
up(+) or down(-) to turn the Alarm Function On/Off.
6. Press the Let-Down Button
again to save your setting.
NOTE: While in Alarm Adjusting mode, the setting will be automatically saved and the pump will return to Clock/Standby
mode if no adjustment was made within 10 seconds.
English 33
C2.indd 36 2011/11/25 下午 05:01:52
Page 37
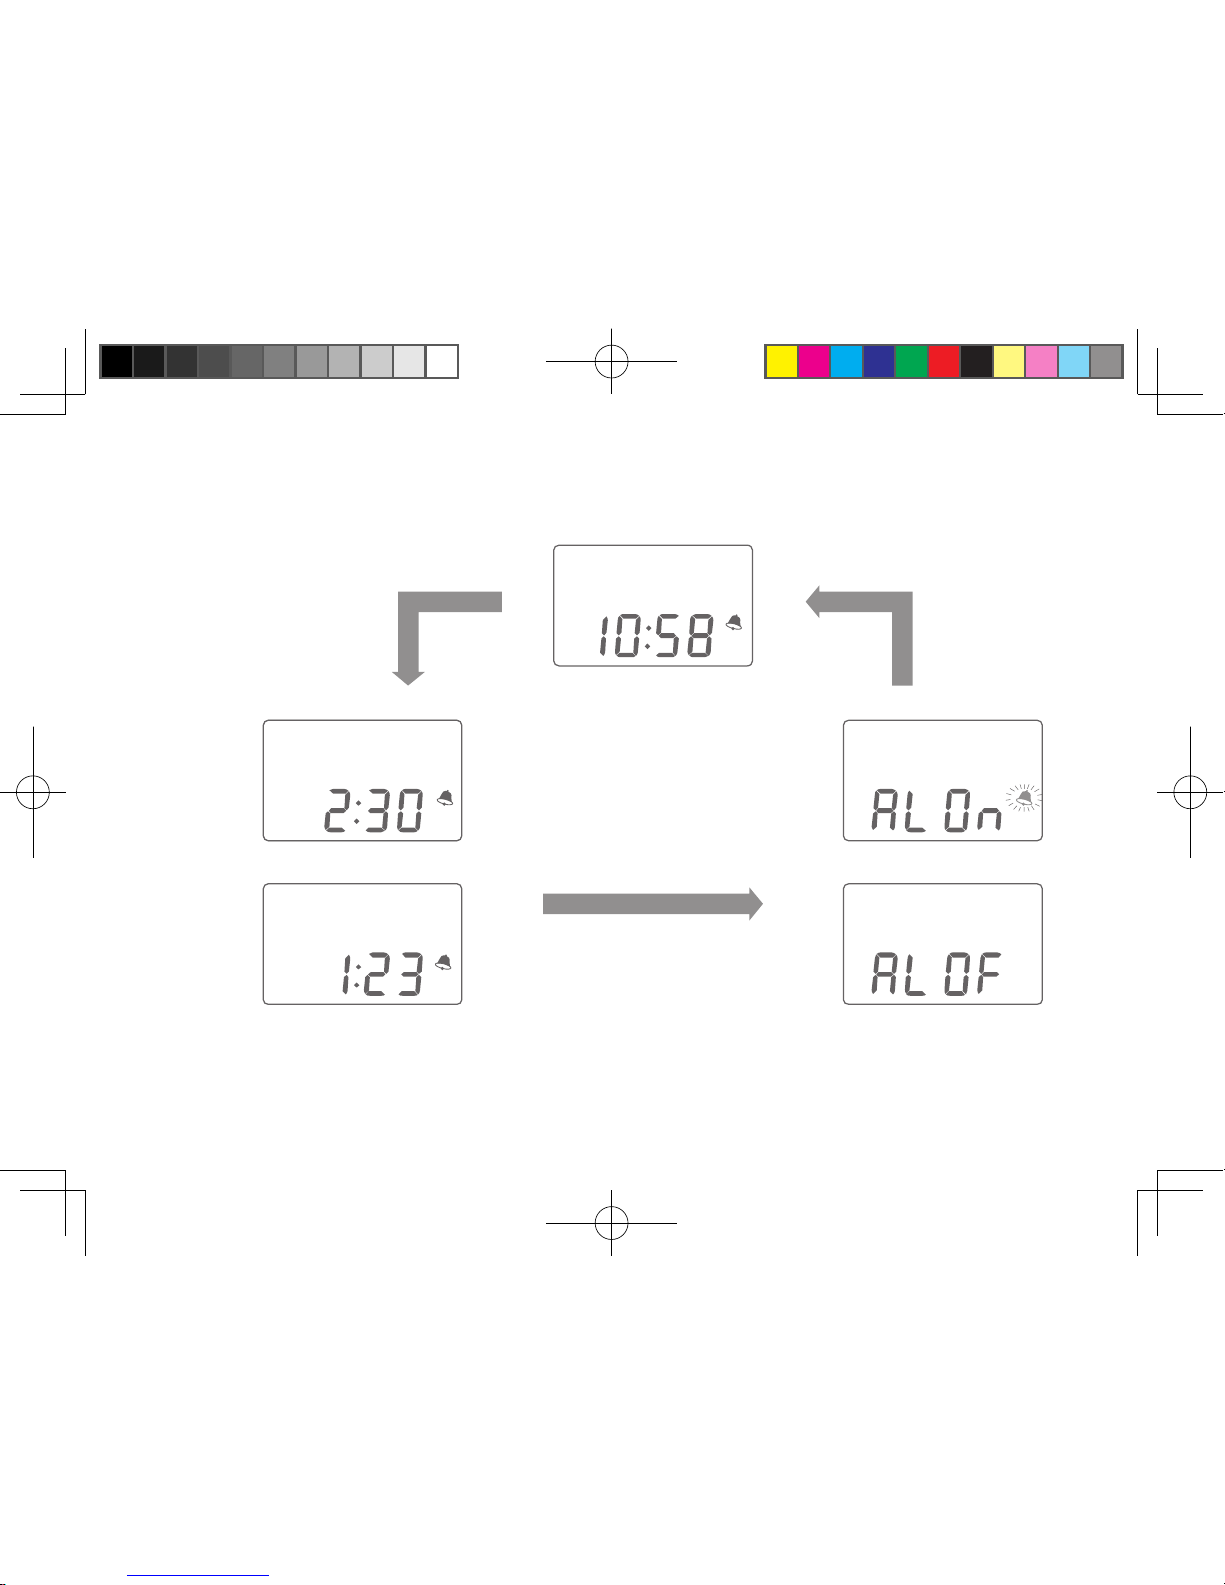
Press
Memory
Button
Press
Let-down
Button
Press
Let-down
Button
** Roll Adjusting Wheel to adjust.
Alarm On
Alarm OffAlarm time display
Time period adjusting
alternative
shows
Clock
PM
AM
English 34
C2.indd 37 2011/11/25 下午 05:01:52
Page 38
English 35
Cleaning Instructions
Unless otherwise instructed by your healthcare provider, follow these sanitizing and cleaning instructions.
Sanitize Prior to First Use:
Before you use your Rumble Tuff® Electric Breast Pump for the first time, disassemble and boil all parts of the
Expression Collection Kit in water for 10 minutes.
● Be sure to use enough water to keep all parts aoat while boiling.
● Do NOT boil tubing or tubing adaptor.
● Remove all parts from the water immediately after boiling.
● Completely air- or towel-dry before reassembly and next use.
Partially dry components may affect the operation of your Electric Breast Pump. Please ensure that all parts are
completely dry before use.
Before Each Use:
● Wash your hands thoroughly with soap and warm water before handling the Expression Collection Kit, the Electrical
Breast Pump or any other attachments.
● Make sure the Expression Collection Kit is cleaned, sanitized, and dried. If not, following the Sanitize Prior to First
Use instruction above or the Cleaning Instructions below.
● Take the Expression Collection Kit apart to clean.
● Ensure the tubing is free from any liquid. Do NOT operate your Electric Breast Pump if any liquid is visible in
the tubing.
Cleaning Instructions:
● Set aside the tubing and tubing connector. These items do not need to be washed or sanitized because the
diaphragm prevents them from coming in contact with the breastmilk.
● All parts of the Expression Collection Kit may be cleaned in the upper compartment of your dishwasher or hand
washed with dish soap in hot water.
● Do NOT use solvents or abrasives.
● Rinse with hot, clean water.
● To clean the Electric Pump Base, wipe the Base with a damp cloth, using only water or water mixed with a mild soap.
● DO NOT WASH THE TUBING OR THE TUBING ADAPTOR.
Note: Before using the Expression Collection Kit, visually inspect the individual components for cracks, chips, tears,
discoloration or deterioration, as they may affect the functionality of the Expression Collection Kit.
C2.indd 38 2011/11/25 下午 05:01:52
Page 39
English 36
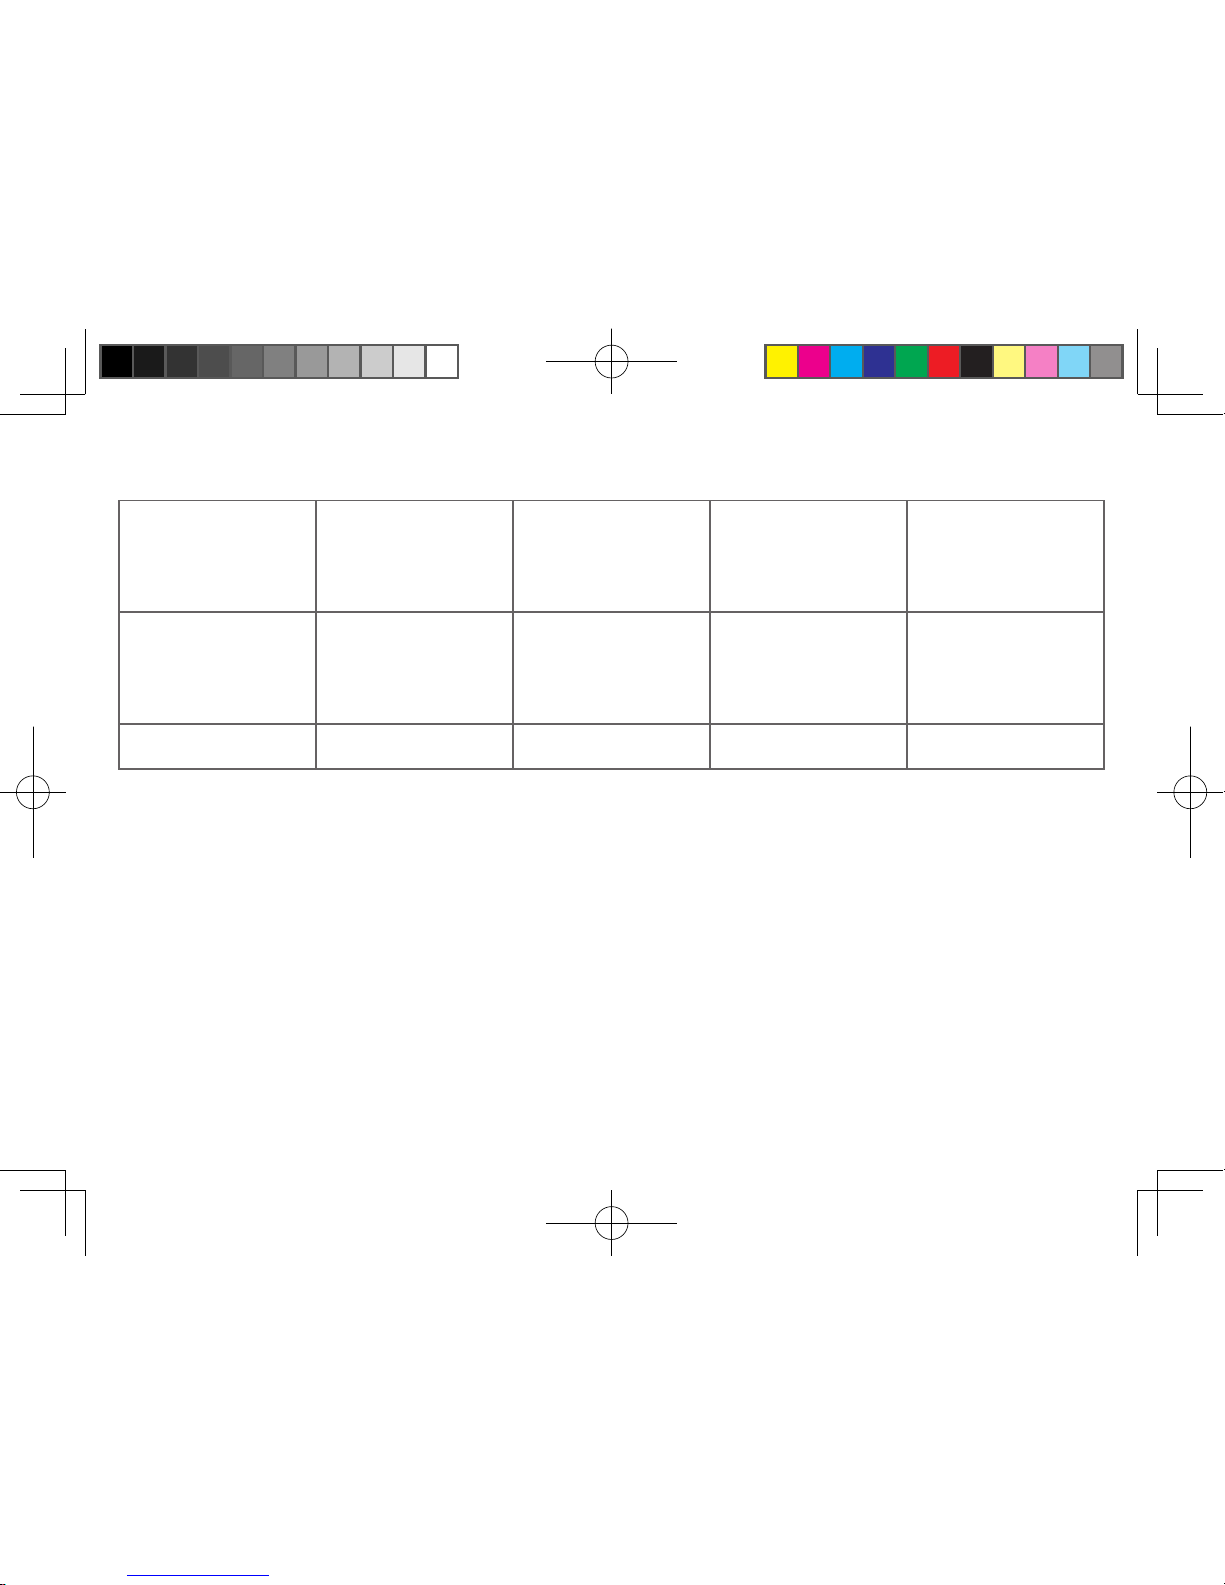
Breastmilk Storage Guidelines
Check with your healthcare provider or an International Board Certified Lactation Consultant for specific storage
instructions. This information is based on current research and applies to mothers who have healthy, full-term babies
who are storing their milk for home use.
Important Notes:
● STORAGE CONTAINERS: The best option for storing human milk is glass or BPA free, hard-sided plastic containers
with well-tting tops. When you are freezing your breastmilk, do not ll the container more than 3/4 full to allow for
expansion from freezing. Do NOT store breastmilk in the freezer door. The door tends to be the warmest part of the
freezer.
● RE-WARMING THE FROZEN MILK: Frozen milk can be thawed in the refrigerator overnight or under cool running
water. Gradually increase the temperature of the water to heat the milk to feeding temperature.
● RE-WARMING THE REFRIGERATED MILK: Refrigerated milk can be warmed by running under warm water for
several minutes.
● WHAT TO DO: Storing milk in 2 to 4 oz amounts may reduce waste. Write the date you expressed your milk on the
container (include your baby's name on the label if your baby is in a daycare setting). Use the oldest milk rst.
● WHAT NOT TO DO: Do NOT heat milk directly on the stove. Do NOT thaw in hot or boiling water. Do NOT microwave
milk. Microwaving alters the composition of the milk and may create hot spots that may burn your baby.
● THAT'S WEIRD: Human milk may separate into a milk layer and a cream layer when it is stored. This is normal.
Gently swirl to redistribute the cream before giving to baby. Sometimes thawed milk may smell or taste soapy. This is
due to a breakdown in the milk fats. The milk is safe and most babies will still drink it.
● IS IT DANGEROUS: Expressed milk can be kept in a common refrigerator at the workplace or day care center. The
US Center for Disease Control (CDC) and the US Occupational Safety and Health Administration (OSHA) agree that
human milk is not among the body uids that require special handling or storage in a separate container.
C2.indd 39 2011/11/25 下午 05:01:52
Page 40
English 37
Deep Freeze
Refrigerator Style
Freezer
(Self-contained
freezer) approx. 0°F
Refrigerator 32°F to
39°F
Room Temperature
66°F to 78°F
Fresh Breastmilk
6 months - ideal
12 months - acceptable
6 months - acceptable
72 hours - ideal
Up to 8 days -
acceptable
4 hours - ideal
6 hours - acceptable
Thawed Breastmilk Do NOT refreeze Do NOT refreeze 24 hours 1 hour
Source: La Leche League International 2009 www.llli.org/faq/milkstorage.html
C2.indd 40 2011/11/25 下午 05:01:52
Page 41
English 38
Tips
Pumping Tips:
The most important and successful part of pumping is the let-down reex. The let-down reex is when your milk begins
to ow freely.
● Try relaxing with a warm, wet compress on your breast.
● Sometimes a light circular massaging of the breast prior to and/or during a pumping session will help your let-down
reex start/continue.
● Go to a Non-stressful environment (close the door to your ofce, or to the lounge area).
● Use a comfortable chair that gives lower back support with or without a footstool. After all, you're the one who has to
be comfortable.
● Think soothing thoughts about your baby and/or look at your favorite baby photo(s).
● Some mothers found that their let-down reex will automatically occur when they hear their baby cry. It happens for
other moms when they hear any baby cry.
Depending on your health and milk production condition, you may be able to achieve more than one let-down in one
pumping session. You can switch back and forth between the Stimulation Cycle and Expression Cycle just by pressing
the Let-Down Button.
Remember that successful pumping is a learned skill. Breastmilk is produced on a supply and demand basis; expressing
your breastmilk regularly stimulates and maintains your milk supply.
If your feels uncomfortable or painful on your breast while using the Pump, try decreasing the suction level by rolling the
Vacuum Adjusting Wheel down (-). You may also try pumping with/without the Silicone Cushion. If these tips do not help,
turn the product off and remove the pump from your breast. You may want to try again at a time when your breast is less
engorged. If you are still experiencing pain or discomfort, consult your healthcare professional or an international board
certied lactation consultant.
C2.indd 41 2011/11/25 下午 05:01:52
Page 42
English 39
Battery Storage:
● When storing the battery for a short period of time, store within the following temperature range: -4°F to 140°F
(-20°C to 60°C).
● When storing the battery for an extended period of time, store within the following temperature range: 32°F to 77°F
(0°C to 25°C).
Breastfeeding Tips:
● The Rumble Tuff® Electric Breast Pump helps you maintain a healthy supply of milk and can help you prepare for
planned events such as "Date Night" or unexpected events such as surgery, thrush, or relief from tender nipples.
C2.indd 42 2011/11/25 下午 05:01:52
Page 43
English 40
Troubleshooting
Interruption of Electrical Service:
If you experience an interruption of electrical service, due to a power surge or other factors, during normal operation of
your Rumble Tuff® Electric Breast Pump, try the following:
● Unplug the AC Adapter cord from the electrical outlet and wait for ve seconds.
● Plug the AC Adapter cord back into the electrical outlet.
● If problem persists, try a different electrical outlet.
Radio Frequency Energy:
This equipment generates, uses, and can radiate radio frequency energy. If not installed and used in accordance with
the instructions, may cause harmful interference with other devices in the vicinity. Try the following:
● Reorient or relocate the receiving device.
● Increase the separation between the equipment.
● Connect the equipment into an outlet on a different circuit from that which the other device(s) are connected.
● Consult the manufacturer or a eld service technician for help.
● There is no guarantee that interference will not occur.
Decreased Suction:
If it feels like the suction has decreased, try the following:
● Detach the tubing and tubing adapter from the back of your Electric Breast Pump and place a nger over the Pump
Inlet.
○ If you do feel suction, the Electric Pump Base is operating properly.
○ If you do NOT feel suction, try unplugging the AC Adapter from the electrical outlet. If problem persists, change
electrical outlets.
● Make sure the Expression Collection Kit is assembled correctly (see page 6).
○ Inspect the one-way valve for any tears or pinholes. This component is critical to achieving proper suction. If
damaged, replace the One-Way Valve with one of the spare valves that is provided with your Rumble Tuff® Electric
Breast Pump.
C2.indd 43 2011/11/25 下午 05:01:52
Page 44
English 41
Breastmilk Buildup in the Breast Shield Body:
If breastmilk doesn't appear to be draining fast enough into the collection bottle, reduce the suction setting on your
Electric Breast Pump to allow the milk to drain before gradually increasing.
Where to get Replacement Parts:
If you are missing a part or a part was damaged in the shipping/packaging process, please contact Rumble Tuff®
customer service by calling toll-free (855) 228-8388 for a return authorization number.
Where to get Additional Accessories:
You can purchase replacement parts or additional accessories for your Rumble Tuff® electric breast pump the following
four ways:
● Website: www.rumbletuff.com
● Email: [email protected]
● Fax: (801) 796-2688
● Calling Toll-Free: (855) 228-8388
What Additional Accessories are Available:
Parts
● BreastShield Body
● Let-down Silicone Cushion
● Cap, for Single Pump
● Diaphragm
● Cup with O-Ring
● Bottle Adapter, Wide
● Vacuum Tube with adaptor, for Single Pump
● Adjusting Valve
● Manual Diaphragm
Parts
● DC 12V Power Adapter, UL
● 7.4V Li Battery (For PA201 only)
● One-Way Valve
● O-Ring
● Bottle, Wide
● Nipple, Wide
● Bottle Ring, Wide
● Sealing Disc, Wide
● Dome Cap, Wide
Order Number
#410204026
#410200059
#410204025
#410200058
#410200064
#410001088
#410200063
#410200055
#410200054
Order Number
#40070000009
#40070214016
#410200057
#410200053
#410204021
#410200056
#410204022
#410200061
#410204023
.....................................................
.......................................
................................................
................................................................
.......................................................
.................................................
............
.........................................................
...................................................
......................................
..............................
.........................................................
.......................................................................
...............................................................
..............................................................
......................................................
....................................................
.......................................................
C2.indd 44 2011/11/25 下午 05:01:53
Page 45
English 42
Technical Data
Power Requirements:
● AC Adapter (included) North American Plug conguration:
100V ~ 240V AC, 50/60 Hz, 0.4A, wall plug type AC adaptor with DC 12V/1A output.
● Batteries:
Li-Ion Rechargeable battery; 7.4V 2000mAh, compatible with BN-V214(for PA201 only)
4 AA batteries; 1.5V Alkaline (for PA203 only)
Technical Specications:
Ambient temperature range:+10OC to 40OC (50OF to 104OF)
Relative Humidity range: 30% to 75%
Atmospheric Pressure:700 to 1060 hpa
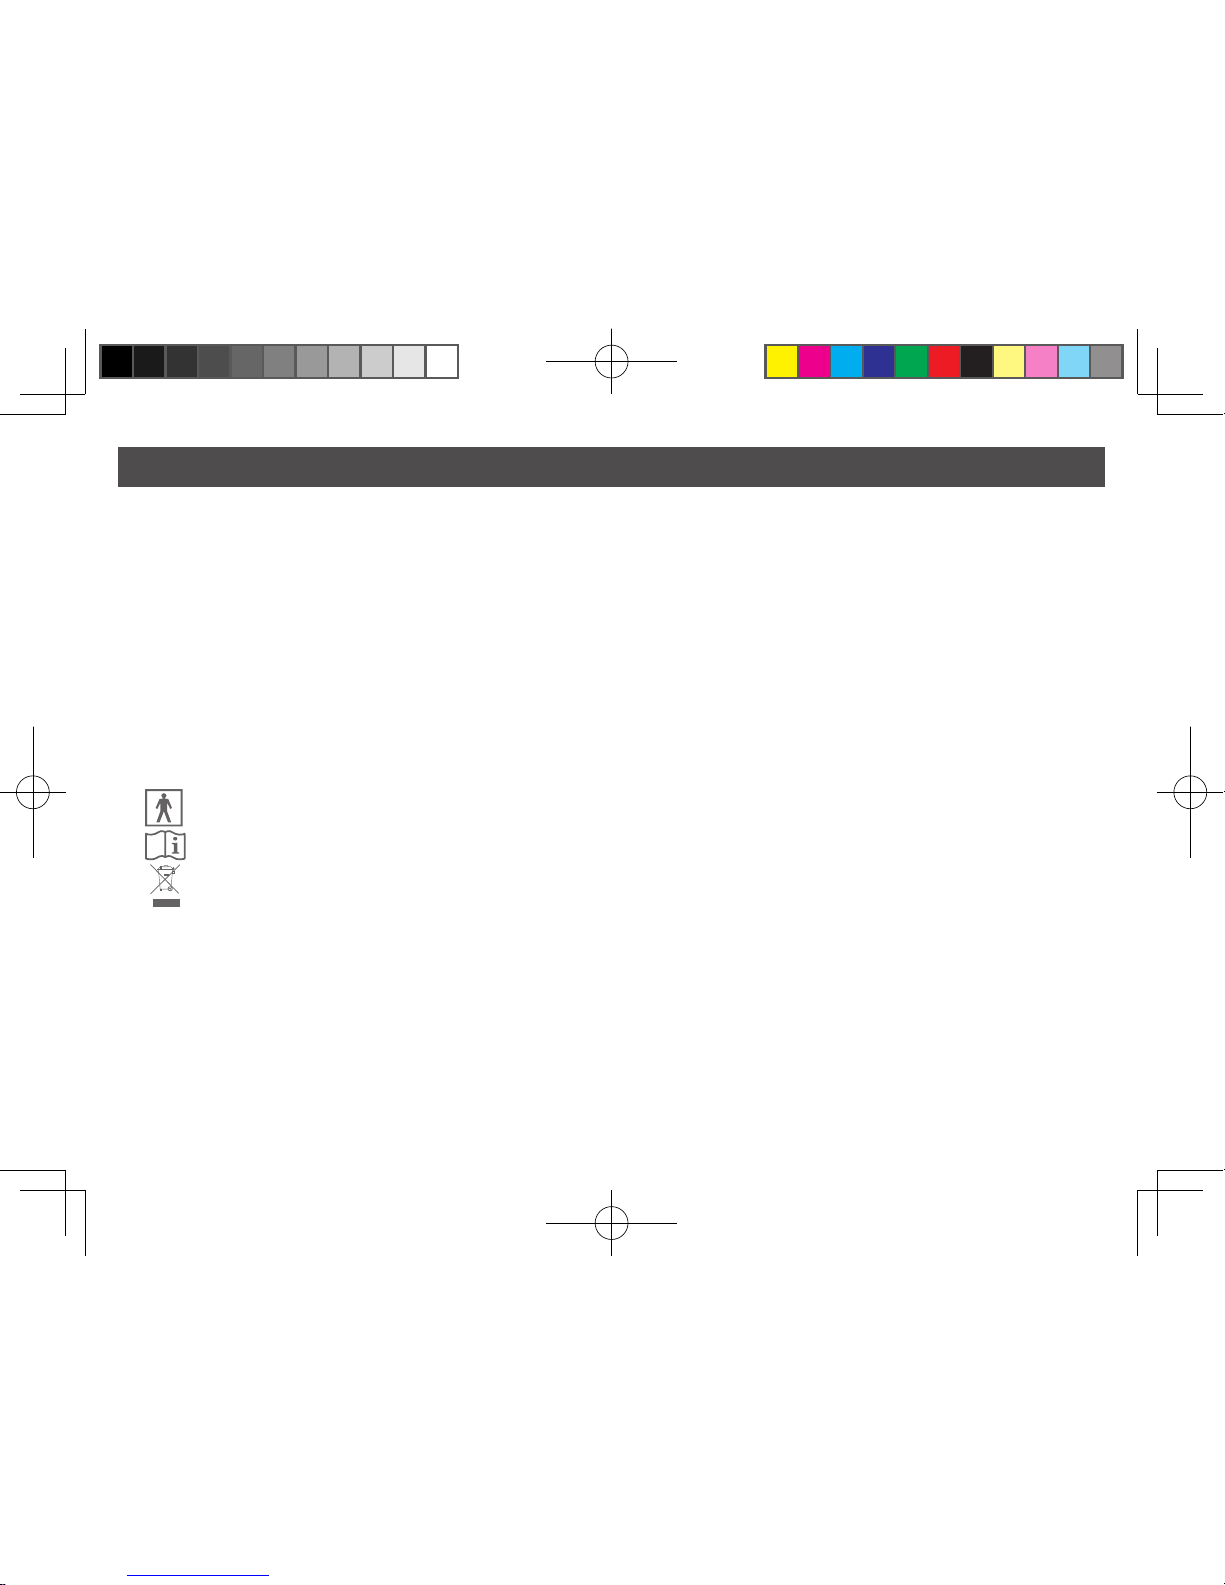
Key to Control Handle Symbols:
●
Type BF equipment (Breastshield)
●
Consult instructions for use
●
Disposal of Electrical & Electronic Equipment (WEEE)
C2.indd 45 2011/11/25 下午 05:01:53
Page 46
English 43
Warranty
Limited Consumer Product Warranty (United States)
This product is warranted to the original consumer purchaser "the purchaser" to be free from defects in material and
workmanship which are not commercially acceptable for the period of one year from the date of purchase on the Electric
Breast Pump mechanism and the period of 90 days on all other product components. Warranty coverage terminates if
you sell or otherwise transfer this product to another person. This warranty gives you specic legal rights and you may
also have other rights, which vary by location.
RUMBLE TUFF
®
MAKES NO EXPRESS WARRANTY OF ANY KIND REGARDING THIS PRODUCT OTHER THAN
THOSE WARRANTIES SET FORTH HEREIN. ANY IMPLIED WARRANTY, INCLUDING ANY IMPLIED WARRANTY
OF MERCHANTABILITY OR ANY IMPLIED WARRANTY OF FITNESS FOR A PARTICULAR PURPOSE TO THE
EXENT PERMITTED BY LAW, SHALL BE LIMITED IN DURATION TO A PERIOD OF 90 DAYS FROM THE DATE OF
PURCHASE BY THE ORIGINAL PURCHASER.
In the event that this product if found by Rumble Tuff
®
to not meet the above limited warranty, as purchaser's sole and
exclusive remedy, Rumble Tuff
®
will repair or at the option of Rumble Tuff®, replace this product without charge for such
replacement parts or labor. The purchaser shall bear all expenses related to returning this product to Rumble Tuff
®
.
This warranty does not apply to any part of the product that has been subject to misuse, abuse, or alteration. Only
Rumble Tuff
®
brand replacement parts are recommended for use with Rumble Tuff® breastfeeding products. Improper or
incorrectly performed maintenance or repair, or use of non-Rumble Tuff
®
brand replacement parts voids this warranty.
TO THE EXTENT PERMITTED BY LAW, RUMBLE TUFF® SHALL NOT BE LIABLE FOR ANY INCIDENTAL OR
CONSEQUENTIAL DAMAGES INCLUDING, BUT NOT LIMITED TO, REPLACEMENT COSTS RESULTING FROM
THE BREACH OF ANY WRITTEN OR IMPLIED WARRANTY.
C2.indd 46 2011/11/25 下午 05:01:53
Page 47
English 44
If you wish to make a claim under this warranty, you will need the following:
● The Rumble Tuff® product
● The original receipt showing date of purchase
● Return Authorization Number (RA#)
● Detailed description of the problem
You, the purchaser, are responsible for all shipping charges.
To obtain an RA# and shipping address: Please call 1.855.2288.8388 or send the detailed description of the problem to
[email protected].
Items returned without a RA# will be returned to sender (postage due).
C2.indd 47 2011/11/25 下午 05:01:53
Page 48
Rumble Tuff® is the trademark owned and operated by
A Cute Baby, Inc.
865 N 1430 W Orem UT 84057-6402
Tel. 801.609.8168 Fax. 801-796.2688
www.acutebaby.com www.rumbletuff.com
C2.indd 48 2011/11/25 下午 05:01:53
 Loading...