

RUIMA RM 212 User Manual
12” PORTABLE
PARTY SPEAKER
Model # BB2714
Instruction Manual
Instrucciones en español incluidas

Thank you for purchasing the Billboard® Wireless Speaker. For best
use of this device we recommend carefully reading this user manual
and keeping it for your records
WARNING!
TO REDUCE THE RISK OF ELECTRIC SHOCK, DO NOT REMOVE THE COVER ON
THIS SPEAKER. THERE ARE NO USER-SERVICEABLE PARTS INSIDE. REFER ALL
SERVICING TO A QUALIFIED TECHNICIAN
To prevent re or electric shock, do not expose this equipment to rain or
moisture. Do not store or operate this product near any liquids, heat sources
such as radiators, heat registers. Clean only with a dry cloth. Users should
exhibit extra safety when this symbol appears in this instruction manual and
follow all precautions as they are stated.
About your Powered Speaker
1. Your Billboard powered speaker has a built-in amplier and line mixer to control the
devices that are connected to it. Therefore you do not need a separate amplier or mixer
in order to use it. The amplier is properly balanced for the output of the speakers.
2. Your Billboard powered speaker also includes a lithium ion or lead-acid battery. This will
allow you to use your speaker without any AC power for long periods of time. The battery
life will vary based on how loud you play your speaker and what type of devices are played
though it as well. It can range from 2 hours to as much as 60 hours for some models.
Please make sure to read the separate section regarding lithium ion and lead-acid batteries
to better understand them
3. Your Billboard powered speaker can play many devices through it’s many inputs.
Check the inputscarefully on your model to better understand what is compatible with
your speaker
Powering up your speaker
1. Plug the micro USB plug into your speaker’s micro USB charging port (#16)
2. Plug the USB side of your cable into your computer or laptop’s USB charging port, or into
a standard USB charger (not included)
3. Make certain that your computer or laptop is powered on, or the USB charger is plugged in to
begin charging.
4. The Charging indicator LED light (#17) should illuminate RED when charging and then
turn to GREEN when the battery is fully charged.
FOR MAXIMUM BATTERY LIFE, IT IS IMPORTANT TO
FULLY CHARGE YOUR BATTERY PRIOR TO USE.
5. Move the power switch (#18) to the ON position. The LED display (#1) should activate.
6. Adjust the volume control (#14) to the MIN position before connecting a device.
7. You’re now ready to connect your device!
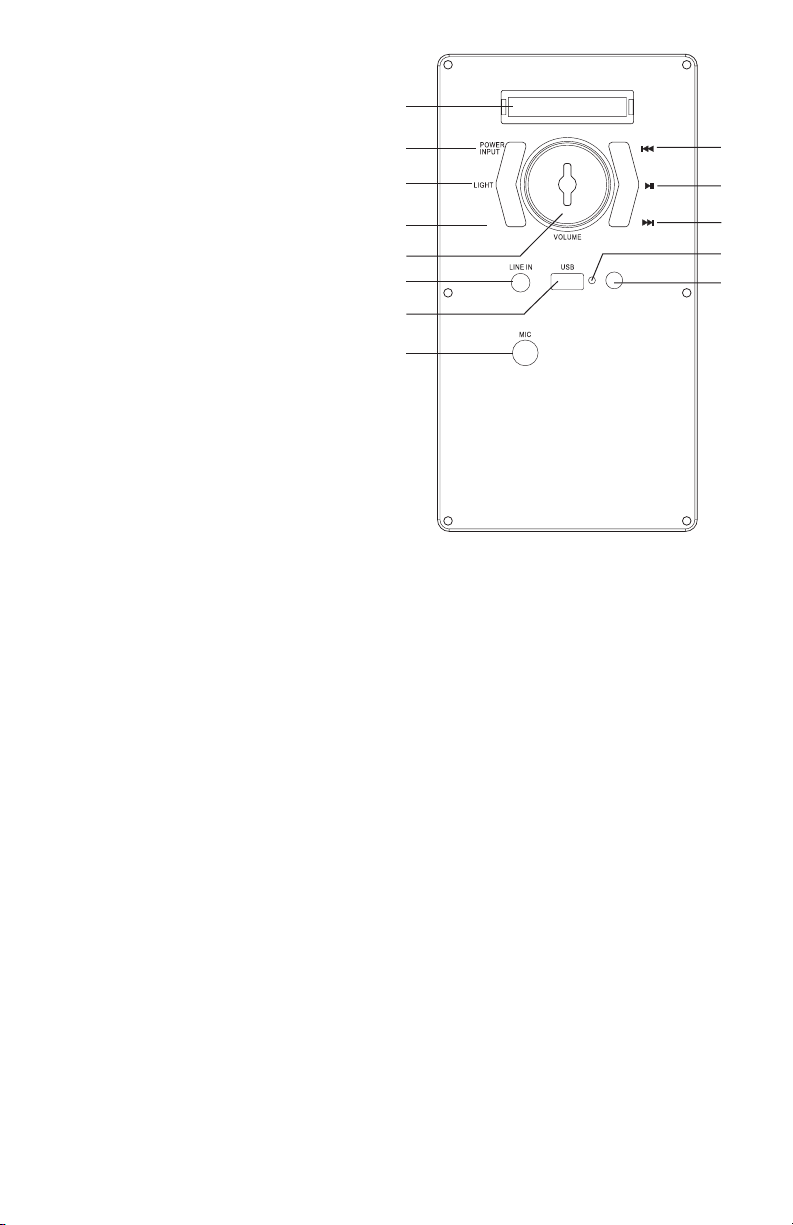
PANEL LAYOUT & FUNCTIONS
1. LED display.
2. POWER/INPUT button.
3. Brightness of LED light mode button
4. EQ sound eect mode button
5. VOLUME-/+&MENU PUSH:
Master volume adjustment&Menu
selection button & PUSH knob enter menu.
6. LINE IN.
7. USB: USB Payer/Power Bank 5V 1A output
8. MIC: Microphone signal input.
9. Previous song .
10. Play/Pause (In FM mode,hold for
3 seconds the device will enter into
automatic scan).
11. Next song.
12.LED CHARGE STATUS:
RED = Charging
GREEN = Fully charged
13.DC 9V external input
1
2
3
4
5
EQ
DC 9V
6
7
8
BASIC OPERATION
1. POWER/INPUT button: long press POWER/INPUT button for about 3 seconds,
the machine displays “HI” and then “bLUE” to start; long press POWER/INPUT
button for about 3 seconds and the machine turns o. During working state, short
press POWER/INPUT button to select the mode, the sequence is USB (when USB
device is connected), FM, LINE, BT.
2. VOLUME-MENU PUSH: adjust volume; PUSH knob enter menu: turn left and right to
adjust the volume from 0 to 30. To press and then turn left and right, you can adjust the
Treble and Bass volume, Microphone volume, and switch 12 kinds of Light Modes.
3. PLAY/PAUSE: to play or pause the music. During FM state, long press PLAY/
PAUSE to automatically search radio and save.
4. PREVIOUS/NEXT: to switch the song and radio.
5.EQ Button: Press EQ button on the top panel to select EQ modes: Pop, Classical,
Jazz and Rock.
6.Brightness of LED light mode: The product has LED light brightness adjust function,
press LIGHT to choose the eect.
7. USB: USB Player/Power Bank 5V 1A output.
FM Operation
Lightly press Power/Input button to switch to FM mode, long press PLAY/PAUSE
button to automatically scan radio station, by pressing PREVIOUS or NEXT you
can select a previous or next song.
Bluetooth:
Press the POWER/INPUT button on the panel control to select Bluetooth mode.
Simultaneously open the Bluetooth setting on your phone, tablet or any other
Bluetooth enabled audio device and select “RM-212”. The unit and device will
then connect via Bluetooth.To control the device via your phone, tablet etc please
download the App “Speaker Pro”. Once the unit and device are connected via Bluetooth,
open the “Speaker Pro” App on your phone, tablet etc and press the Bluetooth button. This
will enable you to control the following ve modes on the device from your phone: Music,
Light, USB Card, Bluetooth and Equalizer. To cancel the app, press the exit button.
9
10
11
12
13
 Loading...