

Page 1
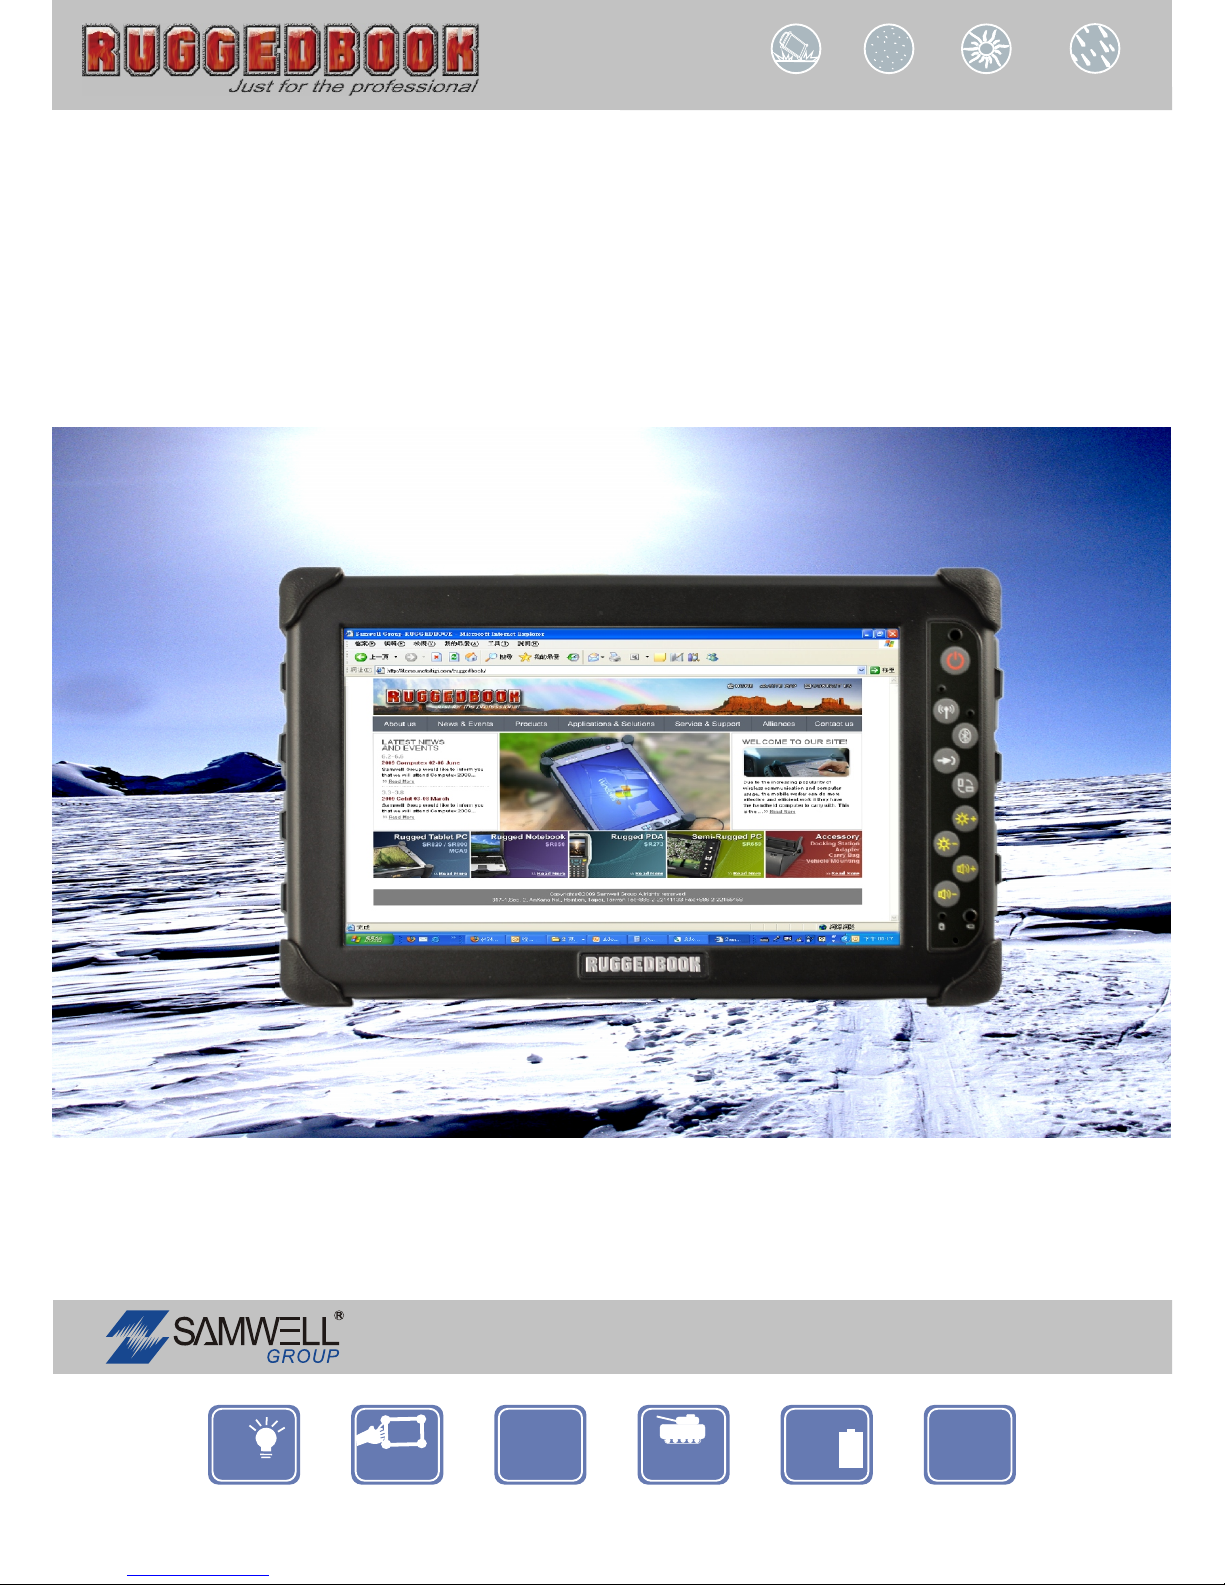
Manual
Dus t Proof
Sun light R eadab le
Wat er Pr oof
Dro p Proof
Cop yrigh t 2009. S AMWEL L GROUP.Cop yrigh t 2009. S AMWEL L GROUP.
Rugged Tablet PC
SR820
Por t able
IP54
MIL
++
--
6
hour s
Batt ery
8.9
WSV GA
LED
Back light
Sinc e 19 75
AN ISO / TS 16949/ 9001 / 1348 5 / 14001 / OHSAS 18001 CERTIFIED GRO UP
Ver 1. 0Ver 1. 0
Page 2

1
CChhaapptteerr 11
IInnttrroodduuccttiioonn
Page 3

Chapter 1 - Introduction
2
0BGetting Started
Congratulations on your purchase of this Tablet PC. The Tablet PC
is a fully functional Tablet PC with built-in LAN, and wireless
connectivity. Therefore its’ capable to organize and access
important business and personal information with excellent
efficiency. In addition, you will be able to send and receive e-mail
and access the Internet at anytime and anywhere.
This Manual contains the information you need to set up and use
your Tablet PC. It describes all the features of the Tablet PC in a
manner of ‘easy-to-read thorough’.
1BInventory
This Tablet PC is designed for years of productive and pleasurable
computing. Use this section to keep details of your purchase. This
information will be required should you need to make repairs to your
Tablet PC during the warranty period. Update this section when you
add new options.
DATE OF PURCHASE:
PLACE OF PURCHASE:
DEALER'S NAME:
DEALER'S ADDRESS:
TELEPHONE:
E-MAIL ADDRESS/WWW:
CONTACT PERSON:
MODEL NUMBER:
SERIAL NUMBER:
Page 4

3
6BSafety and Maintenance
You can use your Tablet PC under a wide range of environmental
conditions. However, to ensure long use and continued high
performance, consider the following factors when setting up your
Tablet PC:
n Follow all warnings and instructions noted in this
documentation and in the Windows Help program.
n The first time you use your Tablet PC, we recommend that you
carefully read the Making Connections section of this manual
and initialize the battery to ensure optimum battery
performance.
n Unplug the Tablet PC from the power outlet before cleaning.
Use a damp cloth for cleaning. Do not use aerosols, solvents,
or strong detergents.
n Slots and openings in the system cabinet are for ventilation
purposes. Do not block or cover these openings or the system
could overheat. Do not use or store the Tablet PC near a
source of heat or dust.
n On the base or rear panel of this Tablet PC, there is a label
with information on the power requirements of this system.
These requirements must be followed. If you are unsure of
your local power supply, consult your dealer or local Power
Company.
n Do not step on or place anything on the power cord.
n If you use the Tablet PC with an extension cord, ensure that
the total ampere ratings of all the devices sharing the extension
do not exceed the rating of the extension cord or the rating of
the wall outlet.
n Never push foreign objects into the Tablet PC through any of
the slots or openings. Dangerous voltages a re presen t, which
could cause electric shock or fire, or damage sensitive
components.
Page 5
Chapter 1 - Introduction
2BCheck Lists
After opening the package, carefully inspect the contents. If any of
the items is missing or appear damaged, contact your dealer. The
shipping carton should contain the following:
n SR820 x 1
n Accessory BOX x 1, included:
a. Battery x 1
b. Adapter x 1
c. Stylus Pen x 1
d. Service DVD x 1
e. Hand Strap x 1
f. Screws x 2 (For hand strap use only)
g. Power Cord x 1
h. Screen Protection Film x 1
Caution: When purchasing any accessories, purchase
only those accessories that are approved for use
with your Tablet PC. Your system vendor can obtain
these approved accessories. If you use items that
are not approved for use with this Tablet PC,
y
ou
may cause your Tablet PC to malfunction, or to emit
or receive electro-magnetic radiation in excess of
local regulations. For non-proprietary accessories
such as Tablet PC cards or printers, ensure that
the accessory functions properly in your Tablet PC
before making the purchase. Your system vendor may
be able to recommend reliable brands and models.
4
Page 6

5
3BFeatures
USoftware Support
Windows® XP Embedded Tablet Edition
n Microsoft
®
Internet Explorer
n Microsoft
®
Outlook Express
n Microsoft
®
Windows Media Player
UHigh Performance Processors
Intel® Atom Z530P 1.6GHz Processor, 512KB L2 Cache
UOverview
SR820 is a versatile Tablet PC equipped with 8.9” TFT LCD, and adopts
the latest Intel
®
ATOM Z530P industrial grade processor with Intel®
US15WP SCH chipset. It also meets IP 54 environmental rating
protection requirement, and is well protected by four rounded rubber
bumpers.
Features of SR820 are in terms of the latest display LED backlight
technology with the touch screen/sunlight readable extraordinary
functions, 1GB up to 2GB DDR II SDRAM, compact 1.8” 60GB HDD,
and fully connection of I/O ports such as 2M pixel integrated camera and
Barcode Scanner. For communication, it includes highly integrated
module 10/100/1000 Ethernet, 802.11 b/g/n WLAN, Bluetooth 2.1 +EDR,
and optional WWAN/ 3.75G module. The Rugged Tab let PC SR820,
providing powerful functionality and instant response, is easy to
handheld and satisfies all users' demand.
With above strengths and features, SR820 is applicable for various
applications, including hospitality, transportation, measuring, field service,
logistics and Telecommunication, etc.
Page 7

Chapter 1 - Introduction
6
UWWAN Function (Optional)
You can use your own SIM card and also purchase our 3.5G module to
setup your high-performance WWAN network. Please connect our sales
for this optional function.
UGPS Function (Optional)
You can purchase our GPS module to set your GPS function up. You
can also purchase third-party GPS navigation program to arrange in a
group to use. Please connect our sales for this optional function.
UBarcode Scanner (Optional)
Your Tablet PC can also install 1D barcode scanner for your own
application, please connect our sales for this optional function.
Page 8

7
Where to Look for Information
About Your Tablet PC
This User’s Manual describes the key elements of your Tablet PC. New
users can find a simple step-by-step orientation in the Quick Start
section of this chapter.
About Windows
Help and Support are available at the Windows XP Tablet Edition Start
menu, offers extensive Windows assistance. Welcome Center offers an
online orientation for new Windows users. Find it in:
Start/Welcome Center
Page 9
Chapter 1 - Introduction
4BQuick Start
Install and change battery at your Tablet PC
______________________________________
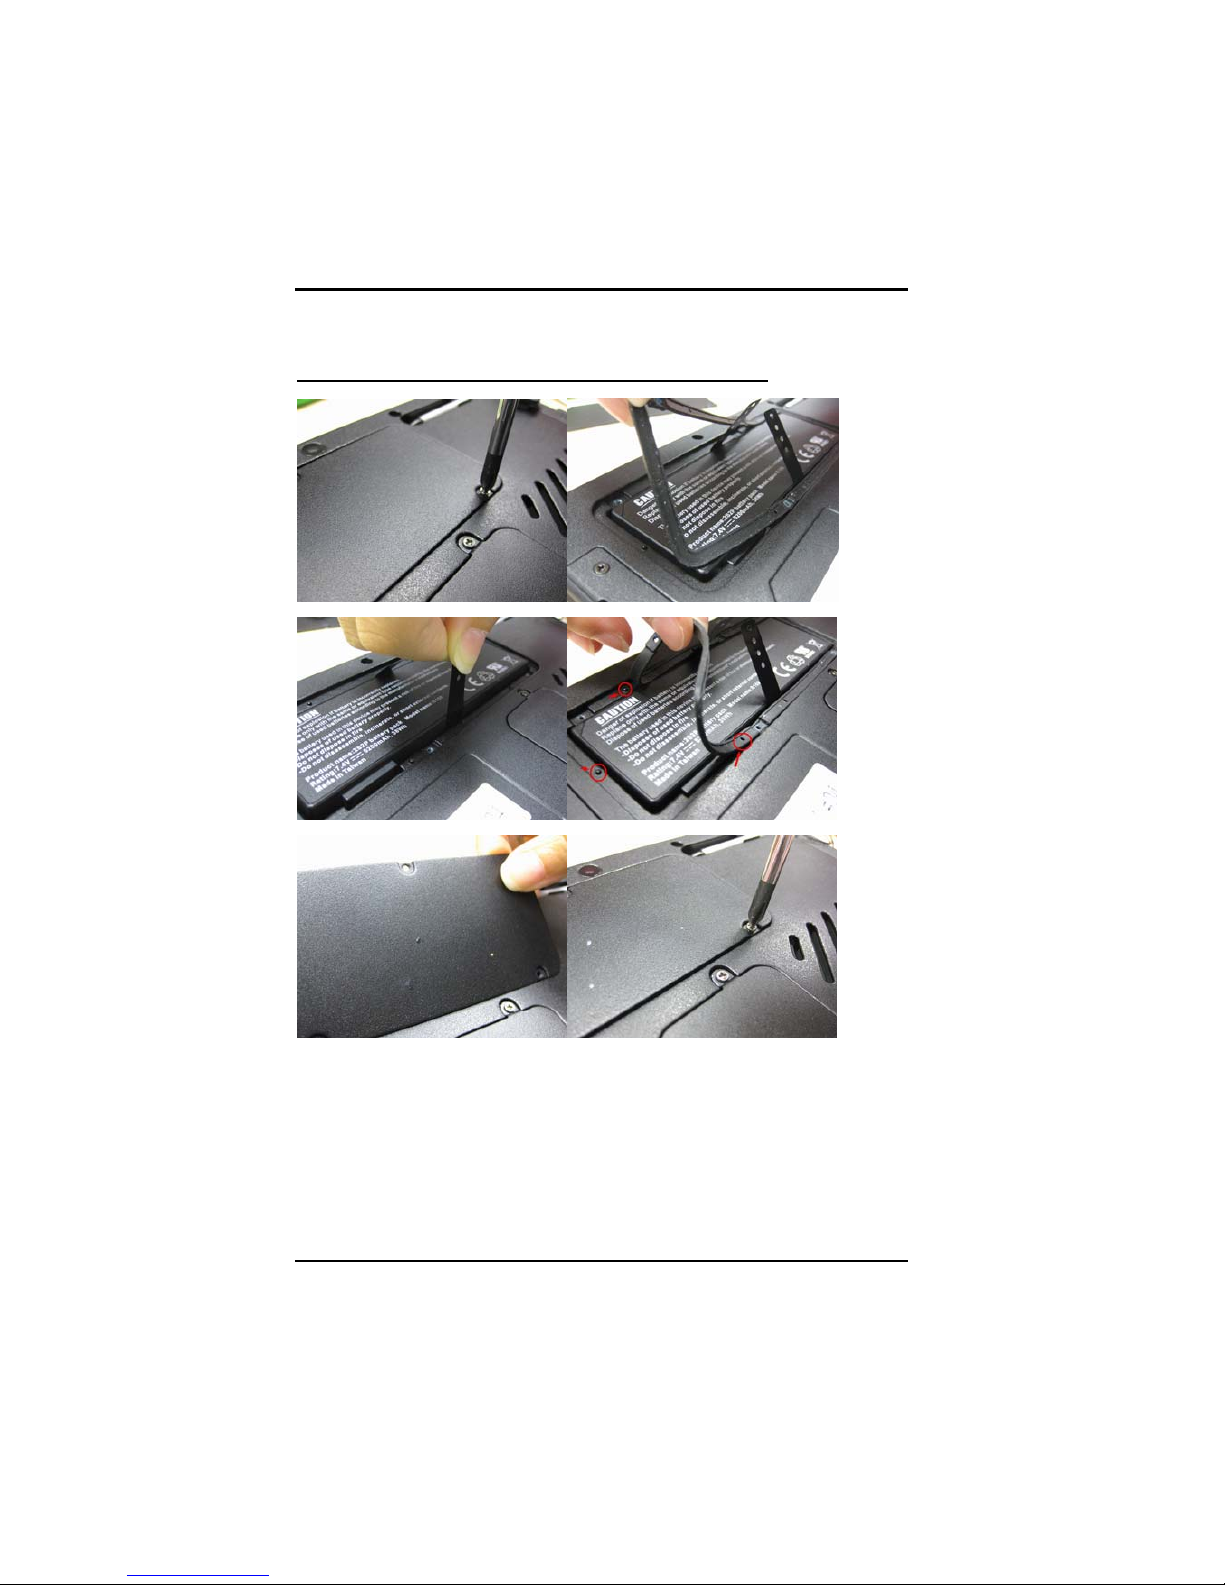
1. Remove the screws on the battery cover at bottom side of your
Tablet PC and open the battery cover.
2. Remove the water-proof rubber on top of battery pack.
3. Insert the battery pack into the Tablet PC and check the connector
location is correct
8
Page 10
4. Put the water-proof rubber back to the cannelure after Insert the
battery pack.
Attention: Please check the fool-proof check point like picture.
5. Put the battery cover back and lock the screws to the battery cover.
Turn on the Tablet PC for the first time
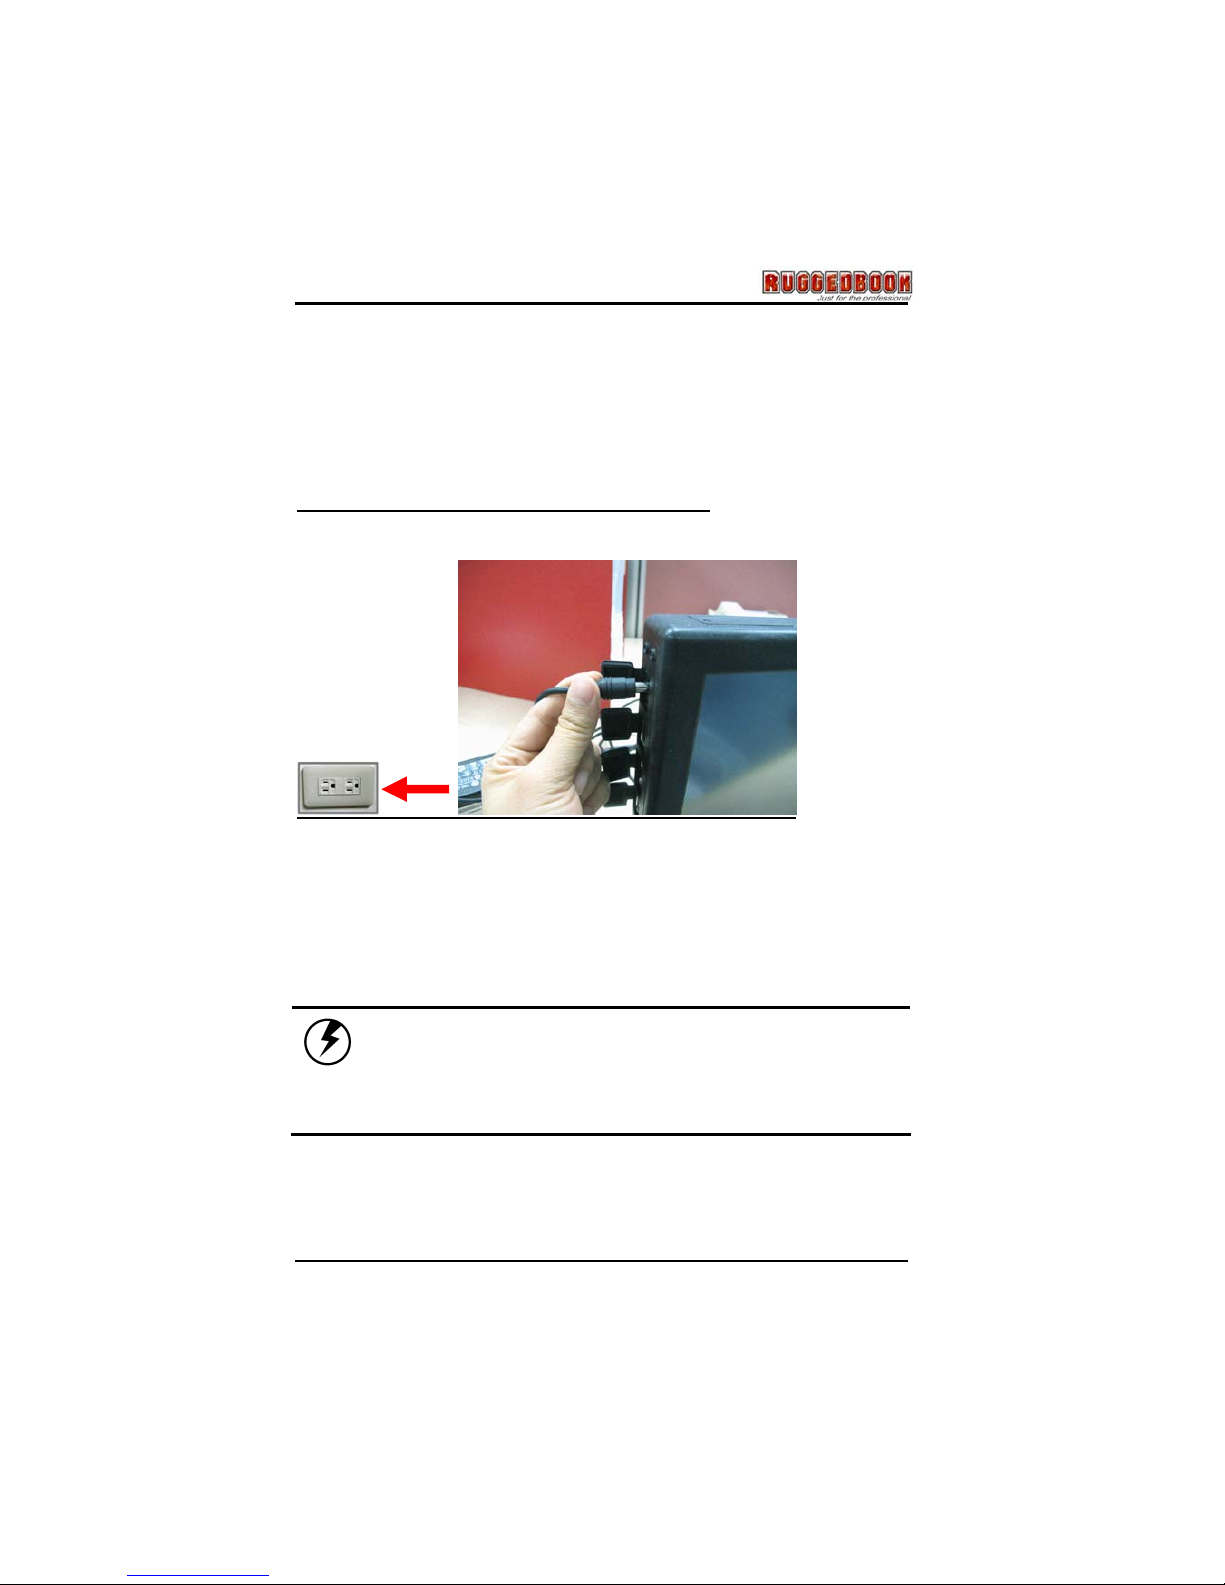
1. Connect the AC adapter to SR820
2. Connect the AC adapter power cord to the AC adapter.
3. Connect the AC adapter power cord to an AC outlet.
4. Press the power button to turn on the power.
Note: The battery is not fully charged. Allow your
batter
y
to fully charge before using it (i.e.,
before disconnecting AC power). Calibrating the
battery before use is also highly recommended.
Refer to Chapter of Power Management, for further
information.
9
Page 11

Chapter 1 - Introduction
10
5BLoad Windows (Bundle OS model only)
The following section is for installing the Windows operating system
only. If you are installing a different operating system, please check
with your vendor for installation details.
After the Start Wizard updates your system settings, the Welcome
to Windows screen will appear. You may disable this feature by
clearing the check box labeled show this screen each time Windows
starts.
Some software comes preloaded with Windows. New users can
familiarize themselves with this software by selecting Programs
from the start menu, then clicking on programs to run them.
Page 12
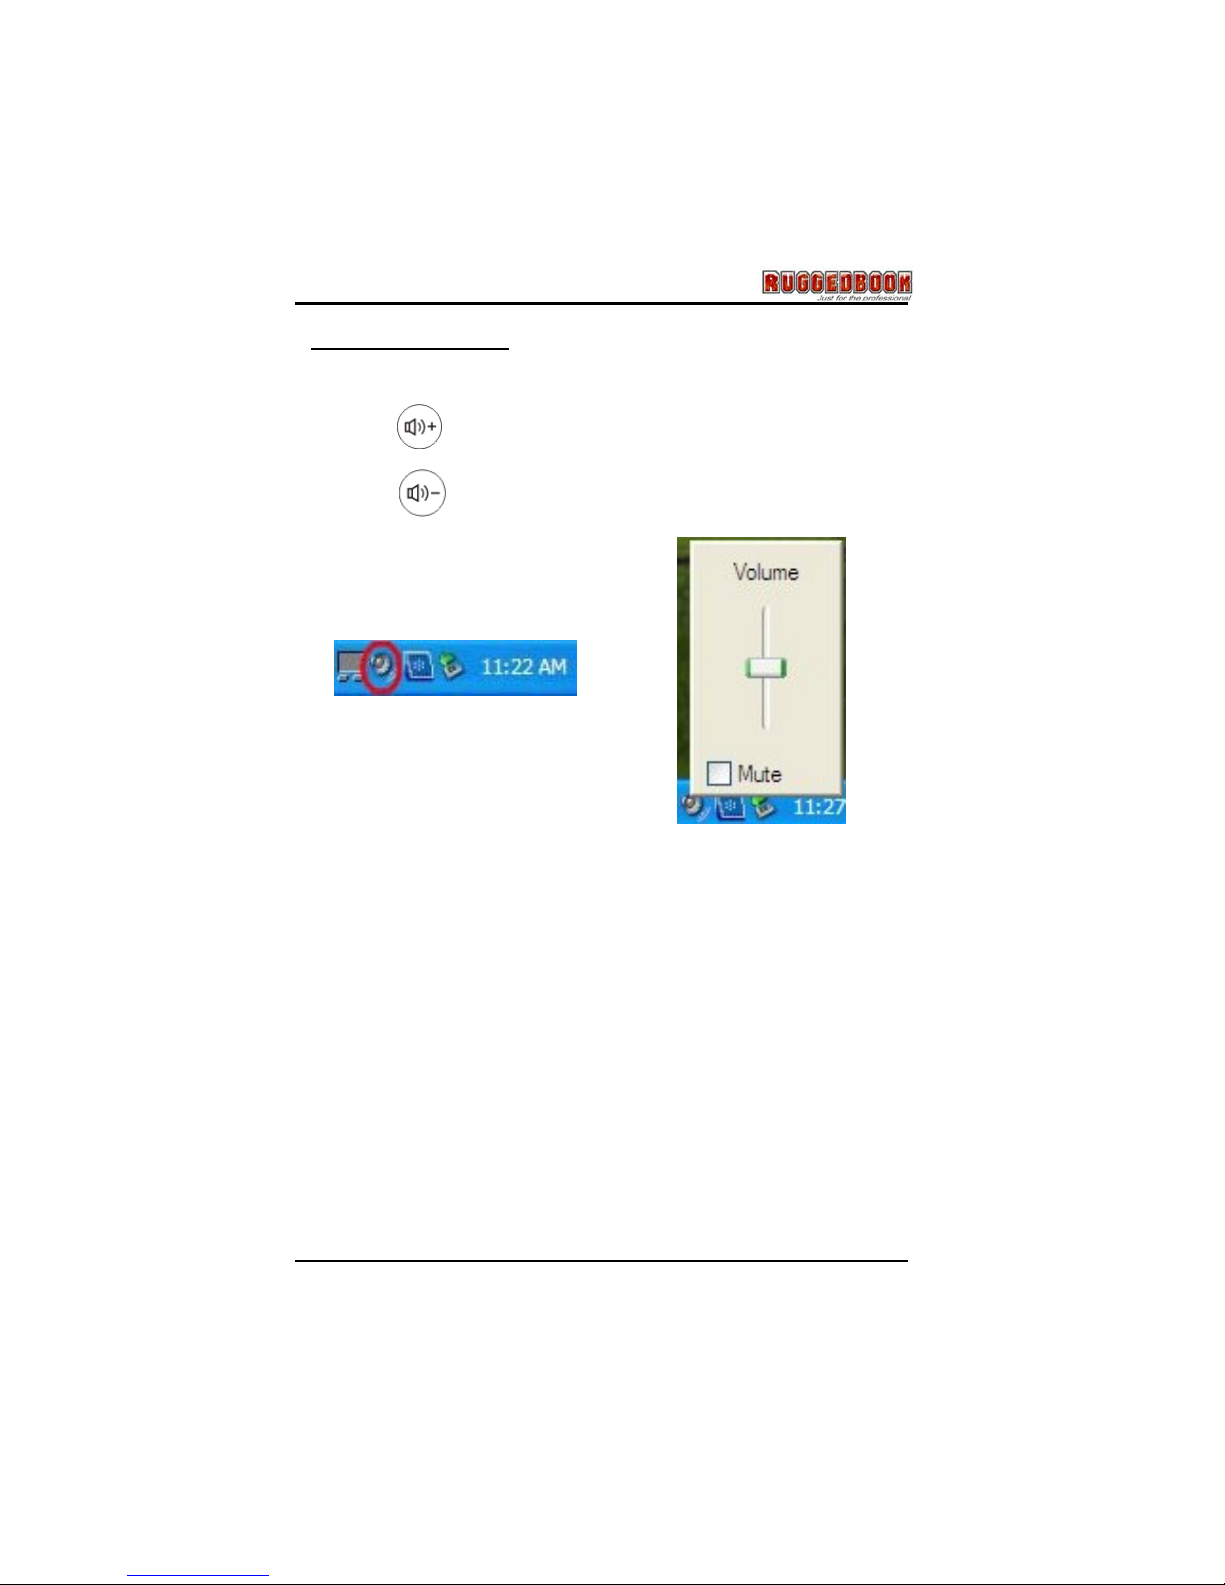
Adjust the Volume
You can adjust the volume with Hot keys on front panel:
n : volume up
n : volume down
Alternatively, you can adjust
the volume with the Windows
volume control applet located
on the taskbar.
11
Page 13
Chapter 1 - Introduction
Adjusting the Brightness
Use the Hot keys on front panel to adjust the LCD panel brightness:
n : increases the brightness
n : decreases the brightness
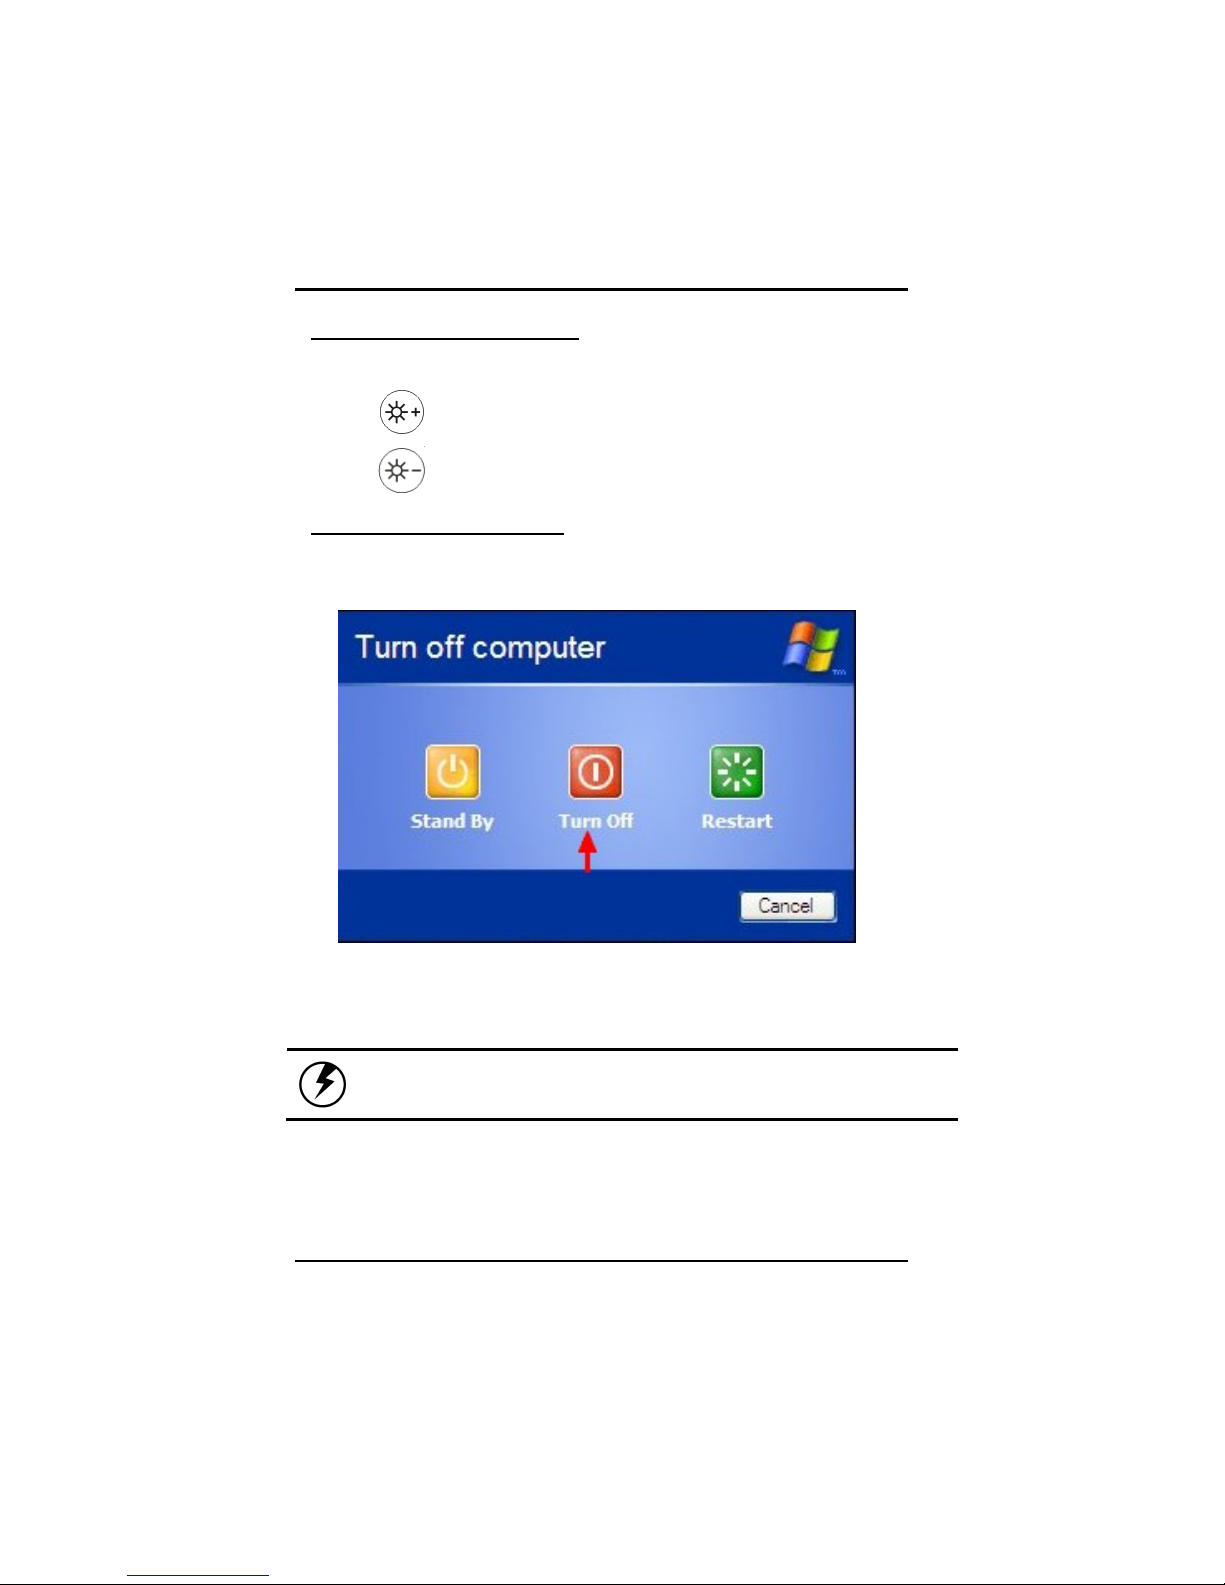
Turn off Your Tablet PC
Turning off the Tablet PC properly is important to maintaining your
Tablet PC.
1. Click the Windows start
button.
2. Choose ‘Turn off” to turn-off the
Tablet PC.
Warning: Shutting off the Tablet PC improperly may
result in data loss.
12
Page 14

13
CChhaapptteerr 22
GGeettttiinngg SSttaarrtteedd
Page 15
Chapter 2 —Getting Started
0BHardware and Software
This chapter introduces the different components and controls of your Tablet PC,
including the hardware components, the software, and the audio and video
systems.
3BGetting Started
Before you begin using your Tablet PC, read this chapter to familiarize yourself
with the main components installed in the system.
14
Page 16
15
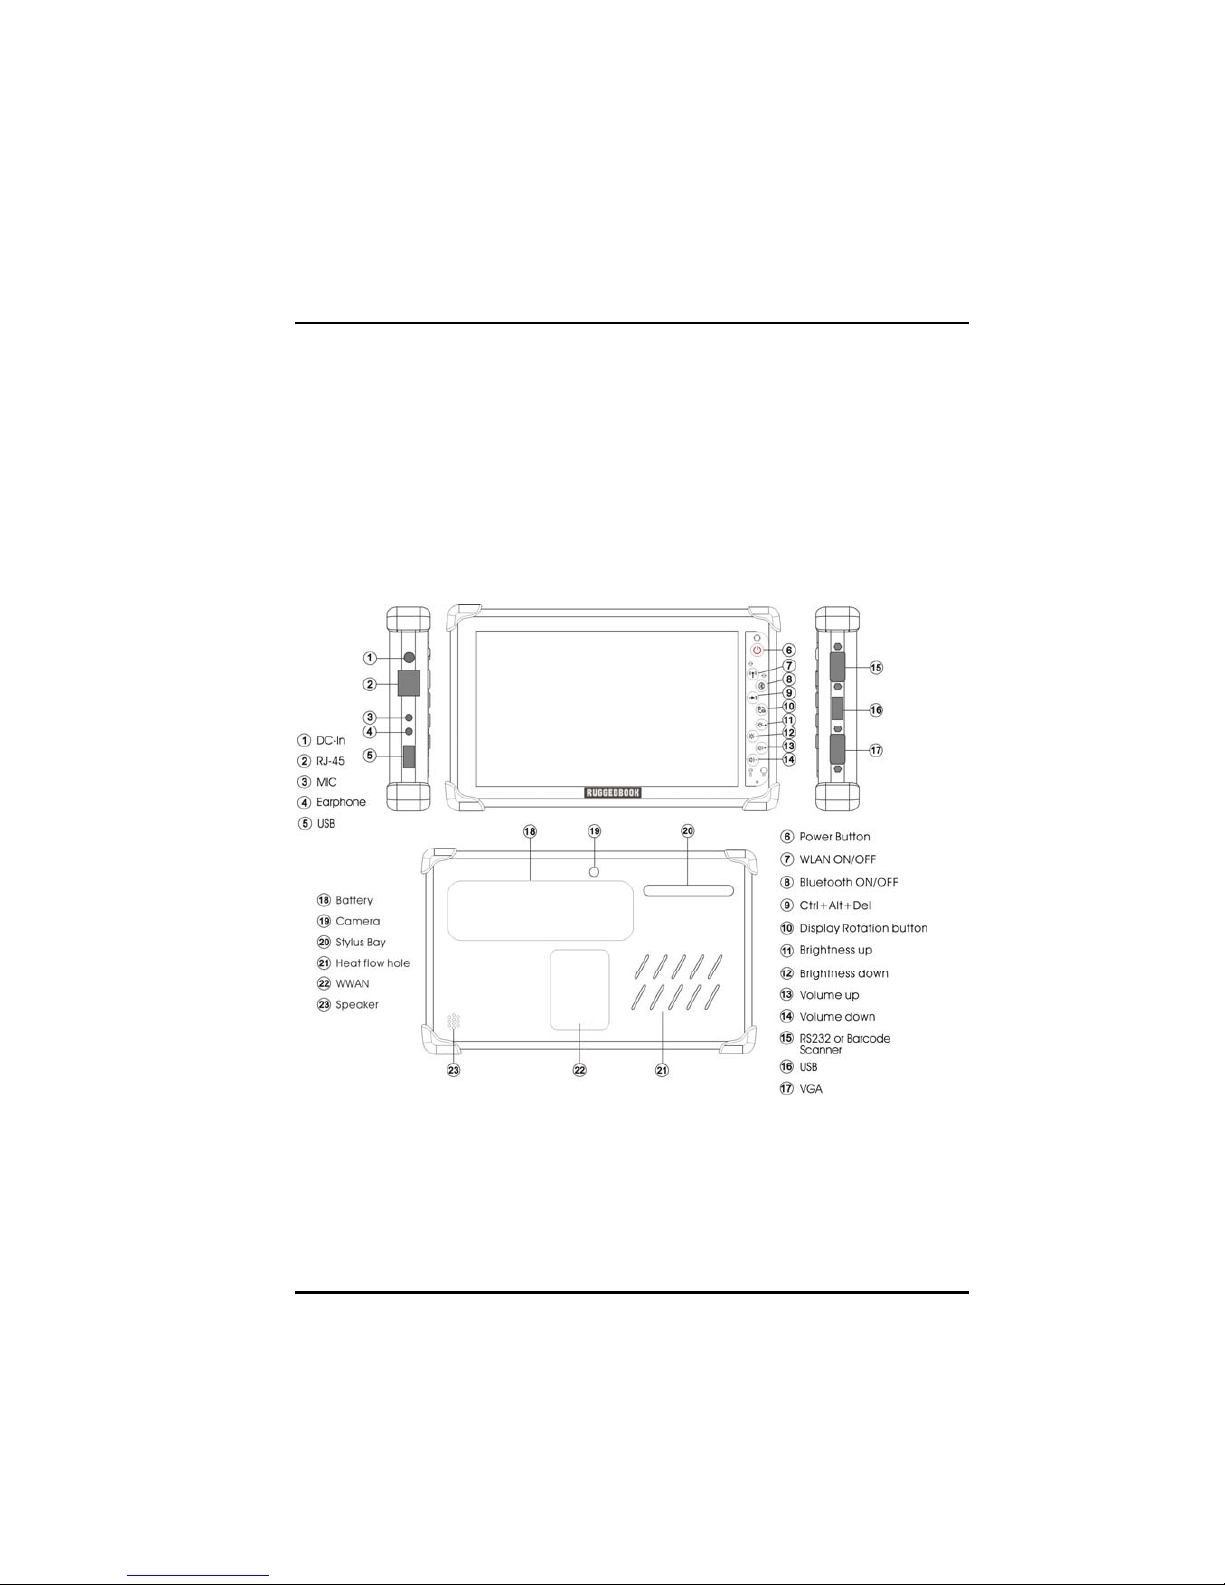
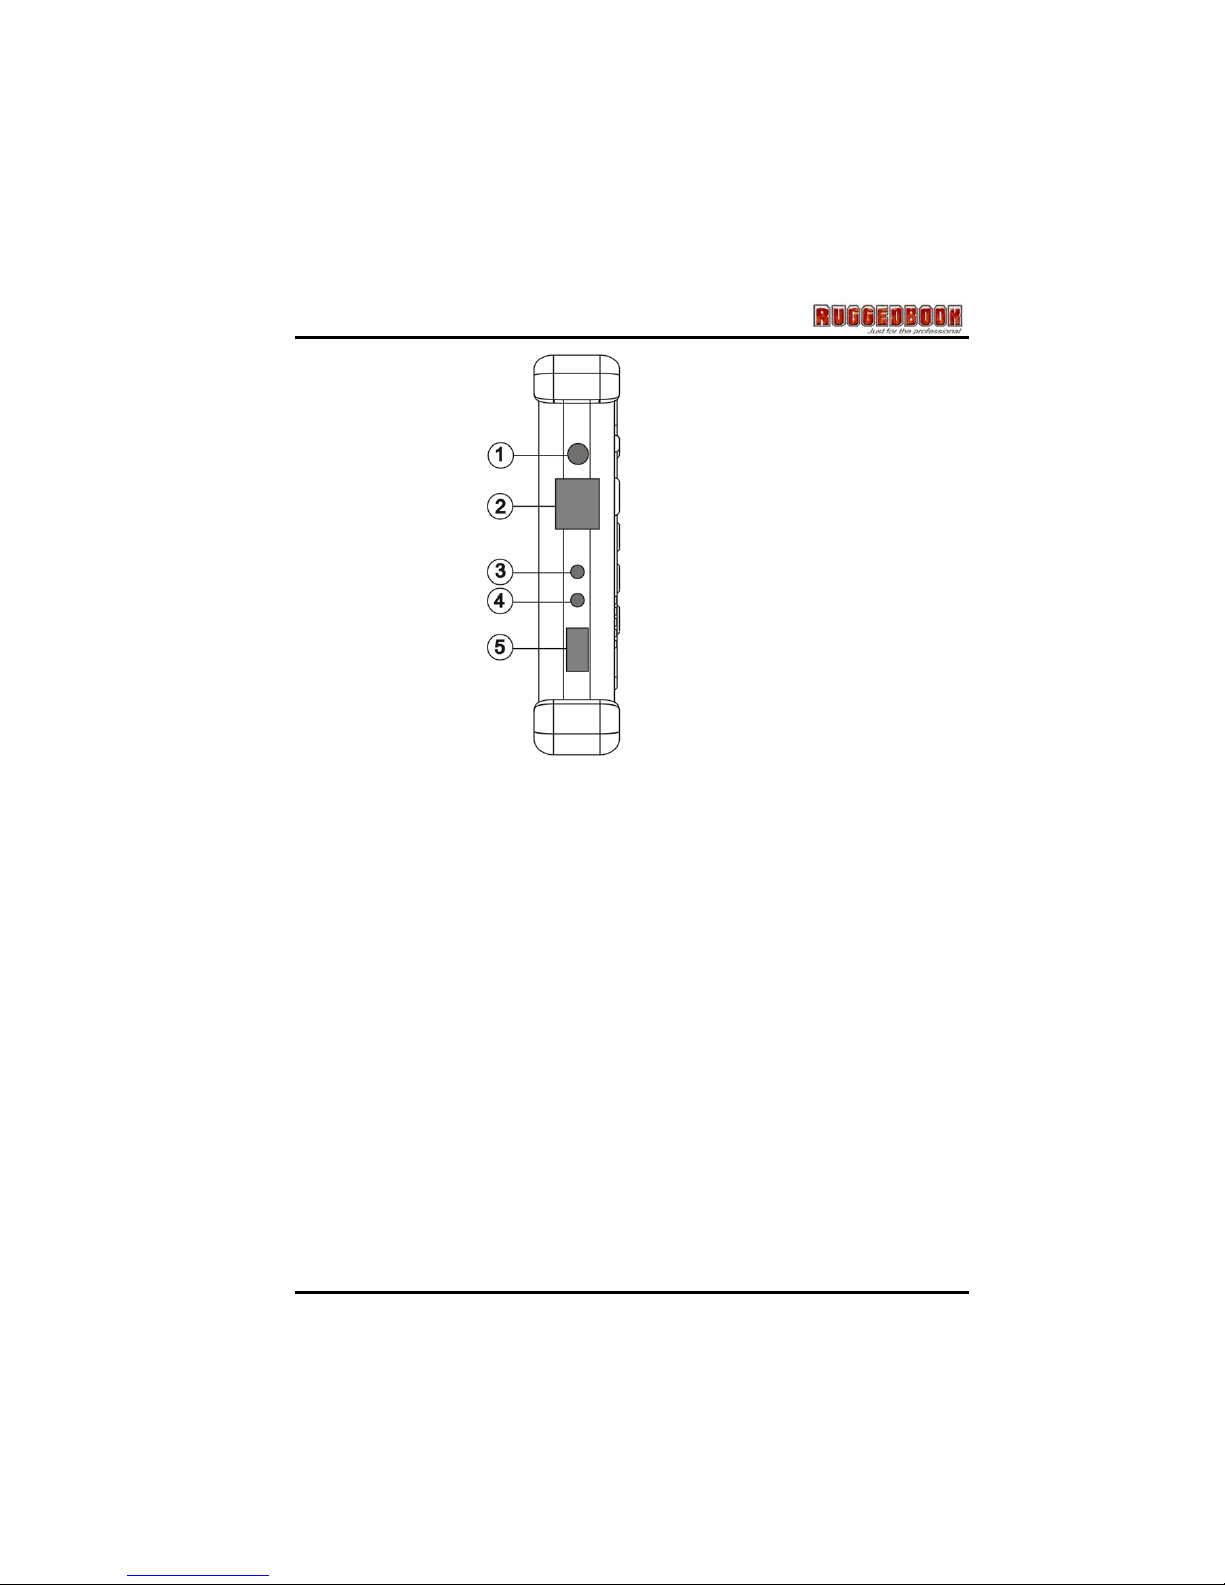
1. DC Power Jack
Connect the Adapter connector to DC Power Jack.
2. RJ-45 LAN port
With the built-in Ethernet LAN combo, you can make LAN connections
without installing PC cards. Connection speed is 10/100/1000 Mbps. When
using the LAN function, wrap your LAN cable around the EMI ferrite
suppression box to inhibit electromagnetic interference.
3. Microphone Jack
There can connect your own microphone to record your voice or using an IM
program which support voice transfer.
4. Earphone Jack
There can connect your high-quality earphone to this earphone jack.
5. USB port
The Universal Serial Bus (USB) is the latest standard for attaching monitors,
input devices, scanners, and other devices to a PC. USB devices can be
chained together on a single cable.
Page 17
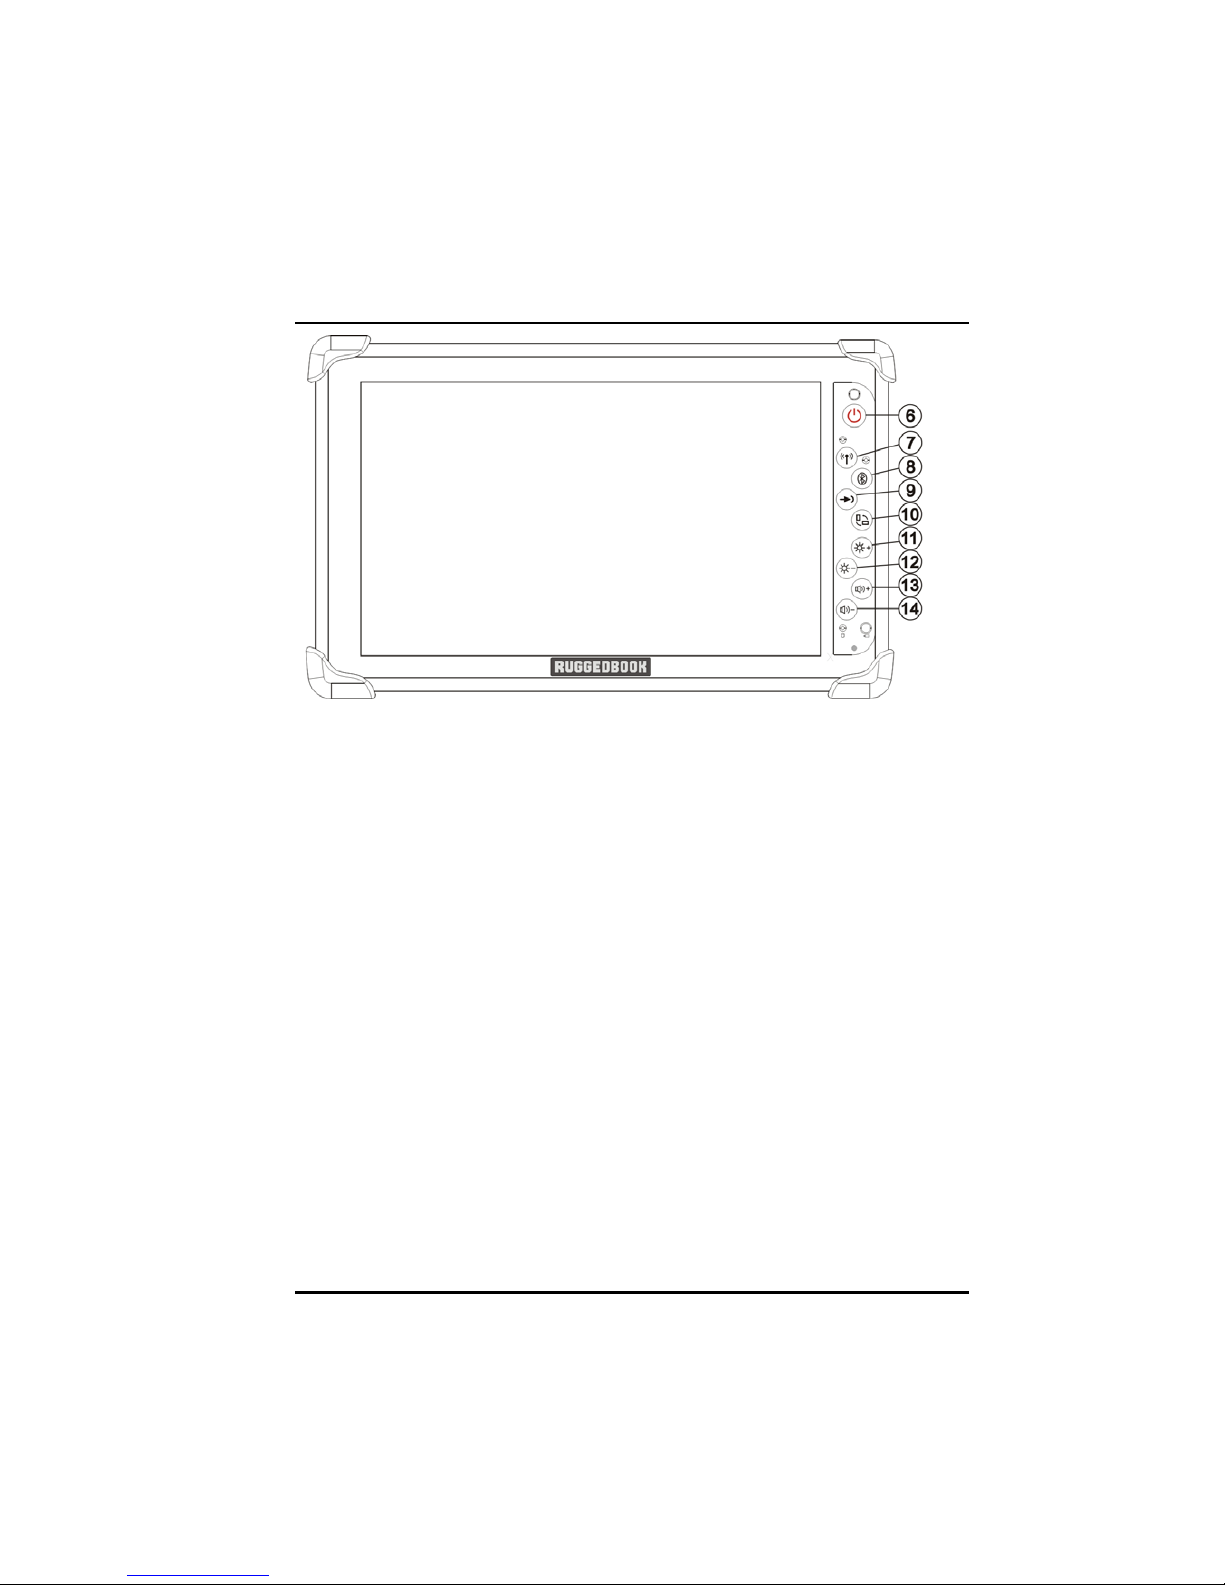
Chapter 2 —Getting Started
16
※ Please see the Hotkey Table section at Page 20
Page 18
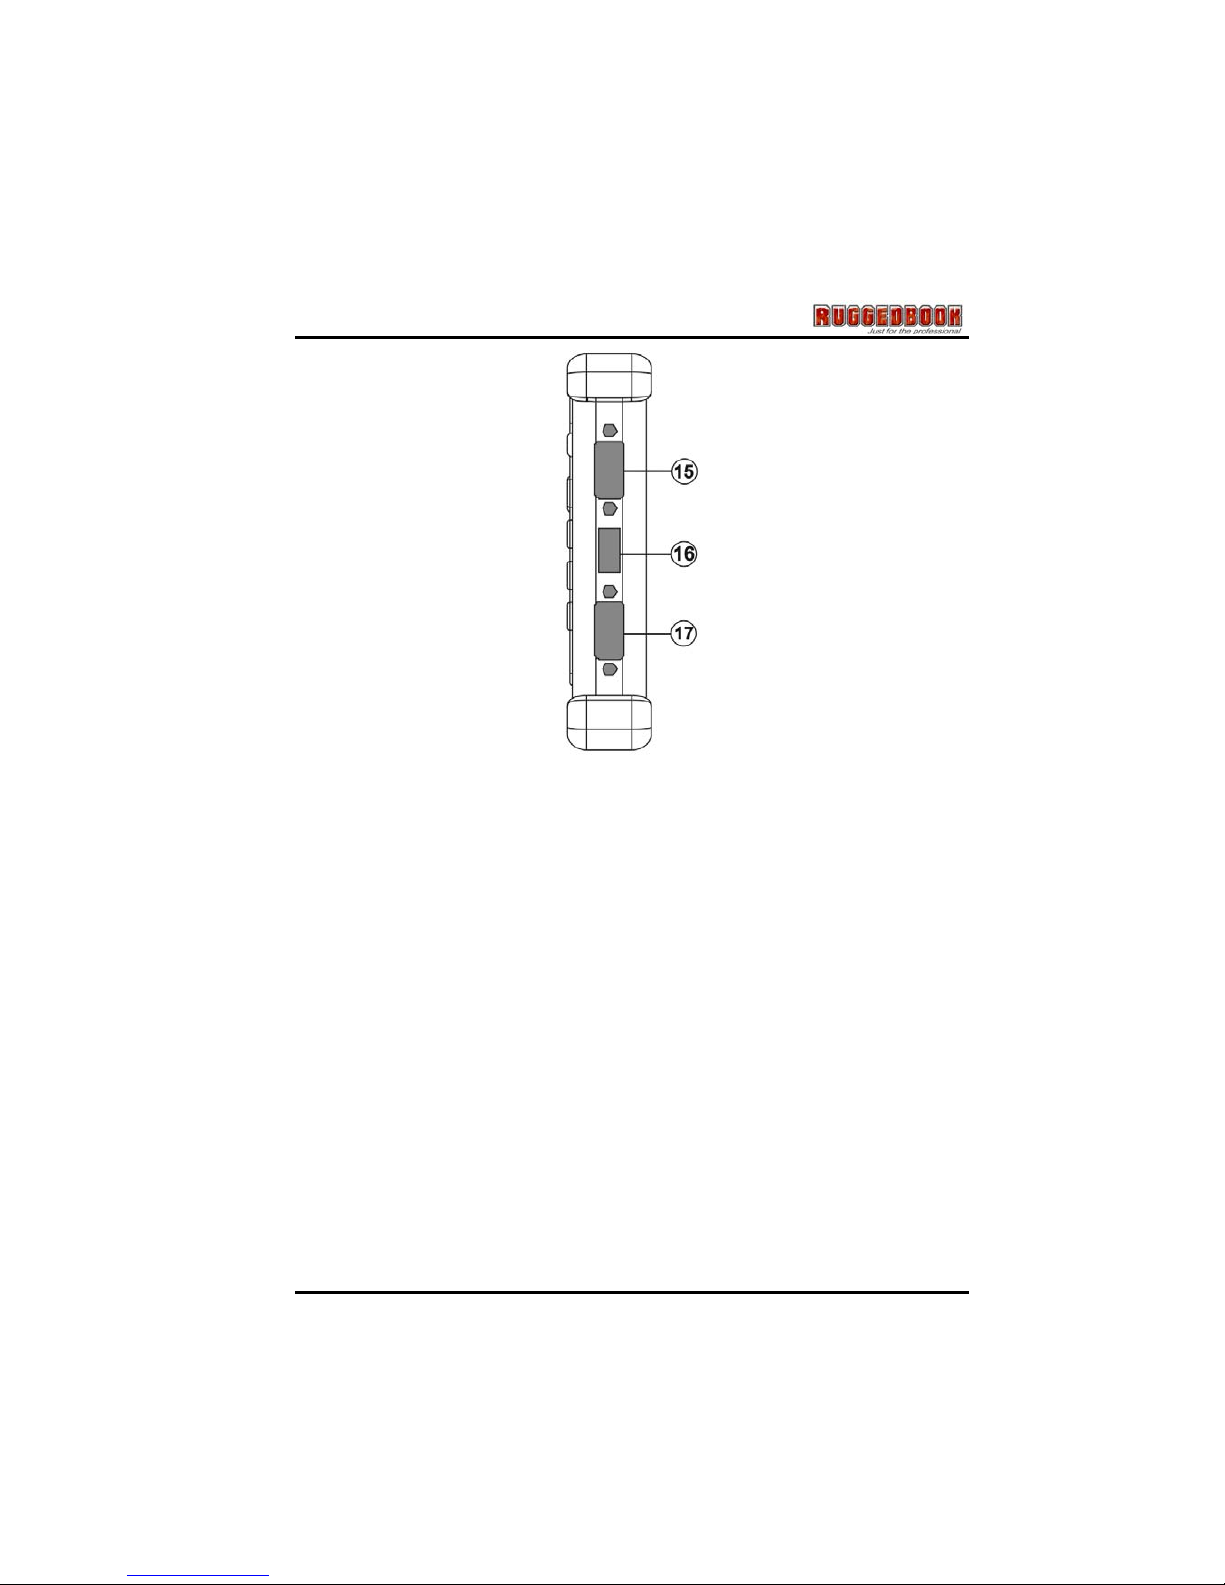
15. RS232 Port
The RS232 port can transmit data using the DB9 cable, and send and
receive faxes at 14.4 Kbps. In some countries, local regulations may not
permit the use of the fax/modem designed for this system.
15. Barcode Scanner (Optional)
There is a Barcode Scanner function for your second choice, the detail
information please see Chapter 5
16. USB port
Please see Item #5
17. VGA Port
VGA output can connect to another monitor, display, or projector…etc. that
the device supports the DB9 VGA output connector.
17
Page 19
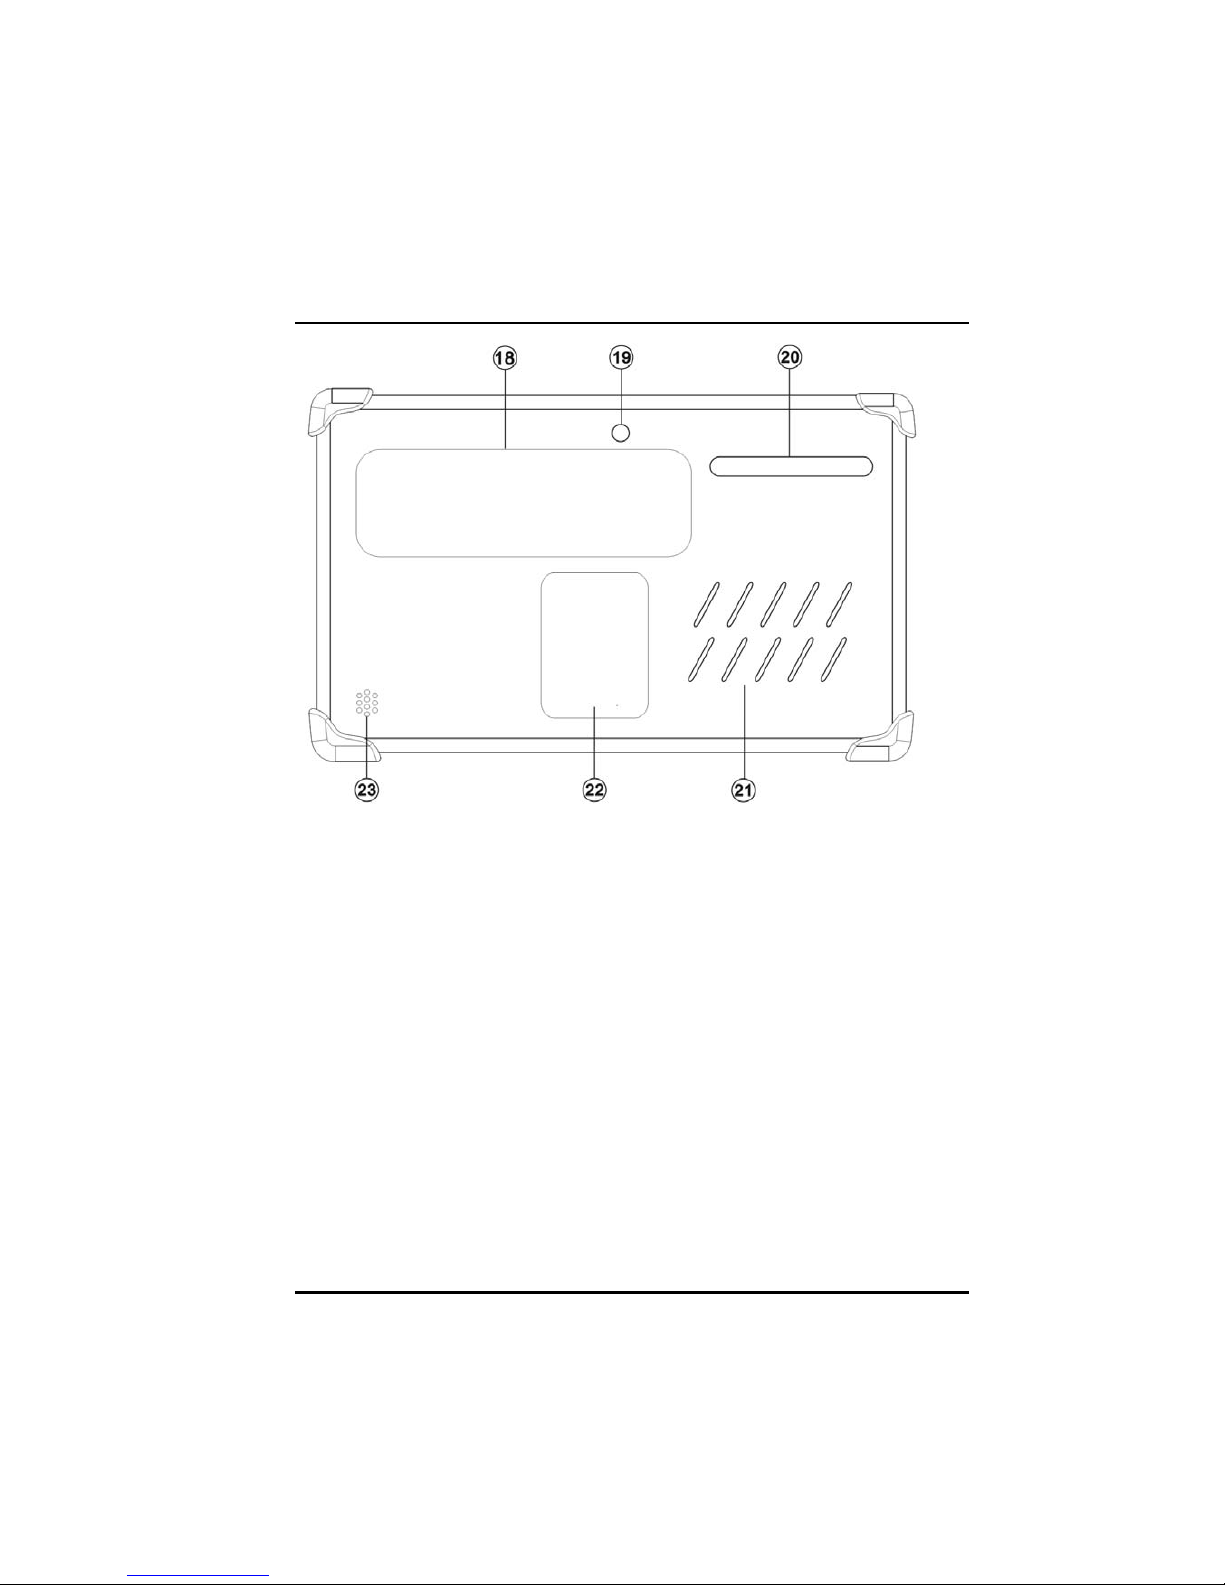
Chapter 2 —Getting Started
18
18. Battery Bay
Install Battery into the Battery Bay
19. Camera
Please see the camera item at Chapter 5 page 49
20. Stylus Bay
Put your stylus at Stylus Bay.
21. Heat Flow Hole
There has a heat sink inside
22. WWAN
You can install a WWAN module to setup WWAN network with your SIM
card.
23. Speaker Hole
There has a speaker inside.
Page 20
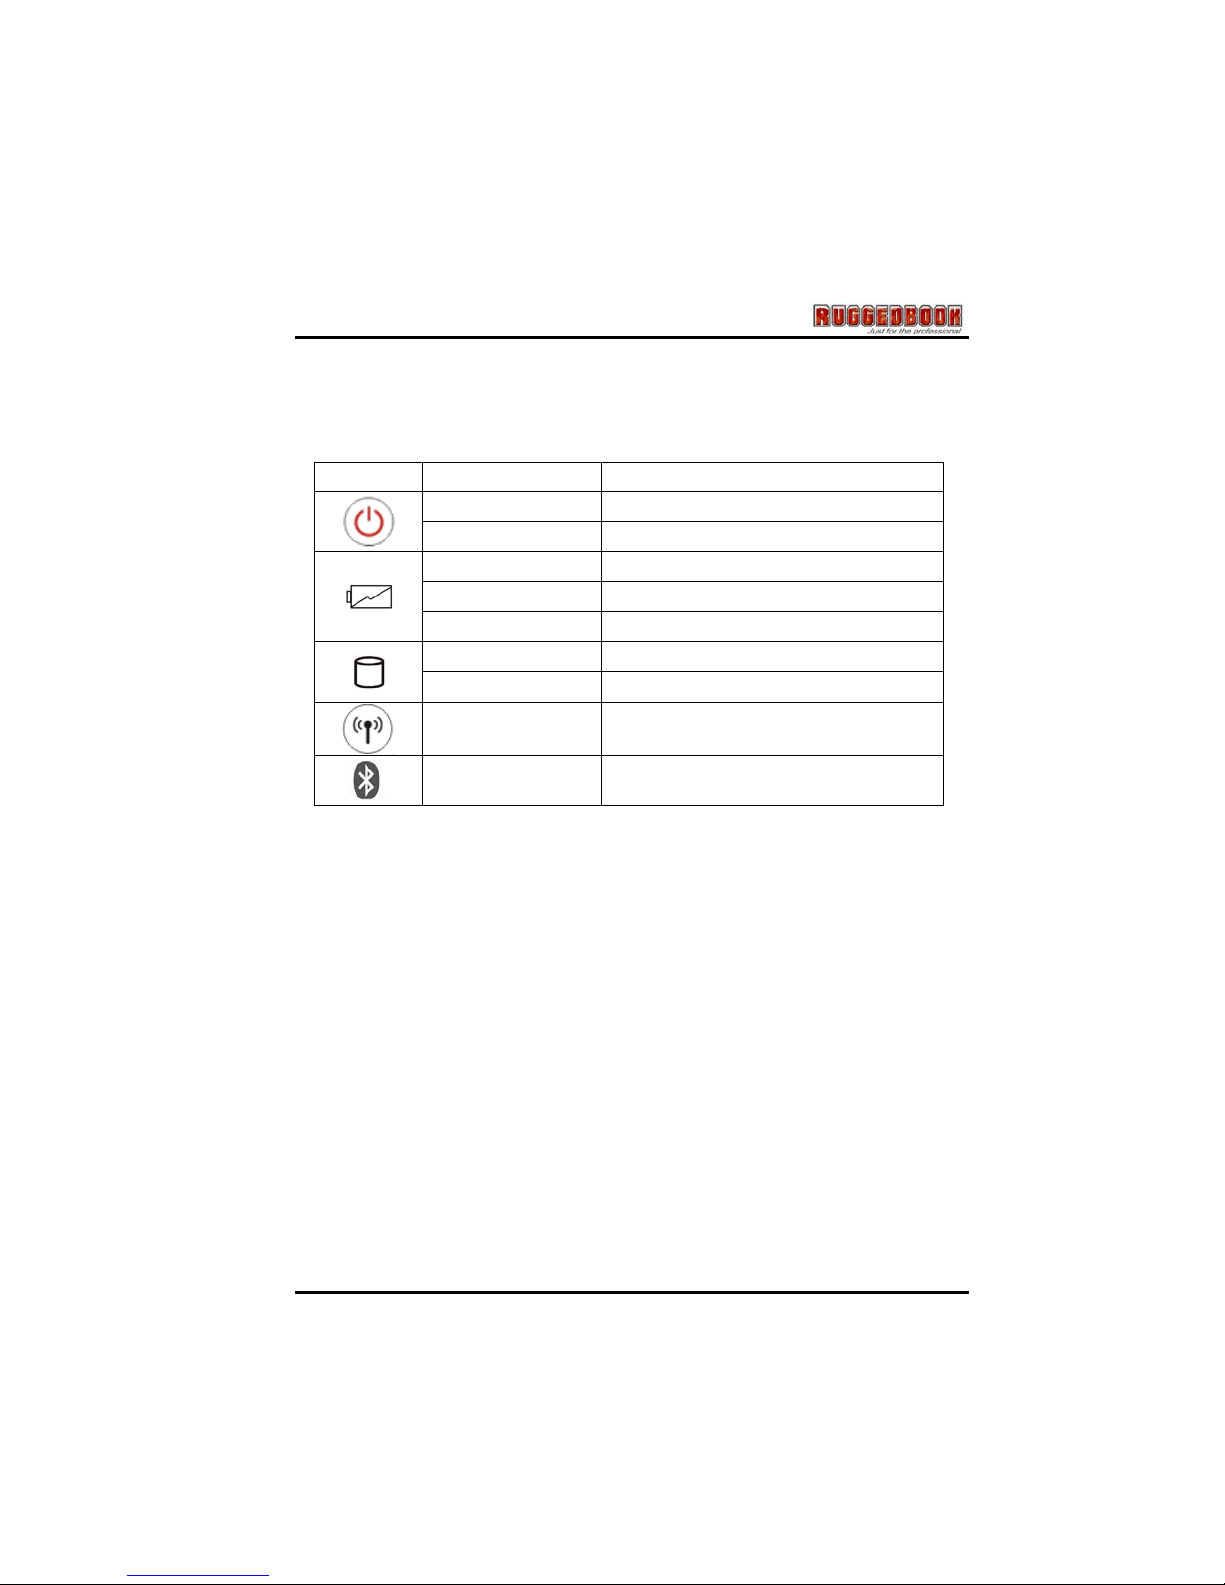
LED Status Indicators
The LED Status Indicators show which power source the system is using. They
also show battery status and low battery power alerts.
Icon Light Description
Blue
Power on
Orange blinking
System save to RAM
Orange
Battery is charging
Off
Battery is discharged
Red blinking
Low battery capacity
Green blinking
HDD in access
Off HDD in idle
Green
WLAN enabled
Green
Bluetooth enabled
19
Page 21
Chapter 2 —Getting Started
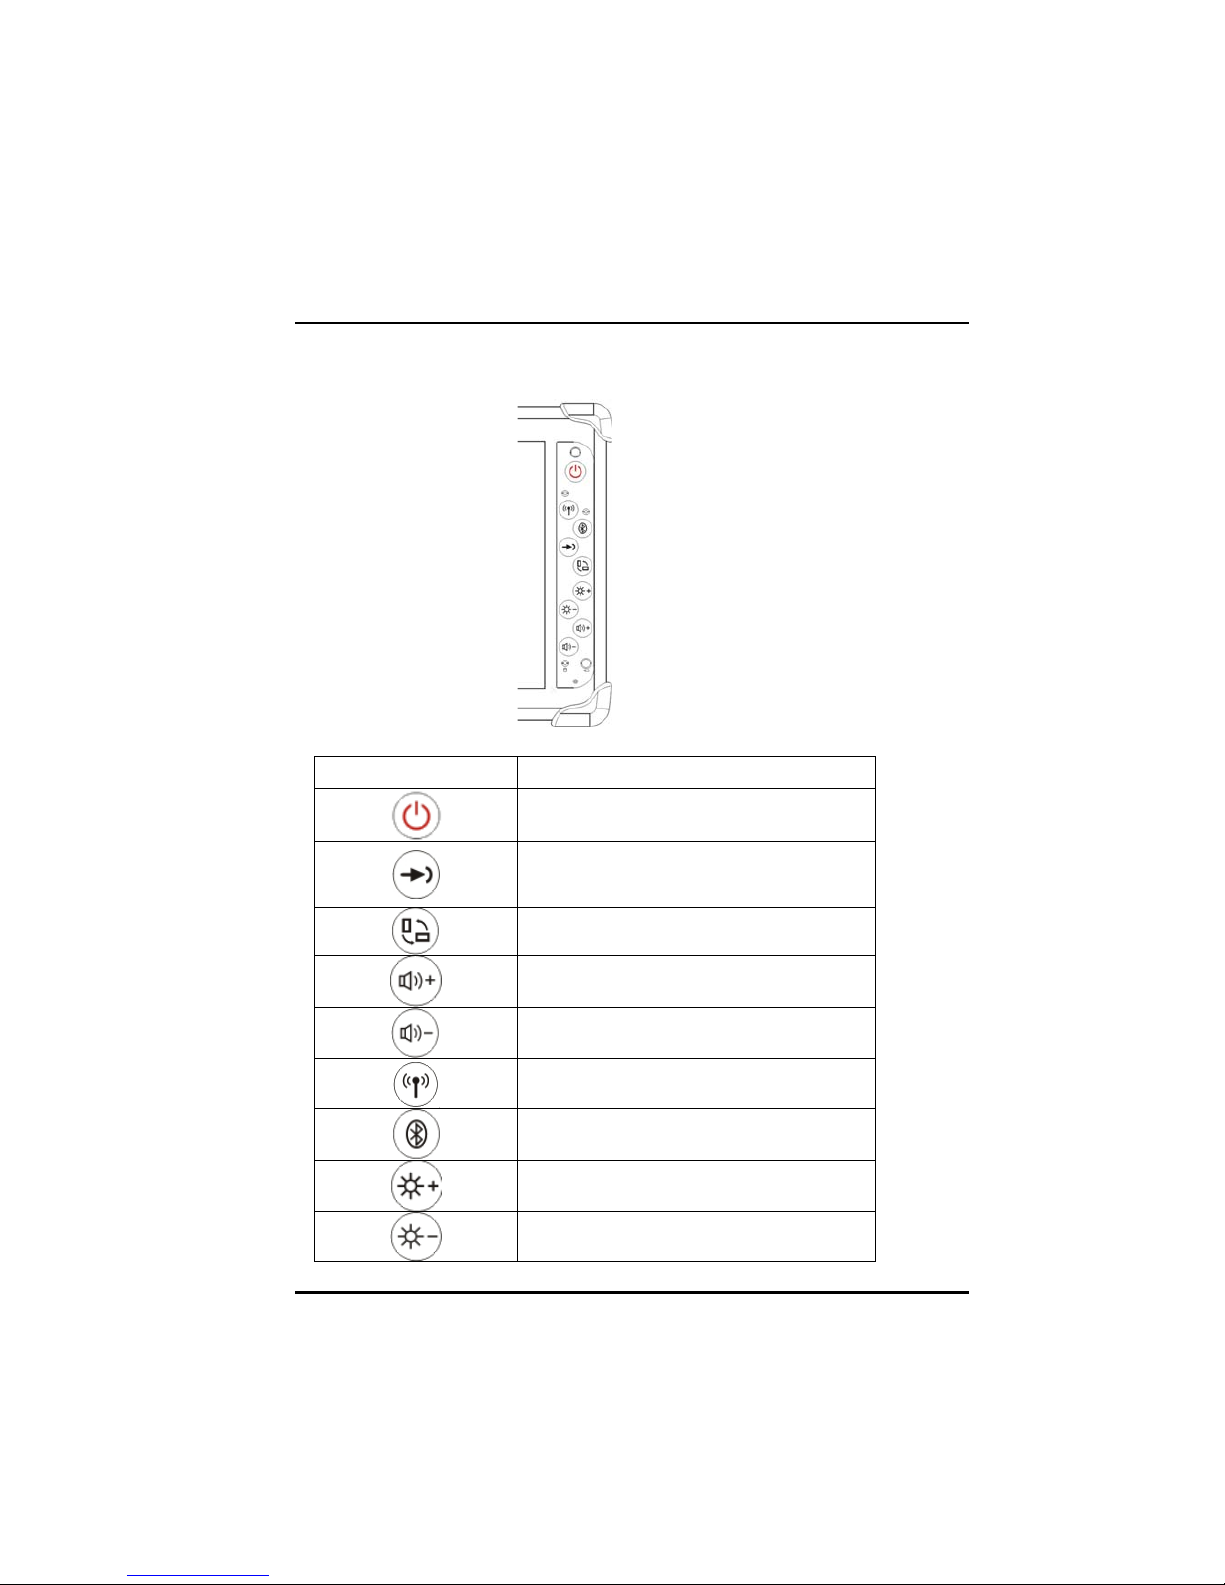
1BHot Keys
The hot keys are unique features of your Tablet PC. The function as follows:
Hot key Function
Power ON/OFF switch
Implement Secure Attention
Sequence(SAS), same as
Ctrl+ Alt+Del
Rotate the working screen
Volume up
Volume down
Switch Wireless LAN ON/OFF
Switch Bluetooth ON/OFF
Brightness up
Brightness down
20
Page 22
4BStylus
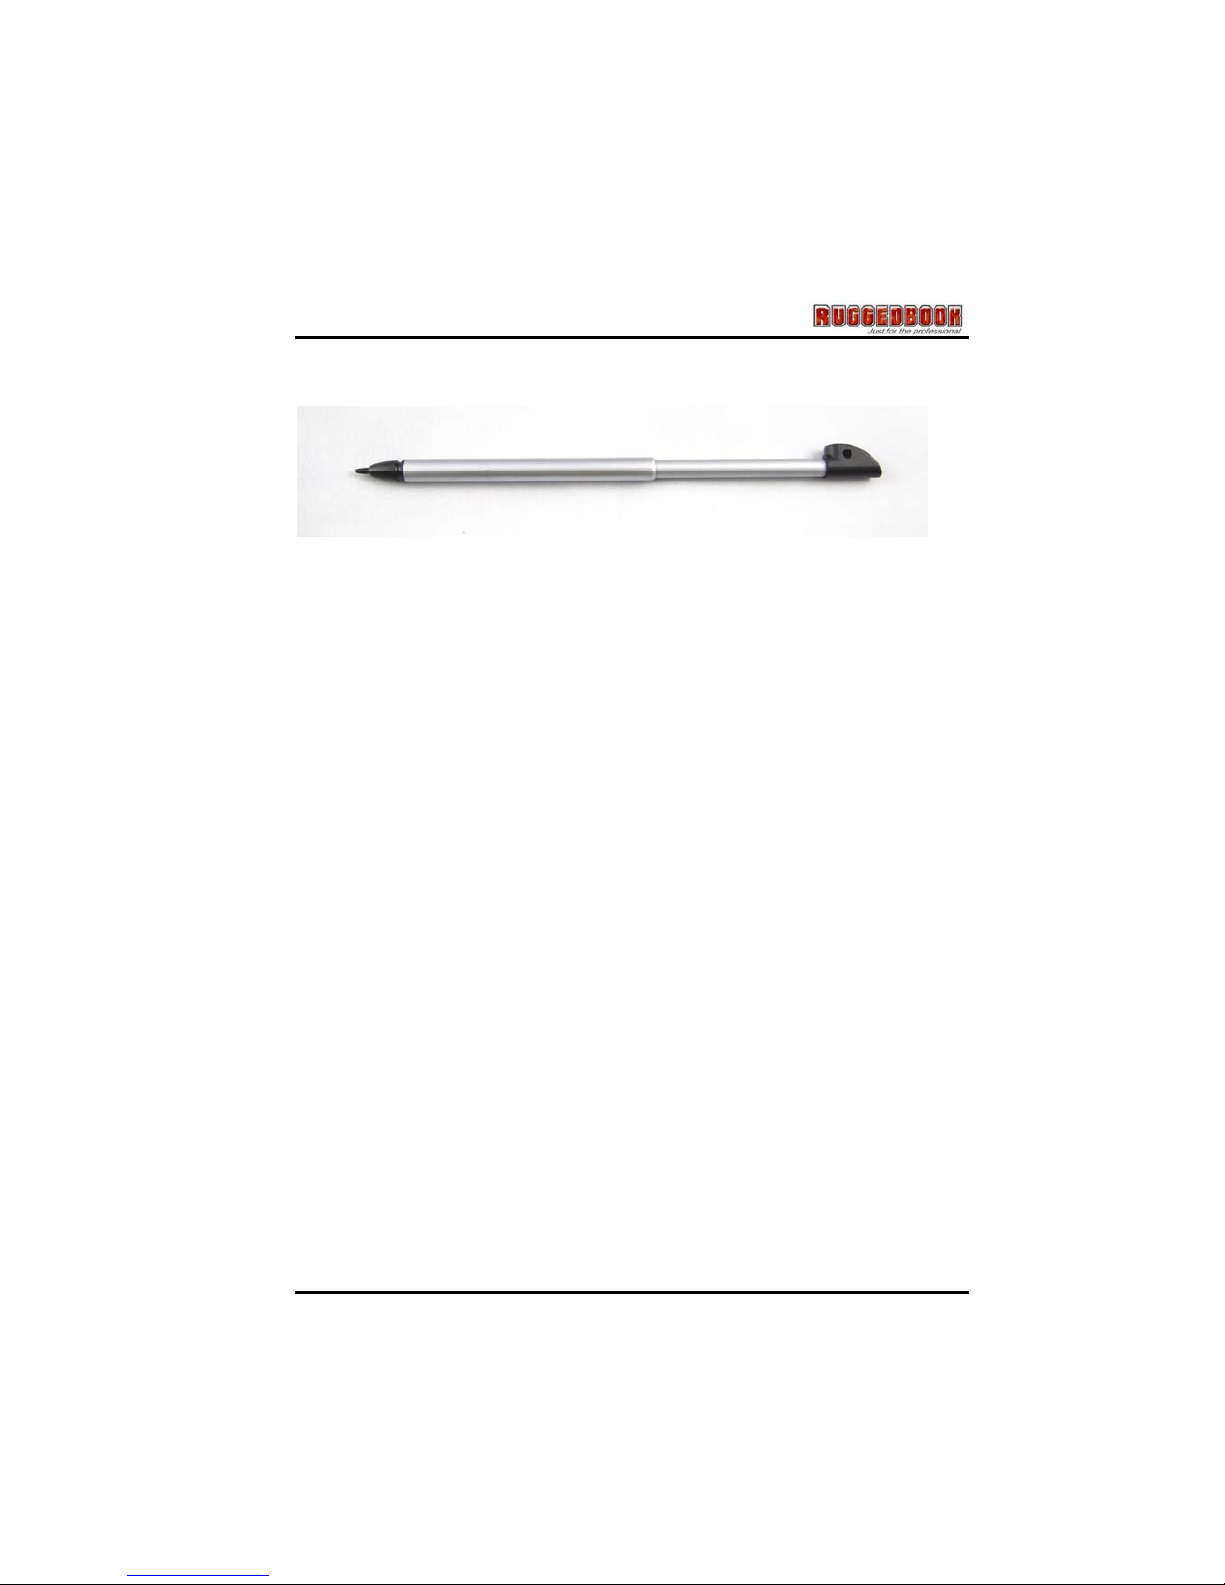
You can use the stylus to replace a mouse when using SR820. Store the
stylus in the stylus bay when it not in use.
2BStorage
a. Solid State Disk(SSD)
The SSD disk provides high performances even after violent shake, high
temperatures. Windows and most programs are stored here. It may be your
other choice
b. Hard Disk Drive(HDD)
The hard disk provides 1.8” ultra slim storage and fast access. Windows and
most programs are stored here.
21
Page 23
Chapter 2 —Getting Started
5BThe SD Card Slot
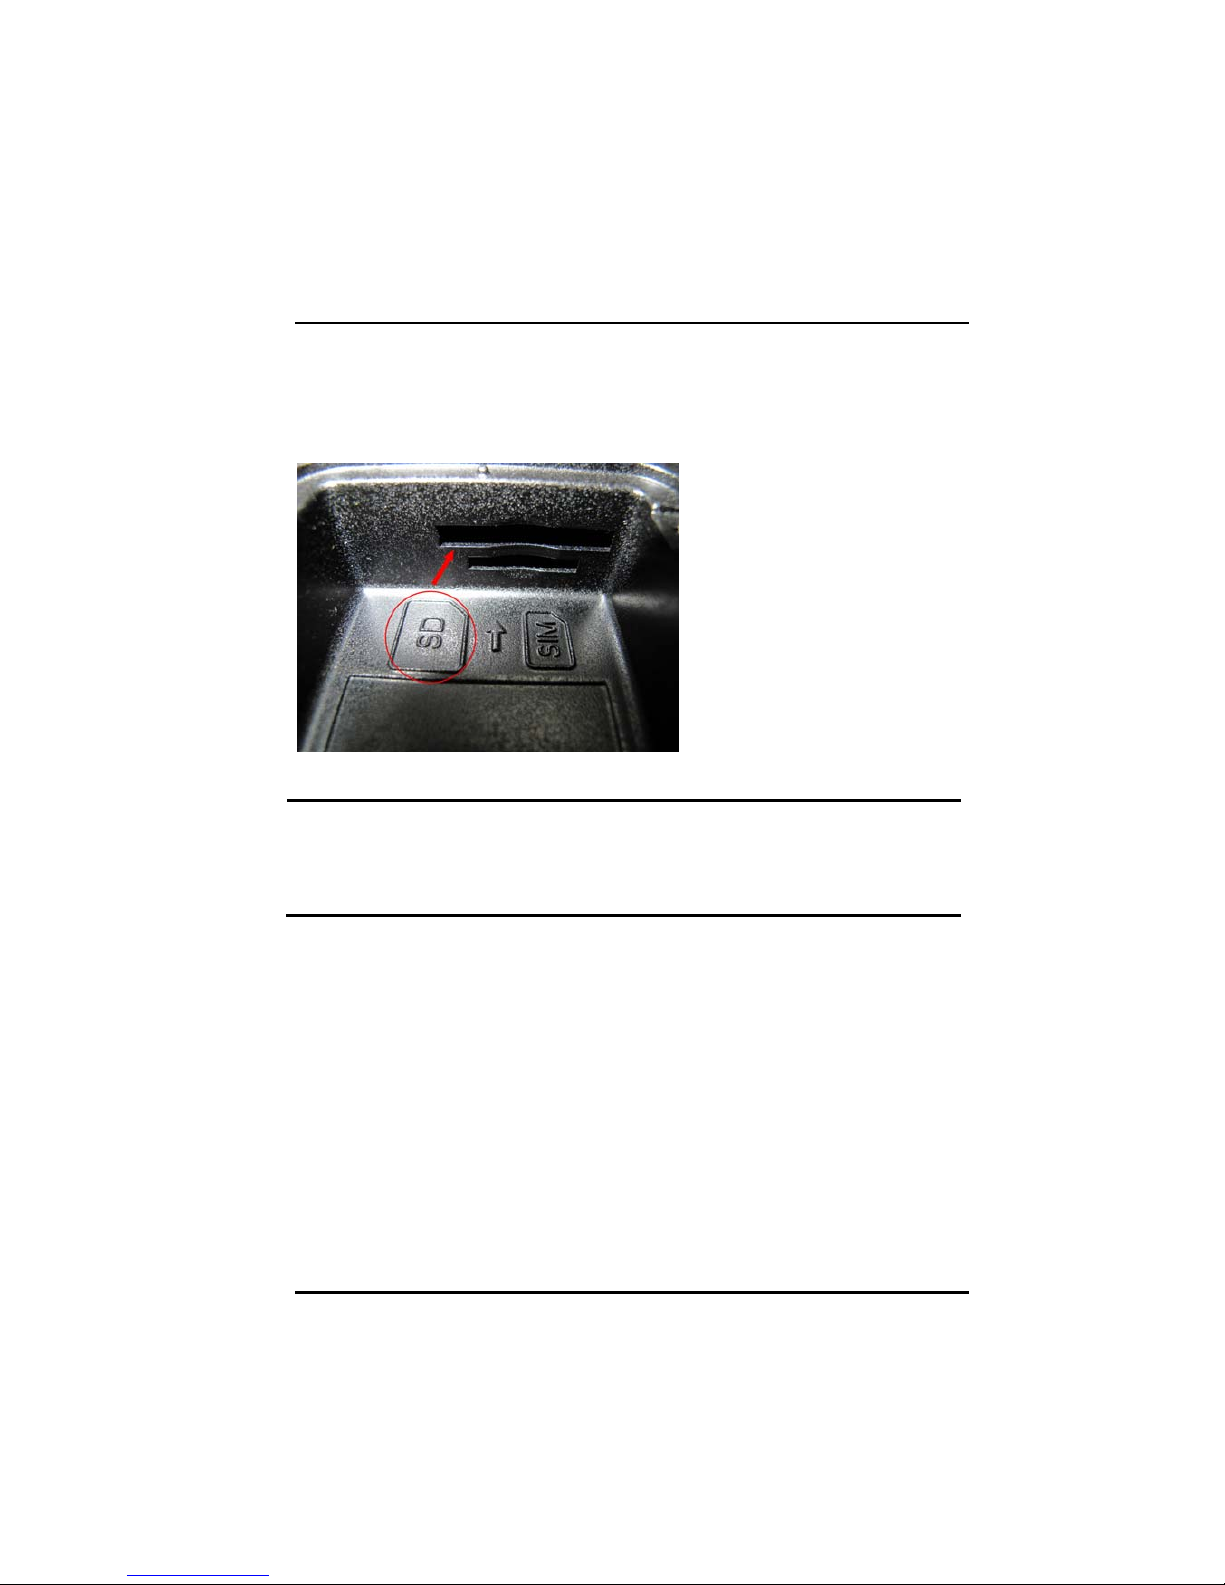
Your Tablet PC includes card slot which supports SD Card. Before you find out
the SD card slot, you need remove battery pack first.
Then you will see the SD card slot like below picture:
Note: Please read the instructions included with individual PC cards. Some
cards may be inserted with power on, while others require that the
Tablet PC be turned off
22
Page 24
6BSIM Card Slot
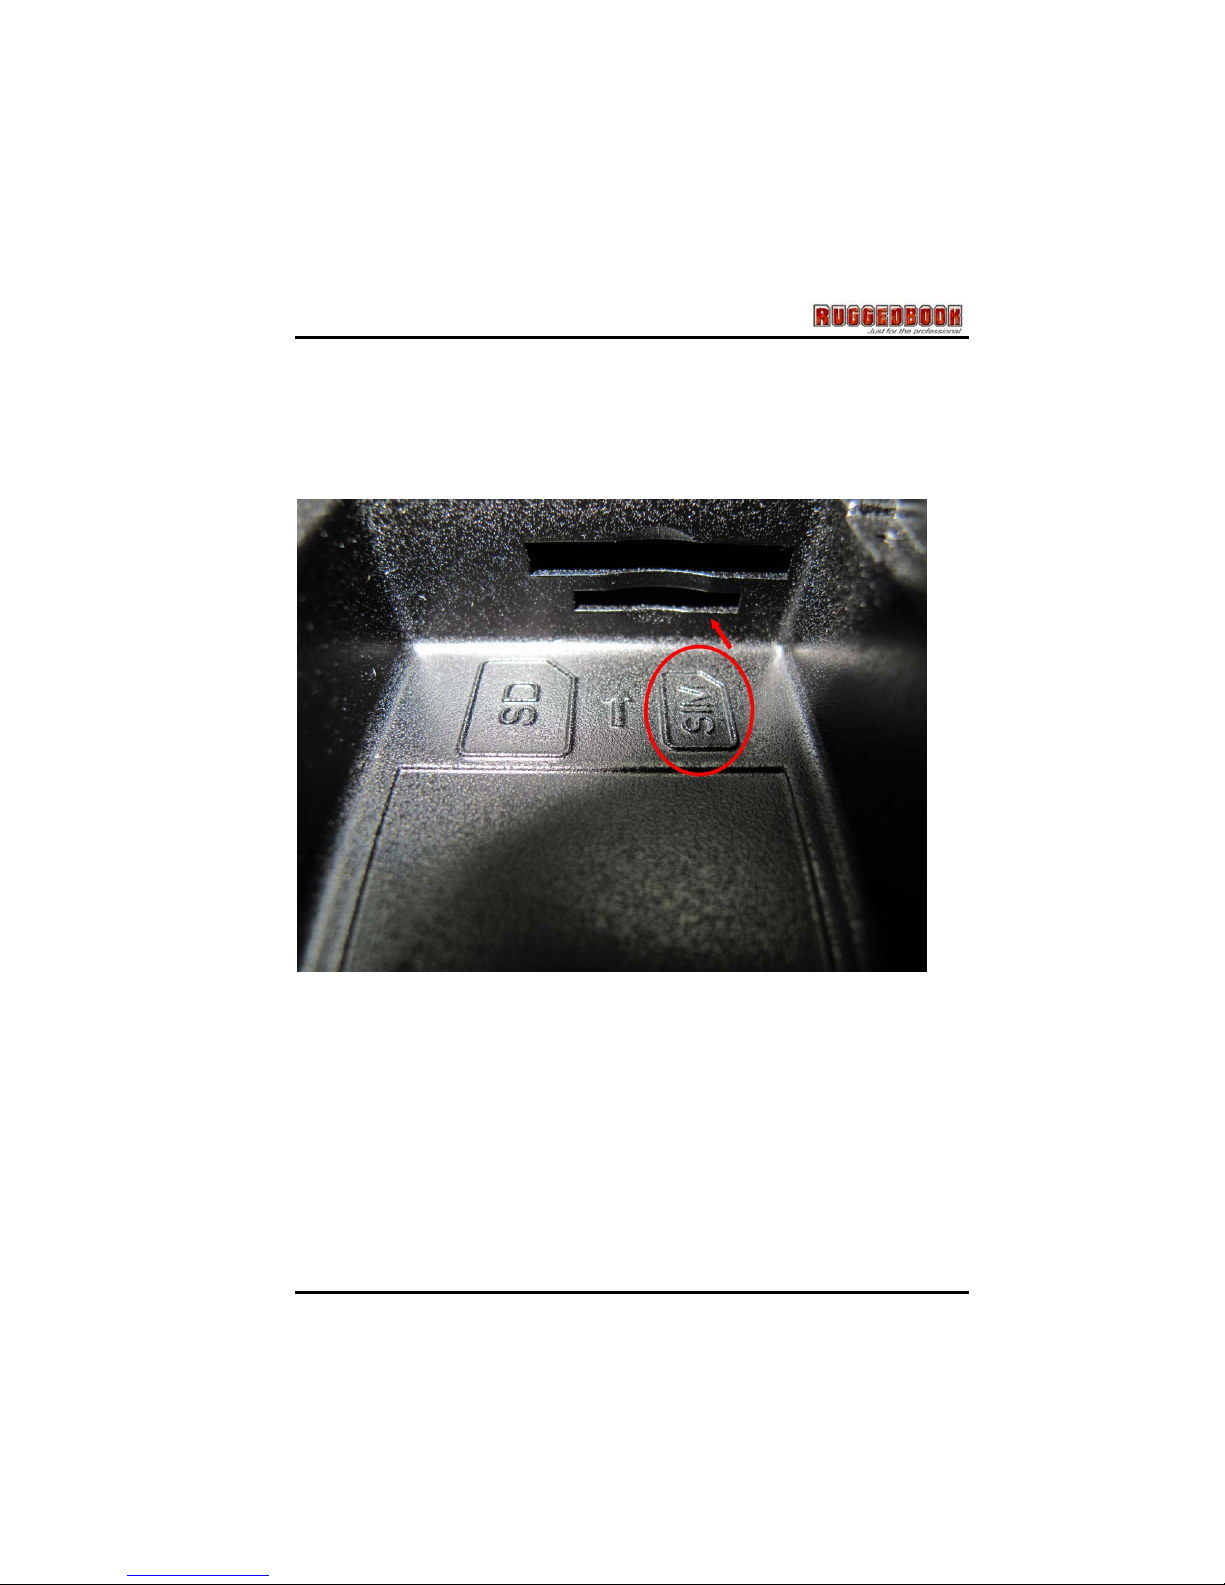
This system has a SIM card slot supported. User can also purchase 3.75G
WWAN module to setup your own WWAN network.
Before you insert your SIM card into the SIM card slot, please remove battery
pack first. Then you will find out the SIM card slot like below picture:
23
Page 25

Chapter 3 - Power Management
24
CChhaapptteerr 33
PPoowweerr MMaannaaggeemmeennt
t
Page 26
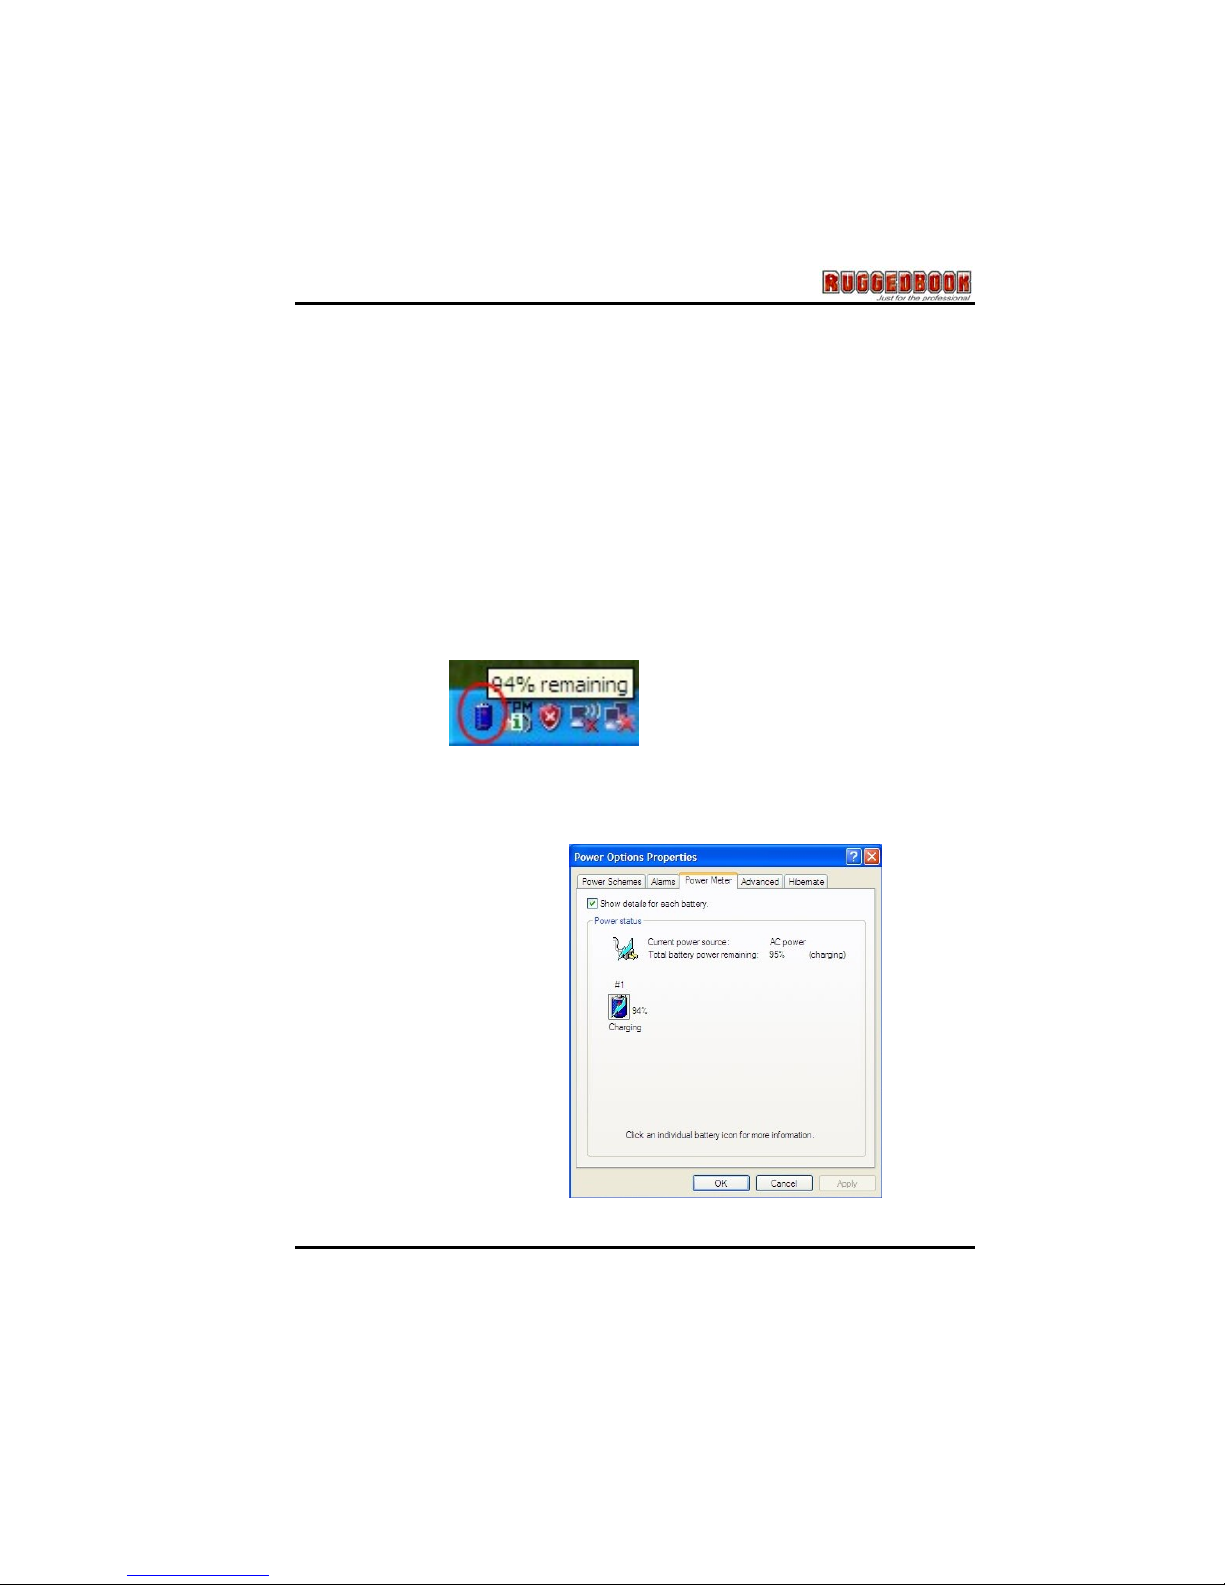
2BPower management
With Windows XP Tablet Edition™, power consumption may be reduced through
‘Power plans’. This tool controls the interaction between hardware and system
settings that manage how the computer uses energy, therefore the battery life
and system performance can be balanced as well as enhanced.
3BChecking the Battery Level
You can check the remaining battery power in the Windows® battery status
indicator located at the lower right-hand corner of the task tray. The Battery
Status icon only appears in the task tray while the unit is running on the battery
power but not while the unit is running off an external power source through the
AC adaptor.
Battery Power Indicator
4BMonitoring battery power
The battery status indicator
allows you to monitor how
much power the battery has
left.
1. Left-click on the battery
status indicator.
2. Moving the cursor to
select a preferrable power
plan to enhance your
energy performance.
25
Page 27
Chapter 3 - Power Management
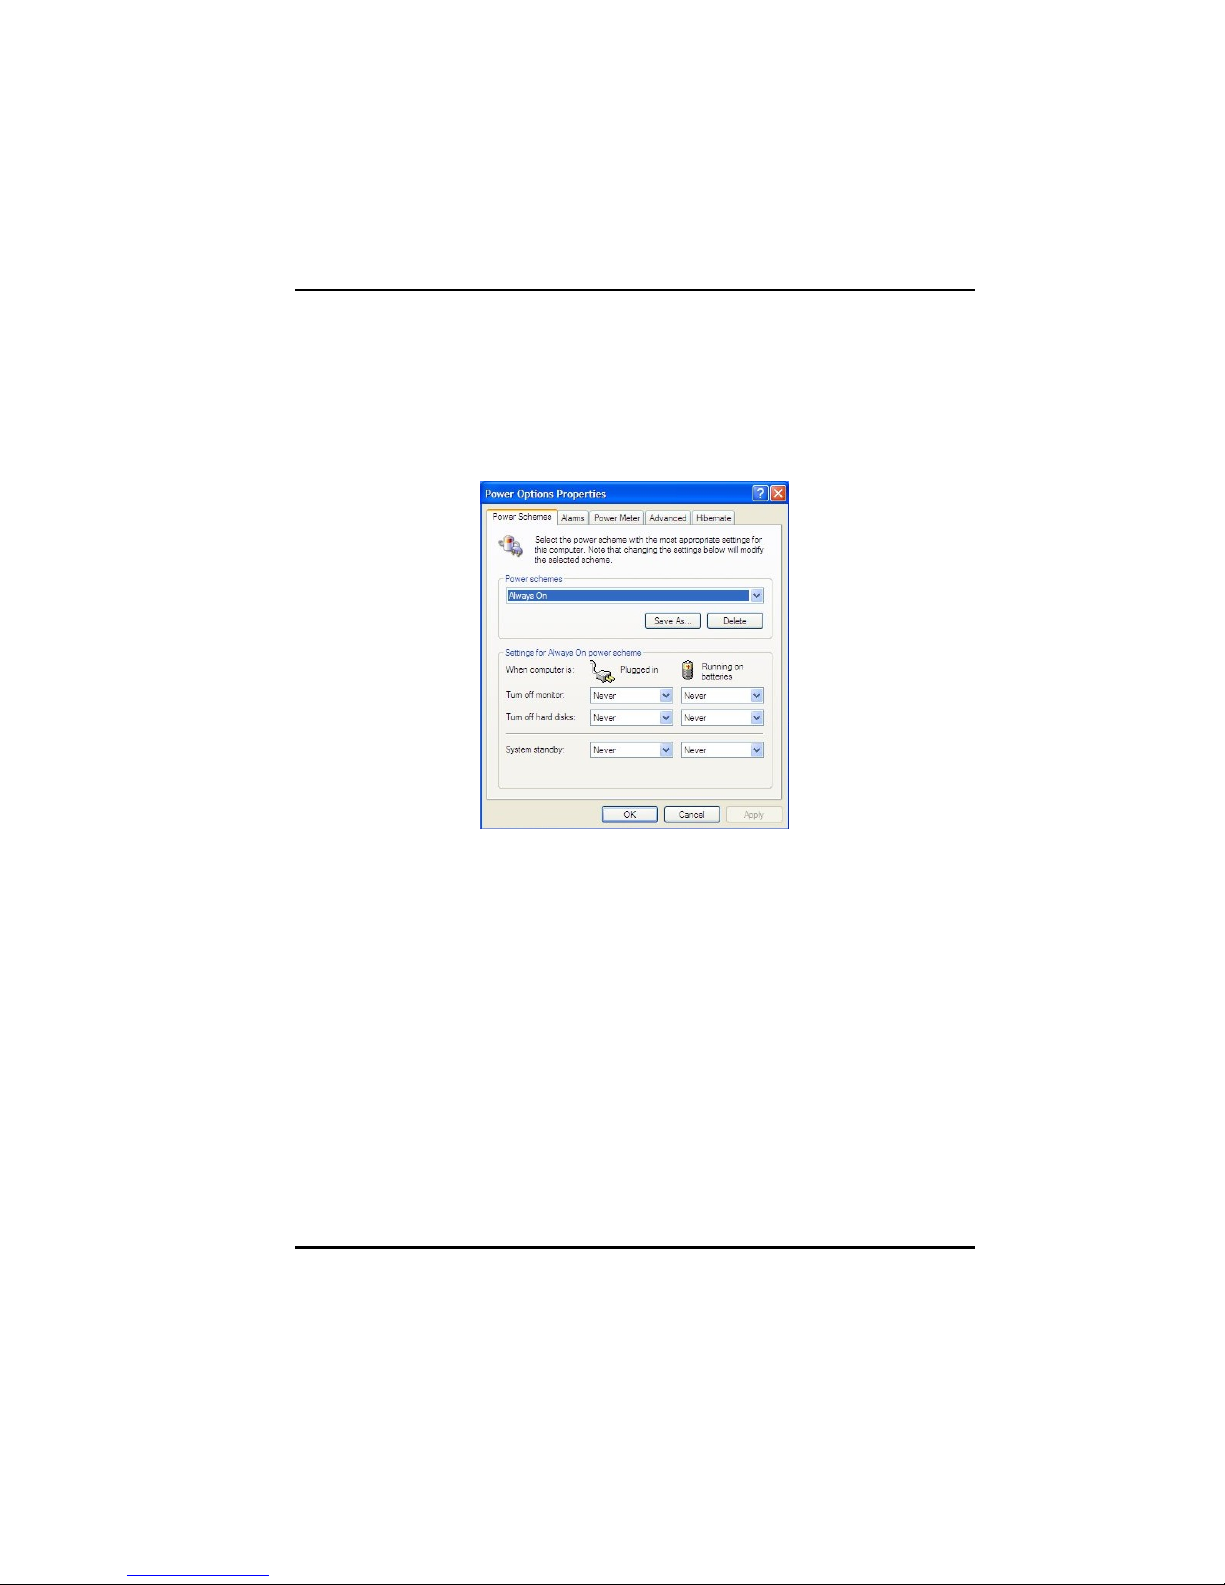
5BAdjust the power plan
As shown, power plan has been specified as Balanced, Power saver and High
performance, each has parameters those may be customized to fit individual
circumstances as requirements of users.
1. Click the Start button>Control Panel>Power Option>Edit Plan Settings.
(System route may differ from your machine)
2. Adjusted the parameters to meet your requirement.
3. Press the ‘Save changes’ button to execute the adjustment.
26
Page 28

27
6BSleep power state
Sleep is a new power state in Windows XP Tablet Edition. This mode allows the
computer to retain its workload in a minimum usage of energy as standby. While
when user returns, the work can be easily resumed no matter where it stopped.
Advantages of sleep state:
- All the works, with information of programs those are currently in use will
automatically be saved to the hard-disk.
- When using a mobile PC, Windows XP Tablet Edition restores the previous
work within seconds, it won’t be necessary to restart or re-open the files.
- While sleeping, only approx. one-tenth the energy will be used comparing
when running at full power, and a mobile PC typically uses one to two percent
of battery power per hour.
To save the energy further, Windows XP Tablet Edition automatically turns off
the computer after a period of time based on the Sleep and Hibernation settings
of the power plan the user is using.
Page 29

Chapter 3 - Power Management
28
7BBattery Charging
When you use the AC adapter to connect your Tablet PC to a power outlet, the
internal battery will automatically begin to recharge. While the battery is charging,
the Battery Charge icon on the Indicator panel will be active. When the battery is
fully charged, the Battery Charge icon will turn off.
If your Tablet PC is turned off, a fully discharged battery will take about 2.5 hours
recharge to 80%. If your Tablet PC is turned on and is not in suspend mode, it
twill take about 6 hours to recharge the battery. Refer to the following table:
Note: A fully charged Li-Ion battery can run the Tablet PC for
approximately 6.0 hours.
Page 30
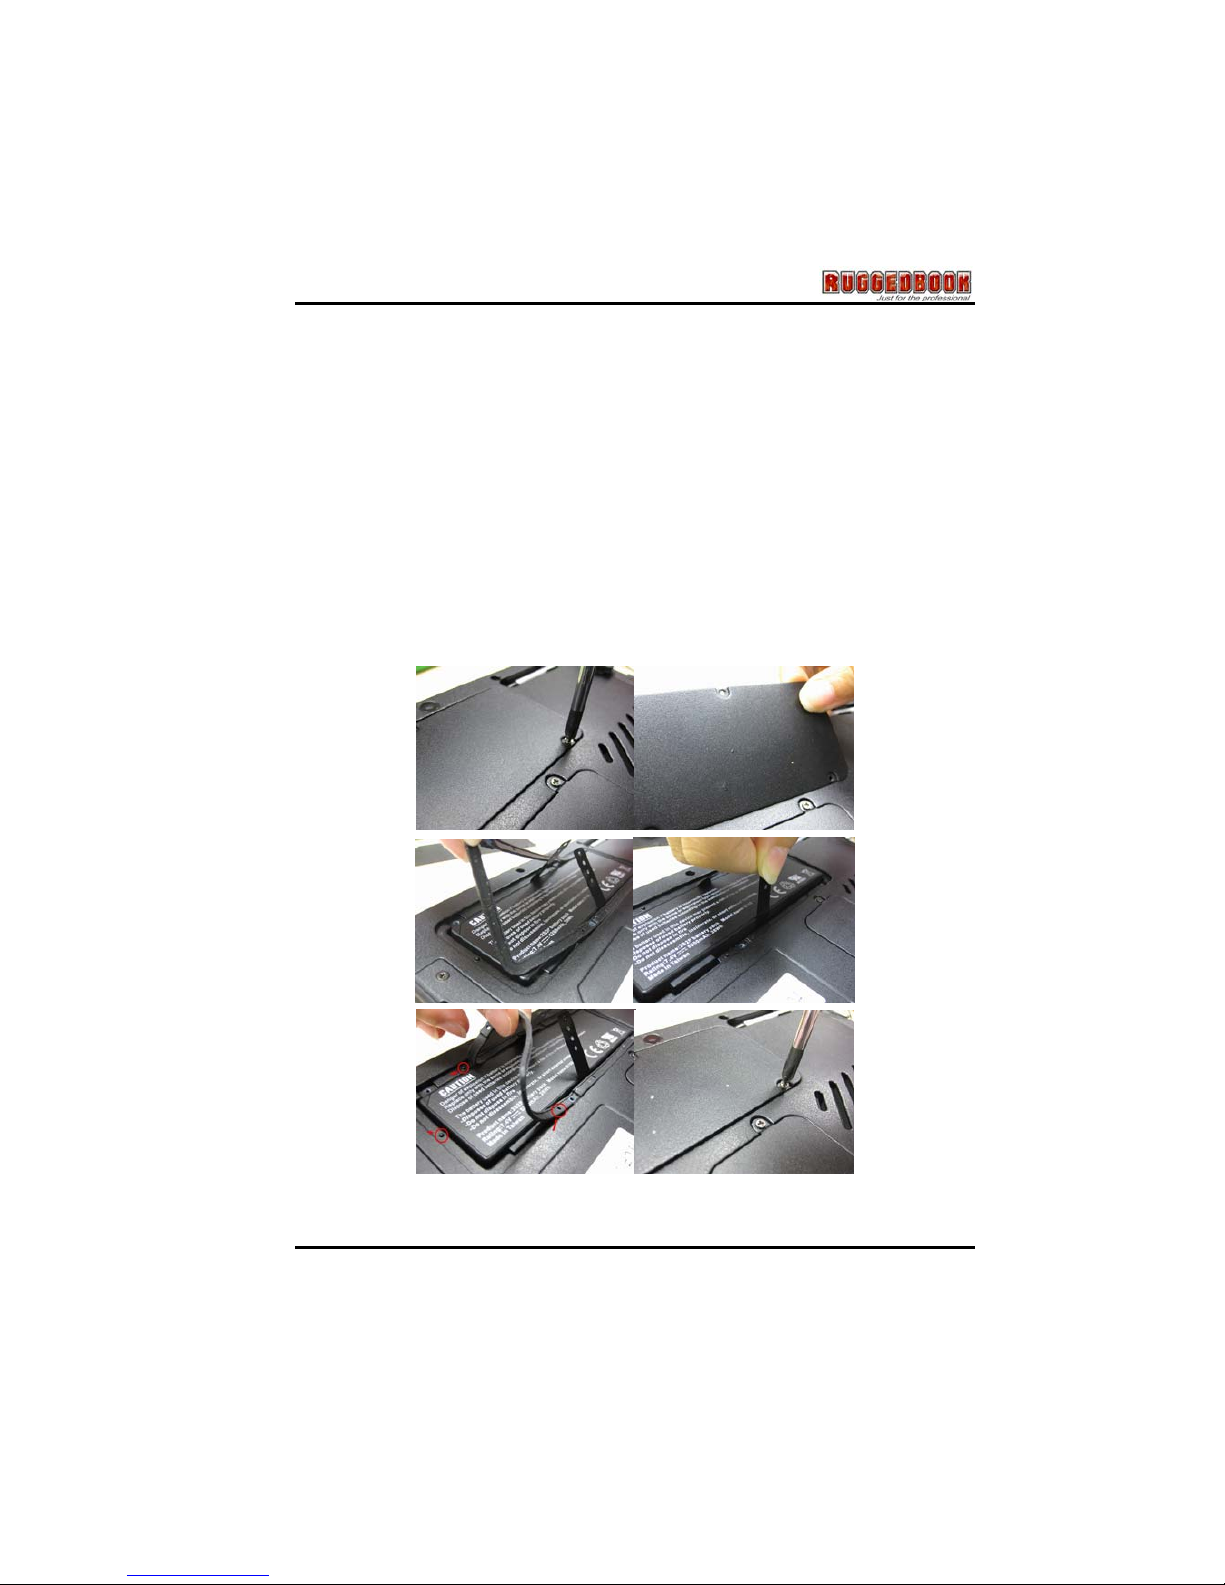
0BWhen to Replace the Battery
Over time, the battery's capacity gradually decreases. We recommend to replace
your battery when you notice that it begins to store significantly less charge.
Changing the Battery
Change the main battery pack as follows:
1. Unlock the screws on battery cover and remove the battery cover, and
remove the water-proof rubber under battery pack.
2. Slide battery latch to lift the cover, then insert battery into the
compartment as illustrated. When the battery has been fully sealed, put
the water proof rubber and battery cover back and lock screws again.
3. Please mind the fool-proof check points at the water proof rubber.
29
Page 31

Chapter 3 - Power Management
30
1BThermal Considerations
The Tablet PC processor has been specially designed to consume little power
and generates less heat. However, working in a hot environment, or working for
long periods may raise the temperature. If the temperature continues to rise,
processor activity will be reduced. You may notice a slight loss of performance
when it happens.
Page 32

31
CChhaapptteerr 44
SSyysstteem
m SSooffttwwaarree
Page 33
Chapter 4 - System Software
0BSystem Software
2BSoftware List
4BUOperating System
Your hard drive already contains all the software that you need to
operate the Tablet PC.
5BUDrivers
These utility programs and drivers contain the PC Card drive, the
sound system, and the graphics sub-system.
1BSystem Recovery
3BUBefore you start
If you reinstall your operating system, all of the data originally on the
hard disk will be overwritten. Before reinstalling the operating system,
carefully backup any important data.
Caution: When you re-install operating system by
Recovery HDI for Windows, we STRONGLY recommend
connecting the AC adapter( do NOT use battery
alone )to avoid warning message.
32
Page 34
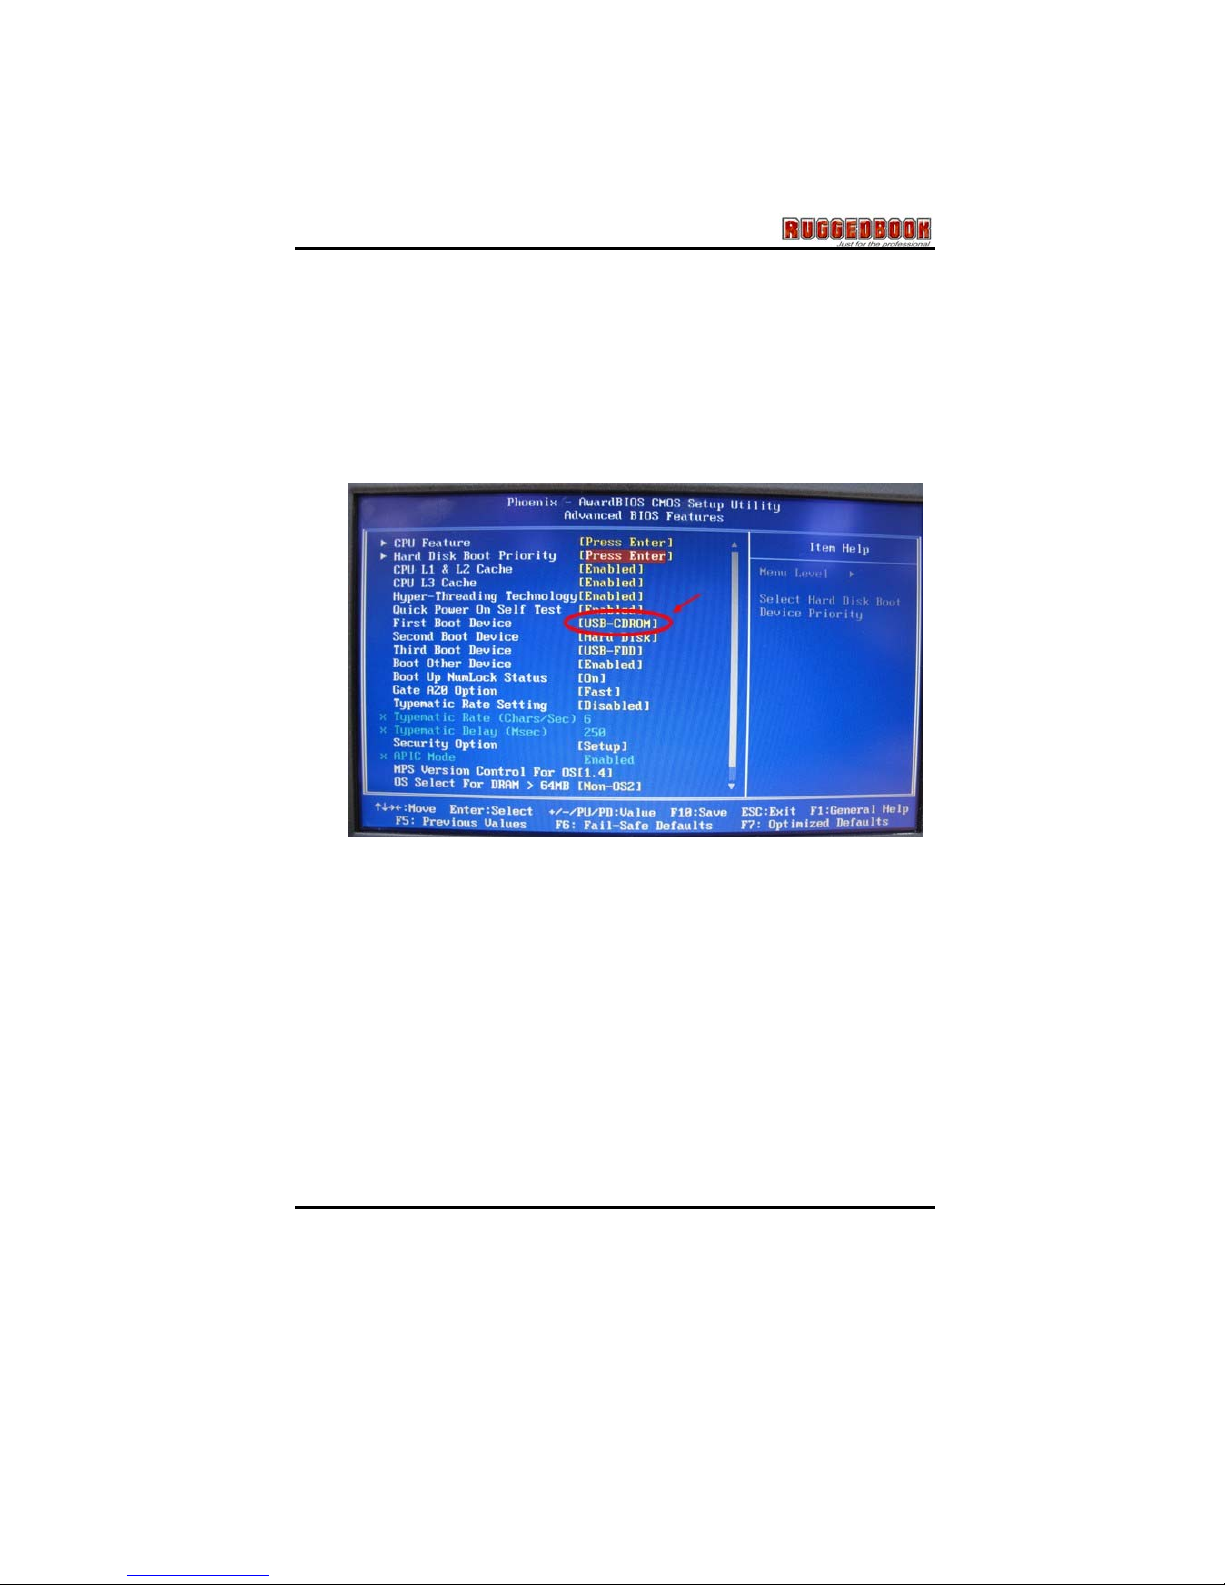
1. Connect an external USB CD/DVD-ROM to SR820 machine.
2. Put the service DVD into the DVD-RW and turn-off system.
3. Press power button to turn on the system, then press “Del” key to
enter BIOS setup menu.
4. Move to Advanced BIOS Features setup menu and set DVD ROM to
priority 1st, HDD to priority 2nd, then put recovery DVD into DVDROM .Save and exit BIOS setup menu to reboot system.
33
Page 35
Chapter 4 - System Software
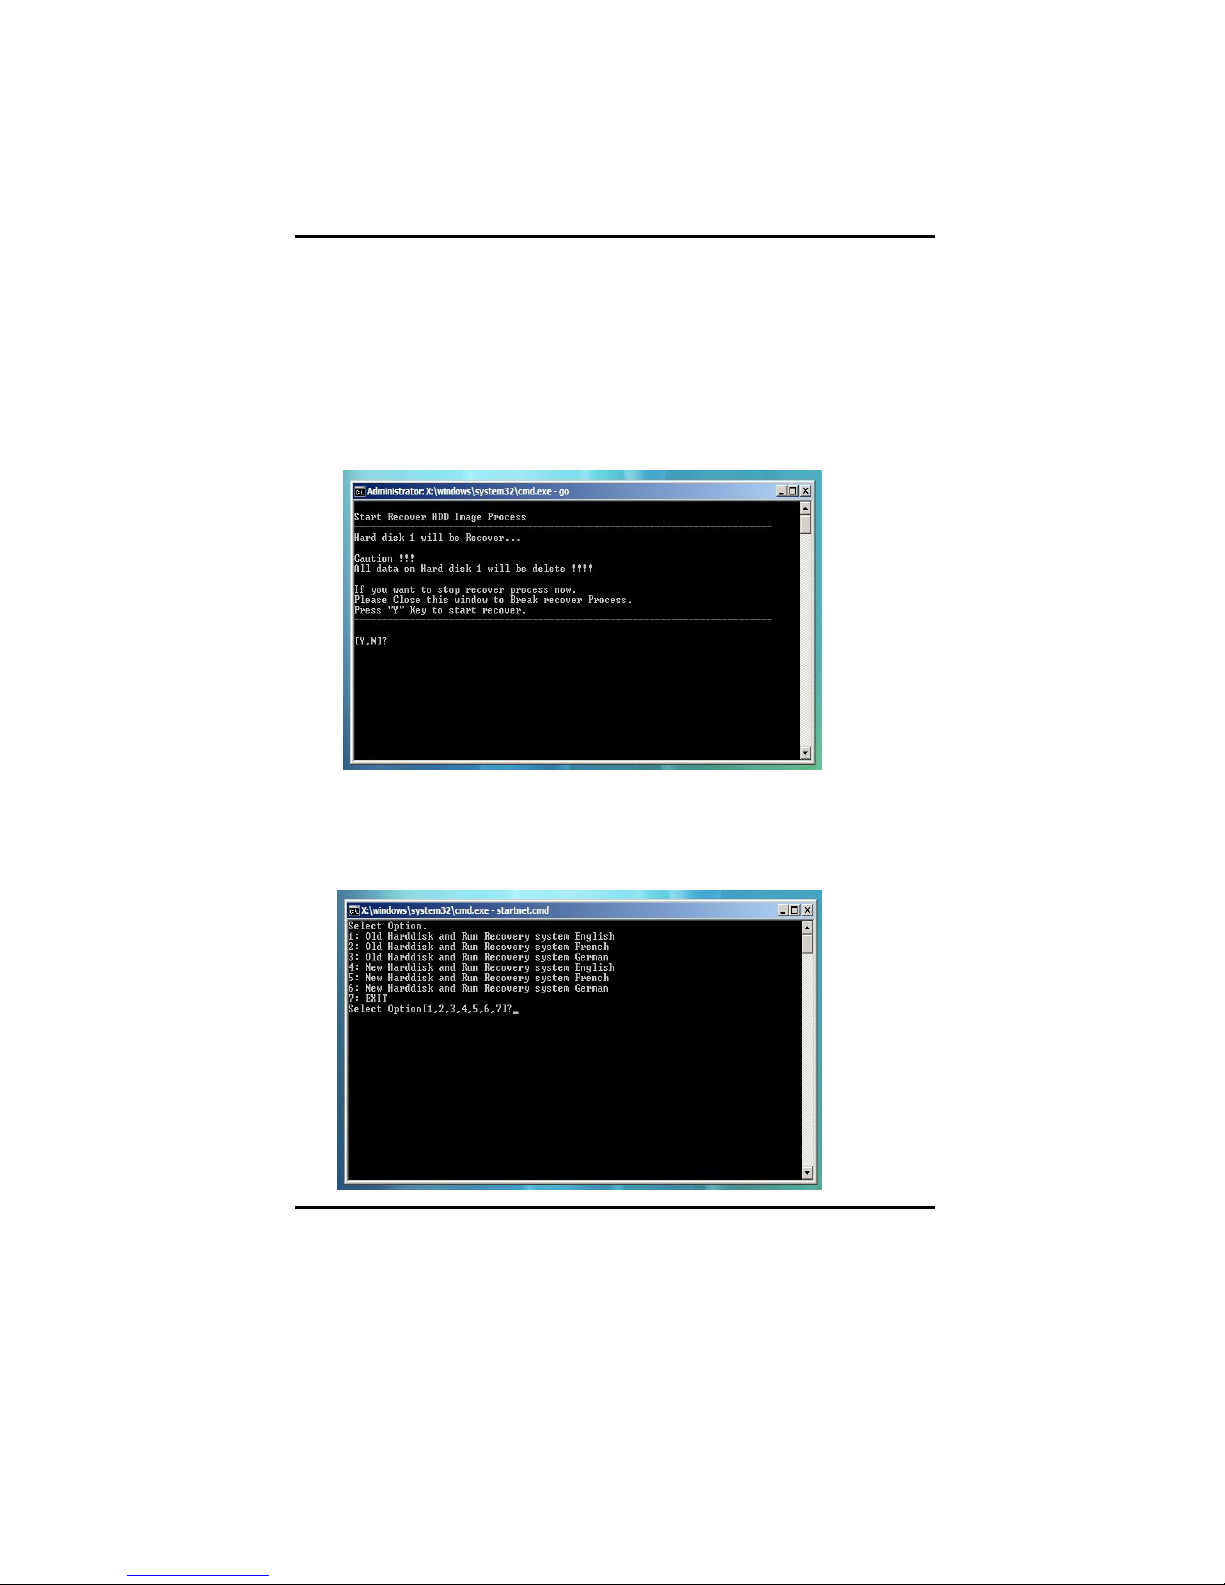
5. When system reboot via DVD-ROM and see the message like below
picture, you can:
a. If you want to execute recovery OS, please type “Y” and press “enter”
key, but data on the current partition will be deleted.
b. If you do not want to recover your OS, please take off the service DVD
first, and then type “N” and press “Enter” key to reboot system. The
system will be rebooting.
6. Continue recovery step, can see message like below:
If your system language is English / French / German, please
following the below picture to go on this step:
34
Page 36
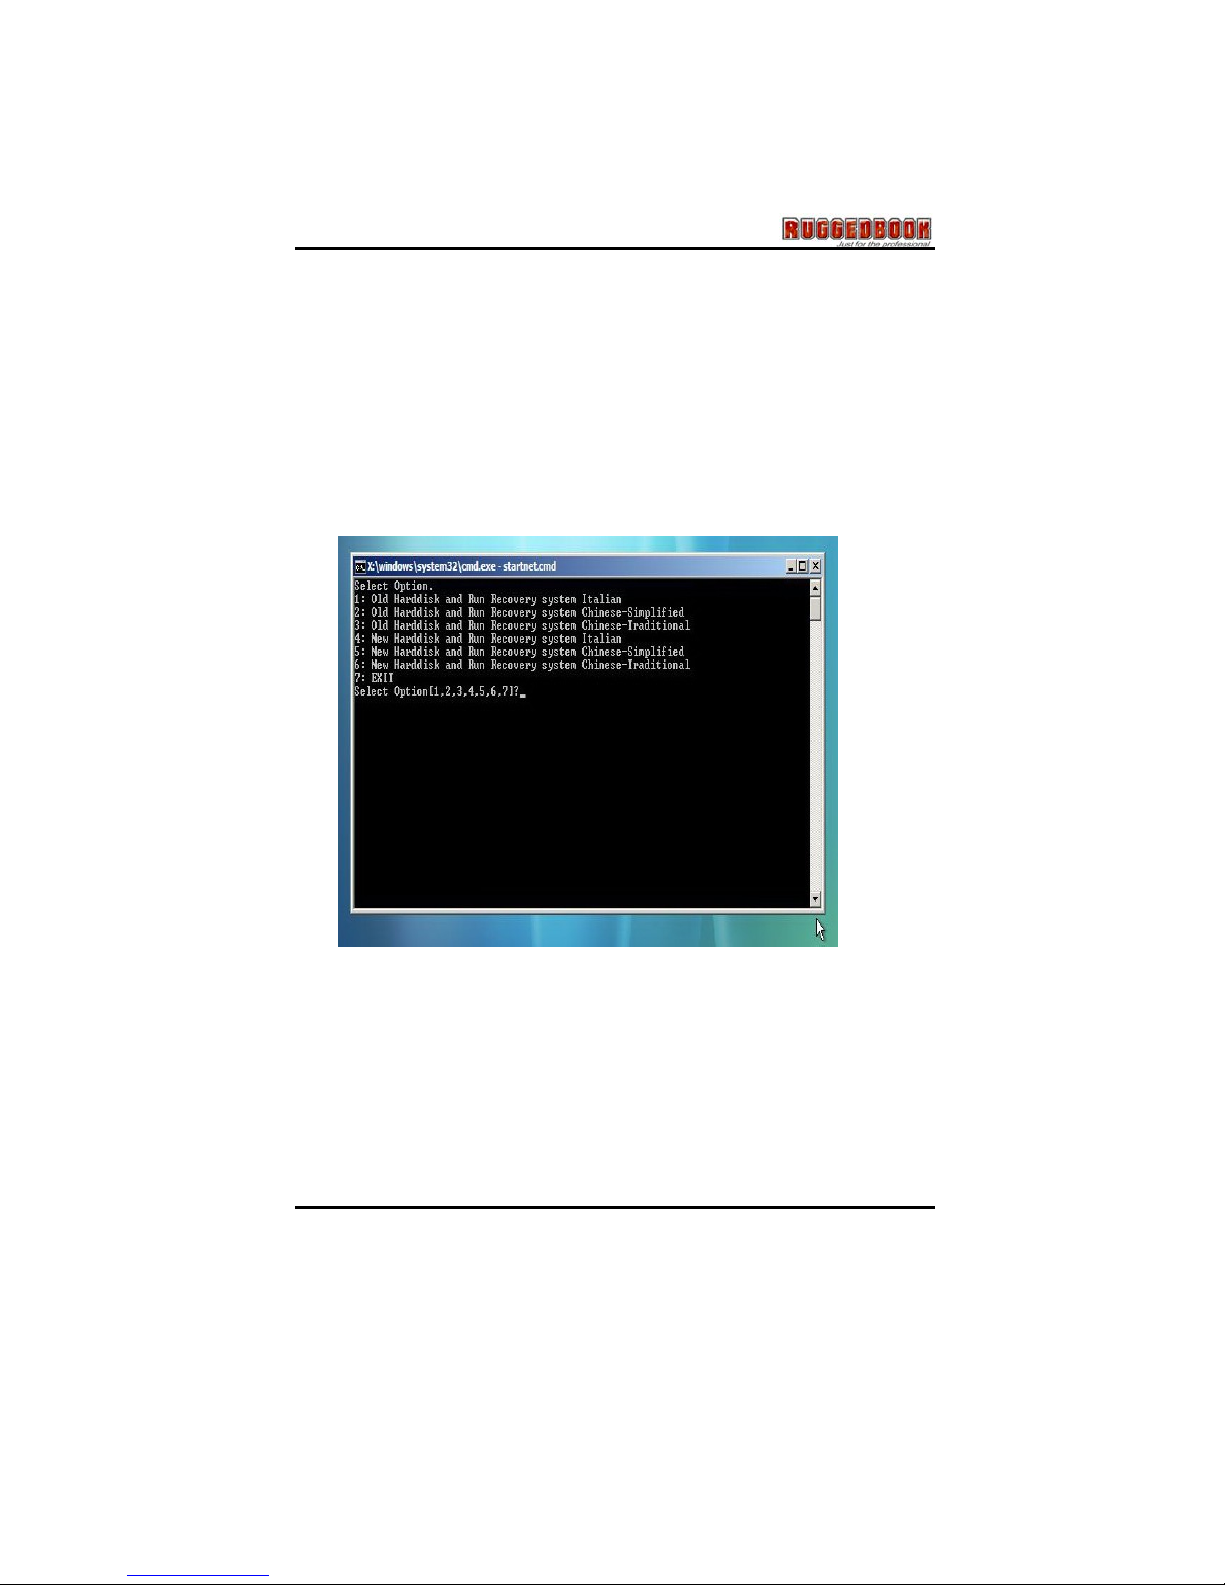
Option 1(or 2, 3): Recovery system via the original partition
Option 4(or 5, 6): Recovery system with re-partition the current hard
disk
Option 7: Quit the recovery asking
If your system language is Italian / Chinese-Simplified / ChineseTraditional, please follow below picture to go on this step:
35
Page 37
Chapter 4 - System Software
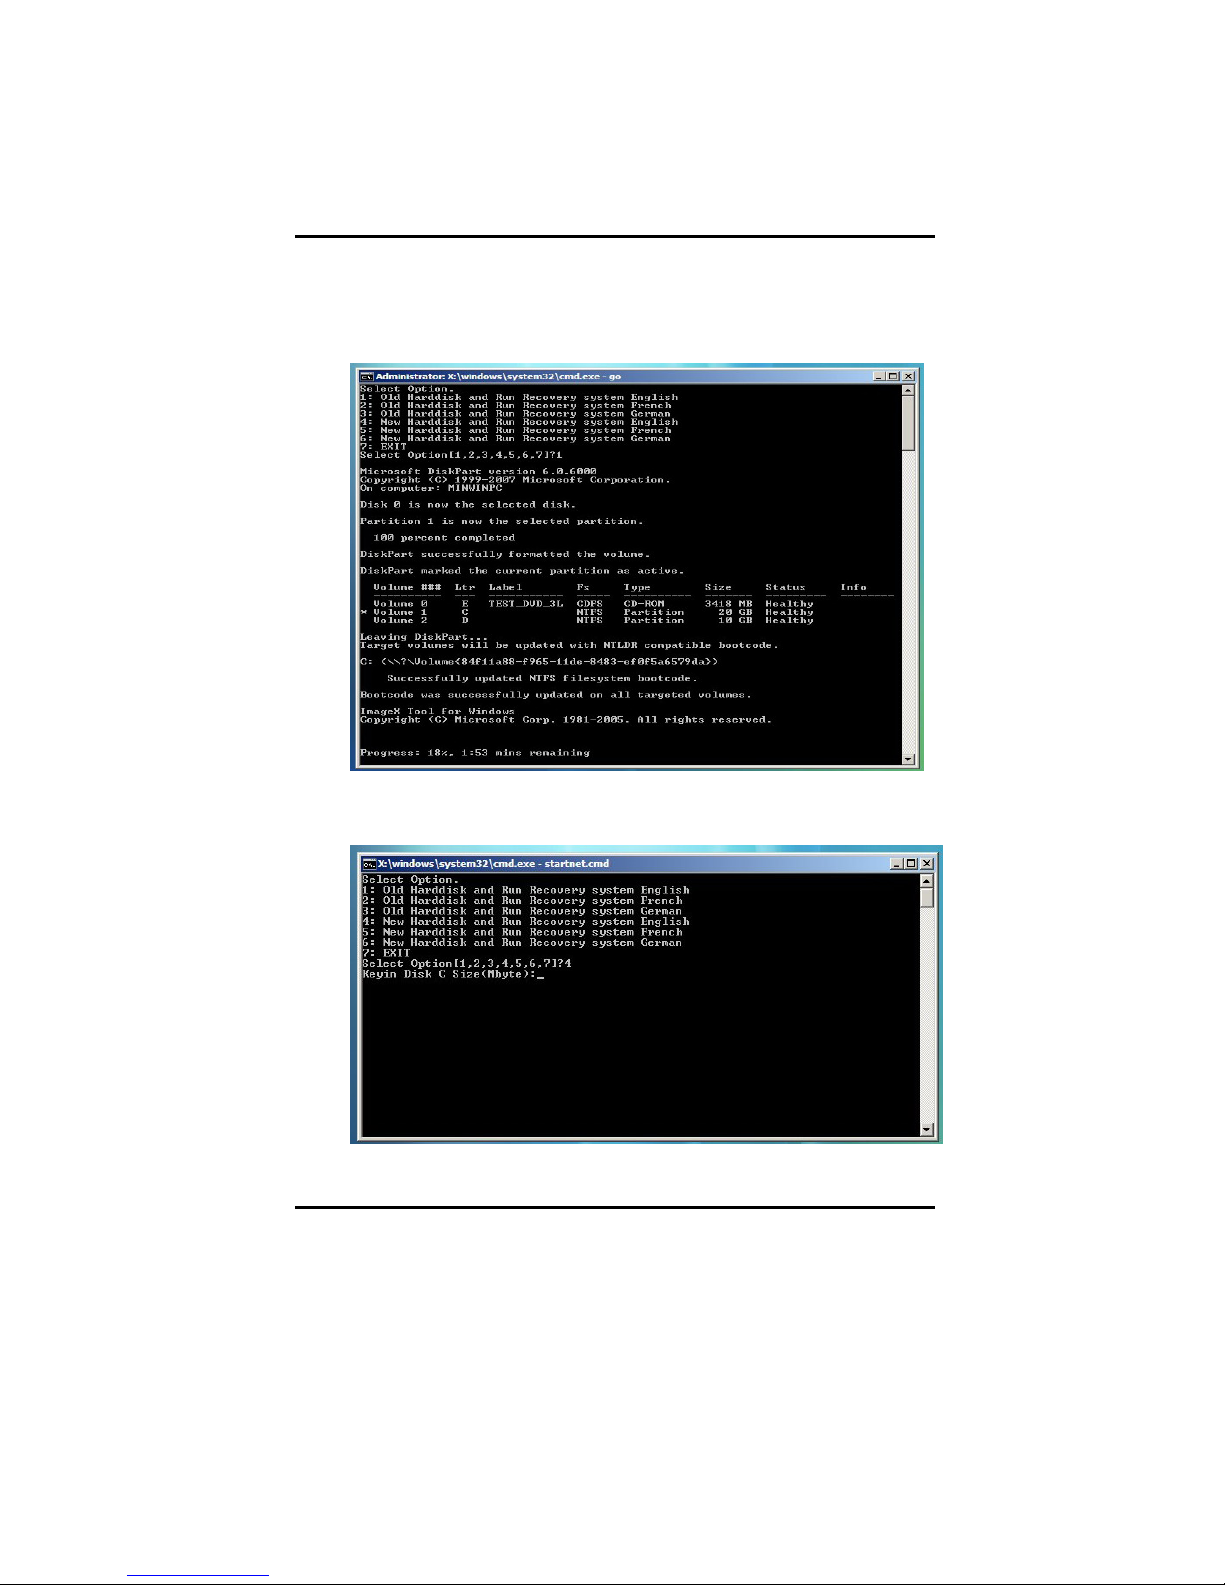
7. If you choose “1(or 2, 3)” to run recovery system, please wait for
program running. After seeing below message “Press any key to
reboot system”, you can remove service DVD from DVD-RW and
press any key to reboot system
8. If you choose “4(or 5, 6)” to run recovery system, your system will be
re-partition first then start
36
Page 38
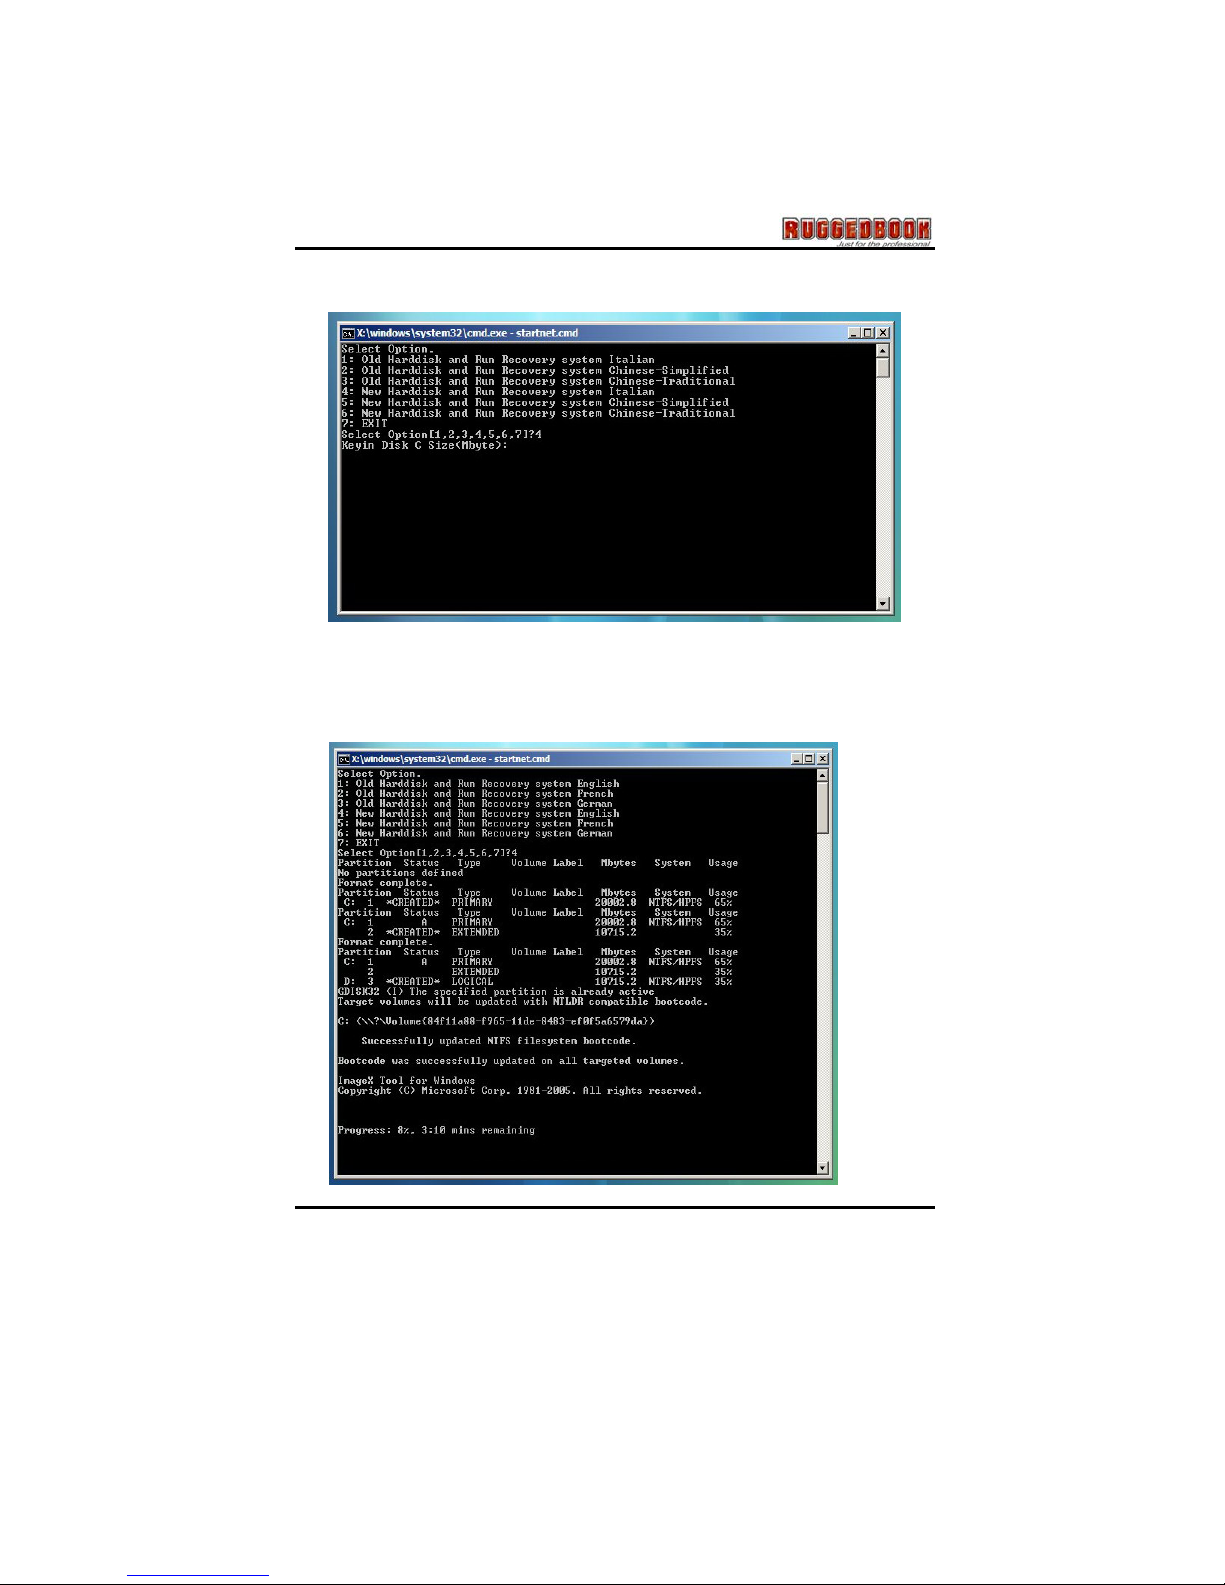
If your system language is Italian / Chinese-Simplified / ChineseTraditional, please follow below picture to go on this step:
9. When restore operation completed, the system will show below picture.
After seeing below message “Press any key to reboot sy stem”, you
can remove the service DVD from DVD-ROM and press any key to
reboot system.
37
Page 39

Chapter 5 - Utilities and Communication devices
38
CChhaapptteerr 55
UUttiilliittiieess aanndd
CCoommmmuunniiccaattiioonn
DDeevviicceess
Page 40
39
Utilities
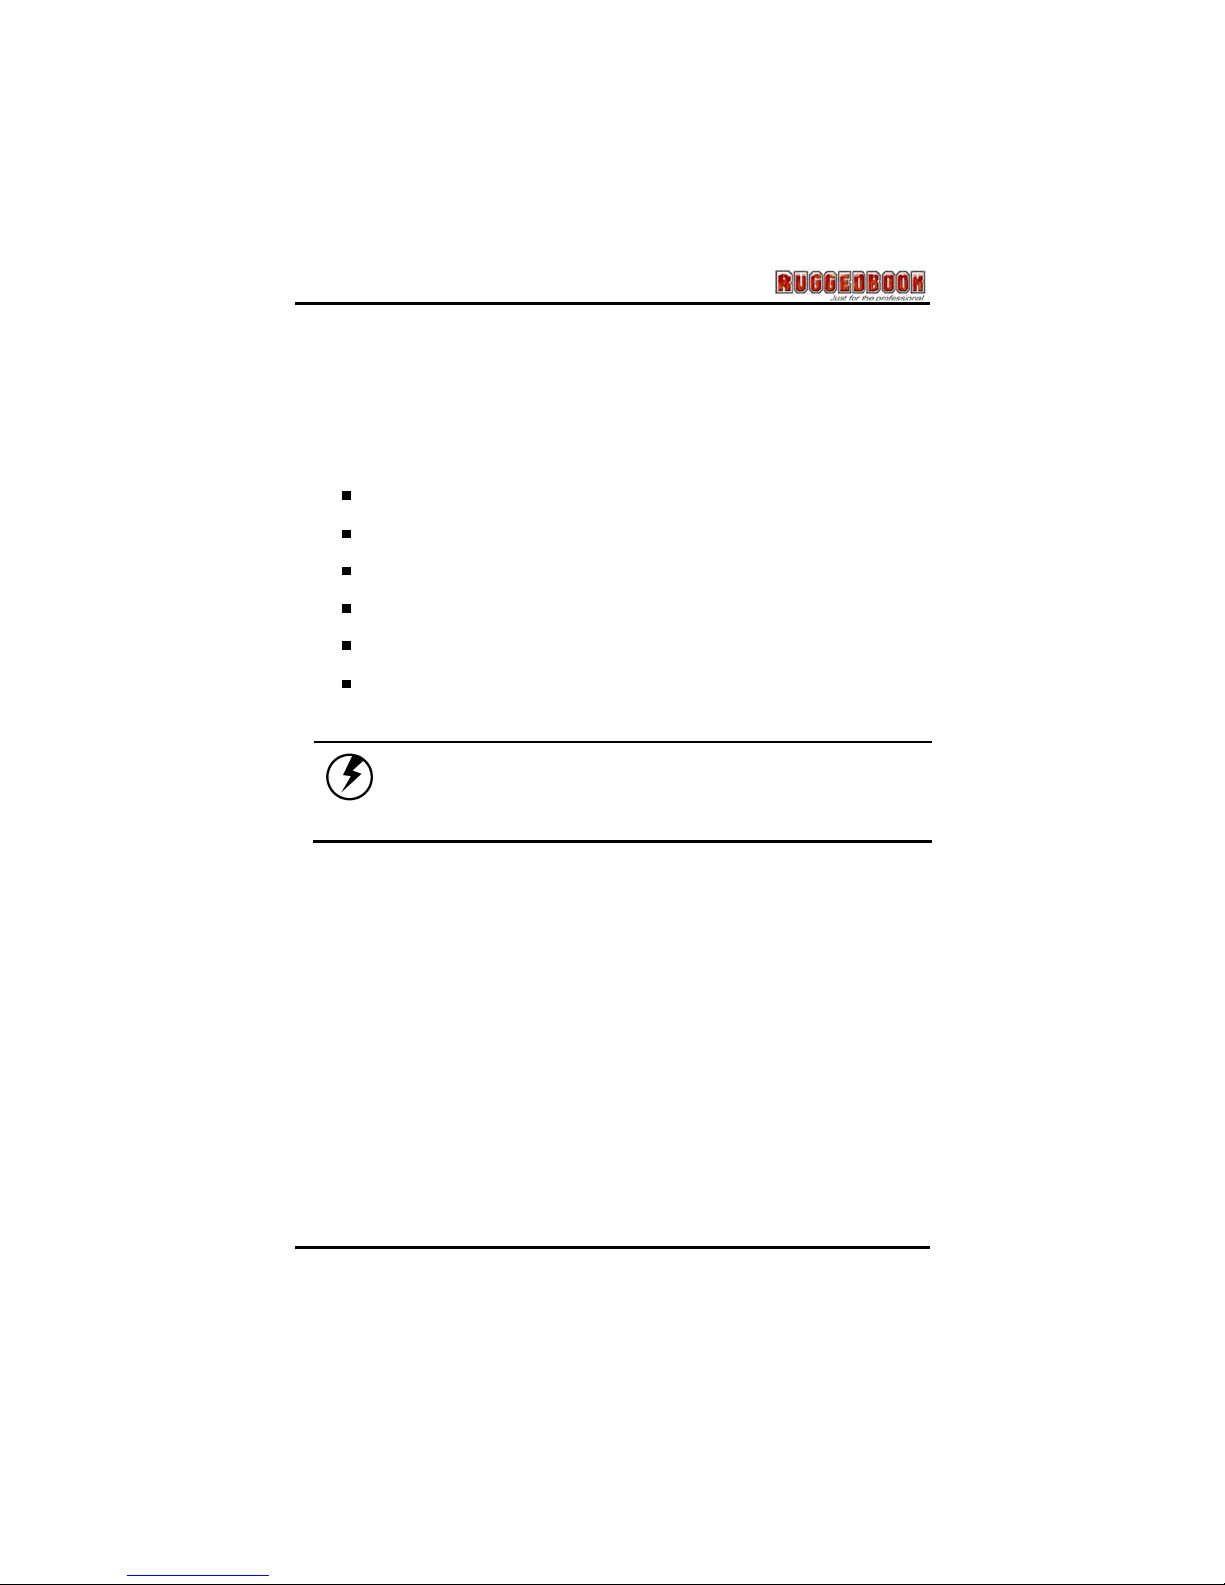
Utility List
Your hard drive already contains all the third-party communication
devices’ utility you can use on the Tablet PC.
Bluetooth
WLAN
GPS
Barcode Scanner
Camera
WWAN
Caution: All of the utilities on SR820 Tablet PC
have authorization to use, but only for your test,
SAMWELL will not preside over any other third-party
programs or software.
Page 41
Chapter 5 - Utilities and Communication devices
40
Bluetooth
Your SR820 Tablet PC is equipped with a Bluetooth device. By using
the Bluetooth function you can elimin ates the need for cables to
connect with other Bluetooth devic e.
Features
n Fully qualified Bluetooth v2.1 system
n Enhanced Data Rate(EDR) compliant for both 2Mbps and 3Mbps
supported
n Fully speed operation with Piconet and Scatternet support
n Implement 802.11 coexistence solution by AFH(Adjacent
Frequency Hopping), WCS(Wireless Coexistence System), and
Bluetooth Priority
Bluetooth Switch Button
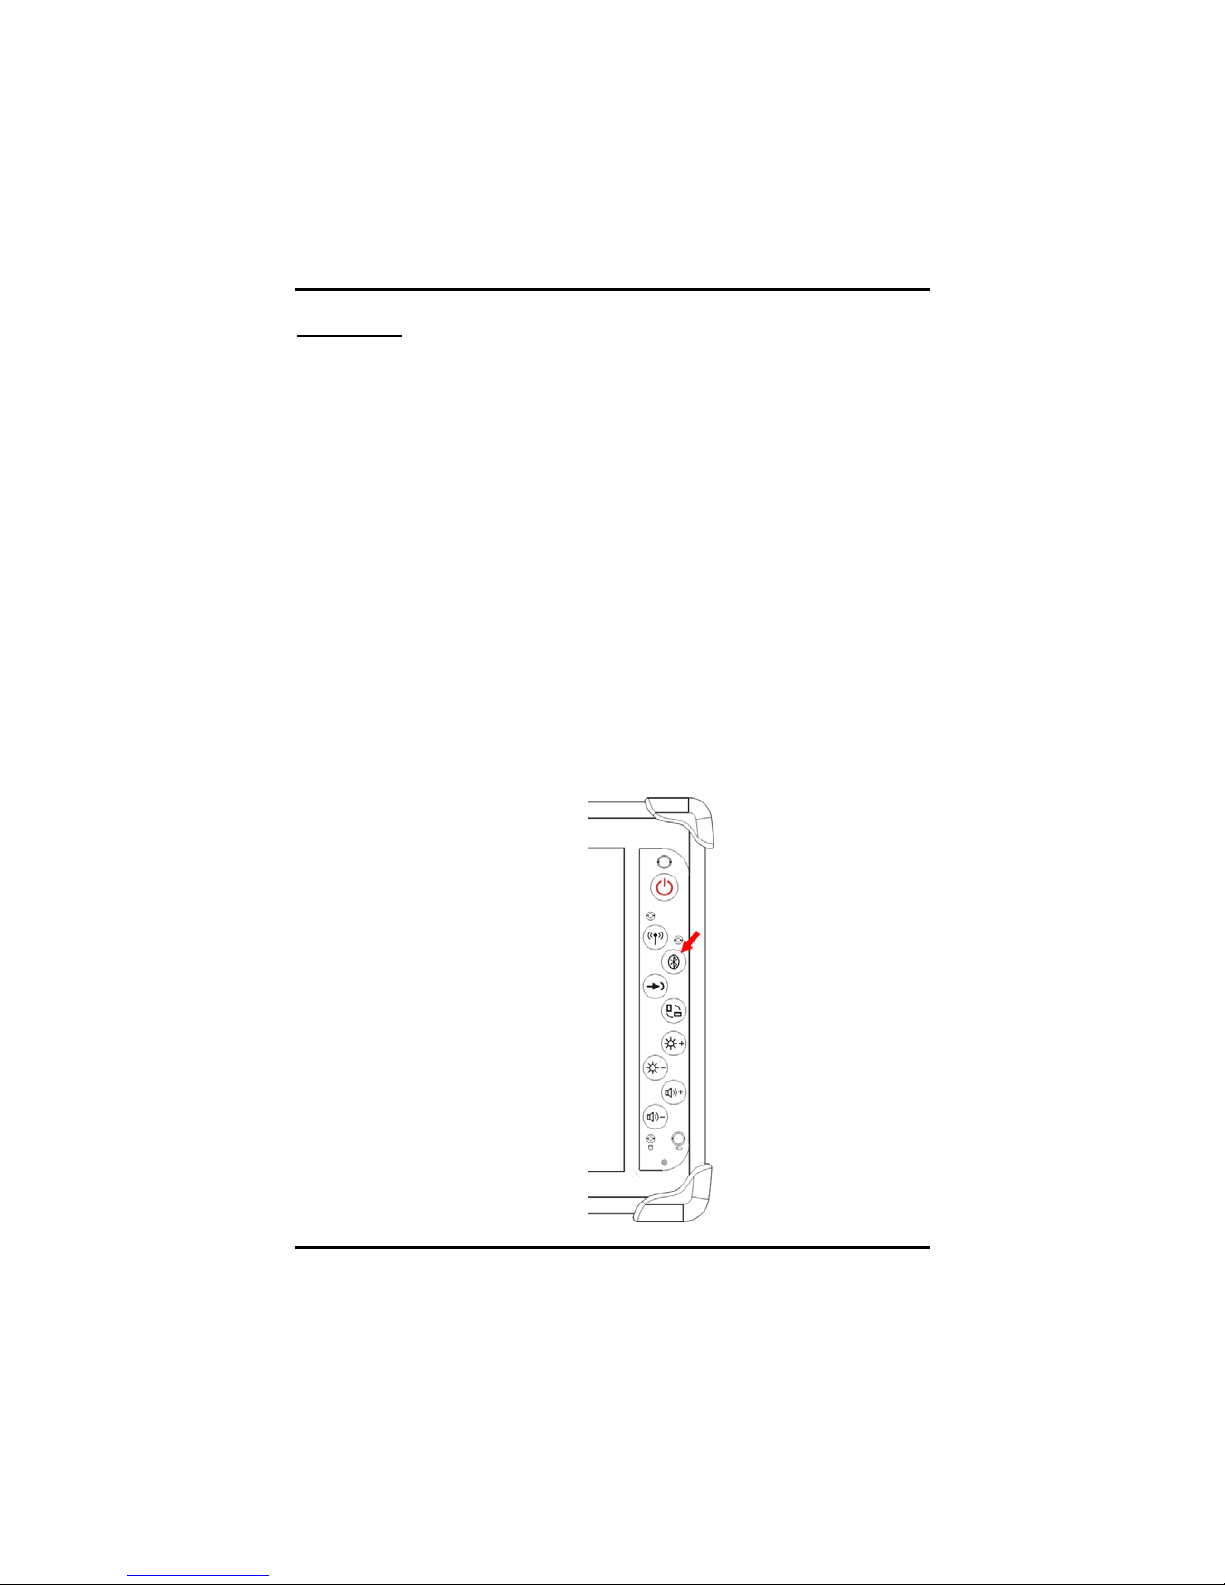
There is a Bluetooth switch button on the fron t panel of Tablet PC. You
can press Bluetooth switch button to toggle the Bluetooth On/Off. You
can also see the hotkey table at Chapter 2.
Page 42
41
Using Bluetooth
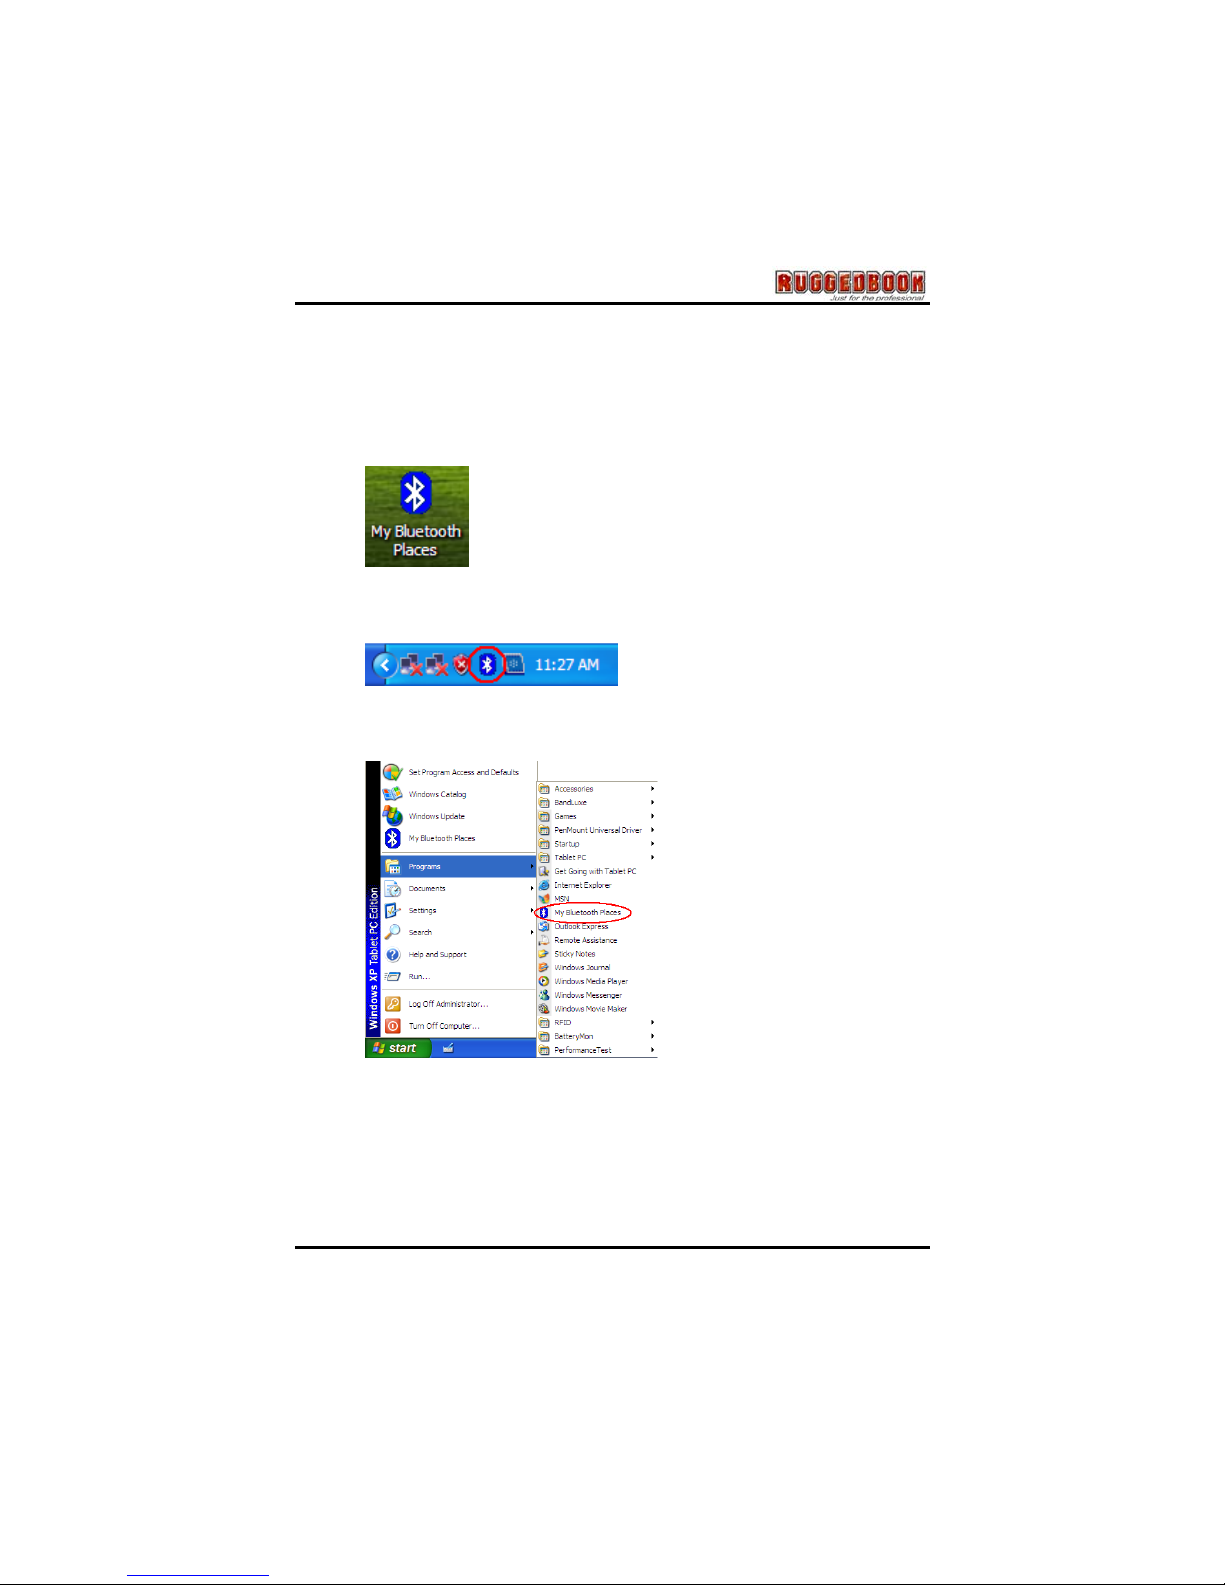
After you turn on the Bluetooth function via press the Bluetooth button
on front panel:
1. From Desktop: By double click “My Bluetooth Places” icon on the
desktop.
2. From Taskbar: By double click “My Bluetooth Places” icon on the
taskbar.
3. From Start Menu: By click “My Bluetooth Places” icon on “Start\
Programs\ My Bluetooth Places”.
Functions
1. Add a Bluetooth Device
2. View My Blue too th services
3. View devices in range
4. View or modify co nfiguration
Page 43
Chapter 5 - Utilities and Communication devices
42
WLAN
SR820 Tablet PC is equipped with a WLAN module. By using the
WLAN function you can eliminates the need for cables to connect to
the network.
Features
n Compliant with the IEEE 802.11n standard and compatible with
the IEEE 802.11b/g standard
n High speed wireless connection up to 300 Mbps data rate an d
long distance of connection range
n 2 antennas to support 1(Transmit) x2(Receive) MIMO technology
n Low power consumption and high performance
n Enhanced wireless security
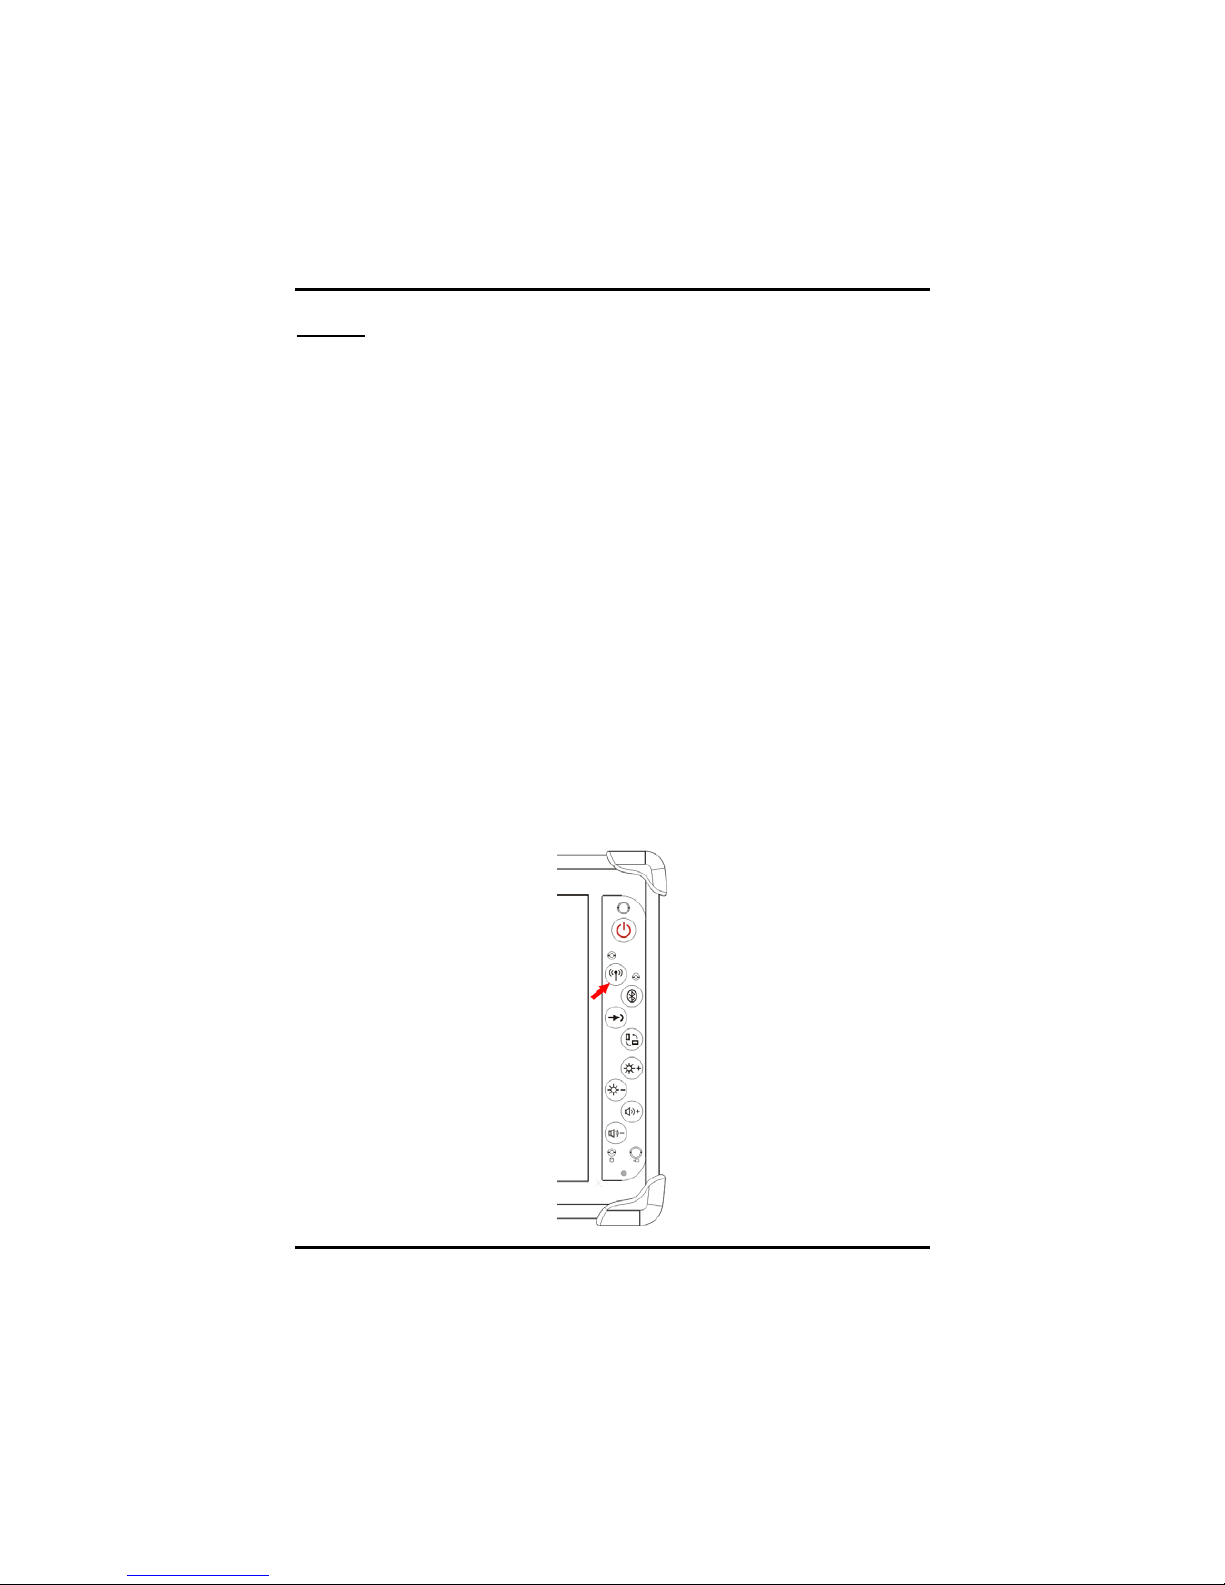
WLAN Switch Button
There is a WLAN switch button on the front panel of Tablet PC. You
can press WLAN Switch Button to toggle the WLAN On/Off. You can
also see the Hotkey Table at Page 20.
Page 44
43
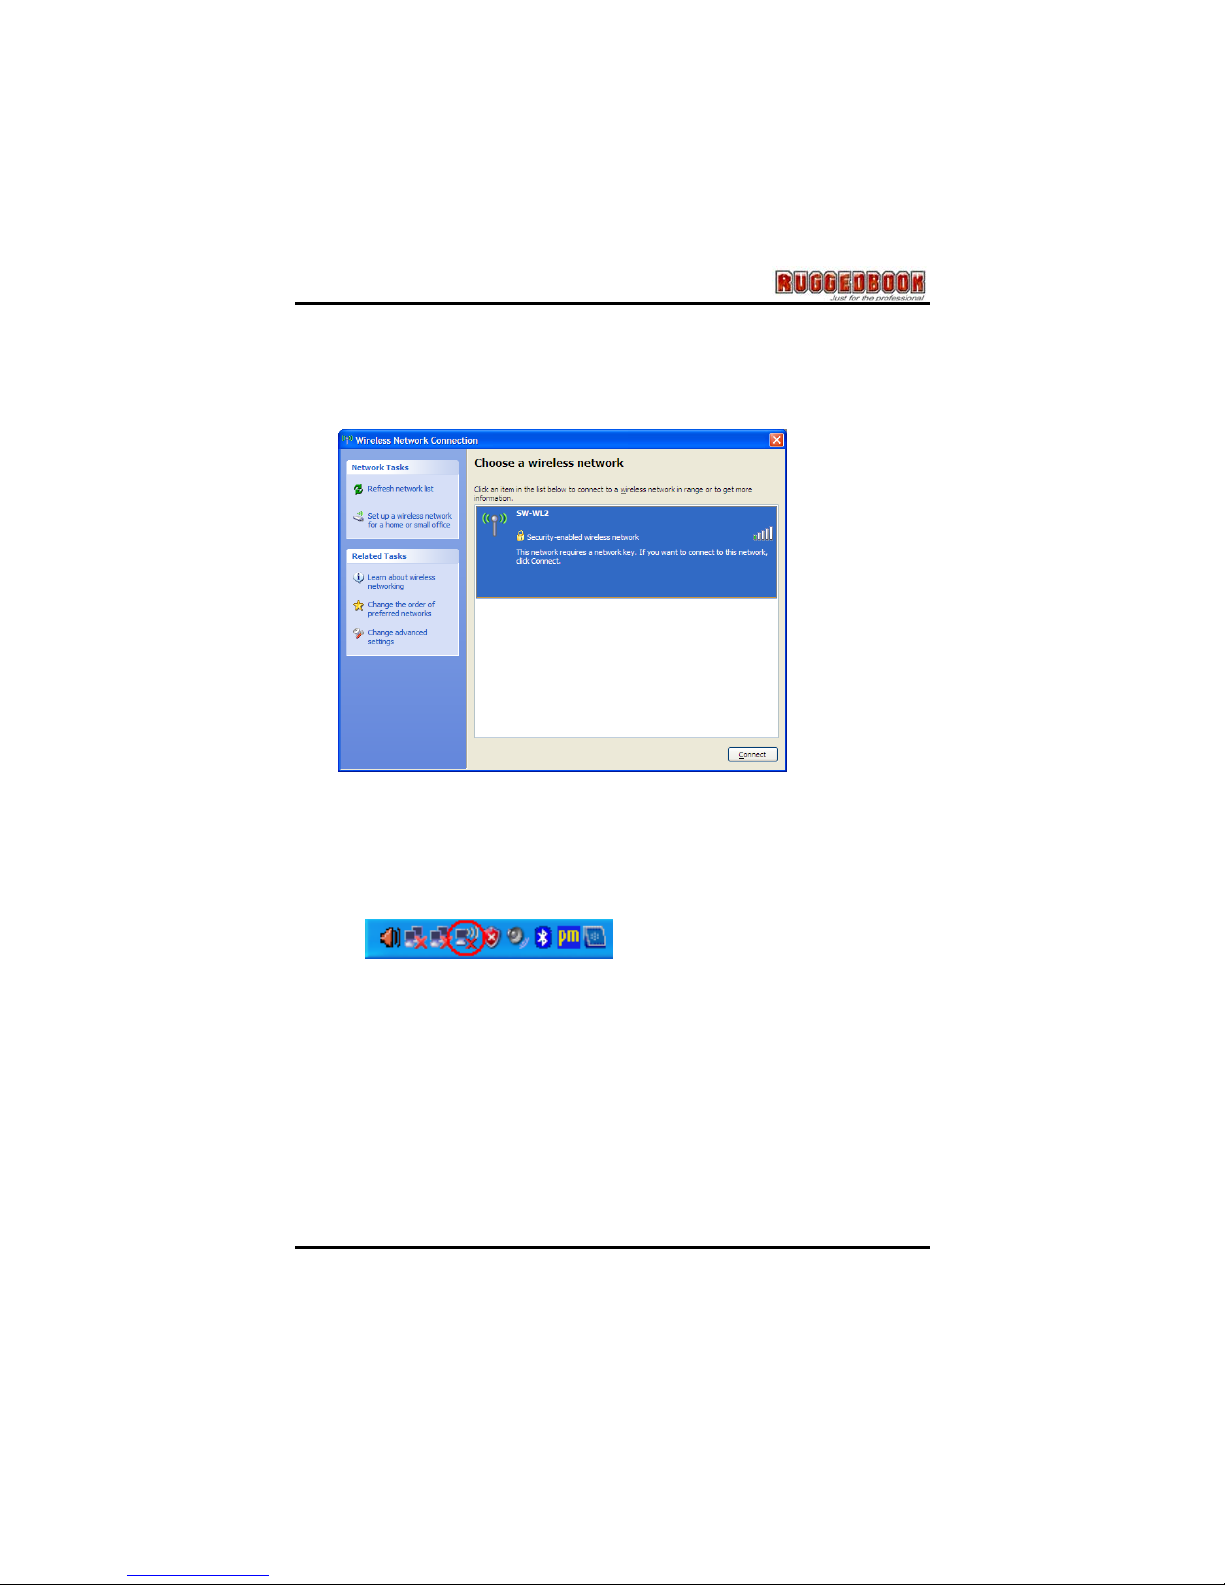
WLAN Utility
Microsoft provides a utility “Wireless Network Connection” that you can
search for the available wireless networks and set up wireless network
configuration.
Using WLAN
After turn on the WLAN function via Hotkey on the front panel:
1. From Taskbar: By double click “Wireless Network Connection” icon
on the taskbar.
Page 45
Chapter 5 - Utilities and Communication devices
44
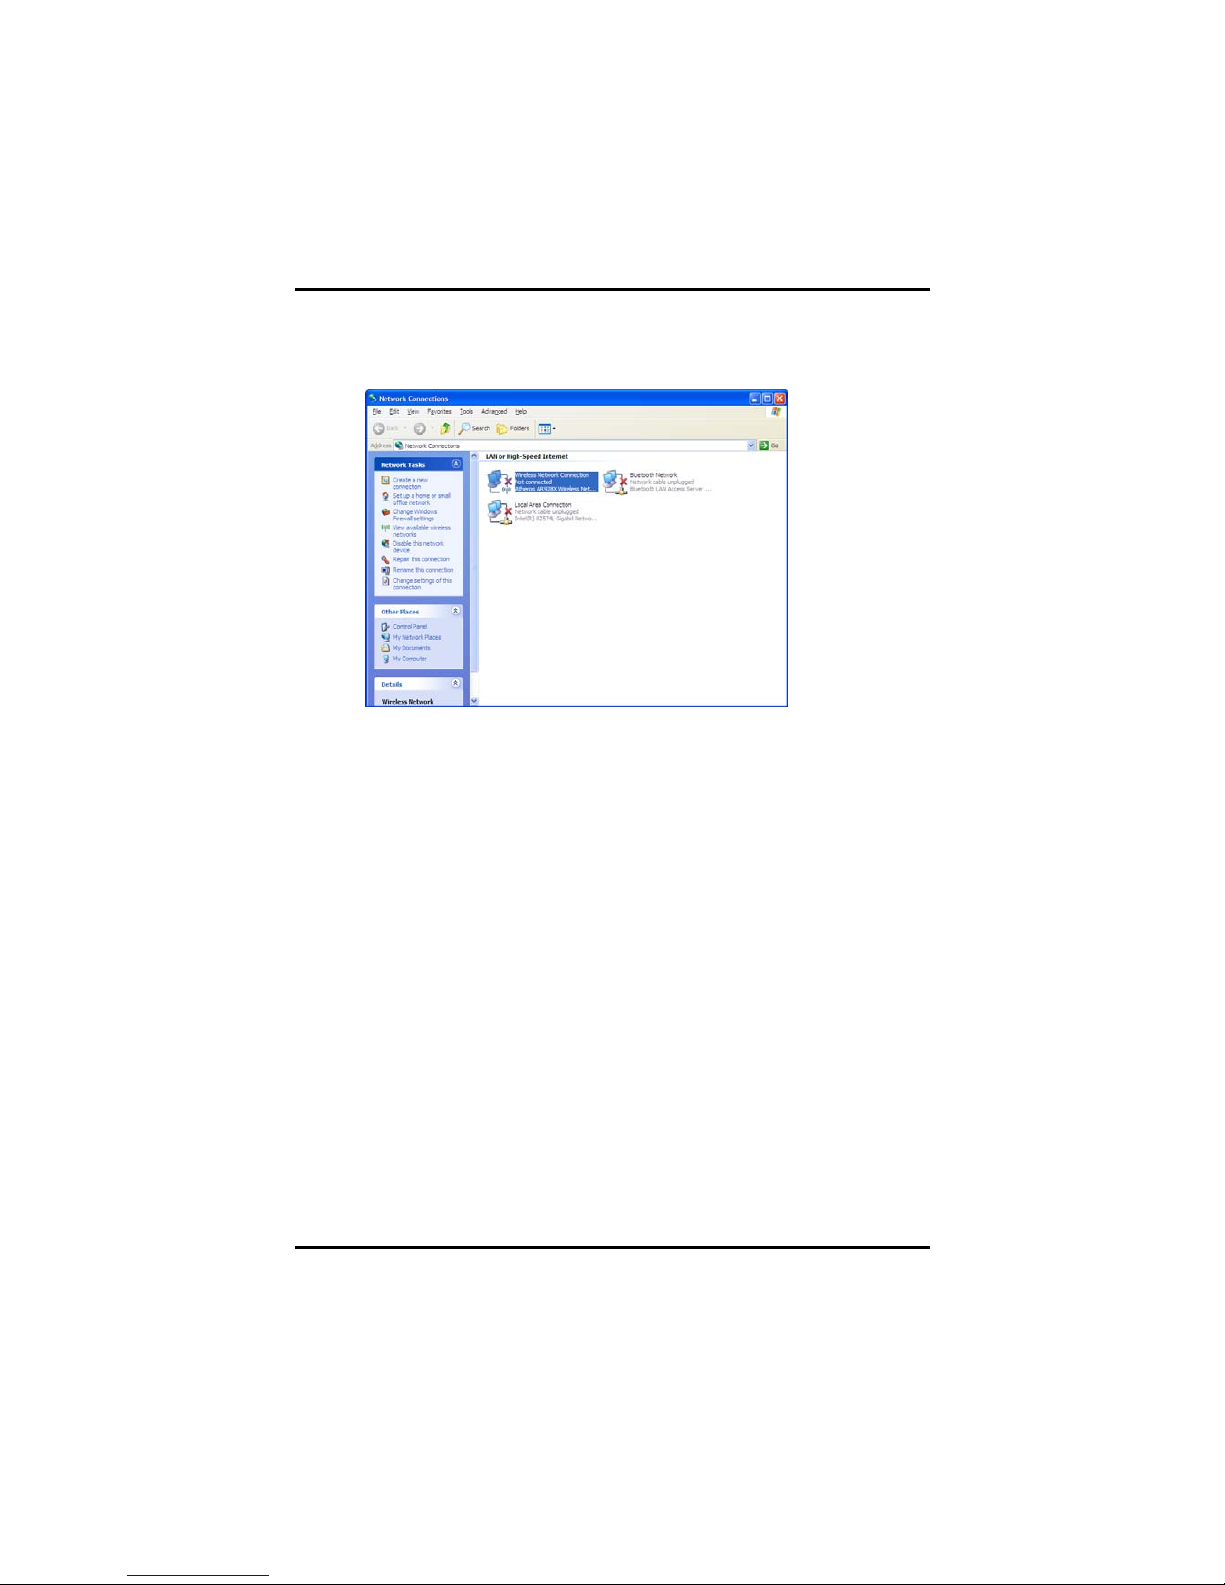
2. From Start Menu: By double click “Wireless Network Connection”
icon on “Start\ Settings\ Network Connections\ Wireless Network
Connection”.
Functions
1. Search for the available wireless networks
2. Connect with a wireless network
3. Set up a wireless network for a home or small office
4. Change the order of preferred networks
5. Change advanced settings
Page 46

45
GPS
SR820 Tablet PC is equipped with a GPS module. You can install
GPS navigation software to start navigating.
Features
n 50-channel u-blox 5 engine with over 1 million effective
correlators
n <1 second Time To First Fix for Hot and Aided Starts
n -160dBm SuperSense® acquisition and tracking sensitivit y
n Accelerated startup at weak signals for modules with KickStart
feature
n Supports AssistNow Online and AssistNow Offline A-GPS
services; OMA SUPL compliant
n High immunity to jamming
n 4 Hz position update rate
n High sensitivity ultra low power consumption cost efficient
n Supports external active antenna when it gets connected
n Allows weak signal tracking and positioning in severe
environments such as urban canyons and under deep foliage
Utility
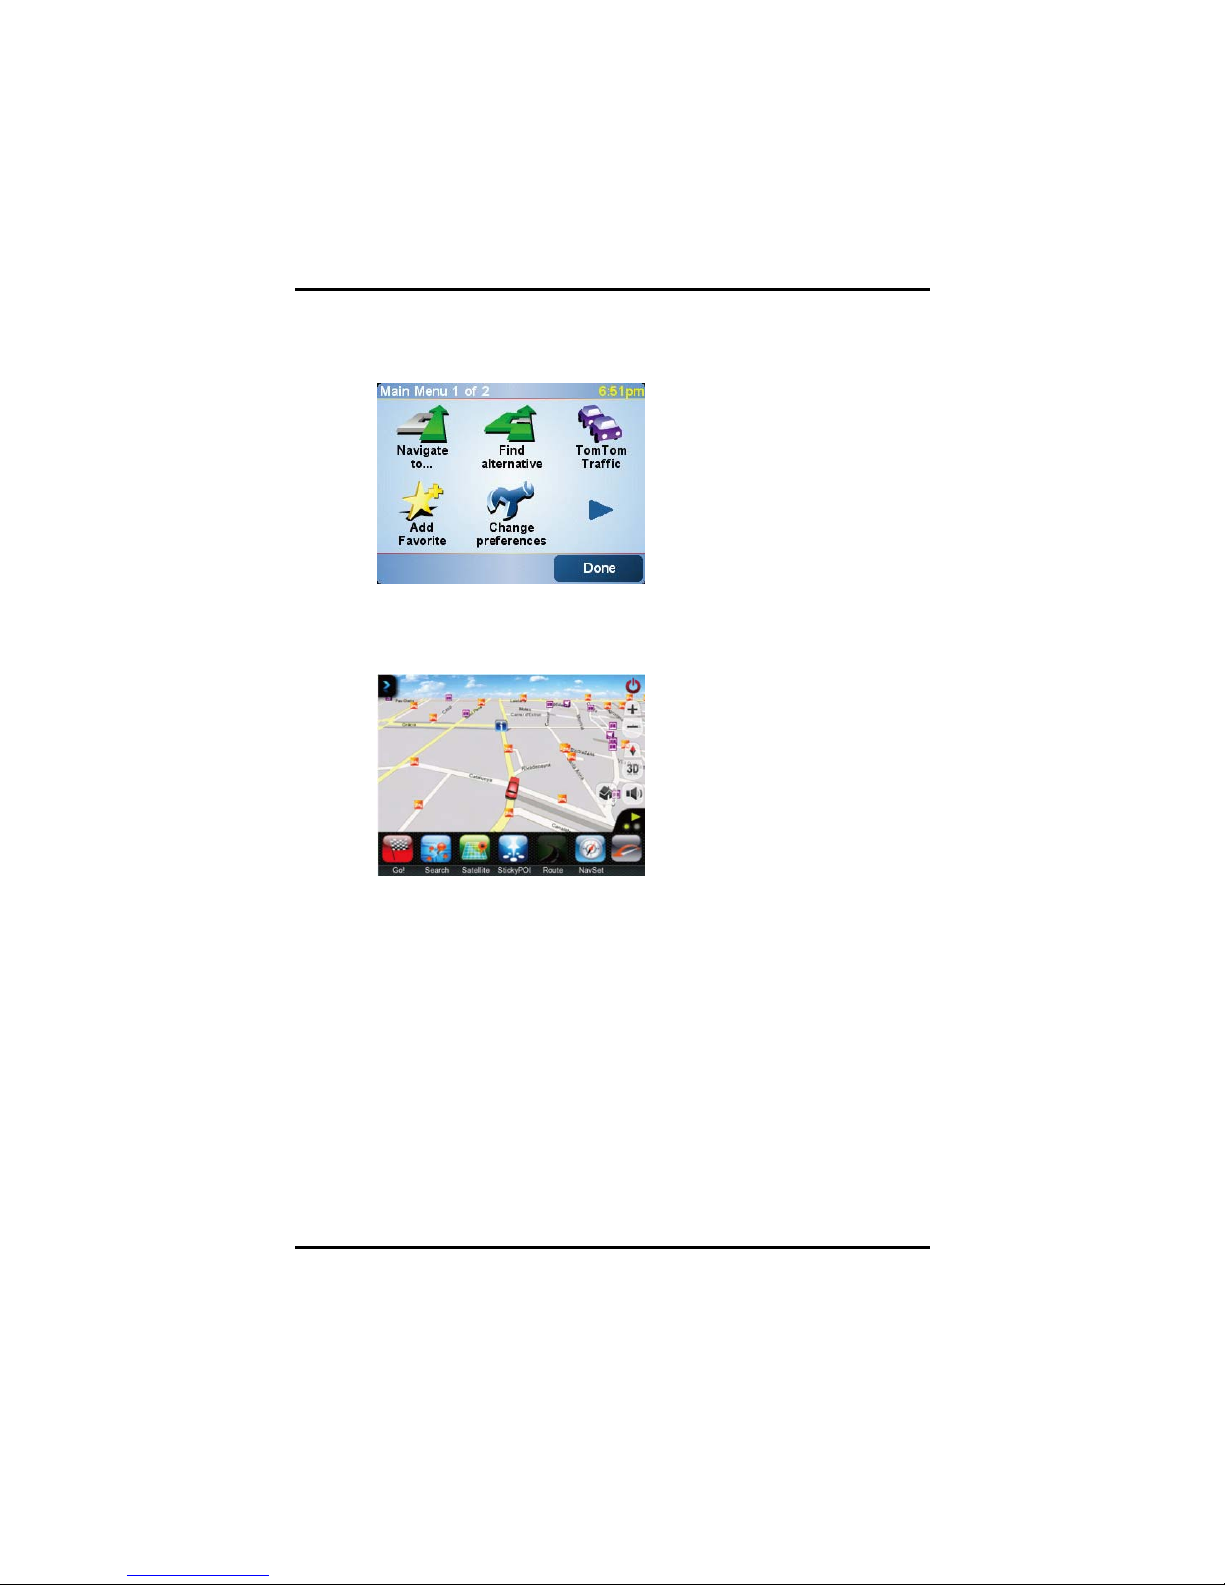
We don’t provide any GPS navigation software and utility with SR820.
You can purchase your own GPS navigation program by yourself.
SAMWELL will help you to setup your own GPS program. Below
graphics are program sample, you also can purchase navigation
program not at our list:
Page 47
Chapter 5 - Utilities and Communication devices
46
1. TomTom
n Web site :http://www.tomtom.com/
2. Destinator
n Web site :http://www.intrinsyc.com/
Page 48

47
Barcode Scanner
SR820 Tablet PC is equipped with a barcode scanner module.
Features
n Large working range
n Small and light scan engine
n 100 scans per second
n Scanning speed delivers aggressive performance and accurate
capture of all bar codes — even damaged and poor-quality.
n Low power consumption
n Bright scan line and "Aim" mode
n Programmable scan angle: Provides flexibility to cost-effectively
customize products for specific applications.
n RoHS-compliant
n Die-cast zinc chassis and single-board construction: Has a shock
rating of 2,000G for outstanding durability.
n Liquid Polymer scan element: Eliminates friction and wear for
superior reliability.
n Flash-upgradeable: Easy to upgrade software.
n Support 1D Barcode.
Support Barcode
The Tablet PC supports the following barcodes:
n UPC-A (Enable)
n UPC-E (Enable)
n UPC-E1 (Disable)
n EAN-8 (Enable)
n EAN-13 (Enable)
Page 49

Chapter 5 - Utilities and Communication devices
48
n Bookland EAN (Disable)
n Code 128 (Enable)
n Code 39 (Enable)
n Code 93 (Disable)
n Code 11 (Disable)
n Interleaved 2 of 5 (Enable)
n Discrete 2 of 5 (Disable)
n Chinese 2 of 5 (Disable)
n Codebar (Disable)
n MSI (Disable)
n RSS (Disable)
Utility
You can use “Scan Engine Demo” to scan barcode.
Using barcode scanner
1. Executes “ScanEngineDemo.exe” on Windows XP Embedded
desktop.
2. Go to “Start\ Programs\ Symbol Technologies\ SSI Demo
Application\ VB Demo” on Windows XP Embedded desktop.
How to Use
1. Executes “ScanEngineDemo.exe”.
2. Click “Connect” button.
3. Click “Pull Trigger” button. Then you can start scanning barcode.
Page 50
49
Camera Module
Your SR820 Tablet PC is equipped with a camera module. You can
use utility what bundled with Windows XP Embedded to take picture
and review. Beside you can use the camera module as a web camera
so you can use instance message software to ta lk an d watch whom
you are connecting to.
Utility
Microsoft provides a utility “Scanner and Camera Wizard” that you can
take and select pictures to copy. You can find out this item and fix the
setting via Control Panel from Windows XP Embedded desktop start
menu.
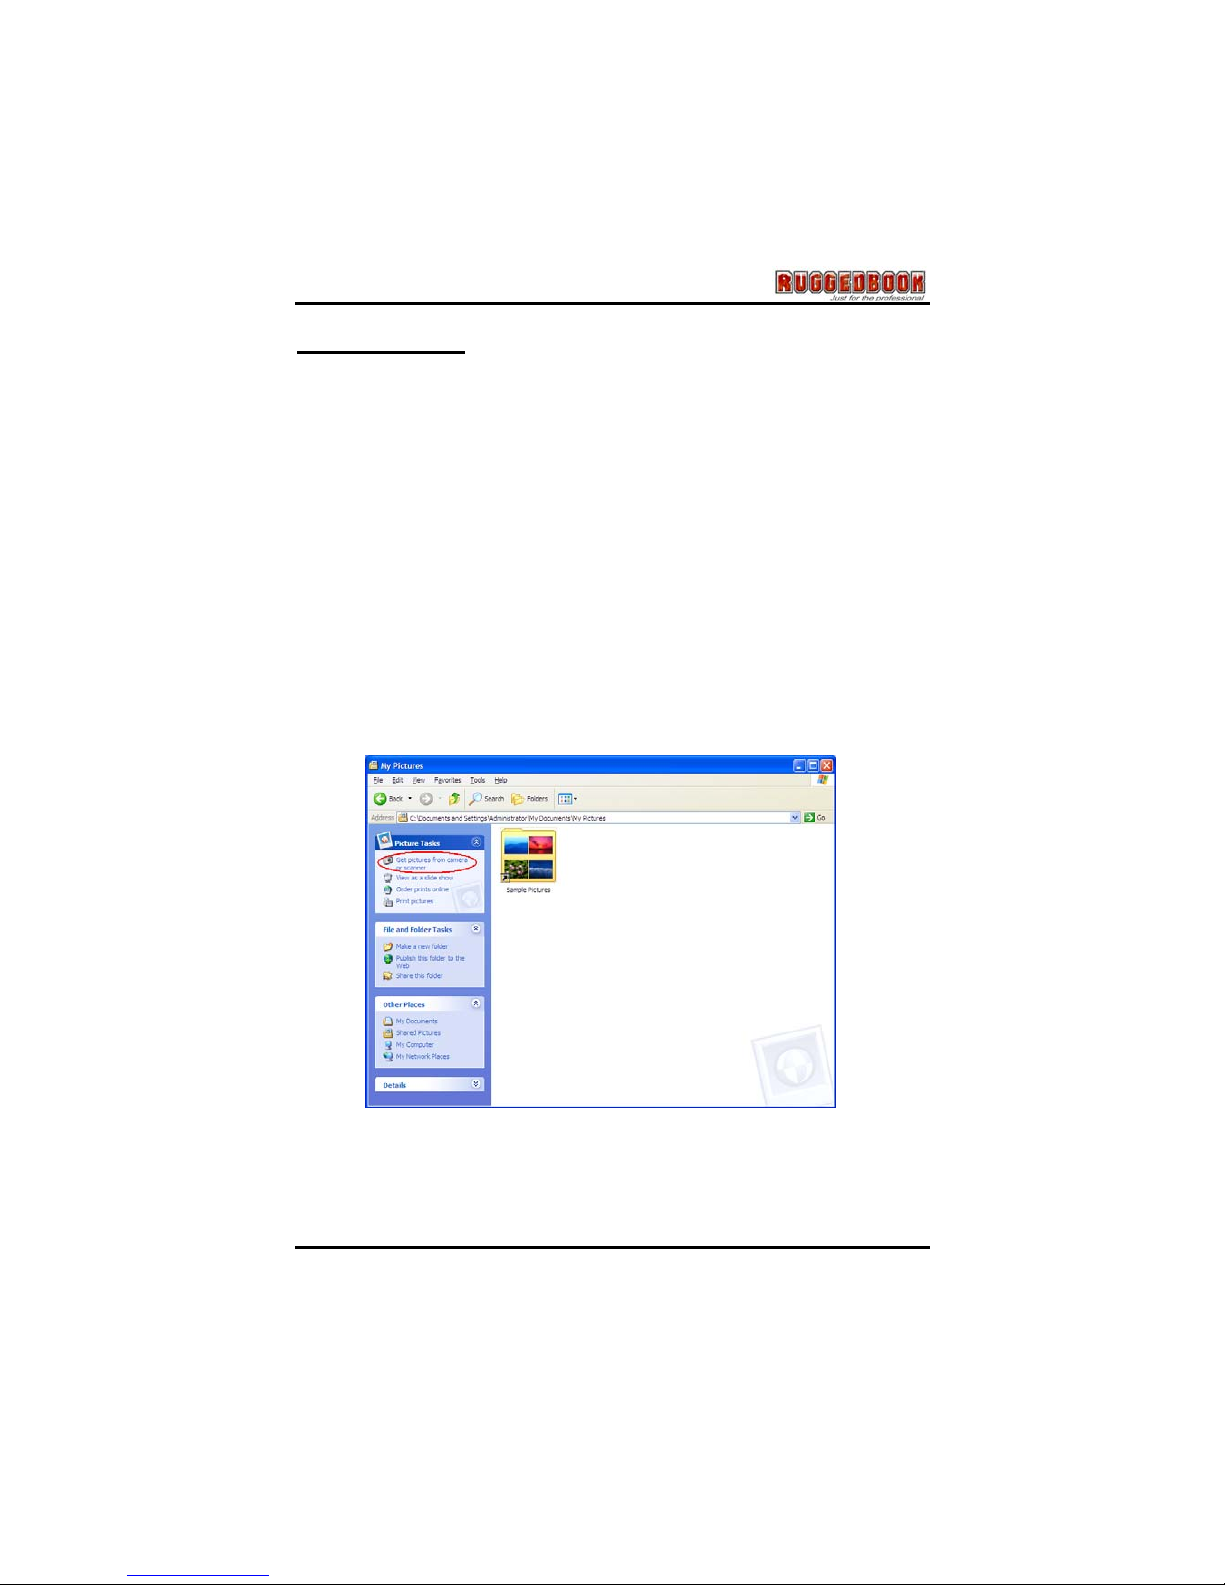
Using camera module
1. Open Explorer, and then go to “My Documents\ My Pictures” like
below graphic.
Page 51
Chapter 5 - Utilities and Communication devices
50
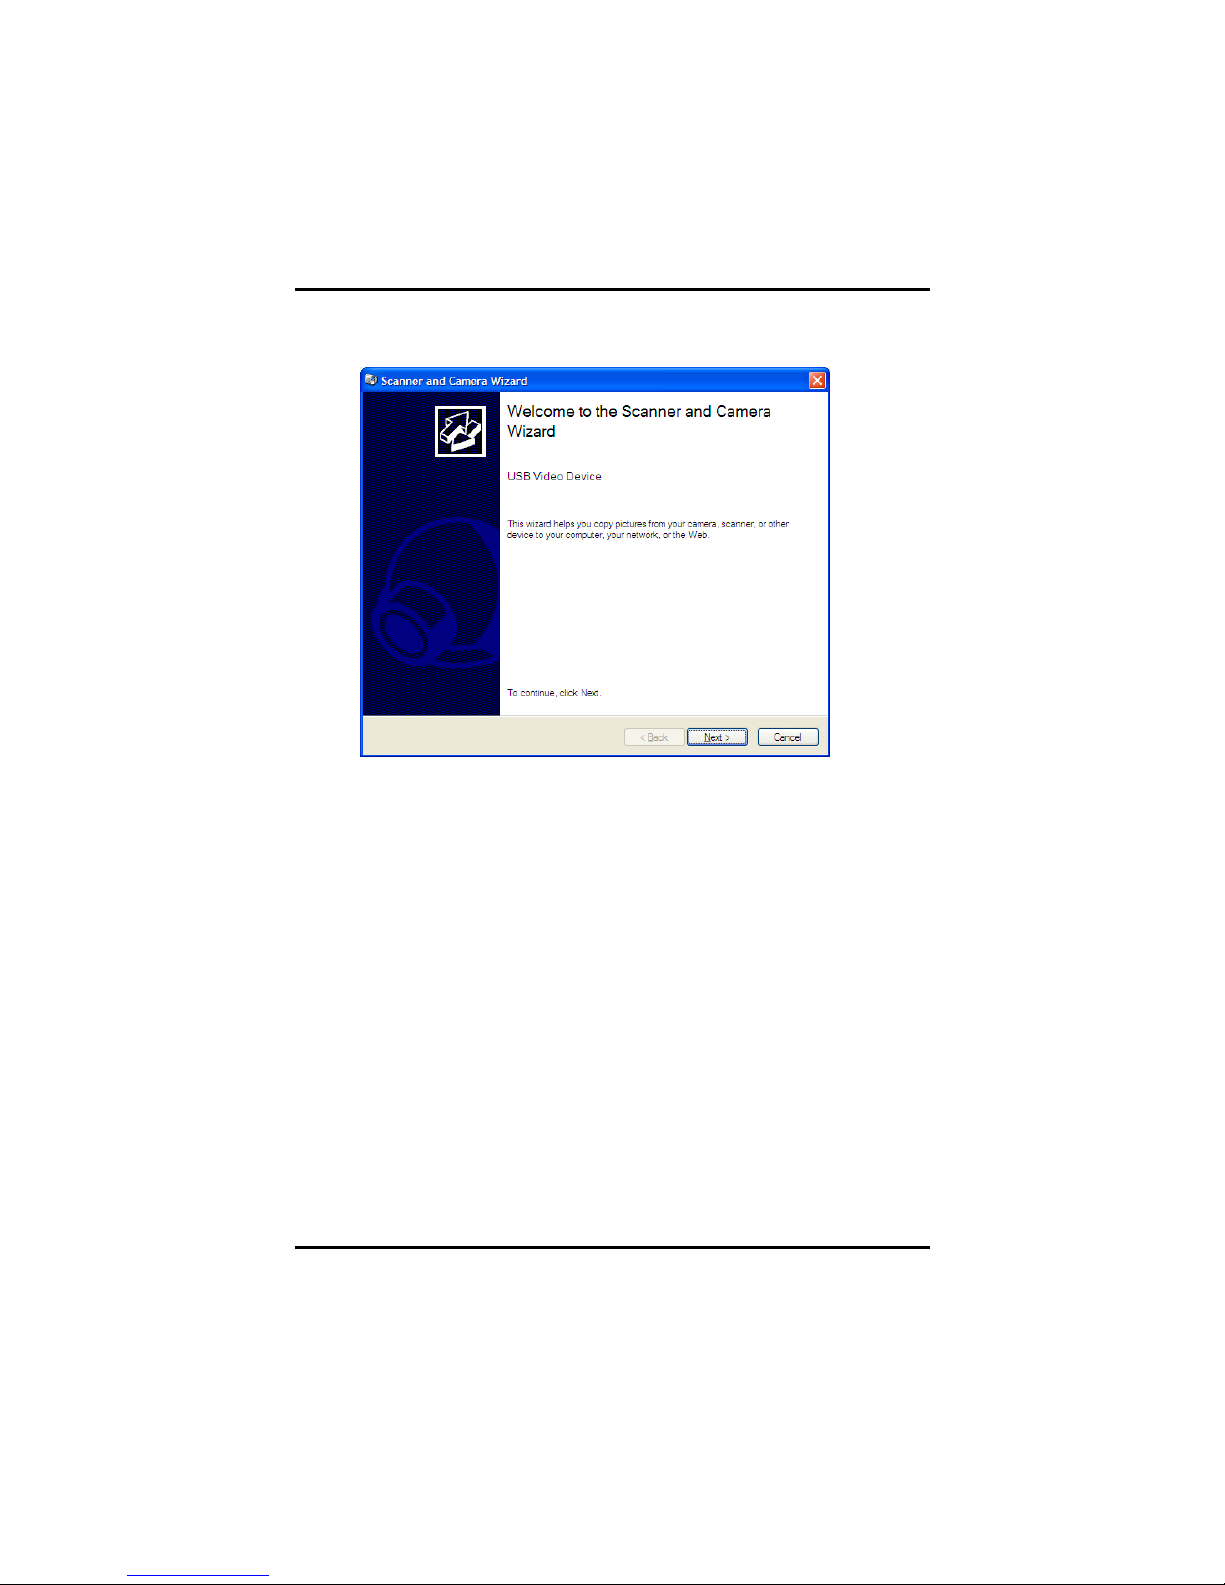
2. Click “Get pictures from camera or scanner”. Then you can see
below message
.
3. Click “Next” button. Then you can enter “Scanner and Camera
Wizard”.
Page 52

Appendix - Statements
51
AAppppeennddiixx
SSttaatteemmeennttss
Page 53

Appendix Statements
52
0BStatements
13BFederal Communication Commission Interference
Statement
This equipment has been tested and found to comply with the limits for a
Class B digital device, pursuant to Part 15 of the FCC Rules. These limits
are designed to provide reasonable protection against harmful
interference in a residential installation. This equipment generates uses
and can radiate radio frequency energy and, if not installed and used in
accordance with the instructions, may cause harmful interference to radio
communications. However, there is no guarantee that interference will not
occur in a particular installation. If this equipment does cause harmful
interference to radio or television reception, which can be determined by
turning the equipment off and on, the user is encouraged to try to correct
the interference by one of the following measures:
n Reorient or relocate the receiving antenna.
n Increase the separation between the equipment and receiver.
n Connect the equipment into an outlet on a circuit different from that to
which the receiver is connected.
n Consult the dealer or an experienced radio/TV technician for help.
FCC Caution: Any changes or modifications not expressly approved by
the party responsible for compliance could void the user's authority to
operate this equipment.
14BDeclaration of Conformity
This device complies with Part 15 of the FCC Rules. Operation is subject
to the following two conditions: (1) This device may not cause harmful
interference, and (2) this device must accept any interference received,
including interference that may cause undesired operation.
Page 54

53
This device and its antenna(s) must not be co-located or operating in
conjunction with any other antenna or transmitter.
Federal Communication Commission (FCC) Radiation
Exposure Statement
This EUT is compliance with SAR for general population/uncontrolled
exposure limits in ANSI/IEEE C95.1-1999 and had been tested in
accordance with the measurement methods and procedures specified in
OET Bulletin 65 Supplement C.
1BSafety CAUTION
To reduce the risk of fire, use only No. 26 AWG or larger
telecommunication line cord.
2BIMPORTANT SAFETY INSTRUCTIONS
When using your telephone equipment, basic safety precautions should
always be followed to reduce the risk of fire, electric shock and injury to
persons, including the following:
Do not use this product near water, for example, near a bathtub, wash
bowl, kitchen sink or laundry tub, in a wet basement or near a swimming
pool.
Avoid using a telephone (other than a cordless type) during an electrical
storm. There may be a remote risk of electric shock from lightning.
Do not use the telephone to report a gas leak in the vicinity of the leak.
Use only the power cord and batteries indicated in this manual. Do not
dispose of batteries in a fire. They may explode. Check with local codes
for possible special disposal instructions.
3BCanadian Department of Communications
This class B digital apparatus meets all requirements of the Canadian
Interference-causing Equipment Regulations.
Page 55

Appendix Statements
54
4BCAUTION FOR ADAPTER
This tablet pc is for use with model adp-36ch
5BBATTERY CAUTION
Danger of explosion if battery is incorrectly replaced.
Replace only with the same or equivalent type recommended by the
manufacturer. Dispose of used batteries according to the manufacturer's
instructions.
6BRegulatory information / Disclaimers
Installation and use of this Wireless LAN device must be in strict
accordance with the instructions included in the user documentation
provided with the product. Any changes or modifications (including the
antennas) made to this device that are not expressly approved by the
manufacturer may void the user’s authority to operate the equipment. The
manufacturer is not responsible for any radio or television interference
caused by unauthorized modification of this device, or the substitution of
the connecting cables and equipment other than manufacturer specified. It
is the responsibility of the user to correct any interference caused by such
unauthorized modification, substitution or attachment. Manufacturer and
its authorized resellers or distributors will assume no liability for any
damage or violation of government regulations arising from failing to
comply with these guidelines.
7BIMPORTANT NOTE (CO-LOCATION)
FCC RF Radiation Exposure Statement: This equipment complies with
FCC RF radiation exposure limits set forth for an uncontrolled environment.
This device and its antenna must not be co-located or operating in
conjunction with any other antenna or transmitter.
8BSAR Exposure
This device has been tested for compliance with FCC RF Exposure (SAR)
limits in typical flat configurations.
Page 56

55
In order to comply with SAR limits established in the ANSI C95.1
standards, it is recommended when using a device that the integrated
antenna is positioned more than 1.5cm from your body or nearby persons
during extended periods of operation. If the antenna is positioned less
than 1.5cm from the user, it is recommended that the user limit the
exposure time.
9BWLAN
“To prevent radio interference to the licensed service, this device is
intended to be operated indoors and away from windows to provide
maximum shielding. Equipment (or its transmit antenna) that is installed
outdoors is subject to licensing.”
10BFor LPD
“Operation is subject to the following two conditions: (1) this device may
not cause interference, and (2) this device must accept any interference,
including interference that may cause undesired operation of the device.”
11BW/detachable antenna
“To reduce potential radio interference to other users, the antenna type
and its gain should be so chosen that the equivalent isotropically radiated
power (EIRP) is not more than that required for successful
communication.”
This Class B digital apparatus complies with Canada RSS-210.
Cet appareil numérique de la classe B est conforme à la norme CNR-210
du Canada
The abbreviation, IC, before the registration number signifies that
registration was performed based on a Declaration of Conformity
indicating that Industry Canada technical specifications were met. It does
not imply that Industry Canada approved the equipment. (DoC)
The term “IC:” before the certification/registration number only signifies
that the Industry Canada technical specifications were met.
Page 57

Appendix Statements
56
12BLaser Safety Statement
The SE950 and SE955 scan engines offer integrators a significant
advantage in both reduced time to market and simplified regulatory
testing and approvals. The engines contain a full suite of host independent
fault protection mechanisms and have been proven to stay
within classification during operation and single fault conditions as
required by EN/IEC 60950.* Because this testing was performed
by an independent accredited laboratory, integrators placing the engine in
most ITE (Information Technology Equipment) products
should not need to undergo the significant single-point failure testing that
would normally be required for laser safety compliance
(certain types of products aimed at medical, military, or other specialty
markets may require additional testing). Additionally, the scan
engines do not require any beam attenuation (via scanning window
attenuation, distance-based attenuation, or other electronic
controls) to meet their laser power classification, provided that the
product’s laser classification matches the engine.
Symbol will also provide you with the documentation you need to speed
through your regulatory approvals. We will provide:
• Initial EN/IEC 60825-1 certificates showing classification and restrictions
to aid development efforts (restrictions include
labeling and other product level restrictions that are impossible to
implement on the component engine itself)*.
• FDA Accession number
• EN/IEC 60950-1 Certificates
• Proof of UL 60950-1 Recognition
• Symbol will provide copies of the EN/IEC 60825-1 laser safety test
reports to your laser/product safety test laboratory upon
receipt of a standard NDA agreement signed by both the lab and Symbol.
Page 58

57
• Upon request, Symbol will also provide copies of the UL Recognition
report and/or the European and CB Scheme EN/IEC
60950-1 report to your laser/product safety test laboratory upon receipt of
a standard NDA agreement signed by both the
lab and Symbol.
Note that some specialty markets such as medical, military, or other
specialty markets may have more specialized regulatory controls,
and may require additional tests to be performed.
* The Class 2 SE950 has one usage restriction: In order to maintain
classification, the AIM mode input from the host cannot be active
for more than 5 seconds at a time.
 Loading...