

Page 1
I
User’s Guide
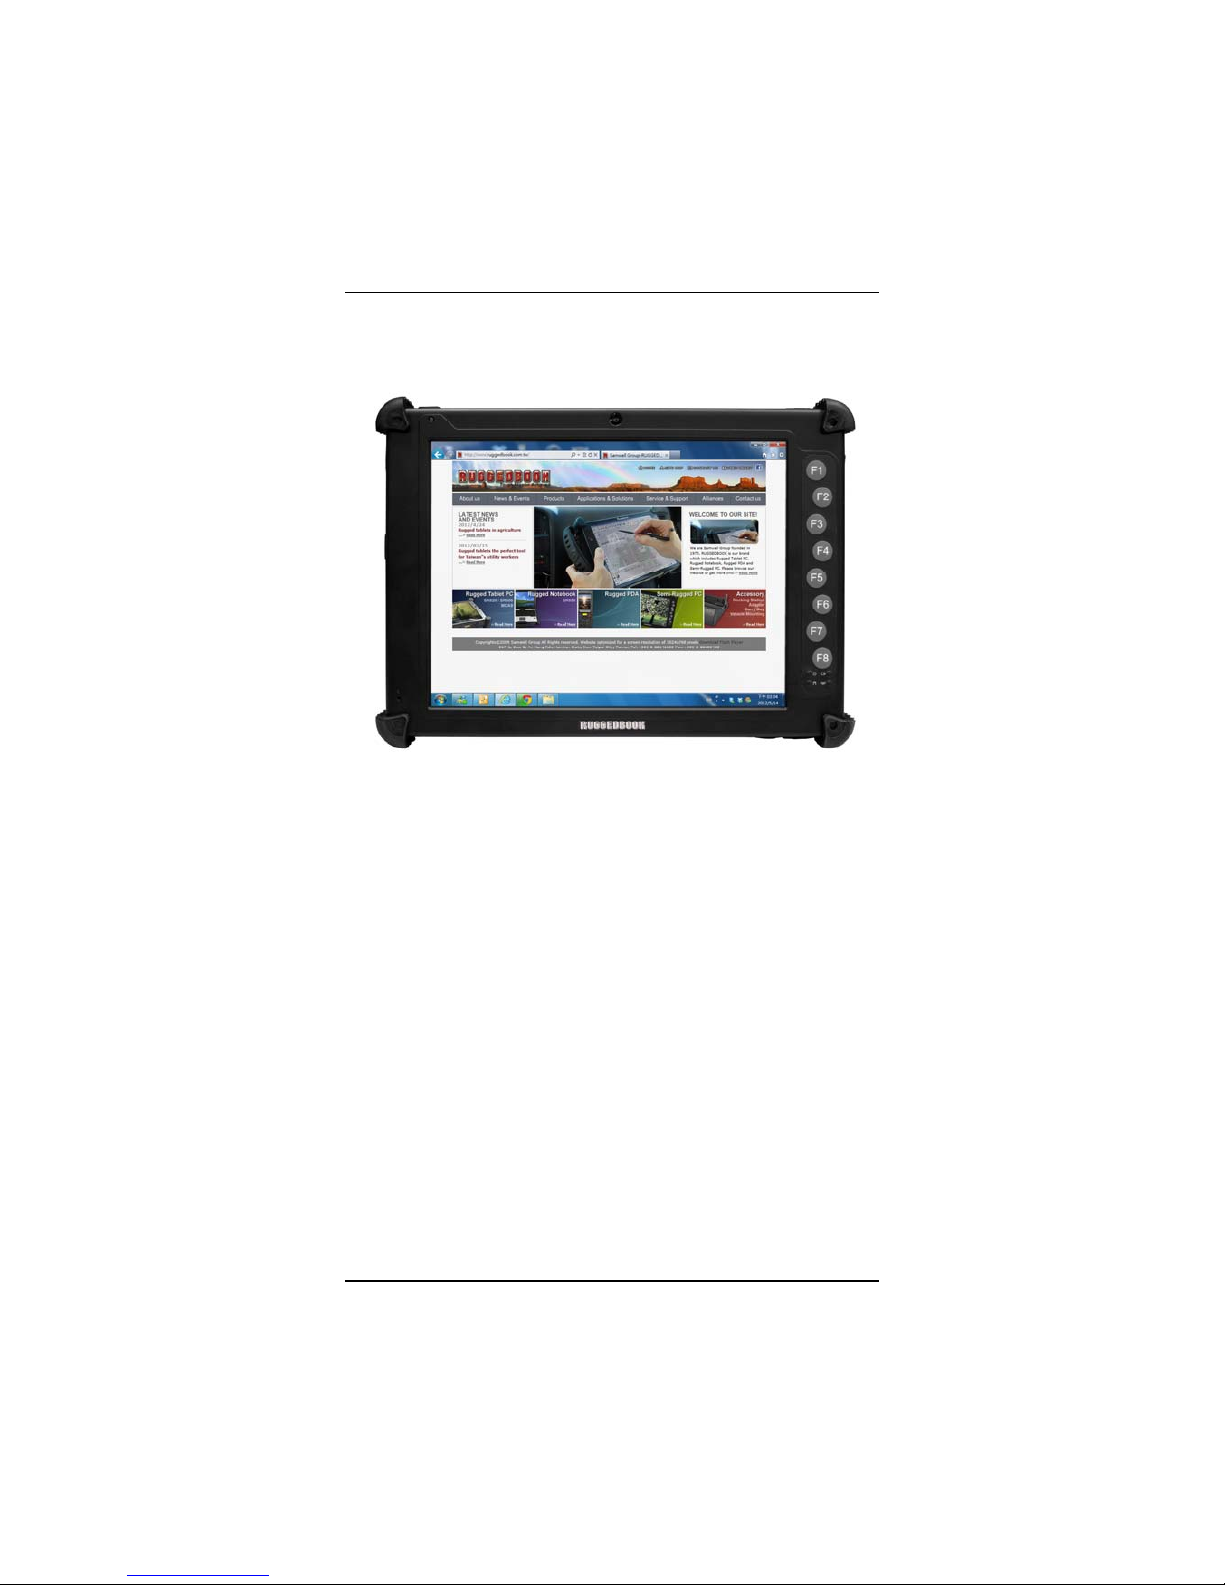
750 Series
Semi-Rugged Tablet PC
Page 2

1
Preface
© Copyright 2012. All Rights Reserved.
The information in this document is subject to change without prior
notice in order to improve reliability, design and function and does not
represent a commitment on the part of the manufacturer.
In no event will the manufacturer be liable for direct, indirect, special,
incidental, or consequential damages arising out of the use or inability
to use the product or documentation, even if advised of the possibility
of such damages.
This document contains proprietary information protected by copyright.
All rights are reserved. No part of this manual may be reproduced by
any mechanical, electronic, or other means in any form without prior
written permission from the manufacturer.
SAMWELL INTERNATIONAL INC.
317-1, Sec.2, An Kang Rd., Hsintien, Taipei 231, Taiwan
Tel: 886-2-2214-1133
Fax: 886-2-2215-5458
www.samwellg.com
Trademarks
SAMWELL and 750 are of Sand Dune Ventures, Inc. IBM, OS/2, and
VGA are trademarks of International Business Machines Corp.
Windows, Word, MS-DOS, and Microsoft are trademarks of Microsoft
Corp. VESA is a trademark of Video Electronics Standards
Association.
Other product names mentioned herein are used for identification
purposes only and may be trademarks and/or registered trademarks of
their respective companies in the USA and worldwide.
Limitation of Liability
While reasonable efforts have been made to ensure the accuracy of this
manual, the manufacturer and distributor assume no liability resulting
from errors or omissions in this manual, or from the use of the
information contained herein.
User Guide rev. 001 – 6/01/2012
Page 3

2
Before you Start
CONVENTIONS OF THIS MANUAL
This manual is intended to help you get the most from your new 750
Series Semi-Rugged Tablet Personal Computer.
If you are an experienced user of computers and / or
Microsoft’s Windows operating systems, you might find it
useful to read the Getting Started Guide that is included in
your package.
If you are a less experienced user, we recommend that you
read through this manual carefully before using your system.
Whether or not you are an experienced user, you should refer to the
Troubleshooting chapter if you encounter any problems with 750.
SAFETY PRECAUTIONS
This section is designed to assist you in identifying potentially unsafe
conditions while working with this product. Required safety features
have been installed in the computer to protect you from injury.
However, you should use good judgment to identify potential safety
hazards:
1. Please read these safety instructions carefully.
2. Please keep this User's Guide for later reference.
3. Please disconnect this equipment from AC outlet before cleaning.
Don't use liquid or sprayed detergent for cleaning. Use moisture
sheet or cloth for cleaning.
4. For pluggable equipment, that the socket-outlet shall be installed
near the equipment and shall be easily accessible.
5. Please keep this equipment from excessive humidity.
6. Handle with care. A drop or fall could cause damage.
7. Make sure to use the right voltage for the power source when
connecting the equipment to the power outlet.
8. Place the power cord in such a way that people can not step on it.
Do not place anything on top of the power cord.
9. All cautions and warnings on the equipment should be noted.
10. If the equipment is not use for a long time, disconnect the
equipment from the main power outlet to avoid being damaged by
transient over voltage.
11. Never pour any liquid into the opening, this could cause fire or
electrical shock.
12. Never open the equipment. For safety reasons, the equipment
should only be opened by a qualified service personnel.
Page 4

3
13. If any of the following situations arise, have the equipment checked
by a service personnel:
a.
The Power cord or plug is damaged.
b. Liquid has penetrated into the equipment.
c. The equipment has been exposed to moisture.
d. The equipment has not worked well or you cannot get it
working according to the user's guide.
e. The equipment has dropped and is damaged.
f. If the equipment has obvious signs of breakage.
14. Do not leave this equipment in an environment unconditioned,
storage temperature above 60℃ (140℉), it may damage the
equipment.
15. The unit can be operated at a maximum ambient temperature of 35°
C (95° F).
16. The sound pressure level at the operators position according to IEC
704-1:1982 is equal or less than 70 dB(A).
17. Power Cord Requirements
The power cord set used with the AC adapter must meet the
requirements of the country where you use the AC adapter, and
whether it is 100-120 or 200-240 Vac. The following information
explains the requirements for power cord set selection.
5 The cord set must be approved for the country in which it is
used.
5 The appliance coupler must have a configuration for mating
with a CEE22/EN6032/IEC 320 appliance inlet.
A. For U.S. and Canada:
5 The cord set must be UL Listed and CSA Certified.
5 The minimum specifications for the flexible cord are No. 18
AWG.
18. When using the unit in conjunction with telephone equipment, basic
safety precautions should always be followed to reduce the risk of
fire, electric shock and injury to persons. These precautions includes
the following:
5 Do not use this product near water, for example, near a
bathtub, washbowl, kitchen sink, or laundry tub, in a wet
basement or near a swimming pool.
5 Avoid using a telephone (other than a cordless type) during
an electrical storm. There may be a remote risk of electric
shock from lightning.
5 Do not use the telephone to report a gas leak in the vicinity of
the leak.
5 Use only the power cord indicated in this manual.
19. Do not use the AC adapter near open water or other liquids. Never
spill liquid into the AC adapter.
Page 5

4
20. Laser Warning: Laser Class I Product Caution - Invisible laser
radiation when open avoid exposure to beam.
21. Danger of explosion if battery is incorrectly replaced. Replace only
with the same or equivalent type recommended by the manufacturer.
Dispose of used batteries according to the manufacturer's instructions
or in accordance with local law. Never remove the battery pack while
the power is on as this may result in data loss when the system loses
power.
22. The input receptacle is used as the main disconnecting device.
Page 6
5
THINGS YOU MUST REMEMBER BEFORE WORKING ON YOUR
COMPUTER
LET YOUR COMPUTER ACCLIMATE ITSELF
Your computer can easily stand temperature extremes but it doesn’t
like rapid changes in temperature, like going from the cold outdoors to
a warm office. Rapid changes in temperature can cause water droplets
to condense inside your case, threatening to damage the electronic
parts inside.
After receiving your computer when it’s hot or cold outside, try not
to power up the computer immediately, let the computer adjust to the
room temperature gradually at least for three to four hours.
If your system arrives in cold weather, do not apply power
to the computer until it has been allowed to warm to room temperature.
HEAT, COLD, HUMIDITY, AND GLARE
Find a suitable place for your computer that’s not too hot, too cold,
too dark, or too bright. Glare can make it hard to read the screen.
This computer’s components can be damaged or destroyed if
over heated, so try to allow plenty of room for air to circulate
around the case.
Do not block the ventilation opening.
Do not place your computer in direct sunlight.
SUITABLE PLACE TO WORK
Your computer will run well wherever you’re comfortable but
extremes of temperature and humidity can be challenging to your
system’s parts. There are some things you can tolerate that the
computer can’t – things like static electricity, dust, water, steam and oil.
In case you decide to pull over for roadside computing, try to choose a
clean, comfortable work area for your system.
The included battery pack will provide the necessary power when you
are traveling. If you are running your system for the first time on
battery power, remove the battery from the package, install it into the
system (the battery should already be preinstalled in the unit when it
arrives from the dealer) and recharge the battery to fully prepare for
service.
Page 7
6
Introduction
WELCOME
Congratulations on purchasing your new 750 Series Semi-Rugged
Tablet PC. Your computer features some of the latest advances in
mobile computing technology.
POWERING UP THE 750 Tablet PC
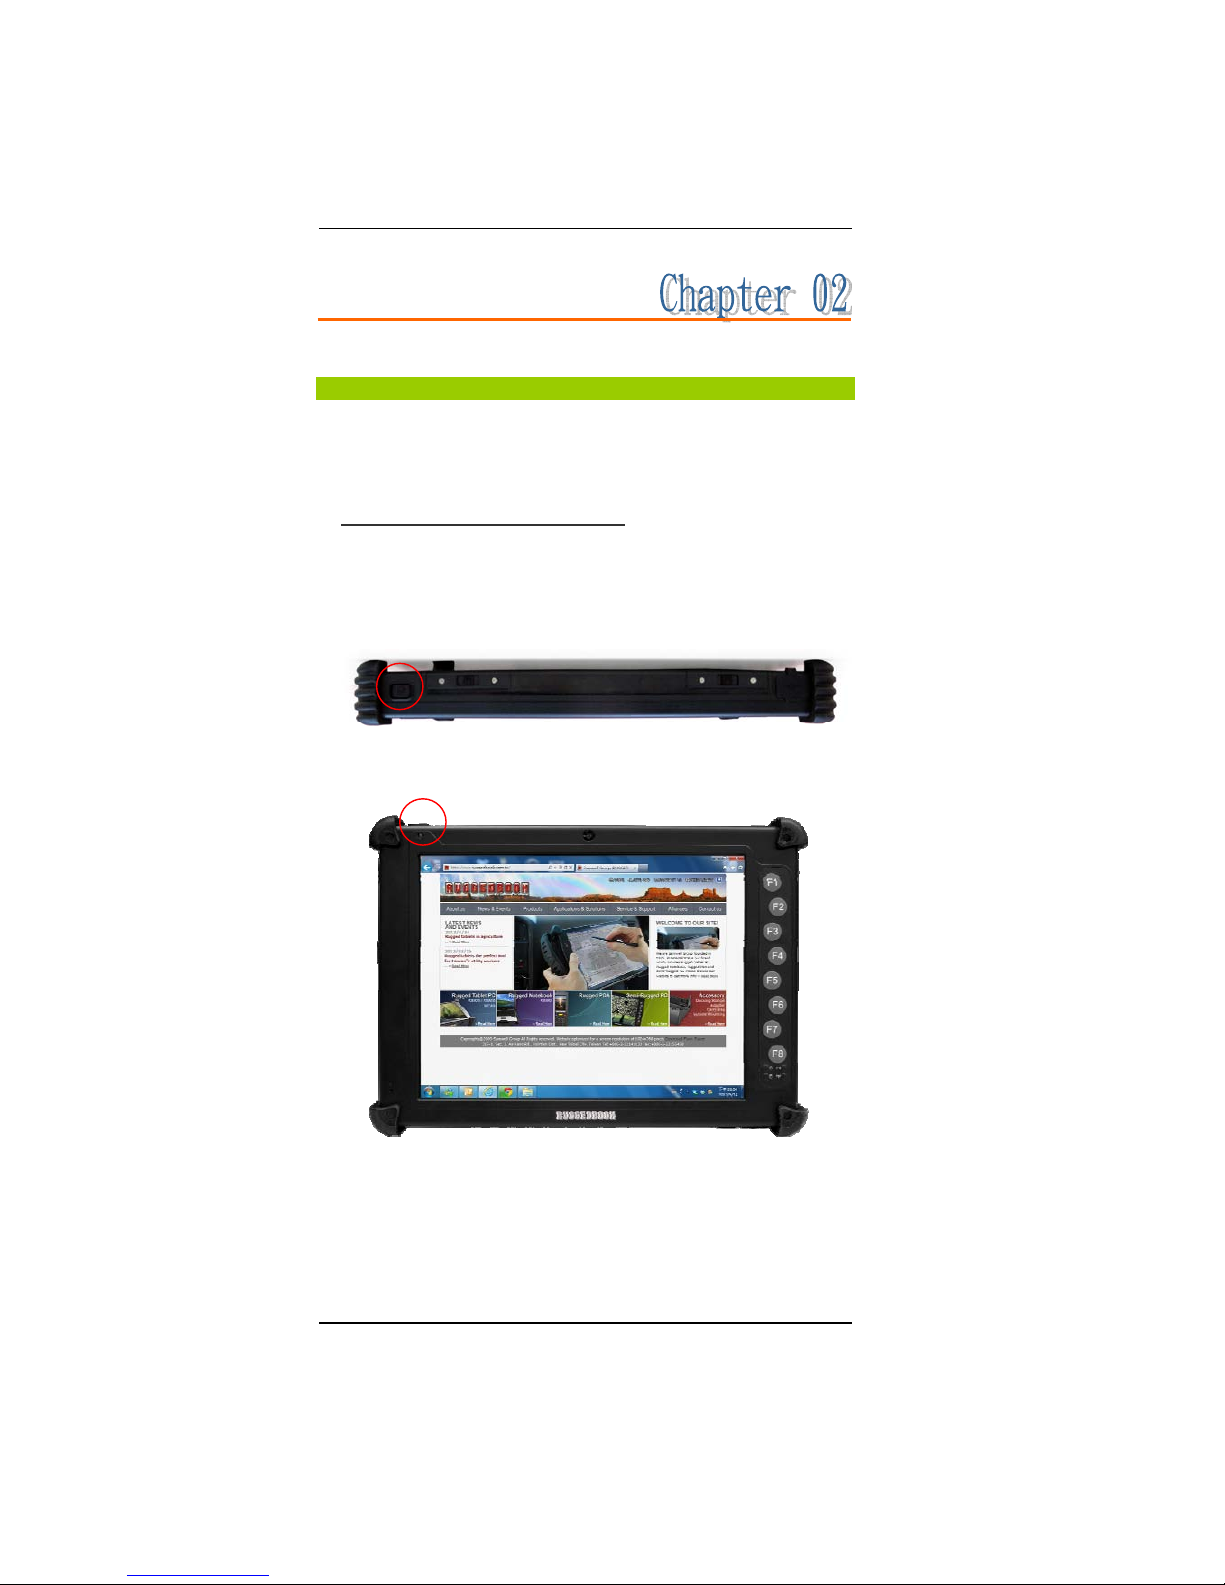
On the top of the 750, locate the power button and press it for a few
seconds to power up the system.
Page 8
7
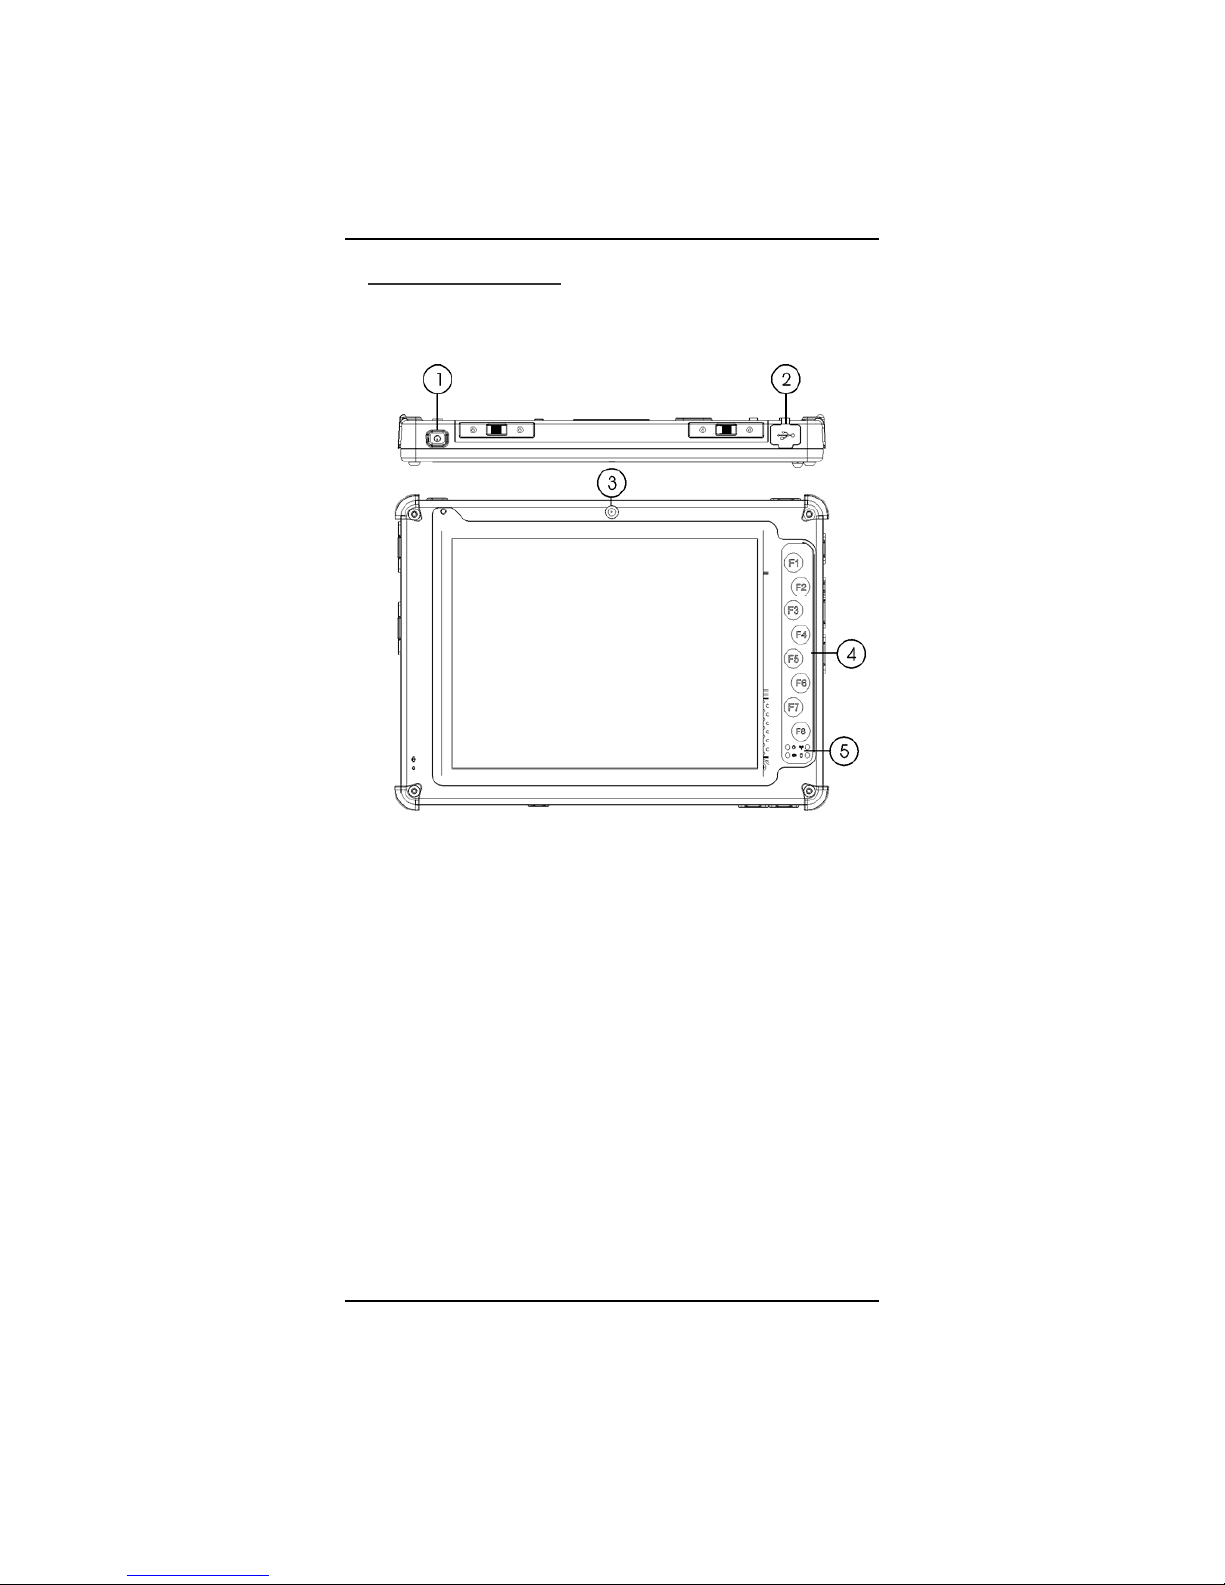
FRONT SIDE FEATURES
1. Power Button
2. USB Port
3. 2M-pixel CMOS Camera (option)
4. F1,F2,F3,F4,F5,F6,F7,F8 Function keys
5. 4 LEDs
Page 9
8
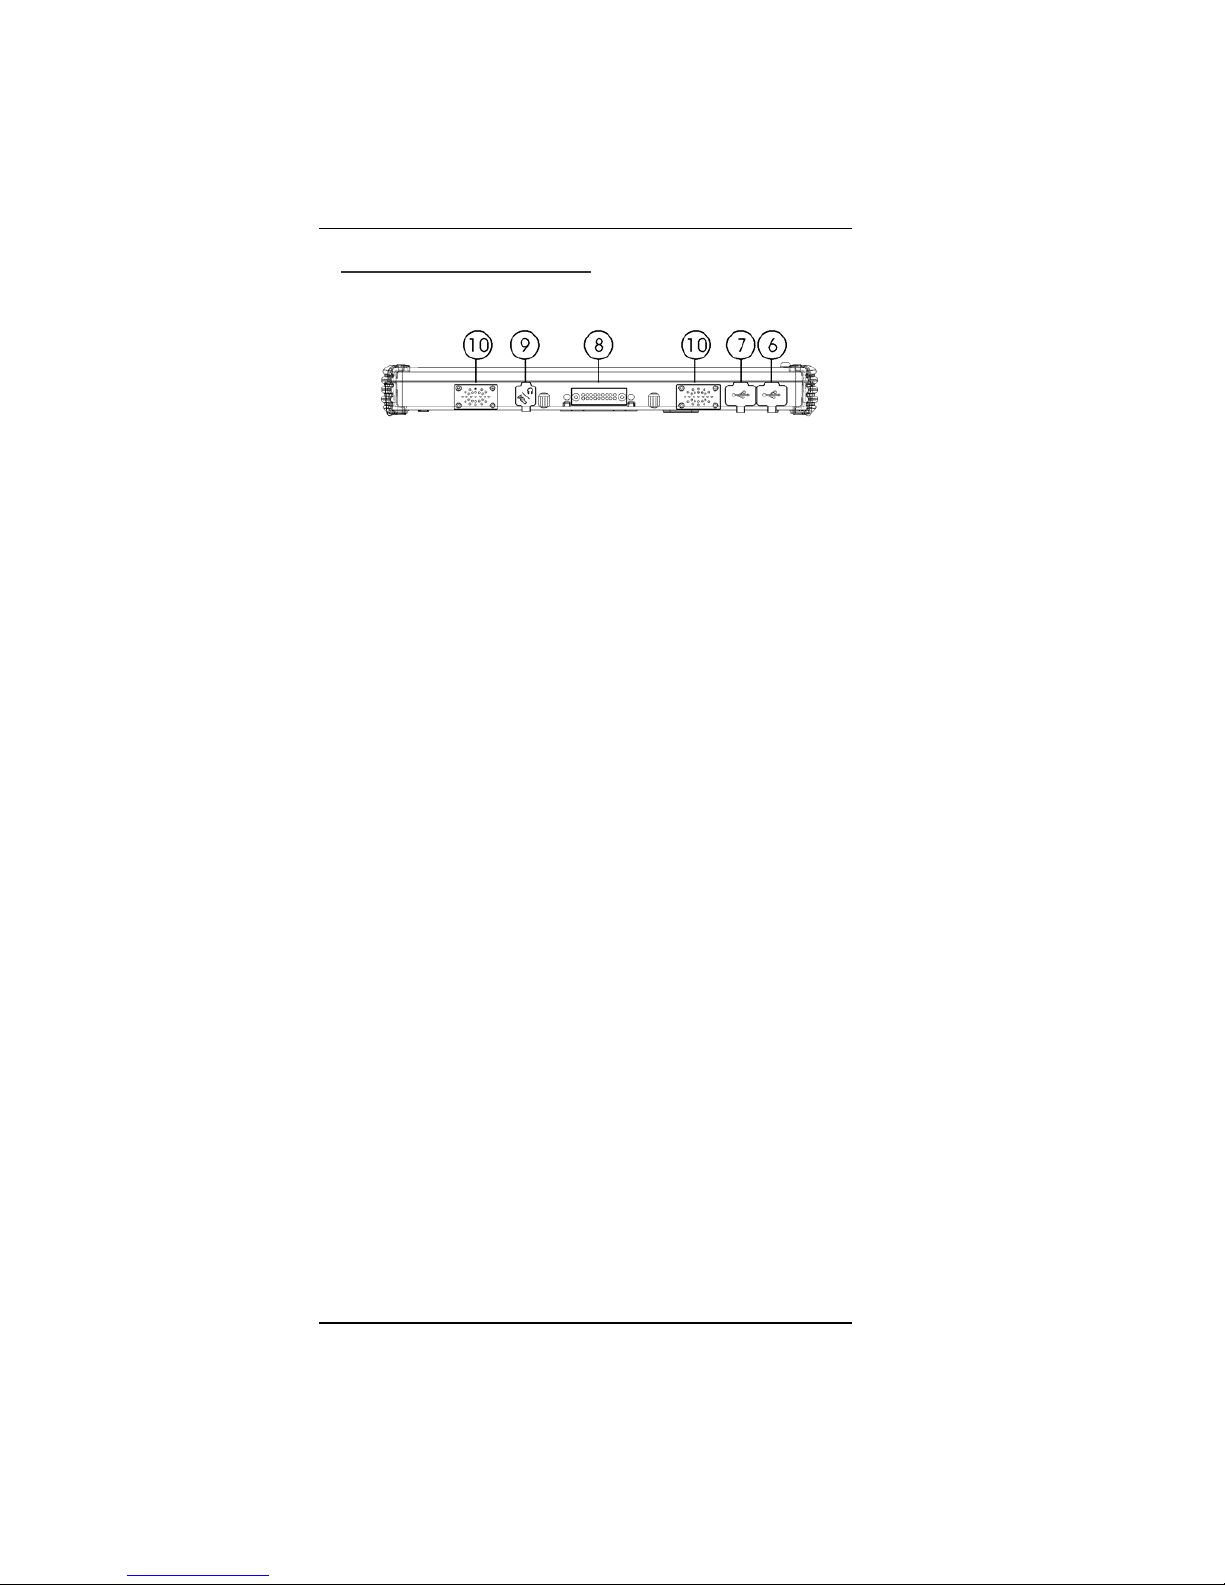
THE BOTTOM SIDE FEATURES
6. USB Port
7. USB Port
8. Docking Connector
9. Mic. & Headphone Jack
10. Stereo Speakers (1.5W x 2)
Page 10
9
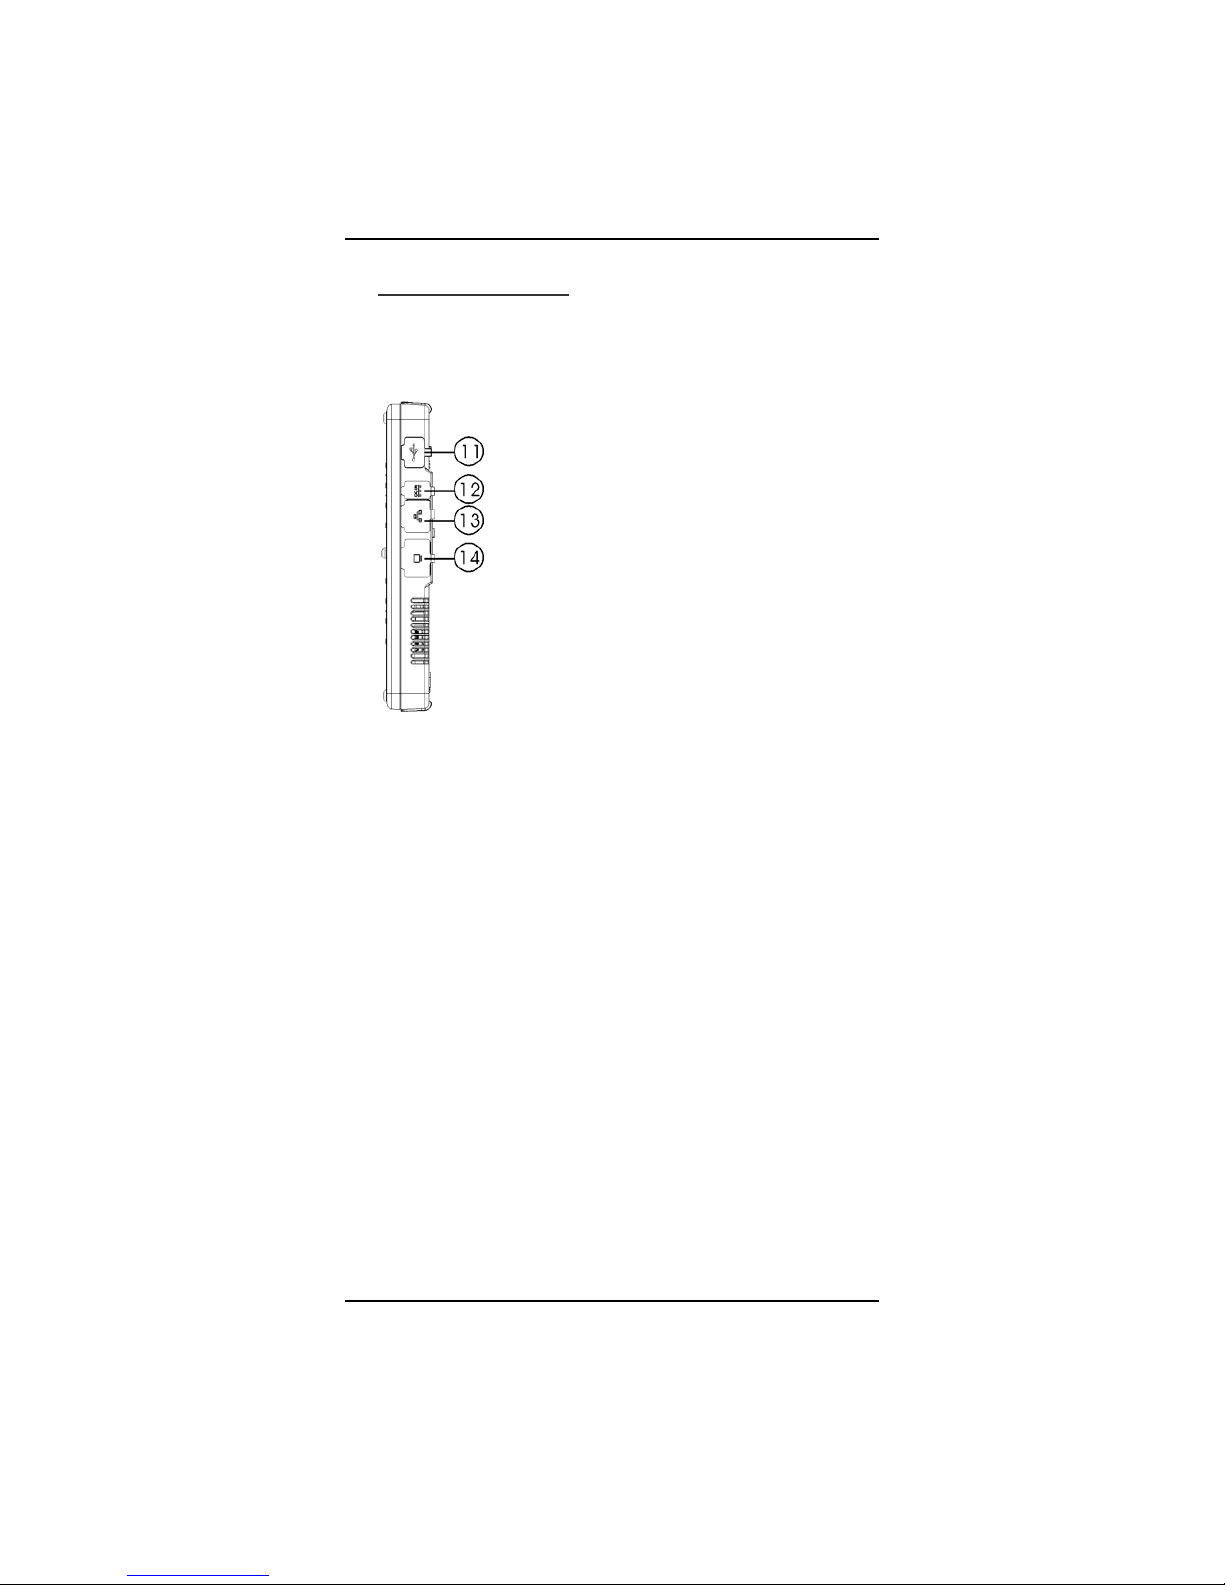
RIGHT SIDE FEATURES
11. USB Port
12. DC-IN Jack
13. RJ45
14. VGA Port
Page 11
10
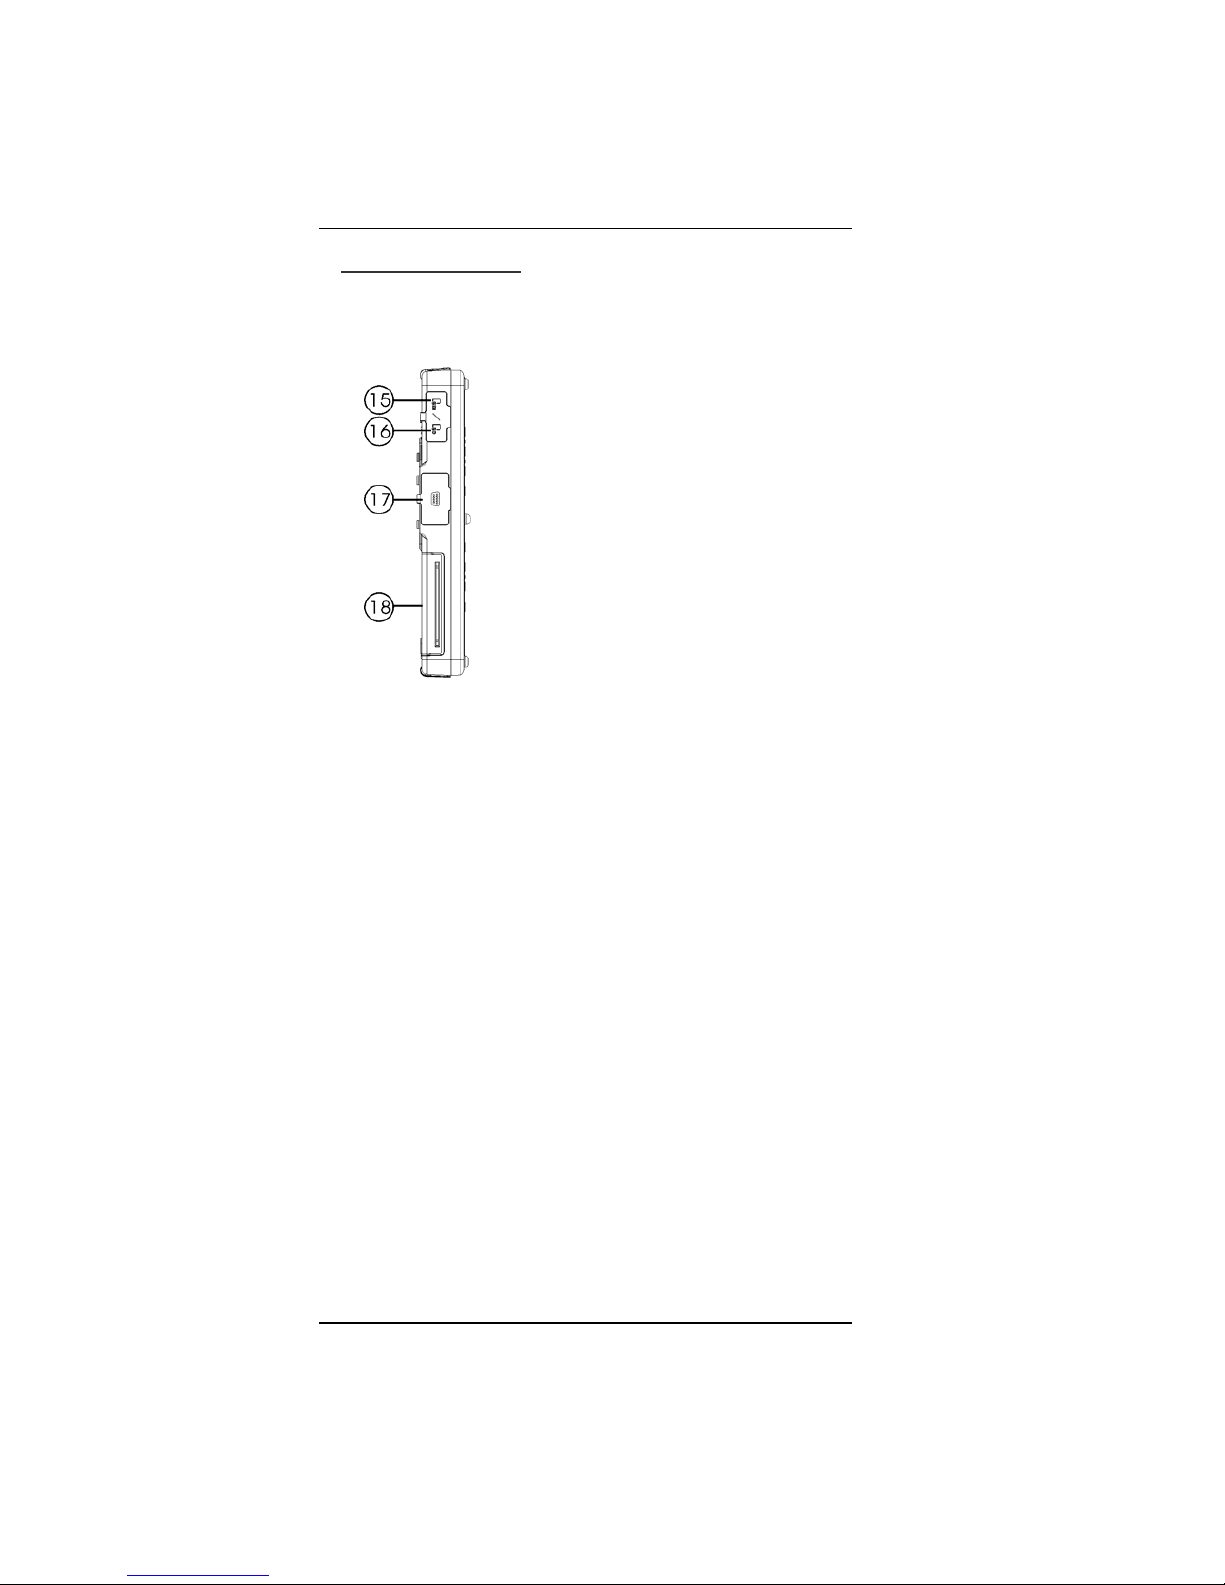
LEFT SIDE FEATURES
15. SIM Card
16. SD Card
17. RS232
18. Door of Device Bay
Page 12
11
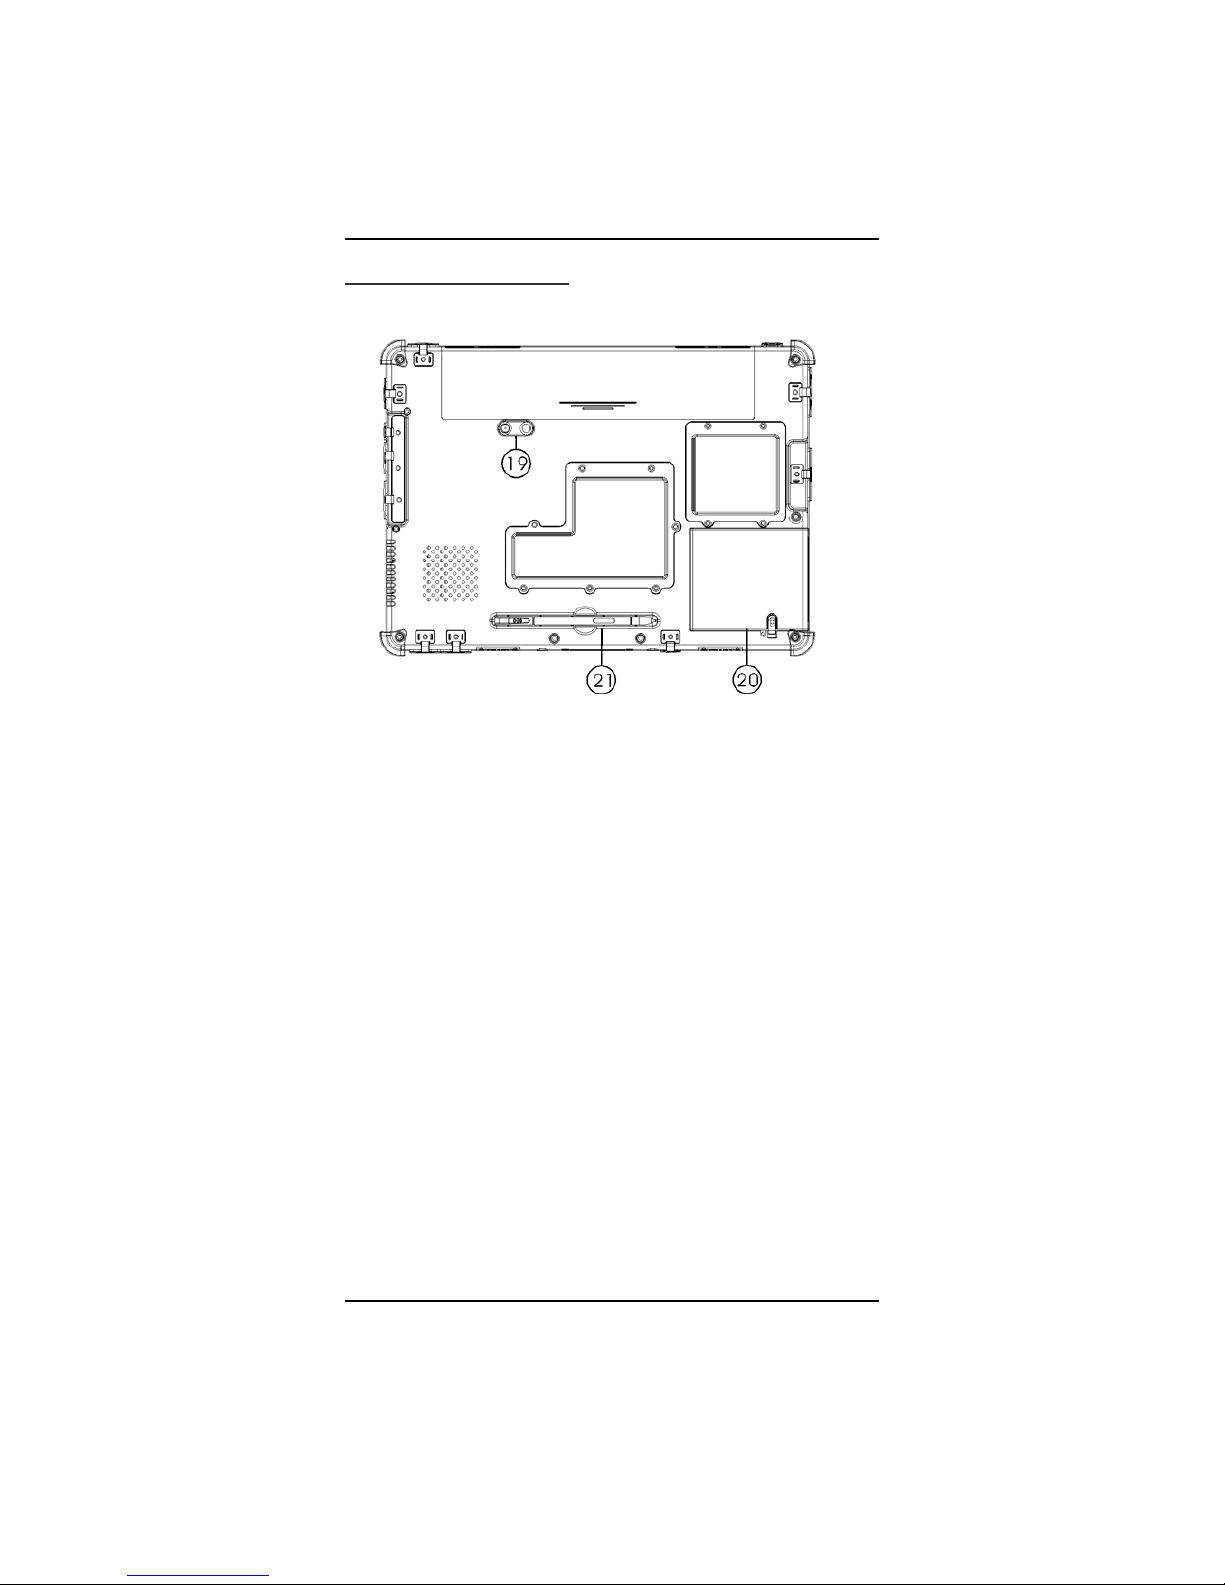
THE BACK SIDE FEATURES
19. 2M-pixel Camera + LED light (option)
20. Device Bay
21. Stylus
Page 13
12
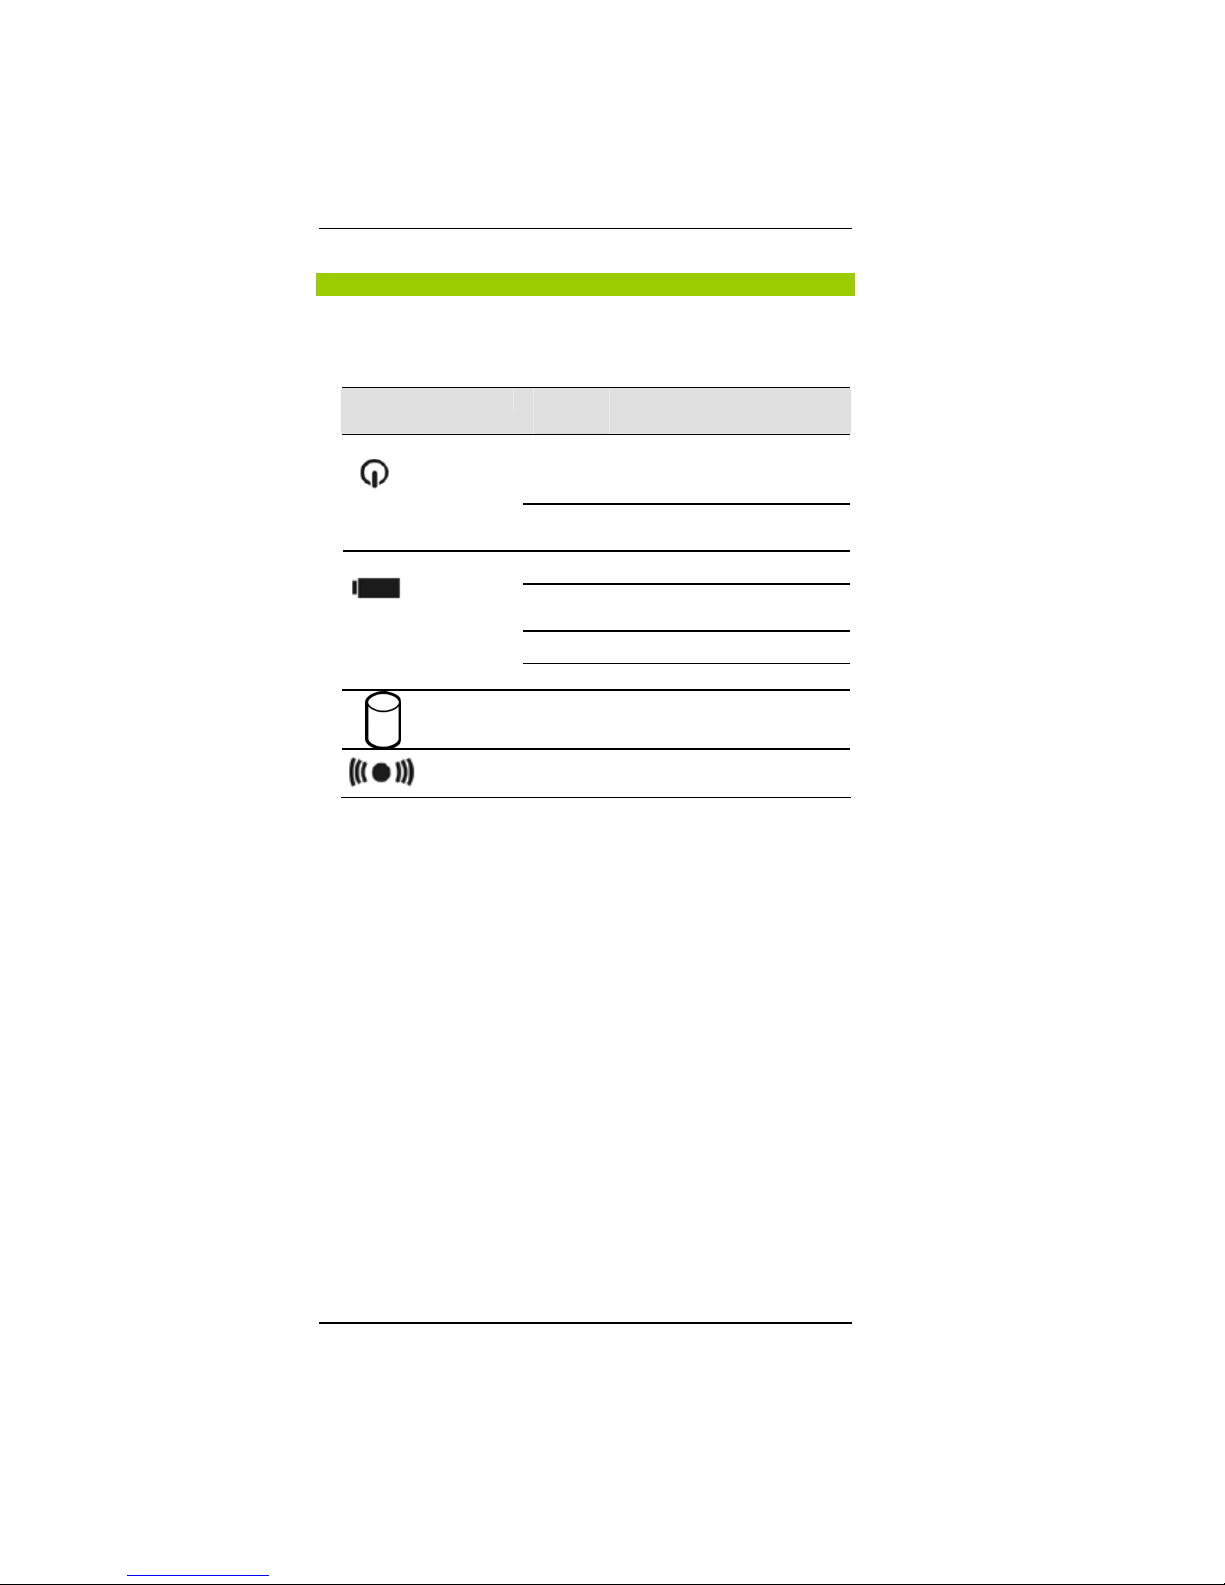
STATUS DISPLAY
The icons that appear below each of the individual system LED
displays indicate the present status of the computer.
Icon Keys LED
Status
Remarks
Green
Press this button once to power
on or enter the suspend/resume
mode (blinking LED).
Power
Off
Press this button for more than 4
seconds to power off the system.
Green Battery capacity 10~95%
Red
Blinking
Low battery capacity (less than
10%)
Red Dead Battery
Battery
Amber Battery charging
Hard Disk Green Hard Disk is running.
Wireless Blue Wireless Networking is enabled.
Page 14
13
Getting Started
CONNECTING TO AN EXTERNAL POWER SOURCE
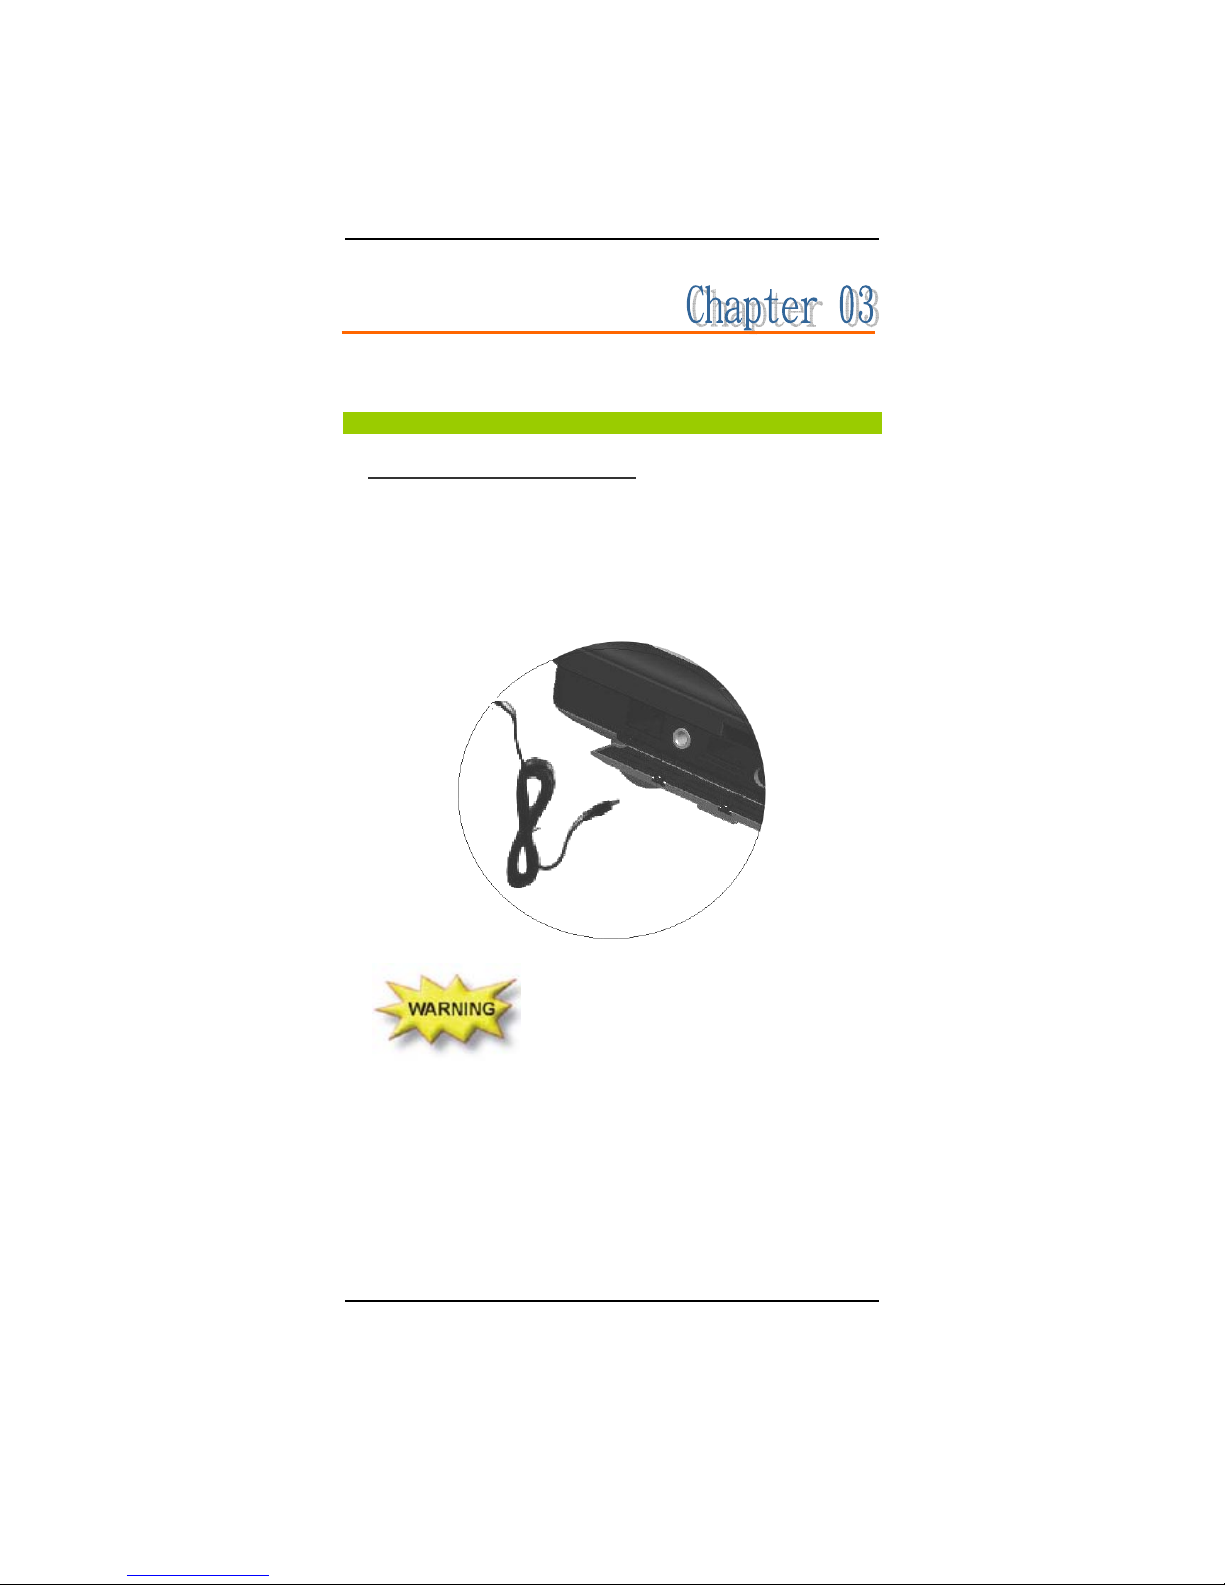
CONNECTING THE AC ADAPTER
A universal AC adapter is provided to supply your computer with
power and also to charge the computer’s battery pack. The adapter’s
AC input can range anywhere from 100V to 240V, covering the
standard voltages available in almost every country. The power cord
(option) for the AC adapter requires a three-hole grounded AC outlet.
To connect the computer to an external power source:
Do not use inferior extension cords as this may
result in damage to your computer. The computer comes with its own AC
adapter. Do not use a different adapter to power or charge the computer.
Page 15
14
Whenever possible, keep the AC adapter plugged into the computer
and an electrical outlet to recharge the battery.
Never turn off or reset your computer while the
hard disk is in use; doing so can result in loss or destruction of your data.
Always wait at least 15 seconds after turning off your computer before
turning it back on; turning the power on and off in rapid succession can
damage the computer’s electrical circuitry.
TURNING ON YOUR COMPUTER
Turn on your computer by pressing the power button. Hold the button
down for a second or two and release. The Power-On Self Test (POST)
runs automatically.
After the POST is completed, the computer reads the operating system
from the hard disk drive or CF Card into computer memory (this is
commonly referred to as “booting” a computer). If your OS
(Operating System such as Windows 7…. etc) is installed, it should
start automatically.
To turn the computer off, save your work and close all opening
applications, click on Windows logo at left-bottom corner, and select
Shut down. Alternatively, you can press and hold the power button
for 4-6 seconds.
OPERATING ON BATTERY POWER
Your computer comes with a rechargeable battery pack that lets you
operate the computer without an external power source. When the
battery pack is fully charged, you can operate the computer under the
following conditions:
The battery pack initially has a full charge.
No peripheral devices are installed.
Only use batteries that are approved by an
authorized dealer. All batteries are not the same and therefore should not
be treated as such. Using the wrong battery could cause serious damage to
your computer and yourself through toxic emissions.
Page 16

15
Charging the Battery Pack
The installed battery pack charges automatically anytime the
computer is connected to the AC adapter and an external power source.
It is a good idea to occasionally discharge the battery pack fully to
preserve its operating performance.
Page 17
16
Using the Computer
FUNCTION KEYS
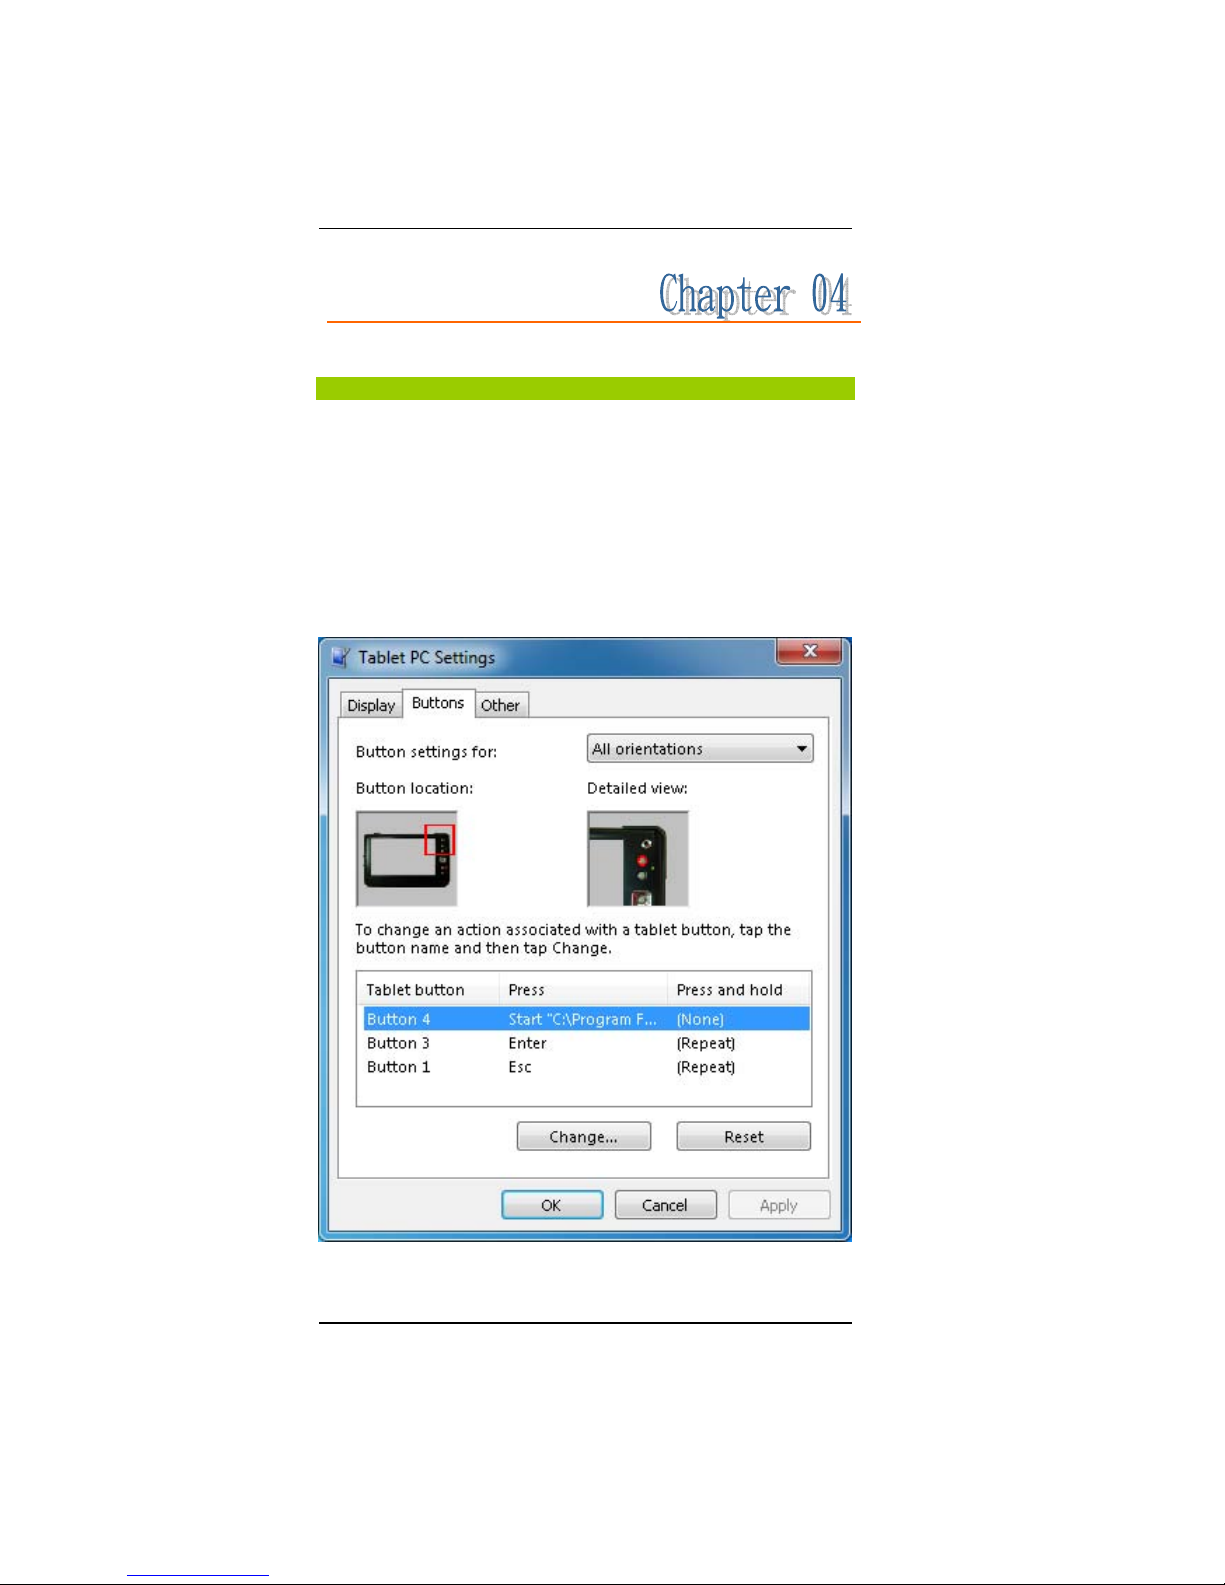
Tablet PC Settings in Control Panel enables users to map the different
buttons to different actions, and you can program the keyboard
shortcuts on your 750.
It includes a Buttons tab, which shows the various button mappings
for each screen orientation and contains images that show where
specific buttons are located on 750 from a distance and in detail.
Users can use the Buttons tab to choose keyboard shortcuts by name,
assign them to various functions, and specify the screen orientation
when those assignments are active.
Page 18

17
The Buttons tab shows a generic Tablet PC. When you select a button
name from the Tablet button list box, the Button location and
Detailed view images display the corresponding images.
Page 19

18
POWER SAVING MODES
This section contains information on the computer’s power system,
including the AC Adapter, the battery pack, recharging the battery,
and tips for conserving battery power.
The power system is comprised of two parts, the AC Adapter and the
battery pack. The AC Adapter converts AC power from a wall outlet
to the DC power required by the computer.
THE BATTERY PACK
Before using the computer on battery power for the first time, check
the battery status icon in the Windows System Tray to make sure the
battery is fully charged.
See “Battery Status” later in this section for a description and
explanation of the Windows’ Battery Status icon. The battery takes
about 4 hours to reach a full charge when the system is in a powered
off state. Whenever possible, always charge the battery completely.
Battery Status
Windows 7 has an applet in the Control Panel that will display an icon
in the Windows taskbar indicating when the computer is running on
battery power or is attached to the AC adapter.
This applet also indicates how many percent of power is remaining in
the battery.
Battery Low Warning
When the battery initially reaches the “Battery Low” state,
approximately 10 ~ 15 minutes of the usable battery life is left.
You will see the Battery LED Indicator change to red blinking to alert
you the “Battery Low” status.
Page 20

19
Your battery now has 1 ~ 2 minutes of battery charge remaining. You
must save your data or connect AC power immediately; otherwise,
you may lose your data.
When there is only one minute of battery charge remaining, the
computer will suspend to the HDD and power off. You should
connect AC power and resume your work.
Small Battery for the Real Time Clock
There is a small built-in battery pack that supplies power to the system
in order to maintain certain system information while the power is off.
If the computer is left without a power source for long period of time,
this battery will be exhausted and system information will be lost.
One may expose to danger if battery is incorrectly
replaced. Replace only with the same or equivalent type recommended by
the manufacturer. Dispose of used batteries according to the
manufacturer's instructions. Never remove the battery pack while the
power is on as this may result in data loss when the system loses power.
Page 21
20
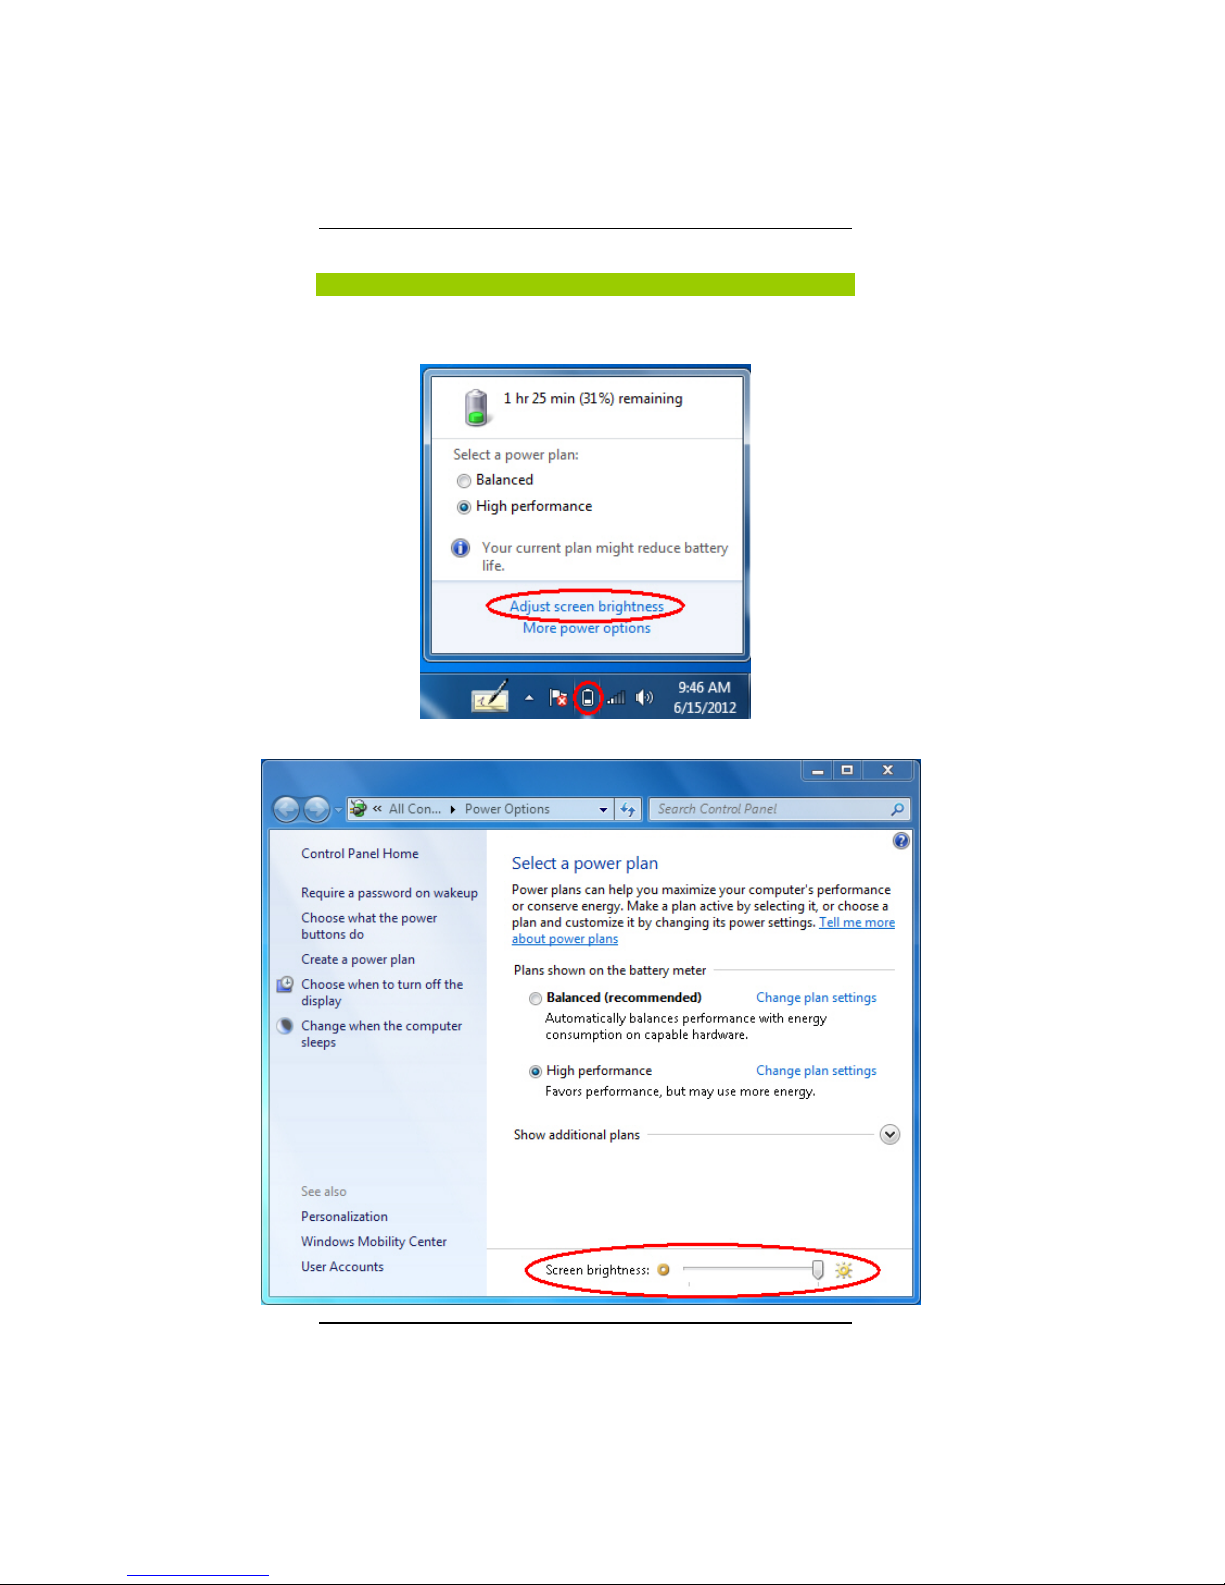
ADJUSTING THE BRIGHTNESS
To adjust the brightness of the LCD screen, use the brightness
adjustment option in Power icon on the Taskbar as following,
a.) Click Power icon → Adjust screen brightness
b.)Slide the Screen brightness bar to adjust the brightness
Page 22

21
USING THE STYLUS
You can use the stylus to generate, to
select items, and to navigate through
programs on the 750.
Hold the stylus as if you were writing
with a standard pen.
The stylus interacts with the computer
whenever its tip touches the screen.
Programs that support handwriting
recognition allow you to write characters
directly on the screen with the stylus. The
stylus can also be used for drawing.
The stylus is a delicate, high-quality instrument that can be damaged if
used improperly. Rules to follow to protect your stylus:
Don’t gesture with the stylus, use it as a pointer, or tap it on
surfaces other than the 750 screen.
Don’t try to store the stylus with the tip down (as you would
normally do with a pen) that it might distort the internal
mechanism. To avoid any damage to the stylus, store it only in the
stylus holder when you are not using it.
Page 23
22
USING THE TOUCH KEYBOARD & WRITING PADS
(OS is the Microsoft Windows 7 Professional)
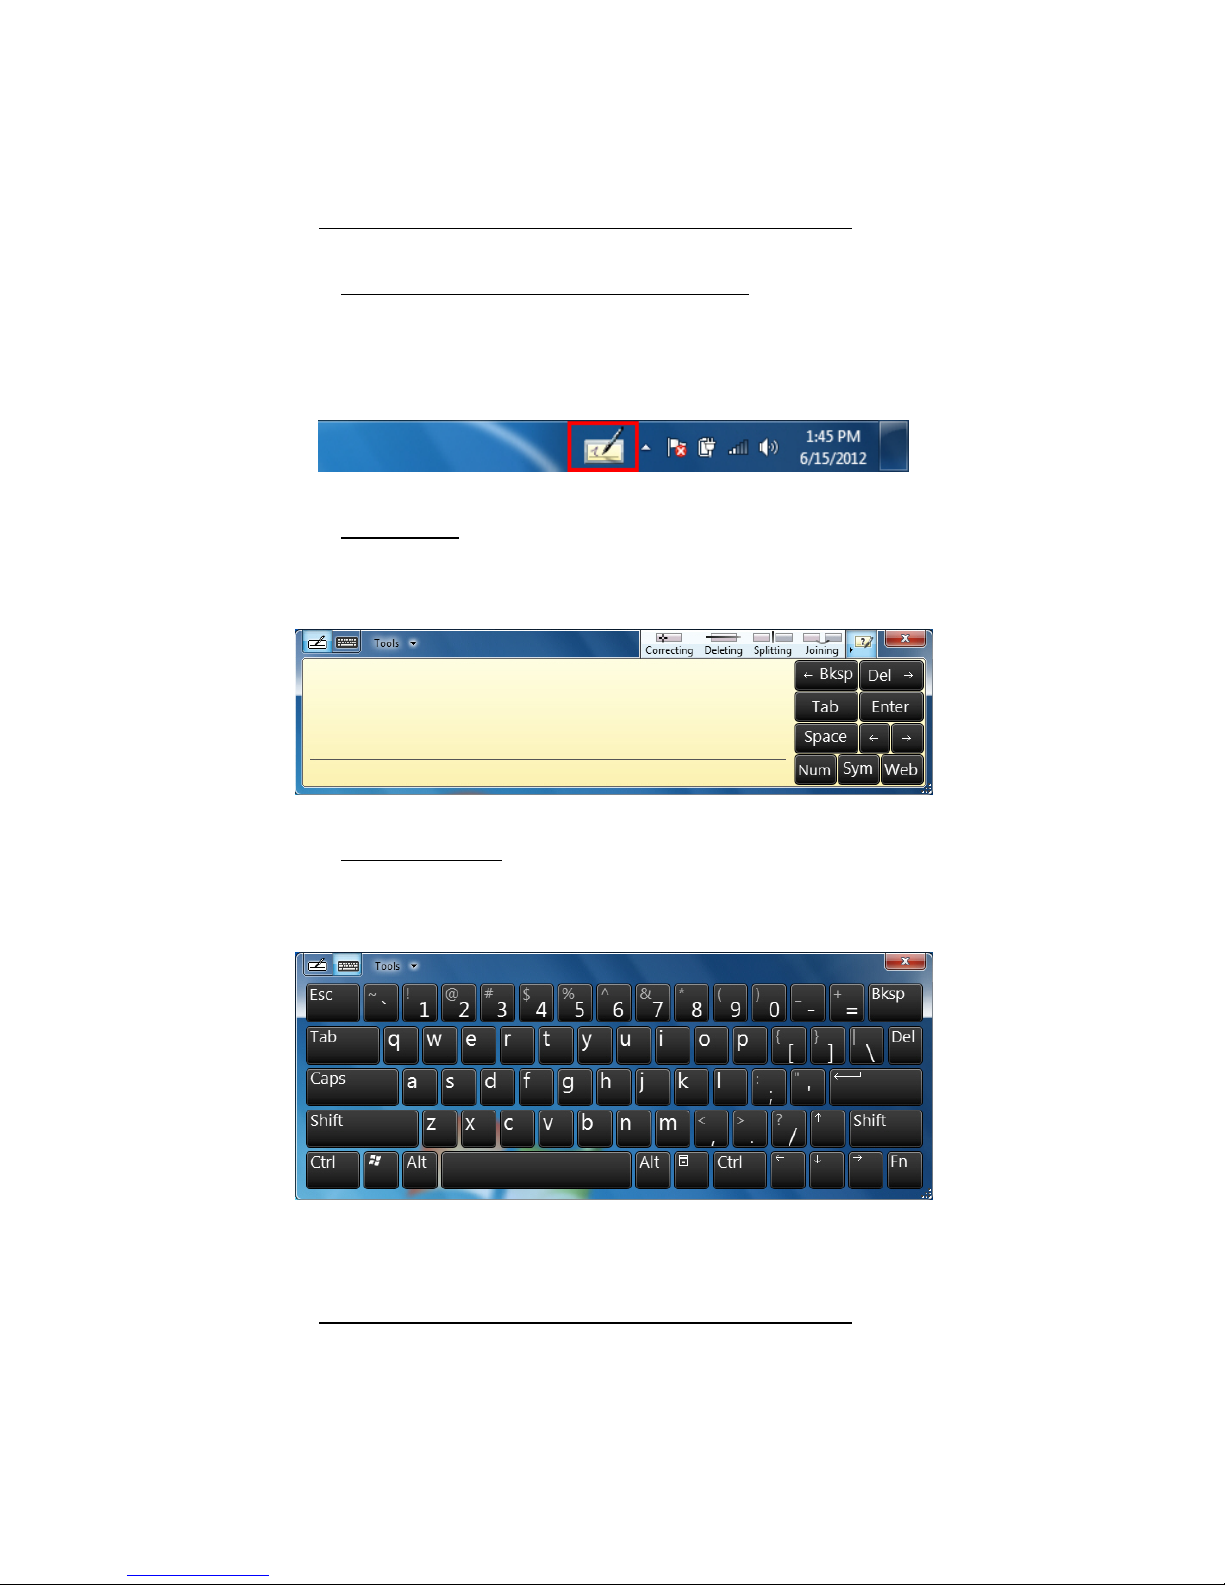
Press the “Keyboard” icon next to the Windows Taskbar to display the
on-screen keyboard and writing pads. These input tools allow you to
type characters without a real keyboard.
WRITING PAD
This pad allows you to enter text on a word-by-word basis. You write
on the lines in the writing pad much the same way you would write on
a lined piece of paper.
TOUCH KEYBOARD
Use it the same way that you would use a standard keyboard. By
tapping on the individual keys with the stylus, text and symbols can be
entered as well as Function Keys and menu short cuts.
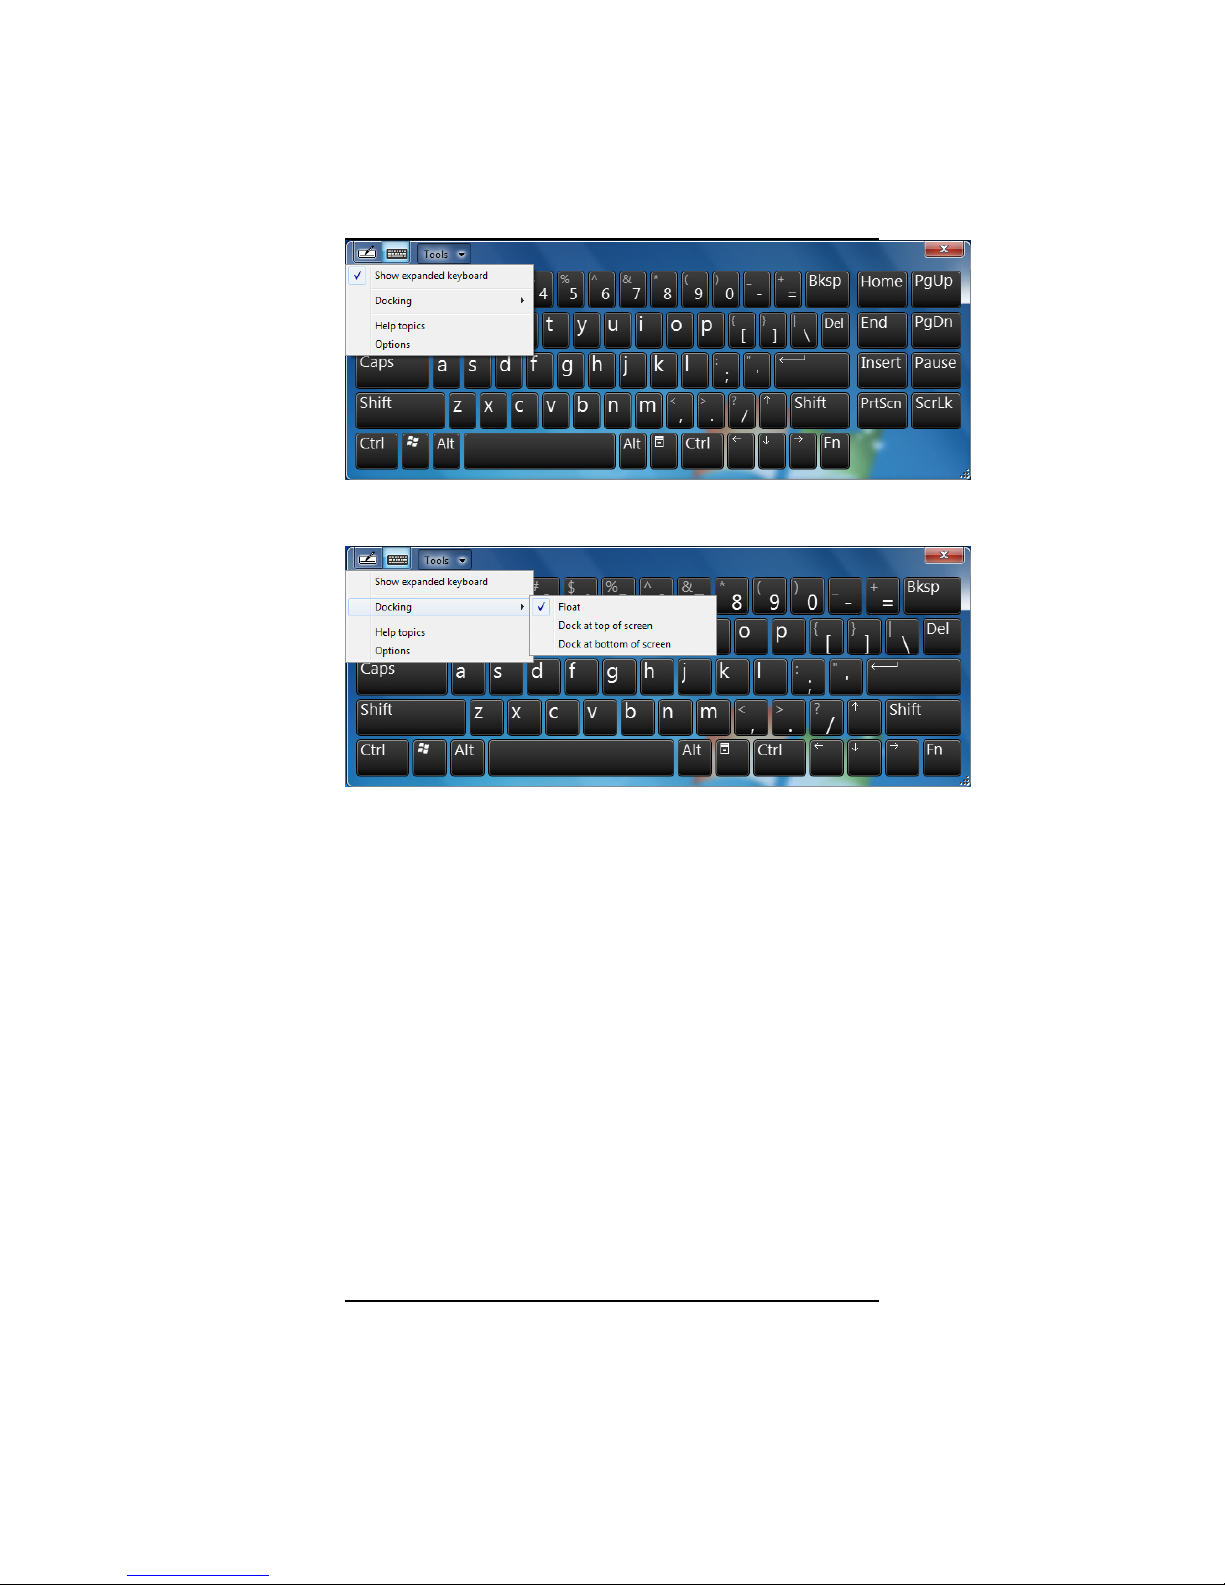
Click “Tools” and select “show expanded keyboard” to display
additional keys. Press “Fn” to bring up the Function keypad.
Page 24
23
Click “Docking” to display the option menu that you can use to adjust
where the on-screen keyboard will appear on the screen.
Float
Undock the on-screen keyboard.
Dock at top of screen
Let the on-screen keyboard to appear at the top of the screen.
Dock at bottom of screen
Let the on-screen keyboard to appear at the bottom of the screen.
Page 25
24
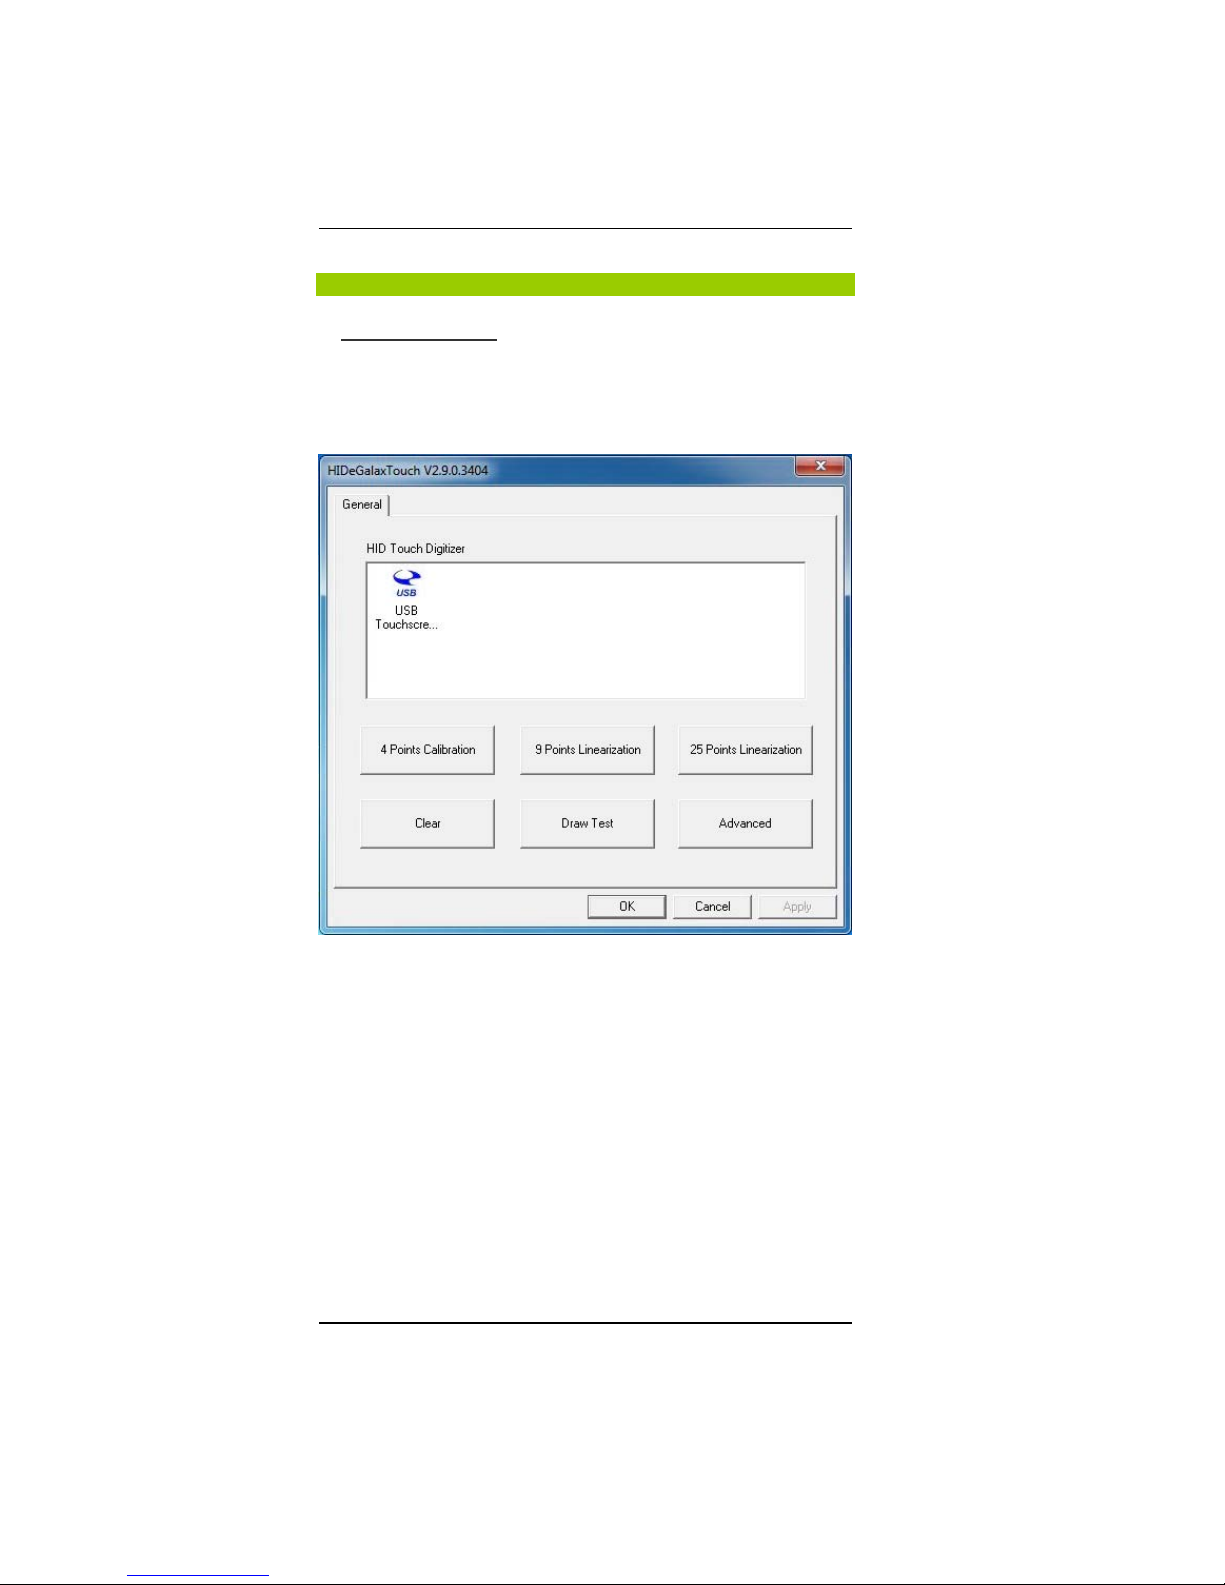
TOUCHSCREEN UTILITY
P
EN CALIBRATION
If the pointing cursor doesn’t seem to follow your stylus taps properly,
you can recalibrate it by selecting either the “4 Points Calibration”
button or the more advanced “9 Points Linearization” button from
HIDeGalaxTouch on Desktop.
Page 26
25
4 Points Calibration
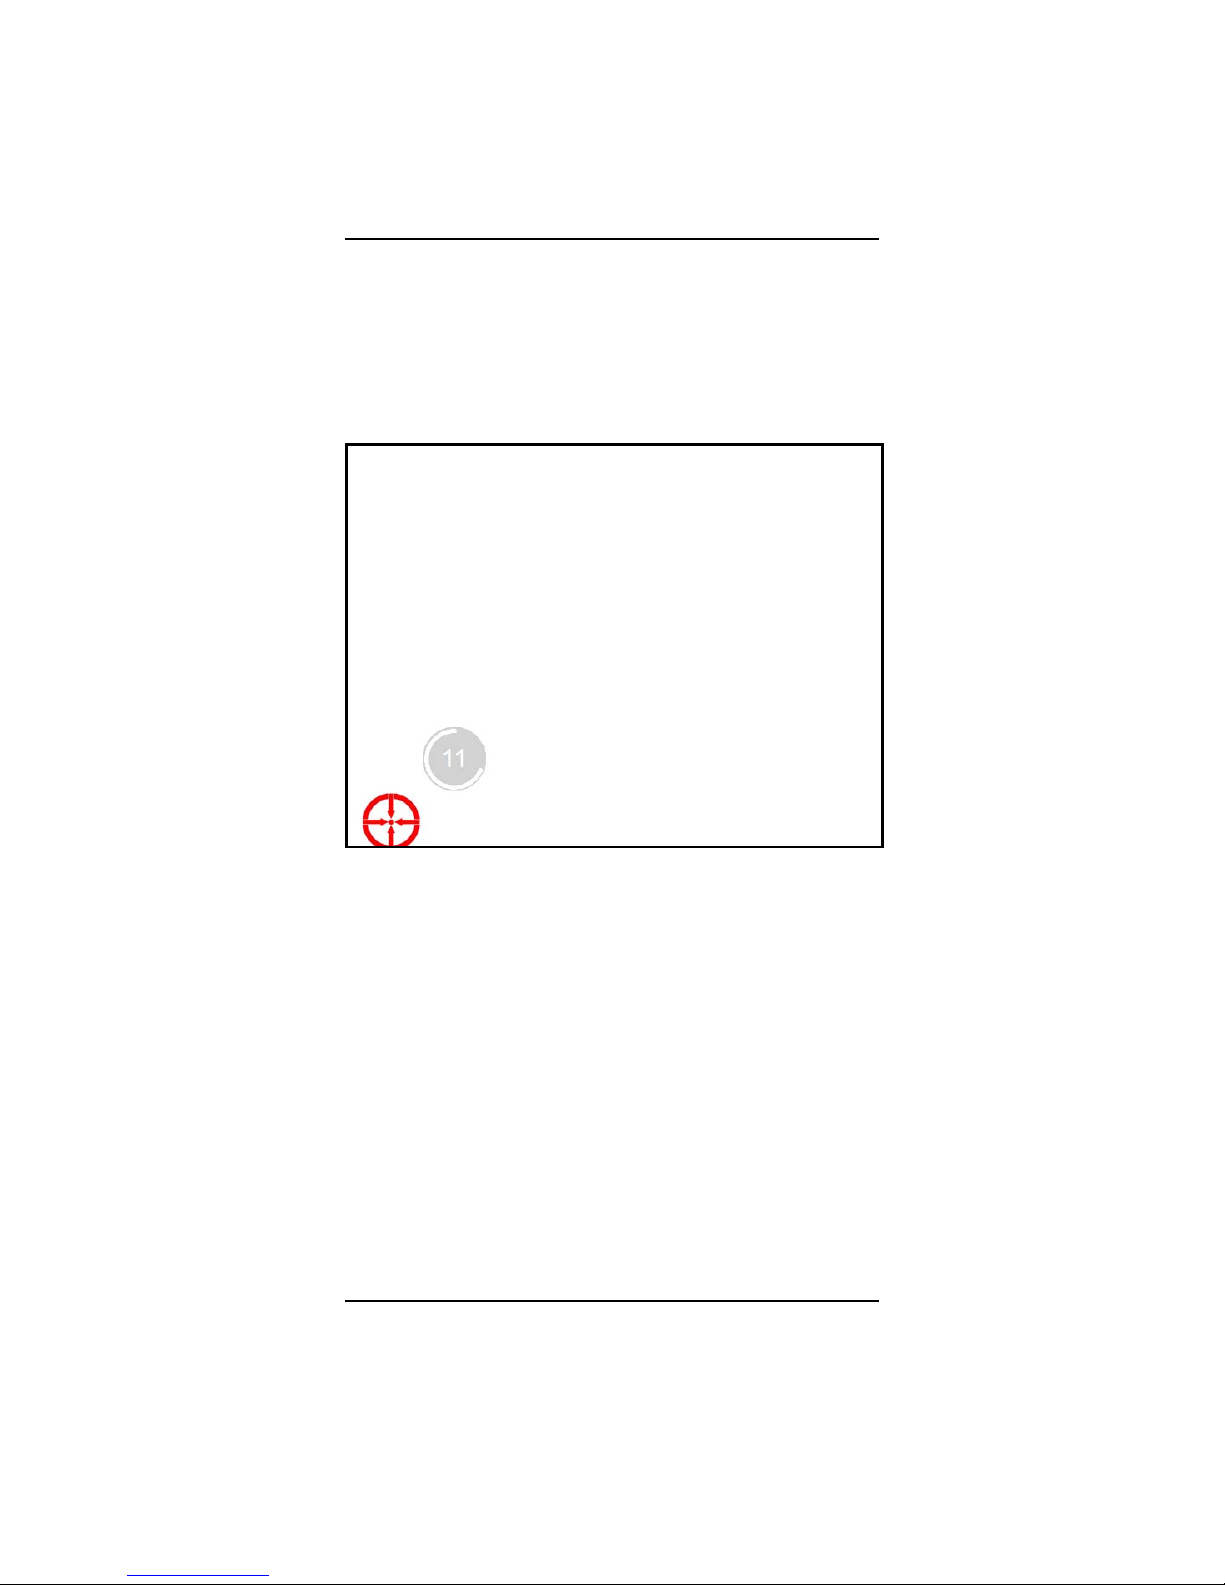
This basic routine will ask you to tap and hold the stylus on a symbol
on the screen until it becoming blue within 15-second countdown.
This will repeat four times at which point your screen should be
properly calibrated.
Page 27
26
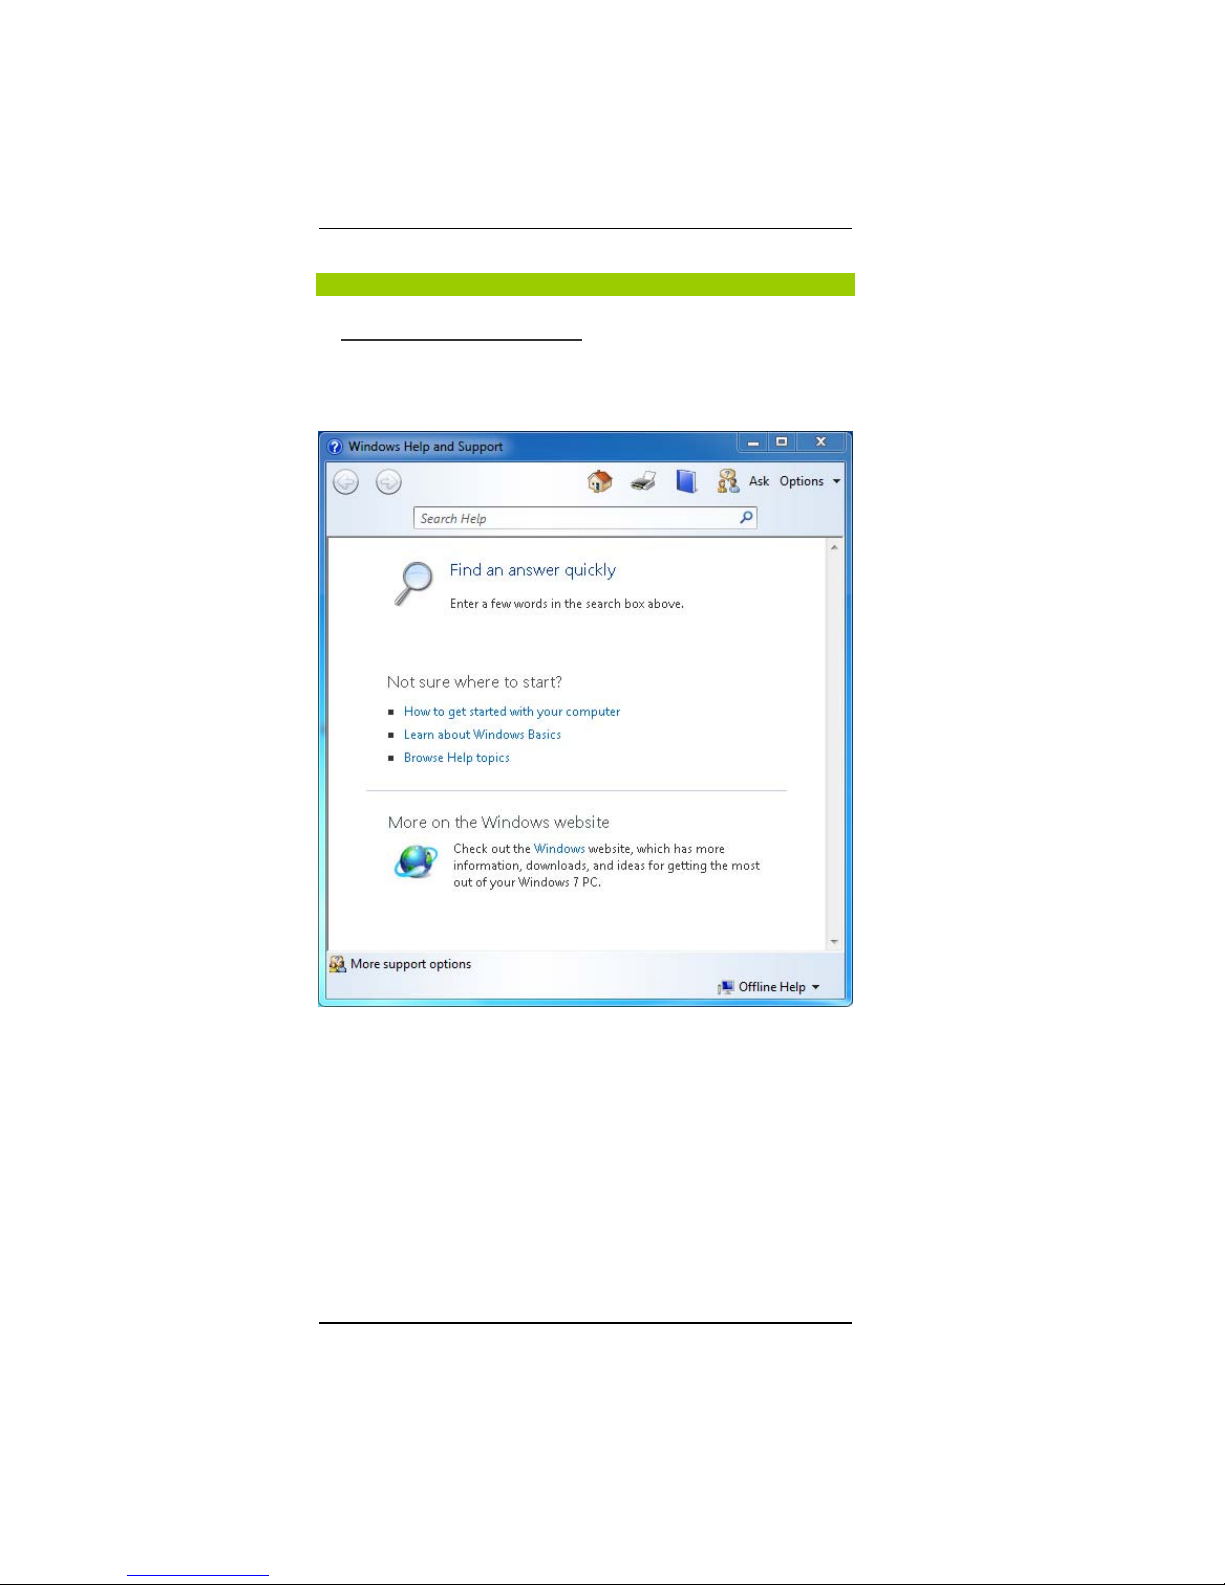
USING WINDOWS HELP
G
ETTING HELP IN WINDOWS
To access the Windows 7 Help and Support Center, click Start
ÎHelp and Support. The following Help window should open.
Page 28
27
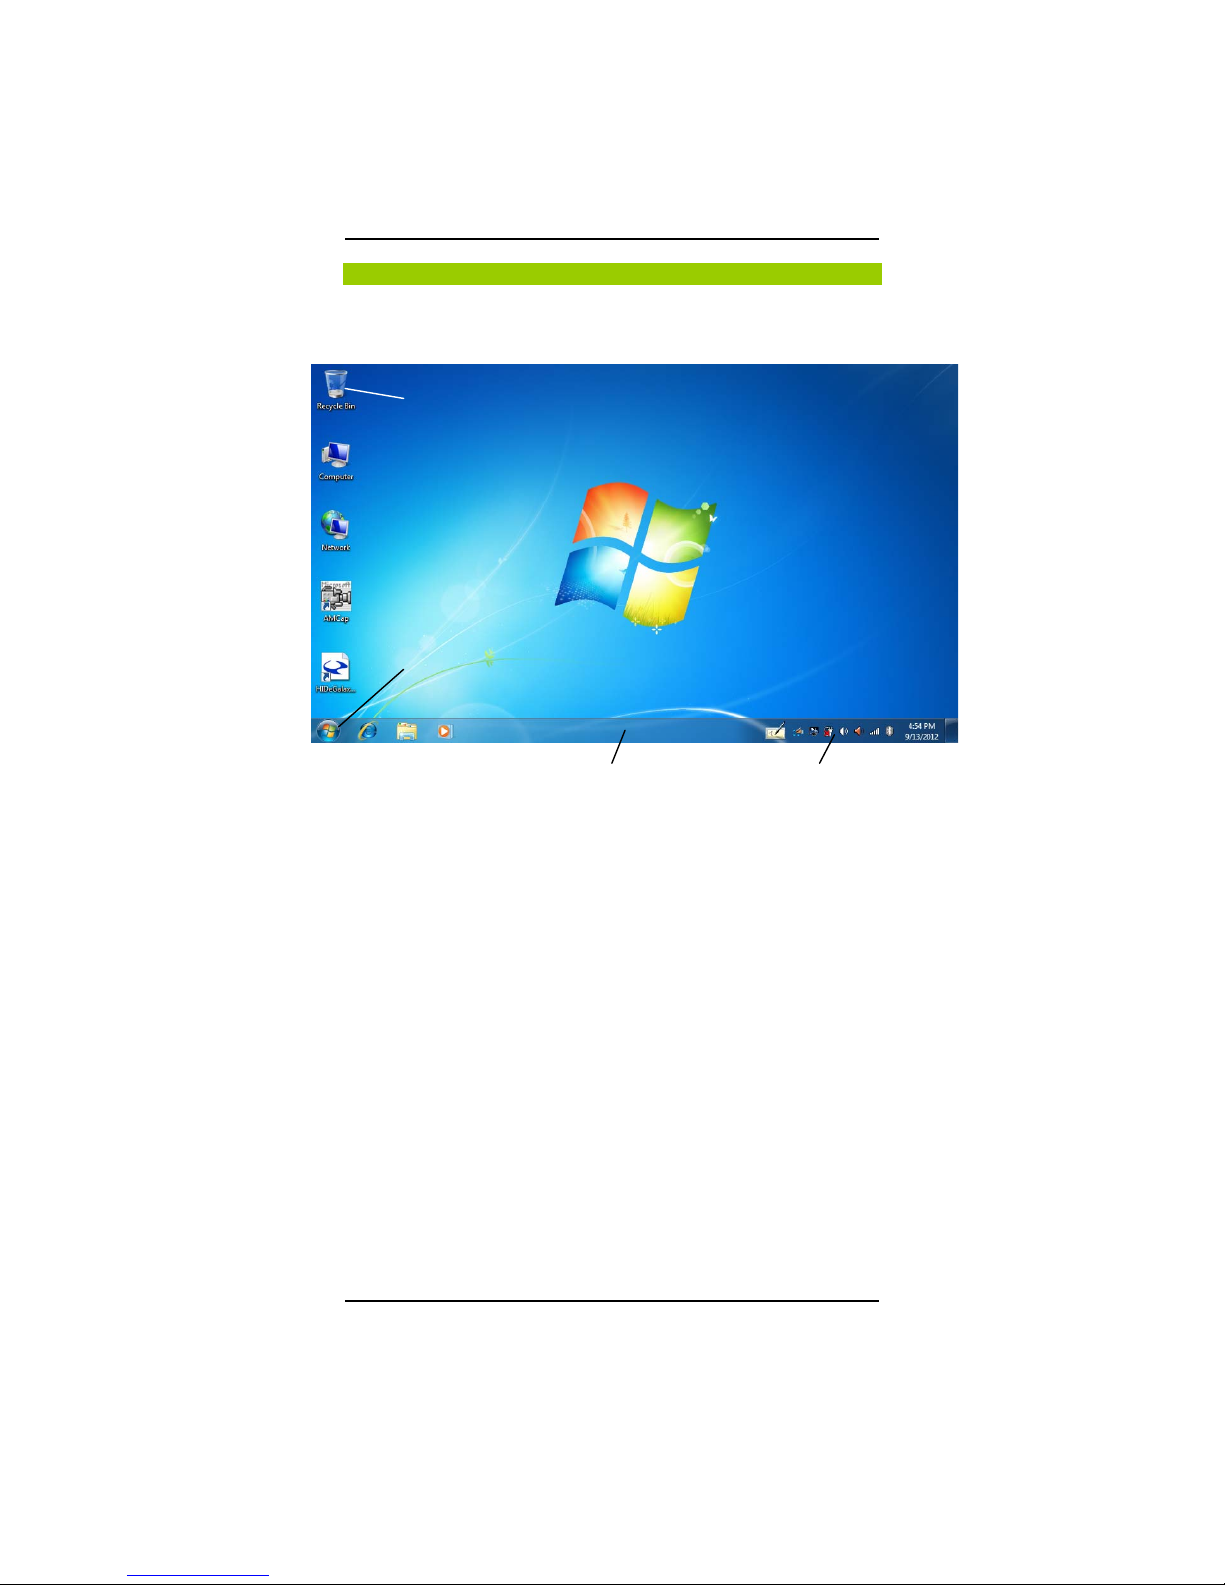
THE WINDOWS DESKTOP
Your Desktop may display different or additional shortcuts icons,
depending upon the software that is installed on your computer.
Recycle Bin
Used for storing deleted files in case you want to recover them at a
later time. The files will only be deleted from the Recycle Bin
permanently if you choose to empty it by right clicking on it and
selecting the “Empty Recycle Bin” option from the pop-up menu.
Start Button
Opens the Start Menu allows
easy access to all Windows
programs.
The Start Menu adapts to your
computing habits by showing the
programs you use most frequently
in a list at the top most level. If
you wish to keep an item in this
list, right click on it and choose
Pin to Start Menu.
Recycle Bin
Start Button
T
askbar
System Tray
Page 29
28
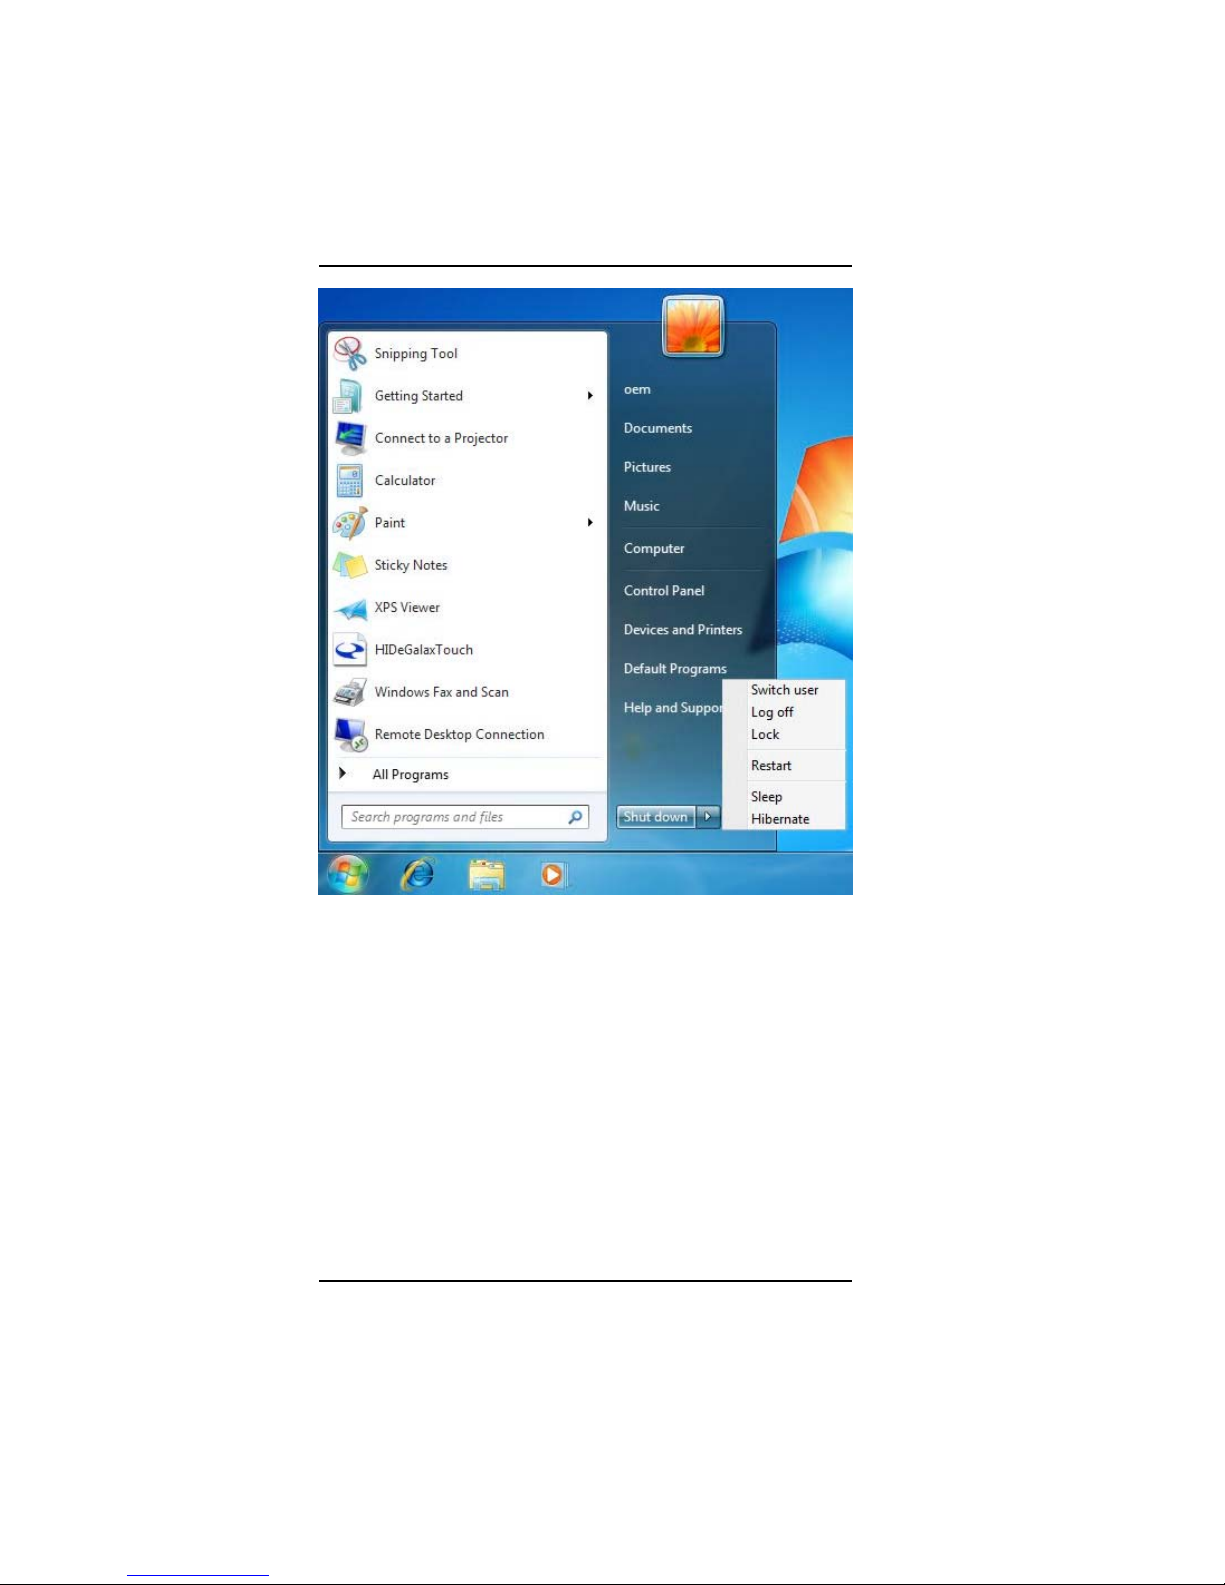
Shut down
turns off the computer.
Switch user
switches to another user from the current user.
Log off
enables the current user to log off and allows a new user to log on.
Lock
locks the desktop and gets into Logon screen.
Restart
reboots the computer.
Sleep puts your work and settings in memory and draws a small amount of
power.
Hibernate puts your open documents and programs on your hard disk,
and then turns off your computer.
Page 30
29
Taskbar
When you open a program, its icon is displayed on the taskbar to
allow you to conveniently move between programs by clicking the
relevant application buttons.
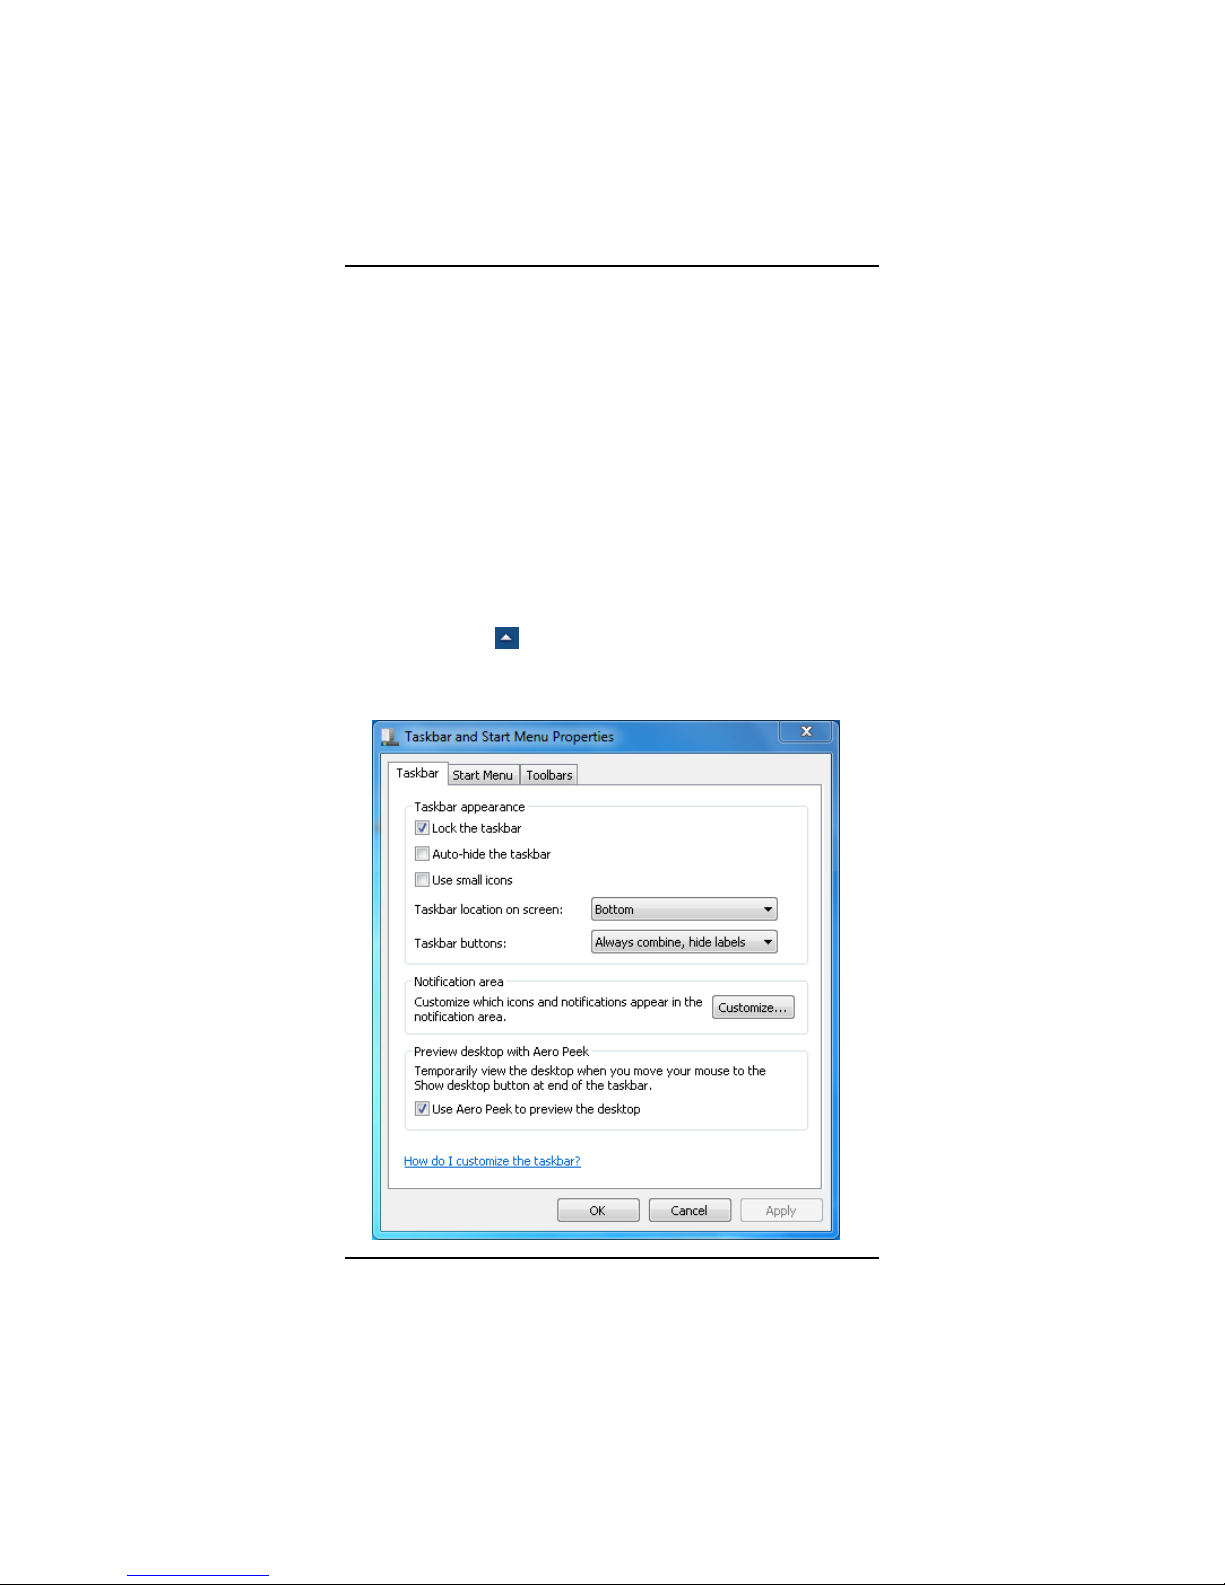
To add or remove toolbars from the taskbar: right click an empty spot
on the taskbar, select Toolbars Î choose the toolbar you want to
add or remove. Select Properties to make additional changes to the
way the Taskbar looks and functions, including whether it auto-hides,
remains on top of open application windows and if it groups similar
Taskbar buttons.
Notification Area (a.k.a. System Tray)
The icons that appear here next to the system clock are for quick
access to some programs and functionality that you might frequently
use. If Windows 7 is set to hide the less frequently accessed icons,
simply click the
icon to display them.
To prevent Windows 7 from hiding icons, find an empty spot on the
Taskbar, right click on it and select Properties. In the Notification
area, click Customize, then check Always show all icons….
Page 31
30
CONTROL PANEL
This panel houses many of the applets that allow changes to be made
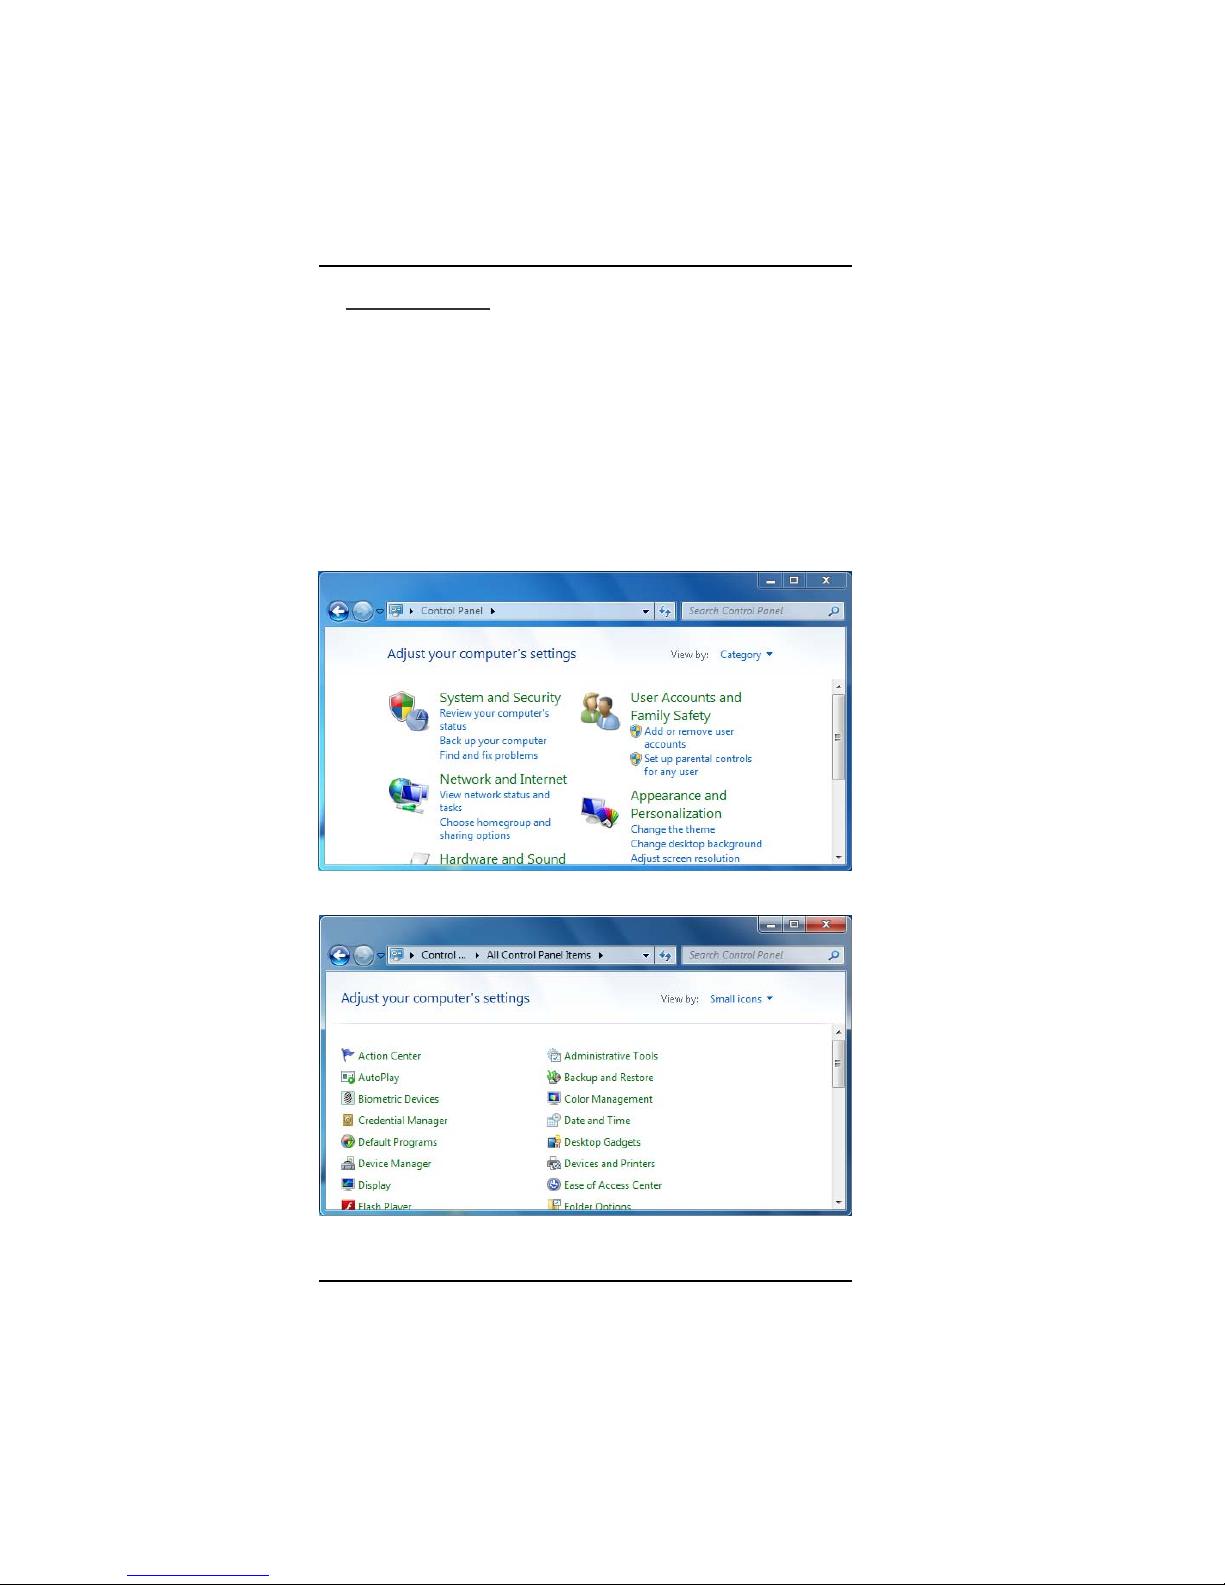
in the way Windows 7 looks and functions. Click Start → Control
Panel dialog box.
There are two interfaces – Classic View or Category View. Classic
view displays all the panels at once in large or small icons, much the
same way previous versions of Windows do. Category view groups
them into functional categories based upon the particular task you
want to perform.
For more detailed information on what each of the various control
panels do, please refer to the Windows Help and Support Center
mentioned earlier in this chapter.
Windows 7 Category View Control Panel
Windows 7 Classic View Control Panel
Page 32
31
VGA Utilities
VGA UTILITIES
S
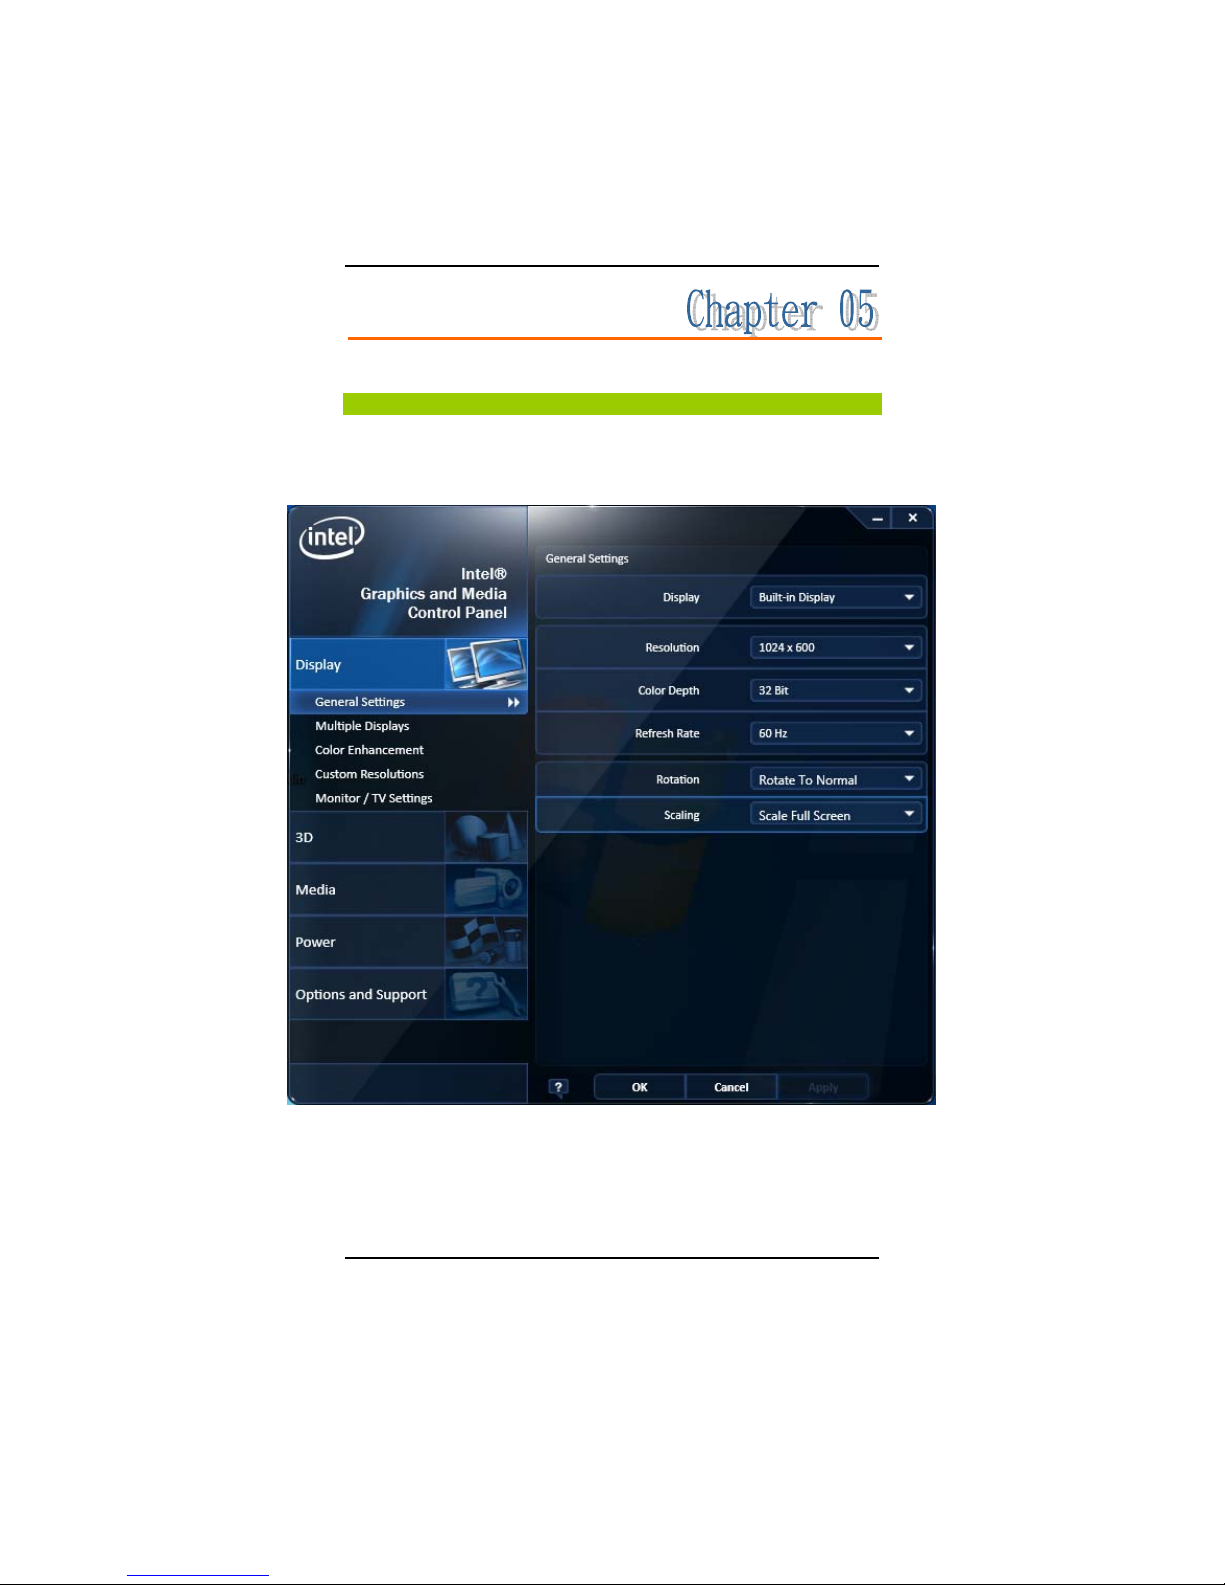
After you have restarted Windows, open the “Control Panel” and click
on the “Intel(R) GMA Driver” icon.
This application will allow you to adjust the settings of your display, get
important information about your video drivers, and adjust colors,
accelerations properties, rotation, and more.
Page 33
32
System Recovery
System recovery steps:
1. Connect following external devices to 750 tablet PC:
a. USB Keyboard
b. USB Mouse (option)
c. USB DVD-ROM or DVD R/W
2. Press power button then press F2 boot into BIOS Setup Menu, then
set USB DVD-ROM device to priority one boot device under Boot
device setting item.
Notice: USB DVD-ROM belongs to USB category, not CD/DVD-ROM Drive in
Boot Type Order menu.
3. Save the BIOS setting and reboot system, after see the below
message, press any key on keyboard to boot via DVD device: Press
any key to boot from CD or DVD…”
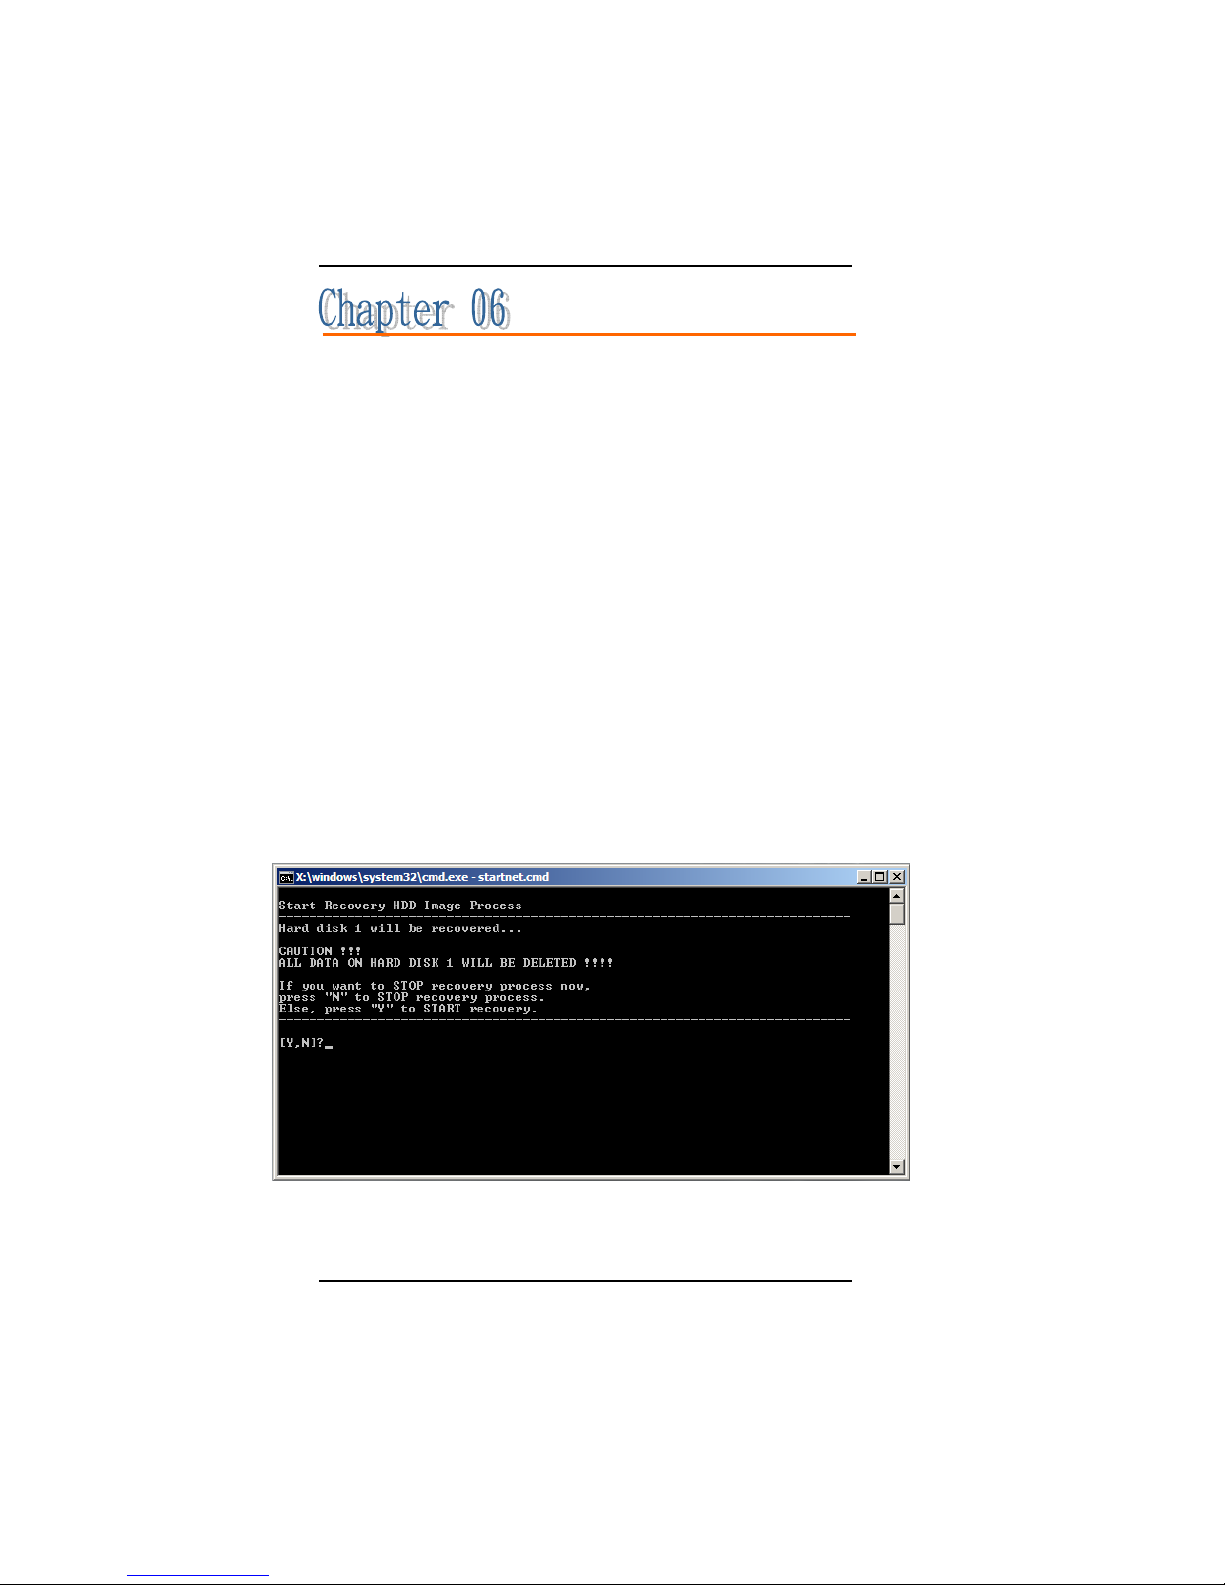
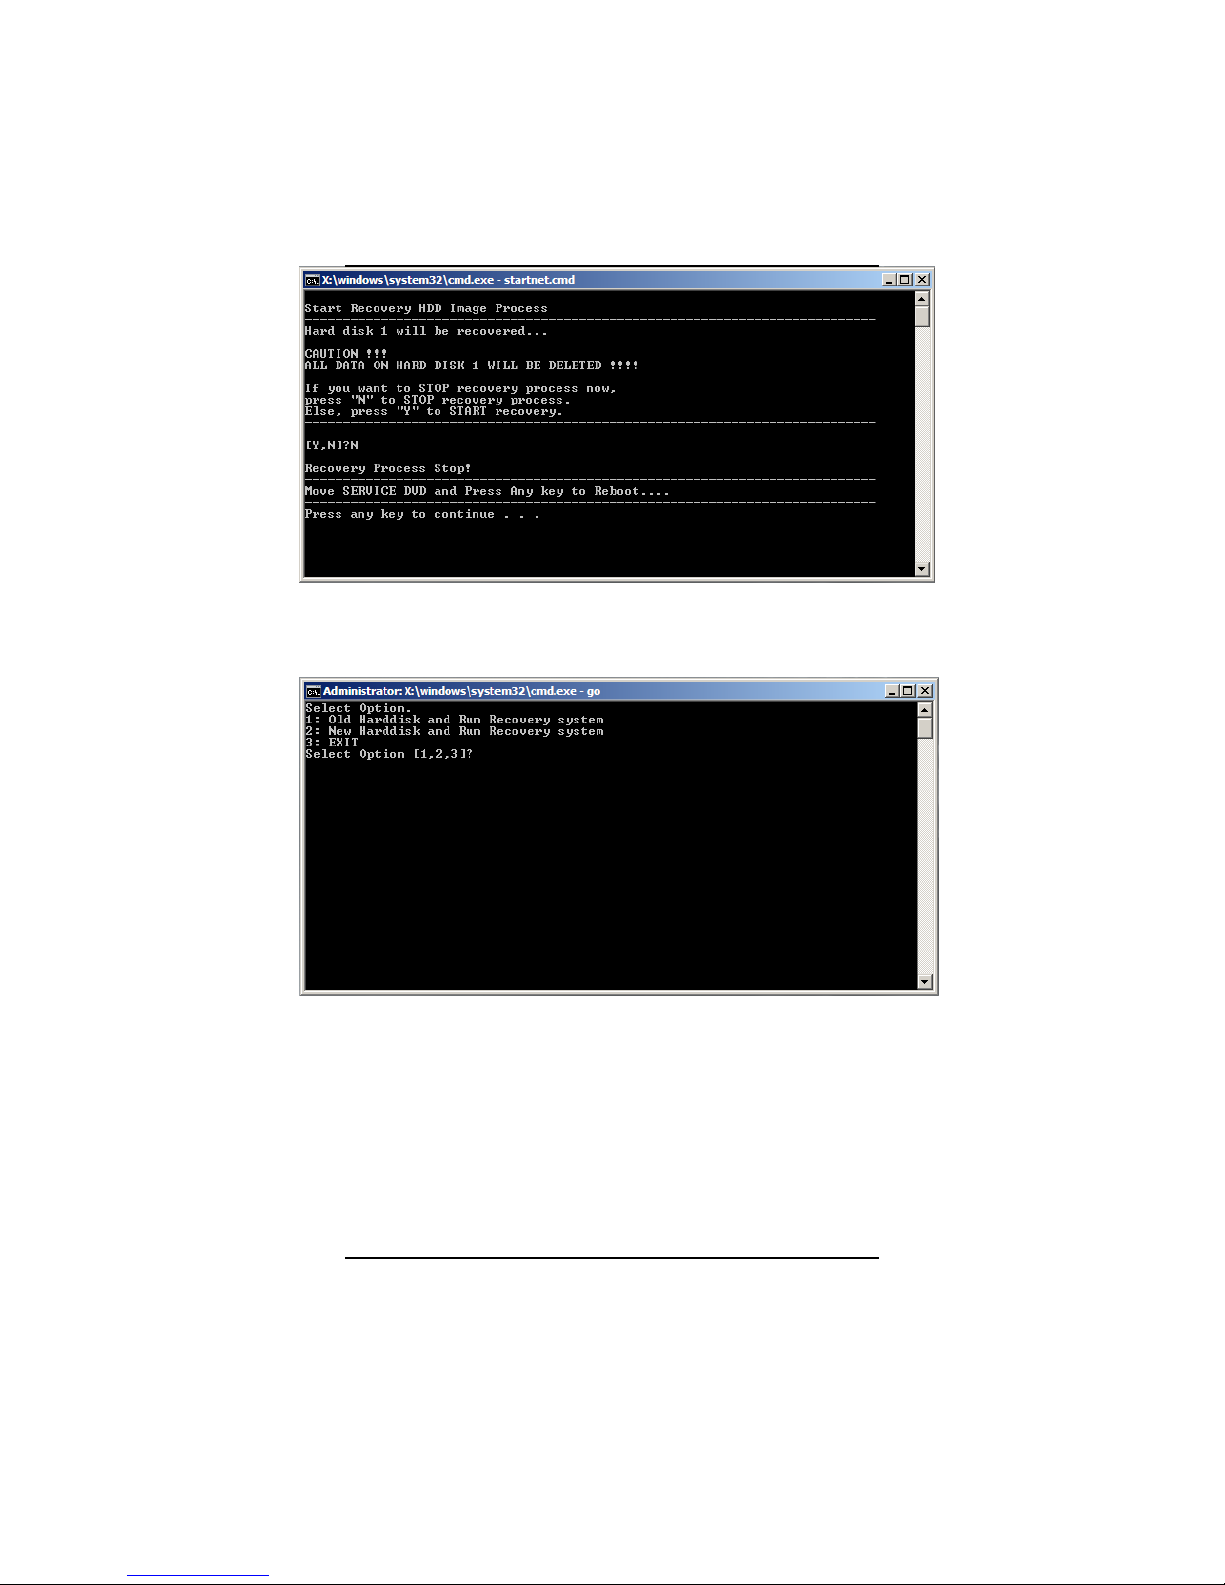
4. When you see the menu as follows:
You can choose: “Y” to continue the recovery process
“N” to exit the recovery process
Page 34
33
5. After you choose “Y” at step 4, you can see the menu like below,
then you can choose:
“1”: Old Hard disk and Run Recovery system (Recover OS with
current partition setting, partition 1 (C:) will be recovered,
and data on D: will not be changed)
“2”: New Hard disk and Run Recovery system (Clean and
re-partition your hard disk and recover OS to the first
partition)
“3”: EXIT (Exit the recovery process and reboot your system)
Page 35
34
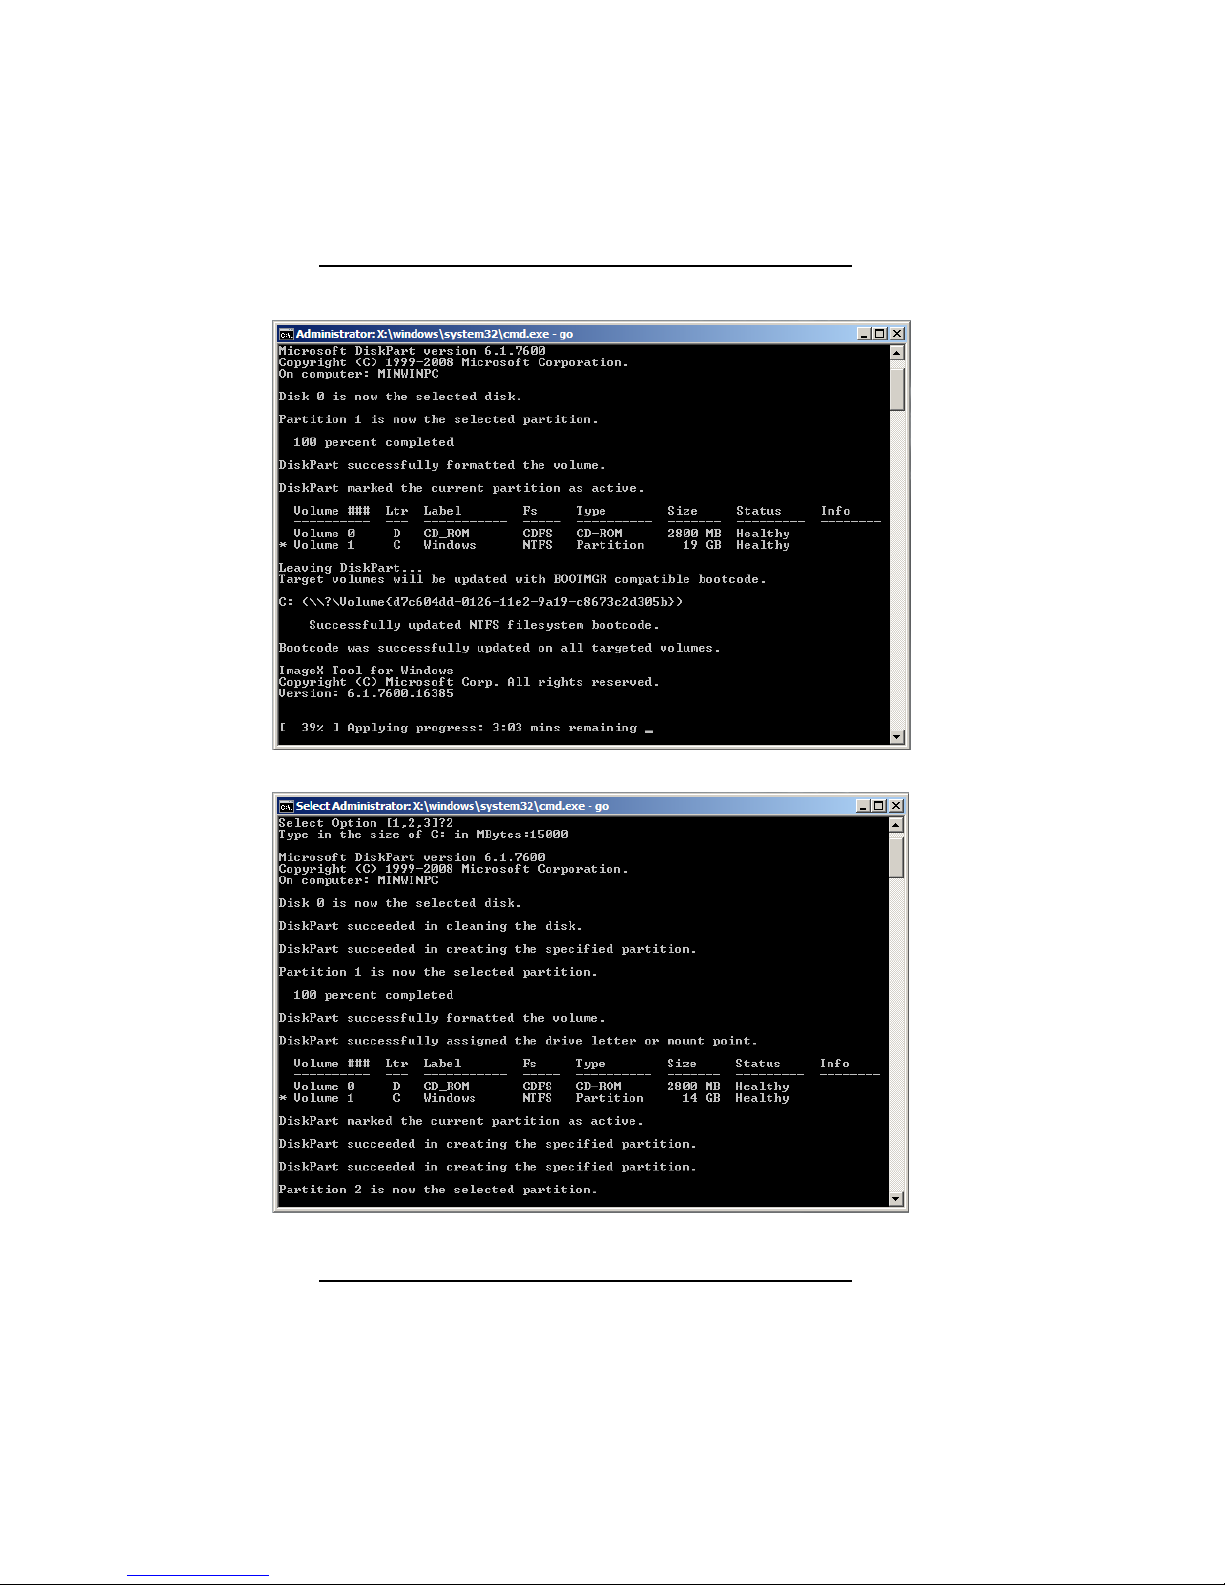
6. After option 1, system recovery will run with the message like this:
7. After option 2, system recovery will run with the message like this:
Notice: You w ill be prompted a message to ask you type the size of C: in MBytes.
Please make sure it is at least 15000.
Page 36

35
Troubleshooting
This chapter describes common problems that you may encounter
while using your computer and how to solve them.
CHECKING CABLES AND CONNECTIONS
When trying to troubleshoot a problem that appears to be hardware
related, always start by performing a careful visual inspection of the
exterior of the computer. If none of the LEDs are illuminated, make
sure that your computer and its peripherals are getting power and
connected to each other properly.
To check the power cables, and connections:
1. If you have been using battery power, connect the computer to an
external power source and make sure that the battery has a sufficient
charge.
2. If you are using the computer with the AC adapter, check the power
outlet, the power cord, and any power switches that may affect your
computer.
3. Check the wall outlet or power strip with an item that you know is
functioning properly. A lamp or radio is a convenient item for
checking the power. You may also need to check the fuses and
breakers in your service box.
4. If the outlet is controlled by a wall switch, make sure that the switch
is on.
5. If the outlet is controlled by a dimmer switch, use a different outlet.
6. If your computer is plugged into a power strip with an On/Off switch,
make sure the switch is on.
7. With the computer’s power switched off, check all cable connections.
If the computer is connected to any peripheral devices, look for loose
or disconnected cables.
Page 37

36
If the computer is too close to a wall, a cable connection may become
loose or the cables may be crimped.
NOTE: Do not substitute cables for different devices (other than the
manufacturer recommended cables) even if they look exactly alike. The
wiring inside the cable may be different.
When you are certain that you have power available and all connections
are good, turn the computer on again. If the computer still does not start,
you may have a hardware problem after all.
GENERAL PROBLEMS
A few common problems and suggested solutions are listed below.
SYSTEM NOT RESUMING OPERATION
If the system will not resume operation after it has been suspended,
check the following possible causes:
The battery may either be defective, or discharged to a critically low
level. To correct this problem, connect the computer to external power
supply.
DISPLAY SCREEN IS BLANK OR DIFFICULT TO READ
If the screen is blank or unreadable, please confirm that the system is
powered on and running. If it is on:
The brightness control may be set too low, change the
brightness by using on the brightness control at the right side of
the system.
The video timeout may have expired, tap on the display screen
to reactivate the display.
Page 38

37
CURSOR IS NOT IN POSITION WHILE USING THE STYLUS
Change the settings in the Touch-kit utility. Select the 4 Points
Calibration to recalibrate the touch screen.
THE CURSOR IS STILL NOT IN POSITION WITH THE STYLUS
If after performing the standard 4 Points Calibration routine the
pointer still won’t properly align with stylus, return to the Touch-kit
and perform a linearization calibration (see Chapter 4 for more
details).
UNABLE TO CONNECT TO THE INTERNET
Check that the settings in the Network Connections panel have not
been changed. If they haven’t, the account for your Internet Service
Provider (ISP) might not be properly configured or has temporarily
gone down. Ask for your ISP’s technical support for assistance.
NO SOUND ON THE EXTERNAL SPEAKERS OR HEADPHONES
Check to make sure your speakers or headphones are connected to the
proper jack. Switch jacks.
 Loading...