

Electronic
Dry Cabinet
with Fingerprint Lock (90 L)
USER MANUAL
THANK YOU FOR CHOOSING RUGGARD
The Ruggard Electronic Dry Cabinet protects your lenses, photographic and optical
equipment, mobile electronics, and other valuable accessories from excessive
moisture. Using the cabinet’s fast-acting TE Cooling Wafer, you can regulate the
interior’s relative humidity to help prevent fungus and corrosion from damaging
your gear. A convenient fingerprint lock allows easy and safe access to your gear
inside. The cabinet oers silent operation, and the unit is dripless, so there’s no need
for a water tray.
PRECAUTIONS
• Please read and follow these instructions, and keep this manual in a safe place.
• Do not place any corrosive or flammable materials inside the cabinet.
•
Keep this product away from direct sunlight, high temperatures, and windy
environments.
•
When storing food, medicine, or chemicals, make sure they are stored in a
separate and sealed container.
• Keep this product away from children.
• This product is for indoor use only.
• All images are for illustrative purposes only.
OVERVIEW
Important! Make sure to retrieve the power adapter, feet (×4), and keys from the bottom
of the box.
1 2 3 4 5 6 7
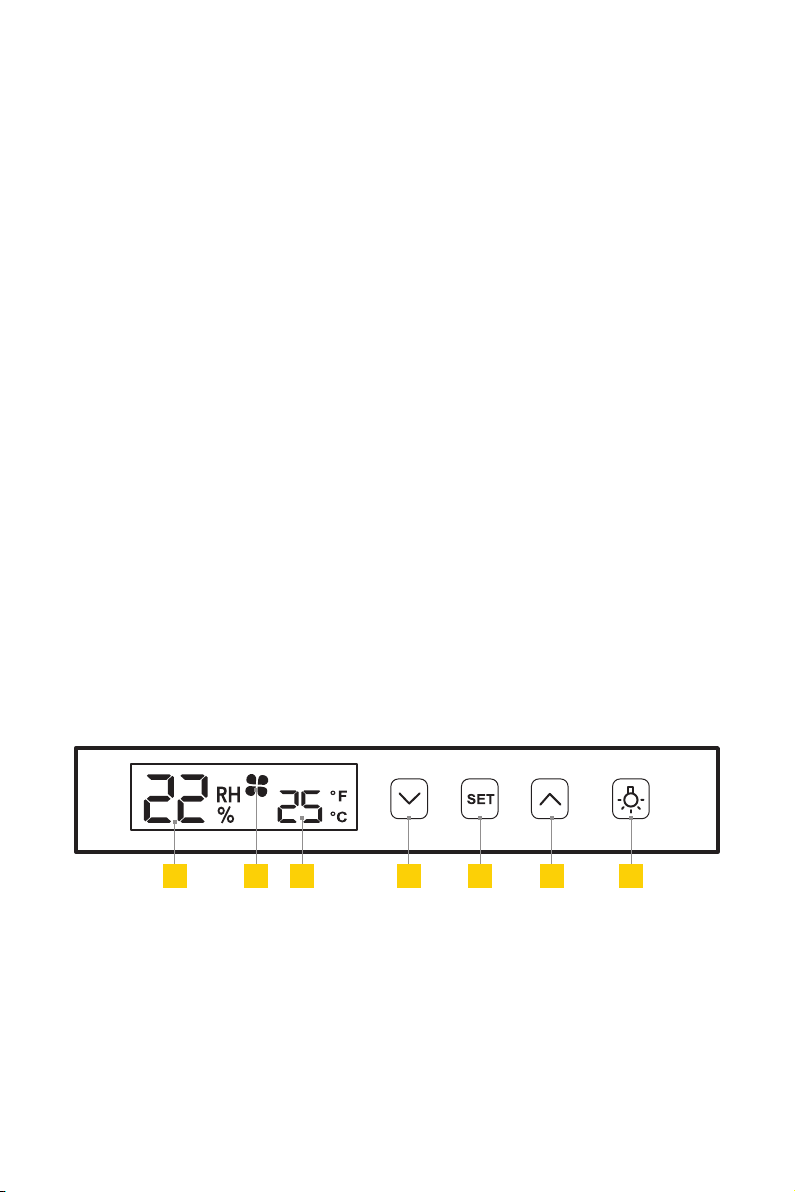
Control Panel
The illuminated digital display provides quick setting adjustments and oers an
energy-saving auto-dimming function.
1. Relative humidity
2. Adjusting to new RH target
3. Temperature
4. Decrease RH value
2
5. Adjust RH/confirm setting
6. Increase RH value
7. Light and display on / light o
6
5
7
10
1
2
3
4
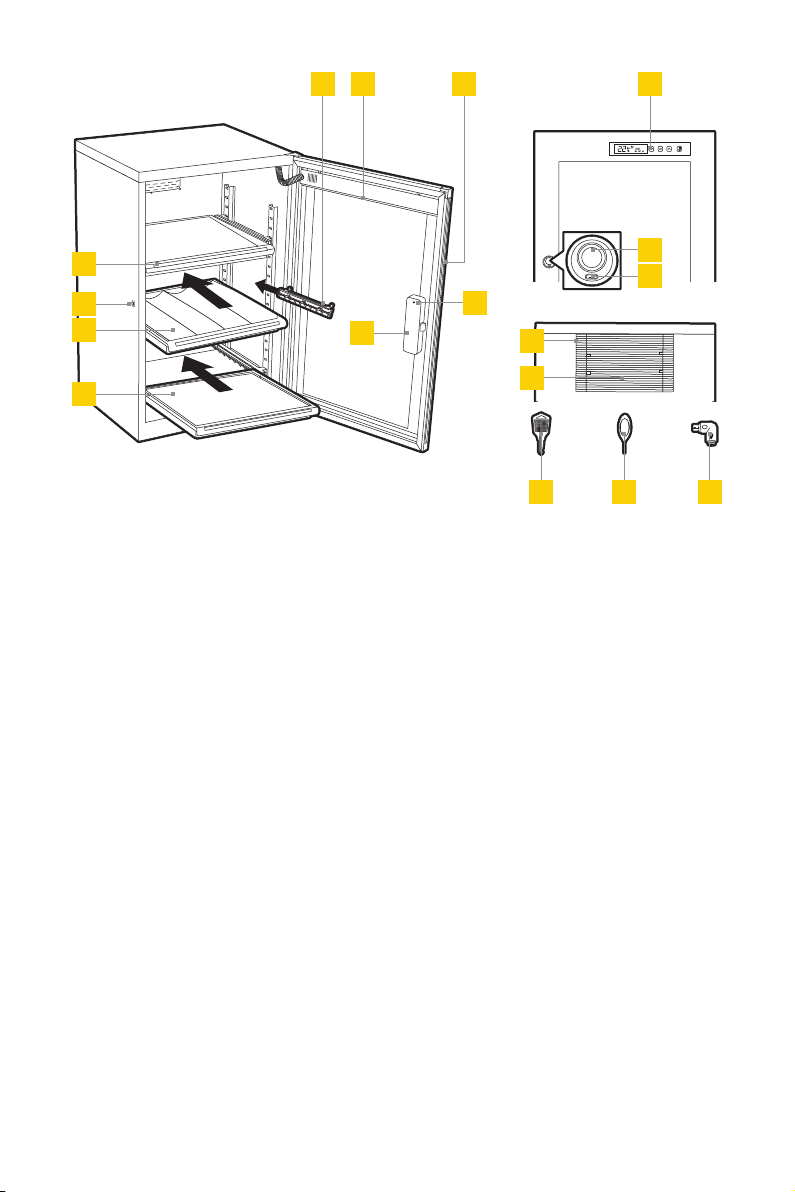
Inside
1. Sliding shelf (×3)
2. Key lock
3. Contoured foam lining
4. Flat foam lining (×2)
5.
Adjustable, sliding quick-mount rails
(×6)
6. LED lights
7. Handle
8. Battery compartment and cover
9. Config. button
9
8
Front
10. Control panel
11. Fingerprint sensor
12. Micro-USB port
Back
13. DC port
14. Moisture sync
Parts
15. Door keys (×2)
16. Config. key
17. DC to Micro-USB adapter
Also included
• Power adapter
• Feet (×4)
11
12
13
14
15 16 17
3
ATTACHING THE CABINET FEET
1. Turn the dry cabinet on its side.
2. Screw in the four cabinet feet.
3. Flip the dry cabinet right side up.
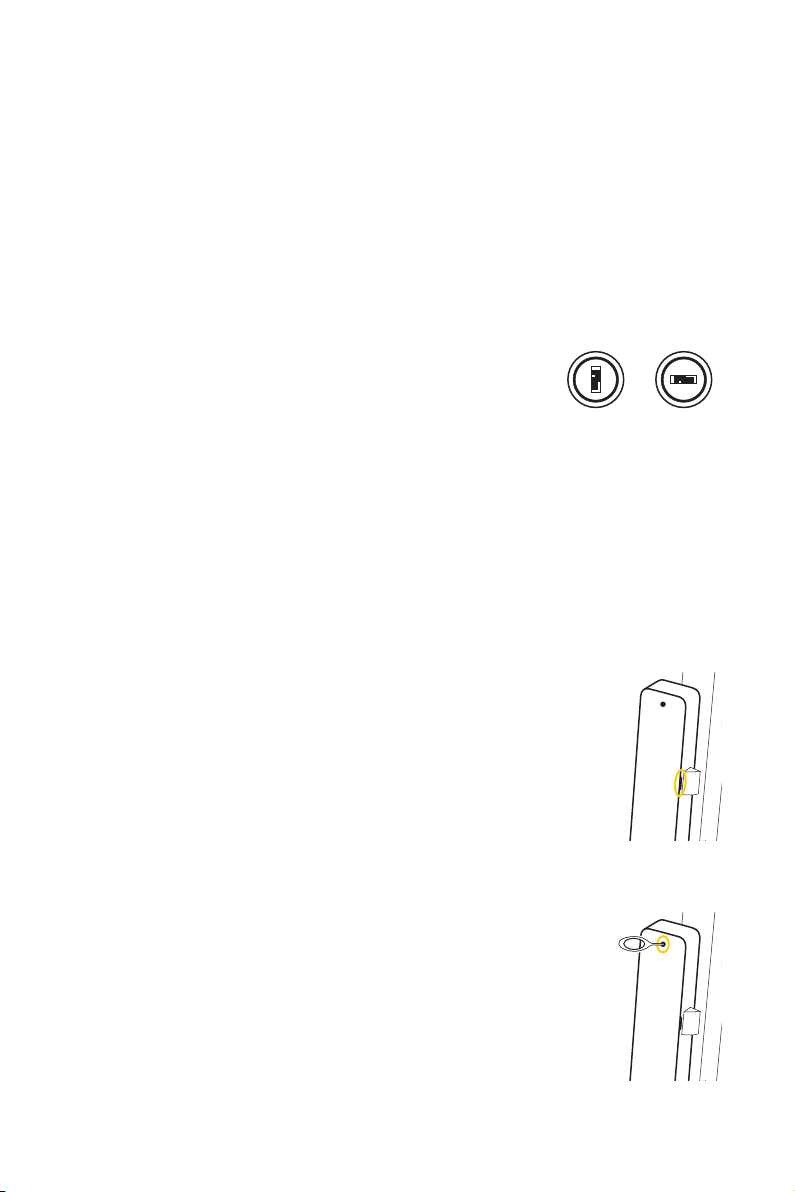
OPENING THE CABINET FOR THE FIRST TIME
You can initially access the inside of the dry cabinet by using the included keys or
supplied USB and power adapter.
Using the keys: Use the included keys to unlock and open
the door.
Locked Unlocked
Using the USB Adapter:
1. Insert the USB adapter into the fingerprint lock’s USB port.
2. Connect the included power adapter to the USB adapter and a power source.
3. Place your finger on the fingerprint sensor for about one second, until the sensor
turns green, and open the door.
INSTALLING THE BATTERIES
1.
Remove the lock’s battery compartment cover and install three
AAA batteries (not included). Install the two outside batteries
first and then the middle battery. Make sure to install the
batteries with the correct orientation, following the guide on
the inside of the battery compartment.
2. Replace the compartment cover until it clicks shut.
THE FINGERPRINT LOCK
The fingerprint lock keeps your photo and video equipment safe
with the touch of a finger. You can easily store up to 20 fingerprints,
and the lock oers automatic and manual locking modes.
Adding Fingerprints
1.
Use the config. key to press and release the config. button. You’ll
hear a beep, and the fingerprint sensor will turn blue.
4

2. Place your finger onto the sensor until you hear a beep.
3. Repeat Step 2 five more times. The sensor will turn green when your fingerprint
is accepted.
If your fingerprint is not accepted, the sensor will beep and turn red. Continue to
repeat the steps until complete.
Note: Make sure the key lock is in the vertical position, so the
cabinet door lock engages properly.
Locked Unlocked
Deleting Fingerprints
Deleting fingerprints will delete all fingerprints stored in the memory.
Use the config. key to press and hold the config. button for about four seconds, until
you hear four beeps, and then release.
Auto and Manual Mode Selection
There are two modes for accessing the inside of the EDC-FP90L. In manual mode, your
fingerprint unlocks and locks the dry cabinet. In automatic mode, your finger unlocks
the cabinet, but the unit automatically locks in about four seconds. The EDC-FP90L’s
default setting is auto mode.
Warning! Switching modes will delete all stored fingerprints.
To change the mode, use the config. key to press and hold the config. button until you
hear a series of four beeps and then two beeps.
Low Battery Warning
If the fingerprint lock has low battery power, it will beep six times. Replace all the
AAA batteries immediately. If the batteries die, use the included USB adapter and
power adapter with the lock’s USB port, or use the included keys to manually unlock
the door. See Opening the Cabinet for the First Time above.
Important: Keep the keys and USB adapter in a safe place so you can access the contents
of the dry cabinet if the batteries fail.
5

SETTING AND CHECKING HUMIDITY
The relative humidity setting regulates the entire cabinet interior. You can set the
relative humidity percentage from 60% to 25%*, and it adjusts within 1 to 3 hours. The
inside humidity can be decreased, but you cannot increase the humidity more than
the surrounding environment. Keep the door closed to ensure optimal humidity levels.
Important: Dry o any items to remove excess moisture before placing them inside
the dry cabinet.
1. Press the button until the humidity display begins to flash.
2. Use the ( ) and ( ) buttons to set the desired relative humidity value. If you set
the RH value lower than the current target, a icon will appear in the display.
3. Press the button to confirm the settings.
You can verify the target humidity value by pressing and holding the button for
approx. two seconds. The display will flash the target value and return to the actual
humidity level reading.
*Relative humidity values programmed outside the 60% to 25% range will have
no eect.
Note: Do not place the rear of the cabinet directly against a wall or other surface. This
may reduce the operational eciency. Keep the door closed to prevent the humidity
increasing inside the cabinet.
SETTING FAHRENHEIT/CELSIUS
When turning on the unit for the first time, the temperature will be displayed in
degrees Celsius.
This unit does not control temperature.
Press and hold the button for five seconds to switch between Celsius and
Fahrenheit. Press the or arrow to confirm.
6

OPTIMAL RELATIVE HUMIDITY (RH) LEVELS
Relative Humidity
(RH) Level Recommended Items
50%–60% Books, antique documents, paper (fax, copy, print)
40%–50%
35%–40% Metal and metal powder products, electrical equipment,
25%–30%
Camcorders, cameras, lenses, telescopes, microscopes,
endoscopes, compact discs, film negatives, film
transparencies/slides, microfilm, disk drives, audio and
video tapes
semiconductors, capacitors, printed circuit boards, IC,
batteries and other electronic equipment, precision
measuring tools, spectrometers, optics, lenses
Pharmaceutical raw materials, spices, powder coating,
adhesives, seeds, pollen, dry flour
SPECIFICATIONS
Volume 90 L
Voltage 110 to 240 V, 50/60 Hz
Power 9 W
Fingerprint lock power AAA batteries (×3) not included
Relative humidity 60% to 25 % (±3%RH)
Outer dimensions (H × W × D) 26.8 × 16.7 × 14.6 in. (68 × 42.5 × 37 cm)
Inner dimensions (H × W × D) 24.8 × 15.7 × 13.4 in. (63 × 40 × 34 cm)
Weight 32.1 lb. (14.6 kg)
7

ONE-YEAR LIMITED WARRANTY
This Ruggard product is warranted to the original purchaser to be free from defects in materials and workmanship
under normal consumer use for a period of one (1) year from the original purchase date or thirty (30) days after
replacement, whichever occurs later. The warranty provider’s responsibility with respect to this limited warranty
shall be limited solely to repair or replacement, at the provider’s discretion, of any product that fails during normal
use of this product in its intended manner and in its intended environment. Inoperability of the product or part(s)
shall be determined by the warranty provider. If the product has been discontinued, the warranty provider reserves
the right to replace it with a model of equivalent quality and function.
This warranty does not cover damage or defect caused by misuse, neglect, accident, alteration, abuse, improper
installation or maintenance. EXCEPT AS PROVIDED HEREIN, THE WARRANTY PROVIDER MAKES NEITHER ANY
EXPRESS WARRANTIES NOR ANY IMPLIED WARRANTIES, INCLUDING BUT NOT LIMITED TO ANY IMPLIED
WARRANTY OF MERCHANTABILITY OR FITNESS FOR A PARTICULAR PURPOSE. This warranty provides you
with specific legal rights, and you may also have additional rights that vary from state to state.
To obtain warranty coverage, contact the Ruggard Customer Service Department to obtain a return merchandise
authorization (“RMA”) number, and return the defective product to Ruggard along with the RMA number and proof
of purchase. Shipment of the defective product is at the purchaser’s own risk and expense.
For more information or to arrange service, visit www.ruggard.com or call Customer Service at 212-594-2353.
Product warranty provided by the Gradus Group.
www.gradusgroup.com
Ruggard is a registered trademark of the Gradus Group.
© 2020 Gradus Group LLC. All Rights Reserved.
GG4
 Loading...