

Page 1

Ruckus Wireless ZoneDirector™
Release 10.0 User Guide
Part Number: 800-71463-001 Rev A
Published: 02 May 2017
www.ruckuswireless.com
Page 2

Copyright Notice and Proprietary Information
Copyright 2017. Ruckus Wireless, Inc. All rights reserved.
No part of this documentation may be used, reproduced, transmitted, or translated, in
any form or by any means, electronic, mechanical, manual, optical, or otherwise, without
prior written permission of Ruckus Wireless, Inc. (“Ruckus”), or as expressly provided
by under license from Ruckus.
Destination Control Statement
Technical data contained in this publication may be subject to the export control laws
of the United States of America. Disclosure to nationals of other countries contrary to
United States law is prohibited. It is the reader’s responsibility to determine the applicable
regulations and to comply with them.
2
Disclaimer
THIS DOCUMENTATION AND ALL INFORMATION CONTAINED HEREIN (“MATERIAL”)
IS PROVIDED FOR GENERAL INFORMATION PURPOSES ONLY. RUCKUS AND ITS
LICENSORS MAKE NO WARRANTY OF ANY KIND, EXPRESS OR IMPLIED, WITH
REGARD TO THE MATERIAL, INCLUDING, BUT NOT LIMITED TO, THE IMPLIED
WARRANTIES OF MERCHANTABILITY, NON-INFRINGEMENT AND FITNESS FOR A
PARTICULAR PURPOSE, OR THAT THE MATERIAL IS ERROR-FREE, ACCURATE OR
RELIABLE. RUCKUS RESERVES THE RIGHT TO MAKE CHANGES OR UPDATES TO
THE MATERIAL AT ANY TIME.
Limitation of Liability
IN NO EVENT SHALL RUCKUS BE LIABLE FOR ANY DIRECT, INDIRECT, INCIDENTAL,
SPECIAL OR CONSEQUENTIAL DAMAGES, OR DAMAGES FOR LOSS OF PROFITS,
REVENUE, DATA OR USE, INCURRED BY YOU OR ANY THIRD PARTY, WHETHER
IN AN ACTION IN CONTRACT OR TORT, ARISING FROM YOUR ACCESS TO, OR USE
OF, THE MATERIAL.
Trademarks
Ruckus Wireless, Ruckus, the bark logo, BeamFlex, ChannelFly, Dynamic PSK,
FlexMaster, Simply Better Wireless, SmartCell, SmartMesh, SmartZone, Unleashed,
ZoneDirector and ZoneFlex are trademarks of Ruckus Wireless, Inc. in the United States
and other countries. All other product or company names may be trademarks of their
respective owners.
Ruckus Wireless ZoneDirector™ Release 10.0 User Guide
2
Page 3

Contents
Copyright Notice and Proprietary Information.............................................................................2
1 About This Guide
Document Conventions.......................................................................................................11
Related Documentation.......................................................................................................12
Documentation Feedback...................................................................................................12
Online Training Resources...................................................................................................13
2 Introducing ZoneDirector
Overview of ZoneDirector....................................................................................................15
ZoneDirector Physical Features...........................................................................................15
ZoneDirector 1200........................................................................................................15
ZoneDirector 3000........................................................................................................17
ZoneDirector 5000........................................................................................................19
Introduction to the Ruckus Wireless Network......................................................................23
Installing ZoneDirector.........................................................................................................24
Ensuring That APs Can Communicate with ZoneDirector....................................................25
How APs Discover ZoneDirector on the Network...........................................................25
How to Ensure that APs Can Discover ZoneDirector on the Network.............................27
Firewall Ports that Must be Open for ZoneDirector Communications.............................35
Accessing ZoneDirector's Command Line Interface............................................................36
Using the ZoneDirector Web Interface.................................................................................37
Navigating the Dashboard.............................................................................................38
Registering Your Product....................................................................................................39
3 Configuring System Settings
System Configuration Overview...........................................................................................41
Changing the System Name..........................................................................................41
Changing the Network Addressing......................................................................................41
IPv6 Configuration.........................................................................................................42
Enabling an Additional Management Interface...............................................................43
Creating Static Route Entries..............................................................................................45
Static Route Example....................................................................................................45
Enabling Smart Redundancy...............................................................................................46
Configuring ZoneDirector for Smart Redundancy...........................................................47
Managing Smart Redundancy AP License Pools...........................................................49
Ruckus Wireless ZoneDirector™ Release 10.0 User Guide
3
Page 4

Configuring the Built-in DHCP Server..................................................................................51
Enabling the Built-in DHCP server.................................................................................51
Viewing DHCP Clients...................................................................................................52
Controlling ZoneDirector Management Access....................................................................53
Setting the System Time.....................................................................................................54
Setting the Country Code....................................................................................................55
Channel Optimization....................................................................................................55
Channel Mode...............................................................................................................56
Changing the System Log Settings.....................................................................................57
Reviewing the Current Log Contents.............................................................................57
Customizing the Current Log Settings...........................................................................58
Setting Up Email Alarm Notifications...................................................................................61
Customizing Email Alarms.............................................................................................63
Configuring SMS Settings for SMS Guest Pass Delivery......................................................64
Enabling Login Warning Messages......................................................................................65
Enabling Network Management Systems............................................................................65
Enabling SmartCell Insight Communication....................................................................65
Enabling Management via FlexMaster............................................................................66
Enabling Northbound Portal Interface Support...............................................................68
Configuring SNMP Support...........................................................................................69
Enabling Telnet..............................................................................................................75
4 Configuring Security and Other Services
Self Healing.........................................................................................................................77
Automatically Adjust AP Power......................................................................................77
Automatic Channel Selection.........................................................................................77
Load Balancing...................................................................................................................81
To disable Load Balancing on a per-WLAN basis..........................................................82
Band Balancing...................................................................................................................82
Radar Avoidance Pre-Scanning..........................................................................................82
AeroScout RFID Tag Detection...........................................................................................82
Ekahau Tag Detection.........................................................................................................83
Active Client Detection........................................................................................................83
Tunnel Configuration...........................................................................................................84
Packet Inspection Filter.......................................................................................................85
Ethernet Port Redundancy..................................................................................................85
Using an External AAA Server.............................................................................................87
Active Directory.............................................................................................................88
LDAP............................................................................................................................90
RADIUS /RADIUS Accounting.......................................................................................93
TACACS+...................................................................................................................104
4
Ruckus Wireless ZoneDirector™ Release 10.0 User Guide
Page 5

Testing Authentication Settings...................................................................................106
Controlling Network Access Permissions..........................................................................106
Creating Layer 2/MAC Address Access Control Lists..................................................107
Creating Layer 3/Layer 4/IP Address Access Control Lists..........................................108
Configuring Precedence Policies.................................................................................109
Blocking Client Devices...............................................................................................110
Configuring Client Isolation White Lists........................................................................112
Application Recognition and Filtering...........................................................................114
Configuring Floorplan Maps..............................................................................................120
Configuring Wireless Intrusion Prevention..........................................................................122
DoS Protection............................................................................................................122
Intrusion Detection and Prevention..............................................................................123
Rogue DHCP Server Detection....................................................................................124
DHCP Relay......................................................................................................................126
To enable DHCP Relay for a WLAN:............................................................................127
Bonjour Gateway..............................................................................................................128
Bridge Service Rules...................................................................................................128
Bridge Service Records...............................................................................................128
Creating a Bonjour Gateway Rule - ZD Site.................................................................129
Creating a Bonjour Gateway Rule AP Site...................................................................131
Applying a Bonjour Policy to an AP..............................................................................132
Example Network Setup..............................................................................................133
Bonjour Fencing................................................................................................................133
Configuring Bonjour Fencing Policies...........................................................................134
Applying a Bonjour Fencing Policy to an AP or AP Group............................................135
SPoT Location Services....................................................................................................136
5 Managing a Wireless Local Area Network
Overview of Wireless Networks.........................................................................................139
About Ruckus Wireless WLAN Security.............................................................................140
Creating a WLAN..............................................................................................................141
General Options..........................................................................................................142
WLAN Usage Types....................................................................................................142
Authentication Method................................................................................................157
Fast BSS Transition.....................................................................................................157
Encryption Options......................................................................................................157
Options.......................................................................................................................158
Advanced Options.......................................................................................................160
Creating a Copy of an Existing WLAN for Workgroup Use.................................................166
Customizing WLAN Security.............................................................................................167
Reviewing the Initial Security Configuration..................................................................167
Ruckus Wireless ZoneDirector™ Release 10.0 User Guide
5
Page 6

Fine Tuning the Current Security Mode........................................................................168
Switching to a Different Security Mode........................................................................168
Using the Built in EAP Server.......................................................................................169
Authenticating with an External RADIUS Server...........................................................169
If You Change the Internal WLAN to WEP or 802.1X...................................................170
Working with WLAN Groups.............................................................................................170
Creating a WLAN Group..............................................................................................171
Viewing a List of APs That Belong to a WLAN Group...................................................172
Deploying ZoneDirector WLANs in a VLAN Environment...................................................172
Tagging Management Traffic to a VLAN......................................................................174
How Dynamic VLAN Works.........................................................................................175
Working with VLAN Pools............................................................................................177
Working with Hotspot Services.........................................................................................179
Creating a Hotspot Service..........................................................................................180
Assigning a WLAN to Provide Hotspot Service............................................................183
Common WISPr Attribute Abbreviations......................................................................183
Creating a Hotspot 2.0 Service.........................................................................................184
Create a Service Provider Profile..................................................................................185
Create an Operator Profile...........................................................................................186
Create a Hotspot 2.0 WLAN........................................................................................188
Bypass Apple CNA...........................................................................................................189
Customizing the Web Portal Logo.....................................................................................190
6 Managing Access Points
Adding New Access Points to the Network.......................................................................193
Connecting the APs to the Network............................................................................193
Verifying/Approving New APs......................................................................................194
Working with Access Point Groups...................................................................................194
Modifying the System Default AP Group......................................................................195
Creating a New Access Point Group...........................................................................197
Modifying Access Point Group Membership................................................................197
Modifying Model Specific Controls...............................................................................198
Configuring AP Ethernet Ports...........................................................................................200
DHCP Option 82.........................................................................................................202
Designating Ethernet Port Type...................................................................................204
Using Port Based 802.1X............................................................................................205
Viewing AP Ethernet Port Status..................................................................................208
Reviewing Current Access Point Policies...........................................................................209
Using Limited ZD Discovery for N+1 Redundancy.......................................................211
Importing a USB Software Package..................................................................................212
To provision a SmartPoint Access Point with USB software:.......................................213
6
Ruckus Wireless ZoneDirector™ Release 10.0 User Guide
Page 7

Managing Access Points Individually.................................................................................213
Configuring Hotspot 2.0 Venue Settings for an AP......................................................216
Optimizing Access Point Performance..............................................................................217
Assessing Current Performance Using the Access Point Table....................................217
Adjusting AP Settings..................................................................................................218
Prioritizing WLAN Traffic..............................................................................................218
7 Managing User Access
Enabling Automatic User Activation with Zero-IT...............................................................219
Clients that Support Zero-IT........................................................................................220
Self-Provisioning Clients with Zero-IT...........................................................................220
Self-Provisioning Clients without Ethernet Ports...........................................................222
Provisioning Clients that Do Not Support Zero-IT.........................................................222
Working with Dynamic Pre-Shared Keys...........................................................................222
Enabling Dynamic Pre-Shared Keys on a WLAN..........................................................223
Setting Dynamic Pre-Shared Key Expiration................................................................224
Generating Multiple Dynamic PSKs.............................................................................225
Adding New User Accounts to ZoneDirector.....................................................................228
Internal User Database................................................................................................228
Managing Current User Accounts.....................................................................................229
Changing an Existing User Account.............................................................................229
Deleting a User Record...............................................................................................230
Creating New User Roles..................................................................................................230
Role Based Access Control Policy...............................................................................231
Managing Automatically Generated User Certificates and Keys.........................................233
Using an External Server for User Authentication...............................................................233
Enabling Web Authentication............................................................................................235
Captive Portal Redirect on Initial Browser HTTPS Request..........................................236
8 Managing Guest Access
Configuring Guest Access.................................................................................................237
Creating a Guest Access Service......................................................................................237
Using Guest Pass Self-Service....................................................................................238
Configuring Guest Subnet Restrictions..............................................................................246
Creating a Guest WLAN....................................................................................................247
Using the BYOD Onboarding Portal..................................................................................248
Working with Guest Passes..............................................................................................251
Generating a Guest Pass from the Monitor Page.........................................................252
Configuring Guest Pass Generation.............................................................................254
Generating and Delivering a Single Guest Pass...........................................................257
Generating and Printing Multiple Guest Passes at Once..............................................262
Ruckus Wireless ZoneDirector™ Release 10.0 User Guide
7
Page 8

Monitoring Generated Guest Passes...........................................................................264
Creating a Custom Guest Pass Printout......................................................................265
Delivering Guest Passes via Email...............................................................................267
Delivering Guest Passes via SMS................................................................................267
9 Monitoring Your Wireless Network
Reviewing the ZoneDirector Monitoring Options................................................................269
Monitoring Access Points..................................................................................................269
Using the AP Status Overview Page............................................................................269
Monitoring Individual APs............................................................................................273
Moniting WLAN Status......................................................................................................280
Reviewing Current User Activity.........................................................................................281
Active Client Action Icons............................................................................................282
Viewing Application Usage Statistics...........................................................................282
Monitoring Individual Clients........................................................................................285
Monitoring Wired Clients...................................................................................................288
Monitoring AAA Server Statistics.......................................................................................288
Reviewing Current Alarms.................................................................................................288
Reviewing Recent System Events.....................................................................................289
Monitoring Location Services............................................................................................290
Monitoring Mesh Status....................................................................................................291
Real Time Monitoring........................................................................................................291
Real Time Monitoring Widgets.....................................................................................292
Detecting Rogue Access Points........................................................................................292
Monitoring System Information..........................................................................................295
Monitoring System Ethernet Port Status......................................................................295
10 Deploying a Smart Mesh Network
Overview of Smart Mesh Networking................................................................................297
Smart Mesh Networking Terms.........................................................................................297
Supported Mesh Topologies.............................................................................................298
Standard Topology......................................................................................................298
Wireless Bridge Topology............................................................................................299
Hybrid Mesh Topology................................................................................................300
Deploying a Wireless Mesh via ZoneDirector.....................................................................301
Step 1: Prepare for Wireless Mesh Deployment...........................................................301
Step 2: Enable Mesh Capability on ZoneDirector.........................................................302
Step 3: Provision and Deploy Mesh Nodes..................................................................303
Step 4: Verify That the Wireless Mesh Network Is Up..................................................304
Understanding Mesh-related AP Statuses.........................................................................304
Using the ZoneFlex LEDs to Determine the Mesh Status...................................................305
8
Ruckus Wireless ZoneDirector™ Release 10.0 User Guide
Page 9

On Single-band ZoneFlex APs.....................................................................................305
On Dual-band ZoneFlex APs.......................................................................................307
Using Action Icons to Configure and Troubleshoot APs in a Mesh.....................................308
Setting Mesh Uplinks Manually..........................................................................................310
Troubleshooting Isolated Mesh APs..................................................................................311
Understanding Isolated Mesh AP Statuses..................................................................311
Recovering an Isolated Mesh AP.................................................................................312
Best Practices and Recommendations.............................................................................314
11 Setting Administrator Preferences
Changing the Web Interface Display Language.................................................................315
Changing the ZoneDirector Administrator User Name and Password................................315
Using an External Server for Administrator Authentication............................................316
Setting Administrator Login Session Timeout...............................................................318
Working with Backup Files................................................................................................318
Backing Up a Network Configuration...........................................................................318
Restoring Archived Settings to ZoneDirector...............................................................319
Restoring ZoneDirector to Default Factory Settings...........................................................321
Alternate Factory Default Reset Method......................................................................323
Upgrading ZoneDirector and ZoneFlex APs.......................................................................323
Importing an AP Firmware Patch.................................................................................324
Enabling Secure AP Image Upgrade............................................................................325
Performing an Upgrade with Smart Redundancy.........................................................325
Working with SSL Certificates...........................................................................................326
Basic Certificate Installation.........................................................................................326
Generating a Certificate Signing Request.....................................................................326
Importing an SSL Certificate........................................................................................328
SSL Certificate Advanced Options...............................................................................330
Upgrading the License......................................................................................................335
Support Entitlement..........................................................................................................336
12 Troubleshooting
Troubleshooting Failed User Logins..................................................................................337
Fixing User Connections...................................................................................................337
If WLAN Connection Problems Persist.........................................................................338
Measuring Wireless Network Throughput with SpeedFlex.................................................339
Using SpeedFlex in a Multi-Hop Smart Mesh Network.................................................342
Allowing Users to Measure Their Own Wireless Throughput........................................344
Starting a Radio Frequency Scan......................................................................................345
Using the Ping and Traceroute Tools................................................................................346
Generating a Debug File....................................................................................................347
Ruckus Wireless ZoneDirector™ Release 10.0 User Guide
9
Page 10

Viewing Current System and AP Logs...............................................................................347
To view AP logs:..........................................................................................................347
Packet Capture and Analysis............................................................................................348
Local Capture..............................................................................................................349
Streaming Mode..........................................................................................................349
AP Diagnostic Information.................................................................................................352
Importing a Script.............................................................................................................352
Enabling Remote Troubleshooting.....................................................................................353
Restarting an Access Point...............................................................................................353
Restarting ZoneDirector....................................................................................................353
13 Mesh Networking Best Practices
Calculating the Number of APs Required..........................................................................355
Placement and Layout Considerations..............................................................................355
Signal Quality Verification..................................................................................................356
Mounting and Orientation of APs.......................................................................................357
Indoor APs - Typical Case: Horizontal Orientation........................................................357
Indoor APs - Vertical Orientation..................................................................................357
Outdoor APs - Typical Horizontal Orientation...............................................................359
Elevation of RAPs and MAPs.......................................................................................359
Mesh Best Practice Checklist............................................................................................359
10
Ruckus Wireless ZoneDirector™ Release 10.0 User Guide
Page 11

11
About This Guide
This User Guide describes how to install, configure and manage the Ruckus Wireless™
ZoneDirector™ version 10.0
This guide is intended for use by those responsible for managing Ruckus Wireless
network equipment. Consequently, it assumes a basic working knowledge of local area
networking, wireless networking and wireless devices.
NOTE If release notes are shipped with your product and the information there differs
from the information in this guide, follow the instructions in the release notes.
Most user guides and release notes are available in Adobe Acrobat Reader Portable
Document Format (PDF) or HTML on the Ruckus Wireless Support website at
https://support.ruckuswireless.com/documents.
NOTE By downloading this software and subsequently upgrading the ZoneDirector to
version 10.0, please be advised that the ZoneDirector will periodically connect to Ruckus
and Ruckus will collect the ZoneDirector serial number, software version and build
number. Ruckus will transmit a file back to the ZoneDirector and this will be used to
display the current status of the ZoneDirector Support Contract. Please also be advised
that this information may be transferred and stored outside of your country of residence
where data protection standards may be different.
1
Document Conventions
The following tables list the text and notice conventions that are used throughout this
guide.
Table 1: Text conventions
ExampleDescriptionConvention
monospace
as it appears on screen
user input
that you enter
UI control
software buttons, and
field names
screen name
menu or section names
ruckus#Represents information
ruckus# set ipaddr 10.0.0.12Represents information
On the Start menu, click All Programs.Keyboard keys,
The Configure > WLANs page appears.Screen or page names,
Ruckus Wireless ZoneDirector™ Release 10.0 User Guide
11
Page 12

About This Guide
Related Documentation
Table 2: Notice conventions
DescriptionNotice Type
NOTE
CAUTION!
WARNING!
Information that describes important features or instructions
Information that alerts you to potential loss of data or potential
damage to an application, system, or device
Information that alerts you to potential personal injury
Related Documentation
In addition to this User Guide, each ZoneDirector documentation set includes the
following:
• Release Notes: Provide information about the current software release, including new
features, enhancements, and known issues.
• Online Help: Provides a web-based subset of the content contained in the User
Guide. The online help is accessible from the web interface and is searchable.
• Command Line Reference Guide: Provides a list of CLI commands, their usage syntax
and examples.
• SNMP Reference Guide: Provides a list of supported Simple Network Management
Protocol (SNMP) Management Information Base (MIB) objects.
• Syslog Alarms and Events Reference Guide: Provides a list of Syslog alarms and
events.
12
Documentation Feedback
Ruckus Wireless is interested in improving its documentation and welcomes your
comments and suggestions. You can email your comments to Ruckus Wireless at
docs@ruckuswireless.com
When contacting us, please include the following information:
• Document title
• Document part number (on the cover page)
• Page number (if appropriate)
For example:
• ZoneDirector 10.0 User Guide
• Part number: 800-71463-001 Revision A
• Page 88
Ruckus Wireless ZoneDirector™ Release 10.0 User Guide
Page 13

About This Guide
Online Training Resources
Online Training Resources
To access a variety of online Ruckus Wireless training modules, including free introductory
courses to wireless networking essentials, site surveys, and Ruckus Wireless products,
visit the Ruckus Wireless Training Portal at: https://training.ruckuswireless.com.
Ruckus Wireless ZoneDirector™ Release 10.0 User Guide
13
Page 14

About This Guide
Online Training Resources
14
Ruckus Wireless ZoneDirector™ Release 10.0 User Guide
Page 15

15
Introducing ZoneDirector
Overview of ZoneDirector
Ruckus Wireless ZoneDirector serves as a central control system for Ruckus ZoneFlex
Access Points (APs). ZoneDirector provides simplified configuration and updates, wireless
LAN security control, RF management, and automatic coordination of Ethernet-connected
and mesh-connected APs.
Using ZoneDirector in combination with Ruckus Wireless ZoneFlex APs allows deployment
of a Smart Mesh network, to extend wireless coverage throughout a location without
having to physically connect each AP to Ethernet. In a Smart Mesh network, the APs
form a wireless mesh topology to route client traffic between any member of the mesh
and the wired network. Meshing significantly reduces the cost and time requirements
of deploying an enterprise-class WLAN, in addition to providing much greater flexibility
in AP placement.
ZoneDirector also integrates network monitoring, sophisticated user access controls,
integrated Wi-Fi client performance tools, highly configurable guest access features and
advanced security features within a single system.
User authentication can be accomplished using an internal user database, or forwarded
to an external Authentication, Authorization and Accounting (AAA) server such as RADIUS
or Active Directory. Once users are authenticated, client traffic is not required to pass
through ZoneDirector, thereby eliminating bottlenecks when higher speed Wi-Fi
technologies, such as 802.11ac, are used.
2
This user guide provides complete instructions for using the Ruckus Wireless web
interface, the wireless network management interface for ZoneDirector. With the web
interface, you can customize and manage all aspects of ZoneDirector and your ZoneFlex
network.
ZoneDirector Physical Features
Three models of ZoneDirector are currently available:
• ZoneDirector 1200 on page 15
• ZoneDirector 3000 on page 17
• ZoneDirector 5000 on page 19
The following section describes the physical features of these ZoneDirector models.
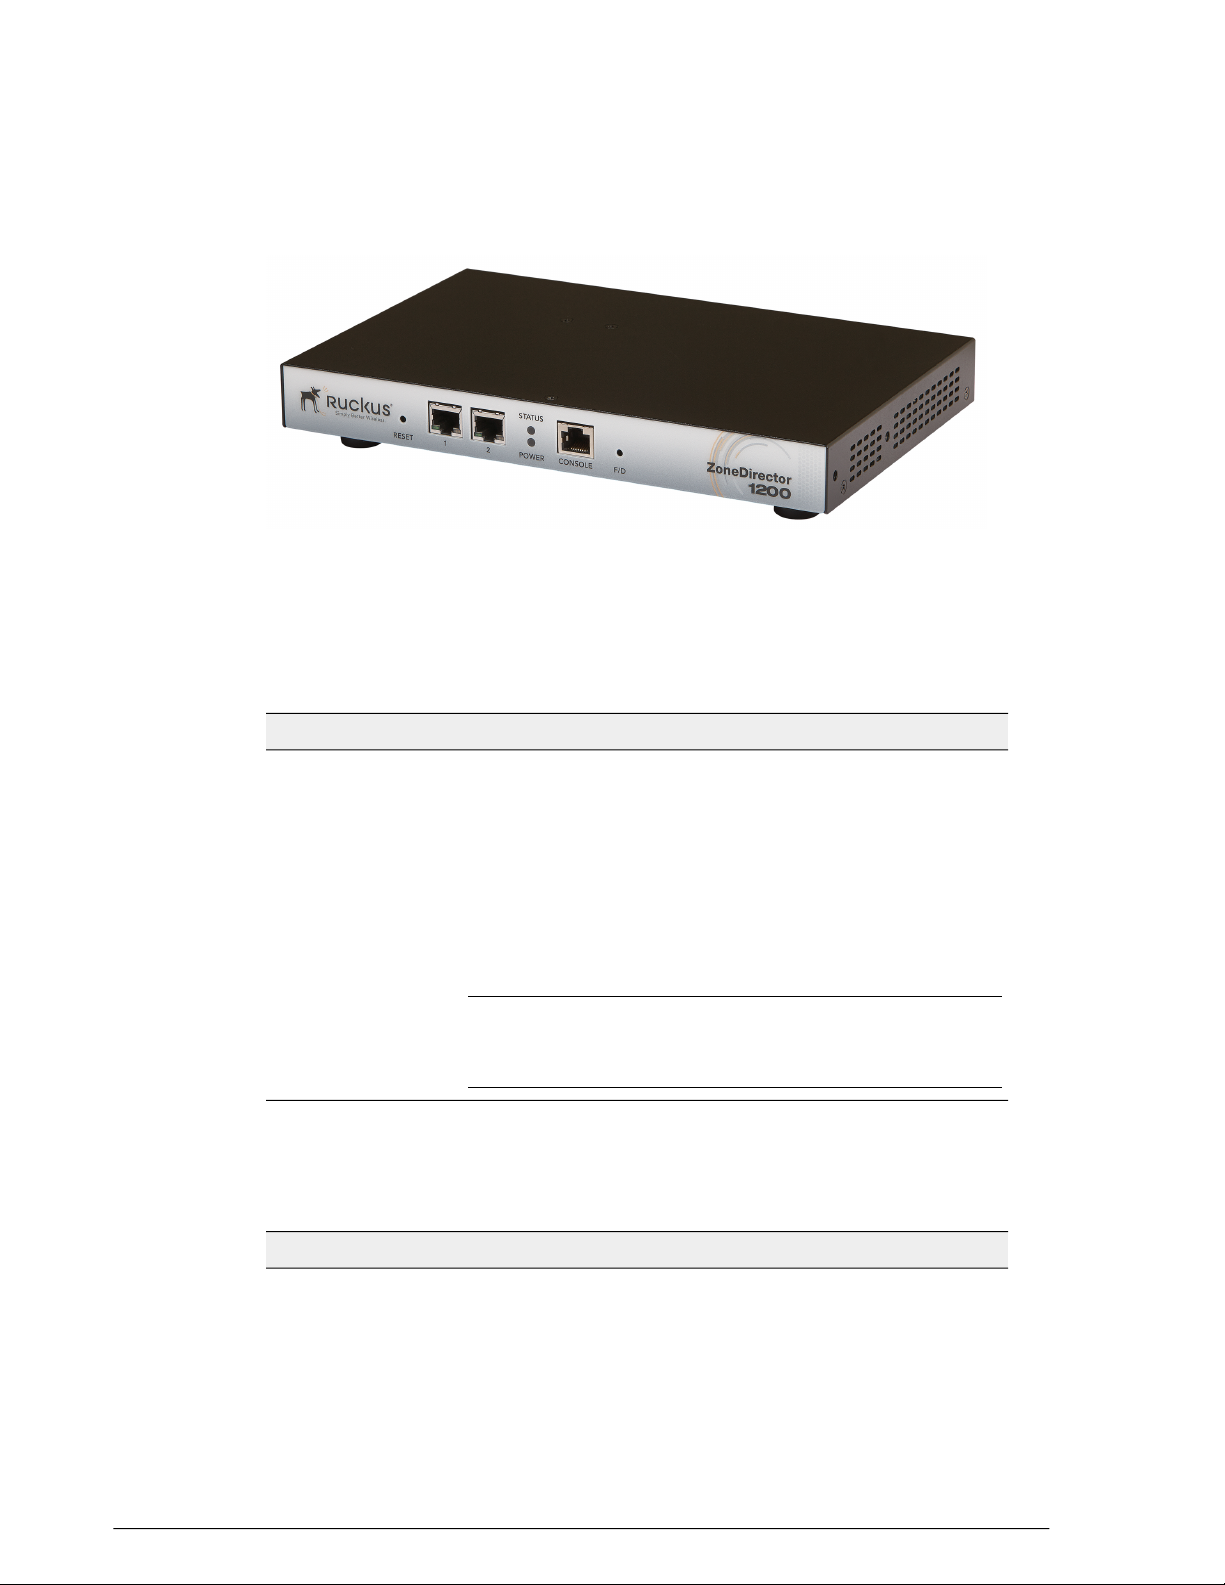
ZoneDirector 1200
This section describes the following physical features of ZoneDirector 1200:
• Buttons, Ports, and Connectors on page 16
Ruckus Wireless ZoneDirector™ Release 10.0 User Guide
15
Page 16
Introducing ZoneDirector
ZoneDirector Physical Features
• Front Panel LEDs on page 16
Figure 1: ZoneDirector 1200
Buttons, Ports, and Connectors
The following table describes the buttons, ports and connectors on ZoneDirector 1200.
Table 3: ZoneDirector 1200 front panel elements
DescriptionLabel
Use the Reset button to restart ZoneDirector.Reset
Two auto negotiating 10/100/1000Mbps Ethernet ports.10/100/1000 Ethernet
Console
F/D
RJ-45 Console port for accessing the ZoneDirector command
line interface.
Factory Default button. To reset ZoneDirector to factory default
settings, press and hold the F/D button for at least five (5)
seconds. For more information, refer to
Alternate Factory Default Reset Method on page 323.
NOTE Resetting ZoneDirector to factory default settings will
erase all configuration changes that you made, except for AP
licenses and SSL certificates.
Front Panel LEDs
The following table describes the LEDs on the front panel of ZoneDirector 1200.
Table 4: ZoneDirector ZoneDirector 1200 LED descriptions
MeaningStateLED Label
16
ZoneDirector is receiving power.Solid GreenPower
Ruckus Wireless ZoneDirector™ Release 10.0 User Guide
Page 17
Introducing ZoneDirector
ZoneDirector Physical Features
MeaningStateLED Label
Ethernet Link
Off
Flashing Green
Red
Amber
Amber
Off
GreenEthernet Rate
ZoneDirector is NOT receiving power. If the
power cable or adapter is connected to a
power source, verify that the power cable
is connected properly to the power jack on
the rear panel of ZoneDirector.
Normal state.Solid GreenStatus
ZoneDirector has not yet been configured.
Log into the web interface, and then
configure ZoneDirector using the setup
wizard.
ZoneDirector has shut down (but is still
connected to a power source).
ZoneDirector is starting up or shutting down.Flashing Red
The port is connected to a device.Solid Green or
The port is transmitting or receiving trafficFlashing Green or
The port has no network cable connected
or is not receiving a link signal.
The port is connected to a 1000Mbps
device.
The port is connected to a 100Mbps device.Amber
The port is connected to a 10Mbps device.Off
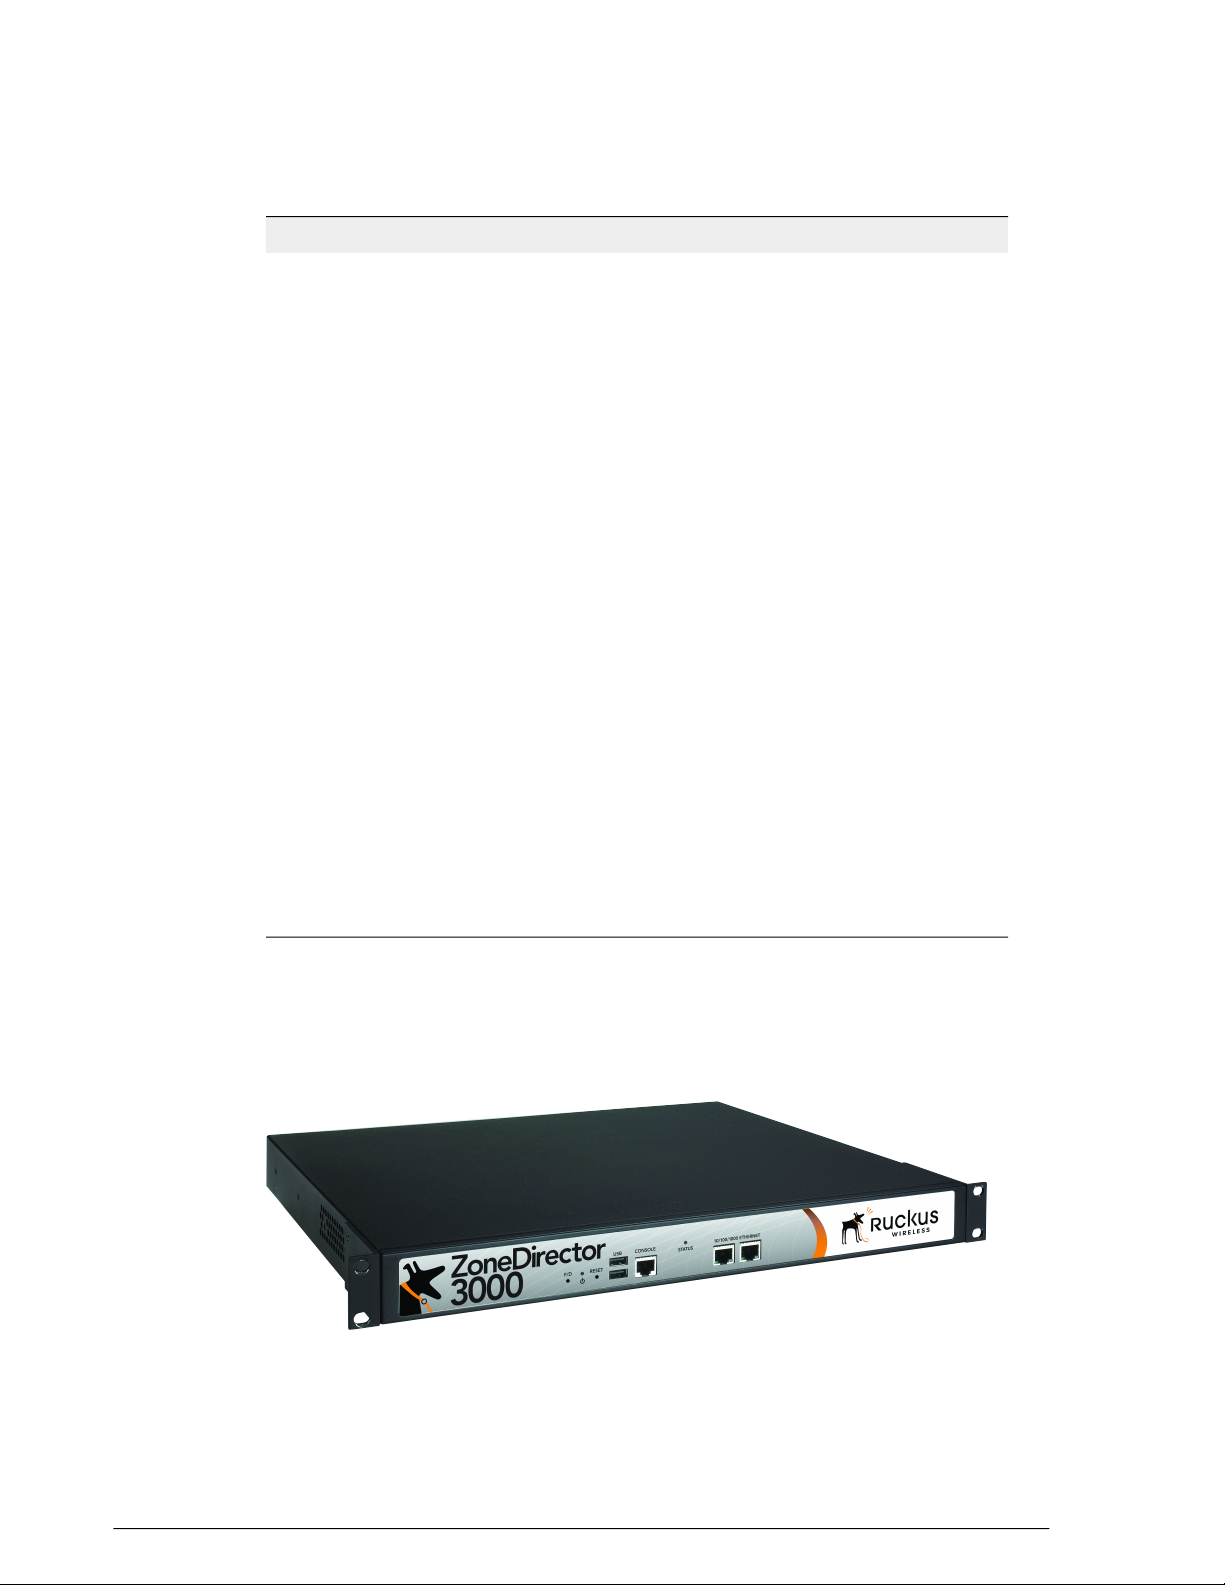
ZoneDirector 3000
This section describes the following physical features of ZoneDirector 3000:
• Buttons, Ports, and Connectors on page 18
• Front Panel LEDs on page 18
Ruckus Wireless ZoneDirector™ Release 10.0 User Guide
17
Page 18

Introducing ZoneDirector
ZoneDirector Physical Features
Figure 2: ZoneDirector 3000
Buttons, Ports, and Connectors
The following table describes the buttons, ports and connectors on ZoneDirector 3000.
Table 5: ZoneDirector 3000 front panel elements
MeaningLabel
Power
F/D
Reset
Console
(Located on the rear panel) Press this button to power on
ZoneDirector.
To reset ZoneDirector to factory default settings, press the F/D
button for at least five (5) seconds. For more information, refer
to
Restoring ZoneDirector to Default Factory Settings on page 321.
NOTE Resetting ZoneDirector to factory default settings will
erase all configuration changes that you have made, except for
AP licenses and SSL certificates.
To restart ZoneDirector, press the Reset button once for less
than two seconds.
For Ruckus Wireless Support use only.USB
RJ-45 port for accessing the ZoneDirector command line
interface.
Two auto negotiating 10/100/1000Mbps Ethernet ports.10/100/1000 Ethernet
Front Panel LEDs
The following table describes the LEDs on the front panel of ZoneDirector 3000.
Table 6: ZoneDirector 3000 LED descriptions
18
Off
Flashing Green
MeaningStateLED Label
ZoneDirector is receiving power.GreenPower
ZoneDirector is NOT receiving power. If
the power cable or adapter is connected
to a power source, verify that the power
cable is connected properly to the power
jack on the rear panel of ZoneDirector.
Normal state.Solid GreenStatus
ZoneDirector has not yet been
configured. Log into the web interface,
and then configure ZoneDirector using
the setup wizard.
Ruckus Wireless ZoneDirector™ Release 10.0 User Guide
Page 19
Introducing ZoneDirector
ZoneDirector Physical Features
MeaningStateLED Label
Solid Red
Flashing Red
Amber
Off
AmberEthernet Rate
Green
Off
ZoneDirector has shut down (but is still
connected to a power source).
ZoneDirector is starting up or shutting
down.
The port is connected to a device.Solid Green or AmberEthernet Link
The port is transmitting or receiving traffic.Flashing Green or
The port has no network cable connected
or is not receiving a link signal.
The port is connected to a 1000Mbps
device.
The port is connected to a 100Mbps
device.
The port is connected to a 10Mbps
device.
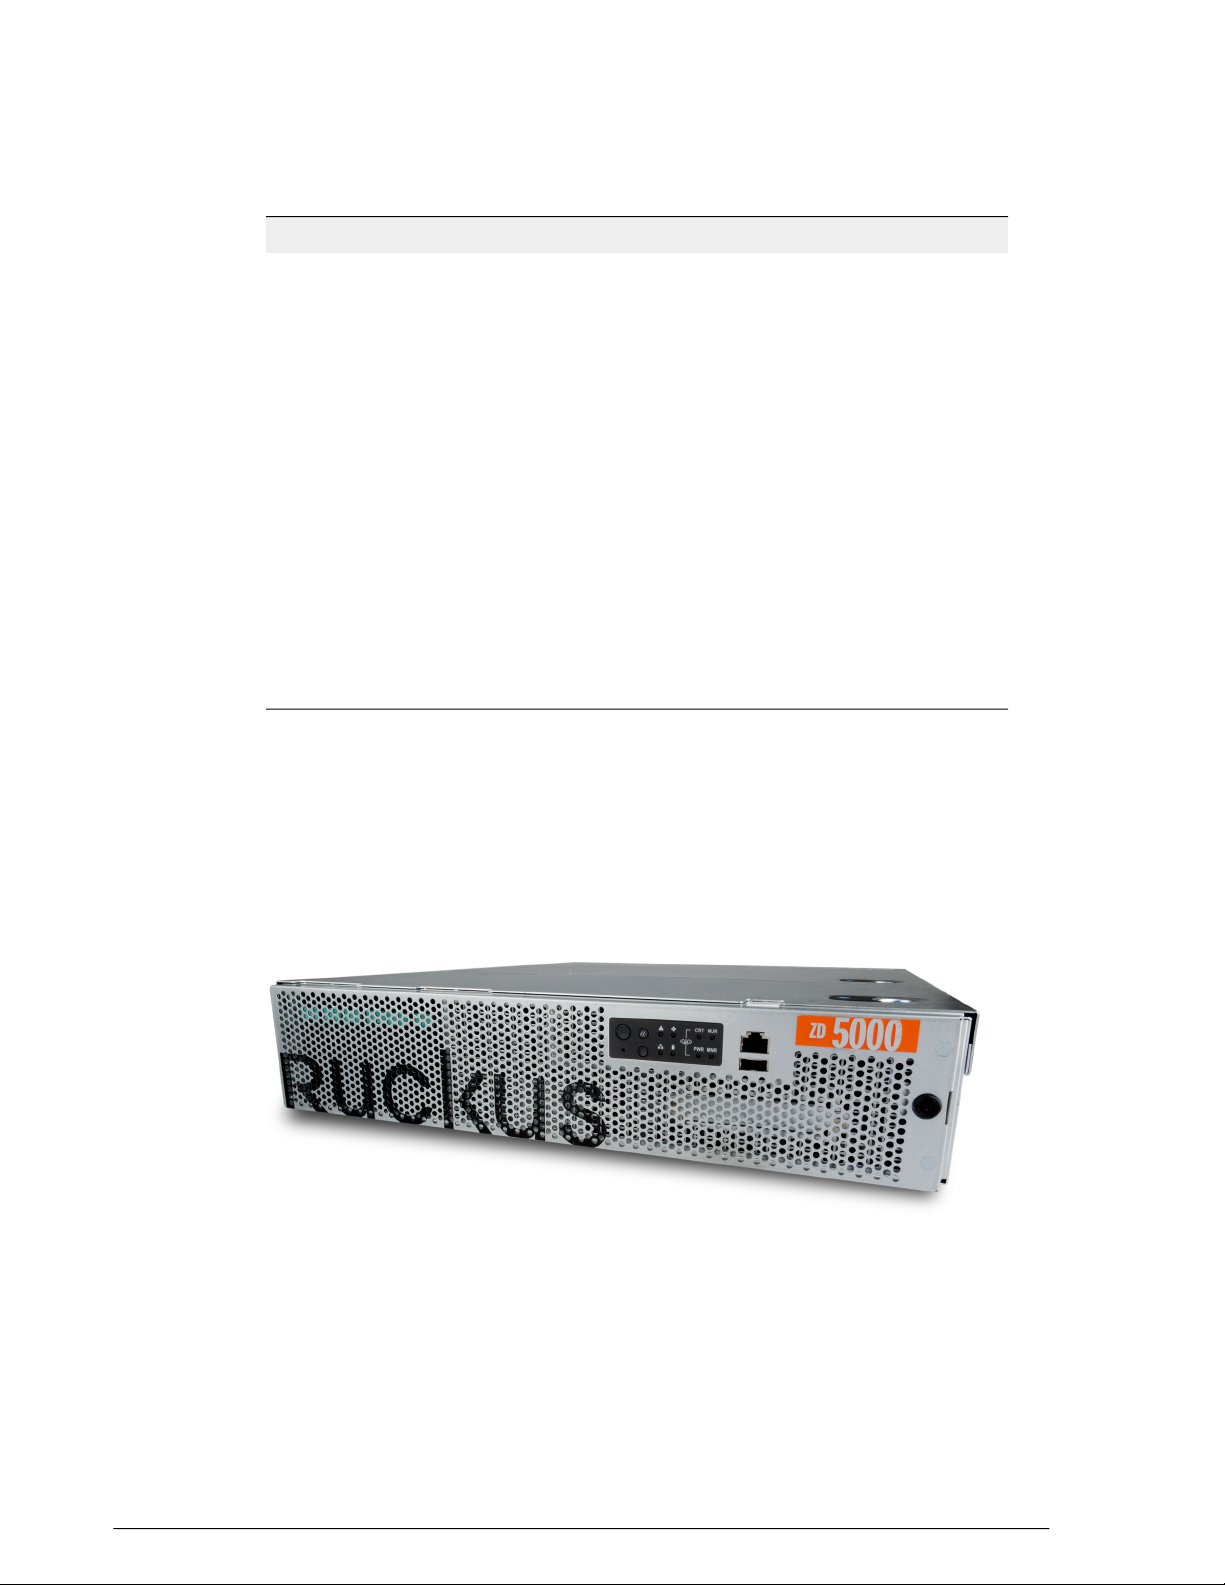
ZoneDirector 5000
This section describes the following physical features of ZoneDirector 5000:
• Front Panel Features on page 20
• Front Panel (Bezel Removed) on page 20
• Control Panel on page 21
• Rear Panel Features on page 22
Ruckus Wireless ZoneDirector™ Release 10.0 User Guide
19
Page 20

Introducing ZoneDirector
ZoneDirector Physical Features
Figure 3: ZoneDirector 5000 Front Panel
Front Panel Features
Table 7: ZoneDirector 5000 front panel features
DescriptionFeature
See Control Panel description below.Control Panel
RJ45 Serial Port
Front Bezel Lock
COM 2 / Serial B port for accessing the ZoneDirector
command line interface.
Not used.USB Port
Remove this bezel lock to remove the front bezel and gain
access to the hard drive bays.
Front Panel (Bezel Removed)
Figure 4: ZoneDirector 5000 front panel (bezel removed)
Table 8: ZoneDirector front panel elements
FeatureNumber
20
ESD ground strap attachment1
Hard drive bays (not used)2
Control panel3
4
RJ45 serial port for accessing the ZoneDirector command line
interface
USB port (not used)5
Ruckus Wireless ZoneDirector™ Release 10.0 User Guide
Page 21
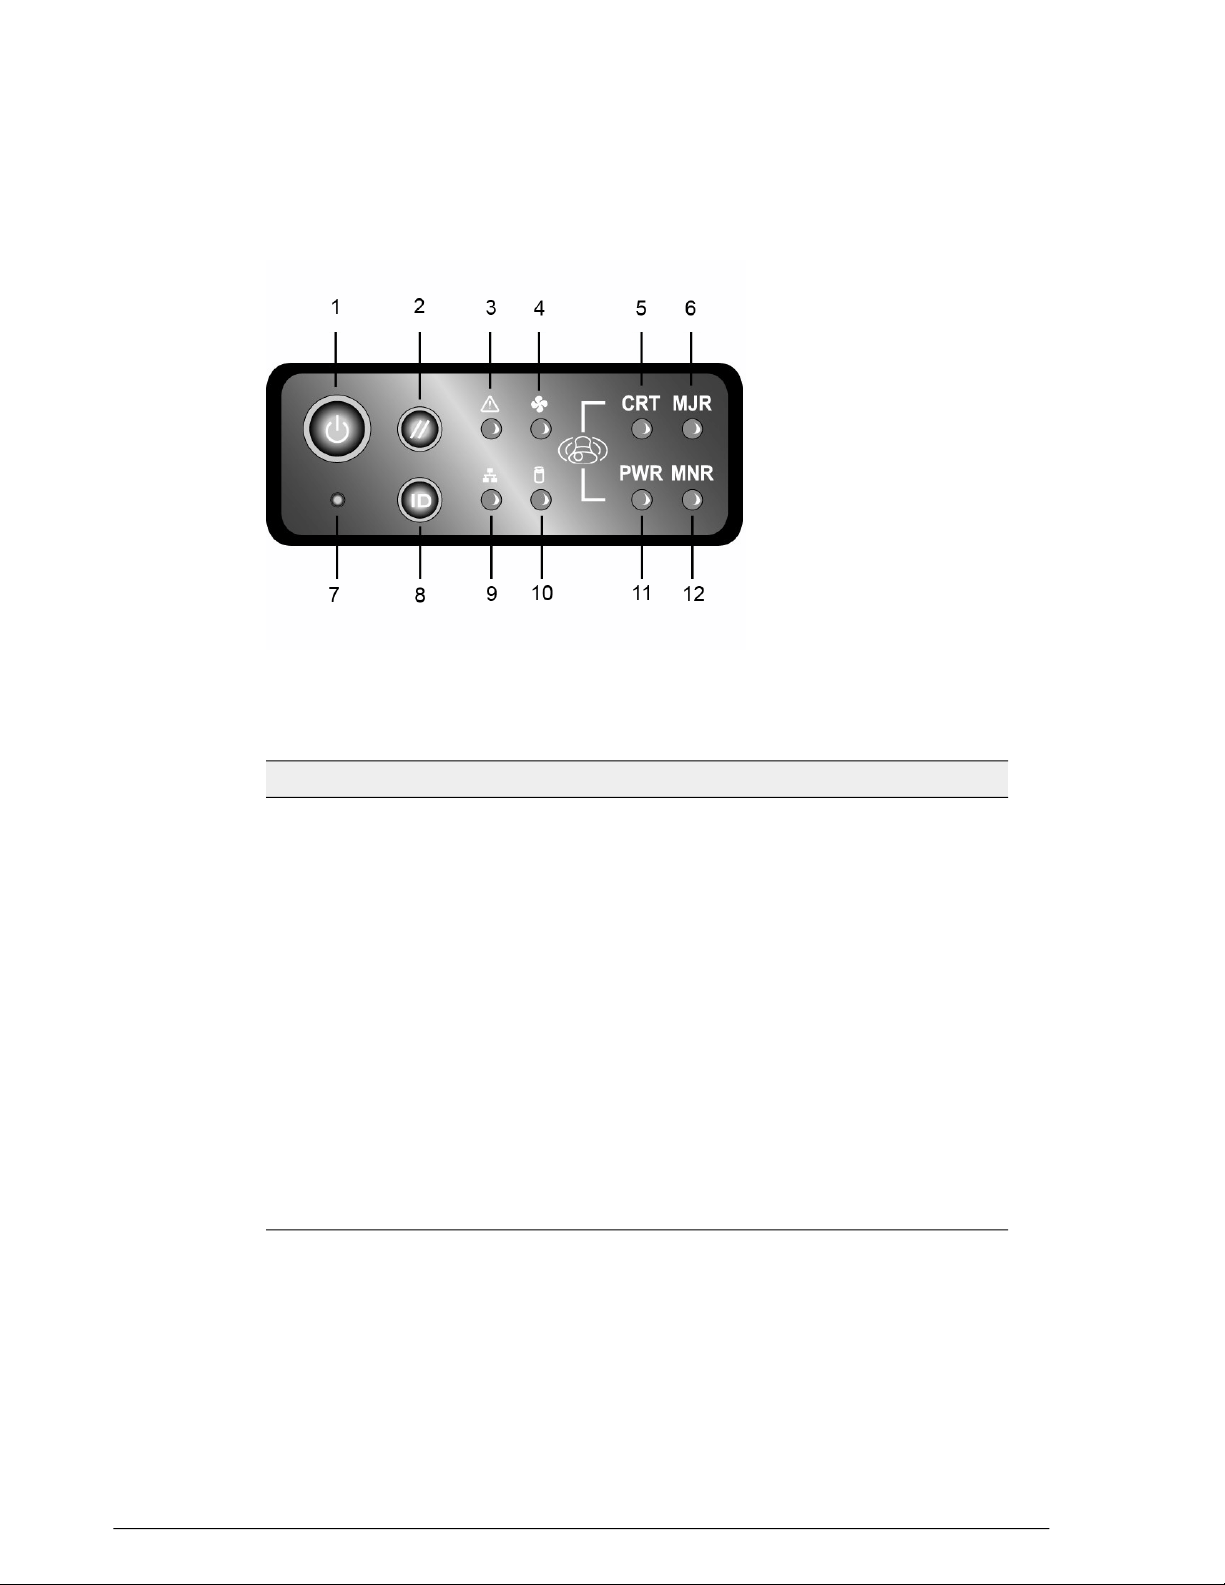
Control Panel
Introducing ZoneDirector
ZoneDirector Physical Features
Figure 5: Control panel buttons and indicators
Table 9: ZoneDirector 5000 control panel
FeatureNumber
Power button1
System reset button2
System status LED (see System status LED definitions Table)3
Fan status LED4
Critical alarm (not used)5
MJR alarm (not used)6
NMI pin hole button (factory reset button)7
Chassis ID button8
NIC 1 / NIC 2 activity LED9
HDD activity LED (not used)10
PWR alarm LED (not used)11
MNR alarm (Amber: system unavailable; OFF: system available)12
Ruckus Wireless ZoneDirector™ Release 10.0 User Guide
21
Page 22

Introducing ZoneDirector
ZoneDirector Physical Features
Table 10: System status LED definitions
DefinitionLED Status
Off
Green On
Green Blinking
Amber On
Rear Panel Features
No power supply detected, or two power supplies detected
and system is off
System ready/normal operation, two power supplies
detected
1. System ready but degraded
2. One power supply connected
3. One fan failure detected
1. Critical or non-recoverable condition
2. Power up in progress, only one power source detected
3. More than one fan failure detected
Non-critical alarmAmber Blinking
Figure 6: ZoneDirector 5000 rear panel features
Table 11: Rear panel features
2
3
FeatureNumber
Alarms cable connector (not used)1
Two low-profile PCIe add-in cards (not
used)
Three full-length PCIe add-in cards (not
used)
Power supply 2 (backup AC power)4
Power supply 1 (primary AC power)5
RJ45 serial port (COM2/serial B)6
Video connector (not used)7
22
Ruckus Wireless ZoneDirector™ Release 10.0 User Guide
Page 23

Introducing ZoneDirector
Introduction to the Ruckus Wireless Network
FeatureNumber
USB 0 and 1 (#1 on top)8
USB 2 and 3 (#3 on top)9
GbE NIC #1 connector10
GbE NIC #2 connector11
12
Two ground studs (used for DC-input
system)
Table 12: NIC status LEDs
NIC StateLED StateLED Color
10MbpsOffGreen/Amber (Left)
100MbpsGreen
1000MbpsAmber
Active connectionOnGreen (Right)
Transmit / Receive activityBlinking
Introduction to the Ruckus Wireless Network
Your new Ruckus Wireless network starts when you disperse a number of Ruckus
Wireless access points (APs) to efficiently cover your worksite. After connecting the APs
to ZoneDirector (through network hubs or switches), running through the Setup Wizard
and completing the "Zero-IT" setup, you have a secure wireless network for both
registered users and guest users.
NOTE "Zero-IT" refers to ZoneDirector's simple setup and ease-of-use features, which
allow end users to automatically self-configure wireless settings on Windows and Mac
OS clients as well as many mobile devices including iOS, Windows Phone and Android
devices.
After using the web interface to set up user accounts for staff and other authorized users,
your WLAN can be put to full use, enabling users to share files, print, check email, and
more. And as a bonus, guest workers, contractors and visitors can be granted limited
controlled access to a separate “Guest WLAN” with minimal setup.
You can now fine-tune and monitor your network through the web interface, which
enables you to customize additional WLANs for authorized users, manage your users,
monitor the network's security and performance, and expand your radio coverage, if
needed.
Ruckus Wireless ZoneDirector™ Release 10.0 User Guide
23
Page 24
Introducing ZoneDirector
Installing ZoneDirector
Installing ZoneDirector
Basic installation instructions are included in the Quick Start Guide that shipped with
your ZoneDirector. The steps are summarized below:
1. Connect and discover ZoneDirector using UPnP (Universal Plug and Play). On
Windows 7 and Windows 8, you may need to turn on network discovery in the
Network and Sharing Center > Advanced Sharing Settings.
2. Double-click the ZoneDirector icon when UPnP displays it, or
3. Point your web browser to ZoneDirector's IP address (default: 192.168.0.2).
4. Run the Setup Wizard to create an internal and (optionally) a guest WLAN
5. Distribute APs around your worksite, and connect them to power and to your LAN.
6. Begin using your ZoneFlex network.
24
Ruckus Wireless ZoneDirector™ Release 10.0 User Guide
Page 25
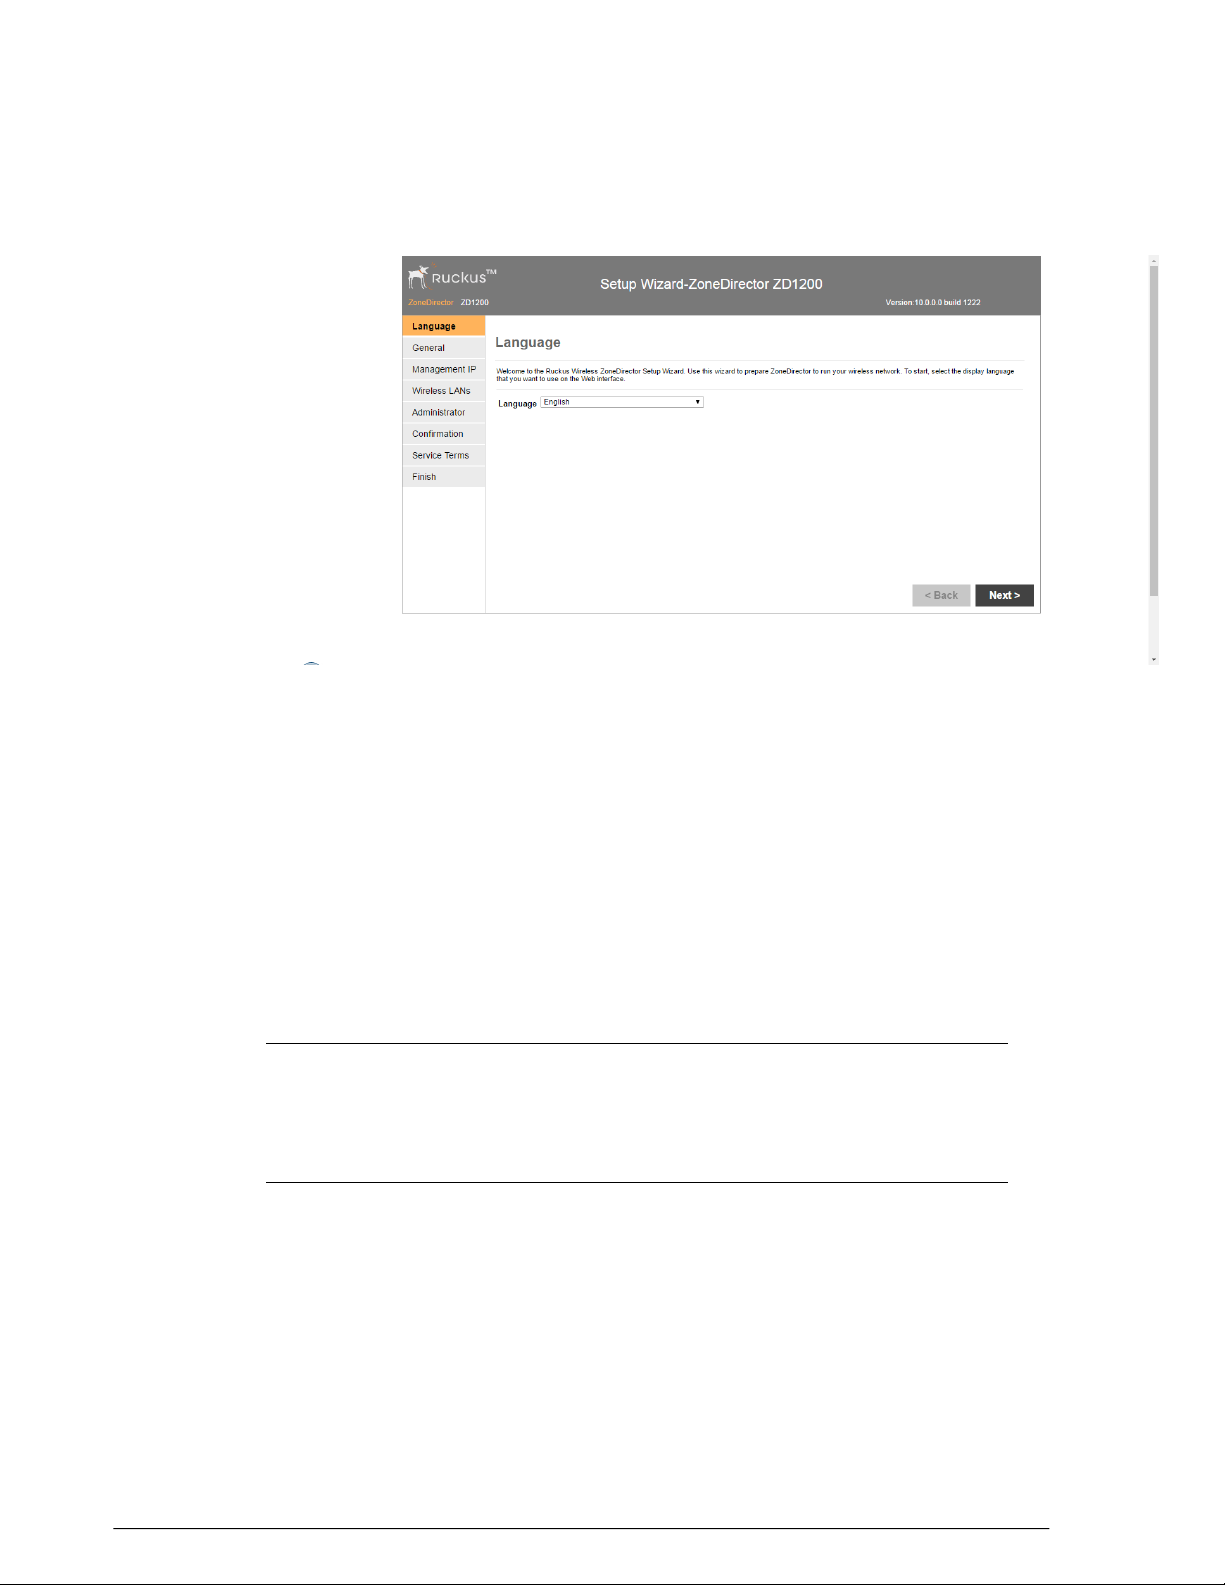
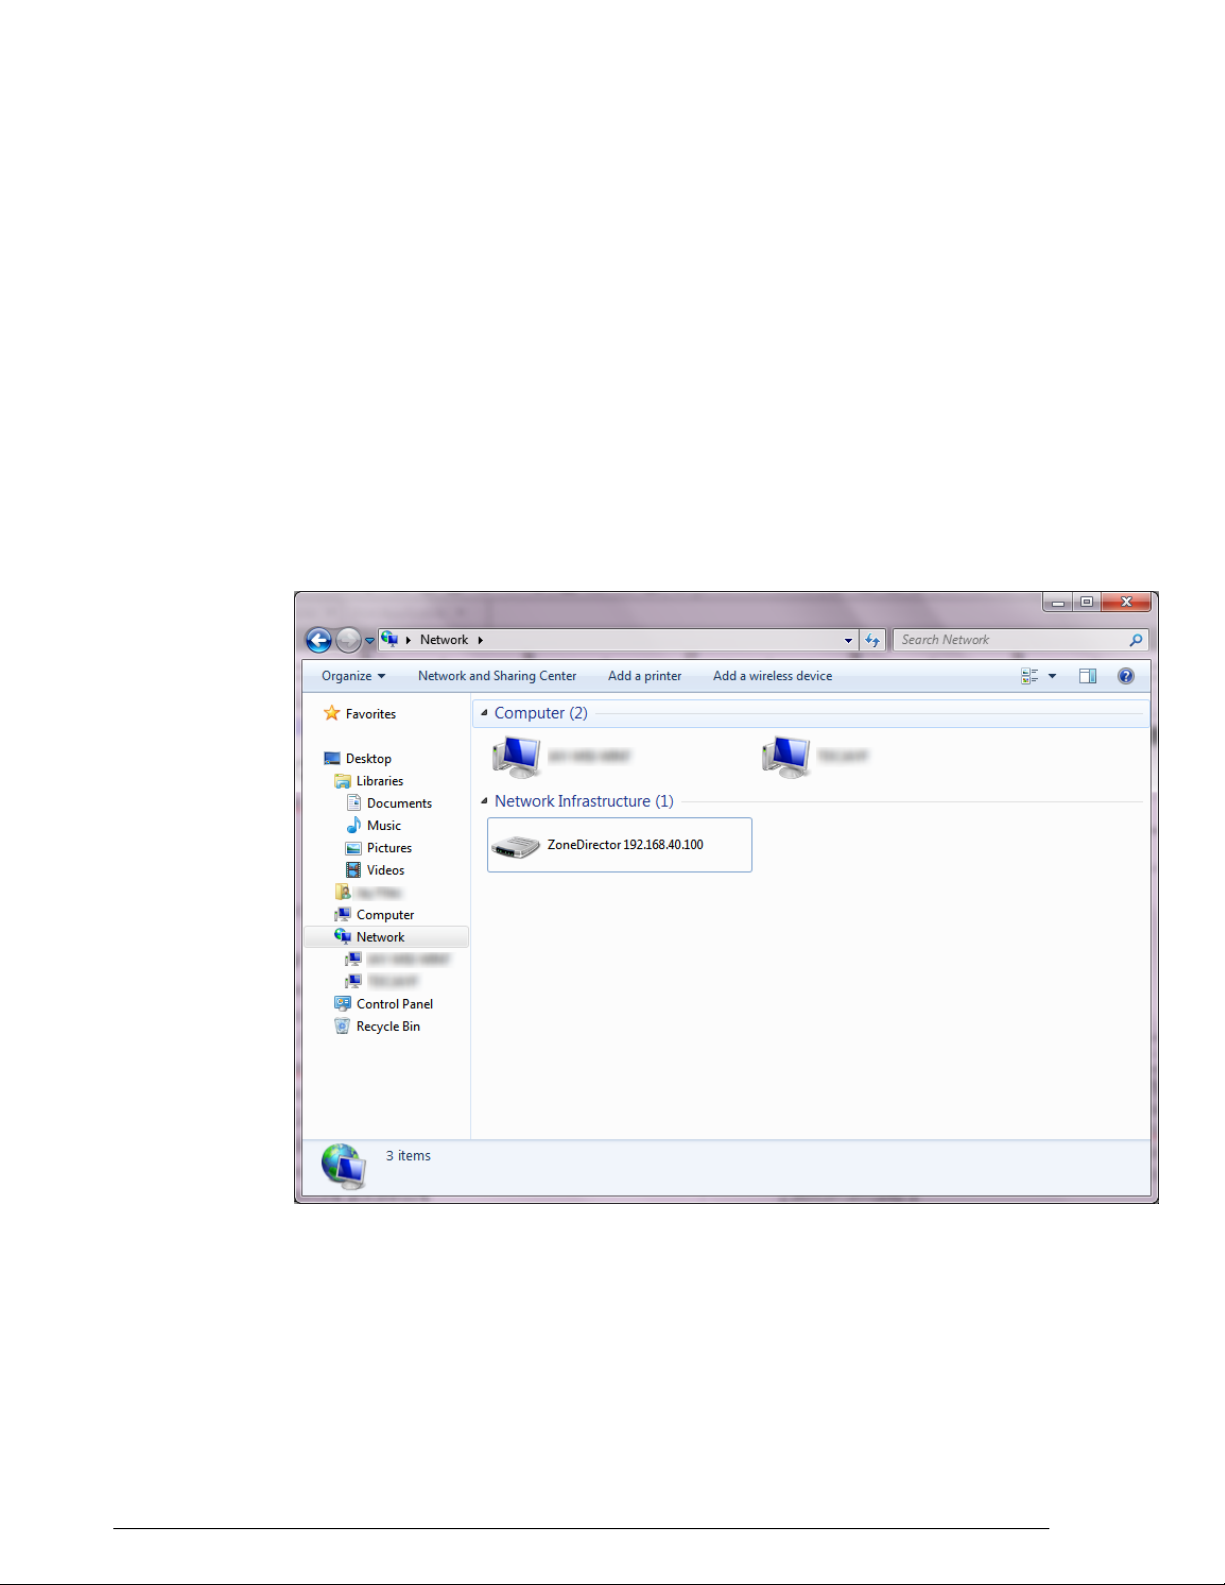
Figure 7: Discover ZoneDirector using UPnP
Introducing ZoneDirector
Ensuring That APs Can Communicate with ZoneDirector
Figure 8: ZoneDirector Setup Wizard
Ensuring That APs Can Communicate with
ZoneDirector
Before ZoneDirector can start managing an AP, the AP must first be able to discover
ZoneDirector on the network when it boots up. This requires that ZoneDirector's IP
address be reachable by the AP (via UDP/IP port numbers 12222 and 12223), even
when they are on different subnets.
This section describes procedures you can perform to ensure that APs can discover
and register with ZoneDirector.
NOTE This guide assumes that APs on the network are configured to obtain IP
addresses from a DHCP server. If APs are assigned static IP addresses, they must be
using a local DNS server that you can configure to resolve the ZoneDirector IP address
using zonedirector.{DNS domain name} or zonedirector if no domain name
is defined on the DNS server.
How APs Discover ZoneDirector on the Network
1. When an AP starts up, it sends out a DHCP discovery packet to obtain an IP address.
2. The DHCP server responds to the AP with the allocated IP address. If you configured
DHCP Option 43 (or DHCPv6 Option 17) (see Option 2: Customize Your DHCP Server
on page 27), the DHCP offer response will also include (among others) the IP
Ruckus Wireless ZoneDirector™ Release 10.0 User Guide
25
Page 26

Introducing ZoneDirector
Ensuring That APs Can Communicate with ZoneDirector
addresses of ZoneDirector devices on the network along with the address of the
DNS server that can help resolve the ZoneDirector IP addresses.
3. After the AP obtains an IP address, it first attempts to contact a ZoneDirector whose
IP address has been pre-configured on the AP. If an AP has a pre-configured
ZoneDirector IP address, it will always use an L3 LWAPP (lightweight access point
protocol) discovery message to attempt to discover the pre-configured
primary/secondary ZoneDirector.
• An AP with a pre-configured ZoneDirector IP address will only attempt to discover
the pre-configured ZoneDirector(s) and will skip the DHCP/DNS/last joined
ZoneDirector steps. If it is unable to contact its pre-configured ZoneDirector, it
will enter “sulk” state, and will remain in an idle/discover/sulk loop until it receives
a response from a pre-configured primary or secondary ZoneDirector.
4. If a primary/secondary ZoneDirector IP address has not been configured on the AP,
the AP next attempts to build a list of candidate ZoneDirectors by sending an L3
discovery request (IPv4 subnet broadcast/IPv6 multicast packet) to each candidate
address received from DHCP and DNS at the same time, and waits for a response
from any ZoneDirector that can respond.
• The AP may receive multiple responses from DHCP and DNS if multiple
ZoneDirector IP addresses have been configured on the DHCP server or DNS
server.
5. If the AP receives a response from a single ZoneDirector device, it will attempt to
register with that ZoneDirector device.
6. If the AP receives responses from multiple ZoneDirector devices, it will attempt to
register with the ZoneDirector that it previously registered with (if any).
• This ZoneDirector can be on the same local IP subnet or a different subnet. The
AP will have a preference for a ZoneDirector device that it previously registered
with.
7. If this is the first time that the AP is registering with ZoneDirector, it will attempt to
register with the ZoneDirector device that has the lowest AP load. The AP computes
the load by subtracting the current number of APs registered with ZoneDirector from
the maximum number of APs that ZoneDirector is licensed to support.
If the AP does not receive a response from any ZoneDirector device on the network, it
goes into idle mode. After a short period of time, the AP will repeat this discovery cycle
until it successfully registers with a ZoneDirector.
26
Ruckus Wireless ZoneDirector™ Release 10.0 User Guide
Page 27

Introducing ZoneDirector
Ensuring That APs Can Communicate with ZoneDirector
How to Ensure that APs Can Discover ZoneDirector on the Network
If you are deploying the APs and ZoneDirector on different subnets, you have three
options for ensuring successful communication between these two devices:
• Option 1: Perform Auto Discovery on Same Subnet then Transfer the AP to Intended
Subnet on page 27
• Option 2: Customize Your DHCP Server on page 27
• Option 3: Register ZoneDirector with a DNS Server on page 32
NOTE If the AP and ZoneDirector Are on the Same Subnet: If you are deploying
the AP and ZoneDirector on the same subnet, you do not need to perform additional
configuration. Simply connect the AP to the same network as ZoneDirector. When the
AP starts up, it will discover and attempt to register with ZoneDirector. Approve the
registration request (if auto approval is disabled).
Option 1: Perform Auto Discovery on Same Subnet then Transfer the AP to Intended Subnet
If you are deploying the AP and ZoneDirector on different subnets, let the AP perform
auto discovery on the same subnet as ZoneDirector before moving the AP to another
subnet.
To do this, connect the AP to the same network as ZoneDirector. When the AP starts
up, it will discover and attempt to register with ZoneDirector. Approve the registration
request if auto approval is disabled. After the AP registers with ZoneDirector successfully,
transfer it to its intended subnet. It will be able to find and communicate with ZoneDirector
once you reconnect it to the other subnet.
NOTE If you use this method, make sure that you do not change the IP address of
ZoneDirector after the AP discovers and registers with it. If you change the ZoneDirector
IP address, the AP will no longer be able to communicate with it and will be unable to
rediscover it.
Option 2: Customize Your DHCP Server
NOTE The following procedure describes how to customize a DHCP server running
on Microsoft Windows. If your DHCP server is running on a different operating system,
the procedure may be different.
NOTE For ZD discovery using IPv6, see IPv6 Configuration for ZoneDirector Discovery
Using DHCPv6 on page 30.
Ruckus Wireless ZoneDirector™ Release 10.0 User Guide
27
Page 28

Introducing ZoneDirector
Ensuring That APs Can Communicate with ZoneDirector
Configuring the DHCP Server for ZoneDirector-AP Communication
To customize your DHCP server, you need to configure DHCP Option 43 (043 Vendor
Specific Info) with the IP address of the ZoneDirector device on the network.
When an AP requests an IP address, the DHCP server will send a list of ZoneDirector
IP addresses to the AP. If there are multiple ZoneDirector devices on the network, the
AP will automatically select a ZoneDirector to register with from this list of IP addresses.
RFC 2132 describes DHCP Option 60 and Option 43. DHCP Option 60 is the Vendor
Class Identifier (VCI). The VCI is a text string that identifies a vendor/type of a DHCP
client. All Ruckus Wireless Access Points are configured to send “Ruckus CPE” as the
Vendor Class Identifier in option 60, and expect ZoneDirector IP information to be provided
in DHCP option 43 (Vendor Specific Info), encapsulated with sub-option code 03 (the
sub-option code for ZoneDirector).
The RFC describes how vendors can encapsulate vendor-specific sub-option codes
(ranging from 0 to 255). Sub-options are embedded in option 43 as TLV (type, length,
value) blocks.
Ruckus Wireless Access points support non-TLV format option 43 values with comma
separated IP address strings for discovering ZoneDirectors, and also TLV based option
43 encapsulation as specified in RFC 2132.
For ZoneDirector information (sub-option code 03)
• Type: 0x03
• Length: Count of the characters in the ASCII string. (Length must include the commas
if there is more than one ZoneDirector specified.)
• Value: A non-null terminated ASCII string that is a comma-separated list of
ZoneDirector IP addresses
Example: If the there are two ZoneDirectors with IP addresses 192.168.0.10 and
192,168.0.20, then the value will be "192.168.0.10,192.168.0.20" and the length
is 25 (hex value 0x19).
For FlexMaster information (sub-option code 01)
• Type: 0x01
• Length: Count the number of characters in the ASCII string. (Length must include
"http", plus all colons, slashes and decimals in the complete URL.)
• Value: A non-null terminated ASCII string that is a URL.
Example: If the Flex Master URL is http://192.168.10.1/intune/server, the length is 33
(hex value 0x21).
You will need this information when you configure DHCP Option 43 for both FlexMaster
and ZoneDirector. To calculate the length field conversion from decimal to hexadecimal,
you can use an online conversion website, such as
http://www.easycalculation.com/decimal-converter.php, to perform the conversion.
28
Ruckus Wireless ZoneDirector™ Release 10.0 User Guide
Page 29

Introducing ZoneDirector
Ensuring That APs Can Communicate with ZoneDirector
The table below lists the sub-option code, FlexMaster URL and ZoneDirector IP address
that are used as examples in this procedure, along with their lengths in decimal and
hexadecimal values.
URL / IP Address
Decimal
Length
Hexadecimal
Length
Sub-option
Code
012133http://192.168.10.1/intune/server (URL)FlexMaster
030C12192.168.10.2 (IP Address)ZoneDirector
Most commonly used DHCP servers such as Microsoft DHCP and ISC DHCP support
vendor class DHCP option spaces and mapping of those option spaces to option 60.
While you can achieve encapsulating TLVs in option 43 by hard coding the DHCP option
43 value, Ruckus Wireless recommends using vendor class option spaces - especially
when you have more than one vendor type on the network and need option 43 to be
supported for different vendor type DHCP clients.
The following example describes how you can encapsulate option 43 using DHCP vendor
class option spaces to provide two ZoneDirector IP addresses: 192.168.0.10 and
192.168.0.20.
Configure Vendor Class Identifier and Vendor Specific Info sub-options on Microsoft DHCP server
Configure vendor class for Ruckus Wireless Access Points:
1. In the Server Manager window, right-click the IPv4 icon, and choose Define Vendor
Classes from the menu.
2. In the DHCP Vendor Classes dialogue, click Add to create a new vendor class.
3. Enter the value to describe the option class/space, (e.g., RuckusWirelessAP).
Optionally, you can also enter a description.
4. Add the VCI string in the ASCII field and click OK. The new vendor class is created
Close to close the dialogue.
5. Right-click the newly created vendor class and select Set Predefined Options...
6. Predefine the ZoneDirector sub-option type for the newly created vendor class. This
section defines the code and format of the sub-option (code for ZoneDirector and
comma separated IP addresses in ASCII text string).
7. Configure the option with a value either at the server level, scope level or at Configure
Options > Advanced
NOTE You can also optionally configure DHCP Option 12 (Host Name) to specify host
names for APs. Then, when an AP joins ZoneDirector and ZoneDirector does not already
have a device name for this AP, it will take the host name from DHCP and display this
name in events, logs and other web interface elements. See your DHCP server
documentation for instructions on Option 12 configuration.
Ruckus Wireless ZoneDirector™ Release 10.0 User Guide
29
Page 30

Introducing ZoneDirector
Ensuring That APs Can Communicate with ZoneDirector
IPv6 Configuration for ZoneDirector Discovery Using DHCPv6
Beginning with release 9.13, ZoneDirector also supports AP discovery using IPv6 DHCP
Option 17 (in addition to IPv4 DHCP Option 43).
NOTE The following instructions assume isc-dhcp-server as the Linux DHCP server.
For other DHCP servers, refer to the relevant documentation for instructions on
customizing the DHCPv6 Option 17 sub-options.
To configure a DHCPv6 server for AP controller discovery, use the following procedure:
1. Install radvd
yum radvd
2. Install isc-dhcp-server:
yum isc-dhcp-server
3. Edit the “/etc/radvd.conf” file as follows:
interface eth1
{
AdvSendAdvert on;
AdvOtherConfigFlag on;
prefix 2001:db8:0:2::/64
{
};
};
4. Edit the “dhcp6.conf file” as follows:
default-lease-time 600;
max-lease-time 7200;
log-facility local7;
subnet6 2001:db8:0:2::/64 {
# Range for clients
range6 2001:db8:0:2::129 2001:db8:0:2::254;
# Additional options
option dhcp6.name-servers fec0:0:0:1::1;
option dhcp6.domain-search "domain.example";
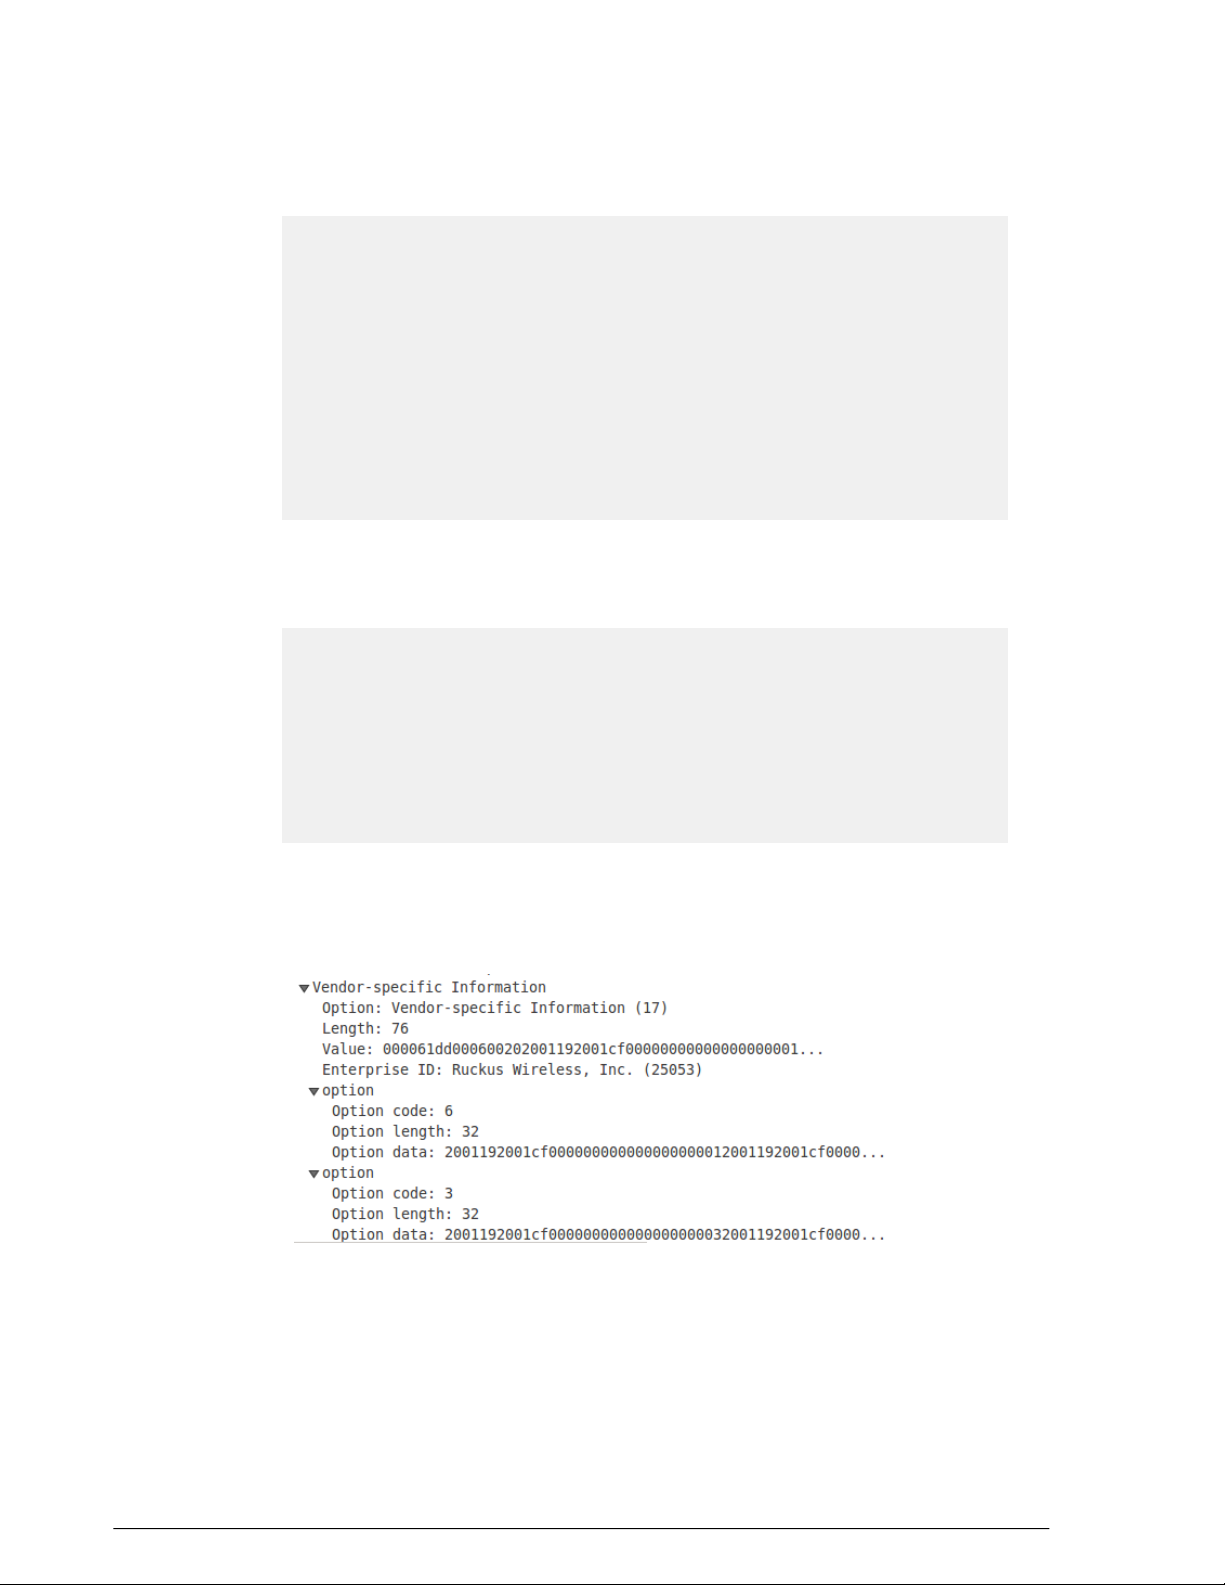
option dhcp6.vendor-opts 00:00:61:dd:
00:06:<-- suboption code 6 for SmartZone List
00:20:<-- suboption length, 2 IP addresses in the list,
so value is 0x20
20:01:19:20:01:cf:00:00:00:00:00:00:00:00:00:01:<-- IP
address
20:01:19:20:01:cf:00:00:00:00:00:00:00:00:00:02:<-- IP
address
00:03:<-- suboption code 3 for ZD List
30
Ruckus Wireless ZoneDirector™ Release 10.0 User Guide
Page 31
Introducing ZoneDirector
Ensuring That APs Can Communicate with ZoneDirector
00:20:<-- suboption length, 2 IP addresses in the list,
so value is 0x20
20:01:19:20:01:cf:00:00:00:00:00:00:00:00:00:03:<-- IP
address
20:01:19:20:01:cf:00:00:00:00:00:00:00:00:00:04;<-- IP
address
# Prefix range for delegation to sub-routers
prefix6 2001:db8:0:200:: 2001:db8:0:f00:: /56;
# Example for a fixed host address
host specialclient {
host-identifier option dhcp6.client-id
00:01:00:01:4a:1f:ba:e3:60:b9:1f:01:23:45;
fixed-address6 2001:db8:0:2::127;
5. To confirm that the AP has received the correct IP info through DHCPv6 option 17,
you can check the /tmp/dhcp6_vendor_opts file. Use the following command on the
AP CLI:
# cat /tmp/dhcp6_vendor_opts
code3
2001:1920:1cf::3
2001:1920:1cf::4
end
code6
2001:1920:1cf::1
2001:1920:1cf::2
end
6. You have completed configuring the isc-dhcp-server for controller discovery using
DHCPv6 Option 17. To confirm that the DHCPv6 options are configured properly
(whether using isc-dhcp-server or another DHCPv6 server), you should ensure that
the Option 17 configuration looks like the following figure:
Ruckus Wireless ZoneDirector™ Release 10.0 User Guide
31
Page 32

Introducing ZoneDirector
Ensuring That APs Can Communicate with ZoneDirector
Figure 9: Ensuring that DHCPv6 Option 17 is configured correctly
Option 3: Register ZoneDirector with a DNS Server
If you register ZoneDirector with your DNS server, supported APs that request IP
addresses from your DHCP server will also obtain DNS related information that will enable
them to discover ZoneDirector devices on the network. Using the DNS information they
obtained during the DHCP request, APs will attempt to resolve the ZoneDirector IP
address (or IP addresses) using zonedirector.{DNS domain name}.
To register ZoneDirector devices with DNS server:
• Step 1: Set the DNS Domain Name on the DHCP Server
• Step 2: Set the DNS Server IP Address on the DHCP Server
• Step 3: Register the ZoneDirector IP Addresses with a DNS Server
NOTE The following procedures describe how to customize a DHCP server running
on Microsoft Windows Server. If your DHCP server is running on a different operating
system, the procedure may be different.
Step 1: Set the DNS Domain Name on the DHCP Server
1. From Windows Administrative Tools, open DHCP, and then select the DHCP
server that you want to configure.
2. If the Scope folder is collapsed, click the plus (+) sign to expand it.
3. Right-click Scope Options, and then click Configure Options. The General tab of
the Scope Options dialog box appears.
4. Under Available Options, look for the 15 DNS Domain Name check box, and then
select it.
5. In the String value text box under Data Entry, type your company’s domain name
6. Click Apply to save your changes.
7. Click OK to close the Scope Options dialog box.
32
Ruckus Wireless ZoneDirector™ Release 10.0 User Guide
Page 33

Introducing ZoneDirector
Ensuring That APs Can Communicate with ZoneDirector
Figure 10: Select the 015 DNS Domain Name check box, and then type your company domain
name in String value
Step 2: Set the DNS Server IP Address on the DHCP Server
1. From Windows Administrative Tools, open DHCP, and then select the DHCP
server you want to configure.
2. If the Scope folder is collapsed, click the plus (+) sign to expand it.
3. Right-click Scope Options, and then click Configure Options. The tab of the Scope
Options dialog box appears.
4. Under Available Options, look for the 6 DNS Servers check box, and then select
it
5. In the IP address box under Data Entry, type your DNS server’s IP address,
and then click Add. If you have multiple DNS servers on the network, repeat the
same procedure to add the other DNS servers.
6. Click Apply to save your changes.
7. Click OK to close the Scope Options dialog box.
Ruckus Wireless ZoneDirector™ Release 10.0 User Guide
33
Page 34

Introducing ZoneDirector
Ensuring That APs Can Communicate with ZoneDirector
Figure 11: Select the 006 DNS Servers check box, and then type your DNS server’s IP address
in the Data entry section
Step 3: Register the ZoneDirector IP Addresses with a DNS Server
After you complete configuring the DHCP server with DNS related information, you need
to register the IP addresses of ZoneDirector devices on the network with your DNS
server. The procedure for this task depends on the DNS server software that you are
using.
Information on configuring the built-in DNS server on Windows is available at
http://support.microsoft.com/kb/814591
NOTE If your DNS server prompts you for the corresponding host name for each
ZoneDirector IP address, you MUST enter zonedirector. This is critical to ensuring that
the APs can resolve the ZoneDirector IP address.
After you register the ZoneDirector IP addresses with your DNS server, you have
completed this procedure. APs on the network should now be able to discover
ZoneDirector on another subnet.
34
Ruckus Wireless ZoneDirector™ Release 10.0 User Guide
Page 35

Introducing ZoneDirector
Ensuring That APs Can Communicate with ZoneDirector
Firewall Ports that Must be Open for ZoneDirector Communications
Depending on how your network is designed, you may need to open ports on any firewalls
located between ZoneDirector, FlexMaster or the access points. The following table lists
the ports that need to be open for different types of communications.
Table 13: Firewall ports that must be open for ZoneDirector communications
PortsCommunication
ZoneDirector Web UI access
AP > ZoneDirector (AP) firmware upgrade
AP > ZoneDirector application statistics
reporting
Redundancy
registration/inform/firmware upgrade
FlexMaster > ZoneDirector management
interface
TACACS+ server < > ZoneDirector
NOTE Additionally, TCP port 1883 is used for AP to AP communication, for infrastructure
services shared by many applications/features, such as avpd, nbrd, ftromd, and so on.
However, this communication is only between adjacent APs, which are normally not
separated by firewalls/ACLs. Therefore this should not have any impact on customer
network infrastructure.
TCP destination ports 80 and 443 (HTTP
and HTTPS)
UDP destination ports 12222 and 12223AP > ZoneDirector LWAPP
UDP port 18301AP > ZoneDirector SpeedFlex
TCP port 21 (the firewall must be stateful
for PASV FTP transfers)
TCP port 21 (FTP). TCP port: Random port
higher than 1024
TCP destination port 443 and port 33003ZoneDirector > ZoneDirector Smart
TCP destination port 443ZoneDirector > FlexMaster
TCP destination port as specified in FM
Inventory 'Device Web Port Number
Mapping'
TCP destination port 22 (SSH)ZoneDirector CLI access
TCP destination port 49 (TACACS+)
(default)
NAT Considerations
Beginning with version 9.2, ZoneDirector can be deployed in a private network behind
a NAT (Network Address Translation) device.
When ZoneDirector is deployed on an isolated private network where NAT is used,
administrators can manually configure a port-mapping table on the NAT device to allow
remote access into ZoneDirector. This allows APs to establish an LWAPP connection
Ruckus Wireless ZoneDirector™ Release 10.0 User Guide
35
Page 36

Introducing ZoneDirector
Accessing ZoneDirector's Command Line Interface
with ZoneDirector, as well as allowing remote HTTPS and SSH management access to
ZoneDirector. Firewall Ports that Must be Open for ZoneDirector Communications on
page 35 lists the ports that must be open for trans-NAT communications.
Specifically, the following ports must be mapped to ZoneDirector's private IP address
on the NAT device's port mapping table: ports 21, 22, 80, 443, 12222, 12223. Note
that there are some limitations with this configuration, including:
• SpeedFlex performance test tool will not work (ZoneDirector needs to know the IP
addresses of the APs).
• Deploying two ZoneDirectors behind the same NAT in a Smart Redundancy
configuration requires creation of two port forwarding rules (one for each ZoneDirector
physical IP address), and that the APs are configured with both ZoneDirectors' public
IP addresses as primary and secondary ZD IPs.
• An active ZoneDirector behind NAT will be unable to perform upgrades to the standby
ZoneDirector on the other side of the NAT device.
Accessing ZoneDirector's Command Line Interface
In general, this User Guide provides instructions for managing ZoneDirector and your
ZoneFlex network using the ZoneDirector web interface. You can also perform many
management and configuration tasks using the ZoneDirector Command Line Interface
(CLI) by connecting directly to the Console port or an Ethernet port.
To access the ZoneDirector CLI:
1. Connect an admin PC to the ZoneDirector Console port or any of the LAN ports
(using either a DB-9 serial cable for the console port or an Ethernet cable for LAN
ports).
2. Launch a terminal program, such as Hyperterminal, PuTTy, etc.
3. Enter the following connection settings:
• Bits per second: 115200
• Data bits: 8
• Parity: None
• Stop bits: 1
• Flow control: None
36
Ruckus Wireless ZoneDirector™ Release 10.0 User Guide
Page 37
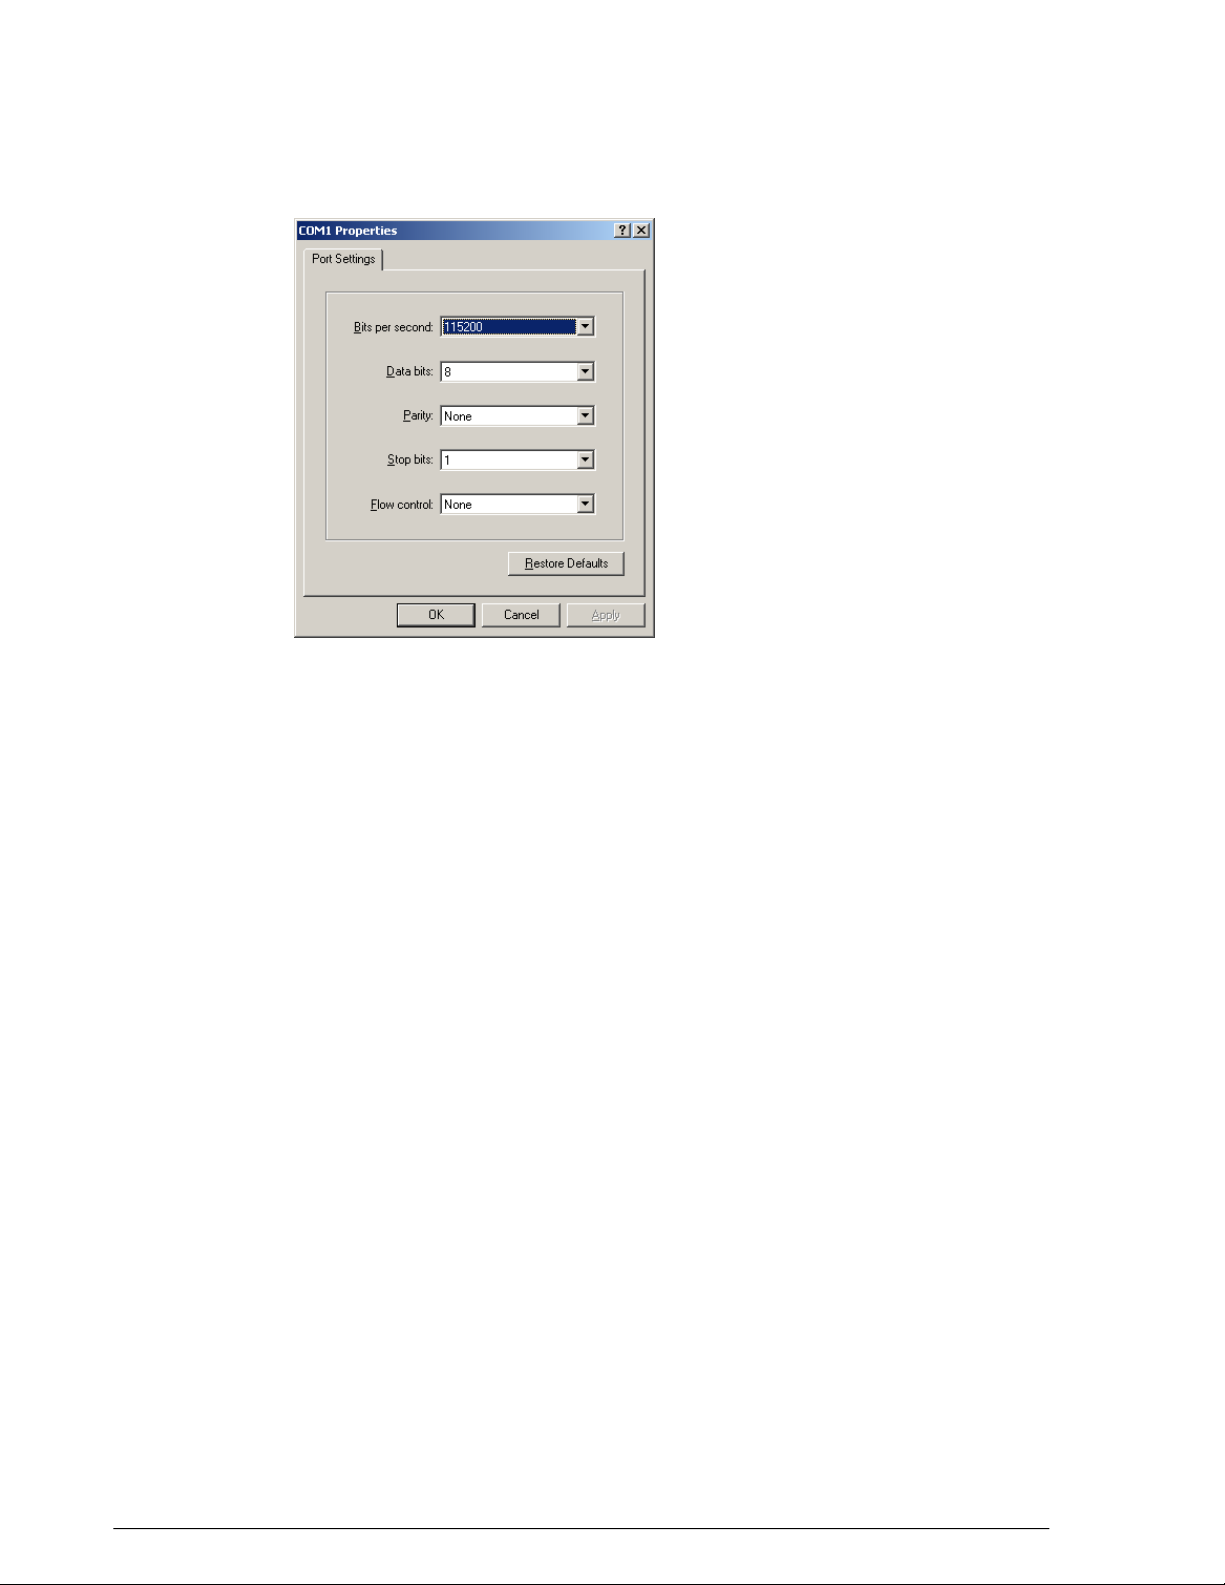
Introducing ZoneDirector
Using the ZoneDirector Web Interface
Figure 12: Configure a terminal client
4. Click OK or Open to connect (depending on your terminal client).
5. At the Please Login prompt, enter the admin login name (default: admin) and
password (default: admin).
You are now logged into ZoneDirector with limited privileges. As a user with limited
privileges, you can view a history of previously executed commands and ping a device.
If you want to run more commands, you can switch to privileged mode by entering
enable at the root prompt.
To view a list of commands that are available at the root level, enter help or ?.
For more information on using the CLI, see the Ruckus Wireless ZoneDirector Command
Line Interface Reference Guide, available from http://support.ruckuswireless.com/.
Using the ZoneDirector Web Interface
The ZoneDirector web interface consists of several interactive components that you can
use to manage your Ruckus Wireless ZoneFlex network (including ZoneDirector and all
connected APs).
When you first log into your ZoneDirector using the web interface, the Dashboard
appears, displaying a map view of your APs (if coordinates are configured) in the top
section, and a Traffic Analysis view of total network traffic and client statistics in the
bottom section.
Ruckus Wireless ZoneDirector™ Release 10.0 User Guide
37
Page 38

Introducing ZoneDirector
Using the ZoneDirector Web Interface
In addition to the Dashboard, the ZoneDirector web interface contains three expandable
menu tabs. Click the tab to expand the menu and access monitoring, configuration and
system administration settings.
Dashboard
Monitor
Configure
Administer
The Dashboard provides an overview of the system and is
divided into two sections; Health and Traffic Analysis.
Expand this tab to monitor wireless clients, APs, system events
and other information.
Expand this tab to configure APs, WLANs, guest access,
system settings, services and other settings.
Expand this tab to configure admin settings such as admin
login name and password, and to perform admin functions
such as system backup, restore and upgrade.
Navigating the Dashboard
The Dashboard provides a basic overview of the general health and traffic status of the
network.
The Health section includes a summary of the total number of WLANs, APs and clients
currently connected above the map view. The map view itself provides a geographical
view of the placement of APs (if map coordinates are configured), and can be filtered by
AP group or replaced with a custom interior map using the drop-down menu above the
map.
Hover over an AP on the map to view its MAC address, AP group and IP address.
NOTE If an AP is incorrectly located or does not appear on the map, go to Configure
> Access Points and configure the AP's GPS Coordinates.
The Traffic Analysis section contains graphs of traffic and client count statistics, top
clients by traffic volume, and a pie chart displaying the breakdown of clients by device
type. Each of these views can be customized to display data for the last hour or last 24
hours, and can be filtered by AP, AP group and WLAN. You can also click the gear icon
to customize the information displayed in the tables.
38
Ruckus Wireless ZoneDirector™ Release 10.0 User Guide
Page 39

Introducing ZoneDirector
Registering Your Product
Figure 13: The Dashboard (collapsed): Click the arrows in the Health or Traffic Analysis section
to expand the section
Registering Your Product
Ruckus Wireless encourages you to register your ZoneDirector product to receive updates
and important notifications, and to make it easier to receive support in case you need
to contact Ruckus for customer assistance. You can register your form.
To ensure that all registration information for all of your APs is included, be sure to register
after all APs have been installed. If you register ZoneDirector before installing the APs,
the registration will not include AP information. To register your ZoneDirector:
1. Go to Administer > Registration.
2. Enter your contact information on the Registration page, and click Apply.
3. The information is sent to a CSV file that opens in a spreadsheet program (if you have
one installed). This file includes the serial numbers and MAC addresses of your
ZoneDirector and all known APs, and your contact information.
4. Save the CSV file to a convenient location on your local computer.
5. Click the link on the Registration page to upload the CSV file
(https://support.ruckuswireless.com/register). If you do not already have a Support
account login, first click the https://support.ruckuswireless.com/get_access_now
link to create a support account, and then click the register link to upload the CSV
file to Ruckus Support.
Ruckus Wireless ZoneDirector™ Release 10.0 User Guide
39
Page 40

Figure 14: The Product Registration page
Your ZoneDirector is now registered with Ruckus Wireless.
Page 41

41
Configuring System Settings
System Configuration Overview
The majority of ZoneDirector's general system settings can be accessed from the
Configure > System page in the web interface. A basic set of parameters is configured
during the Setup Wizard process. These parameters and others can be customized on
this page.
NOTE When making any changes in the web interface, you must click Apply before
you navigate away from the page or your changes will not be saved.
Changing the System Name
When you first worked through the Setup Wizard, you were prompted for a
network-recognizable system name for ZoneDirector.
If needed, you can change that name by following these steps:
1. Go to Configure > System
2. In System Name (under Identity), delete the text, and then type a new name. The
name should be between 1 and 32 characters in length, using letters, numbers,
underscores (_) and hyphens (-). Do not use spaces or other special characters. Do
not start with a hyphen (-) or underscore (_). System names are case sensitive.
3. Click Apply to save your settings. The change goes into effect immediately.
3
Changing the Network Addressing
IIf you need to update the IP address and DNS server settings of ZoneDirector, follow
the steps outlined below.
1. Go to Configure > System.
2. Review the Device IP Settings options.
Ruckus Wireless ZoneDirector™ Release 10.0 User Guide
41
Page 42

Configuring System Settings
Changing the Network Addressing
Figure 15: The Device IP options
3. Select one of the following:
• Enable IPv6 Support: By default, ZoneDirector operates in IPv4 mode. If your
network uses IPv6, select Enable IPv6 Support and enter configuration settings
for either IPv6 only or dual IPv4/IPv6 support. See IPv6 Configuration on page 42
for more information.
• Manual: If you select Manual, enter the correct information in the now-active fields
(IP Address, Netmask, and Gateway are required).
• DHCP: If you select DHCP, no further information is required.
4. Click Apply to save your settings. You will lose connection to ZoneDirector.
5. To log back into the web interface, use the newly assigned IP address in your web
browser or use the UPnP application to rediscover ZoneDirector.
IPv6 Configuration
ZoneDirector supports IPv6 and dual IPv4/IPv6 operation modes. If both IPv4 and IPv6
are used, ZoneDirector will keep both IP addresses. Ruckus ZoneFlex APs operate in
dual IPv4/v6 mode by default, so you do not need to manually set the mode for each
AP.
If you enable IPv6, you have the option to manually configure an IP address in IPv6
format (128 bits separated by colons instead of decimals) or to choose Auto
Configuration. If you choose Manual, you will need to enter IP Address, Prefix Length
and Gateway.
Table 14: Default static IPv4 and IPv6 addresses
42
AP default IP address
ZoneDirector default IP
address
192.168.0.2192.168.0.1IPv4
Ruckus Wireless ZoneDirector™ Release 10.0 User Guide
Page 43

Configuring System Settings
Changing the Network Addressing
AP default IP address
DNS Address can be configured manually or obtained automatically by the DHCPv6
client.
NOTE If you switch from IPv4 to IPv6, you will need to manually change a number of
settings that may have previously been configured, such as Access Control Lists (ACLs),
AAA server addresses, Syslog server, SNMP trap receiver, etc.
When IPv6 is enabled, the other fields where IP addresses are entered (such as Additional
Management Interface) automatically change to allow entry of IPv6 format addresses,
as shown in Figure 24.
Note that some features are not supported when in IPv6 mode. Specifically, internal
DHCP server, LAN rogue AP detection, DHCPv6 vendor specific options, Aeroscout
RFID tag detection, SSL certificate generation, UPnP, remote access to ZD, and L2TP
and WISPr in standalone APs are not supported when in IPv6 mode.
ZoneDirector default IP
address
fc00::2fc00::1IPv6
Figure 16: Enabling IPv6 automatically changes other fields to allow IPv6 addresses
Enabling an Additional Management Interface
The additional management interface is created for receiving and transmitting
management traffic only.
The management IP address can be configured to allow an administrator to manage
ZoneDirector from its management VLAN, thereby separating management traffic from
LWAPP traffic between the controller and the access points. The Management IP can
be reached from anywhere on the network as long as it is routable via the default Gateway
configured in Device IP Settings.
Ruckus Wireless ZoneDirector™ Release 10.0 User Guide
43
Page 44
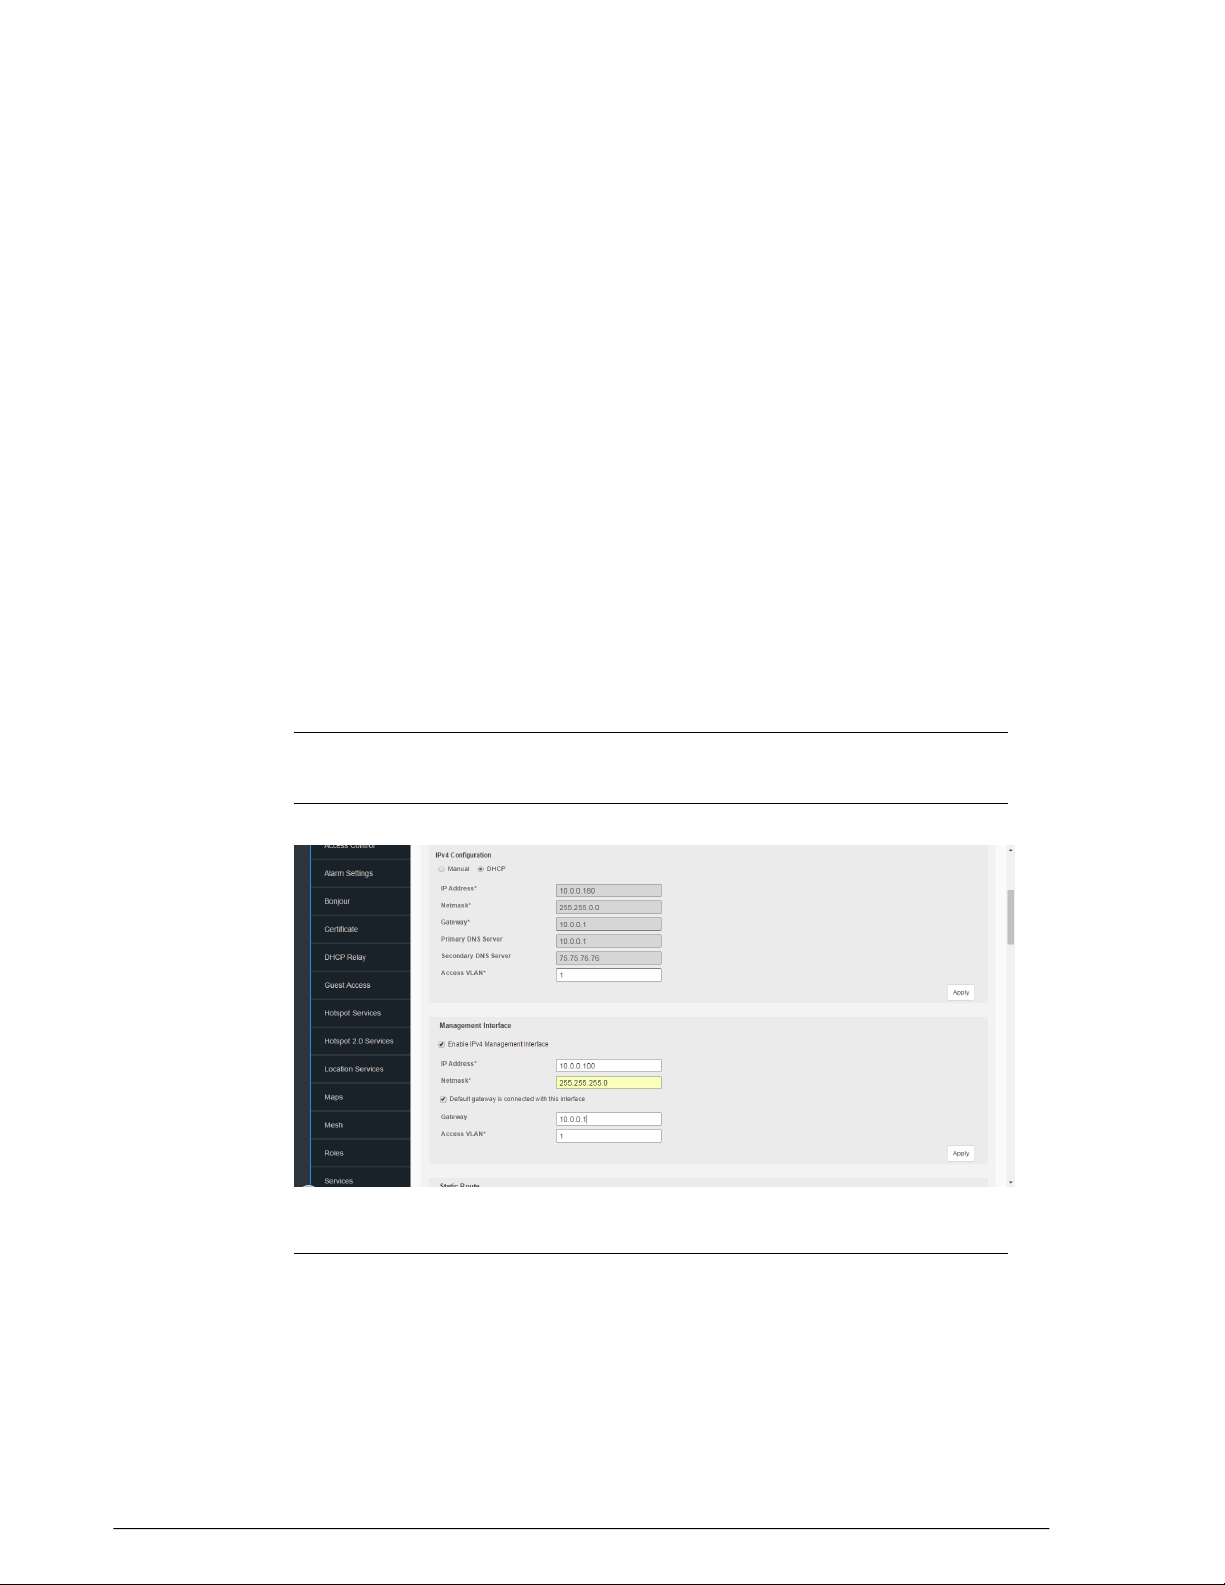
Configuring System Settings
Changing the Network Addressing
It can also be used for Smart Redundancy -- when two redundant ZoneDirectors are
deployed, you can create a separate management interface to be shared by both devices.
Then, you only have to remember one IP address that you can log into regardless of
which ZoneDirector is the active unit. This shared management IP address must be
configured identically on both ZoneDirectors (see Enabling Smart Redundancy on page
46).
To enable an additional management interface:
1. Go to Configure > System.
2. Locate the Management Interface section and click the check box next to Enable
IPv4 Management Interface or Enable IPv6 Management Interface.
3. Enter the IP Address, Netmask and Access VLAN information for the additional
interface. (If IPv6, enter Prefix Length instead of Netmask).
4. (Optional) If you want to configure this management interface with a different gateway
from the gateway configured under “Device IP Settings”, select Default gateway is
connected with this interface, and enter the gateway IP address in the field provided.
Enable this option if you want to change the default gateway of the ZoneDirector to
be in your management subnet. Changing the default gateway to be in the
management subnet will cause all traffic to be routed via this gateway.
5.
NOTE If the Management Interface is to be shared by two Smart Redundancy
ZoneDirectors, repeat these steps for the other ZoneDirector.
Click Apply to save your settings.
Figure 17: Enabling an additional management interface
NOTE If a management interface is used for web UI management, the actual IP
address must still be used when configuring ZoneDirector as a client for a backend
RADIUS server, FlexMaster server or in any SNMP systems. If two ZoneDirectors are
44
Ruckus Wireless ZoneDirector™ Release 10.0 User Guide
Page 45

Configuring System Settings
Creating Static Route Entries
deployed in a Smart Redundancy configuration, both of the actual IP addresses must
be used rather than the management IP address.
Creating Static Route Entries
Static routes can be created to allow ZoneDirector to reach remote networks which can
only be reached via a gateway other than default gateway. The gateway you use must
be in the same subnet as either the ZoneDirector primary IP address or the Management
IP address.
To create a static route to an additional gateway
1. Go to Configure > System and locate the Static Route section.
2. Click Create New to create a new static route.
3. Enter a Name for this access route.
4. Enter a Subnet (in the format A.B.C.D/M (where M is the netmask).
5. Enter the Gateway address.
6. Click OK to save your changes. You can create up to 4 static route entries.
Figure 18: Creating a static route entry
Static Route Example
As an example, in a network where the APs are connected to ZoneDirector via a cable
modem termination system, the APs are in a different subnet and not found via the
Ruckus Wireless ZoneDirector™ Release 10.0 User Guide
45
Page 46

Configuring System Settings
Enabling Smart Redundancy
default gateway. A static route would therefore be needed to allow ZoneDirector to AP
connectivity.
Figure 19: A static route is needed when APs are reachable only through a non-default gateway
Enabling Smart Redundancy
ZoneDirector's Smart Redundancy feature allows two ZoneDirectors to be configured
as a redundant pair, with one unit actively managing your ZoneFlex network while the
other serves as a backup in standby mode, ready to take over if the first unit fails or
loses power.
Each ZoneDirector will either be in active or standby state. If the active ZoneDirector
fails, the standby device becomes active. When the original active device recovers, it
automatically assumes the standby state as it discovers an already active ZoneDirector
on the network.
The ZoneDirector in active state manages all APs and client connections. The
ZoneDirector in standby state is responsible for monitoring the health of the active unit
and periodically synchronizing its settings to match those of the active device. The
ZoneDirector in standby state will not respond to Discovery requests from APs and
changing from active to standby state will release all associated APs.
46
Ruckus Wireless ZoneDirector™ Release 10.0 User Guide
Page 47

Configuring System Settings
Enabling Smart Redundancy
When failover occurs, all associated APs will continue to provide wireless service to
clients during the transition, and will associate to the newly active ZoneDirector within
approximately one minute.
When two ZoneDirectors are connected in a Smart Redundancy configuration, the
standby ZD will send heartbeats and the active will send discover messages at 6 second
intervals. If after 15 seconds no reply is seen, each controller will assume disconnection
from its peer, and the standby ZD will change to active state. At this point both devices
are in active state and will accept join requests from APs.
When the two ZoneDirectors are communicating again, one active ZD will change to
standby state and an auto-synchronization process will be started. A timestamp is used
to determine which ZD should sync its latest configuration changes to those of its peer.
They will continue trying to communicate, sending discover messages every 6 seconds,
until the ZDs are communicating again, at which point they will determine active/standby
roles based on: 1) most managed APs, and/or 2) lower MAC address.
Configuring ZoneDirector for Smart Redundancy
For management convenience, both ZoneDirectors in a Smart Redundancy deployment
can be managed via a single shared IP address. In this situation, three IP addresses
would need to be configured:
• Primary ZoneDirector's real address
• Backup ZoneDirector's real address
• Management address
All configuration changes are made to the active ZoneDirector and synchronized to the
standby unit. The user can access the web interface from any of the three IP addresses,
however not all configuration options are available from the standby device.
NOTE If you will be deploying the two ZoneDirectors on different Layer 3 networks,
you must ensure that Port 443 and Port 33003 are open in any routers and firewalls
located between the two ZoneDirectors.
To enable Smart Redundancy:
1. Log in to the web interface of the ZoneDirector you will initially designate as the
primary unit.
2. Go to Configure > System, and set a static IP address under Device IP Settings, if
not already configured.
3. Click Apply. You will need to log in again using the new IP address (if changed).
4. On the same Configure > System page, locate the Smart Redundancy section.
Ruckus Wireless ZoneDirector™ Release 10.0 User Guide
47
Page 48

Configuring System Settings
Enabling Smart Redundancy
Figure 20: Enable Smart Redundancy
5. Enable the check box next to Enable Smart Redundancy.
6. Enter the IP address of the backup unit under Peer Device IP Address. If you have
configured Limited ZD Discovery under Configure > Access Points > Access Point
Policies, you must identify the IP address of both ZoneDirectors that the APs should
connect to when Smart Redundancy is active. If the Limited ZD Discovery and Smart
Redundancy information you enter is inconsistent, a warning message will be displayed
asking you to confirm. Note that Ruckus recommends using the Smart Redundancy
feature instead of the Limited ZD Discovery feature whenever possible.
7. Enter a Shared Secret for two-way communication between the two ZoneDirectors
(up to 15 alphanumeric characters).
8. Click Apply to save your changes and prompt ZoneDirector to immediately attempt
to discover its peer on the network.
9. If discovery is successful, the details of the peer device will be displayed to the right.
10. If discovery is unsuccessful, you will be prompted to retry discovery or continue
configuring the current ZoneDirector.
11. Install the second ZoneDirector and complete the Setup Wizard.
12. Go to Configure > System, enable Smart Redundancy and enter the primary
ZoneDirector’s IP address in Peer Device IP address.
13. Click Apply. If an active ZoneDirector is discovered, the second ZoneDirector will
assume the standby state. If an active device is not discovered, you will be prompted
to retry discovery or to continue configuring the current device.
48
NOTE If you want to use the same SSL certificate for both devices in a Smart
Redundancy pair, you can back up the certificate/private key from one device and
import it into the other. See Working with SSL Certificates on page 326 for more
information.
Ruckus Wireless ZoneDirector™ Release 10.0 User Guide
Page 49

Configuring System Settings
Enabling Smart Redundancy
NOTE If you disable Smart Redundancy after it has been enabled, both ZoneDirectors
will revert to active state, which could result in unpredictable network topologies.
Therefore, Ruckus Wireless recommends first factory resetting the standby
ZoneDirector before disabling Smart Redundancy.
NOTE If the active and standby ZoneDirector are on different IP subnets, APs need
to know the IP addresses of both ZoneDirectors to quickly find the active ZoneDirector
after a Smart Redundancy failover. You can do this by configuring the IP addresses
of both devices on the Configure > Access Points > Limited ZD Discovery page.
Specify one ZoneDirector as Primary, the other as Secondary. Alternatively you can
specify the IP addresses of both ZoneDirectors through DHCP Option 43 (see Option
2: Customize Your DHCP Server on page 27).
Managing Smart Redundancy AP License Pools
If two Smart Redundancy ZoneDirectors have different license levels (number of licensed
APs), the total number of licenses is displayed in the Smart Redundancy dashboard
widget, in the “License Pool” entry. When one device is disconnected, the remaining
active ZD will continue to use the previous total license pool and start a 60-day timer.
When the timer expires, the ZD will use its own license number (the license pool is
reduced to the number of APs licensed for the currently active device only) until its Smart
Redundancy peer comes back online.
If a third ZoneDirector connects, the license pool will reflect the new total license pool if
the sum of the two licenses is higher than the original pair. If the sum is less than the
previous license pool (within the 60-day timer), the user will be prompted to choose
whether the license pool will be derived from the active + original disconnected device,
or from the currently active + current standby device. License pools cannot exceed the
maximum individual ZD license limit. ZoneDirectors with temporary licenses cannot be
configured as part of a Smart Redundancy pair.
Ruckus Wireless ZoneDirector™ Release 10.0 User Guide
49
Page 50

Configuring System Settings
Enabling Smart Redundancy
Figure 21: Smart Redundancy status degraded (peer is disconnected, license pool remains valid
for 60 days
Figure 22: After 60 day grace period expires, license pool is revoked and AP license count reverts
to active device license level only
Figure 23: If a third ZD connects with a lower license level than the 2nd (disconnected) ZD, the
user can choose to use the original license pool for up to 60 days
Table 15: Max AP Licenses by ZoneDirector Model
Max AP LicensesModel
150ZoneDirector 1200
500ZoneDirector 3000
1,000ZoneDirector 5000
50
Ruckus Wireless ZoneDirector™ Release 10.0 User Guide
Page 51

Configuring System Settings
Configuring the Built-in DHCP Server
Configuring the Built-in DHCP Server
ZoneDirector comes with a built-in DHCP server that you can enable to assign IP
addresses to devices that are connected to it. ZoneDirector’s DHCP server will only
assign addresses to devices that are on its own subnet and part of the same VLAN.
Note that before you can enable the built-in DHCP server, ZoneDirector must be assigned
a manual (static) IP address. If you configured ZoneDirector to obtain its IP address from
another DHCP server on the network, the options for the built-in DHCP server will not
be visible on the System Configuration page.
Enabling the Built-in DHCP server
Ruckus Wireless recommends that you only enable the built-in DHCP server if there are
no other DHCP servers on the network.
ZoneDirector's internal DHCP server can service only a single subnet (the one it's in)
and not other VLANs that may be associated with client WLANs. If you enable the built-in
DCHP server, Ruckus Wireless also recommends enabling the rogue DHCP server
detector. For more information, refer to Rogue DHCP Server Detection on page 124.
1. Go to Configure > System.
2. In the DHCP Server section, select the Enable DHCP Server check box.
3. In Starting IP, type the first IP address that the built-in DHCP server will allocate to
DHCP clients. The starting IP address must be on the same subnet as the IP address
assigned to ZoneDirector. If the value that you typed is invalid, an error message
appears and prompts you to let ZoneDirector automatically correct the value. Click
OK to automatically correct the entry.
4. In Number of IPs, type the maximum number of IP addresses that you want to
allocate to requesting clients. The built-in DHCP server can allocate up to 512 IP
addresses including the one assigned to ZoneDirector. The default value is 200.
5. In Lease Time, select a time period for which IP addresses will be allocated to DHCP
clients. Options range from six hours to two weeks (default is one week).
6. If your APs are on different subnets from ZoneDirector, click the check box next to
DHCP Option 43 to enable Layer 3 discovery of ZoneDirector by the APs.
7. Click Apply. If you typed an invalid value in any of the text boxes, an error message
appears and prompts you to let ZoneDirector automatically correct the value. Click
OK to change it to a correct value.
Ruckus Wireless ZoneDirector™ Release 10.0 User Guide
51
Page 52

Configuring System Settings
Configuring the Built-in DHCP Server
Figure 24: The DHCP Server options
Viewing DHCP Clients
To view a list of current DHCP clients, click the click here link at the end of the "To view
all currently assigned IP addresses that have been assigned by the DHCP server..."
sentence. A table appears and lists all current DHCP clients with their MAC address, IP
address and the remaining lease time.
You can clear DHCP leases on ZoneDirector by disabling and re-enabling the DHCP
service.
52
Ruckus Wireless ZoneDirector™ Release 10.0 User Guide
Page 53

Configuring System Settings
Controlling ZoneDirector Management Access
Figure 25: To view current DHCP clients, click the "click here" link
Controlling ZoneDirector Management Access
The Management Access Control option can be used to control access to
ZoneDirector's management interface.
The Management Access Control interface is located on the Configure > System
screen. Options include limiting access by subnet, single IP address and IP address
range. When you create a management access control rule, all IP addresses and subnets
other than those specifically listed will be blocked from accessing ZoneDirector's web
interface.
To restrict access to ZoneDirector's web interface:
1. Go to Configure > System.
2. Locate the Management Access Control section, and click the Create New link.
3. In the Create New menu that appears, enter a name for the user(s) that you want to
allow access to ZoneDirector's web interface.
4. Enter an IP address, address range or subnet. The administrator's current IP address
is shown for convenience.
CAUTION! Be sure that you do not create an ACL that blocks the admin's own IP
address from accessing the web interface.
5. Click OK to confirm. You can create up to 16 entries to the Management ACL.
Ruckus Wireless ZoneDirector™ Release 10.0 User Guide
53
Page 54

Configuring System Settings
Setting the System Time
Figure 26: Creating a new ZoneDirector management ACL
Setting the System Time
The internal clock in ZoneDirector is automatically synchronized with the clock on your
administration PC during the initial setup. You can use the web interface to check the
current time on the internal clock, which shows up as a static notation in the Configure
tab workspace. If this notation is incorrect, you can re-synchronize the internal clock to
your PC clock immediately by clicking the Sync Time with Your PC button.
A preferable option is to link your ZoneDirector to an NTP server (as detailed below),
which provides continual updating with the latest time.
1. Go to Configure > System.
2. In the System Time features you have the following options:
• Refresh: Click this to update the ZoneDirector display (a static snapshot) from
the internal clock.
• Sync Time with your PC Now: If needed, click this to update the internal clock
with the current time settings from your administration PC.
• Use NTP... (Enabled by default): Clear this check box to disable this option, or
enter the DNS name or IP address of your preferred NTP server to use a different
one.
• Select time zone for your location: Choose your time zone from the drop-down
menu. Setting the proper time zone ensures that timestamps on log files are in
the proper time zone.
3. Click Apply to save the results of any resynchronization or NTP links.
54
Ruckus Wireless ZoneDirector™ Release 10.0 User Guide
Page 55

Configuring System Settings
Setting the Country Code
Figure 27: The System Time options
Setting the Country Code
Different countries and regions maintain different rules that govern which channels can
be used for wireless communications. Setting the Country Code to the proper regulatory
region ensures that your ZoneFlex network does not violate local and national regulatory
restrictions. ZoneDirector’s web interface can be used to define the country code for all
APs under its control.
To set the Country Code to the proper location:
1. Go to Configure > System.
2. Locate the Country Code section, and choose your location from the pull-down
menu.
3. Click Apply to save your settings.
Figure 28: The Country Code settings
Channel Optimization
If your Country Code is set to "United States," an additional configuration option, Channel
Optimization, is shown. This feature allows you to choose whether additional DFS
(Dynamic Frequency Selection) channels in the 5 GHz band should be available for use
by your APs.
Note that these settings only affect Ruckus Wireless APs that support the extended DFS
channel list. Channel Optimization settings are described in the following table.
Ruckus Wireless ZoneDirector™ Release 10.0 User Guide
55
Page 56

Configuring System Settings
Setting the Country Code
Table 16: Channel Optimization settings for US Country Code
Use this setting whenDescriptionSetting
Optimize for Compatibility
Optimize for Interoperability
Optimize for Performance
NOTE If you are located in the United States and have a DFS-capable ZoneFlex AP
that is expected to serve as a Root AP (or eMAP), with a non-DFS-capable Mesh AP as
its downlink, you will need to set the Channel Optimization setting to "Optimize for
Compatibility." This is due to the DFS-capable AP's ability to use more channels than
the non-DFS-capable APs, which could result in the RAP choosing a channel that is not
available to the MAP. Alternatively, manually set the channel for the Root AP to one of
the non-DFS channels. Specifically, choose one of the following channels: 36, 40, 44,
48, 149, 153, 157, 161, 165.
DFS-capable ZoneFlex APs
are limited to the same
channels as all other APs
(non-DFS channels only).
ZoneFlex APs are limited to
non-DFS channels, plus four
DFS channels supported by
Centrino systems (may not
be compatible with other
wireless NICs).
ZoneFlex APs can use all
available DFS and non-DFS
channels, without regard for
compatibility or
interoperability.
You have a mixture of APs
that support DFS channels
and other DFS channels in
a Smart Mesh configuration.
You have only DFS-capable
APs in your network, or
Smart Mesh is not enabled,
and you are confident that
all wireless clients support
DFS channels.
You have only DFS-capable
APs in your network, you
are not concerned with DFS
compatibility of client
devices, and you want to
make the maximum use of
all
56
The channels available for AP use are the following:
• Optimize for Compatibility: 36, 40, 44, 48, 149, 153, 157, 161, 165 (non-DFS
channels).
• Optimize for Interoperability: non-DFS channels plus channels 52, 56, 58, 60.
• Optimize for Performance: all DFS/non-DFS channels, including 100, 104, 108,
112, 116, 120, 124, 128, 132, 136, 140.
Channel Mode
Some countries restrict certain 5 GHz channels to indoor use only. For instance, Germany
restricts channels in the 5.15 GHz to 5.25 GHz band to indoor use. When ZoneFlex
outdoor APs and bridges (including ZF 7731, P300, T300, and T710 series) are set to
a country code where these restrictions apply, the AP or Bridge can no longer be set to
an indoor-only channel and will no longer select from amongst a channel set that includes
Ruckus Wireless ZoneDirector™ Release 10.0 User Guide
Page 57

Configuring System Settings
Changing the System Log Settings
these indoor-only channels when SmartSelect or Auto Channel selection is used, unless
the administrator configures the AP to allow use of these channels.
For instance, if the AP is installed in a challenging indoor environment such as a
warehouse, the administrator may want to allow the AP to use an indoor-only channel.
These channels can be enabled for use through the AP CLI or ZoneDirector web interface
by configuring Configure > System > Country Code > Channel Mode and checking
Allow indoor channels (allows ZoneFlex Outdoor APs to use channels regulated
as indoor use only. If you have a dual-band ZoneFlex Indoor AP functioning as a RAP
with dual-band ZoneFlex Outdoor APs functioning as MAPs, the mesh backhaul link
must initially use a non-indoor-only channel. Your ZoneFlex Outdoor MAPs may fail to
join if the mesh backhaul link is using a restricted indoor-only channel.
Changing the System Log Settings
ZoneDirector maintains an internal log of current events and alarms. This file has a fixed
capacity; at a certain level, ZoneDirector will start deleting the oldest entries to make
room for the newest. This log is volatile, and the contents will be deleted if ZoneDirector
is powered down. If you want a permanent record of all logging activities, you can set
up your syslog server to receive log contents from ZoneDirector, and then use the web
interface to direct all logging to the syslog server.
Reviewing the Current Log Contents
1. Go to Monitor > All Events/Activities
2. Review the events and alarms listed below. Log entries are listed in reverse
chronological order (with the latest logs at the top of the list).
3. Click a column header to sort the contents by that category.
4. Click any column twice to switch chronological or alphanumeric sorting modes.
Ruckus Wireless ZoneDirector™ Release 10.0 User Guide
57
Page 58

Configuring System Settings
Changing the System Log Settings
Figure 29: The All Events/Activities page
Customizing the Current Log Settings
You can review and customize the log settings by following these steps:
1. Go to Configure > System.
2. Scroll down to the Log Settings section.
3. Make your selections from these syslog server options:
• Event Log Level: Select one of the three logging levels: “Show More,” “Warning
and Critical Events,” or “Critical Events Only.”
• Remote Syslog: To enable syslog logging, select the Enable reporting to remote
syslog server at check box, and then type the IP address in the box provided.
• Inherit remote syslog server for APs __ (IP Address): Enabling this feature
allows ZoneDirector to supply client association information to a third party
application that can then deploy ACL policies to a firewall based on client
association information such as user name, IP, MAC address, etc. First,
ZoneDirector retrieves client association information, then reorganizes the
information and sends it to the syslog server, from which it can be collected by
the third party software and sent it to the firewall for access restriction based on
client association information.
4. Click Apply to save your settings. The changes go into effect immediately.
58
Ruckus Wireless ZoneDirector™ Release 10.0 User Guide
Page 59

Configuring System Settings
Changing the System Log Settings
Figure 30: The Log Settings options
Configuring Remote Syslog Advanced Settings
Advanced Syslog settings allow you to override the default Facility Name and Priority
Level of messages sent to the syslog server. In this way, users can separate different
kinds of syslogs according to the facility name on the syslog server side.
To configure remote syslog advanced settings:
1. Go to Configure > System.
2. Scroll down to Log Settings, and expand the Remote Syslog Advanced Settings
section.
3. In ZoneDirector Settings, set the facility name as follows:
• Keep Original: Retain the original facility name.
• local0 - local7: Specify facility name.
4. Set the priority level as follows:
• All: Include all syslog messages.
• 0(emerg), 1(alert), 2(crit), 3(err), 4(warning), 5(notice), 6(info), 7(debug): Lower
numbers indicate higher priority. The syslog server will only receive logs whose
priority levels are the same as or higher than the configured level.
5. Repeat step 4 for Managed AP Settings. ZoneDirector and Access Points can use
different facility and priority settings. All managed APs share the same facility and
priority settings.
Figure 31: Remote Syslog Advanced Settings
Configuring Syslogs for Firewall Integration
Starting with release 9.8, ZoneDirector generates syslog messages upon acquisition,
update or deletion of an IP address by a wireless station. This feature allows enhanced
Ruckus Wireless ZoneDirector™ Release 10.0 User Guide
59
Page 60

Configuring System Settings
Changing the System Log Settings
integration with popular firewalls from vendors including Barracuda and Palo Alto
Networks for implementing client-specific security rules.
Station information is conveyed through a syslog message containing the following
information: IPv4/v6 address, User name, MAC address, Operation Type (Add, Update,
Del), AP/ZD MAC, OS Type. To enable inclusion of client association logs in syslog
messages:
1. Go to Administer > Diagnostics.
2. In Debug Logs, select the Client Association check box.
3. Click Apply to save your changes.
4. You must also ensure that syslog delivery is enabled on the Configure > System
page and that the Priority level in Remote Syslog Advanced Settings is set to Info
or All.
Figure 32: Enable client association logs in syslog for firewall integration
The flow of user data from the end point to the firewall will use the following path:
1. The user authenticates to an authentication server via AP.
2. ZoneDirector verifies the user’s identity.
3. After the station authenticates successfully and gets an IP address, ZoneDirector.
4. The log is sent to a syslog server in real time.
5. The script on the syslog server extracts user information from the log message and
sends it to the firewall. A similar flow can be used to remove user mappings if the
station sends a disconnect message.
Log Format
The log format consists of the following fields:
• operation: Indicates whether to add, delete or update client association information.
60
Ruckus Wireless ZoneDirector™ Release 10.0 User Guide
Page 61

Configuring System Settings
Setting Up Email Alarm Notifications
• sta_ip: Indicates the IP address of station.
• sta_name: Indicates the station’s account name supplied by the client when being
authenticated. The user name is used for 802.1X and Web Auth WLANs. The MAC
address of the client will be used as the user name for Open, MAC Address and
802.1X + MAC Address WLAN types.
• sta_mac: The station’s MAC address.
• sta_oriip: Only takes effect when the operation is “update” in order to indicate the
original IP of the station.
• ap_mac: Shows the MAC address of the AP to which the station is currently
connected.
• seq: Indicates the sequence number of the log message. It is increased by one after
a log is sent. The UDP packet can be adjusted to the right order by this field in the
log server.
• sta_ostype: Indicates the station’s OS type. Will be filled with “unknown” if the OS
type is unobtainable.
Examples
• Add
operation=add;seq=1;sta_ip=192.168.120.16;sta_mac=60:36:dd:19:17:ac;zd/
ap=00:0c:29:11:5a:0b/58:93:96:29:4c:60;sta_ostype=Windows7/
Vista;sta_name=60:36:dd:19:17:ac;stamgr_handle_remote_ipc
• Delete
operation=del;seq=4;sta_ip=192.168.120.30;sta_mac=60:36:dd:19:17:ac;zd/
ap=00:0c:29:11:5a:0b/58:93:96:29:4c:60;sta_ostype=Windows
7/
Vista;sta_name=60:36:dd:19:17:ac;stamgr_sta_log_disconnect
• Update
operation=update;seq=2;sta_ip=192.168.120.30;sta_oriip=
192.168.120.16;sta_mac=60:36:dd:19:17:ac;zd/ap=00:0c:29:11:5a:0b/
58:93:96:29:4c:60;sta_ostype=Windows 7/
Vista;sta_name=60:36:dd:19:17:ac;stamgr_handle_remote_ipc
Setting Up Email Alarm Notifications
If an alarm condition is detected, ZoneDirector will record it in the event log. If you prefer,
an email notification can be sent to a configured email address of your choosing.
To activate this option, follow these steps:
1. Go to Configure > Alarm Settings.
Ruckus Wireless ZoneDirector™ Release 10.0 User Guide
61
Page 62

Configuring System Settings
Setting Up Email Alarm Notifications
2. To enable email notification, select the Send an email message when an alarm is
triggered check box.
3. Enter the recipient email address in the Email Address box provided, and click Apply.
4. Go to Configure > System, and scroll down to the Email Server section.
5. Configure the settings listed in the following SMTP settings for email notification
table.
DescriptionSMTP Setting
From email address
SMTP Server Name
SMTP Server Port
SMTP Authentication Username
SMTP Authentication Password
Type the email address from which
ZoneDirector will send alarm messages.
Type the full name of the server provided by
your ISP or mail administrator. Often, the SMTP
server name is in the format
smtp.company.com. For Hotmail addresses,
the SMTP server name is smtp.live.com.
Type the SMTP port number provided by your
ISP or mail administrator. Often, the SMTP port
number is 25 or 587. The default SMTP port
value is 587.
Type the user name provided by your ISP or
mail administrator. This might be just the part
of your email address before the @ symbol, or
it might be your complete email address. If you
are using a free email service (such as Hotmail
or Gmail), you typically have to type your
complete email address.
Type the password that is associated with the
user name above.
62
Confirm SMTP Authentication
Password
SMTP Encryption Options
Retype the password you typed above to
confirm.
If your mail server uses TLS encryption, click
the SMTP Encryption Options link, and then
select the TLS check box. Additionally, select
the STARTTLS check box that appears after
you select the TLS check box. Check with your
ISP or mail administrator for the correct
encryption settings that you need to set. If using
a Yahoo! email account, STARTTLS must be
disabled. If using a Hotmail account, both TLS
and STARTTLS must be enabled.
Ruckus Wireless ZoneDirector™ Release 10.0 User Guide
Page 63

Configuring System Settings
Setting Up Email Alarm Notifications
6. To verify that ZoneDirector can send alarm messages using the SMTP settings you
configured, click the Test button.
• If ZoneDirector is able to send the test message, the message Success! appears
at the bottom of the Email Notification page. Continue to Step 7.
• If ZoneDirector is unable to send the test message, the message Failed! appears
at the bottom of the Email Notification page. Go back to Step 5, and then verify
that the SMTP settings are correct.
7. Click Apply. The email notification settings you configured become active immediately.
Figure 33: The Alarm Settings page
NOTE If the Test button is clicked, ZoneDirector will attempt to connect to the mail
server for 10 seconds. If it is unable to connect to the mail server, it will stop trying
and quit.
NOTE When the alarm email is first enabled, the alarm recipient may receive a flood
of alarm notifications. This may cause the mail server to treat the email notifications
as spam and to temporarily block the account.
NOTE oneDirector sends email notifications for a particular alert only once, unless
(1) it is a new alert of the same type but for a different device, or (2) existing alert logs
are cleared.
Customizing Email Alarms
Using the Alarm Event section of the Configure > Alarm Settings page, you can choose
which types of events will trigger ZoneDirector to send an email notification.
1. Click Alarm Event to select/deselect all alarm types.
Ruckus Wireless ZoneDirector™ Release 10.0 User Guide
63
Page 64
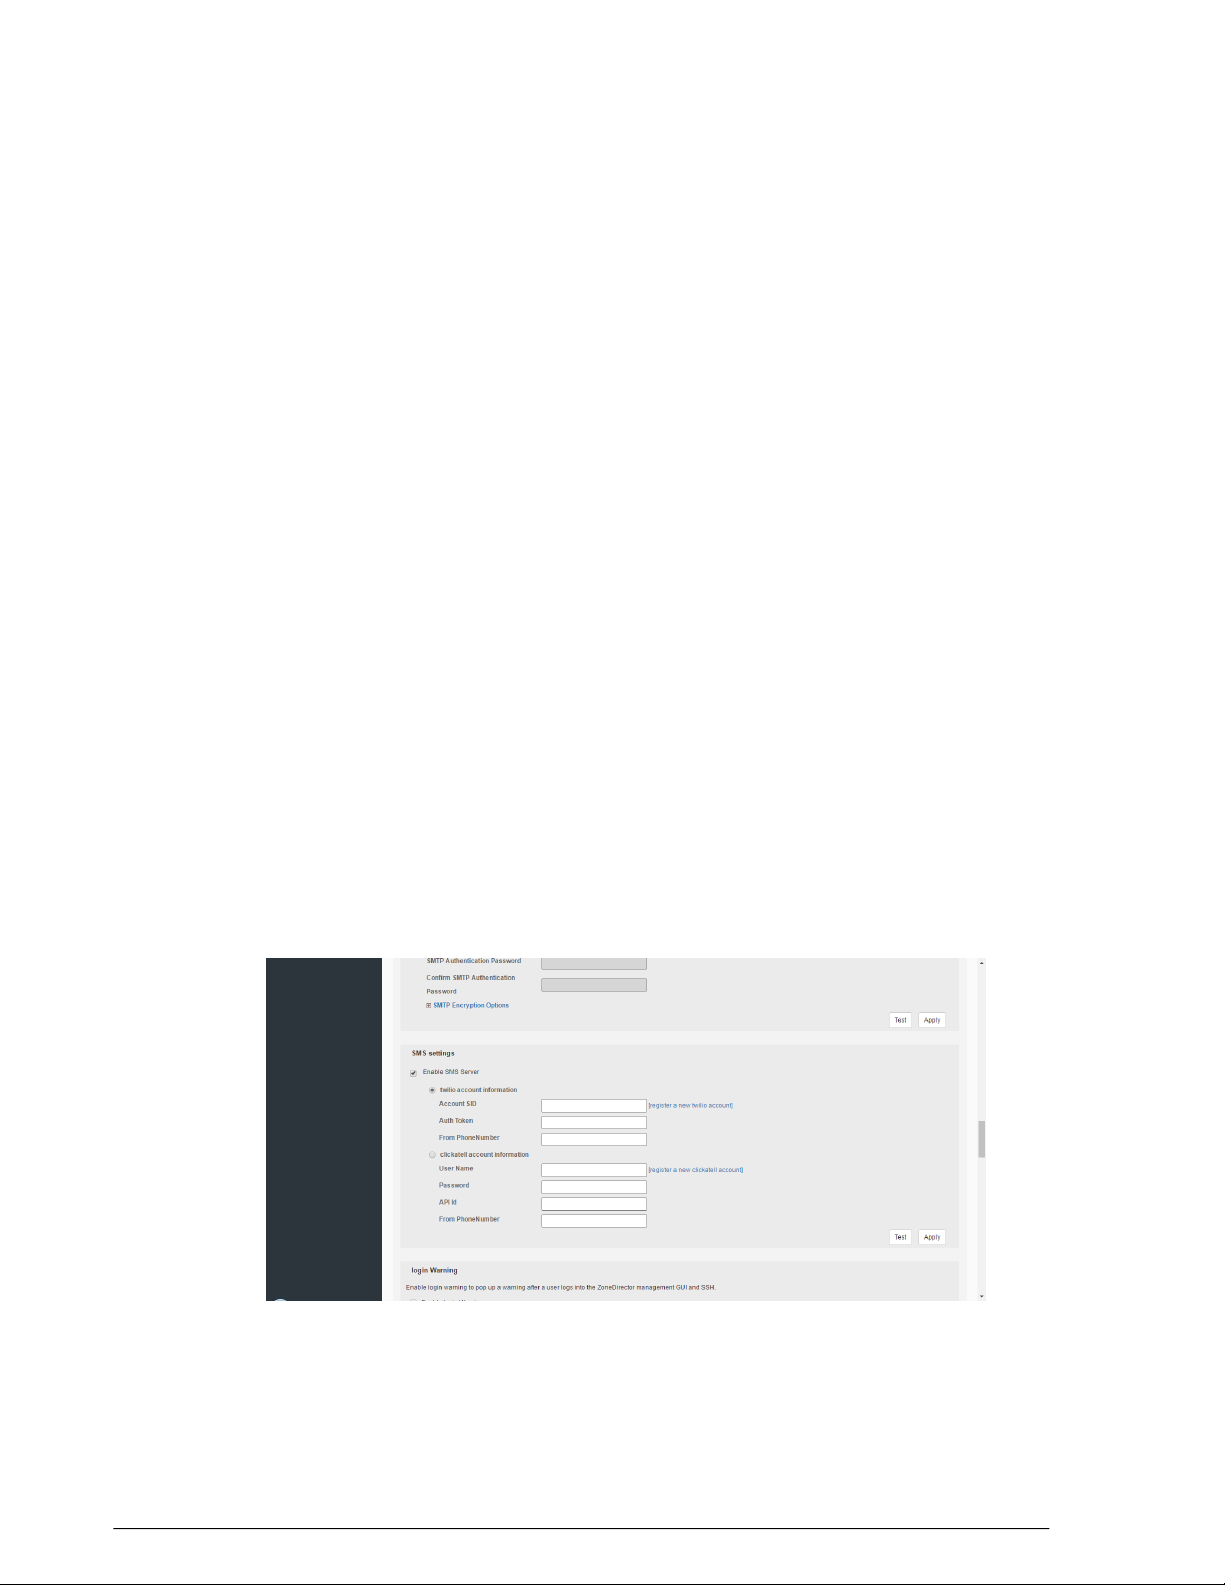
Configuring System Settings
Configuring SMS Settings for SMS Guest Pass Delivery
2. Select or deselect those for which you want or don't want to receive emails.
3. Click Apply to save your changes.When any of the selected events occur,
ZoneDirector sends an email notification to the email address that you specified in
the section. With the exception of the event, ZoneDirector only sends one email alarm
notification for each event. If the same event happens again, no alarm will be sent
until you clear the alarm on the Monitor > All Alarms page. On the other hand,
ZoneDirector sends a new alarm notification each time the Lost contact with AP event
occurs.
Configuring SMS Settings for SMS Guest Pass
Delivery
If you want to deliver Guest Passes to your guests via SMS, you can configure
ZoneDirector to use an existing Twilio or Clickatell account for SMS delivery. The first
step is to inform ZoneDirector of your Twilio or Clickatell account information.
1. Go to Configure > System.
2. Locate the SMS Settings section, and select either Twilio account information or
Clickatell account information.
3. Enter your Account SID, Auth Token and From Phone Number (Twilio) or your User
Name, Password and API ID (Clickatell).
4. Click the Test button to test your settings.
5. Once confirmed, click Apply to save your changes.
You can now allow guest pass generators to deliver guest pass codes to guests using
the SMS button when generating a new guest pass. (You must also enter a phone
number for receiving the SMS messages for each guest pass created.).
64
Ruckus Wireless ZoneDirector™ Release 10.0 User Guide
Page 65

Configuring System Settings
Enabling Login Warning Messages
Figure 34: Configuring SMS Settings
Enabling Login Warning Messages
If you want to display a warning message upon login to the ZoneDirector web UI or CLI,
you can do so using the following procedure:
1. Go to Configure > System, and scroll down to the Login Warning section.
2. Click Enable login warning, and replace the text in the Customize warning content
text box according to your preferences.
3. Click Apply to save your changes. The next time a user attempts to login to
ZoneDirector, they will be presented with the warning message you configured.
Figure 35: Enabling and configuring a login warning message
Enabling Network Management Systems
ZoneDirector supports several external network management systems including Ruckus
Wireless SmartCell Insight, FlexMaster server, SNMPv2, SNMPv3 and Telnet server.
These options are configured from the Configure > System page by expanding the
Network Management link. The following section describes how to enable these network
management systems.
Enabling SmartCell Insight Communication
If your ZoneDirector will be used as a data source for Ruckus SmartCell Insight (SCI)
analytics engine, you can enable the SmartCell Insight Management feature to allow
ZoneDirector to initiate communications with SCI at set 15 minute intervals. In this way,
if ZoneDirector is behind a firewall or NAT device, it can still communicate with SCI
Ruckus Wireless ZoneDirector™ Release 10.0 User Guide
65
Page 66
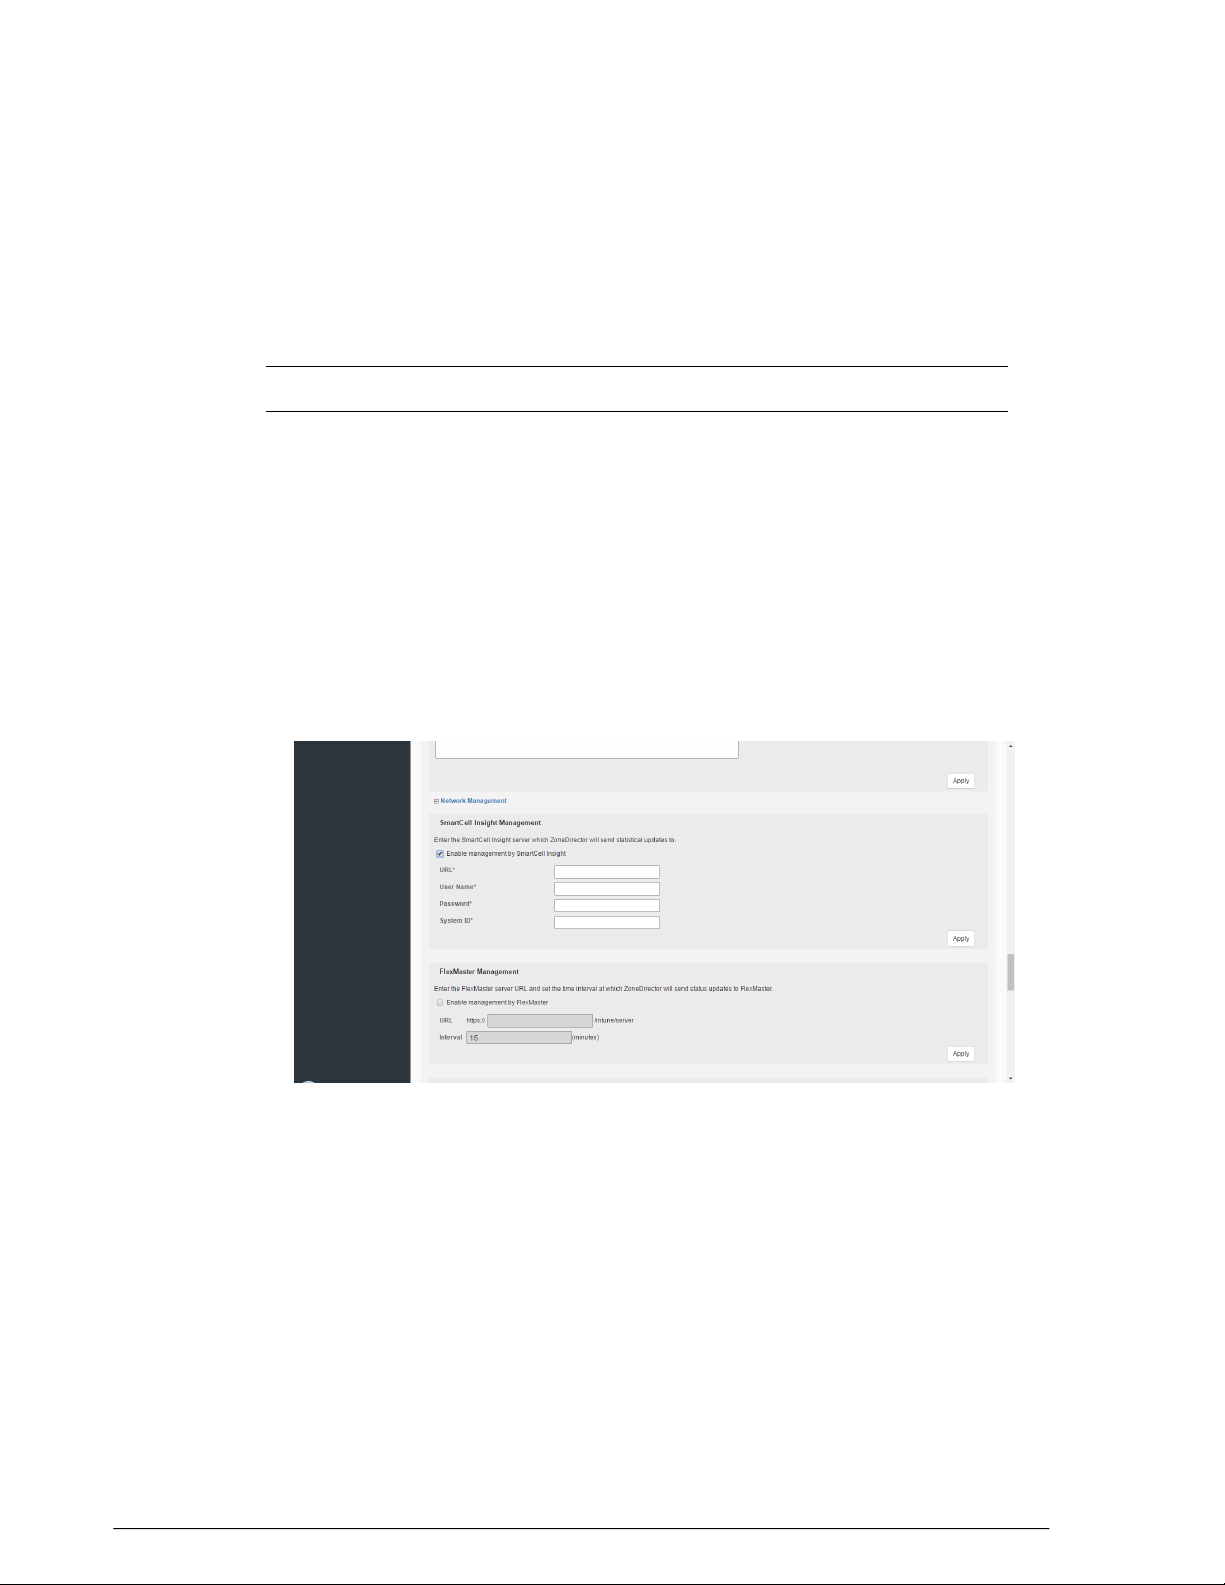
Configuring System Settings
Enabling Network Management Systems
without having to reconfigure your firewalls and NAT devices to allow SCI to contact the
ZoneDirector.
This feature only needs to be enabled if ZoneDirector is inaccessible by SCI (e.g.,
ZoneDirector is behind a firewall/NAT device). Otherwise, configuration only needs to
be done on SCI.
NOTE This feature is only compatible with SCI version 2.0 and later.
To configure SCI Management:
1. Go to Configure > System, and expand the Network Management section.
2. Enable the check box next to Enable management by SmartCell Insight.
3. Enter the following information for your SCI system:
• URL: Enter the SCI URL (e.g., https://[SCI IP address]/pentaho/Home)
• User Name: Enter the SCI login user name used for ZD-SCI communications.
• Password: Enter the SCI login password used for ZD-SCI communications.
• System ID: Enter the System ID that you used for the ZD data source on the SCI
System Setup page (see SCI User Guide for details).
4. Click Apply to save your changes.
Figure 36: Config SCI server
Enabling Management via FlexMaster
If you have a Ruckus Wireless FlexMaster server installed on the network, you can enable
FlexMaster management to centralize monitoring and administration of ZoneDirector
and other supported Ruckus Wireless devices. This version of ZoneDirector supports
the following FlexMaster-deployed tasks:
66
• Firmware upgrade for both ZoneDirector and the APs that report to them
Ruckus Wireless ZoneDirector™ Release 10.0 User Guide
Page 67

Configuring System Settings
Enabling Network Management Systems
• Reboot
• Backup of ZoneDirector settings
• Performance monitoring
When the FlexMaster management option is enabled, you will still be able to access the
ZoneDirector web interface to perform other management tasks. By default, FlexMaster
management is disabled.
To enable FlexMaster management:
1. Click Configure > System.
2. Scroll down to the bottom of the page.
3. Click the Network Management link to expand the section.
4. Under FlexMaster Management, select the Enable management by FlexMaster
check box.
5. In URL, type the FlexMaster DNS host name or IP address of the FlexMaster server
6. In Interval, type the time interval (in minutes) at which ZoneDirector will send status
updates to the FlexMaster server. The default interval is 15 minutes
7. Click Apply. The message Setting Applied appears. You have completed
enabling FlexMaster management on ZoneDirector. For more information on how to
configure ZoneDirector from the FlexMaster web interface, refer to the FlexMaster
documentation.
Ruckus Wireless ZoneDirector™ Release 10.0 User Guide
67
Page 68

Configuring System Settings
Enabling Network Management Systems
Figure 37: The FlexMaster Management options
Monitoring ZoneDirector Performance from FlexMaster
If you want to monitor ZoneDirector's performance statistics from FlexMaster, select
Enable Performance Monitoring, enter an update interval, and click Apply. This option
is disabled by default
Figure 38: Enable FlexMaster performance monitoring
Enabling Northbound Portal Interface Support
The Northbound Portal interface allows the use of DPSKs on open authentication WLANs
meant for public access. By enabling the Northbound Portal Interface, a wireless service
provider can provide simple but secure Wi-Fi access without pre-registration, account
setup or authentication. ZoneDirector redirects authentication requests to an outside
portal. If access is granted, ZoneDirector provides a unique dynamic PSK. The DPSK
can be delivered in a prov.exe file, which automatically configures the user’s device with
the relevant wireless settings or displayed on the portal screen for manual entry.
To enable Northbound Portal interface support:
1. Go to Configure > System > Network Management.
2. Click Enable northbound portal interface support.
3. Enter a Password for API to portal communication.
4. Click Apply in the same section to save changes.
5. Configure the portal to display the key to the user or to push the prov.exe file to the
client.
68
Ruckus Wireless ZoneDirector™ Release 10.0 User Guide
Page 69

Figure 39: Enabling Northbound Portal interface
Configuring System Settings
Enabling Network Management Systems
Configuring SNMP Support
ZoneDirector provides support for Simple Network Management Protocol (SNMP v2
and v3), which allows you to query ZoneDirector information such as system status,
WLAN list, AP list, and clients list, and to set a number of system settings using a Network
Management System (NMS) or SNMP MIB browser.
You can also enable SNMP traps to receive immediate notifications for possible AP and
client issues.
Enabling the SNMP Agent
The procedure for enabling ZoneDirector’s internal SNMP agent depends on whether
your network is using SNMPv2 or SNMPv3. SNMPv3 mainly provides security
enhancements over the earlier version, and therefore requires you to enter authorization
passwords and encryption settings instead of simple clear text community strings. Both
SNMPv2 and SNMPv3 can be enabled at the same time. The SNMPv3 framework
provides backward compatibility for SNMPv1 and SNMPv2c management applications
so that existing management applications can still be used to manage ZoneDirector with
SNMPv3 enabled. For a list of the MIB variables that you can get and set using SNMP,
check the related SNMP documentation on the Ruckus Wireless Support Web site at
http://support.ruckuswireless.com/documents.
If your network uses SNMPv2 To enable SNMPv2 management:
1. Go to Configure > System. Scroll down to the bottom of the page and click the
Network Management link to open the Network Management section.
2. Under the SNMPv2 Agent section, select the Enable SNMP Agent check box.
3. When the SNMPv2 Agent is enabled, the Inherit SNMPv2 for APs option appears.
This option is enabled by default. Disabling it allows you to disable SNMP traps on
all APs.
Ruckus Wireless ZoneDirector™ Release 10.0 User Guide
69
Page 70

Configuring System Settings
Enabling Network Management Systems
4. Enter the following information:
• In SNMP RO community (required), set the read-only community string.
Applications that send SNMP Get-Requests to ZoneDirector (to retrieve information)
will need to send this string along with the request before they will be allowed
access. The default value is public.
• In SNMP RW community (required), set the read-write community string.
Applications that send SNMP Set-Requests to ZoneDirector (to set certain SNMP
MIB variables) will need to send this string along with the request before they will
be allowed access. The default value is private.
• In System Contact, type your email address (optional).
• In System Location, type the location of the ZoneDirector device (optional).
5. Click Apply to save your changes.
Figure 40: Enabling the SNMPv2 agent
If your network uses SNMPv3
To enable SNMPv3 management:
1. Go to Configure > System. Scroll down to the bottom of the page and click the
Network Management link to open the Network Management section.
2. Under the SNMPv3 Agent section, select the Enable SNMP Agent check box.
3. Enter the following information for both the Read Only and Read-Write privileges:
• User: Enter a user name between 1 and 31 characters.
• Authentication: Choose MD5 or SHA authentication method (default is MD5)
• MD5: Message-Digest algorithm 5, message hash function with 128-bit
• SHA: Secure Hash Algorithm, message hash function with 160-bit output.
• Auth Pass Phrase: Enter a passphrase between 8 and 32 characters in length.
• Privacy: Choose DES, AES or None.
70
Ruckus Wireless ZoneDirector™ Release 10.0 User Guide
Page 71

Configuring System Settings
Enabling Network Management Systems
DES: Data Encryption Standard, data block cipher.•
• AES: Advanced Encryption Standard, data block cipher.
• None: No Privacy passphrase is required.
• Privacy Phrase: If either DES or AES is selected, enter a Privacy phrase between
8 and 32 characters in length.
4. Click Apply to save your changes.
Figure 41: Enabling the SNMPv3 agent
Enabling SNMP Trap Notifications
If you have an SNMP trap receiver on the network, you can configure ZoneDirector to
send SNMP trap notifications to the server. Enable this feature if you want to automatically
receive notifications for AP and client events that indicate possible network issues.
To enable SNMP trap notifications:
1. In the Network Management section of the Configure > System page, scroll down
to the bottom of the page.
2. Under SNMP Trap, select the Enable SNMP Trap check box.
3. In SNMP Trap format, select either SNMPv2 or SNMPv3. You can select only one
type of trap receiver.
• If you select SNMPv2, you only need to enter the IP addresses of up to four SNMP
trap receivers on your network.
• If you select SNMPv3, enter up to four trap receiver IP addresses along with
authentication method passphrase and privacy (encryption) settings.
4. Click Apply to save your changes.
Ruckus Wireless ZoneDirector™ Release 10.0 User Guide
71
Page 72

Configuring System Settings
Enabling Network Management Systems
Figure 42: Enabling SNMPv2 trap notifications
72
Figure 43: Enabling SNMP trap notifications with SNMPv3
Trap Notifications That ZoneDirector Sends
There are several events for which ZoneDirector will send trap notifications to the SNMP
server that you specified. The following table lists the trap notifications that ZoneDirector
sends and when they are sent.
Table 17: Trap notifications
DescriptionTrap Name
ruckusZDEventAPJoinTrap
An AP has joined
ZoneDirector. The AP's
MAC address is included in
the trap notification.
Ruckus Wireless ZoneDirector™ Release 10.0 User Guide
Page 73

Configuring System Settings
Enabling Network Management Systems
DescriptionTrap Name
ruckusZDEventSSIDSpoofTrap
ruckusZDEventMACSpoofTrap
ruckusZDEventRogueAPTrap
ruckusZDEventAPLostTrap
ruckusZDEventAPLostHeartbeatTrap
An SSID-spoofing rogue AP
has been detected on the
network. The rogue AP’s
MAC address and SSID are
included in the trap
notification.
A MAC-spoofing rogue AP
has been detected on the
network. The rogue AP’s
MAC address and SSID are
included in the trap
notification.
A rogue AP has been
detected on the network.
The rogue AP’s MAC
address and SSID are
included in the trap
notification.
An AP has lost contact with
ZoneDirector. The AP’s
MAC address is included in
the trap notification.
An AP’s heartbeat has been
lost. The AP’s MAC address
is included in the trap
notification.
ruckusZDEventClientAuthFailBlockTrap
ruckusZDEventClientJoin
A wireless client repeatedly
failed to authenticate with
an AP. The client's MAC
address, AP's MAC address
and SSID are included in
the trap notification.
A client has successfully
joined an AP. The client’s
MAC address, the AP’s
MAC address and SSID are
included in the trap
notification.
Ruckus Wireless ZoneDirector™ Release 10.0 User Guide
73
Page 74

Configuring System Settings
Enabling Network Management Systems
DescriptionTrap Name
ruckusZDEventClientJoinFailed
ruckusZDEventClientJoinFailedAPBusy
ruckusZDEventClientDisconnect
ruckusZDEventClientRoamOut
ruckusZDEventClientRoamIn
A client has attempted and
failed to join an AP. The
client’s MAC address, the
AP’s MAC address and
SSID are included in the
trap notification.
A client attempt to join an
AP failed because the AP
was busy. The client's MAC
address, AP's MAC address
and SSID are included.
A client has disconnected
from the AP. The client's
MAC address, AP's MAC
address and SSID are
included.
A client has roamed away
from an AP. The client's
MAC address, AP's MAC
address and SSID are
included.
A client has roamed in to an
AP. The client's MAC
address, AP's MAC address
and SSID are included.
ruckusZDEventClientAuthFailed
ruckusZDEventClientAuthorizationFailed
ruckusZDEventAPcoldstart
ruckusZDEventAPwarmstart
A client authentication
attempt has failed. The
client's MAC address, AP's
MAC address, SSID and
failure reason are included.
A client authorization
attempt to join an AP has
failed. The client's MAC
address, AP's MAC address
and SSID are included.
An AP has been cold
started.
An AP has been warm
started.
74
Ruckus Wireless ZoneDirector™ Release 10.0 User Guide
Page 75

Configuring System Settings
Enabling Network Management Systems
DescriptionTrap Name
ruckusZDEventAPclientValve
ruckusZDEventAPCPUvalve
ruckusZDEventAPMEMvalve
ruckusZDEventSmartRedundancy ChangetoActive
ruckusZDEventSmartRedundancy ActiveConnected
ruckusZDEventSmartRedundancy ActiveDisconnected
ruckusZDEventSmartRedundancy StandbyConnected
Triggered when an AP’s
online client limit has been
exceeded.
An AP's CPU utilization has
exceeded the set value.
An AP's memory utilization
has exceeded the set value.
The standby Smart
Redundancy ZoneDirector
has failed to detect its active
peer, system changed to
active state.
The active Smart
Redundancy ZoneDirector
has detected its peer and is
in active/connected state
The active Smart
Redundancy ZoneDirector
has not detected its peer
and is in
active/disconnected state.
The standby ZoneDirector
has detected its peer and is
in standby/connected state.
ruckusZDEventSmartRedundancy StandbyDisconnected
The standby ZoneDirector
has not detected its peer
and is in
standby/disconnected
state.
Enabling Telnet
By default, Telnet is disabled due to security considerations, as SSH is the preferred
method if you need to access the ZoneDirector CLI. In some situations however, you
may want to enable Telnet.
To enable Telnet:
1. Go to Configure > System
2. Scroll down to the bottom of the page and expand the Network Management
section.
3. Locate the Telnet Server section, and click the box next to Enable Telnet Server.
Ruckus Wireless ZoneDirector™ Release 10.0 User Guide
75
Page 76

4. Click Apply to save your changes.
Figure 44: Enabling Telnet server
Page 77

77
Configuring Security and Other Services
Self Healing
ZoneDirector has the capability to perform automatic network adjustments to enhance
performance and improve coverage by dynamically modifying power output and channel
selection. These features are called "Self Healing."
Automatically Adjust AP Power
ZoneDirector provides an option to automatically adjust AP radio power to optimize
coverage when interference is present.
This feature is designed to turn down the power of an access point if the following
conditions are met:
1. The power is set to Auto in the AP configuration.
2. The AP can hear another AP that is on the same channel and same ZoneDirector.
3. The AP can hear the other AP at a minimum of 50dB which means the Access Points
are very close to each other.
The 2.4G and 5G radio bands are considered independently. If all conditions are met,
the AP will reduce its power by half. The other AP may or may not necessarily reduce
its power simultaneously.
4
NOTE In general, Ruckus does NOT recommend enabling this feature as it can lead
to sub-optimal AP power levels. With BeamFlex access points, Ruckus' general guidelines
are to run access points at full power to maximize the throughput and SINR levels, thus
maximizing data rates and performance.
Automatic Channel Selection
ZoneDirector offers two methods of automatic channel selection for spectrum utilization
and performance optimization:
• Background Scanning on page 78
• ChannelFly on page 79
While Background Scanning must be enabled for rogue AP detection, AP location
detection and radio power adjustment, either can be used for automatic channel
optimization.
Ruckus Wireless ZoneDirector™ Release 10.0 User Guide
77
Page 78

Configuring Security and Other Services
Self Healing
Background Scanning
Using Background Scanning, ZoneDirector regularly samples the activity in all Access
Points to assess RF usage, to detect rogue APs and to determine which APs are near
each other for mesh optimization.
These scans sample one channel at a time in each AP so as not to interfere with network
use. This information is then applied in AP Monitoring and other ZoneDirector monitoring
features. You can, if you prefer, customize the automatic scanning of RF activity,
deactivate it if you feel it's not helpful, or adjust the frequency, if you want scans at
greater or fewer intervals.
NOTE Background Scanning must be enabled for ZoneDirector to detect rogue APs
on the network.
Background Scanning can be configured independently for the 2.4 and 5 GHz radios.
Additionally, you can configure the frequency at which scans are run.
• Run a background scan on the 2.4 GHz radio every [ ]: Select this check box
enter the time interval (1~65535 seconds, default is 20) that you want to set between
each scan.
• Run a background scan on the 5 GHz radio every [ ]: Select this check box enter
the time interval (1~65535 seconds, default is 20) that you want to set between each
scan.
78
Figure 45: Background Scanning options
You can also disable Background Scanning on a per-WLAN basis from the Configure
> WLANS page. To disable scanning for a particular WLAN, click the Edit link next to
the WLAN for which you want to disable scanning, open Advanced Options, and click
the check box next to Disable Background Scanning.
To see whether Background Scanning is enabled or disabled for a particular AP, go to
Monitor > Access Points, and click on the AP's MAC address. The access point detail
screen displays the Background Scanning status for each radio.
Ruckus Wireless ZoneDirector™ Release 10.0 User Guide
Page 79

Configuring Security and Other Services
Self Healing
Figure 46: Viewing whether Background Scanning is enabled for an AP
ChannelFly
The main difference between ChannelFly and Background Scanning is that ChannelFly
determines the optimal channel based on real-time statistical analysis of actual throughput
measurements, while Background Scanning uses channel measurement and other
techniques to estimate the impact of interference on Wi-Fi capacity based on progressive
scans of all available channels.
NOTE If you enable ChannelFly, Background Scanning can still be used for adjusting
radio power and rogue detection while ChannelFly manages the channel assignment.
Both cannot be used at the same time for channel management.
Benefits of ChannelFly
With ChannelFly, the AP intelligently samples different channels while using them for
service. ChannelFly assesses channel capacity every 15 seconds and changes channel
when, based on historical data, a different channel is likely to offer higher capacity than
the current channel. Each AP makes channel decisions based on this historical data and
maintains an internal log of channel performance individually.
When ChannelFly changes channels, it utilizes 802.11h channel change announcements
to seamlessly change channels with no packet loss and minimal impact to performance.
The 802.11h channel change announcements affect both wireless clients and Ruckus
mesh nodes in the 2.4 GHz and/or 5 GHz bands.
Initially (in the first 30-60 minutes) there will be more frequent channel changes as
ChannelFly learns the environment. However, once an AP has learned about the
environment and which channels are most likely to offer the best throughput potential,
channel changes will occur less frequently unless a large measured drop in throughput
occurs.
Ruckus Wireless ZoneDirector™ Release 10.0 User Guide
79
Page 80

Configuring Security and Other Services
Self Healing
ChannelFly can react to large measured drops in throughput capacity in as little as 15
seconds, while smaller drops in capacity may take longer to react to.
Disadvantages of ChannelFly
Compared to Background Scanning, ChannelFly takes considerably longer for the
network to settle down. If you will be adding and removing APs to your network frequently,
Background Scanning may be preferable. Additionally, if you have clients that do not
support the 802.11h standard, ChannelFly may cause significant issues during the initial
capacity assessment stage.
You can enable/disable ChannelFly per band. If you have 2.4 GHz clients that do not
support 802.11h, Ruckus recommends disabling ChannelFly for 2.4 GHz but leaving it
enabled for the 5 GHz band.
To configure the self healing options:
1. Go to Configure > Service
2. Review and change the following self-healing options:
• Automatically adjust AP radio power to optimize coverage where interference
is present: Enable automatic radio power adjustment based on Background
Scanning
• Automatically adjust 2.4 GHz channels using
• Background Scanning
• ChannelFly
• Automatically adjust 5 GHz channels using
• Background Scanning
• ChannelFly
3. Click the Apply button in the same section to save your changes.
80
Ruckus Wireless ZoneDirector™ Release 10.0 User Guide
Page 81

Configuring Security and Other Services
Figure 47: Enabling ChannelFly
Load Balancing
Enabling load balancing can improve WLAN performance by helping to spread the client
load between nearby access points, so that one AP does not get overloaded while
another sits idle.
The load balancing feature can be controlled from within ZoneDirector's web interface
to balance the number of clients per radio on adjacent APs. "Adjacent APs" are
determined by ZoneDirector at startup by measuring the RSSI during channel scans.
After startup, ZoneDirector uses subsequent scans to update the list of adjacent radios
periodically and when a new AP sends its first scan report. When an AP leaves,
ZoneDirector immediately updates the list of adjacent radios and refreshes the client
limits at each affected AP.
Once ZoneDirector is aware of which APs are adjacent to each other, it begins managing
the client load by sending desired client limits to the APs. These limits are “soft values”
that can be exceeded in several scenarios, including: (1) when a client’s signal is so
weak that it may not be able to support a link with another AP, and (2) when a client’s
signal is so strong that it really belongs on this AP.
Load Balancing
The APs maintain these desired client limits and enforce them once they reach the limits
by withholding probe responses and authentication responses on any radio that has
reached its limit.
Key points on load balancing:
• These rules apply only to client devices; the AP always responds to another AP that
is attempting to set up or maintain a mesh network.
• Load balancing does not disassociate clients already connected.
• Load balancing takes action before a client association request, reducing the chance
of client misbehavior.
• The process does not require any time-critical interaction between APs and
ZoneDirector.
• Provides control of adjacent AP distance with safeguards against abandoning clients.
• Can be disabled on a per-WLAN basis; for instance, in a voice WLAN, load balancing
may not be desired due to voice roaming considerations.
• Background scanning must be enabled on the WLAN for load balancing to work.
To enable Load Balancing globally:
1. Go to Configure > Services.
2. In Load Balancing, choose to perform load balancing on either the 2.4 or 5 GHz
radio.
3. Enter Adjacent Radio Threshold (in dB), and click Apply.
Ruckus Wireless ZoneDirector™ Release 10.0 User Guide
81
Page 82

Configuring Security and Other Services
Band Balancing
To disable Load Balancing on a per-WLAN basis
1. Go to Configure > WLANs > .
2. Click the Edit link beside the WLAN for which you want to disable load balancing.
3. Click the Advanced Options link to expand the options.
4. Select Do not perform load balancing for this WLAN service next to Load
Balancing.
Band Balancing
Band balancing balances the client load on radios by distributing clients between the
2.4 GHz and 5 GHz radios.
This feature is enabled by default and set to a target of 25% of clients connecting to the
2.4 GHz band. To balance the load on a radio, the AP encourages dual-band clients to
connect to the 5 GHz band when the configured percentage threshold is reached.
Radar Avoidance Pre-Scanning
The Radar Avoidance Pre-Scanning (RAPS) setting allows pre-scanning of DFS channels
in the 5 GHz band to ensure the channel is clear of radar signals prior to transmitting on
the channel.
If a channel is blocked by this feature, it will be listed as "DFS Block Radar" on the AP
monitoring page. This setting affects select outdoor dual band 802.11n AP also only be
available if the Country Code settings are configured to allow use of DFS channels (see
Setting the Country Code on page 55).
AeroScout RFID Tag Detection
AeroScout Tags are lightweight, battery-powered wireless devices that accurately locate
and track people and assets. AeroScout Tags, which can be mounted on valuable
equipment or carried by personnel, send periodic data to the AeroScout Engine, the
software component of the AeroScout visibility system that produces accurate location
and presence data. If you are using AeroScout Tags in your organization, you can use
the APs that are being managed by ZoneDirector to relay data from the AeroScout Tags
to the AeroScout Engine. You only need to enable AeroScout tag detection on
ZoneDirector to enable APs to relay data to the AeroScout engine.
To enable AeroScout RFID tag detection on ZoneDirector:
1. Go to Configure > Services.
2. Scroll down to the AeroScout RFID section (near the bottom of the page).
3. Select the Enable AeroScout RFID tag detection check box.
82
Ruckus Wireless ZoneDirector™ Release 10.0 User Guide
Page 83

Configuring Security and Other Services
Ekahau Tag Detection
4. Click the Apply button in the same section to save your changes.
ZoneDirector enables AeroScout RFID tag detection on all its managed APs that support
this feature.
NOTE Tag locations are not accurate if the 2.4 GHz band is noisy or if the AP setup is
not optimal (according to AeroScout documents). For more information on AeroScout
Tags and the AeroScout Engine, refer to your AeroScout documentation.
Ekahau Tag Detection
Utilizing Wi-Fi wireless network as an infrastructure, the Ekahau Real Time Location
battery-powered devices that can be mounted on equipment or carried by personnel,
and send out periodic Ekahau Blink frames. Wi-Fi Access Points receive and forward
the Ekahau Blink frames to the Ekahau RTLS Controller, which calculates accurate
locations for the tags.
To enable Ekahau tag detection on ZoneDirector:
1. Go to Configure > Services.
2. Scroll down to the Ekahau Settings section (near the bottom of the page).
3. Select the Enable Ekahau tag detection check box.
4. Enter the Ekahau Controller IP address and Ekahau Controller Port.
5. Click the Apply button in the same section to save your changes.
ZoneDirector enables Ekahau tag detection on all its managed APs that support this
feature.
Active Client Detection
Enabling active client detection allows ZoneDirector to trigger an event when a client
with a low signal strength joins the network.
To enable active client detection:
1. Go to Configure > Services, and scroll down to the Active Client Detection section.
2. Click the check box next to Enable client detection ... and enter an RSSI threshold,
below which an event will be triggered.
3. Click Apply to save your changes.
A low severity event is now triggered each time a client connects with an RSSI lower
than the threshold value entered. Go to Monitor > All Events/Activities to monitor
these events.
Ruckus Wireless ZoneDirector™ Release 10.0 User Guide
83
Page 84

Configuring Security and Other Services
Tunnel Configuration
Tunnel Configuration
Only WLANs with Tunnel Mode enabled are affected.
See Advanced Options on page 160 in the WLAN configuration section for information
on enabling Tunnel Mode.
To configure data encryption and filtering for tunneled WLANs:
1. Go to Configure > Services
2. Scroll down to the bottom of the page and locate the Tunnel Configuration section.
3. Enable the check boxes next to the features you want to enable.
• Enable tunnel encryption for tunneled traffic: By default, when WLAN traffic
is tunneled to ZoneDirector, only the control traffic is encrypted while data traffic
is unencrypted. When this option is enabled, the Access Point will decrypt 802.11
packets and then use an AES-encrypted tunnel to send them to ZoneDirector.
• Block multicast traffic from network to tunnel: Prevents [all/non-well-known]
multicast traffic from propagating on the tunnel.
• Block broadcast traffic from network to tunnel except ARP and DHCP:
Prevents all broadcast traffic other than Address Resolution Protocol and DHCP
packets.
• Enable Proxy ARP of tunnel WLAN with rate limit threshold __.: Reduces
tunnels. When ZoneDirector receives a broadcast ARP request for a known host,
it acts on behalf of the known host to send out unicast ARP replies at the rate
limit it will forward it to the tunnel to all APs according to the rate limit threshold
set in the Packet Inspection Filter (see Packet Inspection Filter on page 85).
4. Click Apply in the same section to save your changes.
84
Ruckus Wireless ZoneDirector™ Release 10.0 User Guide
Page 85

Configuring Security and Other Services
Packet Inspection Filter
Figure 48: Set tunnel configuration parameters for all WLANs with tunnel mode enabled
Packet Inspection Filter
The Packet Inspection Filter (PIF) allows configuration of rate limits for broadcast neighbor
discovery (IPv4 Address Resolution Protocol and IPv6 Neighbor Solicit) packets. The
PIF rate limiting threshold affects the following services:
• ARP Broadcast Filter for Mesh links (see Optional Mesh Configuration Features on
page 303)
• Proxy ARP for WLAN interfaces (see Advanced Options on page 160 under Creating
a WLAN)
• Proxy ARP for Tunneled WLANs (see Tunnel Configuration on page 84)
When Proxy ARP or ARP Broadcast Filter services are enabled, the AP attempts to
reduce neighbor discovery traffic over the air by replacing broadcast messages with
unicast messages for known hosts. When these packets are received for an unknown
host, the Packet Inspection Filter supplements this functionality by limiting the rate at
which these packets are delivered.
Figure 49: Packet Inspection Filter
Ethernet Port Redundancy
Ethernet Port Redundancy (or NIC bonding) provides a method for aggregating
Zonedirector network interfaces into a single logical "bonded" interface.
With port redundancy enabled, one of the two network interfaces will be in active state
while the other is in standby state. When the active interface physical link is down and
the standby interface physical link is up, the two interfaces will fail over within 3 seconds,
Ruckus Wireless ZoneDirector™ Release 10.0 User Guide
85
Page 86

Configuring Security and Other Services
Ethernet Port Redundancy
and the original active interface becomes the standby interface, while the original standby
interface becomes the active port.
NOTE This feature is currently only available on ZoneDirector 3000/5000. ZoneDirector
1200 does not support port redundancy.
Port redundancy is disabled by default. If enabled, you can specify the time (in
milliseconds) after which the standby port will be enabled after a link recovery has been
detected, and after which the inactive port will be disabled after a link failure has been
detected.
To enable Ethernet Port Redundancy:
1. Go to Configure > Services.
2. Locate the Ethernet Port Redundancy section at the bottom of the page.
3. Enable the check box, and enter the Up Delay Time and Down Delay Time in the
text boxes.
• Up Delay Time: Specifies the time, in milliseconds, to wait before enabling a slave
after a link recovery has been detected. The default value is 50000, range is
0~1000000.
• Down Delay Time: Specifies the time, in milliseconds, to wait before disabling a
slave after a link failure has been detected. The default value is 0, range is
0~1000000.
4. Click Apply to save your changes.
86
Ruckus Wireless ZoneDirector™ Release 10.0 User Guide
Page 87

Configuring Security and Other Services
Using an External AAA Server
Figure 50: Ethernet Port Redundancy
Using an External AAA Server
If you want to authenticate users against an external Authentication, Authorization and
Accounting (AAA) server, you will need to first configure your AAA server, then point
ZoneDirector to the AAA server so that requests will be passed through ZoneDirector
before access is granted. This section describes the tasks that you need to perform on
ZoneDirector to ensure ZoneDirector can communicate with your AAA server.
NOTE For specific instructions on AAA server configuration, refer to the documentation
that is supplied with your server.
ZoneDirector supports four types of AAA server:
• Active Directory
• LDAP
• RADIUS / RADIUS Accounting
• TACACS+
A maximum of 32 AAA server entries can be created, regardless of server type.
Ruckus Wireless ZoneDirector™ Release 10.0 User Guide
87
Page 88

Configuring Security and Other Services
Using an External AAA Server
Active Directory
In Active Directory, objects are organized in a number of levels such as domains, trees
and forests. At the top of the structure is the forest. A forest is a collection of multiple
trees that share a common global catalog, directory schema, logical structure, and
directory configuration. In a multi-domain forest, each domain contains only those items
that belong in that domain. Global Catalog servers provide a global list of all objects in
a forest.
ZoneDirector support for Active Directory authentication includes the ability to query
multiple Domain Controllers using Global Catalog searches. To enable this feature, you
will need to enable Global Catalog support and enter an Admin DN (distinguished name)
and password.
Depending on your network structure, you can configure ZoneDirector to authenticate
users against an Active Directory server in one of two ways:
• Single Domain Active Directory Authentication
• Multi-Domain Active Directory Authentication
Single Domain Active Directory Authentication
To enable Active Directory authentication for a single domain:
1. Go to Configure > AAA Servers, and click Create New under
Authentication/Accounting Servers. The Create New form appears.
2. In Type, Select Active Directory.
• In Encryption, select Enable TLS encryption if you want to encrypt all authentication
traffic between the client and the Active Directory server. The AD server must
support TLS1.0/TLS1.1/TLS1.2.
3. Do not enable Global Catalog support.
4. Enter the IP address and Port of the AD server. The default Port number (389, or
636 if you have enabled TLS encryption) should not be changed unless you have
configured your AD server to use a different port.
5. Enter the Windows Domain Name (e.g., domain.ruckuswireless.com).
6. Click OK.
88
Ruckus Wireless ZoneDirector™ Release 10.0 User Guide
Page 89

Configuring Security and Other Services
Using an External AAA Server
Figure 51: Enable Active Directory for a single domain
For single domain authentication, admin name and password are not required.
Multi-Domain Active Directory Authentication
For multi-domain AD authentication, an Admin account name and password must be
entered so that ZoneDirector can query the Global Catalog.
To enable Active Directory authentication for multiple domains:
1. Go to Configure > AAA Servers, and click Create New under
Authentication/Accounting Servers. The Create New form appears.
2. In Type, Select Active Directory
• In Encryption, select Enable TLS encryption if you want to encrypt all authentication
traffic between the client and the Active Directory server. The AD server must
support TLS1.0/TLS1.1/TLS1.2.
NOTE Note that Secure Active Directory requires the import of a root CA for TLS
encryption. The import option is provided on the Configure > Certificate >
Advanced Options page.
3. Select the Global Catalog check box next to Enable Global Catalog support.
4. The default port changes to 3268, and the fields for Admin DN and password appear.
The default port number (3268, or 636 if you have enabled TLS encryption) should
not be changed unless you have configured your AD server to use a different port.
5. Leave the Windows Domain Name field empty to search all domains in the forest.
Leave the Windows Domain Name field empty to search all domains in the forest.
6. Enter an Admin DN (distinguished name) in Active Directory format (name@xxx.yyy).
Ruckus Wireless ZoneDirector™ Release 10.0 User Guide
89
Page 90

Configuring Security and Other Services
Using an External AAA Server
7. Enter the admin Password, and re-enter the same password for confirmation. The
Admin account need not have write privileges, but must able to read and search all
users in the database.
8. Click OK to save changes.
9. To test your authentication settings, see Testing Authentication Settings on page 106.
Figure 52: Active Directory with Global Catalog enabled
LDAP
In addition to Microsoft Active Directory, ZoneDirector supports several of the most
commonly used LDAP servers, including:
• OpenLDAP
• Apple Open Directory
• Novell eDirectory
• Sun JES (limited support)
To configure an LDAP server for user authentication:
1. Go to Configure > AAA Servers, and click Create New under
Authentication/Accounting Servers. The Create New form appears.
2. In Type, Select LDAP.
• In Encryption, select Enable TLS encryption if you want to encrypt all LDAP
authentication traffic between the LDAP client and the LDAP server. The LDAP
server must support TLS1.0/TLS1.1/TLS1.2.
NOTE Note that Secure LDAP requires the import of a root CA for TLS encryption.
The import option is provided on the Configure > Certificate > Advanced
Options page
90
Ruckus Wireless ZoneDirector™ Release 10.0 User Guide
Page 91

Configuring Security and Other Services
Using an External AAA Server
3. Enter the IP address and Port of your LDAP server. The default port (389 for
unencrypted, 636 for encrypted) should not be changed unless you have configured
your LDAP server to use a different port.
4. Enter a Base DN in LDAP format for all user accounts.
5. Format: cn=Users;dc=<Your Domain>,dc=com
6. Enter an Admin DN in LDAP format. Format: cn=Admin;dc=<Your
Domain>,dc=com
7. Enter the Admin Password, and reenter to confirm.
8. Enter a Key Attribute to denote users (default: uid).
9. Click OK to save your changes.
10. If you want to filter more specific settings, see Advanced LDAP Filtering on page 91.
The Admin account need not have write privileges, but must able to read and search
all users in the database.
Figure 53: Creating a new LDAP server object in ZoneDirector
Advanced LDAP Filtering
A search string in LDAP format conforming to RFC 4515 can be used to limit search
results. For example, objectClass=Person limits the search to those whose “objectClass”
attribute is equal to “Person”.
More complicated examples are shown when you mouse over the “show more” section,
as shown in the figure below.
Ruckus Wireless ZoneDirector™ Release 10.0 User Guide
91
Page 92

Configuring Security and Other Services
Using an External AAA Server
Figure 54: LDAP search filter syntax examples
Group Extraction
By using the Search Filter, you can extract the groups to which a user belongs, as
ZoneDirector to members of specific groups.
For example, in a school setting, if you want to assign members of the group “students”
to a Student role, you can enter a known student’s name in the Test Authentication
Settings section, click Test, and return the groups that the user belongs to. If everything
is configured correctly, the result will display the groups associated with the student,
which should include a group called “student” (or whatever was configured on your
LDAP server).
Next, go to the Configure > Roles page, create a Role named “Student,” and enter
“student” in the Group Attributes field. Then you can select which WLANs you want this
Role to have access to, and decide whether this Role should have Guest Pass generation
privileges and ZoneDirector administration privileges. From here on, any user associated
to the Group “student” will be given the same privileges when he/she is authenticated
against your LDAP server.
To configure user roles based on LDAP group:
1. Point ZoneDirector to your LDAP server:
• Go to Configure > AAA Servers
• Click Edit next to LDAP.
• Enter IP address, Port number, Admin DN and Password.
2. Enter the Key Attribute (default: uid).
3. Click OK to save this LDAP server.
4. In Test Authentication Settings, enter the User Name and Password for a known
member of the relevant group.
92
Ruckus Wireless ZoneDirector™ Release 10.0 User Guide
Page 93

Configuring Security and Other Services
Using an External AAA Server
5. Click Test.
6. Note the Groups associated with this user.
Figure 55: Test authentication settings
7. Go to Configure > Roles, and create a Role based on this User Group (see Creating
New User Roles on page 230).
• Click the Create New link in the Roles section
• In the Group Attributes field, enter Group attributes exactly as they were returned
from the Test Authentication Settings dialog.
• Specify WLAN access, Guest Pass generation and ZoneDirector administration
privileges as desired for this Role.
At this point, any user who logs in and is authenticated against your LDAP server with
the same Group credentials will automatically be assigned to this Role.
RADIUS /RADIUS Accounting
Remote Authentication Dial In User Service (RADIUS) user authentication requires that
ZoneDirector know the IP address, port number and Shared Secret of the
RADIUS/RADIUS Accounting server.
When an external RADIUS/RADIUS Accounting server is used for authentication or
accounting, user credentials can be entered as a standard username/password
combination, or client devices can be limited by MAC address. If using MAC address
as the authentication method, you must enter the MAC addresses of each client on the
AAA server, and any clients attempting to access your WLAN with a MAC address not
listed will be denied access.
A RADIUS/RADIUS Accounting server can be used with 802.1X, MAC authentication,
Web Authentication (Captive Portal) and Hotspot WLAN types. To configure a
RADIUS/RADIUS Accounting server entry in ZoneDirector:
1. Go to Configure > AAA Servers.
2. Click the Create New link under Authentication/Accounting Servers.
3. Select Radius or Radius Accounting for the AAA server type.
Ruckus Wireless ZoneDirector™ Release 10.0 User Guide
93
Page 94

Configuring Security and Other Services
Using an External AAA Server
• If you want to enable encryption of RADIUS packets using Transport Layer Security
(TLS), select the TLS check box next to Encryption. This allows RADIUS
authentication and accounting data to be passed safely across insecure networks
such as the Internet.
NOTE Note that Secure RADIUS requires the import of a root CA for TLS
encryption. The RADIUS or RADIUS Accounting server must support
TLS1.1/TLS1.2. The import option is provided on the Configure > Certificate >
Advanced Options page.
4. Choose PAP or CHAP according to the authentication protocol used by your RADIUS
server.
5. Enter the IP Address, Port number and Shared Secret.
6. Click OK to save changes.
Configuring a Backup RADIUS/RADIUS Accounting Server
If a backup RADIUS or RADIUS Accounting server is available, enable the check box
next to Backup RADIUS and additional fields appear. Enter the relevant information for
the backup server and click OK. When you have configured both a primary and backup
RADIUS server, an additional option will be available in the Test Authentication Settings
.
To configure a backup RADIUS / RADIUS Accounting server:
1. Click the check box next to Enable Backup RADIUS support.
2. Enter the IP Address, Port number and Shared Secret for the backup server (these
fields can neither be left empty nor be the same values as those of the primary server).
3. In Request Timeout, enter the timeout period (in seconds) after which an expected
RADIUS response message is considered to have failed.
4. In Max Number of Retries, enter the number of failed connection attempts after which
ZoneDirector will failover to the backup RADIUS server.
5. In Max Number of Consecutive Drop Packets, enter a value from 1-10 consecutive
dropped packets, after which ZoneDirector will failover to the backup RADIUS server.
6. In Reconnect Primary, enter the number of minutes after which ZoneDirector will
attempt to reconnect to the primary RADIUS server after failover to the backup server
94
Ruckus Wireless ZoneDirector™ Release 10.0 User Guide
Page 95
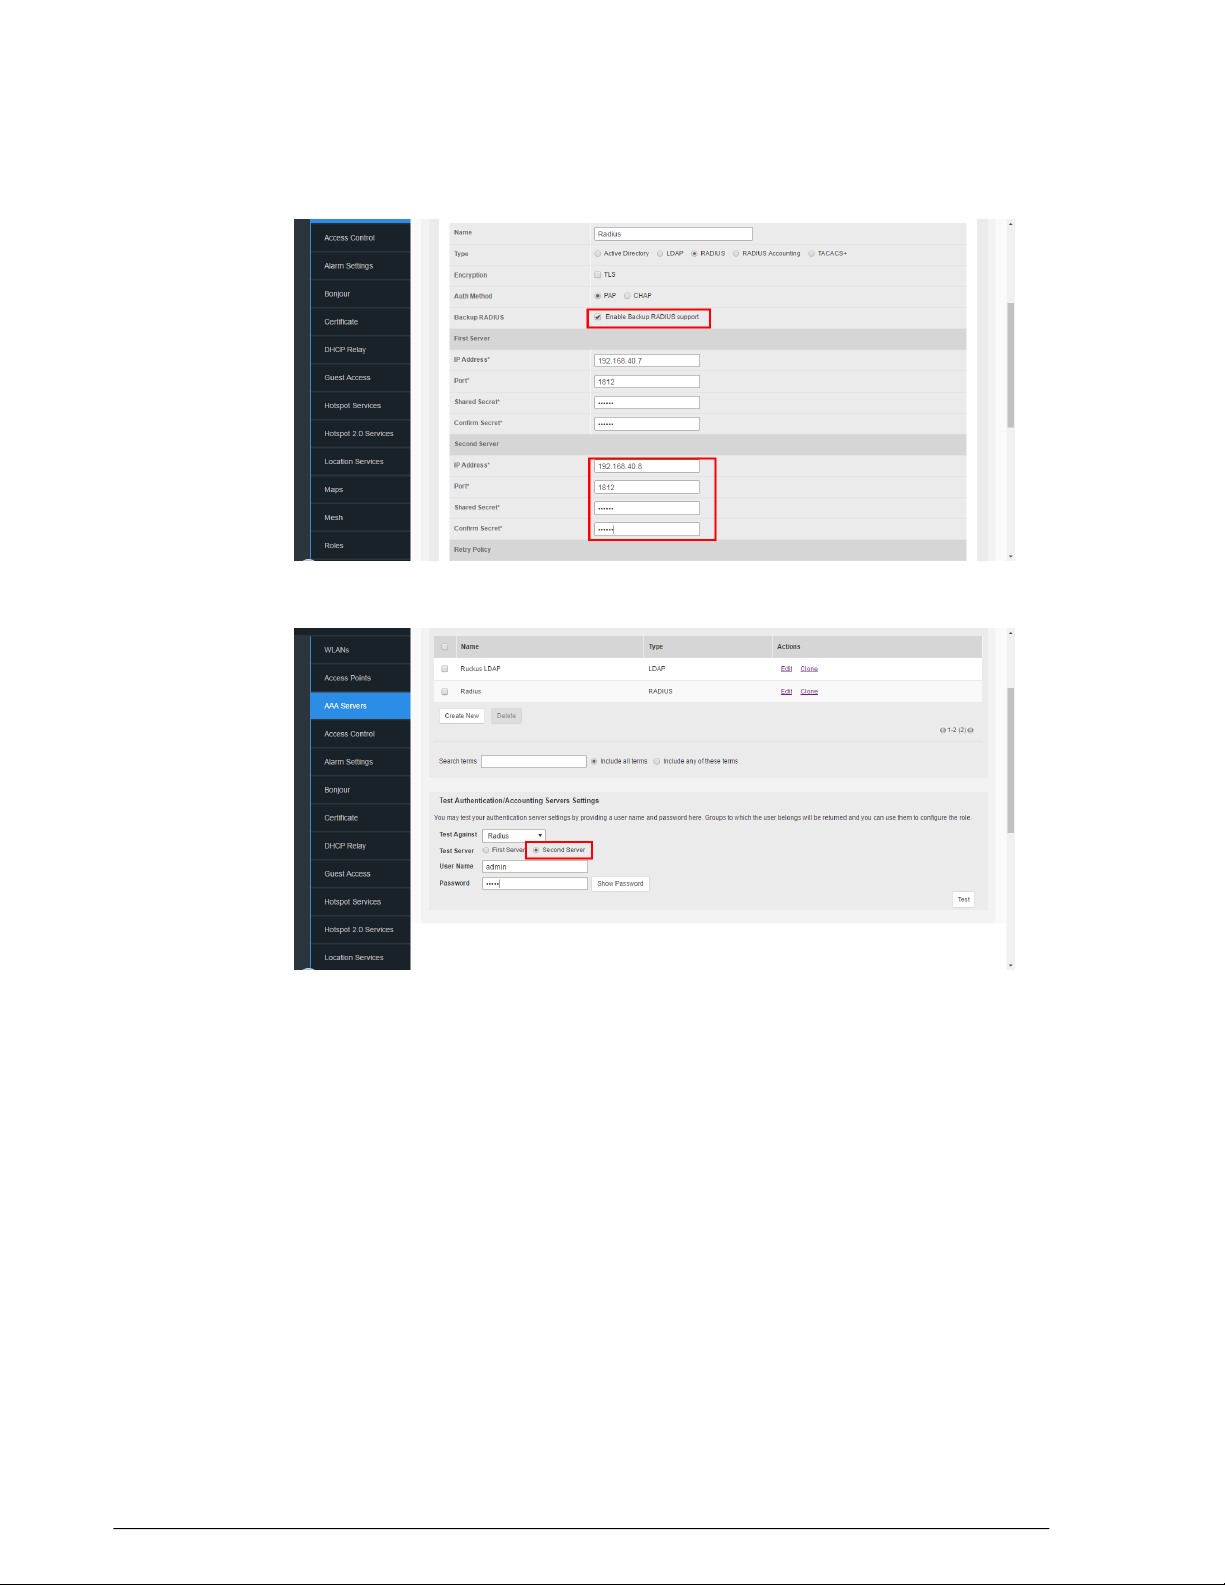
Figure 56: Enable backup RADIUS server
Configuring Security and Other Services
Using an External AAA Server
Figure 57: Test authentication settings against backup RADIUS server
MAC Authentication with an External RADIUS Server
To begin using MAC authentication:
1. Ensure that a RADIUS server is configured in ZoneDirector (Configure > AAA Servers
> RADIUS Server). See Using an External AAA Server on page 87.
2. Create a user on the RADIUS server using the MAC address of the client as both the
user name and password. The MAC address format can be configured in one of the
following formats:
• A single string of characters without punctuation: aabbccddeeff
• Colon separated: aa:bb:cc:dd:ee:ff
• Hyphen separated: aa-bb-cc-dd-ee-ff
Ruckus Wireless ZoneDirector™ Release 10.0 User Guide
95
Page 96

Configuring Security and Other Services
Using an External AAA Server
• All caps: AABBCCDDEEFF
• All caps hyphenated: AA-BB-CC-DD-EE-FF
• All caps colon separated: AA:BB:CC:DD:EE:FF
3. Log in to the ZoneDirector web interface, and go to Configure > WLANs.
4. Click the Edit link next to the WLAN you would like to configure.
5. Under Authentication Options: Method , select MAC Address
6. Under Authentication Server, select your RADIUS Server.
7. Select the MAC Address Format according to your RADIUS server’s requirements.
8. Click OK to save your changes
Figure 58: RADIUS authentication using MAC address
You have completed configuring the WLAN to authenticate users by MAC address from
a RADIUS server.
Using 802.1X EAP MAC Address Authentication
With the 802.1X EAP + MAC Address authentication method, clients configured with
either "open" or EAP-MD5 authentication methods are both supported on the same
WLAN.
The encryption method is limited to "None," and an external RADIUS server is required.
NOTE This option will only work if you have a supplicant that supports this behavior
(and currently no known public domain supplicants support this behavior).
When ZoneDirector authenticates a client, MAC authentication is checked first, followed
by the EAP process. When the client tries to associate, if MAC authentication succeeds,
the client is authorized directly and allowed to pass traffic without any further EAP
authentication required.
96
Ruckus Wireless ZoneDirector™ Release 10.0 User Guide
Page 97

Configuring Security and Other Services
Using an External AAA Server
If MAC authentication fails, the EAP authentication process begins and the client must
provide a valid EAP account before access is granted. If MAC authentication fails, the
EAP authentication process begins and the client must provide a valid EAP account
before access is granted.
You can view the actual authentication method used (MAC address or EAP) from the
Monitor > Wireless Clients page.
Using 802.1X with EAP-MD5
EAP-MD5 differs from other EAP methods in that it only provides authentication of the
EAP peer to the EAP server but not mutual authentication. ZoneDirector supports 802.1X
authentication with EAP-MD5 using either ZoneDirector's internal database or an external
RADIUS server.
To configure a WLAN for EAP-MD5 authentication:
1. Go to Configure > WLANs and click the Edit link next to the WLAN you would like
to configure
2. Under Authentication Options: Method, select 802.1X EAP
3. Under Encryption Options: Method, select None
4. Under Authentication Server, select either Local Database or a previously configured
RADIUS server from the list.
5. Click OK to save your changes.
RADIUS Attributes
Ruckus products communicate with an external RADIUS server as a RADIUS client.
Packets from Ruckus products are called "access-request" or "accounting-request"
messages. The RADIUS server, in turn, sends an "access-challenge", "access-accept"
or "access-reject" message in response to an access-request, and an
"accounting-response" message in response to an accounting-request.
RADIUS Attribute Value Pairs (AVP) carry data in both the request and the response
messages. The RADIUS protocol also allows vendor specific attributes (VSA) to extend
the functionality of the protocol. The following tables list the RADIUS attributes used in
these messages between ZoneDirector and the RADIUS/RADIUS Accounting server
based on which type of authentication is used for the WLAN.
ZoneDirector will terminate a user session if it receives a Change of
Authorization-Disconnect Message (COA-DM) from the RADIUS server. The COA-DM
message may be used when a client changes service levels. For instance, a new user
may initially connect to a free, low-rate service on one WLAN. When they purchase
access on a higher-rate service, RADIUS will send a COA-DM message to ZoneDirector,
causing the user to re-connect to an alternative WLAN. COA-DM may also be used to
remove a client if a user exceeds their total bandwidth allowance or time on the network.
NOTE In addition to COA-DM messages, as of release 10.0, ZoneDirector also supports
the following COA messages:
Ruckus Wireless ZoneDirector™ Release 10.0 User Guide
97
Page 98

Configuring Security and Other Services
Using an External AAA Server
• Idle timeout
• Session Timeout
• Accounting interval
• Uplink rate limit
• Downlink rate limit
• Filter ID (ACL ID)
Notation "==>" below indicates this value is generated external to AP/ZoneDirector.
• In the case of EAP payload, this is generated by a wireless client and encapsulated
in the RADIUS access-request packet.
• In the case of a "state" attribute, it indicates that an access-request packet is a
response to the last received access-challenge packet by copying the "state" AVP
unmodified.
• As for the "class" attribute, it is parsed and stored from an access-accept packet
and then subsequently used in accounting-request packets.
98
Ruckus Wireless ZoneDirector™ Release 10.0 User Guide
Page 99

RADIUS Authentication attributes
Table 18: RADIUS attributes used in authentication
AttributesWLAN Type
Configuring Security and Other Services
Using an External AAA Server
802.1X / MAC Auth
Sent from ZoneDirector in Access Request messages:
(1) User name (4) NAS IP Address (optional; prefer sending
NAS ID) (5) NAS Port (6) Service Type: hard-coded to be
Framed-User(2) (12) Framed MTU: hard-coded to be 1400
(30) Called Station ID: user configurable (31) Calling Station
ID: format is sta's mac (32) NAS Identifier: user configurable
(61) NAS Port Type: hard-coded to be 802.11 port (19)
(77) Connection Info: indicates client radio type
==> (79) EAP payload
==> (24) State: if radius access-challenge in last received
radius msg from AAA
(80) Message Authenticator (95) NAS IPv6 address (if
using/talking to an IPv6 RADIUS server) Ruckus private
attribute: Vendor ID: 25053 Vendor Type / Attribute
Number: 3 (Ruckus-SSID)
Sent from RADIUS server in Access Accept messages: (1)
User name (7) WISPr Bandwidth-Max-Up: Maximum
transmit rate (bits/second) (8) WISPr
Bandwidth-Max-Down: Maximum receive rate (bits/second)
(25) Class (27) Session-timeout & (29) Termination-action:
Session-timeout event becomes a disconnect event or
re-authentication event if termination-action indicates "(1)
radius-request" (85) Acct-interim-interval For Dynamic
VLAN application: (64) Tunnel-Type: value only relevant if
it is (13) VLAN (65) Tunnel-Medium-Type: value only
relevant if it is (6) 802 (as in all 802 media plus ethernet)
(81) Tunnel-Private-Group-ID: this is the VLAN ID
assignment (per RFC, this is between 1 and 4094)
Ruckus Wireless ZoneDirector™ Release 10.0 User Guide
Administrator Authentication: Ruckus private attribute:
Vendor ID: 25053 Vendor Type / Attribute Number: 1
(Ruckus-User-Groups) Value Format: group_attr1,
group_attr2, group_attr3, ... Cisco private attribute: Vendor
ID: 9 Vendor Type/ Attribute Number: 1 (Cisco-AVPair)
Value Format: shell:roles="group_attr1 group_attr2
group_attr3 ..."
99
Page 100

Configuring Security and Other Services
Using an External AAA Server
AttributesWLAN Type
WISPr / Web Auth / Guest
Additional attributes supported in WISPr WLANs (**generic
attributes NOT the same as non-WISPr/802.1X):
(1) User name (2) Password or (3) CHAP-Password (4)
NAS IP Address (6) Service Type: hardcoded to be
Framed-User(2) (8) Framed IP address (30) Called Station
ID: user configurable (31) Calling Station ID: format is sta's
mac (32) NAS Identifier: user configurable (44) Account
session ID
Ruckus private attribute: Vendor ID: 25053 Vendor Type
/ Attribute Number: 3 (Ruckus-SSID) WISPr vendor specific
attribute (vendor id = 14122) (1) WISPr location id (2) WISPr
location name (4) WISPr redirection URL (7) WISPr
Bandwidth-Max-Up: Maximum transmit rate (bits/second)
(8) WISPr Bandwidth-Max-Down: Maximum receive rate
(bits/second) (80) Message Authenticator
RADIUS Accounting attributes
The following table lists attributes used in RADIUS accounting messages.
Table 19: RADIUS attributes used in Accounting
AttributeWLAN Type
802.1X / MAC Auth
Common to Start, Interim Update, and Stop messages:
(1) User Name (4) NAS IP Address (5) NAS Port (8)
Framed IP (30) Called Station ID: user configurable (31)
Calling Station ID: format is sta's mac (32) NAS Identifier:
user configurable (40) Status Type: start, stop,
interim-update (45) Authentic: radius-auth (1) (50)
Acct-Multi-Session-ID (61) NAS Port Type: hard-coded
to be 802.11 port (19) (77) Connection Info: indicates
client radio type
==> (25) Class: if received in radius-accept message from
AAA
Ruckus private attribute: Vendor ID: 25053 Vendor Type
/ Attribute Number: 3 (Ruckus-SSID)
100
Ruckus Wireless ZoneDirector™ Release 10.0 User Guide
 Loading...