

Page 1
Ruckus Wireless™
SmartZone™ 100
Quick Setup Guide for SmartZone
3.4.1
This Quick Setup Guide provides basic instructions for setting
up the Ruckus Wireless SmartZone 100 (SZ-100) on the
network. For information on advanced configuration and
management options, see the SmartZone 100 Getting Started
Guide and SmartZone 100 Administrator Guide, which are
available for download from the Ruckus Wireless Support
website:
https://support.ruckuswireless.com/documents
This Guide in Other Languages
请从以下网站获得该指南的简体中文版
https://support.ruckuswireless.com.
Vous trouverez la version française de ce guide à l'adresse
suivante https://support.ruckuswireless.com.
こ の ガ イ ド の⽇本語版は https://support.ruckuswireless.com
でご覧く ださい。
이 가이드의 한국어 버전은 웹 사이트
(https://support.ruckuswireless.com)
에서 확인하시기 바랍니다 .
Veja a versão em português (Brasil) deste guia em
https://support.ruckuswireless.com.
Puede ver la versión en español (América Latina) de esta guía
en https://support.ruckuswireless.com.
Licensing Information
The SZ-100 comes pre-shipped with 1000 temporary AP
Capacity Licenses, which are valid for a period of 90 days from
when the SZ-100 is configured via the initial setup
configuration. For operation beyond 90 days, you MUST buy
permanent AP Capacity licenses. The purchased Licenses
MUST be activated for them to become valid.
The management of the AP Capacity Licenses and the ability
to activate the permanent License will be through the Ruckus
Wireless Support Portal (https://support.ruckuswireless.com).
An email will be sent to the User that is identified on the
Purchase Order and full instructions as to how to activate the
Licenses is included in the email. As a guide, full instructions
can be found at https://support.ruckuswireless.com/activate.
Using the LiMAN (license management) portal on the Ruckus
Wireless Support website, you can assign licenses to or from a
SZ-100 or move them to another SZ-100 (see a summary of
LiMAN features in Tabl e 1). To physically manage the
distribution of licenses from the Support website to the actual
SZ-100, do one of the following:
• Connect the SZ-100 directly to the Internet.
• Deploy a Ruckus Wireless Local License Server (LLS)
within your network. The LLS must be able to
communicate with your SZ-100 and it must be connected
to the Internet.
• LLS should first synchronize with the license server in
the cloud to get the required license (as per the SZ100 serial number)
• Remove licenses from one SZ-100 to add to another
NOTE: In the event that the SZ-100 is not connected to the
Internet and you have not deployed an LLS, you can download
the actual licenses from the Support Portal and manually
upload to the specific SZ-100.
For step-by-step instructions on how to activate the SZ-100’s
licenses, see Step 5: Activate the SZ-100’s Licenses.
Table 1. LiMAN features and how to activate them on the SZ-100
LiMAN Features SZ-100 Online
(Connected to
the Internet)
• Register SZ-100
controllers,
licenses, support entitlement
• Add capacity
licenses to SZ100 controllers
• Remove
licenses from
one SZ-100 and
add to another
No action
required. The
SZ-100 syncs
with LiMAN
automatically
within 24 hours
and applies the
appropriate
licenses.
SZ-100 Offline
(Disconnected from the
Internet)
Three steps required:
1 Download the license file
from LiMAN.
2 Log on to the SZ-100,
and then upload the
license file from LiMAN.
3 Download the license
response file from the
SZ-100, and then upload
it to LiMAN.
Before You Begin
Before deploying Ruckus Wireless products, please check for
the latest software and the release documentation.
• Release Notes and other user documentation are available
at http://support.ruckuswireless.com/documents.
• Software upgrades are available at
http://support.ruckuswireless.com/software.
• Open source information is available at
http://opensource.ruckuswireless.com.
• Software license and limited warranty information are
available at http://support.ruckuswireless.com/warranty.
Package Contents
• One SmartZone 100 appliance with one AC/DC power
supply unit and power cord
• One console cable
• One rack mount kit
• Service Level Agreement/Limited Warranty Statement
sheet
• Regulatory Statement sheet
•This Quick Setup Guide
What You Will Need
• An administrative computer (admin PC) with a connection
to the local area network
• A web browser, such as Internet Explorer, Mozilla Firefox,
Google Chrome or Apple Safari
• The IP address, netmask, gateway and DNS server
addresses assigned to the SZ-100 —if it has a static
network address (recommended)
Step 1: Connect the SZ-100 to the Network
#1 Connect the SZ-100 to a convenient power source, and
then press the power switch on the rear panel. The Alarm
LED shows a flashing red light as the SZ-100 starts up.
When the SZ-100 has started up successfully, the Alarm
LED turns to a solid green light.
#2 Obtain an Ethernet cable. Connect one end of the Ethernet
cable to one of the LAN ports (port 1 or 2 recommended)
on the SZ-100, and then connect the other end to your
network’s switch or router. DHCP server should be
available in the connected LAN environment for SZ-100 to
get the IP address.
NOTE The SZ-100 is a Universal Plug and Play (UPnP) device.
Once you connect it to the network, it will automatically configure
itself, obtain an IP address, and make its presence known to other
devices on the network.
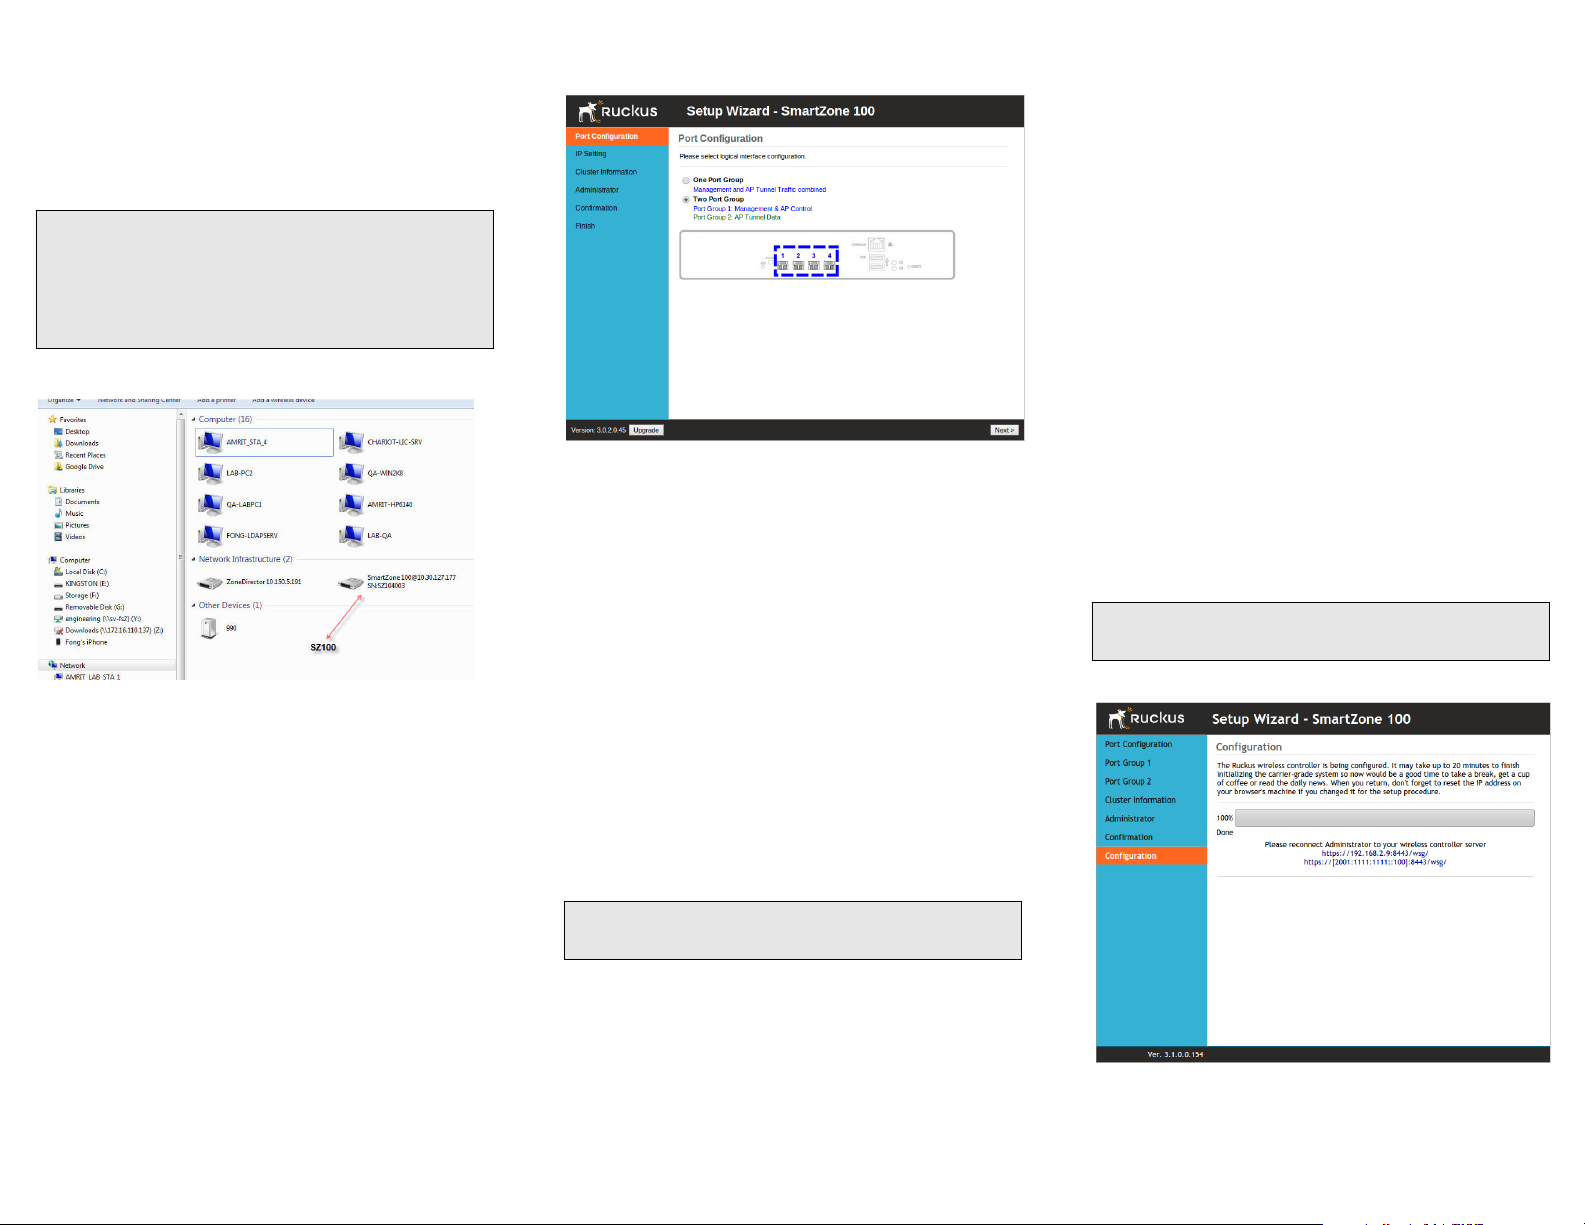
#3 Go to the admin PC and verify that the SZ-100 is now
discoverable on the network. On Windows 7 and Windows
8, go to Control Panel > Network and Internet > View
network computers and devices, and then locate the
Network Infrastructure section. The SZ-100 should appear
there. In such scenarios, SZ-100 and a system (laptop or a
Copyright © 2016 Ruckus Wireless, Inc. Page 1 of 5
Published October 2016, Part Number 800-71383-001 Rev A
Page 2
PC) should have cross-over connection and the system
should have an IP address in the same subnet as SZ-100.
Configure SZ-100 MGMT and CONTROL interface and
add it to the new LAN connection. Use the new IP address
to access SZ-100.
NOTE If you prefer not to use UPnP, you can type the IP address
of the SZ-100 into a web browser instead. In case there is no
DHCP server on the network, the default IP address and URL of
the SZ-100 is http://192.168.2.2:8080 with a network mask of
255.255.255.0. Otherwise, an IP address is assigned
automatically from your existing DHCP service.
Figure 1. The SZ-100 appears in the Network Infrastructure
section
Figure 2. The Port Configuration screen of the Setup Wizard
- If you clicked Two Port Group, configure the IP
address of the management and AP control
interface on the Port 1 screen, and then configure
the IP address of the AP tunnel data interface on
the Port 2 screen.
• Cluster Information: Select whether you want to create
a new cluster with this SZ-100 or to join an existing
cluster on the network. If you want this SZ-100 to join
an existing cluster, you must type the cluster IP
address and admin password in the boxes provided.
#2 When the Confirmation screen appears, verify that all the
settings displayed on the screen are correct.
If you need to make a correction, click Back until the
appropriate setup screen appears, then make the
changes.
#3 If they are all correct, click Finish to apply the settings and
activate the SZ-100 on the network.
A progress bar appears and displays the progress of applying
the settings, starting the SZ-100 services, and activating the
SZ-100 on the network.
When the process is complete, the progress bar shows the
message “100% Done.” The page also shows the IP address
through which you can access the SmartZone web interface to
manage the appliance.
TIP Take note of this IP address. You will need this later to log on
to the SZ-100’s web interface.
Step 2: Complete the Setup Wizard
Figure 3. Take note of the IP address of the web interface
#1 When the Setup Wizard appears, complete the following
#4
Double-click the SZ-100 that appears in the Network
Infrastructure section to start the SZ-100’s Setup Wizard.
A web browser loads and the SZ-100’s Setup Wizard
appears, displaying the Port Configuration screen.
Copyright © 2016 Ruckus Wireless, Inc. Page 2 of 5
Published October 2016, Part Number 800-71383-001 Rev A
screens:
• Port Configuration: If you want to combine the
management, AP control, and AP tunnel traffic on a
single interface (recommended for simple setup), click
One Port Group. If you want to separate the
management and AP control traffic from the AP tunnel
traffic, click Two Po rt Gr o u p.
NOTE If you clicked Two Port Group, verify that the admin PC
is connected to either port 1 or port 2 of the SZ-100.
• IP Setting: Configure the IP address settings of the SZ100 interface or interfaces either by assigning
addresses automatically (if a DHCP server exists on
the network) or manually:
- If you clicked One Port Group on the previous
screen, configure the SZ-100’s IP address settings
on the IP Setting screen.
Step 3: Connect the SZ-100 to the Network
#1 Connect Port 1 to the router or switch.
Page 3

#2 Connect Port 2 to another router or switch to which other
LAN
Default IP address:
192.168.2.2
if no DHCP server
Admin PC
Ruckus Wireless APs
Router or Switch
SmartZone 100
SmartZone appliances (if present) are connected.
NOTE Depending on your network setup, you may also connect
Port 2 to the same router or switch to which Port 1 is connected.
Step 4: Connect the Ruckus Wireless APs to the Network
#1 Distribute the APs around your worksite.
#2 Record each AP’s Ethernet MAC address (printed on the
bottom of every AP), and note each device’s exact
worksite location.
#3 Connect the APs to a local power source.
#4 Using an Ethernet cable, connect the APs to the switch or
router on the same network as the SZ-100.
TIP: Some Ruckus Wireless APs are PoE-capable. If connected
to a Power over Ethernet switch, the APs can draw power through
the Ethernet cables.
When the APs are powered on, they will automatically discover
the SZ-100 on the network.
NOTE If an AP is already running a SZ image then auto-discovery
on same LAN/IP subnet will not work. It only works if the AP is
running a SZ/universal LWAPP based image.
Figure 4. Connecting the admin PC, SZ-100, and Ruckus
Wireless APs to the network
activate and assign the AP and Tunnel Licenses using the
LiMAN (license management) portal on the Ruckus Wireless
Support site.
Before You Begin
You must have a Ruckus Support portal account (including
user name and password). You can use this account to access
general Support site content including software upgrades,
knowledge base articles and technical documents.
If you do not have a Support portal account, you will be
required to register one before continuing with your product
and license activation.
Every capacity and support license that you have purchased
will have its own unique activation code and each must be
activated for the license to become valid. You will receive the
activation code in a separate Support Purchase
Acknowledgment (SPA) email for each license/support license.
Depending on the product, you may receive up to three (3)
different SPA emails for all of your licenses. The first three
characters of the activation code indicate the license type to
which the code is applicable.
• LIC: AP Capacity License
• LIC: AP Tunnel License
• SUP: Support License
Activating a SZ-100’s License/Support License
#1 Open the SPA email that you received from Ruckus
Wireless.
Figure 5. The SPA email from Ruckus Wireless
Figure 6. Ruckus Wireless Support portal logon page
Have the serial number of your SZ-100 device ready.
#3
#4 Click the link in the SPA email.
#5 Follow the onscreen instructions to activate the licenses
purchased. When required, you will be prompted for your
SZ-100 serial number.
#6 It is important that you repeat steps #1 to #5 above for all
licenses that you have purchased as this will simplify the
“+License” workflow in step #7 below.
#7 After you finish activating all of your licenses, you need to
assign them to your LiMAN account. Click the LiMAN
button, which appears after a license has been
successfully activated (see Figure 7).
• If your device is listed, click its serial number and
proceed to step #8.
• If your device is NOT listed, click the Register Smart
Device button (see Figure 8), enter your device's serial
number, and then click the Register Smart Device
button (see Figure 9).
Figure 7. Click the LiMAN button
#2
Step 5: Activate the SZ-100’s Licenses
After you set up the SZ-100 and verify that wireless clients are
able to associate with managed APs successfully, you need to
Copyright © 2016 Ruckus Wireless, Inc. Page 3 of 5
Published October 2016, Part Number 800-71383-001 Rev A
Log on to https://support.ruckuswireless.com.
Figure 8. Click the serial number of your device or click Register
Smart Device
Page 4

Figure 9. Enter your device’s serial number and click Register
If your device is listed
If your
device is not
listed
#8
Smart Device
Click the + License button (see Figure 10), enter the
number of licenses to add in Qty to Add, and then click
the Add License button (see Figure 11). Repeat for all
licenses.
Figure 10. Click + License
Figure 11. Enter the number of licenses to add in Qty to Add and
s
You have completed activating a SZ-100’s licenses.
click Add License
Figure 12. Sync the SZ-100 with the SmartLicense server
• Deploy a Ruckus Wireless Local License Server (LLS)
within your network. The LLS must be able to
communicate with your SZ-100 and it must be connected
to the Internet. Contact Ruckus Wireless Support for
information on how to setup an LLS.
• In the event that the SZ-100 is disconnected from the
Internet and you have not deployed an LLS, you can
download the actual licenses from the Support Portal and
manually upload them to the specific SZ-100. See Syncing
Licenses on an Offline SZ-100.
You have completed activating the capacity or support license
for the SZ-100 device.
Syncing Licenses on an Offline SZ-100
#1 On the Add License page of LiMAN, click the SZ-100’s
serial number. The View Device page appears (see Figure
13).
Figure 13. The View Device page
Step 6: Sync the SZ-100 with LiMAN
After you have activated the SZ-100’s licenses on the Ruckus
Wireless Support Portal, the SZ-100 must be synced with the
Smart License server. This will enable the User’s ability to
assign licenses to and back from a SZ-100 or assign them to
another SZ-100.
To physically manage the distribution of licenses from the
Support Portal to the actual SZ-100, do one of the following:
• Connect the SZ-100 directly to the Internet. On the
SmartZone web interface, go to the
Administration > License page, and then click the Sync
License with Server button to sync the SZ-100 with the
SmartLicense server.
Copyright © 2016 Ruckus Wireless, Inc. Page 4 of 5
Published October 2016, Part Number 800-71383-001 Rev A
Click Download License File. The license file is saved to
#2
the client.
#3 On the SZ-100 web interface, go to Administration >
License. In the Upload License section (see Figure 12)
Figure 12), click the Browse button, and then select the
license file from your client to upload it to the SZ-100
#4 On the SZ-100 web interface, go to Administration >
License. In the Download License section, click the
Page 5

Download button to download the license file from the SZ100 to your client.
#5 Go back to the LiMAN portal on the Ruckus Wireless
Support website, and then do the following:
a Go to the View Device page (see Figure 13).
b Click Upload License File.
c Click the Choose File button (see Figure 14), and then
select the license file from your client.
d Click Send to complete the offline License
synchronization.
You have completed activating licenses on an offline SZ-100.
Figure 14. Click the Choose File button
Related Documentation
If you need more information about the SmartZone 100 or the
SmartLicense platform, refer to the following documents,
which are available for download on the Ruckus Wireless
Support website:
• For information on how to mount and install the SZ-100
and how to complete the essential configuration tasks,
refer to the SmartZone 100 Getting Started Guide.
• For information on how to perform advanced configuration
tasks and AP management and monitoring, refer to the
SmartZone 100 Administrator Guide.
• For a complete list of documentation on the SmartZone
100, refer to the release notes.
• For more information on how to manage your SmartZone
100 licenses, refer to the SmartLicense User Guide.
Copyright © 2016 Ruckus Wireless, Inc. All rights reserved. Ruckus, Ruckus
Wireless are trademarks of Ruckus Wireless, Inc. All other company and
product names mentioned in the documentation are held to be trademarked
(and registered) by the primary holders.
Copyright © 2016 Ruckus Wireless, Inc. Page 5 of 5
Published October 2016, Part Number 800-71383-001 Rev A
 Loading...