

Page 1

FOR TECHNICAL ASSISTANCE:
CONTACT YOUR LOCAL DISTRIBUTOR
For a list of distributors, visit the Merit Industries, Inc. Web site
www.meritind.com
EVO Ion
Installation & Owner’s
Manual
merit industries, inc.
PM0426-13
Page 2

Page 3

Table of Contents
Site Preparation .............................p. 1
Setting up your
Megatouch Game ......................... p. 1
Game Description .......................... p. 1
CPU Section............................... p. 1
Cash Tower Section .................p. 1
General Care
and Maintenance ........................... p. 2-5
Touchscreen/Joystick
Calibration ..................................p. 2
Monitor Adjustment
Procedure .................................. p. 3
General Circuit Board
Handling Information .................. p. 3
Cleaning the Cabinet .................p. 4
Cleaning the Joystick ................p. 4
Cleaning the Touchscreen
Monitor .......................................p. 4
Cleaning the Fans and
Vent s .........................................p. 4
Watch Dog Timer .......................p. 4
Wireless Setup .......................... p. 5
Megatouch ION Software
Game Name and Score Needed
for Initial Replay .............................p. 6
Main Menu ....................................... p. 7-8
Credits/Pricing Menu ................... p. 9-12
Quick Price Setup ......................p. 9
Coin-In Menu.............................. p. 10-11
Coinless Coin Op Menu .............p. 11-12
Rental Mode............................... p. 13
Games Menu .................................. p. 13-14
Game Setup...............................p. 13-14
Hi Scores Menu ..............................p. 14
View/Clear Hi Scores ...............p. 14
Books Menu.................................... p. 14-16
Books Display............................p. 14-15
Cash Settlement ........................p. 15-16
System Menu ................................. p. 17
Diagnostics Menu .......................... p. 18
Presentation Menu ....................... p. 19-20
Operator’s Presentation ............ p. 19
Sales Person’s Presentation..... p. 19
Operator Ad Screens ................p. 20
Promotion Menu ............................ p. 20-21
My Merit ..................................... p. 20-21
Merit Money ............................... p. 21
Promo Credits ............................p. 21
Megatouch Player and
Operator Keys ................................... p. 22
Megatouch ION Hardware
DIP Switch Settings
in ION Games ................................. p. 23
Connecting a Printer
(German games only) ..................p. 24
Troubleshooting............................ p. 25-27
Parts List and Illustrations
EVO Diagrams ...........................p. 28-29
Coin Mech Position .................... p. 30
Replacement Parts List .............p. 31
Connection Diagrams ................ p. 32-34
Warranty and Software License
Agreements
Warranty............................................p. 35
Software License Agreements......... p. 36-41
© 2005 Merit Industries, Inc.
Megatouch Evo, Ion 2006, Mega-Lease, Mega-Link, MegaNet, MegaTunes, MegaWeb, T ournaMAXX and TournaCHAMP
are registered trademarks of Merit Industries, Inc.
Reproduction of this manual, in any form or by any means, is strictly forbidden without the written permission of Merit Industries,
Inc.
Page 4

COPYRIGHT © 2005 MERIT INDUSTRIES, INC.
Site Preparation
In determining the location for your
Megatouch Ion™ video game, consideration
must be given to a suitable, grounded electrical outlet. Since the game is a computerized device, it should have a separate circuit, if at all possible. If a separate circuit is
not available, care should be taken to provide a clean and constant voltage. As a
basic guideline, never connect the unit to a
circuit that also supplies power to freezers,
coolers or other high power consuming and
electrical noise generating equipment. Place
the game in a location where nothing will
interfere with proper ventilation. The game
should not be exposed to any dripping or
splashing liquids. Objects filled with liquid
should not be placed on the unit.
Setting up your Megatouch Game
1. After removing the game from the carton, attach the power cord to the back
of the game near the ON/OFF switch.
Plug the game into a standard AC outlet.
2. Turn the power switch at the back of
the game to ON and wait for it to go
through its boot-up sequence. The
game will display the Main Menu Screen.
3. If you have a Mega-Lease™ game, you
must follow the steps in the MegaNet®
User Manual to connect to the server
in order to activate your game.
4. The machine has been preset at the
factory and therefore should not need
to be adjusted, however it is recommended that the screen be calibrated
(see Screen Calibration) and the coin
or bill acceptor(s) be tested.
5. There are many custom settings available for the game. To customize the
settings, follow the software instructions in this manual.
1 MEGATOUCH EVO ION OWNER’S MANUAL PM0426-13
Game Description
The Megatouch EVO model has 2 key-locked
compartments: the CPU section door and the
cash tower section. It comes equipped with
a coin mech and/or bill acceptor. This model
also has couplers installed in the rear of the
game. These are used for future hardware
upgrades which include linking and modem
capabilities. Each game comes equipped
with a wireless USB adapter which can be
used to wirelessly link two Ion games together by simply turning the games on. With
the addition of a wireless router, up to four
games can be linked and the game(s) can
also connect to the Internet. The Linksys
802.11B router is recommended. For more
information, see Wireless Setup.
The EVO also has several additional wall
mounting kits, including a direct, recessed,
and swivel bracket wall mount. There is
also an available stand on which to place
the game. Contact your distributor to purchase any of these additional parts.
CPU Section
The CPU section is accessible from the front
of the game. The CPU section houses the
LCD monitor, motherboard, I/O board, power
supply, hard drive, and the main harness.
Located on the control board (found inside
the CPU section near the hinge of the CPU
section door) are two internal switches,
SETUP and CALIBRATE (see Figure 24).
Pressing the SETUP button will bring you to
the Megatouch Setup Screen. See the next
section for calibration instructions.
NOTE: Additional “SETUP” and “CALIBRATE” buttons can be accessed
through the back of the CPU section,
by unlocking the cash tower lock (see
Figure 25).
Cash Tower Section
The coin mech/coin box/bill acceptor are accessible from the rear of the cabinet. The
cash tower is locked for security purposes.
See Figure 25.
Page 5

COPYRIGHT © 2005 MERIT INDUSTRIES, INC.
General Care and Maintenance
NOTE: THIS GAME MUST ONLY BE SER-
VICED BY QUALIFIED SERVICE PERSONNEL.
CAUTION: THERE ARE HIGH VOLTAGE
PARTS IN THIS GAME. BE CAREFUL
WHEN SERVICING THE INSIDE OF THE
GAME. THE GAME SHOULD ALWAYS BE
UNPLUGGED BEFORE SERVICING.
Touchscreen/Joystick Calibration
NOTE: If you are using MegaWeb™ or
connecting your game to TouchTunes®
product, you must enable high resolution calibration in order to properly
view Web pages or activate all of
TouchTunes features. All ION machines, except for the Classic, can support this high resolution mode. To enable high resolution:
1. Press the SETUP button located on the
control board inside the CPU section.
2. Touch the System Menu button on
the first screen that appears.
3. Touch the Options button on the System Menu Screen.
4. Scroll through the options until you see
Enable Hi Resolution and touch the
box next to this option so that a check
appears in the box.
5. A warning that it should not be enabled
on Classic games will appear. If you
have a Classic game, touch No to exit.
If you have any other type of cabinet,
touch Yes to continue.
6. The game will now have high resolution enabled. Touch the X button in the
upper corner of the screen to exit out
of setup. Then continue with the following screen calibration steps.
How To Calibrate:
• Find the CALIBRA TE button on the control board inside the CPU section, and
press it to enter screen calibration
mode.
• Touch the center of the first cross that
appears. Once you release your finger, a second cross will appear.
NOTE: You must hold your finger on
the cross for approximately 2 seconds
for the calibration to be recognized.
• Touch the center of the second cross
that appears on the screen.
• Once the second cross is touched and
released, another cross will appear on
the screen. To test the calibration of
the screen, touch the cross with your
finger and slowly drag your finger
around the screen. The cross should
follow your movement.
• Touch the EXIT button.
If you have high resolution enabled, the game
will prompt you to go through the same steps
again for high resolution mode.
• The game will then prompt you to calibrate the joystick. Move the joystick as
far left as it will go, release the joystick, and then press one of the buttons on the joystick.
NOTE: The joystick may not appear
the be functioning correctly during
calibration, but it is important that you
continue the calibration steps. After
calibration has been completed, it will
function properly.
• Move the joystick as far right as it will
go, release the joystick, and then press
one of the joystick buttons.
• Move the joystick as far up as it will go,
release the joystick, and then press one
of the joystick buttons.
PM0426-13 MEGATOUCH EVO ION OWNER’S MANUAL 2
Page 6

COPYRIGHT © 2005 MERIT INDUSTRIES, INC.
• Move the joystick as far down as it will
go, then release the joystick and press
one of the joystick buttons.
• Then, without touching the joystick,
press one of the buttons on the joystick to complete calibration.
Monitor Adjustment Procedure
The vertical/horizontal controls and brightness/contrast controls are located on the
control board, inside the CPU section near
the hinge of the door. Pressing the button
labeled Menu on the control board will show
the on-screen display on the monitor. Use
the Left and Right buttons to move through
the menu. Touch Menu again to select the
option you want to change. Use the Left
and Right buttons to change the option. Then
select Menu again to deselect the option.
Auto will automatically adjust the size and
brightness. Touch the Exit button to exit.
Adjust the monitor controls until the screens
look as suggested in the following steps.
1. Set the game to the Checkerz game
screen.
2. Adjust the vertical and horizontal size
and vertical and horizontal position to
make sure that the game screen fills
the monitor screen and that the game
screen is centered.
3. Adjust the brightness and contrast controls until the top sets of checkers are
a rich red and the bottom set are a dark
gray. The feet on the “Checkerz”
character should be white. (Adjusting
the brightness and contrast can also
correct for a lack of sharpness.)
General Circuit Board Handling
Information
Before handling any boards, observe the
following procedures:
• Prevent Electro-Static Discharge by:
1. Storing the boards in the antistatic bags in which they are
shipped.
2. Removing any static charge
from your body before handling
the boards.
3. Using a ground strap when
handling the boards.
• When plugging in connectors to the
board, make sure the connector is
inserted straight onto the header and
that the connector covers all header
pins.
• Do not connect any peripheral device
to the board, if the power is still
connected to the peripheral or if power
is already applied to the board.
CAUTION: Be extremely careful when replacing the lithium battery on the motherboard. There is a danger of explosion if the
battery on the motherboard is incorrectly
replaced. Only replace the battery with the
same type recommended by the manufacturer. Dispose of used batteries according
to the manufacturer’s instructions.
Cleaning the Cabinet
• The cabinet should be cleaned with a
damp cloth and mild detergent. Always
apply the cleaner to the cloth and not
directly on the game. Liquids could
enter the cabinet and damage electronics inside.
3 MEGATOUCH EVO ION OWNER’S MANUAL PM0426-13
Page 7

COPYRIGHT © 2005 MERIT INDUSTRIES, INC.
Cleaning the Joystick
• The joystick should be cleaned with a
damp cloth and mild detergent. Always
apply the cleaner to the cloth and not
directly on the game. Liquids could
enter the housing and damage electronics inside.
Cleaning the Touchscreen Monitor
• The touchscreen glass should be
cleaned with a damp cloth and isopropyl alcohol or a non-ammonia cleanser.
Do not use any abrasive or vinegarbased cleansers, as they will damage
the touchscreen glass.
NOTE: DO NOT USE ANY ABRASIVE
SOLVENTS, ACID OR VINEGAR-BASED
CLEANSERS ON THE MONITOR OR
SIDE DECALS. OVER TIME, SUCH
CLEANSERS COULD HARM THE
TOUCHSCREEN AND ERASE THE DECALS. BE CAREFUL NOT TO USE COMMERCIAL CLEANERS CONTAINING
ANY OF THESE SUBSTANCES.
Cleaning the Fans and Vents
• The fans and vents should be cleaned
of any dust and grime on a regular
basis to ensure proper ventilation of
the game.
• To ensure proper operation of the
game, it is important that all fans are
operating correctly and that the airflow
is unobstructed. Make sure nothing is
placed inside the cabinet or next to the
fan vents that would inhibit the flow of
air. Also, if any fans are not operating,
it is important that they be replaced.
Watchdog Timer
This game has been equipped with a feature that allows it to automatically reboot if it
encounters a problem. When the watchdog
timer is enabled, it will reboot the machine
within 2 minutes after a failure, allowing the
game to automatically reset itself if a problem arises without needing a technician
present.
If you want to disable the watchdog timer,
set DIP switch 3 on the I/O board to the open
position and reboot the game.
PM0426-13 MEGATOUCH EVO ION OWNER’S MANUAL 4
Page 8

COPYRIGHT © 2005 MERIT INDUSTRIES, INC.
Wireless Setup
Each game comes equipped with a wireless USB adapter which can be used to automatically link two Ion games together by simply turning the games on. With the addition of a
wireless router, up to four games can be linked and the game(s) can also connect to the
Internet. The Linksys 802.11B router is recommended for use with the software.
The software allows you to configure your own network, should you choose to do so.
Follow the steps below to set up your own network.
1. Press the SETUP button.
2. Touch the TournaMAXX button on the
MAIN MENU. The Set Game Serial No.
Screen will appear. At this screen,
enter the game’s serial number and
touch ENTER. The game will then
prompt you to enter the time zone.
Scroll through the list to find your time
zone and select it by touching it. The
game will return to the TOURNAMAXX
MENU.
3. Press the Wireless Setup button.
4. Touch Configure Device and then
choose from the following options to
network your games:
Autodetect Network: The system
will find and connect to the nearest
available wireless network. This is the
easiest way to connect.
Search for Networks: Looks for all
available wireless connections. Select
a connection from the list to proceed.
NOTE: Choosing a “locked” device will
prompt a key (password) request. If the
selection is your own network, use your
network password to gain access. If not,
this indicates an outside wireless network that has been encrypted and is
your network and enter that same SSID name
for all games that you want to link. You will
also be required to enter interface information. We suggest you accept the default
values. If you want to manually configure
these settings, consult a network advisor.
Custom Configuration: Touching
this button will prompt the user to enter
the SSID (network name) for manual
setup of the wireless connection.
NOTE: Wireless Internet connection
does not require Manual Configuration. Only users who have changed
the default SSID during router installation should change the SSID. Consult the instructions supplied with your
wireless router for more information.
NOTE: If you have chosen Custom Con-
figuration, you will be prompted to enter
interface information. We suggest you accept the default values. If you want to manually configure these settings, consult a network advisor.
5. Once you have chosen your network
connection, you can touch the Details
button on the Wireless Device Setup
Screen to display the details of the current netork.
not accessible.
If you want to Mega-Link your game using
Ad-Hoc Network: This is only for
Mega-Link capability, not for connecting to the server for MegaNet.
NOTE: If you have chosen Ad-Hoc Net-
work, you will be prompted to enter the
SSID (network name). Create a name for
5 MEGATOUCH EVO ION OWNER’S MANUAL PM0426-13
cables instead of wirelessly linking, change
the Local Area Network option on the
TournaMAXX Menu to Ethernet.
If you want to disable the wireless link,
uncheck the Linked Games Enabled option on the Games Menu Options Screen.
Page 9
COPYRIGHT © 2005 MERIT INDUSTRIES, INC.
Game Name and Score Needed for Initial Replay
Solitaire, Power Solitaire, Lone Star, and Super Lone Star will always offer a replay once the
listed score is attained. The other games have to reach the score listed as well as attain the
high score for the game in order to offer a replay. NOTE: The available games may vary.
11 Ball/11-Up 125,000
3 Blind Mice 150,000
3 Some 150,000
Air Shot No Replay
Around the World Golf No Replay
Astro Joe 120,000
Backjammin 125,000
Battle 31 125,000
Big Time Roller 60,000
Boxdrop 175,000
Boxglide 475,000
Boxxi 850,000
Breakin’ Bricks 400,000
Card/Castle Bandits 200,000
Card/Crypt Raiders 175,000
Checkerz 28,000
Chip Away 125,000
Chug 21 250,000
Conga Fish (Ion only) No Replay
Conquest 30,000
Crazy Hearts 65,000
Decked Out Uno Poker 100,000
Domino5 200,000
Euchre Nights 5,000
FastTraxx (Ion only) 100,000
Fast Lane 100,000
Feeding Frosty No Replay
Flash 7 125,000
Four Play 1,500,000
F.M.V. Boxxi (Ion only) No Replay
Gender Bender 125,00 0
Gin Rummy 55,000
GO-O-O-AL No Replay
Great Solitaire 45,000
H2H Gender Bender No Replay
H2H Photohunt No Replay
H2H Safari No Replay
H2H Trivia No Replay
Hoop Jones 125
Hooter No Replay
Jumble 120,000
Jumble Crosswords 120,000
Let It Ride Poker 125,000
Let It Ride Trivia 125,000
Lone Star 45,000
Lookout 400,000
Magic Charms 500,000
Match'Em Up 200,000
Mega Bowling 125
Memoree 300,000
Meteor Shower 200,000
MGA Champ. Golf No Replay
PM0426-13 MEGATOUCH EVO ION OWNER’S MANUAL 6
Mini Golf/Crazy Golf No Replay
Monkey Bash No Replay
Monster Madness 400,000
Moon Drop 160,000
Mystery Phrase 325,000
Outer Spades 75,000
Pharaoh’s Fortune 45,000
Pharaoh’s 9 N o Replay
Photo Hunt 400,000
Pile High No Replay
Pix Mix 350,000
Power Solitaire 55,000
Power Trivia No Replay
Puck Shot 3,000
QB Zone 65,000
Q-Shot 50,000
Quik Cell 100,000
Quik Chess 125,000
Quik Match 400,000
Quintzee 60,000
Quiz Show 45,000
Race Poker/Motor Match No Replay
Rack ‘Em 200,000
Rack ‘Em 9 Ball 35,000
Royal Flash 300,000
Run 21 250,000
Snapshot 400,000
Space Crusader (Ion only) No Replay
Space Adventure Golf No Replay
Speed Draw 125,000
Sticker Book No Replay
Strip Club No Replay
Super Lone Star 55,000
Super Snubbel No Replay
Tai Play 240,000
Take 2 110,000
Tennis Ace No Replay
Texas Hold ‘Em N o Replay
Tic Tac Trivia 75,000
Tri-Castles 125,000
Trip Flip 150,000
Tri-Towers 125,000
Trivia Treasure No Replay
Trivia Whiz No Replay
TV Guide Mini Crossword 50,000
Video Whiz (Ion only) No R eplay
Vinci-Ball 400,000
Wild 8's/Wild Apes 400,000
Word Dojo 375,000
Word Fever 155,000
Word Safari 125,000
Wordserve 200,000
Wordster 100,000
Zip 21 200,000
Page 10

COPYRIGHT © 2005 MERIT INDUSTRIES, INC.
Main Menu
The Main Menu can be accessed by pressing the SETUP button inside the game. Use the
Main Menu to set up all game software options.
NOTE: For help with the Options in any menu section, touch the green “?” buttons
to bring up a help screen.
FIGURE 1 - MAIN MENU
A summary of the Main Menu functions appears in the following table. For more detail, see
the corresponding sections of the manual.
Main Menu Available Options Information
CREDITS/
PRICING
GAMES
HI SCORES
BOOKS
SYSTEM
• Quick Price Setup
• Coin-In
• Value of a Credit
• Coinless Coin Op
• Pay Per Time
• Options
• Player Key Cost
• Clear Credits
• Free Credits
• Game Setup
• Options
• View/Clear Hi Scores
• Options
• Books Display
• Cash Settlement Setup
• Cash Settlement Collection
• Set Time
• Security Setup
• Set Game Serial Number
• Volume Control
• Set 6 Star PIN
• Data Transfer
• Setup Operator Keys
• Options
The Credits Screens allow the operator
to set credit rules for all games, set up
the Coin-In Menu, enable the Coinl ess
Coin Op feature, enable the Rental
Mode feature, set the cost to purchas e
player keys, select freeplay mode, and
add or clear credits.
In the Games Screens, you can edit
the game list (choose which games
are available and in what category
they appear on the Category Menu)
and select options for individual
games.
Touch CLEAR ALL GAMES to clear
all high scores or select a partic ul ar
game to edit high scores for that gam e.
The Books Screens display current
and lifetime credits information as well
as calculate and collect the location
and operator fees.
Set the game clock, secur ity PIN, serial
number, game volume, 6 star PIN and
features, and system opti ons such as
language control, 6 Star Enable, and
theft deterrent. Also use thi s menu to
transfer books data with a USB Pen
and program Operator keys to enable
access to the setup screens via the
key.
7 MEGATOUCH EVO ION OWNER’S MANUAL PM0426-13
Page 11
COPYRIGHT © 2005 MERIT INDUSTRIES, INC.
Main Menu Available Options Information
DIAGNOSTICS
• Video Test
• I/O Test
• Touchscreen
Calibration
• Touchscreen Test
• View System Log
• Checksum Test
• System Info
• Verifying Databases
• Joystick Calibration
• Joystick Test
TOURN AM AXX
• LAN Connection
• Internet Connection
• General Info
• Connection Log
• Set Update Time
• Update From Server
• Clear Database
CRED IT CARD
• Credit Card Setu p
• Dial-In Setup
• Credit Card Test
PRESENTATION
• Operator’s Presentation
• Sales Person’s
Presentation
• Operator Ad Screens
PROMOTION
•
My Merit
• Merit Money
• Promo Credits
• Options
MEGANET
• Entertainment Channel
•
Premium Ero tic
• Prize Zone
• MegaWeb
• Operator Web Access
• Hot Topics
•
Options
PM0426-13 MEGATOUCH EVO ION OWNER’S MANUAL 8
• Enters the Video Test to d isplay the
test screens. Touch the screen to
cycle through test.
• Tests the function of the I/O board, DIP
switches, coin meter, lockout (if
applicable), and light (EVO only).
• Allows the operator to calibrate the
touchscreen. Follow the instructions
on the screen.
• Checks touchscreen calibration.
Touch the crosshairs on the screen to
make sure it is accurat ely following
your movement.
• Displays operations performed by the
game.
• Checks the hard drive for missing or
corrupted files.
• Gives details about various hardware
components in the game.
• Only use on the advice of Merit
Technical Service.
• Allows calibration of the joystick.
Follow the instructions on the screen.
• Checks joystick calibration. Move the
joystick and make sure the crosshairs
accurately follow you r m o vement.
Allows you to set u p you r wireles s
network.
Also enters th e T ourn aM A X X /
TournaCHAMP Set-Up Screen if the game
is registered for Tournament play. For
more information, see the MegaNet®
installation manual.
Enters the Credit Card Set-Up Screen if a
credit card swipe is installed in your game.
For more information, see the Credit Car d
Kit Installation Instructions.
Displays a slide show designed to be
presented to location owners by the
operator and another slid e show to be
presented to operators and distributors by
the sales person. Also allows the operator
to create ad screens and add custom
screens created on a personal c om puter.
•
Enables a feature permitting players to
create custom accounts. A lso displays
individual player data and allows the
operator to back up or restore My Merit
data.
• Sets time periods in which location
owners can use the 6 Stars feature to
offer free credits to encourage game
play.
• Sets time periods in whic h the game
offers a free credit while in Idle Mode.
• Enables My Merit, Merit Money, and
Promo Credits features.
Enters the MegaNet Set-Up Screen if the
game is registered for
TournaMAXX/TournaCHAMP play.
Features must be enabled for the
corresponding button to appear. For more
information, see the MegaNet/
TournaMAXX installation manual.
Page 12
COPYRIGHT © 2005 MERIT INDUSTRIES, INC.
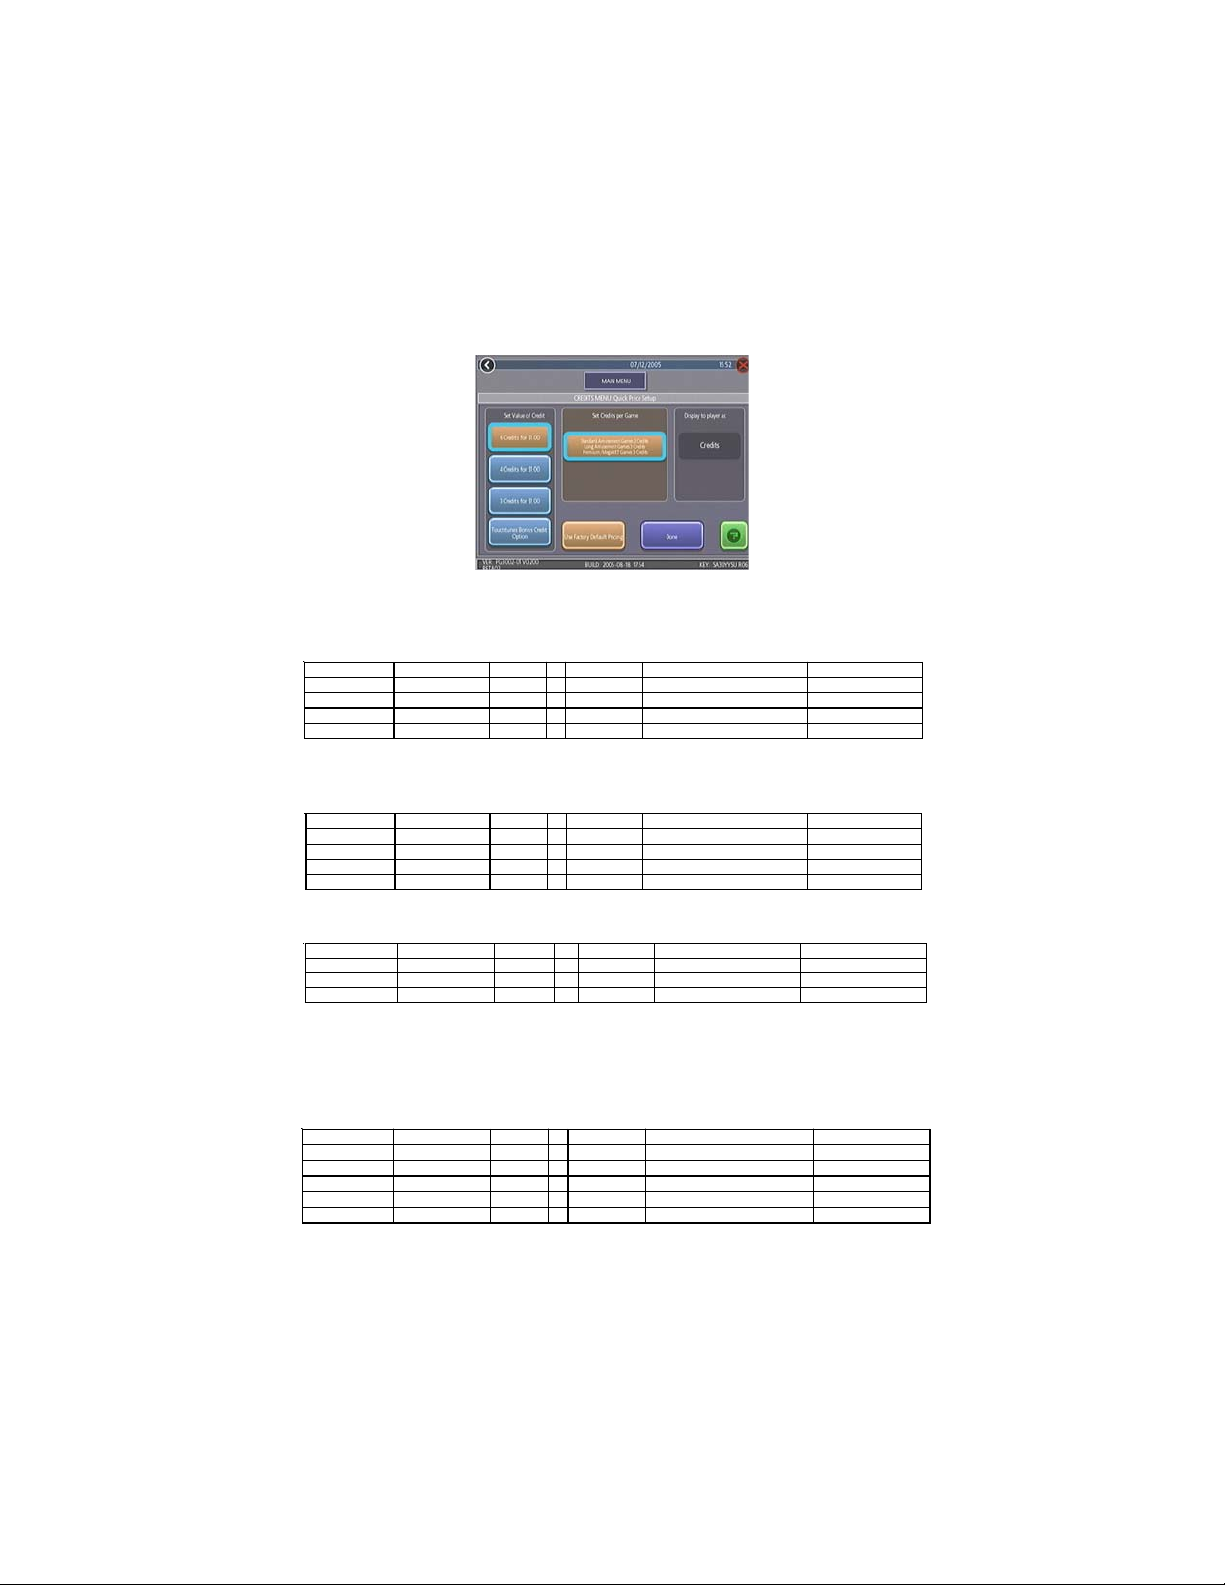
Credits/Pricing Menu
Quick Price Setup - This feature is only available in U.S. games.
Quick Price Setup allows the operator to make general pricing changes without entering the
Games Menu.
FIGURE 2 - QUICK PRICE SETUP SCREEN
6 Credits for a Dollar (default setting): Sets each game to the following price settings:
NOTE: The Coin-In Table cannot be adjusted with 6 Credits for a Dollar selected.
COIN INPUT COIN VALUE COINS = CREDITS & ME TER PULSES
1A 25¢ 1 1 1
2B 25¢ 2 2 2
3C 25¢ 3 4 3
4D 25¢ 4 6 4
NOTE: If the game is set to 3 or 6 Credits for a Dollar, prices will display as Credits.
4 Credits for a Dollar: Sets each game to the following price settings:
COIN INPUT COIN VALUE COINS = CREDITS & METER PULSES
1A 25¢ 1 1 1
2B 25¢ 1 1 1
3C 25¢ 1 1 1
4D 25¢ 1 1 1
3 Credits for a Dollar: Sets each game to the following price settings:
COIN INPUT COIN VALUE COINS = CREDITS & METER PULSES
1A 25¢ 1 1 2
2B 25¢ 3 2 3
3C 25¢ 4 3 4
TouchTunes Bonus Credit Option: Sets jukebox credits to the following settings on the
Megatouch Combo Jukebox or MegaTunes unit. To see the TouchTunes credit settings,
enter the Coin-In Menu after touching the TouchTunes Bonus Credit button. If you are linking
the game to a TouchTunes unit, you should select this option for correct jukebox pricing.
COIN INPUT COIN VALUE COINS = CREDITS & METER PULSES
1A 25¢ 2 1 2
2B 25¢ 3 2 3
3C 25¢ 4 3 4
4D 25¢ 8 10 8
5E 25¢ 20 26 20
The operator can also use this screen to determine whether prices are displayed to players
as credits or monetary amounts, and set the cost of Standard Amusement, Long Amusement, and Premium/MegaNETgames.Touch the Use Factory Default button to restore de-
fault values.
9 MEGATOUCH EVO ION OWNER’S MANUAL PM0426-13
Page 13
COPYRIGHT © 2005 MERIT INDUSTRIES, INC.
Coin-In
NOTE: The Coin-In Menu instructions on the current page apply to select markets
only. For typical markets, the appropriate guidelines for operation will be
found on the following page.
To Enter The “Coin-In” Screen, Touch “Coin-In” on the Credits Menu
Game cost can be controlled two ways: by changing the number of credits required to play
a game or by changing the cost of a credit. The Coin-In Menu allows you to adjust the cost
of a credit, as well as provide a way to give players “bonus” credits for depositing a higher
amount of money.
When programming the Coin-In Menu, Channel 1 is set for the lowest value coin, Channel 2
for the next highest value, etc. If all six coin inputs are not used, the unused inputs must be
set to “N/A”. Adjust the coin/credit/meter pulse settings by touching the up and down
arrows on the field you want to change.
COIN INPUT COIN VALUE COINS = CREDITS & METER PULSES
1A 10p 3 1 3
2B 20p 3 2 6
3C 50p 1 2 player premium 25p/credit 5
4D 1£ 1 5 player premium 20p/credit 10
In the above example (UK currency), each game costs one (1) credit and the cost for a
single credit is 30p. This method is preferred if you want game cost to always be reflected
as “1 credit.”
COIN INPUT COIN VALUE COINS = CREDITS & METER PULSES
1A 10p 1 1 1
2B 20p 1 2 2
3C 50p 1 6 1 bonus credit 5
4D 1£ 1 15 5 bonus credits 10
In the above example (UK currency), the cost of a credit is set to 10p and each game costs
3 credits (for a total of 30p). This method allows game cost to be increased by the smallest
unit of currency used (e.g. increasing the cost of Solitaire to four (4) credits would increase
the game cost by 10p).
In both examples, note that meter pulses are independent of credits and only track the unit
of currency (10p in the examples). Players are given an incentive to deposit more money
by giving them “bonus” credits for depositing 50p or £1. Coins may be deposited in any
combination of values and the game will automatically register the highest number of credits
for the total amount of coins deposited. Once a game is played, any remaining fractional
credits are erased.
Generally, most countries have a factory default setting. This setting can be adjusted (as
described above), but will return if the game memory is cleared. Some programs, depending
on the key used, have a currency default display located to the left of the coin inputs. It
shows the currency value for each of the coin inputs. This display is used as a guide and
iis not used in any calculations. Touch the currency default display to hide/show the display.
PM0426-13 MEGATOUCH EVO ION OWNER’S MANUAL 10
Page 14
COPYRIGHT © 2005 MERIT INDUSTRIES, INC.
Coin-In Menu
FIGURE 3 - COIN-IN MENU
Game cost can be controlled two ways: by
changing the number of credits required to
play a game or by changing the cost of a
credit. The Coin-In Menu allows you to adjust the cost of a credit, as well as provide a
way to give players “bonus” credits for depositing a higher amount of money. Use the
left and right arrows to change the number
of credits.
When programming the Coin-In Menu, Channel 1 is set for the lowest value coin, Channel 2 for the next highest value, etc. Meter
pulses are independent of credits and only
track the unit of currency. Players are given
an incentive to deposit more money by giving them “bonus” credits for depositing larger
denominations. Coins may be deposited in
any combination of values and the game will
automatically register the highest number of
credits for the total amount of coins deposited. Once a game is played, any remaining
fractional credits are erased.
Touch the currency default display to hide/
show the display.
To give customers bonus credits for inserting a five-dollar bill, the $5 line must be enabled in the Coin-In Menu. To enable it, enter the Quick Price Setup Screen and select 6 Credits for $1.00, 4 Credits for
$1, 3 Credits for $1.00 or Use Factory
Default Pricing. NOTE: You must touch
one of the available options on the Quick
Price Setup Screen to enable the $5.00 row.
Then, enter the Coin-In Menu and adjust
the number of credits in the $5.00 row.
Coinless Coin Op Menu
When enabled via the Options button on
the Credits/Pricing Menu, the Coinless Coin
Op feature allows the operator to charge
on a per-game or per-time basis without
players inserting money into the game. The
total amount owed after gameplay is tallied
by the machine and collected by the location
owner. Location owners reset the game
with a PIN after collection.
NOTE: If you have set a tax fee on the
Cash Settlement Screens, Coinless Coin
Op Mode play will be taxed at the set
rate. If you want to set the tax
percentage at a different rate for
Coinless Coin Op mode and regular
mode, you should perform a Cash
Settlement Collection, change the tax
rate and then switch modes.
Generally, most countries have a factory
default setting. This setting can be adjusted
(as described above), but will return if the
game memory is cleared. Some programs,
depending on the key used, have a currency
default display located to the left of the coin
inputs. It shows the currency value for each
of the coin inputs. This display is used as a
guide and is not used in any calculations.
11 MEGATOUCH EVO ION OWNER’S MANUAL PM0426-13
FIGURE 4 - PLAYER MENU IN COINLESS
COIN OP (TIME AND PER GAME MODES
BOTH ENABLED)
Page 15
COPYRIGHT © 2005 MERIT INDUSTRIES, INC.
Certain features will not be available in
Coinless Coin Op Mode, such as MegaNet
content, Merit Money, Promo Credits, Free
Credits, TouchTunes® music. Pricing for
these features can only be displayed in
currency values, not credits.
Settings
Touching the Settings button allows the
operator to choose whether players can
play Per Game, Per Time, or both when the
game is in Coinless Coin Op mode. Per
Time pricing can be changed on this screen
with the up and down arrows. The
currency amount will apply to each 15minute time block selected by the customer.
FIGURE 5 - COINLESS COIN OP MENU -
SETTINGS SCREEN
Setting the PIN
Touch the Set PIN button on the Coinless
Coin Op Menu to program the PIN. The
number can be from 1 to 5 digits.
NOTE: The Coinless Coin Op PIN can
also be set from the Player Menu.
Touch the Options button, enter the 6
Star PIN, and touch the CCO Set PIN
button.
Disabling the Money Inputs
It is recommended that the money inputs be
disabled when the game is in Coinless Coin
Op mode. Unplug the power and signal
harness connected to the bill/note acceptor
and the harness connected to the coin
mech (if applicable) to disable the inputs.
Per-Game Mode
When players choose this mode, a running
total of the amount owed is maintained and
displayed in the CREDITS box on the
screen. The total is tabulated after each
game or function. The location owner then
collects the total amount owed at the end
of gameplay. If there is no activity for 10
minutes, the machine will disable and the
amount owed by the player will display on
screen. No further gameplay can occur
until the machine is reset by a location
employee using the PIN.
Time Mode
The price per 15-minute time block will be
displayed before players choose this
mode. During gameplay, the time remaining
and amount owed by the player will be
displayed on screen. When the time block
runs out, players can purchase additional
time. Otherwise, the machine will disable
and the amount owed by the player will
display on screen. No further gameplay
can occur until the machine is reset using
the PIN. If the player leaves the game
before the purchased time block has ended,
the game can be reset using the PIN.
Resetting or Freezing the Game
The game can be reset at any time using
the pre-programmed PIN. Once gameplay
totals have been tallied by the machine, the
attendant can also choose to freeze the
game to prevent more activity until the
transaction is complete. The Reset or
Freeze buttons are accessible through the
Options button on the Player Menu after
touching the Coinless Coin Op button. An
alarm will begin to sound after 3 failed
attempts to enter the valid number when
entering the PIN to reset the game. The
alarm will terminate when the machine is
rebooted, the operator SETUP button is
pressed, or the correct PIN is entered.
PM0426-13 MEGATOUCH EVO ION OWNER’S MANUAL 12
Page 16

COPYRIGHT © 2005 MERIT INDUSTRIES, INC.
Rental Mode
When enabled via the Options button on
the Credits/Pricing Menu, Rental Mode
allows players to purchase a block of time
and use it to play as many games as they
want.
To set the value of a credit in Rental Mode,
select Pay Per Time from the Credits
Menu. Touch the arrows on either side of
the time interval to adjust the number of
minutes of play given for each credit. To
disable any row, set the minute value to
zero.
To Enter This Screen, Touch
“Pay Per Time” on the Credits Menu
FIGURE 6 - P AY PER TIME SCREEN
Certain features will not be available in
Rental Mode, such as MegaNet, Merit
Money, Promo Credits and Free Credits.
Rental mode is also unavailable with linked
games.
NOTE: It is recommended that you
clear the books when toggling Rental
Mode on and off in order to ensure
accurate bookkeeping.
Games Menu
Game Setup
The game list and prices, as well as game
options, are programmed using these
screens. The first screen shows the various game categories and allows access to
the following general settings for all games.
To Enter This Screen, T ouch “Game
Setup” on the Games Menu and
Select a Category
FIGURE 7 - GAMES MENU: GAME SETUP
Enable All Games Into Menu: Turns on
all games (certain games which were previously displayed in the Game Setup have
been turned off in this software) and defaults the price settings.
Factory Default Games Into Menu: Returns the Game Setup to its default settings.
Games that were not originally enabled will
be turned off and all price settings will be
reset.
When you touch a category name, the next
Game Setup Screen shows the game positions available for that category and the price
for each game, with the list at the bottom
showing all games available for the selected
category. In categories with Merit-thon
games, players who choose Merit-thon play
one round of three different games in that
category for one combined score.
The Game Setup Screen also allows you to
make these general changes:
Default Games: Resets the selected category menu to its default game and price
settings.
Clear One: Clears a selected item from the
player’s game menu.
Clear All: Clears all games from the player’s
game menu.
13 MEGATOUCH EVO ION OWNER’S MANUAL PM0426-13
Page 17
COPYRIGHT © 2005 MERIT INDUSTRIES, INC.
Enable All Games: Turns on all games
within the selected category and defaults
the price settings.
To customize a particular game list, first select a category on the first Game Setup
Screen. On the second screen, touch Clear
All to clear the game list. Choose the menu
position you want a particular game to occupy by touching that position, then touch
the desired game name from the game list
on the bottom of the screen. Repeat until all
desired games appear in the menu (a game
cannot appear in the list more than once).
Games already in the menu will be red in the
game list at the bottom of the screen.
To adjust the price, touch the credit or currency value next to each game.
Some games support a continue function.
In the cost to continue column, games without this function will display N/A. Games
that support continuation will show a credit
value. The cost to continue is adjustable
on a game by game basis. Touch the credit
value button to change the amount. Hit NEXT
to return to the Games Category page.
NOTE: The default Cost to Continue
price is the same as the default cost to
play the game; however, the Cost to
Continue does not need to be the same
amount as the orignal price.
T o Enter This Screen, Touch
“View/Clear Hi Scores” on the
Hi Scores Menu and Choose a Game
FIGURE 8 - HI SCORES MENU:
VIEW/CLEAR HI SCORES SCREEN
Touch Clear All to remove all hi scores for
that particular game or select an individual
score and touch Clear One to remove that
particular score only.
Books Menu
The Books Screens display the current and
lifetime credit totals for each game, as well
as the percentage of credits played per game
(the percentage for each game is the total
number of credits played on that game divided by the total number of credits entered
into the machine).
Books Display
To Enter This Screen, T ouch “Books
Display” on the Books Menu
Hi Scores Menu
View/Clear Hi Scores
Use this menu to manage hi scores. The
first screen allows you to clear all scores
for all games by touching Clear All Games.
To edit the hi scores for an individual game,
select that game on the first screen.
FIGURE 9 - BOOKS MENU:
BOOKS DISPLAY SCREEN
PM0426-13 MEGATOUCH EVO ION OWNER’S MANUAL 14
Page 18

COPYRIGHT © 2005 MERIT INDUSTRIES, INC.
The books information can be sorted in three
ways with the button that toggles through
the sorting categories. Unsorted displays
the books information in the standard order.
Sorted by Current displays the current
credits for each game from most to least
played. Sorted by Lifetime displays the
lifetime credits for each game beginning with
the most played game.
Touch TournaMAXX Statistics or Tour-
nament Statistics to get the books information for that play only. Touch Clear Cur-
rent to erase all current books data. The
date the data was last cleared will appear
at the top right of the Books Screen.
Touch the + above Tot al Credits to view Current and Lifetime credits for each game mode.
Touch the button again to minimize this
screen.
To Enter This Screen, T ouch “Books
Display” on the Books Menu and
Choose a Game Name
Books Display also shows coin input data,
as well as Promotional Credits, Merit Money ,
and Coinless Coin Op totals (when these
features are enabled). Touch the + above
Total Coins to display individual coin input
statistics and MegaNet® Credits to display
the totals for each MegaNet® category.
Touch the button again to minimize this
screen.
NOTE: Books data can be exported to
a file USB pen via the System Menu/
Data Transfer/Export Books feature.
The .data file can then be viewed with a
word processing program after connecting the storage device to a personal computer. The file will display
basic game information such as the software version, the game serial number,
and date/time information relating to
books data. The file will also show the
current and lifetime credit totals, as
well as credit totals for each game featured on the machine.
Cash Settlement Setup
The Cash Settlement Screens are used to
calculate the percentage of earnings the operator and location will receive, as well as
any fees collected by the operator. This will
help to offset MegaNet operation costs.
To Enter This Screen, T ouch “Cash
Settlement Setup” on the
Books Menu and touch “NEXT”
FIGURE 10 - BOOKS MENU: BOOKS
DISPLA Y SCREEN WITH GAME SELECTED
Touching a game name will display the current and lifetime credit totals*, broken into 14 player, linked game, and Megatouch Nation plays (Ion only). It also shows the shortest, average, and longest playing times for
that game.
*Touching Trivia or Power Trivia displays totals by category.
15 MEGATOUCH EVO ION OWNER’S MANUAL PM0426-13
FIGURE 11 - BOOKS MENU:
CASH SETTLEMENT SETUP SCREEN
Page 19

COPYRIGHT © 2005 MERIT INDUSTRIES, INC.
The first screens allow you to set up the
Cash Settlement Screen. Choose YES or
NO to display the operator’s cut on the Cash
Settlement Collection Screen and enter the
percentage of revenue the location will receive. Also, select the fee calculation
method. Select per month if you do not make
regular weekly collections or per week if
you collect every 7 days. Then touch NEXT.
NOTE: Monthly fee collections are
based on 4.3 week month. If you change
your fee calculation method, the game
will auto adjust the fees by multiplying
or dividing by 4.3 and rounding to the
nearest penny.
NOTE: Make sure the time and date
are set on the game in order to ensure
correct fee calculation.
The next screen allows you to set up the
fees. The amounts can be changed on
screen by touching the amount itself and
using the keypad to enter a dollar figure.
The other two columns display the cumulative totals for each fee and the totals for the
current collection period. Fees are calculated on a prorated, per-day basis.
Touch the NEXT button to display more
groups of fees. After setting up the fees,
touch FINISH to save your changes.
T o Enter This Screen, Touch “Cash
Settlement Collection” on the Books
Menu
FIGURE 13 - BOOKS MENU:
CASH SETTLEMENT COLLECTION
Cash Settlement Collection
The Cash Settlement Collection Screens will
display the balance (total revenue minus total fees) to be split between the operator
and the location.
Touch Revenue Details/Cash Out or Fee
Details for breakdowns and Clear/Complete Collection to finish. Cash Settle-
ment totals will reset once collection is complete.
T o Enter This Screen, Touch “Cash
Settlement Setup” on the
Books Menu and touch “NEXT”
Twice
FIGURE 12 - BOOKS MENU:
CASH SETTLEMENT SETUP SCREEN
PM0426-13 MEGATOUCH EVO ION OWNER’S MANUAL 16
Page 20

System Menu
COPYRIGHT © 2005 MERIT INDUSTRIES, INC.
FIGURE 14 - SYSTEM MENU
Set Time
Security Setup
Set Game Serial
Number
Volume Control
Set 6 Star PIN
(only appears if
PIN is enabled)
Data Transfer
The Set Time Menu allows you to set both the time and date on
the game. Time is shown in 24-hour, "military" time (e.g. 5:00pm
= 17:00). Use the up and down arrows to set the time and date.
The operator can set the PIN number and select which of the
features (Coin-In Menu, Free Credits, Game Menu, Hi Scores,
Books, All Options, and Set 6 Star PIN) will be protected by the
PIN. To change the PIN, you must first enter the existing PIN
(the default PIN is 0000), then enter a new 4-digit number and
touch SET on the keypad. The game will prompt you to re-enter
your PIN to confirm. After confirming your PIN, touch the button
for each of the features you wish to protect with the PIN.
Use this screen to enter the game’s serial number using the
keypad.
Touch the volume control button to adjust the volume up or down.
This screen allows you to sample the sound volume without
exiting the screen. The on-screen volume control can also be
accessed using 6 Stars.
Brings up the Set 6 Star PIN Screen via the Options button on
the Player Menu. Set the 6 Star PIN (between one and six digits)
using this screen. You can enable this feature and choose which
options will be accessible by 6 Stars using the System Menu:
Options Screen. Touch an option box under System Menu:
Options for on-screen help.
Transfer information (Books data, My Merit data and ad screens)
using a USB Pen.
Setup Operator
Keys
Options
17 MEGATOUCH EVO ION OWNER’S MANUAL PM0426-13
Use this screen to program or erase Operator keys to enable or
disable access to the setup screens by using the key.
For help with the Options in any menu section, touch the option
box to bring up a help screen.
Page 21

Diagnostics Menu
COPYRIGHT © 2005 MERIT INDUSTRIES, INC.
FIGURE 15 - DIAGNOSTICS MENU
Video Test
I/O Test
Touchscreen
Calibration
Touchscreen Test
View System Log
Checksum Test
System Info
Verifying Databases
Joystick Calibration
(ION o nl y)
Joystick Test
(ION o nl y)
Touch the screen to cycle through a series of video test screens.
Tests the SETUP and CALIBRATE buttons, all coin channels, the
coin meter, and the coin lockout feature (if applicable). A green
light next to the appropriate button will register each tim e th at item
is tested, and the num ber next to the item should increment by one
with each test. The screen also displays which DIP switches are
on or off.
Follow the on-screen instructions to c alibrate the touchscreen.
Allows you to check the touchscreen calibration accuracy. The
crosshairs should follow your finger exactly when you move it
across the screen.
Displays a log of all operations performed by the game since the
log was last cleared. This inform ation is helpful for customer
service in troubleshooting your game.
Checks the hard drive for m issing or corrupted files. With STOP
ON ERROR ? set to YES, a message indicating which file is
corrupte d will b e sh ow n w h enever the game encounters an error.
With ST O P ON ERR O R ? se t to N O , a list of c orru p te d files will b e
displayed when the test is complete. If errors are detected, the
software on the drive may need to be reloaded. If this does not
solve the problem, the drive may require replacement. The test
could take up to 30 minutes.
Gives details about the following:
processor type and speed
•
• motherboard manufacturer
amount of memory
•
• Ethernet card manufacturer
sound chip type
•
video chip type
•
• touchscreen manufacturer
Only use on the advice of Merit Technical Service. An
from Server
Follow the on-screen instructions to c alibrate the joystick.
Allows you to check the joystick calibration accuracy. The
crosshairs should follow the movem ent of the joystick.
must be performed prior to verifying databases.
• hard drive manufacturer
and capacity
modem part
•
identification number
• fan speed
status
•
Update
PM0426-13 MEGATOUCH EVO ION OWNER’S MANUAL 18
Page 22

COPYRIGHT © 2005 MERIT INDUSTRIES, INC.
Presentation Menu
The Presentation Menu features a slide
show for location owners and another slide
show for operators and distributors. This
menu also allows operators to create ad
screens and add custom screens created
on a personal computer.
FIGURE 16 - PRESENTA TION MENU
Operator’s Presentation
This presentation is designed to be shown
to location owners by the operator. It demonstrates how to maximize earning potential with the game and increase profit with
additional products.
Sales Person’s Presentation
This presentation is designed to be shown
to operators and distributors by the sales
person. In addition to illustrating the revenue potential of the games, it gives details
on available products and game content.
FIGURE 18 - SALES PERSON’S
PRESENT ATION SAMPLE SCREEN
FIGURE 19 - SALES PERSON’S
PRESENT ATION SAMPLE SCREEN
FIGURE 17 - OPERA TOR’S PRESENTA TION
SAMPLE SCREEN
FIGURE 20 - SALES PERSON’S
PRESENT ATION SAMPLE SCREEN
19 MEGATOUCH EVO ION OWNER’S MANUAL PM0426-13
Page 23

COPYRIGHT © 2005 MERIT INDUSTRIES, INC.
Operator Ad Screens
A total of 24 advertising screens can be
created with the software and added to the
game. The ads will appear along with the
other attract screens when the game is in
idle mode. Custom images for ad screens
can also be added to the game using an
appropriate storage device for your game
(USB pen or CD). Touch the green ? buttons on each screen for information on how
to create ad screens and add custom
screens to the machine.
In addition, a program for adding up to 120
additional ad screens can be downloaded
from our Web site (www.meritind.com) in
the Support/Software Downloads section.
FORCE and ION games only: A USB Pen Kit
(kit number KAV-100-008-01) is available.
To order, contact your local distributor.
Promotion Menu
The Promotion Menu is designed to encourage player interest. Use the Options button to enable each feature.
FIGURE 21 - PROMOTION MENU
My Merit
The My Merit feature allows individual players to create custom accounts, accessible
via PIN numbers. Accounts can be created
by touching the My Merit button on the
Player Menu or by accepting the option to
create an account after achieving a Hi
Score.
FIGURE 22 - MY MERIT OPTIONS
Players will then have the choice to log in
to their accounts through the My Merit button on the Player Menu and have personal
data stored on the machine. Players can
view their hi scores and the number of
games they’ve played in the My Merit mode
for the last year.
NOTE: My Merit data will be cleared
when a software update is performed.
Be sure to back up the data before updating the game. Conversely, backing up data onto the USB pen will also
overwrite any existing My Merit data
on the USB pen.
View Player Data
Touch View Player Data after selecting
My Merit from the Promotion Menu to bring
up a list of all players with My Merit accounts. Touching a player’ s name will bring
up the PIN, total number of games played,
and date the account was created. The
Show Hi Scores button will display a list
of the games on which the player has the
hi score and the score itself. The operator
can also reward the player with free credits on the View Player Data screen.
PM0426-13 MEGATOUCH EVO ION OWNER’S MANUAL 20
Page 24

COPYRIGHT © 2005 MERIT INDUSTRIES, INC.
Show Game Play Frequency
This feature shows the number of games
played by each My Merit player. The operator can choose whether to display all
totals or just those that fall within a certain
date range.
Show Player Hi Scores
Selecting a game name under this feature
will bring up the Hi Scores of each My Merit
player for that game, as well as the date
the score was achieved. The operator can
choose whether to display all Hi Scores or
just those that fall within a certain date
range.
Backup/Restore
My Merit data can be backed up or restored
with a USB pen. After connecting a pen to
the machine, touch this button to proceed
with backing up or restoring all My Merit
data. USB pen kits (kit number KAV-100008-01) are available. To order, contact
your local distributor.
NOTE: Restoring My Merit data from
a storage device will erase any My
Merit data currently on the game.
Promo Credits
The Promo Credits feature generates interest by offering operator-controlled free
credits while the game is in idle mode. Select days of the week, time frames, idle
time (number of minutes the game would
be in idle mode before free credits are offered) and the number of credits (1-10) to
be awarded. A message announcing that
free credits are available will appear on
the screen during idle mode when Promo
Credits go into effect. Promo Credits expire after 10 minutes or when the Promo
Credits time period comes to an end.
FIGURE 23 - PROMO CREDITS SCREEN
Merit Money
The Merit Money screens allow location
owners to encourage game play by offering free games (not free credits) at certain
time intervals via the 6 Star feature. Select
days of the week, time frames, and the
number of free games (1-10 per day) to be
awarded, as well as a PIN number for location owners to use in order to access
Merit Money using the 6 Stars feature. Location owners can enable Merit Money by
entering that specific PIN in the 6 Stars
screen. One free game is given away each
time the location enters the code until the
predetermined daily limit is reached. Free
games expire after 10 minutes, when money
is deposited into the machine, or when the
Merit Money time period comes to an end.
21 MEGATOUCH EVO ION OWNER’S MANUAL PM0426-13
Page 25

COPYRIGHT © 2005 MERIT INDUSTRIES, INC.
Megatouch Player and Operator Keys
Megatouch Ion games use player keys to store gameplay and log in information and offer
new features to players. Operator keys are used to make it easy for operators to enter
setup to service machines. The keys are activated by touching them to the dongle socket
on the game (see Figure 24).
Operator Keys
Operator Keys can be programmed to make
it possible to access the Main Menu Screen
without opening the game. Operator keys
(with black handles) are provided with your
Ion game. Additional Operator Key Kits (p art
number KAV -111-002-01) can be purchased
from an authorized Merit distributor.
To program an Operator Key:
1. Press the SETUP button to enter the
Main Menu Screen.
2. Touch the System button and then
touch Setup Operator Keys.
3. Touch the Set Key button. The game
will prompt you to touch a key to the
dongle socket on the game.
3. Touch the key to the socket and press
Okay.
4. When prompted, remove the key and
touch Okay.
5. The game will prompt you to enter a PIN
for the key. Enter a PIN and touch Set
New PIN.
NOTE: The PIN for each operator key
can be set to the same number, if desired. Additionally, one key can be
used for any number of games.
Repeat these steps for each Operator Key.
Once the key is programmed, simply touch a
programmed key to the dongle socket and
enter your PIN when prompted. The Main
Menu Screen will then display.
Up to 4 different Operator Keys can be programmed on one game. To clear a programmed key, enter setup, touch System
and then touch Setup Operator Keys.
Touch the key to the dongle socket, then
press the Erase Key button.
PM0426-13 MEGATOUCH EVO ION OWNER’S MANUAL 22
Player Keys
The Player Key stores My Merit and Tournament login information and Mega Level game
levels and codes by touching the key to the
dongle socket. Using a Player Key will also
earn players a Megatouch Nation sweepstakes game each month. Players who
reach a designated score can enter a drawing for a monthly prize.
Two player keys (with colored handles) are
included with your Ion game to give to players to encourage use. Additional Player Key
kits can be purchased from an authorized
Merit distributor (part number KAV-111-001-
01). Players can also purchase keys, for a
set number of credits, on connected games.
Operators may set the cost of these credits
by pressing the SETUP button and then
touching the Credits button on the Main
Menu Screen. Touch Player Key Cost and
use the arrows above and below the credits to set the cost.
Megatouch Nation Contest
(Available where legal)
NOTE: Ensure the game clock is set to
the correct time, as it will affect
Megatouch Nation.
The operator can charge additional credits
to play Megatouch Nation games, if desired.
Press SETUP to enter the Main Menu Screen.
Touch System and then Options. Page
through the options until you see Enable
Megatouch Nation. If you want to price
these games at a premium, use the arrows
next to Game Upcharge to select the additional credits. To disable Megatouch Nation,
touch the check next to Enable Megatouch
Nation to make it disappear.
Page 26

COPYRIGHT © 2005 MERIT INDUSTRIES, INC.
DIP SWITCH SETTINGS
The following table provides information on the functionality of the hard DIP switches in
Megatouch games. Make sure to read the information in the Notes column to determine
what is affected when performing these functions. After performing any DIP switch
function, make sure to follow the instructions on the screen. In most cases, you will be
instructed to reset the DIP switch in order to reboot the game. If you fail to reset the DIP
switch before rebooting, it could result in corruption of the hard drive.
NOTE: The DIP switch functionality is built into the software. To access the DIP switches
through the software: Turn off the game. Set DIP switch 1 to the closed position. Turn
power on. When the message Please reset DIP 1 to proceed appears, reset DIP 1 to
the open position. The Merit diagnostics page will appear. Touch ? for information on DIP
switch functionality. Touch the specific DIP switch to activate it. Touch X to exit.
DIP# Function Usage/Notes
8 Motherboard
configuration &
checksum test
6 Hardware
configuration
5 & 7 Memory clear for
TournaMAXX™
and
TouchTunes®
4 & 7 Complete
memory clear
3 Watchdog Timer
(EVO, Elite
Edge, Wallette
and Fusion
games)
23 MEGATOUCH EVO ION OWNER’S MANUAL PM0426-13
ION 2006, FORCE 2003 / MAXX Ruby and greater
•
Configures the CMOS settings on the motherboard to Merit
specifications and checks the files on the hard drive.
A checksum test should be perf ormed when the game is locking
up or rebooting. If the test fails, the program should be reloaded
onto the hard drive. After reloading, perfo rm another checksum
test. If it fails again, the hard drive should be replaced.
• I dentifies system hardware and configures the motherboard.
A hardware configuration occasionally needs to be performed
after a kit is installed and the touchscreen is not responding to
touch or the calibration is off.
• Clears the login name, password, access phone number, an d
all call-in settings for TournaMAXX users.
•
Clears all the loaded albums for TouchTunes users.
•
Clears current books, coin-in, high scores and resets the
software options.
A memory clear should be performed when a game is not able to
connect to TournaMAXX and there is some question about the
information in the Dial-Up Network S creen being correct. After
performing a memory clear, TournaMAXX setup information must
be re-entered, and an Update From Server should be
performed.
NOTE: TournaMAXX games must perform an Update From
Server BEFORE performing a memory clear.
•
Clears ALL memory on hard drive including the TournaMAXX
player database, TournaMAXX settings, advertising screens,
bookkeeping, high scores, coin-in, options, etc. It resets the
game to the factory defaults. It also marks bad sectors on hard
drive.
A complete memory clear should only be performed when the
game is locking up or resetting and it has passed the check sum
test. After performing a memory clear, the player database
should be reloaded, TournaMAXX setup information must b e reentered, and an Update From Server should be performed.
NOTE: TournaMAXX games must perform an Update From
Server BEFORE performing a complete memory clear.
• When the watchdog timer is enabled, it will reboot the machine
within 2 minutes of a failure, allowing the game to
automatically reset itself if a problem arises.
Page 27

COPYRIGHT © 2005 MERIT INDUSTRIES, INC.
CONNECTING A PRINTER (GERMAN GAMES ONLY)
To connect a printer to the game as needed:
1. Locate the printer port on the back of the game (see Figure 25).
2. When the game enters idle mode, connect the printer to the printer port on the game.
NOTE: Some printers may cause the game to reboot. Once the game has rebooted
and entered idle mode, the printer will begin printing. Do not disconnect the
printer until it is finished printing.
Um einen Drucker an eine Maschine anzuschliessen:
1. Den Druckeranschluss hinten am Gerät feststellen (Siehe Fig. 25).
2. Wenn das Geraet in den Leerlauf uebergeht, den Drucker am Druckeranschluss des
Geraets anschliessen.
BEMERKUNG: Bei bestimmten Druckern rebootet das Geraet. Nachdem das
Geraet dann in den Leerlauf uebergeht, beginnt der Druckvorgang. Den Drucker
bitte nicht abschalten bevor der Druckvorgang beendet ist.
PM0426-13 MEGATOUCH EVO ION OWNER’S MANUAL 24
Page 28

COPYRIGHT © 2005 MERIT INDUSTRIES, INC.
Merit Industries, Inc.
Troubleshooting Guide for Megatouch Ion™ Games
ROBLEM
P
•
no power
•
bill acceptor
motor does not
run
•
no flash on the
monitor screen
•
no cooling fans
operating
•
no output from
power supply
•
no video
•
no cooling fan
operation
•
screen is blank
•
A/C pow er to the
monitor and bill
acceptor
•
no output from
power supply
•
no video
•
cooling fans are
working
•
there is a sound
when coins are
deposited
•
no video
•
constant beeping
or a sequence of
beeps
•
no video
•
no sound when
coins are
deposited
•
poor picture
quality
•
coin jam
•
meter not
advancing
25 MEGATOUCH EVO ION OWNER’S MANUAL PM0426-13
C
• Check that the power cord is connected to a “live” outlet.
• Check that the power switch is on.
• Check that the power cord is connected to the game power supply.
• Check that the power supply’s voltage select switch is set to the
proper voltage.
•
Check the harness connections to the on/off switch and circuit
breaker.
• Check the circuit breaker for an “open”.
• Check the A/C harness connection to the power supply.
• Check the line cord.
• Check the power on jumper wire located on the motherboard. It
should connect J2 to pin 21 of Panel 1. If this jumper wire is missing
or not connected between the correct pins, it may prevent the power
supply from turning on. For more information, see Tech Note 52.
• Check the D/C harness connection to the motherboard.
• Check the A/C harness connection to the power supply.
Radion, Classic and Upright games:
• Check the video cable connections to the motherboard and the
monitor.
• Check the AC power harness to the monitor.
• Radion and FORCE Upright monitors will dis play a test pattern on
the screen when the video cable is disconnected from the
motherboard and the monitor has power. Disconnect the video
cable and if there is no test pattern; replace the monitor chassis
board.
EVO, Elite Edge, EVO Wallette, Fusion, Elite and Vibe:
• Check the video cable connections to the motherboard and the LCD
display (and the monitor control board in EVO and Fusion games).
• Check the +12 volt supply voltage to the LCD display (yellow wire
+12, black wire ground)
•
Check the harness connections between the PC boards on the back
of the LCD display.
•
Replace the LCD display.
• The memory card (DIMM) may not be seated properly. Reseat the
DIMM or repla ce it.
•
Check all connections to the motherboard.
•
Reseat the DIMM.
• Replace the motherboard or send it for repair.
• Adjust Brightness, Contrast, Horizontal, and Vertical controls with
monitor controls.
•
Check the coin mech and coin chute for coins blocking the pathway.
• Make sure the coin harness is connected between the normally
open and common terminals on the coin switch.
• Disconnect the bill acceptor and the coin switch one at a time to
narrow down the problem.
• Check the coin harness for pinched or damaged wires.
• Disconnect the coin harness from J1, J3, J7, and J8 of the I/O
board. If the coin jam still appears, the I/O board will have to be sent
for repair.
(NOTE: The Radion cabinets have an optical coin switch.)
•
Check connection at I/O board.
•
Check wiring at J2 METER connector on I/O board.
ORRECTIVE ACTION
Page 29

COPYRIGHT © 2005 MERIT INDUSTRIES, INC.
Merit Industries, Inc.
Troubleshooting Guide for Megatouch
PROBLEM CORRECTIVE ACTION
• game locks up or
resets while
being played or
in the attract
mode
• no movement on
the screen
• power has to be
cycled off and on
to get the game
to function agai n
• game locks up
with “invalid key
for version
PG3002 – V
XXXX”
• “INVALID KEY”
message while
downloading
software to the
hard drive
• Check the output voltages from the power supply:
Enhance SFX 1211J
Red wire +5 volt
Yellow wire +12 volt
Blue wire -12 volt
White wire +5 volt power good
Violet wire +5 volt VSB
Black wire ground
Brown wire +3.3 volt
• Clean the vents and the fans of any dust and dirt that may interfere
with airflow.
• Clean the CPU cooling fan on the motherboard.
• Replace the CPU cooling fan if it is not operating properly.
• Reseat the DIMM on the motherboard.
• Clear memory with the following procedure:
• Turn off the game.
• Press and hold the Setup and Calibrate buttons.
• Turn the game on and keep holding the buttons until the
screen displays “TWO BUTTON CLEAR DETECTED
RELEASE BUTTONS”. This should take about 30 seconds.
• Release the buttons. This will clear high scores, clear the
books and reset options, and res et the gam e m e nu an d coi n
menu to their factory settings.
• Perform a checksum test on the hard drive:
• Turn off the game.
• Turn on DIP switch 8 on the I/O board.
• Turn on the game. The test will take about 10 minutes.
• A failure will cause the test to stop.
• A passed test will display “DRIVE CHECKSUM
COMPLETE RESET ALL DIP SWITCHES TO REBOOT
MACHINE”.
• With power on, turn off DIP switch 8.
• Check the program number on the security key. It should be
compatible with the program on the hard drive.
• Check the contacts on the security key socket. Lift up on the contact
on the bottom of the socket and make sure there is a good
connection to the base of the security key.
• Check the USB cable that connects the I/O board to the
motherboard.
• Try another security key with the same program number or test the
security key in another game with the same program version.
• If the security key was replaced before the download:
• The motherboard did not boot from the DVD drive.
• Check that the DVD drive is set as master.
• Check the ribbon cable connections between the DVD drive and the
motherboard.
• Try another DVD drive or another set of discs.
Ion
™™
™
™™
Games continued
PM0426-13 MEGATOUCH EVO ION OWNER’S MANUAL 26
Page 30

COPYRIGHT © 2005 MERIT INDUSTRIES, INC.
Merit Industries, Inc.
Troubleshooting Guide for Megatouch Ion
™™
™
Games continued
™™
ROBLEM
P
•
the screen
displays MAXX
and not ION and
the H2H category
is missing
•
game will not
download disc
•
"ERROR
READING DRIVE
C"
•
"DISK BOOT
FAILURE"
•
“QUANTUM
FIREBALL,
SMART FAILURE
DETECTED,
BACK UP HARD
DRIVE”
•
“CRITICAL
ERROR ABORT
RETRY FAIL” or
“BAD COMMAND
OR FILE NAME”
error
C
When the game is turned on, it will check the type of touchscreen
controller, motherboard and hard drive. If one of these does not match
with FORCE hardware, the game will power up and display “MAXX” on
the screen and it will not have the H2H category.
•
Make sure the game is only using ION hardware.
•
Make sure the disc is installed correctly, with the logo facing up.
•
Check for scratches or a defective disc.
•
Try a different DVD drive or another disc.
• If you’re downloading a disc set, make sure each disc is of the same
revision.
•
This message can be caused by the hard drive or in some
program versions, a coin jam while the game is turned on.
1. Turn the game off.
2. Locate DS 1, position 8 and turn it on.
3. Turn on power to the cabinet. This will start the
hard drive checksum test, which should take about
20 minutes to complete.
4. When the hard drive passes the test it will display
a "CHECKSUM GOOD" message and continue to
boot up into the game attract scree ns. Th i s
indicates a coin jam.
5. When the hard drive fails the test, the game will
lock up with a "CHECKSUM ERROR" message,
which will stay on the screen until the power is
turned off. In this case, the hard drive will have to
This message indica te s the motherboard is not receiving data from the
hard drive and has locked up.
• Check the IDE ribbon cable connections to the motherboard and
hard drive.
• Check the power to the hard drive. It should have +5 volts, +12
volts, and ground.
The self-diagnostics on the hard drive has detected an error.
•
The hard drive will have to be replaced.
• Try reloading the program onto the hard drive with a different set of
update CD’s compatible with the security key. If it will not accept the
download, try another CD-ROM drive. If it still does not work,
replace the hard drive.
be replaced.
ORRECTIVE ACTION
27 MEGATOUCH EVO ION OWNER’S MANUAL PM0426-13
Page 31

COPYRIGHT © 2005 MERIT INDUSTRIES, INC.
EVO Ion Diagrams
WIRELESS
ADAPTER
COIN MECH
DONGLE
SOCKET
TOUCHSCREEN
BILL ACCEPTOR
JOYSTICK
FIGURE 24 - FRONT VIEW OF THE EVO ION
ETHERNET
COUPLER
PHONE
COUPLER
CENTRONICS
UPGRADE
CONNECTOR
USB PORT
PRINTER PORT
COVER PLATE
SECURED BY
STANDOFF INSIDE
CPU SECTION
CASH TOWER
LOCK
ON/OFF SWITCH
FIGURE 25 - REAR VIEW OF THE EVO ION
PM0426-13 MEGATOUCH EVO ION OWNER’S MANUAL 28
Page 32

COPYRIGHT © 2005 MERIT INDUSTRIES, INC.
CPU SECTION
LOCK
WIRELESS
ADAPTER
TOUCHSCREEN
CONTROLLER
POWER
SUPPLY
HARD DRIVE
MOTHERBOARD
DETAIL VIEW OF
CONTROL BOARD
FIGURE 26 - THE EVO ION WITH CPU SECTION OPEN
MONITOR
CONTROLS
SETUP
CALIBRATE
SECURITY
KEY
29 MEGATOUCH EVO ION OWNER’S MANUAL PM0426-13
Page 33

COPYRIGHT © 2005 MERIT INDUSTRIES, INC.
Coin Mech Position- EVOs with Coin Mechs Only
If you remove the coin mech for any reason, you must replace it in the correct
notches in the coin mech bracket so that the mech remains vertical. If your
game is sitting on a table or bar top, make sure the tabs on the coin mech are in
the notches labeled “BAR MOUNT” below. If your EVO is mounted on a wall (with
or without the use of the swivel bracket), make sure the tabs on the coin mech
are in the notches labeled “WALL MOUNT” below.
BAR
MOUNT
WALL
MOUNT
FIGURE 27 - PROFILE OF COIN MECH BRACKET
PM0426-13 MEGATOUCH EVO ION OWNER’S MANUAL 30
Page 34

COPYRIGHT © 2005 MERIT INDUSTRIES, INC.
Megatouch EVO® Ion Replacement Parts List
REPLACEMENT COMPONENTS
EVO I ON (G50-201-00X-XX)
PART NUMBER DESCRIPTION
SA10070-01 ION MOTHERBOARD
EC9796-01 MARS BILL ACCEPTOR. $1 /2/5, 500 STK R, AE2411
HW8337- XX MECHA NICAL COI N MECH
EC7538-01 POWER SUP P LY, 125W ±12,+5,+3.3
EC9850- 06 TOUCHSCRE EN OVERLAY
EC9388-01 15" INTE GRA TED LCD
EC9846- 01 T OUCHSCREEN CONTROLLER
SA10068-03 I/O BOARD
SA10066-01 CONTROL B OA RD
SA3505-XX ION 2006 KEY
PA3025-01 ION 2006 PROGRA M ASSEMBLY
NOTE: The parts in your game may vary. When calling for replacement
parts, make sure to have your serial number available to ensure the accuracy
of your order.
NOTE: In order for your Megatouch Ion game to function properly, the
hardware must only be replaced with Ion hardware. Replacing the
motherboard, I/O board, hard drive or touchscreen controller with hardware
that is not specific for Ion will eliminate some of the Ion software features.
For additional assistance, after contacting your distributor , contact:
Merit Product Support and Services
USA and Canada call toll-free:
1-800-445-9353
Outside the USA and Canada call:
(215) 639-4700
FAX: (215) 639-5346
Merit Industries, Inc. P.O. Box 5004, Bensalem, P A 19020-8529.
You can also visit our Web site
www.meritind.com
31 MEGATOUCH EVO ION OWNER’S MANUAL PM0426-13
Page 35

COPYRIGHT © 2005 MERIT INDUSTRIES, INC.
Connection Diagrams
MOTHERBOARD
POWER
DIMM MEMORY
ETHERNET
I/O CONNECTOR
TOUCHSCREEN
CONTROLLER
TOP VIEW OF MOTHERBOARD
AUDIO OUT
VGA VIDEO
CONNECTOR SIDE VIEW OF MOTHERBOARD
HARD DRIVE
CONNECTION
(PRIMARY IDE)
CENTRONICS
CONNECTION
(SECONDARY IDE)
FIGURE 28 - ION MOTHERBOARD DRAWING
PM0426-13 MEGATOUCH EVO ION OWNER’S MANUAL 32
Page 36

COPYRIGHT © 2005 MERIT INDUSTRIES, INC.
Connection Diagrams
Motherboard - Power Connector
FIGURE 29 - REAR VIEW OF CABLE CONNECTOR
PIN WIRE COLOR USE
1 ORANGE +3.3 VDC
2 ORANGE +3.3 VDC
3 BLACK GND
4 RED +5 VDC
5 BLACK GND
6 RED +5 VDC
7 BLACK GND
8 G RAY PWR GOOD
9 VIOLET +5V VSB
10 YELLOW +12 VDC
11 ORANGE +3.3 VDC
12 BLUE -12 VDC
13 BLACK GND
14 GREEN PWR ON
15 BLACK GND
16 BLACK GND
17 BLACK GND
18 ----- ----19 RED +5 VDC
20 RED +5 VDC
33 MEGATOUCH EVO ION OWNER’S MANUAL PM0426-13
Page 37

COPYRIGHT © 2005 MERIT INDUSTRIES, INC.
Connection Diagrams
SMILEY BILL
ACCEPTOR
ELECTRONIC
MECHANICAL
J8
J6
POWER
CONNECTOR
J19
MECH
J3
MECH
SETUP
SECURITY KEY
METER 2
J2
METER 1
CALIBRATE
FIGURE 30 - I/O BOARD DRAWING
DIP SWITCH BANK
J31
DONGLE
CONNECTOR
JUMPER AT JP17
FOR JOYSTICK
FUNCTION
LCD
MONITOR CONTROLS
REMOTE SETUP/
CALIBRATE/KEY
SECURTIY KEY
SETUP CALIBRATE
FIGURE 31 - ON-SCREEN DISPLA Y BOARD DRAWING
PM0426-13 MEGATOUCH EVO ION OWNER’S MANUAL 34
Page 38

COPYRIGHT © 2005 MERIT INDUSTRIES, INC.
Merit Video Machine Limited Warranty
Merit Industries, Inc. warrants its video machines to be free from defects in material
and workmanship for a period of one year
from the date of purchase. The warranty
covers all electrical components (except
fuses and light bulbs) and printed circuit
boards. The touchscreen is under warranty
for a period of three years. The hard drive
is under warranty for a period of 30 months.
Failure due to misuse, vandalism, excessive
or intentional abuse, operation outside specified conditions (including, but not limited to,
improper electrical power source), fire, water damage, acts of God, acts of war and
civil unrest are specifically excluded.
Merit products are carefully inspected and
thoroughly tested prior to packing and shipment. Any damage discovered upon receipt
of goods, whether obvious or concealed,
must be reported immediately to the delivering carrier and claims made directly to them.
Merit assumes no responsibility for damages
once the product has left its facilities and
any disputes regarding transportation damage must be resolved with the shipping
company(s).
Merit will repair or replace, at its option, any
component, part or assembly that fails under warranty, provided that the failed item is
returned, shipping charges prepaid, to
Merit’s repair facility and Merit is notified of
the failure within the warranty period. Merit
reserves the right to request the serial numbers of the item and/or game which has
failed, and copies of sales invoices, bills of
lading or other documents as required to
determine the validity of the warranty coverage. Merit will return or replace warranty
items, as specified above, shipping charges
prepaid, by ground transportation.
Merit’s obligation shall be limited to repair or
replacement as stated above, and shall specifically exclude any liability for consequential damages or loss of earnings.
Merit may, at its discretion, provide replacement parts under warranty prior to receiving defective items, without incurring any
ongoing obligation to extend such accommodations.
In certain instances, due to geographical or
other considerations, Merit may offer PCB
warranty service on an extended time basis as follows:
(a) User notifies Merit in writing (or FAX)
of PCB failure, providing dates of failure,
serial numbers and a brief description of
failure symptoms.
(b) Failed PCBs are accumulated for a
time period or quantity accumulation, as
designated by Merit and sent in one shipment to save shipping expenses.
(c) Merit honors warranty as per dates
of failure notification.
The above terms and conditions constitute
the sole obligation, written or implied, of Merit
Industries under its warranty coverage.
35 MEGATOUCH EVO ION OWNER’S MANUAL PM0426-13
Page 39

COPYRIGHT © 2005 MERIT INDUSTRIES, INC.
Merit Industries, Inc. Software License Agreement
Merit Industries, Inc. (“Licensor”) is willing to license the enclosed software to you only if
you accept all of the terms in this license agreement (“Agreement”).
Ownership of the Software
1. The enclosed Merit® product, which may include but is not limited to the Megatouch®
software program (“Software”) and the accompanying written materials are owned
by Licensor and are protected by United States copyright laws, patent laws and
other intellectual property laws, by laws of other nations, and by international treaties.
Restrictions on Use and Transfer
2. If this Software package contains multiple media types (such as CD’s, flash cards,
hard drives, etc), then you may use only the type of media appropriate for your
Machine. You may not use the other media types on another Machine, or transfer, or
assign them to another user except as part of the permanent transfer of the Software
and all written materials (as provided for below in paragraph 4).
3. You may make one copy of the software for backup purposes only. You may not
copy or make backup copies of any software security key or software security
device under any circumstances.
4. You may permanently transfer the right to use the Software and accompanying
written materials (including the most recent update and all prior versions) if you retain
no copies and the transferee agrees in writing to be bound by the terms of this
Agreement. Such a transfer of this license to another party immediately terminates
your license. You may not otherwise transfer or assign the right to use the Software,
except as stated in this paragraph.
5. You may not operate or allow the operation of the Software at locations where the
operation of such Software does not comply with all local, state, and other
governmental body laws and regulations. You agree to not use or permit the use of
the Software in violation of any U.S. Federal, state, or local laws or regulations or
any foreign law or regulation, including laws regarding gaming, gambling or intellectual
property rights in or concerning the Software.
6. You may not modify, adapt, translate, reverse engineer, decompile, disassemble the
Software or create derivative works from the Software or any component thereof;
nor may you remove, modify or hide or otherwise make unreadable or non-viewable
any notice, legend, advice, watermark or other designation contained on the Software,
component thereof, or output therefrom.
7. You agree that the Software and the authorship, systems, ideas, inventions methods
of operation, documentation and other information contained therein, and all versions,
modifications and adaptations thereto are proprietary intellectual properties of Licensor
and are protected by civil and criminal law, and by copyright, trade secret, trademark
and the patent laws of the United States and other countries.
Limited Warranty
8. Licensor warrants, solely for your benefit, that the Software will function in material
conformity, with its accompanying documentation for a period outlined in Licensor’s
standard product warranty period after your receipt of the Software.
Licensor’s Obligations Under Warranty
9. Licensor’s sole obligation under the aforesaid warranty shall be to utilize commercially
reasonable efforts to correct or modify such portion of the Software as to make it
materially conform with the applicable documentation.
PM0426-13 MEGATOUCH EVO ION OWNER’S MANUAL 36
Page 40

COPYRIGHT © 2005 MERIT INDUSTRIES, INC.
Grant Of License
10. Licensor grants to you a limited, non-exclusive license to distribute and/or use one
copy of the Software on a single Merit (“Machine”) accompanied by a single licensor
factory authorized security key. Licensor reserves the right to update versions of the
software and the content to the Machine as deemed appropriate by the Licensor.
You are entrusted to maintain and protect your single licensor factory authorized
security key, password, or other identification from being utilized by any third party,
and you agree to be responsible for any use of the Software provided herein by a
third party utilizing your identification. Licensor maintains the right to immediately
terminate your License for reasons related to misuse or other non-conformity with
the rules expressed herein. While Licensor does not routinely inspect Machines,
Licensor also reserves the right to inspect or audit the Software from time to time in
Licensor’s sole discretion. To the extent that Licensor’s access to the Software
requires that Licensor also gain access to a Machine in which the Software is
installed, you agree to promptly provide Licensor, when requested, with permission
and aid in Licensor gaining access to the Machine.
Disclaimers
11. EXCEPT AS PROVIDED IN THE SECTION ENTITLED “LIMITED WARRANTY”, LICENSOR
MAKES NO OTHER PROMISES, REPRESENTA TIONS OR W ARRANTIES, WHETHER
EXPRESSED OR IMPLIED, REGARDING OR RELATING TO THE SOFTWARE OR
CONTENT THEREIN OR TO ANY OTHER MA TERIAL FURNISHED OR PROVIDED TO
YOU PURSUANT TO THIS AGREEMENT OR OTHERWISE AND LICENSOR SPECIFICALL Y
DISCLAIMS ALL IMPLIED WARRANTIES OF MERCHANT ABILITY AND FITNESS FOR A
PAR TICULAR PURPOSE WITH RESPECT TO SAID MA TERIALS OR THE USE THEREOF .
TO THE MAXIMUM EXTENT ALLOWABLE BY LA W THE UNIFORM COMMERCIAL CODE
OR OTHER UNIFORM LAWS SHALL NOT APPL Y TO THIS AGREEMENT.
Limitation on Liability
12. IN NO EVENT SHALL LICENSOR BE LIABLE UNDER ANY CLAIM, DEMAND OR ACTION
ARISING OUT OF OR RELA TING TO THE SOFTW ARE, ITS USE, INST ALLA TION OR
LICENSOR’S PERFORMANCE OR LACK THEREOF UNDER THIS AGREEMENT FOR
ANY SPECIAL, INDIRECT , INCIDENT AL, EXEMPLARY OR CONSEQUENTIAL DAMAGES,
WHETHER OR NOT LICENSOR HAS BEEN ADVISED OF THE POSSIBILITY OF SUCH
CLAIM, DEMAND OR ACTION. IN ADDITION, WITHOUT LIMITING THE FOREGOING, IN
ALL EVENTS THE REMEDIES A VAILABLE T O YOU SHALL BE LIMITED TO THE AMOUNT
PAID BY YOU TO LICENSOR FOR THE SOFTWARE.
13. IN NO EVENT WILL LICENSOR BE LIABLE TO YOU FOR DAMAGES, INCLUDING ANY
LOSS OF PROFITS, LOST SA VINGS, OR OTHER INCIDENT AL OR CONSEQUENTIAL
DAMAGES ARISING OUT O F YOUR USE, MISUSE, BREACH OF THIS AGREEMENT OR
INABILITY TO USE THE SOFTWARE.
General
14. The validity and construction of this Agreement and of the right s and obligations herein
shall be determined and governed by the laws of the State of New York. By accepting
the terms of this Agreement, you acknowledge and accept that the courts of New
York, New York shall have exclusive jurisdiction and venue regarding any disputes
arising with regard to this Agreement or arising out of activity or misuse of the
Software.
15. Merit, in its sole discretion, may assign this agreement or any of its rights and
obligations hereunder.
16. If you have any questions concerning this Agreement or wish to contact Licensor for
any reason, please write: Merit Industries, Inc., 2525 State Road, Bensalem, PA
19020, USA.
37 MEGATOUCH EVO ION OWNER’S MANUAL PM0426-13
Page 41

COPYRIGHT © 2005 MERIT INDUSTRIES, INC.
Contrat de licence de logiciel de Merit Industries, Inc.
Merit Industries, Inc. (ci-après le "Concédant") est disposé à vous accorder la licence d'utilisation
du logiciel ci-inclus, à condition que vous vous engagiez à respecter tous les termes, clauses et
conditions du présent contrat de licence (Contrat).
Droit de Propriété
1. Le produit Merit ci-joint contenant, mais ne s'y limitant pas, le logiciel Megatouch™ (ci-après le
"logiciel") et toute la documentation écrite, restent la propriété du Concédant et sont protégés
par : les lois de droits d'auteur des Etats-Unis, les lois s'appliquant aux brevets déposés et à
la propriété intellectuelle, ainsi que par celles des autres pays et les traités internationaux.
Restriction d'Utilisation et Transfert
2. Si le présent logiciel comprend plusieurs types de composants (tels que CD-ROM, cartes
flash, disques durs, etc), vous ne pouvez utilisez que ceux qui conviennent à votre appareil.
Il est strictement interdit de les utiliser sur un autre appareil, les transférer -ou les céder à un
autre utilisateur, sauf en cas de transfert permanent du logiciel et de toute la documentation
écrite (comme indiqué ci-dessous au paragraphe 4).
3. Il est interdit de copier le logiciel, à l'exception d'une copie de sauvegarde. Il est aussi interdit
de reproduire -ou faire des copies de sauvegarde des programmes de clé de sécurité ou
autres fichiers de sécurité, quelles que soient les circonstances.
4. Vous pouvez céder en permanence à un tiers -le droit d'utiliser le LOGICIEL et toute la
documentation écrite l'accompagnant, (ainsi que la plus récente mise à jour et toutes autres
anciennes versions) seulement si vous n'en gardez aucune copie, et si le cessionnaire
s'engage, par écrit, à respecter les termes, clauses et conditions du présent Contrat. Cette
cession à un tiers met fin à votre licence immédiatement. Autrement, vous n'avez pas la
permission de transférer ou d'accorder à un tiers le droit d'utiliser le présent logiciel, excepté
que tel que décrit dans le présent paragraphe.
5. Il est interdit d'utiliser le présent logiciel ou de permettre son utilisation dans des emplacements
où l'utilisation du présent logiciel n'est pas conforme aux lois et réglementations locales,
nationales ou réglementations d'autres organismes gouvernementaux. Vous acceptez de ne
pas utiliser ou d'autoriser l'utilisation du logiciel d'une manière enfreignant les lois ou regulations s'appliquant à la propriété intellectuelle et au jeu, en vigueur aux Etats-Unis ou dans les
autres pays du monde, y compris les lois de l'ensemble du logiciel.
6. Il est interdit de modifier, adapter, traduire, démonter, décompiler, désassembler le logiciel ou
créer du matériel dérivé du logiciel ou de tout composant de celui-ci ; vous ne pouvez pas
enlever, modifier ou cacher ou rendre illisible ou non-visible toute instruction, légende, information ou filigrane ou autre désignation qui apparaît dans le logiciel, composant dudit logiciel
ou résultant dudit logiciel.
7. Vous convenez que le logiciel et les droits d'auteur, les systèmes, les idées, les inventions, les
méthodes d'utilisation, la documentation et autre information incluse, ainsi que toutes les
versions, modifications et adaptations qui s'y rattachent sont les propriétés intellectuelles du
Concédant et sont protégées par le droit civil et pénal et par le droit d'auteur, le secret
commercial, la marque déposée et le brevet aux Etats-Unis et dans les autres pays du monde.
Limite de Garantie
8. Le Concédant garantit seulement à votre intention, que le logiciel permettra une utilisation
conforme, avec la documentation l'accompagnant, pendant la période de temps indiquée
dans la période de garantie du produit standard du Concédant, à compter de la date de
livraison du logiciel.
Responsabilité du Concédant aux termes de la Garantie
9. La seule obligation du Concédant aux termes de la garantie susmentionnée sera de faire tous
les efforts commercialement raisonnables pour corriger ou modifier la partie du logiciel pour
le rendre matériellement conforme aux spécifications de la documentation.
PM0426-13 MEGATOUCH EVO ION OWNER’S MANUAL 38
Page 42

COPYRIGHT © 2005 MERIT INDUSTRIES, INC.
Concession de Licence
10. Le Concédant vous accorde le droit d'utiliser une seule copie par appareil Merit (ci-après
"Appareil") accompagné d'une seule clé de sécurité autorisée en usine et fournie par le
Concédant. Le Concédant se réserve le droit de mise à jour des versions du logiciel et du
contenu de l'Appareil, quand il juge nécessaire de le faire. Il vous appartient également
d'empêcher que les mots de passe ou autres codes et la clé de sécurité soient utilisés par un
tiers. Vous acceptez d'assumer la responsabilité dans le cas de l'utilisation du logiciel par un
tiers. Le Concédant se réserve le droit de résilier votre contrat de licence à tout moment dans
l'éventualité d'une utilisation non-conforme aux clauses stipulées. Bien que le Concédant ne
contrôle pas les appareils périodiquement, il se réserve toutefois le droit de contrôler le logiciel
à tout moment et sans préavis de sa part. De surcroît, dans l'éventualité où le logiciel n'est
accessible qu'à travers la machine dans laquelle il est installé, le licencié s'engage à donner
libre accès au Concédant, ou ses représentants, à la machine et dans les plus brefs délais.
Exclusion de toute autre garantie
11. EXCEPTE COMME PREVU DANS LA SECTION INTITULEE "LIMITE DE GARANTIE", LE CONCEDANT
N'ASSURE AUCUNE AUTRE GARANTIE DE QUELQUE NATURE ET A QUELQUE TITRE QUE CE
SOIT , EXPLICITE OU IMPLICITE, EN RAPPORT A VEC LE LOGICIEL ET LES COMPOSANTS QUI
L'ACCOMPAGNENT OU, LE CAS ECHEANT, TOUT SUPPORT OU MATERIEL FOURNI
CONFORMEMENT AU PRESENT CONTRATEN P ARTICULIER, LE CONCEDANT NE PEUT
DONNER AUCUNE GARANTIE, DE QUELQUE NATURE QUE CE SOIT, POUR LA
COMMERCIALISATION DE TOUS LES PRODUITS EN RAPPORT A VEC LE LOGICIEL OU AVEC
L'UTILISA TION DE CELUI-CI. DANS LA MESURE OU CELA EST PERMIS PAR LA LOI, LE CODE
UNIFORME COMMERCIAL OU AUTRE LOI UNIFORME NE S'APPLIQUE P AS AU PRESENT
CONTRAT.
Limite de Responsabilité
12. LE CONCEDANT NE SERA EN AUCUN CAS RESPONSABLE DE TOUTE RECLAMA TION,
DEMANDE OU ACTION RESUL TANT DE OU EN RAPPOR T A VEC LE LOGICIEL, SON UTILISATION
OU SON INSTALLA TION, OU LA PERFORMANCE OU MANQUE DE PERFORMANCE DU
CONCEDANT EN VERTU DU PRESENT CONTRA T POUR TOUS DOMMAGES D'UNE NA TURE
QUI N'EST P AS PRESUMEE PAR LA LOI ET QUI DOIVENT ETRE EXPRESSEMENT PROUVES,
DOMMAGE INDIRECTS, DOMMAGES-INTERETS POUR PREJUDICE MORAL, QUE LE
CONCEDANT AIT ETE A VISE OU NON DE LA POSSIBILITE D'UNE TELLE RECLAMATION,
DEMANDE OU ACTION. DE PLUS, SANS LIMITER CE QUI PRECEDE, LES DEDOMMAGEMENTS
A VOTRE DISPOSITION SERONT LIMITES AU MONTANT QUE VOUS AUREZ PAYE AU
CONCEDANT POUR LE LOGICIEL.
13. LE CONCEDANT NE SERA EN AUCUN CAS RESPONSIBLE : D'UNE RUPTURE DE CONTRAT ,
DES DOMMAGES, Y COMPRIS TOUTE PERTE DE PROFIT, PERTES D'ECONOMIE OU TOUS
AUTRES DOMMAGES INDIRECTS OU DOMMAGES-INTERETS ACCESSOIRES DECOULANT
DE LA MAUV AISE UTILISATION OU DE L'IMPOSSIBILITE D'UTILISA TION DU LOGICIEL.
Dispositions Générales
14. La validité et la construction du présent Contrat et les droits et obligations ci-inclus seront
déterminés et régis par les lois de l'état de New York aux États-Unis. En acceptant les
dispositions du présent contrat, vous acceptez également que tous litiges ou revendications
relatives seront réglés par voie d'arbitrage par un tribunal de l'état de New York, aux EtatsUnis.
15. Merit Industries se réserve le droit de transférer le présent Contrat à un tiers ainsi que ses
droits et obligations ci-après.
16. Pour toutes questions concernant le présent Contrat -ou si vous désirez contacter le Concédant
pour une raison quelconque, veuillez écrire à : Merit Industries, Inc., 2525 State Road, Bensalem,
PA 19020, Etats-Unis.
39 MEGATOUCH EVO ION OWNER’S MANUAL PM0426-13
Page 43

COPYRIGHT © 2005 MERIT INDUSTRIES, INC.
Merit Industries, Inc. Softwarelizenzabkommen
Merit Industries, Inc. („Lizenzgeber”) ist nur dann bereit Ihnen eine Lizenz für die beiliegende
Software zu erteilen, wenn Sie alle Bestimmungen dieses Lizenzabkommens (“Abkommen”)
akzeptieren.
Eigentumsvorbehalt der Software
1. Das beiliegende Merit®-Produkt, welches das Megatouch® Softwareprogramm („Software”) beinhalten kann, aber nicht darauf beschränkt ist, und die schriftlichen Unterlagen
sind Eigentum des Lizenzgebers und sind durch die Gesetze der Vereinigten Staaten
und anderer Länder und durch internationale Verträge urheberrechtlich geschützt.
Beschränkungen im Gebrauch und Transfer
2. Sollte diese Softwarelieferung mehrere Medien enthalten (z.B. CD, Karten, Festplatten
usw.), dürfen Sie nur die für Ihre Maschine angebrachte Medienart verwenden. Die anderen
Medienarten dürfen nicht auf anderen Maschinen verwendet werden oder an Dritte
übergeben werden, abgesehen von einem endgültigen Transfer der Software und aller
schriftlichen Unterlagen (wie im untenstehenden Paragraphen 4 beschrieben).
3. Sie dürfen nur eine Sicherungskopie der Software herstellen. Unter keinen Umständen
dürfen Sie einen Softwaresicherungsschlüssel oder Sicherungsmaßnahmen kopieren oder
davon Sicherungskopien herstellen.
4. Sie dürfen das Nutzungsrecht für die Software und die schriftlichen Unterlagen (einschließlich
der aktuellen Version und aller vorhergehenden Versionen) an Dritte übertragen, wenn Sie
keine Kopie behalten und wenn der Empfänger die Bestimmungen dieses Abkommens in
schriftlicher Form akzeptiert. Bei einem solchen Transfer der Lizenz an Dritte erlischt Ihre
Lizenz umgehend. Abgesehen von den Bestimmungen dieses Paragraphen sind alle anderen
Transfers oder Übertragungen der Nutzungsrechte für diese Software unerlaubt.
5. Sie dürfen die Software nicht benutzen oder eine Nutzung gestatten, wenn eine
solche Nutzung der Software irgendwelche Gesetze und Verordnungen der
kommunalen oder staatlichen Behörden verletzen würde. Sie verpflichten sich die
Software nicht so zu nutzen oder nutzen zu lassen, dass sie damit gegen staatliche,
Bundes- oder Lokalgesetze oder Bestimmungen der USA oder gegen ausländische
Gesetze oder Bestimmungen, einschliesslich aller Gesetze bezüglich Glücksspiels,
Spielens oder geistigen Eigentumrechts der Software, verstossen.
6. Es ist Ihnen nicht gestattet, die Software abzuändern, zu verändern, zu übersetzen,
rückumzuwandeln, zu dekompilieren oder zu zerlegen, oder aus der Software oder eines
T eils davon andere W erke abzuleiten. Sie dürfen auch aus der Software, einem Best andteil
der Software oder aus den Datenausgaben der Software keine Hinweise, Bemerkungen,
Ratschläge, Wasserzeichen oder andere Markierungen entfernen, verändern, verbergen
oder auf andere Art unlesbar machen.
7. Sie akzeptieren, dass die Software und die Urheberschaft, die Systeme, die Ideen,
Erfindungen, die Arbeitsweisen, die Dokumentation und alle anderen darin enthaltenen
Informationen und alle Versionen, Veränderungen, und Bearbeitungen davon das geistige
Eigentum des Lizenzgebers sind, und dass sie durch Straf- und Zivilgesetzgebung und
durch die Copyright-, Geschäftsgeheimnis-, Warenzeichen- und die Patentgesetze der
Vereinigten Staaten und anderer Länder geschützt sind.
Beschränkte Garantie
8. Der Lizenzgeber garantiert zu Ihren Gunsten, dass die Software für die angegebene
normale Garantiezeit des Lizenzgebers nach Ihrer Annahme der Software in erheblicher
Übereinstimmung mit der beiliegenden Dokumentation laufen wird.
Verpflichtung des Lizenzgebers im Rahmen der Garantie
9. Die ausschließliche Pflicht des Lizenzgebers im Rahmen der vorstehenden Garantie besteht
darin, alle geschäftlich vertretbaren Schritte zu unternehmen, um Teile der Software zu
berichtigen oder abzuändern, bis sie mit der beiliegenden Dokumentation erheblich
übereinstimmen.
PM0426-13 MEGATOUCH EVO ION OWNER’S MANUAL 40
Page 44

COPYRIGHT © 2005 MERIT INDUSTRIES, INC.
Übertragung der Lizenz
10. Der Lizenzgeber gewährt Ihnen eine beschränkte, nicht-ausschliessbare Lizenz zur
Vertreibung und/oder Benutzung einer Kopie der Software auf einem einzelnen Merit™ („Gerät”)
mit einem einzelnen werksmäßig gestatteten Sicherungsschlüssel. Der Lizenzgeber behält
sich das Recht vor, nach eigenem Ermessen die Software und den Inhalt der Maschine zu
verbessern. Sie sind dafür verantwortlich ihren individuellen, vom Lizenzgeber werksmäßig
gestatteten Sicherheitsschlüssel, ihr Passwort oder anderweitigen Identifikationsmechanismus
instandzuhalten und abzusichern gegen die Nutzung durch eine dritte Partei, und sie akzeptieren
die Verantwortung für jegliche Nutzung der besagten Software durch eine dritte Partei mithilfe
ihresIdentifikationsmechanismus . Obwohl der Lizenzgeber nicht regelmässig Maschinen
inspiziert, behält sich der Lizenzgeber das Recht vor, ihre Lizenz umgehend zu kündigen aus
Gründen des Missbrauchs oder bei Nichtbefolgung der Bestimmungen in diesem Vertrag. Der
Lizenzgeber behält sich ebenfalls das Recht vor, die Software von Zeit zu Zeit nach eigenem
Ermessen zu inspizieren oder zu überprüfen. Im Falle, dass der Lizenzgeber Zugang zu dem
Gerät wünscht, in dem besagte Software installiert ist, erklären Sie sich bereit, dass sie dem
Lizenzgeber, wenn nötig, Erlaubnis und Hilfe beim Zugang zum Gerät verschaffen.
Beschränkungen
11. ABGESEHEN VON DEN BESTIMMUNGEN DES PARAGRAPHEN „BESCHRÄNKTE GARANTIE"
GIBT DER LIZENZGEBER KEINE SONSTIGEN VERSPRECHEN, VERPFLICHTUNGEN ODER
GARANTIEN, OB AUSDRÜCKLICH ODER STILLSCHWEIGEND, FÜR DIE SOFTW ARE ODER
IHRE BESTANDTEILE ODER FÜR ALLE ANDEREN MA TERIALIEN, DIE IHNEN IM RAHMEN DIESES
ABKOMMENS ZUR VERFÜGUNG GESTELLT ODER ÜBERLASSEN WERDEN, UND DER
LIZENZGEBER LEHNT AUSDRÜCKLICH ALLE ANSPRÜCHE AUF MARKTFÄHIGKEIT UND
EIGNUNG DER BESAGTEN MATERIALIEN FÜR DEN GEWÖHNLICHEN GEBRAUCH AB. SOWEIT
GESETZESMÄSSIG ZUGELASSEN, SOLLEN DIE HANDELSRECHTLICHE GESETZGEBUNG
AUS DEM UNIFORM COMMERCIAL CODE ODER ANDERE GESETZE AUF DIESES ABKOMMEN
NICHT ANWENDBAR SEIN.
Haftungsbeschränkung
12. DER LIZENZGEBER HAT KEINERLEI HAFTUNG BEI EINEM ANSPRUCH, EINER FORDERUNG
ODER EINER KLAGE, DIE AUF NUTZUNG DER SOFTW ARE, DEREN INSTALLIERUNG , DER
LEISTUNG DES LIZENZGEBERS ODER DESSEN VERSAGEN IM RAHMEN DIESES ABKOMMENS
FÜR JEGLICHE FOLGE-, INDIREKTE, SONDER- ODER NEBENSCHÄDEN BERUHEN, SELBST
WENN DER LIZENZGEBER AUF DIE MÖGLICHKEIT EINES SOLCHEN ANSPRUCHES, EINER
FORDERUNG ODER EINER KLAGE HINGEWIESEN WURDE. WEITERHIN UND OHNE
BESCHRÄNKUNG DES LETZTEN SATZES, DÜRFEN IN ALLEN FÄLLEN DIE IHNEN ZUR
VERFÜGUNG STEHENDEN ABHILFEN DIE VON IHNEN FÜR DIE SOFTWARE AN DEN
LIZENZGEBER GEZAHLTE SUMME NICHT ÜBERSCHREITEN.
13. DER LIZENZGEBER HAT IN KEINEM FALL EINE HAFTUNG IHNEN GEGENÜBER FÜR SCHÄDEN,
EINSCHLIESSLICH ETWAIGER GEWINNVERLUSTE, NICHT REALISIERTER EINSP ARUNGEN
ODER ANDERER NEBEN- ODER FOLGESCHÄDEN, DIE AUS IHRER VERWENDUNG,
MISSBRAUCH, VERLETZUNG DIESES ABKOMMENS ODER GEBRAUCHSUNFÄHIGKEIT DER
SOFTWARE ENTSTEHEN.
Allgemein
14. Die Rechtsgültigkeit und Provisionen dieses Abkommens und der darin enthaltenen Rechte und
Pflichten werden durch die Gesetze des Staates von New York bestimmt. Sollten sie diese
Vereinbarungen annehmen, dann akzeptieren Sie, dass der ausschliessliche Erfüllungsort
und Gerichtsstand bei den Gerichten von New York im Staat New York liegen hinsichtlich aller
Streitigkeiten, die diesen Vertrag betreffen, oder die durch Leistung oder Missbrauch der
besagten Software entstehen.
15. Merit kann nach eigenem Ermessen dieses Abkommen oder jedes der darin enthaltenen
Rechte und Pflichten an Dritte abtreten.
16. Bei Rückfragen über dieses Abkommen oder wenn Sie den Lizenzgeber aus einem anderen
Grund kontaktieren wollen, bitte schreiben an: Merit Industries, Inc., 2525 State Road, Bensalem,
PA 19020, USA.
41 MEGATOUCH EVO ION OWNER’S MANUAL PM0426-13
Page 45

NOTES:
__________________________________________________________________
_______________________________________________________________
________________________________________________________________
___________________________________________________________________
_______________________________________________________________
________________________________________________________________
__________________________________________________________________
_________________________________________________________________
______________________________________________________________
________________________________________________________________
___________________________________________________________________
__________________________________________________________________
_________________________________________________________________
_____________________________________________________________________
___________________________________________________________________
___________________________________________________________________
__________________________________________________________________
___________________________________________________________________
__________________________________________________________________
________________________________________________________________
_________________________________________________________________
_________________________________________________________________
Page 46

NOTES:
__________________________________________________________________
_______________________________________________________________
________________________________________________________________
___________________________________________________________________
_______________________________________________________________
________________________________________________________________
__________________________________________________________________
_________________________________________________________________
______________________________________________________________
________________________________________________________________
___________________________________________________________________
__________________________________________________________________
_________________________________________________________________
_____________________________________________________________________
___________________________________________________________________
___________________________________________________________________
__________________________________________________________________
___________________________________________________________________
__________________________________________________________________
________________________________________________________________
_________________________________________________________________
_________________________________________________________________
Page 47

Page 48

Please read the enclosed license agreement. Operation of this game
constitutes acceptance of the Merit Software License Agreement.
Veuillez lire le contrat de licence d’utilisation ci-inclus. Si vous utilisez ce
jeu, vous vous engagez à respecter les termes et conditions du contrat de
licence d’utilisation du logiciel de Merit.
Bitte beiliegendes Lizenzabkommen durchlesen. Das Merit Software
Lizenzabkommen tritt in Kraft, sobald dieses Spiel verwendet wird.
MEGAT OUCH EVO ION OWNER’S MANUAL
PM0426-13
 Loading...