

Traditional Upright
Vacuum Cleaner
Owner’s Manual
Operating and Maintenance Instructions
Aspiradora
Vertical Tradicional
Manual Del Propietario
Instrucciones de Funcionamiento y
de Mantenimiento
Aspirateur
Traditionnel Vertical
Le Manuel du Propriétaire
SAVE THESE INSTRUCTIONS
GUARDE ESTAS INSTRUCCIONES
CONSERVER CES INSTRUCTIONS
Products manufactured under quality management system registered to ISO 9001:2000
Los productos están fabricados según el sistema de gestión de calidad registrado con la norma ISO 9001:2000
Produits fabriqués selon un système de gestion de la qualité ISO 9001:2000
Printed in China/Impreso en China/Imprimé en Chine
Model no./N.º de modelo/Nº de modèle :
Model No. : 9VCV-12, 9VCV-16
SKU no./N.º de SKU/Nº SKU :
9VCV1200, 9VCV1600
Instructions d’Utilisation et d’Entretien
FOR COMMERCIAL USE
PARA USO COMMERCIAL
UTILISATION COMMERCIALE
©2008 Rubbermaid Commercial Products LLC
4
Rubbermaid Commercial Products LLC
Winchester, VA 22601 U.S.A.
www.rcpworksmarter.com #70-9VCV-12
Customer Service • Atención al Cliente • Service Clientèle
1-866-524-5233
www.rcpworksmarter.com
Work Smarter.

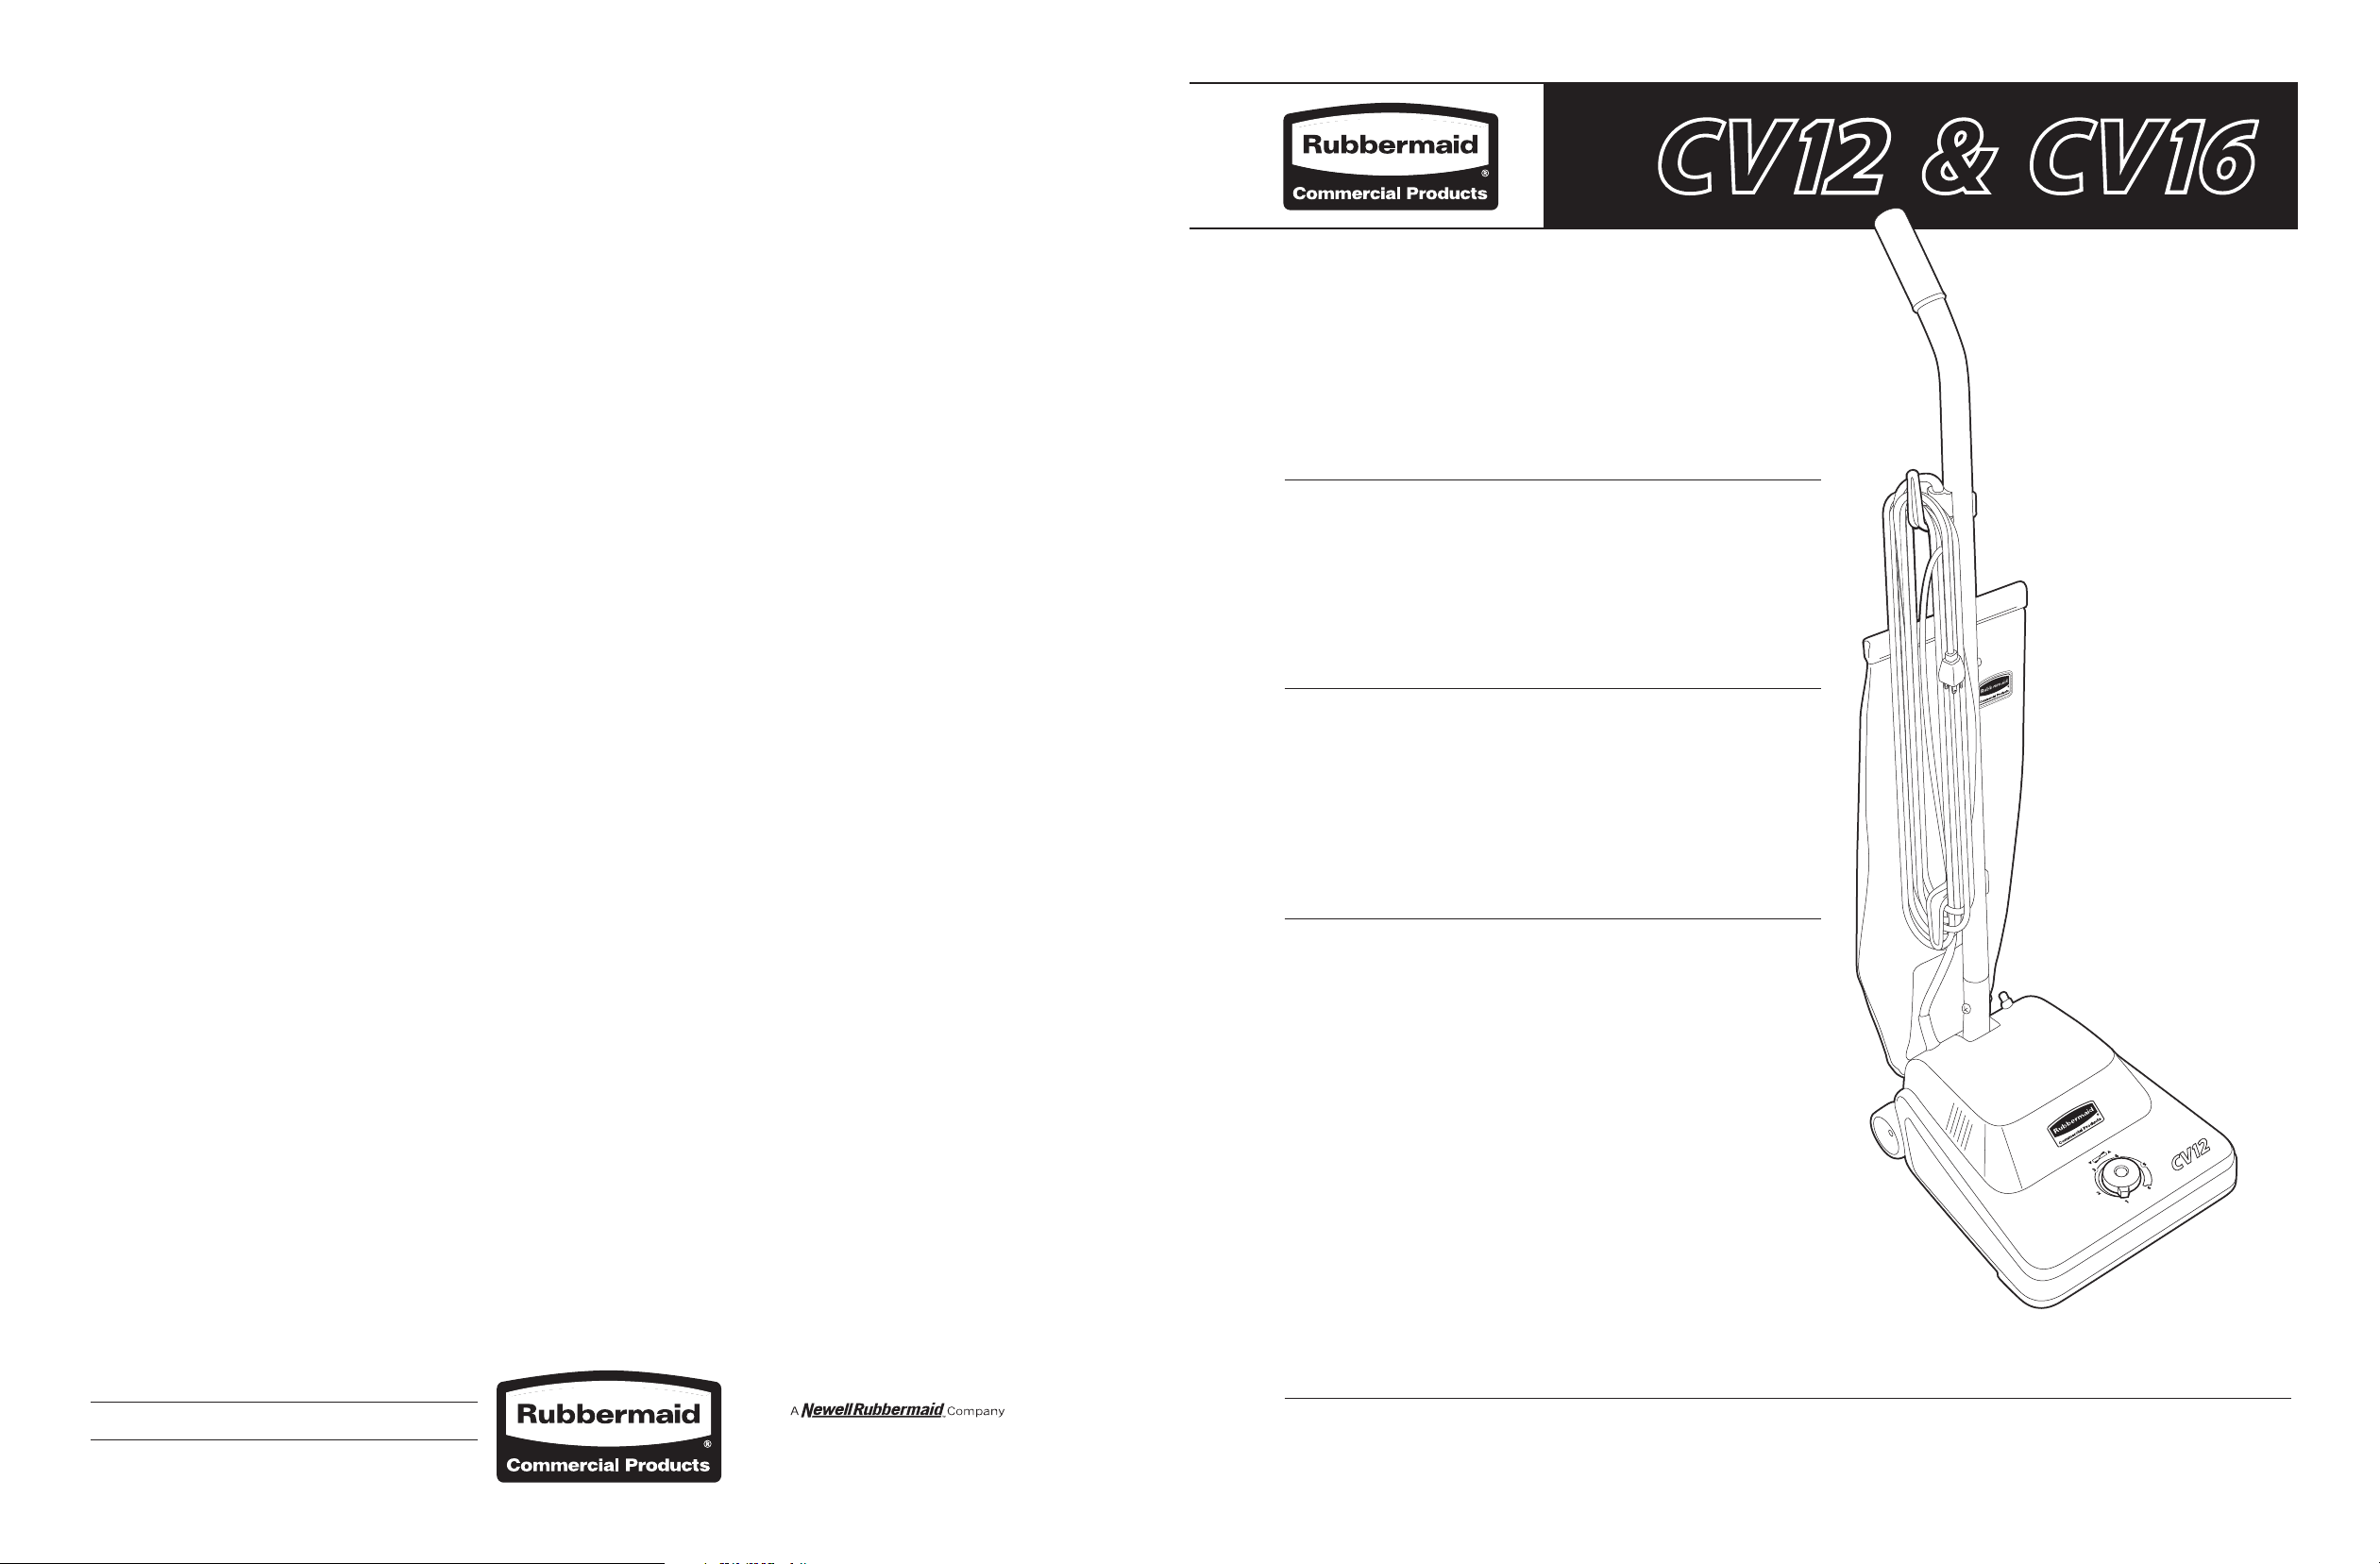
Congratulations!
ENGLISH
ESPAÑOL
FRANÇAIS
ENGLISH
Welcome to the world of smarter vacuums. As the proud new owner of Rubbermaid Commercial
Product’s CV12 or CV16 vacuum cleaner, you can rest assured that you have purchased a convenient, efficient,
and high-quality product. As with all of our products, your CV12 or CV16 is backed by our uncompromising
commitment to customer satisfaction.
One (1) Year Limited Warranty
To the consumer, Rubbermaid Commercial Products, LLC (RCP) warrants to the original owner that this product is free from defects
in material and workmanship for a period of one (1) year from the date of the original purchase. If, within the one (1) year period,
this product becomes defective when used as directed under normal conditions, RCP will either repair or replace the product—at our
option—when it is returned complete (postage prepaid and insured) to an authorized service center. Product must be accompanied
by a proof of purchase—a bill of sale, receipted invoice, or other proof that the product is within the warranty period—to obtain
warranty service. RCP shall bear the cost of repairing/replacing the product and shipping it back to you. RCP makes no other
warranties, express or implied, concerning the product or the merchantability or fitness thereof for any purpose.
This warranty does not apply to product that has been damaged as a result of improper maintenance, accident or other misuse.
This warranty is void if the product is repaired or modified in any way by anyone other than an authorized service center. This
warranty also does not cover normal wear items such as the following: brush, brush rolls, switches, belts, bags, filters, power cords,
casters, wheels, and gaskets. This warranty does not cover unauthorized repairs. In no event shall RCP be liable for incidental or
consequential damages.
For more Rubbermaid best-in-class products, visit our website at
www.rcpworksmarter.com.
Table of Contents
Warranty ........................................................................................................................................................ 3
Troubleshooting .............................................................................................................................................. 3
Safety Instructions .......................................................................................................................................... 4
Maintenance ................................................................................................................................................... 5
Electrical Grounding ........................................................................................................................................ 5
Package Contents ............................................................................................................................................6
Parts List ......................................................................................................................................................... 6
Assembled Views ............................................................................................................................................ 7
Reorder Numbers ............................................................................................................................................ 7
Assembly ........................................................................................................................................................ 8
For product replacement information, or questions regarding replacement parts, please contact customer service directly (within USA
& Canada) at 1-866-524-5233.
Legal rights vary from state to state, so the above limitations may not apply to you if precluded by local law.
Troubleshooting
Problem Reason Solution
Vacuum cleaner
won’t run:
Vacuum cleaner
won’t pick up/low
suction:
1. ON/OFF switch is in “OFF” position.
2. Power cord not firmly plugged into outlet.
3. Blown fuse or tripped breaker.
4. Motor does not work.
5. Broken fan.
6. Broken switch.
1. Paper bag not installed correctly.
2. Paper bag is full.
3. Cloth bag is full or pores are clogged.
4. Brush roll worn.
1. Press switch to “ON” position.
2. Ensure that plug is securely inserted into electrical outlet.
3. Replace fuse/reset breaker.
4. Please contact customer service or authorized service center.
5. Please contact customer service or authorized service center.
6. Please contact customer service or authorized service center.
1. Confirm paper bag is installed correctly–See page 10.
2. Replace paper bag–See page 10.
3. Replace cloth bag–See page 11.
4. Replace brush roll–See page 11.
Operation ....................................................................................................................................................... 9
Cord Storage................................................................................................................................................. 10
Paper Bag Replacement ................................................................................................................................ 10
Cloth Bag Replacement .................................................................................................................................. 11
Belt and Brush Roll Replacement ................................................................................................................... 11
5. Broken or worn belt.
6. Nozzle duct obstructed.
7. Brush roll improperly installed.
Dust escaping from
vacuum cleaner:
ANY OTHER SERVICING SHOULD BE DONE BY AN AUTHORIZED SERVICE REPRESENTATIVE
1. Paper bag is full.
2. Paper bag not installed correctly.
3. Cloth bag not installed correctly.
5. Replace belt–See page 11.
6. Remove obstruction.
7. Check orientation of brush roll endcaps—See page 12, step 4.
1. Replace paper bag–See page 10.
2. Confirm paper bag is installed correctly–See page 10.
3. Confirm cloth bag is installed correctly–See pages 8 and 11.
Customer Service (1-866-524-5233)
In the event further assistance is required, please call the customer service number above, or contact an authorized service center.
Proof of purchase will be required before service is rendered. Transportation charges to and from the repair location must be paid by
the purchaser. For quick troubleshooting, please go to
This warranty does not apply outside of the fifty United States and Canada. This warranty excludes repairs to parts or systems
resulting from unauthorized modifications made to the vacuum cleaner.
www.rcpworksmarter.com.
32
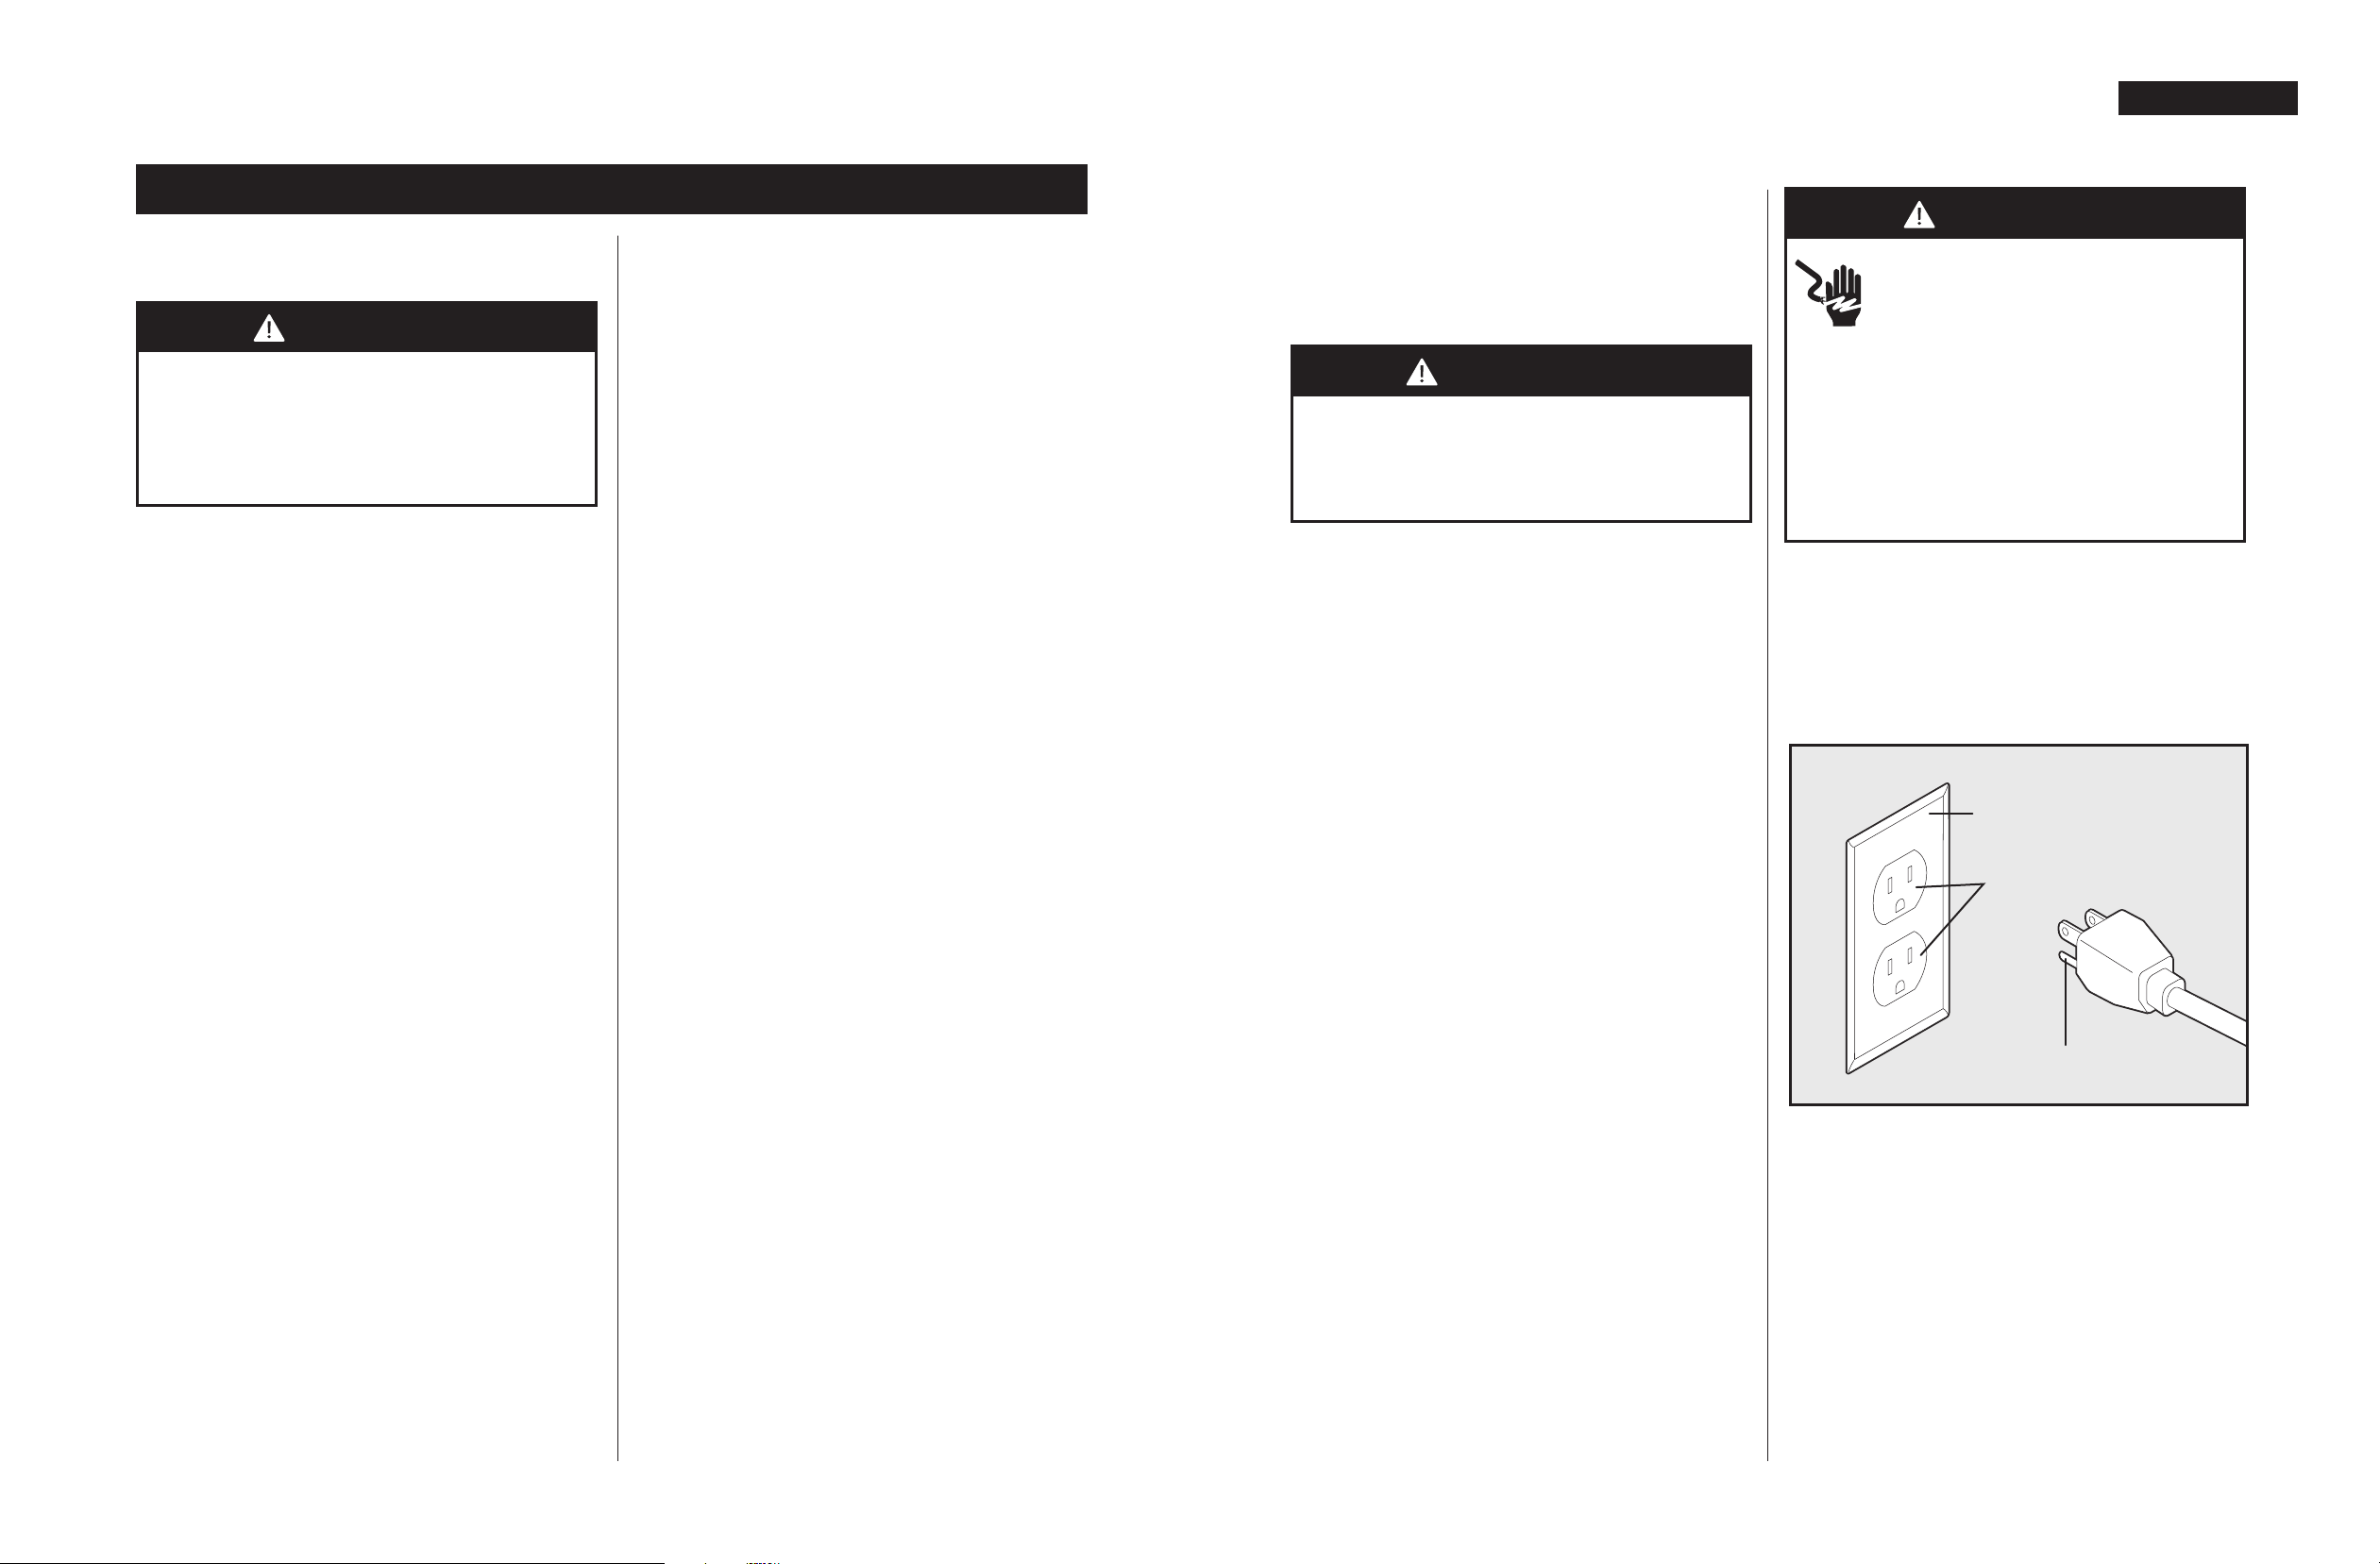
Grounded outlet
Grounded
outlet box
Grounding pin
ENGLISH
Important Safety Instructions
Important Safety Instructions (cont.)
SAVE THESE INSTRUCTIONS
When using an electrical appliance, basic precautions
should be followed, including the following:
WARNING
Read all instructions before using vacuum
cleaner. Use only as described in this
manual, and follow all label and marking
instructions found on unit. Failure to do
so may result in serious injury or death.
TO REDUCE THE RISK OF FIRE,
ELECTRICAL SHOCK, OR INJURY:
• Indoor use only. Store indoors.
• Fully assemble before operating.
• DO NOT use without dust bags and/or filters installed.
•
DO NOT leave power cord lying on floor when not
in use. It can become a tripping hazard.
•
DO NOT use to pick up flammable or combustible
liquids. DO NOT use in areas where these
substances may be present. Electrical devices
produce arcs or sparks that can cause explosions.
DO NOT use anywhere that gasoline is dispensed.
DO NOT use in an enclosed space where
•
flammable, explosive, or toxic vapors are given
off by oil base paint, paint thinner, certain
mothproofing substances, or in an area where
flammable dust is present.
• DO NOT pick up toxic/carcinogenic/hazardous
materials such as chlorine, bleach, drain cleaner,
gasoline, asbestos, pesticides, or lead.
• If vacuum cleaner is not working as it should—
or has been dropped, damaged, left outdoors, or
exposed to water—discontinue use immediately
and take it to a service center for inspection.
Call 1-866-524-5233 to find a location near you.
WARNING
This product contains chemicals known
to the State of California to cause cancer,
birth defects, and other reproductive
harm. Wash hands after handling.
Maintenance
Proper maintenance of your vaccum cleaner will
assure continued effective cleaning performance.
1. Always use genuine Rubbermaid Commercial
Products replacement parts.
WARNING
ELECTRICAL SHOCK HAZARD
Improper connection of the
equipment-grounding conductor
can result in a risk of electrical
shock. Check with a qualified electrician
or service person if you are unsure if an
outlet is properly grounded. DO NOT
modify the plug provided with the
appliance to fit an outlet, have a proper
outlet installed by a qualified electrician.
This appliance is for use on a nominal 120-volt circuit
and has a grounding attachment plug that looks like
the plug illustrated in the sketch below. Make sure
that the appliance is connected to an outlet having
the same configuration as the plug. No adaptor
should be used with this appliance.
• DO NOT leave unattended when plugged in. Unplug
from outlet when not in use, and before servicing.
• DO NOT use outdoors or on wet surfaces. DO NOT
handle vacuum cleaner or plug with wet hands.
• Only plug vacuum cleaner into a properly grounded
outlet. See grounding instructions.
• DO NOT unplug by pulling on power cord. To
unplug from an outlet, pull by the plug, not the cord.
• DO NOT use with damaged cord or plug.
• DO NOT pull or carry by cord, use cord as a handle,
close a door on cord, or pull cord around sharp
edges or corners. DO NOT run vacuum cleaner over
power cord. Keep cord away from heated surfaces.
• DO NOT use with an extension cord.
• Turn on/off switch to “off” before unplugging.
DO NOT pick up any materials that are burning or
•
smoking, such as cigarettes, matches, or hot ashes.
• During use, keep hose, wands, and other
openings away from your face and body. Keep
hands, feet, hair, loose clothing, and other body
parts away from moving parts.
• DO NOT put any object into openings. DO NOT
use with any opening blocked; keep free of dust,
lint, hair, or anything that may reduce air flow.
• Only use manufacturer’s recommended attachments.
• Use with caution on stairs.
• Use with caution when vacuuming over area rug
edges and fringe.
•
DO NOT allow to be used as a toy. Close attention
is necessary during use by or around children.
2. Replace paper bag frequently.
3. Occasionally remove brush roll and clean debris
from end caps to keep brush rotating smoothly.
Electrical Grounding
This appliance must be grounded. Should the unit
malfunction, grounding provides a path of least
resistance for the electric current. This reduces the
risk of electric shock. This appliance is equipped with
a cord having an equipment-grounding conductor,
and a grounding plug. The plug must be inserted into
an appropriate outlet that is properly installed and
grounded in accordance with all local codes
and ordinances.
4 5

ENGLISH
handle grip
power cord
bumper
upper
cord wrap
lower
cord wrap
ON/OFF switch
cord spring
height
adjustment
knob
cloth
bag spring
bag
assembly
wheels
handle
release pedal
upper
cord wrap
Owne
r
’s Manual
operating and maintenance instr
uctions
instructions
Manual Del Propietario
instrucciones de funcionamiento y
de mantenimiento
Le Manuel du Propriétaire
instructions fonctionnantes
et de se
r
vices
Customer Se
r
vice:
1-800-892-6806
ww
w
.rcpworksmarte
r
.com
FOR COMMERCIAL USE
x2
x2
Tool Needed
Supplemental
Contents
Bag Assembly
A
C
D
B
I
E
F
J
K
L
Fasteners
(actual size)
G H
upper handle tube
upper cord wrap
lower handle tube
lower cord wrap
base stem
male screw
female screw
B
A
C
D
E
nozzle
F
dirt tube
paper bag
G
H
cloth bag
I
J
I
J
K
extra belt
J
L
Package Contents
Please confirm that all items shown in the image below are included in the packaging.
If any parts are missing, please call customer service at 1-866-524-5233
.
Assembled Views
Parts List
Reorder Numbers
9VCVBE12 (belt)
9VCVPB12 (paper bag)
9VCVBA12 (cloth bag)
Reorder by logging on to
www.rcpworksmarter.com
or
by contacting your local distributor. Call customer service
at 1-866-524-5233 for service and to order genuine
Rubbermaid Commercial Products replacement parts.
6 7

2
1
2
3
NOTE:
Fully assemble
before operating.
Assembly
1
2
2
3
Tool needed
C
E
1
1
2
2
3
2
C
A
3
2
3
B
D
2
1
C
D
4
2
1
A
B
5
C
A
D
B
6
1
ENGLISH
1
7
1
2
8
B
Insert lower handle tube into base stem of vacuum cleaner.
Align arrow on lower handle tube with slot on base stem.
Insert and tighten male and female screws.
Slide cord spring up power cord. Fit bottom of spring into
notch in upper cord wrap. Press power cord into notches of
upper and lower cord wraps.
Slide upper handle tube over lower handle tube. Position
handle with bend facing rear of vacuum cleaner. Insert and
tighten male and female screws.
Insert keyed tab on lower cord wrap into corresponding keyed
hole in lower handle tube. Rotate lower cord wrap onto lower
handle tube; snap into place (allowing some slack).
Insert tab on bottom of cloth bag into bracket on rear of vacuum
cleaner base. Turn latch to engage post on base of vacuum cleaner.
Operation
Slide ring at top of cloth bag spring onto triangular hook on
rear of upper cord wrap. Ensure that the ring slides past rib
on hook and snaps over bottom of hook.
Turn height adjustment knob on base to adjust to desired
brush roll height.
Insert keyed tab on upper cord wrap into corresponding
keyed hole in upper handle tube. Rotate upper cord wrap
onto upper handle tube; snap into place.
Pull power cord through upper cord wrap to remove slack
between cord wraps.
8
Plug power cord into outlet. Use foot to turn power
switch “on”.
To position vacuum cleaner, use foot to press handle release pedal.
Press handle release pedal again to lay vacuum cleaner flat.
9

1
2
2
K
J
I
1
2
3
K
K
J
I
2
1
4
K
K
J
I
2
1
5
K
J
I
1
1
2
B
2
1
4
1
2
5
B
ENGLISH
1
D
B
Cord Storage
3
2
1
1
1
Paper Bag Replacement
Cloth Bag Replacement
Wrap power cord around upper and lower cord wraps.
Unzip cloth bag. Pull top of old paper bag and dirt tube out of
cloth bag opening.
Unplug before servicing.
Pull old paper bag off of dirt tube. Remove old paper bag
from cloth bag.
Unplug before servicing.
Turn latch to disengage post on base of vacuum cleaner. Remove
tab on bottom of old cloth bag from bracket on rear of vacuum
cleaner base.
Remove ring at top of cloth bag spring from triangular hook
on rear of upper cord wrap. Lay old cloth bag flat on floor.
Insert tab on bottom of new cloth bag into bracket on rear of vacuum
cleaner base. Turn latch to engage post on base of vacuum cleaner.
Belt and Brush Roll Replacement
Feed bottom of new paper bag into cloth bag opening. Press
new paper bag onto dirt tube over lock tabs.
Feed top of new paper bag and dirt tube into cloth bag
opening. Rezip cloth bag.
10
Slide ring at top of cloth bag spring onto triangular hook on
rear of upper cord wrap. Ensure that the ring slides past rib
on hook and snaps over bottom of hook.
Unplug before servicing.
11

3
3
2
3
1
2
1
2
2
3
1
2
2
4
1
5
2
Belt and Brush Roll Replacement (cont.)
low sidelow side
high sidehigh side
beltbelt
ribrib
6
1
1
2
3
4
7
Turn vacuum cleaner over. Turn latches on either side of nozzle
guard to release. Remove nozzle guard.
Loop new belt into groove on brush roll. Insert brush roll into
nozzle with arrows on brush roll endcaps facing down.
Remove old belt from pulley. Lift brush roll to remove from
nozzle opening.
Slide left side of belt onto pulley. Turn pulley clockwise to
feed belt into position.
Important:
Low side of belt should be left of rib. (Dotted guidelines are
molded onto the fan cover to show proper belt orientation.)
Make sure belt does not touch rib on fan shroud.
Reinstall nozzle guard from the front, then rotate back. Turn
latches to secure.
12
13
 Loading...