

Page 1

RPT-110-3PCxxx-K9
REPEATER USER GUIDE
Technical Reference Document
Version 1.2
© May-2019 RTX A/S, Denmark
Page 2

Trademarks
RTX and the combinations of its logo thereof are trademarks of RTX A/S, Denmark.
Other product names used in this publication are for identification purposes and maybe the trademarks of their
respective companies.
Regulatory information United States
Any Changes or modifications not expressly approved by the party responsible for compliance could void the user’s
authority to operate the equipment.
This device complies with part 15 of the FCC Rules. Operation is subject to the following two conditions:
(1) This device may not cause harmful interference, and (2) this device must accept any interference received,
including interference that may cause undesired operation.
Note: This equipment has been tested and found to comply with the limits for a Class B digital device, pursuant to part
15 of the FCC Rules. These limits are designed to provide reasonable protection against harmful interference in a
residential installation. This equipment generates, uses and can radiate radio frequency energy and, if not installed
and used in accordance with the instructions, may cause harmful interference to radio communications. However,
there is no guarantee that interference will not occur in a particular installation. If this equipment does cause harmful
interference to radio or television reception, which can be determined by turning the equipment off and on, the user
is encouraged to try to correct the interference by one or more of the following measures:
—Reorient or relocate the receiving antenna.
—Increase the separation between the equipment and receiver.
—Connect the equipment into an outlet on a circuit different from that to which the receiver is connected.
—Consult the dealer or an experienced radio/TV technician for help.
This equipment complies with FCC radiation exposure limits set forth for an uncontrolled environment. The antenna(s)
used for this transmitter must be used to provide a separation distance of at least 20 cm from all persons.
This transmitter must not be co-located or operating in conjunction with any other antenna or transmitter.
Regulatory information Canada
This device contains licence-exempt transmitter(s)/receiver(s) that comply with Innovation, Science and Economic
Development Canada’s licence-exempt RSS(s). Operation is subject to the following two conditions:
• This device may not cause interference.
• This device must accept any interference, including interference that may cause undesired operation of the device.
This equipment complies with ISEDC radiation exposure limits set forth for an uncontrolled environment.
The antenna(s) used for this transmitter must be used to provide a separation distance of at least 20 cm from all
persons.
Cet appareil contient des émetteurs / récepteurs exemptés de licence conformes aux RSS (RSS) d'Innovation, Sciences
et Développement économique Canada. Le fonctionnement est soumis aux deux conditions suivantes:
• Cet appareil ne doit pas causer d'interférences.
• Cet appareil doit accepter toutes les interférences, y compris celles susceptibles de provoquer un fonctionnement
indésirable de l'appareil.
Cet équipement est conforme aux limites d'exposition au rayonnement ISEDC établies pour un environnement non
contrôlé. La ou les antennes utilisées pour cet émetteur doivent être utilisées de manière à assurer une distance de
séparation d'au moins 20 cm de toutes les personnes.
Disclaimer
The contents of this document are provided about RTX products. RTX makes no representations with respect to
completeness or accuracy of the contents of this publication and reserves the right to make changes to product
descriptions, usage, etc., at any time without notice. No license, whether express, implied, to any intellectual property
rights are granted by this publication
Page 3

Confidentiality
This document should be regarded as confidential, unauthorized copying is not allowed
© May-2019 RTX A/S, Denmark, All rights reserved
http://www.rtx.dk
Page 4

Contents
1. Introduction ................................................................................................................................................................ 5
1.1. Document History ............................................................................................................................................. 5
1.2. What is new ....................................................................................................................................................... 5
1.3. Main topics ........................................................................................................................................................ 5
2. Installation of Repeater .............................................................................................................................................. 6
2.1. Package – Contents/Damage Inspection ........................................................................................................... 6
2.2. Damage Inspection ............................................................................................................................................ 7
2.3. Repeaters Mechanics ........................................................................................................................................ 8
2.4. Mounting the repeater...................................................................................................................................... 9
3. Recommended external DC adapters ....................................................................................................................... 10
4. Repeater registration ................................................................................................................................................ 11
4.1. Register repeater(s) “Local Automatic” .......................................................................................................... 11
4.2. Register repeater(s) “Manually” ..................................................................................................................... 13
5. Firmware update ...................................................................................................................................................... 15
6. LED and button ......................................................................................................................................................... 17
Page 5
1. Introduction
The RPT-110-3PCxxx-K9 repeater user guide is designed to give a detailed overview on how to install, register and
manage RTX repeaters
1.1. Document History
REVISION
AUTHOR
ISSUE DATE
COMMENTS
1.0
HDJ
26-06-2019
1.1
JSK
15-08-2019
Correct the numbering of contents
1.2
JSK
20-09-2019
Add FCC and IC Regulatory information
Correct Mechanics drawing, remove Ethernet connector
1.2. What is new
What new features have been added.
VERSION
FEATURE
V460
1.3. Main topics
• Installation
• Recommended external DC adapters
• Locate automatic registration
• Manual registration
• Firmware update
• LED indications
Page 6
2. Installation of Repeater
After planning the network, next is to determine the proper places or location the repeater. The repeater should be
mounted as high as possible.
2.1. Package – Contents/Damage Inspection
Before Package Is Opened:
Examine the shipping package for evidence of physical damage or mishandling prior to opening. If there is a proof of
mishandling prior to opening, you must report it to the relevant support center of the regional representative or
operator.
Contents of Package:
Make sure all relevant components are available in the package before proceeding to the next step.
Every shipped repeater package/box contains the following items:
2 x mounting screws and 2 x Anchor
1 x Power supply
1 x Repeater
1 x Table stand
1 x Safetysheet
Page 7

2.2. Damage Inspection
The following are the recommended procedure for you to use for inspection:
1. Examine all relevant components for damage.
2. Make a “defective on arrival – DOA” report or RMA to the operator. Do not move the shipping carton until
the operator has examined it. If possible, send pictures of the damage. The operator/regional representative
will initiate the necessary procedure to process this RMA. They will guide the network administrator on how
to return the damaged package if necessary.
3. If no damage is found, then unwrap all the components and dispose of empty package/carton(s) in
accordance with country specific environmental regulations.
Page 8

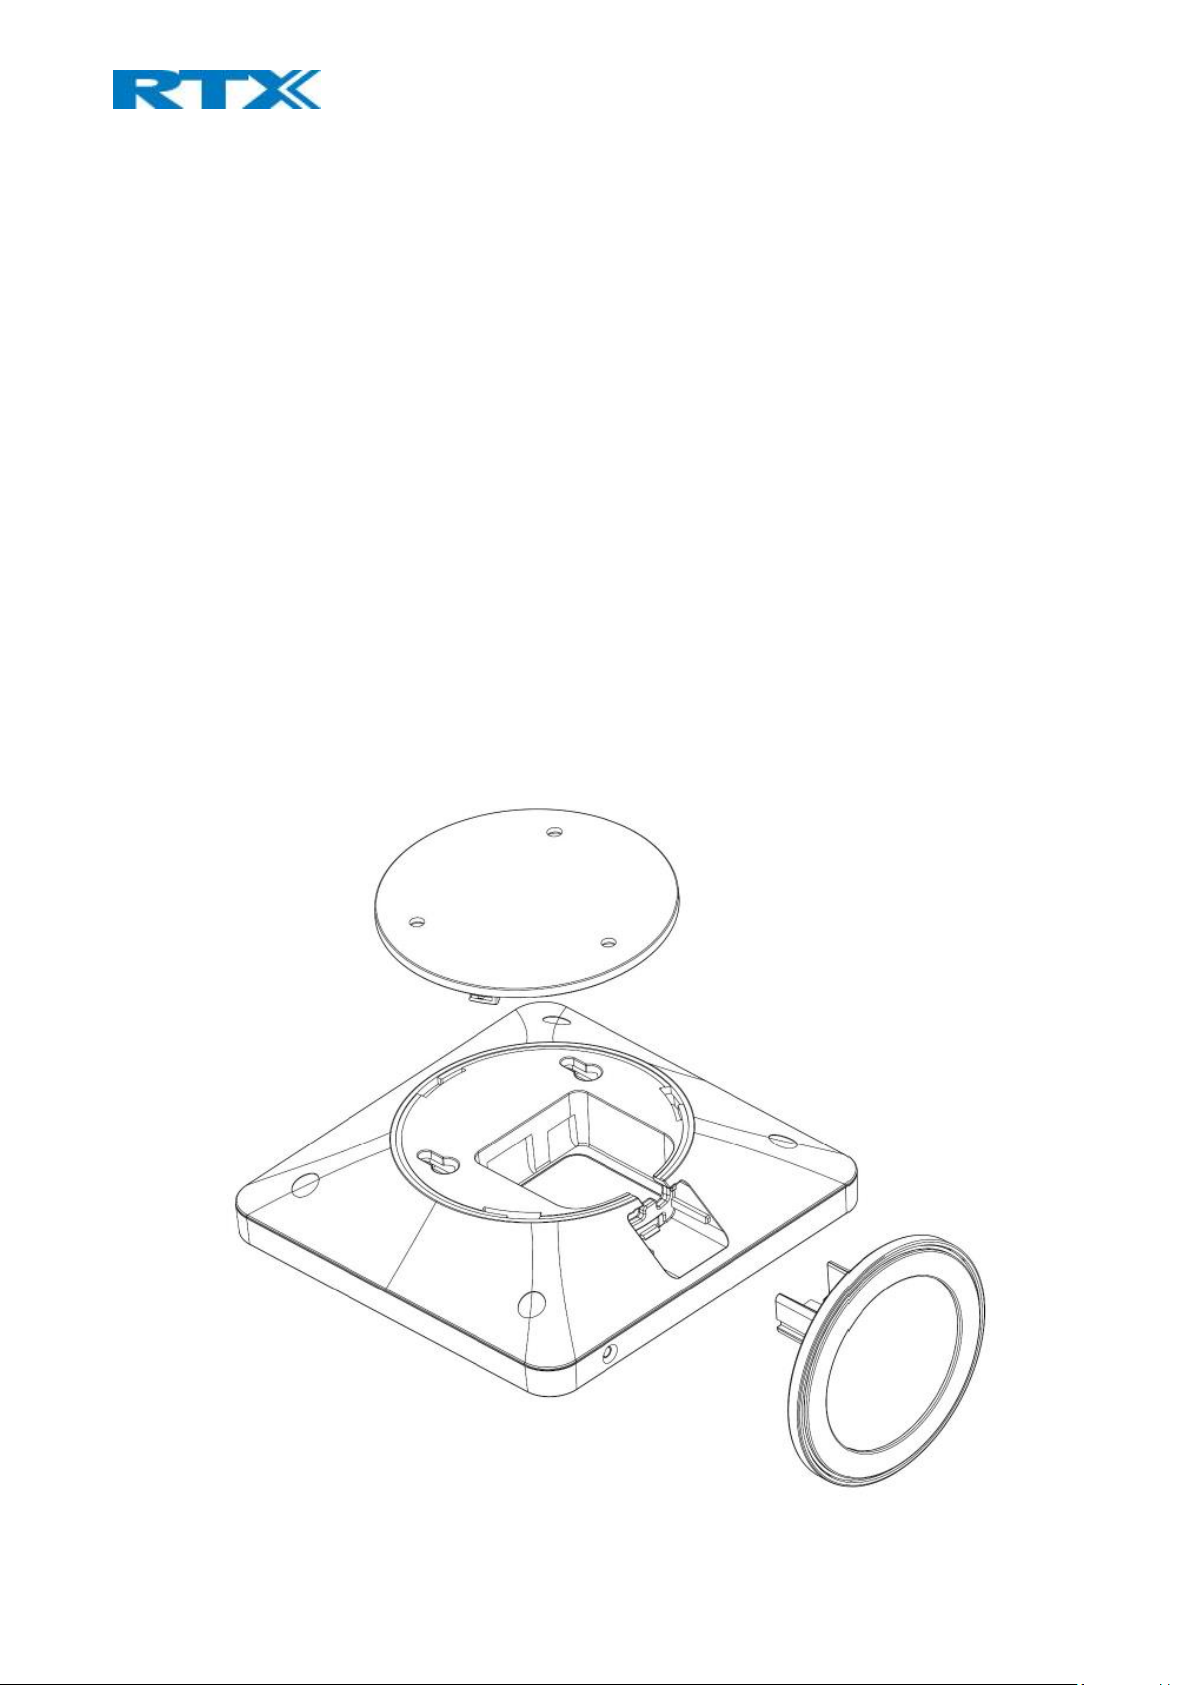
2.3. Repeaters Mechanics
The repeaters front end shows an LED indicator that signals different functional states of the repeater.
The indicator is off when the repeater is not powered on.
Page 9

2.4. Mounting the repeater
There are 2 way to mount the repeater.
1: Use the table stand that is in the box
2: Wall mount the repeater using the screws and anchors
Screws: M3,5 x 31mm
Anchors: Length 29,6mm, OD 6,0mm, ID 4,8mm
NOTE: The repeater should be mounted on a wall not higher than 2 meters
Page 10

3. Recommended external DC adapters
Module number
Specification
Manufacturer
Plug Type
S003GV0500060
SMPS,100-240VAC,5V
600mA with DC Jack
Ten Pao International
LTD
EU
S003GB0500060
UK
S003GS0500060
AU
S003GU0500060
US
Page 11

4. Repeater registration
There are 2 different ways to register RTX repeater’s “Local Automatic” and “Manually”
Local Automatic:
In this mode the repeater registers to the base station with best signal strength, this option is only recommended for
single cell systems and Multi cell systems where the repeater is only able to sync with one specific base station.
Manually:
Manual registration is used in most cases when adding repeaters to a multi cell system. Manual registration allows to
determine what base stations the repeater must connect to.
4.1. Register repeater(s) “Local Automatic”
NOTE: Do not power on the repeaters before they have been added on the base station
NOTE: When adding first repeater the base station(s) will reboot, this is because encryption is being enabled, the
same goes if all repeaters is deleted, then the system will reboot to disable encryption.
Step 1: To register repeater(s), navigate to the Repeater page.
Screen shot
Step 2: Click” Add Repeater” and select “Local Automatic” from the dropdown
Page 12

Screen shot
Step 3: Give the repeater a name and press “save”
Step 4: Power on the repeater(s) and registration will start.
When the LED is steady green the repeater is successfully registered.
Screen shot
PARAMETERS
DESCRIPTION
IDX
System counter
RPN SINGLE CELL SYSTEM:
The base has always RPN00, first repeater will then be RPN01, second repeater RPN02
and third RPN03 (3 repeaters maximum per base)
MULTI CELL SYSTEM:
Bases are increment by 2^2 in hex, means first base RPN00 second base RPN04 etc., in
between RPN01, 02, 03 addressed for repeaters at Primary base and 05, 06, 07 addressed
for Secondary base (3 repeaters maximum per base)
NAME/IPIE
Name and IPIE number of the repeater
DECT SYNC MODE
DECT Sync mode – Manually or Automatic
STATE
State of the repeater Enabled/Disabled
FW INFO
Firmware version
FWU PROGRESS
How many percentages of the firmware is loaded / Off if no firmware is being loaded
Page 13

4.2. Register repeater(s) “Manually”
NOTE: Do not power on the repeaters before they have been added on the base station
NOTE: When adding first repeater the base station(s) will reboot, this is because encryption is being enabled, the
same goes if all repeaters is deleted, then the system will reboot to disable encryption.
Step 1: To register repeater(s), navigate to the Repeater page.
Screen shot
Step 2: Click” Add Repeater” and select “Manually” from the dropdown
Screen shot
Step 3: Give the repeater a name and press “save”
Step 4: select what base station the repeater needs to register to “DECT sync source” drop down
In this case there are three base stations in the multicell (RPN00, RPN04 and RPN08) and three repeaters can be
connected to each base station.
Select the base station the repeater needs to register to.
E.g. RPN04
Page 14

Screen shot
Step 5: Select the RPN for the repeater.
ERROR: The repeater will choose the first available slot on the selected base station.
RPN x: The repeater connects to RPN x of the chosen base station.
E.g. Base station RPN04 + RPN1 repeater, then the repeater connects to “RPN5”
Screen shot
Page 15

5. Firmware update
The repeaters are updated over air.
Step 1: Navigate to Firmware Update page
Step 2: Enter “Firmware Update server address”, “Firmware path” and DECT402x firmware version
Screen shot
Page 16

PARAMETER
DEFAULT
VALUE(S)
DESCRIPTION
FIRMWARE UPDATE
SERVER ADDRESS
Empty
IP address or DNS of firmware update files source
Valid Inputs: AAA.BBB.CCC.DDD or <URL>
Example: firmware.rtx.net or 10.10.104.41
FIRMWARE PATH
Empty
Location of firmware on server (or firmware update server path
where firmware update files are located).
Example: RTXFWU
TERMINAL FILE PATH
Empty
Location of image (folder where background and start up image are
located).
Example: Images
REQUIRED VERSION
Empty
Version of firmware to be upgraded (or downgraded) on handset,
repeater, or base station.
Valid Input(s): 8-bit string length. E.g. 400
Note: Value version 0 will disable firmware upgrade
Note: Two handset types will be serial firmware upgraded. First type
8630 then type 8430.
REQUIRED BRANCH
Empty
Branch of firmware to be upgraded (or downgraded) handset,
repeater or base station.
Valid Input(s): 8-bit string length. E.g. 01
NOTE: Repeater firmware do not follow the normal version numbers.
Page 17

6. LED and button
Power cycle
The repeater basically has two modes: Subscribed or not subscribed.
When powered up without a registration, the following applies.
Power
Press
Action
OFF
00s < x < XXs
Nothing
ON
00s < x < 05s
Nothing
ON
05s < x < 300s
Search for suitable base and start registration procedure if a suitable
is found
When powered up with a registration, the following applies:
Power
Press
Action
OFF
00s < x < XXs
Nothing
ON
00s < x < 60s
Search for source base/repeater
ON
60s < x < XXs
Search for any base/repeater in the system
Button
In the below table the action of the button press is presented.
Button
Press
Action
1
00s < x < 02s
Nothing
1
02s < x < 06s
Delete registration
Old registration is deleted, and a new registration procedure is
started.
1
18s < x < 60s
Enable or disable repeater monitor beep tone in handset during call.
1
60s < x < XXs
Nothing
LED
LED
Indication
Action
GREEN
Off
Power Off
GREEN
Slow flash
Unlocked, Searching for base station
GREEN
Double flash
Registration/subscription mode and searching for open base station –
registering procedure.
GREEN
Steady on
Locked to base station and ready for use - idle
RED
Off
No handset relayed by repeater
Page 18

RED
n flash
n handset relayed by repeater
RED
Steady on
1. Registration procedure timed out after 5 min.
2: When key is held pressed the LED will light up in 2 sec. to indicate
that releasing the key will delete registration, LED turns off after 4
more sec.
RED/GREEN
Flashing
Red/Green
Recovery mode – repeater is locked to base station/repeater without
repeater mode activated.
1: Sync. Source base station/Repeater not found (Manual mode).
2: Timeout during RPN allocation due to busy base station/Repeater.
 Loading...