

Page 1

Innovating the Future of Global Communications
Installation Instructions
1
ROAMEO AP-1800
Access Point
RF (Radio Frequency) Considerations
When placing an access point, the antennas should be
placed in such a way as to have great visibility over the
area of desired coverage. This means mounting the access
point to a high point, such as a ceiling or wall above most of
the clutter and trafc of an area. If the access point has to
be mounted in a tight space, keep the antennas at least 12
inches (30cm) from any metal.
Survey Implementation
Site Survey is a system feature used to plan and design the
ROAMEO system. It provides crucial information such as
wireless coverage and roaming coverage.
Using the Site Survey mode of the ROAMEO system, you
are able to nd access point coverage areas, even when
obstacles are encountered, such as metal walls, reinforced
concrete, metal-coated glass, etc.
Mounting the Access Point
Reference View
There are four (4) recommended ways to mount the
ROAMEO AP-1800 access point unit: ceiling or wallmounting, pole mounting, rail mounting, or as a free-standing
installation (such as a table or shelf).
IMPORTANT: The mounting clamp kit is an optionally sold
item.
Antenna connection and placement
Antennas should be in the upright-most position for the best
reception of signal. The antenna has a joint so you can adjust
the angle, if needed.
To attach the antennas to the ROAMEO AP-1800, do the
following:
1. Gently push the antenna into the antenna connector
on the ROAMEO AP-1800. Take care to align the
connector pin with the antenna pin hole.
2. Turn the antenna clockwise to tighten in place.
NOTE: For permanent antenna installation, it is
recommended to tighten the antennas so
they cannot come loose from vibration or if
bumped.
Hand-tighten the antenna, and then using
needle-nose pliers, grasp the serrated metal
collar of the antenna and tighten about
1/16th inch (1.6 mm) more in the clockwise
direction. This tightens the connector
to about 5 lbf-in (0.56 Nm), which is the
specication for a solid connection.
Rail-Mounted
Pole-Mounted
Ceiling or Wall-Mounted
Rotate the antenna
clockwise to tighten
Rotate the antenna
counter-clockwise to loosen
Carefully align
t
he antenna with
t
he antenna connector
Page 2

Innovating the Future of Global Communications
www.rtsintercoms.com
2
To adjust the antennas for the best signal reception
when the access point is mounted horizontally, do the
following:
• Carefully bend the antenna 90° at the antenna joint
until the antennas are aligned straight up or down.
Wall or Ceiling Mounting
To wall mount the ROAMEO AP-1800 access point, do the
following:
1. Using the access point as a template and a pencil, mark
the four (4) hole locations on the wall or ceiling.
NOTE: It may be necessary to predrill the holes
or use screw anchors, depending on the
material of the wall.
2. Align the AP-1800 in the position and placement
desired.
3. Using a screw driver, drive the screws into the
predened holes.
Pole Mounting
To pole mount the ROAMEO AP-1800 access point, do
the following:
1. Align the mounting clamp in the Pole Use Clamp
Position on the bottom of the AP-1800.
2. Using the supplied screws from the mounting kit, attach
the mounting clamp to the AP-1800.
3. Fit the mounting clamp around the pole desired.
4. Once in position, use the adjustment knobs to tighten
the clamp around the pole.
Use the larger
knob to tighten
the clamp in
place
Page 3
Innovating the Future of Global Communications
www.rtsintercoms.com
3
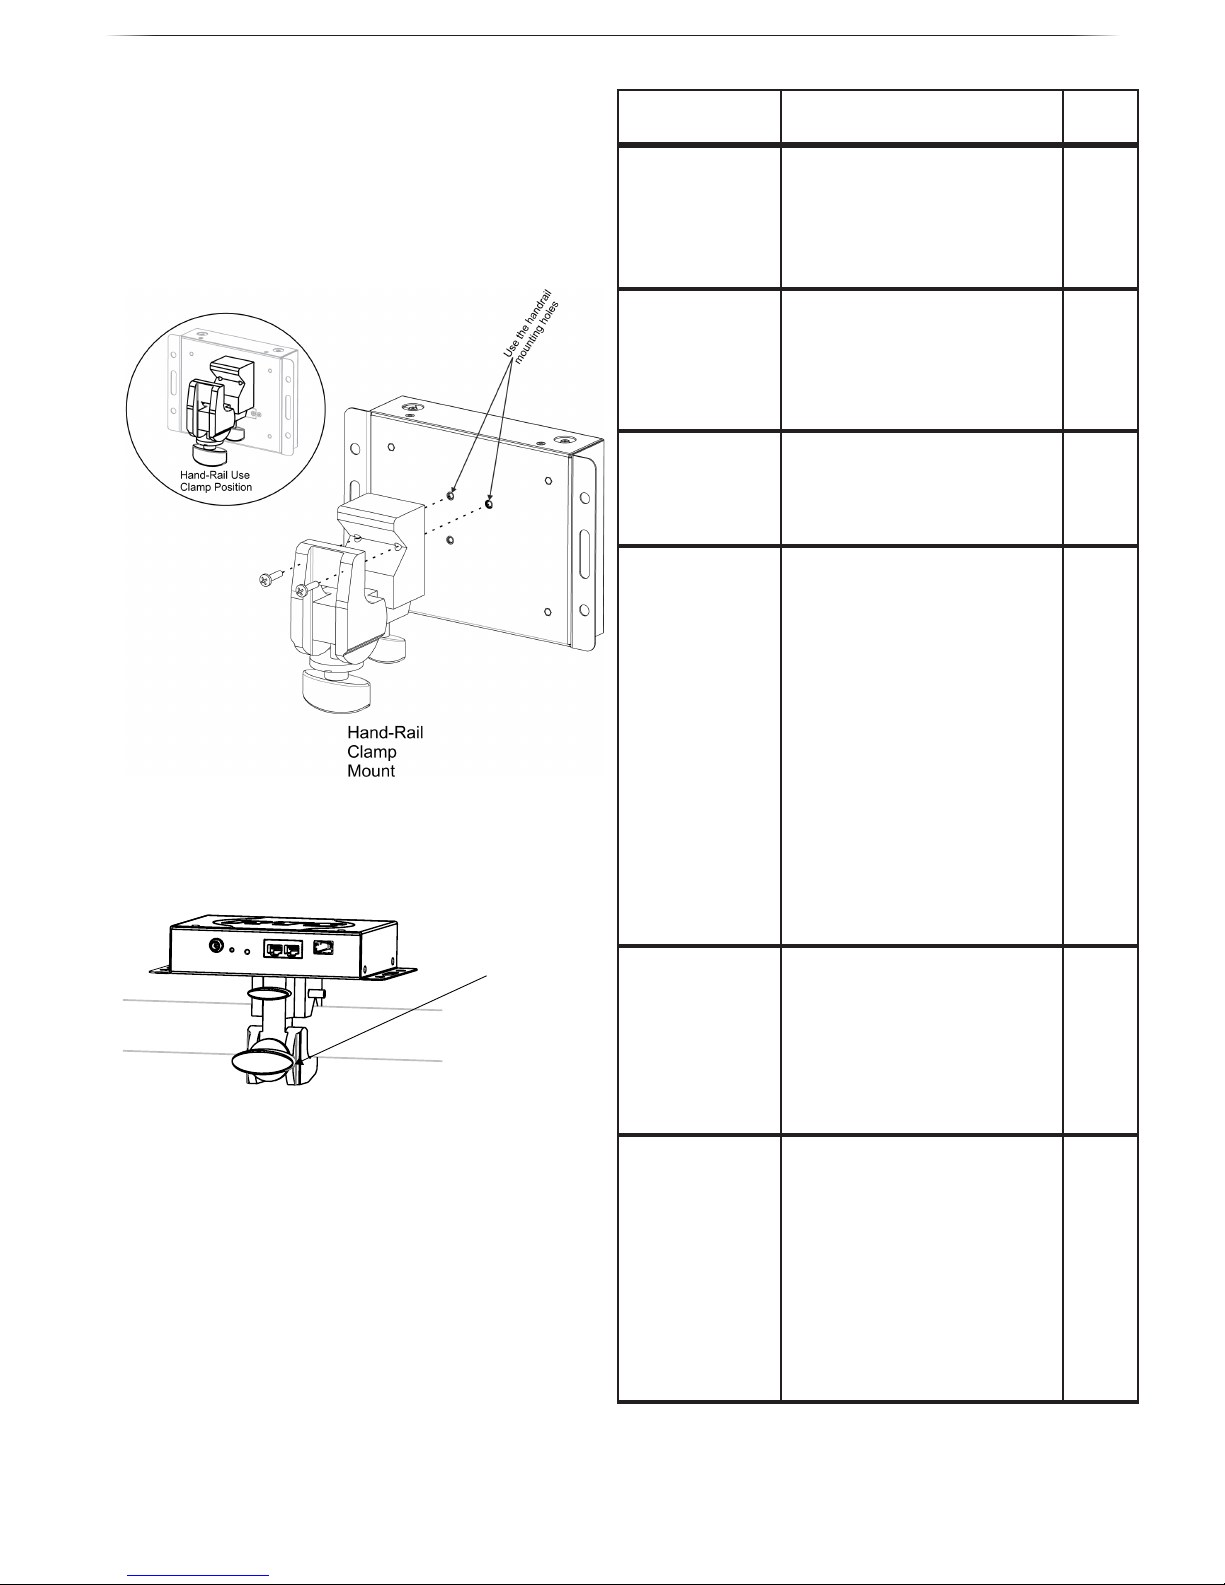
Rail Mounting
To rail mount the ROAMEO AP-1800 access point, do the
following:
1. Align the mounting clamp in the Hand Rail Use Clamp
Position on the bottom of the AP-1800.
2. Using the supplied screws from the clamp kit, attach the
mounting clamp to the AP-1800.
3. Fit the mounting clamp around the rail you want to
mount the unit to.
4. Once in position, use the larger adjustment knob to
tighten the clamp around the pole.
Free-Standing Installation
Setting the AP-1800 unit on a table or shelf is commonly
referred to as free-standing installation. When using this
type of mounting, it is important to remember to position the
antennas perpendicurlar to the unit (antennas in the air) for the
best signal reception.
Mounting
Surface
Materials Used Qty
Drywall
Drywall screws 4
Drywall anchors (as needed) 4
¼-inch (max.) Flat washer(as
needed)
4
Concrete
¼-inch (max.) Concrete screws 4
Concrete anchors (as required) 4
¼-inch (max.) Flat washer(as
needed)
4
Wood
¼-inch (max.) Wood screws 4
¼-inch (max.) Flat washer(as
needed)
4
Metal Surface
¼-inch (max.) Sheet metal
screws
4
¼-inch (max.) Flat washer(as
needed)
4
OR
Self-tapping or Self-drilling
sheet metal screws, ¼-inch
(max.)
4
OR
Machine screw, ¼-inch (max.) 4
Machine nut or drilled and
tapped holes
¼-inch (max.) Flat washer(as
needed)
4
Rack Frame
10-32 Rackmount Screws 2 to 4
¼-inch (max.) Flat washer(as
needed)
2 to 4
OR
10-32 Truss Head Rackmount
Screws
2 to 4.
Building Structure
Member (roof
trusses, etc)
¼-inch (max.) U-bolts 4
¼-inch (max.) Flat washer(as
needed)
4
¼-inch (max.) Machine nuts 4
OR
See Metal Surface Mounting
Use the larger
knob to tighten
the clamp in
place
Page 4

Innovating the Future of Global Communications
www.rtsintercoms.com
4
Set Up for Site Survey
Requirements
• AP-1800 Access Point and Power Supply
• TR-1800 Beltpack and Battery
• Computer with an Ethernet port and IPedit Software
installed
• Standard Ethernet Cable
Prepare the Hardware
• Verify the antennas are mounted on the access point.
Use IPedit to Congure the AP-1800 Access
Point
NOTE: If the AP-1800 you plan to use is already part of
an operating system, then none of the following
conguration is required.
Network Conguration
NOTE: By Default, the AP-1800 is congured to automatically
receive an IP Address (link-local or DHCP). If the
network addressing scheme of the
AP-1800 is unknown, a factory restore sets the unit
back to the default conguration.
• Link-Local addressing:
If the AP-1800 and computer are connected directly,
the computer network conguration should be
changed to a link-local address (see instructions
below).
• DHCP Server addressing:
If the AP-1800 and computer are connected to a
network with DHCP server, the computer should be
set up to receive an IP Address automatically.
• Static-IP Address addressing:
If the AP-1800 uses static IP Address addressing,
the computer network conguration should be
changed to an IP Address belonging to the same
network.
Set the Computer to a Link-Local IP Address
To set the computer to a Link-Local IP Address, do the
following:
NOTE: These instructions detail a typical setup for the
Windows 7 platform.
1. From the Start menu, select Control Panel.
2. Click Network and Internet.
The Network and Internet window appears.
3. Click Network and Sharing Center.
The Network and Sharing Center window appears.
4. Click Change Adapter Settings.
The Network Connections window appears.
5. Double-click Local Area Connection.
The Local Area Connection Status Properties window
appears.
6. From the connection list, select Internet Protocol
Version 4 (TCP/IPv4).
7. Click the Properties button.
The Internet Protocol Version 4 (TCP/IPv4) Properties
window appears.
8. Select the Use the following IP Address check box.
The IP elds become active
9. In the IP Address: eld, enter 169.254.0.1.
NOTE: If the AP-1800 you plan to use has been
connected to a Matrix system in the past
or has been assigned a xed IP Address
already, then assigning the computer a
Link-Local Address will not work. If you know
the AP-1800’s IP Address, congure the
computer to be in its network. If you do not
know the IP Address, then reset the AP-
1800 back to a Link Local Address by doing
a factory reset. For more information on
performing a factory reset, see the ROAMEO
Technical Manual.
10. In the subnet mask: eld, enter 255.255.0.0.
11. Click the OK button to exit the Internet Protocol
Properties window.
12. Click the Close button to exit the Local Area Connection
Properties window.
Add the Access Point to IPedit
To add the access point to IPedit, do the following:
1. Start IPedit.
2. From the Devices menu, select Add.
The Add Devices window appears.
3. From the Available Devices pane, select the Access
Point.
The Add button becomes active.
4. Click Add.
The AP-1800 appears in the device catalog in the left
panel.
5. Click Done.
The Add Devices window closes. The AP-1800 appears in
the Device Catalog.
Congure the Access Point
IMPORTANT: The user must be signed into IPedit with
network administrator rights to complete these
instructions
To congure the Access Point with IPedit, do the following:
1. From the Device Catalog on the left, select the AP-1800.
The Device Information elds populate.
2. In the Description eld, enter a unique description for
the access point.
3. In the Version eld, verify the version information is
correct. The latest software can be obtained from www.
rtsintercoms.com.
4. If using a static IP Address, verify the IP Address is
correct.Select the
5. Select the Disable RSTP check box to disable the RSTP
Page 5

Innovating the Future of Global Communications
www.rtsintercoms.com
5
protocol, if desired.
NOTE: If RSTP is enabled and the connection has a switch,
then the switch must also have RSTP enabled.
DECT Information
6. In the System ID eld, enter the system ID for the access
point. This eld accepts a 3-digit hexadecimal number. By
default, this eld is set to B2B.
NOTE: All access points in a system must have the
same System ID.
7. In the AP ID eld, enter the unique AP ID for the access
point. The range for this eld is 1-255.
8. Select the Sync Master check box. When doing a site
survey with a single AP-1800, it must be set to a Sync
Master unit. If doing a site survey of a system, leave this
set for the system.
NOTE: There can be only one master in each
system.
9. In the PIN eld, enter the PIN of the access point. By
default, this eld is set to 0000.
10. From the Zone drop down menu, select the zone the
access point is assigned.
11. From the CODEC drop down menu, select the CODEC
the access point is running.
IMPORTANT: The CODEC of the access point is
either G.722 (wideband) or G.726 (narrowband). A
system MUST be all G.722 or G.726.
Channel Conguration Pane
12. From the column headings, select the channel to
congure (for example, Channel 1, etc.).
IMPORTANT: With CODEC G.722, ve channels
are available for conguration. With CODEC G.726
10 channels are available for conguration.
TIP: When setting up a multiple access point
system, consider leaving one or two channels open
for additional beltpacks and distribute the existing
beltpacks equally among the access points.
13. In the Channel Description eld, enter a channel
description, if applicable.
To assign the beltpack to a connected Matrix system, follow
step 14 through step 16 to congure the access point and
OMI channels. For Site Survey without a Matrix, proceec to
step 17
14. From the Description Type drop down menu, select the
OMI card to which the channel is connected.
15. In the Destination Device Name eld, enter the name of
the OMI card to which the channel is connected.
OR
Click the Browse button.
The Discovered Devices window appears.
a. Expand the tree to view the available
destination devices.
b. From the expanded tree, select the
destination device.
c. Click OK.
The Discovered Devices window closes.
16. From the Destination Channel drop down menu, select
the destination channel to which the channel is
connected.
17. In the DECT BPID, enter the beltpack ID to assign to
that channel.
18. In the DECT Zone Selections eld, enter the zone the
belpack is permitted to operate (the default is zone 1).
OR
From the DECT Zone drop down menu, select the check
box next to each zone to assign the beltpack.
NOTE: At least one zone must be selected for the
beltpack. Any combination of zone may be
selected.
19. From the Changes menu, select Send.
20. From the File menu, select Save.
Subscribe the TR-1800 to the AP-1800
To subscribe the TR-1800 to the AP-1800, do the following:
IMPORTANT: Be sure the beltpack is within 40 feet (12
meters) of the AP-1800.
1. With the AP running, power-on the TR-1800.
The front color display panel activates.
2. Press the Menu button twice.
The beltpack main menu appears.
3. Using the up and down arrow buttons, navigate to the
System Setup icon.
4. Press the Select button.
The Subscription Setup menu appears.
5. Using the up and down arrow buttons, navigate to the
sub-system setup icon.
6. Press the Select button.
The Enter System ID screen appears.The default System
ID is B2B.
7. Using the up and down arrows, enter the rst character
of the access point system ID.
8. Press the Select button.
The focus moves to the next character space in the
system ID.
9. Repeat steps 8 and 9 until the system ID is entered
completely.
10. Once the system ID is entered, press the Select button.
The Enter PIN screen appears.
11. Using the up and down arrows, enter the rst number of
the access point pin number. (The default is 0000).
12. Press the Select button.
The focus moves to the next character space in the PIN
number.
13. Repeat steps 12 and 13 until the PIN number is entered
completely.
The Home screen appears in the front display. The DECT
connection icon and the RSSI icon become active.
Page 6

Innovating the Future of Global Communications
www.rtsintercoms.com
6
Performing a Site Survey
A site survey is performed to determine the placement
of access points to ensure RF coverage of the desired
area. A beltpack, communicating with an access point at
a test location, is set to the site survey screen where RSSI
(Received Signal Strength Indication) and QF (Quality Factor)
are both used to nd the RF coverage area.
Prerequisites
• Have a beltpack that has been successfully subscribed to
an access point.
• Have a site map or blueprint of the building that can be
marked up.
• Power can be supplied to the access point at the possible
test locations either by using power extension cables or
battery power.
• For battery power 12VDC @ 0.600 Amps must
be available to the access point. A charged
12VDC battery rated for at least 2.4 Amp-hours is
recommended for a typical site survey length of time.
• The input connector required for an access point
is a 13.8mm long, female barrel, 2.5mm x 5.5mm
connector.
NOTE: The unit is marked 1.5 Amps. This is an upper limit set
to handle peak loads when fully loaded. When doing
site surveys, an access point is not heavily loaded.
To perform a site survey, do the following:
1. Place the access point in the location to be tested for
coverage.
2. Power up the access point.
When the power light turns solid green, the access point is
ready.
3. Power up the beltpack.
The splash screen momentarily displays and then the
home screen appears.
NOTE: When the beltpack nishes booting, the
home screen indicates a wireless connection.
If the wireless connection does not display, verify
settings in the “Setup for a Site Survey” section.
4. Press the Menu button.
The beltpack main menu appears.
5. Using the up and down arrow buttons, navigate to the
System Setup icon.
6. Press the SELECT button.
The beltpack system setup menu appears.
7. Using the up and down arrow buttons, navigate to
the Site Survey icon.
8. Press the SELECT button.
The site survey screen appears.
CARRIER - Current RF carrier of the access point (this
may change from time to time)
SLOT - Current time slot on the RF carrier the access
point to beltpack packets are on (this may
change from time to time)
AP ID - Access Point Identication
RSSI - Radio Signal Strength Indication
QF - Quality Factor. This is representative of the
number of packets received out of packets
sent
Meaning of RSSI
RSSI Color Description
0-47 Red Weak - poor to no reception in area
48-70 Yellow Marginal - some dropouts of audio in area
71-216 Green Strong - good RF coverage
Meaning of QF
QF Color Description
0-4 Red Weak - too many dropouts in the area
5-6 Yellow Marginal - some dropouts of audio in area
7-10 Green Strong - good RF coverage
9. Mark the access point’s location on the building layout
diagram.
10. Walk around with the beltpack throughout the area(s) of
interest while looking at the site survey screen.
NOTE: If performing a survey of an installed system,
monitor the AP ID displayed on the site survey screen
to view where coverage area boundaries exist.
11. Record the RSSI and QF number on the building layout
diagram at several locations throughout the area of
interest.
GOOD COVERAGE AREA DEFINITION:
RSSI = 71 – 216, Site survey bar in the green.
QF = 7 -10, Site survey bar in the green.
If the two indications are different, always use
the worst case of the RSSI and QF indications
for dening a good coverage area. Example: QF
= 10 and RSSI = 71, use the RSSI level as the
cutoff for the good coverage area.
12. When you have collected enough data points, draw a
line on the building layout, using the coverage limits as
shown in the good coverage area denition information
Page 7

Innovating the Future of Global Communications
www.rtsintercoms.com
7
Try other access point locations to to improve the RF coverage in the desired area, if needed.
If setting up a roaming system, ensure good overlap of coverage areas of the access points. Good roaming between access
point areas requires overlap of coverage for error-free roaming.
The access points that support roaming beltpacks should have an RSSI of >80 from each access point involved in the overlap
to provide error-free roaming.
In high density beltpack areas where more than six wideband access points may be required, some access points may not
detect an RF carrier already in use which can result in roaming issues. The system works best if these scenarios are avoided
by designing high density areas with good access point overlap. The following gure shows how all seven access points can
detect and coordinate carriers and time slots with each other, even when there are more than six devices present. The 112
RSSI contour limit can be measured by a beltpack using the site survey screen when testing an access point location.
Page 8

www.rtsintercoms.com
Bosch Security Systems, Inc. | 12000 Portland Avenue South | Burnsville, Minnesota 55337
Website: www.rtsintercoms.com
Form Number: F.01U.332.311 Rev 03
Date: June 2017
 Loading...