

Page 1
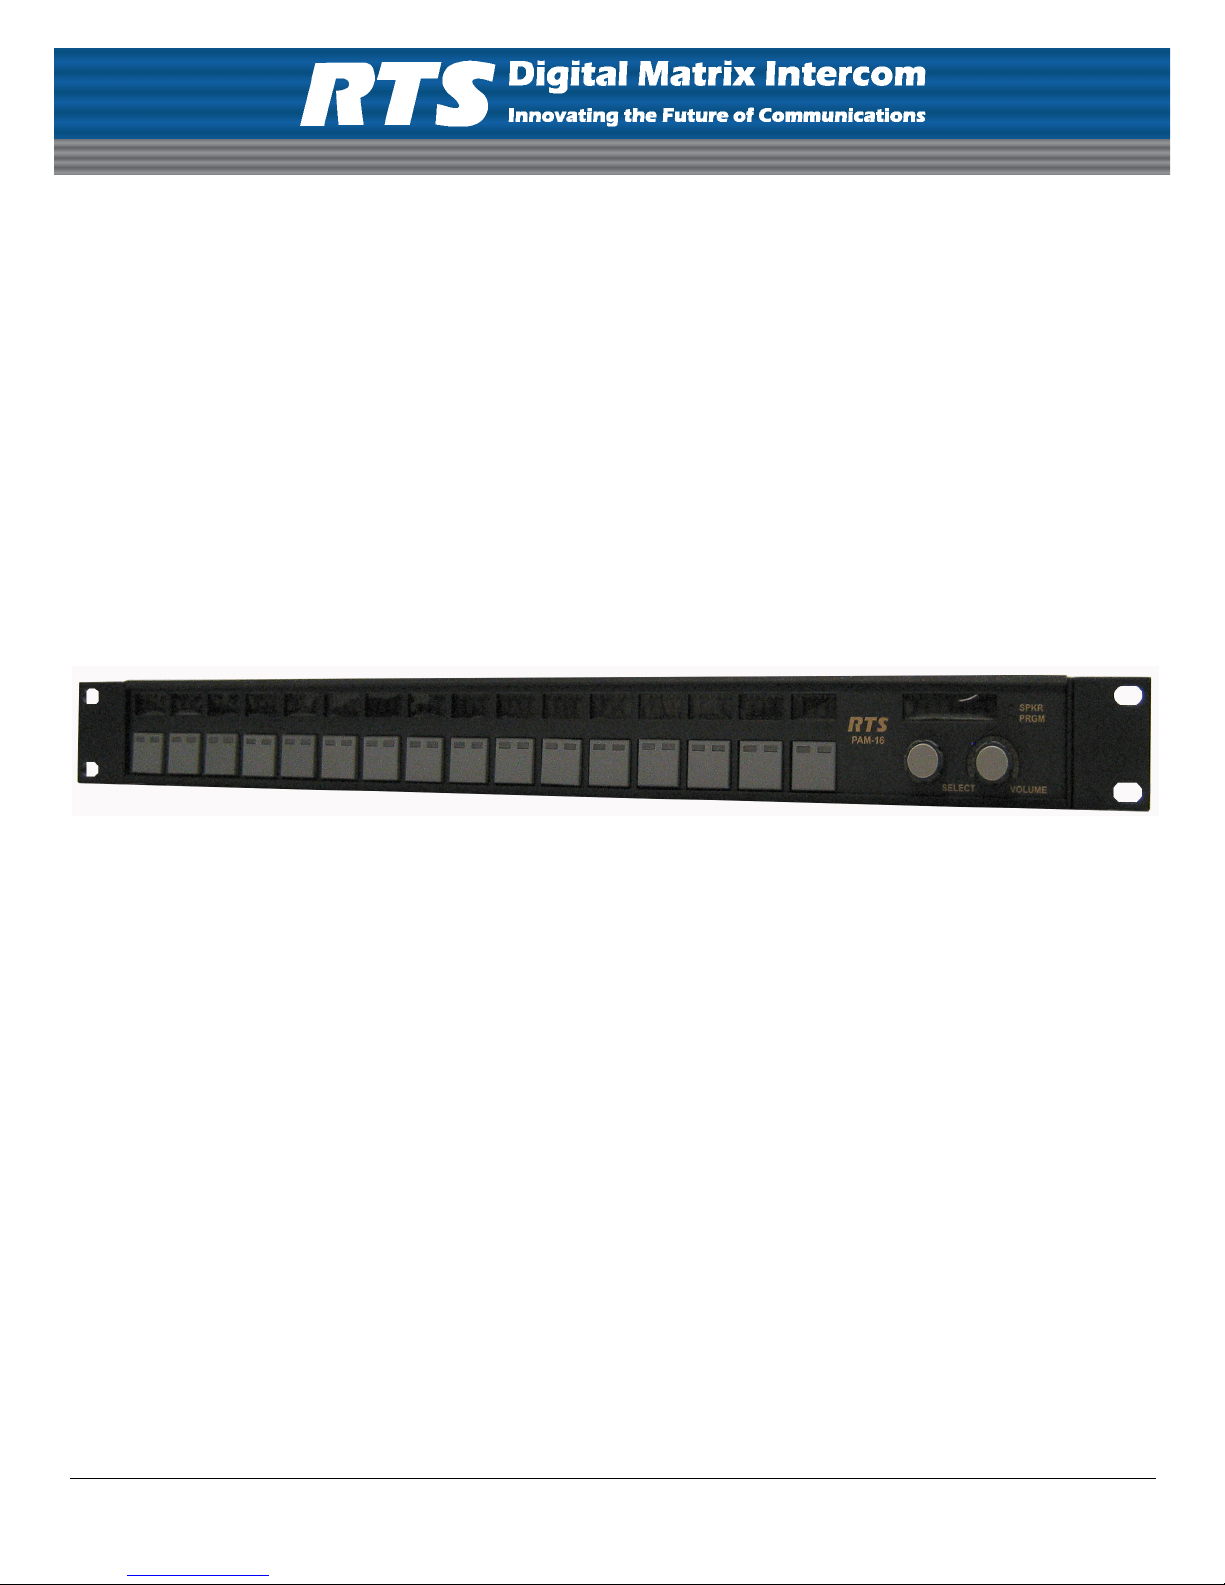
PAM-16
Production Audio Monitor
User Instructions
9350-7771-000 Rev E 7/2010
Page 2
PROPRIETARY NOTICE
SHIPPING TO THE MANUFACTURER
The product information and design disclosed herein were originated by
and are the property of Bosch Security Systems, Inc. Bosch reserves all
patent, proprietary design, manufacturing, reproduction, use and sales
rights thereto, and to any article disclosed therein, except to the extent
rights are expressly granted to others.
COPYRIGHT NOTICE
Copyright 2010 by Bosch Security Systems, Inc. All rights reserved.
Reproduction, in whole or in part, without prior written permission from
Bosch is prohibited.
WARRANTY NOTICE
See the enclosed warranty card for further details.
CUSTOMER SUPPORT
Technical questions should be directed to:
Customer Service Department
Bosch Security Systems, Inc.
12000 Portland Avenue South
Burnsville, MN 55337 USA
Telephone: 877-863-4169
Fax: 800-323-0498
Info@rtsintercoms.com
Technical Questions EMEA
Bosch Security Systems Technical Support EMEA
http://www.rtsintercoms.com/contact_main.php
RETURN SHIPPING INSTRUCTIONS
All shipments of product should be made via UPS Ground, prepaid (you
may request from Factory Service a different shipment method). Any
shipment upgrades will be paid by the customer. The equipment should
be shipped in the original packing carton. If the original carton is not
available, use any suitable container that is rigid and of adequate size. If
a substitute container is used, the equipment should be wrapped in paper
and surrounded with at least four (4) inches of excelsior or similar
shock-absorbing material. All shipments must be sent to the following
address and must include the Proof of Purchase for warranty repair.
Upon completion of any repair the equipment will be returned via
United Parcel Service or specified shipper, collect.
Factory Service Department
Bosch Security Systems, Inc.
8601 East Cornhusker Hwy.
Lincoln, NE 68507 U.S.A.
Attn: Service
THE LIGHTNING
FLASH AND
ARROWHEAD
WITHIN THE
TRIANGLE IS A
WARNING SIGN
ALERTING YOU
OF
“DANGEROUS
VOLTAGE”
INSIDE THE
PRODUCT.
SEE MARKING ON BOTTOM/BACK OF PRODUCT
CAUTION: TO REDUCE
THE RISK OF ELECTRIC
SHOCK, DO NOT
REMOVE COVER. NO
USER-SERVICABLE
PARTS INSIDE. REFER
SERVICING TO
QUALIFIED SERVICE
PERSONNEL.
THE
EXCLAMATION
POINT WITHIN
THE TRIANGLE
IS A WARNING
SIGN
ALERTING YOU
OF IMPORTANT
INSTRUCTIONS
ACCOMPANYIN
G THE
PRODUCT
Customer Service Department
Bosch Security Systems, Inc. (Lincoln, NE)
Telephone: 402-467-5321
Fax: 402-467-3279
Factory Service: 800-553-5992
Please include a note in the box which supplies the company name,
address, phone number, a person to contact regarding the repair, the type
and quantity of equipment, a description of the problem and the serial
number(s).
WARNING: APPARATUS SHALL NOT BE EXPOSED TO DRIPPING
OR SPLASHING AND NO OBJECTS FILLED WITH LIQUIDS, SUCH
AS VASES, SHALL BE PLACED ON THE APPARATUS.
WARNING: THE MAIN POWER PLUG MUST REMAIN READILY
OPERABLE
CAUTION: TO REDUCE THE RISK OF ELECTRIC SHOCK, GROUNDING OF THE CENTER PIN OF THIS PLUG MUST BE MAINTAINED.
WARNING: TO REDUCE THE RISK OF FIRE OR ELECTRIC SHOCK,
DO NOT EXPOSE THIS APPRATUS TO RAIN OR MOISTURE.
WARNING: TO PREVENT INJURY, THIS APPARATUS MUST BE
SECURELY ATTACHED TO THE FLOOR/WALL/RACK IN ACCORDANCE WITH THE INSTALLATION INSTRUCTIONS.
This product is AC only.
Page 3

Important Safety Instructions
1. Read these instructions.
2. Keep these instructions.
3. Heed all warnings.
4. Follow all instructions.
5. Do not use this apparatus near water.
6. Clean only with dry cloth.
7. Do not block any ventilation openings. Install in accordance with the
manufacturer’s instructions.
8. Do not install near any heat sources such as radiators, heat registers, stoves, or
other apparatus (including amplifiers) that produce heat.
9. Do not defeat the safety purpose of the polarized or grounding-type plug. A
polarized plug has two blades with one wider than the other. A grounding type
plug has two blades and a third grounding prong. The wide blade or the third
prong are provided for your safety. If the provided plug does not fit into your
outlet, consult an electrician for replacement of the obsolete outlet.
10.Protect the power cord from being walked on or pinched particularly at plugs,
convenience receptacles, and the point where they exit from the apparatus.
11.Only use attachments/accessories specified by the manufacturer.
12.Use only with the cart, stand, tripod, bracket, or table specified by the
manufacturer, or sold with the apparatus. When a cart is used, use caution when
moving the cart/apparatus combination to avoid injury from tip-over.
13.Unplug this apparatus during lightning storms or when unused for long periods
of time.
14.Refer all servicing to qualified service personnel. Servicing is required when the
apparatus has been damaged in any way, such as power-supply cord or plug is
damaged, liquid has been spilled or objects have fallen into the apparatus, the
apparatus has been exposed to rain or moisture, does not operate normally, or
has been dropped.
Page 4

Page 5

Table
of
Contents
Important Safety Instructions .......................................................................................................................................... iii
READ ME FIRST ................................................................................................................................................i
POWER-UP AND INITIAL SETTINGS ............................................................................................... 7
Applying Power ................................................................................................................................................... 7
Addressing ........................................................................................................................................................... 7
Determine the Address, ADAM and ADAM CS Intercoms .............................................................................................7
Determine the Address, Zeus Intercom Systems ..............................................................................................................7
Set the Address .................................................................................................................................................................7
Power-Up Indications .......................................................................................................................................... 8
Keypanel with Alphanumeric Displays ............................................................................................................................8
Assigned Key: ................................................................................................................................................................8
Unassigned Keys ............................................................................................................................................................8
CALL / MENU Indicators .............................................................................................................................................8
SPKR/PGM Volume Indicator ......................................................................................................................................8
BASIC INTERCOM OPERATION ........................................................................................................ 9
Keys and Displays ............................................................................................................................................... 9
Speaker/PRGM Selection and Volume Adjustment .......................................................................................... 10
Copy Call Waiting ............................................................................................................................................. 10
MENU DESCRIPTION ........................................................................................................................ 13
Top–Level Menu ............................................................................................................................................... 13
General Description ........................................................................................................................................................13
Display Menu .................................................................................................................................................... 14
General Description ........................................................................................................................................................14
Display Menu, KEY ICOM ............................................................................................................................................14
Display Menu, Key Type ................................................................................................................................................14
Display, Port Num ..........................................................................................................................................................15
Display, Version .............................................................................................................................................................15
Key ASGN Menu .............................................................................................................................................. 15
Key Asgn, Clear ..............................................................................................................................................................15
Key Asgn, Copy ..............................................................................................................................................................15
Key Asgn, Lists, ICOM ..................................................................................................................................................16
Key ASGN, Lists, PL (Party Lines) ................................................................................................................................16
Key ASGN, P-P (Point-to-Point) ....................................................................................................................................16
Key ASGN, Lists, IFB ....................................................................................................................................................17
Key ASGN, Lists, IFSL ..................................................................................................................................................18
Page 6

Key ASGN, Lists, ISO ....................................................................................................................................................19
Key ASGN, Lists, RLY (Relays) ....................................................................................................................................19
Key ASGN, Lists, SPCL (Special Lists) ........................................................................................................................20
Key ASGN, Lists, UPL ...................................................................................................................................................21
Level Menu ........................................................................................................................................................21
Page (1 – 4) Menu ..............................................................................................................................................22
Select Control Operation in Service Mode ........................................................................................................22
Service Menu .....................................................................................................................................................22
General Description ........................................................................................................................................................22
Service, Dimmer .............................................................................................................................................................23
Service, Lock/unlock ......................................................................................................................................................23
Service, Mod Asgn ..........................................................................................................................................................23
How MODS Work .......................................................................................................................................................24
Procedure to Assign MODS ........................................................................................................................................25
Using Multiple Expansion Panels (PAM-16 Only) .....................................................................................................26
SERVICE, MODE ..........................................................................................................................................................27
SERVICE, RESET ..........................................................................................................................................................27
SERVICE, SET ADDR ..................................................................................................................................................27
Determine the Keypanel Address, CS9XXX Intercoms ..............................................................................................27
Determine the Keypanel Address, ADAM and ADAM CS Intercoms .......................................................................27
Determine the Keypanel Address, Zeus Intercom Systems .........................................................................................27
SERVICE, TEST PNL ....................................................................................................................................................28
PAM-16 KEYPANEL QUICK REFERENCE ..................................................................................... 29
Quick Reference Menu ......................................................................................................................................29
Page 7
READ ME FIRST
This manual is designed for two (2) basic types of users:
Operators – those who are not involved in the setup or maintenance of the keypanel, but simply want to use it to
communicate. The first type of user should skip to “Basic Intercom Operation” on page 9.
Technicians – those who will use the advanced features to modify the keypanel’s operation and key assignments. The
second type of user may also be the maintenance person and/or system administrator for the intercom
system.
Technicians should become familiar with “Power-Up and Initial Settings” on page 7, as well as “Basic
Intercom Operation” on page 9. The advanced features are arranged in a system of menus accessible using
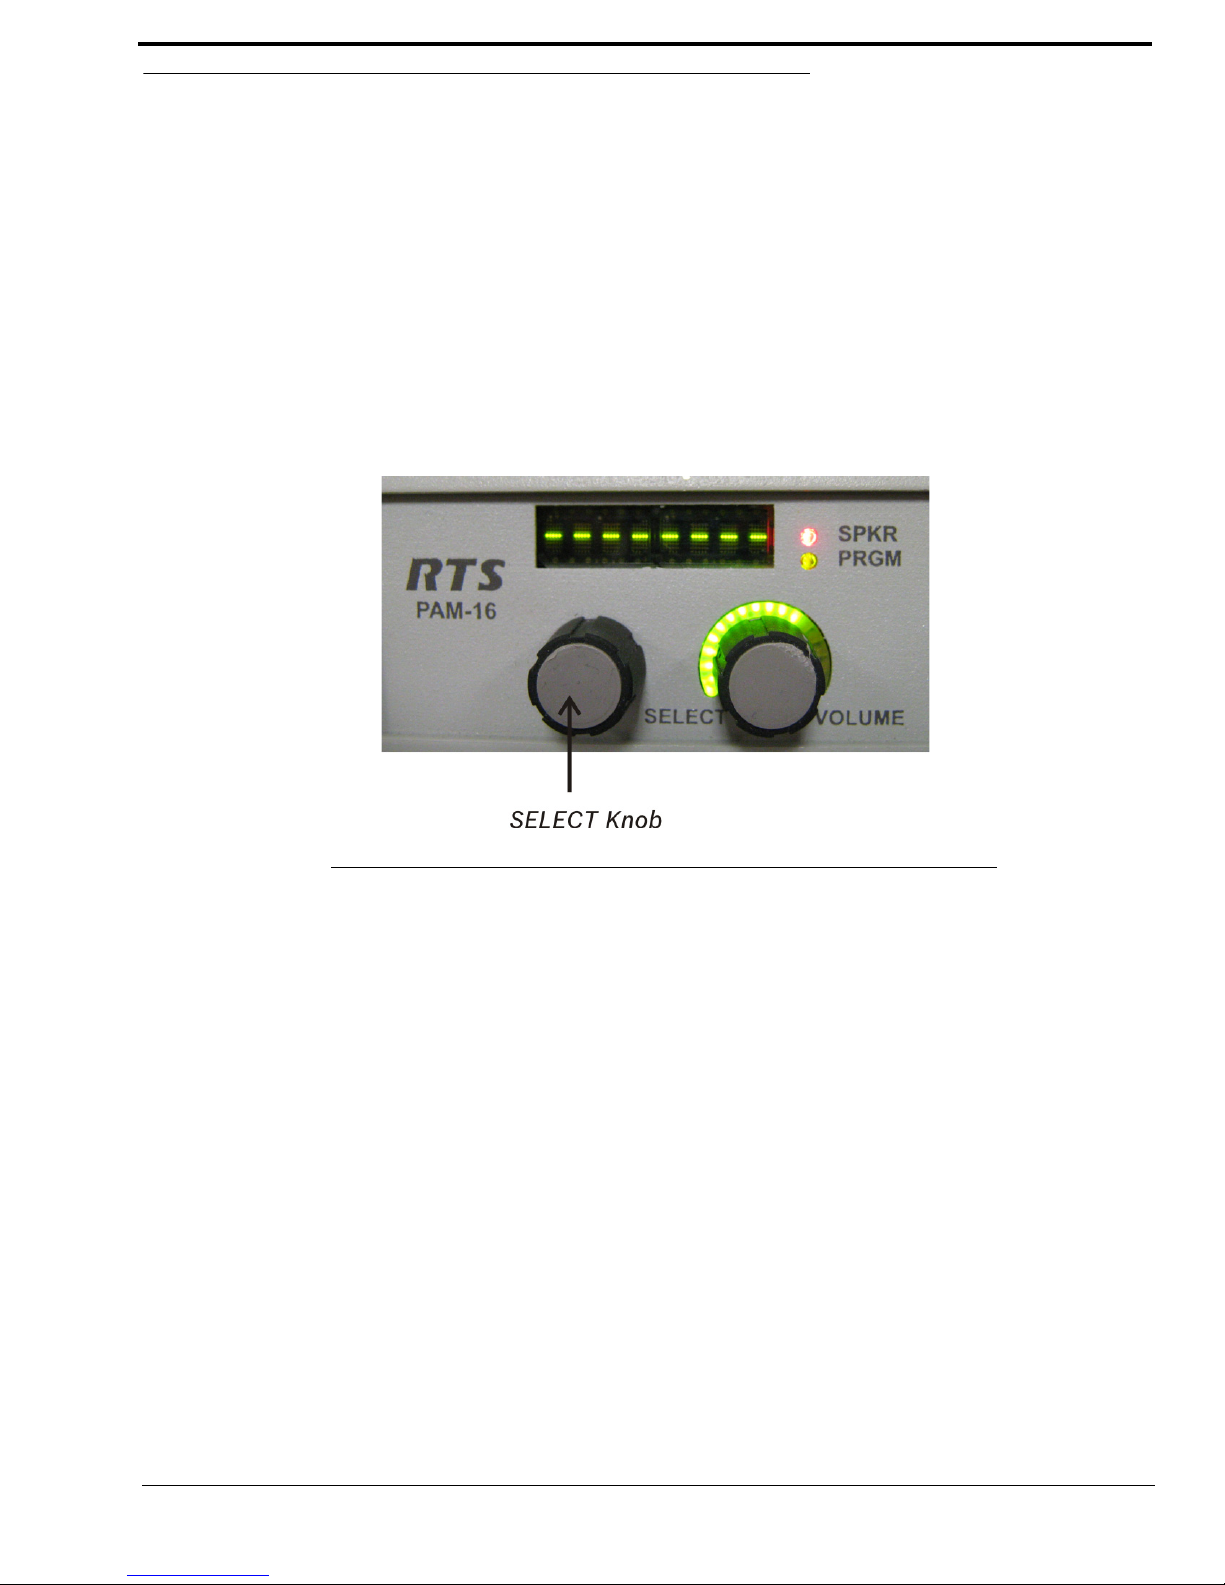
the control labeled SELECT on the front panel (see Figure 1).
FIGURE 1. SELECT knob on the PAM-16 front panel
The entire menu structure is summarized in “PAM-16 Keypanel Quick Reference” on page 29, with references to the page
numbers where you can find detailed information. Use this list as your starting point to become familiar with the advanced
features. Be sure to also read any general information supplied at the start of each menu section. At first, the menu system
might seem complicated, but navigation through it is actually quite basic, and experience has shown that users catch onto it
quickly.For many items, brief instructions are given as you navigate. From any level in the menus, you can double-tap the
Select control to proceed to the next higher level.
i
Page 8

ii
Page 9

Power-Up and Initial Settings
Applying Power
Versions with an external power supply and DC power jack do not have a power switch.
> Plug in the power supply to apply power.
Addressing
CHAPTER 1
Normally, when the keypanel is powered-up for the first time, the call waiting window displays SET ADDR. This means that
you must set the address prior to first use of the keypanel. The address is based on the intercom port number to which the
keypanel is connected.
NOTE: If the keypanel displays MD in the call waiting window at power-up, this indicates service adjustments must be
made before using the keypanel. For information on correcting the MD1 service message, see “Service, Mod
Asgn” on page 23.
Determine the Address, ADAM and ADAM CS Intercoms
Determine the keypanel’s address using Table 1 on page 11.
Determine the Address, Zeus Intercom Systems
The address is the number (1-8) printed next to the connector on the back panel of the Zeus Frame. This number repeats for
each group of eight (8) connectors. The intercom system is able to distinguish between two (2) keypanels set to the same
address by the group where each is connected.
NOTE: Cronus system and the AIO-16 MDR card do not require you to set the address because they automatically set the
address when installed into the system.
Set the Address
1. While SET ADDR is displayed, tap the Select control.
ADDR 1 displays in the call waiting window.
2. Turn the Select control to display the address (ADDR 1 through ADDR 10) you determined above.
3. Tap the Select control.
While the address is being stored, the alphanumeric displays and the call waiting window shows asterisks (****).
Then, the normal power-up indications occur as described below. If you move the keypanel to a new port and need to
change the address at a later time, see “SERVICE, SET ADDR” on page 27.
7
Page 10

Power-Up Indications
Power-Up Indications
After the correct keypanel address has been set, SET ADDR no longer displays at power-up. If the keypanel cannot establish
communications with the intercom system, all alphanumeric displays continue to show asterisks. Check the cable connection.
Instead, the following indications appear:
Keypanel with Alphanumeric Displays
Assigned Key:
During a normal power-up, the alphanumeric display first shows asterisks (****). After a few moments, the intercom key
assignments display.
Unassigned Keys
For each unassigned key, the display shows dashes (- - - -).
CALL / MENU Indicators
At power-up, the CALL and MENU indicators should be OFF.
SPKR/PGM Volume Indicator
At power-up, the selected volume indicator is red, while the rest of them are green.
8
Page 11

Keys and Displays
Below describes how to use the keys and displays on the PAM-16.
• Press and hold the desired key for momentary activation.
• For latching operation, do the following:
a. Tap th e key; it turns ON and remains ON.
b. Tap the key again to turn it OFF, when finished.
CHAPTER 2
Basic Intercom Operation
FIGURE 2. Panel Keys
The listen indicator turns green while a key is activate.
9
Page 12

Speaker/PRGM Selection and Volume Adjustment
Speaker/PRGM Selection and Volume Adjustment
You can select operation and adjust the volume with the internal speaker (SPKR).
To select SPKR, do the following:
1. Tap t h e VOLUME control once.
The indicator lights red.
2. Turn the VOLUME control to set the level. Turn clockwise to increase volume, and counterclockwise to decrease
volume.
To select Aux, do the following:
1. Tap t h e Volume control twice.
The PRGM indicator lights red.
2. Turn the VOLUME control to set the level.
Copy Call Waiting
You can copy a name from the call waiting window to an intercom key to create a new key assignment.
To copy the call waiting window, do the following:
1. While the desired name is displayed, press and hold the Select control.
2. Then, tap an intercom key.
• If restrictions against key assignments have been imposed, the intercom key ignores the assignment. In
this case, contact the intercom system administrator if you need to make a change.
• All new key assignments you create are automatically uploaded to the intercom system and saved to the
online configuration.
10
Page 13

11
TABLE 1. Correspondence between ADDR numbers and intercom port number for ADAM and ADAM CS Intercom Systems
SETTINGS FOR
ADDR
INTERCOM PORT NUMBERS
1 1 9 17 25 33 41 49 57 65 73 81 89 97 105 113 121 129 137 145 153 161 169 177 185 193
2 2 10 18 26 34 42 50 58 66 74 82 90 98 106 114 122 130 138 146 154 162 170 178 186 194
3 3 11 19 27 35 43 51 59 67 75 83 91 99 107 115 123 131 139 147 155 163 171 179 187 195
4 4 12 20 28 36 44 52 60 68 76 84 92 100 108 116 124 132 140 148 156 164 172 180 188 196
5 5 13 21 29 37 45 53 61 69 77 85 93 101 109 117 125 133 141 149 157 165 173 181 189 197
6 6 14 22 30 38 46 54 62 70 78 86 94 102 110 118 126 134 142 150 158 166 174 182 190 198
7 7 15 23 31 39 47 55 63 71 79 87 95 103 111 119 127 135 143 151 159 167 175 183 191 199
8 8 16 24 32 40 48 56 64 72 80 88 96 104 112 120 128 136 144 152 160 168 176 184 192 200
1 201 209 217 225 233 241 249 257 265 273 281 289 297 305 313 321 329 337 345 353 361 369 377 385 393
2 202 210 218 226 234 242 250 258 266 274 282 290 298 306 314 322 330 338 346 354 362 370 378 386 394
3 203 211 219 227 235 243 251 259 267 275 283 291 299 307 315 323 331 339 347 355 363 371 379 387 395
4 204 212 220 228 236 244 252 260 268 276 284 292 300 308 316 324 332 340 348 356 364 372 380 388 396
5 205 213 221 229 237 245 253 261 269 277 285 293 301 309 317 325 333 341 349 357 365 373 381 389 397
6 206 214 222 230 238 246 254 262 270 278 286 294 302 310 318 326 334 342 350 358 366 374 382 390 398
7 207 215 223 231 239 247 255 263 271 279 287 295 303 311 319 327 335 343 351 359 367 375 382 391 399
8 208 216 224 232 240 248 256 264 272 280 288 296 304 312 320 328 336 344 352 360 368 376 383 392 400
1 401 409 417 425 433 441 449 457 465 473 481 489 497 505 513 521 529 537 545 553 561 569 577 585 593
2 402 410 418 426 434 442 450 458 466 474 482 490 498 506 514 522 530 538 546 554 562 570 578 586 594
3 403 411 419 427 435 443 451 459 467 475 483 491 499 507 515 523 531 539 547 555 563 571 579 587 595
4 404 412 420 428 436 444 452 460 468 476 484 492 500 508 516 524 532 540 548 556 564 572 580 588 596
5 405 413 421 429 437 445 453 461 469 477 485 493 501 509 517 525 533 541 549 557 565 573 581 589 597
6 406 414 422 430 438 446 454 462 470 478 486 494 502 510 518 526 534 542 550 558 566 574 582 590 598
7 407 415 423 431 439 447 455 463 471 479 487 495 503 511 519 527 535 543 551 559 567 575 583 591 599
8 408 416 424 432 440 448 456 464 472 480 488 496 504 512 520 528 536 544 552 560 568 576 584 592 600
1 601 609 617 625 633 641 649 657 665 673 681 689 697 705 713 721 729 737 745 753 761 769 777 785 793
2 602 610 618 626 634 642 650 658 666 674 682 690 698 706 714 722 730 738 746 754 762 770 778 786 794
3 603 611 619 627 635 643 651 659 667 675 683 691 699 707 715 723 731 739 747 755 763 771 779 787 795
4 604 612 620 628 636 644 652 660 668 676 684 692 700 708 716 724 732 740 748 756 764 772 780 788 796
5 605 613 621 629 637 645 653 661 669 677 685 693 701 709 717 725 733 741 749 757 765 773 781 789 797
6 606 614 622 630 638 646 654 662 670 678 686 694 702 710 718 726 734 742 750 758 766 774 782 790 798
7 607 615 623 631 639 647 655 663 671 679 687 695 703 711 719 727 735 743 751 759 767 775 783 791 799
8 608 616 624 632 640 648 656 664 672 680 688 696 704 712 720 728 736 744 752 760 768 776 784 792 800
Page 14

12
1 801 809 817 825 833 841 849 857 865 873 881 889 897 905 913 921 929 937 945 953 961 969 977 985 993
2 802 810 818 826 834 842 850 858 866 874 882 890 898 906 914 922 930 938 946 954 962 970 978 986 994
3 803 811 819 827 835 843 851 859 867 875 883 891 899 907 915 923 931 939 947 955 963 971 979 987 995
4 804 812 820 828 836 844 852 860 868 876 884 892 900 908 916 924 932 940 948 956 964 972 980 988 996
5 805 813 821 829 837 845 853 861 869 877 885 893 901 909 917 925 933 941 949 957 965 973 981 989 997
6 806 814 822 830 838 846 854 862 870 878 886 894 902 910 918 926 934 942 950 958 966 974 982 990 998
7 807 815 823 831 839 847 855 863 871 879 887 895 903 911 919 927 935 943 951 959 967 975 983 991 999
8 808 816 824 832 840 848 856 864 872 880 888 896 904 912 920 928 936 944 952 960 968 976 984 992 1000
TABLE 1. Correspondence between ADDR numbers and intercom port number for ADAM and ADAM CS Intercom Systems
SETTINGS FOR
ADDR
INTERCOM PORT NUMBERS
Page 15

Menu Description
Top–Level Menu
General Description
When the keypanel is turned ON, it resets to the top-level menu. At this level, the MENU indicator is OFF.
To access the items in the top–level menu, do the following:
CHAPTER 3
1. Turn the Select control.
The top-level menu appears.
2. Tap t h e Select control on any item in the top–level menu to select one of the following items:
ITEM DESCRIPTION
- - - - Clear call waiting. Default condition of display. May be used to clear keys.
DISPLAY Displays information such as the keypanel’s port number, setup page usage, listen assignments, etc.
KEY ASGN Access the intercom system scroll lists for key assignments.
LEVEL Lets you adjust the range of VOLUME control or adjust the listen level for selected intercom keys.
PAGE (1-4) Lets you assign a different page of key assignments
SERVICE Provides access to less commonly used keypanel features.
The following paragraphs describe the use of the top-level menu items.
13
Page 16

Display Menu
Display Menu
General Description
When you select DISPLAY from the top–level menu, you can access several menu items that display current information
about the keypanel using the key displays, and the call waiting window.
Display Menu, KEY ICOM
When you select KEY ICOM, the intercom system names for all key assignments appear in the display above the intercom
keys. If there is only one intercom system, the word LOCL displays to indicate Local intercom.
The call waiting window also displays TAP KEYS. If the keypanel does not have alphanumeric displays for intercom key
assignments, tap any key and the name of the intercom system to which that key is assigned appears in the call waiting
window. If the key is not assigned, the call waiting window displays dashes.
To return to the previous menu level, do the following:
> Double-tap the Select control.
OR
Press and hold the Select control for two seconds to clear the call waiting window, if desired.
Display Menu, Key Type
When you select KEY TYPE, the type of key assignment (see below) for each key is displayed in the alphanumeric display
above that key. If there is not an assignment, the display shows dashes (----).
The call waiting window also displays TAP KEYS. If the keypanel does not have alphanumeric displays for intercom key
assignments, tap any key and the key type for that key appears in the call waiting window. If the key is not assigned, the call
waiting window displays dashes.
TAB L E 2. Key Assignment Types
TYPES OF KEY ASSIGNMENTS
Key Assignment Description
PL Party Lines
IFB IFBs
IFB SL IFB Special Lists
ISO Camera ISOs
P-P Point-to-Point
RLY Relays
SPCL Special Lists
UPL UPL Resources
To return to the previous menu, do the following:
> Double-tap the Select control.
OR
Press and hold the Select control for two (2) seconds to clear the call waiting window, if desired.
14
Page 17

Key ASGN Menu
Display, Port Num
When you select PORT NUM, the port number to which the keypanel is connected displays in the call waiting window.
NOTE: You will get a false reading if the keypanel address has not been correctly set using “SERVICE, SET ADDR” on
page 27.
To return to the previous menu, do the following:
> Double-tap the Select control.
OR
Press and hold the Select control for two (2) seconds to clear the call waiting window, if desired.
Display, Version
Select VERSIONS to display the keypanel’s software version in the call waiting window.
NOTE: The PAM-16 version is easily updated from AZedit. See firmware download in AZedit help or the AZedit User
Manual.
Key ASGN Menu
Key Asgn, Clear
The Clear menu option is used to clear individual key assignments.
To clear individual key assignments, do the following:
1. Turn the Select control to scroll to Key Asgn.
2. Tap t h e Select control.
Copy appears in the call waiting window.
3. Turn the Select control to scroll to Clear.
4. Tap t h e Select control.
Tap Key appears in the call waiting window.
5. Tap the key you want to clear the assignment from.
The assignment is cleared from that key.
6. Double-tap the Select control and tap another key to clear its assignment.
OR
Press and hold the Select control for two seconds to exit.
Key Asgn, Copy
The Copy menu option is used to copy an existing key assignment to another key.
To copy a key assignment, do the following:
1. Turn the Select control to scroll to Key Asgn.
2. Tap t h e Select control.
Copy appears in the call waiting window.
3. Tap t h e Select control.
Tap Orig. appears in the call waiting window.
4. Tap t h e key assignment you want to copy (Orig key).
Tap Dest. appears in the call waiting window.
5. Tap t h e destination key or keys you want to copy the assignment to.
6. Press and hold the Select control for two (2) seconds to exit.
15
Page 18

Key ASGN Menu
Key Asgn, Lists, ICOM
ICOM displays only if your intercom system is connected to other intercom systems.
To view the other intercom systems, do the following:
1. Turn the Select control to scroll to Key Asgn.
2. Tap t h e Select control.
Copy appears in the call waiting window.
3. Turn the Select control to scroll to ICOM.
4. Tap t h e Select control to choose ICOM.
A list of intercom systems appear in the call waiting window.
5. Turn the Select control to display the desired intercom system.
6. Tap t h e Select control.
The call waiting window will display WAIT while the scroll lists are retrieved from that intercom system. Once the
lists have been retrieved, you may use them just like the scroll lists for the local intercom system. See the descriptions
for IFB, ICO, etc., that follow.
NOTE: ICOM only appears in the menu list when the keypanel is attached to a trunked system.
Key ASGN, Lists, PL (Party Lines)
When you select PL, the list of party lines is displayed in the call waiting window.
To locate the desired party line, do the following:
1. Turn the Select control to scroll to Key Asgn.
2. Tap t h e Select control.
Copy appears in the call waiting window.
3. Turn the Select control to scroll to Lists.
4. Tap t h e Select control to choose Lists.
PL appears in the call waiting window.
5. Tap t h e Select control to choose PL.
A list of party lines appear in the call waiting window.
6. Turn the Select control to display the desired PL.
7. Tap t h e Select control.
The call waiting window displays WAIT while the PL scroll list is retrieved. See the descriptions for IFB, ICO, etc.,
that follow.
8. Turn the Select control to locate the desired party line.
To assign the party line to an intercom key for future use, do the following:
1. Press and hold the Select control, then tap a keypanel key.
• If restrictions against key assignments have been imposed, the intercom key may ignore the assignment. In this
case, contact the intercom system administrator if you need to make a change.
• Party line key assignment changes are automatically uploaded to the intercom system and saved to the online
configuration.
• If you want to change or add a listen assignment, you must access menu mode and use the “Menus, KEY ASGN,
General Description” on page 20.
To return to the top-level menu from the party line list, do the following:
> Double-tap the Select control twice.
If no action is taken for 30 seconds, the call waiting window clears.
Key ASGN, P-P (Point-to-Point)
16
Page 19

When you select P-P, the list of ports is displayed in the call waiting window.
To locate the desired P-P, do the following:
1. Turn the Select control to scroll to Key Asgn.
2. Tap t h e Select control.
Copy appears in the call waiting window.
3. Turn the Select control to scroll to Lists.
4. Tap t h e Select control to choose Lists.
PL appears in the call waiting window.
5. Turn the Select control to scroll to P-P.
6. Tap t h e Select control to choose P-P.
A list of P-P assignments appear in the call waiting window.
7. Turn the Select control to display the desired P-P.
8. Tap t h e Select control.
The call waiting window displays WAIT while the P-P scroll list is retrieved. See the descriptions for IFB, ICO, etc.,
that follow.
9. Turn the Select control to locate the desired P-P.
To assign the P-P to an intercom key for future use, do the following:
1. Press and hold the Select control, then tap a keypanel key.
• If restrictions against key assignments have been imposed, the intercom key may ignore the assignment. In this
case, contact the intercom system administrator if you need to make a change.
• P-P key assignment changes are automatically uploaded to the intercom system and saved to the online
configuration.
• If you want to change or add a listen assignment, you must access menu mode and use the “Menus, KEY ASGN,
General Description” on page 20.
Key ASGN Menu
To return to the top-level menu from the P-P list, do the following:
> Double-tap the Select control twice.
If no action is taken for 30 seconds, the call waiting window clears.
Key ASGN, Lists, IFB
When you select IFB, the IFB list appears in the call waiting window.
To locate the desired IFB, do the following:
1. Turn the Select control to scroll to Key Asgn.
2. Tap t h e Select control.
Copy appears in the call waiting window.
3. Turn the Select control to scroll to Lists.
4. Tap t h e Select control to choose Lists.
PL appears in the call waiting window.
5. Turn the Select control to scroll to IFB.
6. Tap t h e Select control to choose IFB.
A list of IFB assignments appear in the call waiting window.
7. Turn the Select control to display the desired IFB.
8. Tap t h e Select control.
The call waiting window displays WAIT while the IFB scroll list is retrieved. See the descriptions for IFB, ICO, etc.,
that follow.
9. Turn the Select control to locate the desired IFB.
To assign the IFB to an intercom key for future use, do the following:
17
Page 20

Key ASGN Menu
> Press and hold the Select control, then tap a keypanel key.
• If restrictions against key assignments have been imposed, the intercom key may ignore the assignment. In this
case, contact the intercom system administrator if you need to make a change.
• IFB key assignment changes are automatically uploaded to the intercom system and saved to the online
configuration.
• If you want to change or add a listen assignment, you must access menu mode and use the “Menus, KEY ASGN,
General Description” on page 20.
To return to the top-level menu from the IFB list, do the following:
> Double-tap the Select control twice.
If no action is taken for 30 seconds, the call waiting window clears.
Key ASGN, Lists, IFSL
When you select IFSL, the IFSL list appears in the call waiting window.
To locate the desired IFSL, do the following:
1. Turn the Select control to scroll to Key Asgn.
2. Tap t h e Select control.
Copy appears in the call waiting window.
3. Turn the Select control to scroll to Lists.
4. Tap t h e Select control to choose Lists.
PL appears in the call waiting window.
5. Turn the Select control to scroll to IFSL.
6. Tap t h e Select control to choose IFSL.
A list of IFSLs appear in the call waiting window.
7. Turn the Select control to display the desired IFSL.
8. Tap t h e Select control.
The call waiting window displays WAIT while the IFSL scroll list is retrieved. See the descriptions for IFB, ICO, etc.,
that follow.
9. Turn the Select control to locate the desired IFSL.
To assign the IFSL to an intercom key for future use, do the following:
> Press and hold the Select control, then tap a keypanel key.
• If restrictions against key assignments have been imposed, the intercom key may ignore the assignment. In this
case, contact the intercom system administrator if you need to make a change.
• IFSL key assignment changes are automatically uploaded to the intercom system and saved to the online
configuration.
• If you want to change or add a listen assignment, you must access menu mode and use the “Menus, KEY ASGN,
General Description” on page 20.
To return to the top-level menu from the IFSL list, do the following:
> Double-tap the Select control twice.
If no action is taken for 30 seconds, the call waiting window clears.
18
Page 21

Key ASGN, Lists, ISO
When you select ISO, the ISO list appears in the call waiting window.
To locate the desired ISO, do the following:
1. Turn the Select control to scroll to Key Asgn.
2. Tap t h e Select control.
Copy appears in the call waiting window.
3. Turn the Select control to scroll to Lists.
4. Tap t h e Select control to choose Lists.
PL appears in the call waiting window.
5. Turn the Select control to scroll to ISO.
6. Tap t h e Select control to choose ISO.
A list of ISO assignments appear in the call waiting window.
7. Turn the Select control to display the desired ISO.
8. Tap t h e Select control.
The call waiting window displays WAIT while the ISO scroll list is retrieved. See the descriptions for IFB, ICO, etc.,
that follow.
9. Turn the Select control to locate the desired ISO.
Key ASGN Menu
To assign the ISO to an intercom key for future use, do the following:
> Press and hold the Select control, then tap a keypanel key.
• If restrictions against key assignments have been imposed, the intercom key may ignore the assignment. In this
case, contact the intercom system administrator if you need to make a change.
• ISO key assignment changes are automatically uploaded to the intercom system and saved to the online
configuration.
• If you want to change or add a listen assignment, you must access menu mode and use the “Menus, KEY ASGN,
General Description” on page 20.
To return to the top-level menu from the ISO list, do the following:
> Double-tap the Select control twice.
If no action is taken for 30 seconds, the call waiting window clears.
Key ASGN, Lists, RLY (Relays)
RLY can be used to activate relays in an FR9528, UIO-256, and GPIO-16 Frame. It may also be used to activate the GPI
Outputs on the back of an ADAM CS frame (J903) or on an XCP-ADAM-MC Master Controller Breakout Panel in an ADAM
intercom system (J11).
1. Turn the Select control to scroll to Key Asgn.
2. Tap t h e Select control to choose Key Asgn.
Copy appears in the call waiting window.
3. Turn the Select control to scroll to Lists.
4. Tap t h e Select control to choose Lists.
PL appears in the call waiting window.
5. Turn the Select control to scroll to RLY.
6. Tap t h e Select control to choose RLY.
The relay scroll list appears in the call waiting window.
7. Turn the Select control to display the desired RLY.
19
Page 22

Key ASGN Menu
8. Tap t h e Select control.
The call waiting window displays WAIT while the RLY scroll list is retrieved. See the descriptions for IFB, ICO, etc.,
that follow.
9. Turn the Select control to locate the desired RLY.
To assign the RLY to an intercom key for future use, do the following:
> Press and hold the Select control, then tap a keypanel key.
• If restrictions against key assignments have been imposed, the intercom key may ignore the assignment. In this
case, contact the intercom system administrator if you need to make a change.
• RLY key assignment changes are automatically uploaded to the intercom system and saved to the online
configuration.
• If you want to change or add a listen assignment, you must access menu mode and use the “Menus, KEY ASGN,
General Description” on page 20.
To return to the top-level menu from the RLY list, do the following:
> Double-tap the Select control twice.
If no action is taken for 30 seconds, the call waiting window clears.
Key ASGN, Lists, SPCL (Special Lists)
When you select SPCL, a list of special lists appears in the call waiting window.
To locate the desired SPCL, do the following:
1. Turn the Select control to scroll to Key Asgn.
2. Tap t h e Select control.
Copy appears in the call waiting window.
3. Turn the Select control to scroll to Lists.
4. Tap t h e Select control to choose Lists.
PL appears in the call waiting window.
5. Turn the Select control to scroll to SPCL.
6. Tap t h e Select control to choose SPCL.
A list of IFB assignments appear in the call waiting window.
7. Turn the Select control to display the desired SPCL.
8. Tap t h e Select control.
The call waiting window displays WAIT while the SPCL scroll list is retrieved. See the descriptions for IFB, ICO, etc.,
that follow.
9. Turn the Select control to locate the desired SPCL.
To assign the SPCL to an intercom key for future use, do the following:
1. Press and hold the Select control, then tap a keypanel key.
• If restrictions against key assignments have been imposed, the intercom key may ignore the assignment. In this
case, contact the intercom system administrator if you need to make a change.
• SPCL key assignment changes are automatically uploaded to the intercom system and saved to the online
configuration.
• If you want to change or add a listen assignment, you must access menu mode and use the “Menus, KEY ASGN,
General Description” on page 20.
20
Page 23

To return to the top-level menu from the SPCL list, do the following:
> Double-tap the Select control twice.
If no action is taken for 30 seconds, the call waiting window clears.
Key ASGN, Lists, UPL
When you select UPL, a list of UPL Resources (URs) appears in the call waiting window.
To locate the desired UPL, do the following:
1. Turn the Select control to scroll to Key Asgn.
2. Tap t h e Select control.
Copy appears in the call waiting window.
3. Turn the Select control to scroll to Lists.
4. Tap t h e Select control to choose Lists.
PL appears in the call waiting window.
5. Turn the Select control to scroll to UPL.
6. Tap t h e Select control to choose UPL.
A list of UPL assignments appear in the call waiting window.
7. Turn the Select control to display the desired UPL.
8. Tap t h e Select control.
The call waiting window displays WAIT while the UPL scroll list is retrieved. See the descriptions for IFB, ICO, etc.,
that follow.
9. Turn the Select control to locate the desired UPL.
Level Menu
To assign the UPL to an intercom key for future use, do the following:
> Press and hold the Select control, then tap a keypanel key.
• If restrictions against key assignments have been imposed, the intercom key may ignore the assignment. In this
case, contact the intercom system administrator if you need to make a change.
• UPL key assignment changes are automatically uploaded to the intercom system and saved to the online
configuration.
• If you want to change or add a listen assignment, you must access menu mode and use the “Menus, KEY ASGN,
General Description” on page 20.
To return to the top-level menu from the UPL list, do the following:
> Double-tap the Select control twice.
If no action is taken for 30 seconds, the call waiting window clears.
Level Menu
The LEVEL menu displays crosspoint listen levels for point-to-point or party line key assignments. When you select LEVEL
the call waiting window displays TAP KEY.
To adjust the crosspoint listen levels, do the following:
1. Turn the Select control until Level displays in the call waiting window.
2. Tap t h e Select control.
Tap key appears in the call waiting window.
3. Press and hold any key that has a point-to-point or party line listen assignments, then turn the Select knob to adjust
the crosspoint listen level (-99dB to +6dB).
21
Page 24

Page (1 – 4) Menu
NOTE: The current listen level setting displays in the call waiting window. If the key is not a point-to-point
or party line key, or if there is not a listen assignment, the call waiting window displays N/A when
you tap the key.
4. Double-tap the Select control and tap another key to read its level.
OR
Press and hold the Select control for two (2) seconds to exit.
Page (1 – 4) Menu
Each keypanel has four (4) setup pages of key assignments. One (1) setup page is used for the keypanel, and one (1) is used for
each expansion panel (PAM-16 only). Or, if no expansion panels are connected, setup pages may be switched on the keypanel
to provide a completely different set of key assignments for different conditions.
To change setup pages, do the following:
1. Turn the Select control to select the desired setup page.
2. Tap the Select control.
3. Tap any key on the keypanel or the expansion panel (PAM-16 only) where you want to assign the new setup page.
The new key assignments should appear on that panel.
To return to the top-level menu, do the following:
> Double-tap the Select control.
If no action is taken for 30 seconds, the call waiting window clears.
Select Control Operation in Service Mode
To enter service mode, do the following:
> Turn the Select control to display SERVICE, then tap the Select control.
NOTE: If your keypanel displays (SERV) instead of SERVICE, this indicates that this mode has been locked, and you
must enter the previously saved 4-digit passcode to gain access.
• The menus in SERVICE mode are displayed in “PAM-16 Keypanel Quick Reference” on page 29. To
choose that menu, turn the Select control to display the desired menu in the call waiting window, the
tap SELECT.
• To exit a selection and return to the previous menu level, double-tap the Select control.
• To exit menu mode immediately (from most locations) press and hold the Select control for two
seconds. If no action is taken in menu mode for 30 seconds, the keypanel will automatically return to
the top-level menu.
The following pages describe the Service menu options:
Service Menu
General Description
Use this menu to set the to set general operating features such as display brightness, etc.
22
Page 25

Service Menu
Service, Dimmer
Dimmer sets the brightness for the front panel displays.
To set the front panel display brightness, do the following:
1. Turn the Select control to Service.
2. Tap t h e Select control to choose Service
Dimmer appears in the call waiting window.
3. Tap t h e Select control to choose Dimmer.
>>>>>>>>> appears in the display window.
4. Turn the Select control to set the desired brightness (clockwise to increase brightness, counterclockwise to decrease
brightness).
You can preview the new brightness level in the call waiting window.
5. Tap t h e Select control to activate the change for all the displays.
6. Double-tap the Select control to return to the previous menu level.
OR
Press and hold the Select control for two (2) seconds to exit menu mode.
Service, Lock/unlock
Use Lock/unlock to lock or unlock menu mode. When menu mode is locked, the menu items under Service can only be
accessed by entering a 4-digit passcode.
To lock the menu, do the following:
1. Turn the Select control to Service.
2. Tap t h e Select control to choose Service
Dimmer appears in the call waiting window.
3. Turn the Select control to scroll to LOCK
4. Tap t h e Select control to choose LOCK.
The call waiting window displays TAP CODE.
5. Using the keypanel keys, enter a 4-digit passcode.
When the last digit is entered, all windows briefly display asterisks while the passcode is being stored, then the
keypanel resets.
To unlock the menu, do the following:
1. Turn the Select control to Service.
2. Tap t h e Select control to choose Service
Dimmer appears in the call waiting window.
3. Turn the Select control to scroll to LOCK
4. Tap t h e Select control to choose LOCK.
Tap Code appears in the call waiting window.
5. Tap t h e keypanel keys for the code.
UNLOCK appears in the call waiting window.
6. Tap t h e Select control to choose UNLOCK.
When you select UNLOCK, asterisks briefly appear on all displays while the 4-digit passcode is being cleared, then
the keypanel resets.
Service, Mod Asgn
The information in this section applies when any of the following occurs:
• The call waiting window displays MD1 at power-up
• Key modules have been replaced
23
Page 26

Service Menu
• EKP Expansion Panels and/or LCP Level Control Panels are being used with a PAM-16
• A group of 4 keys do not operate correctly
When any of these situations occurs, you may have to reprogram MOD numbers as described in the following paragraphs.
How MODS Work
The keypanels, expansion panels and level control panels in this product line all use a system of MODS (modules). MODS are
simply groups of 4 (four) consecutive intercom system keys and their associated displays (or groups of 4 control knobs in the
case of LCPs). The PAM-16 keypanel, on the other hand, can be used with various combinations of expansion panels and level
control panels. In this case, you need to program each group of four (4) keys on the PAM-16 and any connected EKPs to a
unique MOD number. And, if you are using LCP level control panels to adjust listen levels for intercom keys, you want to
make sure that the MOD numbers for the level control knobs match the MOD numbers for the intercom keys. The LCP MOD
numbers cannot be set from the PAM-16. They must be set by replacing the internal ROM (Read-Only Memory). Table 3
shows the default MOD numbers that are programmed into the various LCPs.
The default settings for LCPs will work when one LCP-12 is used with a PAM-16, or when one LCP-16 or LCP-20 is being
used with one EKP-16 or EKP-20. However, there are two (2) situations where you will need to change the ROM in an LCP:
• When you want to use an LCP-12 with an EPAM-16
• When you are connecting more than one EKP, and you want to use LCPs with each EKP. If you need to
change MOD numbers in an LCP, contact your intercom dealer for assistance.
TAB L E 3. Default Module Number Assignments
Keypanel/LCP-12 Default MOD Assignments
MOD 1 Keys 1-4
MOD 2 Keys 5-8
MOD 3 Keys 9-12
MOD 4 Keys 13-16
MOD 5 Do not assign this MOD. It is used exclusively for the SELECT control and call waiting display on keypanels.
EKP-16/LCP-16 Default MOD Assignments
MOD 6 Keys 17-20
MOD 7 Keys 21-24
MOD 8 Keys 25-28
MOD 9 Keys 29-32
EKP-20/LCP-20 Default MOD Assignments
MOD 6 Keys 17-20
MOD 7 Keys 21-24
MOD 8 Keys 25-28
MOD 9 Keys 29-32
MOD 10 Keys 33-36
PAM-16 and EKP MOD numbers are setup using the instructions found at the “Procedure to Assign MODS” , below.
24
Page 27

Service Menu
Procedure to Assign MODS
If the keypanel is currently displaying MD1 in the left side of the call waiting window, skip steps 1 through 3.
1. Turn the Select control to display MENU, then tap the Select control.
2. Turn the Select control to display SERVICE, then tap the Select control.
3. Turn the Select control to display MOD ASGN, then tap the Select control.
The currently assigned MOD numbers now appear in the displays above the keys on the keypanel (and any connected
EKPs connected to a PAM-16). Also, MD1 displays in the left side of the call waiting window. This signifies MOD1.
The right side of the call waiting window indicates where the module is currently assigned. One of the following
displays:
MAIN indicates the module is assigned to the keypanel
EXP1indicates the module is assigned to the first expansion panel
EXP2indicates the module is assigned to the second expansion panel
NONEindicates the module is not assigned
4. Turn the Select control until the MOD number you want to assign (MD1, MD2, etc.) is displayed in the left side of
the call waiting window. Then, tap the Select control.
IMPORTANT: Read this instruction completely before proceeding!
> Turn the Select control to select the panel where you want to assign the MOD, BUT DO NOT
TAP SELECT YET.
5. On the selected panel, identify the group of 4 keys where you want to assign the MOD.
6. Press and hold any one of these 4 keys, then tap the Select control.
After a few moments, the new MOD number should appear in the displays above the affected keys (if it was not
displayed before) and the call waiting window confirms the MOD has been assigned as requested by displaying the
MOD number and the panel where it was assigned.
7. Double-tap the Select control to return to the previous menu level, then repeat step 5 through step 7 to assign
additional MODs.
OR
Press and hold the Select control for two (2) seconds to exit menu mode.
25
Page 28

Service Menu
Using Multiple Expansion Panels (PAM-16 Only)
When using multiple expansion panels, some MOD numbers may have to be reassigned so each group of four (4) keys has its
own unique MOD number. Table 3 on page 24 shows the correspondence between MOD numbers, key numbers, and setup
pages.
EXAMPLE:Connecting one EKP-20 along with a PAM-16
Use the default MOD numbers as shown in Table 3 on page 24. Next, assign setup pages, see “Page (1 –
4) Menu” on page 22 You should assign one setup page as MAIN. This page corresponds to the keys on
the PAM-16. Assign a second setup page as “EXP1”. This page corresponds to the first 16 keys on the
EKP-20. Assign a third setup page as “EXP2”. The first four (4) keys on this setup page corresponds to
the remaining four (4) keys on the EKP-20. The remaining 12 keys on the setup page are not used. If
you want to connect LCPs, you can use one LCP-12 and one LCP-20 without changing the ROMs.
EXAMPLE:Connecting two EKP-20 Expansion Panels along with a PAM-16
From Table 3 on page 24 you can see the EKP-20 has default MOD numbers 5 through 9. One of the
EKPs must therefore be reprogrammed to use MOD 10 through 14. Also, assign one setup page a
MAIN. (To assign setup pages, see “Page (1 – 4) Menu” on page 22) This page corresponds to the keys
on the PAM-16. Assign a second setup page as EXP1. This page corresponds to the first 16 keys on the
first EKP-20. Assign a third setup page EXP2. The first four (4) keys on this setup page corresponds to
the first 12 keys on the second EKP-20. The remaining 12 keys on this setup page corresponds to the
first 12 keys on the second EKP-20 Assign the last setup page as EXP3. The first eight (8) keys on this
page corresponds to the remaining 8 keys on the second EKP-20. The remaining eight (8) keys on the
setup page are not used. If you want to connect to LCPs, you can use one LCP-12 for the PAM-16 and
one LCP-20 for the first EKP-20 without changing the ROMs. You must change the ROM in the second
LCP-20, however, to match the MOD number for the second EKP-20.
TAB L E 4. The relationship between setup pages, key numbers and MOD numbers.
Setup Page 1
Keys 1-4 MOD 1
Keys 5-8 MOD 2
Keys 9-12 MOD 3
Keys 13-16 MOD 4
Setup Page 2
MOD 5 Do not assign this MOD ever! It is used exclusively for the SELECT control and call waiting display.
Keys 17-20 MOD 6
Keys 21-24 MOD 7
Keys 25-28 MOD 8
Setup Page 3
Keys 29-32 MOD 9
Keys 33-36 MOD 10
Keys 37-40 MOD 11
Keys 41-44 MOD 12
Setup Page 4
Keys 45-48 MOD 13
Keys 49-52 MOD 14
26
Page 29

Service Menu
TABLE 4.
Setup Page 1
Keys 53-56 MOD 15
Keys 57-60 MOD 16
The relationship between setup pages, key numbers and MOD numbers.
SERVICE, MODE
The Mode menu determines how the keypanel handles active keys.
There are three (3) modes of operation:
Many –MANY mode gives preference to many keys being on at once. Tap any key to latch it in the ON position. The
green LED is lit while the key is ON. You can tap several keys to latch them ON.
In MANY mode, if a key is held down for 2–3 seconds, this key becomes active and turns OFF any latched keys currently
latched ON. Upon release of the held key, the previous latched ON key returns to the ON state.
Monitor –MONITOR mode allows the user to listen (monitor) to any crosspoint on the PAM-16 when the key is active.
One –ONE mode gives preference to a single active key. Tap a key to turn it ON. The green LED lights. When you tap
another key, the first key turns OFF and the second key turns ON.
In ONE mode, if a key is held down for 2–3 seconds, this key latches ON and does not turn OFF when the next key press
occurs. It remains latched ON until it is pressed again, returning it to normal ONE mode operation.
SERVICE, RESET
RESET restores all items on the SERVICE menu (except MOD ASGN) to the factory default settings. RESET also resets the
VOLUME to minimum at power-up. RESET does not affect any of the key assignments you create using KEY ASGN menu:
these assignments are saved at the intercom system and not the keypanel.
1. After you select RESET, the displays show asterisks for a few moments.
SET ADDR displays as if the keypanel is being powered up for the first time.
2. You must reenter the correct keypanel address. “SERVICE, SET ADDR” on page 27.
SERVICE, SET ADDR
SET ADDR must be used during installation or whenever the keypanel is reset or moved to a new port.
Determine the Keypanel Address, CS9XXX Intercoms
For intercom port numbers ending in 1 through 9, the keypanel address is the last digit of the port number. If the last digit of
the port number is 0, use 10 as the keypanel address.
Determine the Keypanel Address, ADAM and ADAM CS Intercoms
See, Table 1 on page 11.
Determine the Keypanel Address, Zeus Intercom Systems
The address is the number (1–8) printed next to the connector on the back panel of the Zeus Frame. This number repeats for
each group of eight (8) connectors. The intercom system is able to distinguish between two (2) keypanels set to the same
address by the group where each one is connected.
To set the keypanel address, do the following:
27
Page 30

Service Menu
1. While SET ADDR is displayed, tap the Select control.
ADDR 1 appears in the call waiting window.
2. Turn the Select control to display the desired logical keypanel address (ADDR 1 through ADDR 10), then tap the
Select control.
The new setting is automatically saved, and after a few moments, the alphanumeric displays change from asterisks
(****) to dashes (----).
3. Double-tap the Select control to return to the previous menu level.
OR
Press and hold the Select control for two (2) seconds to exit menu mode.
SERVICE, TEST PNL
TEST PNL lets you check operation of indicators and controls.
When you select TEST PNL, the following sequence occurs:
a. Percent (%) symbols appear on all alpha–numeric displays to verify operation.
b. All tri-color indicators will flash green—yellow—red—off. All single-color indicators will flash
green-off. This verifies the operation of all indicators displays.
c. The call waiting window will display TAP KEYS.
d. If you tap any intercom key, the display above that key briefly displays OK.
If you turn either the SELECT or VOLUME control, the alphanumeric display above the control
increments or decrements by ones at each detente. If you tap the SELECT or VOLUME control, the
call waiting window displays OK. This verifies operation of all controls.
e. Double-tap the Select control to return to the previous menu level.
OR
Press and hold the Select control for two (2) seconds to exit menu mode.
28
Page 31

Quick Reference Menu
MENU ITEM DESCRIPTION
DISPLAY Menu
See “Display Menu” on page 14.
KEY ICOM Displays intercom system to which each key is assigned.
KEY TYPE Displays type of key assignment for all assigned keys (P-P, PL, IFB, etc.)
PORT NUM Displays the intercom port number that the keypanel is connected to.
VERSION Displays the firmware version for the keypanel.
KEY ASGN Menu
CLEAR Clears talk/listen assignments. (Does not clear key options, see “CLR OPT” in KEY OPT menu.
COPY Copies one key’s assignment to another key
LISTS
ICOM Accesses another intercom system for key assignment (trunked intercoms only).
PL Accesses party line list for key assignment
P-P Accesses point-to-point list for key assignment.
IFB Accesses IFB lists for key assignment
IFSL Accesses IFSL lists for key assignments
RLY Accesses the intercom system’s list of relays for key assignment.
SPCL Accesses special lists for key assignment.
UPL Accesses UPL resources for key assignment.
LEVEL
See “Level Menu” on
page 21.
PAGE 1-4
See “Page (1 – 4) Menu”
on page 22.
SERVICE Menu
DIMMER Adjusts brightness of displays.
LOCK Locks out access to all SERVICE menu items, and locks HDST / SPKR / PRGM selection.
MOD ASGN Defines which keys occupy which positions on the keypanel and expansion panels.
MODE Defines the listen key operation mode: Many, Monitor, or One.
RESET Clears all settings that are saved locally at the keypanel.
SET ADDR Sets the logical keypanel number, or keypanel address.
TEST PNL Tests keys, controls and displays.
Lets you adjust the listen level for any key assigned to an intercom port or party line.
Changes setup pages on the keypanel or any connected expansion panels.
CHAPTER 4
PAM-16 Keypanel Quick Reference
29
Page 32

Quick Reference Menu
90 - 264VAC 47/63Hz
SERIAL
NO.
TELEX COMMUNICATIONS, INC.
MADE IN USA
CIM
FRAME
On/Off
Switch
Fuse
and
AC Power
Connector
Expansion
Panel
Connector
BACK
567891011121314
15
16
TEL1 TEL2 RDL ADL0 ADL1 DIR2 AUD2 VID2 MNT CAM1 CAM2 CAM3
Alpha-numeric Displays
Listen Keys
SELECT Control
VOLUME Control
&
Speaker / Program
Select
FRONT
1234
DIR1 AUD1 VID1 MNT
SPEAKER
OUT
AUX
LINE
OUT
SELECT VOLUME
SPKR
PRGM
PAM-16
FIGURE 3. PAM-16 Reference View
30
Page 33

Quick Reference Menu
31
Page 34

 Loading...