

TheaterTouch
™
MODEL T2 UNIVERSAL SYSTEM CONTROLLER
User’s Guide and Programming Manual
The Power Of
ATouchscreen
In The Palm Of
Your Hand


TheaterTouch System Controller
FEDERAL COMMUNICATIONS COMMISSION NOTICE
This equipment has been tested and found to comply with the limits for a Class B digital
device, pursuant to Part 15 of the FCC Rules. These limits are designed to provide reasonable
protection against harmful interference in a residential installation.
This equipment generates, uses, and can radiate radio frequency energy and, if not installed
and used in accordance with the instructions, may cause harmful interference to radio
communications. However, there is no guarantee that interference will not occur in a
particular installation.
If this equipment does cause harmful interference to radio or television reception, which can
be determined by turning the equipment off and on, the user is encouraged to try to correct
the interference by one or more of the following measures:
•
Reorient or relocate the receiving antenna.
•
Increase the separation between the equipment and the receiver.
•
Connect the equipment into an outlet on a circuit different from that to which the
receiver is connected.
•
Consult the dealer or an experienced radio/TV technician for help.
This device complies with Part 15 of the FCC Rules. Operation is subject to the following two
conditions: (1) this device may not cause harmful interference and (2) this device must
accept any interference received, including interference that may cause undesired operation.
For environmental reasons, your TheaterTouch universal system controller
uses “environmentally sound” nickel metal-hydride rechargeable batteries.
The batteries do not contain any poisonous heavy metals that can damage
the environment.
In the interest of recycling, please do not dispose of these batteries in the
Copyright © 2000
Remote Technologies Incorporated
All rights reserved.
Printed in the United States
household waste at the end of their useful life. Instead, dispose of them
an appropiate collection site.
at
III

TheaterTouch System Controller
SAFETY SUGGESTIONS
Read Instructions.
Read all safety and operating instructions before operating the unit.
Retain Instructions.
Heed Warnings.
Follow Instructions.
Heat.
Keep the unit away from heat sources such as radiators, heat registers, stoves, etc.,
including amplifiers that produce heat.
Power Sources.
operating instructions, or as marked on the unit.
Power Cord Protection.
on or pinched by items placed on or against them, paying particular attention to the cords at
plugs, at convenient receptacles, and at the point at which they exit from the unit.
Nonuse Periods.
for a long period.
Water and Moisture.
basement, near a swimming pool, near an open window, etc.
Object and Liquid Entry.
enclosure through openings.
Cleaning.
Servicing.
Refer all other service needs to qualified service personnel.
The unit should be cleaned only as recommended by the manufacturer.
Do not attempt any service beyond that described in the operating instructions.
Keep the safety and operating instructions for future reference.
Adhere to all warnings on the unit and in the operating instructions.
Follow operating instructions and instructions for use.
Connect the unit only to a power supply of the type described in the
Route power supply cords so that they are not likely to be walked
Unplug the power supply from the outlet when the unit is to be left unused
Do not use the unit near water—for example, near a sink, in a wet
Do not allow objects to fall or liquids to be spilled into the
Damage Requiring Service.
when:
•
The power supply cord or the plug has been damaged.
•
Objects have fallen or liquid has been spilled into the unit.
•
The unit has been exposed to rain.
•
The unit does not appear to operate normally or exhibits a marked change in
performance.
•
The unit has been dropped, or the enclosure damaged.
TO REDUCE THE RISK OF FIRE OR ELECTRIC
SHOCK, DO NOT EXPOSE THE UNIT TO RAIN OR
MOISTURE.
The unit should be serviced by qualified service personnel
WARNING !
IV

TheaterTouch System Controller
LIMITED WARRANTY AND DISCLAIMER
Remote Technologies Incorporated warrants its products for a period of one (1) year from
the date of purchase from Remote Technologies Incorporated or an authorized Remote
Technologies Incorporated dealer.
This warranty may be enforced by the original purchaser and subsequent owners during the
warranty period, so long as the original dated sales receipt or other proof of warranty
coverage is presented when warranty service is required.
Except as specified below, this warranty covers all defects in material and workmanship in
this product. The following are
Damage resulting from:
1. Accident, misuse, abuse, or neglect.
2. Failure to follow instructions contained in your User’s Guide.
3. Repair or attempted repair by anyone other than Remote Technologies
Incorporated.
4. Failure to perform recommended periodic maintenance.
not
covered by the warranty:
5. Causes other than product defects, including lack of skill, competence or
experience of user.
6. Shipment of this product (claims must be made to the carrier).
7. Being altered or which the serial number has been defaced, modified or removed.
Remote Technologies Incorporated is not liable for any damages caused by its products or
for its failure of its products to perform, including any lost profits, lost savings, incidental
damages, or consequential damages.
Remote Technologies Incorporated is not liable for damages based upon inconvenience, loss
of use of the product, loss of time, interrupted operation, commercial loss, any claim made
by a third party or made by you for a third party.
Remote Technologies Incorporated’s liability for any defective product is limited to repair or
replacement of the product, at our option.
If your TheaterTouch system controller needs service, please contact Remote Technologies
Incorporated by telephone, fax or E-mail for return information (See
not return products to Remote Technologies Incorporated without return authorization.
All rights are reserved. No part of this document may be photocopied, reproduced, or
translated without the prior written notice of Remote Technologies Incorporated.
The information contained in this document is subject to change without notice. Remote
Technologies Incorporated shall not be liable for errors contained herein or for consequential
damages in connection with the furnishing, performance, or use of this material.
Chapter 9
). Please do
Microsoft and Windows are registered trademarks of Microsoft Corporation. Other brands
and their products are trademarks or registered trademarks of their respective holders.
TheaterTouch, TheaterTouch Designer and the RTI logo are registered trademarks of Remote
Technologies Incorporated.
V

TheaterTouch System Controller
VI

Table of Contents
TheaterTouch System Controller
Federal Communications Commission Notice.............................................................................III
Safety Suggestions..................................................................................................................... IV
Limited Warranty and Disclaimer.................................................................................................V
CHAPTER 1. WELCOME...............................................................................................1
Note ..............................................................................................................................................1
Unpacking and Inspection ............................................................................................................1
Important.......................................................................................................................................1
Product Contents..........................................................................................................................2
Software Requirements ................................................................................................................2
CHAPTER 2. INTRODUCTION.......................................................................................3
Features........................................................................................................................................3
Important Notes ............................................................................................................................4
Cleaning........................................................................................................................................4
Batteries and Charger...................................................................................................................5
Getting Started..............................................................................................................................6
Remote Reference........................................................................................................................7
The Touchscreen Display.............................................................................................................8
The Control Panel Page................................................................................................................8
CHAPTER 3. THEATERTOUCH DESIGNER
Installing TheaterTouch Designer...............................................................................................15
Programming Overview ..............................................................................................................15
TheaterTouch Designer Screen..................................................................................................16
Touchscreen Grid .......................................................................................................................17
Design Hints................................................................................................................................17
Getting Help................................................................................................................................18
SOFTWARE.........................................15
CHAPTER 4. THEATERTOUCH DESIGNER BASICS .................................................19
How to Add a Page.....................................................................................................................19
How to Delete a Page.................................................................................................................19
How to Add Buttons....................................................................................................................20
How to Delete Buttons................................................................................................................20
How to Add Text to Buttons........................................................................................................21
How to Place a Bitmap................................................................................................................22
How to Link Pages......................................................................................................................23
How to Remove Page Links .......................................................................................................24
How to Add Commands to Buttons.............................................................................................24
How to Delete Commands from Buttons ....................................................................................26
How to Save a File......................................................................................................................26
How to Open an Existing File......................................................................................................26
How to Preview your File............................................................................................................27
How to Setup Communications ..................................................................................................28
How to Send a File to the TheaterTouch....................................................................................29
VII

TheaterTouch System Controller
CHAPTER 5. THEATERTOUCH DESIGNER ADVANCED FEATURES.......................31
How to Rename a Page..............................................................................................................31
How to Duplicate a Page ............................................................................................................31
How to Merge Pages ..................................................................................................................32
How to Use the PageWizard.......................................................................................................33
How to Change Button Styles.....................................................................................................33
How to Select Buttons.................................................................................................................34
How to Cut or Copy Buttons .......................................................................................................34
How to Paste Buttons .................................................................................................................34
How to Move a Button.................................................................................................................35
How to Resize a Button ..............................................................................................................35
How to Place a Custom Button...................................................................................................35
How to Use the Macro Editor......................................................................................................36
How to Delete a Macro ...............................................................................................................42
How to Edit an IR Command in a Macro ....................................................................................42
How to Use the Channel Macro Wizard......................................................................................45
How to Edit the Remote Properties.............................................................................................48
How to Edit Button Properties.....................................................................................................52
How to setup RS-232 Communications......................................................................................57
How to Edit the Properties of Multiple Buttons............................................................................60
How to Print Screenshots ...........................................................................................................61
How to Print System Configuration Reports ...............................................................................61
How to Check Memory Usage....................................................................................................62
How to Create a “Self-Downloading .EXE”.................................................................................63
How to Use the “Send” Command..............................................................................................63
CHAPTER 6. IR LIBRARY MANAGER.........................................................................65
Infrared Codes............................................................................................................................65
How the TheaterTouch Learns IR Codes ...................................................................................66
Hints for Learning IR Codes .......................................................................................................67
How to Open the IR Library Manager.........................................................................................68
How to Create a New IR Library.................................................................................................68
How to Open an Existing IR Library............................................................................................70
How to Add a New Remote to an IR Library...............................................................................71
How to Use the New Remote Wizard .........................................................................................72
How to Align a Donor Remote Control........................................................................................73
How to Capture Infrared Commands..........................................................................................75
How to Test Infrared Commands................................................................................................77
How to Edit Infrared Commands.................................................................................................78
CHAPTER 7. IMAGE EDITORS....................................................................................81
The Difference Between Custom Buttons and Bitmaps .............................................................81
Button Bitmap Editor Screen.......................................................................................................82
Custom Button Editor Screen .....................................................................................................83
Toolbar........................................................................................................................................84
Tool Palette.................................................................................................................................86
Up Image-Down Image Tool (Custom Button Editor Only):........................................................88
New Bitmap Size Dialog Box (Button Bitmap Editor Only):.........................................................89
CHAPTER 8. TROUBLESHOOTING............................................................................91
Display is Dim, Blank or Unreadable ..........................................................................................91
Communication Problems...........................................................................................................91
Infrared Problems .......................................................................................................................93
Unable to Learn Commands.......................................................................................................94
Macro Problems..........................................................................................................................94
VIII

TheaterTouch System Controller
CHAPTER 9. SERVICE AND SUPPORT......................................................................95
Updates and New Products........................................................................................................95
Contacting Remote Technologies Incorporated .........................................................................95
RTI Technical Support................................................................................................................95
Shipment of Remote for Service.................................................................................................97
SPECIFICATIONS........................................................................................................99
APPENDIX..................................................................................................................101
Software License Agreement....................................................................................................101
INDEX.........................................................................................................................103
IX

TheaterTouch System Controller
X

Chapter 1. Welcome
Congratulations on your purchase of the TheaterTouch universal system controller.
The TheaterTouch combines the power and flexibility of a graphic LCD touchscreen
with an ergonomic design that permits effortless one-handed operation. This design
overcomes the need for compromise between form and function. Sleek and perfectly
balanced, the TheaterTouch is infinitely flexible and expandable.
TheaterTouch takes complete control of the home theater, replacing all other remotes.
It features an intuitive, easy to read LCD that can display custom buttons, text,
graphics and symbols. In addition to the backlit display, 25 “Hard” keypad buttons
allow easy access to frequently used functions.
Programming is easy and convenient thanks to the built-in infrared learning ability
and the Windows® based software. TheaterTouch is capable of both infrared and
radio frequency output. A separate RF to IR converter is available for transmission
through walls and cabinets. The converter will also monitor the power status of most
A/V equipment thru the use of voltage and video sensors.
Chapter 1 • Welcome
NOTE
The TheaterTouch and TheaterTouch Designer software are compatible with infrared
(IR) commands with carrier frequencies between 15kHz and 460kHz, as well as those
commands that do not use a carrier. This covers the vast majority of remotes
available to date, including Bang & Olufsen® (most of which use 455kHz) and
Vidikron® (some of which use 333kHz).
Despite every effort to make the TheaterTouch universal system controller work with
all IR-systems, some IR-controlled products are unable to be learned by the
TheaterTouch due to incompatible frequencies or non-standard IR formats. The
TheaterTouch cannot learn non-IR formats such as RF and ultrasonic.
UNPACKING AND INSPECTION
After unpacking your new TheaterTouch universal system controller, save all of the
packing materials in case you ever have to ship the unit.
Thoroughly inspect the TheaterTouch and packing materials for signs of damage.
Report any damage to the carrier immediately. Report any equipment malfunctions
to Remote Technologies Incorporated or an authorized Remote Technologies
Incorporated dealer.
IMPORTANT
After unpacking your new TheaterTouch universal system controller for the first time,
charge each battery pack for at least 12 hours.
1

TheaterTouch System Controller
PRODUCT CONTENTS
Contents within the box include the following items:
• TheaterTouch™ System Controller
• Smart battery charger
• Two (2) rechargeable Nickel Metal-Hydride battery packs
• Wall-mount power supply for battery charger
• TheaterTouch Designer™ software CD-ROM
• Serial cable for programming
• Owner’s Manual
• Warranty card
• Registration card
SOFTWARE REQUIREMENTS
TheaterTouch Designer software minimum system requirements:
• Windows 95, Windows 98,Windows NT 4.0 or higher
operating system
• IBM or compatible PC with 486DX2/66Mhz or higher
processor
• 16 Megabytes (MB) of RAM
• 8 Megabytes of free disk space for minimum installation
(16 MB recommended)
• A mouse or other pointing device is required
• VGA monitor (256 color Super VGA recommended)
• CD-ROM drive
• Open RS-232 serial port
• Optional printer for printing setup reports
2

Chapter 2. Introduction
The TheaterTouch is a programmable touchscreen computer that is designed to
provide wireless control of audio/video and automation systems. Like other
“universal” or “learning” remote controls, the TheaterTouch allows you to consolidate
the functions of many independent infrared remote controls into one unit. The
TheaterTouch also incorporates a unique programmable user interface, allowing it to
provide a simple, intuitive, and customized interface for any system. Before using the
TheaterTouch, please read and follow all instructions in this manual.
FEATURES
The TheaterTouch provides superior quality and reliability as well as these specific
features:
•
A replacement for all of your system’s remote controls. The TheaterTouch can
reproduce all of the commands of almost any other infrared remote control.
•
A programmable graphic display. The TheaterTouch uses powerful Windows
based software that makes it easy to place buttons, text, graphics and symbols
anywhere on the display.
Chapter 2 • Introduction
•
A backlit LCD with digital matrix touchscreen. When you want to perform a
command, simply touch the display where that command is displayed. The
touchscreen never needs calibrating.
•
25 backlit “hard” keypad buttons that allow easy access to frequently used
functions.
•
Two detachable, low-profile rechargeable battery packs. The TheaterTouch can
run continuously for several hours between charges. Because the remote is
normally used only a few minutes per session, the unit typically will run for a
week or more between charges. A built-in low battery indicator warns you
when it’s time to recharge the battery.
•
A macro function. This feature allows the TheaterTouch to perform a series of
commands by pressing a single button. For example, you can create a macro
called “Movie” that turns on the TV, sets the correct channel, turns on the
VCR, dims the lights, and starts playing a movie.
•
Two output options for controlling your equipment: infrared (IR), radio
frequency (RF), and the ability to use both in the same system.
•
Automatic power on and off. The TheaterTouch turns itself off whenever it is
not used for a pre-set amount of time. Touching any area of the display or a
hard button will turn it on again, also a built in tilt sensor can turn the unit on
when it is picked up.
3

TheaterTouch System Controller
•
A serial port for communication with the TheaterTouch Designer programming
software.
•
Non-volatile flash memory. The TheaterTouch will not lose any programmed
data when the batteries are exchanged.
•
One-year parts and labor warranty.
IMPORTANT NOTES
Please read these important notes about the TheaterTouch:
•
The TheaterTouch should be placed in an area where it is around normal room
temperature (between 60°F to 90°F). If the temperature is too hot, the display
appears dim. If the temperature is too cold, the display appears dark and may
respond slowly.
CLEANING
Occasional cleaning may be required, depending on use.
To clean your TheaterTouch:
•
Do not use sharp objects on the touchscreen. It is designed to operate with a
touch of your finger.
•
Do not let the TheaterTouch get wet. It should not be handled with wet hands
or placed in an area where it could get wet.
•
Do not subject the TheaterTouch to smoke, dust, or vibrations. The display may
be damaged from excessive shock or vibration.
•
Use only the power supply that is provided with the TheaterTouch. Using the
wrong type of power supply may result in battery leakage or other damage.
•
Do not disassemble the unit. The TheaterTouch contains high voltage circuits
that may cause injury if contacted.
1. Remove the battery pack from the TheaterTouch.
2. Lightly dampen a lint-free cloth with water or mild detergent and wipe the
touchscreen, keypad and outer surfaces.
4
BATTERIES AND CHARGER
The following recommendations will assure the best battery performance.
1. Operate the unit until you receive a Low Battery warning in the upper left
hand corner of display.
Chapter 2 • Introduction
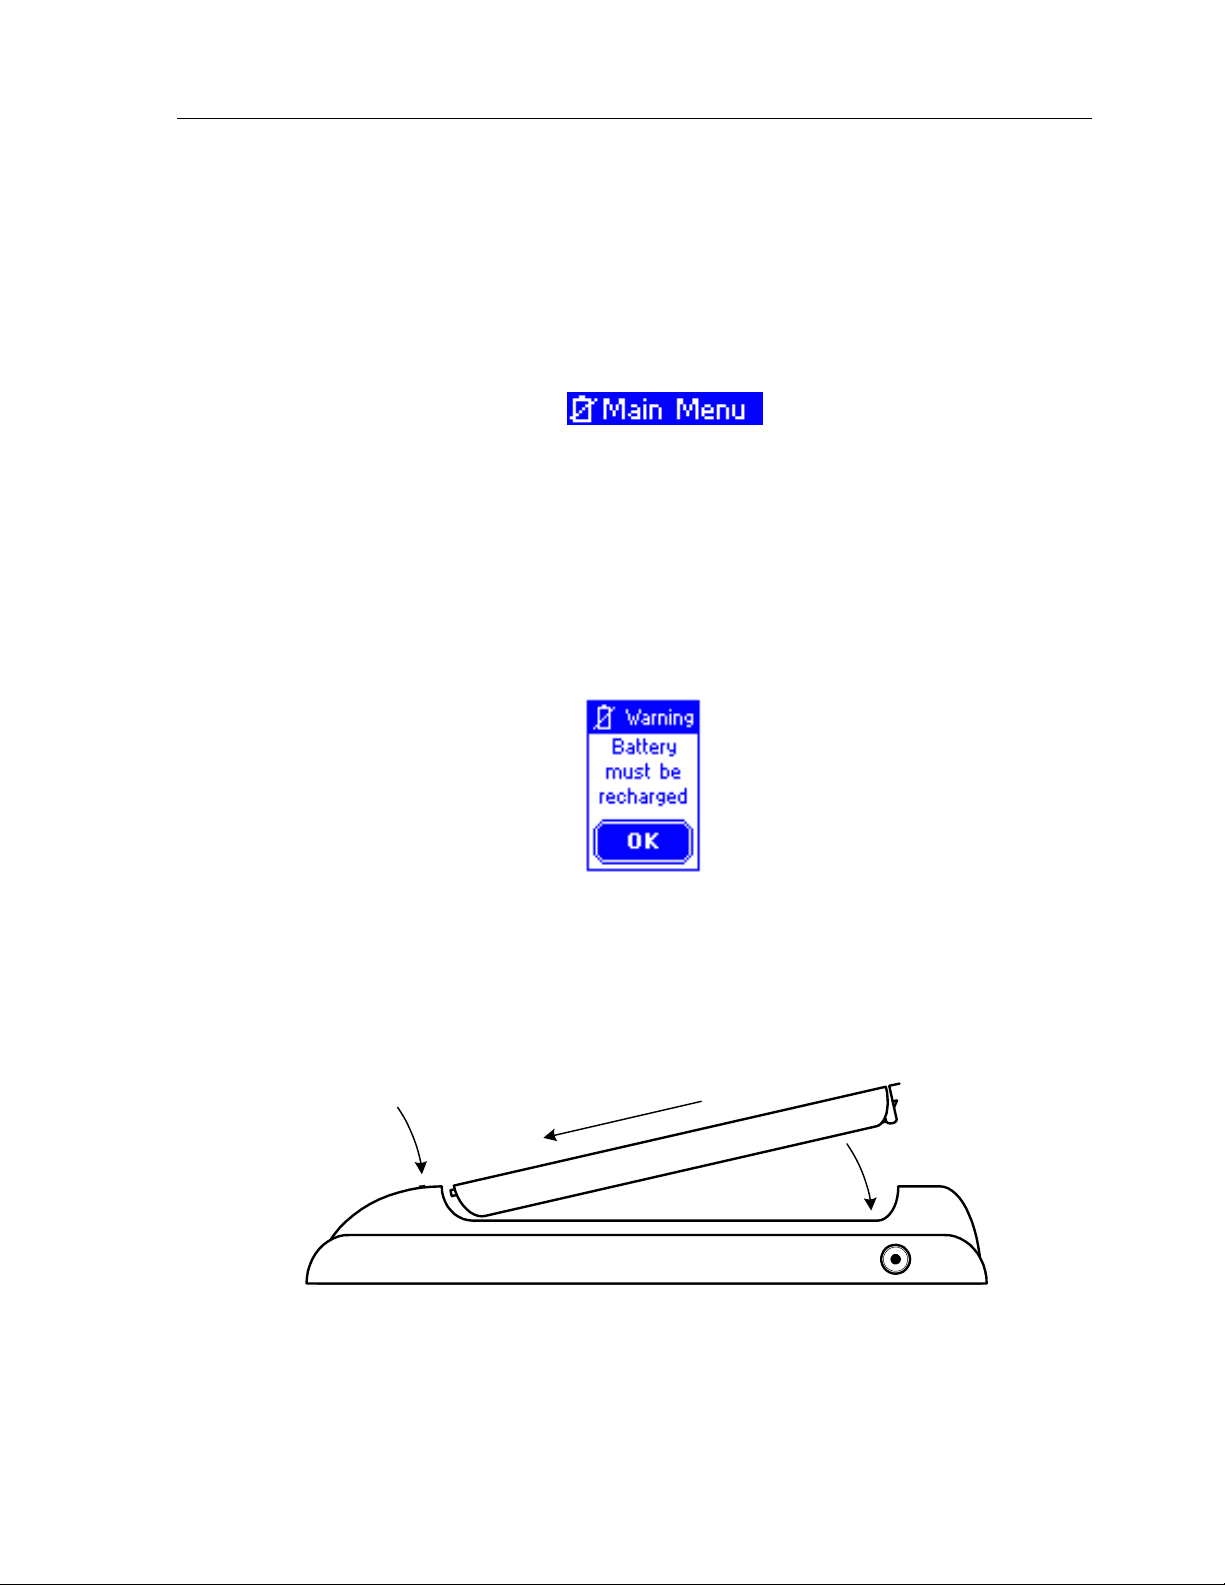
2. At that point, you will have approximately 10 - 20 minutes of run time
remaining before the unit shuts down. At any point after the
Low Battery
icon appears, you can exchange the depleted battery with a charged battery
from the charger. If you operate the battery past a usable level, you will
receive a warning stating
Battery must be recharged
.
To recharge a battery pack, insert the end of the battery with the contacts into the
charger first, and then gently pushing the end with the clip until it snaps into place.
The light on the charger will start flashing after a couple of seconds.
Charging Status
Light
(1)
(2)
Recharge the TheaterTouch batteries for about 3-4 hours. (The light on the battery
charger will stop flashing and stay on when the charge cycle is completed).
The batteries can remain in the charger indefinitely without damage to the batteries.
5
TheaterTouch System Controller
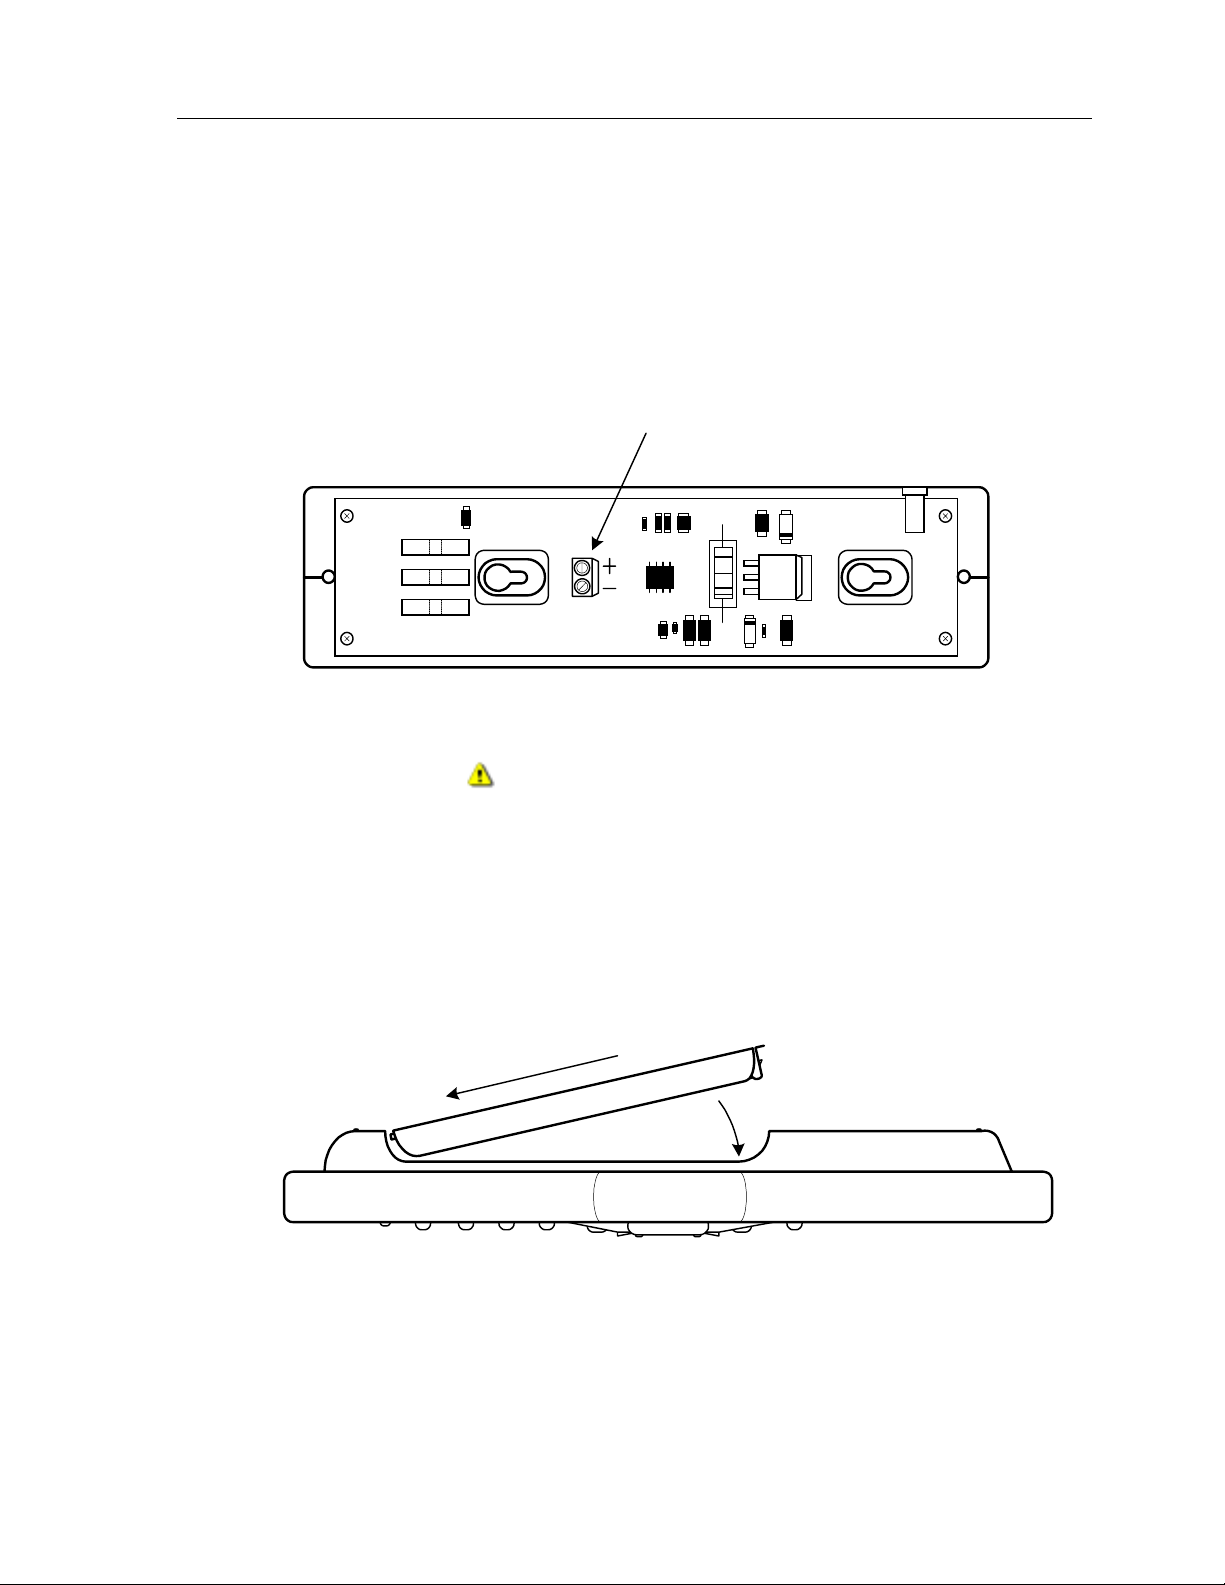
Custom Installation Note:
The TheaterTouch battery charger’s power can be hardwired through the back of the charger
for permanent mounting on a wall or other flat surface. This is done by removing the
bottom plate of the charger and hard wiring the wall mount power supply directly to the
terminal strip. Replace the bottom plate before mounting.
Use only the original power supply.
Power Connection - (J2)
9VDC 0.5A
J2
Battery Charger with bottom plate removed.
Warning!
Watch the polarity.
GETTING STARTED
Start by snapping a fully charged battery on the back of the TheaterTouch. This is done by
inserting the end of the battery with the contacts in first, and then gently pushing the end
with the clip until it snaps into place.
(1)
(2)
The TheaterTouch is powered-up by touching any area of the display or any keypad button as
well as picking up the unit if the tilt sensor is active.
6

REMOTE REFERENCE
Chapter 2 • Introduction
Transmitting and
Learning Window
Rechargeable
Battery Pack
PWR
MAIN MENU
C
H
A
N
SELECT
G
U
ID
E
23
1
456
78
0
Transmitting and
Learning Window
Touchscreen
MUTE
V
O
L
IT
X
E
Main Menu
Keypad Button
Programmable
Keypad Buttons
9
ENTER
Serial
Port
Backlight Key
(Glows in the Dark)
FrontBack
7
TheaterTouch System Controller
THE TOUCHSCREEN DISPLAY
The TheaterTouch touchscreen display is organized as a series of pages and frames. A
page can consist of up to 12 frames of information having one frame displayed on the
screen at a time.
Normally each frame on a page contains objects (buttons, text, graphics, and
symbols) that are related in some way. For instance, they may all display information
necessary for controlling a particular VCR.
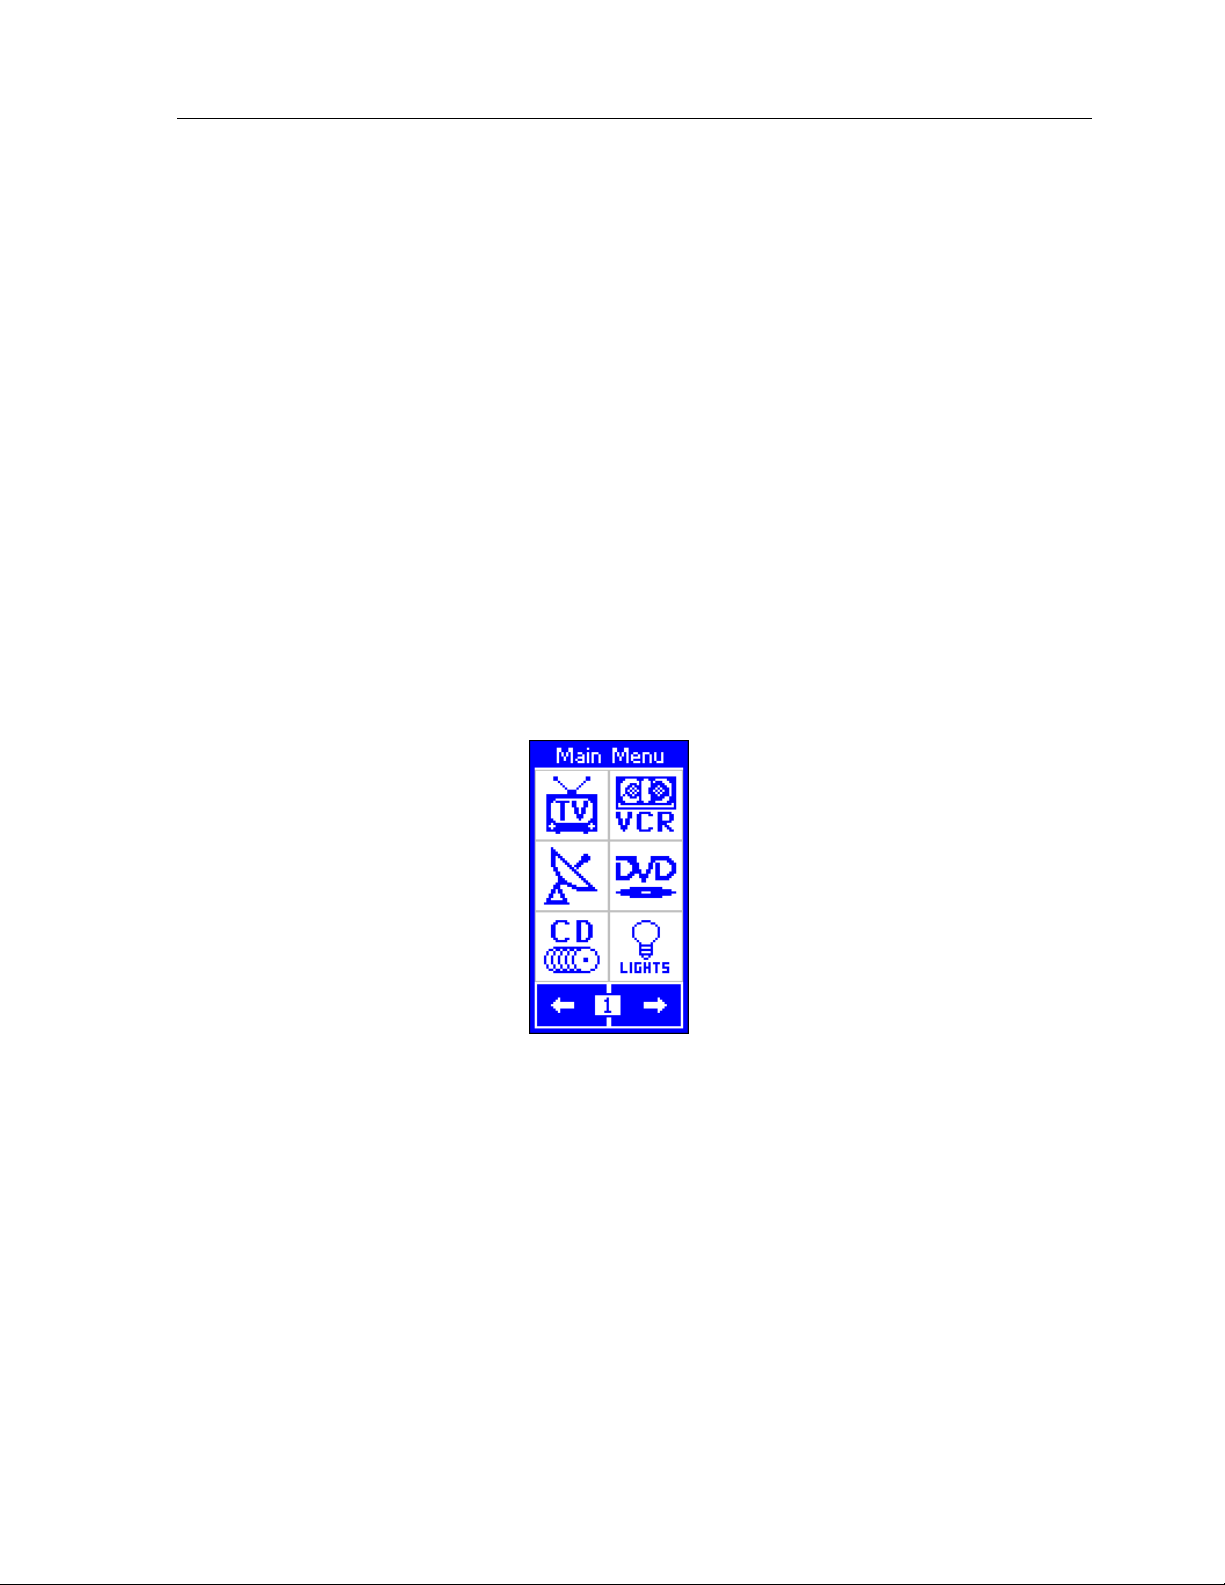
By default, the TheaterTouch has one Main Menu page—all other pages are
considered submenus. Any page can contain a button that will display any other
page when selected.
Normally the Main Menu page is used to display the names of the submenus (e.g.,
the equipment being controlled). The submenus may consist of one or more pages.
The TheaterTouch will support 63 pages plus the Main Menu page; each page can
consist of up to 12 frames.
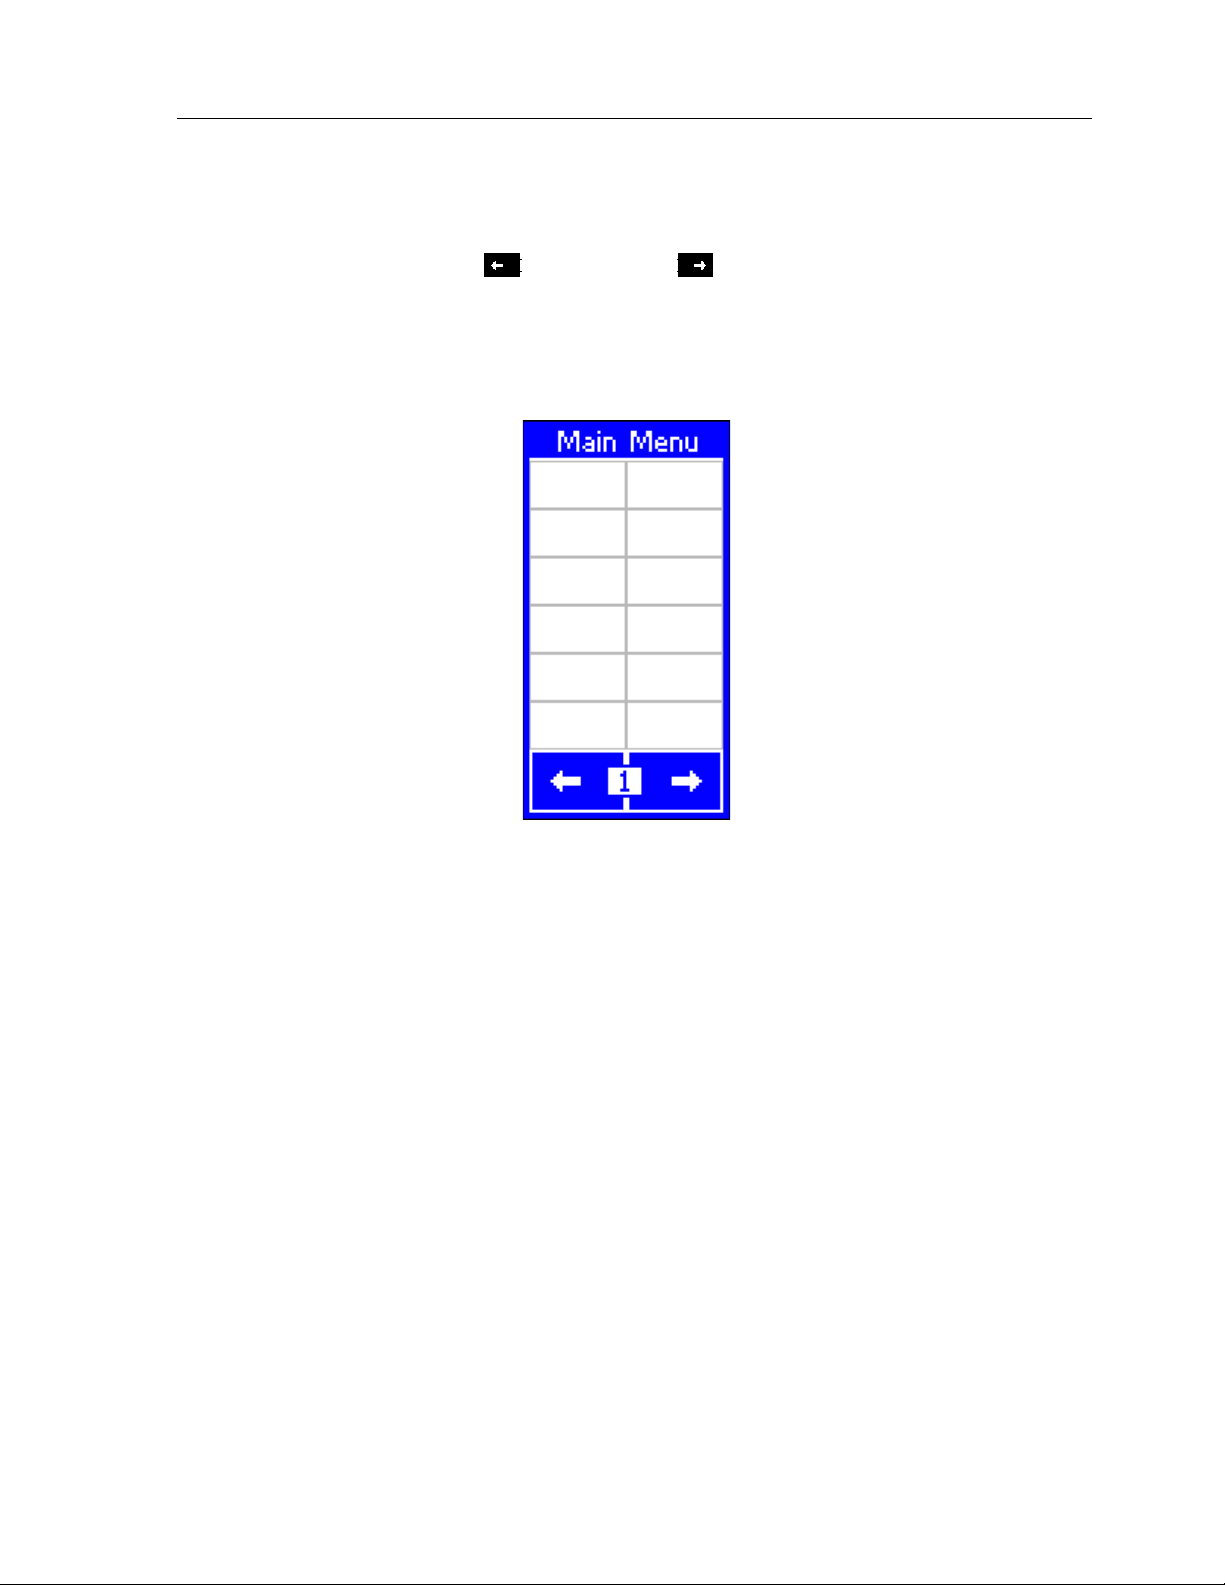
A representation of a programmed Main Menu page is shown below.
Pressing the
different page is assigned using the TheaterTouch Designer software).
THE CONTROL PANEL PAGE
The Control Panel page can be displayed by pressing and holding the backlight key
at least 3 seconds
for
Main Menu
.
key at any time will return you to this page (unless a
You can also access the Control Panel page by assigning a “Control Panel” page link
to a button using the TheaterTouch Designer software.
8
Chapter 2 • Introduction
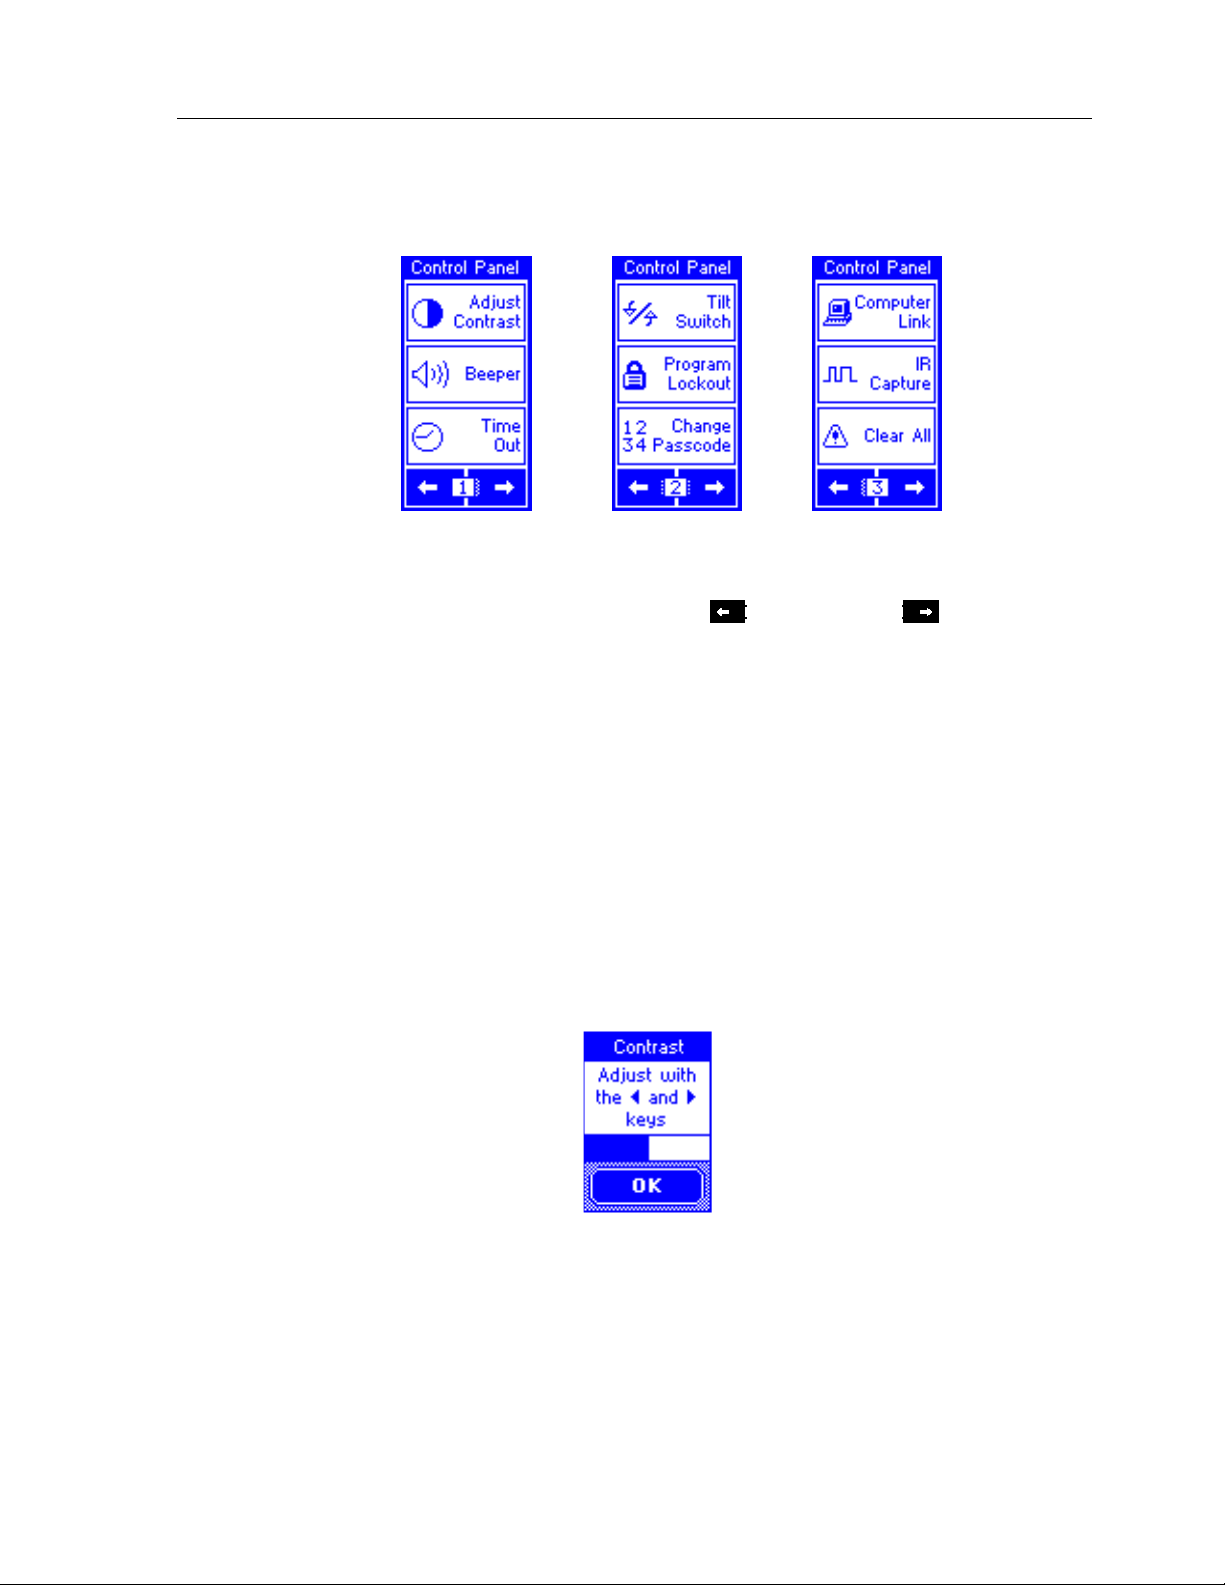
The Control Panel consists of the following three frames:
To change frames, press the frame
bottom of the touchscreen.
To return to your TheaterTouch program, press the
ADJUST CONTRAST
This button displays a window that allows you to adjust the LCD contrast.
Press the
button in the window to close.
Left Arrow
Right Arrow
or
Left
or frame
Right
Main Manu
buttons on the
key.
keypad buttons to adjust. Press the OK
9
TheaterTouch System Controller
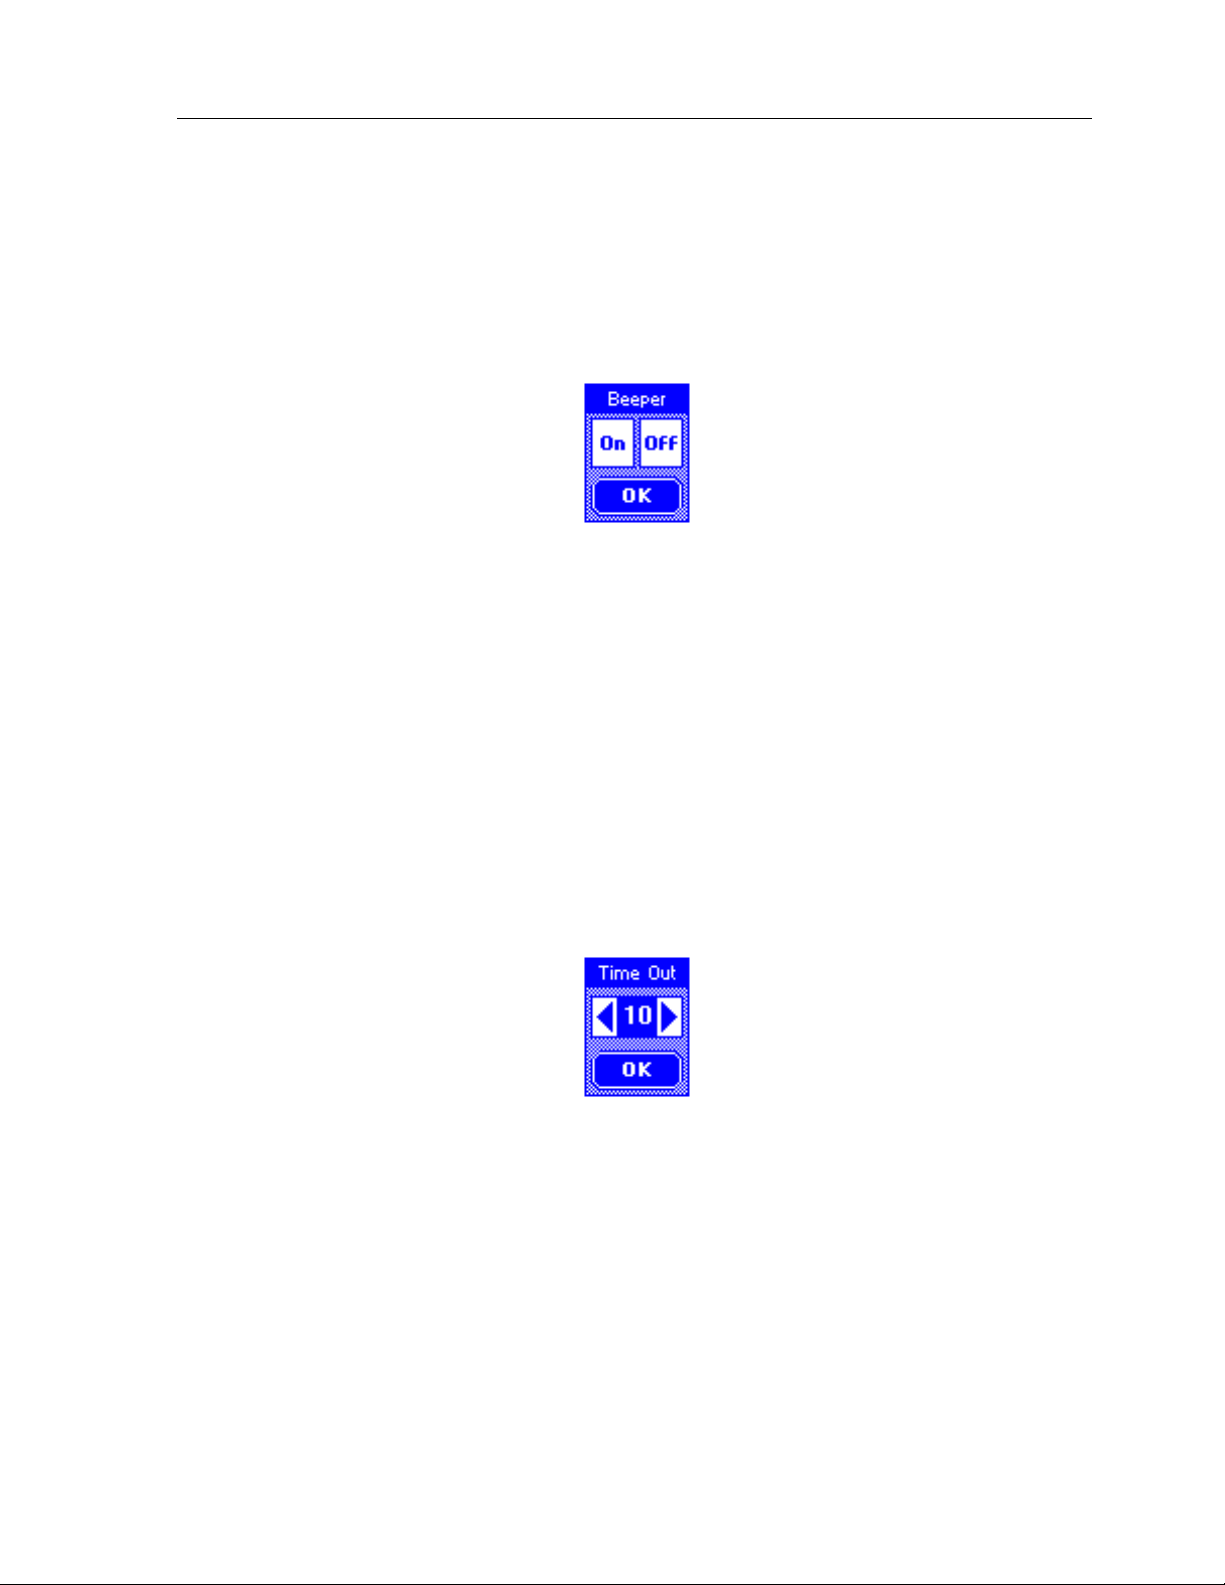
BEEPER
This button displays a window that allows you to turn the audible beep on or
off. The beeper provides feedback that a button was pressed. Press the OK
button in the window to close.
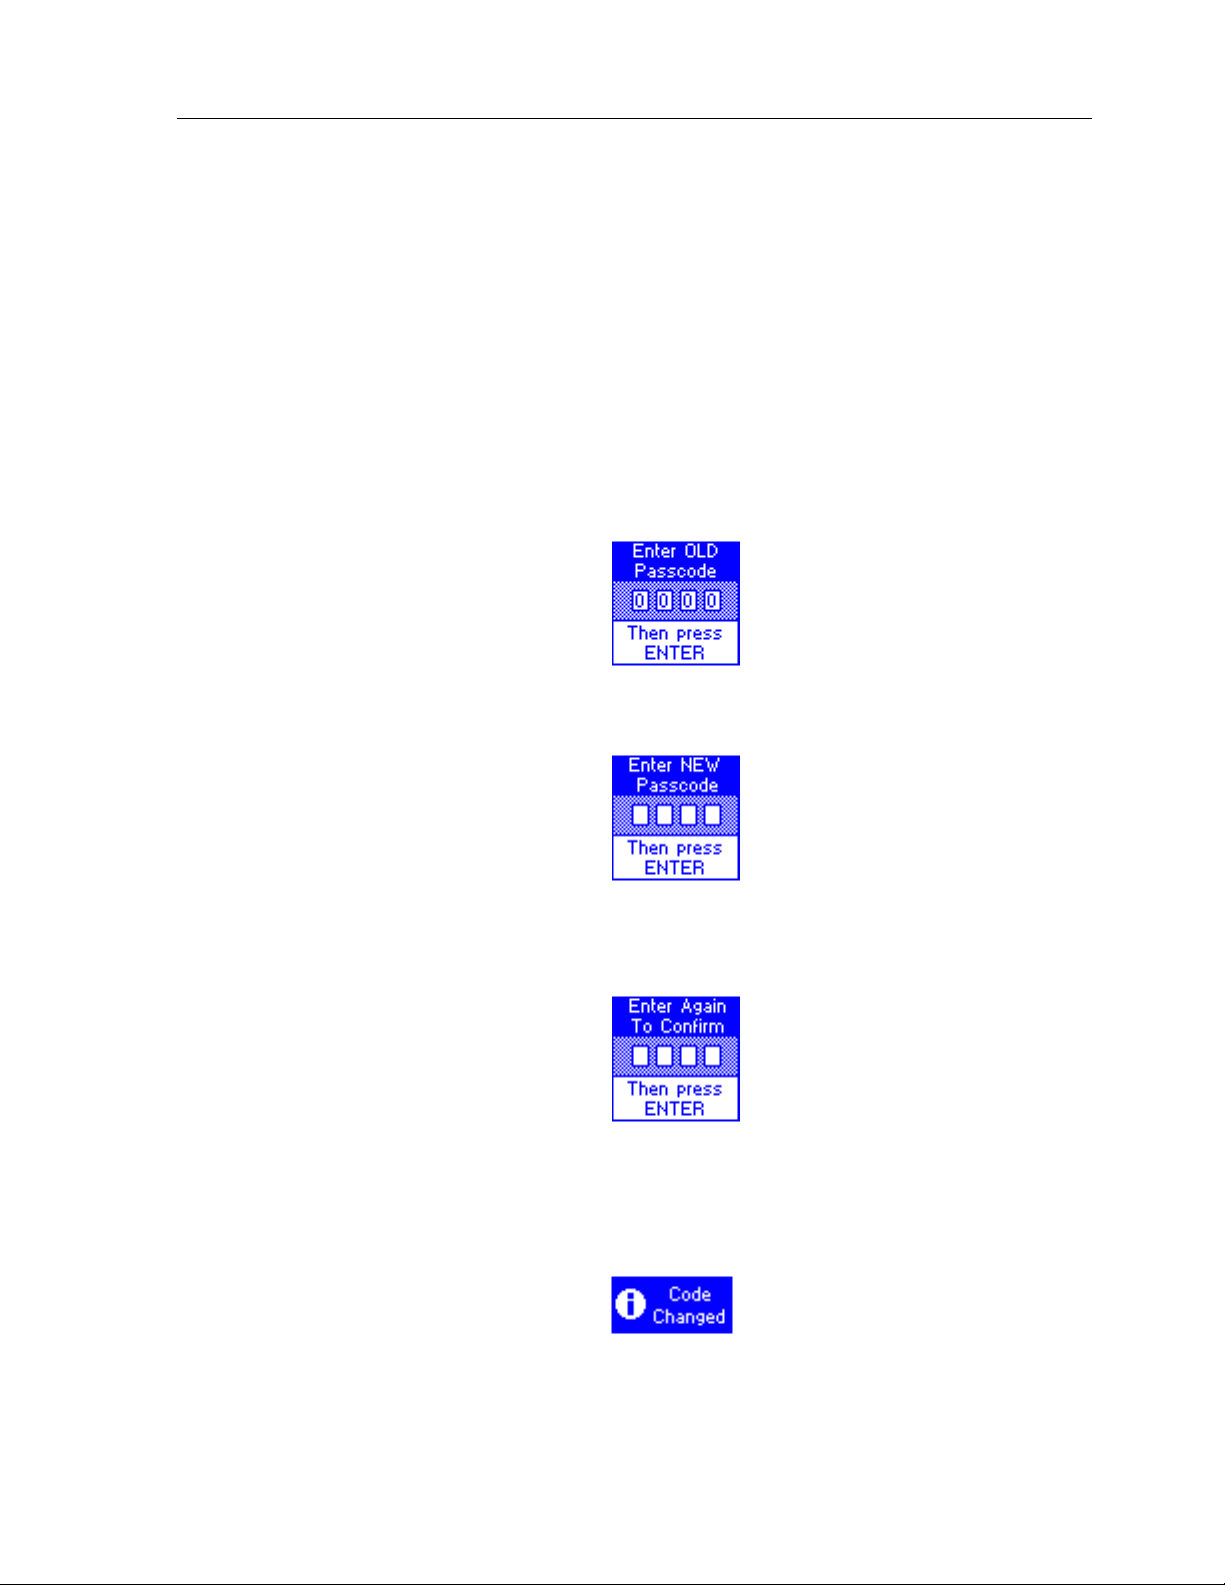
TIME OUT
This button displays a window that allows you to adjust the amount of time
the unit stays awake after the last button press. The time is variable from 1
second to 60 seconds (default is 10 seconds). Press the arrows to the left or
right of the
Time Out
setting to adjust the time. Press the OK button in the
window to close. During Sleep mode, the TheaterTouch uses virtually no
battery power.
10

TILT SWITCH
Chapter 2 • Introduction
This button displays a window that allows you to adjust the settings for the
built in tilt switch, which is a device that turns the remote on when tilted past
a 45 degree angle.
On
means the tilt switch is active and will turn on display and backlight
when picked up.
Off
means the tilt switch is inactive.
Press the OK button in the window to close.
PROGRAM LOCKOUT
This button displays a window that allows you to turn the program lockout
feature on and off. This is used to lockout un-authorized users from the
Computer Link
If the
before you can change this setting.
On
means the
the passcode.
Off
a passcode.
Press the OK button in the window to close.
mode, so that the program cannot be altered.
Lockout
feature is enabled, you will need to enter the current passcode
Computer Link
means the
Computer Link
mode is locked and can only be accessed with
mode is unlocked and can be accessed without
11
TheaterTouch System Controller
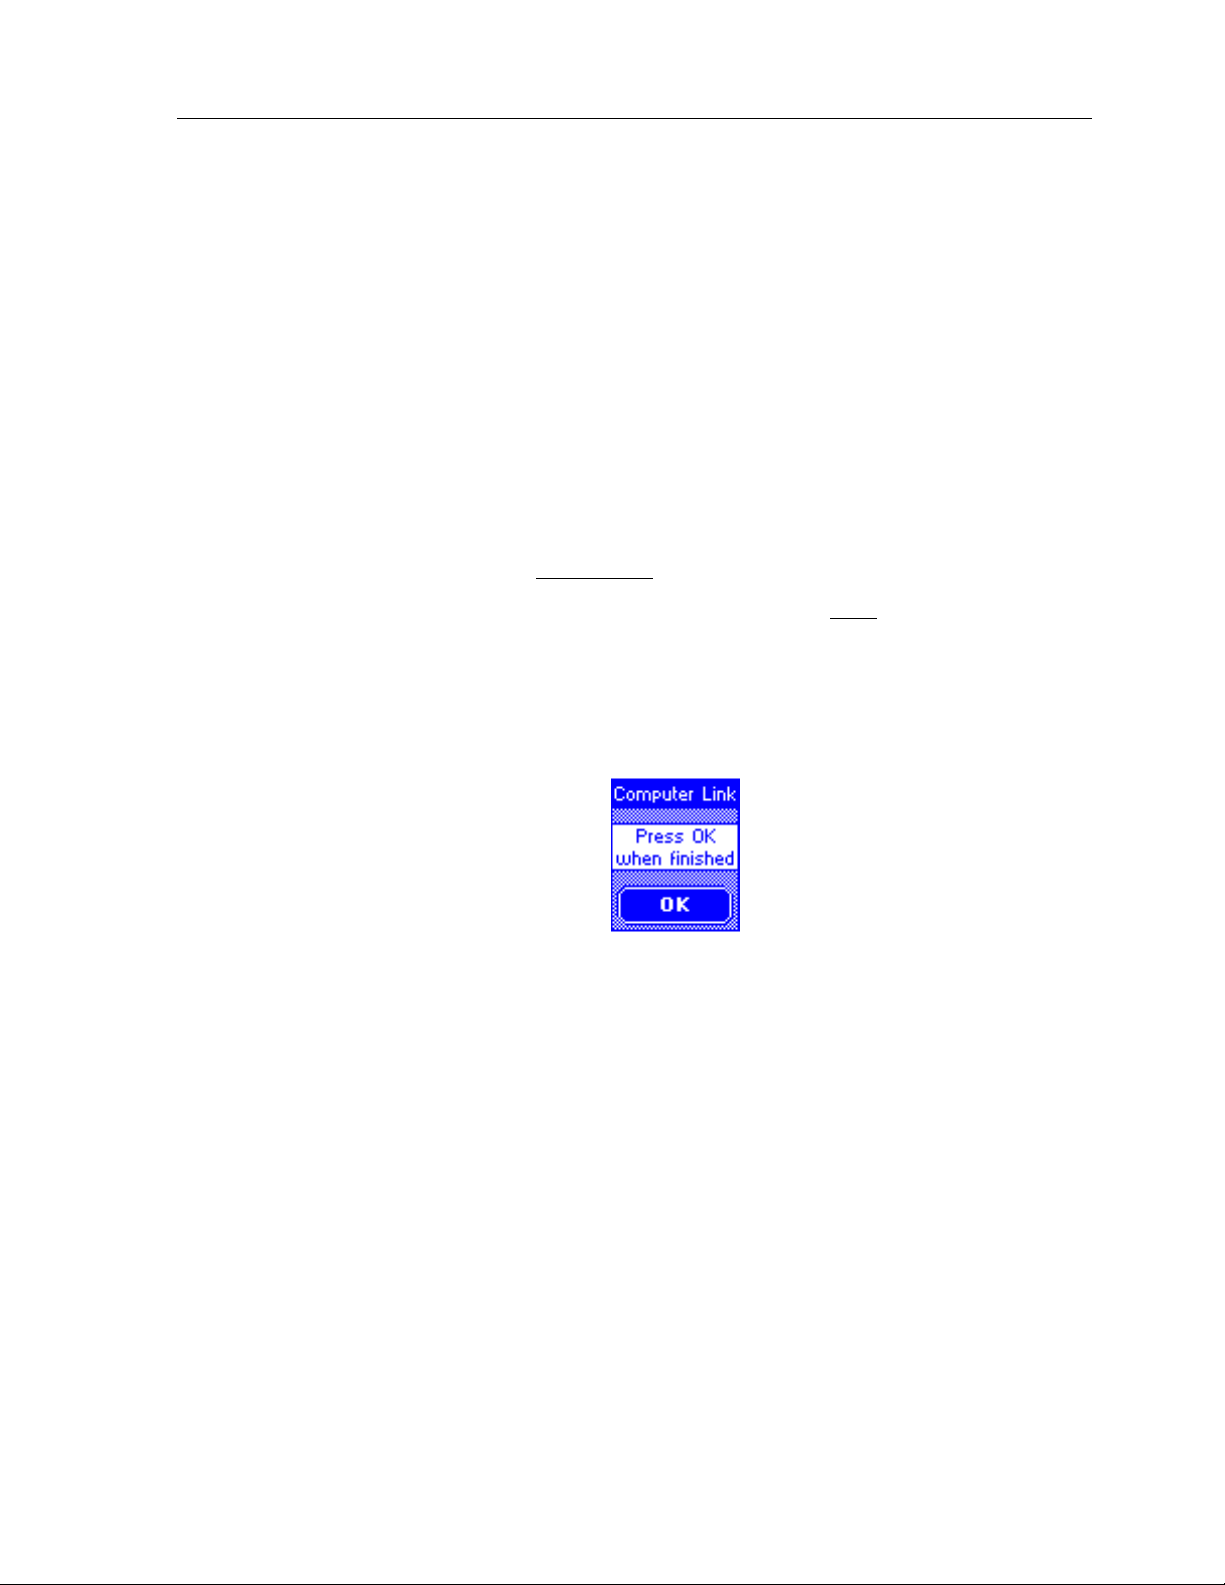
CHANGE PASSCODE
This button displays a window that allows you to set the passcode that is
used to limit access to the
the control panel page, as well as the
available on all buttons.
Computer Link
Button Lockout
mode and
Clear All
function that is
function on
When you press the
enter the
keypad.
(The default code is
old
passcode using the hard keys, then press the
Now enter a
You will be prompted to enter the
confirmation, then press
Change Passcode
0000)
.
new
four-digit passcode, then press
Enter
button, the screen will prompt you to
new
.
Enter
key on the
Enter.
four-digit passcode again for
12
When new code is entered successfully, the
will pop up to let you know you have changed the passcode.
Do not forget the passcode!
Code Changed
window
COMPUTER LINK
Chapter 2 • Introduction
This button displays a window that allows you to put the TheaterTouch into
Computer Link
This is used for RS-232 communications between a personal computer and the
TheaterTouch for loading a program into the TheaterTouch or extracting a
program from the TheaterTouch.
The two options available for the transfer of a program in the TheaterTouch
Designer software are:
Send File to Remote,
♦
to the remote, overwriting
mode.
which sends the new program from the software
the existing program.
Receive File from Remote,
♦
which extracts a copy
of the program from
the remote to the software, leaving the program in the remote intact.
Press the OK button to close the window after the transfer is complete.
13

TheaterTouch System Controller
IR CAPTURE
This button displays a window that allows the TheaterTouch to align, learn,
and test infrared commands from donor remotes. Used together with the
TheaterTouch Designer Infrared Library Manager software you can create a
custom database of infrared commands.
CLEAR ALL
The use of the IR Capture command is described in chapter 6 “IR Library
Manager”.
To exit
IR CAPTURE
mode, press the Main Menu button on the remote.
This button displays a window that will allow you to erase the current
program in the TheaterTouch remote. When the button is pressed, you will be
prompted to enter the current passcode. If the proper code is entered, the
entire program in the TheaterTouch will be erased.
Warning!
This will erase the complete program in the TheaterTouch with no
way to restore it, except by reloading the program from the TheaterTouch
Designer software!
14
If you inadvertently press the
CLEAR ALL
button without entering the passcode
Panel page.
button, simply press the
and you will be returned to the Control
ENTER

Chapter 3 • TheaterTouch Designer Software
Chapter 3. TheaterTouch Designer
TheaterTouch Designer allows you to create the entire graphical interface for an RTI
TheaterTouch System Controller on your computer. Once the interface has been
created, it is downloaded to the TheaterTouch using the included programming cable.
Existing programming can also be extracted, modified, and re-sent to any
TheaterTouch system controller.
Software updates will be available for download at www.rticorp.com
INSTALLING THEATERTOUCH DESIGNER
1. Close any open programs.
2. Place the TheaterTouch Designer compact disc into the CD- ROM drive.
3. If the installation doesn’t appear automatically, click
Run,
drive). Click OK.
4. Follow the on-screen instructions.
PROGRAMMING OVERVIEW
d:\setup\setup.exe
type
(For d, type the letter for your CD-ROM
Software
Start
and choose
Here is an overview of the process of programming a TheaterTouch from scratch.
Instructions on carrying out these tasks can be found in chapters 4 and 5.
1. Create a new page and add buttons for each source component in a
system.
2. Place a button on the main menu to access each one of the source
components.
3. Use the Assign Page tool to link the buttons on the main menu to their
respective source component pages.
4. Assign infrared codes and other commands to buttons using the
Command Library.
5. Create macros using the macro editor (if needed).
6. Check the Remote Properties.
7. Save the file.
8. Send the file to the TheaterTouch using the communications commands.
15
TheaterTouch System Controller
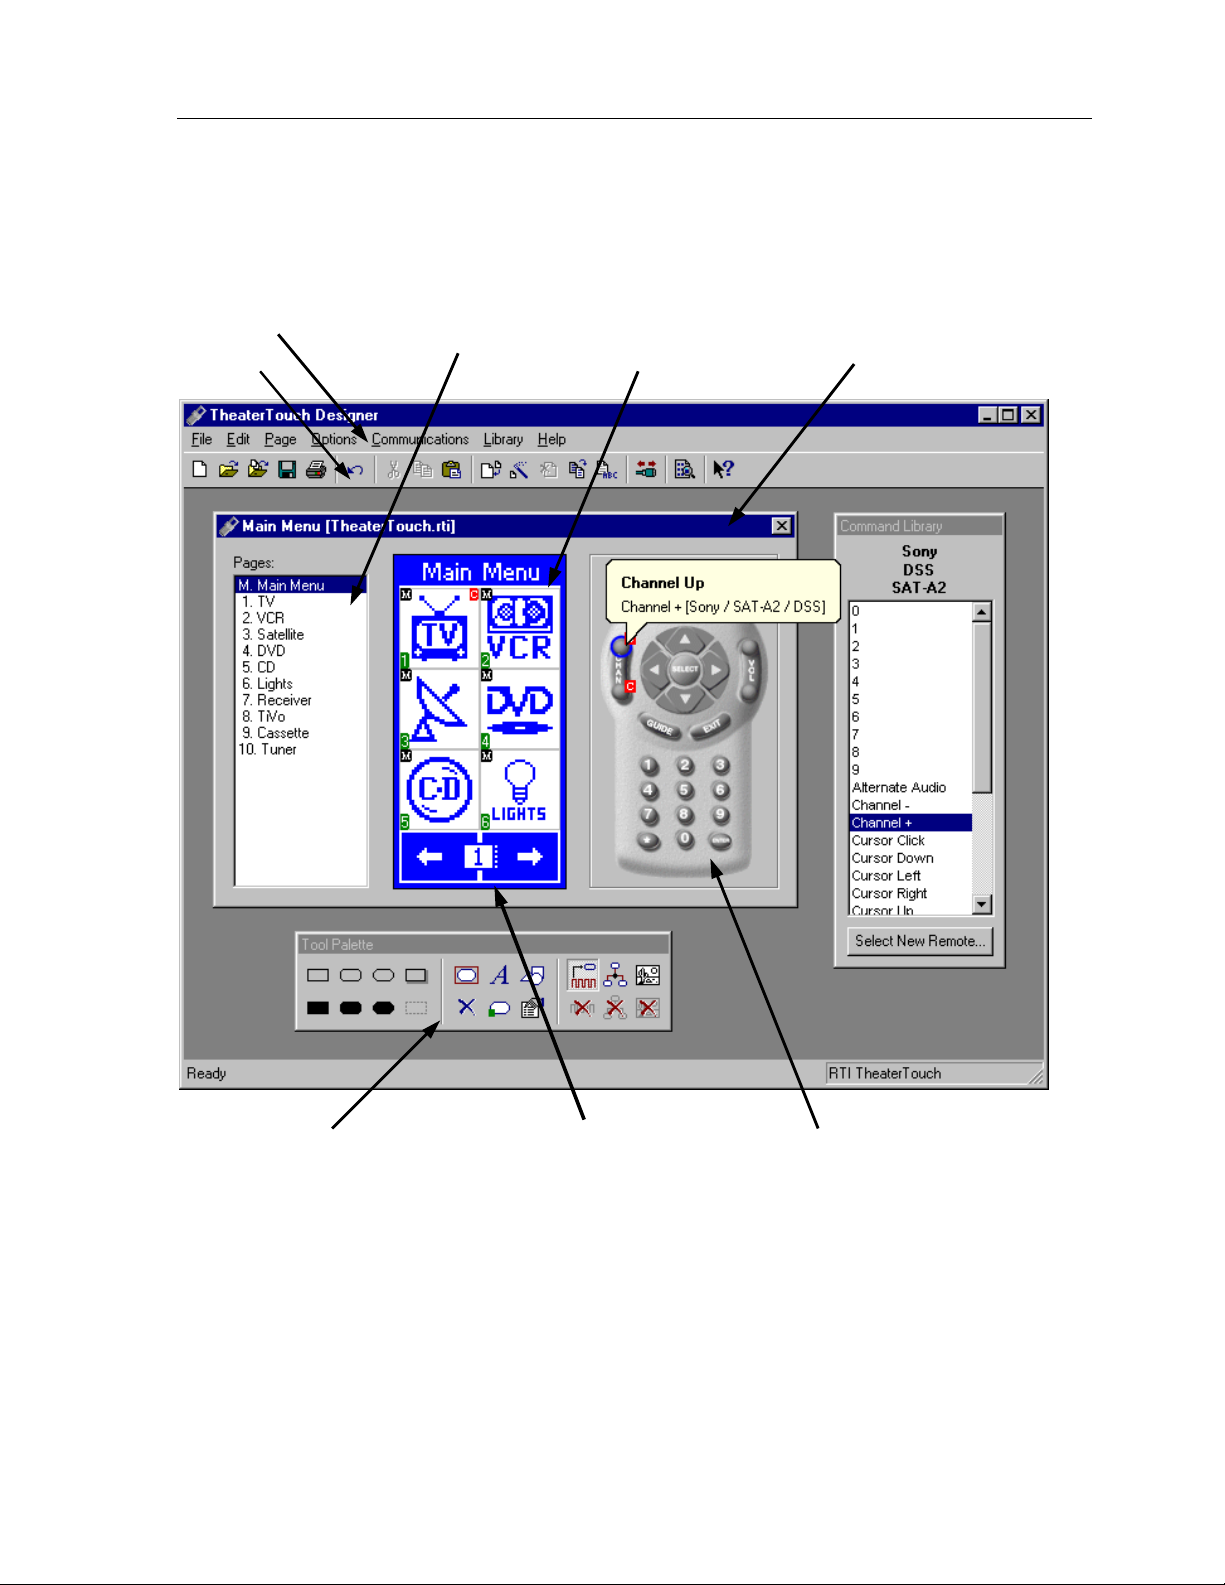
THEATERTOUCH DESIGNER SCREEN
Menu Bar
Toolbar
Page List
Touchscreen
grid
Design Window
Tool Palette Keypad Buttons
16
Frame Left and
Right arrows
TOUCHSCREEN GRID
The touchscreen grid is where the buttons, text, graphics and symbols are placed.
Click on the frame
touchscreen grid to place buttons on other frames.
Left
or frame
Chapter 3 • TheaterTouch Designer Software
Right
buttons at the bottom of the
DESIGN HINTS
1. Be consistent with the location of similar buttons. For example, if you
2. It’s not necessary to re-create each donor remote in its entirety on the
3. Use macros to hide complex command sequences from the user. For
have a DVD player and a VCR in your system, try to make the transport
controls (Play, Pause, Stop, etc.) on both pages look similar.
TheaterTouch. Think of the functions the user will be using daily.
example, instead of presenting the user with only the key pad for
changing channels on their TV, make a set of macros for CBS, HBO, etc.
that send the proper channel numbers automatically. The
Wizard
makes it easy to create this type of macro.
Channel Macro
17

TheaterTouch System Controller
GETTING HELP
TheaterTouch Designer includes an extensive on-line help system. If you need help
Help
Toolbar
button in
.
with any tool or command, click the
If you need an explanation of any item in a dialog box, click the
the dialog’s title bar, and then click on the control you would like to learn about.
What’s this?
button on the
18

Chapter 4 • TheaterTouch Designer Basics
Chapter 4. TheaterTouch Designer Basics
The TheaterTouch system controller is divided into two sections: the touchscreen and
the keypad. You can assign commands, macros and page links to any button you
create on the touchscreen or on the keypad buttons.
The keypad button layout of the TheaterTouch follows the pages, not the frames, so all
12 frames of a page will have the same commands, macros and page links on the
keypad buttons. Each frame of the touchscreen can have different commands, macros
and page links.
PAGES
he individual screens on the TheaterTouch system controller are called pages. Pages
T
on the touchscreen can contain buttons, links to other pages, a title, text, commands,
and macros.
The page links, commands and macros associated with the keypad buttons on the
TheaterTouch are also stored with each page.
Each page can have up to 12 frames on the touchscreen, and usually has the controls
for just one component. Each frame is accessed by scrolling left and right with the
arrows at the bottom of the TheaterTouch touchscreen. With TheaterTouch Designer,
you can add and delete pages, duplicate pages, etc.
All TheaterTouch pages have a page title. The page title is the name that appears in the
title bar above the touchscreen grid and in the Page List.
HOW TO ADD A PAGE
1. Click the
2. Enter a name for the page in the
name of the component, such as: CD, Satellite, Lights and so on.
3. Click OK.
Repeat this procedure for each page you wish to add.
HOW TO DELETE A PAGE
Create New Page Command
New Page Title
on the
Toolbar
dialog, this is usually the
.
1. Select the page to be deleted from the
2. Click the
3. Click
Delete Current Page Command
Yes
in the
Delete Page
confirmation box.
Page List
.
on the
Toolbar
.
19

TheaterTouch System Controller
BUTTONS
Buttons are the functional elements of the TheaterTouch system controller. Each
button can be associated with commands, macros, and page links. Creating buttons
in the touchscreen grid consists of making the button itself and then adding text,
bitmaps, or symbols to them.
HOW TO ADD BUTTONS
1. Select a page from the
frame left and right arrows on the bottom of the touchscreen grid.
2. Select the style of button from the button drawing tools on the left side of
Tool Palette
the
3. Place the mouse cursor over the cell in the touchscreen grid where one
corner of the button will be.
4. Click and hold the left mouse button and drag the mouse to the opposite
corner of where the button will be.
5. Release the left mouse button when the button has the desired shape and
size.
Repeat this procedure for each button you wish to add.
HOW TO DELETE BUTTONS
1. Select the
2. Place the mouse cursor over the button to delete.
3. Click the left mouse button.
Delete Button
Page List
.
tool
, and then the frame on that page with the
from the
Tool Palette
.
20

HOW TO ADD TEXT TO BUTTONS
Chapter 4 • TheaterTouch Designer Basics
1. Select the
2. Place the mouse cursor over the button you want to add or edit text on.
3. Click the left mouse button.
4. Enter the text in the
You can use any of the options in the
button.
Edit Text
tool
Edit Button Text
from the
Edit Button Text
Tool Palette
dialog and click OK.
.
dialog to customize the
Make the text bold.
Justify the text to left side of the button.
Center the text horizontally in the button.
Justify the text to the right side of the button.
Shift the text to the top of the button.
Center the text vertically in the button.
Shift the text to the bottom of the button.
Enable the auto-complete feature, which will automatically finish
typing the name for commonly used buttons.
Click on any of the symbols at the bottom the dialog box to insert them into the active
line.
21

TheaterTouch System Controller
HOW TO PLACE A BITMAP
Bitmap Library
The
to create new bitmap buttons by dragging the bitmaps from the
the touchscreen grid. Hold the mouse over any bitmap in the
window to see its title and the
If you drop the bitmap onto an empty section of the touchscreen grid, a new button is
automatically created with the default style, and the bitmap is placed on that button.
If you drop the bitmap onto an existing button, any text or bitmap already on that
button is replaced with the bitmap that you drop.
window allows you to assign bitmaps to buttons in your file or
Bitmap Library
it is stored in.
Bitmap Library
Bitmap Library
to
1. Select the
2. When the
Bitmap Library
Place Bitmap
Bitmap Library
onto the touchscreen grid.
tool
window appears, drag any bitmap from the
on the
Tool Palette
.
22

HOW TO LINK PAGES
The TheaterTouch Designer software gives you the ability to link pages. When a button
with a page link is pushed on the TheaterTouch, the linked page becomes active, in
essence turning the page.
Page links are indicated by a small green box containing the number of the linked-to
page in the lower left corner of the button.
Chapter 4 • TheaterTouch Designer Basics
1. Select the
2. Place the mouse cursor over the button to which you wish to assign a
page.
3. Click the left mouse button.
4. Select the page name you wish to link to from the pop-up menu.
Assign Pages
tool
from the
Tool Palette
.
5. Notice the green square in the lower left corner of the button corresponds
to the linked page in the list.
Two additional options are available for linking:
<previous>
♦
<control panel>
♦
will take you back to the last page that was displayed.
will switch to the built-in
Control Panel
page.
23
TheaterTouch System Controller
HOW TO REMOVE PAGE LINKS
1. Select the
2. Place the mouse cursor over the button from which you wish to remove
the page link.
3. Click the left mouse button.
4. Select the
HOW TO ADD COMMANDS TO BUTTONS
IR commands are indicated by a small red box with the letter ‘C’ in the upper right
corner of buttons.
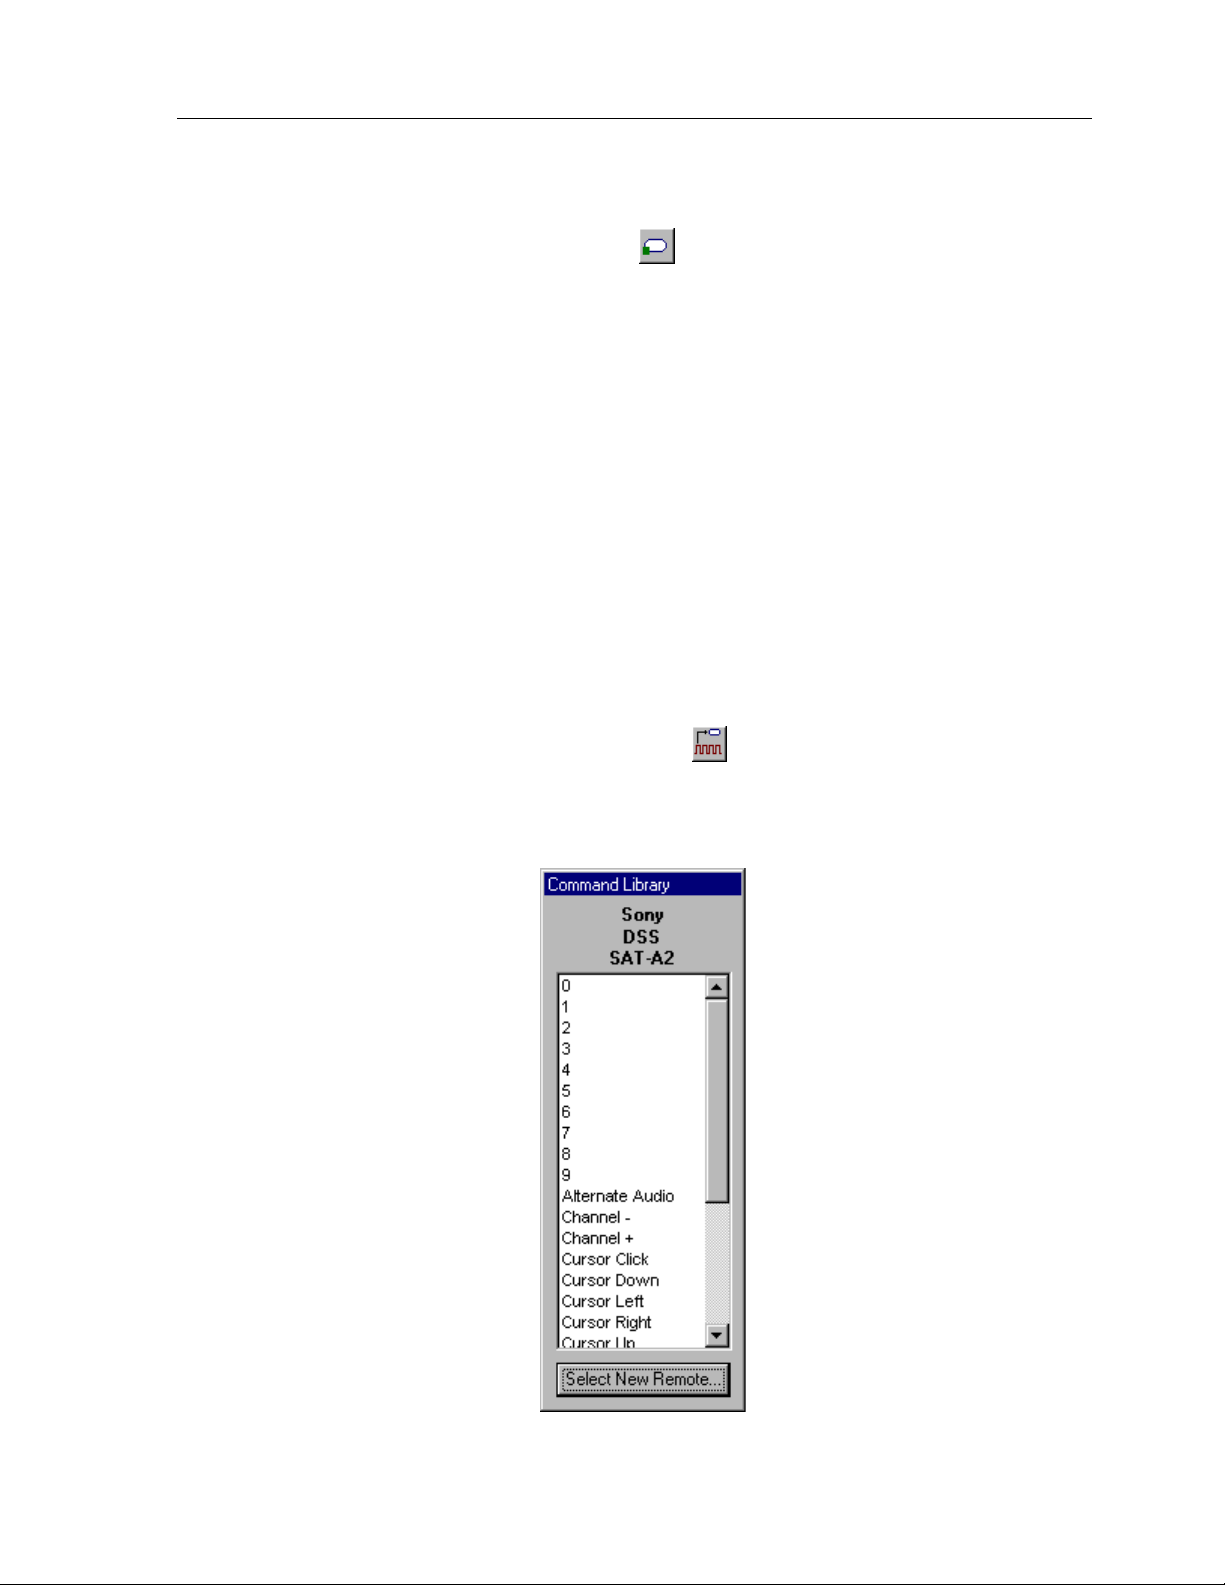
1. Select the
2. Click the
select a different remote than displayed.
Assign Pages
<none>
Command Library
Select New Remote
tool from the
item from the bottom of the pop-up menu.
tool
button in the
from the
Tool Palette
Tool Palette
Command Library
.
.
window to
24
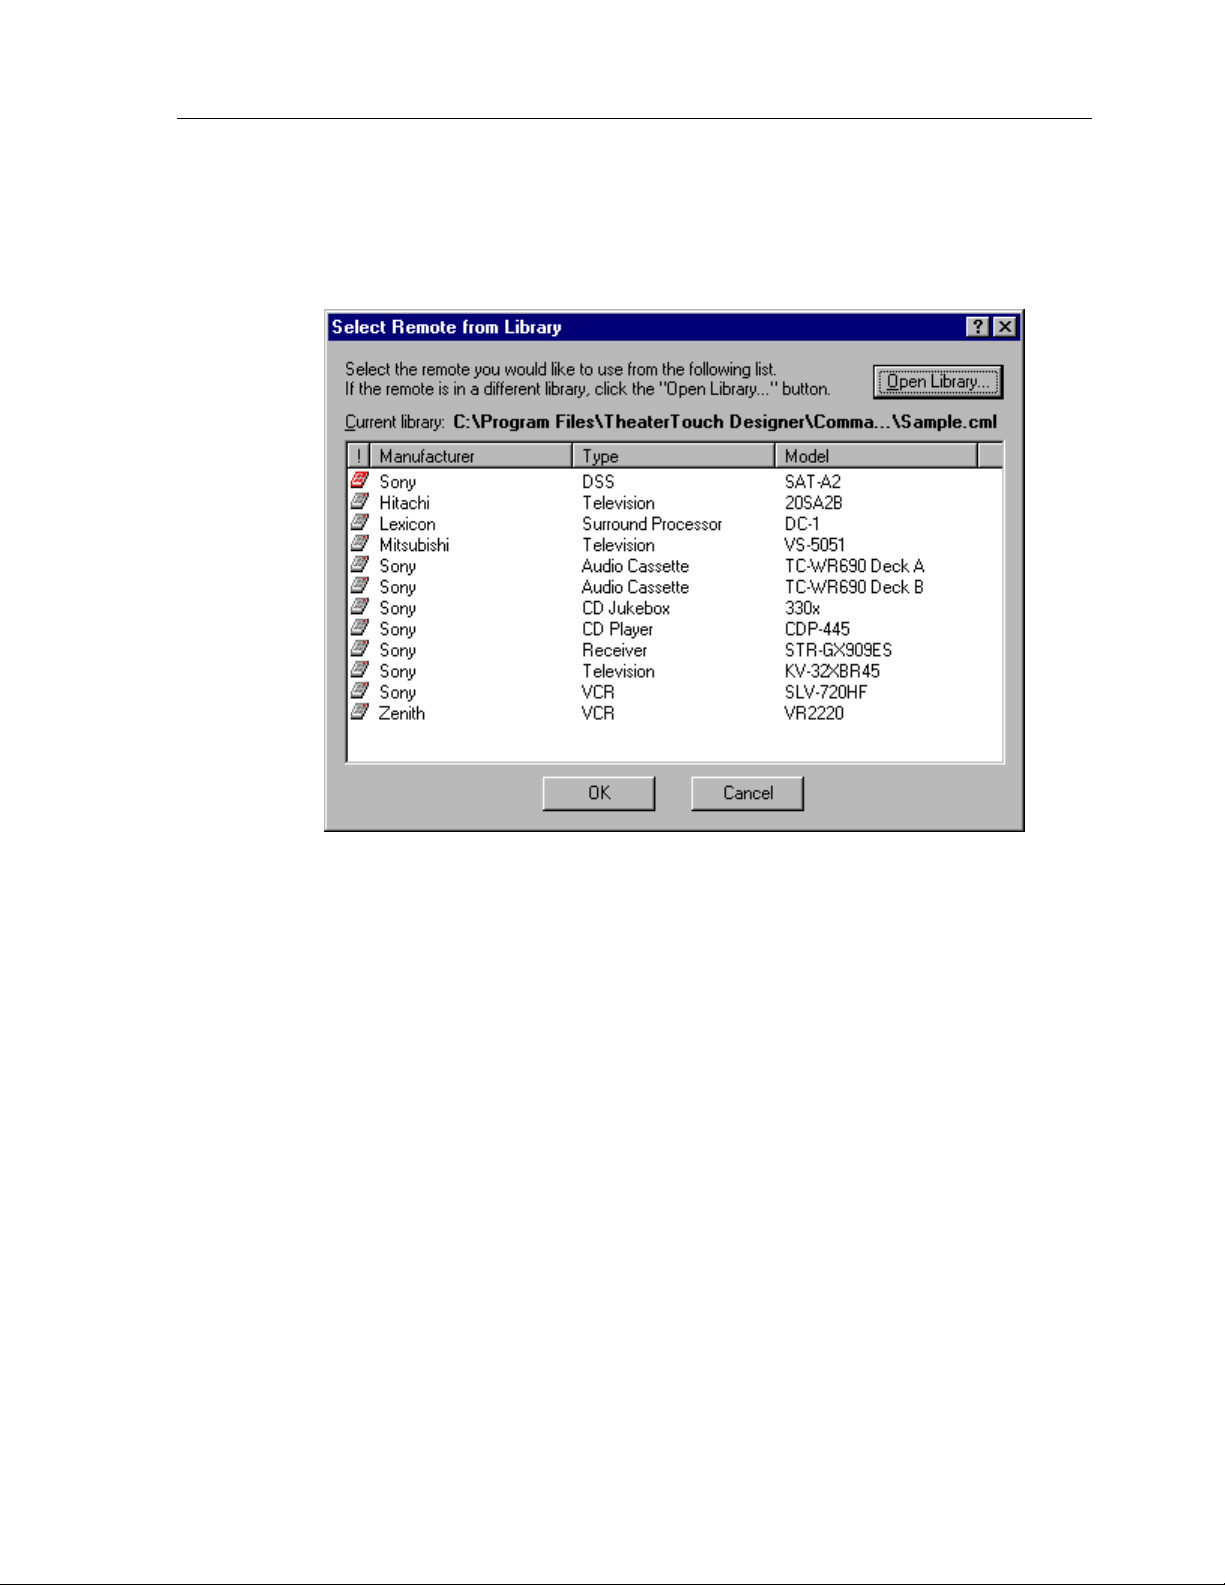
Chapter 4 • TheaterTouch Designer Basics
Remotes are listed by manufacturer, type, and model in the
Library
Remotes that have already been used in the current remote file will be moved to the
top of the list and their icon will turn red for easy identification.
window; use this to select the remote you would like to assign codes from.
Select Remote from
3. If the remote is in a different library or no library is open, click on the
Open Library
4. Click on the remote you would like to assign codes from and the
Command Library
5. Place the mouse cursor over the function in the
you want to assign.
6. Click and hold the left mouse button.
7. Drag the mouse cursor to the button on which you want to place the
command.
8. Release the left mouse button.
If you drag a command to a spot on the touchscreen grid where there are no buttons,
TheaterTouch Designer will automatically create a button and insert the text for that
command.
button to find the library you are looking for.
will open again.
Command Library
that
25
TheaterTouch System Controller
HOW TO DELETE COMMANDS FROM BUTTONS
1. Select the
2. Place the mouse cursor over the button with the command you wish to
delete.
3. Click the left mouse button.
HOW TO SAVE A FILE
The files created with TheaterTouch Designer hold all the elements that make up an
individual remote file. They have the extension
directory.
Default directory is: [C:\Program Files\TheaterTouch Designer\My Remotes]
Note:
If a file already exists on the disk, the current copy is backed up in a file
with the extension
Delete Command
.rtb
and the new file is saved with the
tool
from the
.rti
Tool Palette
and may be stored in any
.rti
.
extension.
1. Click the
2. Specify the name and directory for the file when saving for the first time
and click
HOW TO OPEN AN EXISTING FILE
1. Click the
2. Click on the file you wish to open.
3. Click
Save File Command
Save
.
Open File Command
Open
.
on the
from the
Toolbar
Toolbar
.
.
26
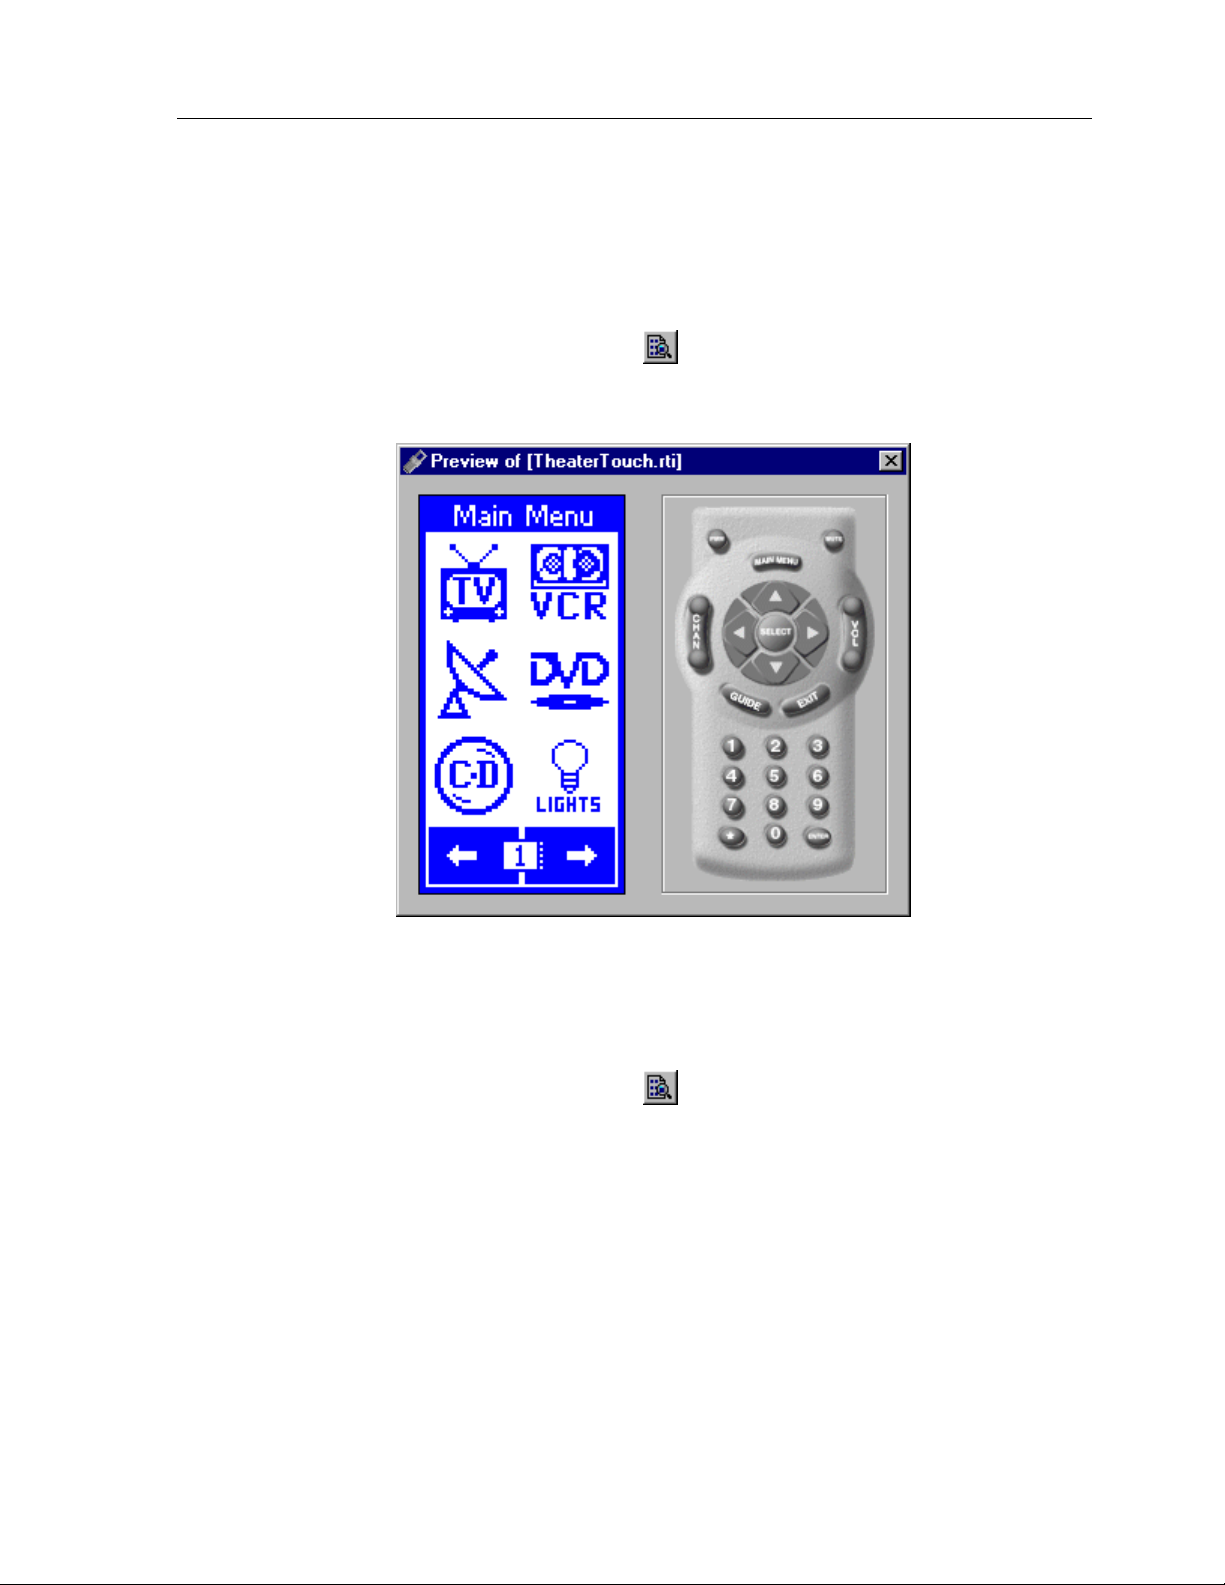
HOW TO PREVIEW YOUR FILE
The Preview mode in TheaterTouch Designer allows you to see exactly what your file
will look like when it is sent to the TheaterTouch remote.
Chapter 4 • TheaterTouch Designer Basics
Click the
Preview Mode Command
from the
Toolbar
.
Use the mouse to press the buttons in the preview window. The buttons will
push-in just like they would on the TheaterTouch, and if they are linked to another
page, the linked page will become the current page in the Preview Window.
Click the
finished testing your file.
Preview Mode Command
from the
Toolbar
again when you are
27
TheaterTouch System Controller
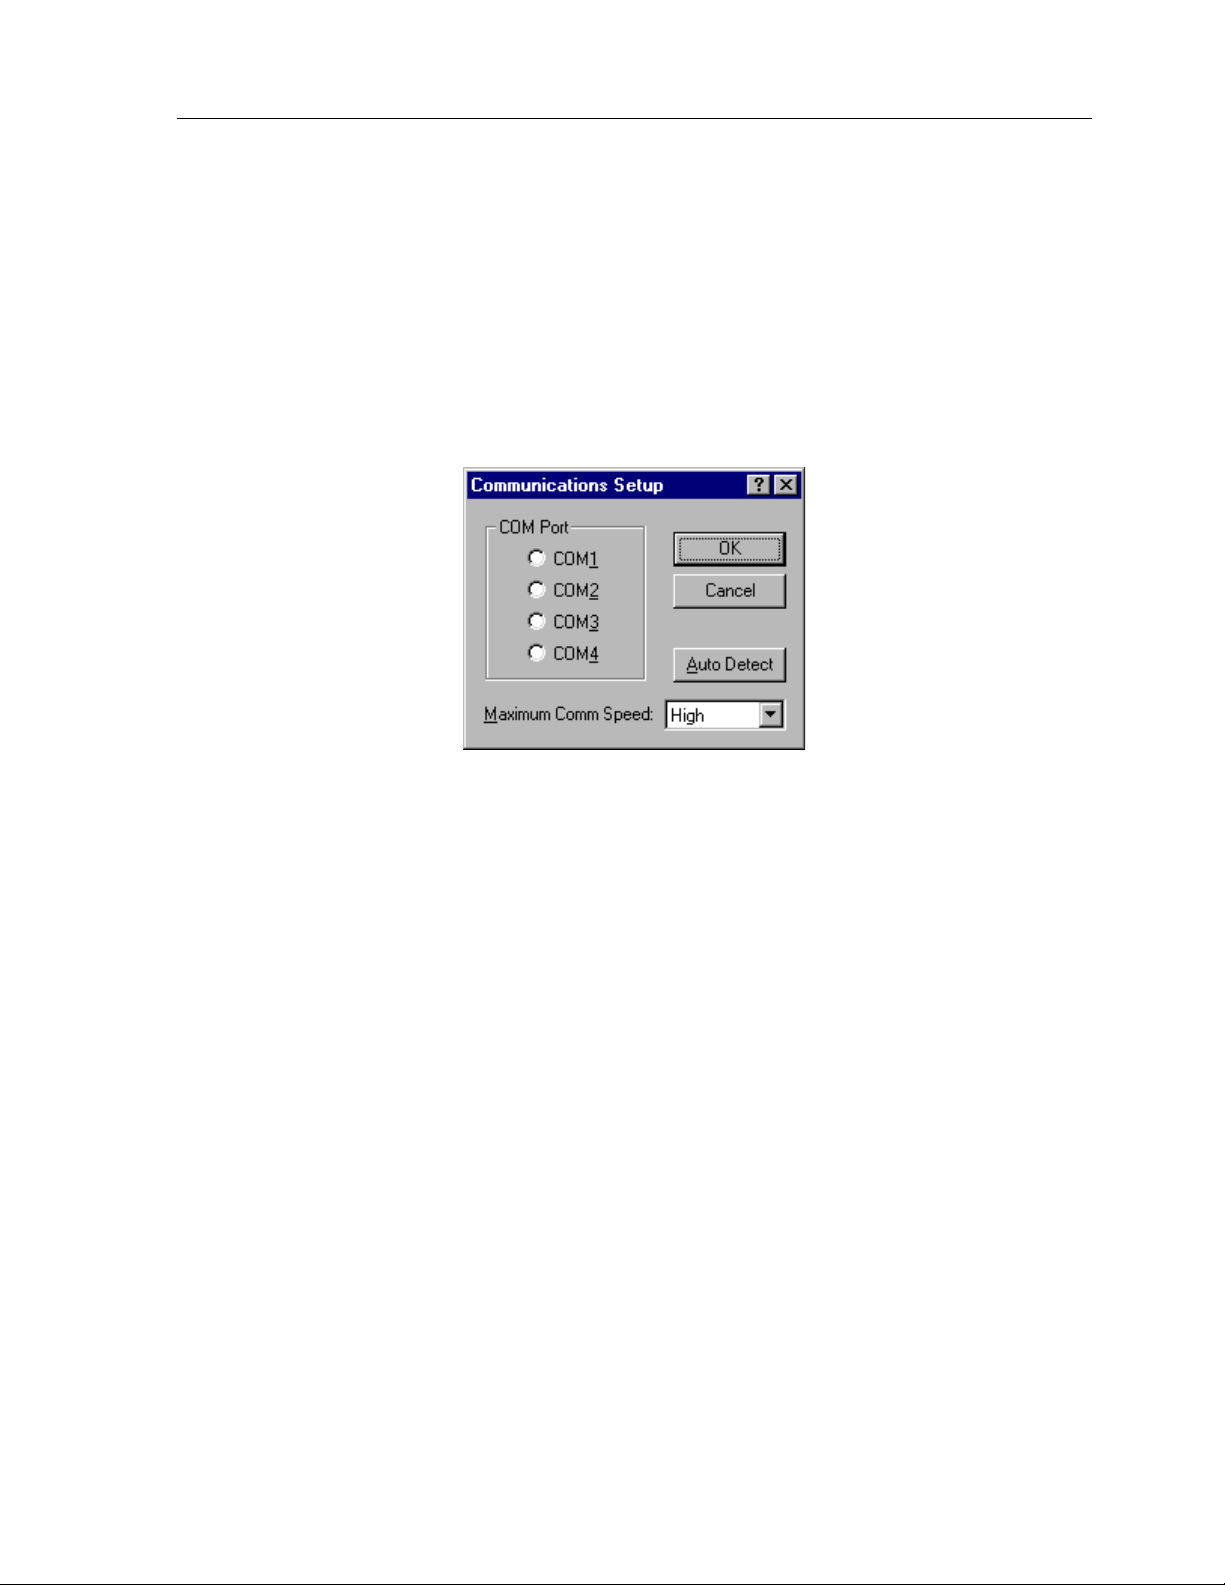
HOW TO SETUP COMMUNICATIONS
Communications Setup
The
the TheaterTouch and your PC.
dialog box is for setting up communications between
To open the
Choose
Communications Setup
Set COM Port
from the
dialog box:
Options
menu.
Com Port group box -
Choose the COM Port that the TheaterTouch is connected
to.
Auto Detect -
Click this button to have TheaterTouch Designer attempt to
automatically locate the correct COM port. The TheaterTouch must be connected to
the computer with the programming cable and in
need help with
Computer Link
mode see the Control Panel section on page 8.
Computer Link
mode, if you
Maximum Comm Speed -
Choose a lower speed from this list if you are having
problems communicating with the TheaterTouch system controller. The default is
High.
28
Chapter 4 • TheaterTouch Designer Basics
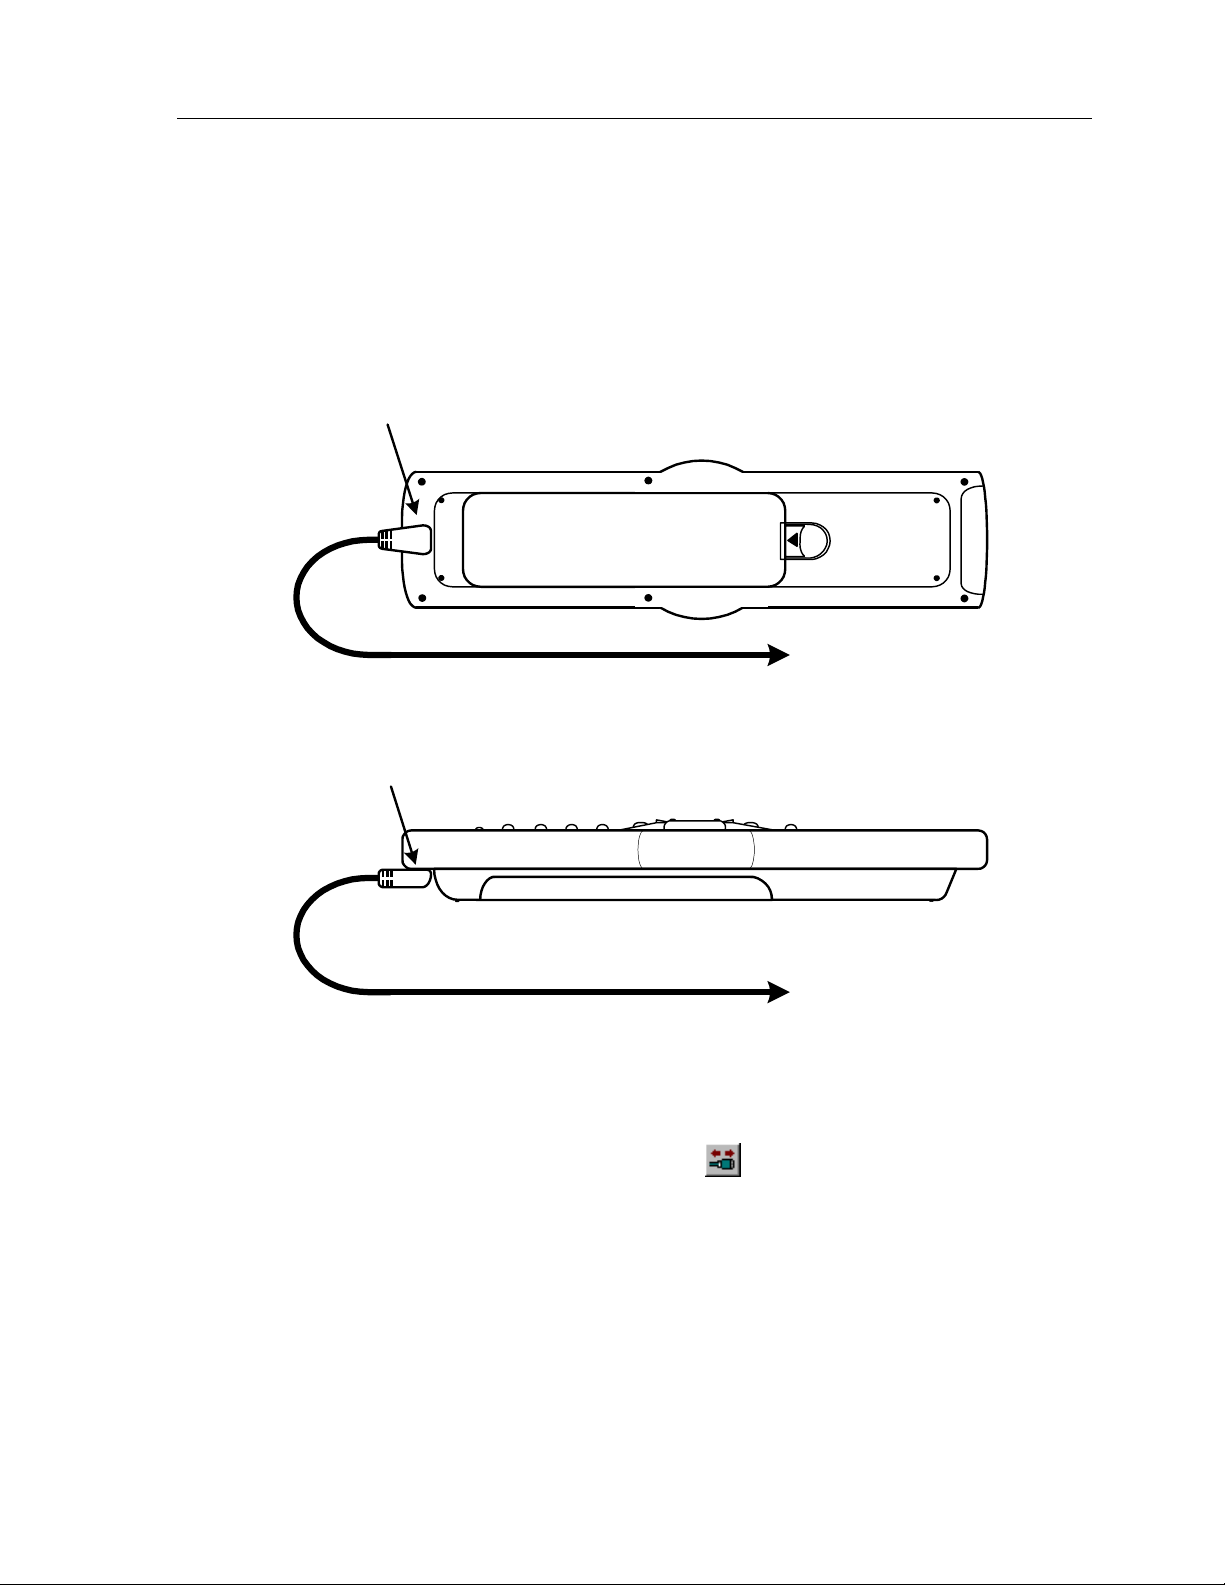
HOW TO SEND A FILE TO THE THEATERTOUCH
1. Hook the Programming Cable from the TheaterTouch serial port to the desired
COM port on your computer if you have not done so already. This should be
the COM port you set up using the
TheaterTouch
Serial Port
Communications Setup
dialog.
Programming Cable
TheaterTouch
Serial Port
Programming Cable
2. Put the TheaterTouch in
Computer Link
3. Click the
4. Choose
Communications Command
Send File
To Computer
COM Port
To Computer
COM Port
Computer Link
mode. If you need help with
mode, see the Control Panel section on page 8.
on the
Toolbar.
.
All buttons, commands, bitmaps, and macros are sent. Any existing program in the
TheaterTouch is replaced with the file you send.
All communications take place on the COM port selected with the
command from the
Options
menu.
Set COM Port
29

TheaterTouch System Controller
30

Chapter 5 • TheaterTouch Designer Advanced Features
Chapter 5. TheaterTouch Designer Advanced Features
HOW TO RENAME A PAGE
1. Make sure the desired page is displayed in the touchscreen grid.
2. Select the
3. Place the cursor over the page title area at the top of the touchscreen grid
and click the left mouse button.
4. Specify the new page title and click
HOW TO DUPLICATE A PAGE
Edit Text
Pages can be instantly duplicated. This is useful when pages share common buttons
like channel macros or transport controls. One page can be created with these
buttons and duplicated as many times as needed.
1. Make sure the desired page to be duplicated is displayed in the
touchscreen grid.
2. Click the
3. Give the new page a different name and click OK.
The new page appears at the end of the page list.
Duplicate Page Command
tool
from the
OK
Tool Palette
.
on the
Toolbar
.
.
31

TheaterTouch System Controller
HOW TO MERGE PAGES
The Merge Pages dialog makes it possible to move groups of pages from another
file to the current remote file.
1. Click the
2. Select the remote file from which you wish to merge pages from. Choose
from the list located in the
Open.
Merge Pages
tool
on the
Select file to merge from
Toolbar.
dialog box and click
.rti
32
3. Place a check next to each page you would like to merge into the current
file.
4. You can click the frame left and frame right arrows to see the individual
frames on a page.
5. When finished selecting pages, click OK.
All of the marked pages in the list are placed at the end of the current file.
Chapter 5 • TheaterTouch Designer Advanced Features
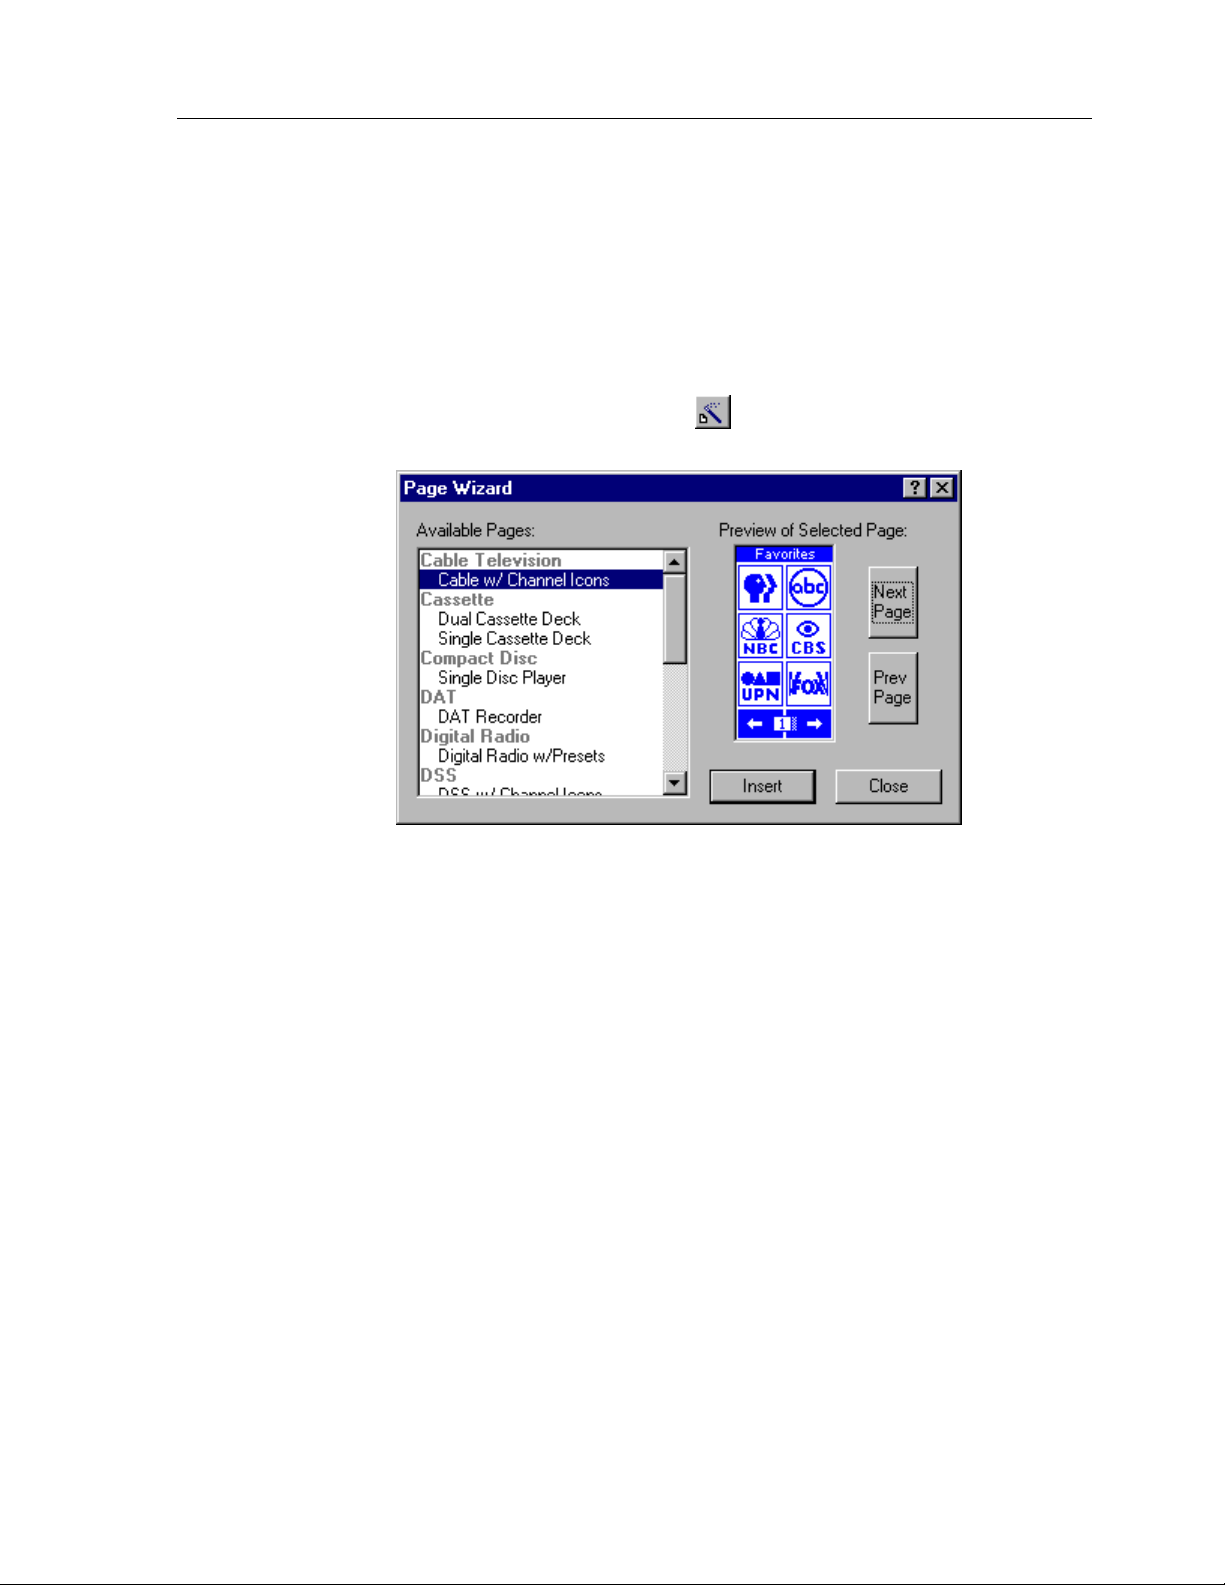
HOW TO USE THE PAGEWIZARD
TheaterTouch Designer comes with a library of pre-built pages for many common
types of equipment that you can insert into your file and customize as desired. The
page library is accessed through the
To add a pre-built page to your file:
PageWizard
tool.
1. Click the
2. Scroll through the list of available pages and select the one you want. You
can use the
pages if there is more than one.
3. Click the
Page Wizard Command
Next Page
Insert
button to add the page(s) to your file.
and
Prev Page
on the
buttons to see previews of all the
Toolbar
.
4. Click the
The new page(s) appear at the end of the page list.
Use the editing tools to customize the button style to fit the rest of your file and to
place commands, page links and macros on the buttons.
HOW TO CHANGE BUTTON STYLES
1. Select the style of button from the
2. Place the mouse cursor over the button you wish to change.
3. Click the left mouse button.
Close
button to close the dialog box.
Tool Palette
.
33

TheaterTouch System Controller
HOW TO SELECT BUTTONS
Select Button
The
tool
is used to select buttons for cutting, copying, moving,
resizing, or property editing. When buttons are selected, they are painted in red.
To select a single button or a group of buttons next to each other:
1. Click the
Select Button
tool
on the
Tool Palette.
2. Place the mouse over one corner of the button(s) and click the left mouse
button.
3. Draw a rectangle around the buttons you wish to select in the design
window (either in the touchscreen grid or the keypad buttons).
To select multiple buttons at one time that are not next to each other:
1. Click the
Select Button
2. Hold down the
tool
Ctrl
key on your keyboard.
on the
Tool Palette.
3. Click the buttons you wish to select (either in the touchscreen grid or the
keypad buttons).
Note:
Many TheaterTouch Designer commands can be used on selections as well as
individual buttons. Click the right mouse button on a selection for a list of available
commands.
HOW TO CUT OR COPY BUTTONS
1. Use the
Select Button
tool
button(s).
2. Choose either the
Cut Command
toolbar.
3. The button(s) are now on the clipboard.
HOW TO PASTE BUTTONS
1. Select the page you want to paste the button(s) on from the page list.
2. Choose the
Paste Command
3. Drag the button(s) to the proper place on the page.
from the
or the
from the
Tool Palette
Copy Command
Toolbar
.
to select the
from the
34

HOW TO MOVE A BUTTON
Chapter 5 • TheaterTouch Designer Advanced Features
1. Use the
button(s).
2. Hold down the left mouse button to drag the selection to a new location.
3. Release the left mouse button to place the buttons.
HOW TO RESIZE A BUTTON
Select Button
Existing buttons on the touchscreen grid may be re-sized using TheaterTouch Designer.
The text on a button may be clipped if the size is reduced, but any associated
command or macro will not be lost.
1. Use the
Note that to resize a button, only one button can be selected. If the
selection can be resized, small boxes will appear in the red border on all
four sides.
2. Position the mouse over the edge of the button that you would like to
resize.
3. Click the left mouse button.
Select Button
tool
tool
from the
from the
Tool Palette
Tool Palette
, to select the
to select the button.
4. Drag the mouse to change the size.
5. Release the mouse button when you have the desired size.
HOW TO PLACE A CUSTOM BUTTON
Custom Button Library Browser
The
onto the touchscreen grid.
1. Select the
2. Select the library in which the custom button you want is located by
clicking the
Default directory is: [C:\Program Files\TheaterTouch Designer\Custom Buttons]
3. Click on a button name and a preview of the button will appear in the
Custom Button Library Browser
4. Click
Custom Button Library Browser
the
5. Drag the custom button to the proper place on the page.
Place Custom Button
Open Library
OK
to insert the custom button on the touchscreen grid and close
allows you to select and place Custom Buttons
tool
button, selecting the library and clicking
.
from the
.
Tool Palette
.
Open
.
35

TheaterTouch System Controller
HOW TO USE THE MACRO EDITOR
Macros are a sequence of commands placed on any single button. Macros are placed
by using the
Buttons with macros can be moved, cut, copied, and pasted to other pages without
discarding the codes attached to them.
Macros are indicated by a small black box with the letter ‘M’ in the upper left corner
of buttons.
EDITING MACROS
Edit Macro
command found on the
To add a new macro or edit an existing macro on a button:
Tool Palette
.
1. Select the
Edit Macro
2. Click the button to which you would like to add a new macro or edit an
existing macro.
3. Use the tools in the
commands.
4. Click OK in the
Cancel
click
Macro Editor
to discard
tool
from the
Macro Editor
window to save
them.
Tool Palette
.
window to add, insert, and delete
changes to the macro, or
36

Chapter 5 • TheaterTouch Designer Advanced Features
Report
opens up your default web browser for viewing and printing of the open macro.
Trash Can
delete commands from a macro. Left click and hold the command you want to delete
and drag it to the
output an Infrared command. Any number of Infrared commands can be added to
the macro by selecting the proper library and then dragging the desired function(s)
from the list on the right side to the macro display on the left side of the Macro
Editor.
If you do not have access to the Command Library with the desired function, but it is
assigned to a button in the current file, use the
to the macro.
Double-click the infrared command step in the macro if you need to edit any of the
parameters or to change which IRF-6 the command is output if you are using more
than one.
command – The
Trash Can
– The
Trash Can
Report
The
Infrared from Library
command button at the bottom of the macro editor
located at the bottom of the macro editor is used to
and release.
macro step type causes the macro to
Infrared from Page
step type to add it
The
output an Infrared command. The command is taken from a button in the current
file. Select the page containing the desired code, and then drag the code from the
Available Buttons
This should be used for maintaining files for which the Command Library is not
available. If the desired command is in a Command Library, use the Infrared from
Library step type.
Double-click the infrared command step in the macro if you need to edit any of the
parameters or to change which IRF-6 the command is output if you are using more
than one.
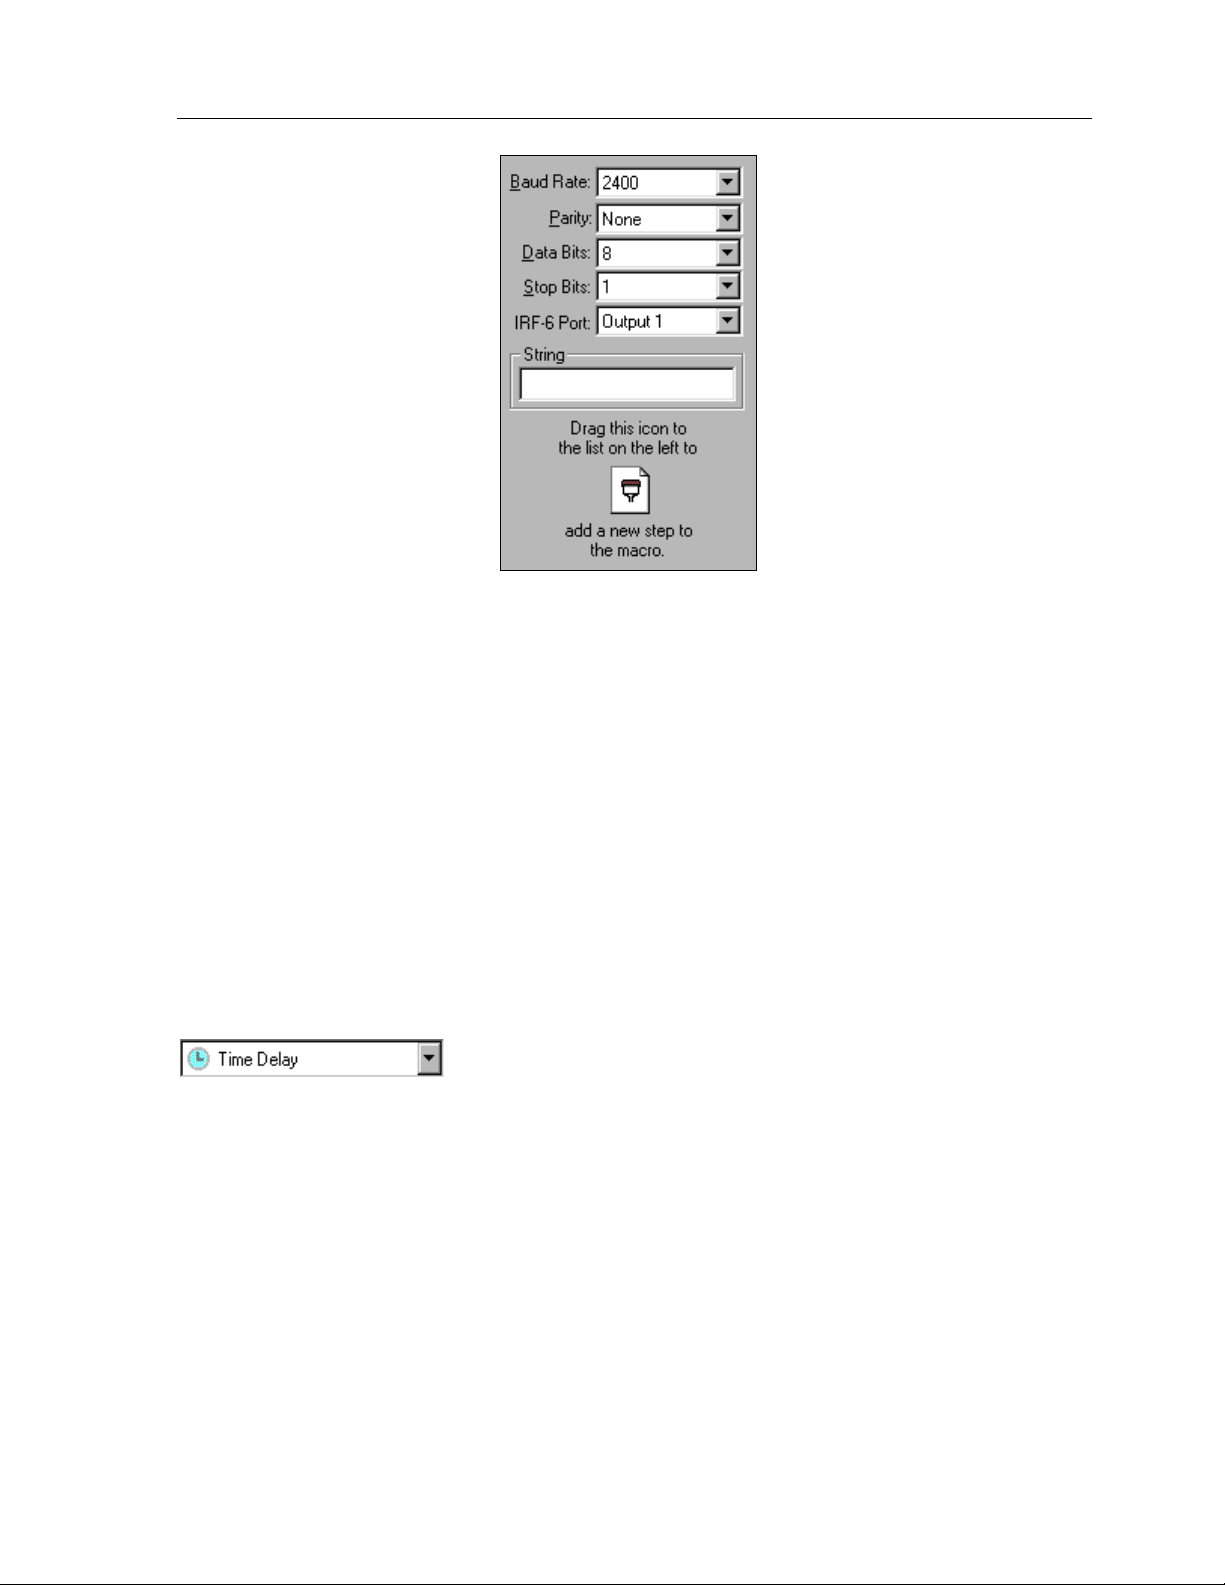
232 command when the TheaterTouch is used in RF mode with an optional IRF-6
System Interface Module and an optional RS-232 Communications Module. The
command structure (Baud Rate, Parity, Data Bits, Stop Bits, IRF-6 output, and
Command String) is created for the particular piece of equipment with the editing
tools provided. The command structure information should be in the equipment
owners manual or contact the equipment manufacturer.
list on the right to the macro display on the left.
The
Infrared from Page
RS-232 Command
macro step type causes the macro to
step causes the macro to output an RS-
37
TheaterTouch System Controller
The default settings for Parity, Data Bits and Stop Bits should work in most cases if
not listed in the equipments owners manual. However, you will need at least the
Baud Rate and Command String for that particular piece of equipment and the
command you are to execute.
After you have set the desired parameters and entered the command string, drag the
RS-232
button at the location where you would like to add the RS-232 step.
Double-click the
parameters or to change which IRF-6 the command is output if you are using more
than one.
specified by the
seconds. After you have set your desired delay time, drag the
the lower right to the macro display on the left.
Release the mouse button at the location where you would like to add the time delay
step.
icon from the lower right to the macro display on the left. Release the mouse
RS-232
Delay Time
command step in the macro if you need to edit any of the
The
Time Delay
spin box. The time can be adjusted from 0.1 to 9.9
step causes the macro to pause for the time
Time Delay
icon from
38
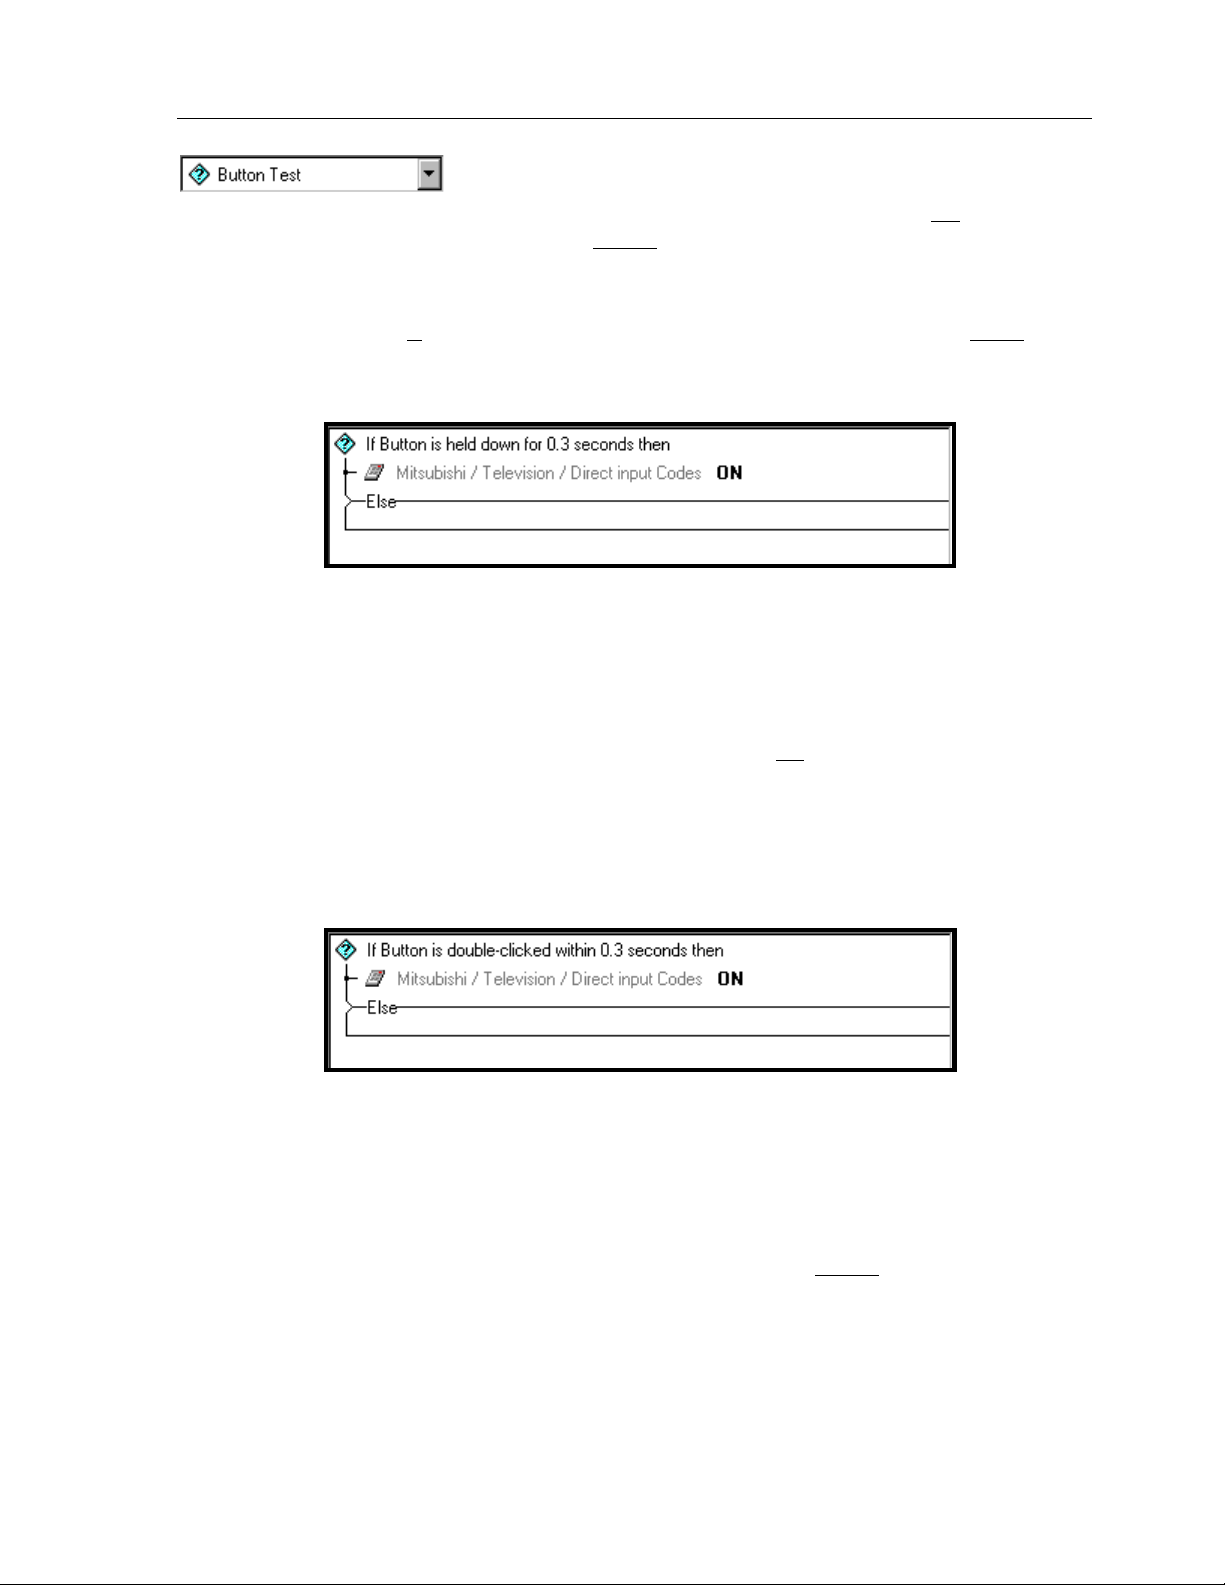
Chapter 5 • TheaterTouch Designer Advanced Features
steps ONLY IF the button that the macro is attached to is Held Down for
amount of time or Double-Clicked within
the option selected.
Button Test
The
if the condition is
the second command will be sent.
Held Down ON
command will execute. If the button is not held down for 0.3 seconds, the
command will not execute.
This can be used to make a source button that switches pages if pressed briefly, or
switches pages and turns equipment on if held down for
time. This can also be used to send a command when pressed briefly, or send a
different command when held down.
The
steps are conditional statements or “Else” commands meaning that
met the first command will be sent and if the condition is not met
In the example above, if the button is held down for 0.3 seconds, the
Button Test
step causes the macro to execute the following
a specified
a specified amount of time, depending on
the specified amount of
Double-Clicked –
seconds, the ON command will execute. If the button is not double-clicked within 0.3
seconds, the command will not execute.
This can be used to make a source button that switches pages if pressed once, or
switches pages and turns equipment on if double-clicked within
amount of time. This can also be used to send a command when pressed once, or
send a different command when double-clicked.
In the example above, if the button is double-clicked within 0.3
the specified
39
TheaterTouch System Controller
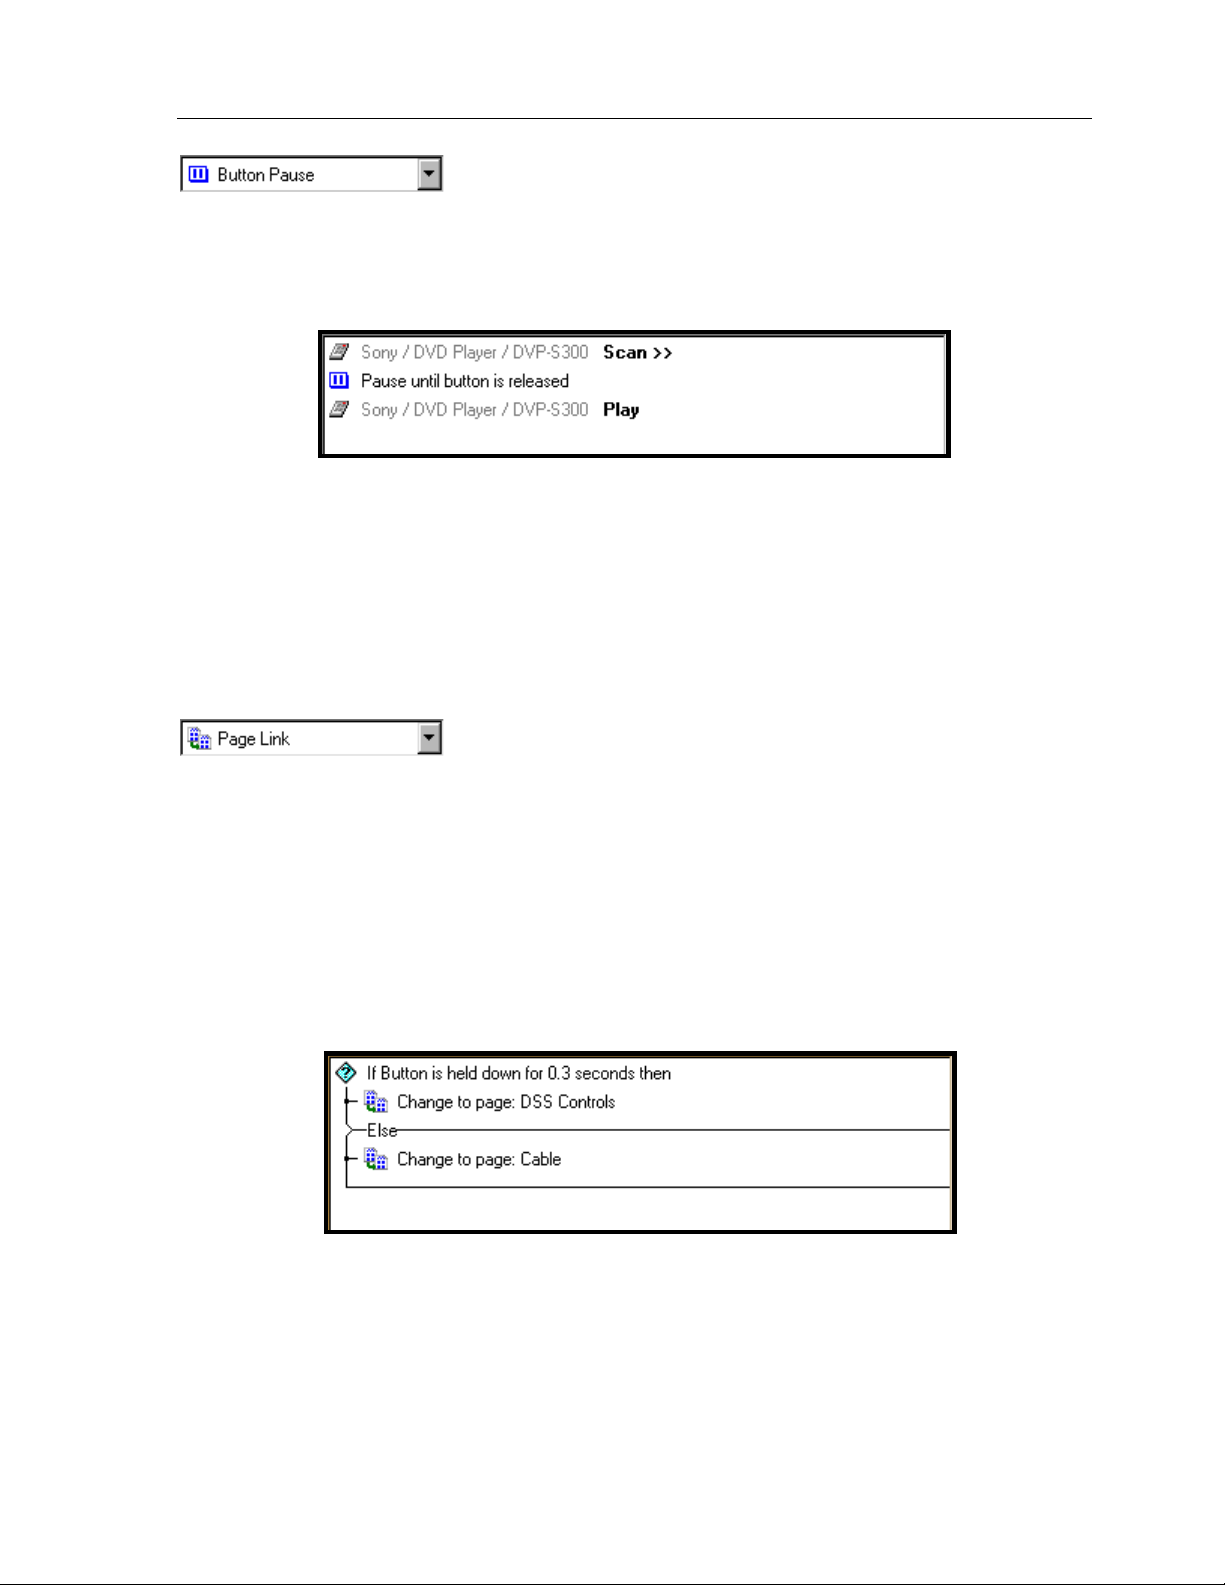
Button Pause –
executing until the button it is attached to is released. This essentially sends a
command(s) when the button is pressed and another command(s) when the button is
released.
In the example above, if you press and hold the button that the macro is attached to,
the macro will execute the first command and pause until the button is released, then
execute the rest of the commands in the macro. This works well for commands like
Scan on some VCR’s and DVD players, which you need to send the Play command to
stop the Scan function. This also works well for RS-232 commands, having the option
of a command on the button press and another command on the button release.
The Button Pause step causes the macro to stop
Page Link –
currently displayed page to the page you have selected from the drop-down list. The
displayed page does not change until the macro has finished.
If you put multiple Page Link steps in a macro, only the last Page Link step will be
displayed. With the exception of the <previous> page step, there is no need to put
multiple Page Links in a macro. Each <previous> step will cause the macro to go
back one previously displayed page.
If you have put a Page Link on a button as well as in a macro, the Page Link on the
button will be the last visible change, making the Page Links in the macro useless.
The Page Link step causes the macro to change the
40
Shown in the example above is one way you could make one button go to two
different pages using the Page Link step with the Button Test step in a macro.
Chapter 5 • TheaterTouch Designer Advanced Features
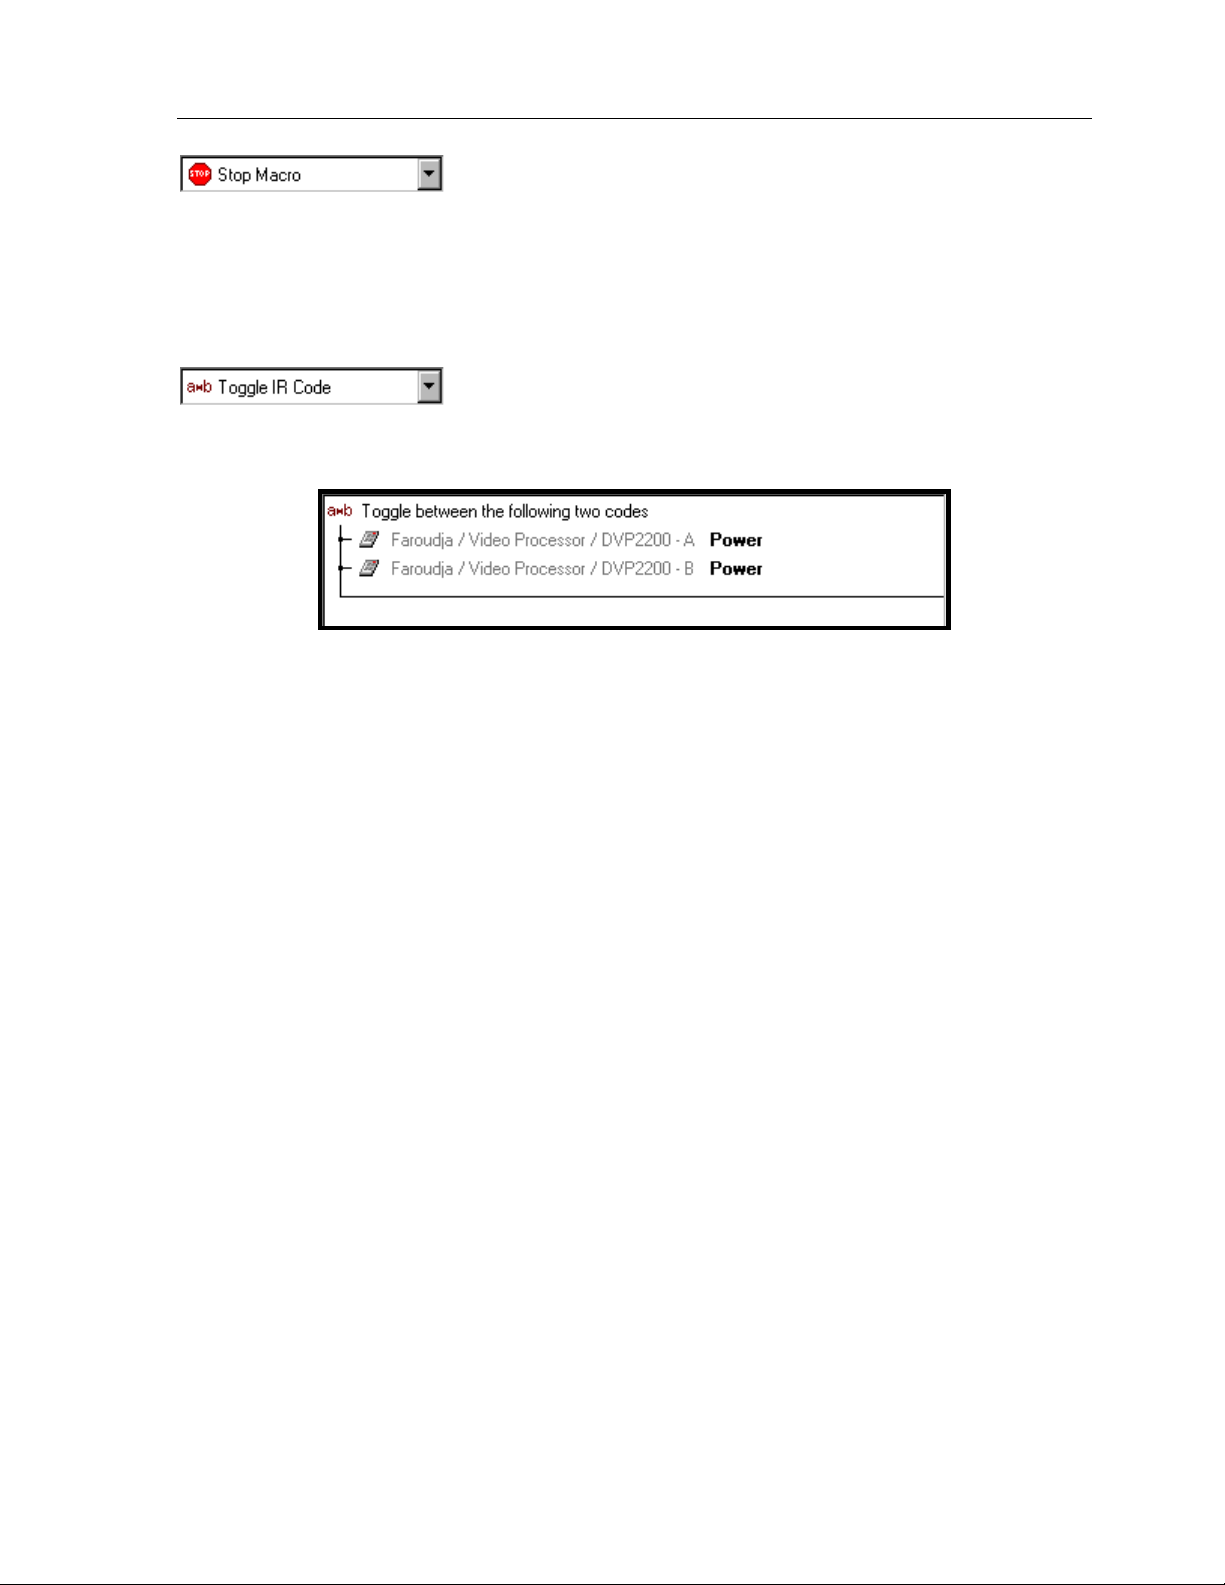
Stop Macro -
executing at the point where it is inserted.
Macros automatically stop when they reach the end, so you should not normally
need to insert a Stop Macro step. It is intended for use in conjunction with the Button
Test step, where you can have the macro stop if a condition is met.
Toggle IR Code -
alternate between two different IR codes every other time the button is pressed.
The Stop Macro step causes the macro to stop
The Toggle IR Code step causes the macro to
In the example above, each time the button that the macro is attached to is pressed,
the commands alternate. The initial button press executes the A command and the
second button press executes the B command.
If you have equipment that uses toggle codes, you must learn each code twice, and
then place the two codes within the Toggle IR Code step. Every time the macro is
run, it will send out only one of the two codes inside of the Toggle IR Code step,
switching back and forth each time the button is pressed.
Toggle IR Code
The
feature, contact Technical Support for help.
command is an advanced feature. If you have trouble with this
41
TheaterTouch System Controller
HOW TO DELETE A MACRO
To delete a macro from a button:
1. Select the
Delete Macro
tool
2. Place the mouse cursor over the button with the macro you wish to delete.
3. Click the left mouse button.
HOW TO EDIT AN IR COMMAND IN A MACRO
1. To edit an individual command in a macro you must have the macro
displayed in the Macro Editor.
2. Double click on the command in the macro you want to edit to open the
Edit Infrared Command
Note:
Not all of the controls will be available simultaneously. Only the options
dialog box.
relevant to the default settings and command being edited will be shown.
from the
Tool Palette
.
42

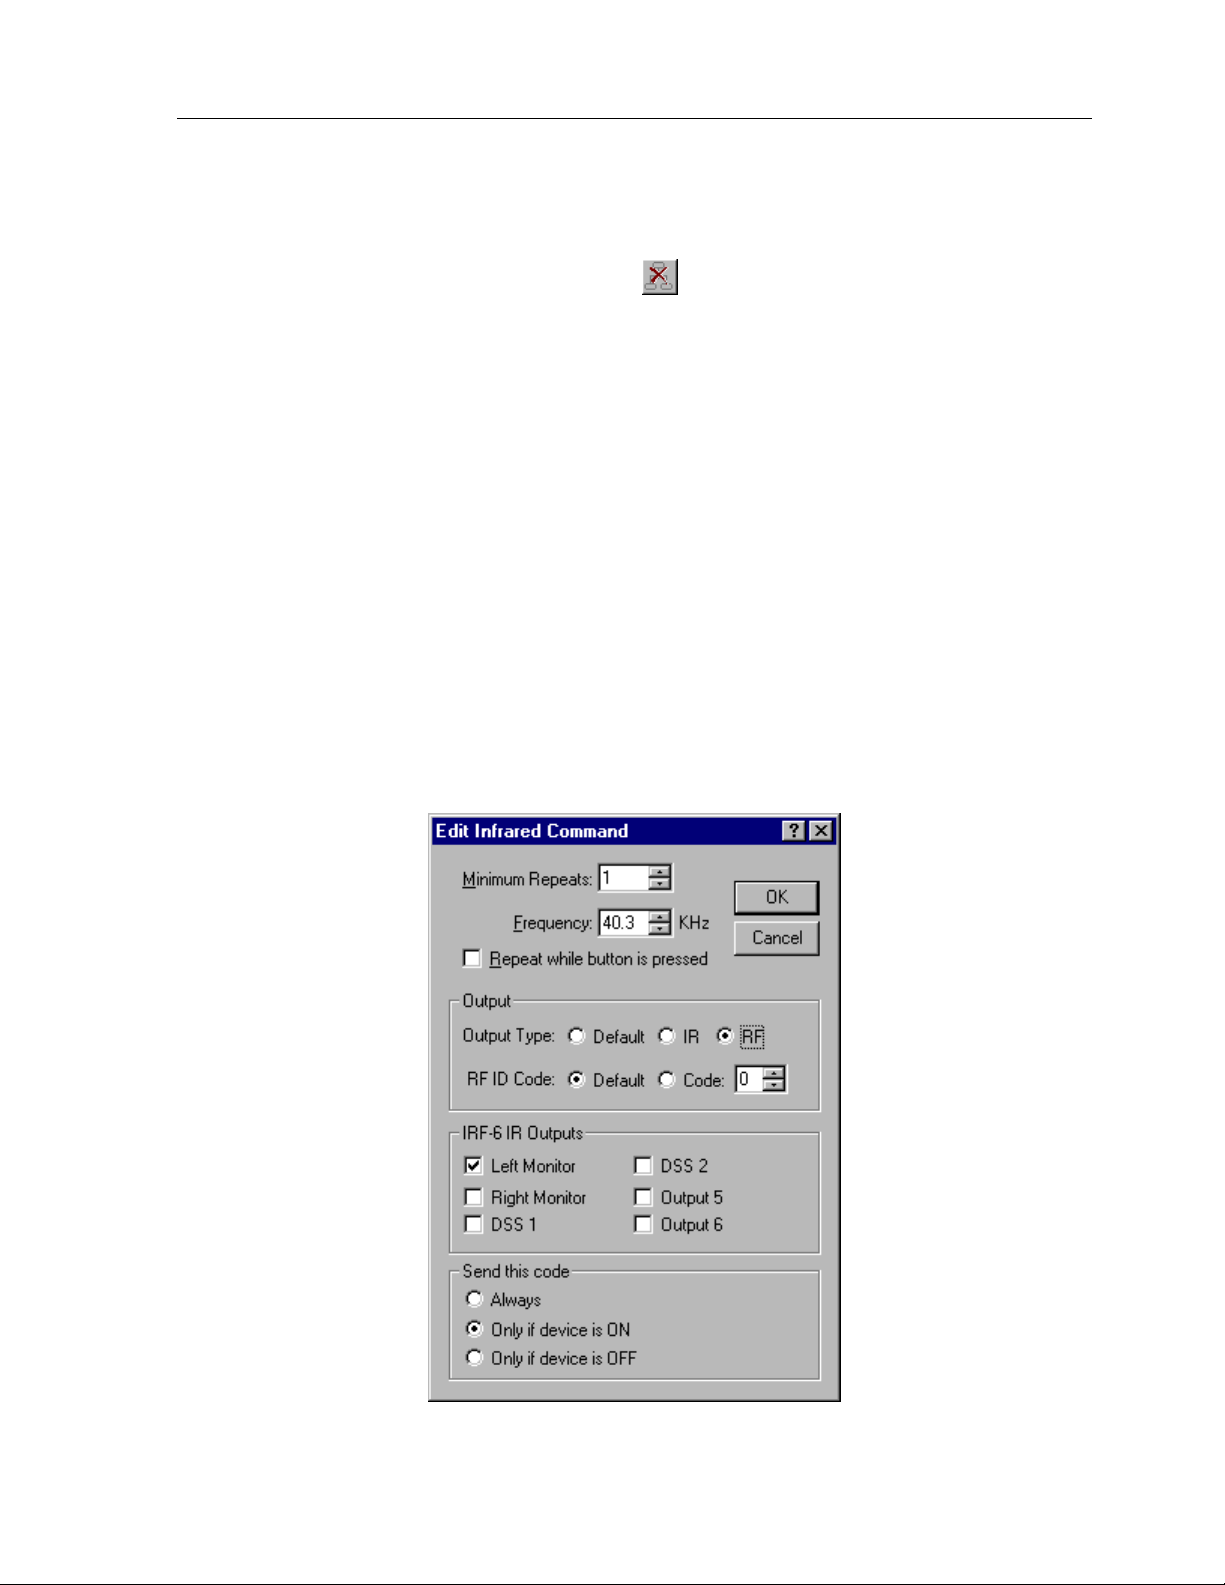
Edit Infrared Command
The
Chapter 5 • TheaterTouch Designer Advanced Features
options are:
Minimum Repeats -
part of the IR code is sent by the remote. Some infrared receivers need a
command to be repeated a certain number of times to work properly, and
some may not work properly if the command is repeated at all. Even if a
command works properly, increasing the number of repeat times may be
necessary if the command is to be used in a macro. Since macro commands
are not automatically sustained while a button is pressed, they may need to
automatically repeat more times to be recognized.
Frequency –
set automatically. You should not need to change this value unless directed to
do so by Technical Support.
Repeat while button is pressed -
repeated for as long as the button is held down.
Output Type:
Unless the system contains a mixture of direct IR and IRF-6/RF commands,
this option will not normally need to be changed.
Shown in this box is the carrier frequency of the IR code, this is
Note:
Only one command in any macro can have this property set.
Enter in this box the number of times that the repeating
Check this box to cause this IR code to be
Default -
command
selected on the
IR -
the infrared window on the front of the remote, regardless of the
system setting.
RF -
through the IRF-6, regardless of the system setting.
RF ID Code:
Unless the system contains more than one IRF-6, this option will not normally
need to be changed.
Default -
command
selected on the
Code -
command
regardless of the system default setting.
Check this option to set the default output type for this
to the button default. The button default is the option
Output
Check this box to force this
Check this box to force this
Check this option to set the default RF ID code for this
to the button default. The button default is the ID code
Output
Check this option and enter an ID Code in the box to force this
to transmit a specific RF ID code when in RF mode,
tab of the
tab of the
Edit Button Properties
command to transmit IR directly out
command button to transmit IR via RF
Edit Button Properties
command.
command.
43

TheaterTouch System Controller
IR Outputs
Send this code
group box:
Check the box(s) that corresponds with the output(s) you wish to send
the command(s) on this button out of the IRF-6. Note that the labels
for the output can be changed with the
command on the
The default is to have the command(s) come out of all of the outputs
on the IRF-6. This option will not normally need to be changed unless
you have multiple identical components or are using one of the power
sensor modules.
The options in this section require that a power sensor module be
plugged into the appropriate port on the IRF-6.
Always -
power sensor state. This option should also be checked if no power
sensor is connected to the selected IR output.
Only when device is ON -
if the power sensor in the specified port detects that the equipment it
is monitoring is ON.
Edit Remote Properties
Edit
menu.
group box:
Check this option to send the IR code regardless of the
Check this option to send the IR code only
Only when device is OFF -
if the power sensor in the specified port detects that the equipment it
is monitoring is OFF.
Note:
must be selected in the IRF-6 IR Outputs box, and the power sensor
must be plugged into that
In order to use the power sensor options, exactly one
Check this option to send the IR code only
IR output
IR output port.
44
Chapter 5 • TheaterTouch Designer Advanced Features
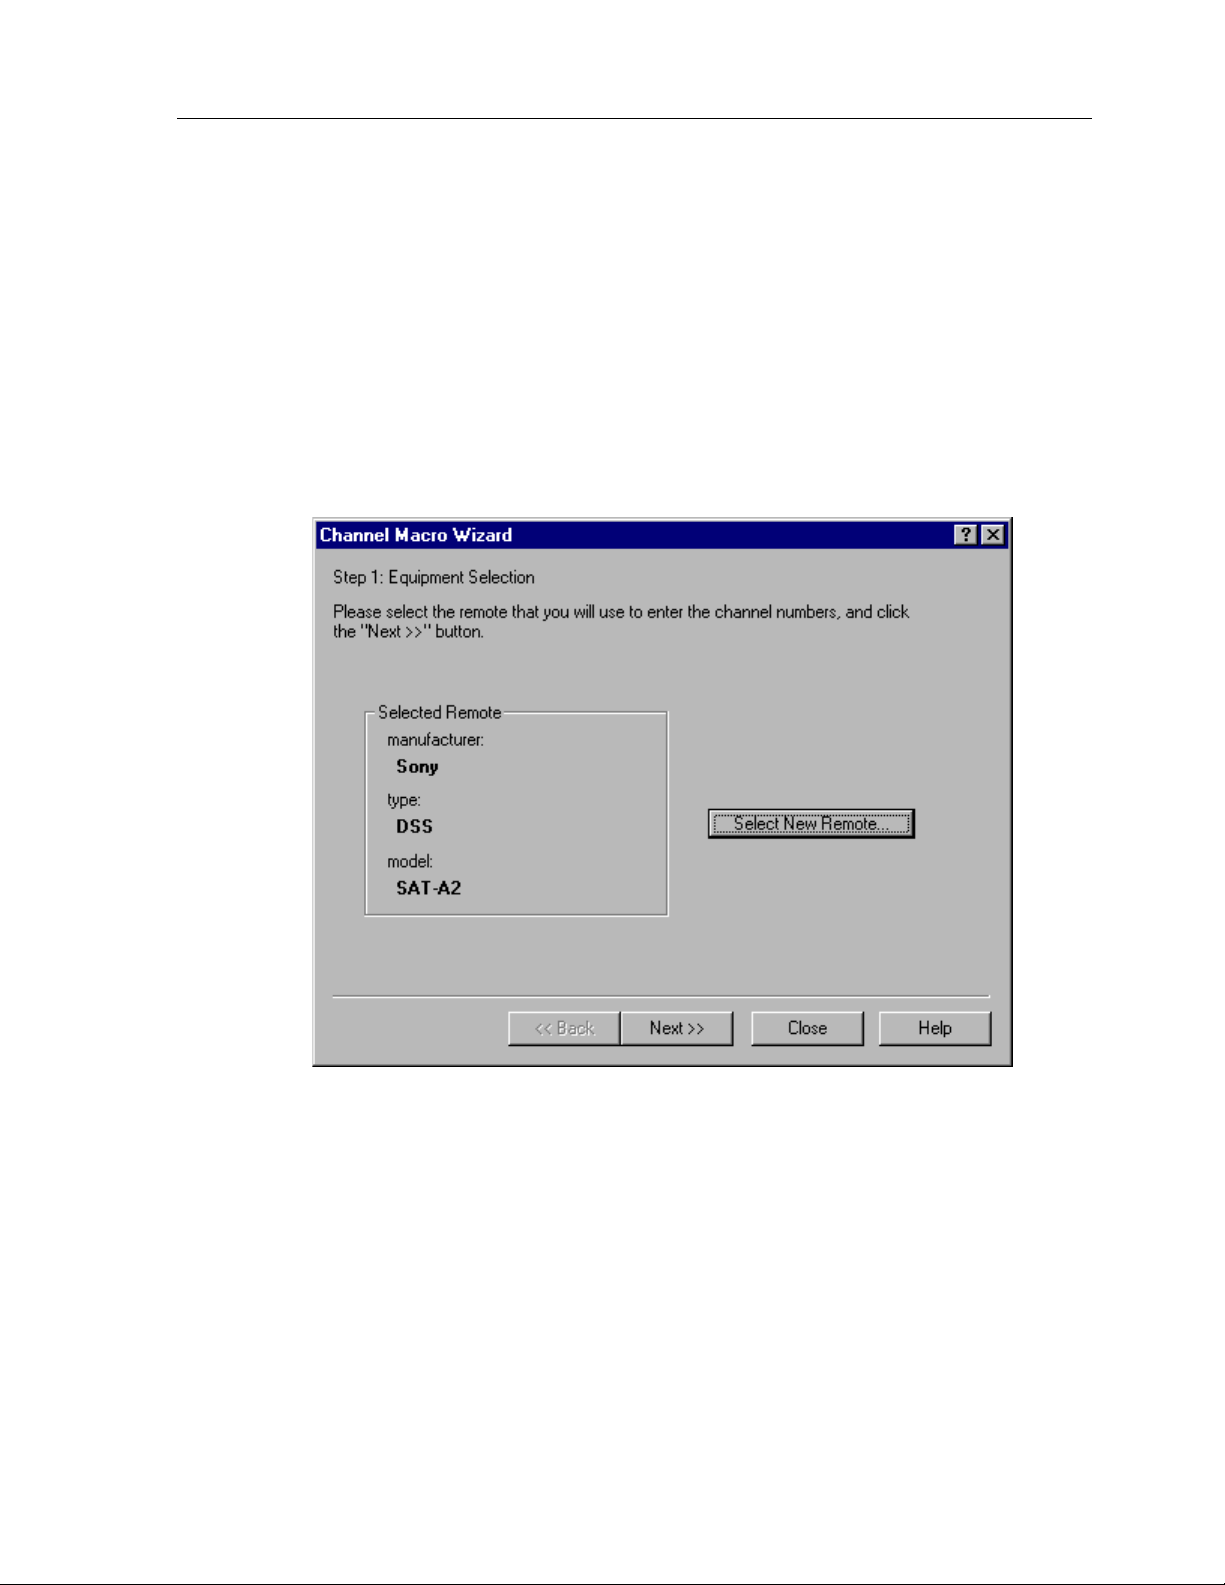
HOW TO USE THE CHANNEL MACRO WIZARD
TheaterTouch Designer comes with a feature called the Channel Macro Wizard. The
Channel Macro Wizard allows you to quickly and easily create macros for satellite
and cable channel presets.
To start using the Channel Macro Wizard:
1. Select
Channel Macro Wizard
2. Click the
Select New Remote
from the
button to select the remote that you will use
Edit
to enter to enter the channel numbers and click the
menu.
Next >>
button.
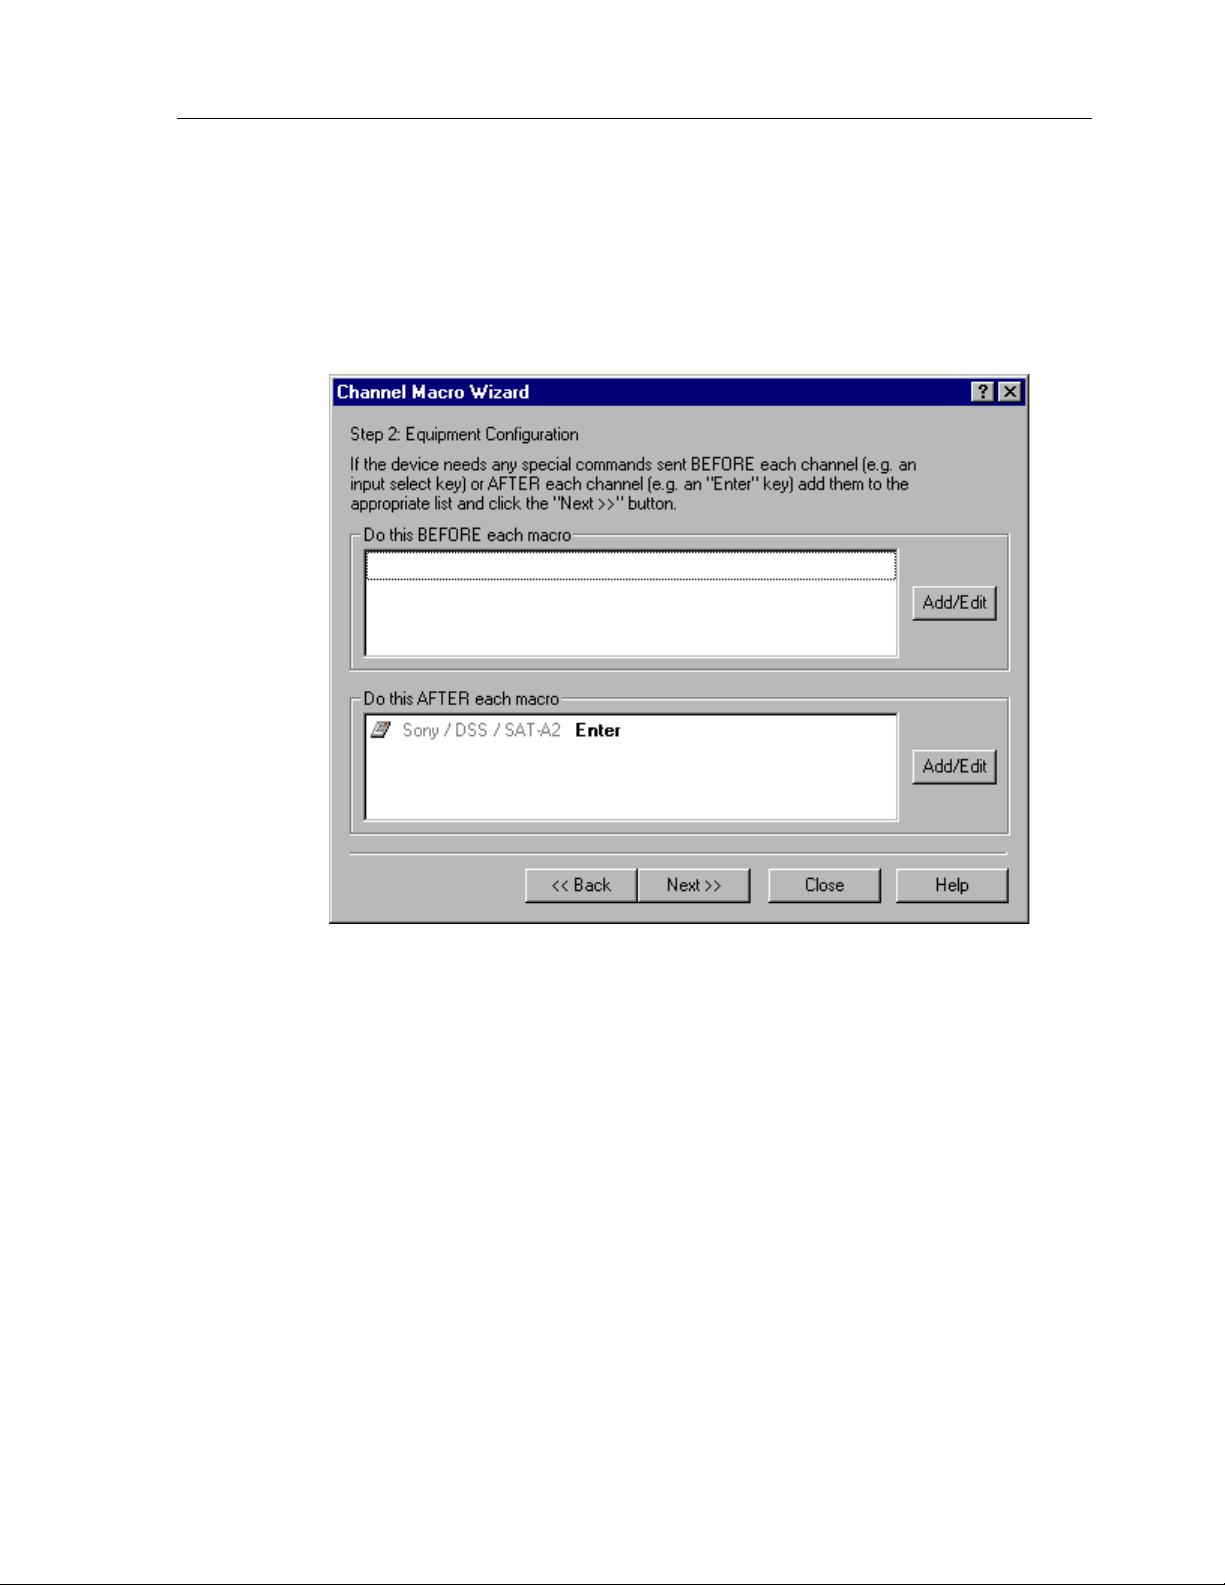
3. You have the option of adding commands before and/or after each macro
for things such as an IR router before each command or an Enter
command after.
45
TheaterTouch System Controller
4. Click the
commands. This will open the
commands using the
these commands, see the “
Add/Edit
in the BEFORE or AFTER section if choose to add
Macro Editor
Macro Editor
How to Use the Macro Editor”
commands. If you need help with
where you can select the
section.
5. Click the
6. Select the page you wish to place macros on from the
46
Next >>
and then select the frame by clicking on the Left and Right frame arrows.
command button.
Page
drop-down list

Chapter 5 • TheaterTouch Designer Advanced Features
7. Select the number of digits in the channel macro from the Spin box in the
lower right corner. If you enter more digits than selected the numbers will
wrap around.
8. Click the first button from the touchscreen grid on which you want to
place a macro.
9. Enter the channel numbers by either clicking the numbers in the
Click
Macro Wizard
on the keyboard.
10. Click
Close
when finished with all your channel macros.
Save
with the mouse or you can enter them with the numbers
after you enter each macro.
Channel
47

TheaterTouch System Controller
HOW TO EDIT THE REMOTE PROPERTIES
Remote Properties
The
remote.
dialog box allows you to change settings that affect the entire
To open the
POWER TAB
Choose
Remote Properties
dialog box:
Edit Remote Properties
from the
Edit
menu.
Power
The
Power Down Time:
tab options are:
This allows you to adjust the to time the unit stays awake
after the last button press. The time is variable from 1 second to 60 seconds
(default is 10 seconds). During sleep mode, the TheaterTouch uses virtually no
battery power.
Display Mode:
The option buttons allows you to adjust the settings of the display
and keypad backlight.
The options are:
Any keypress (default)
1.
when any
Touchscreen or backlight key
2.
button is pressed.
backlight on only
, which turns the display and button backlight on
, which turns the display and button
when the touchscreen or backlight key is pressed. This
allows the volume/channel/etc. keys to be used without turning on the
display and backlight each time.
Tilt Switch: (default is: active)
The Tilt Switch check box allows you to turn the
tilt switch on or off. When the box is checked, it means the tilt switch is active and
will turn on the display and button backlight when picked up.
48
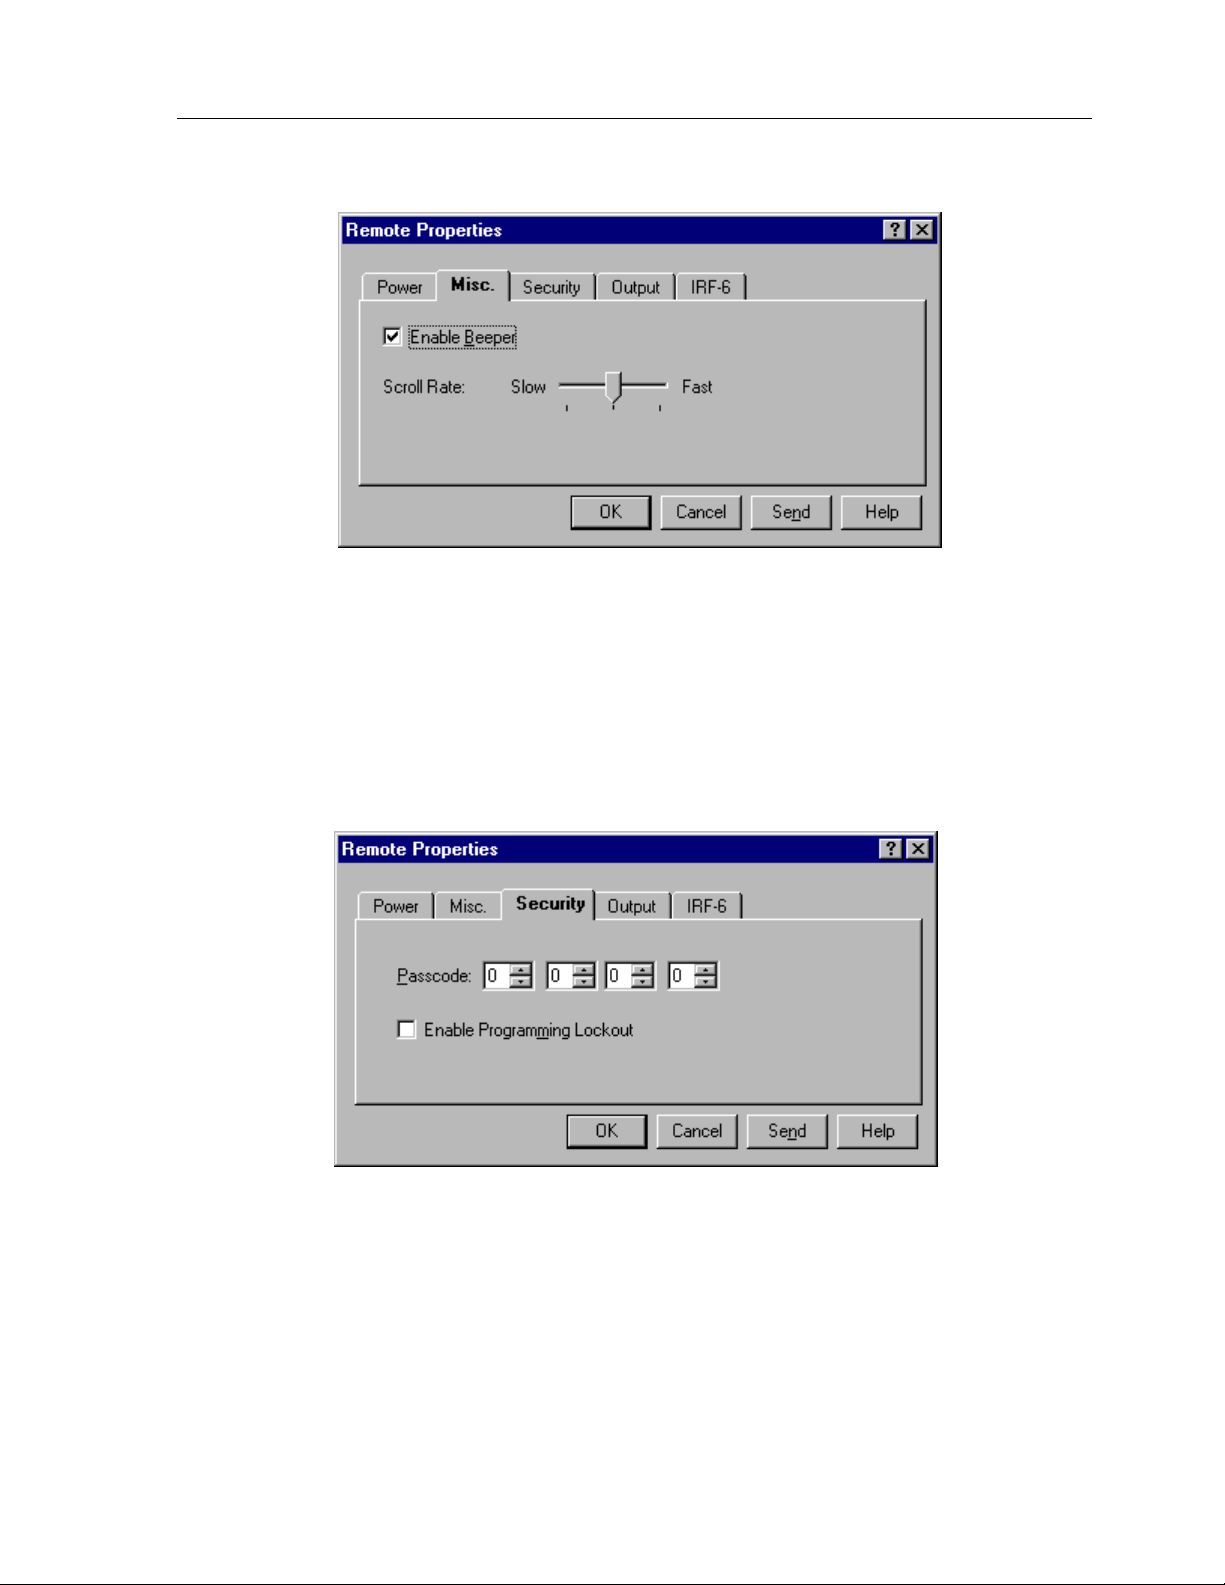
MISC. TAB
Misc.
The
tab options are:
Chapter 5 • TheaterTouch Designer Advanced Features
Enable Beeper:
Check the box to enable the beeper. If this box is checked, the
TheaterTouch will beep every time a button is pressed.
Scroll Rate:
Slide this control to set how fast the frames scroll left and right when
the frame scroll arrows are pressed.
SECURITY TAB
Security
The
Passcode: (default is 0000)
limit access to the
panel page as well as the
Enable Programming Lockout:
entered before the TheaterTouch will go into
tab options are:
Computer Link
That allows you to set the passcode that is needed to
mode, the
Button Lockout
Clear All
function on the control
function that is available on all buttons.
Check this box to require that the passcode be
Computer Link
mode. This can be
used to prevent unauthorized modifications to the TheaterTouch programming.
49

TheaterTouch System Controller
OUTPUT TAB
Output
The
Default Output Type:
1.
2.
Default RF ID Code:
be used for all RF buttons unless it is set differently in the properties for each
button. The ID code switch on the back of the IRF-6 must also be set to this
setting.
tab options are:
IR – (default)
Check this option to set the remote's default output to IR.
Every key on the remote will output IR signals directly out the window on
the front of the remote unless the button properties for the individual
button are set to output RF.
RF
- Check this option to set the remote's default output to RF. Every key
on the remote will output IR signals via RF to the IR to RF converter
unless the button properties for the individual button are set to output IR
directly.
Use this to set the default RF ID code. This RF ID code will
50

IRF-6 TAB
Chapter 5 • TheaterTouch Designer Advanced Features
IRF-6
The
the IRF-6 ID code for which you wish to modify the labels. You can modify the labels
of all ten possible IRF-6 ID codes independently. The labels are optional and are only
used to make it easier for you to remember what equipment is plugged into each IRF6 output.
Send -
Click this button to send the current settings directly to the remote.
tab lets you label the outputs of the IRF-6. Use the pull down list to choose
51

TheaterTouch System Controller
HOW TO EDIT BUTTON PROPERTIES
Edit Button Properties
The
button or a group of buttons.
dialog allows you to edit many different attributes of a
To open the
Note:
options relevant to the button being edited will be shown.
GENERAL TAB
Edit Button Properties
1. Select the
Edit Button Properties
dialog box:
tool
from the
Tool Palette
.
2. Click the button you want to edit, either touchscreen or keypad buttons
Not all of the tabs and/or controls will be available simultaneously. Only the
52
The options on the
Disabled -
reversing/pushing in) when it is touched.
Note:
General
tab are:
Check this box to prevent the button from responding (beeping or
Disabled buttons can still have commands, macros and page links. The
disabled property refers only to the appearance of the button, not the
functionality.
Reversed -
pushed-in state when the button is not
button is
Check this box to cause the button to be displayed in a reversed or
pushed and the normal state when the
pushed. The reversed state is: filled in for Rectangular, Radius, Oblong
and Borderless buttons; and Down for Custom Buttons.
Note:
This property does not apply to 3D buttons.

Chapter 5 • TheaterTouch Designer Advanced Features
Secured -
action (command, macro, or page link) associated with this button is run. The
security code is set with the
Special Functions group box
None -
Power Down -
immediately when this button is pressed, instead of waiting for the timer to
time out.
Contrast Up -
contrast when it is pressed.
Contrast Down -
display contrast when it is pressed.
Pause -
button is released. This value will not usually need to be changed from 0.
Check this box to require that the security code be entered before the
Edit Remote Properties
Check this option to cause this button to have no special function.
Check this option to cause the remote to power down
Check this option to cause this button to increase the display
Check this option to cause this button to decrease the
Enter in this box the number of seconds for the remote to pause after the
command on the
Edit
menu.
53
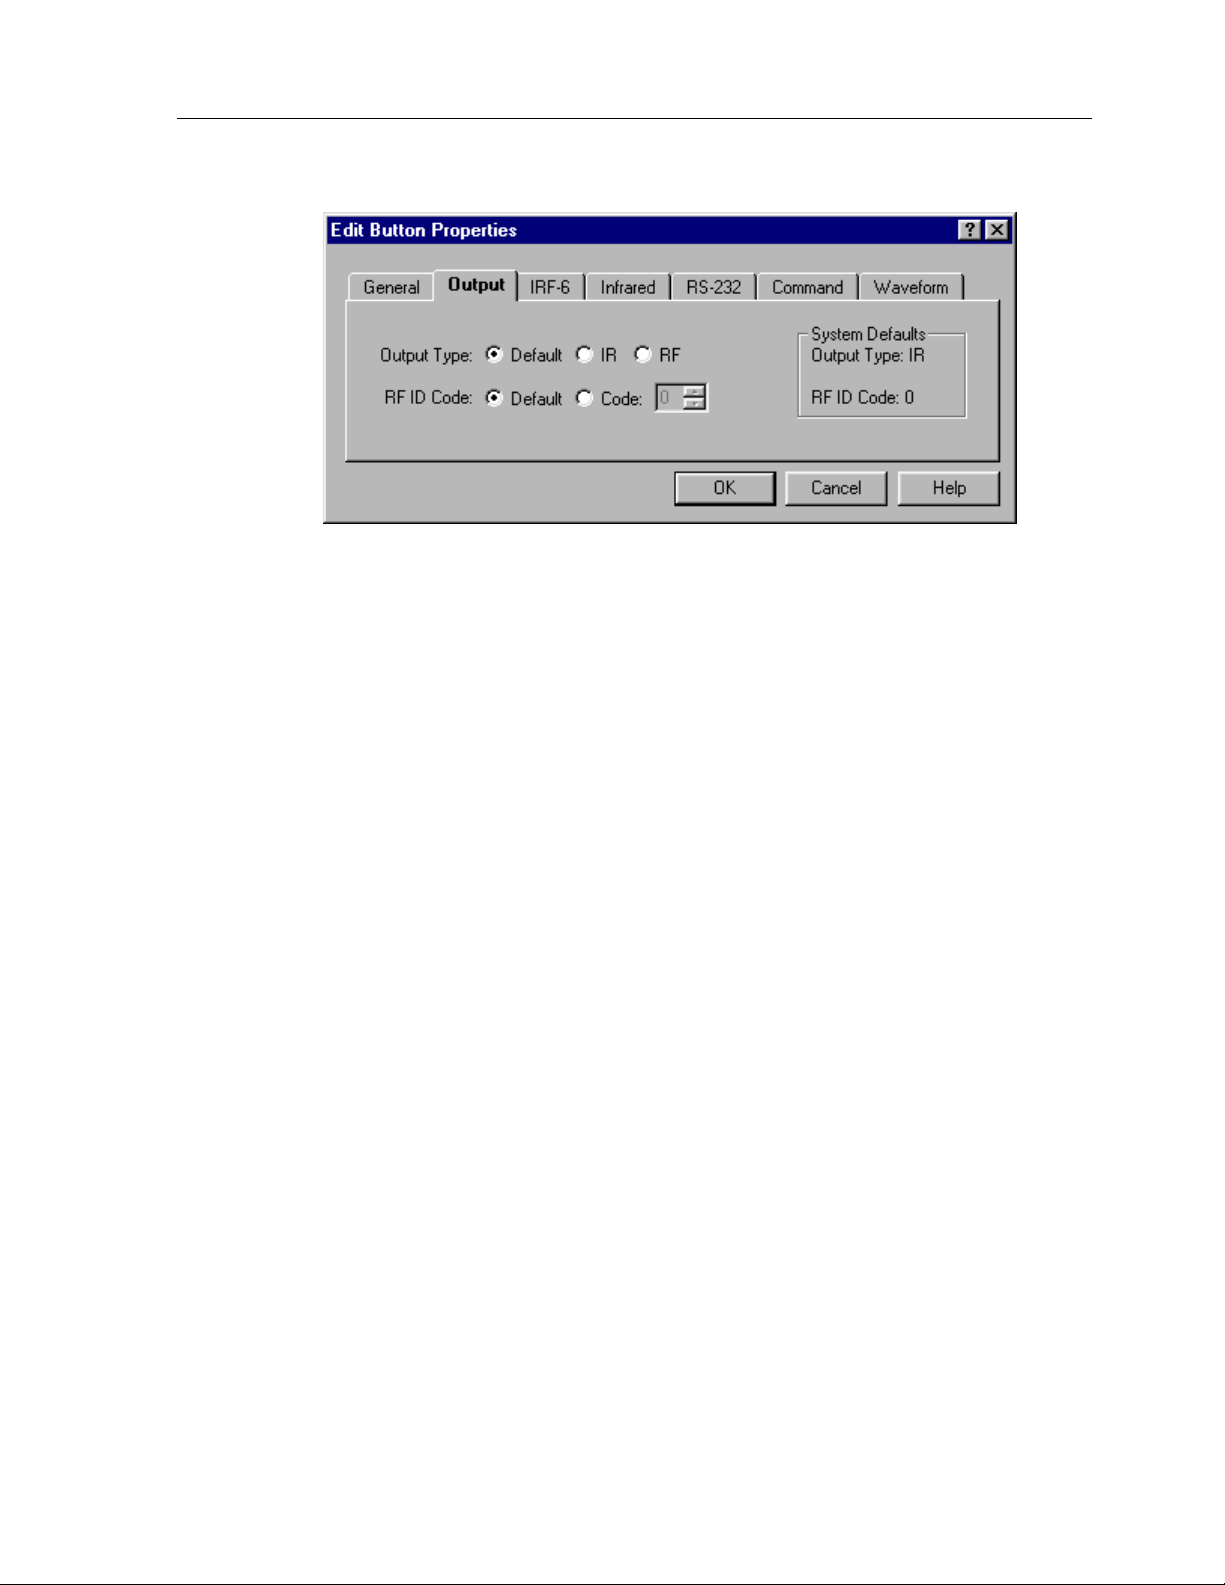
TheaterTouch System Controller
OUTPUT TAB
The options on the
Output
tab are:
Output Type:
Unless the system contains a mixture of direct IR and IRF-6/RF commands, this
Edit
Edit
menu.
option will not normally need to be changed.
Default -
Select this option to set the default output type for this button to the
system default. The system default is the option selected with the
Remote Properties
IR -
Select this option to force this button to transmit IR directly out the
command on the
infrared window on the front of the remote, regardless of the system setting.
RF -
Select this option to force this button to transmit IR or RS-232 via RF
through the IRF-6, regardless of the system setting.
RF ID Code:
Unless the system contains more than one IRF-6, this option will not normally
need to be changed.
Default -
Select this option to set the default RF ID code for this button to the
system default. The system default is the ID code selected with the
Remote Properties
command on the
Edit
menu.
Edit
54
Code -
Select this option to force this button to transmit a specific RF ID code
when in RF mode, regardless of the system default setting.
System Defaults -
This section shows the global defaults for the output type and RF
ID code, for reference. If you wish to change these values, use the
Properties
command on the
Edit
menu.
Edit Remote
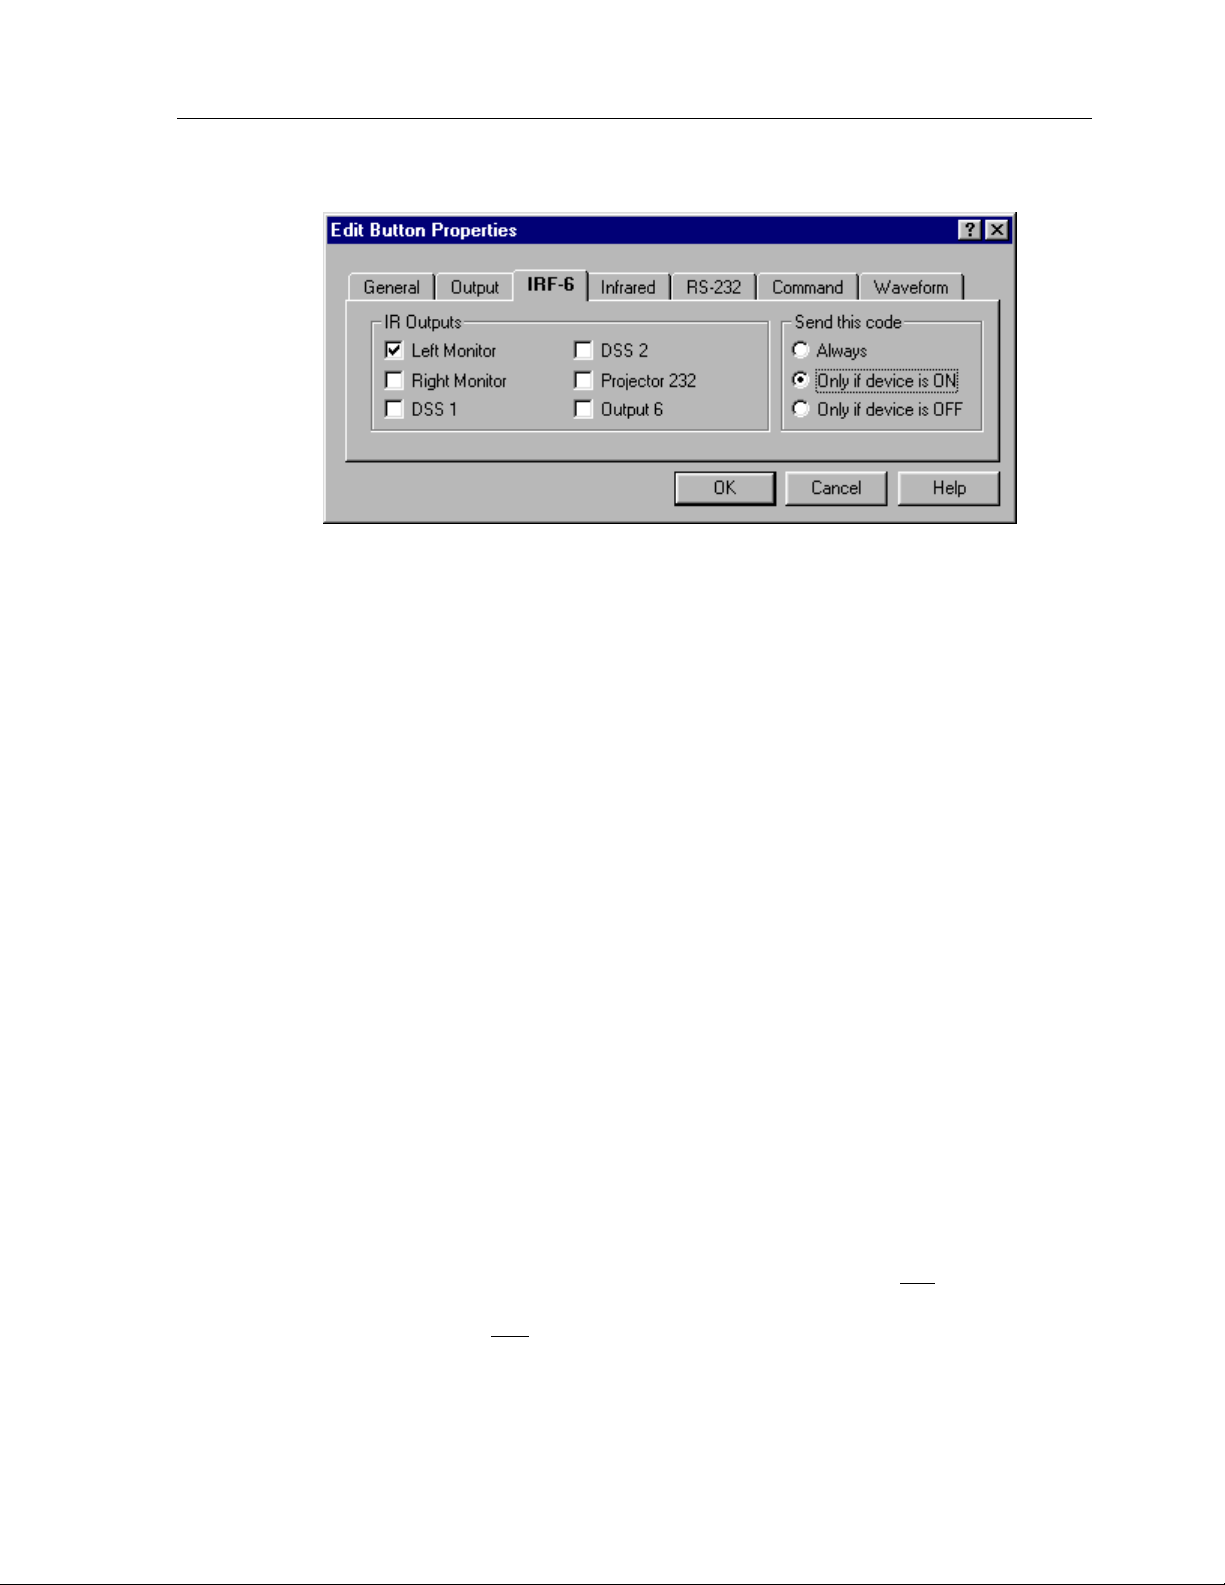
Chapter 5 • TheaterTouch Designer Advanced Features
IRF-6 TAB
IRF-6
The
tab options are:
IR Outputs
group box:
Check the box(s) that corresponds with the output(s) you wish to send the
commands on this button out of the IRF-6. Note that the labels for the output
can be changed with the
Edit Remote Properties
command on the
Edit
menu.
The default is to have the commands come out of all of the outputs on the
IRF-6. This option will not normally need to be changed unless you have
multiple identical components or are using one of the power sensor modules.
Send this code
group box:
The options in this section require that a power sensor module be plugged into
the appropriate port on the IRF-6.
Always -
Check this option to send the IR code regardless of the power sensor
state. This option should also be checked if no power sensor is connected to
the selected IR output.
Only when device is ON -
Check this option to send the IR code only if the
power sensor in the specified port detects that the equipment it is monitoring
is ON.
Only when device is OFF -
Check this option to send the IR code only if the
power sensor in the specified port detects that the equipment it is monitoring
is OFF.
Note:
In order to use the power sensor options, exactly one
IR output
must be selected in the IRF-6 Output box, and the power sensor must be
plugged into that
IR output port.
55
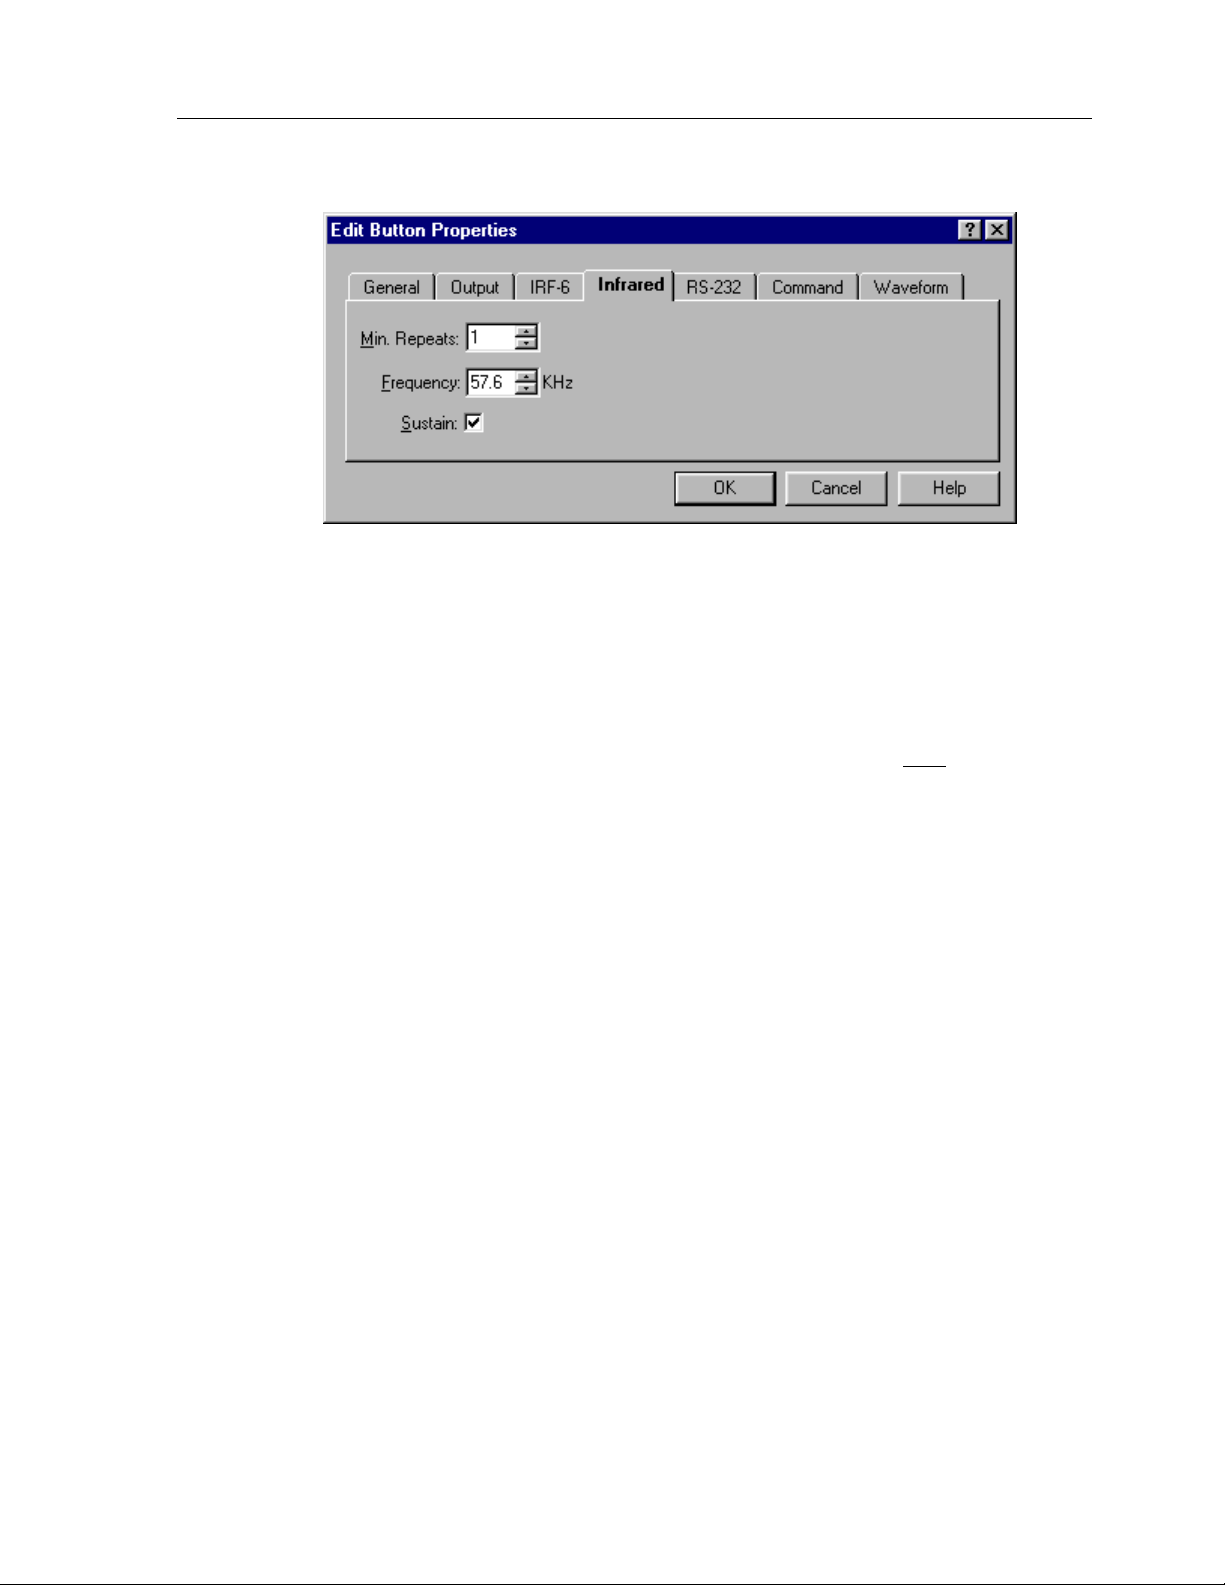
TheaterTouch System Controller
INFRARED TAB
Infrared
The
tab options are:
Min. Repeats -
Enter in this box the number of times that the repeating part of the
IR code is sent by the remote. Some infrared receivers need a command to be
repeated a certain number of times to work properly, and some may not work
properly if the command is repeated at all. Change this setting only
if you are
having trouble with a command.
Frequency -
This box shows the carrier frequency of the IR code. This is set
automatically. You should not need to change this value unless directed to do so
by Technical Support.
Sustain -
Check this box to control whether or not the IR code should repeat if the
button is held down. Most infrared codes will transmit continuously as long as
the button is held down, but some infrared receivers may not work properly if the
command is repeated at all. If the Sustain button is checked, the code will be
transmitted for as long as the button is held down, or the Minimum Repeat times,
whichever is greater. If the Sustain button is not checked, the code will be
transmitted only the Minimum Repeat number of time regardless of how long the
button is held down.
56
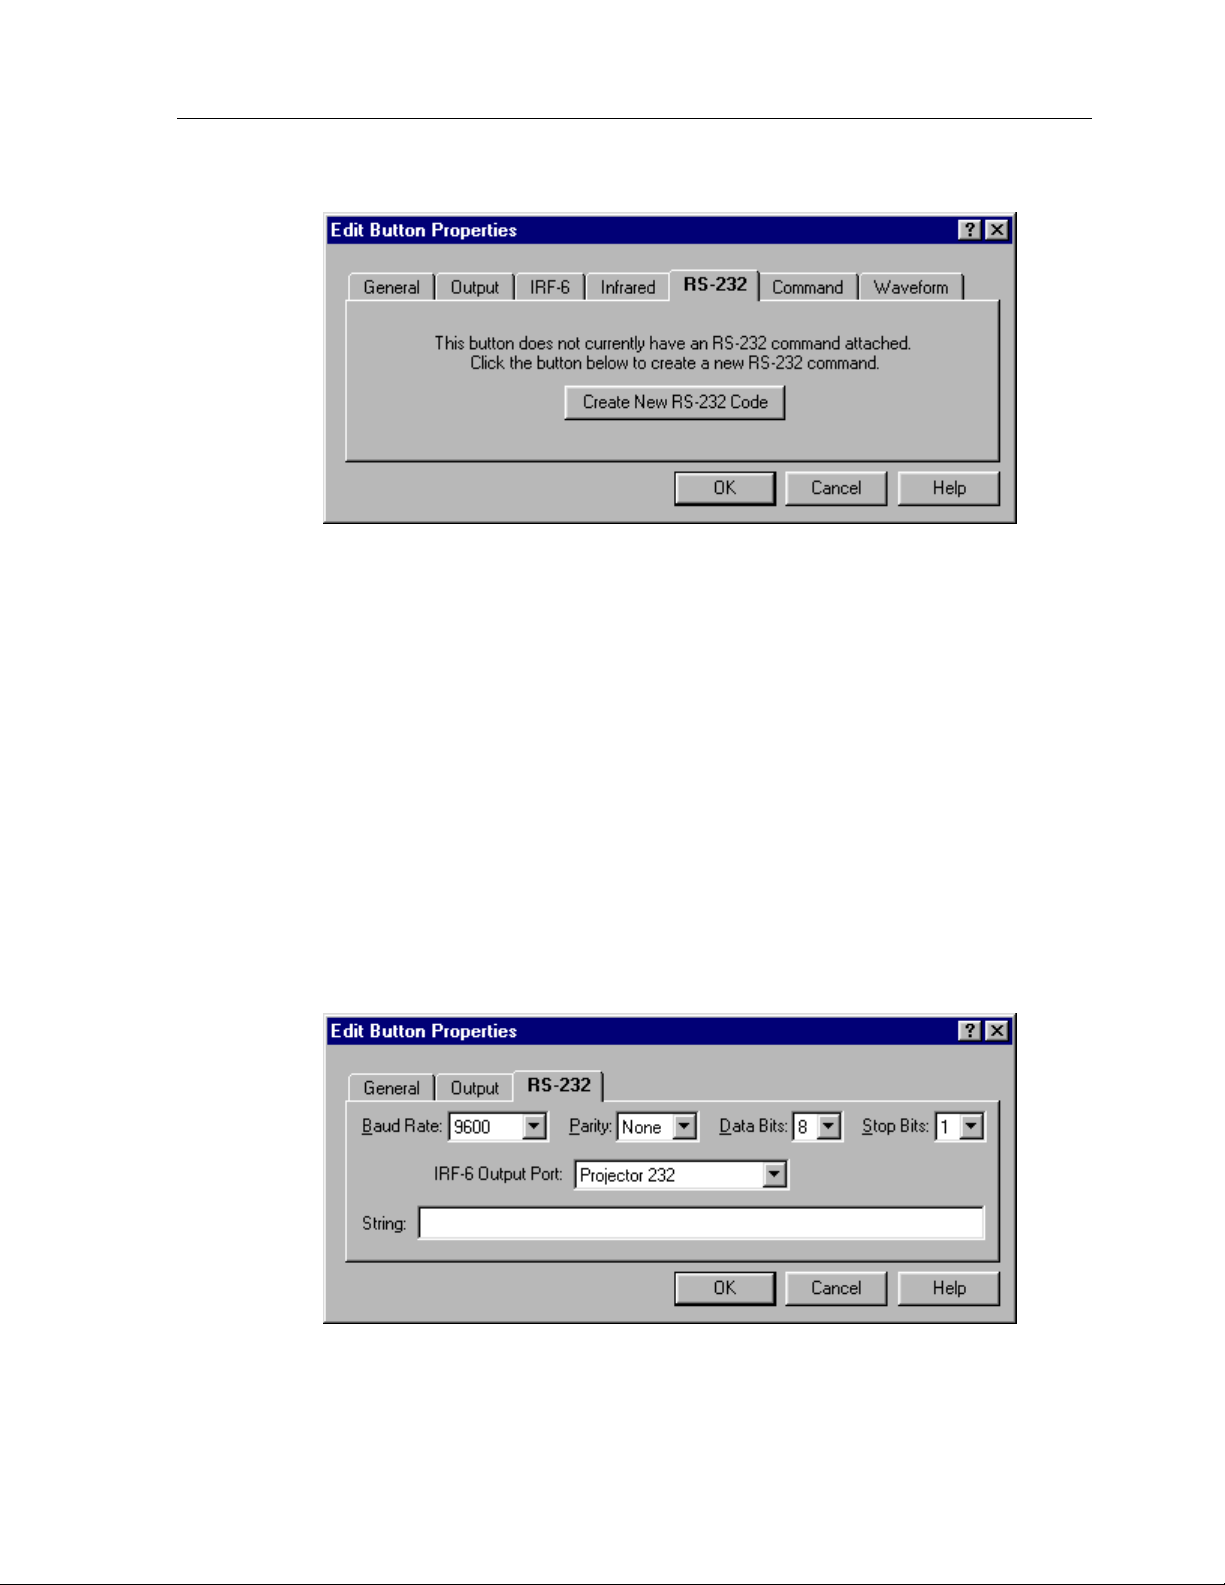
RS-232 TAB
The RS-232 function will only work if you are using the TheaterTouch in RF mode
with an optional RTI System Interface Module, and an optional RS-232
Communications Module. You can use up to six (6) RS-232 Communications
Modules with any one (1) System Interface Module. (See the instructions included
with the RS-232 Communications Module for more on installation).
Chapter 5 • TheaterTouch Designer Advanced Features
HOW TO SETUP RS-232 COMMUNICATIONS
RS-232
The
command to the button. Click the
tab will appear as shown above the first time you attach an RS-232
Create New RS-232 Code
232 dialog as shown below.
button to open the RS-
57

TheaterTouch System Controller
1. Select which IRF-6 you wish to send this RS-232 command string from if
using more than one. This is done on the
Properties
2. Edit the communications settings (Baud Rate, Parity, etc.) to match that of the
equipment that you are trying to control. This information should be in the
equipment owners manual, if not contact the equipment manufacturer.
3. Select the output port on the IRF-6 that the RS-232 Communications Module
you want to send this RS-232 string is attached.
dialog.
Output
tab of the
Edit Button
4. In the
this button is pressed. The maximum number of characters is 60 in a single
string.
Note:
macro with two or more command strings with no time delay between them.
You can type plain text into this field, and you can use the following special
characters (called “Escape Sequences”):
\a Alert / Bell (Control-G)
\b Backspace (Control-H)
\e Escape (Control-[)
\f Form Feed (Control-L)
\n Line Feed (Control-J)
\r Carriage Return (Control-M)
\t Tab (Control-I)
\v Vertical Tab (Control–K)
String
If you should need more than 60 characters in a command, you can make a
field, type in the RS-232 command string you wish to send when
58
\\ Backslash
\xHH Hexadecimal constant (where H is a hex digit from 0-9 or A-F)
\dNNN Decimal constant (where N is a digit from 0-9). All three digits
MUST
Note:
Because the backslash {\} character is used to introduce each Escape Sequence,
MUST
you
string.
use the \\ form to enter a backslash character, if one is needed by your
be entered, so you may need to add leading zeros.
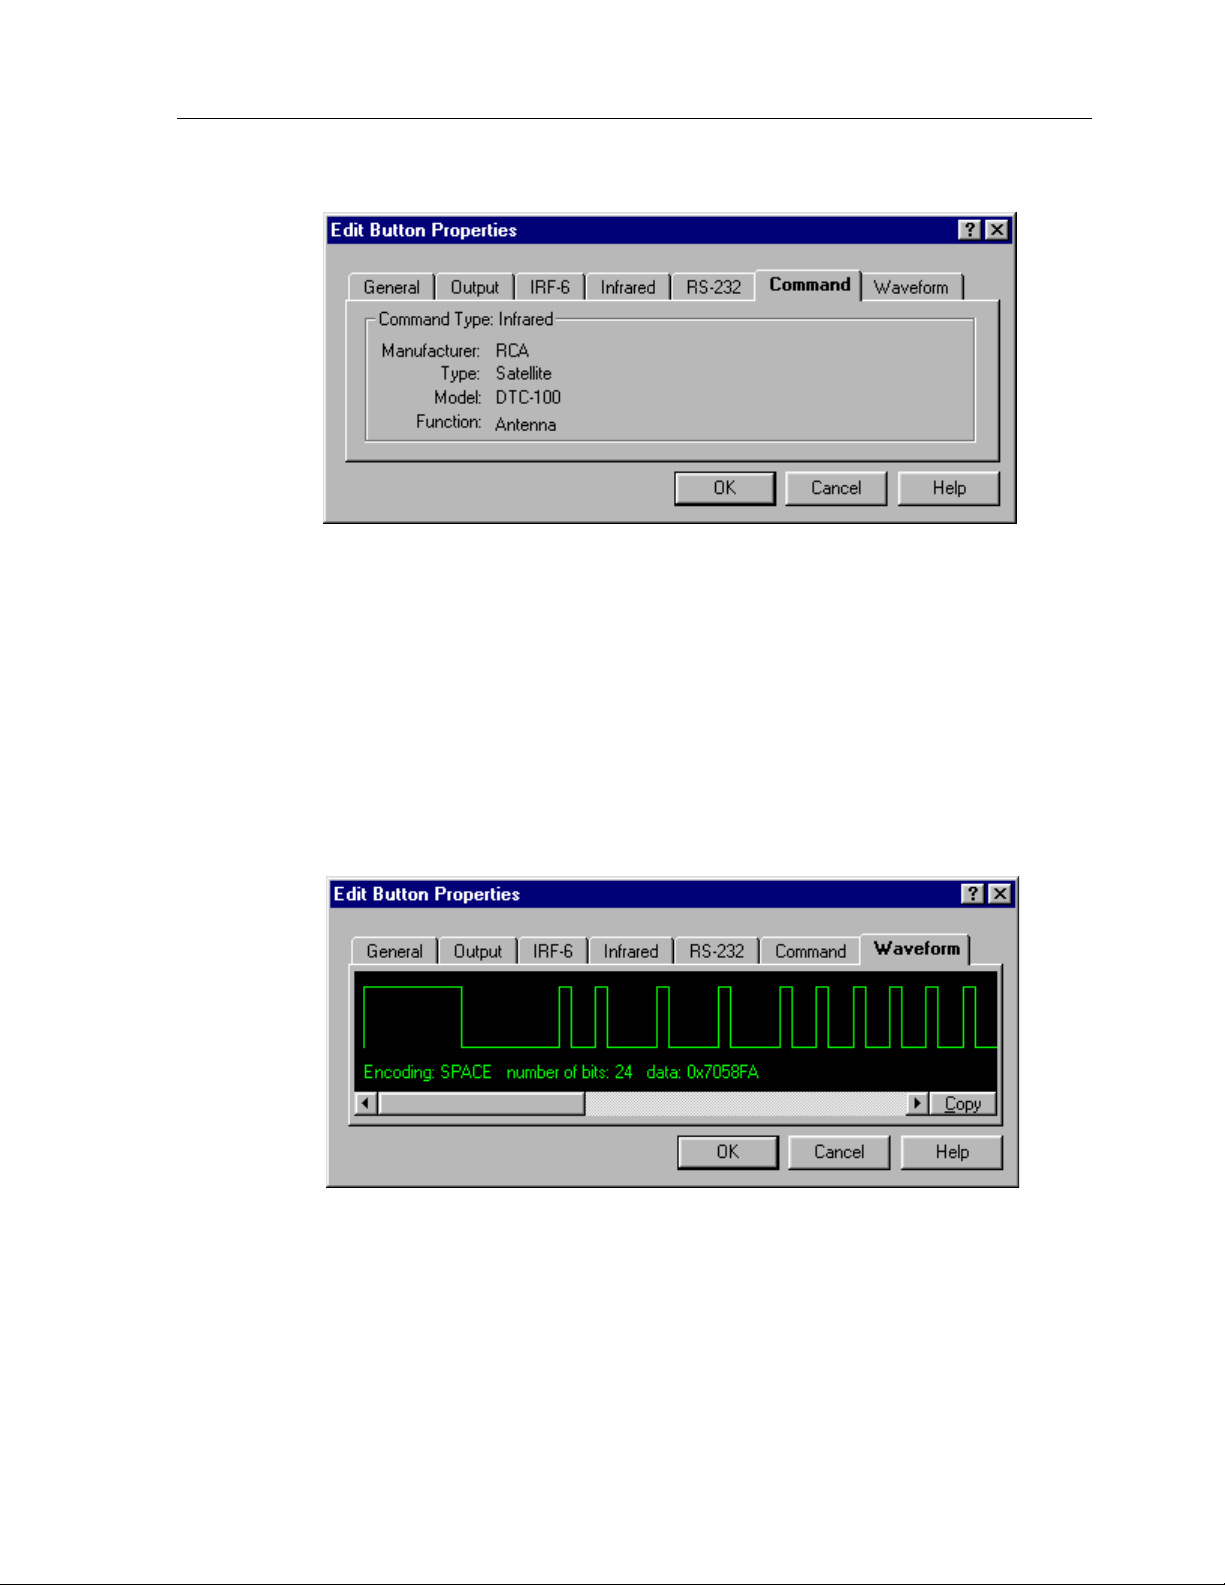
Chapter 5 • TheaterTouch Designer Advanced Features
COMMAND TAB
Command
The
number and function of the command on a button.
tab displays the manufacturers name, type of equipment, model
WAVEFORM TAB
Waveform
The
tab displays the waveform of a command for advanced
troubleshooting or if you would just like to see what Infrared data looks like.
59

TheaterTouch System Controller
HOW TO EDIT THE PROPERTIES OF MULTIPLE BUTTONS
The Edit Button Properties dialog allows you to edit many different attributes of a
button or a group of buttons.
To edit the properties of multiple buttons at once:
1. Select the buttons using the
2. Click the right mouse button on one of the selected buttons, either
touchscreen or keypad buttons and choose
For an explanation of all the button properties, see the “
Properties
Note:
options relevant to the button(s) being edited will be shown.
A note about Multiple Selections
” section.
Not all of the tabs and/or controls will be available simultaneously. Only the
If you have more than one button selected, it is possible that they will initially
have different settings.
The following meanings apply to options with a check box:
All buttons in the selection will retain their original values for the setting.
All buttons in the selection will have the setting set to TRUE
All buttons in the selection will have the setting set to FALSE
Select Button
tool
Edit Properties
from the
.
How to Edit Button
Tool Palette
.
60
If options with numerical fields have different values, they will be left blank.
If you DO NOT enter a number, all the buttons will retain their original
setting. If you DO enter a number, all the buttons will be set to that value.
If options with radio buttons have different settings, NONE of the radio
buttons will have a dot next to them. In that case, each button will retain its
original function. If you do wish to assign the SAME function to EVERY
button, select one of the functions from the dialog.

Chapter 5 • TheaterTouch Designer Advanced Features
HOW TO PRINT SCREENSHOTS
TheaterTouch Designer comes with the ability to print screenshots of the individual
frames of your remote file for reference purposes.
To print screenshots of the open remote file:
1. Choose
Print
from the
File
menu.
2. Choose whether you want to
Print Current Page Only
a)
– Prints a life-sized image of all of the frames
of the currently displayed page.
Print All Pages on One Sheet
b)
– Prints all of the frames from all of the
pages in the current file on a single sheet of paper, scaling them if
necessary.
Print All Pages, 1 Per Sheet
c)
– Prints life-sized images of all of the
pages in the current file, with all of the frames from each page
grouped together on individual sheets of paper.
3. Click OK.
HOW TO PRINT SYSTEM CONFIGURATION REPORTS
TheaterTouch Designer comes with the ability to create System Configuration Reports.
This report is for archival purposes as well as a visual reference guide of the system
options and each IRF-6 configuration.
To print the Configuration Report of the open remote file:
1. Choose
System Configuration Report
2. Click the
3. Click
OK
Print
command button.
to close.
from the
File
menu.
To copy the Configuration Report of the open remote file to the Windows clipboard:
1. Choose
System Configuration Report
2. Click the
3. The
4. Click
System Configuration Report
OK
Copy
command button.
to close.
from the
is now on the Windows clipboard.
File
menu.
61
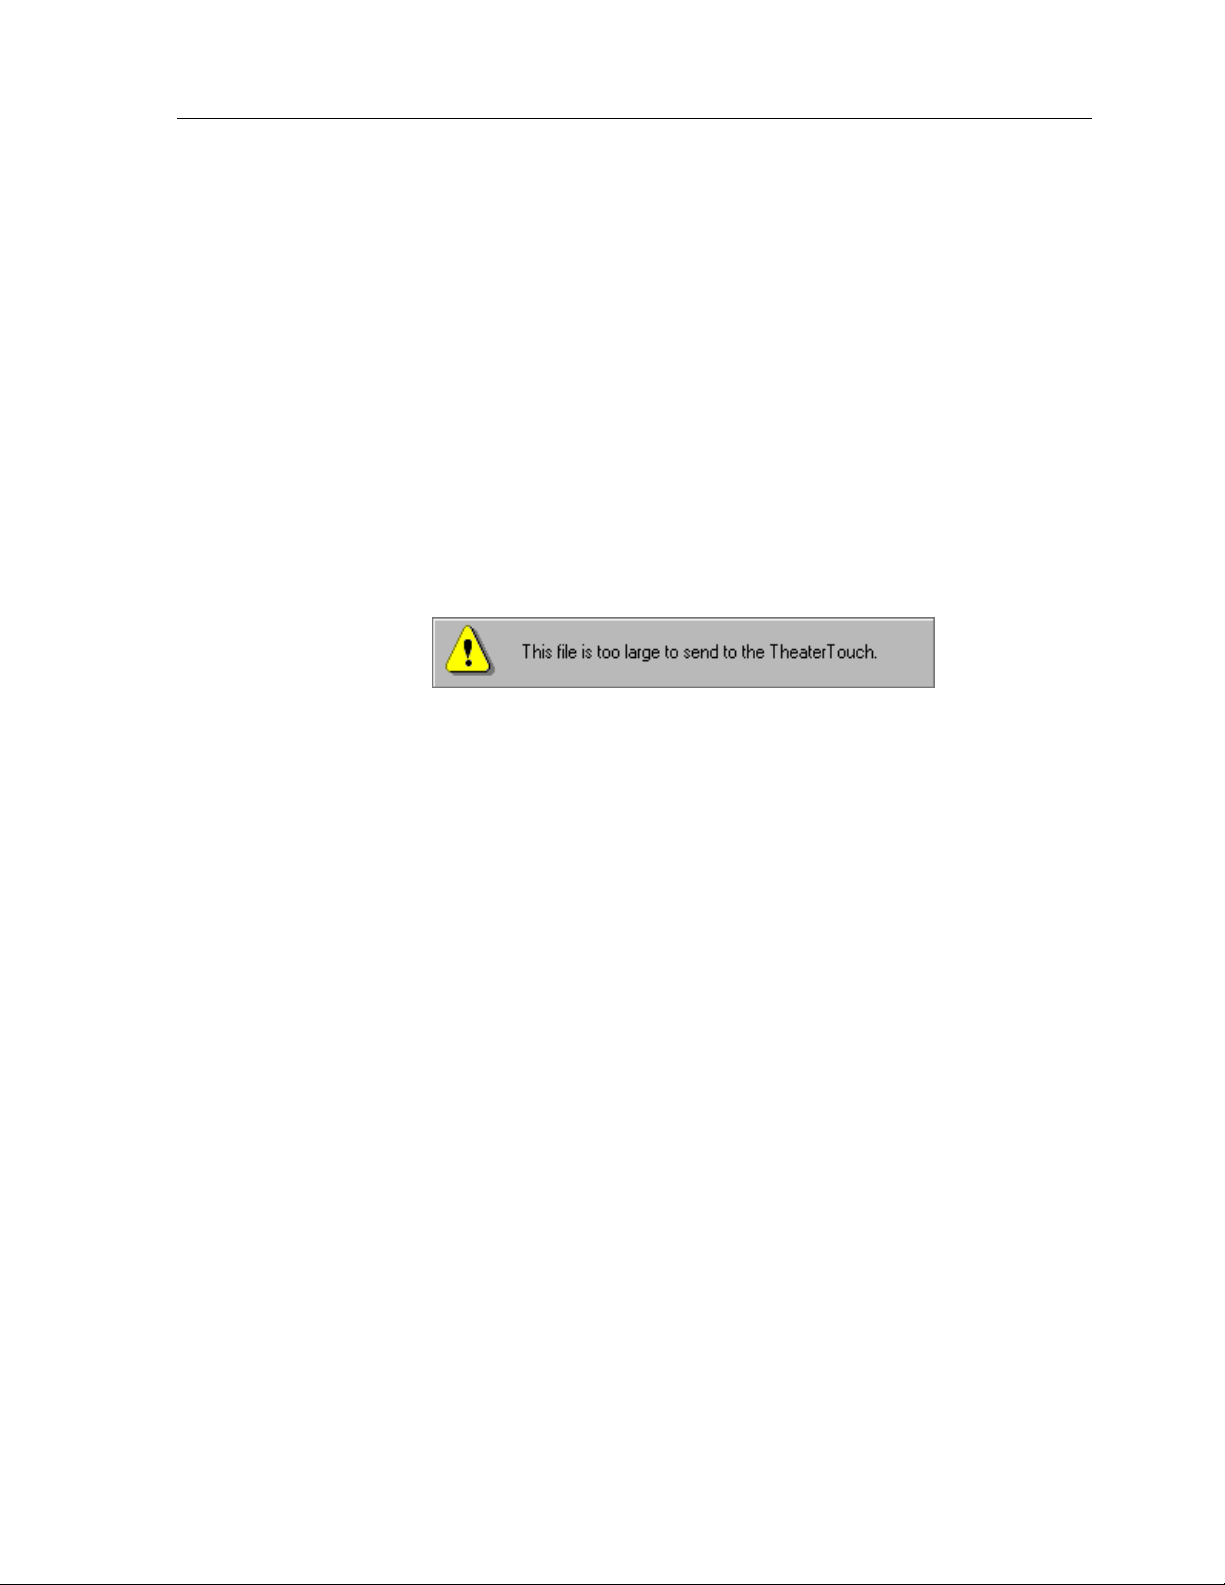
TheaterTouch System Controller
HOW TO CHECK MEMORY USAGE
It is possible, though not likely, to create a file in TheaterTouch Designer with more
information than the TheaterTouch can hold. To make sure this does not happen, use
Check Memory Usage
the
file is.
Remote Memory Used
The
bitmaps, custom buttons, commands, and macros take up in the TheaterTouch system
controller’s 128KB of memory. The pie chart in the dialog represents the amount of
memory that each of the object types uses.
command on the
dialog displays the amount of space that buttons,
Edit
menu to see how large the current
If the memory is more than 100% full, the
memory, and will be flashing red. In this case, the following warning will be
displayed in the dialog box:
You will have to delete enough objects so that the
you can send this file to the TheaterTouch.
Free
line will show a negative amount of
Free
line is not flashing red before
62

Chapter 5 • TheaterTouch Designer Advanced Features
HOW TO CREATE A “SELF-DOWNLOADING .EXE”
This command creates an executable from the current file that will automatically
download itself to the remote when run. These executables can be distributed to
client sites to simplify the process of updating remotes in the field.
TheaterTouch Designer does not need to be installed for the self-contained executable
to work.
To make a Self-Downloading .EXE of the current file:
1. Choose
2. Choose the location you want to save the file in the
3. Enter the name of the file in the
4. Click the
You can now put the
HOW TO USE THE “SEND” COMMAND
This command sends the current file through electronic mail. This command is only
available if your computer has a properly configured e-mail client that is compatible
with the Microsoft MAPI specification. Microsoft Exchange and Microsoft Outlook
are two examples of MAPI-compliant e-mail clients.
TheaterTouch Designer does need to be installed for the file to work.
To send the current file via E-Mail:
Create Self-Downloading .EXE
Save
button to save and close.
.EXE
from the
File Name
file on a diskette or E-Mail it.
box.
Communications
Save in
menu.
address box.
1. Choose
2. The default E-Mail program will open with the current file inserted as an
attachment with the extension
3. Send the E-Mail as required by you E-Mail program.
Send
from the
File
menu.
.rti
.
63

TheaterTouch System Controller
64

Chapter 6. IR Library Manager
The TheaterTouch reproduces the infrared commands of other remote controls. Each
of these infrared commands must be captured (learned) and placed into the
TheaterTouch Designer Command Library.
This is done by using the original remote control (the donor) from a piece of
equipment to teach its commands to the TheaterTouch. The TheaterTouch then transfers
the captured command to the Infrared Library Manager software through its RS-232
serial port. Once a command is placed in the infrared library, it never has to be
captured again.
Before you can send infrared commands to the PC, you need to create a new remote
file by going to the IR Library Manager in the TheaterTouch Designer software.
INFRARED CODES
There are two types of infrared codes that are commonly used for consumer
electronics products: Frequency Modulated and Pulsed.
Chapter 6 • IR Library Manager
FREQUENCY MODULATED
This type of transmission modulates the IR energy at a fixed carrier frequency. The
vast majority of consumer electronics remote controls use a carrier frequency around
40kHz, although the carrier can range from 15kHz to 455kHz or higher. The
TheaterTouch is designed to reproduce carrier frequencies between 15kHz and 460kHz.
The actual code consists of bursts of IR energy modulated at the carrier frequency,
separated by pauses.
Pause40 kHz Burst
The code is defined by the length of each burst and each pause, as well as by the
carrier frequency.
65

TheaterTouch System Controller
PULSED IR CODES
This type of transmission does not use a carrier frequency.
Pulsed codes are common in cable TV converter boxes.
HOW THE THEATERTOUCH LEARNS IR CODES
There are many different encoding schemes used for IR codes. The burst and pause
times have fixed lengths, variable lengths, or some combination of the two. To learn
the code, the TheaterTouch “records” a sample of the code in a manner similar to the
way a tape recorder records sound. Once a sample of the code has been taken, it is
analyzed to find any repeating patterns.
Some codes continuously repeat themselves for as long as the button is pressed.
Others send a code followed by a “keep alive” pattern. Some codes don’t repeat at all.
Any of the above types of codes can also have some sort of preamble in front of them.
It is very important to capture the preamble in this type of code. The IR learning
buffer of the TheaterTouch
is large enough to accommodate the preamble.
When a repeating pattern is found, extra repeats are stripped off before the code is
stored in memory. The number of repeats is also stored so the code can be
reproduced accurately.
66
If the buffer was filled up during learning, it is assumed that the pattern should be
repeated for as long as the key is pressed. This is common for commands such as
Volume, Balance, and Scan— functions that may need to be continuously repeated.
For these types of commands,
not filled,
Repeats
Sustain
.
The default
Minimum Repeats
is set
OFF
Sustain
is set ON as the Edit IR default. If the buffer is
and the repeat pattern is displayed as the
for a code with
Sustain ON
is one. This means the
Minimum
repeating pattern will repeat at least one time when the button is pressed. You can
edit this if necessary, in the Edit IR mode of Infrared Library Manager software.
If the code uses a carrier frequency, that frequency is also stored with the code.

HINTS FOR LEARNING IR CODES
Always place the TheaterTouch and the donor remote control on a flat surface. You
may find it necessary to elevate the donor or the TheaterTouch with a book or similar
object to align them vertically.
Once you have learned and tested a code from a remote, try not to move it until you
have learned all the codes. If you do accidentally move either remote, you should realign them.
VERY IMPORTANT
It is
TheaterTouch needs a strong IR signal to properly learn a code.
If the frequency read-out in the ALIGN mode is 0.0 kHz, then the code is a pulsed
type. In this case, you should transmit the commands to the TheaterTouch from the
longest distance you can without getting an error message.
If you always get an error message when trying to learn a code, you should try
moving the donor remote up and down or back and forth. If this does not help, try
tapping the buttons on the donor instead of holding them down.
Many commands can be made more reliable if the number of repeat times is
increased. This is especially true for commands assigned to buttons that are likely to
be briefly “tapped” or for commands that are part of a macro.
to make sure the donor remote is using fresh batteries. The
Chapter 6 • IR Library Manager
Increasing the number of repeat times increases the probability of the command
“getting through.” This is essentially a trade-off between increased reliability and an
increase in the length of time required to transmit a command. This can take a bit of
fine-tuning on complicated macros.
Keep in mind that the IR transmit LEDs may not be located in the center of the donor
remote. It may be necessary to place the remote off-center to get a reliable capture.
67

TheaterTouch System Controller
HOW TO OPEN THE IR LIBRARY MANAGER
1. Choose
IR Library Manager
Designer toolbar.
2. From here, you can decide to create a new library of commands or add to
an existing library by choosing from the
HOW TO CREATE A NEW IR LIBRARY
1. Choose
New
from the
open.
2. Enter the name of the new library in the
3. Be sure to save your new file in the
TheaterTouch Designer software folder.
4. Click the
Save
button to create the library.
from the
File
menu, the Create IR Library dialog box will
Library
menu from the TheaterTouch
File
menu either
File name
box.
Command Libraries
New
folder of the
or
Open
.
68

Chapter 6 • IR Library Manager
Once you click the
remotes that are in that particular library. If there are no remotes in that library, such
as after creating a new library, the fields will be empty.
Save
button, the Edit View dialog box will open showing you the
69
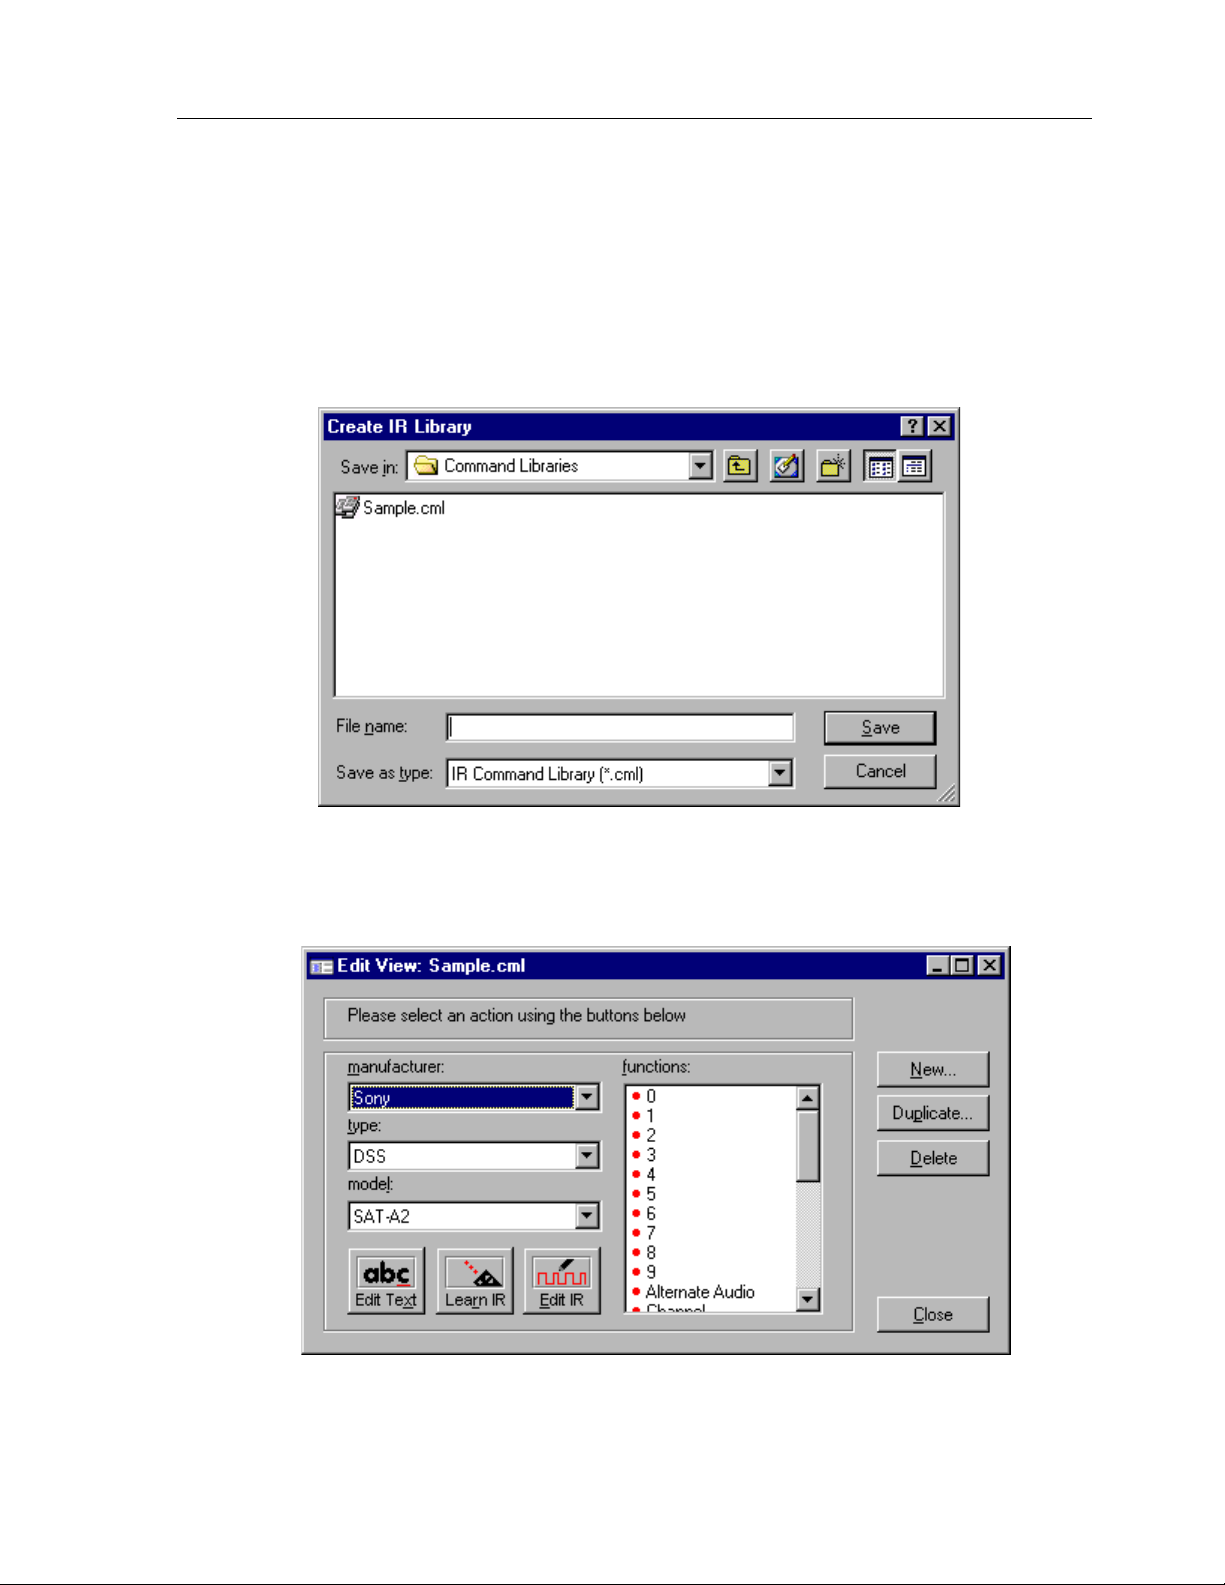
TheaterTouch System Controller
HOW TO OPEN AN EXISTING IR LIBRARY
Open
Open
from the
button.
1. Choose
2. When the Open IR Library dialog box opens, select the file you wish to
open.
3. Click the
File
menu.
Once you click the
remotes that are in that particular library.
Open
button, the Edit View dialog box will open showing you the
70
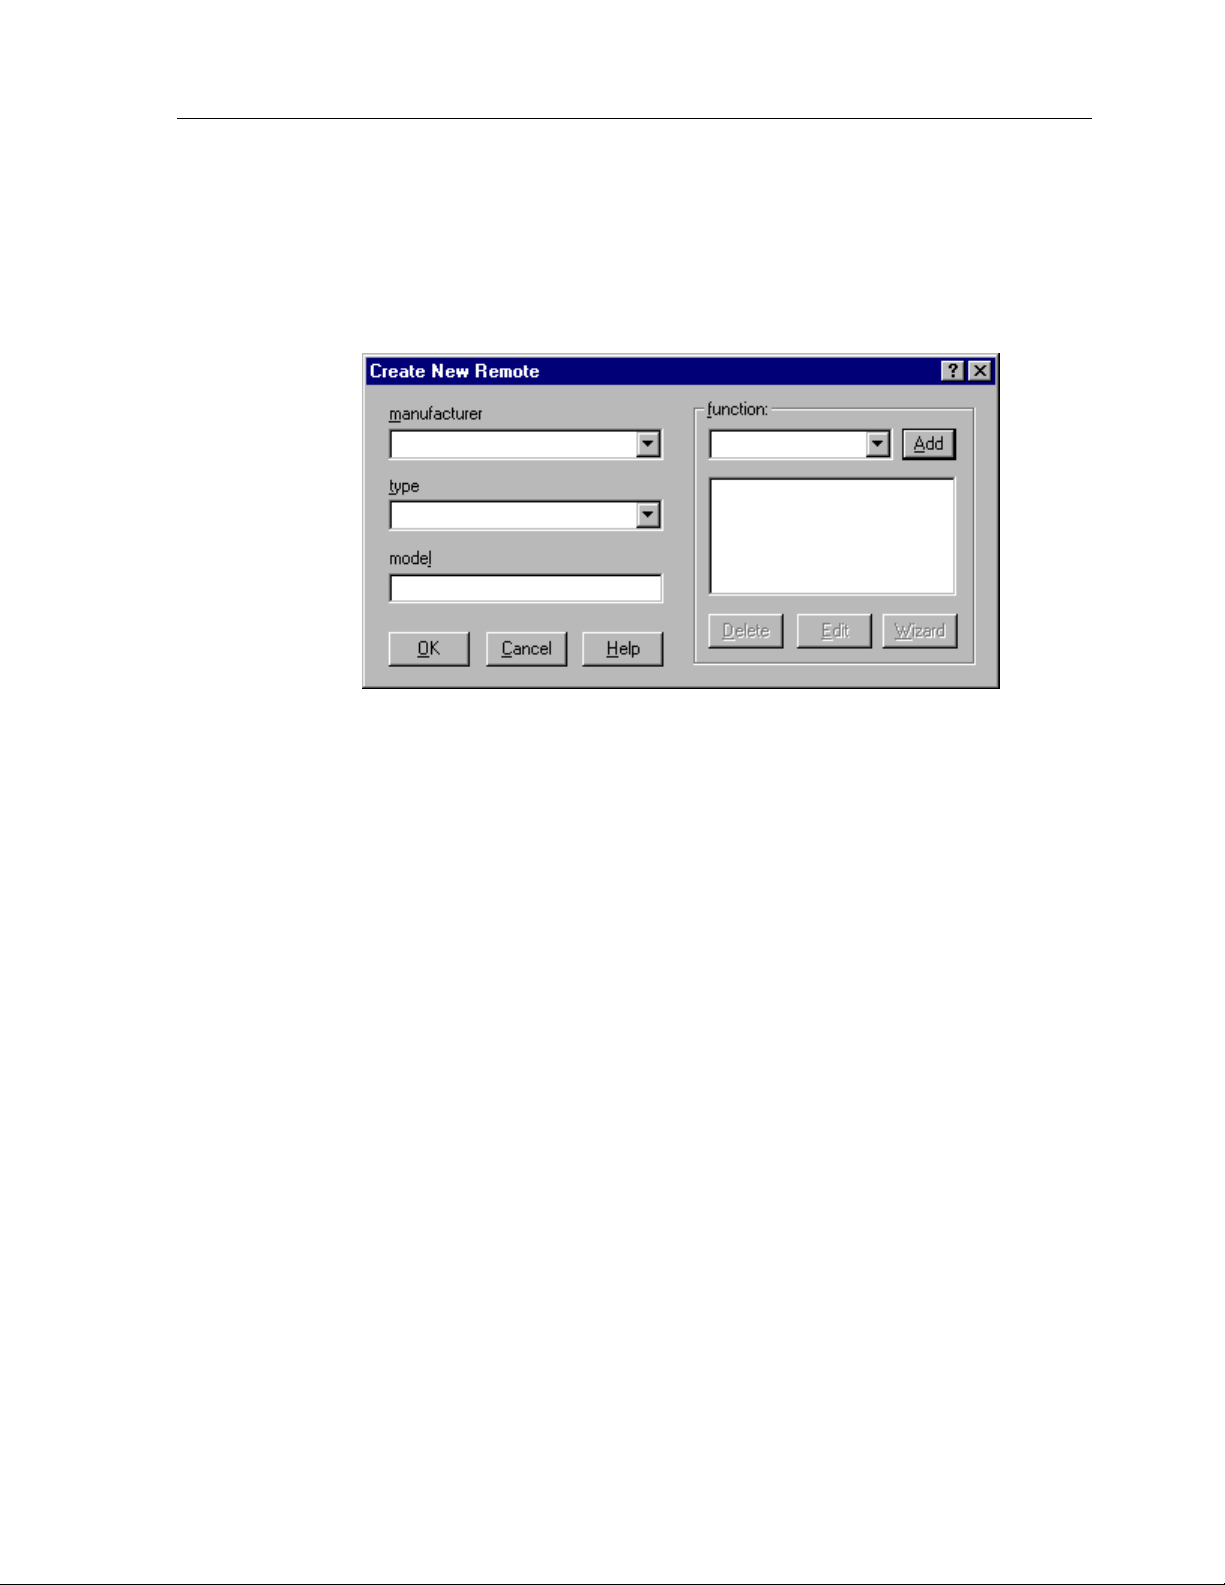
HOW TO ADD A NEW REMOTE TO AN IR LIBRARY
Chapter 6 • IR Library Manager
1. Click on the
2. This will open the
3. Enter the manufacturer’s name, type of equipment, (such as TV, VCR,
New
button on the upper right hand side of the
dialog box.
Create New Remote
Drapes, Lights and so on) and model number of the component or remote
in the appropriate fields.
dialog box.
Edit View
4. In the function field, enter the name of the actual commands you are
going to learn (such as Channel+, Channel-, Volume+, Volume-, Power, 1,
2, 3 and so on).
5. After you enter each function name click on the
save, you can always edit the name of a function later if you make a
mistake or add a function.
6. Repeat steps 4 and 5 for each button on the remote.
7. When done entering information about new remote, click on the
command button to save and close.
Add
command button to
OK
71
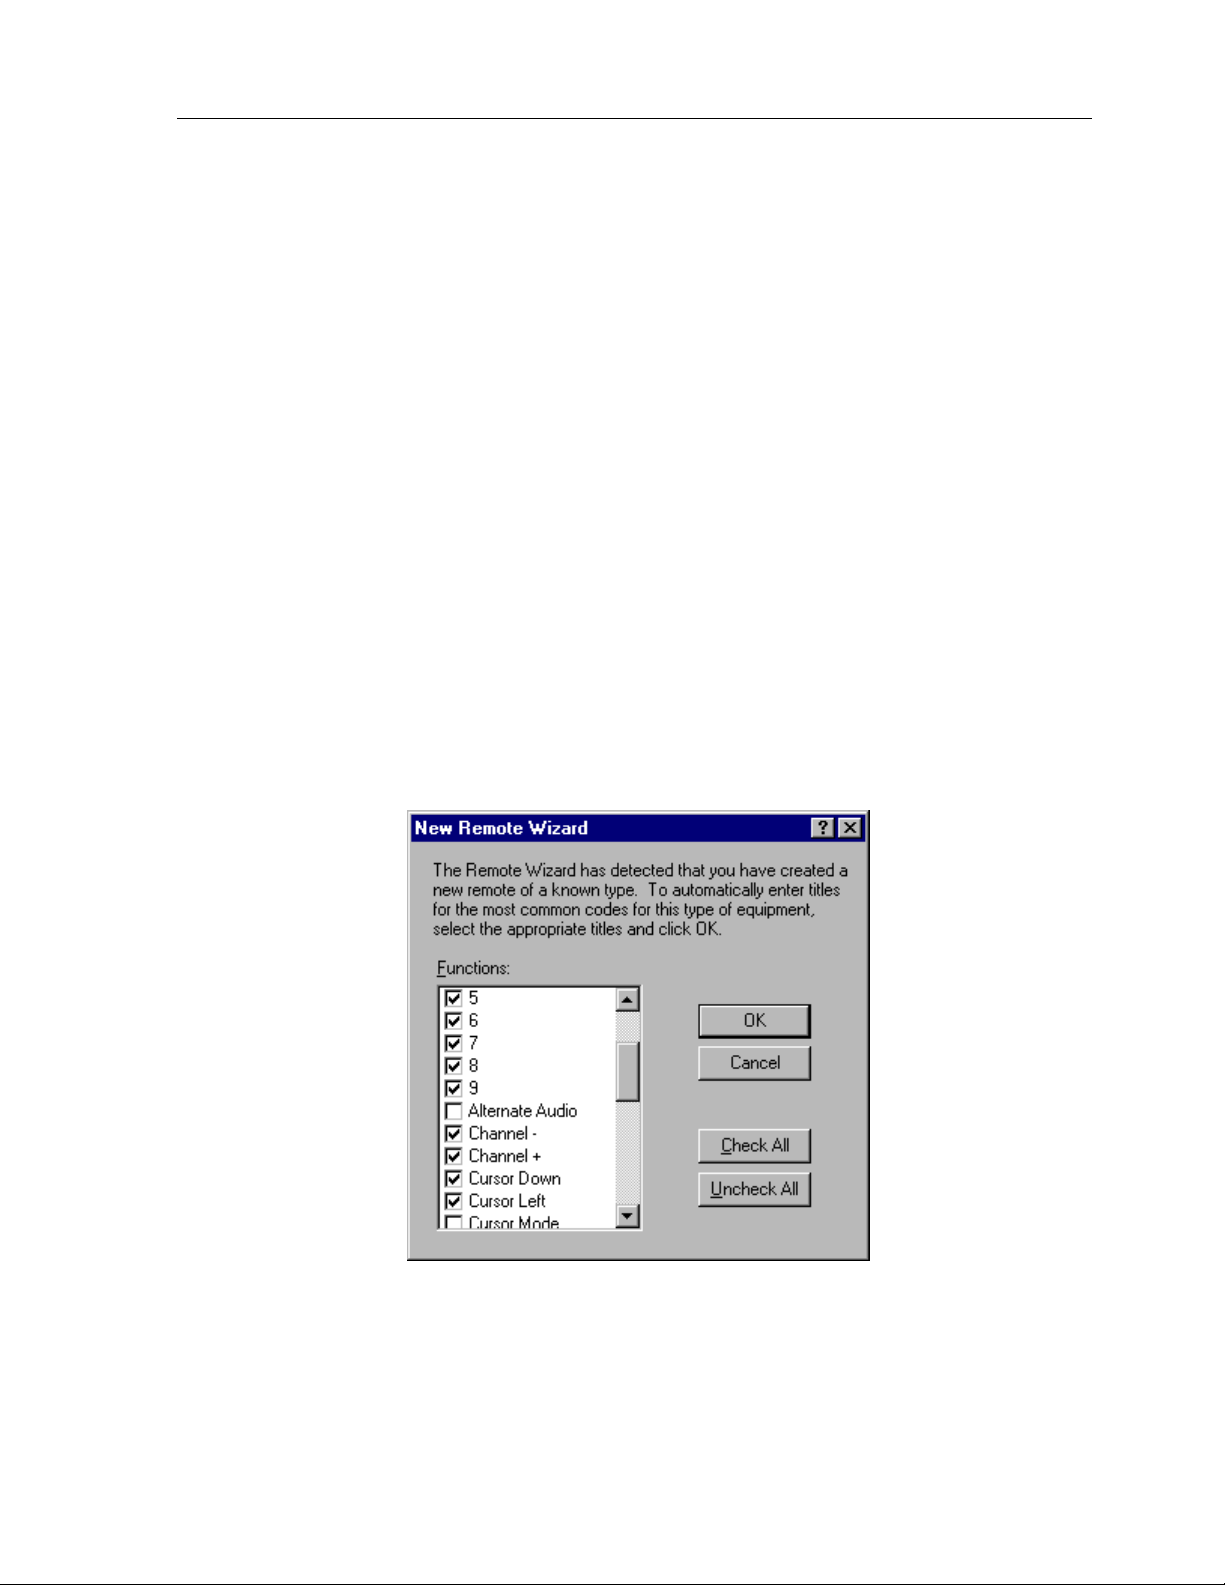
TheaterTouch System Controller
HOW TO USE THE NEW REMOTE WIZARD
If you are entering a commonly used component to the IR Library, you can use the
New Remote Wizard
equipment.
to enter the titles of commonly use commands for that type of
1. Open the
2. Enter the information on the equipment you are about to learn commands
from. The manufacturers name, type of equipment, (such as TV, VCR,
Drapes, Lights and so on) and model number of the component or remote
in the appropriate fields.
3. Click the
Wizard
4. Check or uncheck the function titles you wish to insert and click OK.
5. You can always edit the name of a function later if you make a mistake or
add a function.
6. When done entering information about new remote, click on the
command button to save and close.
dialog box.
Create New Remote
Wizard
command button; this will open the
dialog box.
New Remote
OK
72
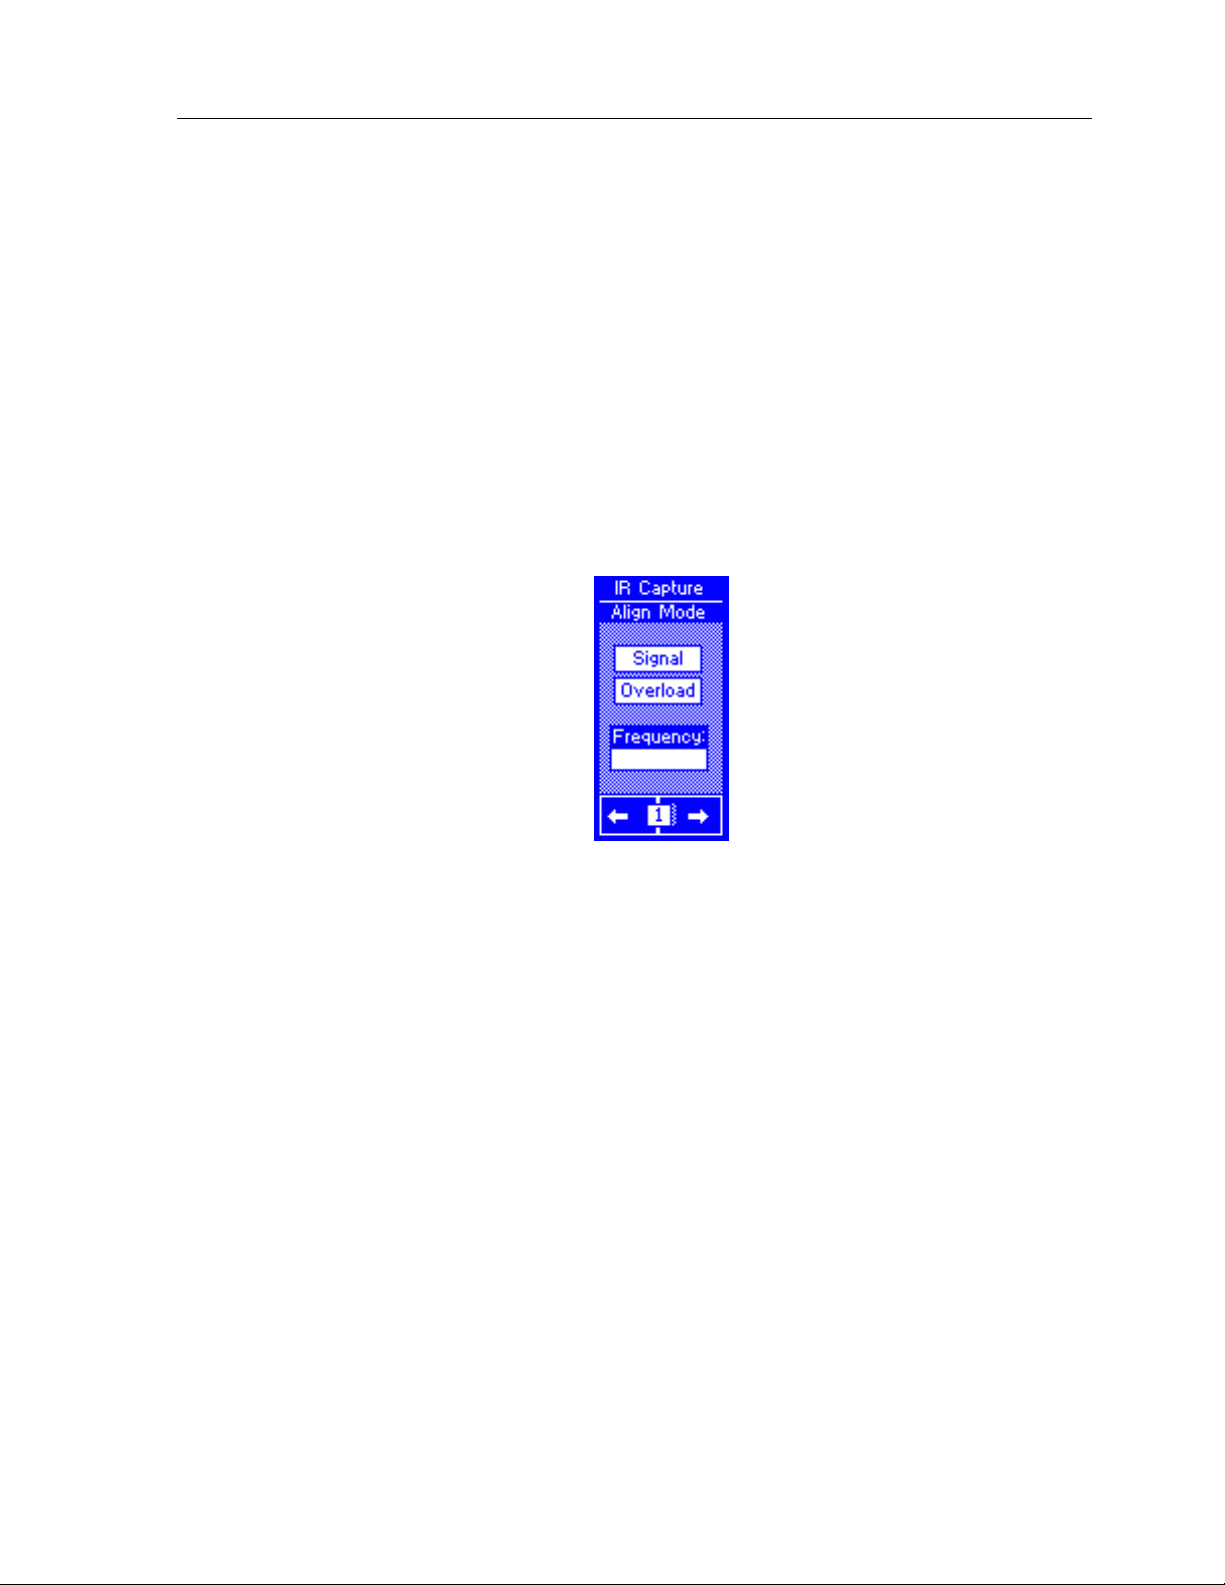
HOW TO ALIGN A DONOR REMOTE CONTROL
To ensure that a valid signal is being received, all donor remote controls must be
properly aligned with the TheaterTouch learning window. This is the window located
on the front of the unit.
Chapter 6 • IR Library Manager
The TheaterTouch has an
front of the learning window, and determine the modulation frequency of the donor
remote’s infrared signal. This function is invoked upon entering the
mode from the CONTROL PANEL page.
IMPORTANT: The Align function determines the modulation frequency of the
donor remote’s infrared signal; so all donor remote controls must be aligned
before being captured.
ALIGN
function to help determine the correct position in
IR CAPTURE
73
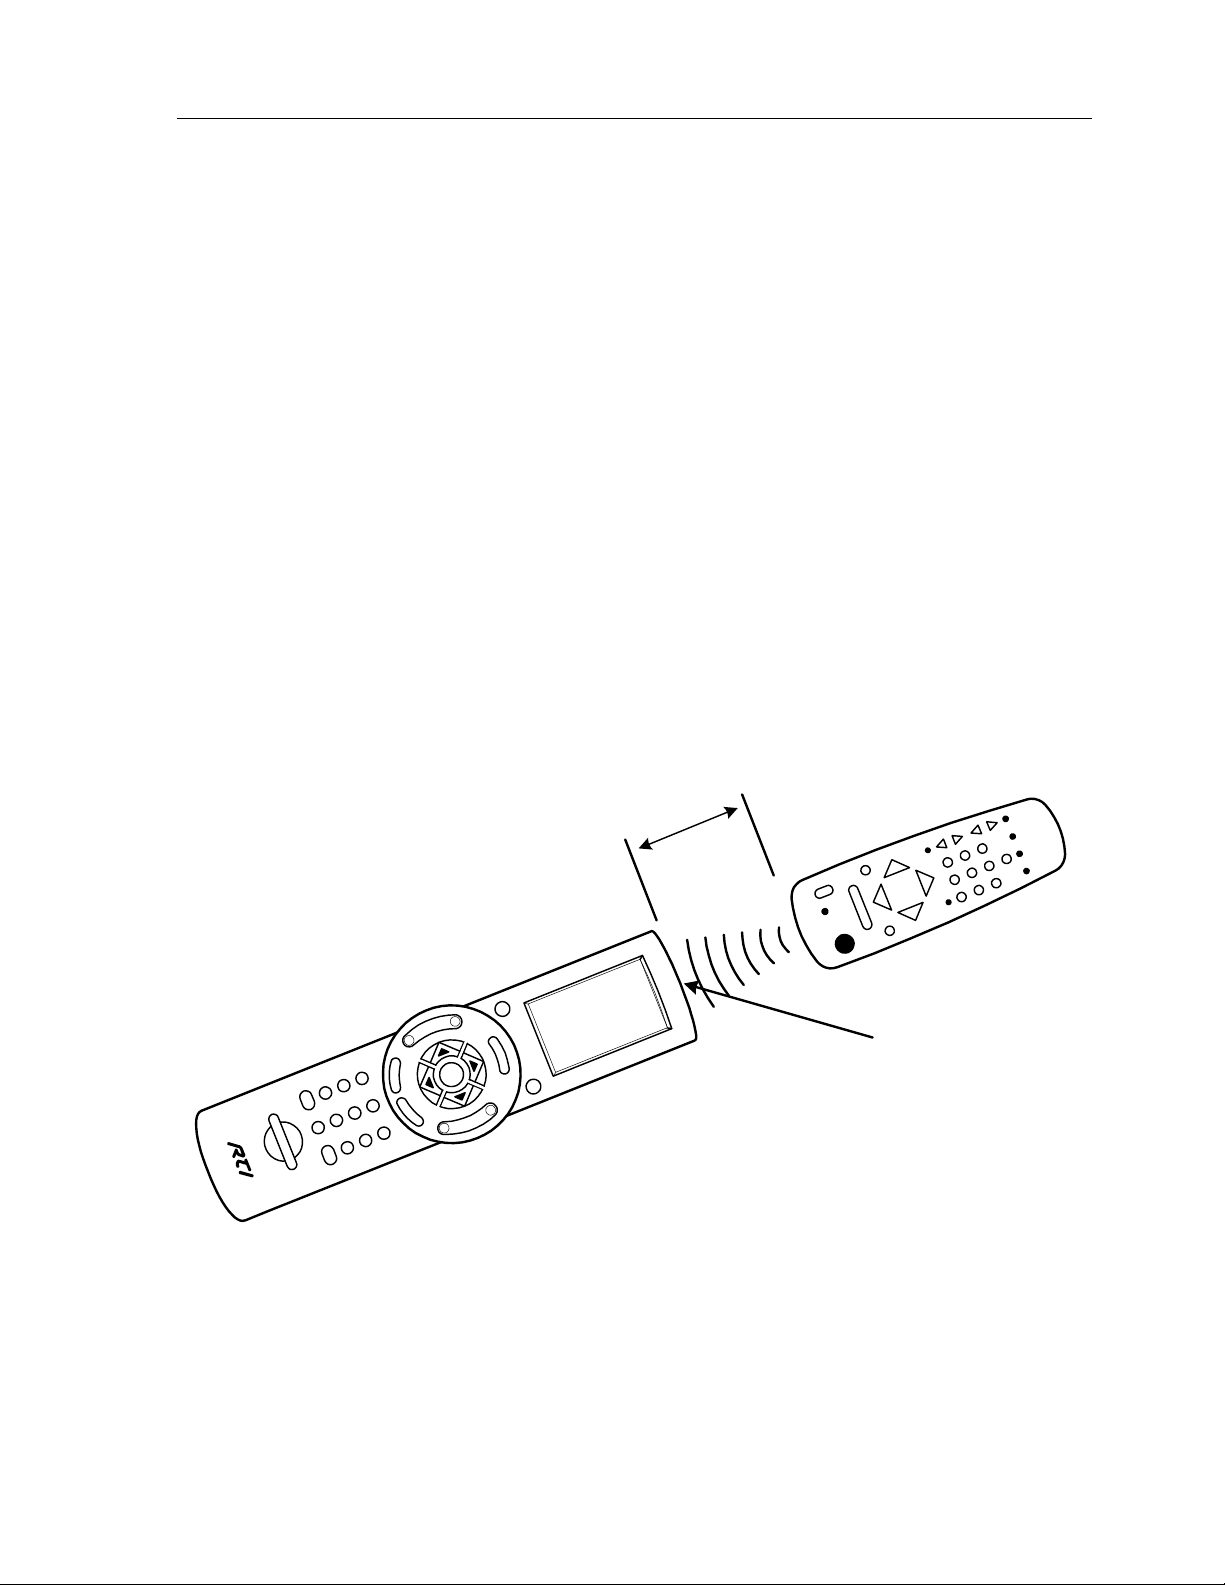
TheaterTouch System Controller
To properly align a donor remote control with the TheaterTouch:
1. Make sure the donor remote has fresh batteries then line up donor remote
so that is at the same height as the learning window on the TheaterTouch. It
may be necessary to place the donor remote control on a higher surface
than the TheaterTouch, or vice-versa.
2. Press any key on the donor remote control, moving the remote back and
forth in front of the learning window. The donor remote control is located
at the proper distance from the TheaterTouch when the
(darkened) and the frequency read-out is stable. The frequency readout
should not be 0.0kHz if it is possible to get it to read any other number by
moving the donor remote around. If the
TheaterTouch is not detecting any infrared signal.
Signal
Signal
box is on
box is off (white), the
3. If the
Overload
box is darkened, the donor remote is too close to the
TheaterTouch. Move the donor remote away from the TheaterTouch until
Overload
the
indicator turns white.
Approximately
2-4"
Learning Window
74
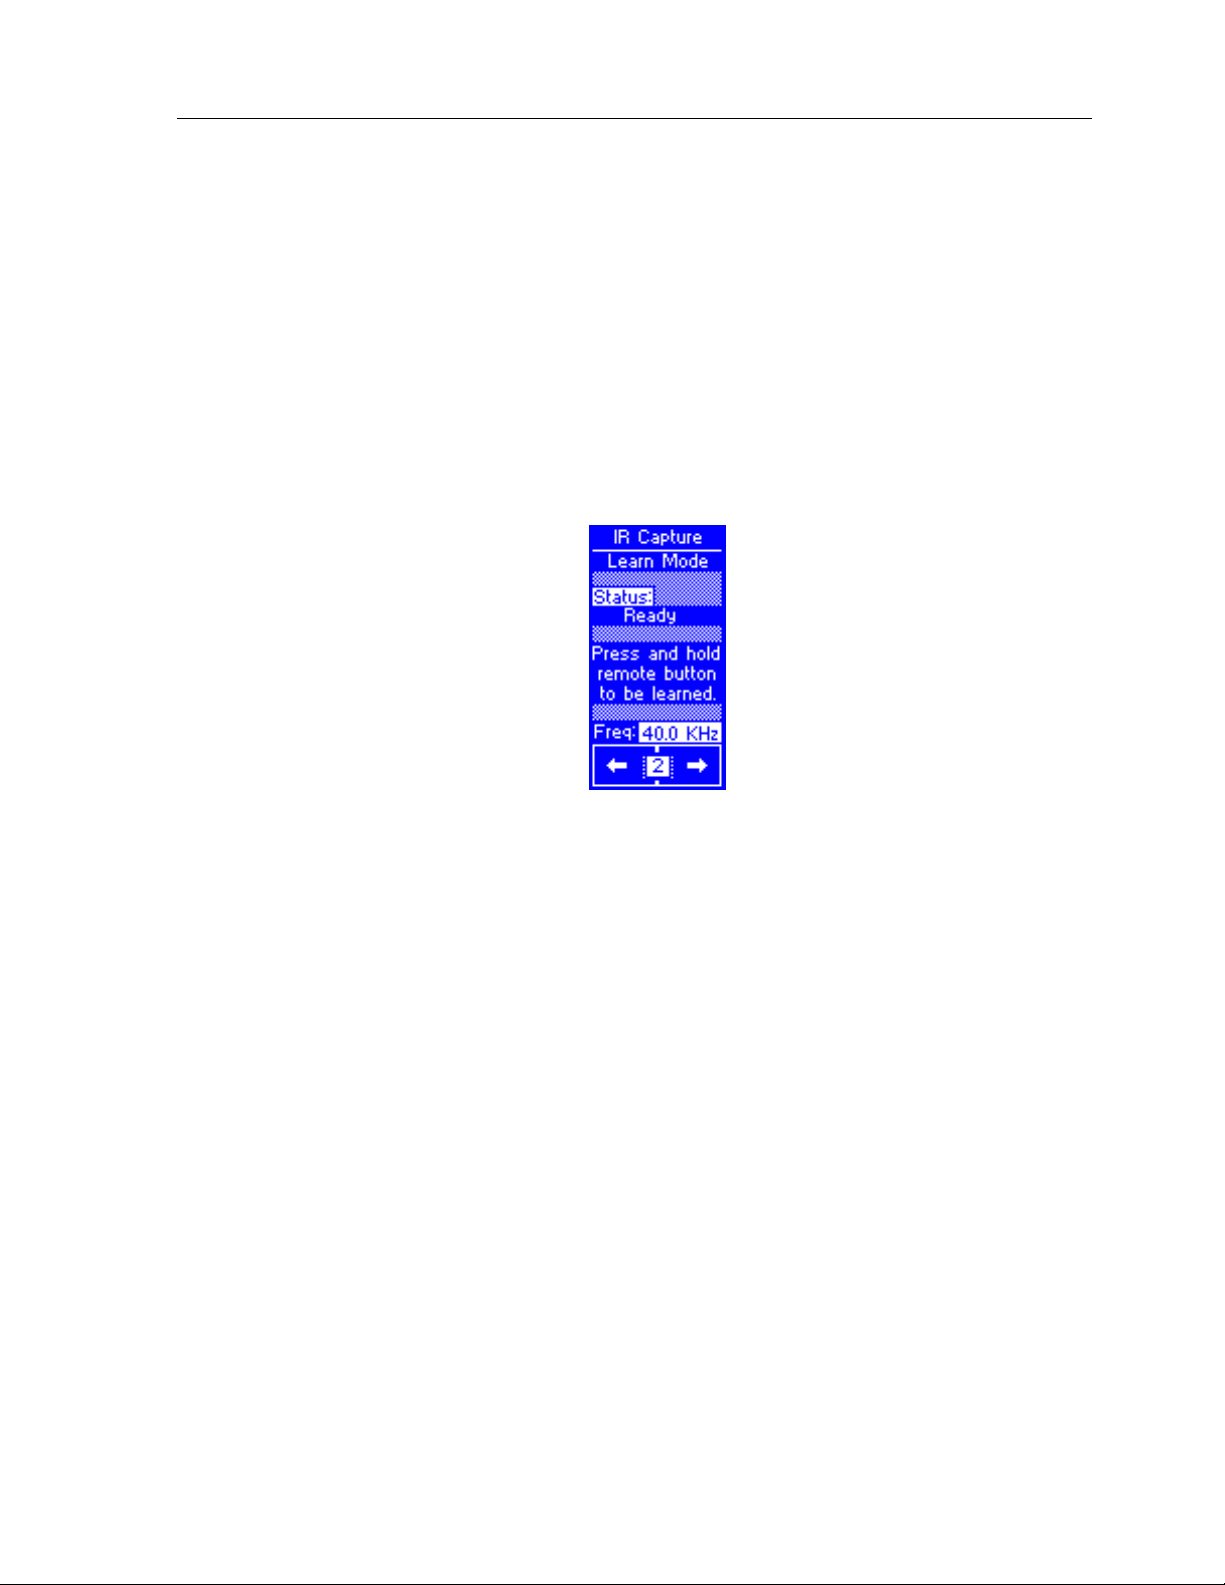
HOW TO CAPTURE INFRARED COMMANDS
Once a donor remote control is properly aligned, the TheaterTouch is ready to start
capturing the IR commands and transferring them to the Infrared Library Manager
Software.
Chapter 6 • IR Library Manager
1. Make sure the TheaterTouch is in the IR CAPTURE
frame 2 of the IR CAPTURE page and says STATUS:
The last frequency measured with the ALIGN function should be
displayed at the bottom of the screen. If it is not, you must go through the
Align Procedure again.
2. The communications cable should be connected to the TheaterTouch and
the PC. The TheaterTouch Designer software needs to be running with the
Infrared Library Manager
window open.
LEARN MODE
READY
.
on
The dialog box should say
infrared library you are working in after it.
3. Click on the
aligned, you are ready to start capturing codes.
Learn IR
Edit View
command button and if you are still properly
on the title bar with the name of the
75
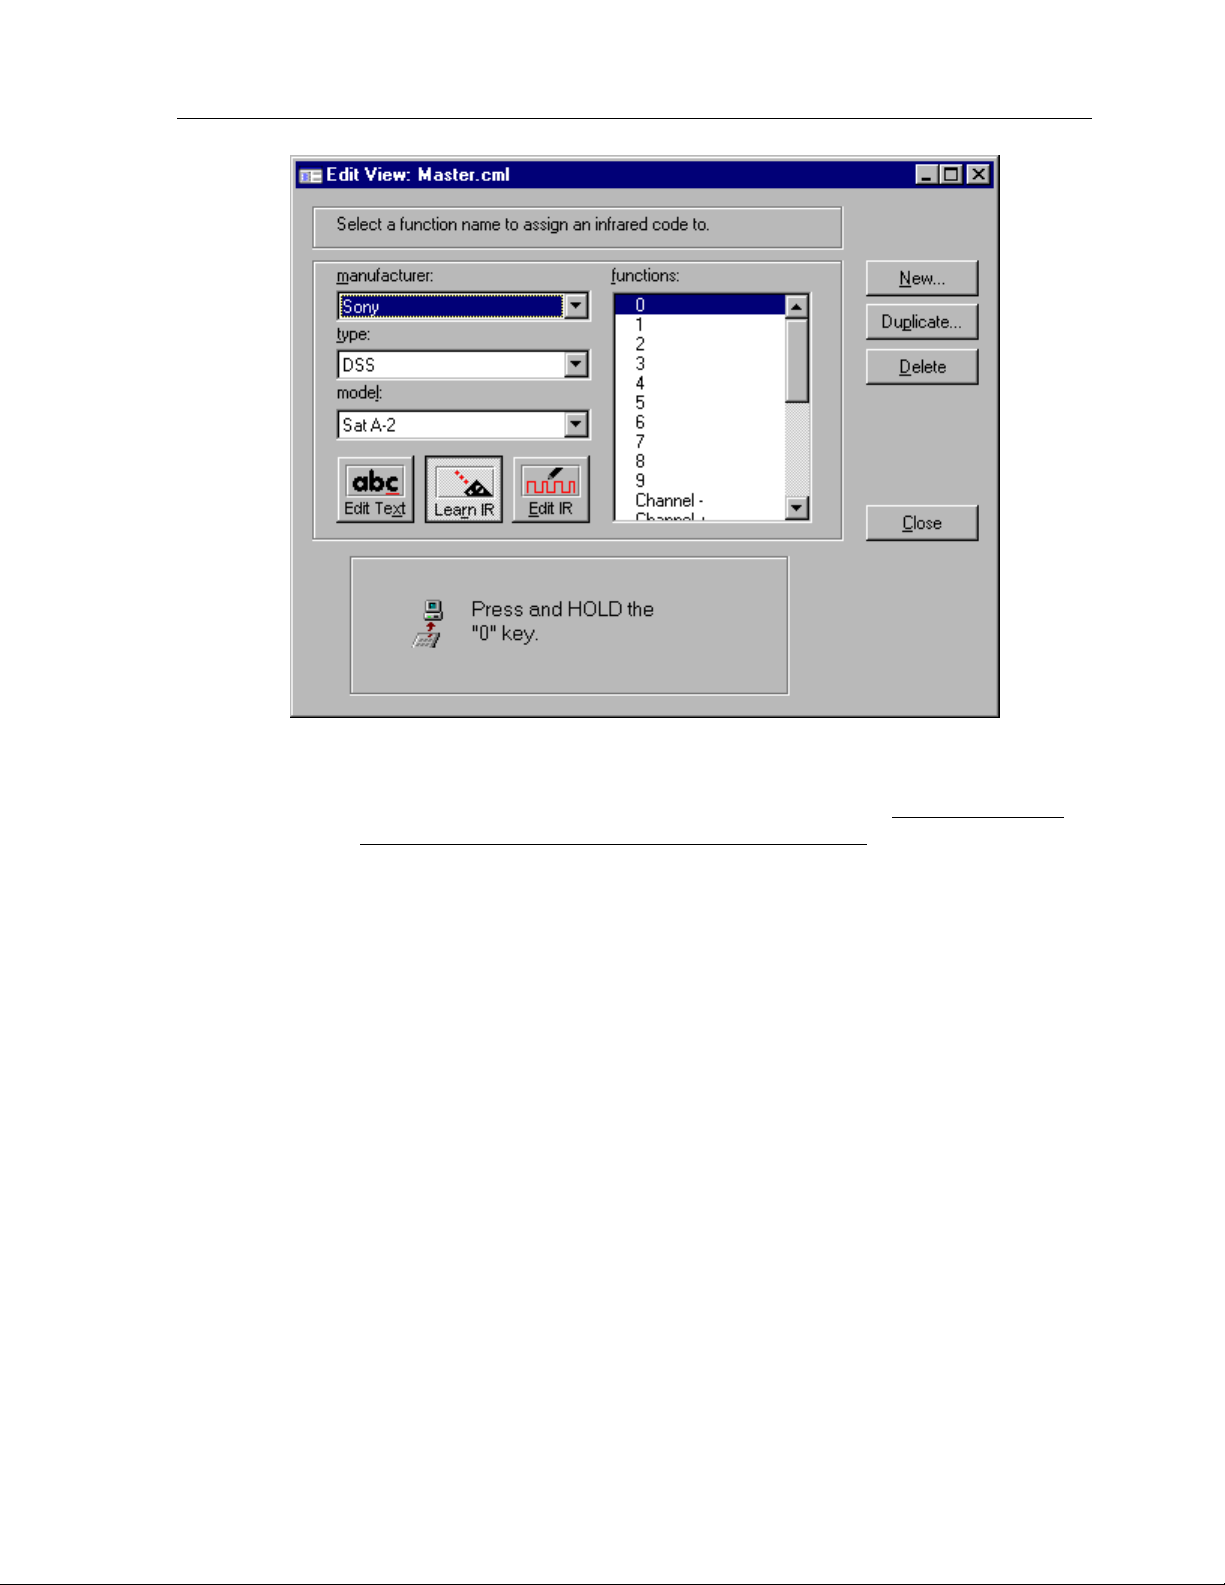
TheaterTouch System Controller
4.
Now press and hold the key on the donor remote control that transmits
the command that you want the TheaterTouch to learn.
the key down until the
After the command has been processed, the TheaterTouch will display
Captured
donor remote control and try again.
If the IR command was captured properly, it will be stored in a temporary
memory buffer, and transferred to the Infrared Library Manager software
automatically. A red dot will be placed in front of the function text to let
you know that the function has been learned.
The command will remain in memory (for testing) until it is overwritten
by the next captured command. The software will prompt you for each
function command to be learned.
5. To close the
6. To close the
on the keypad. The remote will stay in the
manually press the
Sending
then
IR Capture
IR Capture
TheaterTouch
. If an error message is displayed, realign the
window in the software click on the
page on the remote, press the
Main Menu
button.
displays OK.
IR Capture
Continue to hold
Close
Main Menu
mode until you
button.
button
76

HOW TO TEST INFRARED COMMANDS
After the TheaterTouch has learned a command, you can test it to make sure it behaves
properly.
Chapter 6 • IR Library Manager
SELECT
button while in the IR Capture Test Mode on frame 3 of
SELECT
button.
SELECT
Button
1. Press the
IR Capture page, this will test the last captured IR command.
The command will remain in memory (for testing) until it is overwritten
by the next captured command.
2. Make sure you point the TheaterTouch at the equipment to be controlled
when you press the
If the command does not work properly, it may need to be edited or relearned.
3. To close the IR Capture window on the remote press the
button.
Main Menu
77
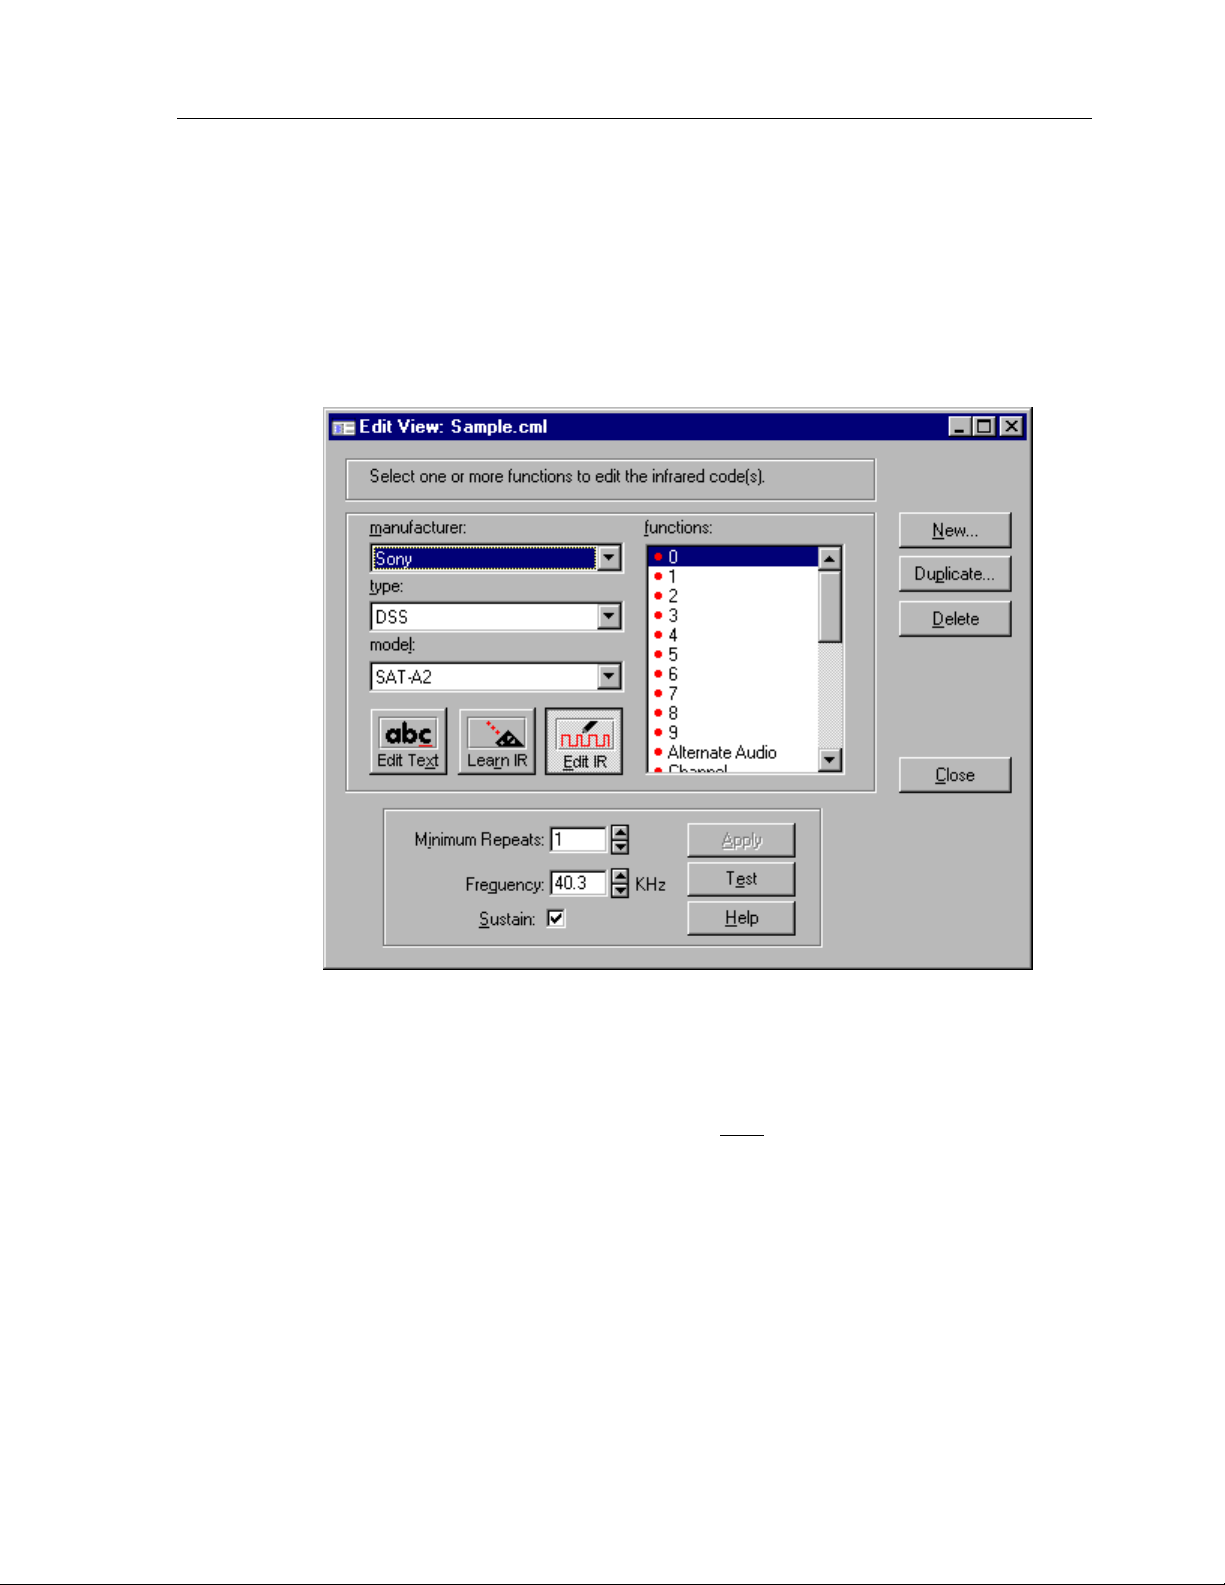
TheaterTouch System Controller
HOW TO EDIT INFRARED COMMANDS
Most infrared commands will transmit continuously as long as the remote control
key is held down. This means that either the entire command or some part of it is
being repeated over and over.
The Infrared Library Manager software allows you to adjust the number of command
repeat times and to enable or disable continuous transmission.
Min. Repeats -
code is sent by the remote. Some infrared receivers need a command to be repeated a
certain number of times to work properly, and some may not work properly if the
command is repeated at all. Change this setting only
command.
Frequency -
automatically. You should not need to change this value unless directed to do so by
Technical Support.
78
Enter in this box the number of times that the repeating part of the IR
if you are having trouble with a
This box shows the carrier frequency of the IR code. This is set

Chapter 6 • IR Library Manager
Sustain -
button is held down. Most infrared codes will transmit continuously as long as the
button is held down, but some infrared receivers may not work properly if the
command is repeated at all. If the Sustain button is checked, the code will be
transmitted for as long as the button is held down, or the
whichever is greater. If the Sustain button is not checked, the code will be
transmitted only the
button is held down.
Apply –
Test –
the TheaterTouch hooked up to the computer with the serial cable and have the
remote in
Check this box to control whether or not the IR code should repeat if the
Minimum Repeat
Minimum Repeat
Use this to save any changes you have made.
Use this to test any changes you have made to a command. Make sure to have
Test IR
Mode on frame 3 of the
number of time regardless of how long the
IR Capture
page in the Control Panel.
times,
79

TheaterTouch System Controller
80

Chapter 7 • Image Editors
Chapter 7. Image Editors
The TheaterTouch Designer software comes with two additional programs for creating
custom graphics. These programs are very similar in appearance and functionality
and both programs can be accessed from the
Designer program.
Button Bitmap Editor
The
as channel and transport icons.
Custom Button Editor
The
as company logos or complex groups of controls.
THE DIFFERENCE BETWEEN CUSTOM BUTTONS AND BITMAPS
Custom Buttons have several fundamental differences from Bitmaps:
1. Custom Buttons must specify an image of the entire button. Bitmaps are
smaller, and therefore can be placed on buttons with the standard border
styles.
is for creating and editing button bitmaps for such things
is for creating and editing custom buttons for such things
Library
menu within the TheaterTouch
2. Custom Buttons can contain more than one active button area, so a whole
group of related controls can be created as a single Custom Button.
Bitmaps are indivisible, and must be placed separately onto individual
buttons.
3. Custom Buttons must provide an image for both the Up (normal) and
Down (pressed) states of the button. Bitmaps provide only the Up image.
The Down image of a Bitmap is created by simply inverting it.
4. Custom Buttons can be any size, up to the entire display size. Bitmaps are
limited to a handful of pre-defined sizes.
Given these characteristics, Custom Buttons are most appropriate for complex or
large groups of controls, such as a customized set of transport controls for a VCR, or a
large company logo.
Bitmaps are most appropriate for small pictures that don’t need a full button to
display, such as TV channel icons or small logos. Since Bitmaps don’t have a Down
image, they take half as much memory to store in the TheaterTouch, so more Bitmaps
can be created.
Both Custom Buttons and Bitmaps are stored within Libraries, not as individual files.
Before you can design your own Custom Buttons or Bitmaps, you must create a new
library file using the
can have many Custom Buttons or Bitmaps within it.
Custom Button Editor
Button Bitmap Editor
or
. The library file
81

TheaterTouch System Controller
BUTTON BITMAP EDITOR SCREEN
To open the
menu in the TheaterTouch Designer program.
Button Bitmap Editor
, select
Button Bitmap Editor
from the
Library
82

CUSTOM BUTTON EDITOR SCREEN
Chapter 7 • Image Editors
To open the
menu in the TheaterTouch Designer program.
Custom Button Editor
, select
Custom Button Editor
from the
Library
83
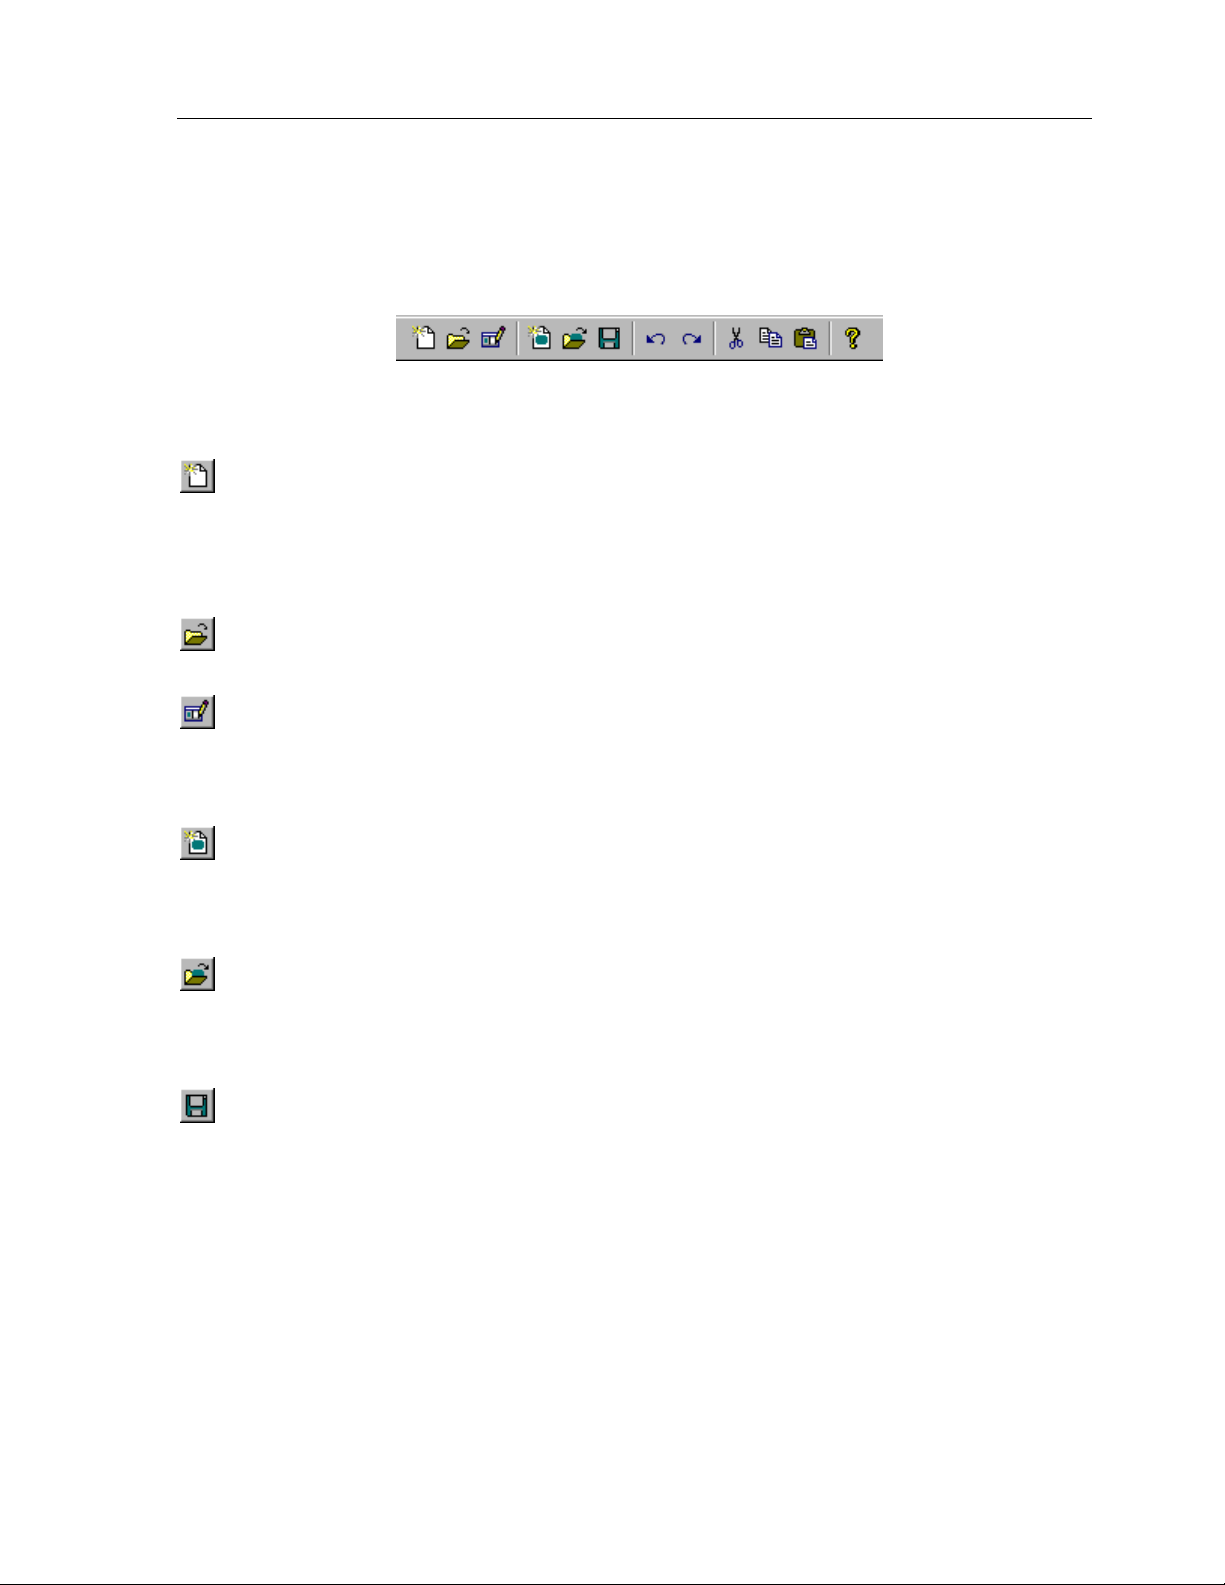
TheaterTouch System Controller
TOOLBAR
The toolbar provides instant access to commonly used Button Bitmap Editor and
Custom Button Editor functions.
Create New Library Command
custom buttons or bitmaps. The built in libraries that come with the software are
read-only and new images cannot be saved to them. This command should only be
used when a new library is desired. If you want to create a new image, use the
New Image Command
Open Library Command
currently open library, if any, will be closed.
.
– Use this command to open existing libraries. The
– Use this command to create a library to hold your
Create
Edit Library Command
bitmap in a library that you created. The built in libraries that come with the software
are read-only and images cannot be edited. This command is not available unless a
Bitmap Library is open.
Create New Image Command
currently open library in the
displayed, where you can select the size for the new Bitmap. The built in libraries that
come with the software are read-only and new images cannot be saved to them.
Open Image Command
currently open library for editing. When you choose the
Open Image
command is not available unless a Bitmap Library is open.
Save Image Command
currently open library. If the image has already been saved, this command updates
the existing version. If the image has never been saved before, this command is the
same as the Image
you to enter a name. This command is not available unless a library is open and an
image is being edited.
dialog box is displayed to allow you to select which image to edit. This
– Use this command to rename or delete a custom button or
– Use this command to create a new image in the
Bitmap Editor,
– Use this command to open an existing image in the
– Use this command to save the current image to the
Save Image As
command, and displays the
New Bitmap Size
the
dialog will be
Open Image
Edit Title
command, the
dialog for
84

Chapter 7 • Image Editors
Undo Command
image. Choose the
maximum of 64 changes are reversible with the
command can only reverse editing changes to the current image. It cannot undo
changes to a library, and the
or the view is toggled between the Up and Down images in the Custom Button Editor.
– Use this command to reverse the last change you made to the
Undo
command again to reverse the previous change. A
Undo
command. The
Undo
information is destroyed when the image is closed
Undo
Redo Command
Choose the
changes can be canceled with the
cancel Undo commands to the current image. The Redo information is destroyed
when the image is closed, when the view is toggled between the Up and Down
images, or when other editing changes are made to the image.
Cut Command
this replaces the selection with solid white. You can use this to move images between
the Button Bitmap Editor and the Custom Button Editor.
Copy Command
command does not alter the current image. You can use this to move images between
the Button Bitmap Editor and the Custom Button Editor.
Paste Command
the clipboard back onto the touchscreen grid and switches the Button Bitmap Editor
or Custom Button Editor into
the desired position on the page. You can use this to move images between the
Button Bitmap Editor and the Custom Button Editor. This command is not available
if the data on the Clipboard is not in bitmap format.
– Use this command to cancel the effect of the last
Redo
command again to cancel the next Undo. A maximum of 64
Redo
command. The
– Use this command to move the selected sections to the Clipboard,
– Use this command to copy selected sections to the Clipboard. This
– Use this command to place previously cut or copied sections from
Selection
mode. You can drag the pasted sections to
Redo
command can only
Undo
command.
Help Topics
– Use this command to open the
Help Topics
dialog box for more help.
85
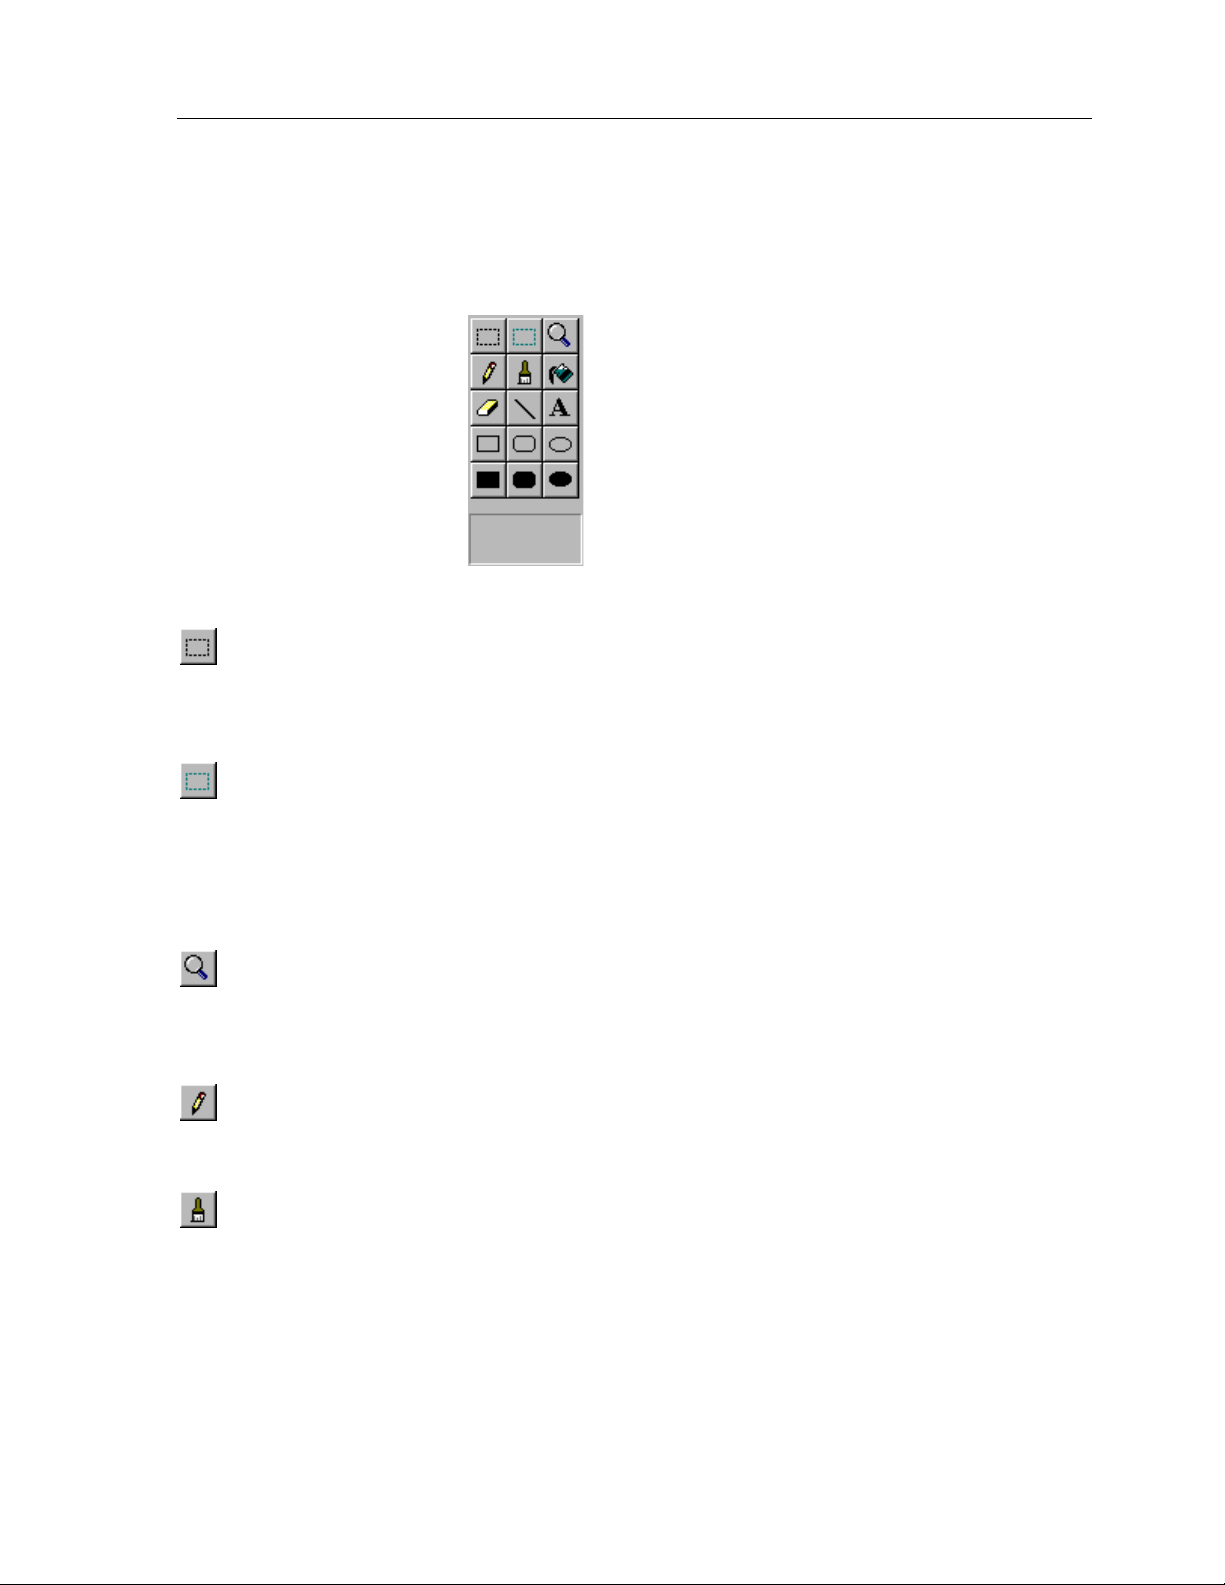
TheaterTouch System Controller
TOOL PALETTE
The Tool Palette provides access to all the drawing tools used by the Button Bitmap
Editor and Custom Button Editor.
Selection Tool
on the image. To define a selection, click the left mouse button in the Drawing Area
where one corner of the selection rectangle should be placed, drag the mouse to the
opposite corner, and release the mouse button.
Button Selection Tool
defines the active button areas on a Custom Button image. To define a button
selection, click the left mouse button in the Drawing Area where one corner of the
selection rectangle should be placed, drag the mouse to the opposite corner, and
release the mouse button. To remove an existing button selection, place the mouse
cursor inside of the selection you wish to remove and click the right mouse button.
Zoom Tool
mouse button over a spot in the Drawing Area to “Zoom In” (make the image larger)
or click the right mouse button over a point to “Zoom Out” (make the image smaller).
Zoom
The
Pencil Tool
the left mouse button in the Drawing Area to turn the pixel under the Pencil point
black, and click the right mouse button to turn the pixel white.
- The
commands on the
- The
Selection Tool
- The
(Custom Button Editor only) - The
Zoom
Pencil
Tool is used to magnify portions of the image. Click the left
Tool is used to color individual pixels on the image. Click
is used to define a rectangular selection region
Button Selection
View
menu can also be used to change the Zoom level.
Tool
86
Brush Tool
the image. The Brush Size, the size of the shape that the Brush draws, can be
changed by clicking on a different sized brush in the rectangular area below the
drawing tools, or by choosing a size from the Brush Size menu under the View menu.
Click the left mouse button in the Drawing Area to turn the pixels under the Brush
black, and click the right mouse button to turn the pixels white.
- The
Brush
Tool acts like the Pencil Tool, but colors a larger portion of
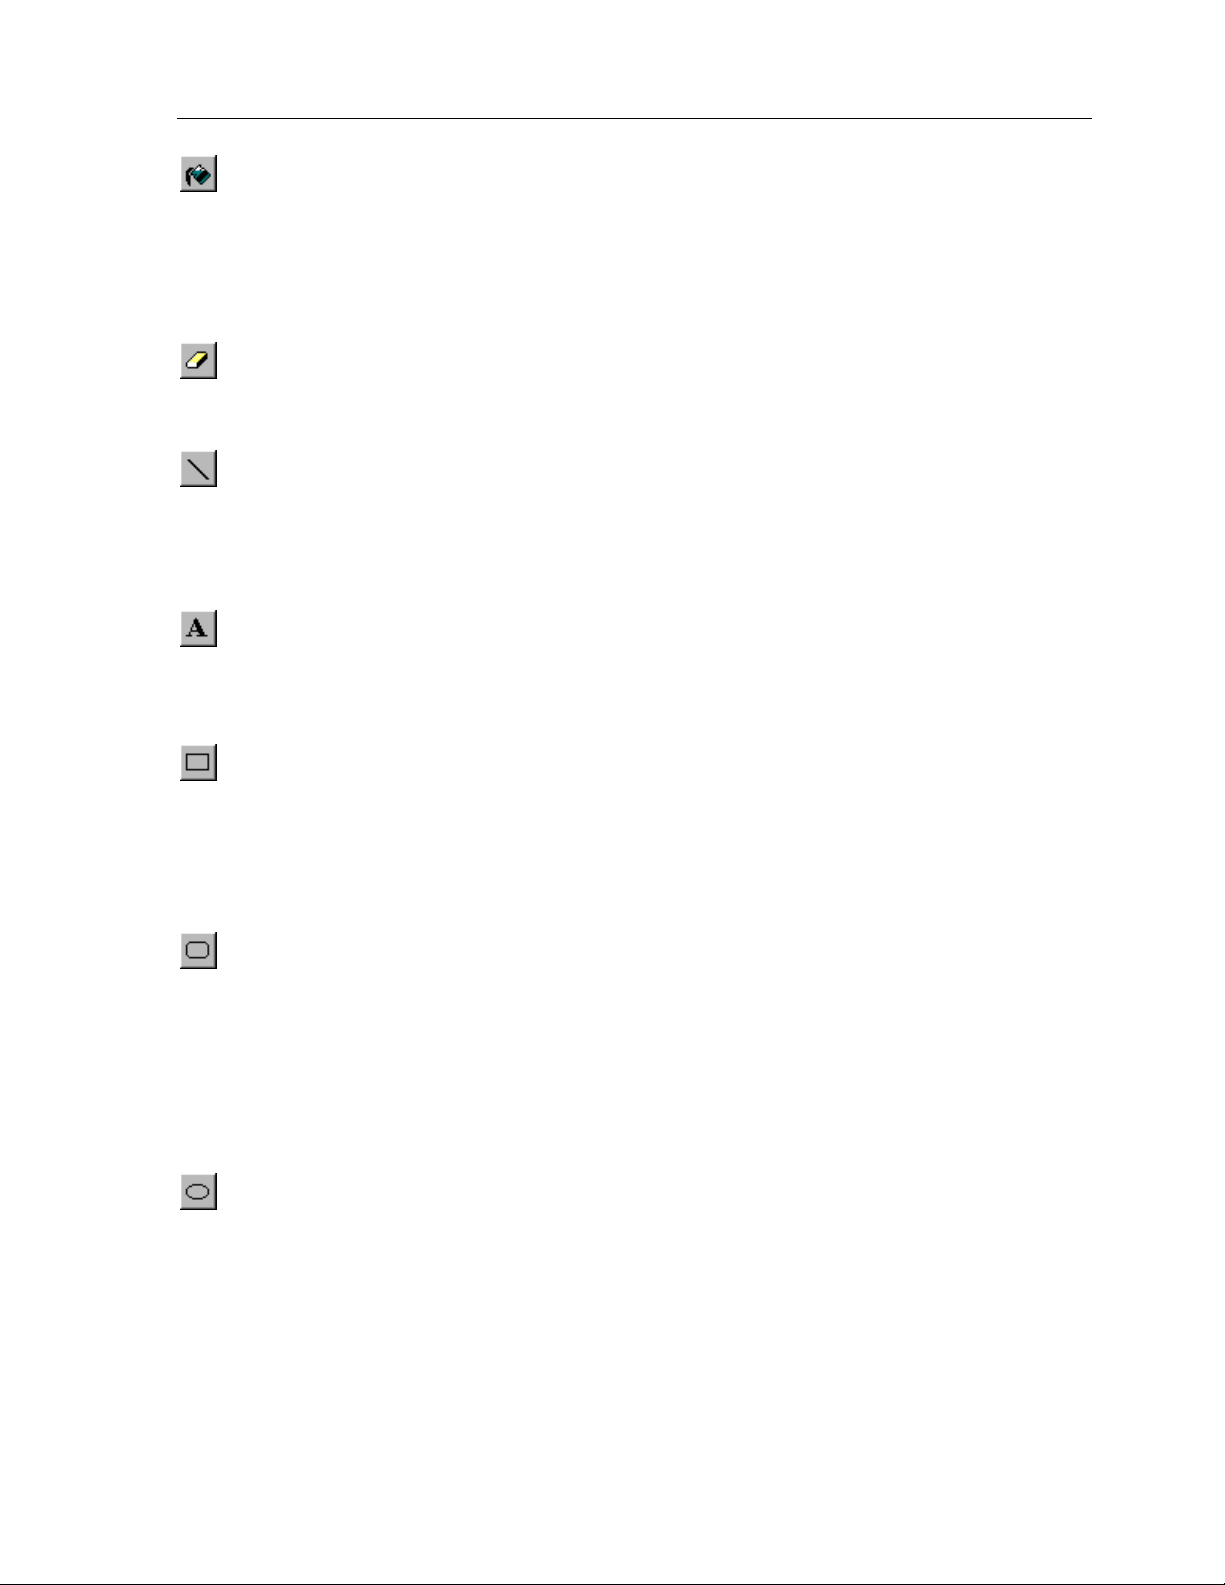
Chapter 7 • Image Editors
Fill Tool
Patterns are available in the rectangular area below the drawing tools. To use the Fill
Tool, choose the desired Fill Pattern, and then click the left mouse button inside of
the area to fill. The Fill Tool will color the image with the Fill Pattern in all directions
until it encounters a black line or the edge of the image. If the fill is to be contained to
the inside of a shape, be sure that there are no gaps in the shape’s border.
Eraser Tool
left mouse button draws in white, and clicking the right mouse button draws in
black.
Line Tool
black line, click and hold the left mouse button in the Drawing Area where one end
of the line should go, move the mouse to the other end of the line, and release the
mouse button. To draw a white line, follow the same steps but click the right mouse
button instead of the left.
Text Tool
left mouse button in the Drawing Area, and the
the desired text in the dialog and click OK. The text will appear in a blue selection
rectangle, where it can be placed precisely on the image.
- The
- The
- The
- The
Fill
Tool is used to color large portions of the image. Several Fill
Eraser
Line
Text
Tool is identical to the Brush Tool except that clicking the
Tool is used to draw straight lines on the image. To draw a
Tool is used to place text on the image. To place text, click the
Place Text
dialog will appear. Enter
Rectangle Tool
the left mouse button in the Drawing Area where one corner of the rectangle should
be placed, drag the mouse to the opposite corner, and release the mouse button. To
draw a white rectangle, follow the same steps but click the right mouse button
instead of the left. The portions of the image in the center of the rectangle are not
affected by this tool.
Rounded Rectangle Tool
with rounded corners on the image. The radius of the corners is the same as that of
“Radius” buttons on the TheaterTouch. Click the left mouse button in the Drawing
Area where one corner of the rounded rectangle should be placed, drag the mouse to
the opposite corner, and release the mouse button. To draw a white rounded
rectangle, follow the same steps but click the right mouse button instead of the left.
The portions of the image in the center of the rounded rectangle are not affected by
this tool.
Circle Tool
the left mouse button in the Drawing Area where one corner of the imaginary
rectangle that bounds the circle should be placed, drag the mouse to the opposite
corner, and release the mouse button. To draw a white circle, follow the same steps
but click the right mouse button instead of the left. The portions of the image in the
center of the circle are not affected by this tool.
- The
Rectangle
- The
Circle Tool
Tool is used to draw rectangles on the image. Click
- The
Rounded Rectangle
is used to draw circles and ovals on the image. Click
Tool is used to draw rectangles
87
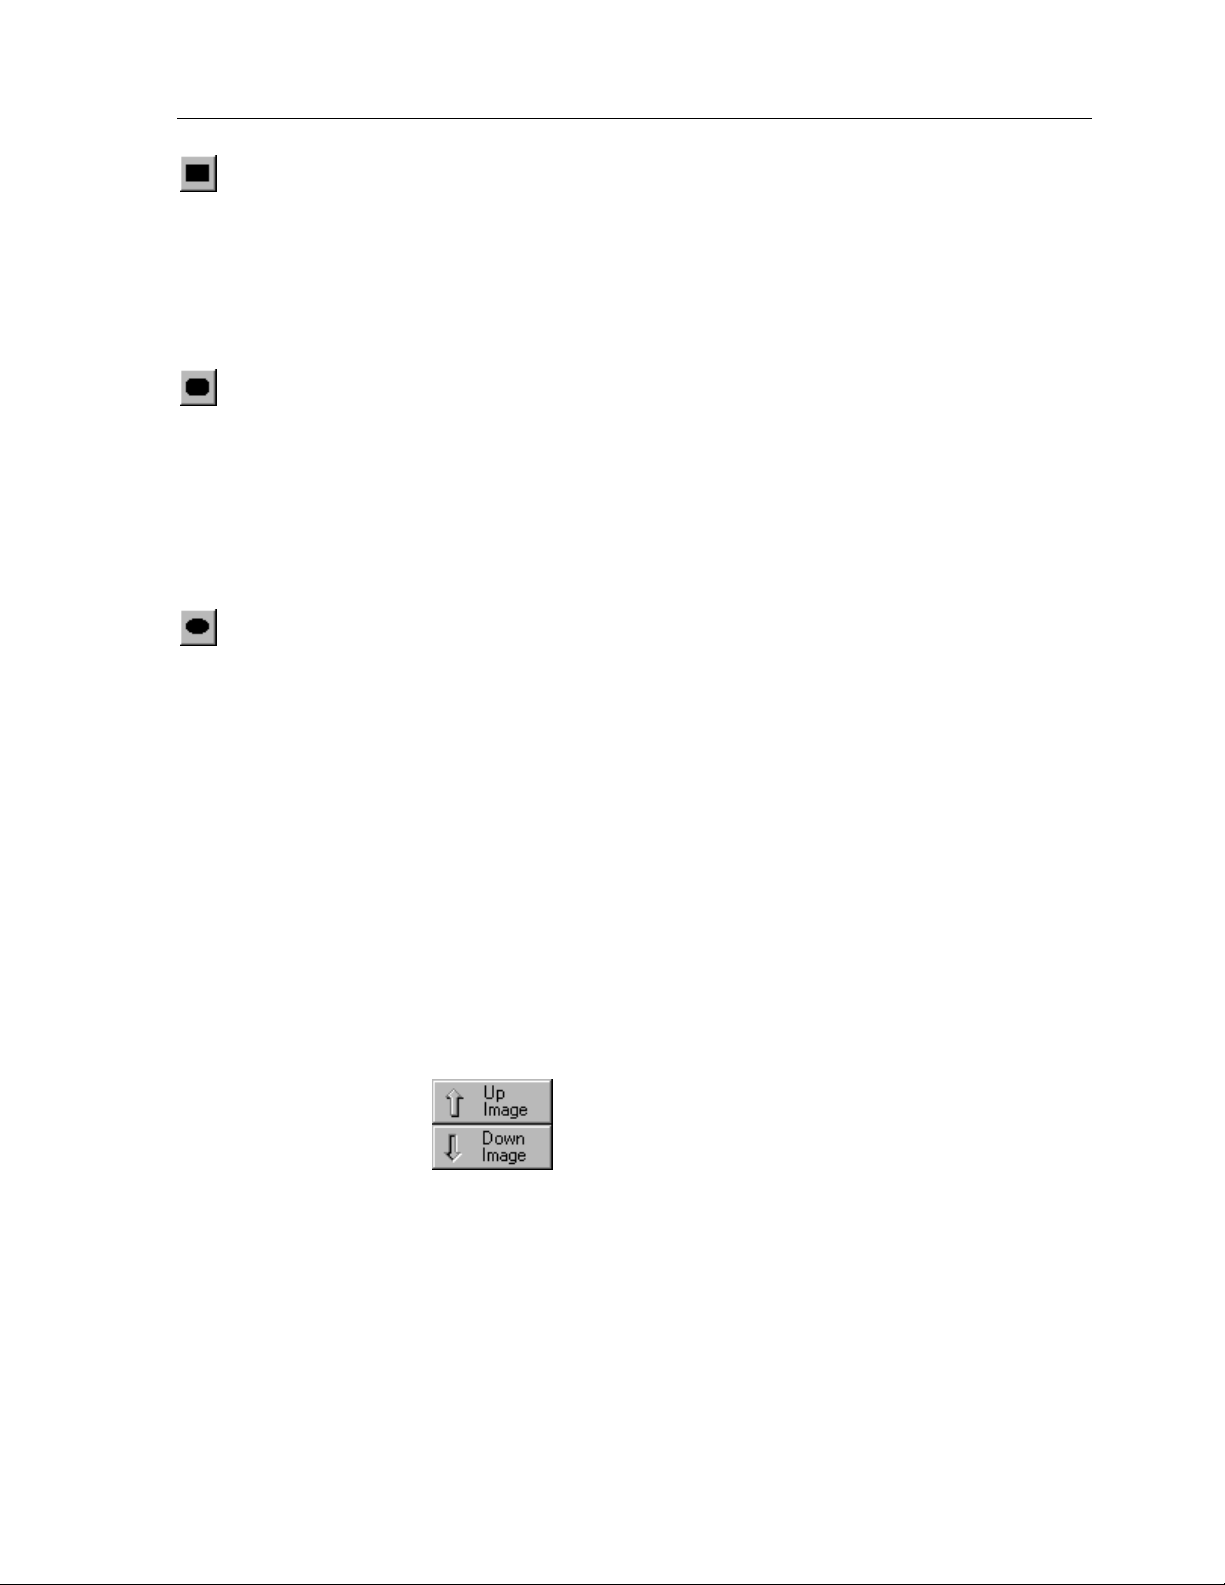
TheaterTouch System Controller
Filled Rectangle Tool
with a Fill Pattern on the image. Several Fill Patterns are available in the rectangular
area below the drawing tools. To use the
Fill Pattern, click the left mouse button in the Drawing Area where one corner of the
rectangle should be placed, drag the mouse to the opposite corner, and release the
mouse button. To draw a solid white rectangle, follow the same steps but click the
right mouse button instead of the left.
Filled Rounded Rectangle Tool
draw rectangles with rounded corners filled with a Fill Pattern on the image. Several
Fill Patterns are available in the rectangular area below the drawing tools. To use the
Filled Rounded Rectangle
button in the Drawing Area where one corner of the rectangle should be placed, drag
the mouse to the opposite corner, and release the mouse button. To draw a solid
white rounded rectangle, follow the same steps but click the right mouse button
instead of the left.
Filled Circle Tool
with a Fill Pattern on the image. Several Fill Patterns are available in the rectangular
area below the drawing tools. To use the
Pattern, click the left mouse button in the Drawing Area where one corner of the
imaginary rectangle bounding the circle should be placed, drag the mouse to the
opposite corner, and release the mouse button. To draw a solid white circle, follow
the same steps but click the right mouse button instead of the left.
- The
- The
Filled Rectangle
- The
Tool, choose the desired Fill Pattern, click the left mouse
Filled Circle
Filled Rounded Rectangle
Tool is used to draw circles and ovals filled
Tool is used to draw rectangles filled
Filled Rectangle
Filled Circle
Tool, choose the desired
Tool is used to
Tool, choose the desired Fill
UP IMAGE-DOWN IMAGE TOOL (Custom Button Editor Only):
Click on the
on the
All Custom Buttons have two totally separate images, an Up image, which represents
the button in its normal state; and a Down image, which represents the button in its
pressed state. The Up image is the picture that is normally displayed by the
TheaterTouch, unless the button has its
Down image is normally displayed.
Up Image
Down Image
button to display the Up Image in the Drawing Area, or click
button to display the Down Image.
Reversed
property set, in which case the
88
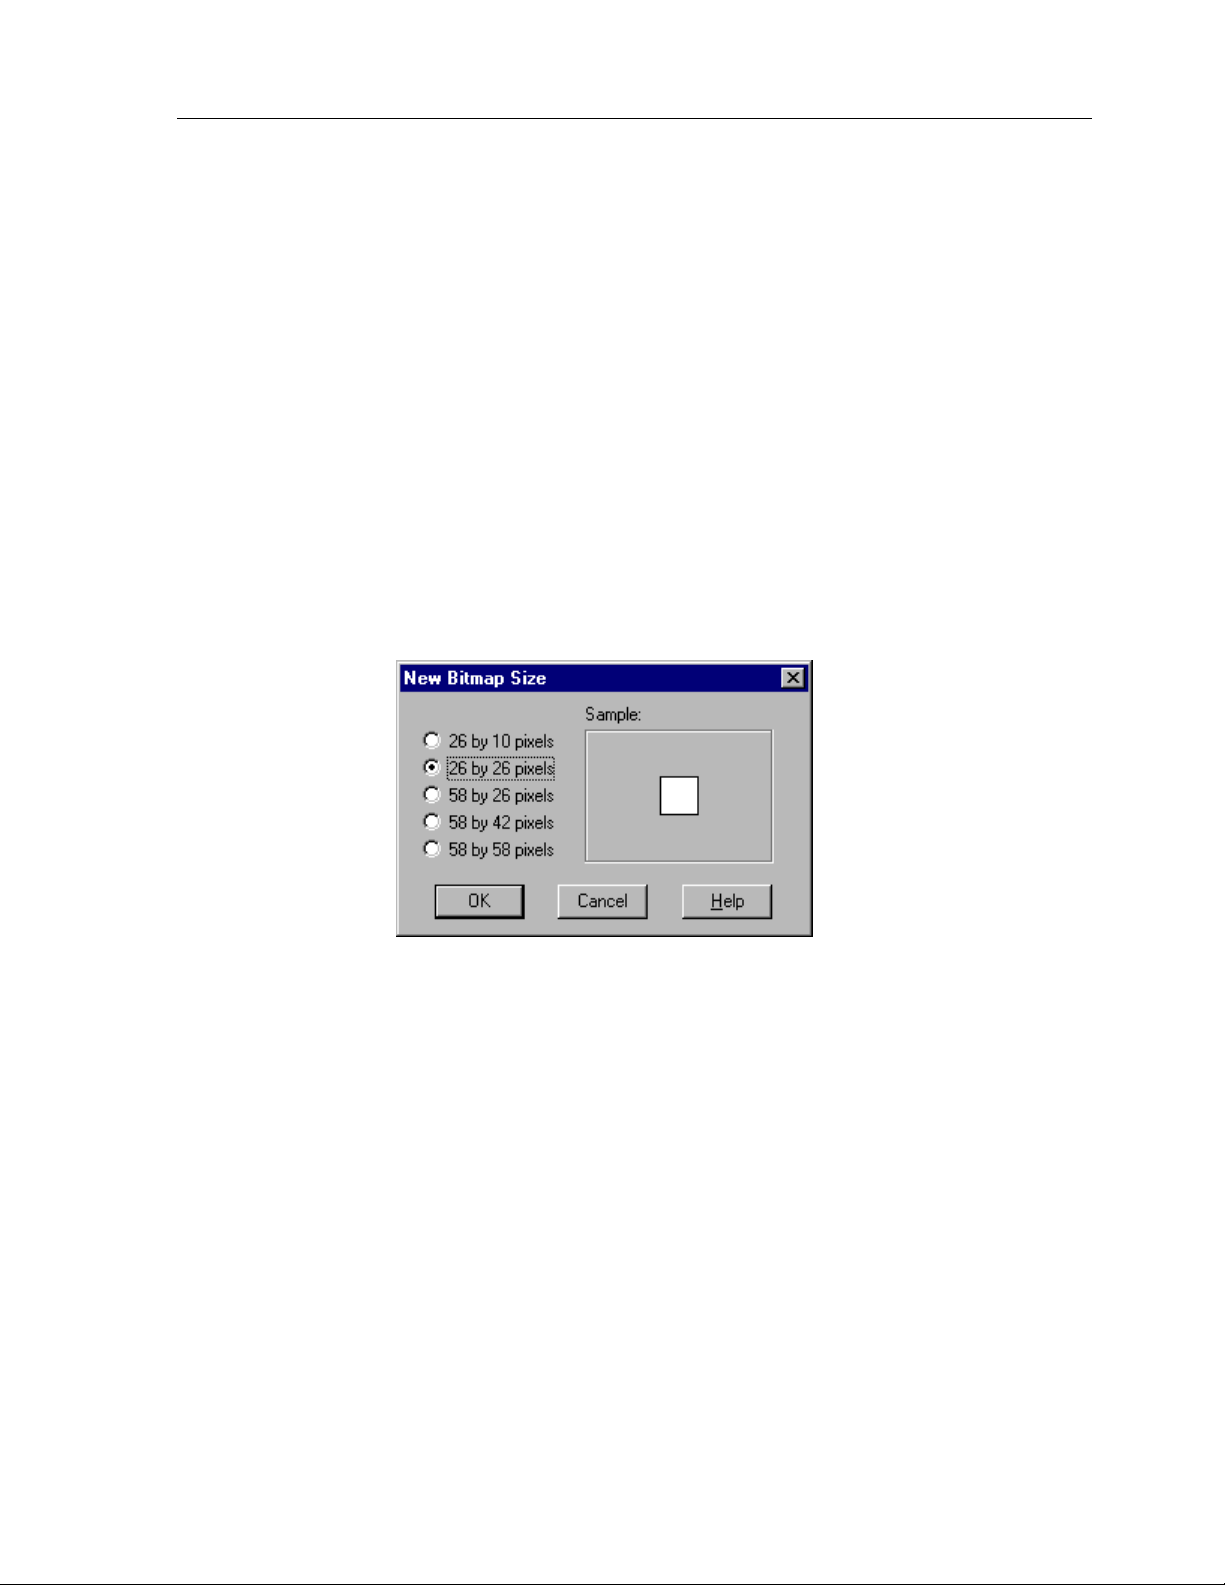
In most cases, you will find it easiest to create the Up image first. As a starting point
for creating the Down image, you may want to select the whole Up image, copy it to
Clipboard
the
At this point, you can use the editor to modify the image you pasted to make it the
Down image. If a simple reversal is all you need, the
Edit
the
NEW BITMAP SIZE DIALOG BOX (Button Bitmap Editor Only):
menu will do the trick.
, switch to the Down image, and paste the image from the
Invert Selection
Chapter 7 • Image Editors
Clipboard
command on
.
New Bitmap Size
The
command. You can choose from the five sizes listed in the dialog box, a sample of the
size will be displayed in the
26 by 10 pixels =
26 by 26 pixels =
dialog box opens when you select the
Sample
1 section wide by 1 section high, which is the smallest button
bitmap size.
1 section wide by 2 sections high, which is the standard channel
icon size.
section.
Create New Image
58 by 26 pixels =
58 by 42 pixels =
58 by 58 pixels =
2 sections wide by 2 sections high, which is one-third of the
touchscreen
2 sections wide by 3 sections high, which is half of the touchscreen.
2 sections wide by 4 sections high, which is two-thirds of the
touchscreen.
89

TheaterTouch System Controller
90
 Loading...