

Page 1
Unpacking - RHS780
Thank you for opening the envelope and reading this documentation. Your new
RHS780 was carefully assembled and will begin generating profits for you in just a
few minutes.
1. Please follow these simple instructions to ensure your new machine survived
any rough handling it may have experienced during transport.
2. Immediately report any visible damage to the unit. Save the shipping carton for
inspection by a claims adjuster. Call RTI Technologies at 800-468-2321 (ext
259) for instructions.
3. Cut and remove all hold-down straps including the one underneath the front of
the unit.
4. Remove protective plastic cover.
5. Carefully tip unit and remove cardboard blocks from
Knob
underneath.
6. GENTLY ease the unit off the pallet.
7. Unscrew knob from top and store on rear of unit. This
knob restrains the internal cylinder during shipping and
should be used during any future shipping. A hole plug is
provided to insert in the hole on the top.
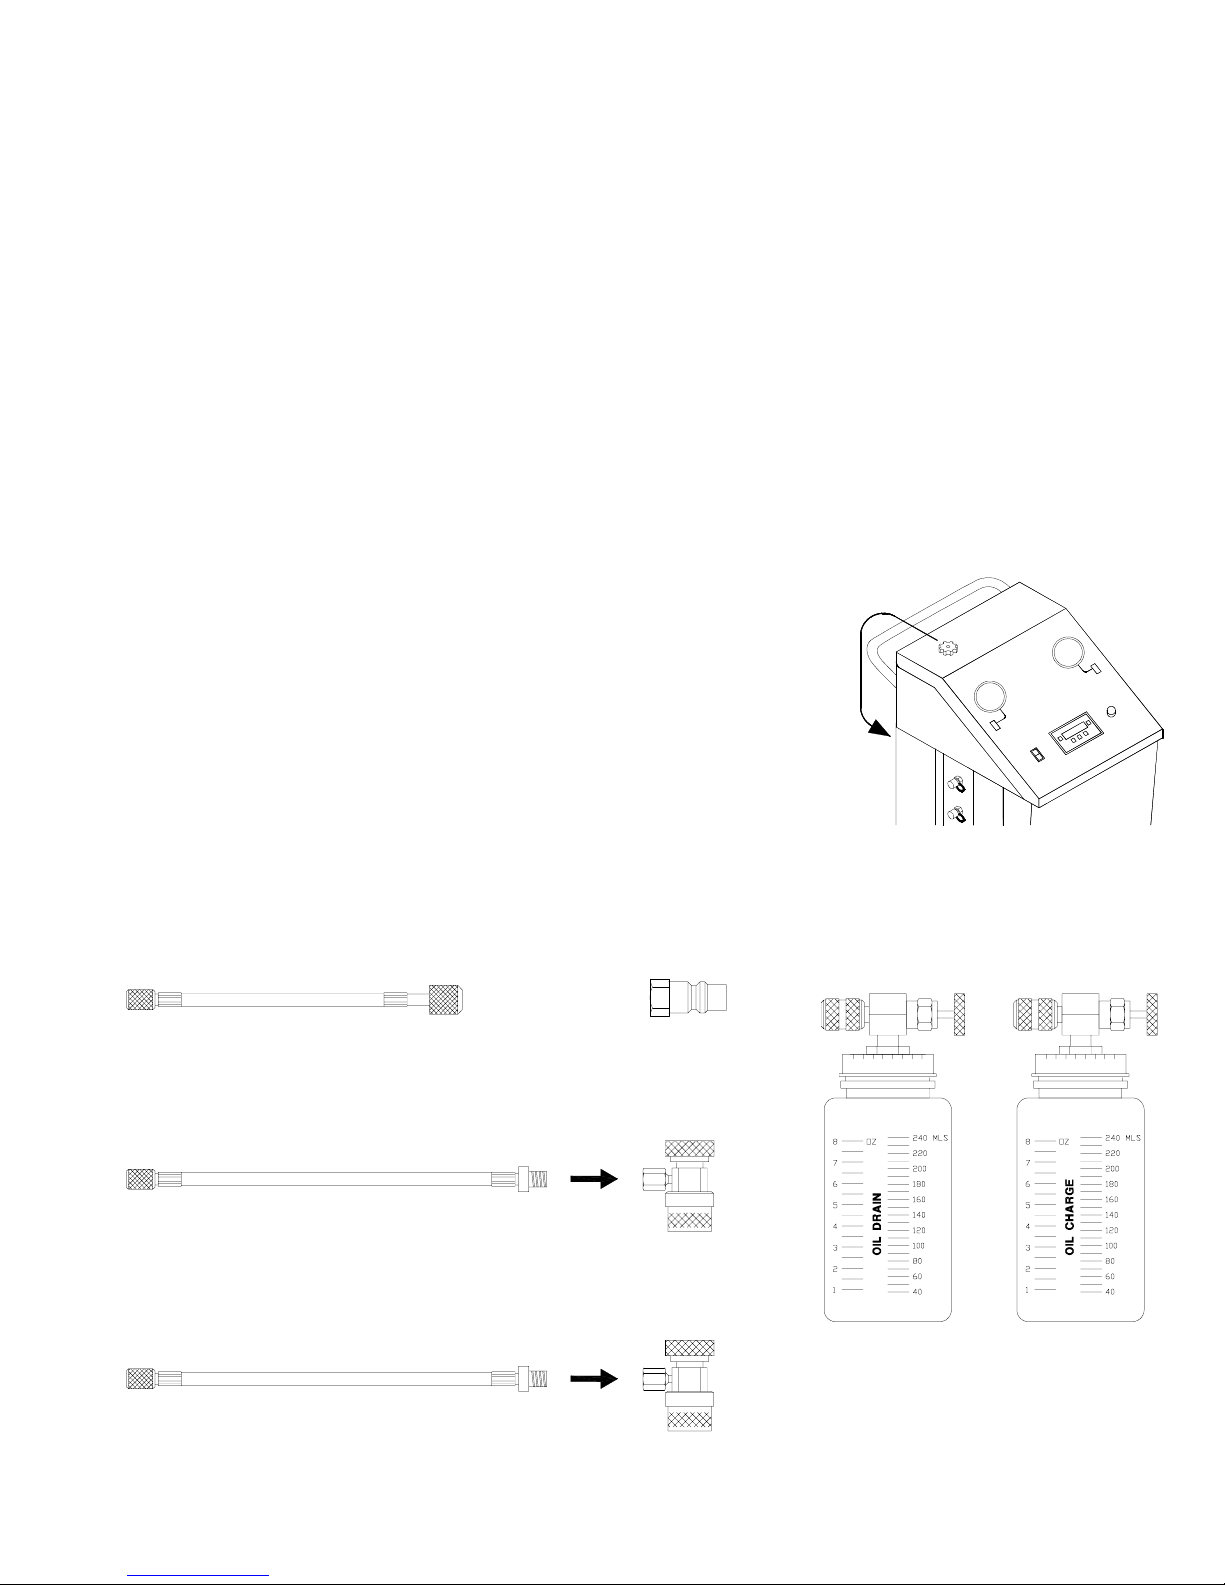
8. Refer to the illustration below and verify that all accessories were received.
Anti-blowback
Valve
Yellow Hose (30 inch)
360-80464-03
Red Hose (11 feet)
028-80035-02
FSC to ACME
Adapter
023-80147-00
Red - High Side
Field Service Coupler
023-80095-00
Blue Hose (11 feet)
028-80036-02
560-80201-00
Blue - Low Side
Field Service Coupler
023-80096-00
Oil Drain Bottle
026-80207-00
Oil Charge Bottle
026-80208-00
Page 1 of 5
Page 2
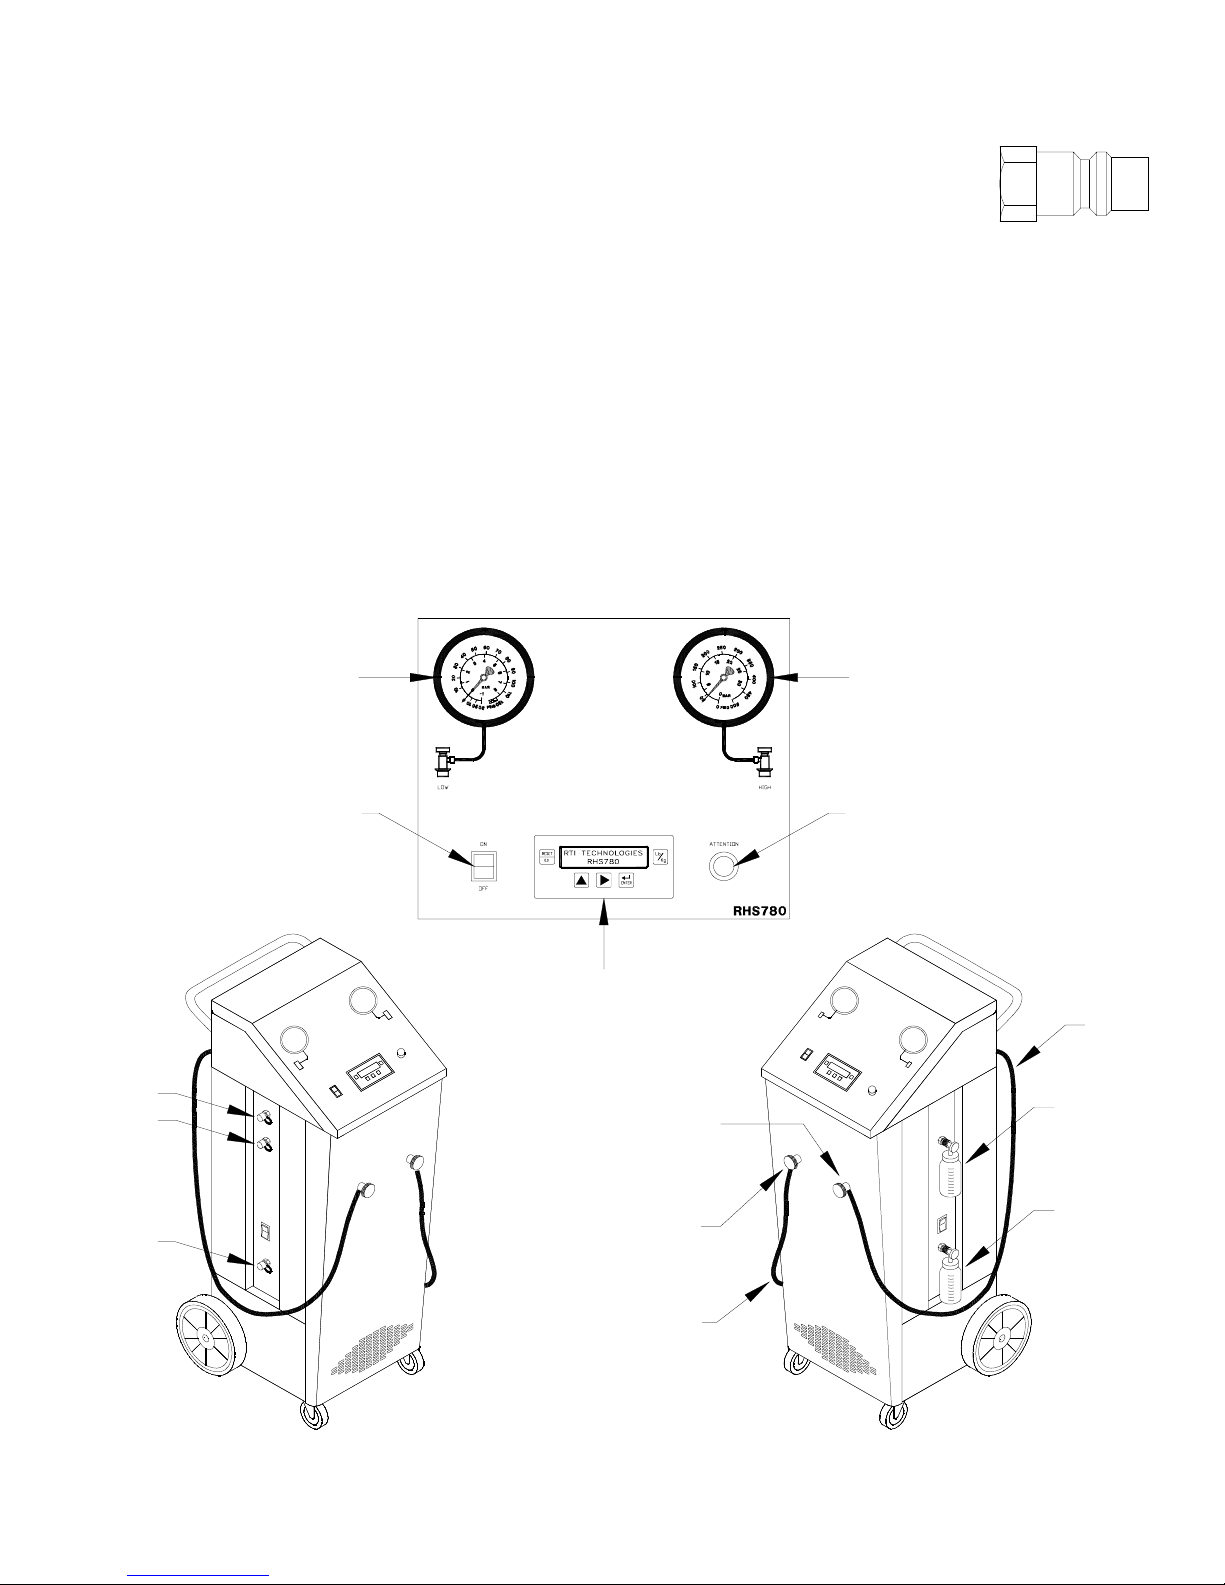
Setup - RHS780
Refer to the illustration and attach accessories as follows:
1. Store the FSC to ACME Adapter in a secure place. This adapter is used to connect the Blue Field
Service Coupler to a tank with a 0.500 ACME fitting.
2. Install Red Field Service Coupler on end of Red Hose.
3. Connect other end of Red Hose to left port (when facing back of unit) on rear of RHS780. The port has a red
band.
4. Install Blue Field Service Coupler on end of Blue Hose.
5. Connect other end of Blue Hose to right port (when facing back of unit) on rear of RHS780. The port has a blue
band.
6. The Field Service Couplers should be connected to the parking fittings on the front of the RHS780 when not in
use to protect the seals and prevent debris from entering.
7. Install Oil Charge Bottle on top port on the side of the RHS780. Close the valve by turning knob clockwise.
8. Install Oil Drain Bottle on lower port on side of the RHS780. Close the valve by turning knob clockwise.
9. Make sure caps are screwed onto three ports on left side of RHS780.
Cap
Cap
Cap
Low Pressure Gauge
Power Selector Switch
Keypad
Red Field Service Coupler
Stored on Parking Fitting
Blue Field Service Coupler
Stored on Parking Fitting
High Pressure Gauge
Attention Light
Red Hose
Oil Charge Bottle
Oil Drain Bottle
Blue Hose
Page 2 of 5
Page 3

Filling Internal Cylinder
The RHS780 has an internal cylinder with a maximum capacity of 17.5 lbs. Refrigerant is recovered from A/C systems,
filtered and stored in this cylinder. This refrigerant is then available for charging into A/C systems.
Typically, it is also necessary to add new refrigerant to the internal cylinder. The RHS780 will transfer refrigerant
directly into the internal cylinder from a tank of new refrigerant.
FIRST TIME SETUP
The RHS780 is shipped from the factory without refrigerant. The following steps must be followed to transfer new
refrigerant into the internal cylinder.
EXTREMELY IMPORTANT
ALWAYS connect the yellow hose to the tank of new refrigerant (Step 1) BEFORE
connecting the other end to the port on the RHS780 (Step 2).
1. Begin with preferably a full tank of new refrigerant. Connect the end (A) of the 30 inch yellow hose to the port on
the tank of new refrigerant. Turn tank of new refrigerant up-side-down.
2. Connect the anti-blowback valve end (B) of the 30 inch yellow hose to the fill port on the side of the RHS780.
3. Plug in power cord and press top of power selector switch. The display will show WEIGHT = XX.X LB -
AUTOMATIC?
4. Press [
_] key four times. The display will show WEIGHT = 00.0 LB - FILL CYLINDER?.
5. Press [ENTER] key. The display will show CHECK HOSES - START?.
6. Open valve on tank of new refrigerant.
7. Press [ENTER] key. Refrigerant will transfer from the tank of new refrigerant into the RHS780 internal cylinder.
The display will show the weight increasing in the internal cylinder and display WEIGHT = XX.X LB -
COMPRESSOR ON. The display may periodically show HIGH PRESSURE - SEE MANUAL. This is normal and
part of the fill cylinder procedure.
8. Two options are available to control the amount of refrigerant transferred into
the internal cylinder:
(A) Press [RESET] key when the desired amount is displayed.
(B) Let the process continue until the internal cylinder fills to about 13 lbs
and stops automatically. The Attention Light will illuminate.
The display will show FILL COMPLETE - FILLED = 13.0 LB.
Press [ENTER].
9. Close valve on tank of new refrigerant.
Anti-blowback
Valve
10. Disconnect yellow hose from RHS780.
11. Put plastic cap on fill port of RHS780.
30 inch
Yellow Hose
New
Refrigerant
Up Side
Down
NOTE:
Blue Hose
Not Shown
for clarity
Page 3 of 5
Page 4

Function Tests
It’s a good idea to perform the following function tests to ensure the RHS780 is operating correctly
prior to using it to service an A/C system. These tests will also demonstrate some of the basic
operating functions.
The technical support group at RTI Technologies should be contacted if any problems or
questions arise during the following tests. Call 800-468-2321 (ext. 259) for assistance.
EVACUATE HOSES AND TEST VACUUM PROCESS:
1. The RHS780 should be set up and refrigerant transferred into the internal cylinder as described previously. The
tank of new refrigerant (with hose attached) should have been disconnected from the RHS780 and the plastic cap
installed on the port.
2. Plug in power cord and press top of power selector switch. The display will show WEIGHT = XX.X LB -
AUTOMATIC?
3. Press [
4. Press [ENTER] key. The display will show ENTER VACUUM - TIME XX MIN.
5. Press the [
display shows ENTER VACUUM - TIME 02 MIN.
6. Press [ENTER] key. The display will show PERFORM LEAK TEST? Y/N. Press [
flashing to indicate that a leak test is not desired.
7. Press [ENTER] key. The display will show ADD OIL? Y/N. Press [
that adding oil is not desired.
8. Press [ENTER] key. The display will show START?.
9. Press [ENTER] key. The display will show TIME LEFT = XX MIN - PUMP ON. The vacuum pump will start
running. Watch the High and Low pressure gauges to verify that the pressure drops into a vacuum as the red and
blue hoses are evacuated. The display will show PUMP OFF XX MIN - CONTINUE? at the end of two minutes.
10. Press [ENTER] key. The display will show WEIGHT = XX.X LB - AUTOMATIC?. Continue to next test.
____] key two times. The display will show WEIGHT = XX.X LB - VACUUM?.
<<<<] key one time to move the blinking cursor one position to the right. Press [____] key two times until the
<<<<] key as required until N is
<<<<] key as required until N is flashing to indicate
FILL HOSES AND TEST CHARGE PROCESS:
1. Press [_
2. Press [ENTER] key. The display will show ENTER CHARGE - AMOUNT = XX.X LB.
3. Press the [
the display shows ENTER CHARGE - AMOUNT = 01.0 LB.
_] key three times. The display will show WEIGHT = XX.X LB - CHARGE?.
__
<<<<] key one time to move the blinking cursor to the right one position. Press the [____] key one time until
4. Press [ENTER] key. The display will show CHECK HIGH-LOW - CHARGE SWITCH. This message is asking if
you want to charge through the red high side hose or the blue low side hose. For test purposes we will charge
through one and then the other to fill both hoses with refrigerant. The High-Low Charge Switch is on the left side
of the RHS780 above the port where the yellow hose was connected during the filling of the internal cylinder. Press
the top of this switch.
5. Press [ENTER] key. Refrigerant will fill the blue low side hose. The low pressure gauge will show the pressure
rise from a vacuum to the pressure of the refrigerant charged into the hose. Next press the bottom of the High-Low
Charge Switch. Refrigerant will fill the red high side hose. The high pressure gauge will show the pressure rise
from a vacuum to the pressure of the refrigerant charged into the hose. The display will show WEIGHT = 01.0 LB -
CHARGING. The amount may or may not change as the two hoses are filled.
6. Press [RESET] key. The display will show WEIGHT = XX.X LB - AUTOMATIC? Continue to next test.
Page 4 of 5
Page 5

Function Tests
RECOVER REFRIGERANT FROM HOSES TO TEST RECYCLE PROCESS:
1. Press [_
2. Press [ENTER] key. The display will show RECYCLE HOLD - TIME 02 MIN. The default minimum time is two
minutes. Do not make any change.
3. Press [ENTER] key. Display will show CHECK HOSES - START?.
4. Press [ENTER] key. Display will show WEIGHT = XX.X LB - COMPRESSOR ON. The refrigerant in the high and
low side hoses will be recovered. The high and low pressure gauges will show the pressure decrease until a
vacuum is reached. The compressor will shut off and the display will show WEIGHT = XX.X LB - COMPRESSOR
OFF. The two minute recycle hold timer will start. The display will show AMOUNT RECYCLED = XX.X LB after
the two minutes has elapsed.
5. Press [ENTER] key to end the process.
_] key ONE time. The display will show WEIGHT = XX.X LB - RECYCLE?.
__
CONGRATULATIONS
THANKS
Performing these tests demonstrated that the RHS780 is operating correctly.
NOW IT’S TIME TO MAKE SOME MONEY
The best suggestion we can offer is that you quickly browse the Operation Manual before using
the RHS780 to perform an actual A/C service. Then, during the first few uses, refer to the
Operation Manual and follow the instructions as each process is performed.
The RHS780 was carefully designed to be intuitive to use. The display screens prompt for input
as required and always ask for confirmation before starting a process.
It’s very important that you follow the Operation Manual the first few times to become familiar with
the techniques of using the RHS780 for A/C service. Then you will find that the display screens
will give you adequate prompts for future use.
4075 East Market Street
York, Pennsylvania 17402
Phone: 800-468-2321
Fax: 717-755-8304
E-mail: tech@rtitech.com
Web-site: www.rtitech.com
Page 5 of 5
 Loading...