

Page 1

Piranha/Cobia & Quick Check
Getting Started
Piranha/Cobia & Quick Check Getting Started - English - Version 1.11A
RTI articel number: 9629057-00
Page 2

Welcome to Quick Check
Ocean 2014 with Quick Check is a is a powerful
tool for everybody working with Quality
Assurance of X-ray systems. Ocean 2014 can
be used with the X-ray meters Piranha and
Cobia from RTI.
Page 3

Contents
Table of Contents
1
.............................................................................................................. 4Quick Check
Start the Tablet 1.1
.............................................................................................................................. 4
First measurement with Quick Check 1.2
.............................................................................................................................. 6
3
.............................................................................................................................. 10
.............................................................................................................................. 17
.............................................................................................................................. 26
.............................................................................................................................. 29
.............................................................................................................................. 31
.............................................................................................................................. 31
.............................................................................................................................. 32
.............................................................................................................................. 34
.............................................................................................................................. 44
Run Quick Check on a Tablet 1.3
Change Meter Settings 1.4
Piranha 1.4.1
Cobia 1.4.2
Applications with analysis 1.5
Quick Check Favorites 1.6
Detector selection 1.6.1
Create Quick Check Favorites 1.6.2
Save a measurement 1.7
Open an old measurement 1.8
Print 1.9
Transfer data to Excel 1.10
Excel control window 1.10.1
Connect (Fixed format) 1.10.2
Connect (Standard mode) 1.10.3
Send data to Excel 1.10.4
Import/export 1.11
...................................................................................................................... 17
...................................................................................................................... 17
...................................................................................................................... 29
...................................................................................................................... 29
...................................................................................................................... 34
...................................................................................................................... 34
...................................................................................................................... 34
...................................................................................................................... 34
.............................................................................................................................. 46
.............................................................................................................................. 49
2018-06-20/1.11A
Options 1.12
Close Quick Check 1.13
Piranha/Cobia & Quick Check Getting Started
Page 4
4
Use Quick Check when you just need to make a
quick measurement. Quick Check automatically
adapts to the meter you use and the detector you
have connected. It is fully plug-and-play and any
change you do is automatically detected and Quick
Chick adapts to the new situation. Quick Check is
designed for a tablet (touch screen) but works of
course also on a standard laptop. You can do the
following with Quick Check.
1 Quick Check
· Quick measurements
· Save
· Print
· Export to Excel
· Applications with analysis
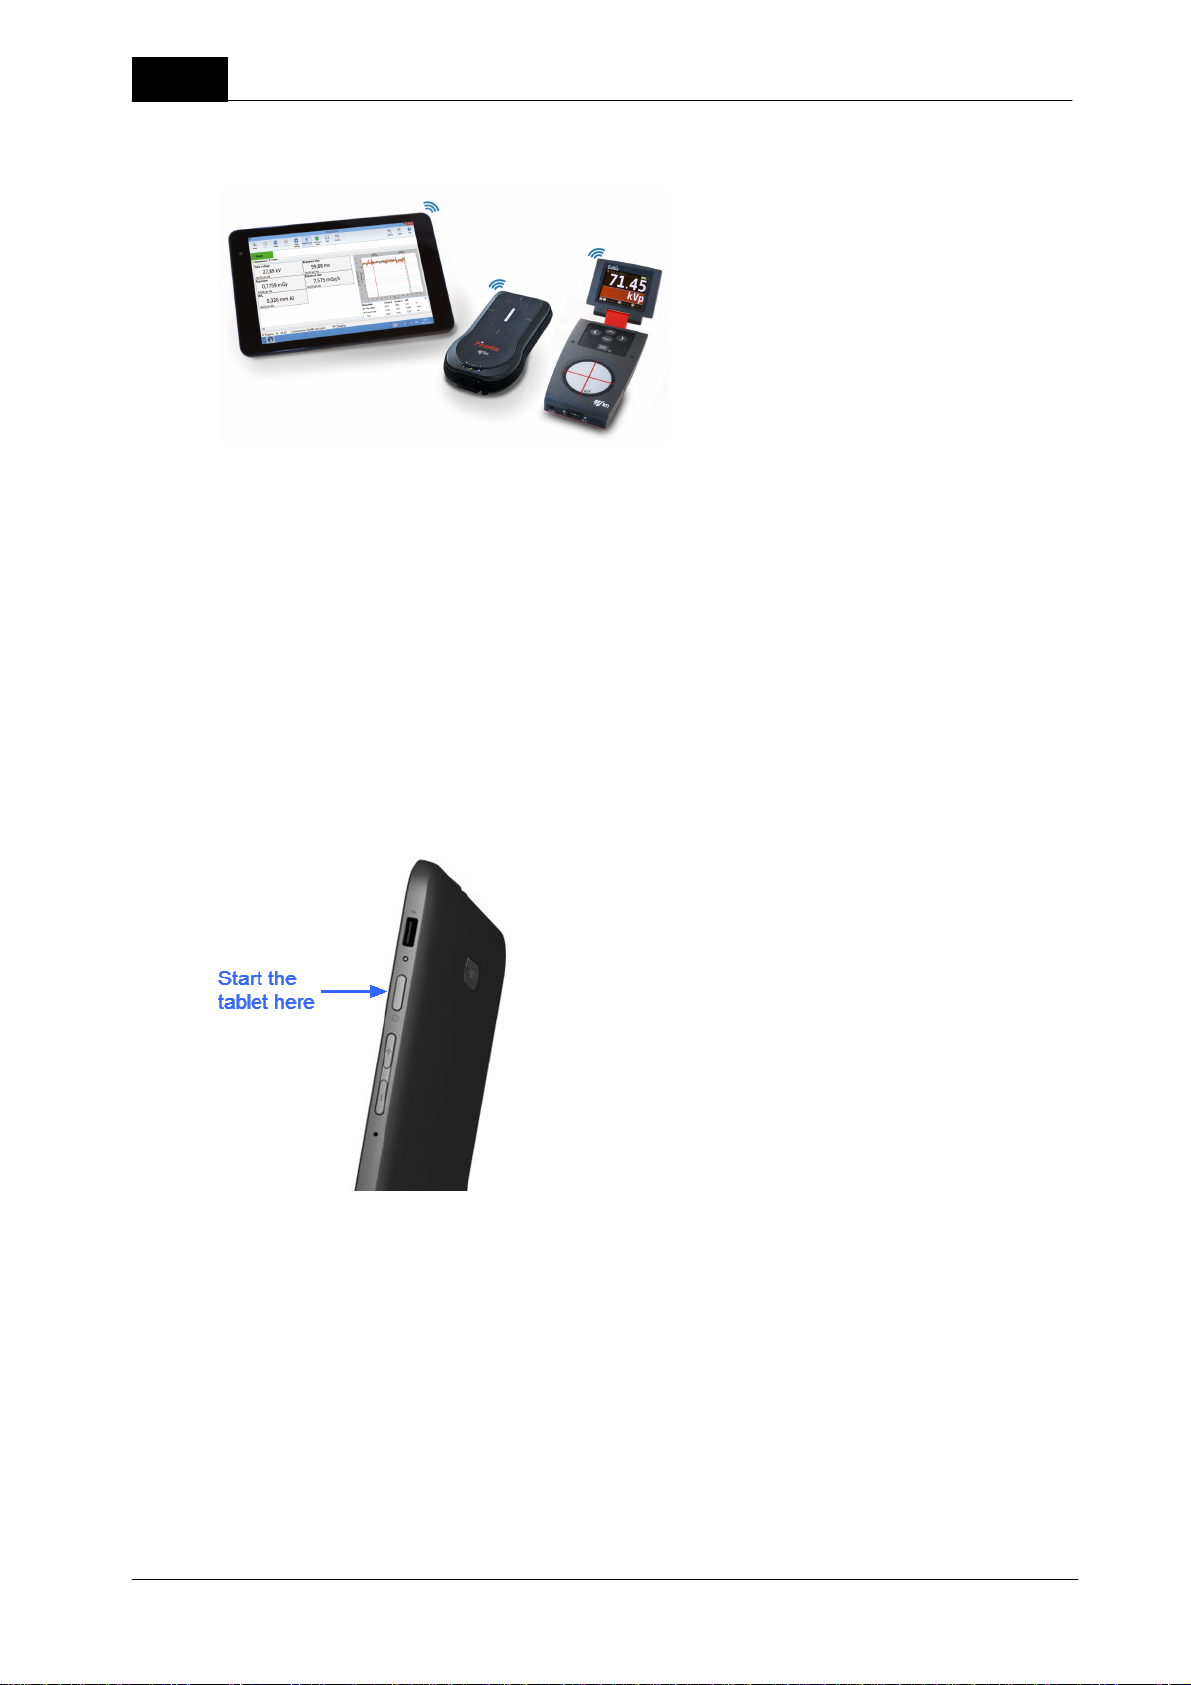
1.1 Start the Tablet
Quick Check
This is a quick introduction to how you get started with the tablet that comes with your meter. The tablet has
Windows 8 and is configured and ready to be used with the meter.
To start measuring:
1. Power on the meter.
2. Power on the Tablet.
3. Windows 8 starts and the Start screen is launched.
Piranha/Cobia & Quick Check Getting Started
2018-06-20/1.11A
Page 5
Quick Check
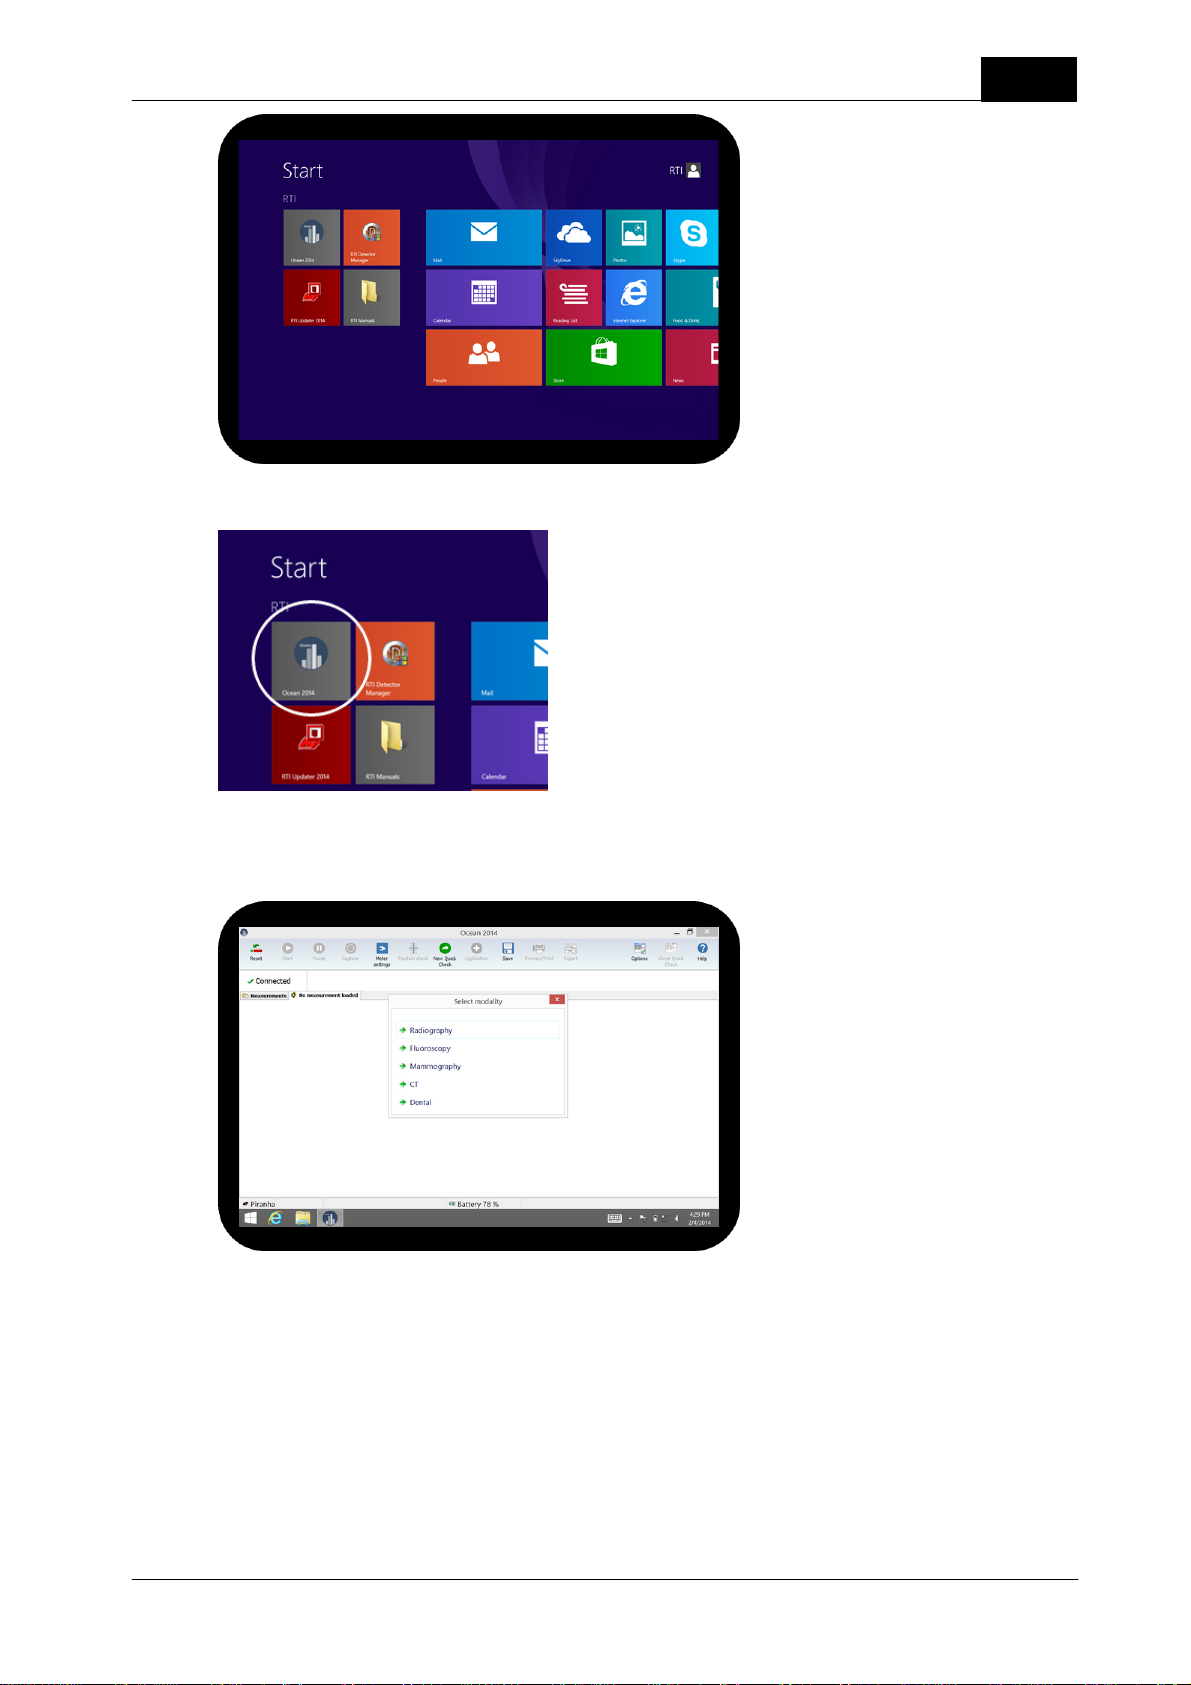
4. You will see the Ocean 2014 tile to the left, click on it to start Ocean 2014.
5
5. Assuming that your meter is powered on; Ocean 2014 starts in Quick Check mode.
6. Select the modality you want to use:
The coming topics will describe how you perform your first measurement and how you navigate in Quick
Check.
How to turn off the Tablet
It is recommended that you turn off the Tablet, and not just puts it in sleep mode, when you don't use it. It
consumes power even in sleep mode and the battery will be drained quite fast even if you don't use it.
To turn off the tablet:
2018-06-20/1.11A Piranha/Cobia & Quick Check Getting Started
Page 6

6
1. Press the power button and keep it pressed until the screen shows the following:
2. Release the button and slide the panel down to shut down the Tablet.
Quick Check
1.2 First measurement with Quick Check
By default, Quick Check is launched automatically when Ocean 2014 starts and the meter is available. Use
Quick Check when you just want "a meter" to do a quick measurement. Quick Check is extremely simple to
use since it automatically recognizes what type of meter you have and which detectors you use. It is full plugand-play, directly when you unplug or plug in a detector; Quick Check sets up the measurement for you. You
can save data you measure with Quick Check but you must save manually - Quick Check will never ask you if
you want to save. It is also possible to print and export measured data to Excel. Quick check also has built-in
applications for accuracy, linearity, reproducibility, half-value layer and more. Quick check is designed for use
with a tablet and easy to operate directly on a touch screen.
Let us start with a simple measurement to illustrate how to use Quick Check. This example assumes a Piranha
657. If you have another model follow this example and apply it on what you see on your screen when you
use your Piranha.
Make sure your meter is powered on and within distance for Bluetooth communication or connected via USB.
Disconnect any external probe that might be connected (unless you have a Piranha model that only works
with external detector or a Cobia Sense). Assume that we are using a Piranha 657.
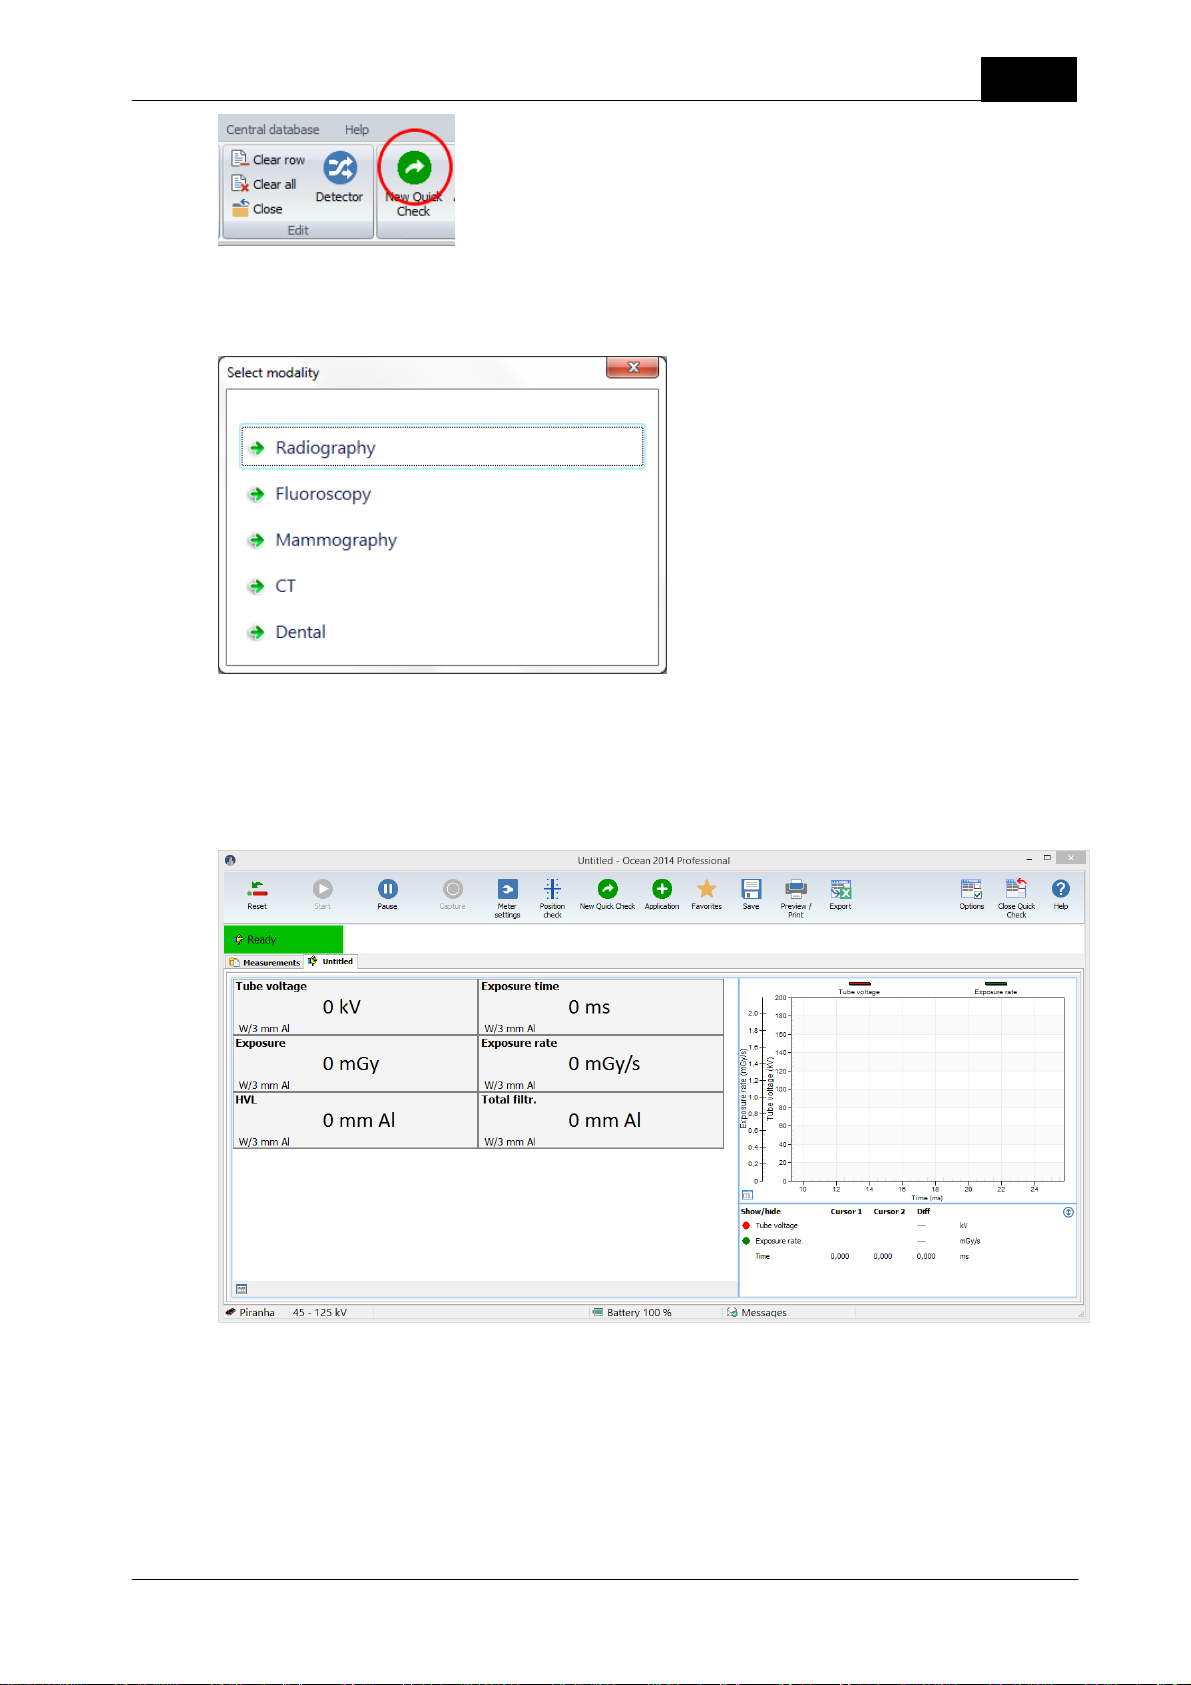
1. Start Ocean 2014 or start the Quick Check from the Measure tab on the ribbon bar if you are in Ocean
2014 main view:
(Note: If you use Windows 8; you start Ocean 2014 from the desktop)
Piranha/Cobia & Quick Check Getting Started
2018-06-20/1.11A
Page 7
Quick Check
2. Quick Check starts and a menu will be shown. The list is depending on your meter type, it might not
appear at all.
7
3. Select for example Radiography. For other modalities from here and on; it may be several choices to make
before the measurement screen appear. For example, for mammography you must chose calibration and if
compression plate is used or not.
4. The measurement loads and you are ready to start to measure.
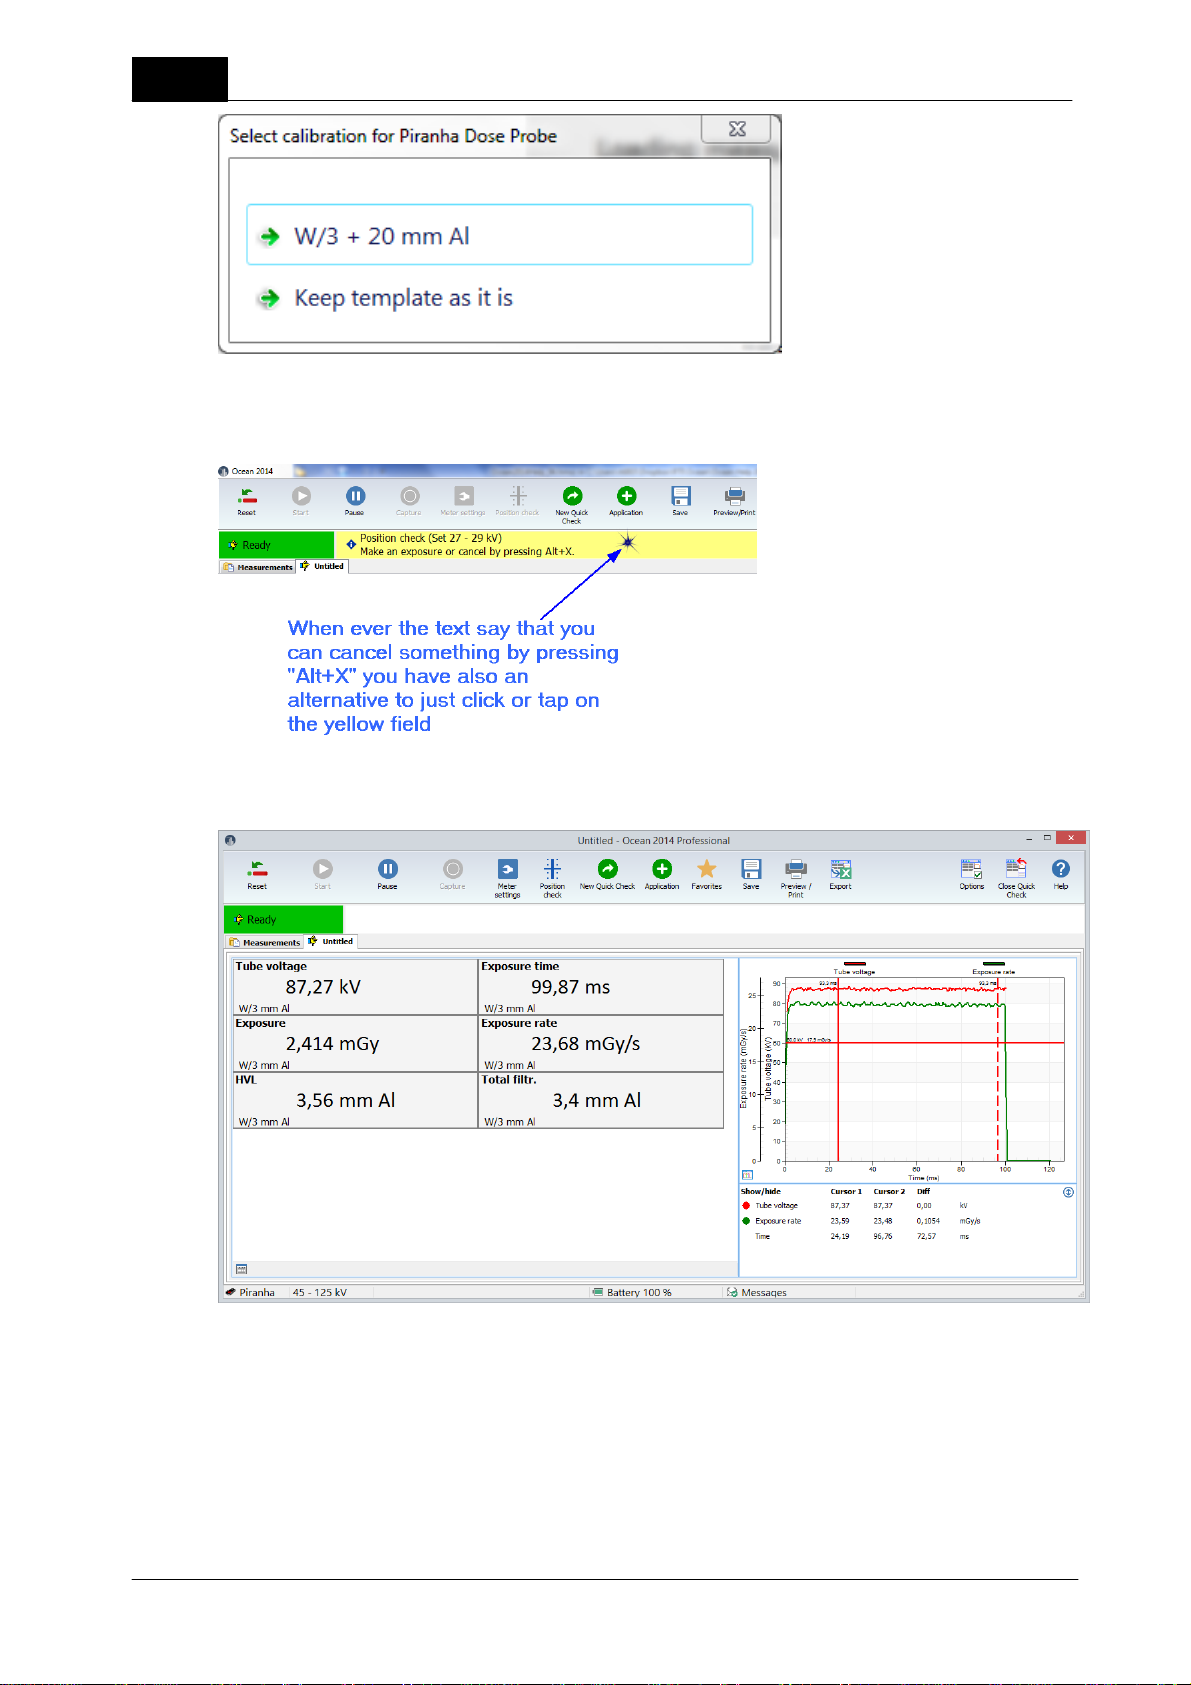
If the selected Quick Check is using a calibration that isn't available in your meter/detector, a dialogue is
shown. You can here select another calibration instead of the one saved in the document.
2018-06-20/1.11A Piranha/Cobia & Quick Check Getting Started
Page 8
8
In some situations a message is shown with a yellow background; all such messages can be closed by just
clicking or tapping on the yellow background.
Quick Check
5. Make some exposures.
6. You can operate Quick Check with mouse and keyboard or with your fingers if you have a tablet with touch
screen.
Quick Check is designed to be simple to use on a tablet (touch screen) but you can of course also use a
mouse. Below are the most important operations described.
Piranha/Cobia & Quick Check Getting Started
2018-06-20/1.11A
Page 9
Quick Check
Toggle between displays and logged data: Click on the button in the lower left corner of the display
panel or sweep left or right on the displays if you use a tablet.
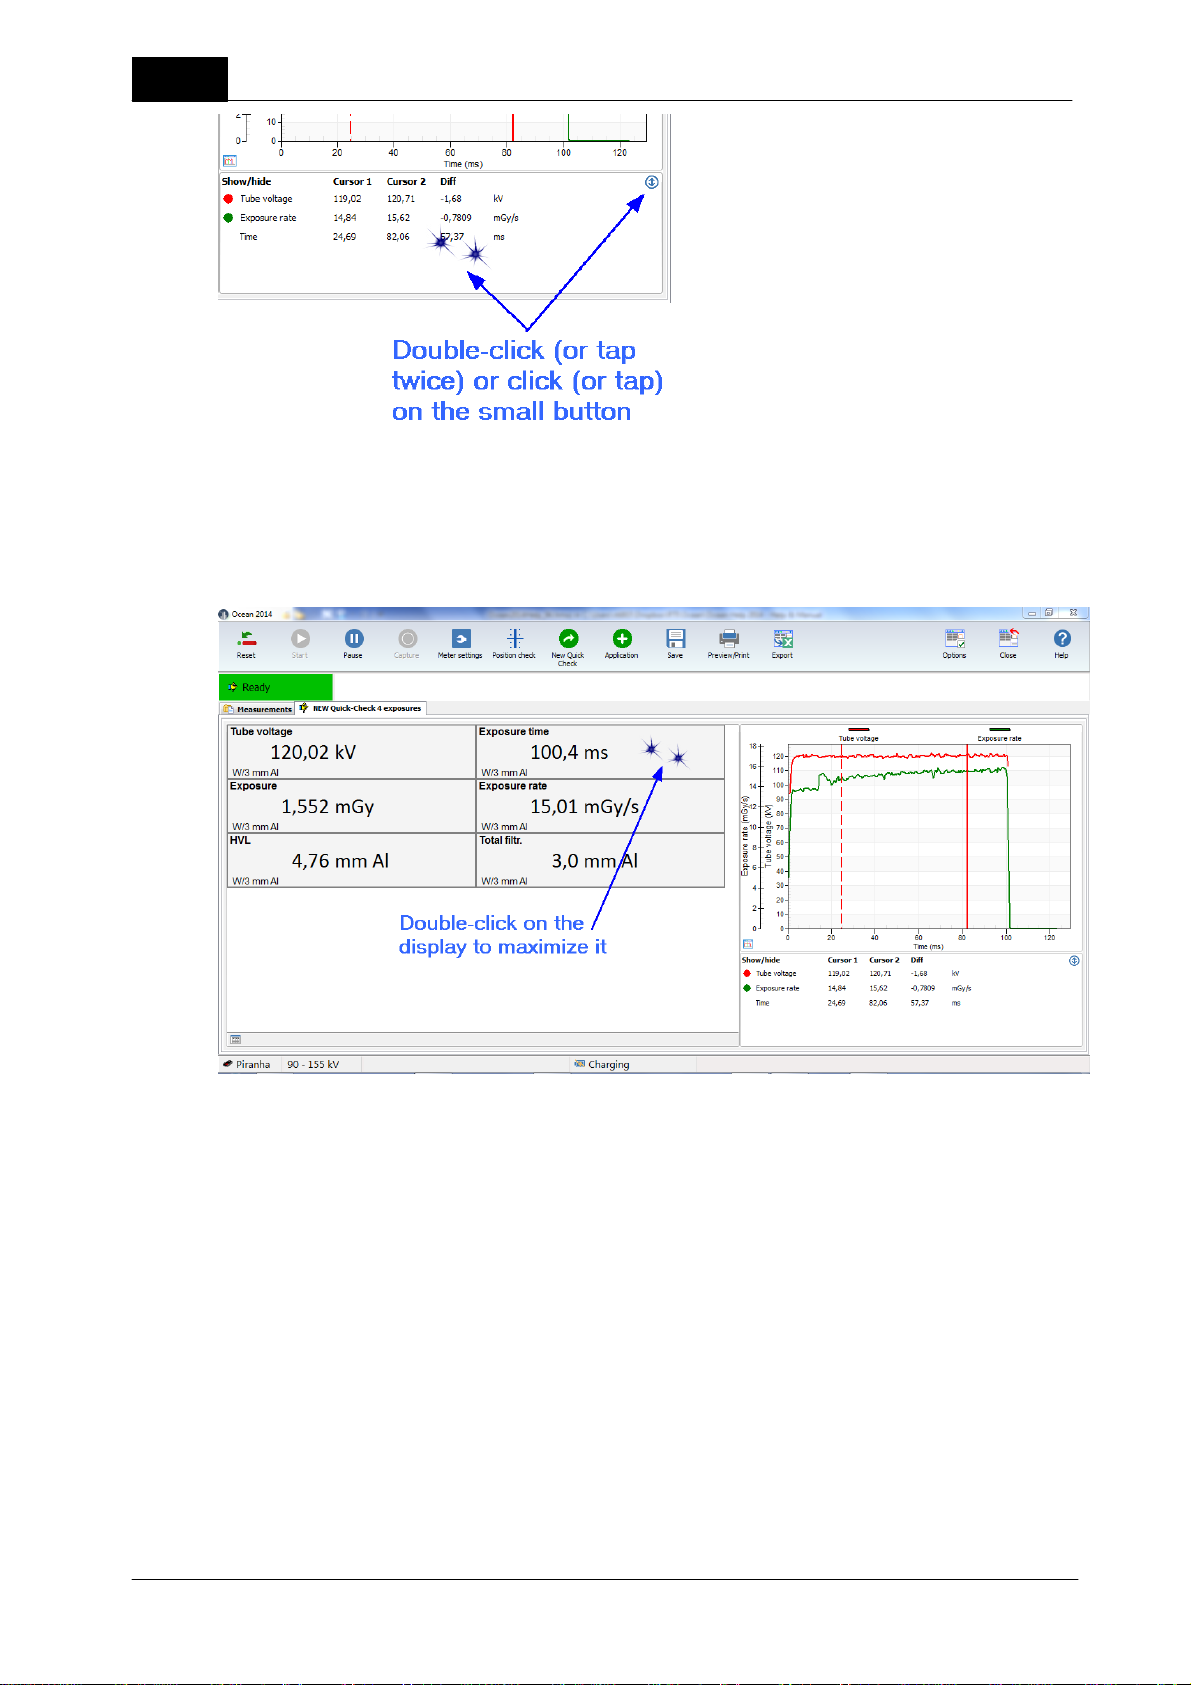
Enlarge waveform: Click on the button in the lower left corner of the waveform graph or double-click on
the waveform. Same to minimize it.
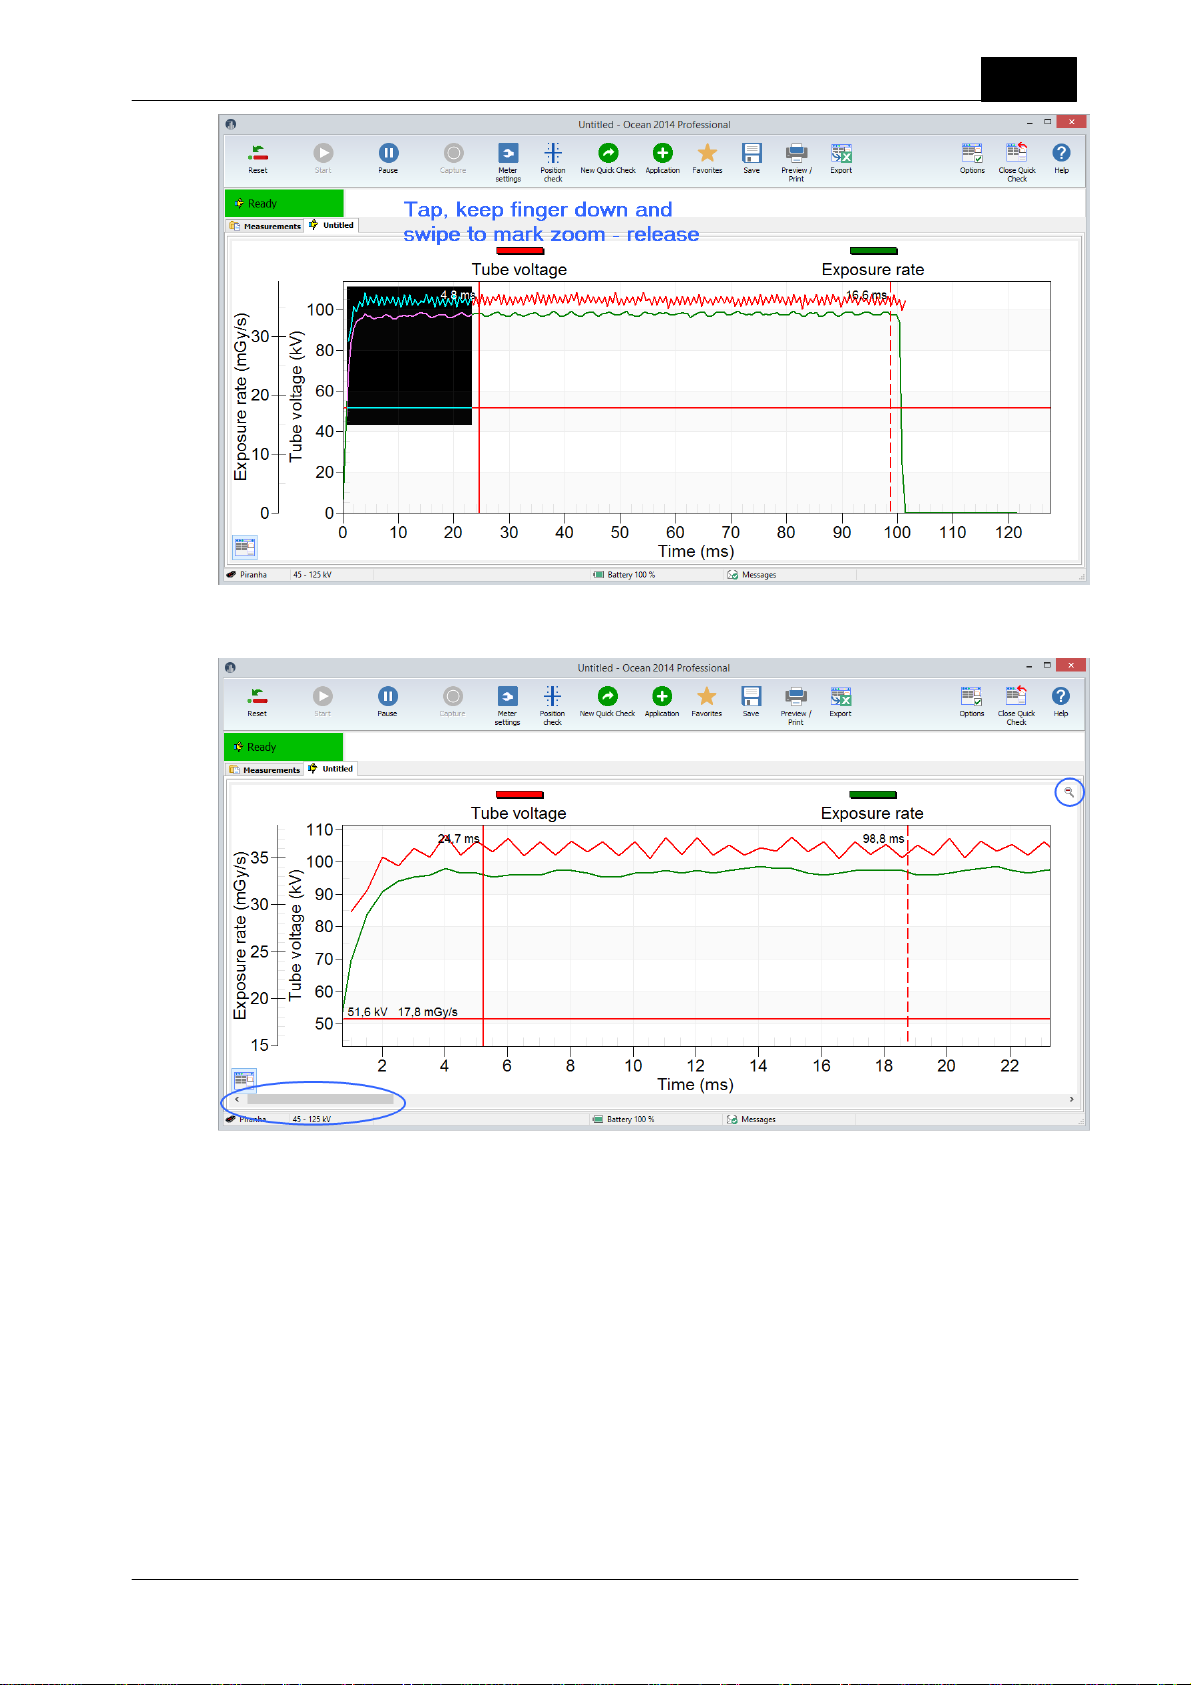
Zoom waveform: Zoom the waveform by holding down the left mouse button and mark the part you want
to zoom. When you have zoomed it is remembered for current exposure. If a new row is automatically
created for the next exposure, the zoom state is inherited for the new row.
Enlarge a display/single display: Double-click on a display.
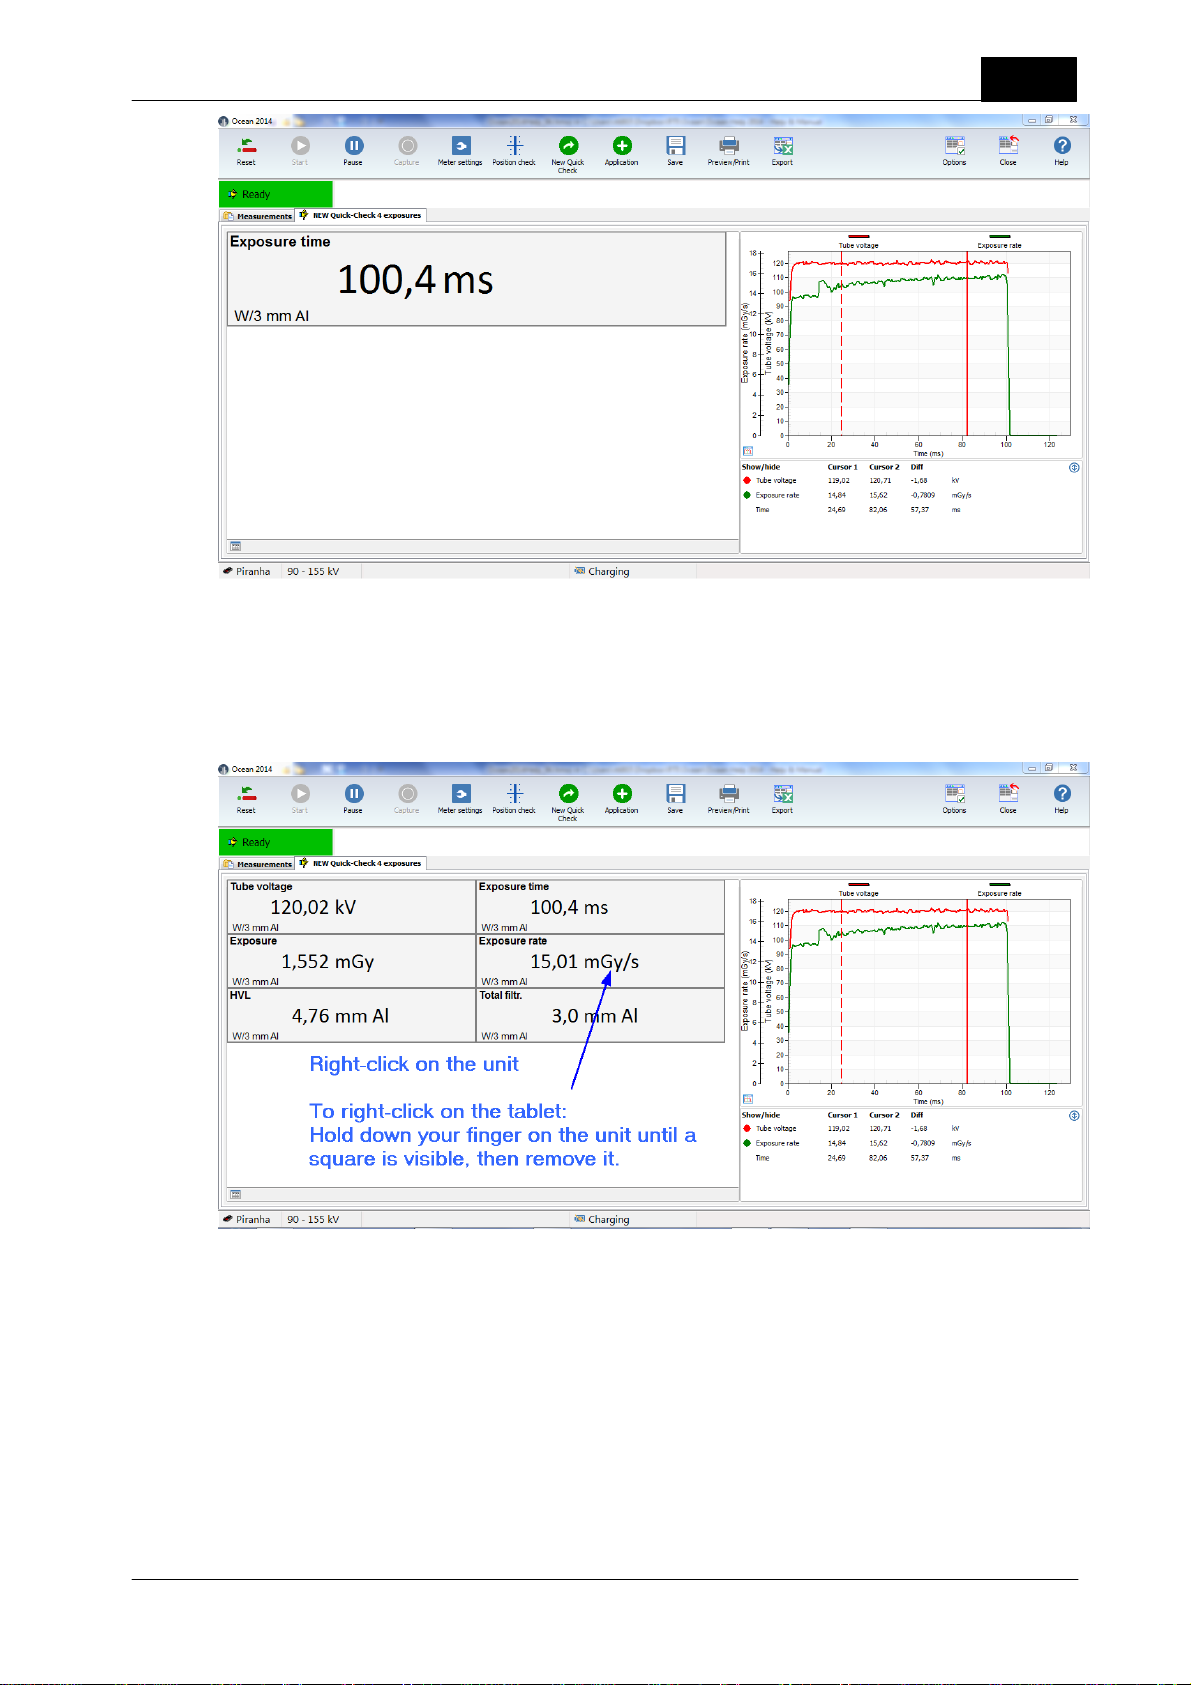
Change unit of measure: Right-click on a unit and choose a new unit from the list shown. To right-click
one tablet; hold your finger on the unit, remove it when a small square appear.
Change kV range: Click on the kV range indication in the lower part of the screen.
You have now seen the basic function of the Quick Check. You can now try to connect an external detector (if
you have one) and see that Quick Check will directly recognize the probe and ask you what to do.
Read also the full description of Quick Check in the topic Run Quick Check on a Tablet to further see how you
operate Quick Check. This section is followed by more about how to store, print and how to export your
measured data to Excel.
9
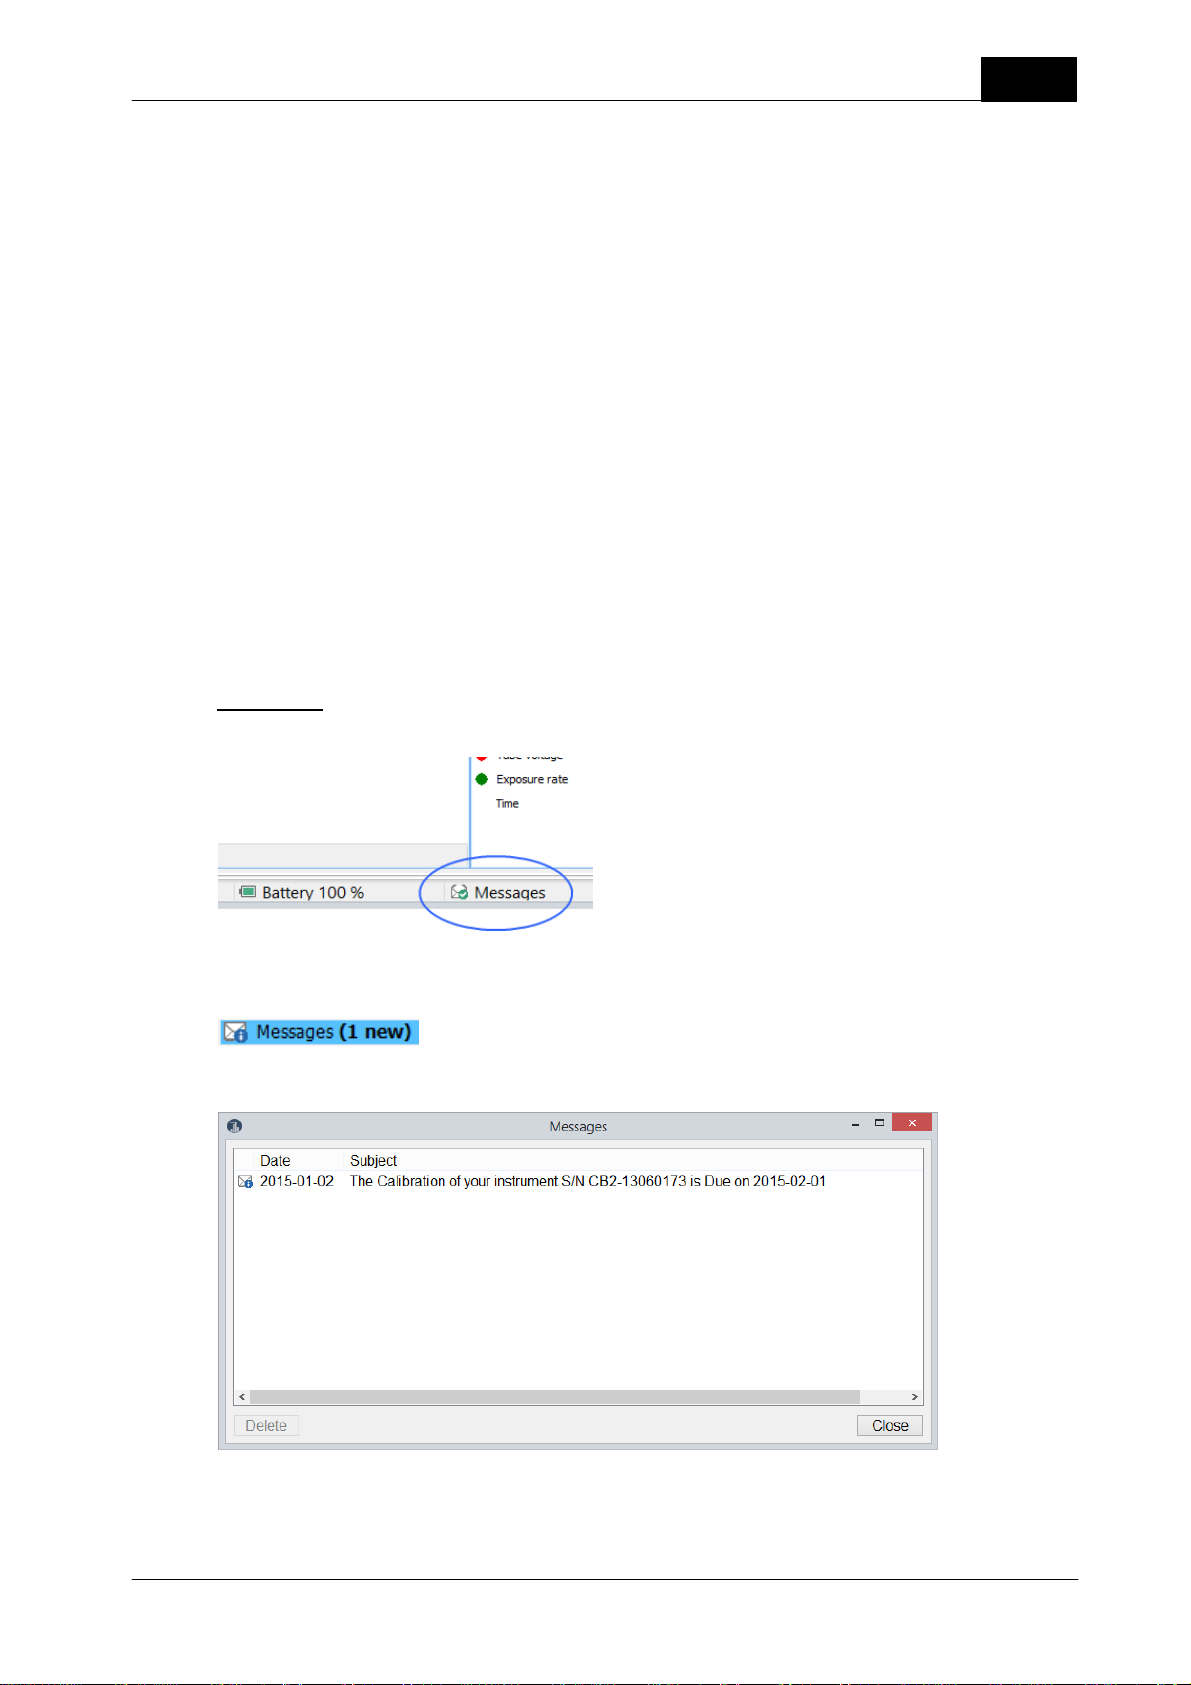
Messages
It is indicated on the lower status bar if a message arrives.
When a message arrives the icon changes to:
You can now click on the icon to open the message list:
Here are all your messages shown. Double-click in the list to read a message. Unwanted messages can be
deleted.
2018-06-20/1.11A Piranha/Cobia & Quick Check Getting Started
Page 10
10
You can turn off calibration reminders in the Program Options, see more in section Program Options
1.3 Run Quick Check on a Tablet
Quick Check is simple to operate and use both on a tablet with touch screen or a normal laptop. This section
will describe all the actions you can use to operate Quick Check if you use a tablet, as well as a laptop.
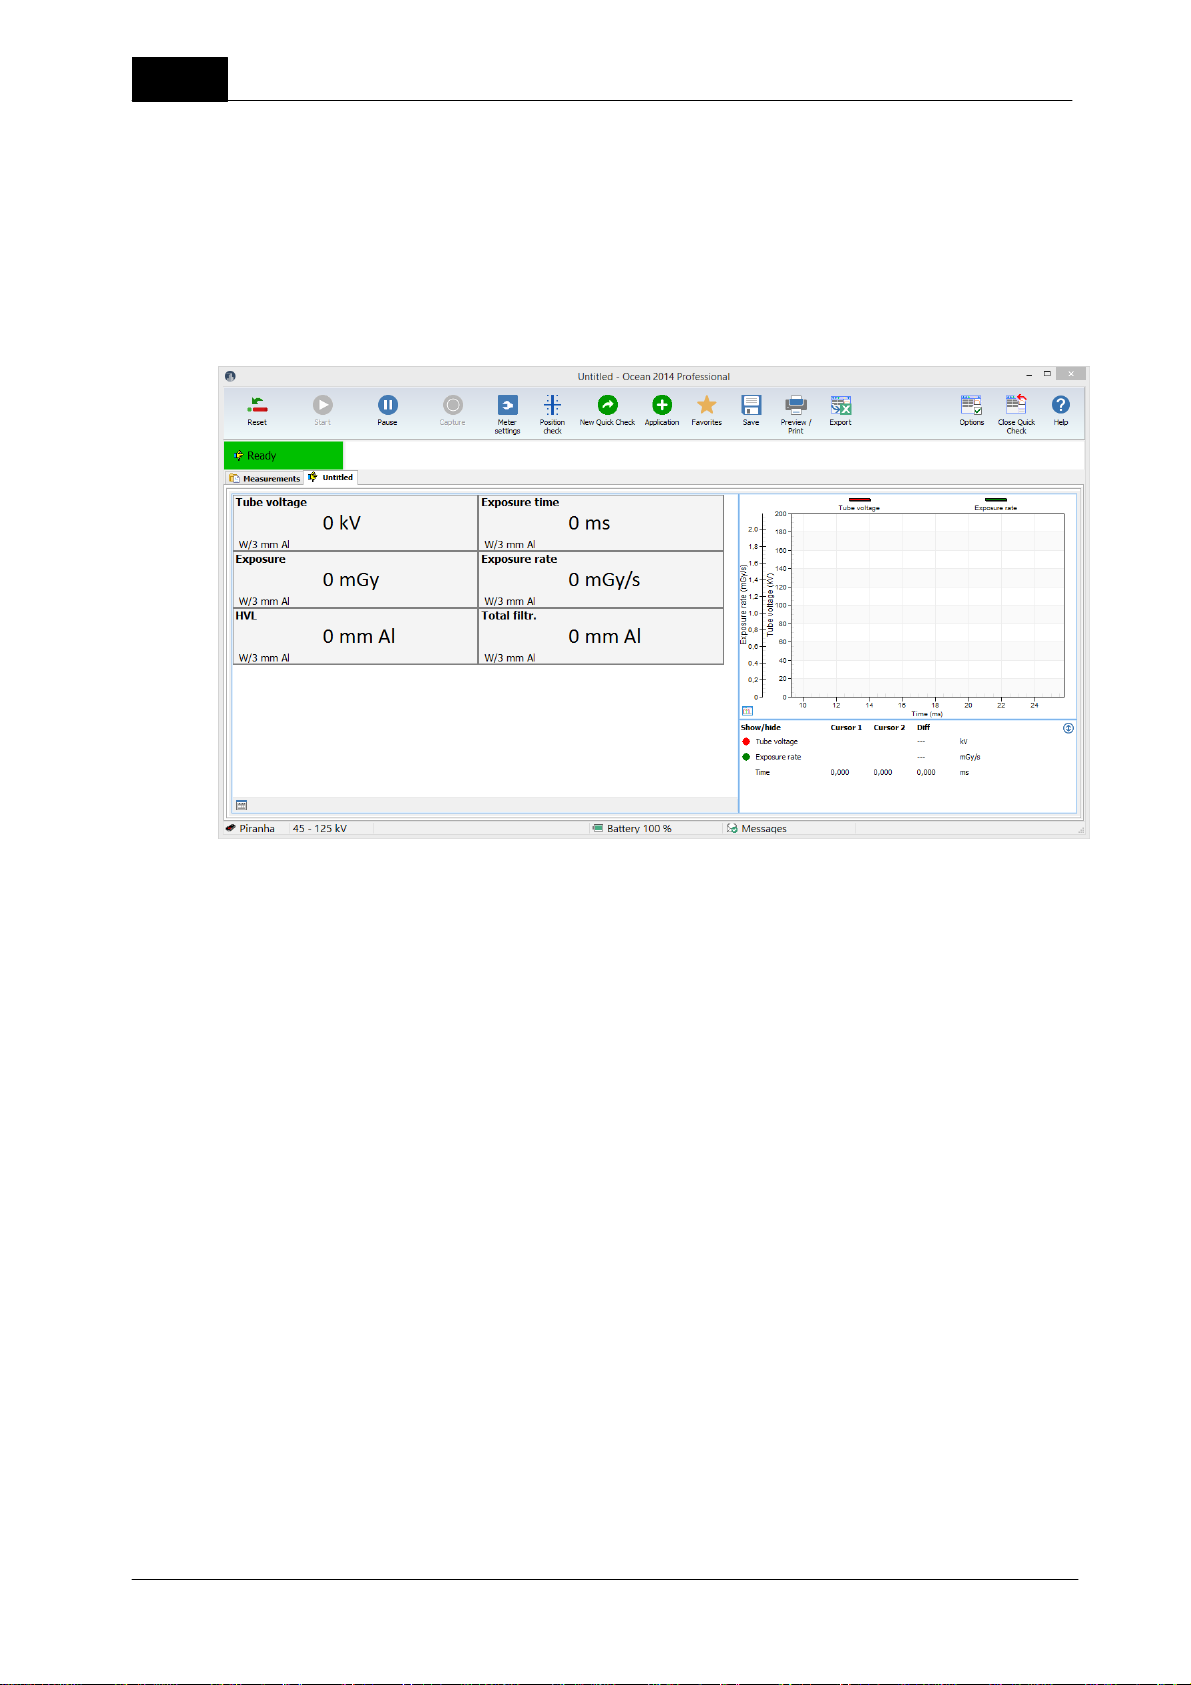
Quick Check main screen for standard measurements looks like this:
Quick Check
You have a ribbon bar at the top with different buttons to activate different function. You can click on these
buttons with a mouse click or by tapping on the screen with your finger if you use a tablet.
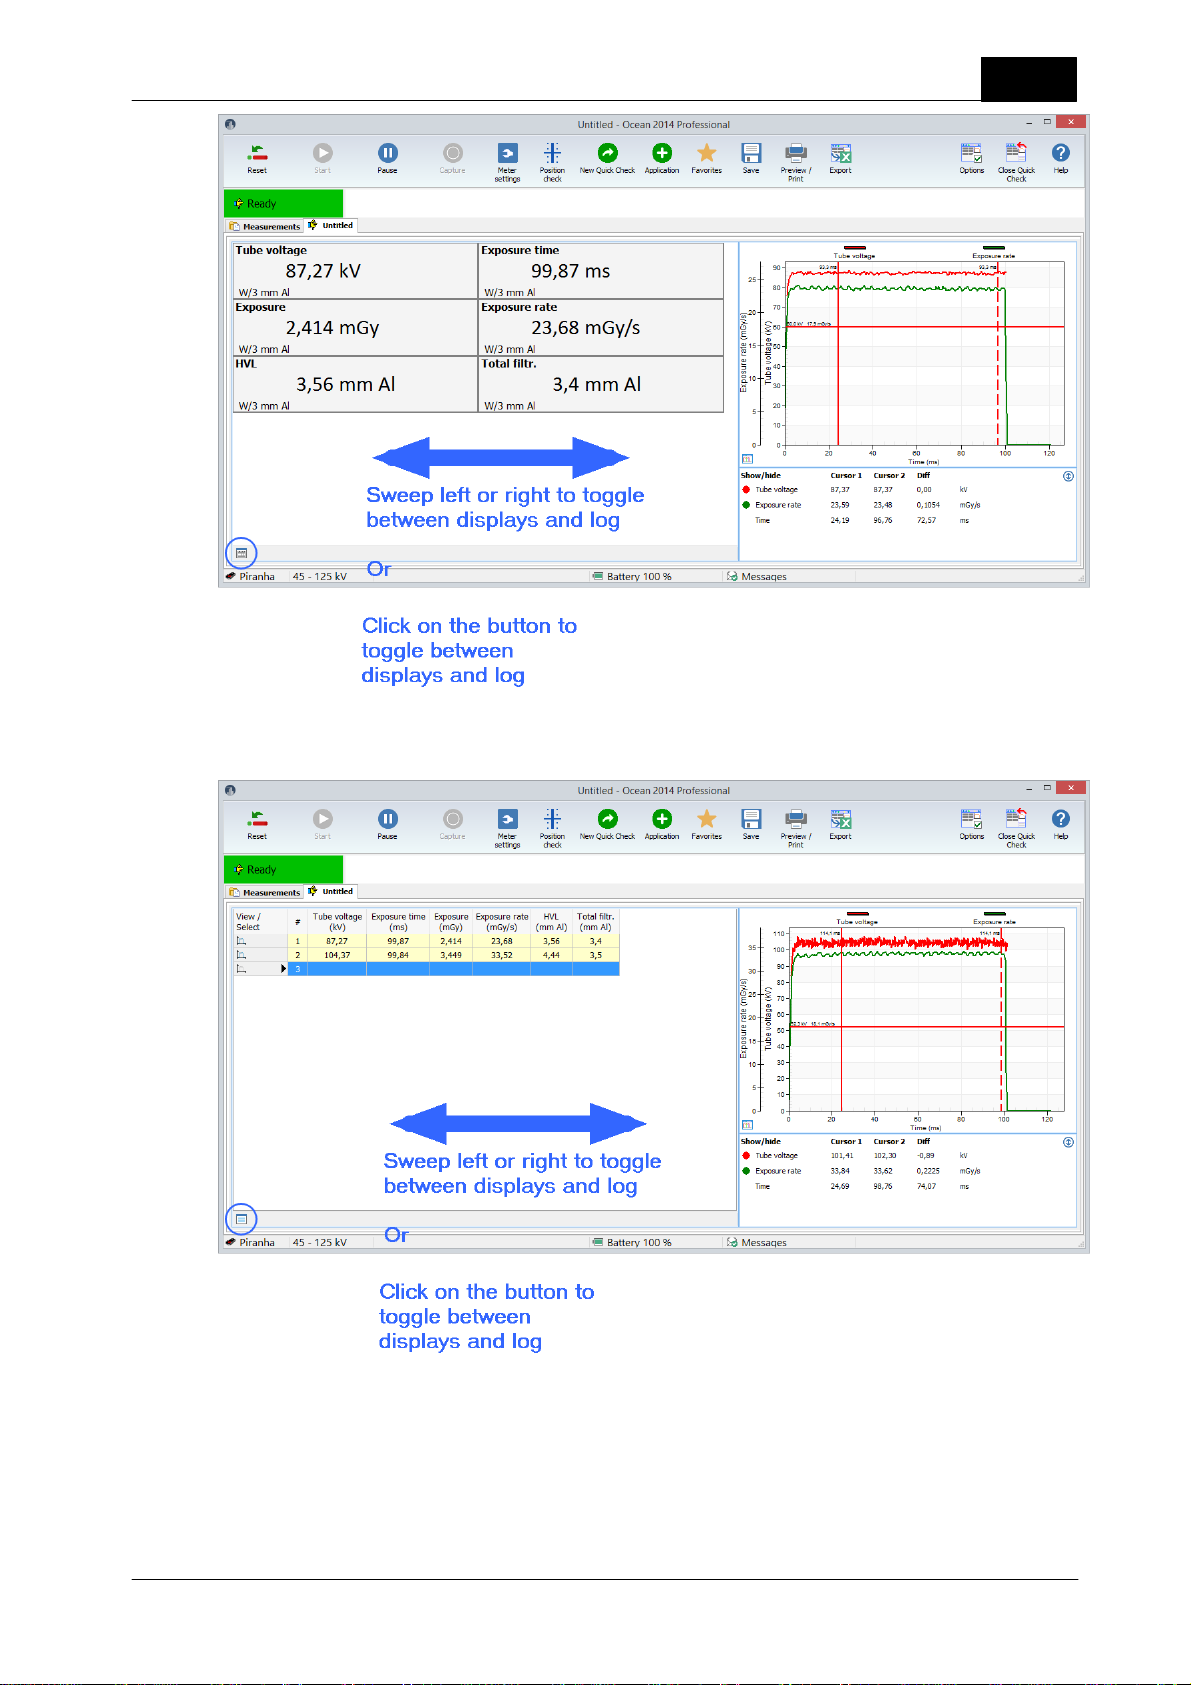
Switch between display and list with exposures
Click on the button in the lower left corner or sweep on the display area of the screen.
Piranha/Cobia & Quick Check Getting Started
2018-06-20/1.11A
Page 11
Quick Check
11
The log is shown and you can see all the measurements you have done during this Quick Check session.
Sweep or click on the button to go back to the displays.
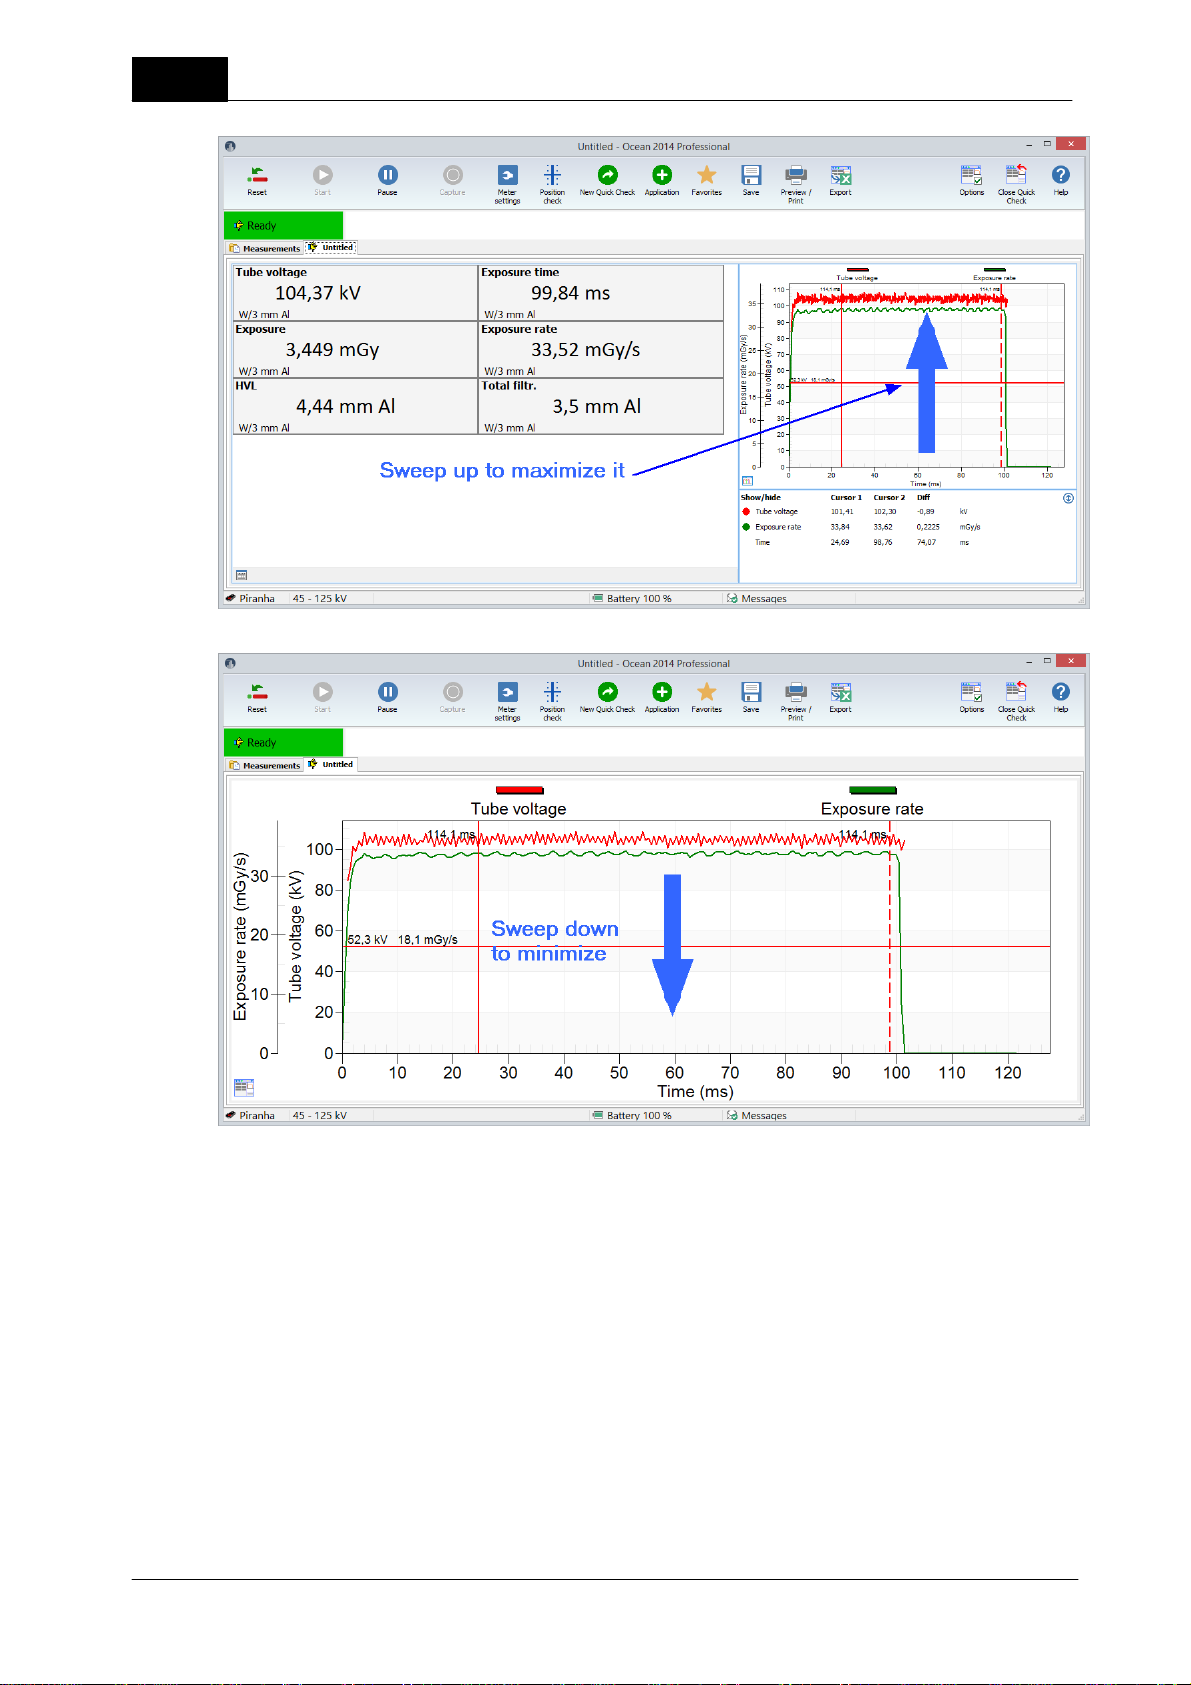
Enlarge the waveform
You can maximize the waveform by double-clicking (tap twice) on it.
2018-06-20/1.11A Piranha/Cobia & Quick Check Getting Started
Page 12
12
Quick Check
Zoom the waveform
Tap on the waveform and move finger (or right-click, hold down and move mouse pointer) to mark the zoom.
Piranha/Cobia & Quick Check Getting Started
2018-06-20/1.11A
Page 13
Quick Check
The zoomed waveform is shown when you release and you can now see details.
13
The current zoom state is now automatically locked and the waveform will be saved in this way. If a new row
is automatically created, the new row inherit the zoom state.
You can use the scroll bar to "move" backward and forward. Click on the button in the right upper corner to
go back to full view.
Waveform data and cursors
The waveform data is shown under the display (when it is minimized). You can switch between "cursor
values" and "value between cursor", use double-click (or tap twice) to change. Values for the two vertical
cursors are shown. Cursor data for the horizontal cursor is only shown in the graph.
2018-06-20/1.11A Piranha/Cobia & Quick Check Getting Started
Page 14
14
Quick Check
Single display
If you just want to see one value, you can maximize just that display. Double-click (tap twice) on the display
you want to see.
Piranha/Cobia & Quick Check Getting Started
2018-06-20/1.11A
Page 15
Quick Check
Double-click on the display to go back to smaller displayes.
15
Change unit of measure
You can change unit of measure by right-clicking on the unit:
2018-06-20/1.11A Piranha/Cobia & Quick Check Getting Started
Page 16
16
Quick Check
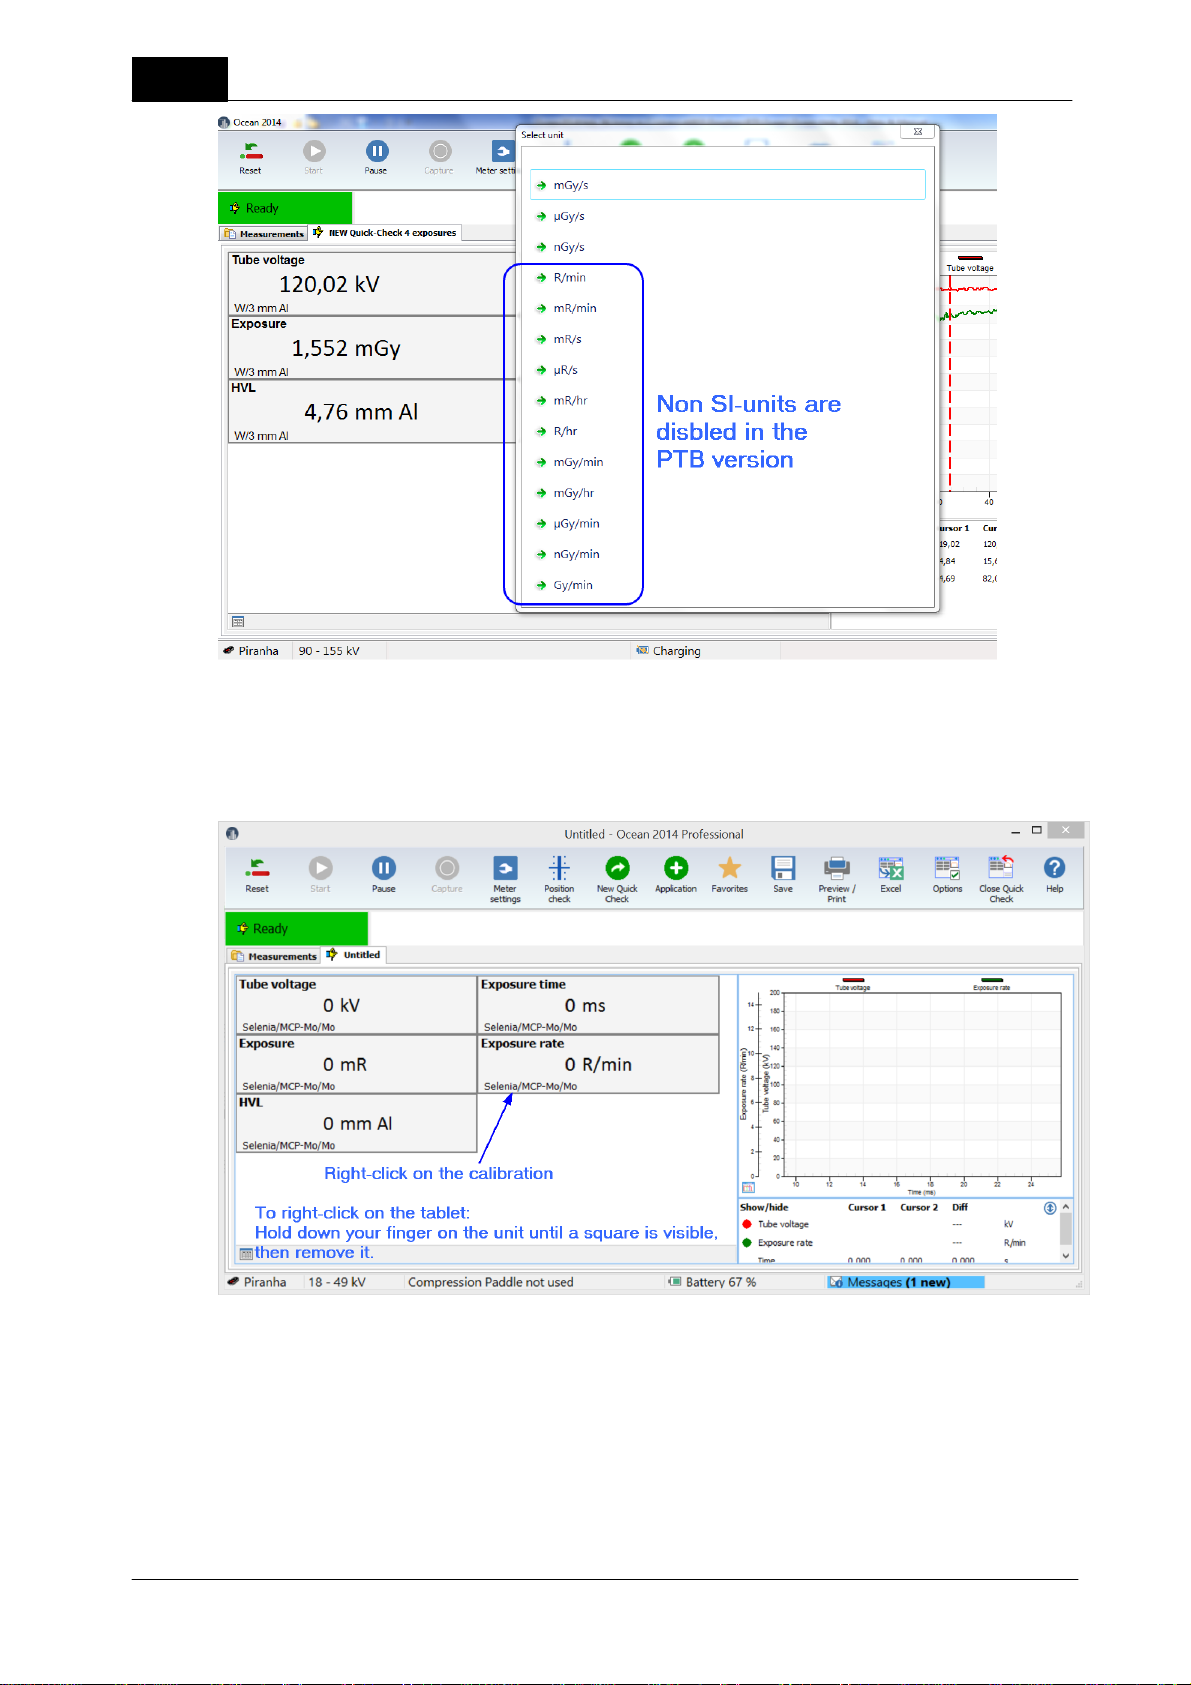
Select a new unit.
Change calibration
It is possible to change calibration by right-clicking in the display. This is not applicable for radiography,
fluoroscopy and dental since for these modalities only one calibration (W/Al) is required.
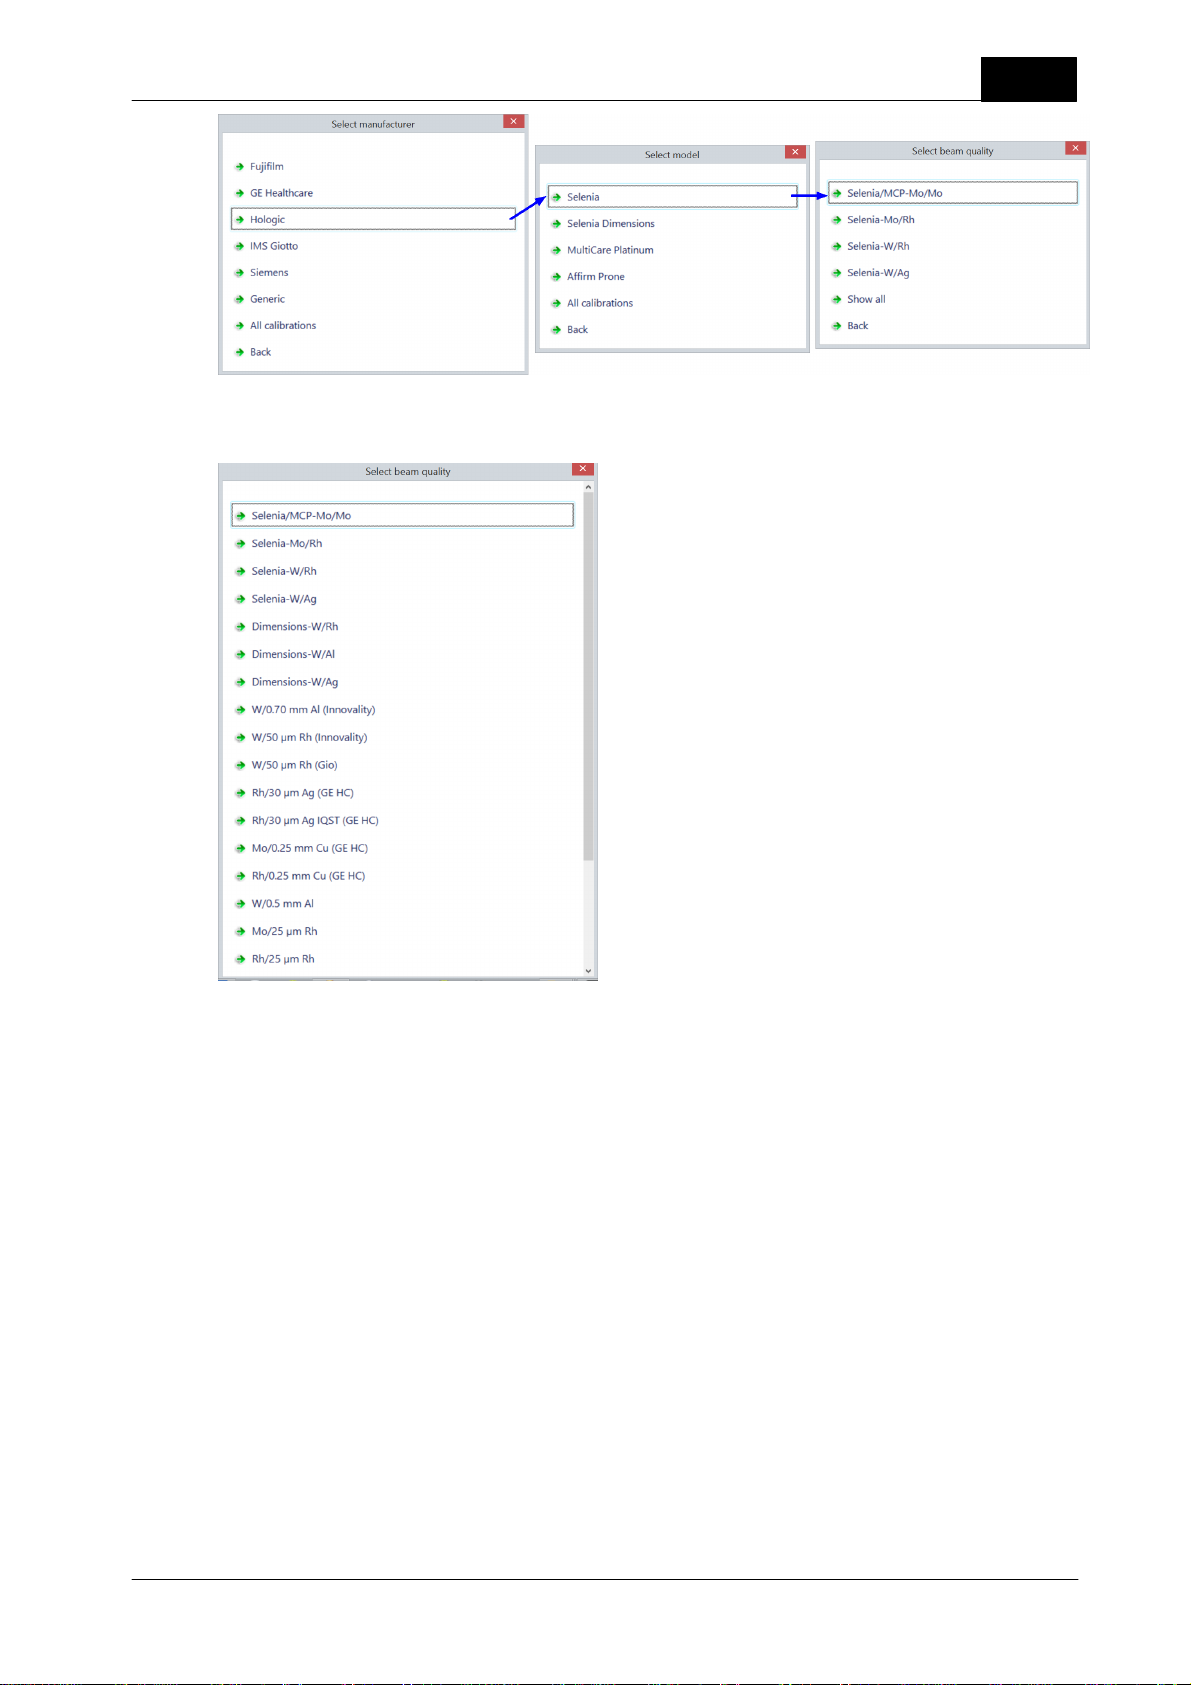
For mammography selection of calibration may look i two different ways; either as a list of manufacturer and
models with specific calibrations or as a list of all available calibrations. The list with manufacturer may look
like this when you start a new Quick Check:
Piranha/Cobia & Quick Check Getting Started
2018-06-20/1.11A
Page 17
Quick Check
The list with all calibrations may look like this (the exact look depends on actual calibrations available in the
meter):
17
Change number of decimals
You can change number of decimals in the same way by right-clicking on the numeric value in a display.
1.4 Change Meter Settings
Piranha and Cobia have slightly different meter settings but the way you access and change them is the same.
Cobia has less settings, since it has auto-range and is a less advanced meter than Piranha. Quick Check will
recognize which meter you use and what its capabilities are and adapt to it. You will only see what you can
use and you can without any changes switch between Piranha and Cobia.
2018-06-20/1.11A Piranha/Cobia & Quick Check Getting Started
Page 18
18
Currently meter is shown in the lower left corner. Quick Check can be directly used with both Piranha and
Cobia, just connect to the meter you want to use.
Note: You can use the same Ocean 2014 templates for both Piranha and Cobia, a template built for Piranha
can be used with Cobia and vice verse. It is recommended, if you intend to use your templates with both
Piranha and Cobia, that you build your templates for Piranha. The reason for this is that Piranha has more
settings and you can in this way setup the templates to work in the best way with Piranha. f you do the
opposite (you build it for Cobia), Ocean 2014 will when you use it with Piranha select default settings for the
Piranha when a set value is missing (due to it doesn't exist for the Cobia). If you build templates without a
meter connected and intend to use it with both Piranha and Cobia; go to program options and select default
"Meter type" in the Preference section.
Quick Check
1.4.1 Piranha
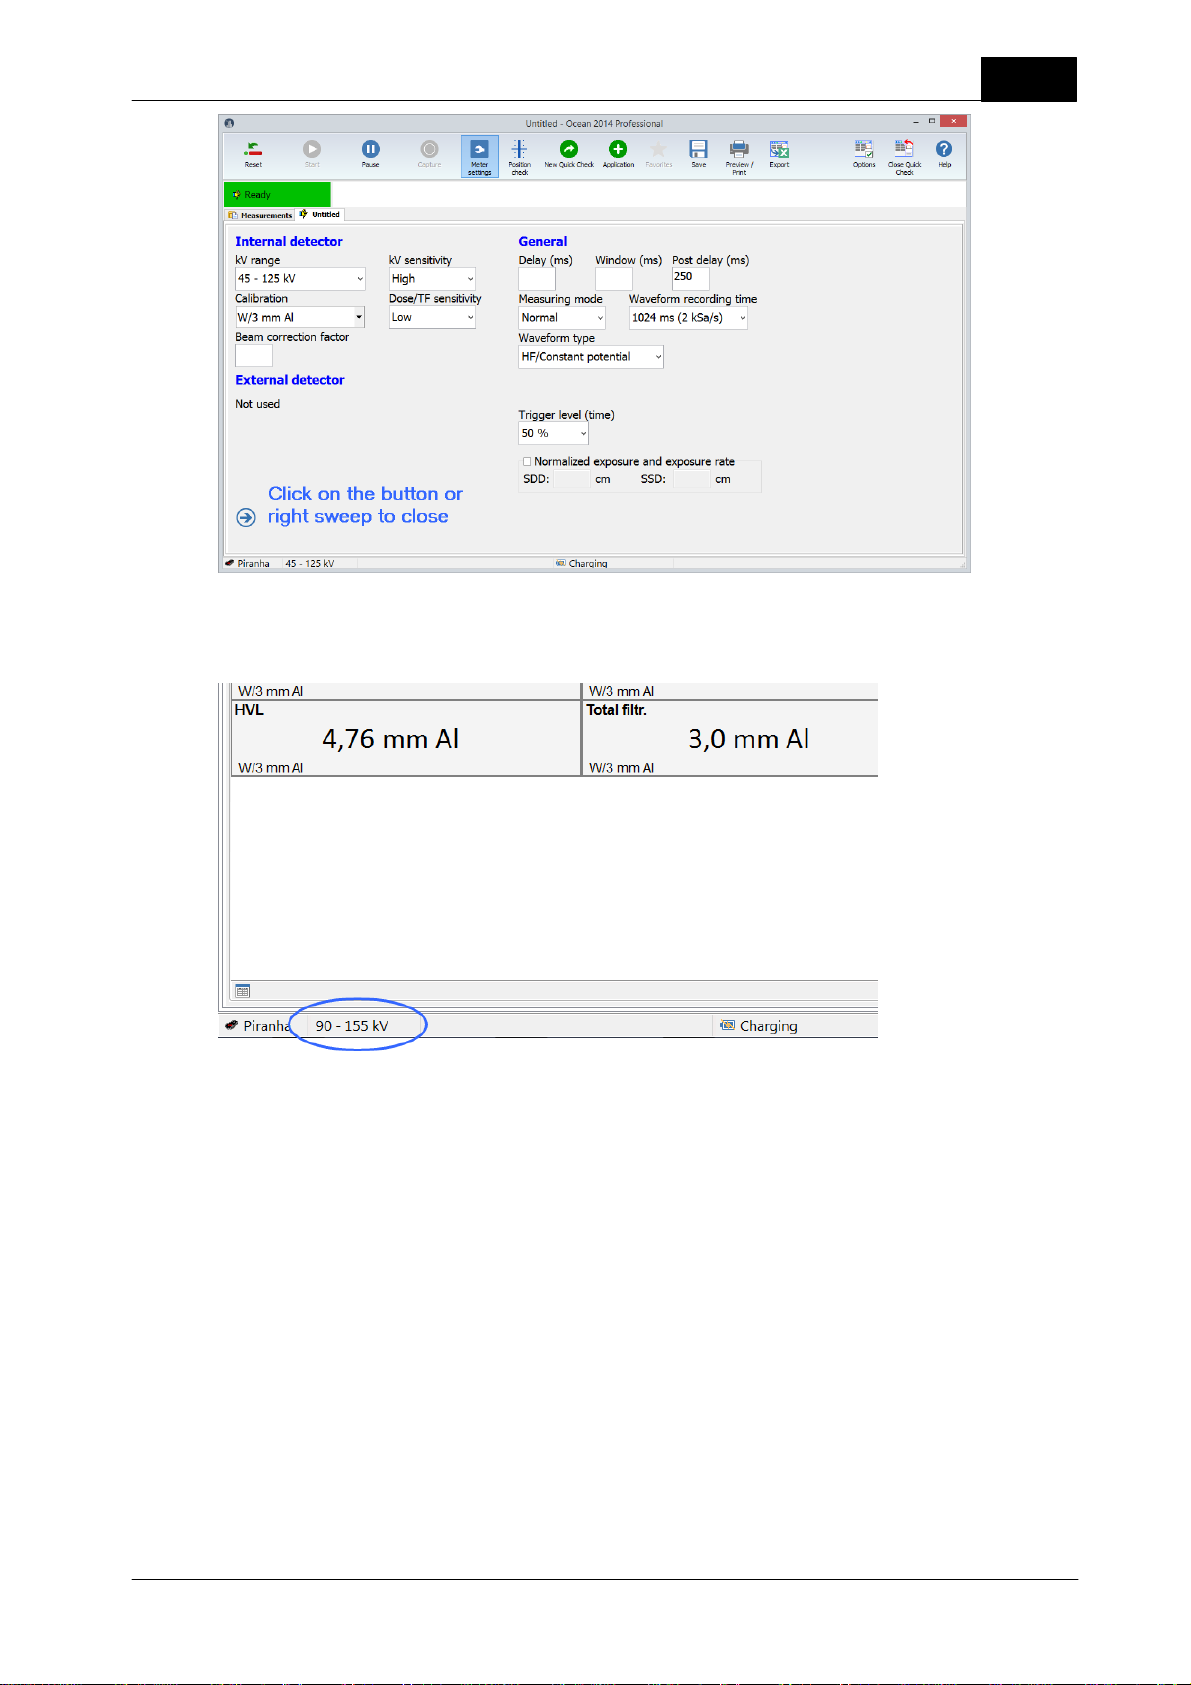
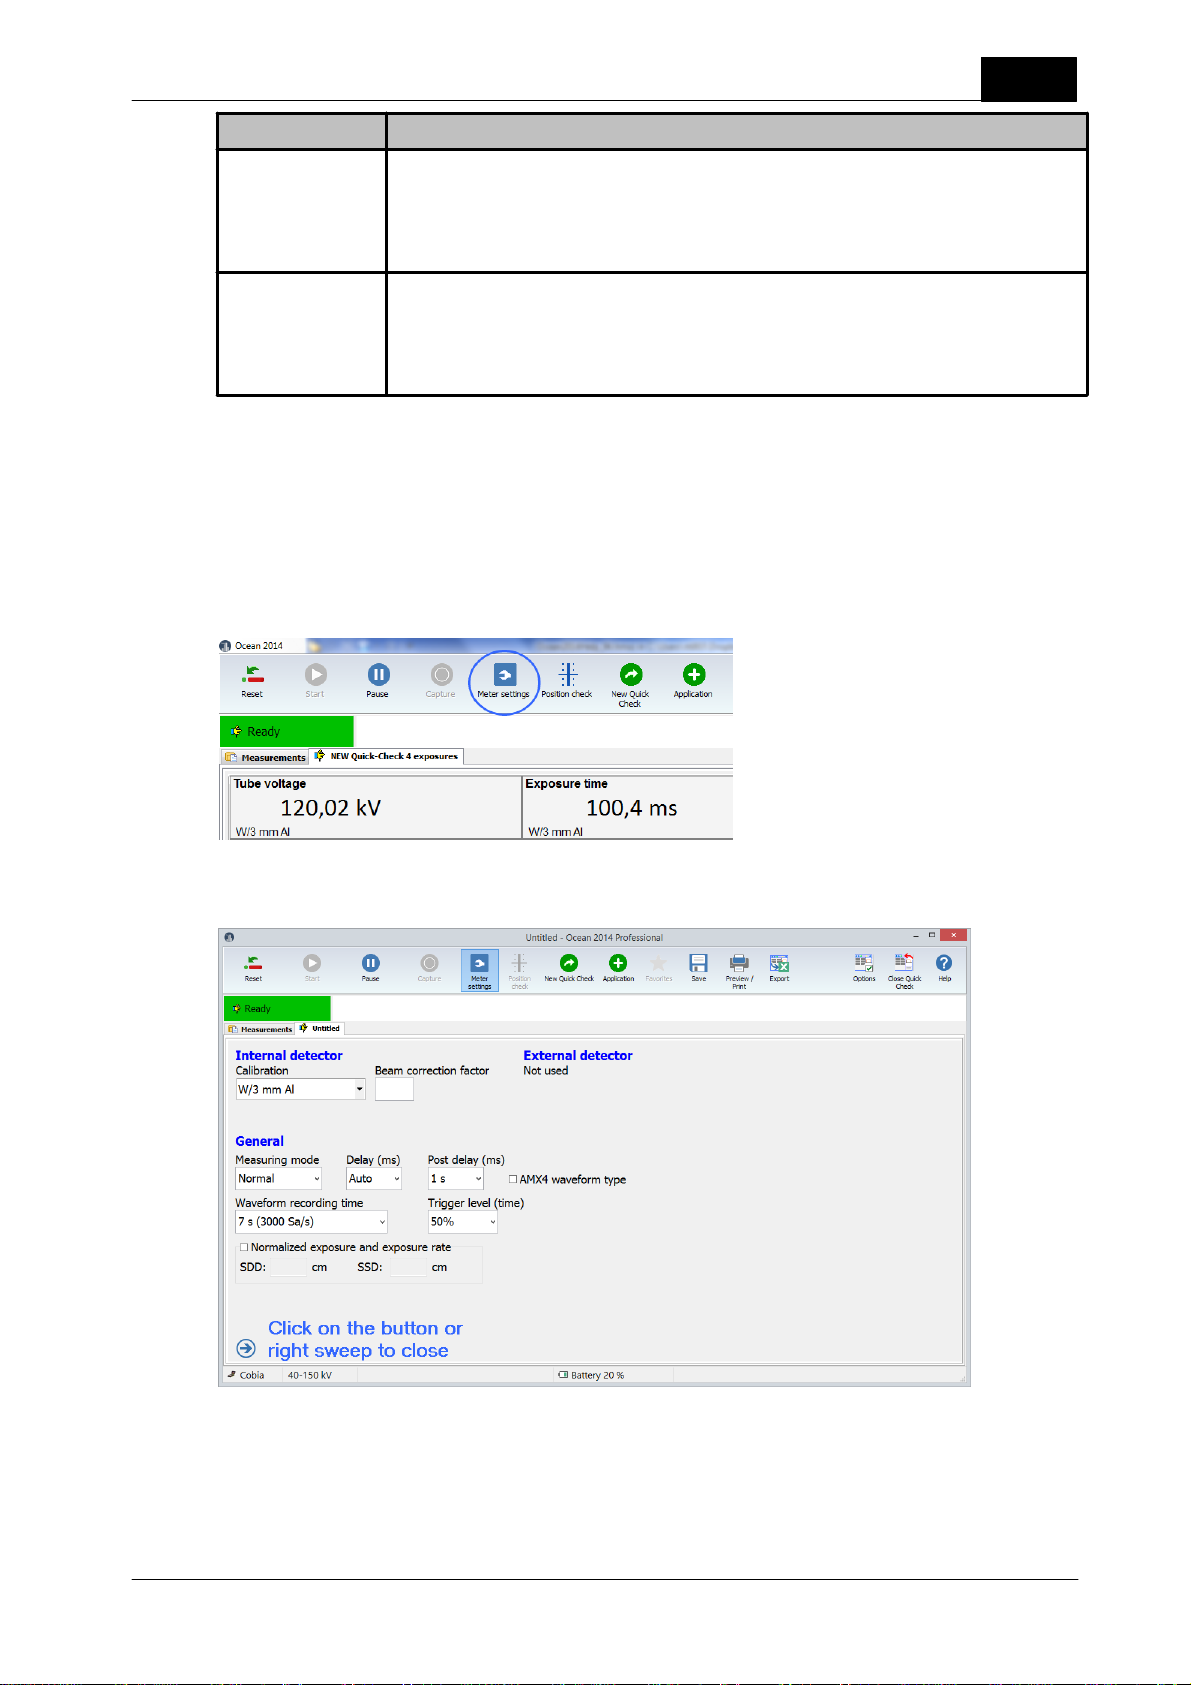
There are several ways to change meter settings. All meter settings are available if you click on the "Meter
adjust" button:
When you click on the button the Meter settings are shown (this screen may look different depending on
model and selected detectors):
Piranha/Cobia & Quick Check Getting Started
2018-06-20/1.11A
Page 19
Quick Check
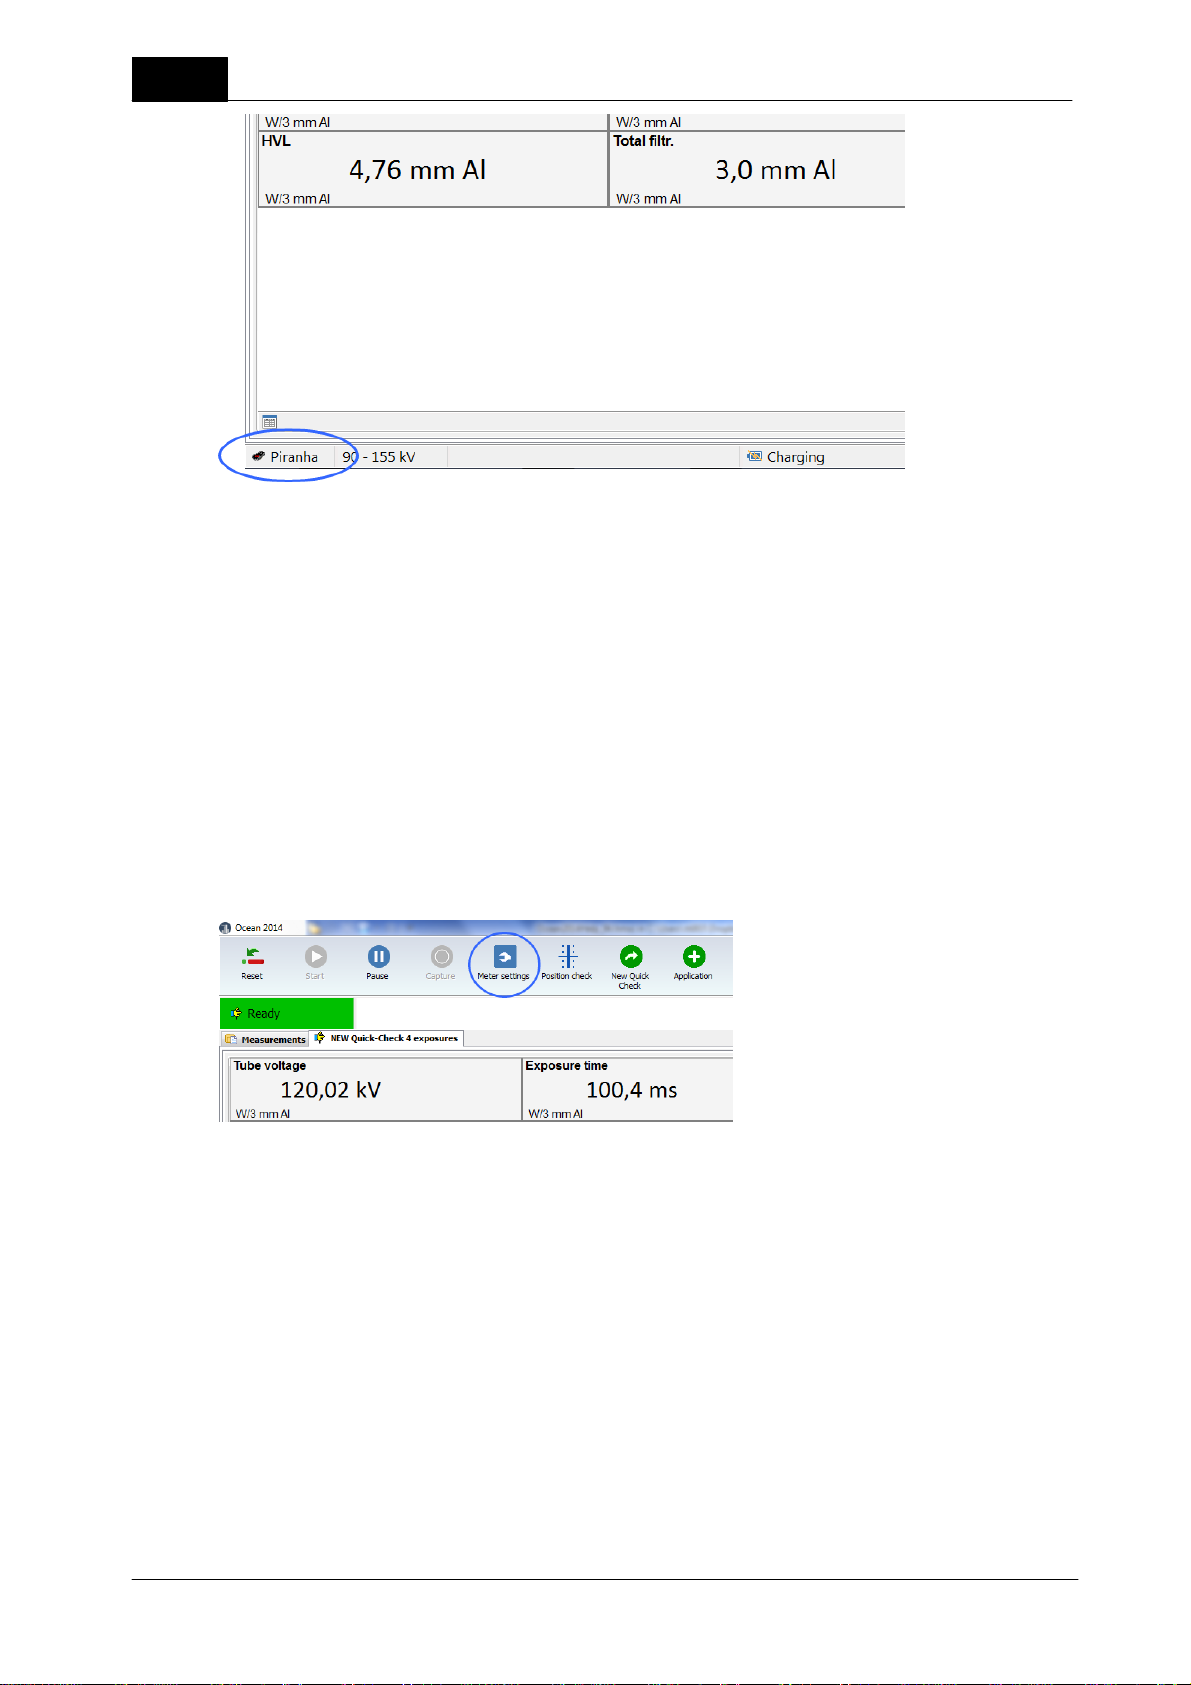
There are also some short cuts to change some of the set values. You can click (or tap) on the kV range
indication at the bottom to change kV range:
19
When you click or tap here, a menu is shown that allows you to quickly select a different kV range.
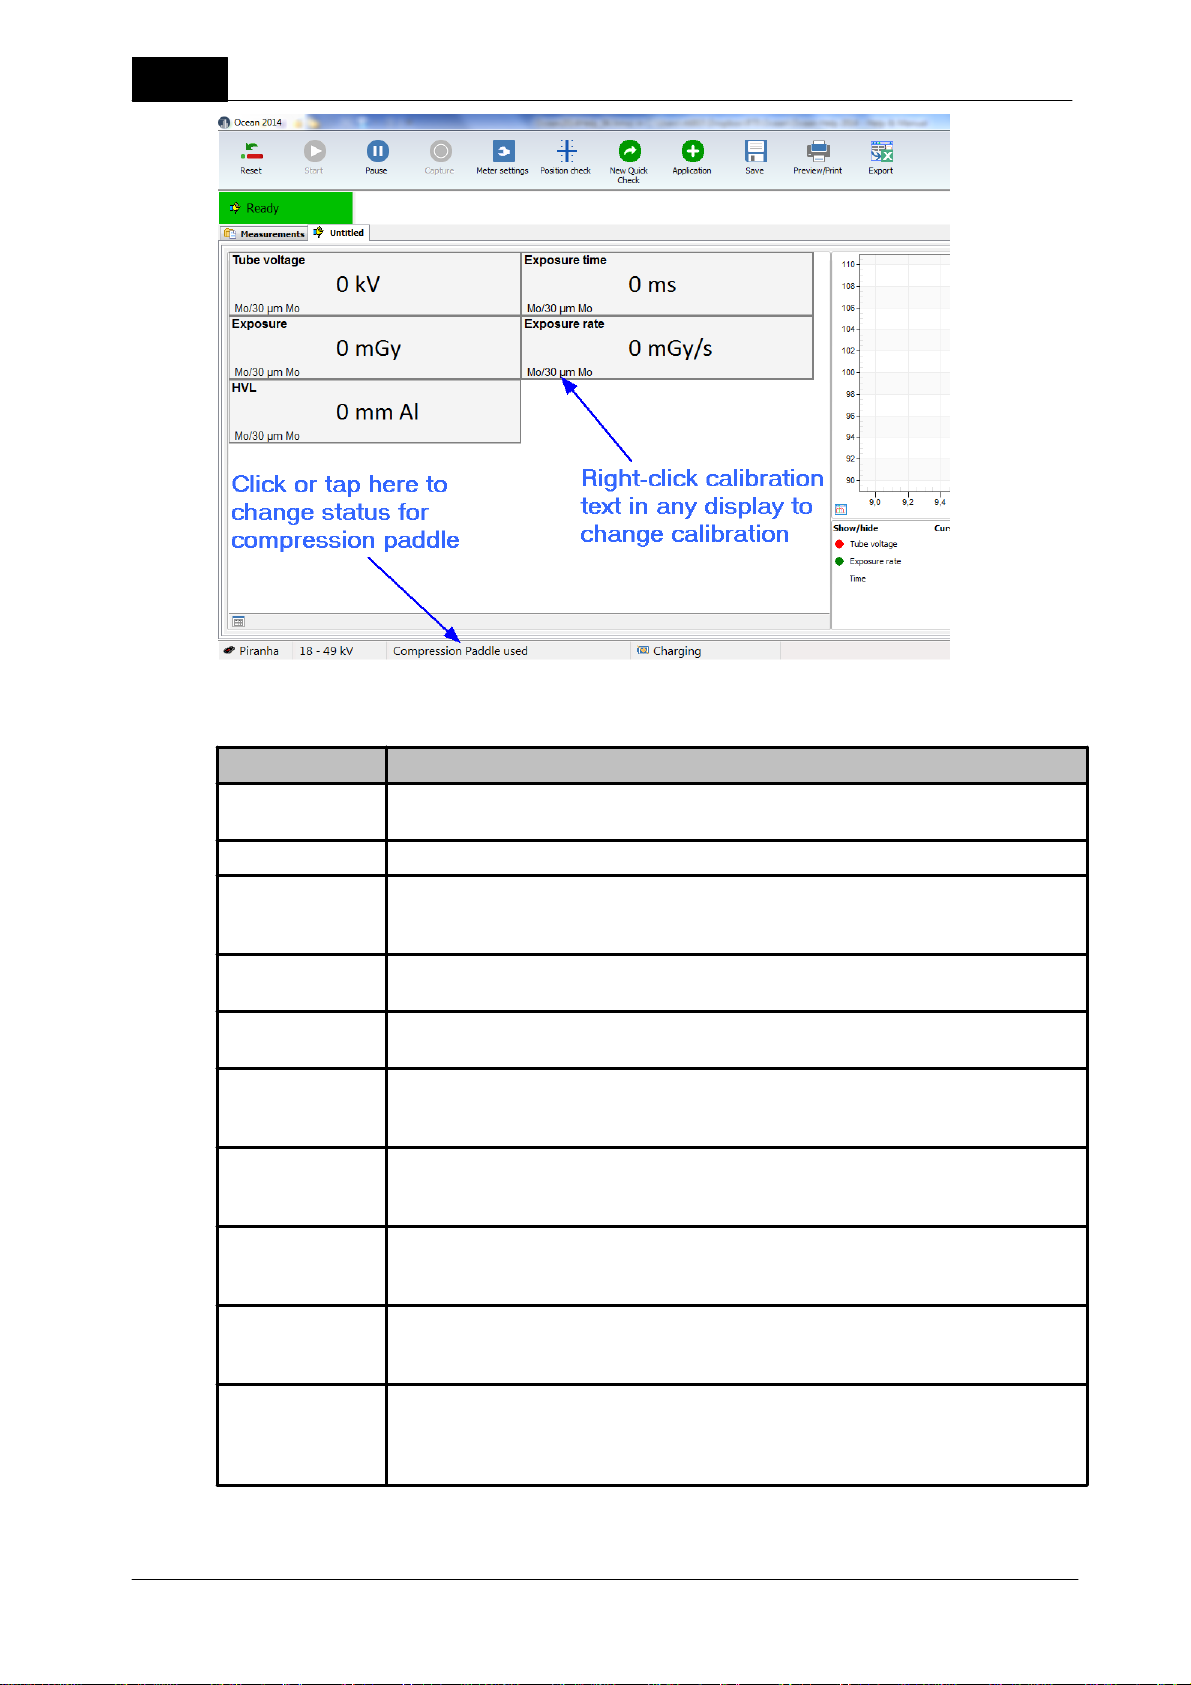
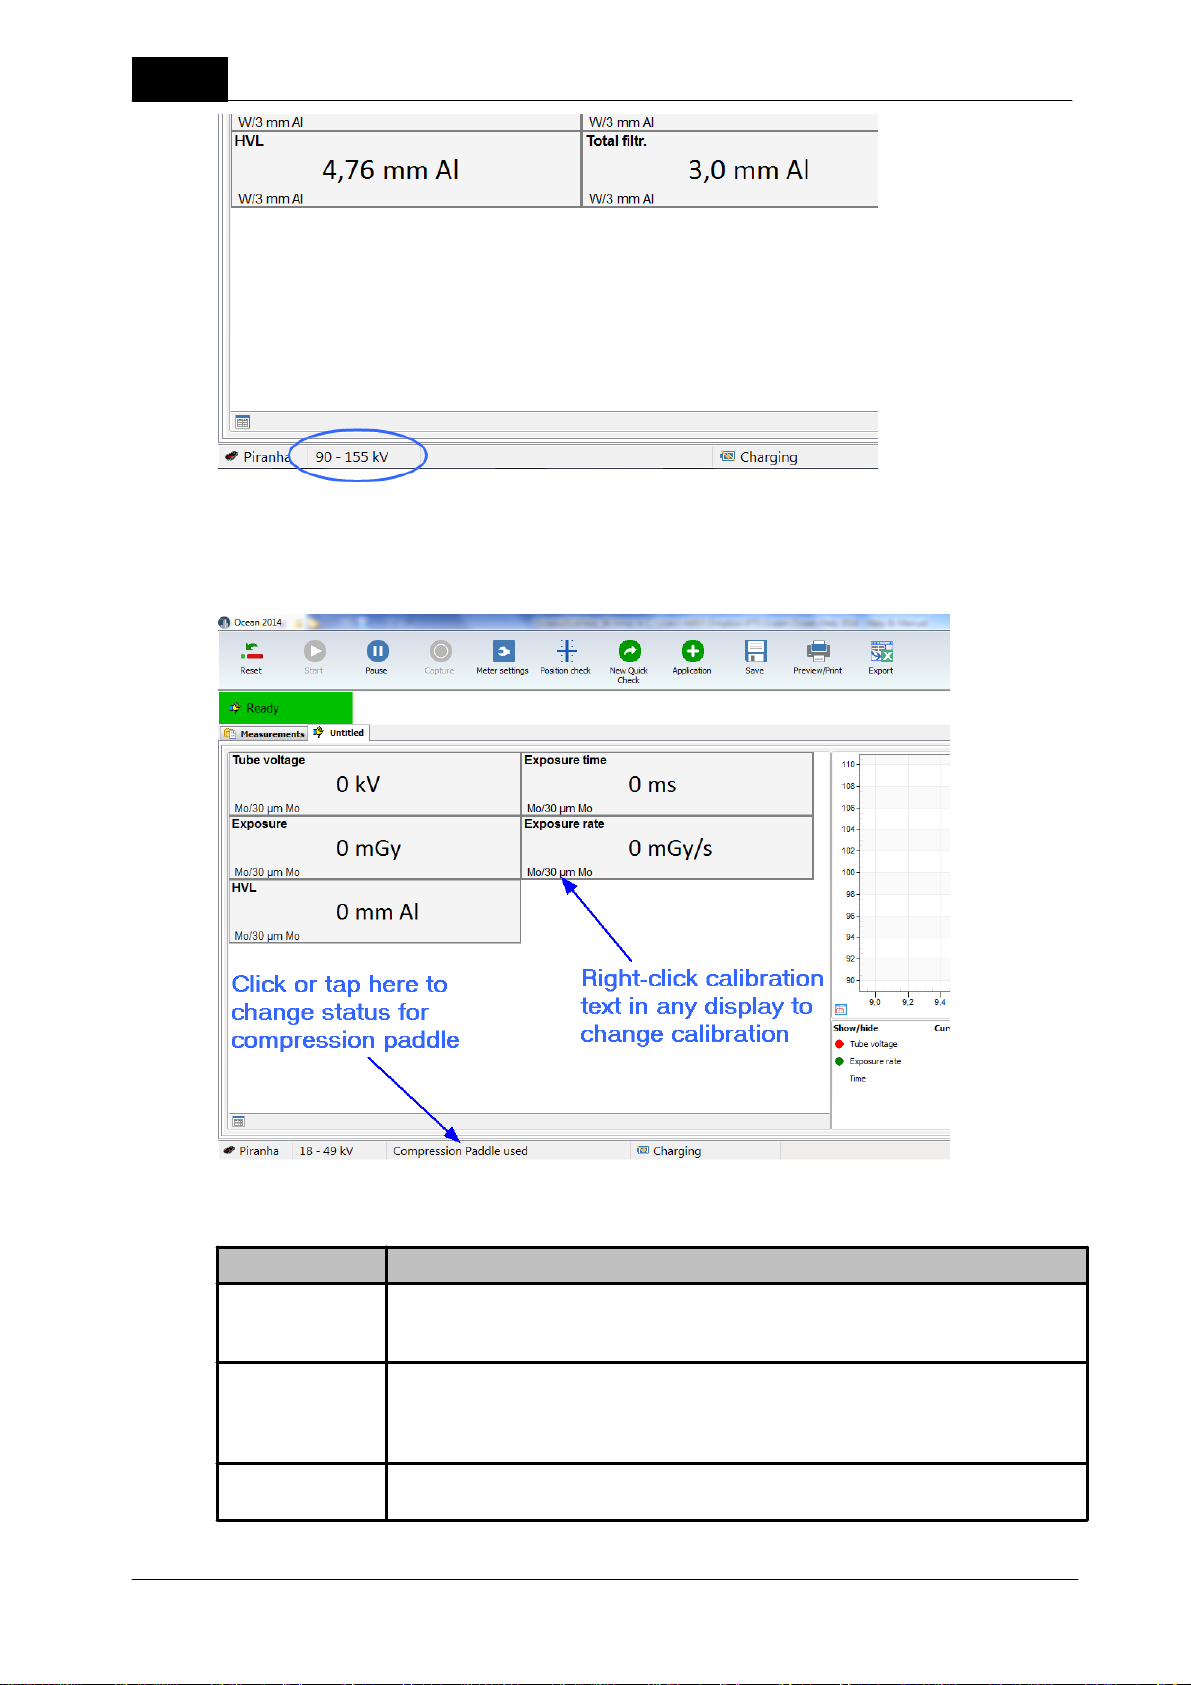
When you measure on mammography you might want to change calibration and/or status for the
compression paddle:
2018-06-20/1.11A Piranha/Cobia & Quick Check Getting Started
Page 20
20
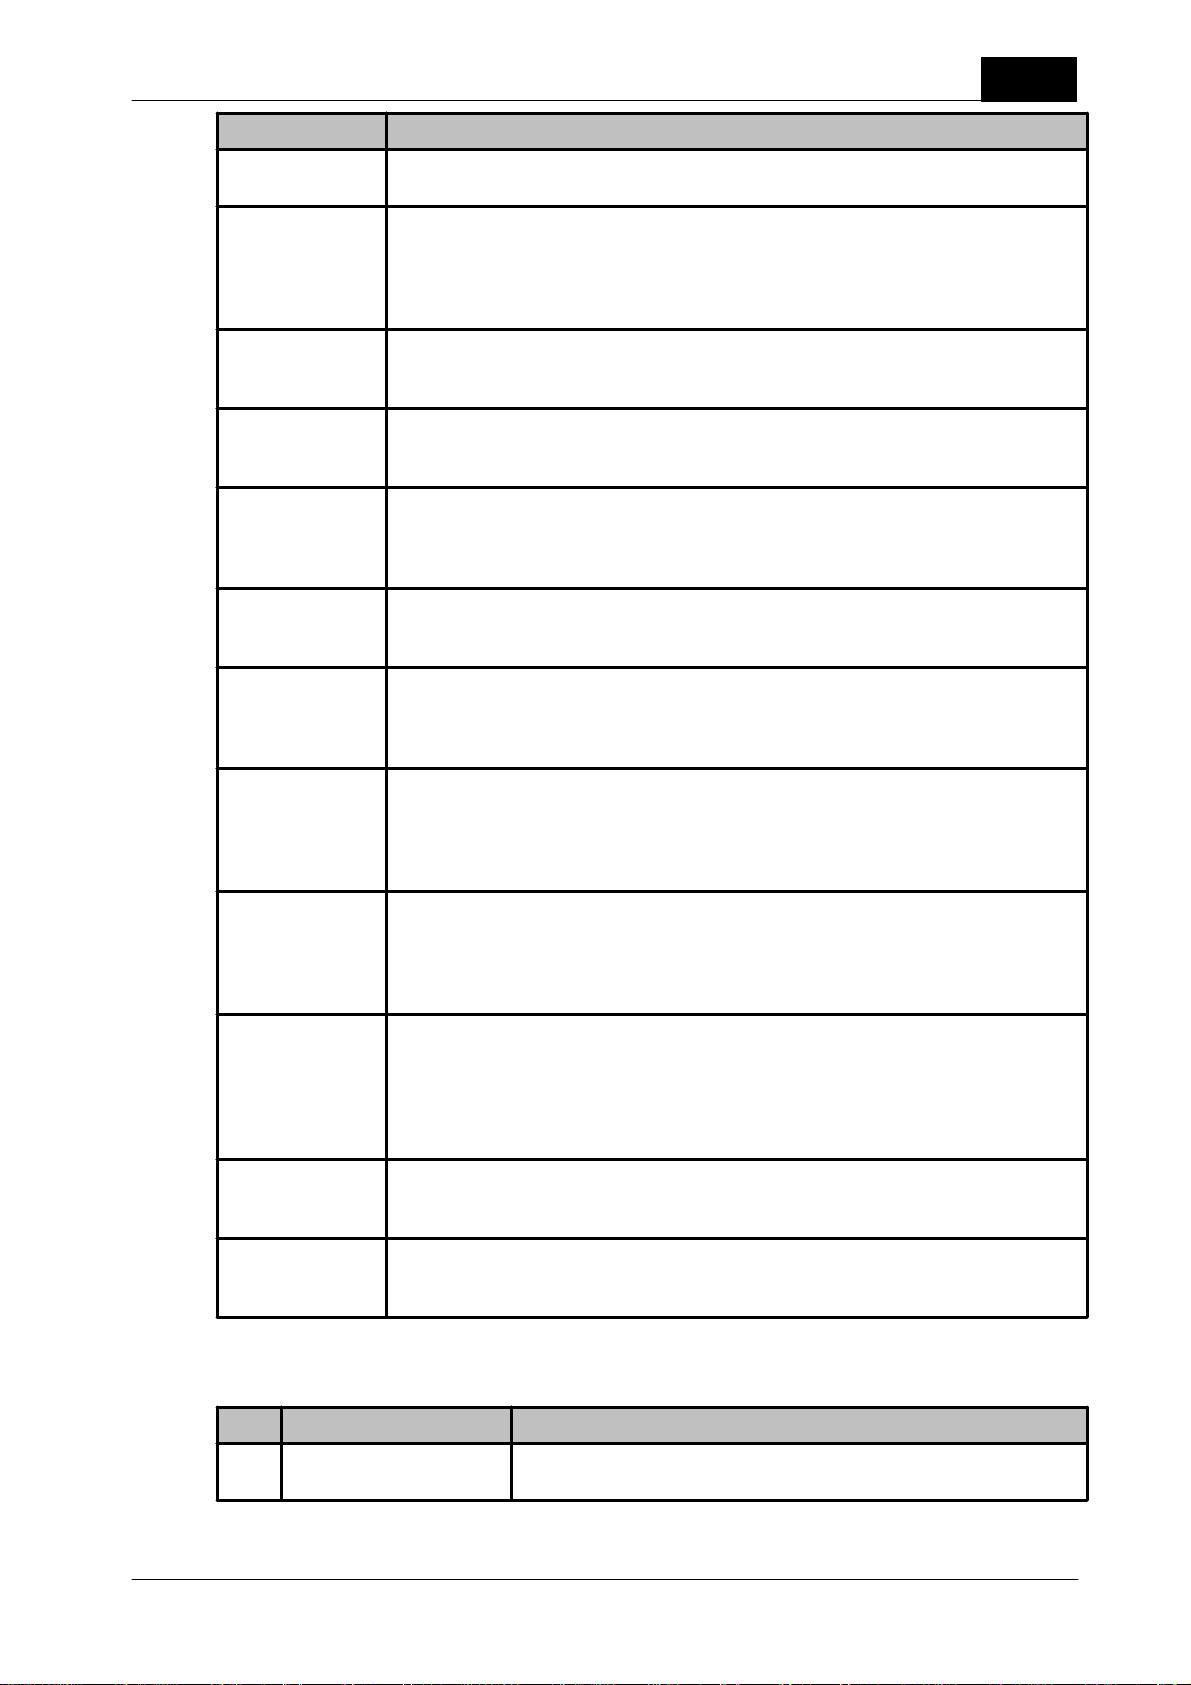
Meter setting
Description and use
Delay
Add a delay after the detection of trig before measurement of kVp starts. This will
delay the kVp measurement, it doesn't affect dose, mAs or time measurements.
Window
Post delay
This is the time the meter waits after trig off before it assumes that the exposure is
finished. The post delay must be set to a time longer than any dead time in the
radiation.
kV range
Current kV range. You need to change this only for radiography/fluoroscopy, for
mammography, dental and CT you only have one range.
Calibration
Available calibrations for the internal (kVp and exposure) used. See table below that
describes usage of the different calibrations.
kV sensitivity
Sensitivity setting for the kVp detector (internal detector).
Hi = High sensitivity - for low dose rate
Lo = Low sensitivity - for high dose rate
Dose/TF
sensitivity
Sensitivity setting for the dose and total filtration measurement (internal detector).
Hi = High sensitivity - for low dose rate
Lo = Low sensitivity - for high dose rate
Sensitivity
(External)
Sensitivity setting for the external probe
Hi = High sensitivity - for low signals
Lo = Low sensitivity - for high signals
Beam Correction
factor
General (user-defined) correction factor used for all exposure related parameters
measured with the internal detector.
Beam Correction
factor
(External)
General (user-defined) correction factor used for all exposure related parameters
measured with the external detector.
Quick Check
The following meter settings are available in Quick Check:
Piranha/Cobia & Quick Check Getting Started
2018-06-20/1.11A
Page 21
Quick Check
Meter setting
Description and use
Calibration
(External)
Calibration for the external probe
Measuring mode
You can select between Normal, Timed or Free run
Normal =use this measuring mode for exposures and fluoroscopy
Timed = meter measures during a time you specify
Free run = meter measures continuously without use of any trig levels
(for more information see table below)
Measurement
time
(Timed mode only)
Measuring time when Timed mode is used.
Waveform
recording time
Select the waveform recording time. Use the shortest time to see details in the
waveform. If you use a longer time, you lose details in the waveform. This setting
doesn't influence on the accuracy.
Waveform type
This is the waveform type for the X-ray generator. It is normally HF/DC. Sometimes
for older X-ray units and for dental you must use 1-phase. Be careful to select the
correct waveform type for maximum accuracy. Note that there is a special selection for
AMX-4.
Total filtration
(External)
(R/F, dental only)
The filtration used the external RTI Dose Probe to do energy compensation.
Added filtration
(mammography
only)
Added filtration used for the internal detector do do energy compensation and kV
compensation.
Added filtration
(External)
(mammography
only)
Added filtration used for the external RTI Dose Probe do do energy compensation.
Compression
paddle
(mammography
only)
Select here if compression paddle is used or not used.
Compression
paddle
thickness(mm)
(mammography
only)
Specifies the thickness of the compression paddle in equivalent mm Al. Default is 0.12
mm.
Trigger level
(time)
This is the level used for the time measurement. You can use this if you want for
example to avoid pre-pulses to be included in the exposure time.
Normalized
exposure and
exposure rate
The square-law is used to normalize the dose and dose rate to a distance (SSD)
different from the measuring distance (SDD) when the box is checked.
Code
Calibration
Usage
R1C1W/3 mm Al
General radiography, fluoroscopy, dental and CT
21
How to use the different calibrations:
2018-06-20/1.11A Piranha/Cobia & Quick Check Getting Started
Page 22

22
Code
Calibration
Usage
C3
Straton (Siem1)
Suitable for Siemens CT with Straton tube
C4
GECT (7°)
Suitable for GE CT tubes with a 7° anode angle as well as for other
manufactures CT tubes and replacement tubes with a 7° anode angle
C5
Aquillion 64-
Suitable for Toshiba Aquillion 64-320 CT
C6
GECT (10.5°)
Suitable for GE CT tubes with a 10.5° anode angle
C7M1Mo/30 µm Mo
General mammography
M3
Mo/25 µm Rh
General mammography
M4
Rh/25 µm Rh
General mammography
M6
W/50 µm Rh
General mammography - suitable for Hologic Selenia Dimensions and
Fujifilm Amulet
M7
W/0.50 mm Al
General mammography - suitable for Philips MicroDose (Sectra)
M8
Mo/1 mm Al
General mammography
M10
W/50 µm Ag
General mammography - suitable for Hologic Selenia Dimensions and
Fujifilm Amulet
M11
W/75 µm Ag
General mammography
M12
W/50 µm Rh (Gio)
Suitable for Giotto Mammography
M15
W/0.70 mm Al
General mammography - suitable for Hologic Selenia Dimensions and
Fujifilm Amulet
M16
W/50 µm Ag (Sel)
Suitable for Hologic Selenia
M17
W/50 µm Rh (Sel)
Suitable for Hologic Selenia
M18
W/0.30 mm Cu
General mammography - Suitable for Hologic Selenia Dimensions and
Fujifilm Amulet
M19
W/0.70 mm Al (Inno.)
Suitable for Fujifilm Innovality
M20
W/50 µm Ag (Inno.)
Suitable for Fujifilm Innovality
M21
Mo/25 µm Rh (Sel)
Suitable for Hologic Selenia
M22
Rh/Ag (GE HC)
Suitable for GE Senographe Prestina
M23
Rh/Ag IQST (GE HC)
Suitable for GE Senographe Prestina
M24
Mo/Cu (GE HC)
Suitable for GE Senographe Prestina
M25
Rh/Cu (GE HC)
Suitable for GE Senographe Prestina
M26
Mo/Mo (GE HC)
Suitable for GE Senographe Prestina
M27
Affirm Prone W/Ag
Suitable for Hologic Affirm Prone
M28
Affirm Prone W/Al
Suitable for Hologic Affirm Prone
Measuring mode
Description and use
Normal
The Normal mode is used for short and long (fluoro) exposures. In this mode, your
meter will automatically sense if there is a signal and when it is above a certain trigger
level. If the exposure is long, the displays/grid will be updated with new data every 2
seconds. If the exposure is short, the results are displayed as soon as the trigger is
off.
Quick Check
There are three different measuring modes available using the Piranha. They are as follows:
Piranha/Cobia & Quick Check Getting Started
2018-06-20/1.11A
Page 23
Quick Check
Measuring mode
Description and use
Free run
The free run mode has no trigger level. As soon as the meter is told to begin
measuring, it starts to measure even if there is no signal. This measuring mode is
useful when the signal you want to measure is very low. Free run is recommended for
light measurements, especially when measuring "ambient" light (when no shutter is
present).
Timed
The Timed mode setting measures during a pre-defined time period. Measurements in
Timed mode must be started manually. This measuring mode is very useful when you
want to measure a very low signal. You can use the "very high" sensitivity setting in
Timed mode and it will further improve the meter's capability to measure very low
signals.
You can read more about meter settings for Piranha in the topics Meter Adjust and Different measuring
modes.
1.4.2 Cobia
There are several ways to change meter settings. All meter settings are available if you click on the "Meter
adjust" button:
23
When you click on the button the Meter settings are shown:
There are also some short cuts to change some of the set values. You can click (or tap) on the kV range
indication at the bottom to change kV range:
2018-06-20/1.11A Piranha/Cobia & Quick Check Getting Started
Page 24
24
Meter setting
Description and use
Delay
Add a delay after the detection of trig before measurement of kVp starts. This will
delay the kVp measurement, it doesn't affect dose, mAs or time measurements.
Post delay
This is the time the meter waits after trig off before it assumes that the exposure is
finished. The post delay must be set to a time longer than any dead time in the
radiation.
Calibration
Calibration for the internal probe.
When you click or tap here, a menu is shown that allows you to quickly select a different kV range.
When you measure on mammography you might want to change calibration and/or status for the
compression paddle:
Quick Check
The following meter settings are available in Quick Check:
Piranha/Cobia & Quick Check Getting Started
2018-06-20/1.11A
Page 25

Quick Check
Meter setting
Description and use
Beam Correction
factor
General (user-defined) correction factor used for all exposure related parameters
measured with the internal detector.
Beam Correction
factor
(External)
General (user-defined) correction factor used for all exposure related parameters
measured with the external detector.
Calibration
(External)
Calibration for the external probe.
Measuring mode
You can select between Normal or Timed
Normal =use this measuring mode for exposures and fluoroscopy
Timed = meter measures during a time you specify
(for more information see table below)
Measurement
time
(Timed mode only)
Measuring time when Timed mode is used.
AMX-4
Waveform type
Check this box when you measure on a GE AMX-4.
Total filtration
(External)
(R/F, dental only)
The filtration used the external RTI Dose Probe to do energy compensation.
Trigger level
(time)
This is the level used for the time measurement. You can use this if you want for
example to avoid pre-pulses to be included in the exposure time.
Normalized
exposure and
exposure rate
The square-law is used to normalize the dose and dose rate to a distance (SSD)
different from the measuring distance (SDD) when the box is checked.
Code
Calibration
Usage
R1
W/3 mm Al
General radiography, fluoroscopy and dental
Measuring mode
Description and use
Normal
The Normal mode is used for short and long (fluoro) exposures. In this mode, your
meter will automatically sense if there is a signal and when it is above a certain trigger
level. If the exposure is long, the displays/grid will be updated with new data every 2
seconds. If the exposure is short, the results are displayed as soon as the trigger is
off.
Timed
The Timed mode setting measures during a pre-defined time period. Measurements in
Timed mode must be started manually. This measuring mode is very useful when you
want to measure a very low signal. You can use the "very high" sensitivity setting in
Timed mode and it will further improve the meter's capability to measure very low
signals.
25
How to use the different calibrations (only one calibration is available for Cobia):
There are two different measuring modes available using the Cobia. They are as follows:
You can read more about meter settings for Cobia in the topics Meter Adjust and Different measuring modes.
2018-06-20/1.11A Piranha/Cobia & Quick Check Getting Started
Page 26

26
1.5 Applications with analysis
There are also a number of applications available in Quick Check. An application is a predefined measurement
where your data are analyzed, it might also include pass/fail criteria. The applications available in Quick Check
are not possible to modify in any way. If you have more needs, use Ocean Professional. You can then create
tests with user-defined calculations and pass/fail criteria. You will find applications for:
· Accuracy
· Reproducibility
· mA linearity
· HVL
· CTDI
1. You start an application by clicking on the Application button (if the button is not enabled, no applications
are available for current mode):
2. A menu showing available applications is shown:
Quick Check
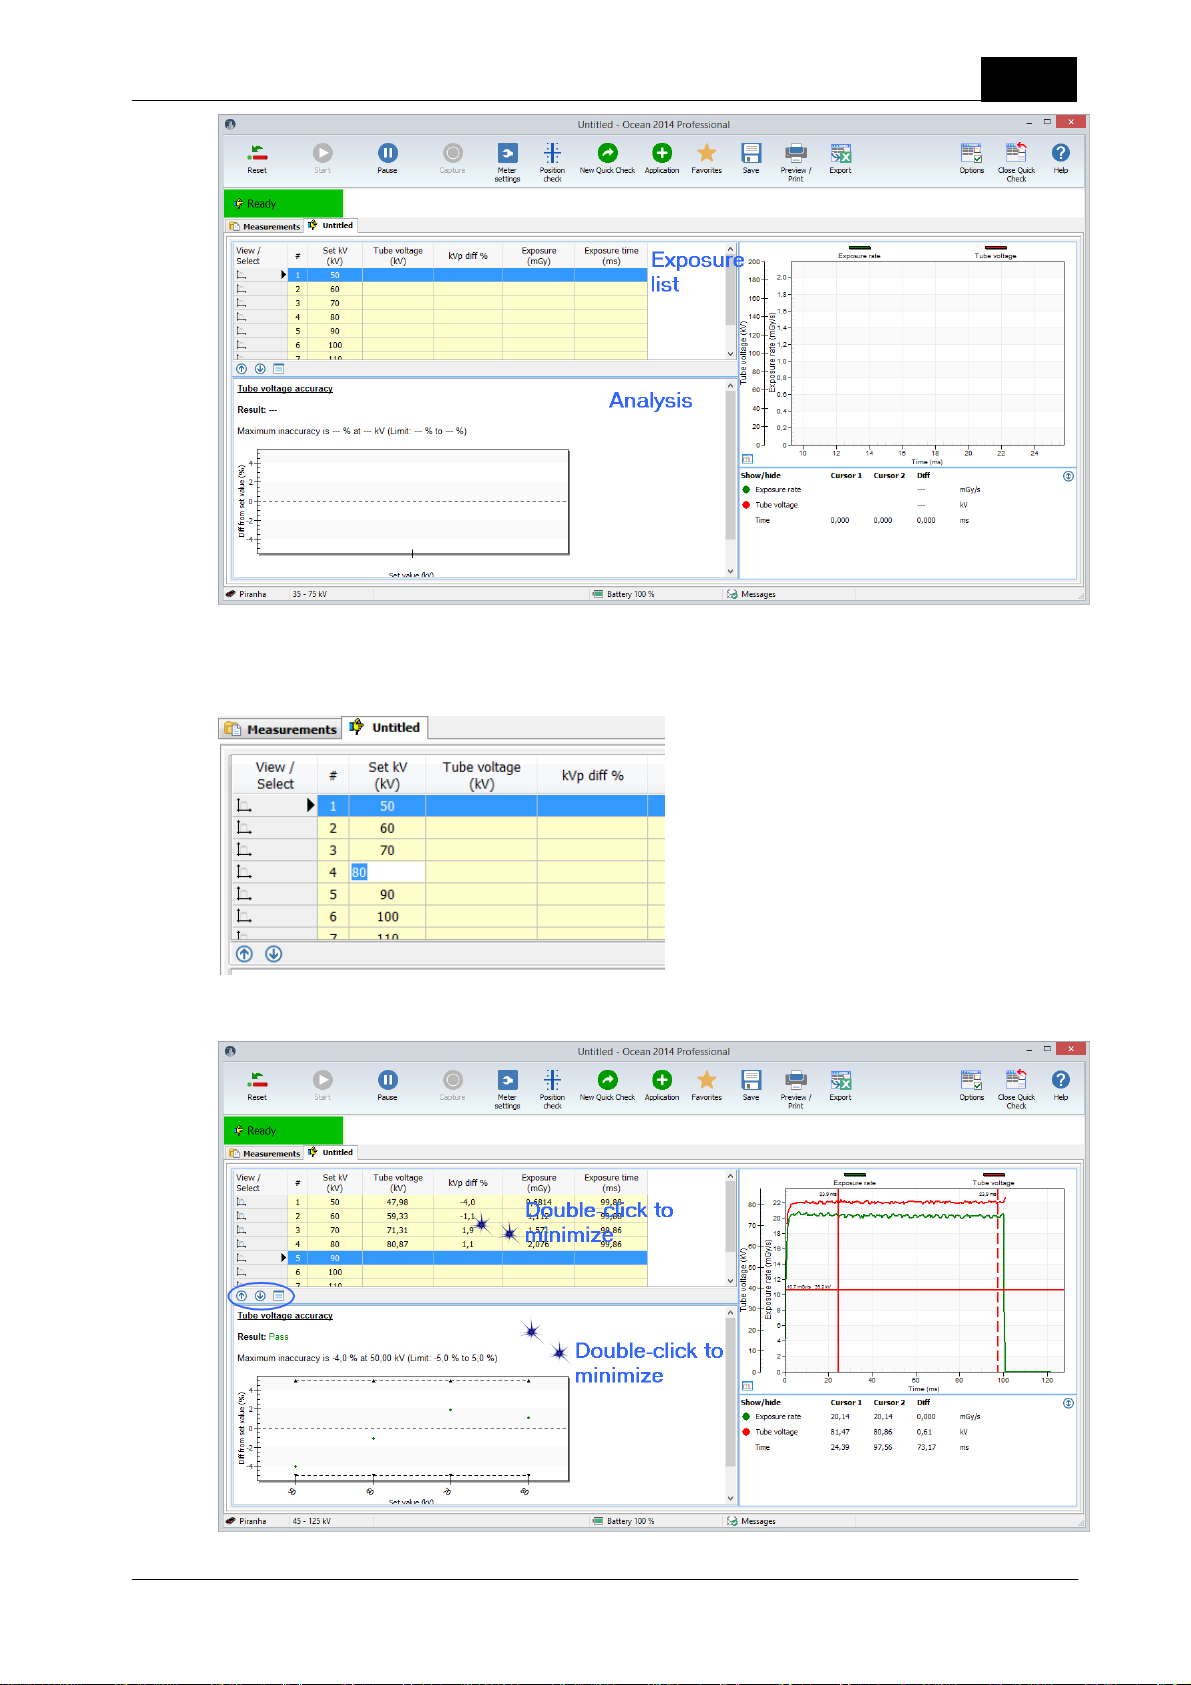
3. Chose an application, for example kVp Accuracy. The screen layout is different for the application compared
to a standard Quick Check measurement. In this case there are no displays only grid (exposure list) is shown.
There is also an analysis that perform some kind of calculation (in this case kVp accuracy) on your measured
data.
Piranha/Cobia & Quick Check Getting Started
2018-06-20/1.11A
Page 27
Quick Check
4. You can modify set values in the grid (exposure list). Click in a cell to change set values. For example, you
may want to change the kVp set value for exposure #4 from 80 to 81 kV.
27
5. Now make the exposures.
2018-06-20/1.11A Piranha/Cobia & Quick Check Getting Started
Page 28

28
You can maximize/minimize the exposure list section and the analysis section with double-click or by clicking
on the buttons .
If there is both displays, grid and analysis present the button is shown. Click here to toggle between
displays and the grid.
Quick Check
The analysis part will now show the result.
6. Click on Preview/Print to print your report.
Piranha/Cobia & Quick Check Getting Started
2018-06-20/1.11A
Page 29
Quick Check
This analysis is fixed and you can not change its structure. If you have more needs and want to customize
your analysis, change pass/fail criteria, use your own calculations and so on; then use Ocean 2014
Professional. The topic Analysis (Definitions) describes which analysis that are available in Ocean 2014.
You can open any Quick Check measurement as a Real-time display and in that way modify and extend its
capability. See topic Open an old measurement.
1.6 Quick Check Favorites
The Favorites function in Quick Check is an optional way for you to customize the use of Quick Check. It
allows you to use and quickly access templates that performs specific measurements. You use Ocean 2014's
template design functions to create your own templates and you store them in a specific folder to make them
available in Quick Check.
By default, no Favorites are available in Quick Check. You can create your own Favorites to be used in Quick
Check by using Ocean 2014's template design capability. The section Create Quick Check Favorites describes
how this is done.
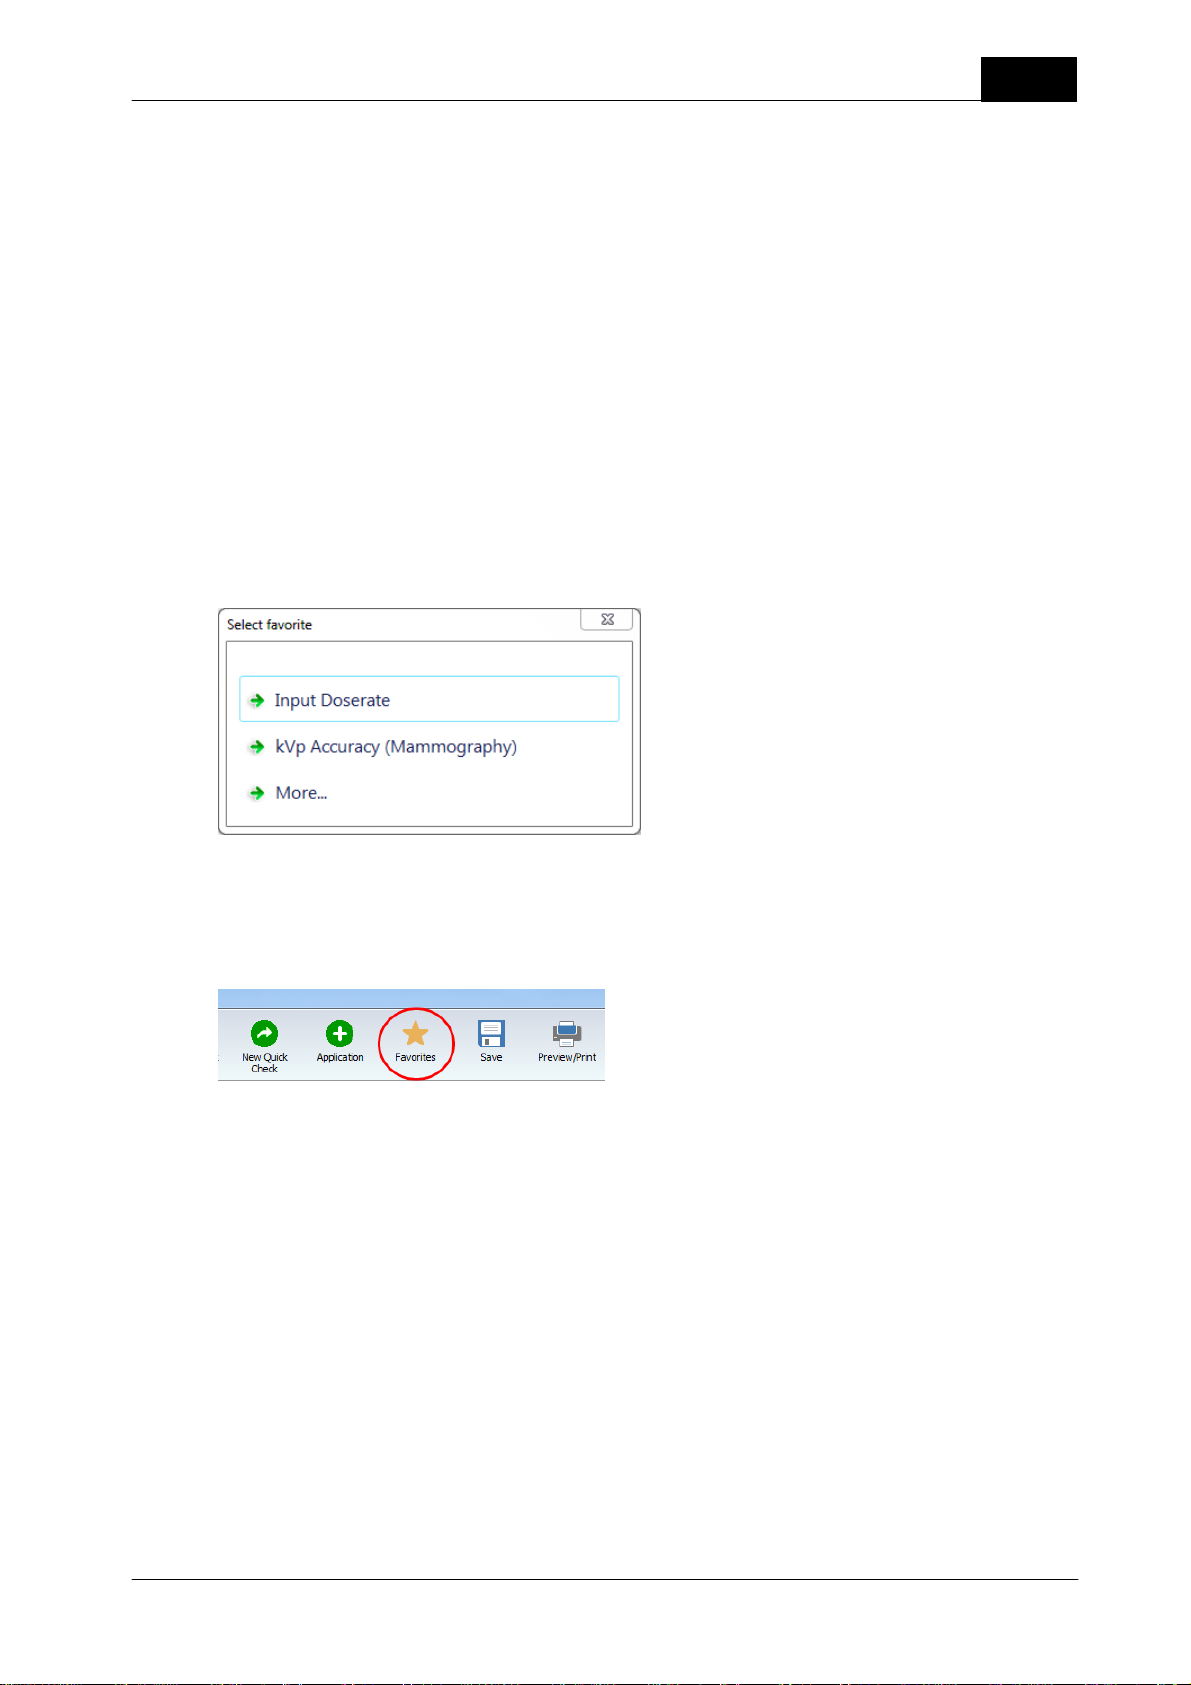
If you have stored one or more favorites in the Favorite folder (in the Library) the Favorite list is shown when
you start Quick Check. The list shows the Favorites you have stored in the folder.
29
In this case are two favorites stored in the Favorites folder. If you select one, it loads and you can start to
measure directly. If you click on "More...", the normal Quick Check setup procedure starts.
You can go to the Favorite list whenever you are using the Quick Check by clicking on the Favorites button.
The Favorite list will be shown and you can quickly select a another favorite.
2018-06-20/1.11A Piranha/Cobia & Quick Check Getting Started
Page 30
30
Click to minimize
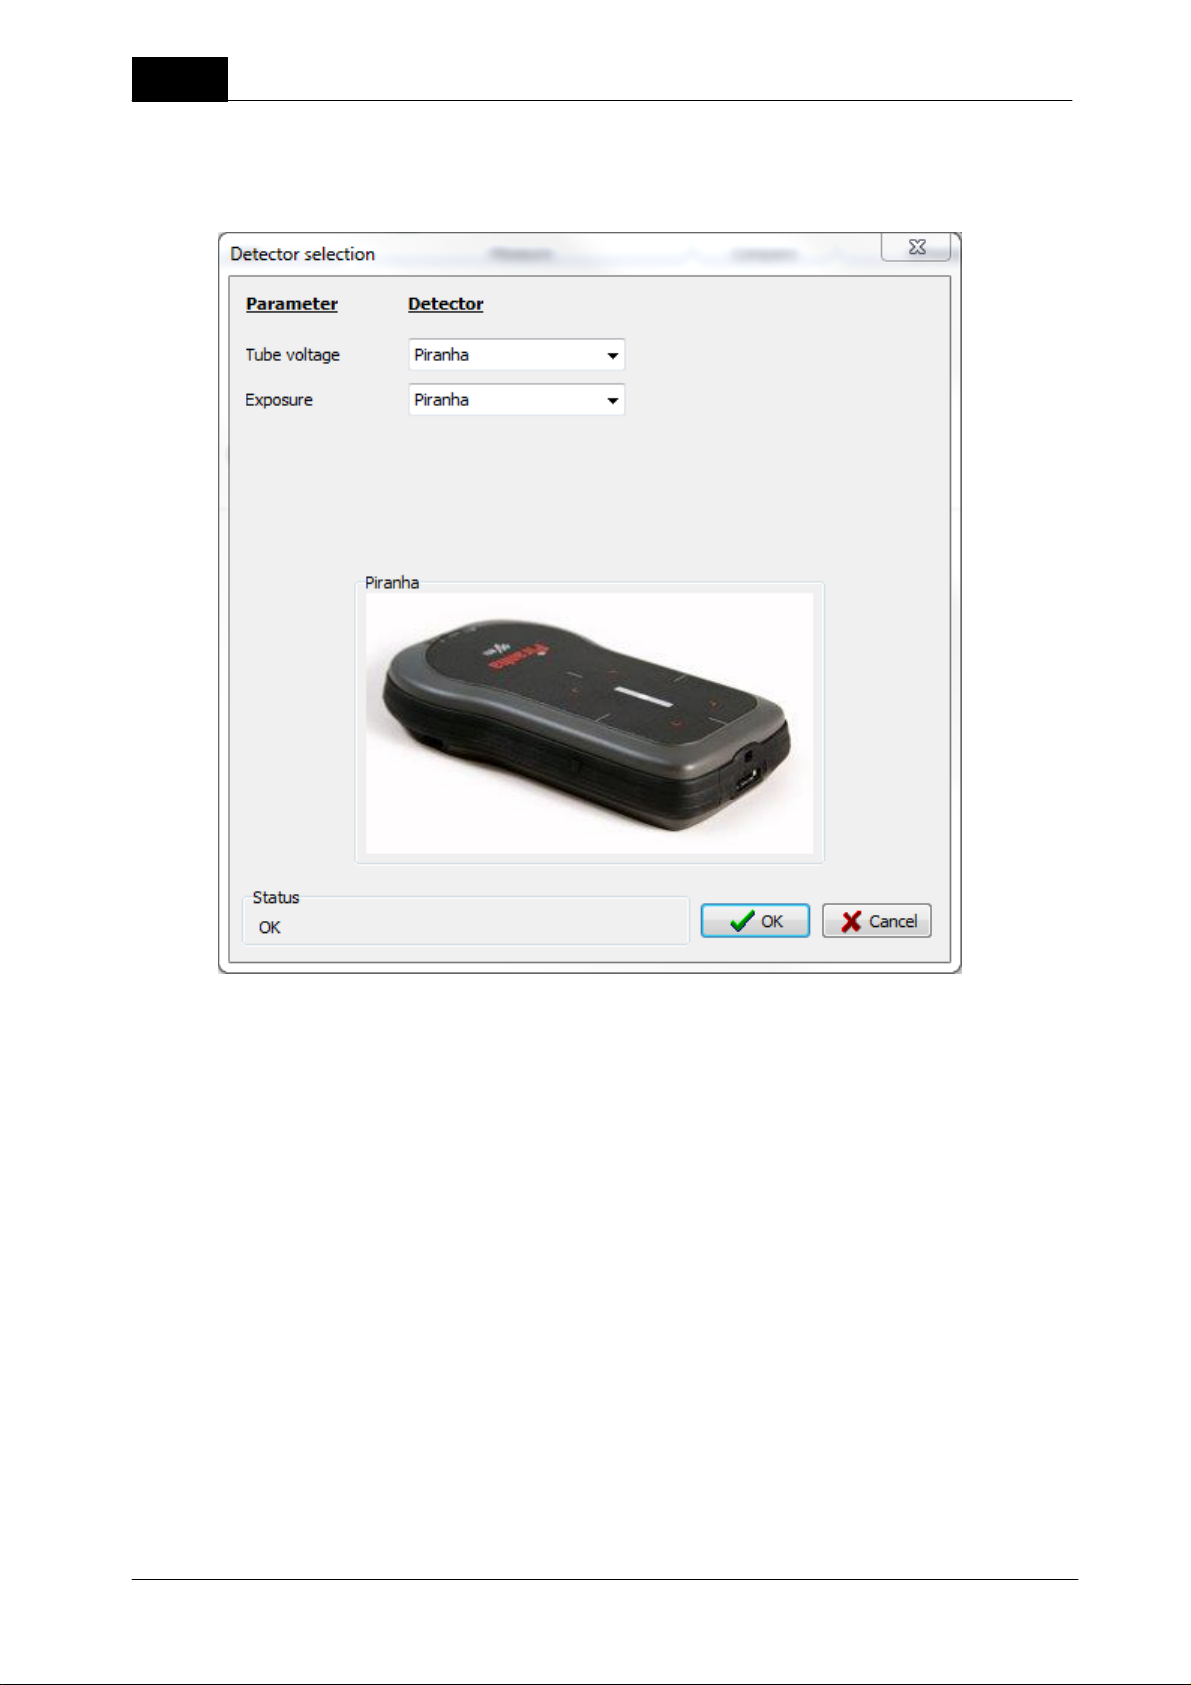
1.6.1 Detector selection
When you load a Favorite the required detectors are checked when it loads. If a detector specified, or a
compatible one, isn't available in the template, the Detector Selection window is shown. It will shown available
detectors. It will be directly shown if you disconnect/connect a detector.
Quick Check
Select the appropriate detector and click OK.
You have two choices if you for some reason isn't able to select a detector:
Do not use: In this case is the corresponding measured parameter(s) skipped.
Keyboard: In this case is a dialogue shown after each exposure that allows you to enter a value manually.
1.6.2 Create Quick Check Favorites
Perform the following steps to use Favorites in Quick Check:
1. Quick Check uses Real-time Display templates. You need to use Ocean 2014's template design function to
create templates for you favorite measurements. This is described in the Design section.
2. Your templates can be ordinary "displays" or have analysis/calculations (you must have Professional to
create this type) like the Quick Check Applications. The following design rules apply for Quick Check:
- To create a "display" favorite: design the Real-time display template with displays and no analysis.
Piranha/Cobia & Quick Check Getting Started
2018-06-20/1.11A
Page 31
Quick Check
- To create a favorite that is shown as an "Application": design the Real-time display template without
displays and include an analysis.
- The template title you specify is shown in the Favorites list.
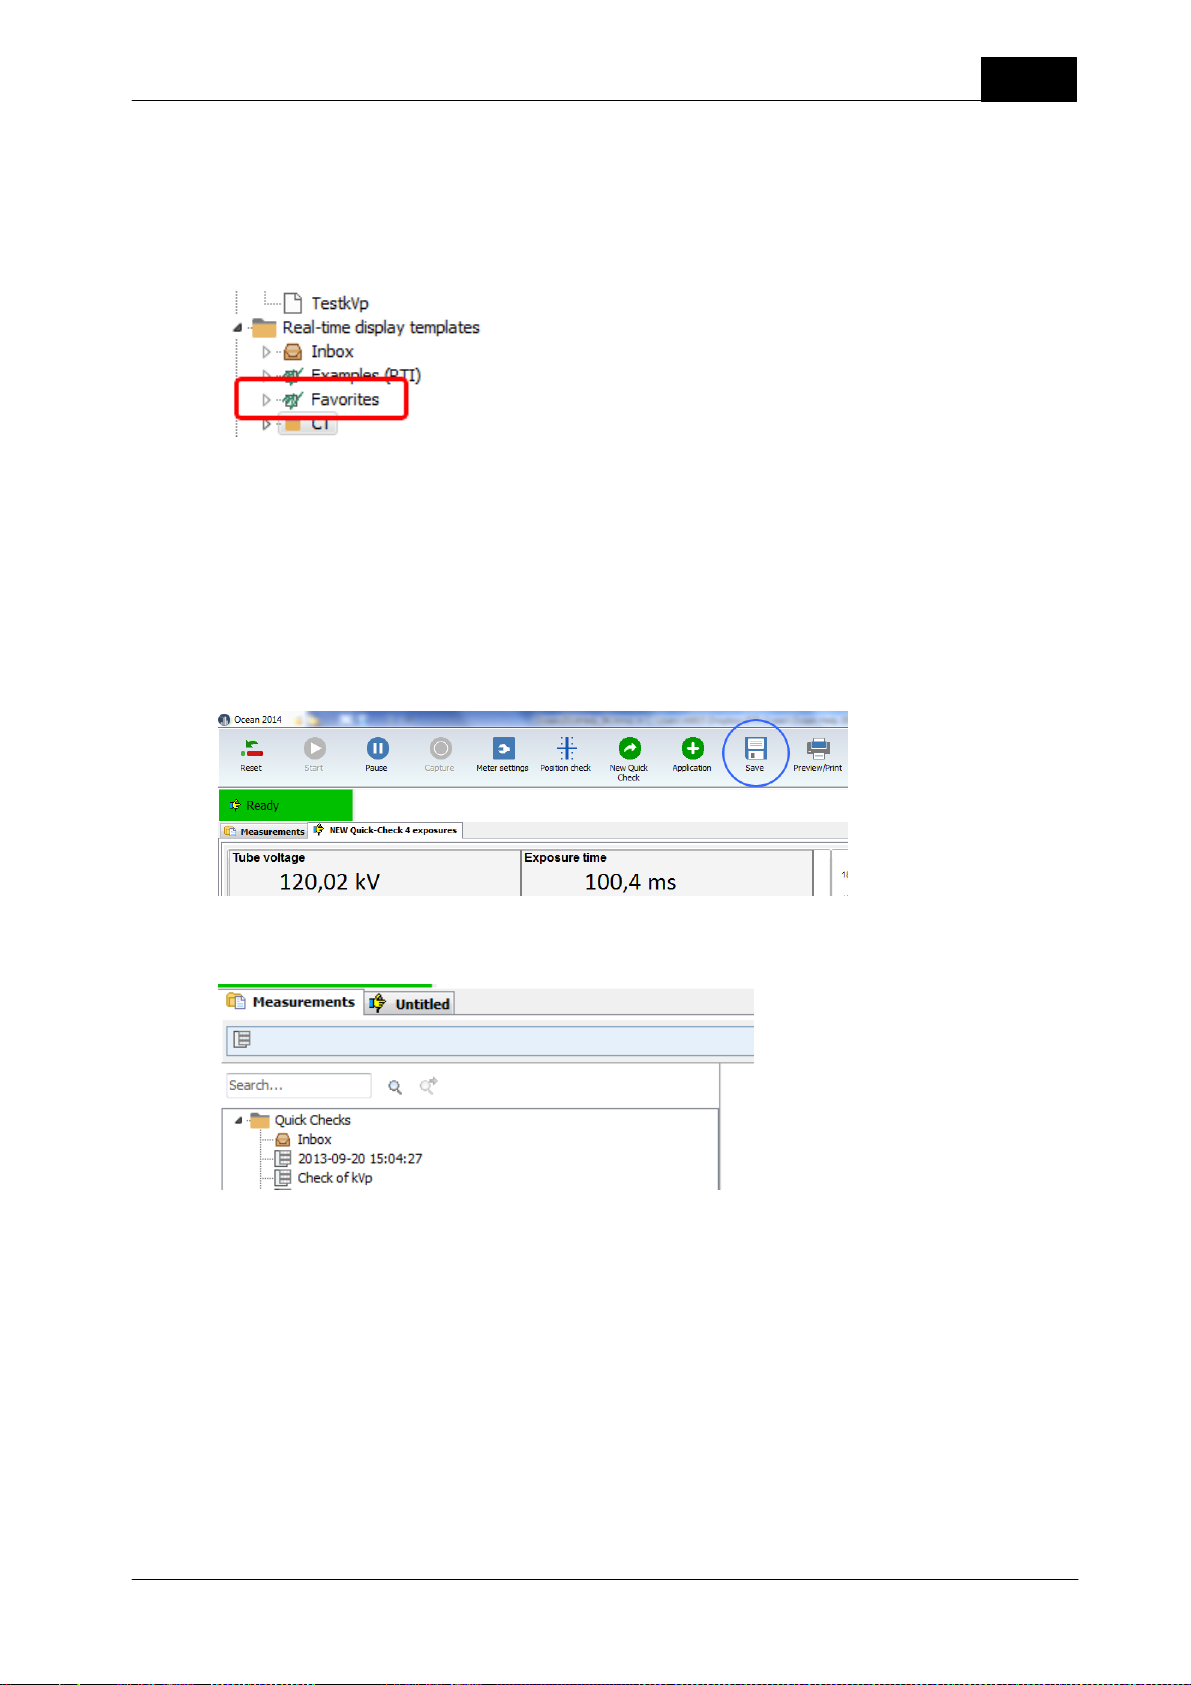
3. Copy or store the favorite templates to the The Favorites folder. It is located in the Library.
You can, if you have many Favorites of different types, create sub folders. Name the sub folders and store
your favorites according to the way you have chosen to categorize them. The sub folders name will be shown
in the Favorite list.
1.7 Save a measurement
Quick Check will not ask you if you want to save your data, you must yourself decide if you want to save.
Click on the Save button in case you want to save your measured data.
31
When you click on the Save button you are asked to enter a name for your data. Your data will be saved in
the "Quick Check" folder in the Measurement database.
Once you have saved your data the first time, Quick Check will ask you before it discards any data.
1.8 Open an old measurement
You can re-open a Quick Check measurement that you have saved. You can open it if you want to continue
to measure or if you want to print it. From Ocean 2014 you can also open a Quick Check measurement in offline mode (no meter connected) to review or print the measurement.
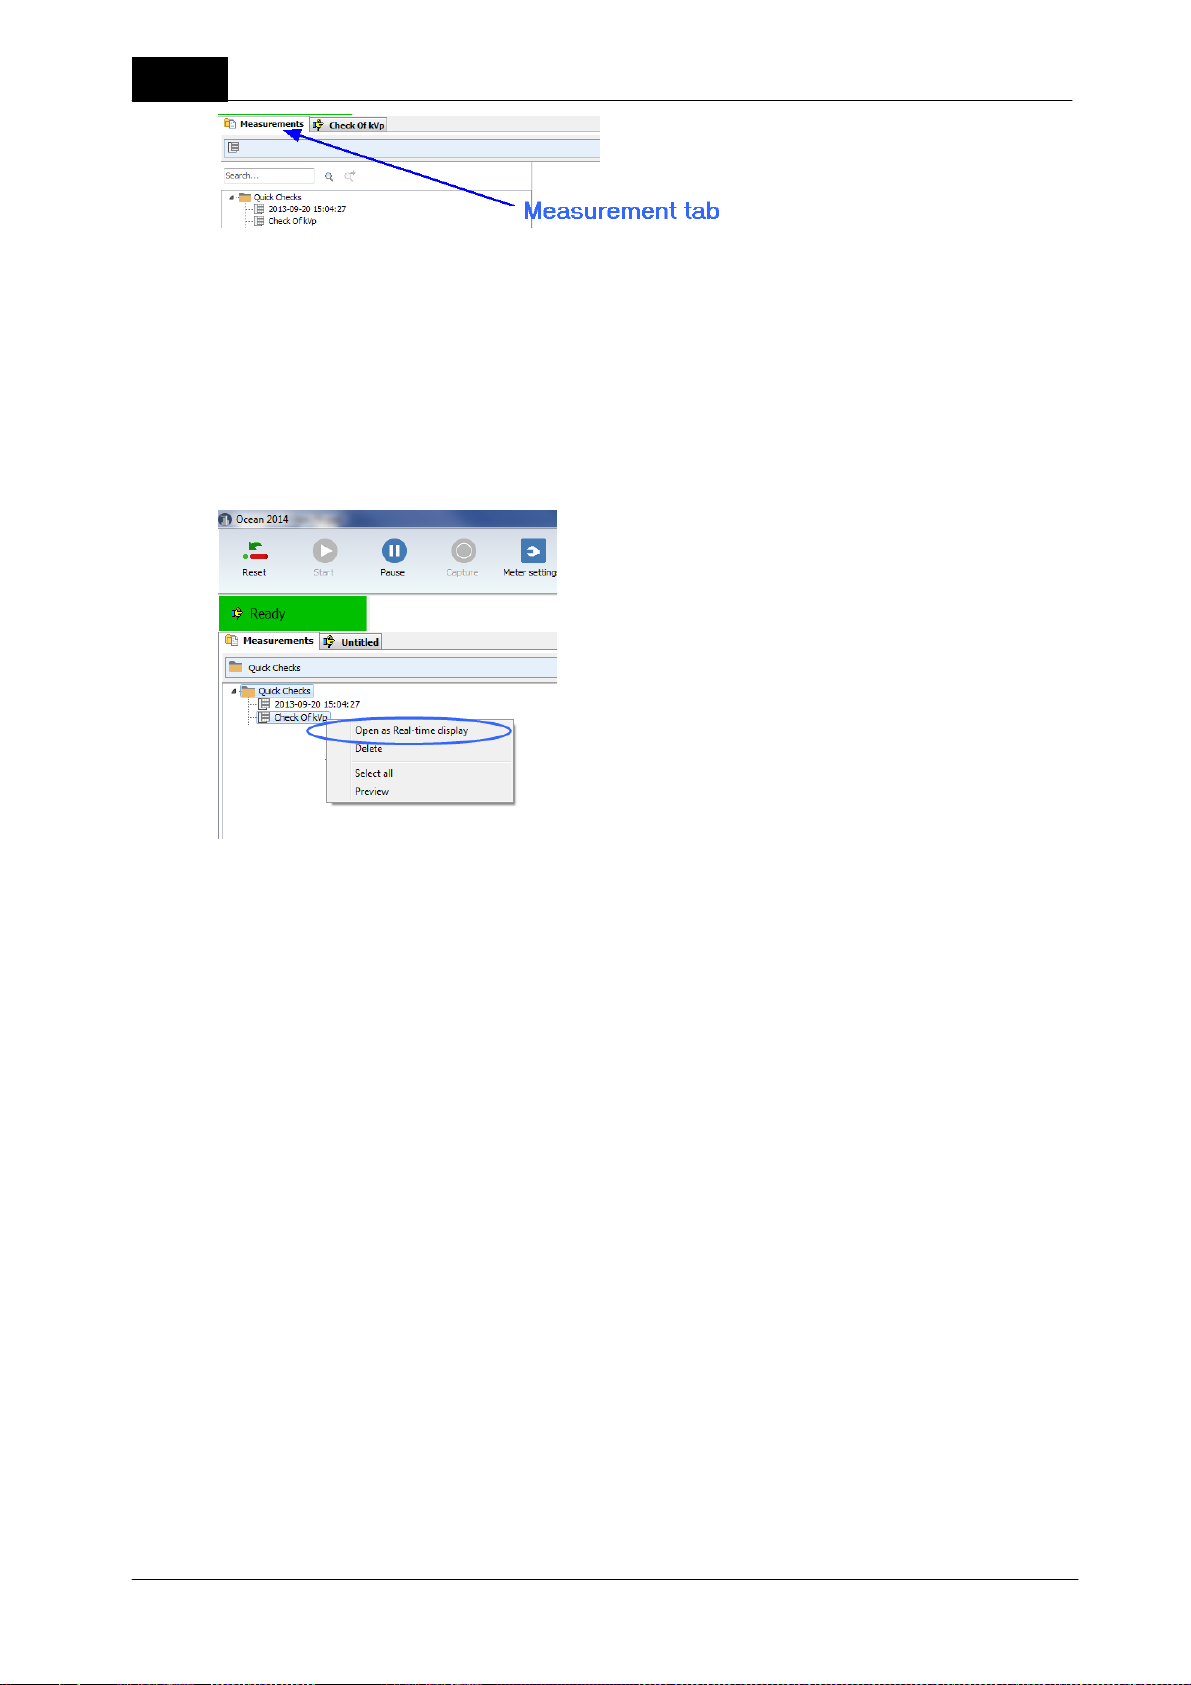
To open a Quick Check measurement:
1. Click on Measurement tab.
2018-06-20/1.11A Piranha/Cobia & Quick Check Getting Started
Page 32
32
2. Go to the "Quick Checks" folder, double-click on the measurement you want to re-open.
You can also open a Quick Check measurement as an Real-time display in Ocean 2014 if you want to modify
it. To open as a real-time display:
1. Open the measurement folder.
2. Right-click on the Quick Check measurement you want to open as a real-time display.
Quick Check
3. The measurement will open in Ocean 2014 as a real-time display. You can now modify the measurement,
what you can do depends on the license level you have. If you open a Quick Check measurement that has
analysis with only Connect license, the analysis will not be visible.
1.9 Print
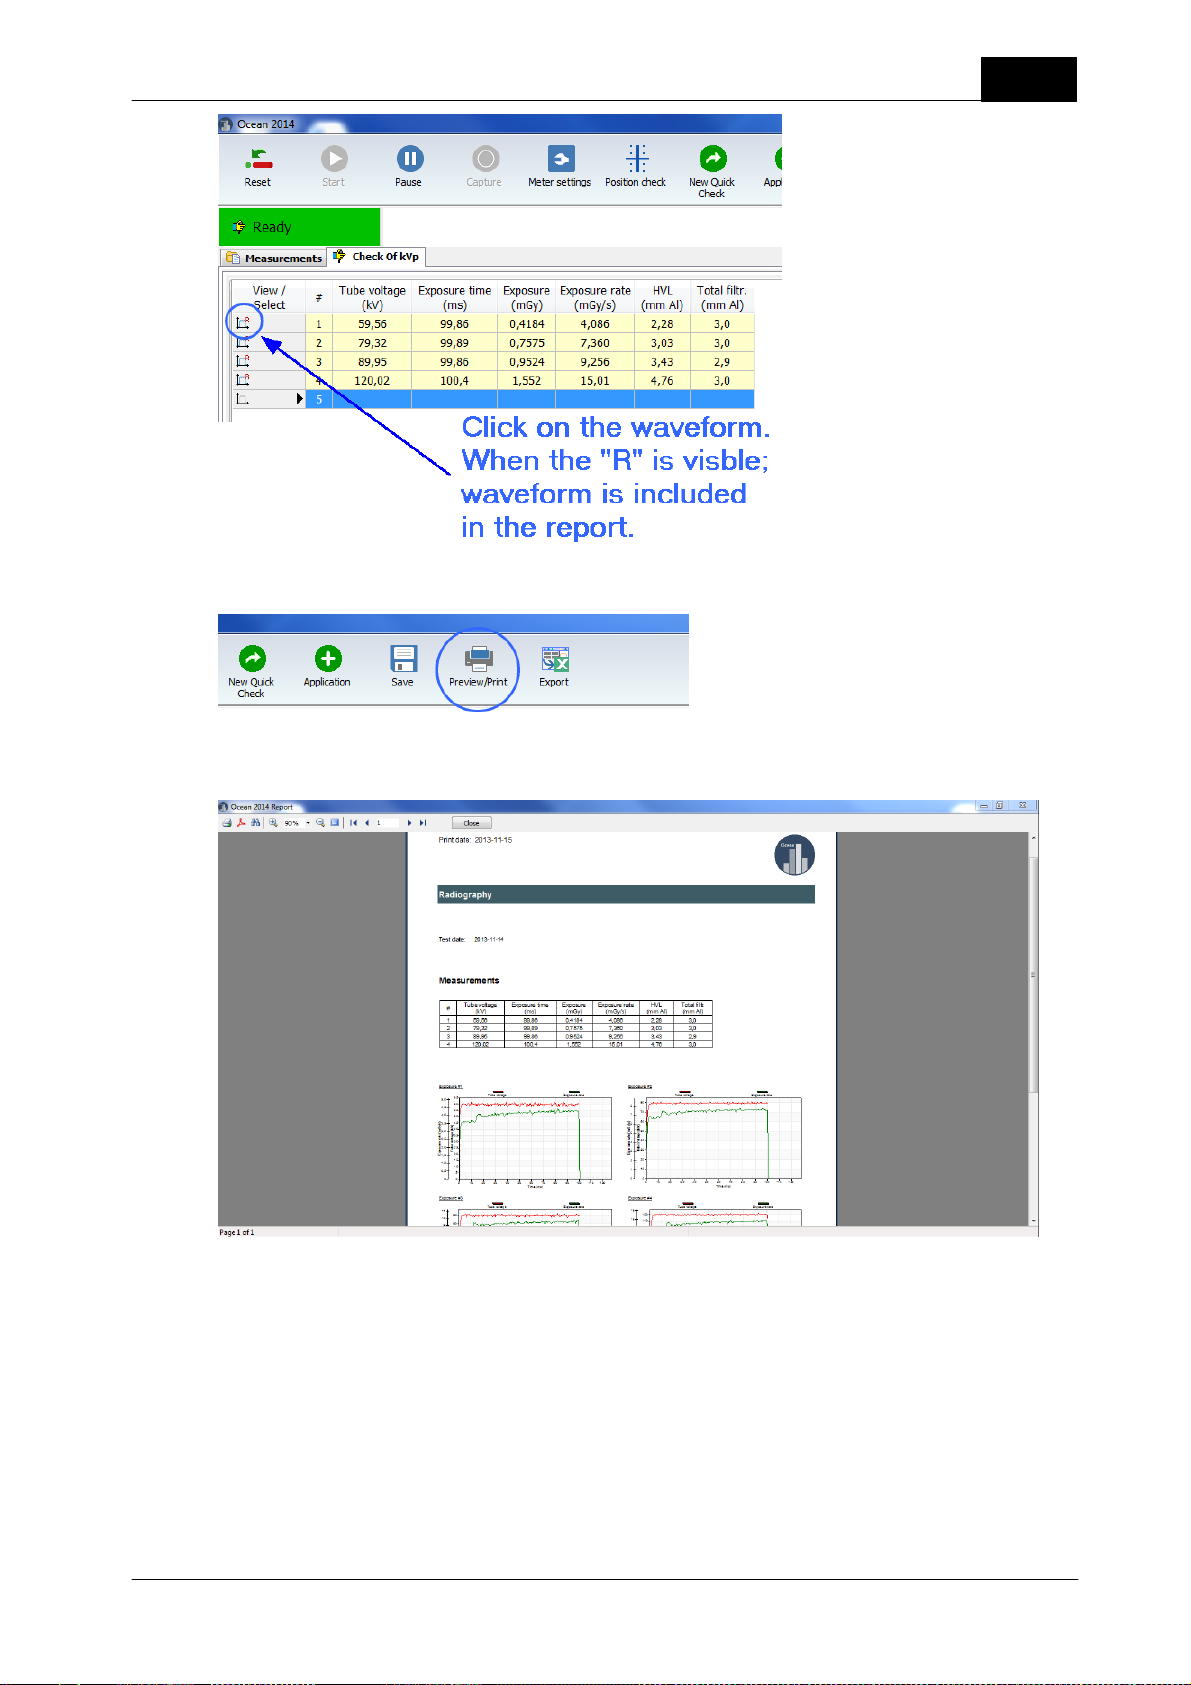
You can print your measured data (or create a PDF file). By default no waveform are included in the report.
To include waveforms do the following:
1. Go to the list view.
Piranha/Cobia & Quick Check Getting Started
2018-06-20/1.11A
Page 33
Quick Check
2. Now click on the Preview/Print button.
33
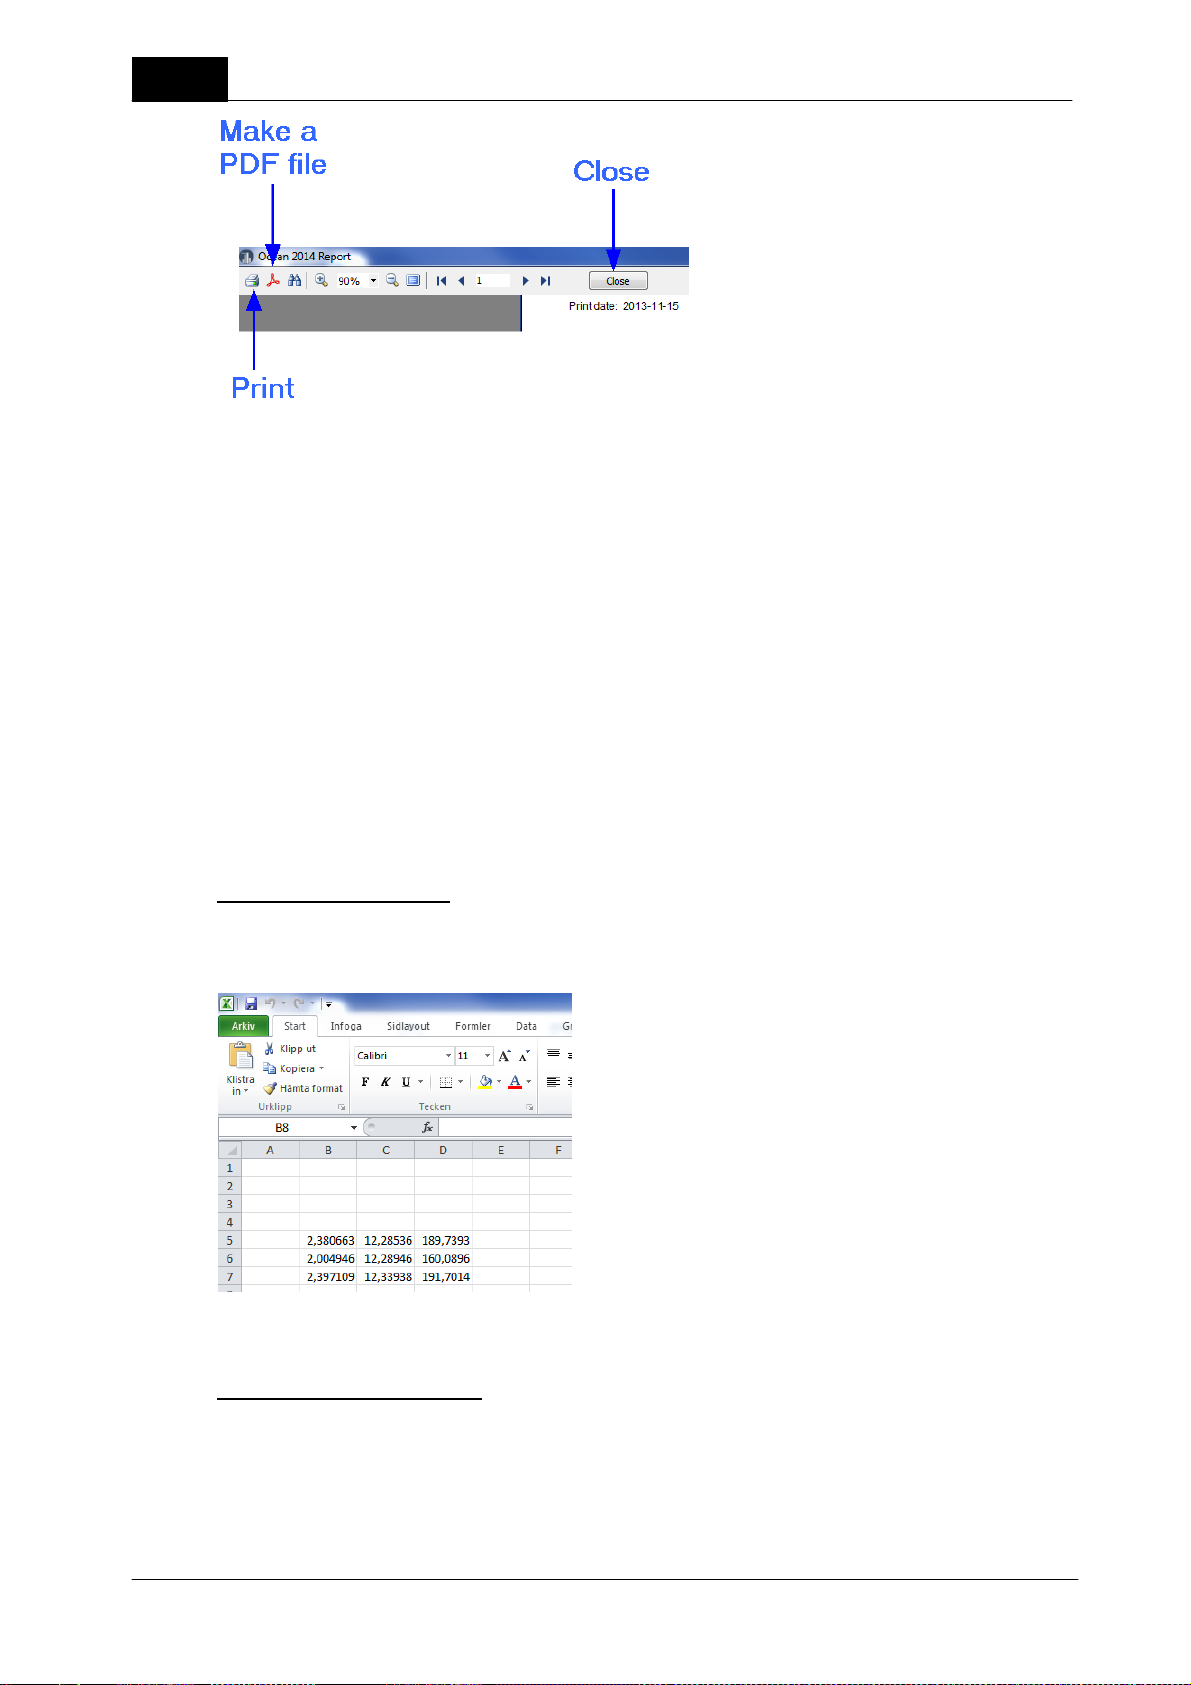
3. A preview is now shown.
4. You can now just preview the report and return, save it as a PDF file or print it.
2018-06-20/1.11A Piranha/Cobia & Quick Check Getting Started
Page 34
34
Report template
You may want to change the report layout, for example, use you own logo. You can make you own report
layout and assign it as default for Quick Check. You can do this in Program Options and you can find
instructions in section Create a report template.
1.10 Transfer data to Excel
Quick Check
You can transfer data from Quick Check to Excel in three different ways:
· Connect to an Excel workbook. Measured data, are for each exposure, transferred to Excel starting in active
cell. Used template determine data format.
· Connect to an Excel workbook. Measured data, are for each exposure, transferred to Excel starting in active
cell. Use a fixed data format (compatible with Excel templates used with Xi and X2 View).
· Send current measured data to Excel. The data dump starts in active Excel cell.
Connect (Standard mode)
When this mode is used, data are transferred to Excel in the same order as the columns are appearing in the
template. Only numerical values are sent to Excel, no units or waveforms.
Data are send according to how columns appear in the template.
Connect (Fixed format mode)
This is same as "Standard mode" but data is sent in a different format. The format is compatible with the
format used with Xi and X2 View from RaySafe. Same Excel templates can be used with none or minimal
modifications. This mode is only available in Quick Check. It is activated by checking "Fixed format (Excel
connect)" on the Option page (in Quick Check). The format is described in the section Connect (Fixed
format).
Piranha/Cobia & Quick Check Getting Started
2018-06-20/1.11A
Page 35
Quick Check
Send
In this mode the entire content in the template is dumped to Excel.
35
Read the coming sections for detailed information about the different Excel modes.
1.10.1 Excel control window
When data is transferred to Excel a small Excel control window is shown to simplify the interaction between
Quick Check and Excel. The exact content in the window is depending on mode (send or connect) and/or
used detectors.
2018-06-20/1.11A Piranha/Cobia & Quick Check Getting Started
Page 36

36
Quick Check
The most common meter settings are available (depending on used detector(s).
To close the Excel connection, click "x" in the upper right corner of the Excel control window. Both the
window and the used Excel workbook will be closed. If necessary, you are asked to save.
1.10.2 Connect (Fixed format)
Data is sent to Excel using a fixed format that is compatible with the format used in Excel workbooks used
with Xi and X2 view. The format is described in detail below.
To connect to the workbook:
First go to Options in Quick Check and make sure that the checkbox "Fixed format (Excel connect)" is
checked.
1. Activate a Quick Check display.
2. Click on the Excel button.
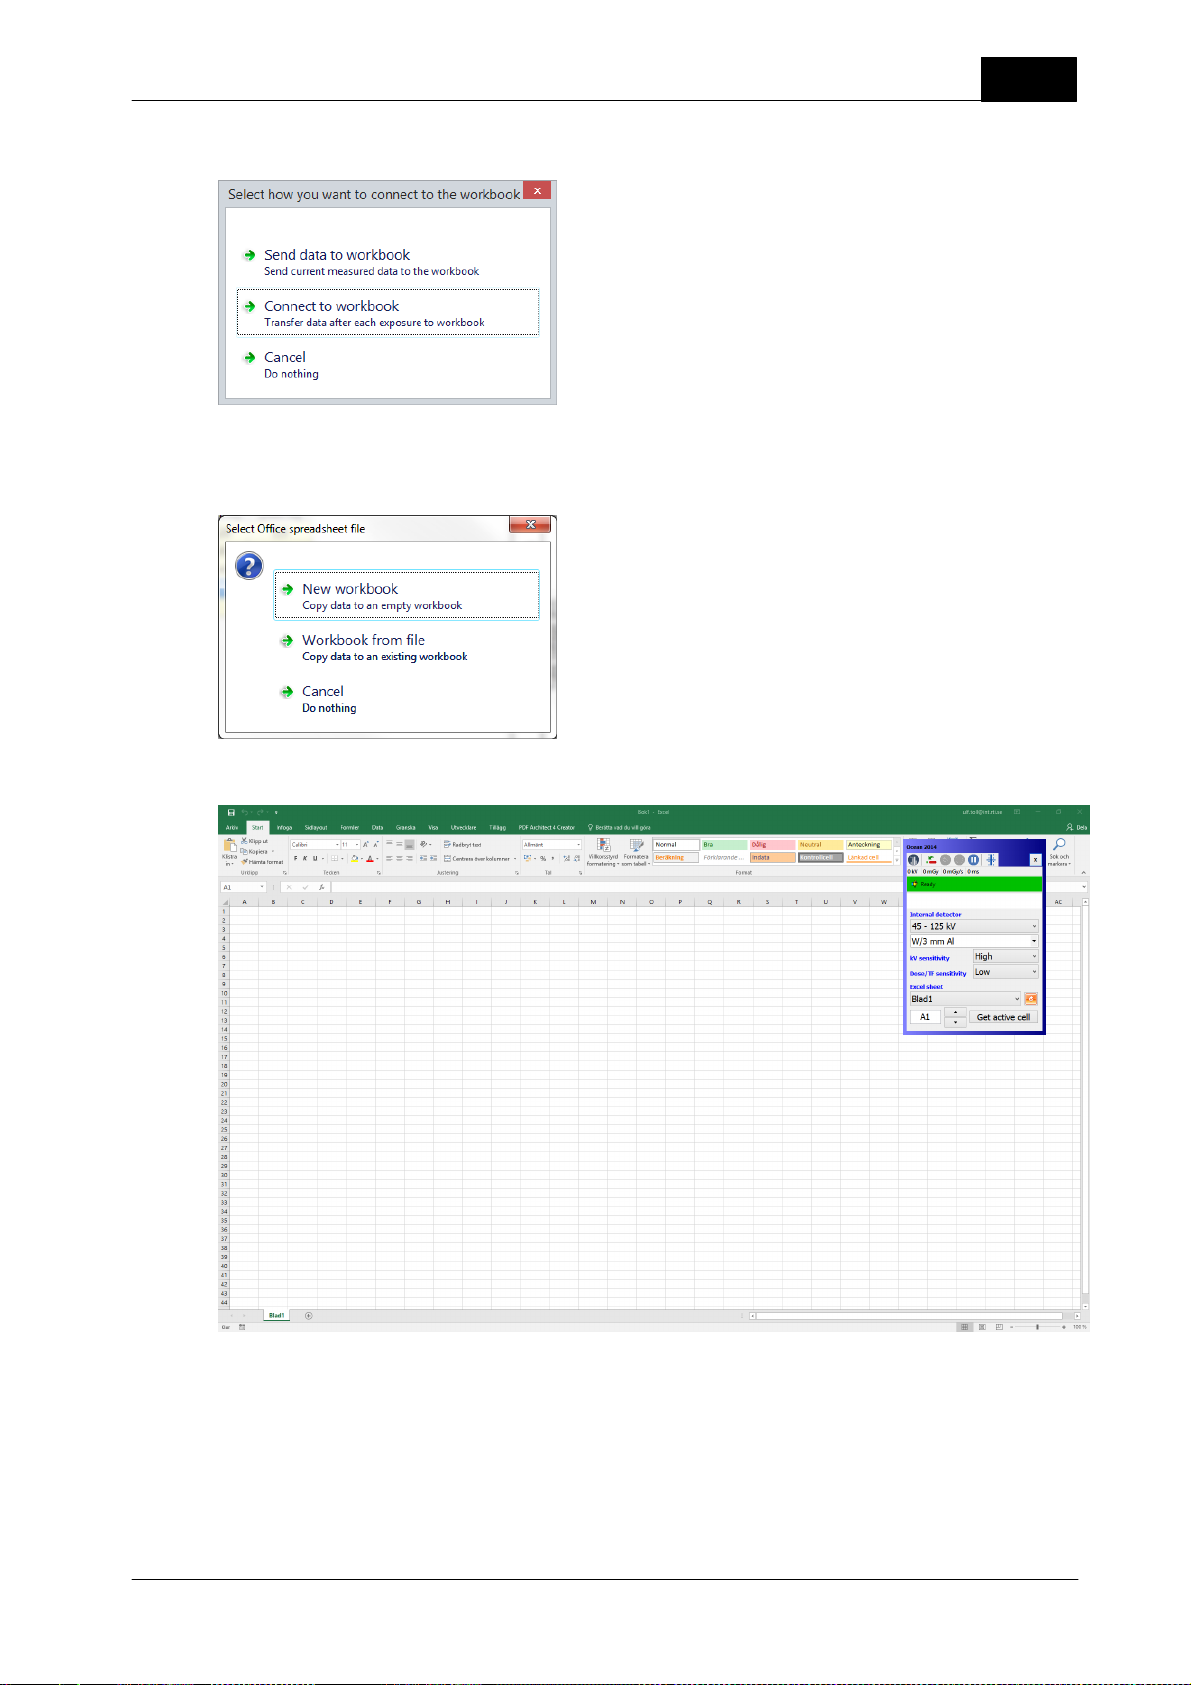
3. A dialogue is shown, select "Connect to workbook".
Piranha/Cobia & Quick Check Getting Started
2018-06-20/1.11A
Page 37
Quick Check
4. Next you have to chose a workbook. You can chose a new workbook or one you already have on your
computer. In this case select "New workbook".
37
Excel starts and an empty workbook is loaded.
5. Activate the cell, for example B5, where you want measured data to start. You can do that by entering B5
into the cell field in the Excel control box or select cell B5 in the Excel spreadsheet and click on "Get active
cell".
6. Make a couple of exposures.
2018-06-20/1.11A Piranha/Cobia & Quick Check Getting Started
Page 38
38
Tube voltage
unit
Dose
unit
Dose rate
unit
Exp. time
unit
Pulses
unit
Empty
Empty
Pulse rate
unit
Dose/pulse
unit
HVL
unit
Tube mAs
unit
Tube mA
unitTFunit
Dose (ext.)
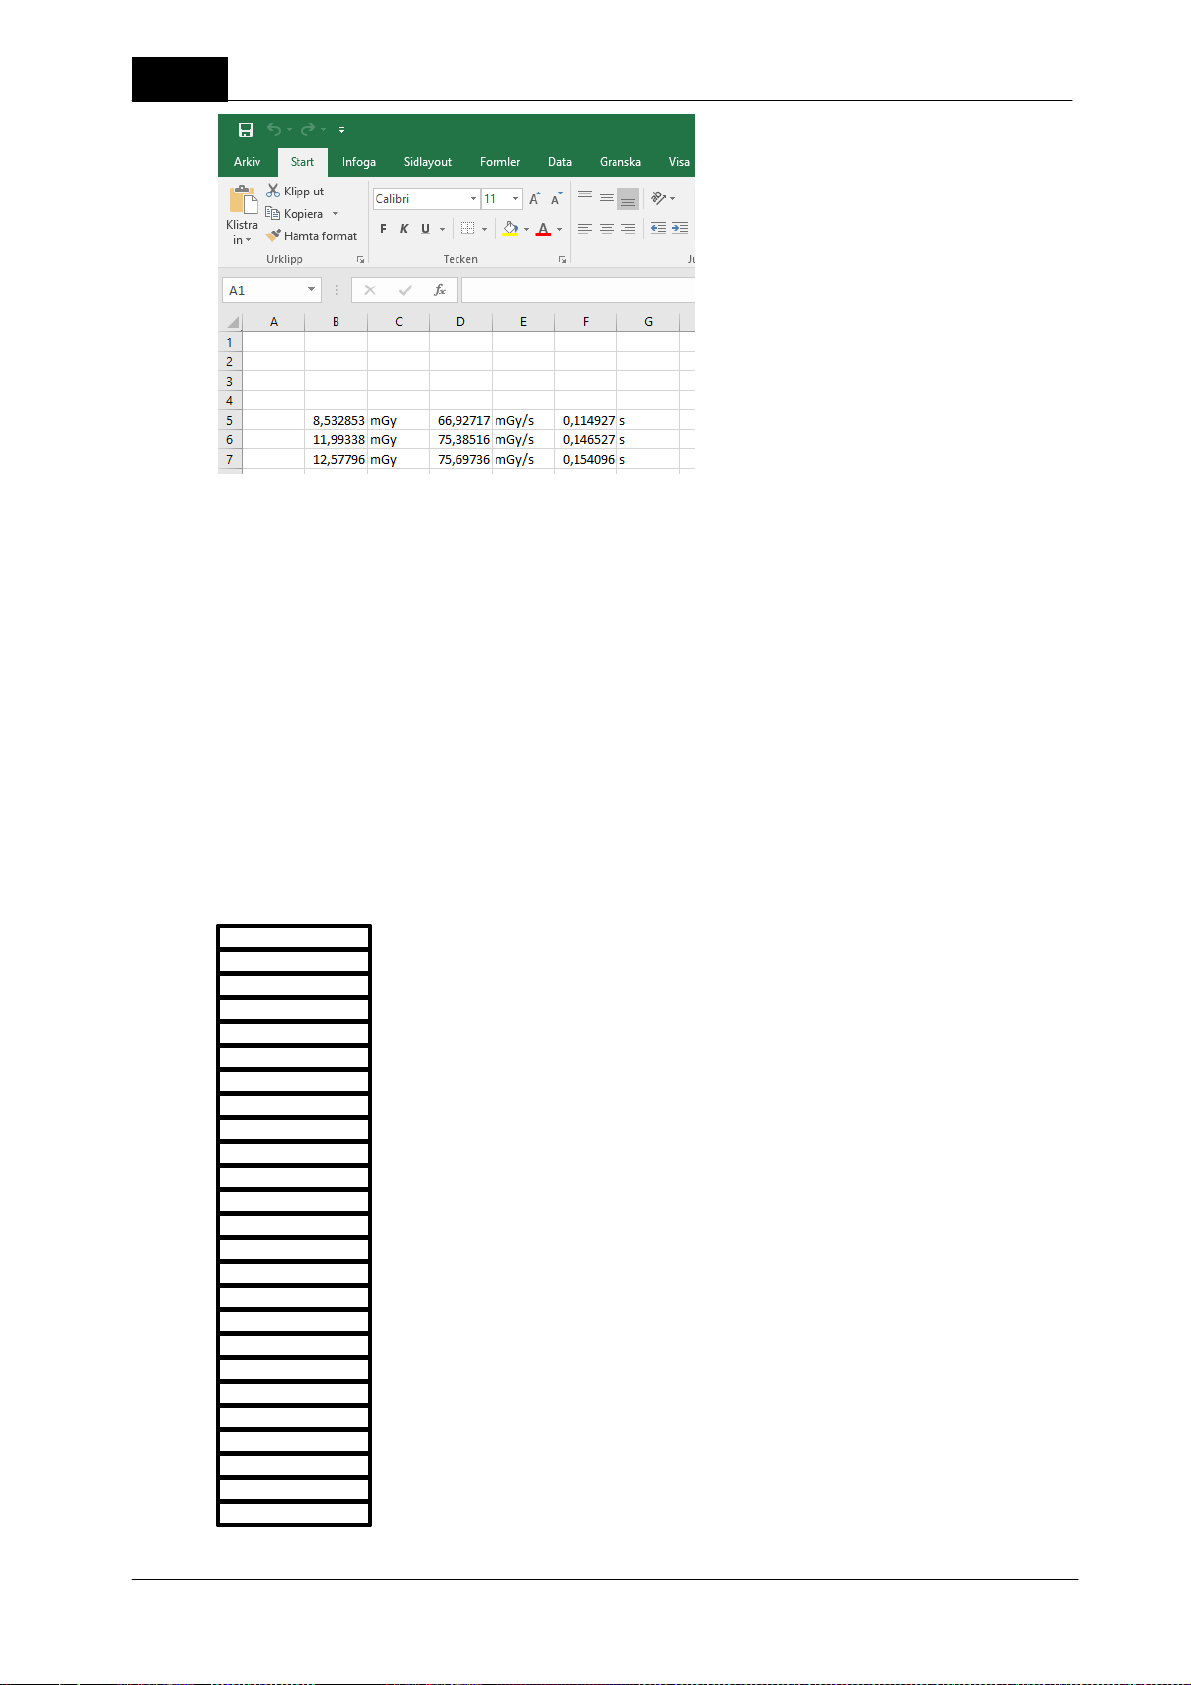
7. Measured data are transferred to Excel for each exposure. You can use the small minimize Excel window to
control your measurement procedure while having Excel on the screen. You can change basic meter settings
and the left most button is used to switch between Quick Check and Excel. Data are arriving in a fixed format
(compatible with tyhe format used by Xi and X2 View). The fixed format is defined below.
Quick Check
Definition of the fixed format
There are four different detector combinations that each has its own fixed format:
· Multi-detector (internal detector) with an optional external detector
· Only an external radiation detector (Dose Probe, CTDP, T20, Ion chamber of any type)
· Only the Light detector
· Only a mAs probe
Multi-detector (internal detector)
Piranha/Cobia & Quick Check Getting Started
2018-06-20/1.11A
Page 39
Quick Check
unit
Dose rate (ext.)
unit
Units are defined by Defult units in Program options in Ocean 2014 (not available in Quick Check).
39
2018-06-20/1.11A Piranha/Cobia & Quick Check Getting Started
Page 40

40
Dose
unit
Dose rate
unit
Exp. time
unit
Pulses
unit
Empty
Empty
Pulse rate
unit
Dose/pulse
unit
Lumunance or Illuminance
unit
Tube mAs
unit
Tube mA
unit
Exp. time
unit
Only external radiation detector
Units are defined by Defult units in Program options in Ocean 2014 (not available in Quick Check).
Only light detector
Quick Check
Units are defined by Defult units in Program options in Ocean 2014 (not available in Quick Check).
Only mAs probe
Units are defined by Defult units in Program options in Ocean 2014 (not available in Quick Check).
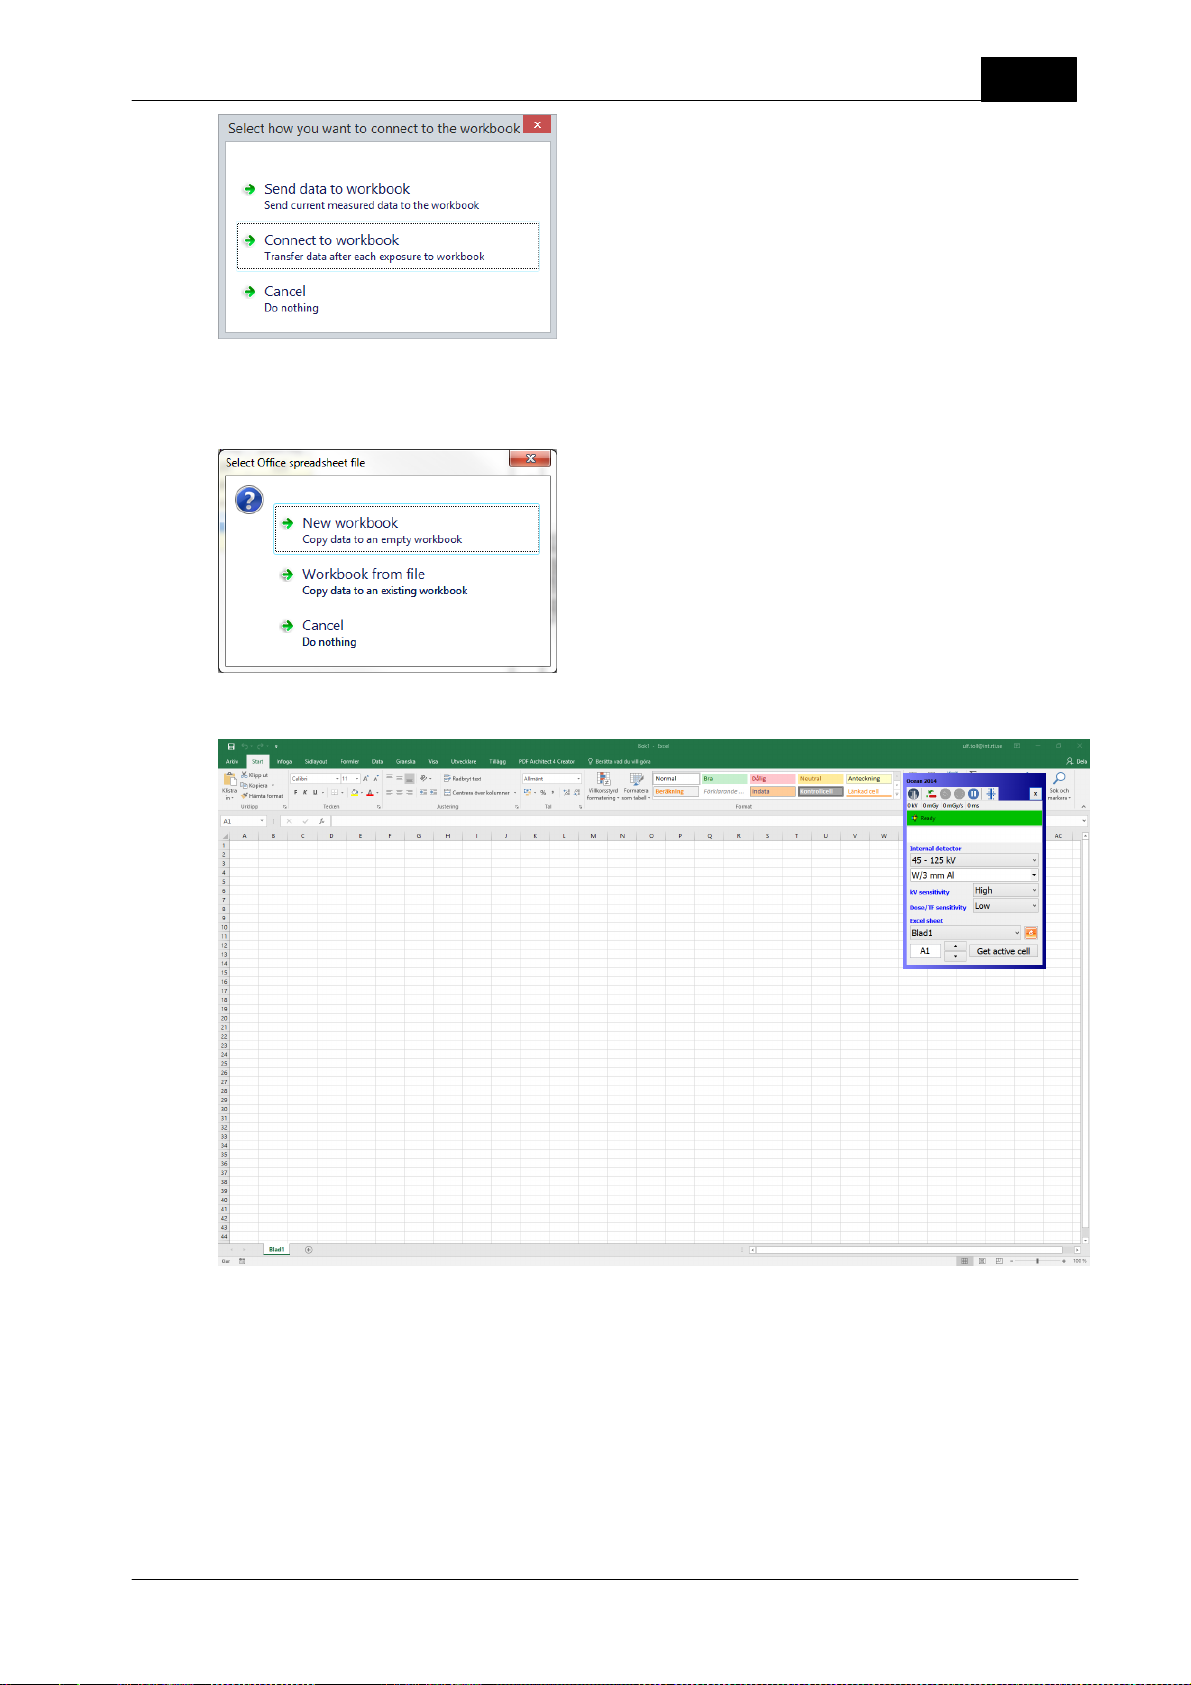
1.10.3 Connect (Standard mode)
Data is sent to Excel using a fixed format that is compatible with the format used in Excel workbooks used
with Xi and X2 view. The format is described in detail below.
To connect to the workbook:
First go to Options in Quick Check and make sure that the checkbox "Fixed format (Excel connect)" is
unchecked. This ensures that standard mode is used and data transferred is defined by the actual template
used in Quick Check.
Piranha/Cobia & Quick Check Getting Started
1. Load a Quick Check or an Application.
2. Click on the Excel button.
2018-06-20/1.11A
Page 41
Quick Check
3. A dialogue is shown, select "Connect to workbook".
4. Next you have to chose destination. You can chose a new workbook or one you already have on your
computer. In this case select "New workbook".
41
Excel starts and an empty workbook is loaded.
5. Activate the cell, for example B5, where you want measured data to start. The measured values appears in
the same order as the columns in the active template. No units are sent, only the numeric values. (If you
want a fixed format and units; use the "Fixed format" option described in the next section).
6. Make a couple of exposures.
2018-06-20/1.11A Piranha/Cobia & Quick Check Getting Started
Page 42

42
7. Measured data are transferred to Excel for each Exposure. The data transferred and the order of data is
determined by the column present in the template used in Quick Check. You can use the minimized Excel
window to control your measurement procedure while having Excel on the screen. The left most button is
used to switch between Quick Check and Excel.
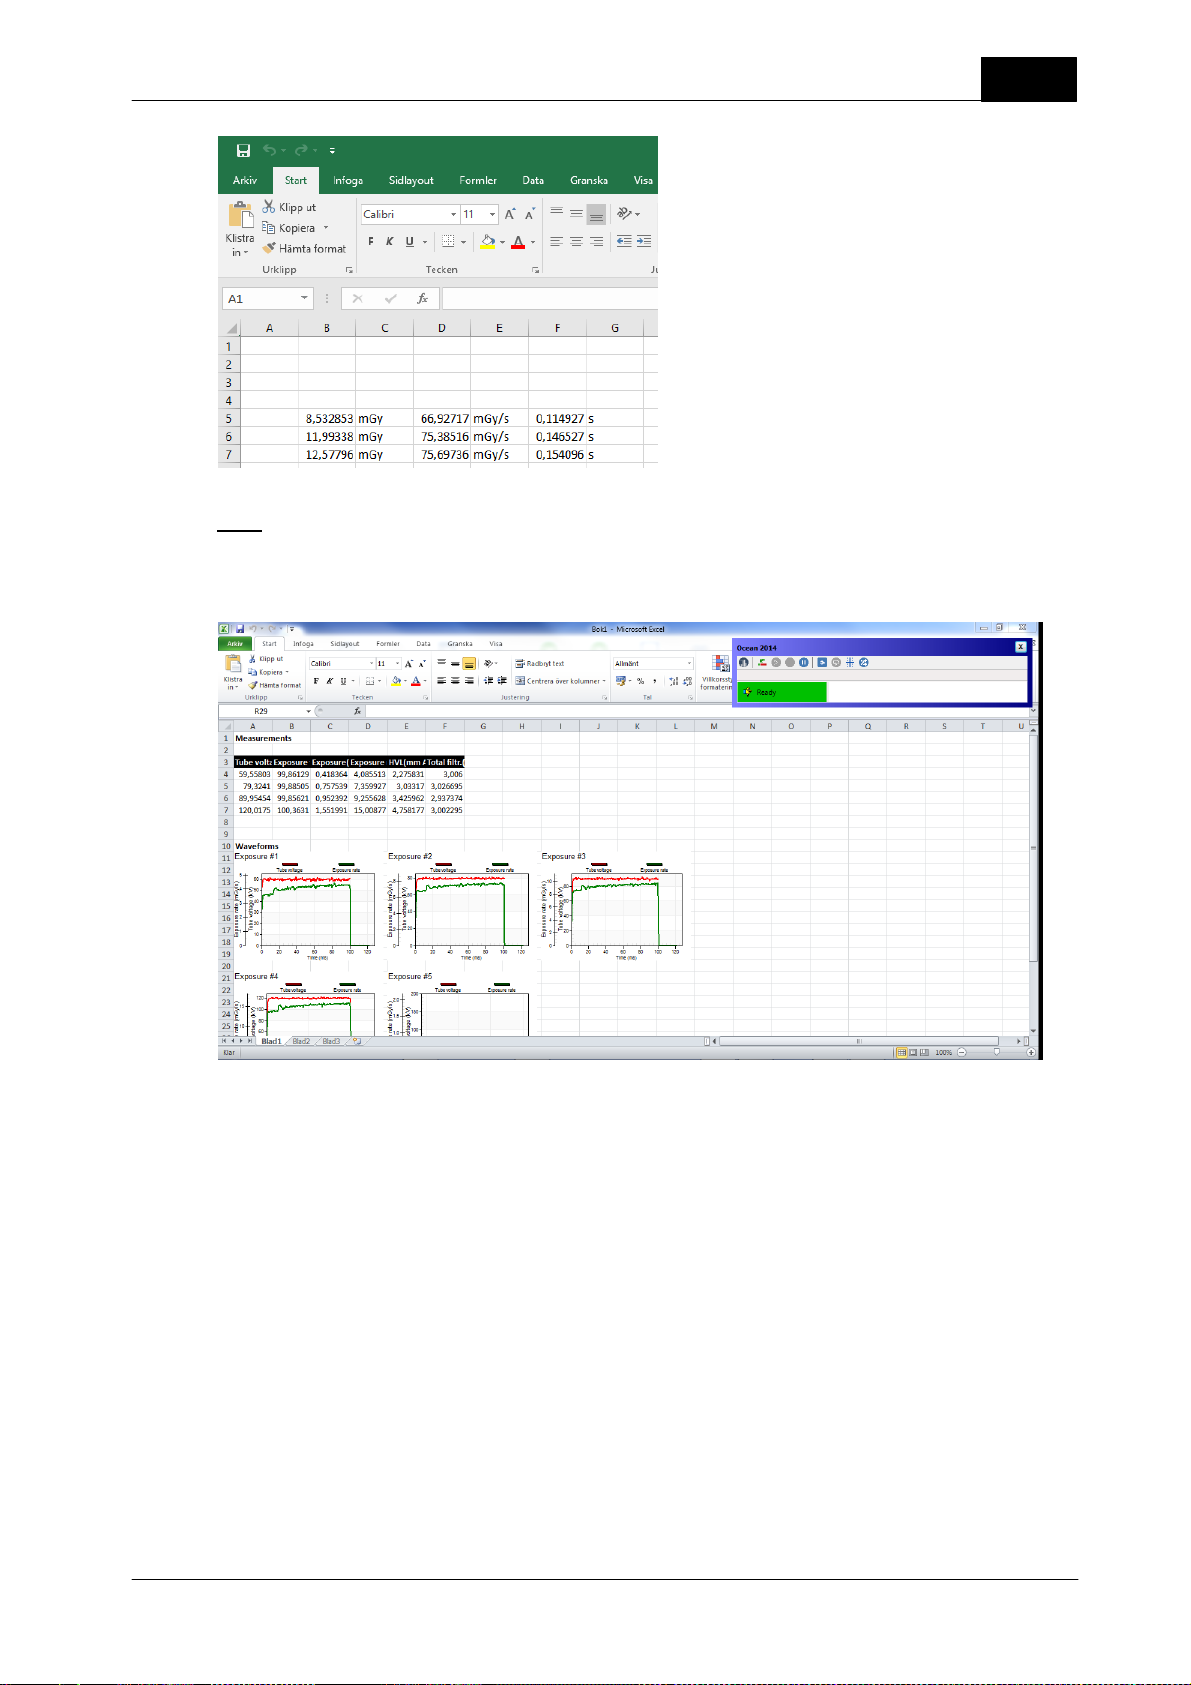
1.10.4 Send data to Excel
This is used when you want dump your current data to Excel. You have a choice to include or exclude
waveforms (waveform are exported as pictures).
Quick Check
1. Assume that you have done a number of exposures and you want to dump all the measured values to
Excel and that you want waveforms.
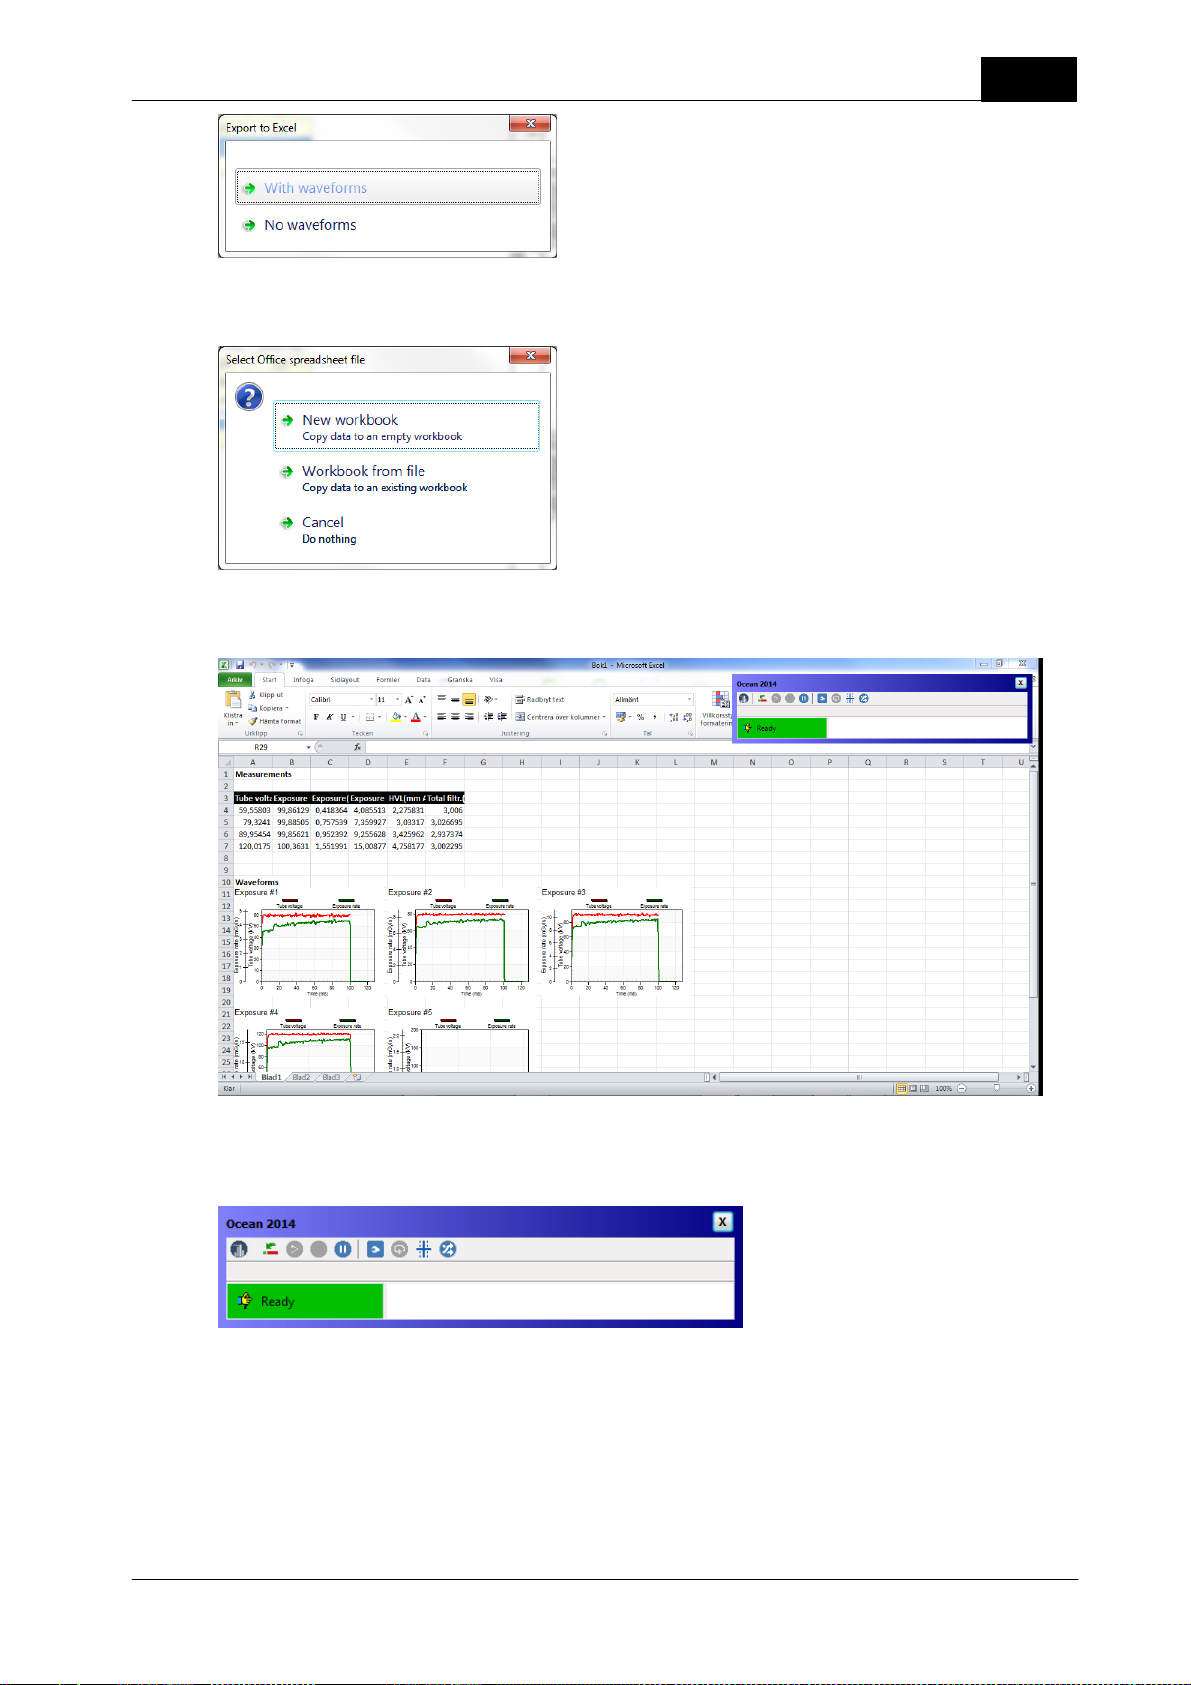
2. Click on the Export button. A dialogue is shown:
Select "Send data to workbook"
3. A new dialogue is shown where you can chose if you want waveforms or not. In this case select "With
waveforms".
Piranha/Cobia & Quick Check Getting Started
2018-06-20/1.11A
Page 43
Quick Check
4. Next you have to chose destination. You can chose a new workbook or one you already have on your
computer. In this case select "New workbook".
5. Ocean 2014 starts Excel and opens the workbook you selected. All you measured and in this case including
waveforms are transferred to Excel.
43
6. You will also see a minimized Ocean 2014 window that is shown. This window provides help when you
work with Excel.
The left most button is used to switch between Quick Check and Excel. See topic Data link to get more
information about this window. You can also read Send data to Excel to see how you can use this feature in
Ocean 2014.
7. You can save your Excel workbook and further process your measured data.
2018-06-20/1.11A Piranha/Cobia & Quick Check Getting Started
Page 44

44
1.11 Import/export
If you want to move measured data from one computer to another, an export and import function is available
to you. However, only Export is available from the Quick Check mode. To use the Import function; you must
go to Ocean 2014 main screen.
Export
To export one or several measurements:
1. Go to the Measurement tab.
2. Right-click on the measurement you want to export.
You can first make a multiple selection by using the Ctrl- and Shift key and then right-click to directly select
more than one measurement for export.
Quick Check
3. Select Export. A new window is shown that allows you to here select more measurements to export. The
measurements you include are shown on the right side.
4. Click on Next when you have included all measurements.
Piranha/Cobia & Quick Check Getting Started
2018-06-20/1.11A
Page 45

Quick Check
6. You can chose between "File" and "E-mail". If you have an e-mail program, you can send the file directly if
that is what you want. Otherwise select "File". Select a file name and destination to finish.
You can now use the file you have created to move your measurements to another computer with Ocean
2014.
45
Import
You can import data, but you must then close Quick Check to go to Ocean 2014 main screen and the
application button.
1. Click on the Close button.
2. Ocean 2014 main screen will now appear. Click on the Application button and select Import.
3. Locate the file you want to import and select it.
2018-06-20/1.11A Piranha/Cobia & Quick Check Getting Started
Page 46

46
4. The dialogue shows all measurements that will be imported. You will find them in the Inbox after the
import is finished.
Quick Check
You can read more about Import and Export in the topics Import and Export.
1.12 Options
If you click on the options button a menu is shown.
You will have several options here:
Piranha/Cobia & Quick Check Getting Started
2018-06-20/1.11A
Page 47

Quick Check
Select "Options".
47
There are three sections here:
Preferred modality
You can use this if you have a meter that covers many modalities but you don't want to see all choices in the
Quick Check.
Auto Position Check
Specify in which situations you want Quick Check to automatically suggest a Position Check.
Defaults
Various settings that controls how Quick Check works.
Exposure unit: Select Gray or Roentgen
Language: select the language you want for the Quick Check.
Auto-start with USB: If this is checked, Ocean 2014 and Quick Check starts automatically as soon as the
meter is connected with USB. Quick Check also terminates automatically when the meter is disconnected or
powered off.
Exposure assistant: Turn on or off the Exposure assistant.
Show hints automatically: If a Quick Check template has a hint attached to it, the hint is shown
automatically if this checkbox is checked.
Confirm exit: If you check this a dialogue is shown when you quit Ocean 2014. It give you three
alternatives:
· Quit Ocean 2014 and return to Windows
· Quit Ocean 2014 and turn off computer
· Resume Ocean 2014
Only use Quick Check: If you check this box, Ocean 2014 main window is hidden and you will only see the
Quick Check. Ocean only starts if meter is available.
Close the Options screen by sweeping right if you use a tablet or click on the close button.
2018-06-20/1.11A Piranha/Cobia & Quick Check Getting Started
Page 48

48
Enable Favorites: When this box is checked and at least one template is stored in the Favorites folder, the
Quick Check Favorite list is shown at start up of Quick Check.
Always ask for Save: When this box is checked Quick Check always asks if you want to save your
measurements before starting a new measurement or closing.
Always show all meters: When this box is checked a list with available meters to connect to is shown. If
unchecked, Ocean 2014 directly tries to connect to the last used meter.
Fixed format (Excel connect): Check this box if you want to use fixed format when connecting to Excel.
Save as Favourite...
Save current measurement as a Favourite. The name given will be shown in the list when the Favourite button
is clicked.
Meter Info
Shows meter information.
Make support file
If you want to report a problem, you may use this.
Quick Check
Check update
Look if there is a later version of Ocean 2014.
Activate Meter
Use this if you want to upgrade from Connect to Professional. You will be asked to enter the license code.
Show error report
All error reports that are generated are saved in a folder on your computer. Directly when one is generated,
you are always asked if you want to send it to RTI. You may not be able to do that and it will be available in
this folder. Click on this button to open the folder.
About
See version information.
You can read more about Ocean 2014's program options in the topic Program options.
Piranha/Cobia & Quick Check Getting Started
2018-06-20/1.11A
Page 49
Quick Check
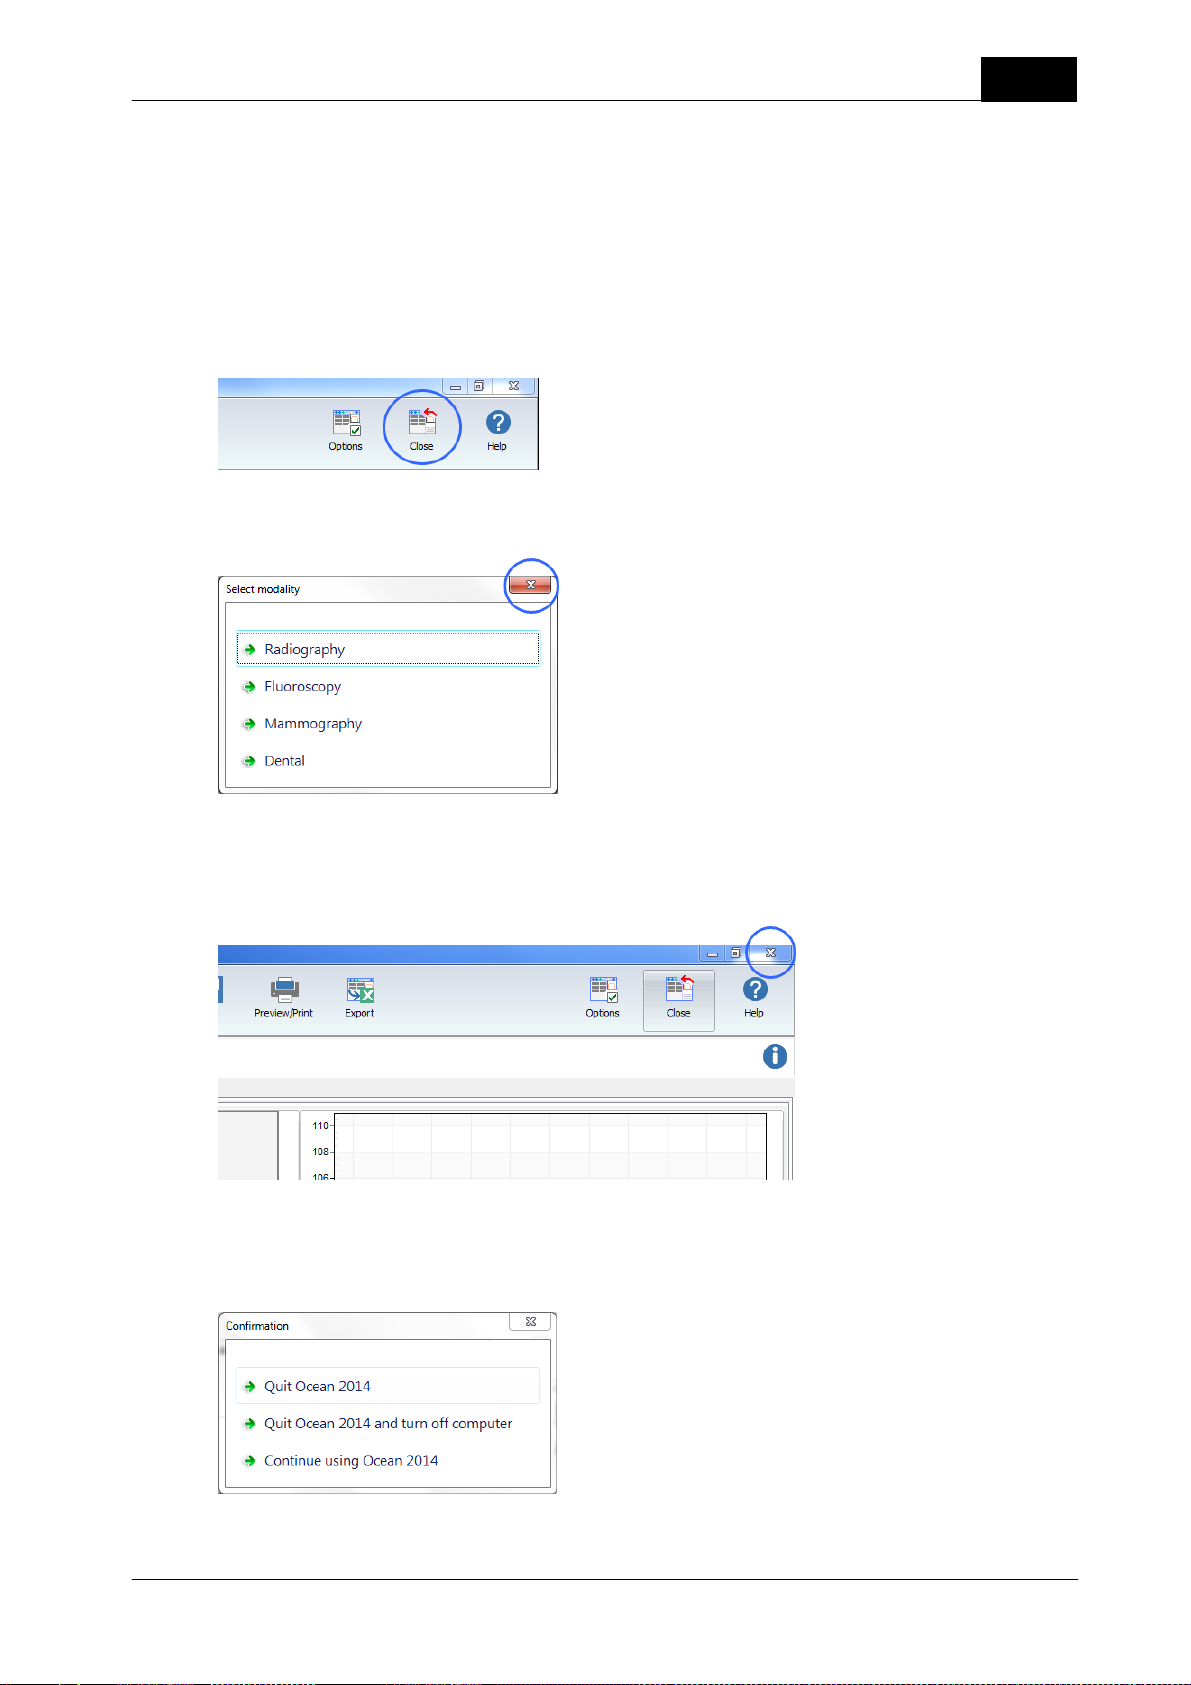
1.13 Close Quick Check
You can close Quick Check in two different ways:
· Close and go back to Ocean 2014's main screen
· Close and quit Ocean 2014 at the same time
Close Quick Check and go back to Ocean 2014's main screen
Click on the close button:
You can also close any of the menus shown in Quick Check. This will also take you back to Ocean 2014's
main screen:
49
Close and quit Ocean 2014
If you want to close Ocean 2014 directly from Quick Check, click on the close button in the upper right corner
of the Quick Check screen:
Remember that Quick Check will not ask you if you want to save data unless you already have saved them
once.
If you have enabled "Confirm exit" i Options, a dialogue is shown (otherwise Ocean 2104 quits directly):
You can chose to go to Windows, turn off the computer or go back to Ocean 2014.
2018-06-20/1.11A Piranha/Cobia & Quick Check Getting Started
 Loading...