


KA11
11” Touchpanel Controller
Reference Guide
KA11 Touchpanel
The KA11 touch panel is the ultimate choice for simple, intuitive control of the entertainment, environment and security
systems in residential or commercial facilities. It features a fully customizable 11.6” widescreen LCD display with
1920x1080 FHD resolution and integrated capacitive touchscreen. The sleek touchpanel is easily wall mounted or an
accessory stand is available for table top installations. The ambient light and proximity sensors automatically adjust the
screen brightness and LED backlight according to the environmental light level.* Built-in gigabit Ethernet with PoE enables
powerful two-way control via the RTI control system, video from IP security cameras, video intercom functionality,* and
remote programming updates.
The KA11 provides superior quality and reliability as well as these features:
• 11.6” widescreen LCD with 1920x1080 FHD resolution and integrated capacitive touchscreen for fast touch response.
• Fully customizable display for simple, intuitive control.
• Innovative design allows wall mount or table top installation using stand accessory (sold separately).
• Ambient light and proximity sensor adjusts the screen brightness and LED backlights automatically according to the
environmental light level (* Requires rmware update).
• Powered by PoE (Power over Ethernet) or a power supply (sold separately).
• Gigabit Ethernet with PoE enables two-way control via the RTI control system, video from IP security cameras, and remote
programming updates.
• Built in camera, microphone and speakers enable video intercom (* Future rmware update).
KA11
PoE Network Switch
PoE Network Switch
Line in wall
24V DC
2.1mm
Coaxial Plug
Network Switch
PoE Injector
PoE Network Switch
To KA11
Loosen
Loosen
Tighten
Loosen
Tighten
11” Touchpanel Controller
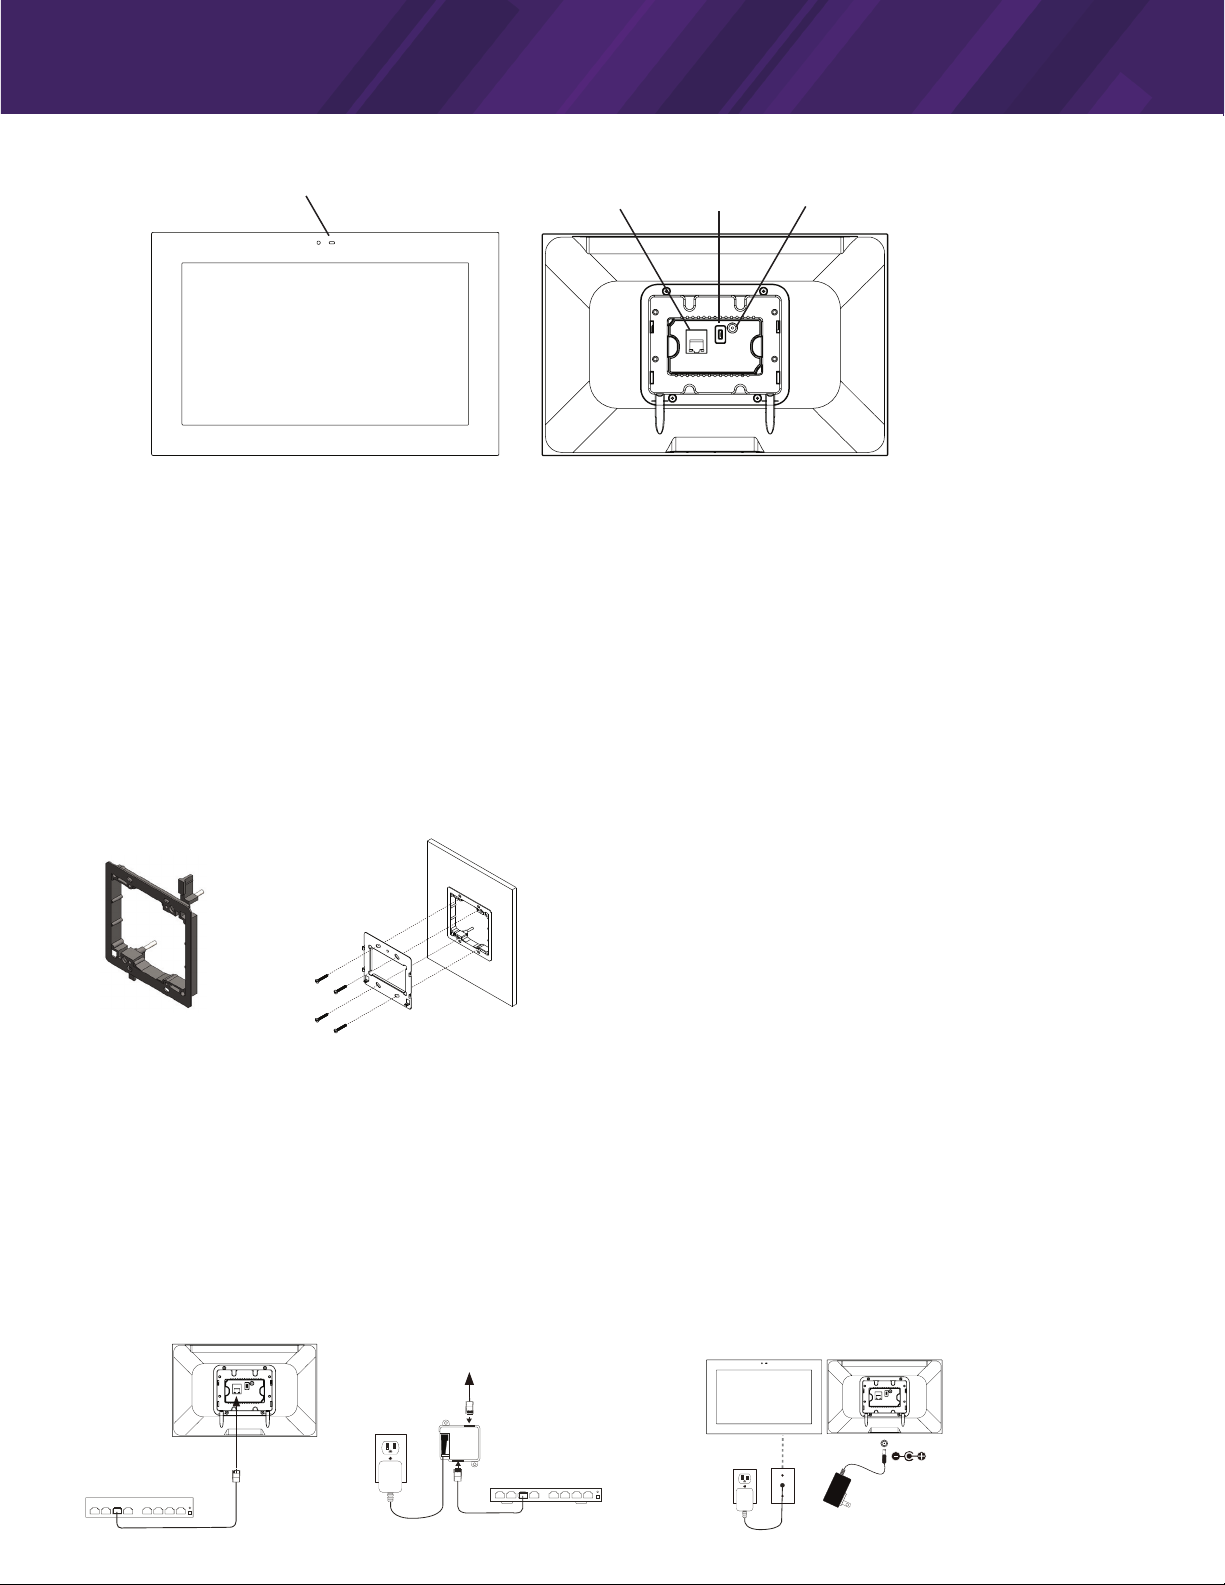
KA11 OVERVIEW
Light Sensor
Front View Rear View
LAN and Power over
Ethernet (PoE)
USB
DC Power Input
MOUNTING BRACKET INSTALLATION
The KA11 is designed to be wall mounted in either Portrait or Landscape orientation, or on tabletop using stand (available separately).
MOUNTING DEPTH
The KA11 requires a minimum mounting depth of 1”(2.45cm) from the wall surface to the room for cable/s.
MOUNTING HEIGHT
The recommended mounting height for the KA11 is 57”- 65”(145 cm -165 cm) from the nished oor to the center of the unit.
MOUNTING BRACKET
• The KA11 is designed to be mounted to a US standard 2 gang low voltage bracket like Arlington LV2 (included in the box).
• The KA11 mounting bracket, included in the box, should be attached to the 2 gang low voltage bracket with the supplied screws, then the KA11 unit is mounted on the
mounting bracket with 2 captive screws located at the bottom.
Landscape/Portrait Mounting
• Landscape orientation: Install the 2 gang low-voltage bracket on a wall in its normal position.
• Portrait orientation: Install the 2 gang low-voltage bracket on wall after rotating it 90 degrees in a counterclockwise direction.
Installing the KA11 Mounting Bracket
• The KA11 package includes a mounting bracket that MUST be used for installation.
• Use the included screws to mount the bracket onto a two gang low-voltage bracket.
• Verify that the bracket is level before tightening the captive screws on the KA11.
2 Gang low voltage bracket
(Included)
KA11 Mounting Bracket
(Included)
POWERING THE KA11
The KA11 is designed to be powered over an Ethernet connection with PoE or by connecting a 24v power supply (not included), but not both. If both the PoE and a 24v power
supply are connected, the KA11 will draw power from the 24v source.
PoE Connection
• PoE connection requires IEEE 802.3at standard. Utilize a network switch or PoE injector that meets this standard.
• Connect the KA11 using a standard T568A or T568B Ethernet cable from the network switch to the LAN/PoE jack on the back of the KA11.
24v Power Supply
• You can provide power locally or remotely to KA11 by utilizing a 24VDC/1A power supply (not included).
• If powering remotely, ensure the wire is of adequate gauge for the length of the run and the routing is in compliance with local codes.
• Verify the polarity of the barrel connector on your power supply before connecting it to the KA11. The center pin of the KA11 Power Connector is positive and the outer
• Plug the connector into the DC jack on the back of the KA11.
POWERING UP THE KA11
• The KA11 will automatically power on when power is applied.
ring is negative.
PoE Network Switch Cabling
PoE Injector Cabling
24VDC Power Supply Cabling

It’s Under Control
Loosen
Tighten
Tighten
Loosen
Tighten
MOUNTING KA11
1. Loosen the captive screws of the unit to the level indicated by the lines in the diagram. Screws should not be removed from the unit.
2. Align the mounting frame hooks with the KA11 mounting slots and gently pull the KA11 unit down the mounting bracket. Make sure the mounting hooks are properly
engaged.
3. To complete the installation, tighten the 2 captive screws on the bottom part of unit, to secure the KA11 on the mounting bracket.
4. For Portrait orientation, rotate mounting bracket and KA11 90 degree in counterclockwise direction before installation.
®
Loosen captive screws Align mounting frame hooks Gently pull KA11 down
REMOVING THE KA11
• Using a Philips head screw driver, loosen the 2 captive screws on the KA11, then gently pull straight up from the mounting frame to disengage the unit.
Loosen captive screws Gently pull KA11 up to release
Tighten the 2 captive screws to secure
the KA11 to the mounting bracket.
DIMENSIONS
KA11 (Rear View) KA11 (Front) KA11 (Side View)
313,6mm
12.35
Inch
39,85mm
1.57
Inch
42,5mm
1.67Inch
108mm
4.25 Inch
ETHERNET COMMUNICATION
• When the KA11 is connected to a network switch by Ethernet cable, the unit will acquire a network address via DHCP and automatically connect to the LAN.
PROGRAMMING
THE TOUCHSCREEN DISPLAY
• The KA11 touchscreen display is programmed using the RTI Integration Designer Programming Software. Normally it is organized into a series of pages containing
objects (buttons, text, graphics, etc.) that are related to each other.
UPDATING SOFTWARE
• RTI’s Integration Designer data les can be downloaded to the KA11 via an Ethernet network.
201,5mm
7.93
Inch

It’s Under Control
®
Product Contents
• One (1) KA11 Touchpanel
• One (1) Mounting Bracket
• Four (4) Mounting Screws
• One (1) 2 Gang Low Voltage Bracket
• One (1) Quick Reference Guide
Safety Suggestions
Read and Follow Instructions. Read all safety and operating instructions before
operating the unit.
Retain Instructions. Keep the safety and operating instructions for future
reference.
Heed Warnings. Adhere to all warnings on the unit and in the operating
instructions.
Heat. Keep the unit away from heat sources such as radiators, heat registers,
stoves, etc., including ampliers that produce heat.
Power Sources. Connect the unit only to a power supply of the type described in
the operating instructions, or as marked on the unit.
Power Cord Protection. Route power supply cords so that they are not likely
to be walked on or pinched by items placed on or against them, paying particular
attention to the cord plugs at power receptacles and at the point at which they exit
from the unit.
Water and Moisture. Do not use the unit outdoors, in high humidity areas or near
water—for example, near a sink, in a wet basement, near a swimming pool, near an
open window, etc.
Object and Liquid Entry. Do not allow objects to fall or liquids to be spilled into
the enclosure through openings.
Servicing. Do not attempt any service beyond that described in the operating
instructions. Refer all other service needs to qualied service personnel.
Damage Requiring Service. The unit should be serviced by qualied service
personnel when:
The power supply cord or the plug has been damaged.
Objects have fallen or liquid has been spilled into the unit.
The unit has been exposed to rain.
The unit does not appear to operate normally or exhibits a marked change in
performance.
The unit has been dropped or the enclosure has been damaged.
Cleaning
To clean your KA11, lightly dampen a lint-free cloth with plain water or a mild detergent
and wipe the touchscreen, keypad and outer surfaces.
NOTE: Do not use harsh chemicals as damage to the unit may occur.
Contacting RTI
For news about the latest updates, new product information, and new accessories,
please visit our web site at:
www.rticorp.com
For general information, you can contact RTI at:
Remote Technologies Incorporated
5775 12th Ave. E Suite 180
Shakopee, MN 55379
Tel. (952) 253-3100
Fax (952) 253-3131
info@rticorp.com
Service & Support
If you are encountering any problems or have a question about your RTI product, please
contact RTI Technical Support for assistance (see the Contacting RTI section of this guide for
contact details).
RTI provides technical support by telephone or e-mail. For the highest quality service, please
have the following information ready:
• Your Name
• Company Name
• Telephone Number
• E-mail Address
• Product model and serial number (if applicable)
If you are having a problem with hardware, please note the equipment in your system, a
description of the problem, and any troubleshooting you have already tried.
*Please do not return products to RTI without return authorization.*
Limited Warranty
RTI warrants its products for a period of three (3) years (90 days only for included
battery packs); or for a period of time compliant with local laws when applicable from
the date of purchase from RTI or an authorized RTI distributor.
This warranty may be enforced by the original purchaser and subsequent owners
during the warranty period, so long as the original dated sales receipt or other proof of
warranty coverage is presented when warranty service is required.
Except as specied below, this warranty covers all defects in material and workmanship
in this product. The following are not covered by the warranty.
Damage resulting from:
1. Accident, misuse, abuse, or neglect.
2. Failure to follow instructions contained in this Guide.
3. Repair or attempted repair by anyone other than Remote Technologies
Incorporated.
4. Failure to perform recommended periodic maintenance.
5. Causes other than product defects, including lack of skill, competence or
experience of user.
6. Shipment of this product (claims must be made to the carrier).
7. Being altered or which the serial number has been defaced, modied or removed.
Federal Communications Commission Notice
This equipment has been tested and found to comply with the limits for a Class B digital device, pursuant to Part 15 of the FCC Rules. These limits are designed to provide
reasonable protection against harmful interference in a residential installation. Any changes or modications not expressly approved by the party responsible for compliance
could void the user’s authority to operate the device.
This equipment generates, uses, and can radiate radio frequency energy and, if not installed and used in accordance with the instructions, may cause harmful interference to
radio communications. However, there is no guarantee that interference will not occur in a particular installation.
If this equipment does cause harmful interference to radio or television reception, which can be determined by turning the equipment o and on, the user is encouraged to try
to correct the interference by one or more of the following measures:
Reorient or relocate the receiving antenna.
Increase the separation between the equipment and the receiver.
Connect the equipment into an outlet on a circuit dierent from that to which the receiver is connected.
Consult the dealer or an experienced radio/TV technician for help.
This device complies with Part 15 of the FCC Rules. Operation is subject to the following two conditions:
1. This device may not cause harmful interference.
2. This device must accept any interference received including interference that may cause undesired operation.
Industry Canada Compliance Statement
This device complies with Industry Canada license-exempt RSS standard(s). Operation is subject to the following two conditions:
1. This device may not cause harmful interference.
2. This device must accept any interference received including interference that may cause undesired operation.
Cet appareil est conforme avec Industrie Canada exempts de licence standard RSS (s). Son fonctionnement est soumis aux deux conditions suivantes:
1. Ce dispositif ne peut causer des interférences nuisibles.
2. Cet appareil doit accepter toute interférence reçue y compris des interférences qui peuvent provoquer un fonctionnement indésirable.
DECLARATION OF CONFORMITY (DOC)
The Declaration of Conformity for this product can be found on the RTI website at: www.rticorp.com/declaration
Copyright © 2019 • Remote Technologies Incorporated • All rights reserved. 70-210188-27 V1.2
 Loading...