

Page 1
JUMBO-PLATTENGRILL
D
CONTACT GRILL
KONTAKTGRILL
KONTAKTNÍ GRIL
KONTAKGRILL
KONTAKTNÝ GRIL
GB
HR
CZ
HU
SK
KGJ 2300
Page 2
D
BEDIENUNGSANLEITUNG KGJ-2200 JUMBO-PLATTENGRILL
Liebe Kundin, lieber Kunde,
bitte lesen Sie die Bedienungsanleitung aufmerksam durch, bevor Sie Ihr Gerät ans Netz anschließen, um
Schäden durch nicht sachgemäßen Gebrauch zu vermeiden. Beachten Sie besonders die
Sicherheitshinweise. Sollten Sie dieses Gerät an Dritte weitergeben, muss diese Bedienungsanleitung mit
ausgehändigt werden.
WICHTIG
• Lesen Sie die Gebrauchsanleitungen sorgfältig durch und schauen Sie sich die Abbildungen vor dem
ersten Gebrauch des Gerätes gut an.
• Überprüfen Sie, ob die Angaben zur Spannung auf der Unterseite des Gerätes mit Ihrer
Haushaltsspannung übereinstimmen, bevor Sie das Gerät an ein Netz anschließen.
• Stellen Sie das Gerät auf eine stabile, ebene Oberfläche.
• Stellen Sie das Gerät nicht unter Hängeküchen, Regale oder in der Nähe von leicht brennbaren
Materialien wie Rollos oder (Netz)Gardinen auf.
• Verwenden Sie bei diesem Gerät weder Utensilien aus Metall, noch aggressive oder scheuernde
Reinigungsmittel; diese können die antihaftbeschichtete Oberfläche der Grillplatten beschädigen.
• Ziehen Sie immer erst den Stecker und lassen Sie das Gerät abkühlen, bevor Sie mit dem Reinigen
beginnen.
• Tauchen Sie das Gerät niemals in Wasser. Sie können es mit einem feuchten Lappen abwischen.
• Nehmen Sie die Grillplatten ab, um Sie gründlich zu reinigen.
• Achten Sie darauf, dass das Netzkabel nicht mit den heißen Grillplatten in Berührung kommt.
• Schließen Sie das Gerät an eine geerdete Steckdose an.
• Lassen Sie das Netzkabel nicht über die Kanten der Oberfläche, auf der das Gerät steht,
herunterhängen.
• Nehmen Sie sich beim Grillen von fettigem Fleisch oder Würstchen vor spritzendem Fett in Acht.
• Lassen Sie Lebensmittel beim Grillen nicht aus dem Grill herausragen.
• Wickeln Sie das Netzkabel für den Gebrauch vollständig ab. Lassen Sie das Gerät vollständig
abkühlen, bevor Sie das Kabel um die Haken an der Unterseite wickeln.
• Wenn das Netzkabel des Gerätes beschädigt ist, darf es nur von einem autorisierten Kundenzentrum
ausgetauscht werden, da für die Reparatur spezielle Werkzeuge und/oder Ersatzteile notwendig sind.
D
- 2 -
Page 3
D
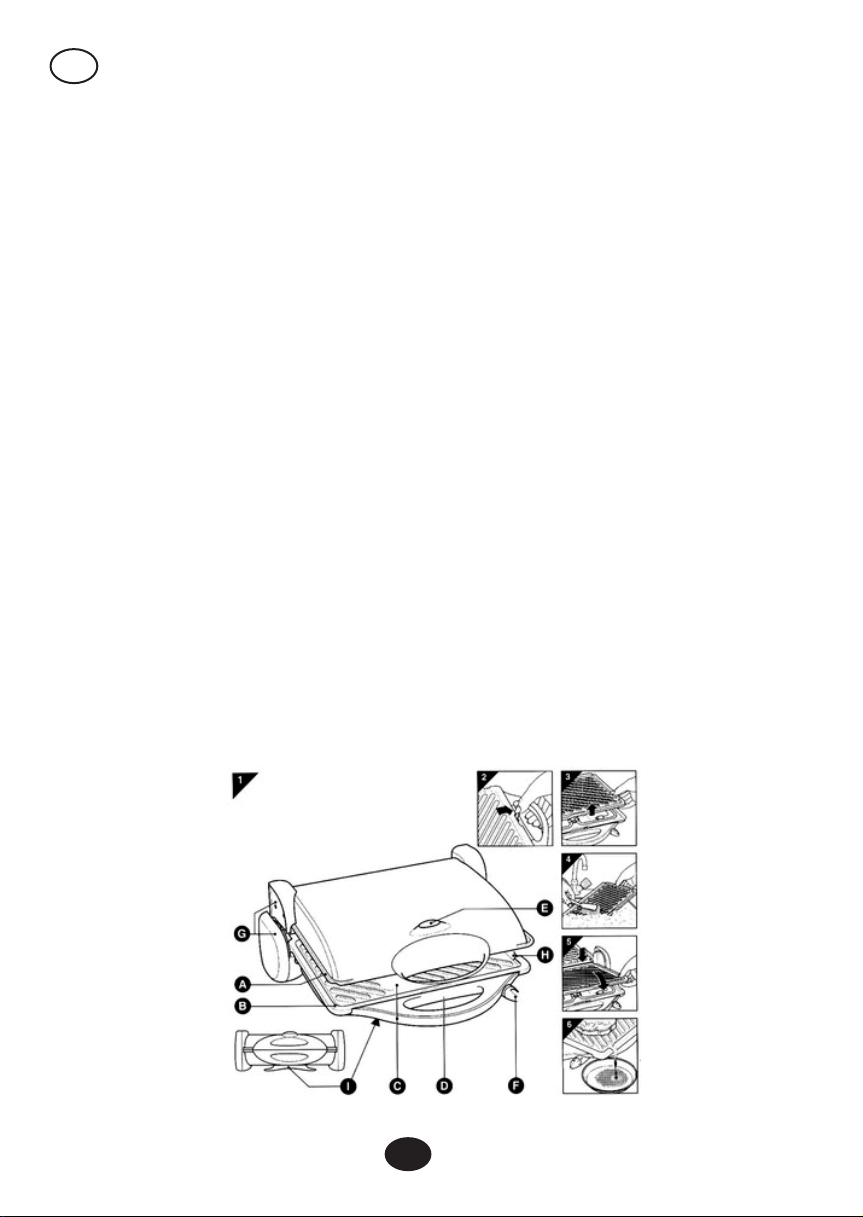
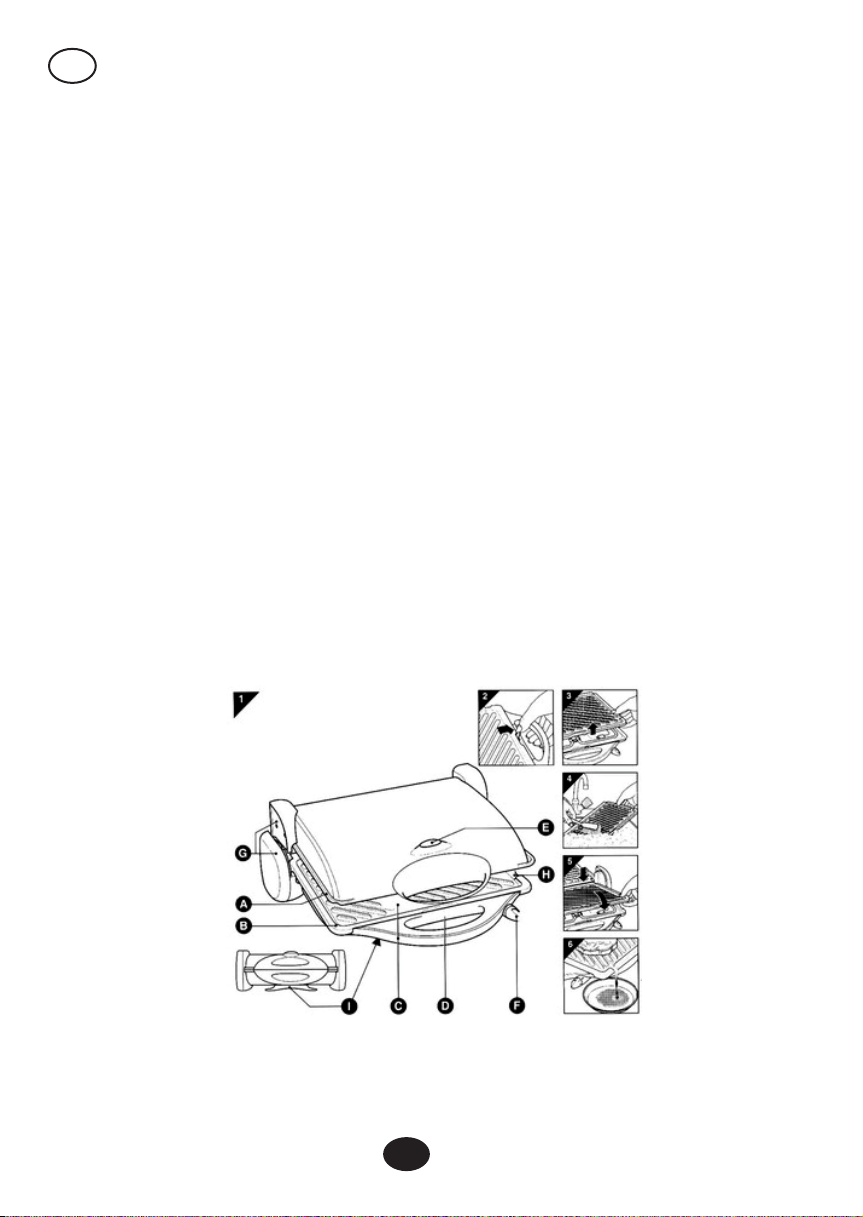
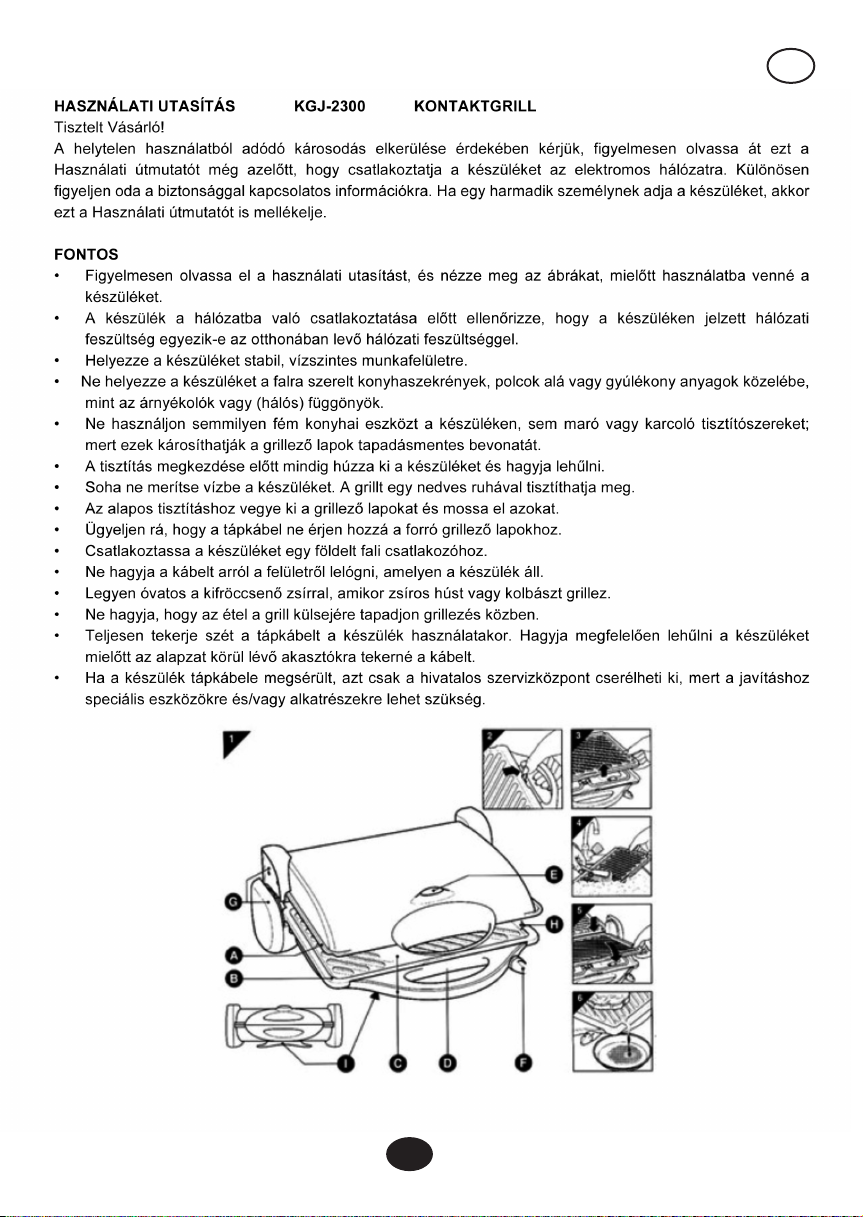
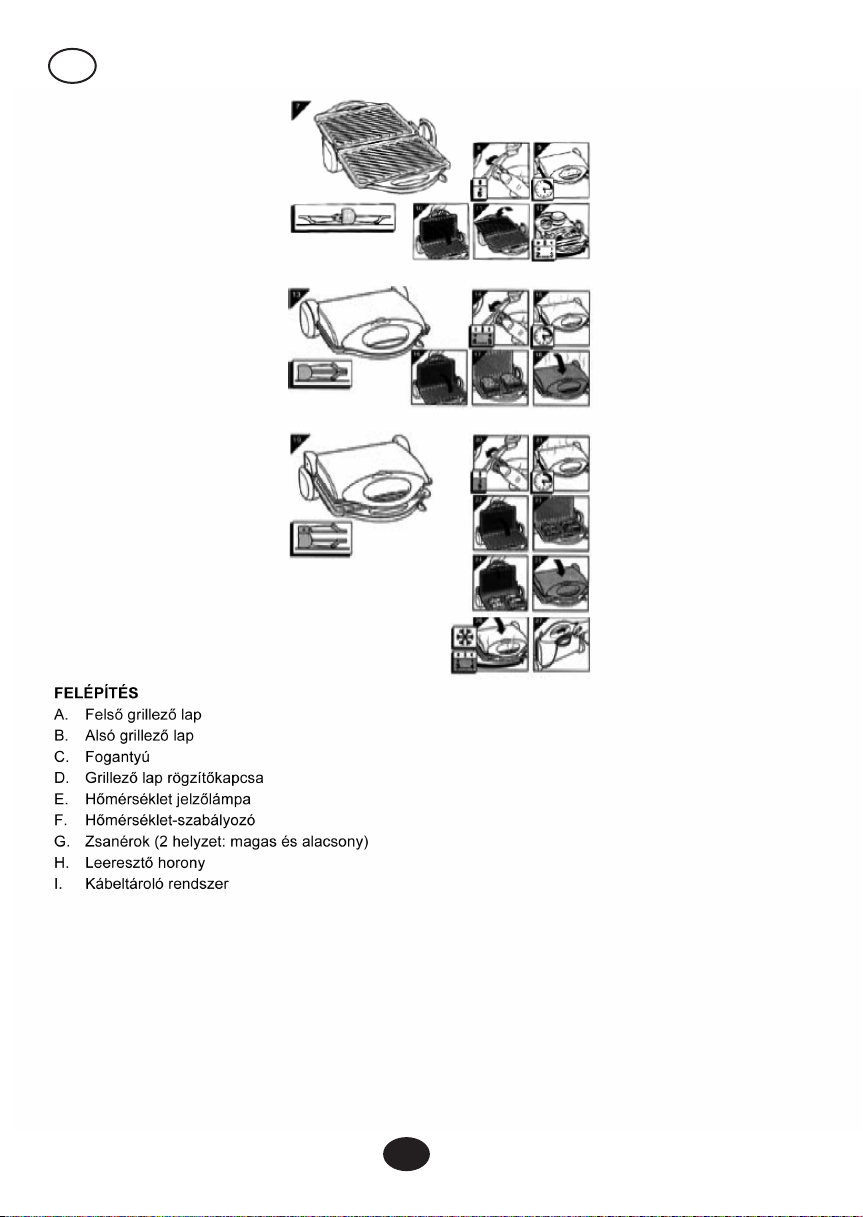
AUSSTATTUNG
A. Obere Grillplatten
B. Untere Grillplatten
C. Griff
D. Befestigungsklemme der Grillplatten
E. Temperaturleuchte
F. Temperaturregler
G. Scharniere (2 Gelenke: hoch und niedrig)
H. Abflussrille
I. Aufbewahrung für das Kabel
D
- 3 -
Page 4

D
VOR DEM ERSTGEBRAUCH DES GERÄTES
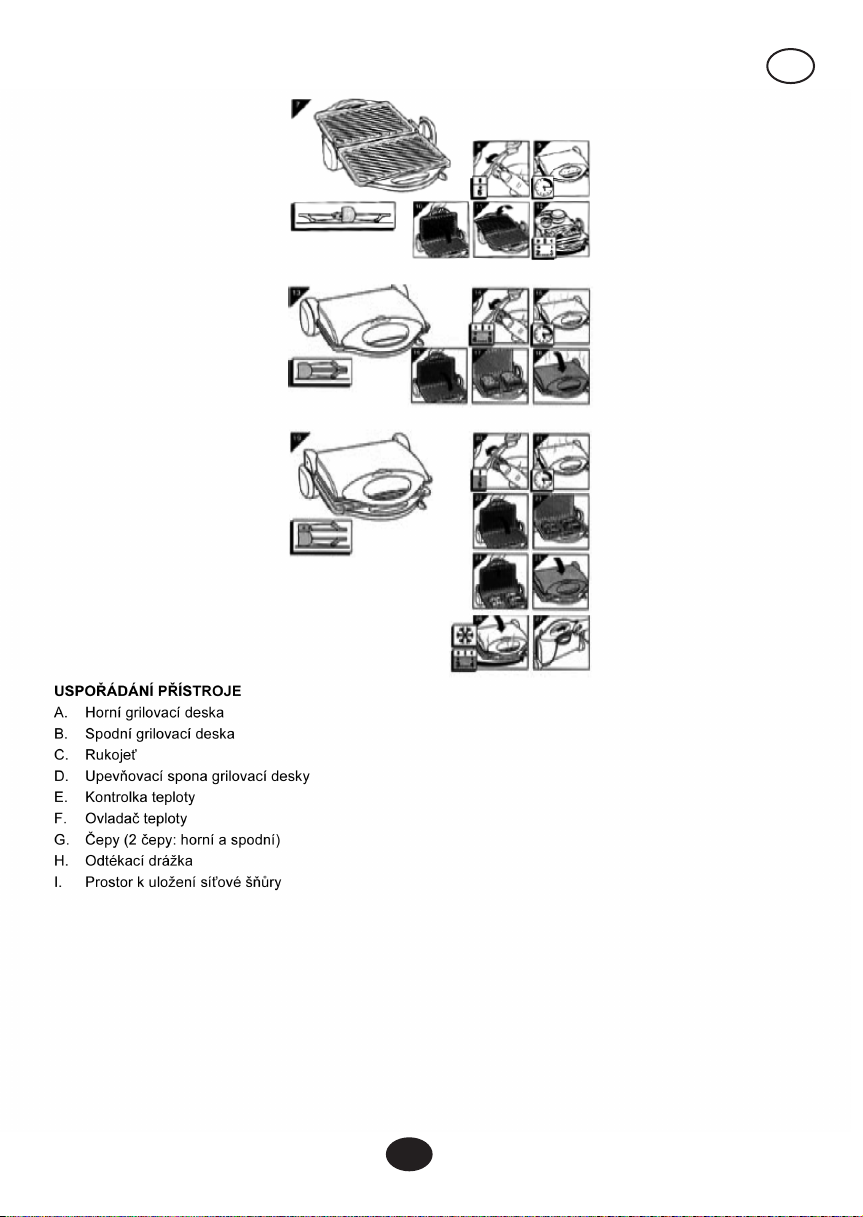
• Stellen Sie die das Gerät auf die Position „Party Grill“ (siehe Abb. 7,11 und 12).
• Nehmen Sie die Grillplatten ab (Abb. 2,3) und waschen Sie diese einzeln in heißem Seifenwasser
(Abb.4)
• Spülen und trocknen Sie die Grillplatten ab.
• Setzen Sie die Grillplatten wieder auf. Setzen Sie das untere Ende der Grillplatten auf das Gerät (Abb.
5). Lassen Sie die Platten nach unten gleiten und drücken Sie diese unter die Befestigungsklemme.
• Suchen Sie einen Platz, an dem Sie den Grill sicher verwenden können. Denken Sie daran, dass
fettiges Fleisch und Würstchen während des Grillens spritzen können.
• Fetten Sie die Grillplatten mit wenig Gemüseöl ein.
GRILLEN
• Wenn Sie sehr saftiges oder fettiges Fleisch grillen und/oder sehr viel Öl oder Butter verwenden
möchten, vergessen Sie bitte nicht, eine Tasse oder ein Tablett unter die Abflussrille zu stellen, um das
Fett oder den Saft aufzufangen (Abb. 6).
• Grillen Sie Fleisch und Fisch trocken und ungesalzen. Sie können Speisen nach dem Grillen salzen.
• Trocknen Sie Fleisch oder Fisch vor dem Grillen gründlich.
DER KONTAKTGRILL KANN IN DREI POSITIONEN VERWENDET WERDEN
„Party Grill“ (Abb. 7)
In dieser Position bietet der Grill eine sehr große Grillfläche für die Zubereitung aller möglichen Snacks wie
Schaschlik, Sate, Gemüse, Früchte, usw.
• Setzen Sie den Temperaturregler auf Position 5 (Abb. 9).
• Heizen Sie den geschlossenen Grill 15 Minuten vor (Abb. 9).
• Heben Sie die Scharniere auf die höchste Position (Abb. 10) und bringen Sie den Kontaktgrill in eine
geöffnete Stellung (Abb. 11). Vorsicht: Die Grillplatten sind heiß!
• Verteilen Sie die Lebensmittel auf der Grilloberfläche.
• Wenden Sie die Speisen von Zeit zu Zeit mit einem Holzspatel.
„Hotplate“ (Abb. 12)
Stellen Sie den Grill auf die Position „Party Grill“. Decken Sie die Grillplatten mit Alu-Folie ab – mit der
reflektierenden Seite nach oben – und setzen Sie den Temperaturregler auf eine niedrige Position (2
oder3). Sie haben den Kontaktgrill nun in eine temperaturgesteuerte Kochplatte verwendet, die Ihre
Speisen automatisch auf der gewünschten Temperatur hält.
„Kontaktgrill“ (Abb. 13)
Diese Position ist für das intensive und schnelle Grillen (Rumpsteak, Hamburger, usw.) und zum
Zubereiten von Sandwichs geeignet.
• Stellen Sie den Temperaturregler auf Position 4 oder 5 (Abb.14).
• Heizen Sie den geschlossenen Grill ungefähr 15 Minuten vor (Abb. 15).
• Öffnen Sie den Grill halb (Abb. 16).
• Legen Sie die Lebensmittel (Fleisch, getoastete Sandwichs, usw.) auf die Mitte der unteren Grillplatte
(Abb. 17).
• Heben Sie die untere Grillplatte etwas an und schließen Sie dann den Grill (Abb. 18).
• Die obere Grillplatte liegt nun auf den Speisen, damit diese gleichmäßig auf beiden Seiten gegrillt
werden.
D
- 4 -
Page 5

D
„Gratin Grill“ (Abb. 19)
Diese Position ist ideal zum Grillen und Kochen und gleichzeitigem Überbacken.
Die Gratin-Position ist auch für die Zubereitung von „offenen“ Sandwichs, z.B. mit Eiern, Tomaten, Paprika
und/oder Zwiebelringen und mit Käse belegt, geeignet. Sie ist jedoch nicht für die Zubereitung von
panierten Speisen geeignet.
• Stellen Sie den Temperaturregler auf die Position 5 (Abb. 20).
• Heizen Sie den geschlossenen Grill ungefähr 15 Minuten vor (Abb. 21).
• Öffnen Sie den Grill halb (Abb. 22).
• Legen Sie die Lebensmittel auf die Mitte der unteren Grillplatte (Abb. 23).
• Heben Sie die obere Grillplatte bis zur höchsten Position an (Abb. 24).
• Bringen Sie die obere Grillplatte in horizontale Position (Abb. 25).
Hinweis: Die obere Grillplatte sollte die Speisen nicht berühren.
Gefrorene Lebensmittel (Abb.26)
Sie können in dieser Position auch Tiefkühlkost auftauen. Wickeln Sie die gefrorenen Lebensmittel in
Alu-Folie ein und stellen Sie den Temperaturregler auf eine niedrige Position (3 oder4). Die Auftauzeit
hängt vom Gewicht der Lebensmittel ab.
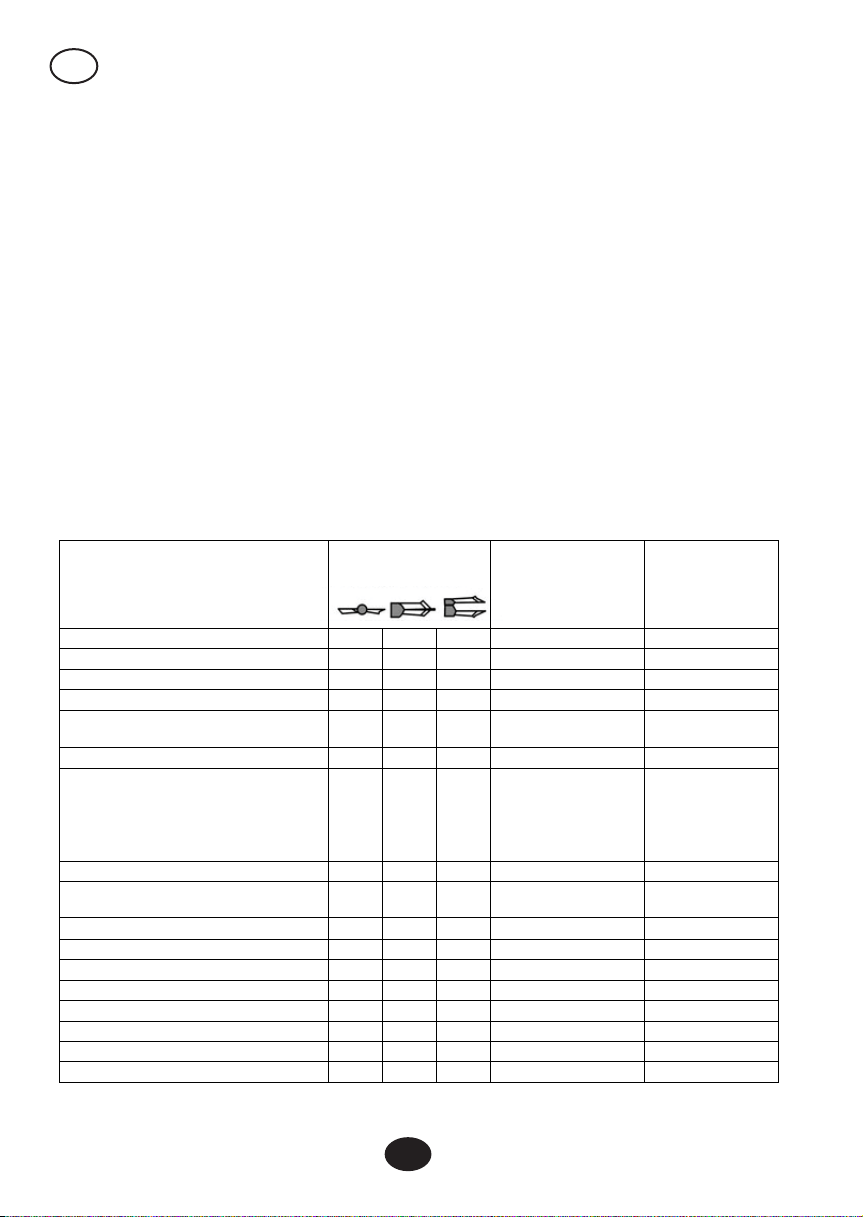
Welche Temperatur, wie lange und welche Position?
In der Tabelle finden Sie eine Vielzahl von Gerichten, die Sie in diesem Kontaktgrill zubereiten können. Die
Tabelle gibt an, welche Temperaturstufe Sie wählen, wie lange Sie die Speisen grillen und welche Position
Sie einstellen müssen.
Die Zeit zum Vorheizen des Grills ist in den angegebenen Grillzeiten nicht berücksichtigt.
Während des Grillens schaltet sich die Temperaturleuchte ein und aus. Das bedeutet, dass der Kontaktgrill
die Temperatur der eingestellten Position entsprechend konstant hält. Grillen Sie einfach weiter, wenn das
Licht ein oder aus geht.
Sie können Grillzeiten und -temperaturen natürlich je nach eigenem Geschmack einstellen.
Die Einstellungen sind außerdem abhängig von den Speisen, die Sie zubreiten (z.B. Fleisch), deren Dicke
und Temperatur.
Beachten Sie bitte auch die Anzeigen auf dem Kontaktgrill.
Ratschläge
• Wenn Sie Sate, Geflügel, Schwein oder Kalb zubereiten, braten Sie das Fleisch zunächst bei hoher
Temperatur kurz an (Position 5). Anschließend können Sie die Temperatur eine Stufe niedriger
einstellen und das Fleisch grillen, bis es durch ist.
• Würstchen springen normalerweise beim Kochen auf. Vermeiden Sie das, indem Sie mit einer Gabel
ein paar Löcher in die Würstchen machen.
• Frisches Fleisch erzielt bessere Grillergebnisse als tiefgefrorenes oder aufgetautes Fleisch
• Salzen Sie das Fleisch nicht, bis Sie es fertig gegrillt haben. Damit bewahren Sie den Saft im Fleisch.
• Der Kontaktgrill ist nicht für das Grillen von panierten Speisen geeignet.
• Achten Sie darauf, dass die zu grillenden Fleischscheiben nicht zu dick sind, um optimale
Grillergebnisse zu erzielen (ungefähr 1,5 cm dick).
D
- 5 -
Page 6
D
Reinigung
• Ziehen Sie den Stecker und lassen Sie den Grill abkühlen, bis sich die Grillplatten nicht mehr heiß
anfühlen.
• Stellen Sie den Grill auf die Position „Party Grill“ und nehmen Sie die Grillplatten ab (Abb. 26), indem
Sie auf die Befestigungsklemme drücken.
• Tauchen Sie die Grillplatten 5 Minuten in heißes Seifenwasser, um angebrannte Rückstände
aufzuweichen.
• Reinigen Sie die Grillplatten in heißem Seifenwasser oder im Geschirrspüler.
• Sie können die Außenseite des Grills mit einem feuchten Lappen abwischen. Verwenden Sie keine
scheuernden Reinigungsmittel oder Gegenstände.
Die Grillplatten wieder aufsetzen
• Stellen Sie den Grill auf die Position „Party Grill“ (Abb. 7).
• Setzen Sie das untere Ende der Grillplatten auf das Gerät (Abb. 5).
• Lassen Sie die Grillplatten auf das Gerät herab und schieben Sie diese unter die Befestigungsklemme.
Aufbewahrung
Um Platz zu sparen, können Sie das Gerät in aufrechter Position lagern.
• Bringen Sie das Gerät in vertikale Position.
• Wickeln Sie das Kabel um die Haken auf der Unterseite des Grills (Abb. 27).
ART DER LEBENSMITTEL
Lachs oder Tuna- Steak
Gambas
Fisch (kleine Stückchen)
Würstchen
Hamburger (tiefgefroren,
vorgekocht)
Lamm-Kotelett
Fleisch mit kurzer Zubereitungszeit
(z.B. Steaks)
Fleischstückchen
Gemüse / Früchte mit Käse
überbacken
Gemischter Grill (kleine Stückchen)
„offener“ Toast
Ananasstücken
Schaschlik
Getoastete Sandwichs
Truthahn / Hühnerfilet (250g)
Warm halten
Auftauen
GRILLPOSITION
•
• •
•
•
•
•
• •
•
• •
• •
•
•
•
GRILLZEIT
(MINUTEN)
8 – 10 4 – 5
abhängig von der
Dicke des
Fleisches und
Ihrem persönlichem
Geschmack
•
•
•
8 – 10 4 – 5
8 – 10 4 – 5
TEMPERATUR-
STUFE
5 – 7 4 – 5
3 – 4 4 – 5
4 – 6 4
6 – 8
4 – 6
4 – 5 5
4 – 5 5
5 – 6 5
3 – 4
3 – 4
6 – 8
4 – 5
4 – 5
5
5
5
4 – 5
–2 3
3 – 4
D
- 6 -
Page 7

D
TECHNISCHE DATEN
Eingangsspannung Wechselstrom: AC 230 V ~ 50 Hz
Ausgangsleistung: 1800 W
Hinweise zum Umweltschutz
Dieses Produkt darf am Ende seiner Lebensdauer nicht über den normalen Haushaltsabfall entsorgt
werden, sonderm muss an einem Sammelpunkt für das Recycling von elektrischen und elektronischen
Geräten abgegeben werden. Das Symbol auf dem Produkt, der Gebrauchsanleitung oder der Verpackung
weist darauf hin.
Die Werkstoffe sind gemäß ihrer Kennzeichnung wiederverwertbar. Mit der Wiederverwendung, der
stofflichen Verwertung oder anderen Formen der Verwertung von Altgeräten leisten Sie einen wichtigen
Beitrag zum Schutze unserer Umwelt.
Bitte erfragen Sie bei der Gemeindeverwaltung die zuständige Entsorgungsstelle.
D
- 7 -
Page 8
GB
INSTRUCTION MANUAL KGJ-2200 CONTACT GRILL
Dear customer,
Please read these operating instructions through carefully before connecting your device to the mains, in
order to avoid damage due to incorrect use. Please pay particular attention to the safety information. If you
pass the device on to a third party, these operating instructions must also be handed over.
IMPORTANT
• Read the instructions for use carefully and look at the illustrations before you start using the appliance.
• Check if the mains voltage indicated on the bottom of the appliance corresponds to the mains voltage at
your home before you connect the appliance to the power.
• Place the appliance on a firm, level surface.
• Do not place the appliance under wall-mounted kitchen cupboards, under a shelf or close to flammable
materials such as blinds or (net) curtains.
• Do not use any metal kitchen utensils on this appliance, nor any aggressive or abrasive cleaning
agents; these can damage the non-stick coating of the grilling plates.
• Always unplug the appliance and allow it to cool down before you start cleaning it.
• Never immerse the appliance in water. You can clean it with a damp cloth.
• For thorough cleaning, you can remove the grilling plates and wash them.
• Make sure the mains cord does not come into contact with the hot grilling plates.
• Connect the appliance to an earthed wall socket.
• Do not let the cord hang over the edge of the surface the appliance is standing on.
• Be careful of spattering fat when you are grilling fatty meat or sausages.
• Do not let food stick out of the grill during grilling.
• Fully unwind the cord when you use the appliance. Let the appliance cool down properly before you
wind the cord around the hooks in the base.
• If the mains cord of this appliance is damaged, it must only be replaced by a authorized service center
as repair requires special tools and / or parts.
GB
- 8 -
Page 9

GB
STRUCTURE
A. Upper grilling plate
B. Lower grilling plate
C. Handle
D. Fixing clip of grilling plate
E. Temperature pilot light
F. Temperature control
G. Hinges (2 pivots: high and low)
H. Draining groove
I. Cord storage facility
GB
- 9 -
Page 10

GB
BEFORE THE APPLIANCE FOR THE FIRST TIME
• Put the contact grill in the “party grill” position (see figs. 7, 11 and 12).
• Remove the grilling plates (fig. 2, 3) and wash them separately in hot soapy water (fig. 4).
• Rinse and dry the grilling plates.
• Reassemble the grilling plates. Place the rear edge of the grilling plates on the appliance (fig. 5). Lower
the plates and press them down under the fixing clip.
• Find a place for the contact grill where it can be used safely. Bear in mind that fatty meats and sausages
may spatter while being grilled.
• Grease the grilling plates lightly with some vegetable oil.
GRILLING
• When you intend to grill juicy or fatty meat and/or use a lot of oil or butter, do not forget to place a cup or
tray under the draining groove(s) to catch the fat or juice (fig 6).
• Grill meat and fish dry and unsalted. You can add salt after grilling.
• Before grilling, dry fish or meat thoroughly.
THE CONTACT GRILL CAN BE USED IN THREE POSITIONS
“Party grill” (fig. 7)
In this position the contact grill offers a large grilling surface for the preparation of all kinds of snacks, such
as shashlik, sate, vegetables, fruits etc.
• Set the temperature control to position 5 (fig. 9).
• Preheat the grill for about 15 minutes in closed position (fig. 9).
• Pull the hinges up to the highest position (fig. 10) and put the contact grill in the open position (fig. 11).
Be careful: the grilling plates are hot!
• Spread the food on top of the grilling surface.
• Turn the food from time to time by means of wooden spatulas.
“Hotplate” (fig. 12)
Set the contact grill in the “party grill” position, cover the grilling plate with aluminum foil with the shiny side
facing upwards and set the temperature control to a low position (2 or 3). You have now converted the
contact grill into a thermostatically controlled hotplate which will automatically keep your dishes at the
required temperature.
“Contact grill” (fig. 13)
This position is especially suitable for intense and quick grilling (rump steaks, hamburgers etc.) and for
making toasted sandwiches.
• Set the temperature control to position 4 or 5 (fig. 14).
• Preheat the grill for about 15 minutes in closed position (fig. 15).
• Open the grill halfway (fig. 16).
• Put the food (meat, toasted sandwiches etc.) in the middle of the lower grilling plate (fig. 17).
• Lift the upper grilling plate slightly and then close the grill (fig. 18).
• The upper grilling plate now rests on the food, causing it to be grilled equally strong on both sides.
“Gratin grill” (fig. 19)
This is the ideal position for grilling and cooking au gratin at the same time.
The gratin position is also suitable for the preparation of all kinds of “open” toasts, e.g. with egg, tomato,
peppers and / or onion rings covered with cheese. However, it is not suitable for preparing bread-crumbed
dishes.
• Set the temperature control to position 5 (fig. 20).
• Preheat the grill for about 15 minutes in closed position (fig. 21).
• Open the grill halfway (fig. 22).
• Put the food in the middle of the lower grilling plate (fig. 23).
GB
- 10 -
Page 11

GB
• Pull the upper grilling plate to its highest position (fig. 24).
• Put the upper grilling plate in horizontal position (fig. 25).
Note: the upper grilling plate should not be in contact with the food.
Frozen food (fig. 26)
You can also use this position to defrost frozen food. Wrap the frozen food in aluminum foil and set the
temperature control to a low position (3 or 4). The defrosting time depends on the weight of the food.
Which temperature, how long and which position?
In the table you will find a number of dishes you can prepare with the contact grill.
The table sows which temperature to select, how long the food should be grilled and the appropriate
position of the grill.
The time necessary to preheat the appliance has not been included in the indicated grilling time.
During the grilling process the temperature pilot light will go on from time to time. This means that the
contact grill is adjusting the grilling temperature to the preset position. When this happens, you can simply
continue grilling.
You can of course adapt the grilling time and temperature to your own taste.
The settings also depend on the kind of food that is being prepared (e.g. meat), its thickness and its
temperature.
See also the indications on the contact grill
TIPS
• When you are preparing sate, chicken, pork or veal, first sear the meat at a high temperature (position
5). If necessary, you can then set the temperature control one position lower and grill the food until it is
done.
• Sausages tend to burst when they are being cooked. To prevent this, punch a few holes in them with a
fork.
• Fresh meat gives better grilling results than frozen or defrosted meat.
• Do not put salt on the meat until after you have grilled it. This will help to keep the meat juicy.
• The contact grill is unsuitable for grilling bread-crumbed food.
• For the best result, make sure the pieces of meat you are going to prepare are not too thick (approx. 1.5
cm).
CLEANING
• Unplug the appliance and let it cool down until the grilling plates are no longer hot to the touch.
• Put the grill in the “party grill” position and remove the grilling plates (fig. 26) by pressing on the fixing
clips.
• Soak the grilling plates in hot soapy water for five minutes to loosen any residues that might have caked
onto it.
• Clean the grilling plates in hot soapy water or put them in the dishwasher.
• You can clean the outside of the appliance with a damp cloth. Do not use any scouring cleaning agents
or materials.
GB
- 11 -
Page 12

GB
Please inquire at the community administration for the authorized disposal location.
•
•
•
•
•
•
•
•
•
•
•
•
• Put the grill in the “party grill” position (fig. 7).
• Place the rear edge of the grilling plates on the appliance (fig. 5).
• Lower the grilling plates onto the appliance and press them down under the fixing clip.
Storage
To save space, you can store the appliance in upright position.
• Put the appliance in vertical position.
• Wind the cord around the hooks in the base of the grill (fig. 27).
POSITION OF THE
TYPE OF FOOD
Salmon or tuna steak
Gambas
Fish (small pieces)
Sausage
Hamburger (frozen, precooked)
Lamb chop
Meat that takes little time to cook
(e.g. steaks)
Pieces of meat
Vegetables / fruit covered with
cheese
Mixed grill (small pieces)
Open toast
Pineapple slices
Shashlik
Toasted sandwich
Turkey / chicken fillet (250g)
Keeping warm
Defrosting
TECHNICAL DATA
Input Voltage: AC 230 V ~ 50 Hz
Output Power: 1800 W
GRILL
•
•
•
•
•
•
•
•
•
•
GRILLING TIME
(MINUTE)
5 – 7 4 – 5
3 – 4 4 – 5
4 – 6 4
8 – 10 4 – 5
6 – 8
4 – 6
Depending on
the thickness of
the meat and
your personal
preference
4 – 5
4 – 5
8 – 10 4 – 5
5 – 6
3 – 4
8 – 10
3 – 4
6 – 8
TEMPERATURE
SETTING
4 – 5
4 – 5
55
5
5
55
4 – 5
4 – 5
2 – 3
3 – 4
Instructions on environment protection
Do not dispose of this product in the usual household garbage at the end of its life cycle; hand it over at a
collection point for the recycling of electrical and electronic appliances. The symbol on the product, the
instructions for use or the packing will inform about the methods for disposal.
The materials are recyclable as mentioned in its marking. By recycling, material recycling or other forms of
re-utilization of old appliances, you are making an important contribution to protect our environment.
GB
- 12 -
Page 13

HR
Reassembling the grilling plates
HR
- 13 -
Page 14

HR
HR
- 14 -
Page 15

HR
HR
- 15 -
Page 16

HR
HR
- 16 -
Page 17

HR
HR
- 17 -
Page 18

CZ
CZ
- 18 -
Page 19
CZ
CZ
- 19 -
Page 20

CZ
CZ
- 20 -
Page 21

CZ
CZ
- 21 -
Page 22
CZ
CZ
- 22 -
Page 23
HU
HU
- 23 -
Page 24
HU
HU
- 24 -
Page 25
HU
HU
- 25 -
Page 26

HU
HU
- 26 -
Page 27

HU
HU
- 27 -
Page 28

SK
SK
- 28 -
Page 29

SK
SK
- 29 -
Page 30

SK
SK
- 30 -
Page 31

SK
SK
- 31 -
Page 32

SK
SK
- 32 -
Page 33

Kinder oder Personen, denen es an Wissen oder Erfahrung im Umgang mit dem Gerät mangelt,
DE
oder die in ihren körperlichen, sensorischen oder geistigen Fähigkeiten eingeschränkt sind,
dürfen das Gerät nicht ohne Aufsicht oder Anleitung durch eine für ihre Sicherheit
verantwortliche Person benutzen. Kinder müssen beaufsichtigt werden, damit sie nicht mit dem
Gerät spielen.
This appliance is not intended for use by persons (including children) with reduced physical,
GB
sensory or mental capabilities, or lack of experience and knowledge, unless they have been
given supervision or instruction concerning use of the appliance by a person responsible for
their safety. Children should be supervised to ensure that they do not play with the appliance.
Cet appareil n’est pas conçu pour être utilisé par des personnes (y compris des enfants)
FR
avec des handicaps physiques, sensoriels ou mentaux, ou manquant d’expérience et de
connaissances, sauf si elles en sont sous surveillance ou on reçu des instructions sur
l’utilisation de l’appareil par une personne responsable de leur sécurité. Surveillez toujours les
enfants pour vous assurer qu’ils ne jouent pas avec l’appareil.
Ezt a berendezést nem olyan személyek (köztük gyermekek) által való használatra szánták,
HU
akik csökkent zikai, érzékszervi vagy mentális képességekkel rendelkeznek, vagy akiknek
hiányzik a tapasztalatuk és tudásuk hozzá, hacsak nincsenek felügyelet alatt vagy nem
részesültek a berendezés használatára vonatkozó felvilágosításban olyan személy részéről,
aki felelős biztonságukért. A gyermekekre különösen vigyázni kell, nehogy játsszanak a
berendezéssel.
Questo apparecchio non è destinato all’uso da parte di persone (compresi i bambini) con
IT
ridotte capacità motorie, sensoriali o psichiche, o comunque prive di esperienza e conoscenza,
a meno che non siano sorvegliate o istruite sull’uso dell’apparecchio da parte di una persona
responsabile della loro sicurezza. I bambini devono essere sorvegliati per impedire che possano
giocare con l’apparecchio.
Este aparato no está diseñado para su uso por parte de personas (incluidos niños) con
ES
capacidades físicas, sensoriales o mentales reducidas o sin experiencia o conocimientos a
menos que este uso se realiza bajo supervisión o instrucción de una persona responsable para
garantizar la seguridad. Se debe vigilar a los niños para asegurar que no juegan con el aparato.
Este aparelho não se destina a ser utilizado por pessoas (incluindo crianças) com capacidades
PT
físicas, sensoriais ou mentais reduzidas, ou com falta de experiência e conhecimentos, a
menos que recebam supervisão ou formação sobre o uso do aparelho, por uma pessoa
responsável pela sua segurança. As crianças devem ser vigiadas para garantir que não
brincam com o aparelho.
Niniejsze urządzenie nie jest przeznaczone dla osób (w tym dzieci) o ograniczonych
PL
zdolnościach zycznych, sensorycznych lub umysłowych, odznaczających się brakiem
doświadczenia lub wiedzy, chyba że pozostają pod nadzorem osoby odpowiedzialnej za ich
bezpieczeństwo lub otrzymają od niej wskazówki dotyczące używania urządzenia. Dzieci
powinny pozostawać pod nadzorem, aby nie używały urządzenia do zabawy.
Page 34

Dit apparaat is niet bedoeld om gebruikt te worden door personen (inclusief kinderen) met
NL
beperkte lichamelijke, sensorische of geestelijke capaciteiten of om gebruikt te worden door
personen zonder ervaring en / of met een gebrekkige kennis, tenzij ze onder toezicht staan van
een persoon die voor hun veiligheid instaat of van die persoon instructies hebben gekregen
hoe ze het apparaat moeten gebruiken. Kinderen moeten onder toezicht gehouden worden om
ervoor te zorgen dat ze niet met het apparaat spelen.
Tento přístroj není určen pro použití osobami (včetně dětí) se sníženými fyzickými, smyslovými
CZ
nebo duševními schopnostmi nebo nedostatkem zkušeností a znalostí, ledaže by byli pod
dohledem nebo poučeny o použití přístroje osobou zodpovědnou za bezpečnost. Děti by měli
být pod dohledem, aby si nehráli s přístrojem.
Bu alet; aletin güvenliðinden sorumlu personel tarafýndan aletin kullanýmýna iliþkin talimat
TR
verilmedikçe ya da kullanýmý esnasýnda kontrol (nezaret) yapýlmadýkça, düþük ziksel,
duyusal ya da zihinsel kapasiteleri veya deneyim ve bilgi eksikliði olan kiþilerin (çocuklar dahil)
kullanýmýna yönelik deðildir. Bu aletle oynamamalarýný saðlamak için çocuklar kontrol ve
denetim altýnda tutulmalýdýr.
Acest dispozitiv nu este destinat utilizării de către persoane (inclusiv copii) cu capacităţi
RO
zice, senzoriale şi mintale reduse, sau lipsite de experienţă şi cunoştinţe, decât dacă se aă
sub supraveghere sau au fost instruite privitor la utilizarea aparatului de către o persoană
responsabilă cu siguranţa acestora. Copiii vor supravegheaţi pentru a exista siguranţa că nu
se joacă cu dispozitivul.
Този уред не е предвиден за използване от хора (включително деца) с намалена
BG
физическа, сензорна и умствена способност или такива, които нямат опит и знания, освен
ако те не действат под надзора или не са били инструктирани относно използването на
уреда от лице, отговарящо за тяхната безопасност. Децата трябва да бъдат надзиравани,
за да се гарантира, че те няма да си играят с уреда.
Данный прибор не предназначен для использования людьми (включая детей) с
RUS
уменьшенными физическими, сенсорными или умственными способностями, или
недостатком опыта и знания, за исключением, если они были под надзором или им была
дана инструкция относительно использования прибора человеком, ответственным за их
безопасность. Дети должны быть под надзором, чтобы убедиться, что они не играют с
прибором.
Toto zariadenie a prístroj nie je určené na použitie osobami (vrátane detí) so zníženými
SK
fyzickými, zmyslovými alebo senzorickými alebo duševnými mentálnymi schopnosťami, alebo
nedostatkom skúseností a poznania, ibaže by mali dohľad a dozor alebo inštrukcie ohľadne
použitia zariadenia alebo prístrojov osobou zodpovednou za ich bezpečnosť. Deti by mali byť
kontrolované a na nich dohliadané, aby sa zabezpečilo a zaistilo, že sa so zariadením alebo
prístrojom nebudú hrať.
Te naprave naj ne uporabljajo osebe (vključno z otroci) z zmanjšanimi zičnimi, senzoričnimi ali
SI
mentalnimi sposobnostmi, osebe brez potrebnega znanja in izkušenj, razen če jih je o pravilni
uporabi naprave poučila oseba odgovorna za njihovo varnost ali jih ta oseba nadzoruje. Otroke
vedno nadzorujte, saj boste tako preprečili, da bi le-ti napravo uporabljali kot igračo.
Nije predviđeno da ovaj aparat koriste osobe (uključujući i djecu) sa smanjenim zičkim,
HR
osjetilnim ili mentalnim sposobnostima ili neiskusne i neuke osobe, osiam ako su pod nadzorom
i ak aparat koriste na temleju puta osobe koja je odgovorna z anjihovu sigurnost. Potrebno je
nadzirati djecu kako se ne bi igrala ovim aparatom.
 Loading...