

Page 1
MOD EL RTA-S 07
MODEL RTA- S 0 7
Page 2
RTA-S07
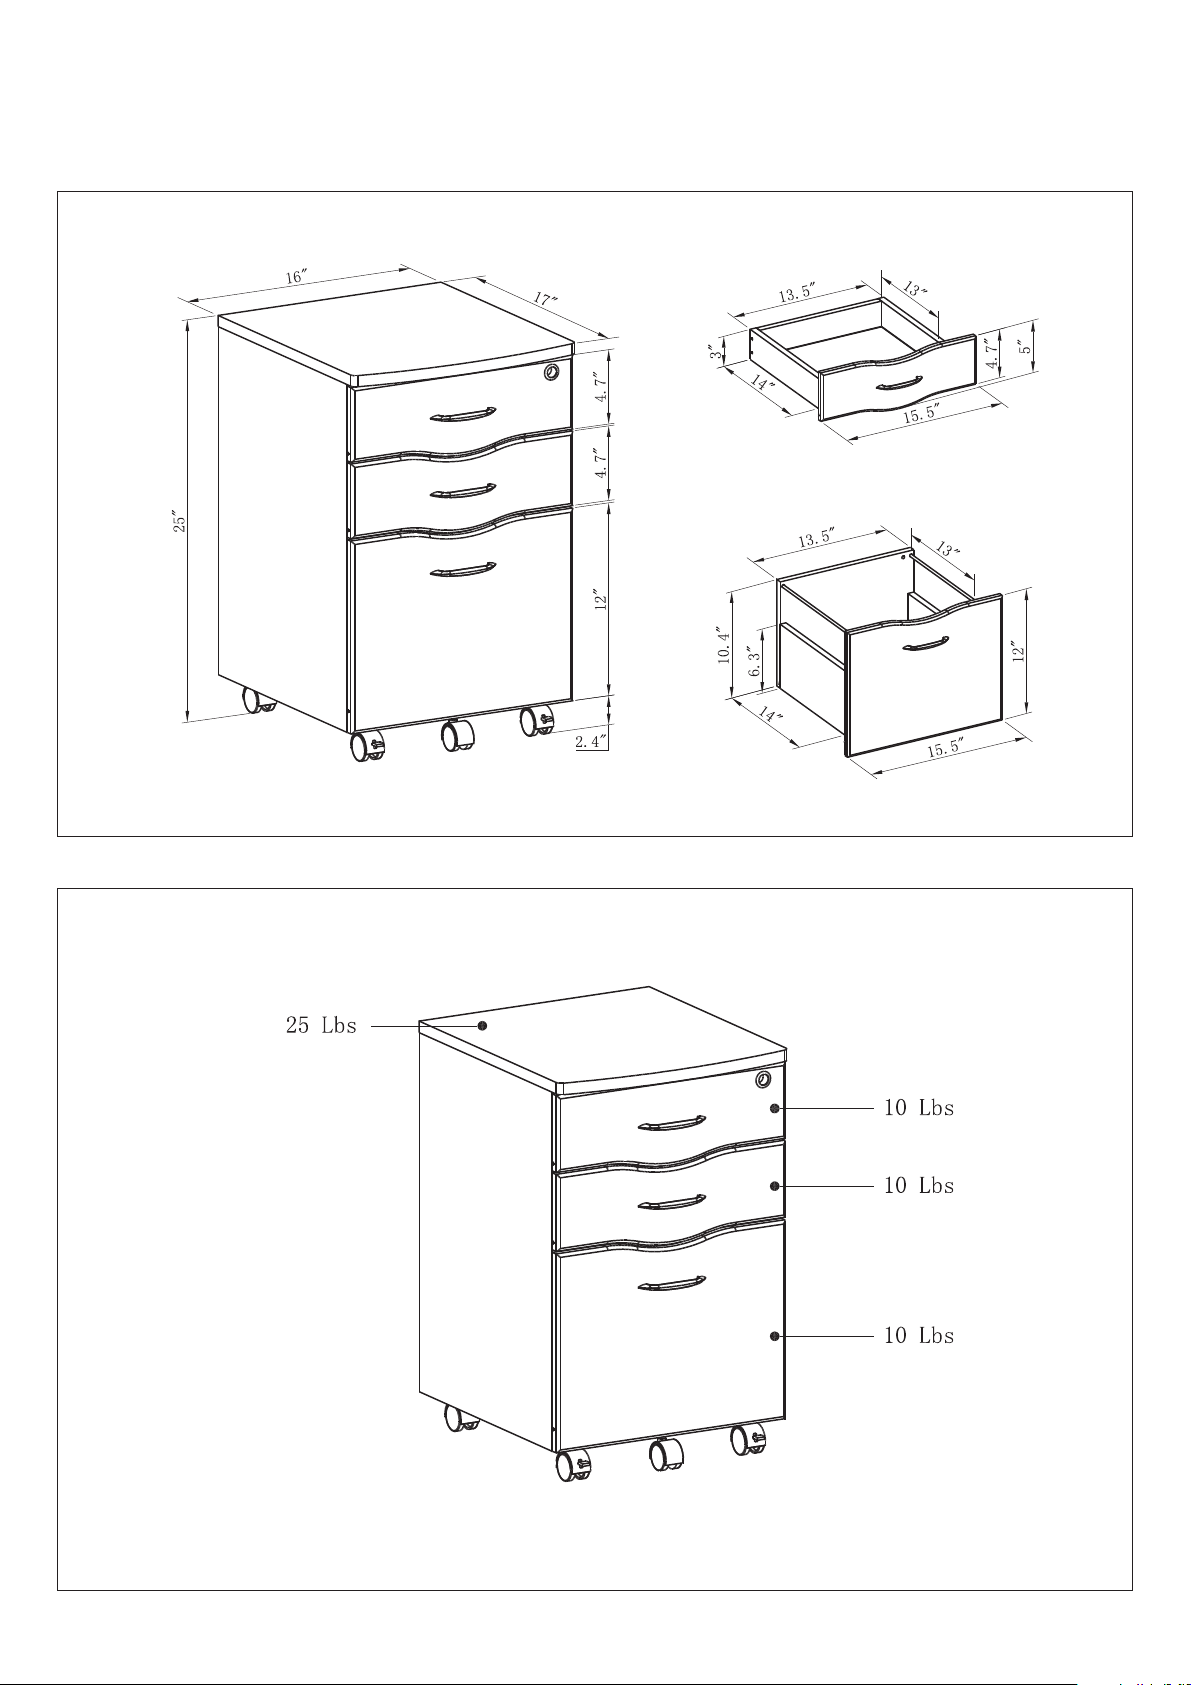
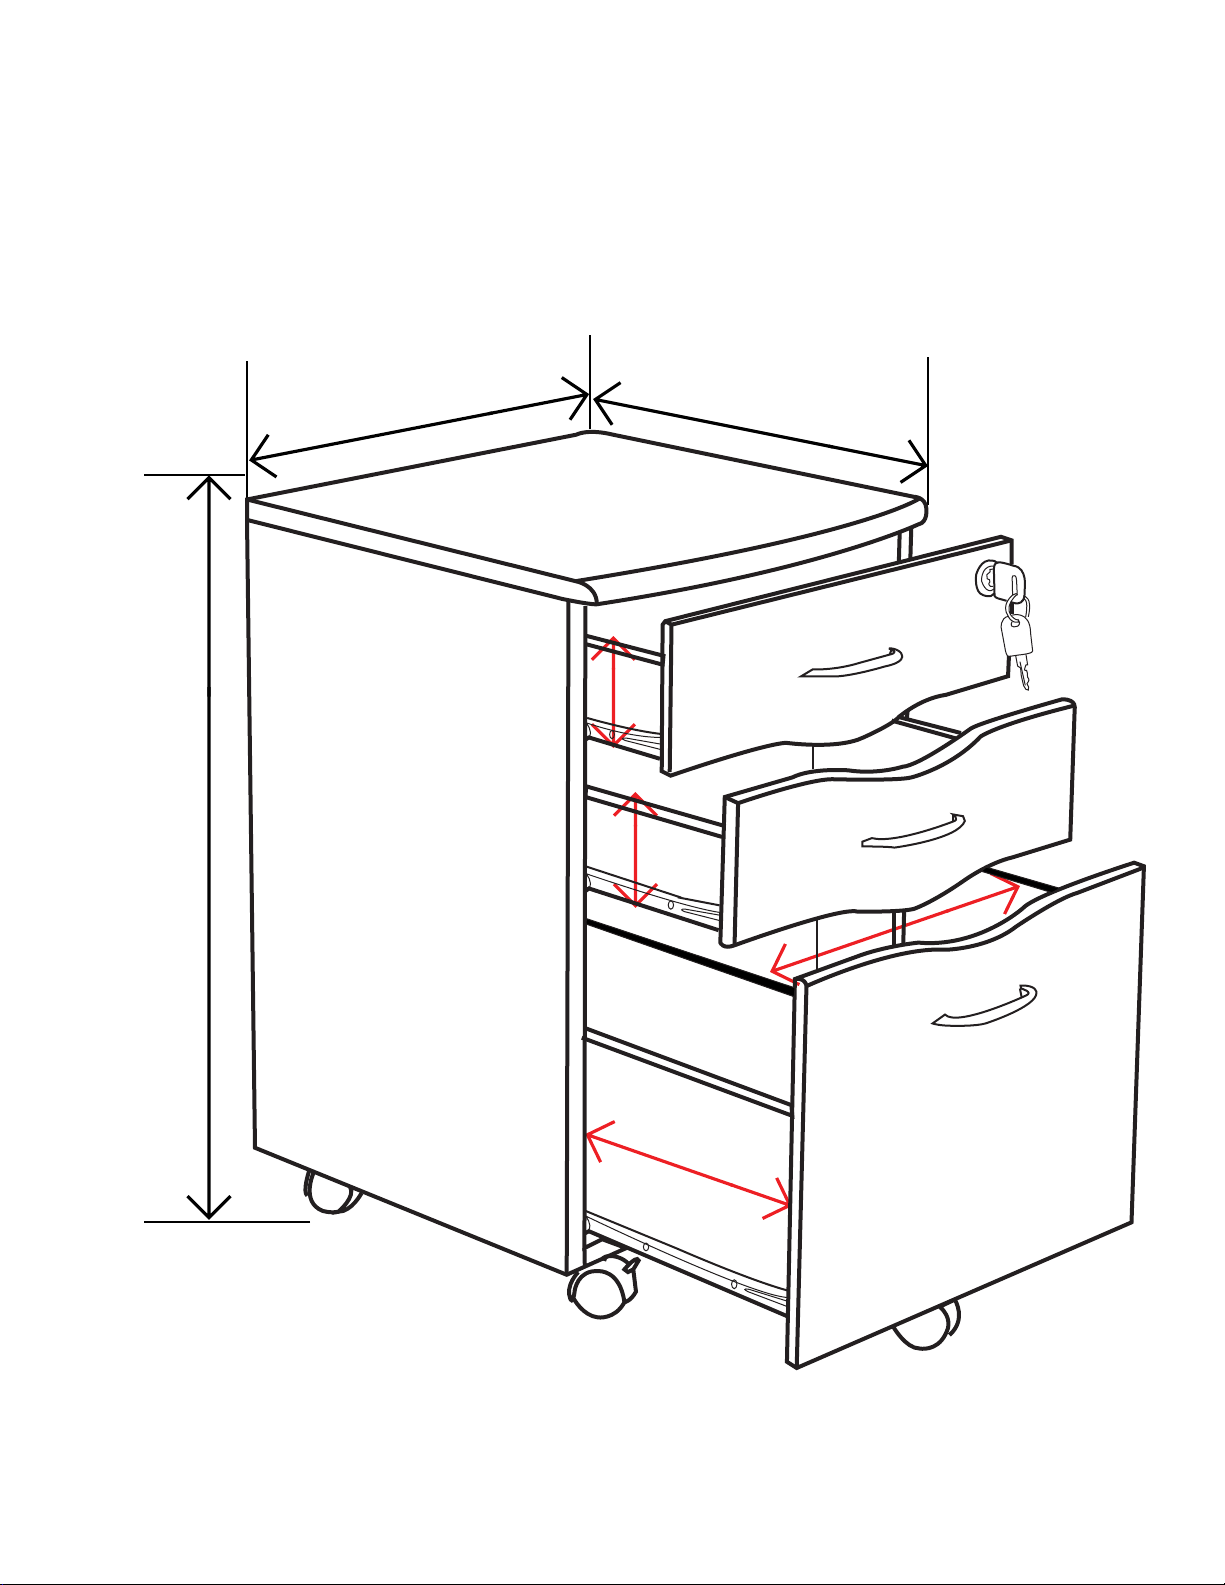
DIMENSIONS
Small drawe r inside space: 13.5"W x 13"D x 3"H
Product Siz e: 17"W x 16"D x 25"H
MAXIMUM WEIGHT CAPACITIES
File drawer i nside space: 13. 5"W x 13"D x 10.4"H
DO NOT exceed t his limit
Please use ca re and good judgement
when placin g objects on wood surface
Page 3
RTA-S07
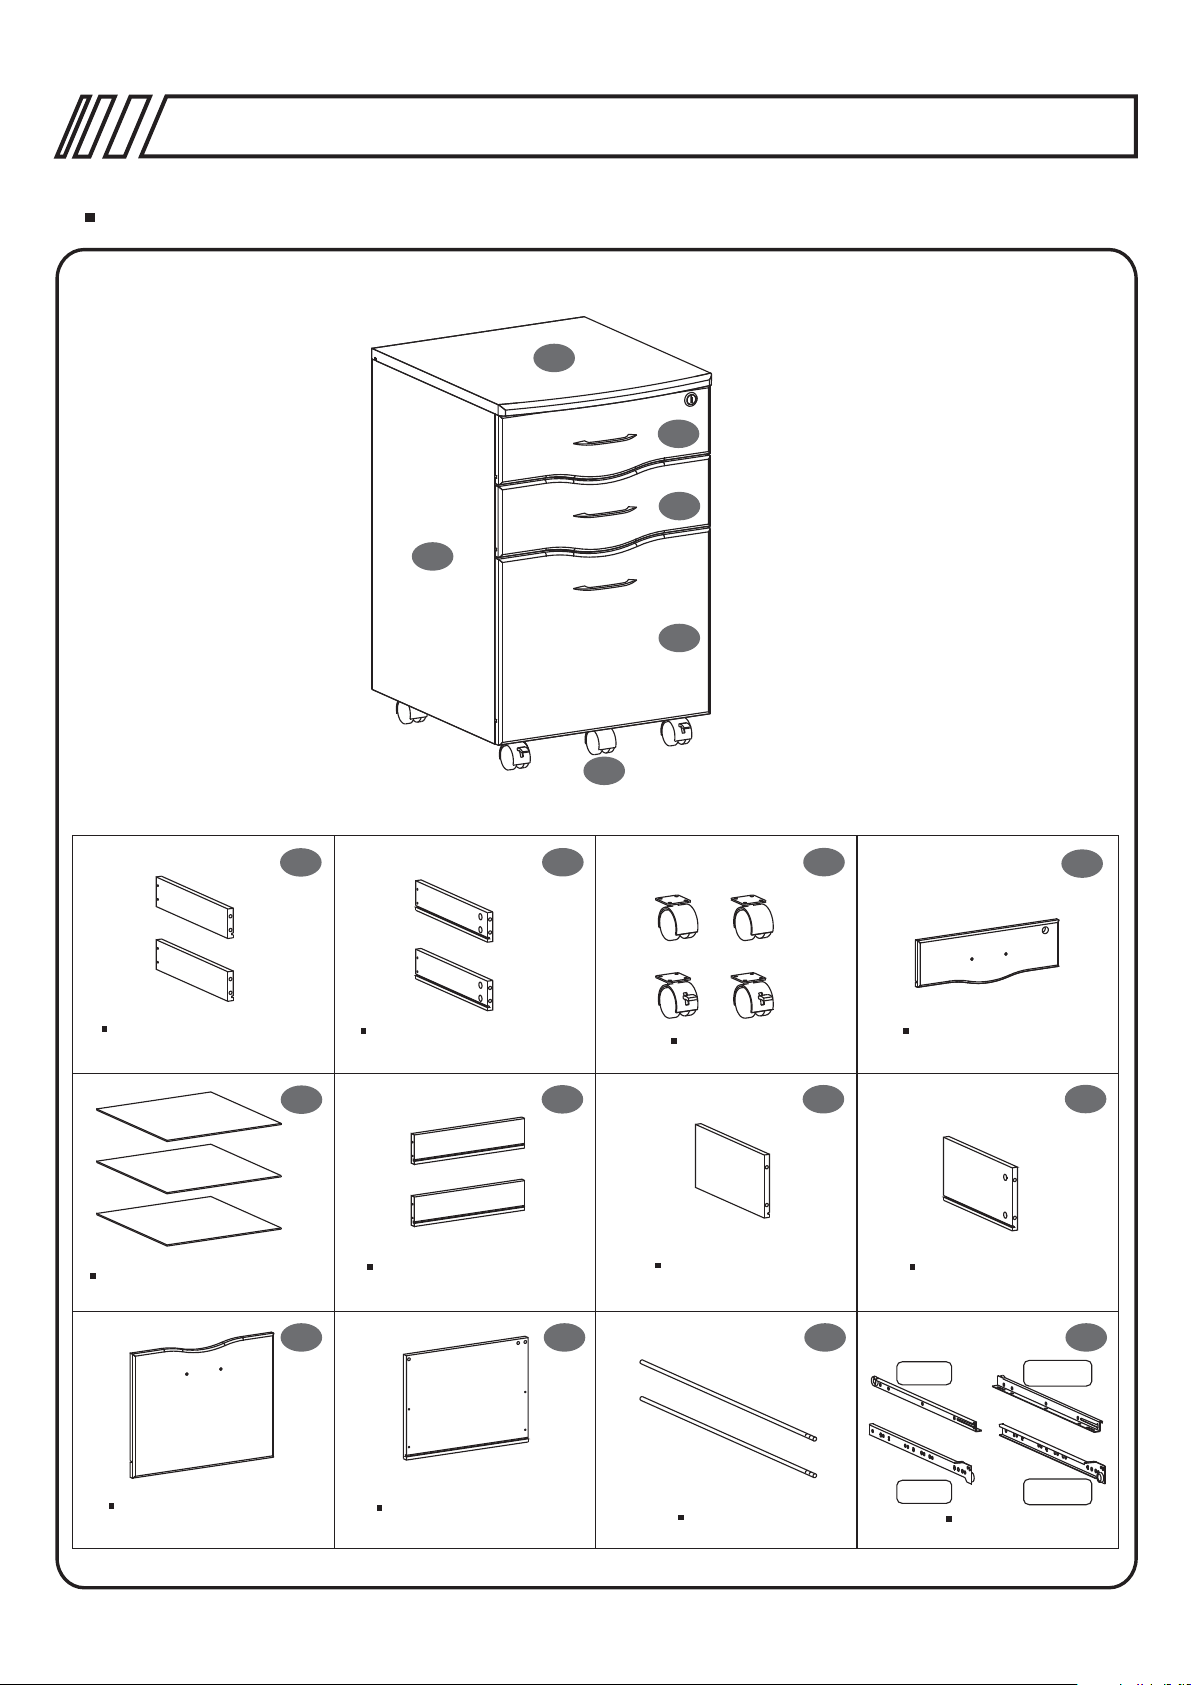
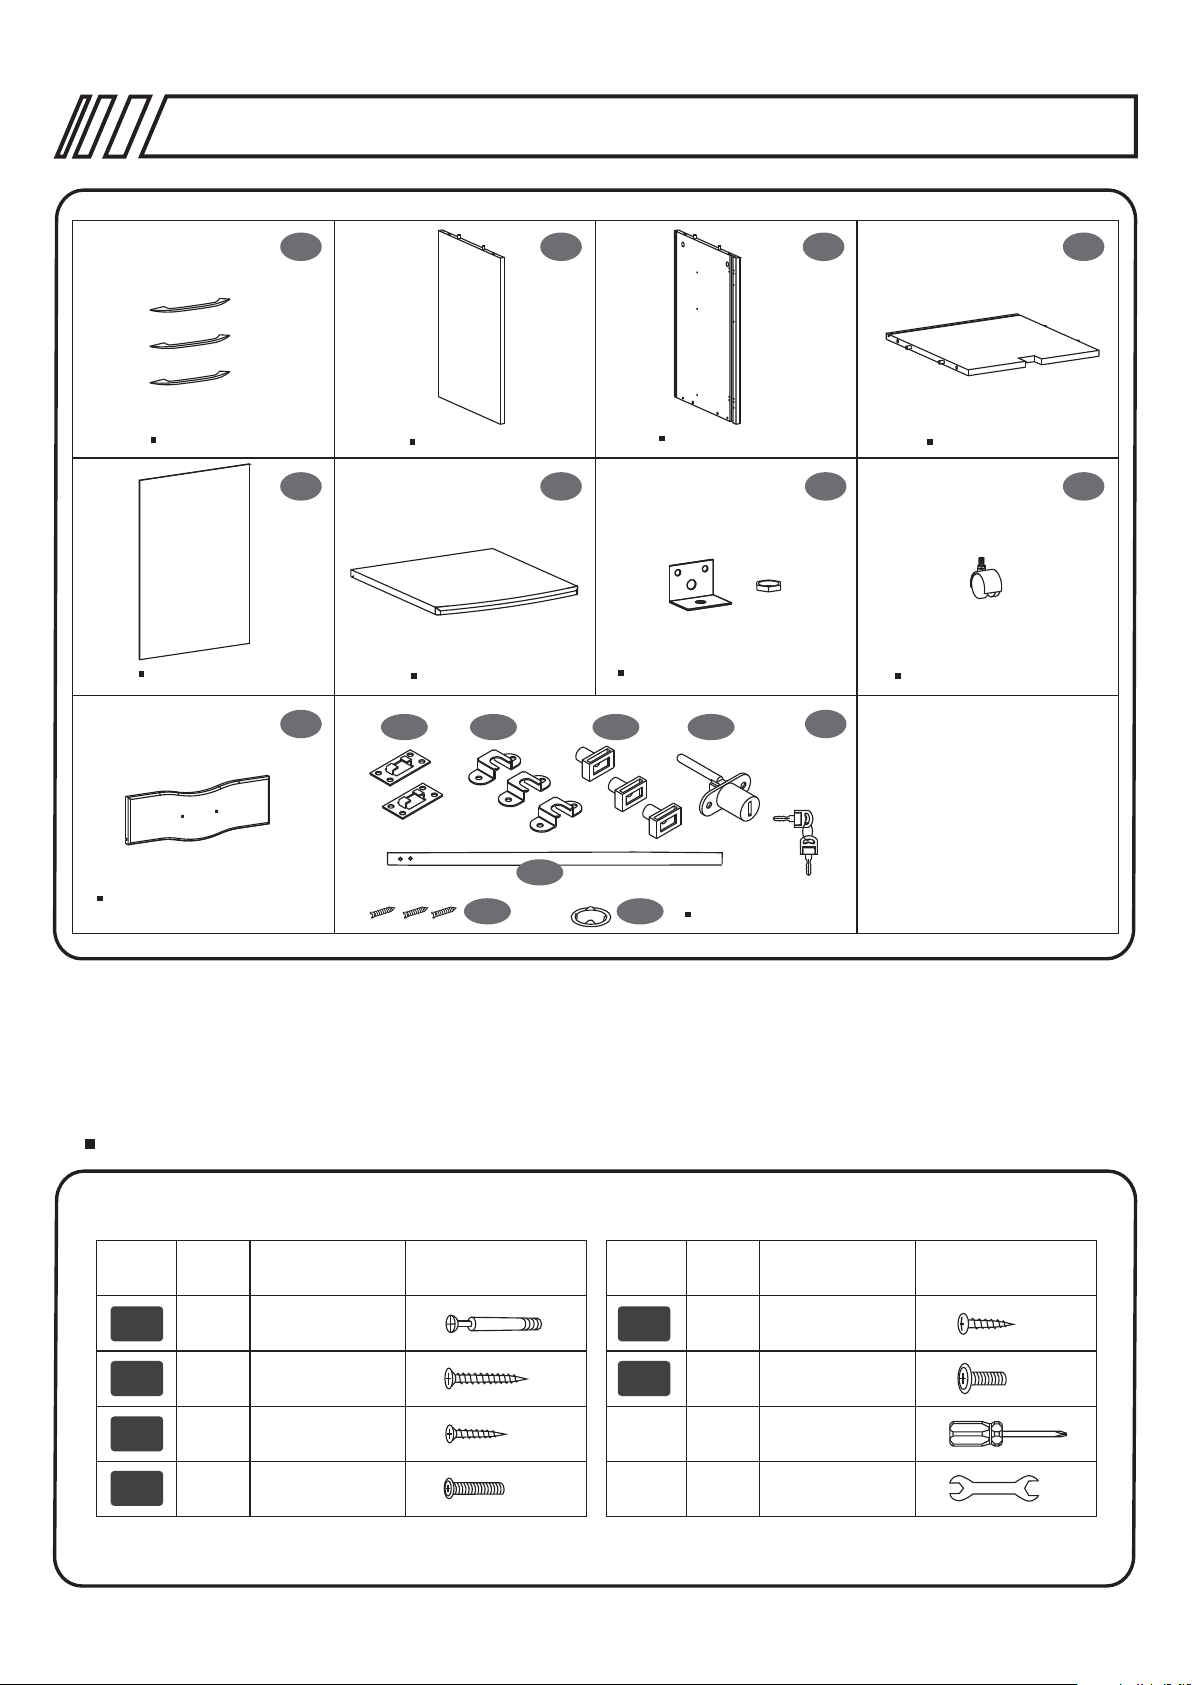
PARTS LIST
P.3
18
4
21
14
9
Small Drawer Left
Panel
Drawer Bottom Panel
1
Small Drawer Right
x2 x2
Panel
5
Small Drawer Back
x3
Panel
9
2
6
10 11 12
x2
20
Caster
File Drawer Left
Panel
3
x4
7
Top Drawer Front
Panel
File Drawer Right
Panel
Left
Right
4
8
File Drawer Front
Panel
File Drawer Back
Panel
File Tube
x2
Left
Right
Slider
x3 SETS
Page 4
RTA-S07
P.4
Handle
Back Panel
x3
17
21
Left Panel
Top Panel
22A 22B
1413 16
Right Panel
18
Bracket and nut, SET
22C
22D
15
19
22
Bottom Panel
20
File Drawer Caster
Middle Drawer Front
Panel
SCREWS LIST
PART
A
B
C
QTY.
12
40
ITEM PART
6X40 MM
4X35 MM
3X15 MM
22F
22E
22G
E
F
Locking Fittings
QTY.
18
1
ITEM
4X14 MM20
6X12 MM
1
D
6
4X20 MM
1
Page 5
RTA-S07
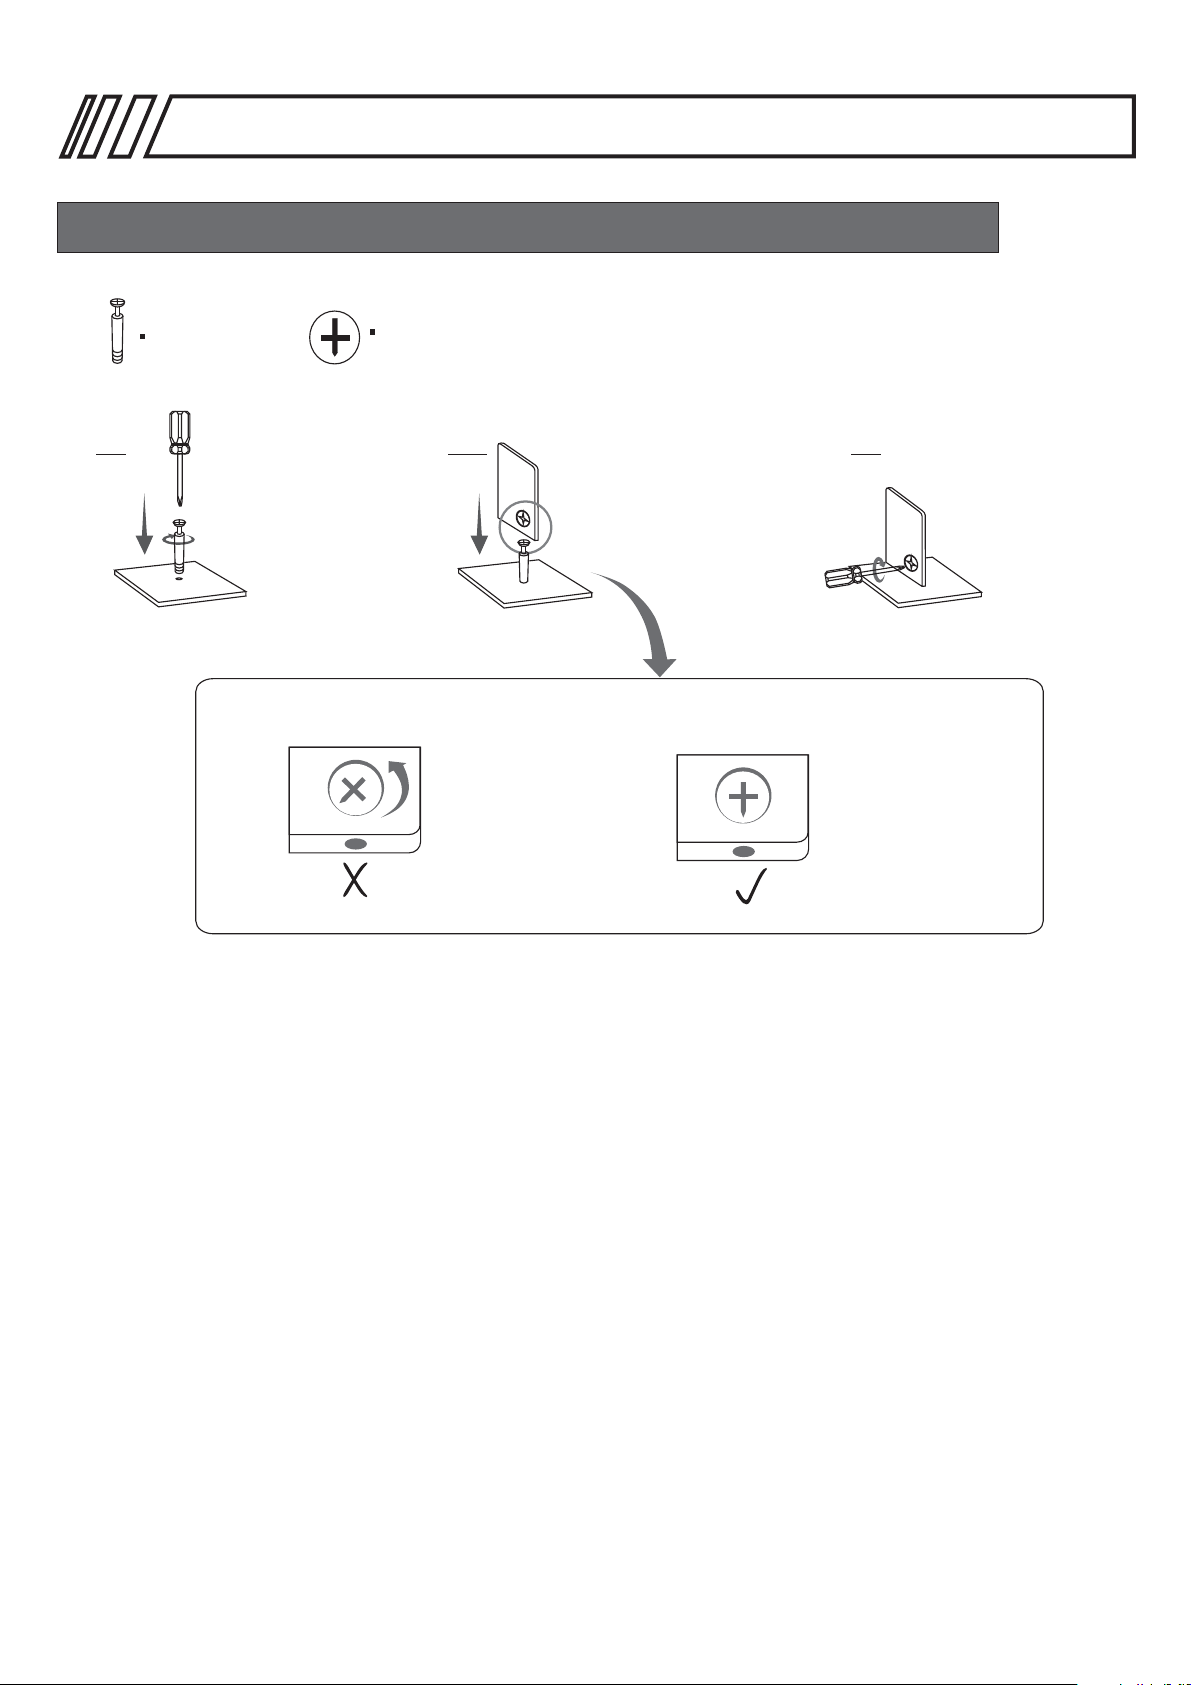
HOW TO ASSEMBLE U SING BOLT S AND CAM LOC KS:
P.5
Cam b olt
1. 2. 3.
Screw the bolt into the
corresponding panel.
If the panel already comes with the cam lock inserted, make sure is aligned:
Cam l ock
In the other panel, insert
and align the cam lock.
Join the panels.
MISALIGNE D:
TU RN CAM LOCK
TO P OINT TOWARDS
TH E HOLE
CORRECT
Turn the ca m lock.
Page 6
30mm
RTA-S07
P.6
Page 7

RTA-S07
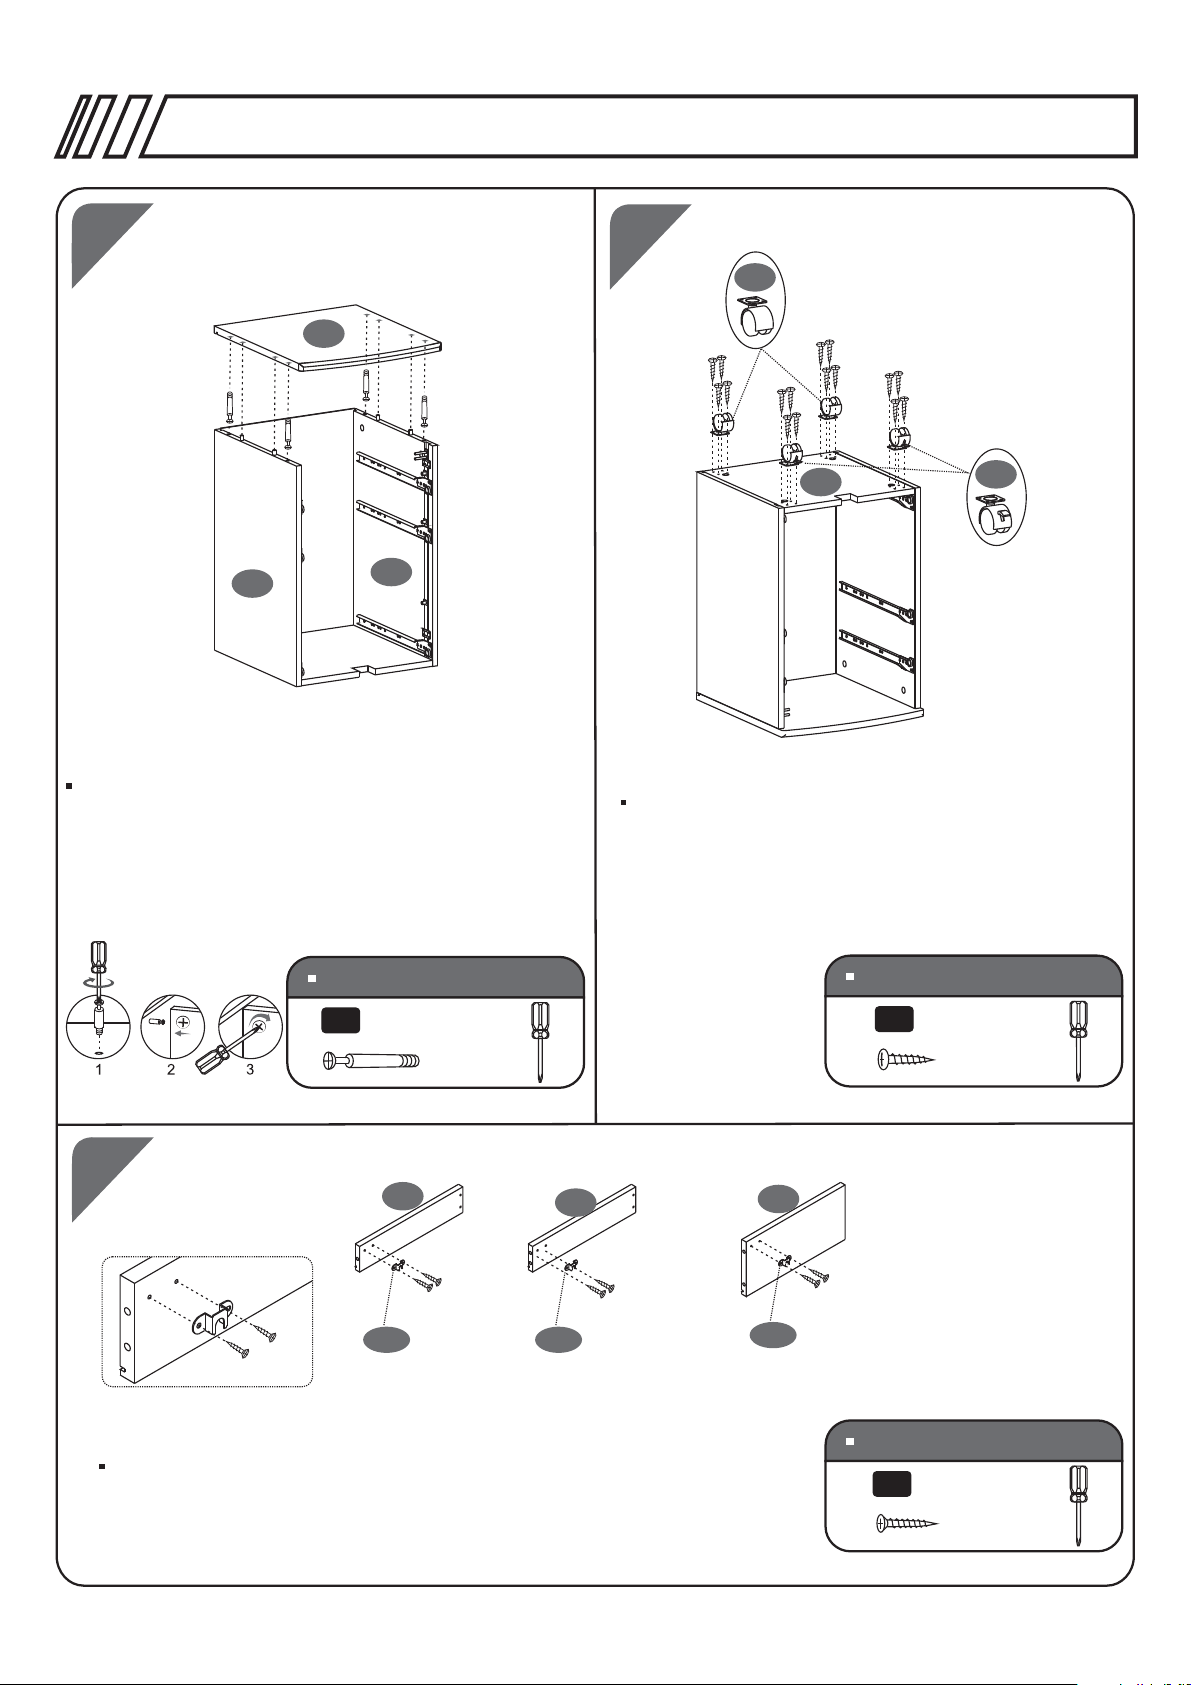
ASSEMBLY STEPS:
1
22C
P.7
22F
22C
22F
22C
22E
22A
22C
22C
22C
22A
Insert the metal fittings into the bar (22E) in the following orde r: (22A)x 1, (22C)x3, (22A)x1. Then tighten
the (22C) on the marked positions o f the bar (22 E).
22F
Tighten the metal plates
on the marked position
of the metal ba r
2
15
22A
X2
Place the bar (22E) inside the chan nel of Righ t panel (15 ) with the tu bes
towards the top of the panel, and secure the fittings (22A) to the pan el using
Screws (C).
SCREWS
3X15 MM
C
8PCS
Page 8

3
RTA-S07
P.8
14
X3
12
Left
Grab all the flat shaped sliders (12) and set aside the “L” s haped one s. Assemble the sliders to the inside
face of the Left & Right Panels (14&15) with usi ng Screws ( C). The wheel s will be loc ated at the f ront and
facing down.
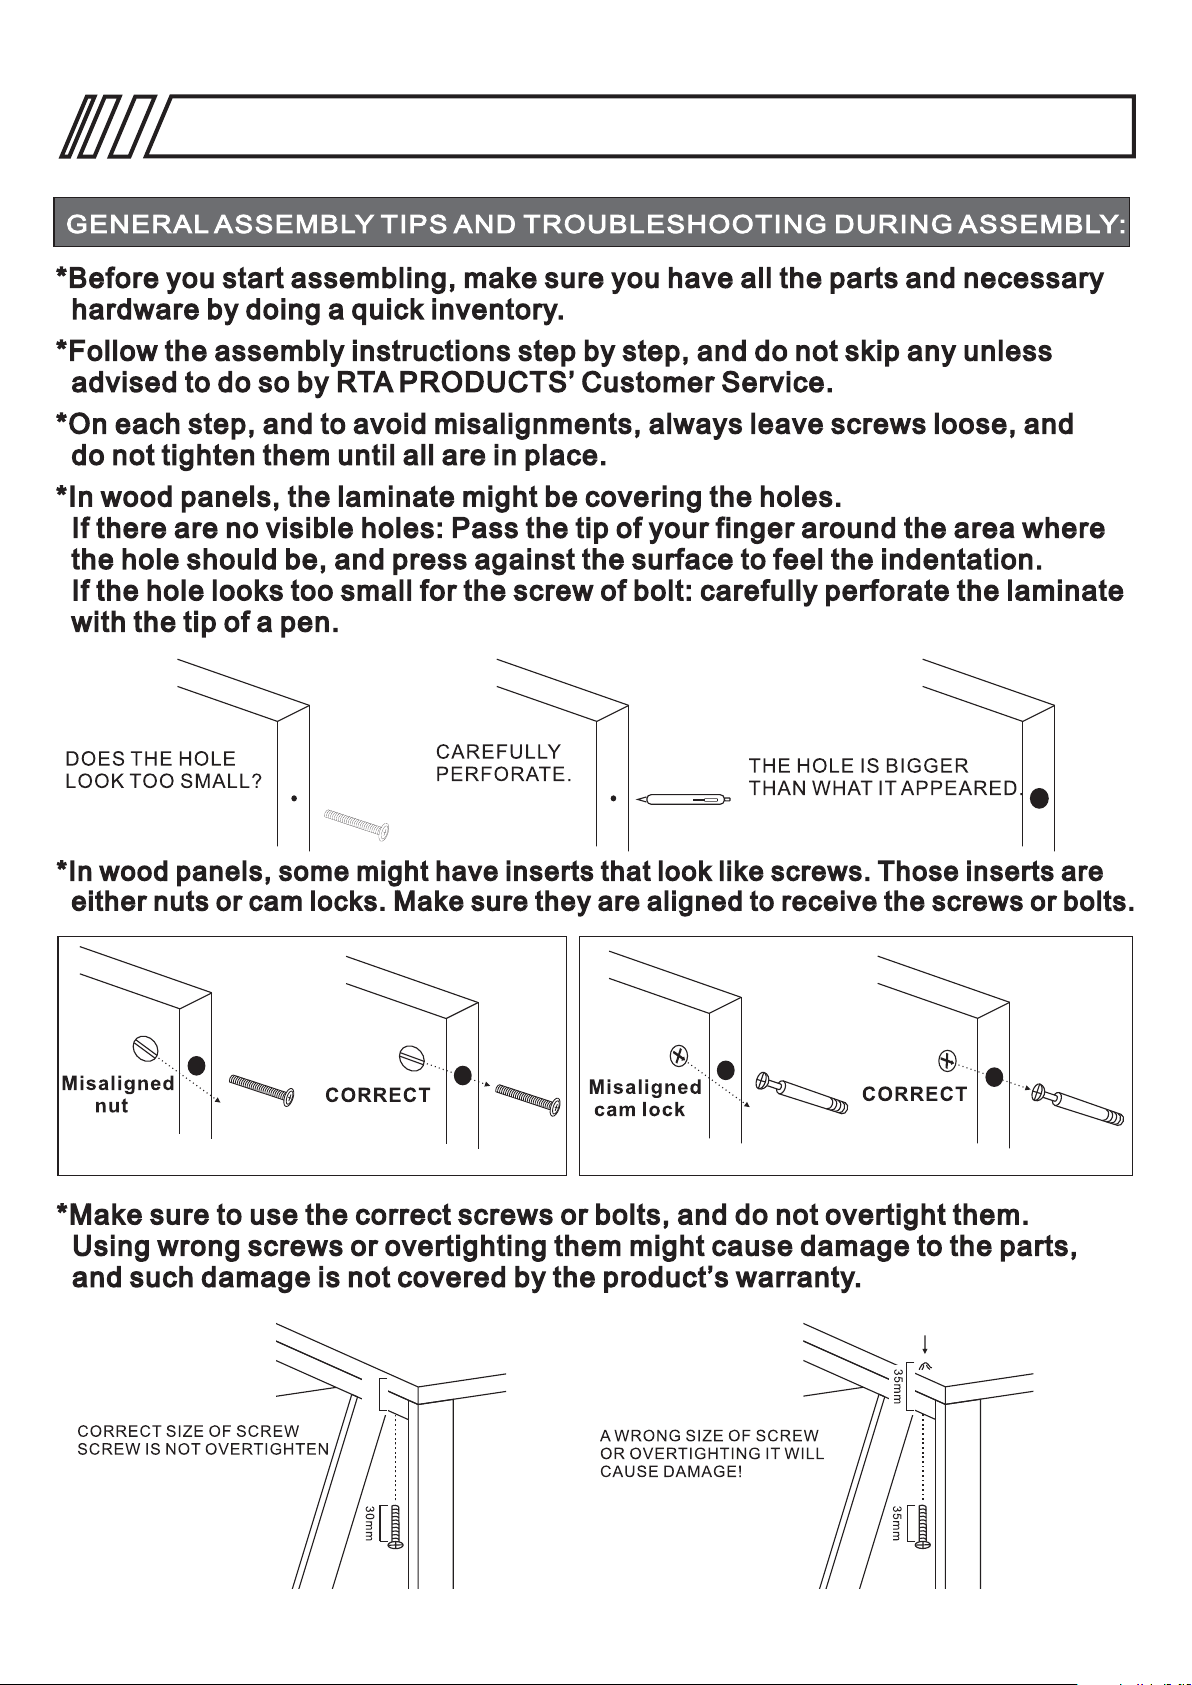
If you don't see the holes, pass the tip of your finger aroun d the area wh ere
the holes should be, pressing aga inst the su rface to fe el the indentation.
15
12
Right
X3
SCREWS
3X15 MM
C
12PCS
4
5
17
15
14
16
Screw the Bolts (A) to the corresponding hol es on the ins ide
face of Left & Right Panels (14&15), then asse mble the
panels to the Bottom Panel (16) by turning all t he
corresponding cam lo cks.
SCREWS
6X40 MM
A
4PCS
14
15
16
Slide the Back Panel (17) thru the channels in
between panels (14), (15) & (16) as shown.
Make sure the panel fits inside all the
channels.
Page 9
RTA-S07
P.9
6
18
14
Screw the Bolts (A) to the bottom face of the Top
Panel (18), then assemble it to the c abinet by t urning
the corresponding cam locks.
15
7
3
16
Use Screws (E) to assemble the Cast ers (3) to th e
Bottom Panel (16).
3
SCREWS
6X40 MM
A
4PCS
8
2
22B
Use Screws (C) to attach the lock fittings (22B) to the outside face o f the
Small Drawer Right Panels (2) and F ile Drawe r Right Pan el (8).
2
22B
8
22B
SCREWS
4X14 MM
E
SCREWS
3X15 MM
C
16PCS
6PCS
Page 10

9
RTA-S07
P.10
2
1
1
2
21
4
Screw Bolts (A) to the holes on the inside face of Top Drawer Front Panel (4)
and Middle Drawer Fron t Panel (21 ). Then assem ble the Sma ll Drawer Left &
Right Panels (1&2) to Top Dr awer Fron t Panel (4) a nd Middle Drawer Front
Panel (21) as shown by turning the cam locks.
10
5
2
5
2
SCREWS
6X40 MM
A
8PCS
1
1
Slide the Drawer Bottom Panels (5) thru the channels in b etween pa nels (1), (2) and (4) / (21) as shown.
Make sure the panel fits inside all t he channe ls.
11
6
2
1
1
Assemble the Small Dra wer Back Pa nels (6) in b etween th e Small Drawer
Left & Right Panels (1&2) using Scr ews (B) as sh own.
6
2
SCREWS
4X35 MM
B
8PCS
Page 11

RTA-S07
12
Right
Left
12
12
1
Place the small drawer s upside- down. Gra b the “L” shaped sliders (12) and
assemble them to the drawers usin g Screws (C ), with the w heels facing
towards the back of the drawers. Make sure the s liders ar e touching the side
panels, and that they are not “up in the air”.
Left
12
1
Right
12
Right
12
12
Left
SCREWS
3X15 MM
C
P.11
8PCS
13
22G
22D
Assemble the lock (22D) and ring (2 2G) to the Top Draw er Front Pa nel (4)
using Screws (C).
IMPORTANT: The rod on the lock MUST face down, and the lock MUST turn
counter-clockwis e with the ke y.
4
14
21
13
4
13
SCREWS
3X15 MM
C
2PCS
Assemble the Handles (13) to the sm all drawe rs using Screws (D) as shown.
SCREWS
4X20 MM
D
4PCS
Page 12

RTA-S07
P.12
15
16
19
9
F
E
E
Assemble the Bracket (19) to the bo ttom of the i nside fac e of the File
Drawer Front Panel (9) using Scre ws (E) & (F) as s hown.
19
20
SCREWS
4X14 MM
E
2PCS
6X12 MM
F
1PC
Attach the File Drawer Caster (20) to the Bracket (19) us ing the nut a nd tighte n with the wr ench.
17
8
7
9
Screw the Bolts (A) to the inside face of the File Drawer Fro nt Panel (9 ) as
shown. Then assemble the File Drawer Left & Right Panels (7 &8) by turn ing
the cam locks.
SCREWS
6X40 MM
A
4PCS
Page 13

18
19
RTA-S07
5
7
P.13
8
Slide the Drawer Bottom Panel (5) thru the cha nnels in be tween
panels (7), (8) and (9) as shown. Mak e sure the pa nel fits in side
all the channels.
20
10
Assemble the File Drawer Back Pan el (10) to th e File Draw er Left
& Right Panels (7&8) using Screws ( B) as shown .
8
7
SCREWS
4X35 MM
B
4PCS
11
10
Carefully insert the File Tubes (11) thru the File Drawer Back Panel (10 )
and screw them into the insert of the File Drawe r Front Pan el (9).
WARNING: DO NOT OVERTIGHTEN t he tubes as i t may perfo rate and
damage the front panel. Such dama ge is not cov ered by the p roduct's
warranty.
9
Page 14

21
RTA-S07
P.14
22
Left
Right
12
Right
12
12
12
7
Left
Place the file drawer upside-do wn. Grab th e “L” shaped sliders (12)
and assemble them to the file drawe r using Scr ews (C), wi th the
wheels facing towards the back of the drawer. M ake sure th e sliders
are touching the side panels, and that they ar e not “up in th e air”.
9
13
SCREWS
3X15 MM
C
4PCS
Attach the Handle (13) to the file drawer usin g Screws (D ) as shown.
23
4
21
9
Carefully insert all the drawer s startin g from the bo ttom.
Make sure the wheel from the drawer s engage an d roll in
the middle of the sliders.
SCREWS
4X20 MM
D
2PCS
Page 15
Page 16
RTA-S07
PRODUCT DIMENSIONS
24.75”
15.75”
4”
4”
17.25”
12”
13”
Page 17

PRODUCT WARRANTY
TECHNI MOBILI DESK WARRANTY
LIMITED 5-YEAR WARRANTY
RTA Products, LLC warrants to the Original Purchaser who acquired a new product from RTA Products or its
authorized resellers that this product will be free from defects in its workmanship and materials, under normal
use and service conditions, as described herein. "Defects" as used in this warranty, is dened as any
imperfections that impair the use of the furniture or product. RTA products will repair or replace, at is option,
without charge to the original purchaser ‘other than freight from purchaser to RTA Products, only the defective
products or parts for a period of FIVE (5) Years.
Replacement parts can only be supplied if parts are available. Items out of production may be unavailable.
This warranty will be effective for the applicable time period beginning the date of purchase on your original
sales receipt. RTA product’s obligation under this warranty is limited to repairing or replacing products or parts
as provided herein. This product has been designed for and is intended for ofce and home-ofce use only.
This warranty is Original Purchaser’s sole remedy for product defects, and this warranty does not extend to
any product, or damage to any product, caused by or attributed to abuse or misuse, products used for
commercial or rental purposes, use modications of, or attachments to the product, and products or parts not
used, maintained, or extended hereunder is in lieu of any and all other warranties, express or implied, including
without limitations any implied warranty or merchantability or of tness for a particular purpose. Please note, all
desks made with PVC Laminate surface should not be exposed to direct sunlight, as it may damage the
material. Damage of this nature is not covered under this warranty.
RTA Products will not be responsible for indirect, special, incidental or consequential damages. This warranty
is limited to merchandise purchased in the Continental United States. Some States do not allow the exclusion
or limitation of incidental or consequential damages, so the above limitations or exclusions may not apply to
you. This warranty gives you specic legal rights. You may also have other rights that may vary from state to
state.
RTA Products will advise you of the procedure to follow in making warranty claims. The following are the
procedures for warranty claims:
a. Call us Monday – Friday, from 9am-5pm (Eastern Time) at (866) 782-8262 to explain the defect and give
your name, address and phone number. Please have ready the model number of our product, date and place
of purchase. You can also write to us by e-mail to warranty@rtaproducts.com and include the same
information.
b. If we determine that replacement will remedy the situation, and in order to determine the extent or the cause
of the defect, purchaser will need to send the part in question at purchaser’s expense. Once we receive the
part, we will examine it and determine whether the claim is valid (or not), and then proceed to send the
replacement. We will ship the replacement at our expense.
 Loading...