

Page 1
EnglishEnglish
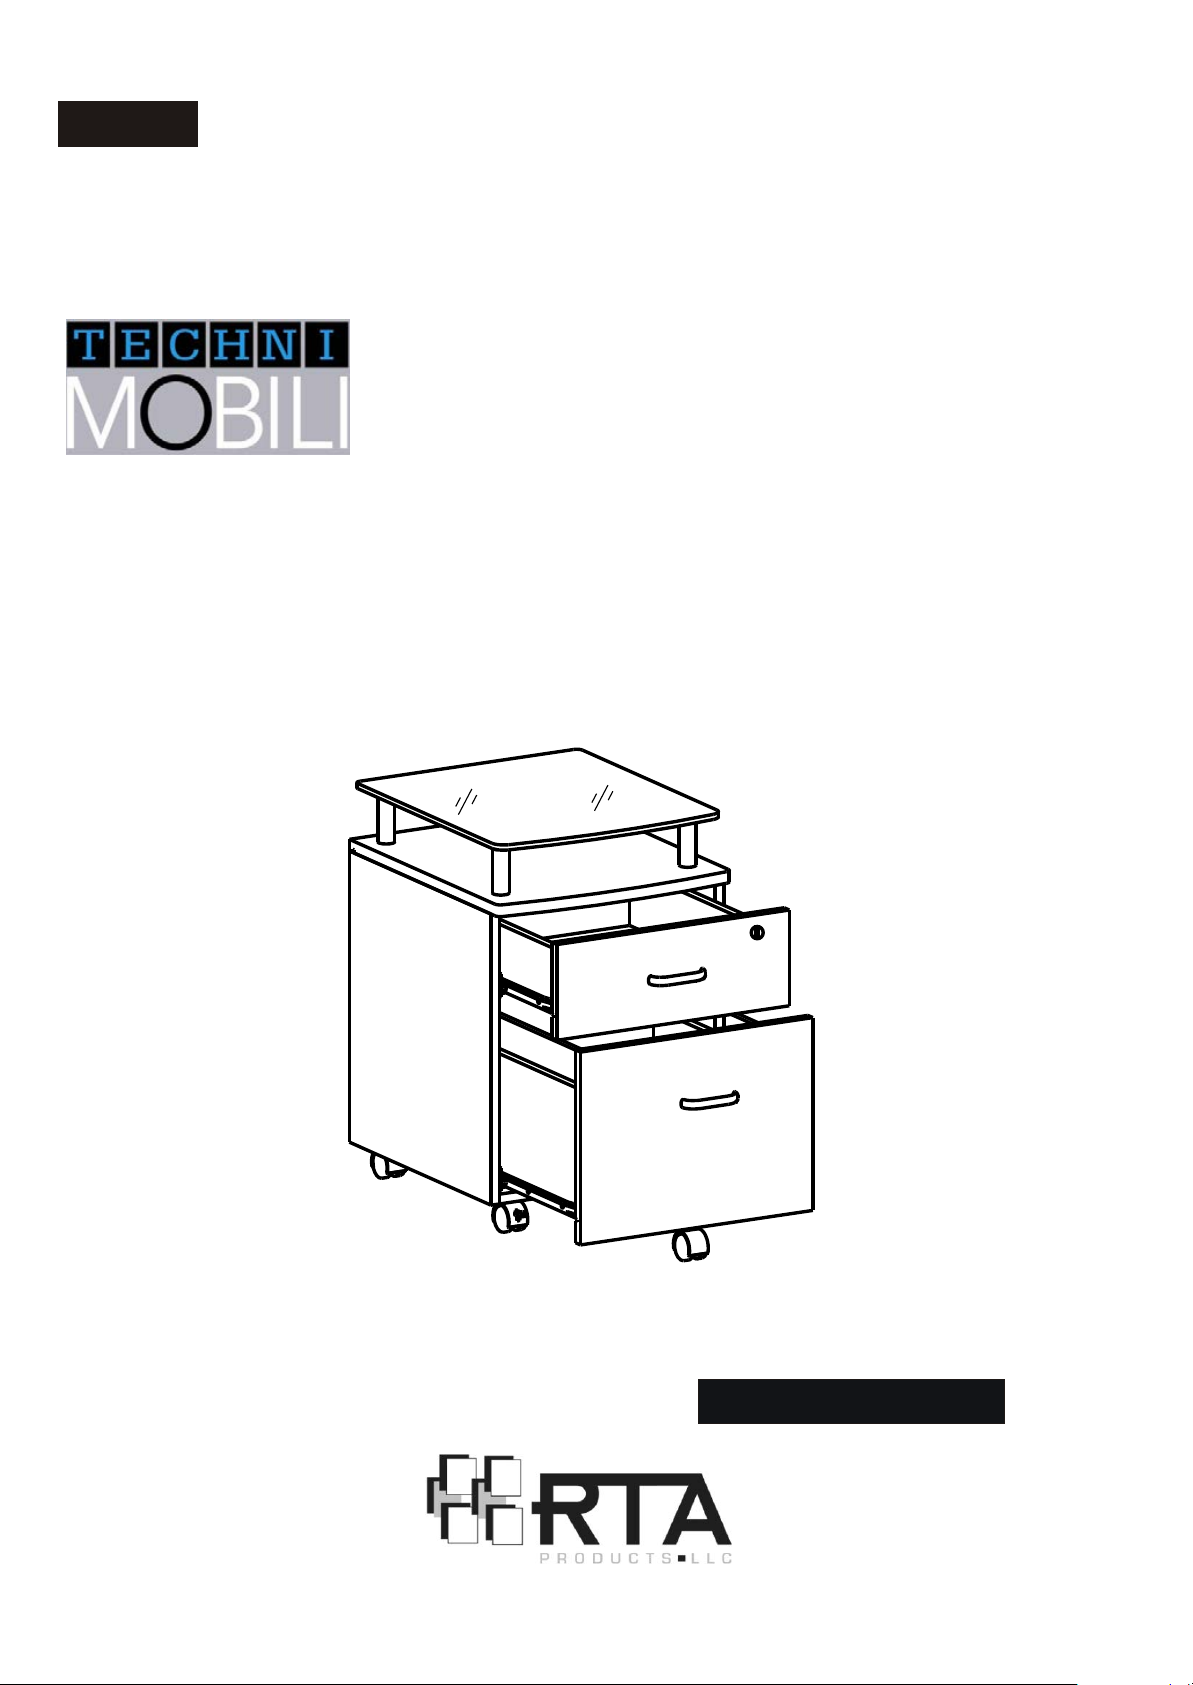
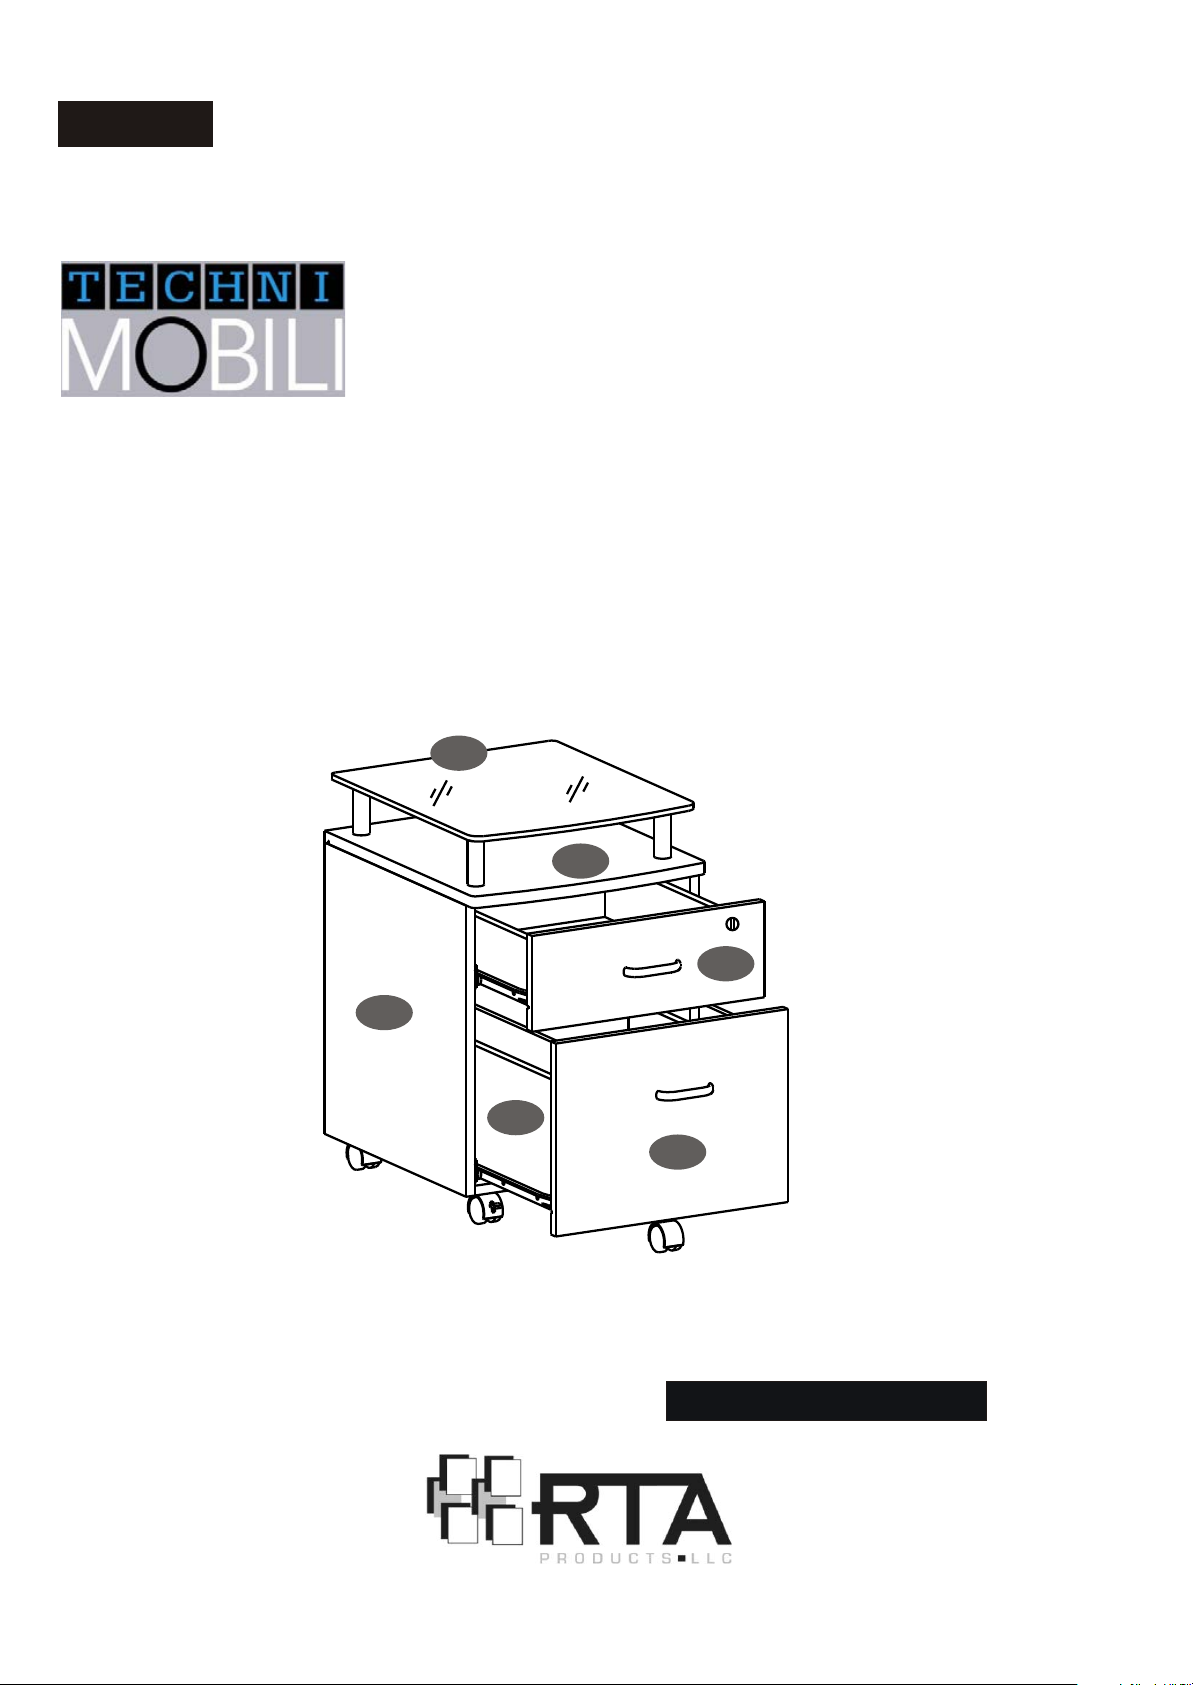
MULTI-FUNCTIONAL COMPUTER TABLEMULTI-FUNCTIONAL COMPUTER TABLE
ASSEMBLY INSTRUCTIONASSEMBLY INSTRUCTION
IMPORTANT: Surfaces must be cleaned with a
IMPORTANT: Surfaces must be cleaned with a
solution of a smooth soap and water, then cleared
solution of a smooth soap and water, then cleared
with a dry towel. Do not use solvents over surfaces
with a dry towel. Do not use solvents over surfaces
or structural tubes.
or structural tubes.
MODEL RTA - S06MODEL RTA - S06
Thanks for purchasing one of our products, please read carefully the assembly
Thanks for purchasing one of our products, please read carefully the assembly
instructions before the installation (Attention: Do not tighten the screws before
instructions before the installation (Attention: Do not tighten the screws before
all screws are in place).
all screws are in place).
B15 090521
MODEL RTA-S06MODEL RTA-S06
Page 2
SpanishSpanish
INSTRUCCIONES DE ENSAMBLAJE.
IMPORTANTE: Para su limpieza sobre la
superficies utilice una toalla humedecida en una
soluci n de agua y jab n de pasta y luego pase
óó
sobre esta un trapo seco. No utilice solventes,
MODELO RTA-S06MODELO RTA-S06
Gracias por comprar uno de nuestros productos por favor lea
cuidadosamente las instrucciones de ensamblaje antes de instalar la
unidad.(Atencion: No adjuste firmemente los tornillos antes de tener la
estructura completamente armada).
sobre las superficie ni las estructuras tubulares.
22
18
14
4
7
9
MODELO RTA-S06MODELO RTA-S06
Page 3
RTA-S06
P. 3
LISTA DE PARTESPARTS LISTPARTS LIST
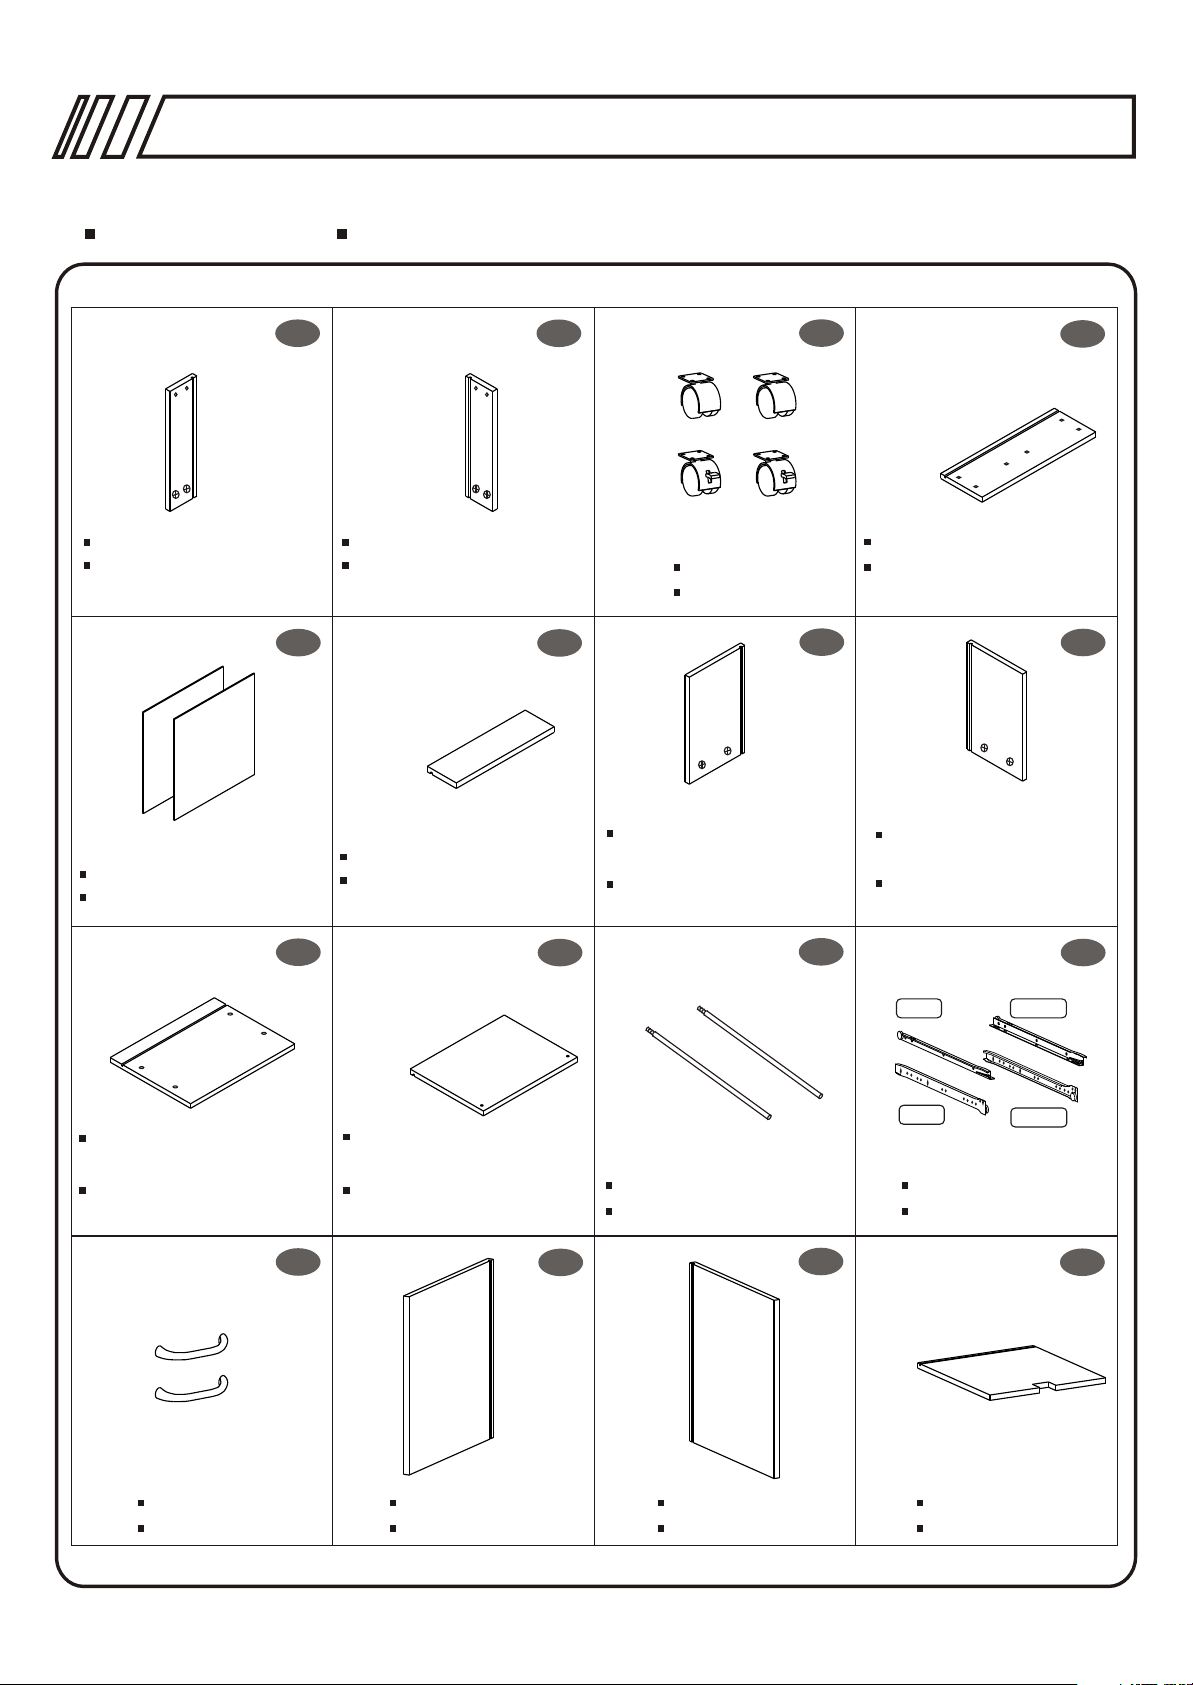
1
Top Drawer Left Panel
Panel Izquierdo de
Gaveta Superior
5
Drawer Bottom Panel
Panel Inferior de Gaveta
2
Top Drawer Right Panel
Panel Derecho de
Gaveta Superior
6
Top Drawer Back Panel
Panel Posterior de
Gaveta Superior
Casters
Ruedas
Bottom Drawer Left
Panel
Panel Izquierdo de
Gaveta Inferior
3
Top Drawer Front Panel
Panel Frontal de
Gaveta Superior
7
Bottom Drawer Right
Panel
Panel Derecho de
Gaveta Inferior
4
8
9
Bottom Drawer Front
Panel
Panel Frontal de Gaveta
Inferior
13
Handles
Manijas
10
Bottom Drawer Back
Panel
Panel Posterior de
Gaveta Inferior
14
Left Panel
Panel Izquierdo
11
Tubes for Files
Tubos para los Archivos
15
Right Panel
Panel Derecho
Izquierdo
Left
Left
Izquierdo
Sliders
Deslizadores
Bottom Panel
Panel Inferior
12
Derecho
Right
Right
Derecho
2pcs
16
Page 4
RTA-S06
P. 4
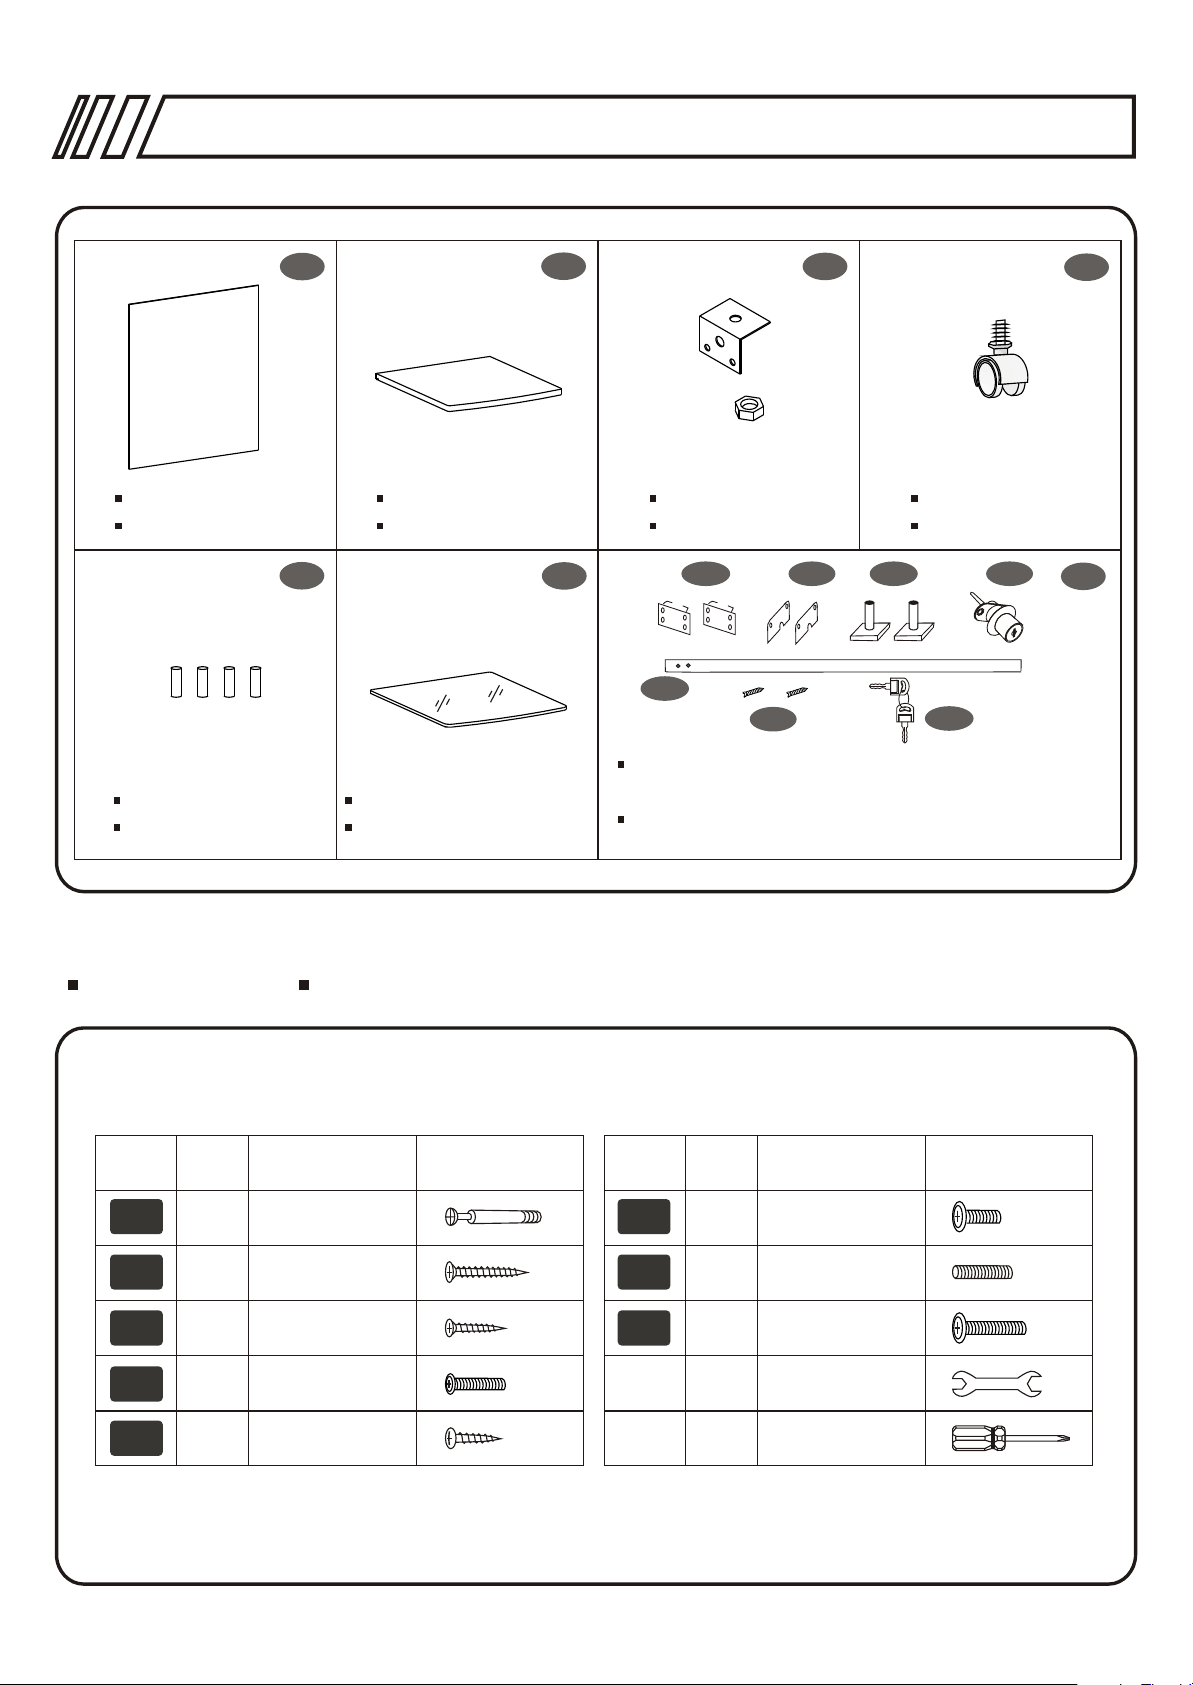
17
Back Panel
Panel Posterior
Top Panel
Panel Superior
21
Support Tubes Top Glass Panel
Tubos de Soporte
Vidrio del Panel Superior
18
22
19
L Bracket Front Wheel
Angulo de Soporte
23A 23B
23E
23F
A,B,C-Metal Fittings; D-Lock; E-Metal Plate;
F-Screws; G-Key
A,B.C-Accesorios de Metal; D-Cerradura; EPlaca de Metal; G-Llave
Rueda Frontal
23C
23G
23D
20
23
SCREWSSCREWS
PART PARTQTY. QTY.ITEM ITEM
A
B
C
D
E
16
8
30
4
18
TORNILLOS
6X40 MM
4X30 MM
3X15 MM
4X20 MM
4X14 MM 1
F
G
H
1
4
4
6X12 MM
6X20 MM
6X25 MM
1
Page 5
RTA-S06
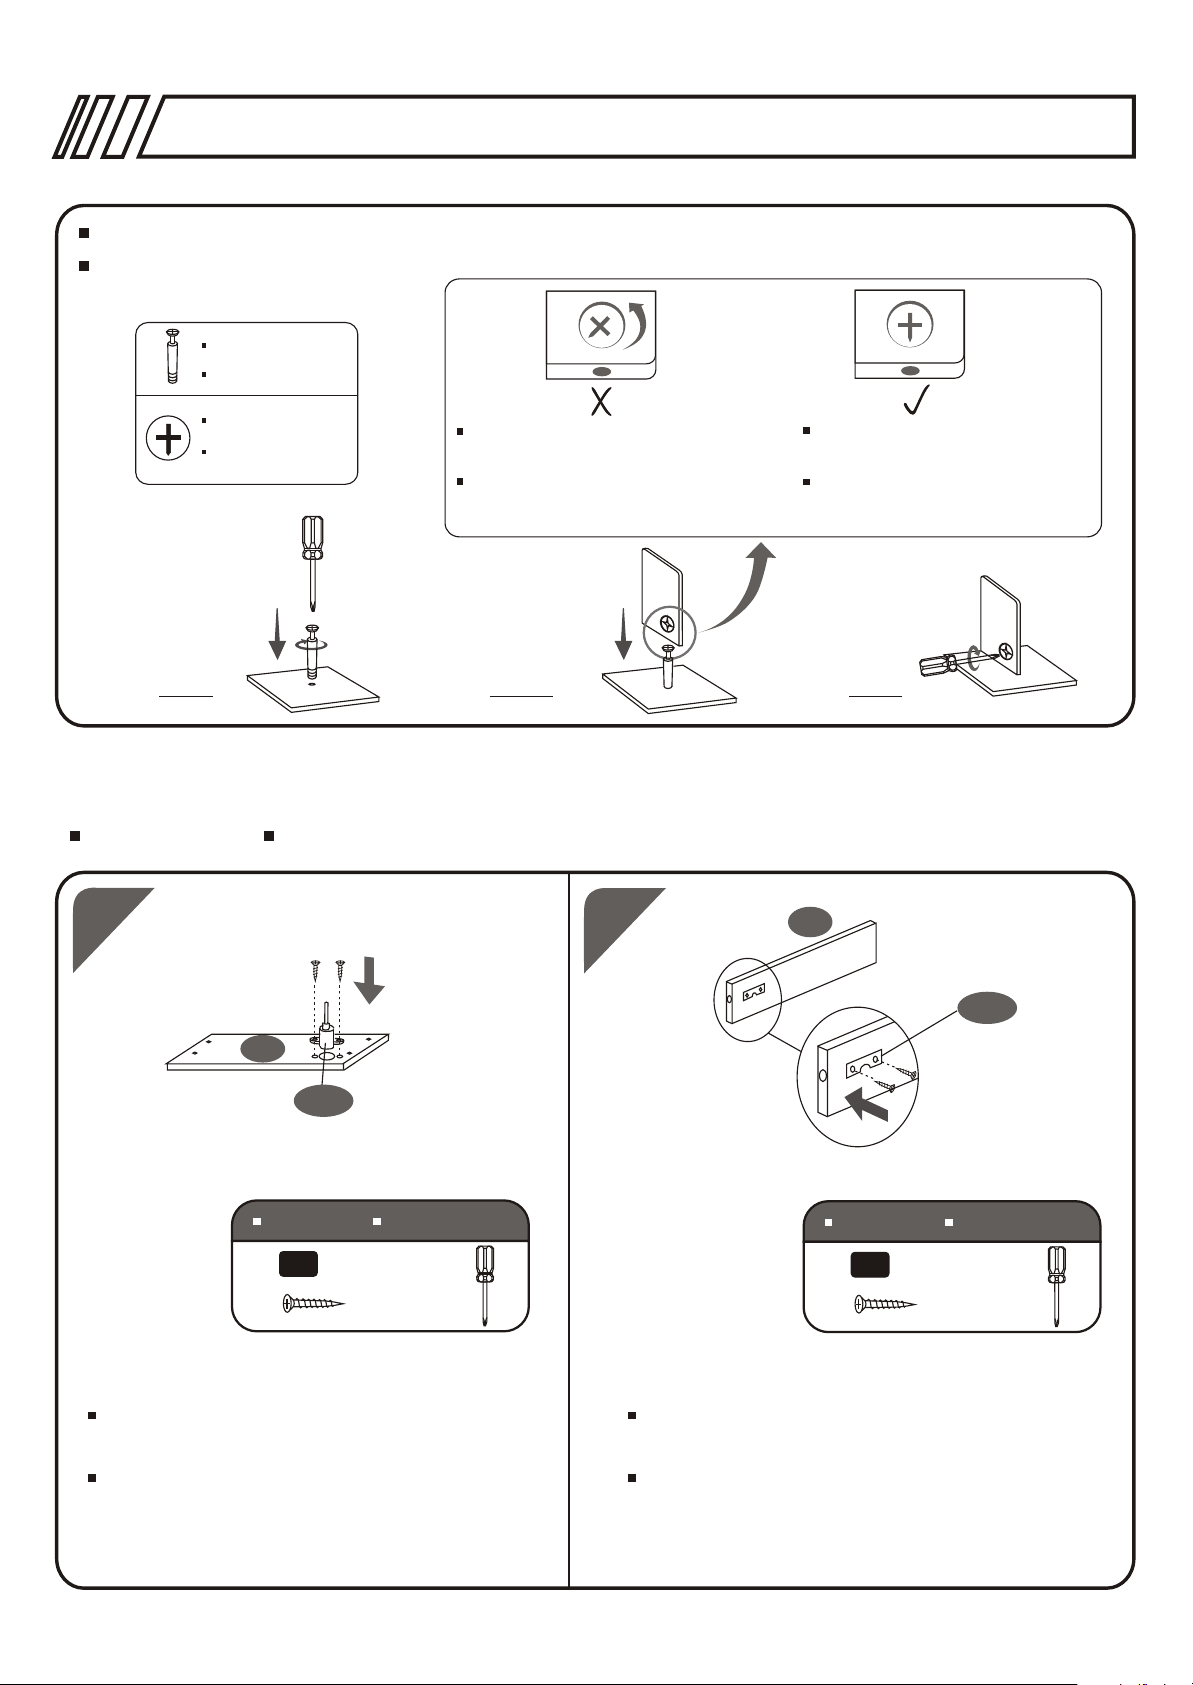
6X40MM BOLT INSTALLATION AS BELOW:
6x40mm INSTALE EL PERNO ASI:
Bolt
Perno
P. 5
Connecting piece
Pieza de ajuste
A1.
Adjust connecting piece direction if
condition as illustrated
Cuando la pieza de ajuste este
desviada, debe alinearla antes de
insertar el perno
A2. A3.
Insert bolt when Connecting piece
under Such condition
Inserte el Perno cuando la Pieza
de ajuste este alineada
PASOSSTEPSSTEPS
1
2
2
4
23D
SCREWSSCREWS
C
Use screws C to fix the Lock (23D) to the
back face of Top Drawer Front Panel (4).
Use tornillos C para fijar la cerradura (23D)
en la cara posterior del Panel Frontal de
Gaveta Superior (4)
TORNILLOSTORNILLOS
3X15 MM
2PCS
23B
SCREWSSCREWS
C
Use screws C to assemble the Metal Fitting
(23B) to the Top Drawer Right Panel (2).
Use tornillos C para ensamblar el Accesorio
de Metal (23B) al Panel Derecho de la Gaveta
Superior (2).
TORNILLOSTORNILLOS
3X15 MM
2PCS
Page 6
3
RTA-S06
P. 6
2
1
SCREWSSCREWS
6X40 MM
A
TORNILLOSTORNILLOS
4PCS
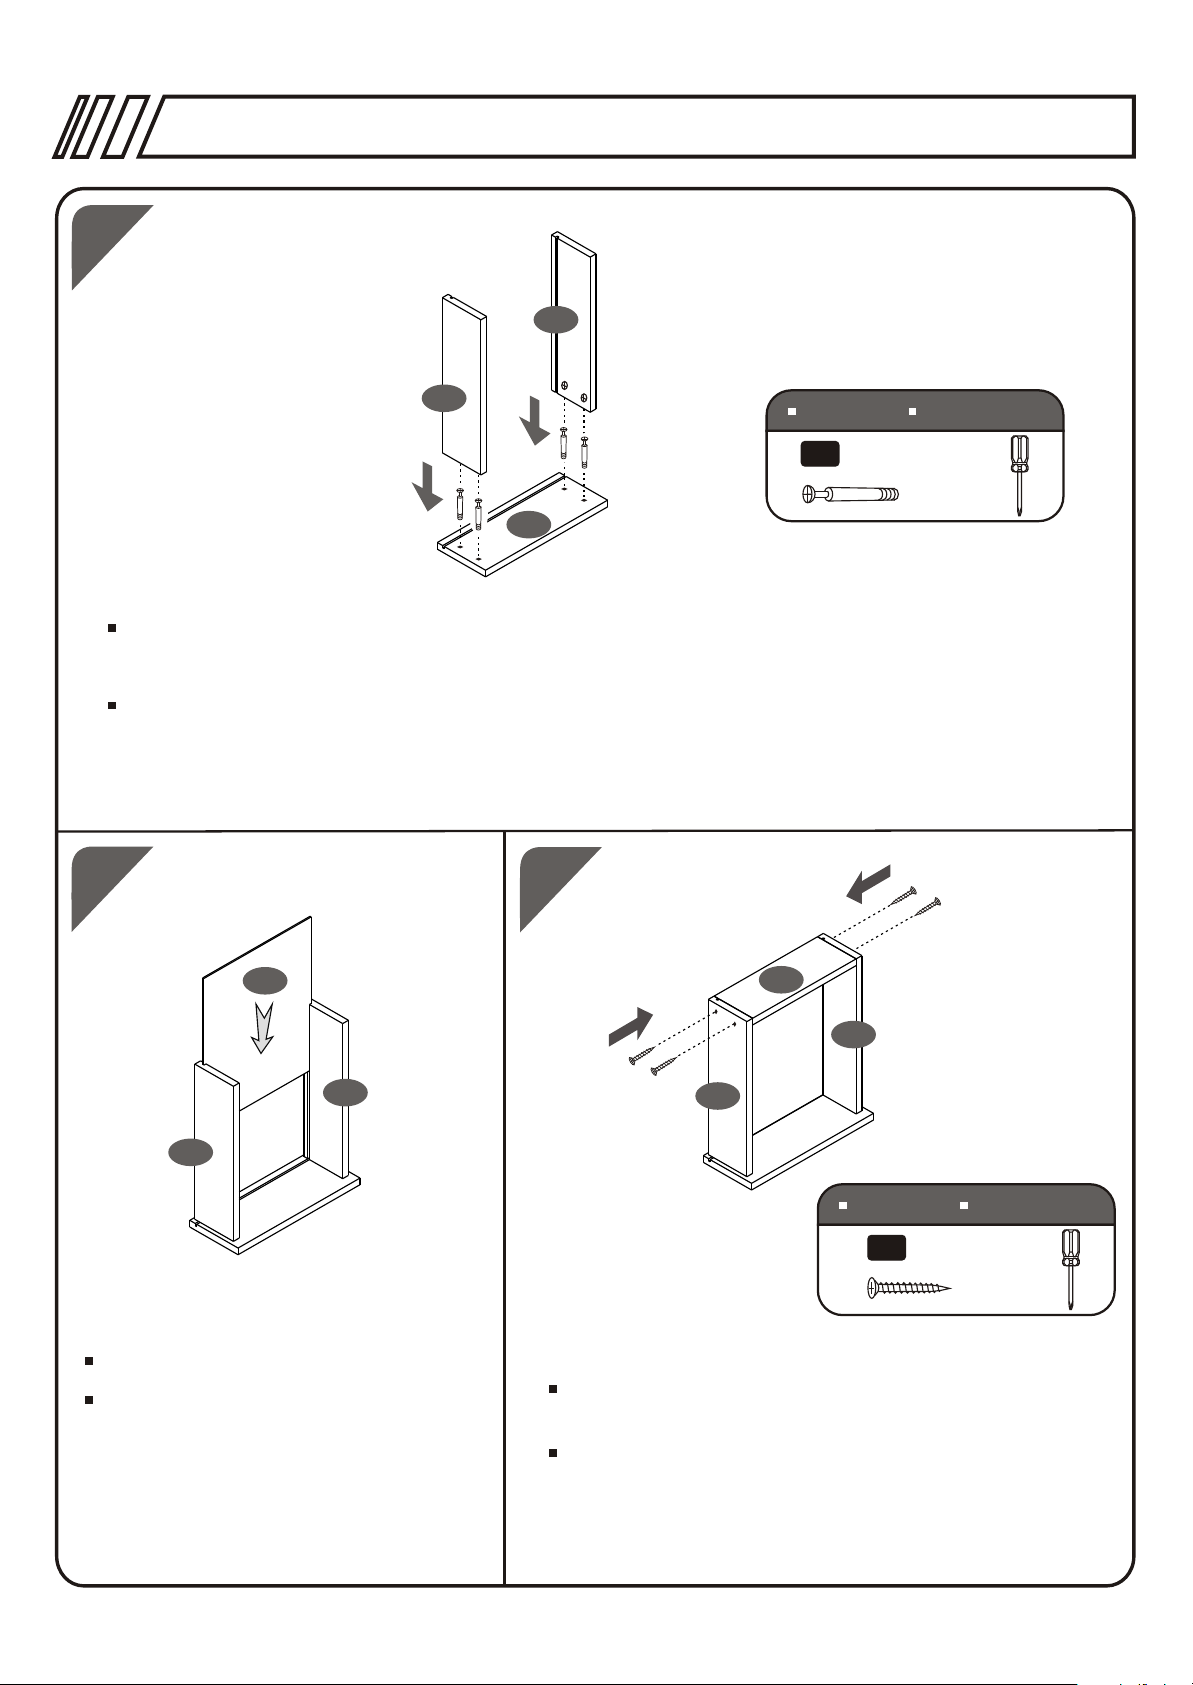
4
Insert the Bolts A in the holes of the back face of the Top Drawer Front Panel (4) and tighten
them with the screwdriver, then place the Top Drawer Left Panel (1) and the Top Drawer Right
Panel (2) over the Bolts and tighten the nuts on the inside face.
Inserte los Pernos A en los agujeros de la cara posterior del Panel Frontal de Gaveta Superior (4)
y ajústelos con el destornillador,luego coloque sobre ellos el Panel Izquierdo de Gaveta Superior
(1) y el Panel Derecho de Gaveta Superior (2) y ajuste las tuercas situadas en la cara interna de
los Paneles.
4
5
5
2
1
Slide in the Drawer Bottom Panel (5).
Deslice el Panel Inferior de Gaveta (5).
6
2
1
SCREWSSCREWS
B
Use Screws B to fix the Top Drawer Back Panel (6)
to the Top Drawer's Left and Right Panels (1 & 2).
Use tornillos B para fijar el Panel Posterior de Gaveta
Superior (6) a los Paneles Izquierdo y Derecho de
Gaveta Superior (1 y 2).
TORNILLOSTORNILLOS
4X30 MM
4PCS
Page 7

6
RTA-S06
Derecho
Right
12
Izquierdo
Left
12
P. 7
Align selected holes on slides as illustrated with predrilled holes on drawer box before inserting screws
Haga coincidir los agujeros seleccionados en los
Deslizadores con los agujeros pre-taladrados sobre
el cajón de la gaveta(como indica la ilustración)
antes de insertar los tornillos.
7
SCREWSSCREWS
C
TORNILLOSTORNILLOS
3X15 MM
4PCS
Use screws C to assemble the Slider (12) to the Top Drawer Left & Right Panels (1 & 2).
Use tornillos C para ensamblar los Deslizadores(12) a los Paneles Izquierdo y Derecho de
Gaveta Superior (1 y 2).
8
8
8
23B
13
SCREWSSCREWS
D
TORNILLOSTORNILLOS
4X20 MM
2PCS
Use screws D to fix the Handle (13) to the
Top Drawer Front Panel (4).
Use tornillos D para fijar la Manija(13) al Panel
Frontal de Gaveta Superior (4).
SCREWSSCREWS
C
TORNILLOSTORNILLOS
3X15 MM
2PCS
Use screws C to assemble the Metal
Fitting (23B) to the Bottom Drawer Right
Panel (8).
Use tornillos C para ensamblar el Accesorio
de Metal (23B) al Panel Derecho de Gaveta
Inferior
Page 8

9
RTA-S06
P. 8
8
7
SCREWSSCREWS
6X40 MM
A
9
Insert the Bolts A in the holes of the back face of the Bottom Drawer Front Panel (9) and
tighten them with the screwdriver, then place the Bottom Drawer Left Panel (7) and the Bottom
Drawer Right Panel (8) over the Bolts and tighten the nuts on the inside faces.
Inserte los Pernos A en los agujeros de la cara interna del Panel Frontal de Gaveta Inferior y
ajústelos con el destornillador,luego coloque el Panel Izquierdo de Gaveta Inferior (7) y el Panel
Derecho de Gaveta Inferior (8) sobre los pernos y ajuste las tuercas en la cara interna de los
Paneles.
10
11
TORNILLOSTORNILLOS
4PCS
10
5
8
7
9
Slide in the Drawer Bottom Panel (5).
Deslice el Panel Inferior de Gaveta (5).
9
SCREWSSCREWS
B
TORNILLOSTORNILLOS
4X30 MM
4PCS
Use Screws B to fix the Bottom Drawer Back
Panel (10) to the Bottom Drawer's Left and Right
Panels (7 & 8).
Use tornillos B para fijar el Panel Posterior de
Gaveta Inferior (10) a los Paneles Izquierdo y
Derecho de Gaveta Inferior (7 y 8).
Page 9
RTA-S06
P. 9
12
2PCS
11
10
9
Insert the Tubes for Files (11).
Inserte los Tubos para los
Archivos (11).
13
Derecho
Right
12
Izquierdo
Left
12
Align selected holes on slides as illu
strated with pre-drilled holes on
drawer box before inserting screws
Haga coincidir los agujeros
seleccionados en los Deslizadores
con los agujeros pre-taladrados
sobre el cajón de la gaveta(como
Indica la ilustración) antes de
insertar los tornillos.
9
SCREWSSCREWS
C
TORNILLOSTORNILLOS
3X15 MM
4PCS
Use screws C to assemble the Slider (12) to the Bottom
Drawer Left & Right Panels (7 & 8).
Use tornillos C para ensamblar los Deslizadores (12) a los
Paneles Izquierdo y Derecho de Gaveta Inferior (7 y 8).
14
E
20
19
NON LOCKING CASTER
Fix the Front Wheel (20) to the L Bracket (19) and tighten it well. Turn around the lower drawer,
Use screws E& F to assemble the L Bracket (19) to the Bottom Drawer Front Panel (9).
Fije la Rueda Delantera (20) al Angulo de Soporte (19) y ajuste bién.Use tornillos E y F para
ensamblar el Angulo de Soporte (19) al Panel Frontal de la Gaveta Inferior (9) en el lado posterior
de la misma. Use una rueda sin freno.
F
E
SCREWSSCREWS
4X14 MM
E
6X12 MM
F
TORNILLOSTORNILLOS
2PCS
1PC
Page 10

RTA-S06
P. 1 0
15
9
13
SCREWSSCREWS
D
Use screws D to fix the Handle (13) to the
Bottom Drawer Front Panel (9).
Use tornillos D para fijar la Manija (13) al
Panel Frontal de Gaveta Inferior (9).
TORNILLOSTORNILLOS
4X20 MM
2PCS
16
23E
23F
Tighten the metal plates
on the marked position
of the metal bar
23A
23F
23C
23A
First Slide into the Metal Bar (23E) the 4 Metal
Fittings in the order shown in the drawing
(23A,23C,23C,23A). Then, tighten the metal
plates 23C on the marked position of the Metal
Bar (23E) with 23F.
Aprete las Placas de Metal (23F) en la posición
marcada sobre la Barra de Metal.Primero deslice
en la Barra de Metal (23E) los cuatro accesorios de
metal en el orden que muestra el dibujo
(23A,23C,23C,23A).Luego ajuste los Accesorios de
Metal (23C) en la posición marcada sobre la Barra
de Metal (23E) con 23F.
17
23A
15
SCREWSSCREWS
C
TORNILLOSTORNILLOS
3X15 MM
8PCS
23E
Use screws C and the Metal Fittings (23A) to assemble the Metal Bar (23E) to the Right
Panel (15).
Use tornillos C y el Accesorio de Metal (23A) para ensamblar la Barra de Metal (23E) al Panel
Derecho (15).
Page 11

18
RTA-S06
P. 11
19
14
12
Left
Izquierdo
Match the Sliders (12) with the holes of the inside faces of the Left & Right Panels (14
& 15). Then fix the fixed part to the Panels using screws C.
Haga coincidir los Deslizadores (12) con los agujeros de la cara interna de los Paneles
Izquierdo y Derecho (14 y 15).Luego fíjelos a los Paneles usando tornillos C.
15
12
Right
Derecho
SCREWSSCREWS
2PCS2PCS
C
TORNILLOSTORNILLOS
3X15 MM
8PCS
15
14
16
SCREWSSCREWS
6X40 MM
A
TORNILLOSTORNILLOS
4PCS
Insert two Bolts A in the holes of the inside faces of the Left & Right Panels (14 & 15) and
tighten them with the screwdriver. Place the Bottom Panel (16) over the Bolts of the Right
Panel (14), then place Left Panel (15) over the Bottom Panel (16) and tighten all nuts on the
inside faces of panels (16).
Inserte los Pernos A en los agujeros de la cara interna de los Paneles Izquierdo y Derecho (14 y
15) y ajústelos con el destornillador.Coloque el Panel Inferior (16) sobre los Pernos de los
Paneles Izquierdo y Derecho (14 y 15) y aprete las tuercas ubicadas en la cara interna del Panel
Inferior (16).
Page 12

20
RTA-S06
P. 1 2
17
21
14
15
16
Slide in Back Panel (17) between the Left & Right Panels (14 & 15).
Deslice el Panel Posterior (17) entre los Paneles Izquierdo y Derecho (14 y 15).
18
SCREWSSCREWS
6X40 MM
A
Insert the Bolts A in the holes of the Top Panel (18) and put it over the Left & Right
Panels (14 & 15) and tighten all nuts well.
Inserte los Pernos A en los agujeros del Panel Superior (18) y coloque éste sobre los Paneles
Izquierdo y Derecho (14 y 15) y ajuste bién las tuercas.
TORNILLOSTORNILLOS
4PCS
Page 13

22
RTA-S06
2PCS
3
P. 1 3
23
16
3
2PCS
SCREWSSCREWS
E
18
Use screws E to fix the Casters (3) to the Bottom Panel (16).
Use tornillos E para fijar las Ruedas (3) al Panel Inferior (16).
TORNILLOSTORNILLOS
4X14 MM
16PCS
4PCS
21
22
SCREWSSCREWS
G
Use screws G to assemble the Support Tubes (21) with the Top Glass Panel (22).
Use tornillos G para ensamblar los Tubos de Soporte (21) con el Vidrio del Panel Superior (22).
TORNILLOSTORNILLOS
6X20 MM
4PCS
Page 14

RTA-S06
P. 1 4
24
22
18
SCREWSSCREWS
6X25 MM
H
Use screws H to assemble the Support Tubes (21) with the Top Panel (18).
Use tornillos H para ensamblar los Tubos de Soporte (21) con el Panel Superior (18).
TORNILLOSTORNILLOS
4PCS
25
4
9
Slide in the drawers. Tighten all screw well and enjoy the cabinet.
Deslice las Gavetas. Ajuste bien los tornillos y disfrute su gabinete.
Page 15

Page 16

Page 17

6/1/2012 11:37 AM
®
PRODUCT WARRA NTY
TECHNI MOBILI DESK WARRANTY
LIMITED 5-YEAR WARRA NTY
R TA Products, LLC warrants to the Original Purchaser t hat this product will be free from defects in its workmanship and
materials, under normal use and service conditions, as described herein. "Defects" as used in this warranty, is dened as any
imperfections that impair the use of the furniture or product. RTA products will repair or replace, at is option, w ithout charge to
‘other than freight from purchaser to RTA Products, only the def ective products or parts for a period of
the original purc
FIVE (5) Years.
Replacement part s can only be supplied if parts are available. I tems out of production may be unavailable. This warranty will
be eective for the applicable t ime period beginning the date of purchase on your original sales receipt. RTA product’s
obligation under this warranty is limited t o repairing or replacing products or parts as provid
designed for and is intended for oce and home-oce use only. This warranty is Original Purchaser’s sole remedy f or
product defects, and this warranty does not extend to any product, or damage to any product, caused by or att ributed to
abuse or misuse, products used for commercial or rental purposes, use modications of, or attachments to the product, and
products or part s not used, maintained, or extended hereunder is in li
including without limitations any implied warranty or merchantability or of tness for a particular purpose. Please note, all
desks made with PVC Laminate surface should not be exposed to direct sunlight, as it may damage the material. Damage of
this nature is not covered under this warranty.
haser
eu of any and
n. This product has been
ed herei
all other warranties, express or implied,
RTA Products will not be responsible for indirect, special, incidental or consequential damages. This warranty is limit
andise purchased in the Continental United St ates. Some Stat es do not allow the exclusion or limitation of incidental or
merch
consequential damages, so t he above limitations or exclusions may not apply to y ou. This warr anty gives you specic legal
rights. You may also have other rights that may vary from stat e to state.
RTA Products will advise you of the procedure to follow in making warranty claims. The following are the procedures for
claims:
warranty
a. Call
us Monday – Friday, from 9am-5pm (Eastern Time) at (866) 782-8262 t o explain the defect and give your name,
address and phone number. Please have ready t he model number of our product, dat e and place of purchase. You can also
write to us by e-mail to warranty@rtaproducts. com and include the same information.
b. I f we determine that replacement will remedy the situation, and in order to determine the extent or the cause of the def ect,
purchaser will need to send the part i
determine whether the claim is valid (or not), and then proceed to send the replacement. We will ship the replacement at our
expense.
n question at purchaser’s expense. Once we receive the part, we will examine it and
ed to
TECHNI MOBILI CHAIR WARRANTY
2-YEAR WARRA NTY
R TA Products, LLC has warranted the Techni Mobili oce chairs to the original purchaser who acquired a new product from RTA
1.
Products or its authorized resellers of the product against defects in material or workmanship.
2.
This warranty is expressly lim
normal use as a result of a defect in materials or workmanship. This warranty is limited to merchandise purchased in the Continental
United States. No assembly labor is included. The word "defects" as used in this warranty, is dened as imperfections that impair the
utility of the product.
3.
This warranty applies under conditions of normal use, but does not apply to defects that result from intentional damage, negligence,
ble use or expo
unreasona
Liability for consequential damages is excluded to the extent exclusion is permitted by law. This warranty gives you specic legal rights,
4.
and you may have other rights that vary from State to State.
5.
RTA Products does not warrant: a) natural variations in character marks b) changes in surface nishes due to aging or exposure to
light c) marks, scars, or wrinkles occurring naturally in leather d) failure resulting from normal wear and tear e) the matching of colors,
grains, or textures of natural materials f) the colorfastness or the matching of textil
cards g) damage, marking, or staining of veneer surfaces due to contact with rubber or similar compounds, damage from sharp objects
or imprinting from writing instruments, or prolonged exposure to direct sunlight h) we do not warrant products that are exposed to
extreme envi ronmental conditions or that have been subject to improper storage.
RTA Products shall not be liable for loss of time, inconvenience, commercial loss, or incidental or consequential damages.6.
ited to the repair or replacement (at its option) of defective chair components or materials that fails under
sure.
es, incl
uding an exact match to cuttings or to swatch
1 of 2
Page 18

Product Warranty - RTA Products
http://rtaproducts.com/product-warranty.htm
6/1/2012 11:37 AM
Any modi cation to the original product voids the warranty. We do not warrant the performance of the product when used in
7.
combination with other than original products.
8.
This product has been designed for and is intended for oce and home-oce use only. This warranty is Original Purchaser’s sole
remedy for product defects, and this warranty does not extend to any product, or damage to any product, caused by or attributed to
abuse or misuse, products used for commercial or rental purposes, use modications of, or attachments to the product, and product
parts n
ot used, maintained, or extended hereunder is in lieu of any and all other warranties, express or implied, i ncluding without
limitations any implied warranty or merchantability or of tness for a particular purpose.
Report any defects to RTA Products, LLC together with your sales receipt or other proof of purchase. If the chair is defective within the
9.
terms of the warranty, RTA Products, LLC will furnish a replacement chair (at its option) at no cost of equal or similar value and design.
arranty
10.
RTA Products will advise you of the procedure to follow in making w
claims:
a) Call us Monday – Friday, from 9am-5pm (Eastern Time) at (866) 782-8262 to explain the defect and give your name, address and
phone number. Please have ready the model number of our product, date and place of purchase. You can also write to us by e-mail to
warranty@rtaproducts.com and include the same information.
b) If we determine that replacement will remedy the situation, and in order to determine the extent or the cause of the defect, purchaser
will need to send the part in question at purchase
claim is valid (or not), and then proceed to send the replacement. We will ship the replacement at our expense.
r’s expense. Once we receive
claims. The following are the procedures for warranty
the part, we will examine it and determine whether the
2COOL PRODUCT WARRANTY
ONE (1) YEAR LIMITED WARRANTY
2COOL warrants this product against defects in materials and/or workmanship under normal use for a period of ONE (1)
YEAR from t he date of purchase by the original purchaser ("Warranty Period"). If a defect arises and a valid claim is received
within the Warranty Pe
riod, at its option, 2COO L will
either 1) repair the defect at no charge, using new or refurbished
replacement parts, or 2) replace t he product wit h a new product that is at least functionally equivalent to the original product.
s or
Obtaining Service: To obtain warranty service, call 2COOL Limited Warranty Service at 1-866-782-8262. Please be prepared
paired
to describe the product that needs service and the nature of t he problem. A purchase receipt is required. All re
and
replacements must be authorized in advance. Service options, parts availability and response times w ill vary. You are
responsible for delivery and the cost of delivery of the product or any parts to t he authorized service center for replacement,
per our instructions.
Limits and Exclusions: Coverage under this Limited Warranty is limited to the Continental United States of America. This
follow i
warranty does not apply t o: a) damage caused by failure to
nstructions relating to the product’s use or the installation
of components; b) damage caused by accident, abuse, misuse, re, oods, earthquake or other external causes; c) damage
caused by service performed by anyone who is not a repr esentative of 2COOL; d) accessories used in conjunction with a
covered product; e) a product or part that has been modied to alter functionality or capability; f) items intended to be
periodically replaced by the purchaser during
the normal
life of the product including, without limitation, batteries or light bulbs;
g) any product sold "as is" including, without limitation, oor demonstration models and refurbished items; or h) a product that
is used commercially or for a commercial purpose.
2COOL shall not be liable for incidental or consequential damages resulting from the use of this product, or arising out of any
breach of t his warranty. To the extent permitted by applicable la
w, 2COOL dis
claims any and all st atutory or implied
warranties, including, without limitation, warranties of merchantability, tness for a particular pur pose and warranties against
hidden or latent defects. If 2COOL cannot lawfully disclaim statutory or implied warranties, then to the extent permitted by
law, all such warranties shall be limited in duration to the duration of this express warr ant y.
Some states disallow the exclusion or limitation of incidental or
consequential damages or how long an implied warranty lasts,
so the above exclusions or limitations may not apply to you. This warranty gives you specic legal rights and you may also
have ot her rights, w hich vary from state t o state.
Copyright © 2011 RTA Pr oducts, LLC, All rights reserved.
,
2 of 2
 Loading...