

Page 1
MODEL RTA - 2706A
Thanks for purchasing one of our products.
Please read carefully the assembly instructions before the installation.
Please save this manual for future reference.
MODEL RTA-2706A
Page 2
MODELO RTA - 2706A
Gracias por comprar uno de nuestros productos.
Por favor lea cuidadosamente las instrucciones de ensamblaje antes de
instalar la unidad.
Por favor guarde este manual para referencias futuras.
6
8
11
1
5
10
13
3
7
2
MODELO RTA-2706A
Page 3
RTA-2706A
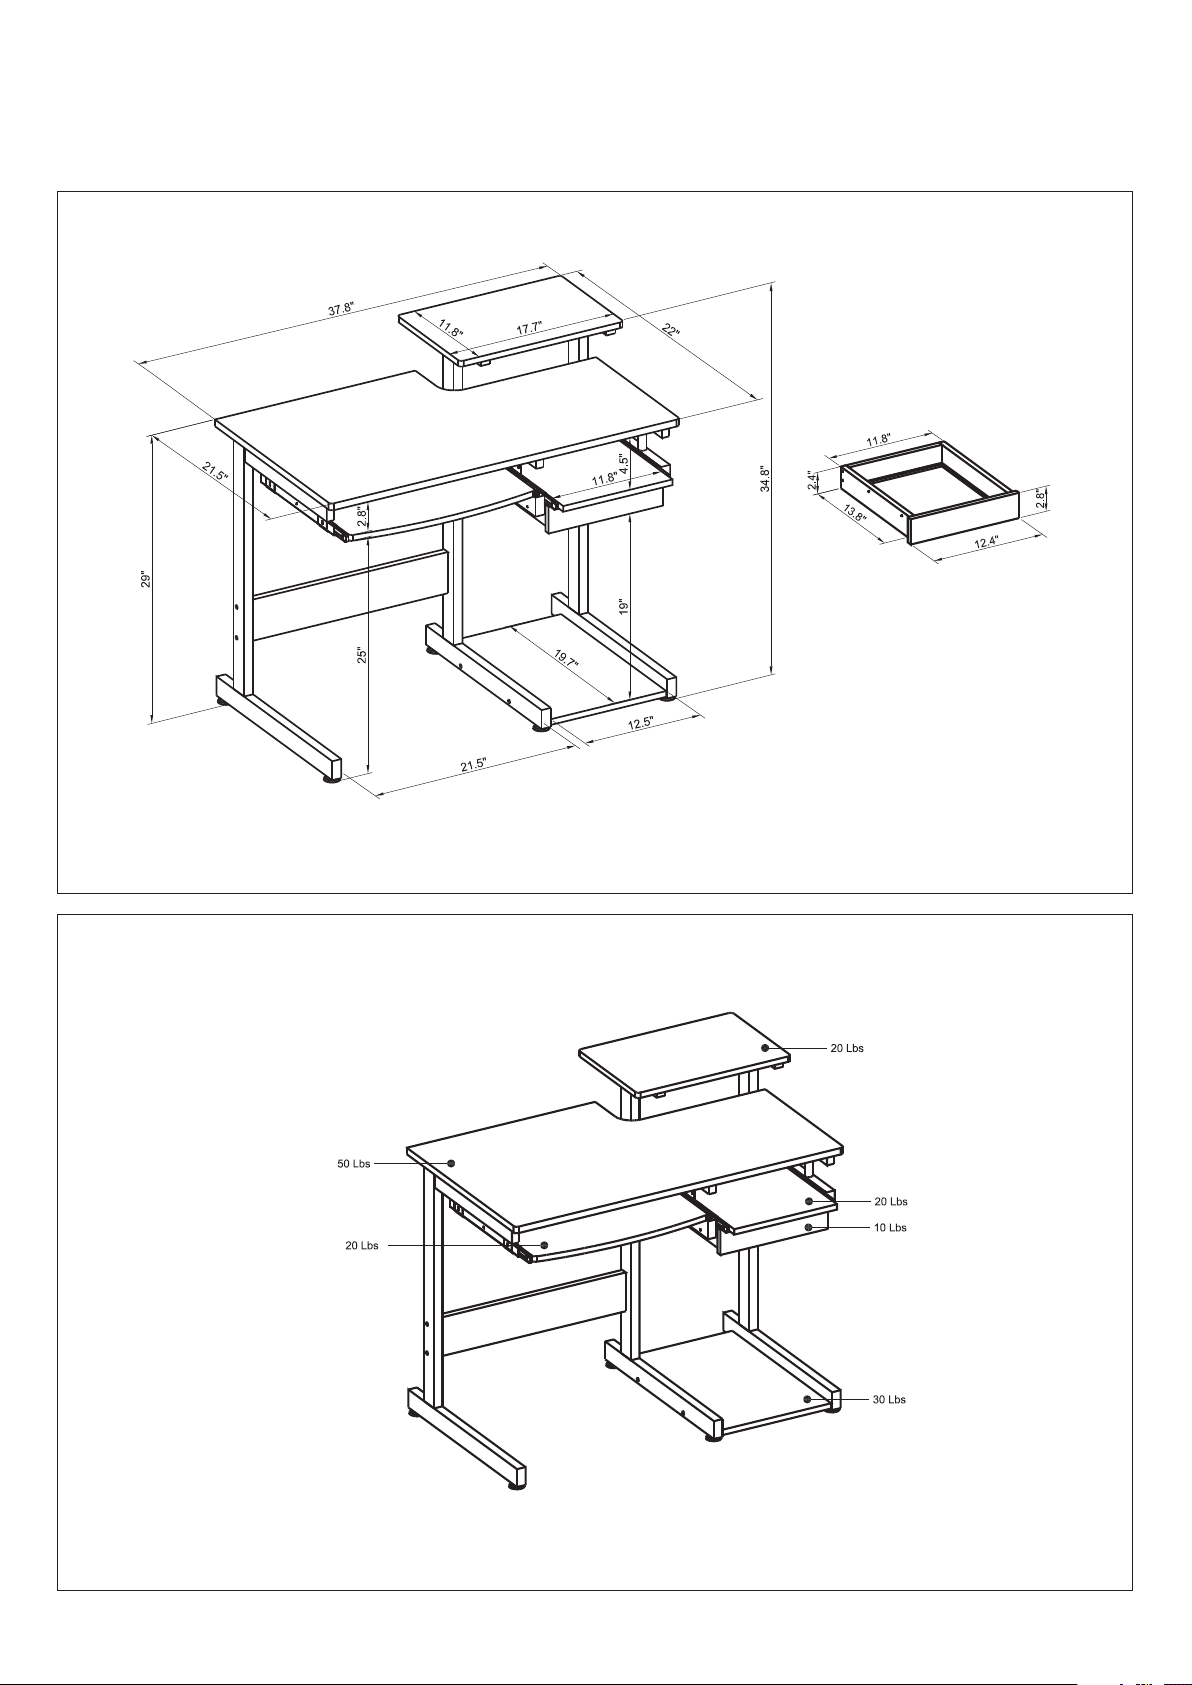
DIMENSIONS
Product Size: 37 .8"W x 22"D x 34.8"H
MAXIMUM WEIGHT CAPACITIES
DO NOT ex ceed this limit
Please use care an d good judgement
when placing obj ects on wood surface
Page 4
RTA-2706A
P.4
1
2
3
6
8
11
10
5
13
3
7
2
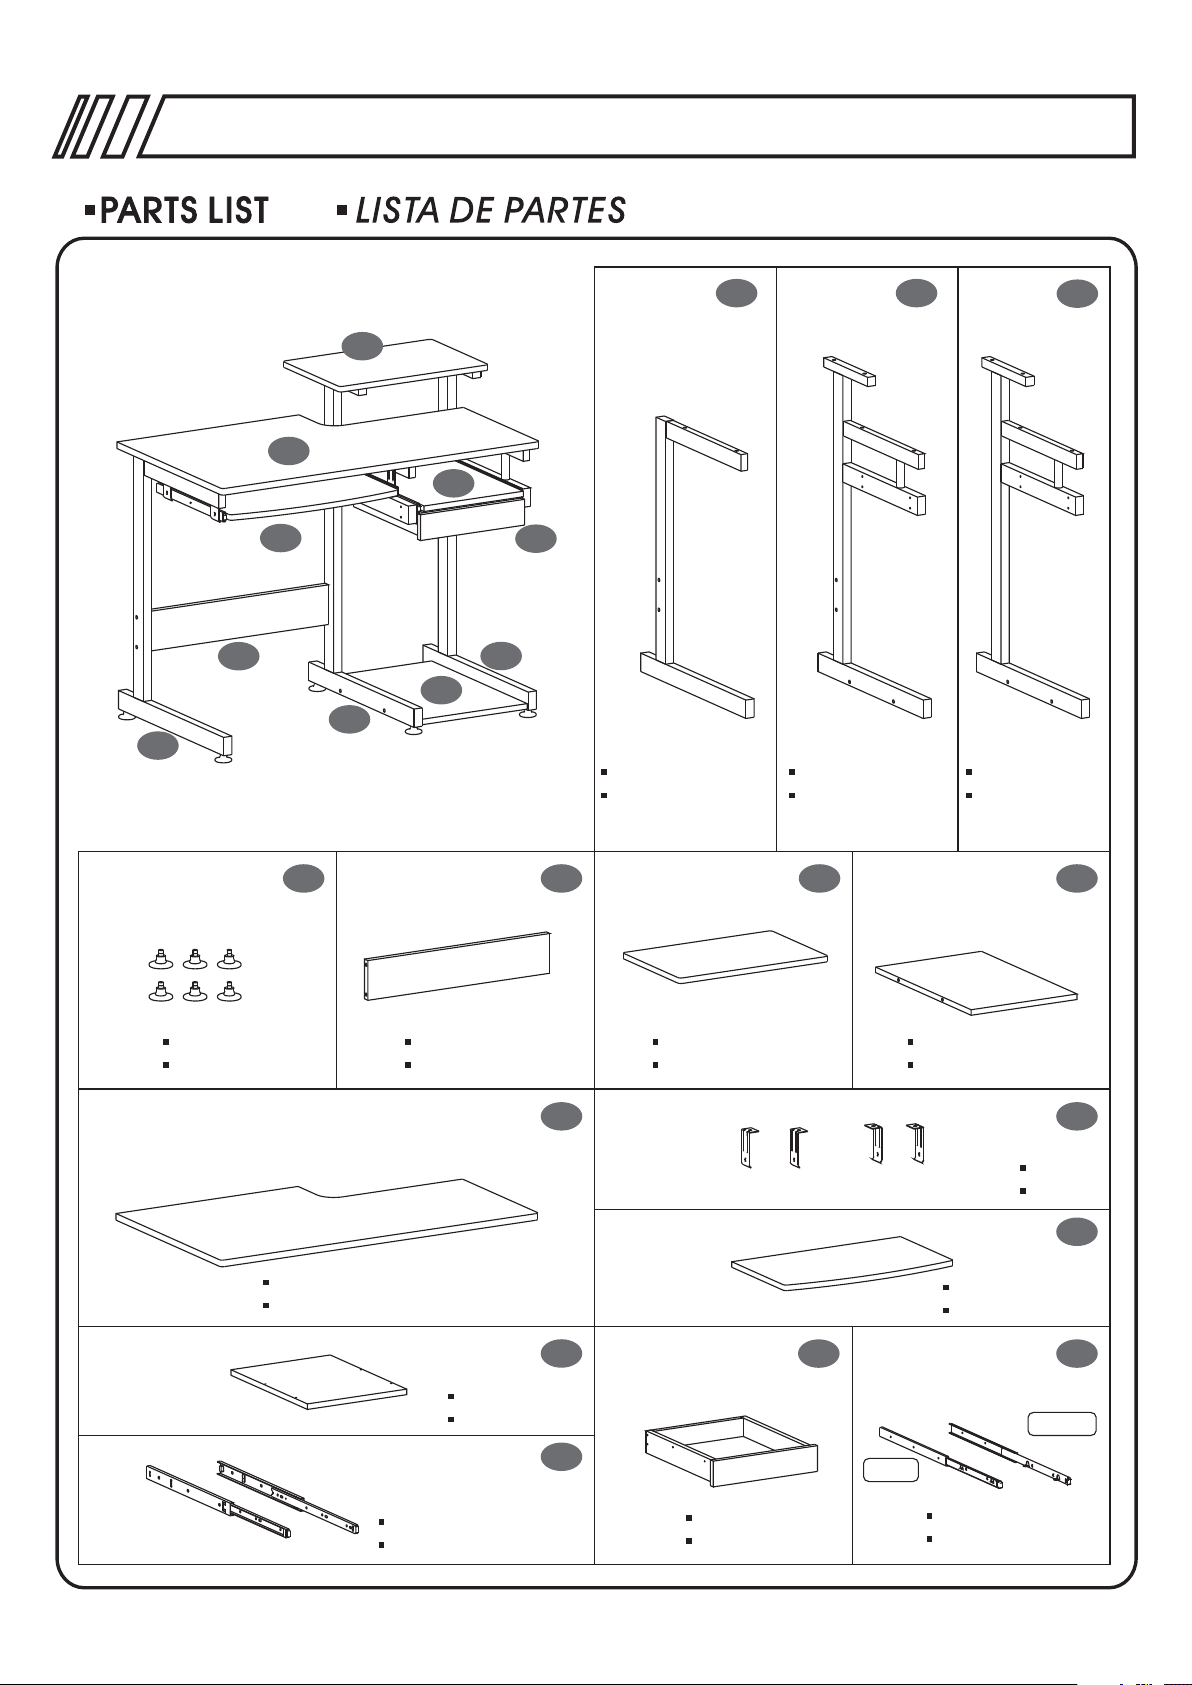
1
Left Structure
Estr uc tura Izqu ie rda
Central Structure
Estr uc tura Cent ra l
Right Structure
Estr uc tura
Dere ch a
X6
Studs
Tope s
4
Main Panel
Pane l Pr incipal
5
Back Panel
Pane l Po sterior
8
11
Auxiliary Panel
Pane l Auxili ar
12
1 SET
Slider For Drawer
Desl iz adores pa ra g aveta
Monitor Panel
Pane l de M onitor
Drawer
Gave ta
6
13
X4
7
CPU Panel
Pane l Pa ra Cpu
9
Hooks
Base s
10
Keyboard Panel
Pane l pa ra Tecl ad o
14
2SETS
Dere ch o
Right
Left
Izqu ie rdo
Sliders
Desl iz adores
Page 5
RTA-2706A
PART PARTQTY. QTY.ITEM ITEM
P.5
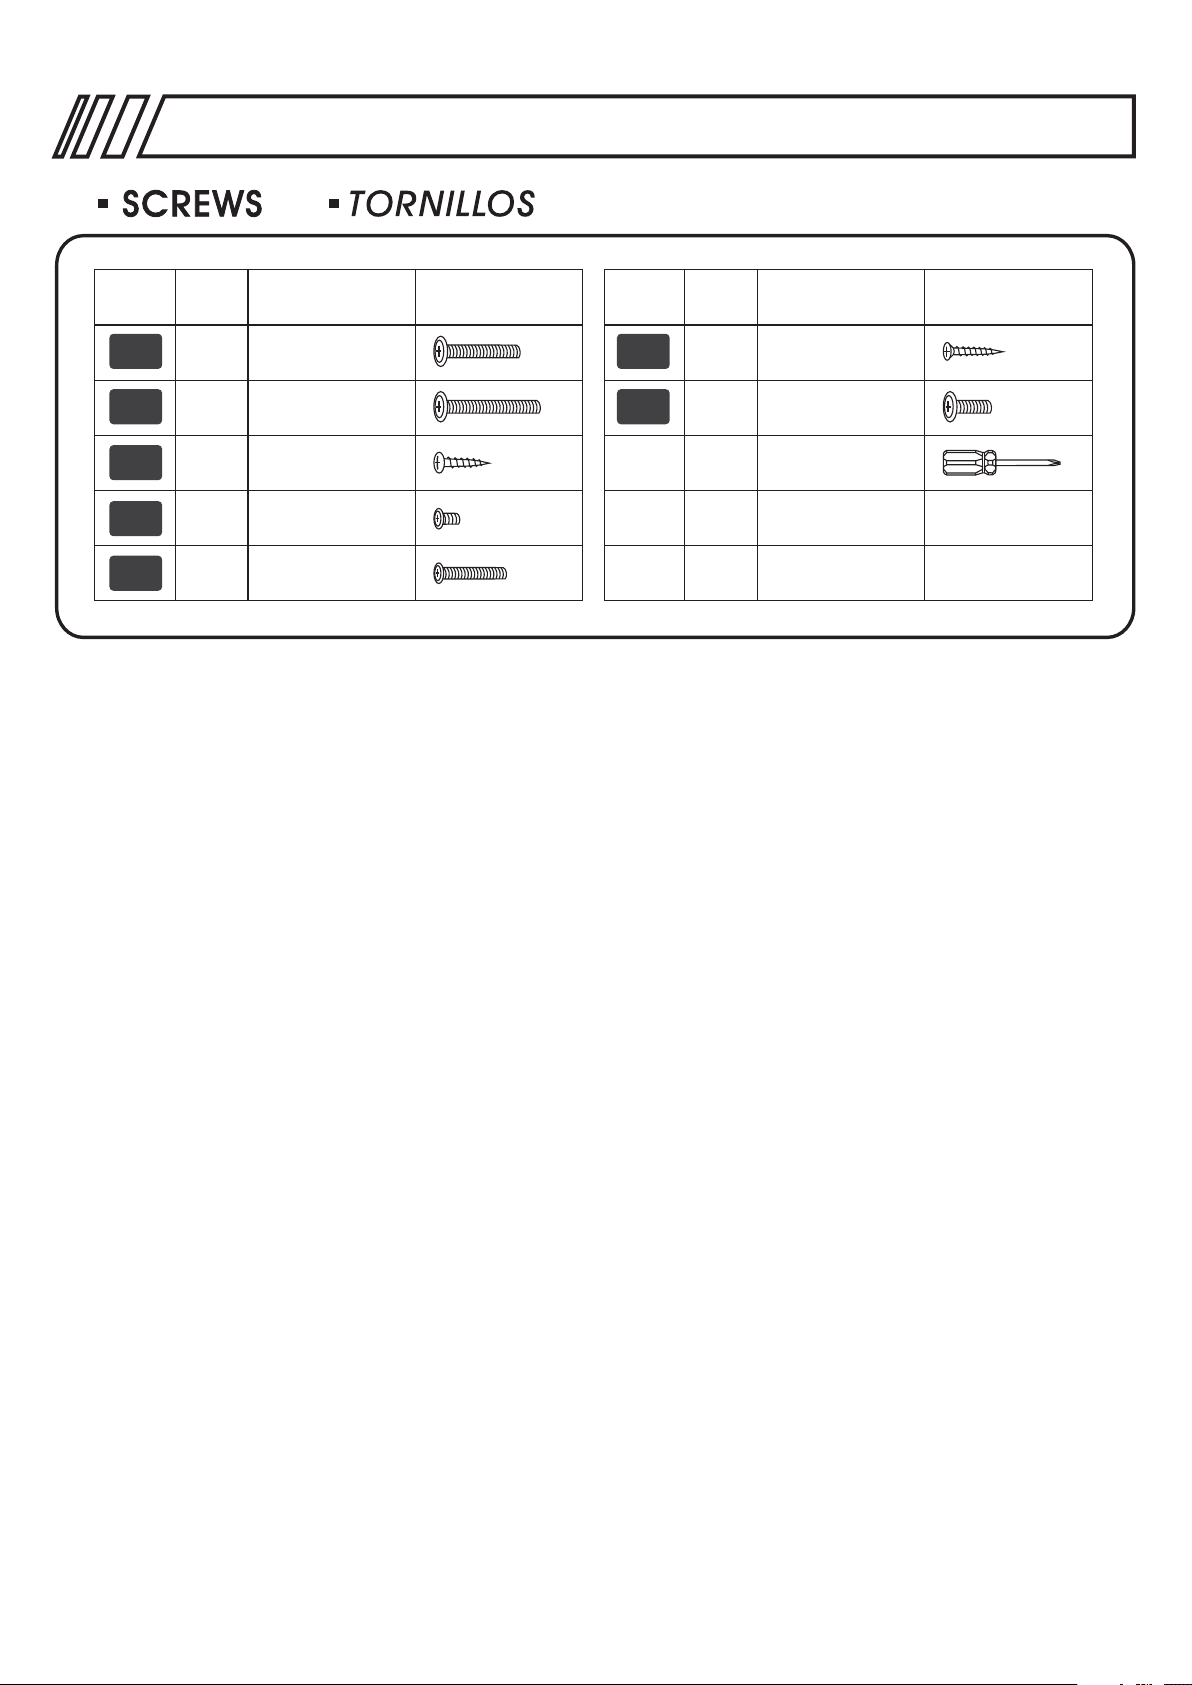
A
B
C
D
E
4
14
8
4
8
6X35 MM
6X50 MM
4X14 MM
4X4 MM
4X28 MM
F
G
4
4
1
3X15 MM
6X12 MM
Page 6

30mm
RTA-2706A
P.6
Page 7

RTA-2706A
P.7
Page 8

1
RTA-2706A
P.8
2
2
1
4
4
3
4
Insert the Studs (4) at the bottom of the Left, Central & Right Structures (1,2&3).
Inserte los topes (4) en las patas de las estructuras izquierda, derecha y central (1,2,3).
Before doing this step, make sure that all the nuts
in the panel are properly aligned to receive the screws!
A1.
A2.
2
1
B1.
5
Antes de hacer este paso, asegúrese que las tuercas
en el panel estén alineadas para recivir los tornillos!
SCREWS
B
B2.
TORN ILLOS
6X50 MM
4PCS
Use screws B to assemble the Back Panel (5) between the Left & Central Structures (1 & 2).
Use tornillos B para ensamblar el panel posterior (5) entre las estructuras central e izquierda (1, 2).
A3.
B3.
Page 9

3
RTA-2706A
P.9
A1.
B1.
3
2
7
Before doing this step, make sure that all the nuts
in the panel are properly aligned to receive the screws!
Antes de hacer este paso, asegúrese que las tuercas
en el panel estén alineadas para recivir los tornillos!
SCREWS
6X50 MM
B
A2.
B2.
TORN ILLOS
4PCS
Use screws B to assemble the CPU Panel (7) between the Central and Right Structure (2&3).
Use tornillos B para ensamblar el Panel de Cpu (7) entre las estructuras Central y Derecha y asi
quedaran conectadas las (3) estructuras.
A3.
B3.
4
6
2
Use screws A to fix the Monitor Panel (6) to Central & Right Structure (2&3).
Use tornillos A para ensamblar el Panel para Monitor (6) a las estructuras derecha y central (2,3).
3
SCREWS
6X35 MM
A
4PCS
TORN ILLOS
Page 10

5
RTA-2706A
2
3
14
Left
Izquierdo
14
Right
Derecho
Tabs
Top hole
SCREWS
4X28 MM
E
P.10
TORN ILLOS
4PCS
Use screws E to assemble one pair of Sliders (14) to the Central & Right Structures (2&3)
noting that the they must slide-out to the front of the desk. You will find four holes in the
metal structures, use the top two.
Use Tornillos E para fijar el lado grueso de dos de los deslizadores (14) a las Estructuras
derecha y central (2,3) tomando en cuenta que deben poder deslizarse hacia el frente del mueble.
En la estructura encontrara 4 huecos de cada lado, use los de arriba.
6
11
14
Right
Derecho
14
Left
Izquierdo
11
SCREWS
4X14 MM
C
4PCS
Use screws C to fix the back face of the Auxiliary Panel (11) to the Sliders (14).
Con tornillos C y por la cara posterior del panel Auxiliar (11) fijelo a los deslizadores (14).
TORN ILLOS
Page 11

7
RTA-2706A
P.11
12
8
SCREWS
13
Use screws F to assemble the thiner part of the Sliders (12) to the Drawer (13).
Use tornillos F para fijar los deslizadores de gaveta (12) a la Gaveta (13), note que debe
fijar la parte delgada del deslizador.
3X15 MM
F
TORN ILLOS
4PCS
3
2
12
X2
13
SCREWS
4X28 MM
E
Use screws E to assemble the wider part of the Drawer’s sliders (12) to the Central & Right
Structures (2&3).
Con tornillos E fije la parte gruesa de los deslizadores de Gaveta (12) a las estructuras derecha y
central (2,3).
TORN ILLOS
4PCS
Page 12

9
RTA-2706A
P.12
8
SCREWS
3
6X50 MM
B
2
1
Use screws B to assemble the back face of the Main Panel (8) to the Main Structures (1,2&3).
Use tornillos B para fijar el Panel Principal (8) a las estructuras derecha, izquierda y central (1,2,3).
10
X4
9
TORN ILLOS
6PCS
14
Left
Izquierdo
14
Right
Derecho
Tabs
SCREWS
4X4 MM
D
Use screws D to fix the Hooks (9) to the other pair of Sliders (14).
Use Tornillos D para fijar la parte gruesa de los otros dos deslizadores (14) a las bases (9).
TORN ILLOS
4PCS
Page 13

11
RTA-2706A
P.13
Use screws G to fix the Hooks (9) to the underside of
the Main Panel.
12
8
X4
9
14
Left
Izquierdo
14
Right
Derecho
Use tornillos G para fijar las bases (9) a la parte inferior
del Panel Principal (8).
SCREWS
6X12 MM
G
TORN ILLOS
4PCS
14
Left
Izquierdo
10
14
Right
Derecho
Use screws C to assemble the back face of the
Keyboard Panel (10) to the Sliders (14).
Con tornillos C y por debajo, ensamble el Panel de
Teclado (10) con los deslizadores (14).
SCREWS
4X14 MM
C
TORN ILLOS
4PCS
Page 14

CARE AND MAINTENANCE
English
- DO NOT EXPOSE THE SURFACES TO DIRECT SUNLIGHT, OR
EXTREME ENVIRONMENTAL CONDITIONS. EXPOSURE WILL
DAMAGE THE PRODUCT, WHICH IS NOT COVERED BY THE
WARRANTY.
- DO NOT USE SOLVENTS OVER SURFACES OR STRUCTURAL
TUBES. SURFACES MUST BE CLEANED WITH A SOLUTION OF
A SMOOTH SOAP AND WATER, THEN CLEARED WITH A DRY
TOWEL.
- PRODUCTS THAT ARE HEAVY SHOULD BE LIFTED OR MOVED
BY AT LEAST 2 PERSONS, AND ALL OBJECTS SHOULD BE
REMOVED FROM THE PRODUCT.
Spanish
- NO EXPONGA LAS SUPERFICIES A LA LUZ SOLAR DIRECTA,
O A CONDICIONES AMBIENTALES EXTREMAS. ESTE TIPO DE
DAÑOS NO SON CUBIERTOS POR LA GARANTÍA DEL PRODUCTO.
- NO USE SOLVENTES SOBRE LAS SUPERFICIES O TUBOS
ESTRUCTURALES. LAS SUPERFICIES DEBEN SER LIMPIADOS
CON UN JABÓN SUAVE Y AGUA, Y SECADOS IMMEDIATAMENTE
CON UNA TOALLA LIMPIA Y SECA.
- PRODUCTOS QUE SON PESADOS DEBEN LEVANTARSE O
MOVERSE POR AL MENOS 2 PERSONAS, Y TODOS LOS
OBJETOS DEBEN SER REMOVIDOS DEL PRODUCTO.
Page 15

PRODUCT WARRANTY
TECHNI MOBILI DESK WARRANTY
LIMITED 5-YEAR WARRANTY
RTA Products, LLC warrants to the Original Purchaser who acquired a new product from RTA Products or its
authorized resellers that this product will be free from defects in its workmanship and materials, under normal
use and service conditions, as described herein. "Defects" as used in this warranty
imperfections that impair the use of the furniture or product. RTA products will repair or replace, at is option,
without charge to the original purchaser ‘other than freight from purchaser to RTA Products, only the defective
products or parts for a period of FIVE (5) Years.
Replacement parts can only be supplied if parts are available. Items out of production may be unavailable.
This warranty will be effective for the applicable time period beginning the date of purchase on your original
sales receipt. RTA product’s obligation under this warranty is limited to repairing or replacing products or parts
This warranty is Original Purchaser’s sole remedy for product defects, and this warranty does not extend to
any product, or damage to any product, caused by or attributed to abuse or misuse, products used for
used, maintained, or extended hereunder is in lieu of any and all other warranties, express or implied, including
desks made with PVC Laminate surface should not be exposed to direct sunlight, as it may damage the
material. Damage of this nature is not covered under this warranty.
RTA Products will not be responsible for indirect, special, incidental or consequential damages. This warranty
is limited to merchandise purchased in the Continental United States. Some States do not allow the exclusion
or limitation of incidental or consequential damages, so the above limitations or exclusions may not apply to
state.
RTA Products will advise you of the procedure to follow in making warranty claims. The following are the
procedures for warranty claims:
a. Call us Monday – Friday, from 9am-5pm (Eastern Time) at (866) 782-8262 to explain the defect and give
your name, address and phone number. Please have ready the model number of our product, date and place
of purchase. You can also write to us by e-mail to warranty@rtaproducts.com and include the same
information.
b. If we determine that replacement will remedy the situation, and in order to determine the extent or the cause
of the defect, purchaser will need to send the part in question at purchaser’s expense. Once we receive the
part, we will examine it and determine whether the claim is valid (or not), and then proceed to send the
replacement. We will ship the replacement at our expense.
 Loading...