

Page 1
RSA SecurID Ready Implementation Guide
Last Modified: March 8, 2006
Partner Information
Product Information
Partner Name
Web Site www.mrv.com
Product Name
Version & Platform
Product Description
Product Category
MRV Communication, Inc.
LX Series
LX OS 3.6.0 or later
MRV Communications is a leading provider of network access solutions for
the enterprise edge, the seam where corporate networks meet the widearea public network and the service provider edge. The LX-Series advance
security protects access to your network. The LX-Series authenticates local
and remote users while providing a secure network dialup access for
remote offices and home users.
Remote Access
1
Page 2
Solution Summary
The MRV LX-Series Secure Console/Terminal Servers have been specifically designed with a focus on
security. The LX Series multi-processor platforms have the processing horsepo wer to handle the FIPS
approved encryption and cipher algorithms required to meet demands of today’s high security
environments. LX-Series platforms provide the highest and most comprehensive set security and
encryption support of any Console or Terminal Server on the market today.
The RSA SecurID Authentication support is one of many authentication mechanisms available in the LXSeries products. RSA SecurID (in conjunction with RADIUS Authentication and Accounting) provides a
very powerful means by which to manage all aspects of security for traditional Terminal Server, Console
Server, and Out Of Band Network applications.
LX-Series Console and Terminal Servers (in conjunction with RSA SecurID two factor authentication),
coupled with the power of RADIUS accounting capabilities provide administrators not only with a strong
sense of security, but also a high level of accountability and logging capabilities.
Partner Integration Overview
Authentication Methods Supported
List Library Version Used
RSA Authentication Manager Name Locking
RSA Authentication Manager Replica Support
Secondary RADIUS Server Support
Location of Node Secret on Agent
RSA Authentication Agent Host Type
RSA SecurID User Specification
RSA SecurID Protection of Administrative Users
RSA Software Token API Integration
Use of Cached Domain Credentials
Native RSA SecurID Authentication, RADIUS
5.0.3.2
Yes
Full Replica Support
Yes, up to 2
Stored in Flash
Communication Server
Designated Users, All Users
Yes
No
No
Product Requirements
Partner Product Requirements: LX OS 3.6.0
CPU
Memory
Storage
Firmware Version
Operating System
LX OS
LX Firmware
Additional Software Requirements
Java JRE
Motorola PQ 133MHz
128MB DRAM
No hard drive; 16MB Flash
3.6.0 or higher
3.6.0 or later
3.6.0 or later
1.4.2 or later
2
Page 3
Agent Host Configuration
To facilitate communication between the LX Product line and the RSA Authentication Manager / RSA
SecurID Appliance, an Agent Host record must be added to the RSA Authentication Manager Database
and RADIUS Server Database when using RADIUS. The Agent Host record identifies the
within its database and contains information about communication and encryption.
To create the Agent Host record, you will need the following information.
• Hostname
• IP Addresses for all network interfaces
• RADIUS Secret (When using RADIUS Authentication Protocol)
When adding the Agent Host Record, you should configure the LX Series as a Communication Server.
This setting is used by the RSA Authentication Manager to determine how communication with the
will occur.
Series
Note: Hostnames within the RSA Authentication Manager / RSA SecurID
Appliance must resolve to valid IP addresses on the local network.
Please refer to the appropriate RSA Security documentation for additional information about Creating,
Modifying and Managing Agent Host records.
LX Product line
LX
3
Page 4
Partner Authentication Agent Configuration
Setting Up RSA SecurID Authentication (Command Line Interface)
You can implement SecurID authentication at the server level and for specific interfaces and
asynchronous ports on the LX unit. You must implement RSA SecurID Authentication at the server level
before you can implement it on specific interfaces and asynchronous ports on the LX unit.
The basic steps for configuring SecurID authentication on the LX unit are:
1. Specifying the RSA Authentication Manager Server settings on the LX.
2. Installing and configuring the SecurID server on a Network-based Host.
3. Configuring a RSA Authentication Manager Local Subscriber. (optional)
Specifying the RSA Authentication Manager Server Settings on the LX
Perform the following operations to specify the RSA Authentication Manager settings on the LX unit:
1. Check the primary RSA Authentication Manager Server host to ensure that the RSA Authentication Manager
application is running.
2. Access the AAA Command Mode on the LX
3. Use the securid authentication version command to specify the RSA Authentication Manager authentication
version for the LX unit. You can specify the authentication version as Version 5, or pre- Version 5 (legacy); for
example:
Login: InReach
Password: access
InReach:0> enable
Password: system
InReach:0>> configuration
AAA:0 >>securid authentication version version_5
AAA:0 >>securid authentication version legacy
4. Use the securid authentication port command to specify the socket your RSA Authentication Manager server is
listening to; for example:
AAA:0 >>securid authentication port 1687
Note: The LX listens to port 5500 by default.
5. Use the securid primary authentication server address command to spe cify the IP address of the RSA
Authentication Manager Primary; for example:
AAA:0 >>securid primary authentication server address 10.242.131.11
6. Use the securid authentication encryption command to specify the RSA SecurID encryption method for the LX
unit. You can specify DES or SDI as the encryption method; for example:
AAA:0 >>securid authentication encryption des
AAA:0 >>securid authentication encryption sdi
7. To verify the LX configuration, execute the show securid characteristics command at the superuser command
prompt; for example:
AAA:0 >>show securid characteristics
Note: To clear the node secret from the LX unit, use the ‘zero securid
secret’ command.
4
Page 5
RSA SecurID Authentication Command Examples
This section provides examples of all of the commands that are used to specify settings for the RSA
Authentication Manager servers.
AAA:0 >>securid primary authentication server address 10.242.131.11
AAA:0 >>securid authentication port 4500
AAA:0 >>securid primary authentication server name bigsky1.com
AAA:0 >>securid authentication encryption des
AAA:0 >>securid authentication retransmit 7
AAA:0 >>securid authentication timeout 3
AAA:0 >>securid authentication version version_5
Note: *If you do not specify a UDP port, retransmit value, timeout,
version, encryption, or name for the RSA Authentication Manager server,
the LX unit will use the default values for these settings.
RSA SecurID Local Subscriber Feature
Under the RSA Authentication Manager Local Subscriber Feature, a subscriber can be logged on in one
of two ways:
• As an LX subscriber with the attributes of that subscriber (if the LX subscriber account exists)
• Or, if the LX subscriber account does not exist, as the default (InReach) subscriber.
Under either scenario, the subscriber must have an account on the RSA Authentication Manager server.
If the subscriber account also exists on the LX unit, the subscriber is logged on under that account and
given the attributes of that account. If the subscriber account does
is logged on under his RSA Authentication Manager account with the attributes of the default (InReach)
account.
not exist on the LX unit, the subscriber
Use the securid local subscriber enable command to configure the RSA Authentication Manager Local
Subscriber Feature for the LX unit; for example:
AAA:0 >>securid local subscriber enable
When the RSA Authentication Manager Local Subscriber Feature is set to only, the subscriber can only
be logged in if the subscriber account is configured on both the LX unit and the RSA Authentication
Manager server
and the subscriber account on the LX server has the same name as the subscriber
account on the RSA Authentication Manager server.
Use the securid local subscriber only command to set the RSA Authentication Manager Local
Subscriber Feature to only; for example:
AAA:0 >>securid local subscriber only
RSA SecurID sdconf.rec
The LX software now supports the import of sdconf.rec files. To use the sdconf.rec file, download it into
the LX / config directory. If this file is present on the LX, the RSA Authentication Manager system
characteristics included within the sdconf.rec file will be used, and configuration of the RSA
Authentication Manager attributes will be blocked at the CLI command level.
To download the sdconf.rec file:
1. Go to the shell.
2. Change to the directory cd / config directory.
3. From /config, perform an FTP and retrieve the sdconf.rec file.
5
Page 6

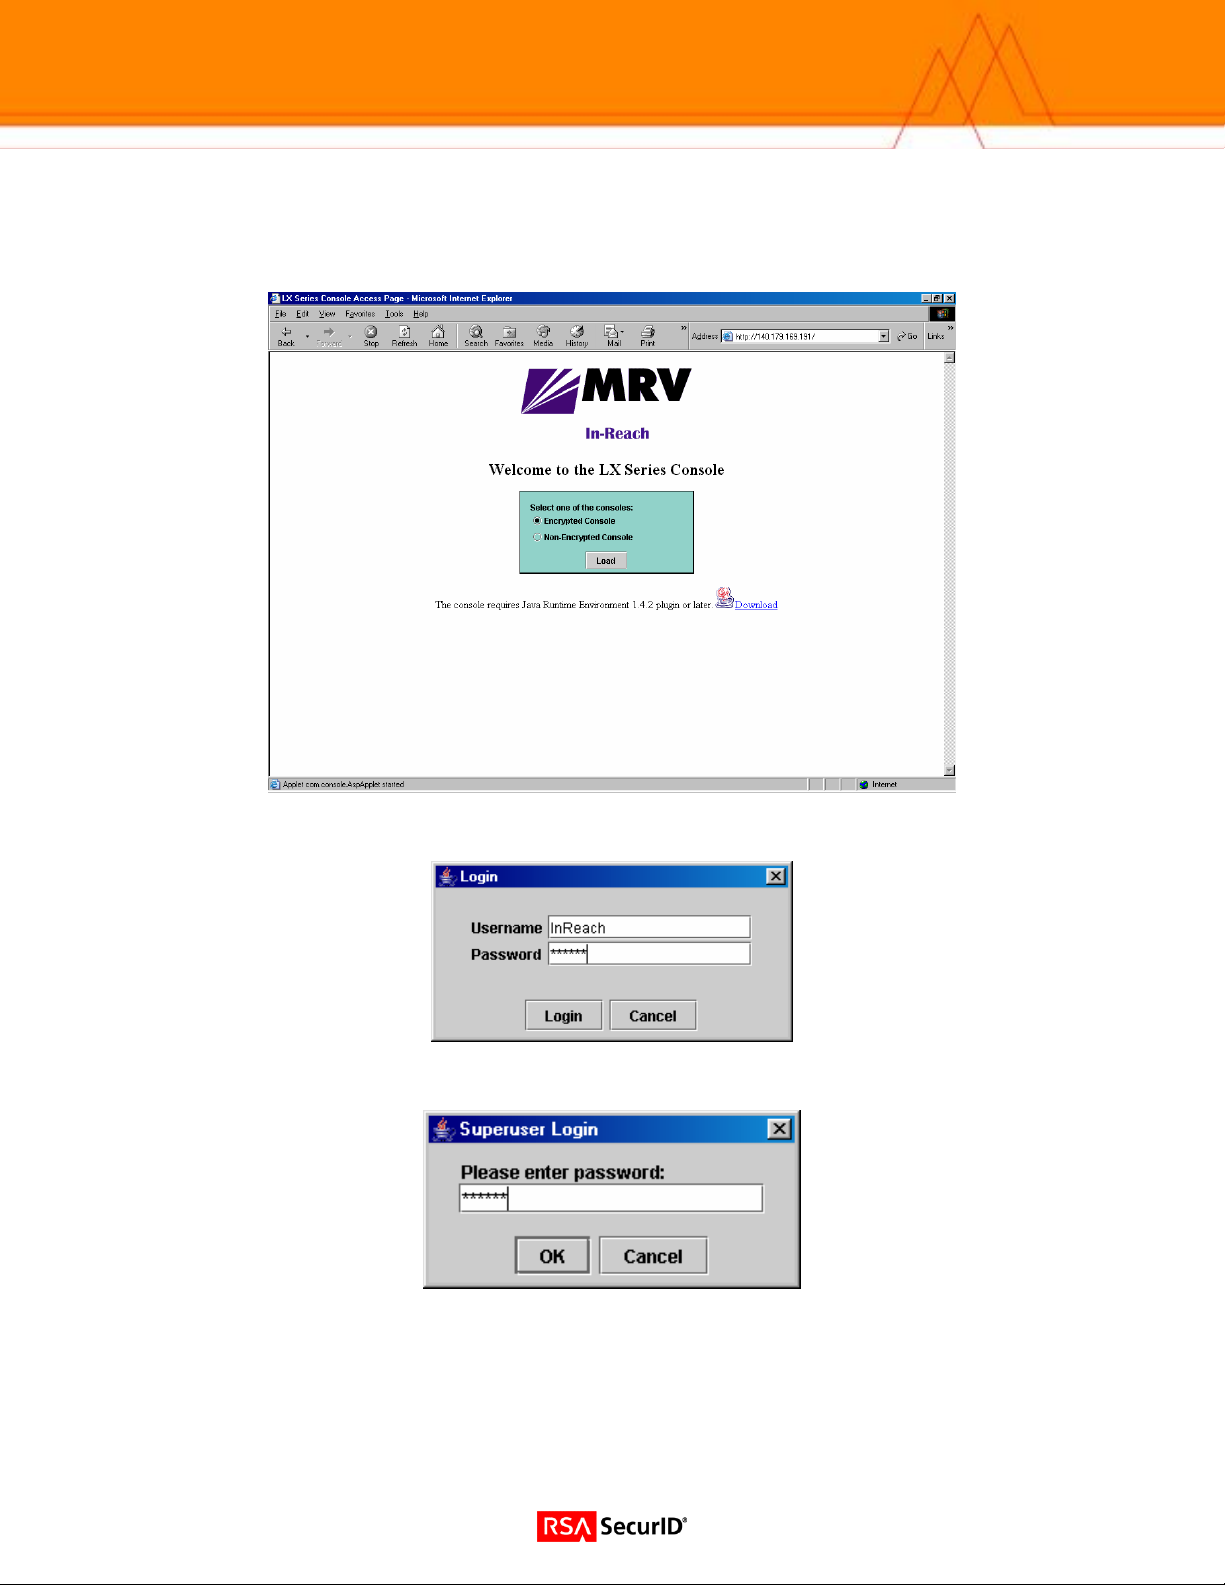
Setting Up RSA SecurID Authentication (Web Interface)
1. Point your browser to the LX IP address. (Browser must have Java 1.4.2 or higher installed.)
2. Login to the LX unit.
3. Click the Admin button on the upper tool bar.
6
Page 7

4. Select SecurID under the Authentication Folder from the navigation tool bar on the left. Enter the desired
information for your site.
7
Page 8

Setting Up RADIUS (Command Line Interface)
RADIUS Primary Authentication Server Commands
Login: InReach
Password: access
InReach:0 >enable
Password:******
InReach:0 >>configuration
Config:0 >>aaa
RADIUS Primary Accounting Server Commands
RADIUS Secondary Authentication Server Commands
AAA:0>> radius primary authentication server address 10.242.131.13
AAA:0 >>radius primary authentication server port 1645
AAA:0 >>radius primary authentication server port 1812
AAA:0 >>radius primary authentication server secret STRING
AAA:0 >>radius primary authentication server retransmit 3
AAA:0 >>radius primary authentication server timeout 7
AAA:0>> radius secondary accounting server address 10.242.131.13
AAA:0 >>radius secondary accounting server port 1646
AAA:0 >>radius secondary accounting server port 1813
AAA:0 >>radius secondary accounting server secret STRING
AAA:0 >>radius secondary accounting server retransmit 3
AAA:0 >>radius secondary accounting server timeout 7
AAA:0>> radius secondary authentication server address 10.242.131.13
AAA:0 >>radius secondary authentication server port 1645
AAA:0 >>radius secondary authentication server port 1812
AAA:0 >>radius secondary authentication server secret STRING
AAA:0 >>radius secondary authentication server retransmit 3
AAA:0 >>radius secondary authentication server timeout 7
RADIUS Secondary Accounting Server Commands
AAA:0>> radius secondary accounting server address 10.242.131.13
AAA:0 >>radius secondary accounting server port 1646
AAA:0 >>radius secondary accounting server port 1813
AAA:0 >>radius secondary accounting server secret STRING
AAA:0 >>radius secondary accounting server retransmit 3
AAA:0 >>radius secondary accounting server timeout 7
Port Commands
Config:0 >>port async #
Async #:0 >>authentication outbound radius enable
Async #:0 >>authentication inbound radius enable
Async #:0 >>radius accounting enable
Interface Commands
Config:0 >>interface #
Intf #:0 >>authentication radius enable
Intf #:0 >>radius accounting enable
8
Page 9

Setting Up RADIUS (Web Interface)
1. Point your browser to the LX IP address.
2. Login to the LX unit.
3. Click the Admin button on the upper tool bar.
9
Page 10

4. Select RADIUS under the Authentication Folder from the navigation tool bar on the left. Enter the desired
information for your site.
10
Page 11

Setting Up TACACS+
You can implement TACACS+ authentication and TACACS+ accounting at the server level and for
specific interfaces and asynchronous ports on the LX unit.
Access the AAA Configuration mode on the LX.
TACACS+ Primary Authentication Server Commands
AAA:0>> tacacs+ primary authentication server address 10.242.131.15
AAA:0 >>tacacs+ primary authentication server port 49
AAA:0 >>tacacs+ primary authentication server secret STRING
AAA:0 >>tacacs+ primary authentication server retransmit 3
AAA:0 >>tacacs+ primary authentication server timeout 7
TACACS+ Primary Accounting Server Commands
AAA:0>> tacacs+ primary accounting server address 10.242.131.15
AAA:0 >>tacacs+ primary accounting server port 49
AAA:0 >>tacacs+ primary accounting server secret STRING
AAA:0 >>tacacs+ primary accounting server retransmit 3
AAA:0 >>tacacs+ primary accounting server timeout 7
TACACS+ Secondary Authentication Server Commands
AAA:0>> tacacs+ secondary authentication server address 10.242.131.15
AAA:0 >>tacacs+ secondary authentication server port 49
AAA:0 >>tacacs+ secondary authentication server secret STRING
AAA:0 >>tacacs+ secondary authentication server retransmit 3
AAA:0 >>tacacs+ secondary authentication server timeout 7
TACACS+ Secondary Accounting Server Commands
AAA:0>> tacacs+ secondary accounting server address 10.242.131.13
AAA:0 >>tacacs+ secondary accounting server port 1646
AAA:0 >>tacacs+ secondary accounting server port 1813
AAA:0 >>tacacs+ secondary accounting server secret STRING
AAA:0 >>tacacs+ secondary accounting server retransmit 3
AAA:0 >>tacacs+ secondary accounting server timeout 7
Port Commands
Config:0 >>port async #
Async #:0 >>authentication outbound tacacs+ enable
Async #:0 >>authentication inbound tacacs+ enable
Async #:0 >>tacacs+ accounting enable
Interface Commands
Config:0 >>interface #
Intf #:0 >>authentication tacacs+ enable
Intf #:0 >>tacacs+ accounting enable
11
Page 12
Setting Up TACACS+ (Web Interface)
1. Point your browser to the LX IP address.
2. Login to the LX unit.
3. Click the Admin button on the upper tool bar.
12
Page 13
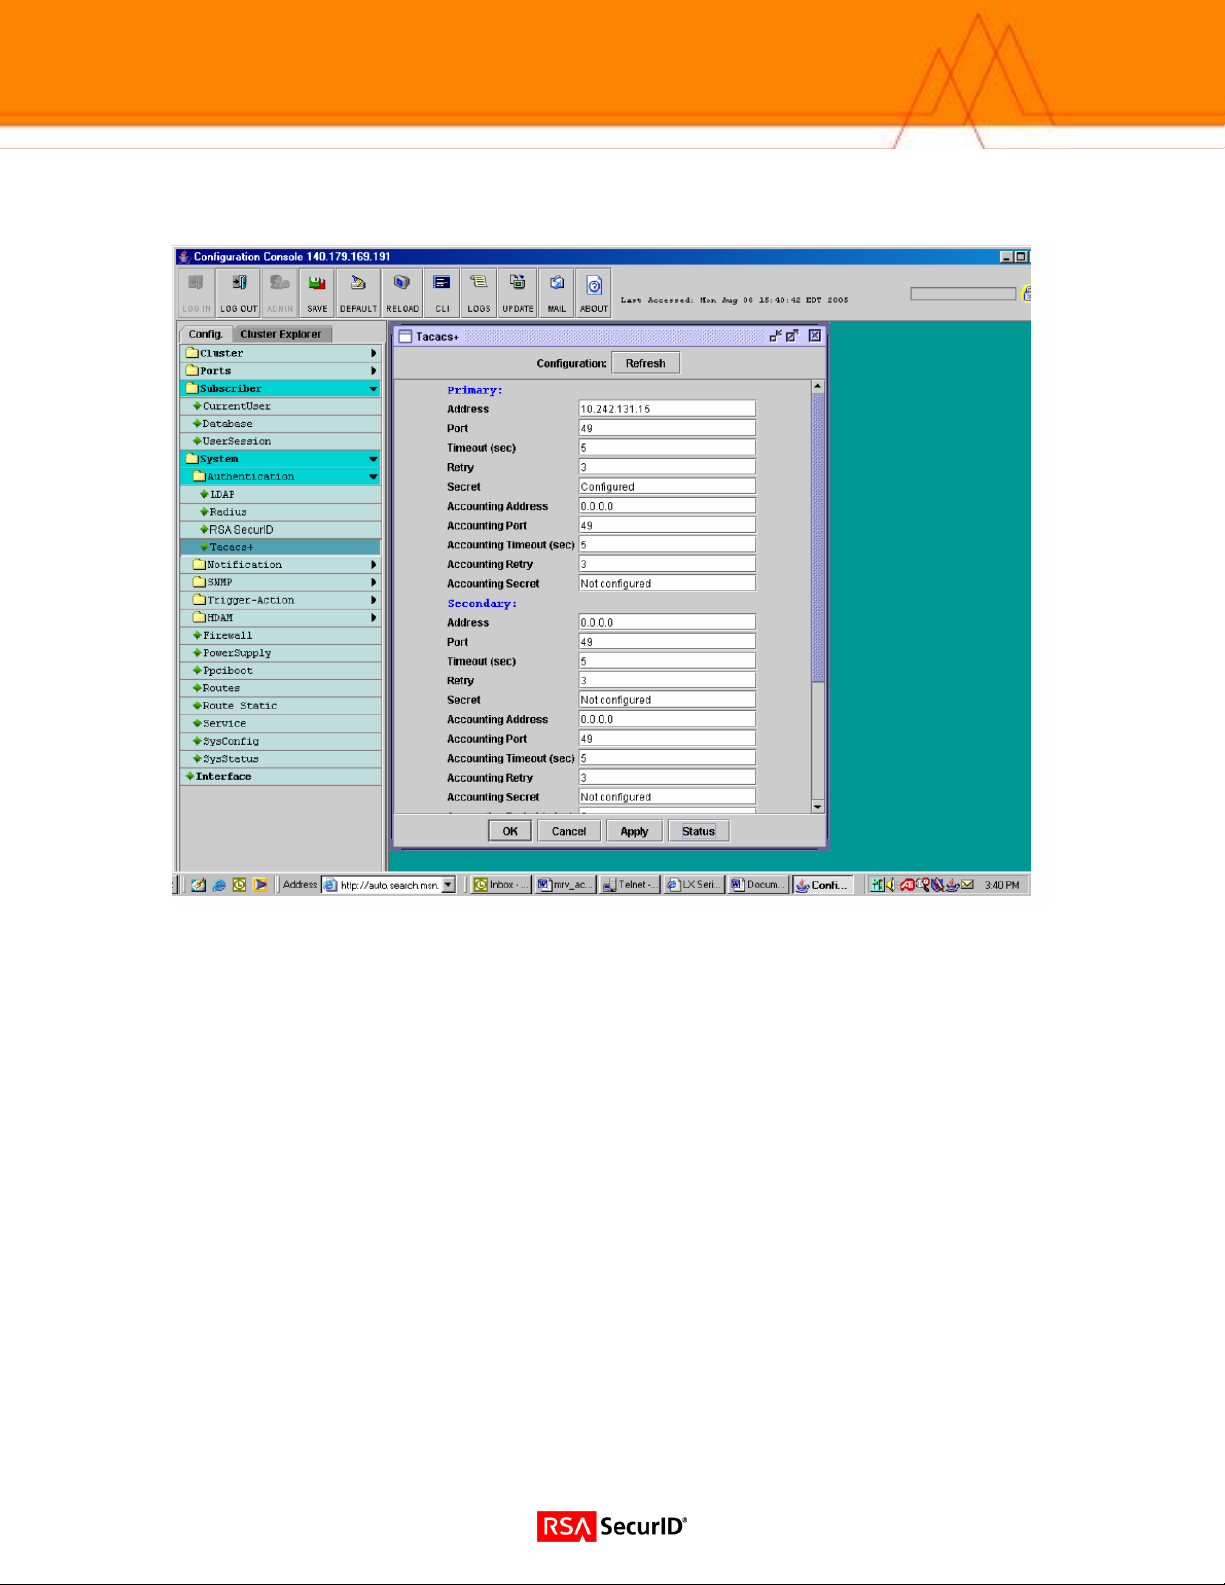
4. Select TACACS+ under the Authentication Folder from the navigation tool bar on the left. Enter the desired
information for your site.
13
Page 14

Certification Checklist
Date Tested: March 8, 2006
Certification Environment
Product Name Version Information Operating System
RSA Authentication Manager
LX Series
RSA Native Protocol RADIUS Protocol
New PIN Mode
Force Authentication After New PIN
System Generated PIN
User Defined (4-8 Alphanumeric)
User Defined (5-7 Numeric)
User Selectable
Deny 4 and 8 Digit PIN
Deny Alphanumeric PIN
PASSCODE
16 Digit PASSCODE
4 Digit Password
Next Tokencode Mode
Next Tokencode Mode
Load Balancing / Reliability Testing
Failover (3-10 Replicas)
Name Locking Enabled
No RSA Authentication Manager
RSA Software Token API Functionality
System Generated PIN N/A
User Defined (8 Digit Numeric) N/A
User Selectable N/A
Next Tokencode Mode N/A
Domain Credential Functionality
Determine Cached Credential State N/A
Set Domain Credential N/A
Retrieve Domain Credential N/A
PAR / SWA = Pass = Fail N/A = Non-Available Function
6.1 Windows 2000
3.6.0 LX-4000 LX-8000
Mandatory Functionality
Force Authentication After New PIN
System Generated PIN
User Defined (4-8 Alphanumeric)
User Defined (5-7 Numeric)
User Selectable
Deny 4 and 8 Digit PIN
Deny Alphanumeric PIN
16 Digit PASSCODE
4 Digit Password
Next Tokencode Mode
Failover
Name Locking Enabled
No RSA Authentication Manager
Additional Functionality
System Generated PIN N/A
User Defined (8 Digit Numeric) N/A
User Selectable N/A
Next Tokencode Mode N/A
Determine Cached Credential State
Set Domain Credential
Retrieve Domain Credential
14
 Loading...