

Page 1

Dehumidifier
Instruction Manual
Model DH-320/A
Page 2

CONTENTS
Safety Warnings 2
Operation consideration 5
Construction & controls 6
Function selection 8
Preparation for use 10
Operation 12
Maintenance 14
Continuous drainage 16
Specifications 17
Trouble-shooting 17
Please read this instruction manual carefully before operating the
dehumidifier.
This manual contains important instructions for its correct operation.
Please retain for future reference.
-1-
Page 3

Safety Warnings
Please read this section carefully before operating your dehumidifier.
The warning and the cautions stated in this section must be observed for safe operation
Warning: means improper operation may result in a serious injury or death to a person.
Caution: means improper operation may result in an injury or damage to property.
Shows prohibited operation
Shows Compulsory condition
Shows Caution condition
Warnings
● In case of any abnormality turn off the dehumidifier, disconnect the power
and contact RS technical support
● Never attempt to turn off the dehumidifier by disconnecting the plug.
● Never modify the dehumidifier. Do not attempt to disassemble or
service the unit.
● To avoid the risk of the electric shock, never connect of disconnect
the plug with wet hands.
● Make sure plug is clean and free from damage. Make sure it fits C
socket securely
● Do not operate near flammable materials or gasses.
Do not spray chemicals on to unit
● To prevent damage, do not place the dehumidifier near heat sources
● The power cord must not be damaged or modified. Do not allow objects to
rest on the cord. Do not pull on the cord or bundle during operation.
● Avoid damage to the power cord; take care not to trap or pinch cord. P
Power off and remove plug
Prohibited
Prohibited
Prohibited
lean or replace plug
Prohibited
Prohibited
Prohibited
rohibited
-2-
Page 4

● Do not insert foreign objects into the dehumidifier Prohibited
● Remove collected water from the tank. Do leave water in the unit if is not
Dispose of water
used for extended periods of time. Dispose of water appropriately, do not
drink water.
● The dehumidifier must be used on a level and stable surface.
Use in flat ground
● To prevent collected water from freezing do not use the dehumidifier
Prohibited
at ambient temperatures below 0 ℃
● For indoor use only.
Prohibited
● Avoid Exposure to direct sunlight
Prohibited
.
● Do not spill water on to the dehumidifier. Switch off & disconnect
Prohibited
from supply. Mop up excess water & allow to dry
● Do not use unit for specialized environmental applications.
Caution
If in doubt please contact RS Technical Support
● Do not use solvents or chemical cleaners.
Prohibited
● For continuous drainage make sure that the drain hose is set properly
Check hose
without a rising slope.
● Be aware of where units exhaust is directed
Prohibited
●Do not place anything on top of unit.
Prohibited
-3-
Page 5

● Disconnect and remove plug if unit is not to be use for extended periods
When removing plug be sure to hold by molded plug only
● Care must be taken when using in confined spaces
.
● Do not remove or disable the float in the water tank..
● Do not obstruct air vents. Do not place object immediately in front of the
dehumidifier
● Periodic checking of air filters and water collection or drainage is
advised as failure may reduce efficiency or cause the unit to shutdown
● Before cleaning or routine maintenance switch off and disconnect power
● Make sure the unit is empty of water before moving. Use handle provided
to transport water container
Schedule regular checkups
Prohibited
Prohibited
Prohibited
Empty water
-4-
Page 6

Operation considerations
Defrost operation
The evaporator within the dehumidifier can frost over during normal operation (at
temperatures of approx.15℃ or less). The unit automatically removes the frost at intervals of
approximately 30 minutes or more (for a duration of approximately 5 minutes).While this
unit performs this cycle both the dehumidifying function and the air cleaning function are
suspended
● Do not turn off or disconnect the unit during the defrosting operation.
This dehumidifier is not suitable for sustained lowering of humidity (approx.50% or less)
This dehumidifier is designed to remove uncomfortable levels humidity in daily life and for
enhanced indoor drying. It is not suitable for sustaining very low humidity levels
Room temperature rises during dehumidifier operation.
This dehumidifier does not have a cooling function. It produces heat during normal operation
which will have an effect on the surrounding environment. Further more any temperature
changes will be respective to the size of the room it is located in. Therefore appropriate
considerations should be taken when deciding how and where to locate this unit.
-5-
Page 7

Construction & Controls
Front Back
Advised installation distances
Accessory
Filter… 1 piece
Installation
For efficient and safe operation of
the dehumidifier. The unit should
be ideally located taking in to
account the spacing’s shown.
Note: Since the unit generates
heat, special care should be taken
around the exhaust
Air Cleaning
Note
In case of interference, keep
electrical equipment at least 70cm
away form the dehumidifier
-6-
Page 8

Controls
Control panel Indicators
Light off ○
Light on ●
Light flashing *
Lamp lights up and
the operation stops
automatically when the
water tank is filled with
water (approx..4.0L)
The indication of current
Environment humidity.
Press ”Mode” switch
to select the modes
of operation (see later)
The timer lamps show
the remaining time
of operation
Press ”Timer Select”
switch to set the duration
for automatic stopping.
Press ”ON/OFF” switch
to start operation, to
Stop press the switch
again.
-7-
Page 9

Function Selection
____________________________________________________
To dehumidify a room to a comfortable level MODE
____________________________________________________
To dehumidify a closet or storage area
____________________________________________________
To aid the drying process and reduce moisture levels
____________________________________________________
To aid in the drying of water based spills
____________________________________________________
To dehumidify a small space and inhibit the formation of
mould
____________________________________________________
To reduce odors and provide a pleasant environment
____________________________________________________
The built-in memory stores the last operation of dehumidifier once
the mode has been selected. The unit returns to that operation
when the ”Power” button is pressed and the unit is switched on again.
(In case of power failure or disconnection, the unit returns to its default
settings.)
-8-
Page 10

Operation mode ”Automatic”
● Open either flap and orientate for optimum operation
● The dehumidifying operation stops automatically when
humidity drops below approx. 60%. The dehumidifier
continues the air cleaning operation only (“Automatic
operation lamp remains illuminated.)
Operation mode ”Continuous”
● Open either flap and orientate for optimum operation
● The initial timer setting is”2H”, settings can be changed
to ”4H”or”8H” by pressing the “Timer” button successively
● Be sure to locate the dehumidifier in such a manner that the
tank side is easily accessible.
If used in a confined space try to reduce the amount of air
flow allowed in from outside the target area
“Continuous” operation with additional air flow
● Open either the upward flap or the downward flap for drying
Uniformly specific areas.
“Continuous” operation with the downward flap open.
● Open the downward flap for air outlet only.
“Continuous” operation with the spot flap open.
● Open the spot flap of air outlet only.
“Air Clean”
Note: This unit is not intended for use as an exclusive air
cleaner.
● Open either flap and orientate for optimum operation
● Air cleaning function does not work without suitable filter.
-9-
Page 11

Preparation for use
Installation of dehumidifier air filter.
1. Remove the back cover.
Use the indents to lift away cover
2. Remove the filter holder from the back cover.
Filter holder is clipped to the inside of the cover.
The filter holder then unclips and is ready for the filter
3. Installing/changing filter.
Remove the filter out of its packaging and put in
the filter holder. Repeat in reverse step 2, placing
the filter holder on the clips of the back cover with the flat surface
facing up, and set the holder to the four catches in the
cover (with the convex portions of the holder upward).
Replace the cover securely, pressing its perimeter making sure
It is flush
● In case of incorrect alignment of the filter, the cover cannot be correctly replaced.
____________________________________________________________________________
Replacing the cover.
To ease installation, install
one side of the cover first, and
then the other.
____________________________________________________________________________
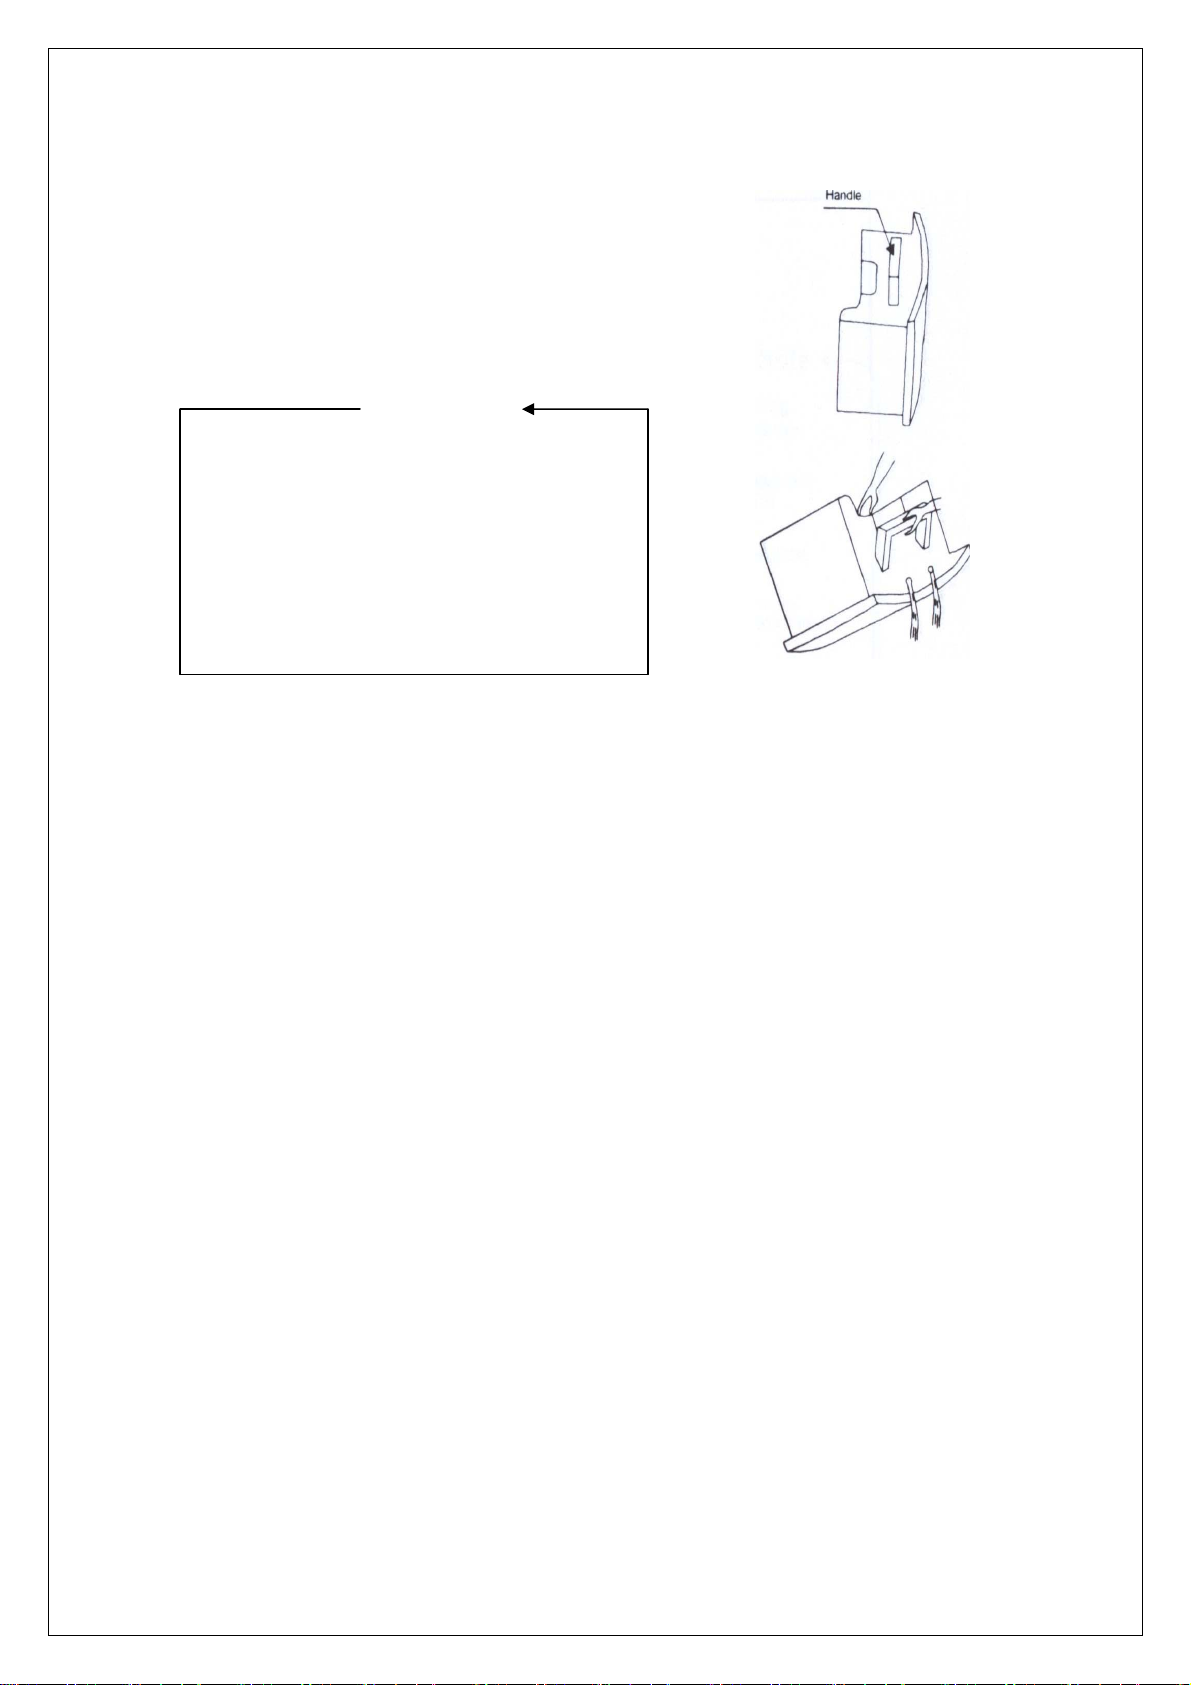
Water tank orientation.
NB. The dehumidifier will not operate if the water tank
Is full of water or it is not located correctly.
How to remove
Draw the water tank gently toward you by holding the
Concave sides of the tank.
How to install
Push the tank horizontally and gently. The
handle folds down flat within the take.
Take care, not to damage to level float in either operation
-10-
Page 12
Emptying water from a water tank
1. Remove water tank from the dehumidifier and fold up handle
2. Tilt the tank to the direction as shown. and slowly empty
the water out of the tank.
3. Set the tank in the dehumidifier taking care not to damage the
level float.
Note
As part of the dehumidifiers’ operation, water is
collected in the water tank.. Once the tank is full,
the dehumidifier stops automatically and the
buzzer sounds.
The buzzer will sound for 10 seconds while the
tank is removed for emptying.
For continuous draining, see the page 16.
-11-
Page 13

Operation
Please note:
● The dehumidifier will stop automatically after the duration set by the timer(2H,4H OR 8H)
● If the unit is set to “Continuous” mode, the initial timer setting is “2H”.You can change the
Setting to”4H” or”8H”.
__________________________________________________________________________
Plug in dehumidifier to power outlet
● ”Automatic” mode lamp will flash.
● Make sure that the water tank is set property.
Orientate air outlet flaps for desired operation.
___________________________________________________________________________
Press “power” switch.
● ”Automatic” mode lamp will light up.
____________________________________________________________________________
Select desired operation by pressing “Mode” switch.
● Each time the mode switch is press, the mode indicator lights up in turn as shown
and that operation mode will be changed. If the wrong mode is selected the modes
can be cycled around as shown
●With timer selected, the time duration indicator shows the remaining time.
The unit will shut down after the preset time selected
-
-12-
Page 14

_____________________________________________________________________________
Warming
To avoid damage to the power cord, do not pinch the cord in a door.
______________________________________________________________________________
______________________________________________________________________________
Be sure when using in confined spaces that there is sufficient ventilation
______________________________________________________________________________
Caution
Stopping operation
Press “power” switch again.
● The mode select indicator will go out and unit will shut down.
● Once the unit has stopped, close any flaps and remove and dispose of any collected water.
Buzzer
Be sure to allow free airflow movement though the unit. If the unit does not have sufficient air movement around
it, overheat protection devices will stop the dehumidifier from working properly.
Due to the nature of this device the dehumidifying operation commence approximately 3 minutes after the unit is
first connected or restarted after a power failure.
Immediately after a power failure, the “Automatic” mode lamp will flash. Press the “Power” switch to restart the
units’ operation
The Efficiency of the dehumidifier is dependant on air flow around the unit. For optimum efficiently, try to avoid
excessive opening and closing of windows and doors.
For the best performance, operate the dehumidifier under the normal operating temperatures. For safety purposes
the dehumidifying operation will stop automatically and change to air cleaning when the ambient temperature
exceeds approx. 36℃.
Initial circulation of refrigerant may cause sounds from within the dehumidifier when the unit is first started.
However after the circulation is stable, the sound will diminish.
To change the timer setting
press “timer select” Switch
until desired time is
Whenever a function is selected the buzzer will sound indicating a change in operation.
To stop the timer operation To cancel the timer operation
Press “Power” Switch
Note:
Press “timer Select ”Switch
The timer lamp will go off.
Notes
●Except for “Continuous” mode operation, the timer setting will be cancelled whenever the
“Mode” switch is pressed. Set the timer again after pressing “Mode” switch, if necessary.
●The timer stops when the water tank is full of water. After the tank is emptied, the timer will
start.
-13-
Page 15

Warning
To avoid of the risk of electric shock. never connect or disconnect
plug with wet hands
Maintenance
Turn off the unit and disc on nec t the pow e r plug before clea ni ng or
other routine maintenance.
Do not remove the float lever from the water tank.
Cautions
If unit is not used for extended periods of time.
1.Unplug unit, bundle the power cord, and hang at the back of the unit on the hoo ks prov ide d
2.Empty the water tank, wipe dry with cloth and replace in position.
3.Clean air clean filter.
4.For storing, stand the unit upright and avoid the exposure to the direct sunlight.
Important
● To avoid malfunction or abnormal sound, keep unit upright.
Body of dehumidifier
● To clean wipe dehumidifier with a dry soft cloth.
● To remove heavy dirt, use a damp cloth
(Never use a wet cloth for cleaning the controls)
●To avoid deformation or cracking, do not use thinners
or solvent cleaners.
●Chemical cleaners may cause colour changes to unit.
_______________________________________________________________________________
Water Tank
● Pull out the water tank using indents and take it out.
● Remove the tank cover and wash the inside of the
tank with water and mild detergent.
● Avoid scratching, do not use abrasives.
● Do not remove the float lever from the tank.
● Wipe off water from the outside of tank with a cloth.
Replace the cover of the tank and replace..
● Pass the handle through the hole of the tank cover
as shown. Tank cover
Hole
Tank Handle
Float lever
-14-
Page 16

Back & Side Air Intakes (Maintenance every 2 weeks)
● Dehumidifying efficiency will be reduced if the
air filter becomes clogged. filter holder
● Remove front cover from unit and remove filter
filter holder. Remove air filter from cover
● Pull the side of holder towards you and release
it from the unit. Repeat for the other side
● To dislodge dust from filter, use a vacuum
cleaner or shake lightly.
● If the filter is heavily fouled. Wash in warm
water using a neutral detergent.
Rinse well and leave unit dry.
● Replace filter and return to unit.
filter holder
Front cover
Air Clean filter (Maintenance every 6 months)
● The life span of an air filter is approx.6 months.
● Replace filter are model No.: DH-320/A
Model No. of Anti bacteria Air clean FILTER: dh-320-14
-15-
Page 17

Continuous Drainage
●For continuous drainage, ensure that drain hose is correctly set Ensure drain hose
●To prevent the water from freezing, do not use the dehumidifier
and drain hose at ambient temperature below 0℃ Prohibit
If there is a suitable drain nearby, you can opt for the continuous draining option. This function
enables the dehumidifier operation for hours as it is not necessary to empty the water tank. Before
converting, be sure to turn off the dehumidifier and disconnect the power plug.
Requirements for continuous draining:
Hose for draining (vinyl hose)
Length: Distance to drain+approx.30cm
Inner diameter: 15mm
Outer diameter: 20mm or less
Cautions
without a rising slope.
Make the hose opening
● To make the opening, remove the cover for the drain
hose by means of a flat screw screwdriver. This will
need to be repeated on internal cover as well
Fit a drain hose.
● Remove water tank and fit adaptor to internal drain.
Ensure retaining screw is fitted. Put the drain hose
through the opening and fit to the adaptor securely
Return the water tank as before
● The unit will not be operated without the tank. Even if not in use.
-16-
Page 18

Specifications
Model No. DH-320/A
Power Supply 220V~240V (50HZ)
De-humidity Capacity 19 (30℃/80%)
Power Consumption 340W
Capacity of water tank 5.0L (auto shut off)
Net weight 12kg
Dimensions Height 572mm, Length 390mm, Width 286mm
Room Temperature 5℃-35℃
The specification may be subject to change without notice
Trouble shooting
Prior to contacting RS, please check for the following:
Malfunction Points to be checked Measures to be taken Ref.
page
No operation
Check to see if the power is disconnected. Insert the plug into electric outlet
fully and securely
Check to see if the water tank is full of
water
Check to see if the water tank is not set
properly in position.
Check to see if all the air flaps are closed. Open one of the flaps
Empty the water tank.
Set tank in to correct position
2
2
10
12
Dehumidified
Check air filters for blockages. Clean the filters as specified or
volume is low
Check to see if the air vents are
blocked up
Check to see if the dehumidifier is in air
clean mode
Loud noise
while operating
Operation stops
during
dehumidifying
Drying function
not working
efficiently
Check to see if the unit is not installed as
Specified.
Check to see if the room temperature is
higher than the usable operating
temperature.
Check to see if drying area is not exposed
to t
Check to see if the room temperature is
too low
he exhaust from the unit.
-17-
replace.
Remove obstacles from the air
vents.
Change the operation mode to the
dehumidifying mode
Install the unit on a level and
stable floor
The dehumidifying operation will
start automatically when the
temperature lowers
Try to exposed the drying area
to the air flow
Drying becomes less efficient at
lower temperatures.
12
12
12
12
12
12
12
Page 19

Note the following phenomena are normal under standard operating conditions
Phenomenon Reason
Operation stops
occasionally
Dehumidified
volume is small
Humidity remains
high
Bad smell during
operation
Sound is produced
from unit
The buzzer sounds The buzzer sound when the water tank is full of water.
Please record the following items.
Model DH-320/A
Purchase Date
Supplier RS Components UK
Address
Web address
The unit is defrosting (See the page5 )
Dehumidified efficiency is less when the room temperature is low (see the page 6). The unit
stops dehumidifying because the humidity in a room drops to 60% or less while in
“Automatic” mode. (See page 5).
The room size may be too large .(see the page5)
Doors or windows may be opened and/or closed frequently.(see the page5)
The dehumidifier is used to close to moisture emitting devices (some types of heaters).
While the humidity levels are high mould can form. When the unit is operating it will raise
area temperatures and increase air flow.
Circulation of the refrigerant may cause sound until levels have stablised.
PO Box 99, Corby,
Northants.,
NN17 9RS
TEL: Tel: 01536 201234
Fax: 01536 405678
http://rswww.com
-18-
 Loading...