

Page 1
Professionally approved products.
Instruction Manual
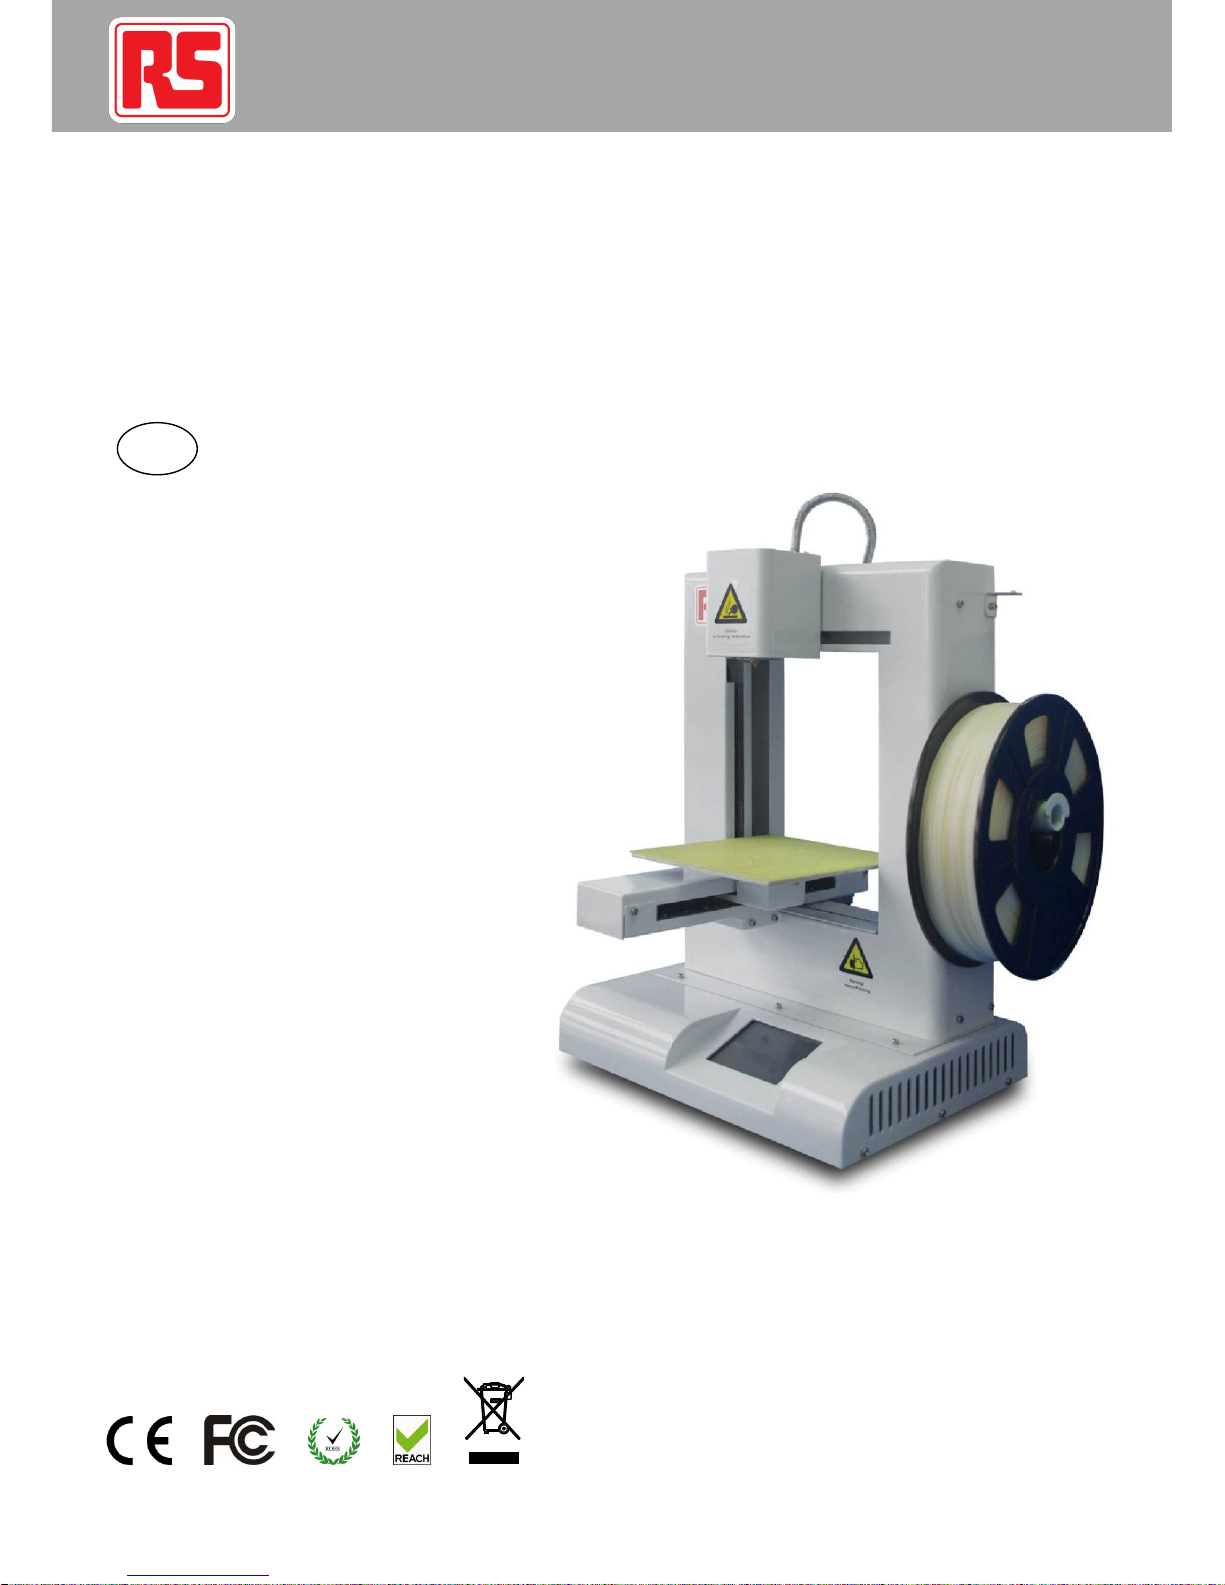
RS 3D Printer
EN
Page 2
3D Printer/English
10/03/2015Version No. 002
1) GENERAL
This instruction manual contains important information regarding the
installation, operation, maintenance and storage for RS 3D Printer. Please
read these instructions carefully and save them for future reference.
2) WARNING
PlaceRS3D Printer in a dry environmentand keepa safe distancefrom other
objects,fireorwater.
PlaceRS3DPrinteronastablehorizontalplatform.
PleaseuseRS 3DPrinterina ventilatedenvironmentbecauseof potentialslight
smellduringprinting,butkeepawayfromtheairvent.
Toavoidnozzleblocking,pleasedonotheatupthe extruderbeforefeedingthe
filament.
Do nottouchor removethe power cordor USB cable,or pulloutthe SD card
duringprinting.
Nevertouchtheextruderor buildingplatebyanypartsofyourbodyoranything
whichiseasyonfireduringprinting,toavoidskindamageorfire.
Gloves are required to remove the models from the building plate to avoid
cutting,scratchingorburning.
Duringonlineprinting,thecomputercannotbeinsleepmode.
3) WORKING CONDITIONS ANDTECHNICAL DATA
Printer Size: 298×221×403mm
Printing Size: 150×150×140mm
Layer Thickness: 0.18~0.3mm (0.2mm recommended)
Speed: 30-150 cm³/h
Net Weight: 7.5kg
Material: PLA
Printing Temperature: PLA 220-230°C
Power Input: 100 - 240V47/63Hz1.6A
Output: 12V/DC5.3A
MaximumPower: 63.6W
File format: STL/X3G/CODE
Compatiblesystem:Windows XP/Vista/Win7/Win8/Win8.1
Operatingsoftware: DoraWare-W
EnvironmentTemperature:5℃~35℃
Relative Humidity: 30%~90%
4) ACCESSORIES
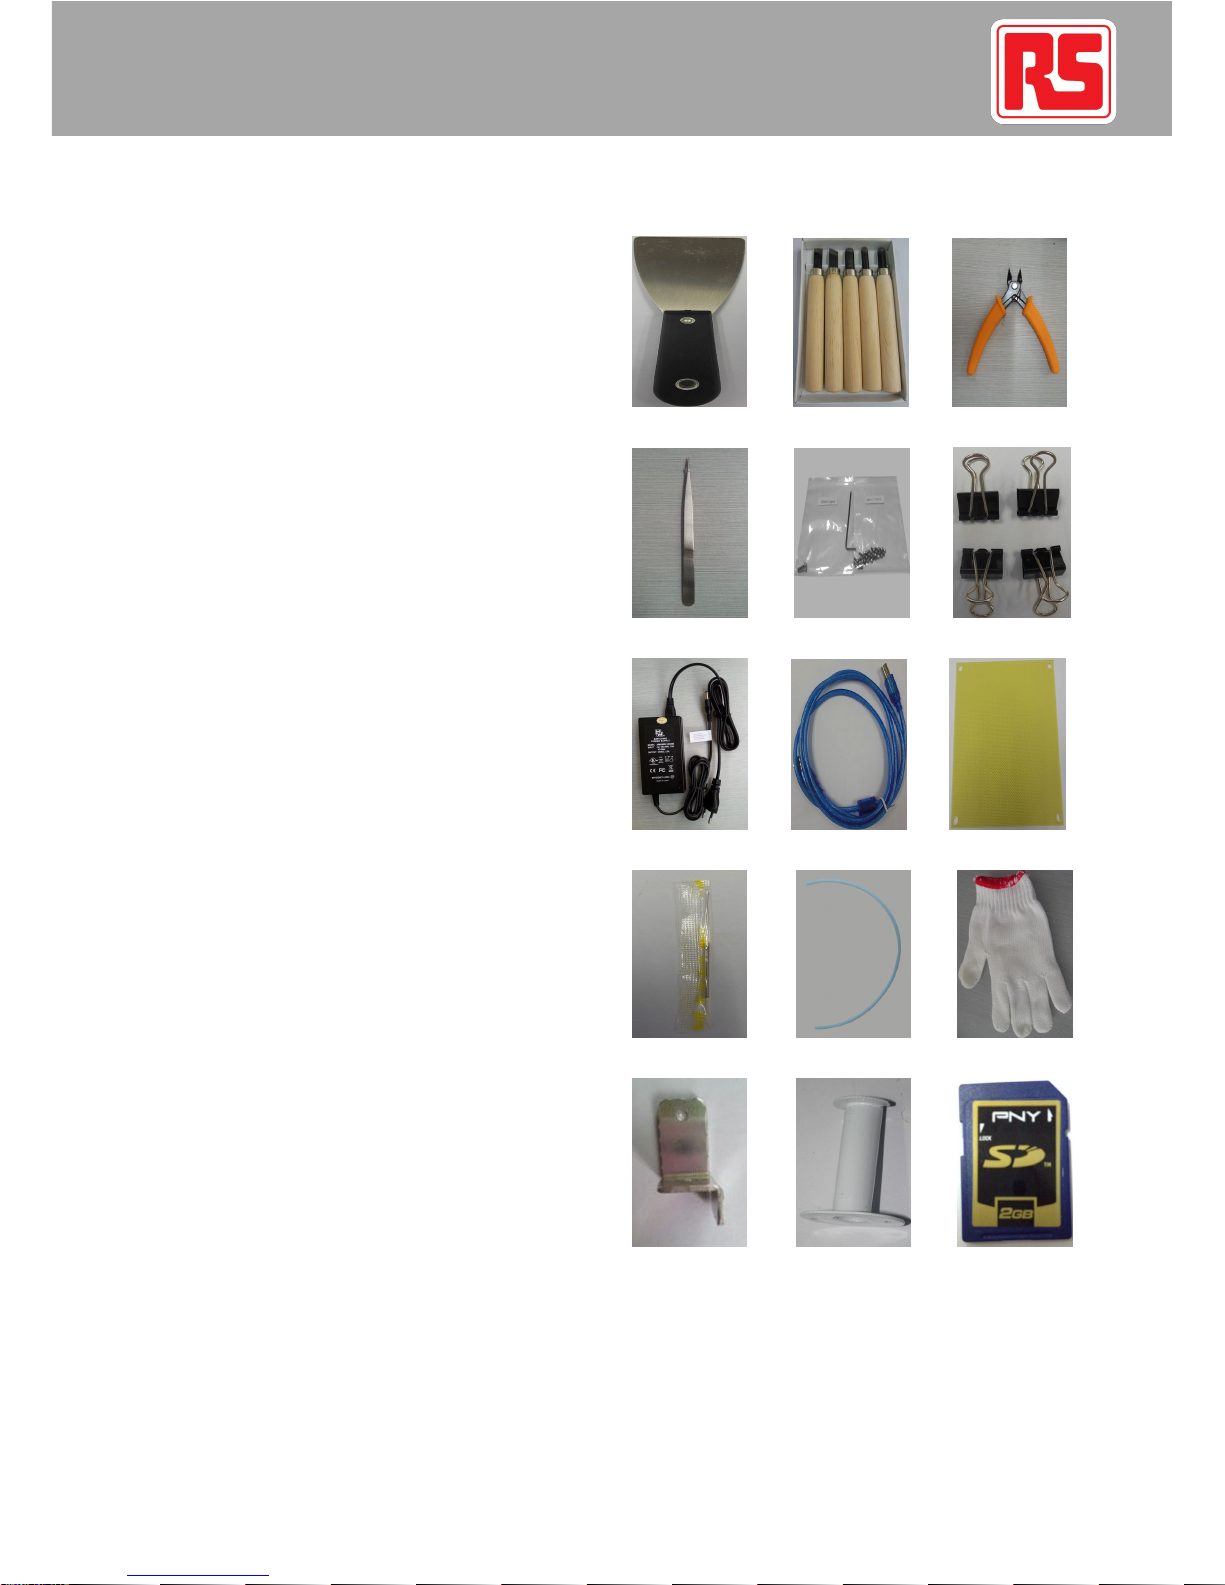
All of the following accessories are in thetool box.
Shovel Chisel Cut pliers
Tweezers Allen wrench and screw Clips
Power adapter and power cord USB Cable Build plate
AcupunctureNeedle Teflon tube filament guide Gloves
Filament tube guide Spoolholder SD card 2G
(Pic 1.2-01)
5) SOFTWARE INSTALLATION
Notice:
The following installation ofdrivers and software is for Windows XP, 7,8
and 8.1 system. For Windows Vista or XP Lite, please consult your local
retailer. For Mac OS, please contact your local retailer for Replicator
G.Please DO NOT use other open source Replicator G, because they
1
Page 3
3D Printer/English
10/03/2015 Version No. 002
might be not compatible with RS 3DPrinter.
The driver for software is in the SD card. Please copy the driver to your
pc.
Please shutdown all firewalls or antivirus software before installing
Doraware.
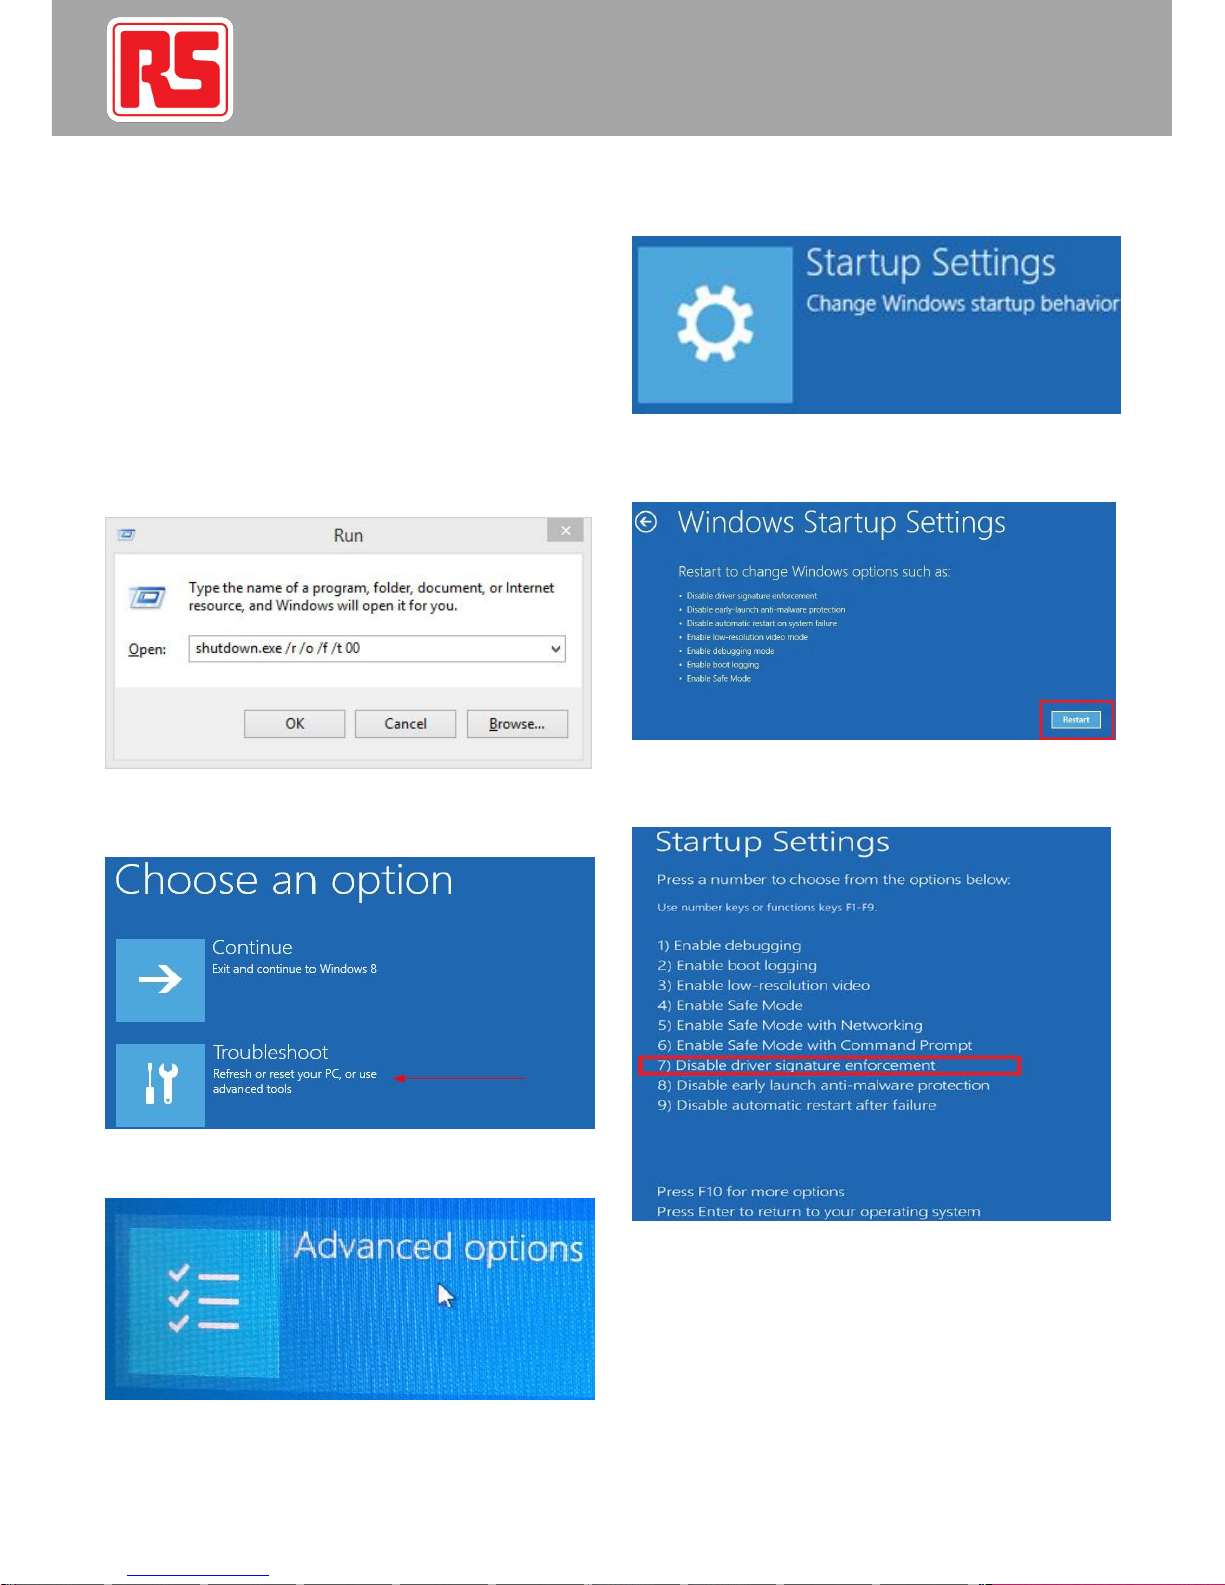
“Disable Driver Signature Enforcement”is required for Windows 8 or 8.1.
Please follow the instruction below.
After running the driver, Windows 7 willinstall the driver automatically.
5.1 Disable Driver Signature Enforcement for Windows 8 or8.1
5.1.1 Press [WIN] and [R] on your keyboard, enter command [shutdown /r /o /f /t
00], and click the [OK] button.(Pic 5.1-01)
(Pic 5.1-01)
5.1.2 System will restart to a [Choosean option] screen, thenselect
[Troubleshoot].(Pic5.1-02)
(Pic 5.1-02)
5.1.3 Select [Advanced options] from [Troubleshoot] screen. (Pic 5.1-03)
(Pic 5.1-03)
5.1.4 Select [Startup Settings] from [Advanced options] screen. (Pic 5.1-04)
(Pic 5.1-04)
5.1.5 Click [Restart] button System will restart to[Advanced Boot Options]
screen. (Pic 5.1-05)
(Pic 5.1-05)
5.1.6 Select [Disable Driver Signature Enforcement] or press [F7]on your
keyboard,then restart. (Pic 5.1-06)
(Pic 5.1-06)
5.2 Driver Installation for Windows 8 or8.1
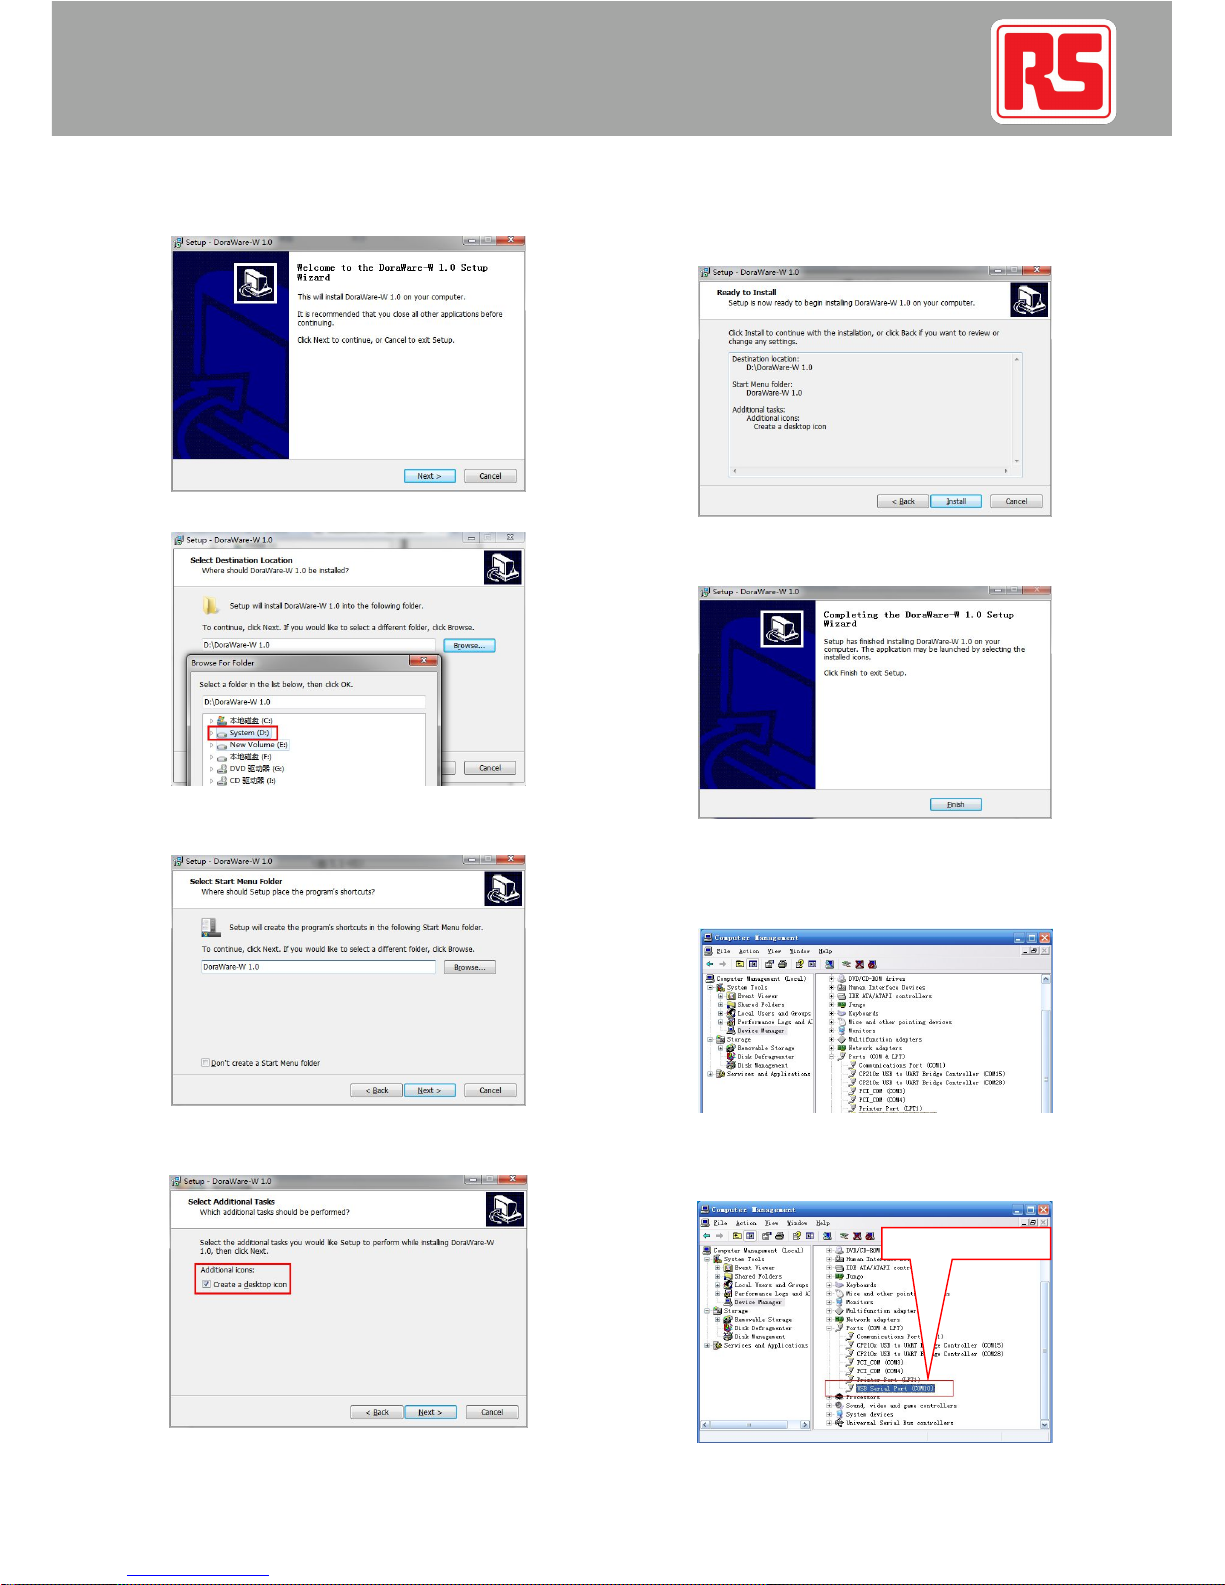
5.2.1 Double-click English-Setup.exe.Click [more]and select [allows all
programs].
5.2.2 Select [next], then select [Browse] to change[DestinationLocation].
Select a folder, click [next]. (Pic 5.2-01 to Pic 5.2-02)
2
Page 4
3D Printer/English
10/03/2015Version No. 002
(Pic 5.2-01)
(Pic 5.2-02)
5.2.3 Click [next]. (Pic 5.2-03)
(Pic 5.2-03)
5.2.4 Select [Create a desktop icon], thenselect[next]. (Pic5.2-04)
(Pic 5.2-04)
5.2.5 Select [install]. (Pic 5.2-05)
(Pic 5.2-05)
5.2.6 Select [Finish] to complete software installation. (Pic 5.2-06)
(Pic 5.2-06)
5.3 Confirm installation for Windows 7, 8 or8.1
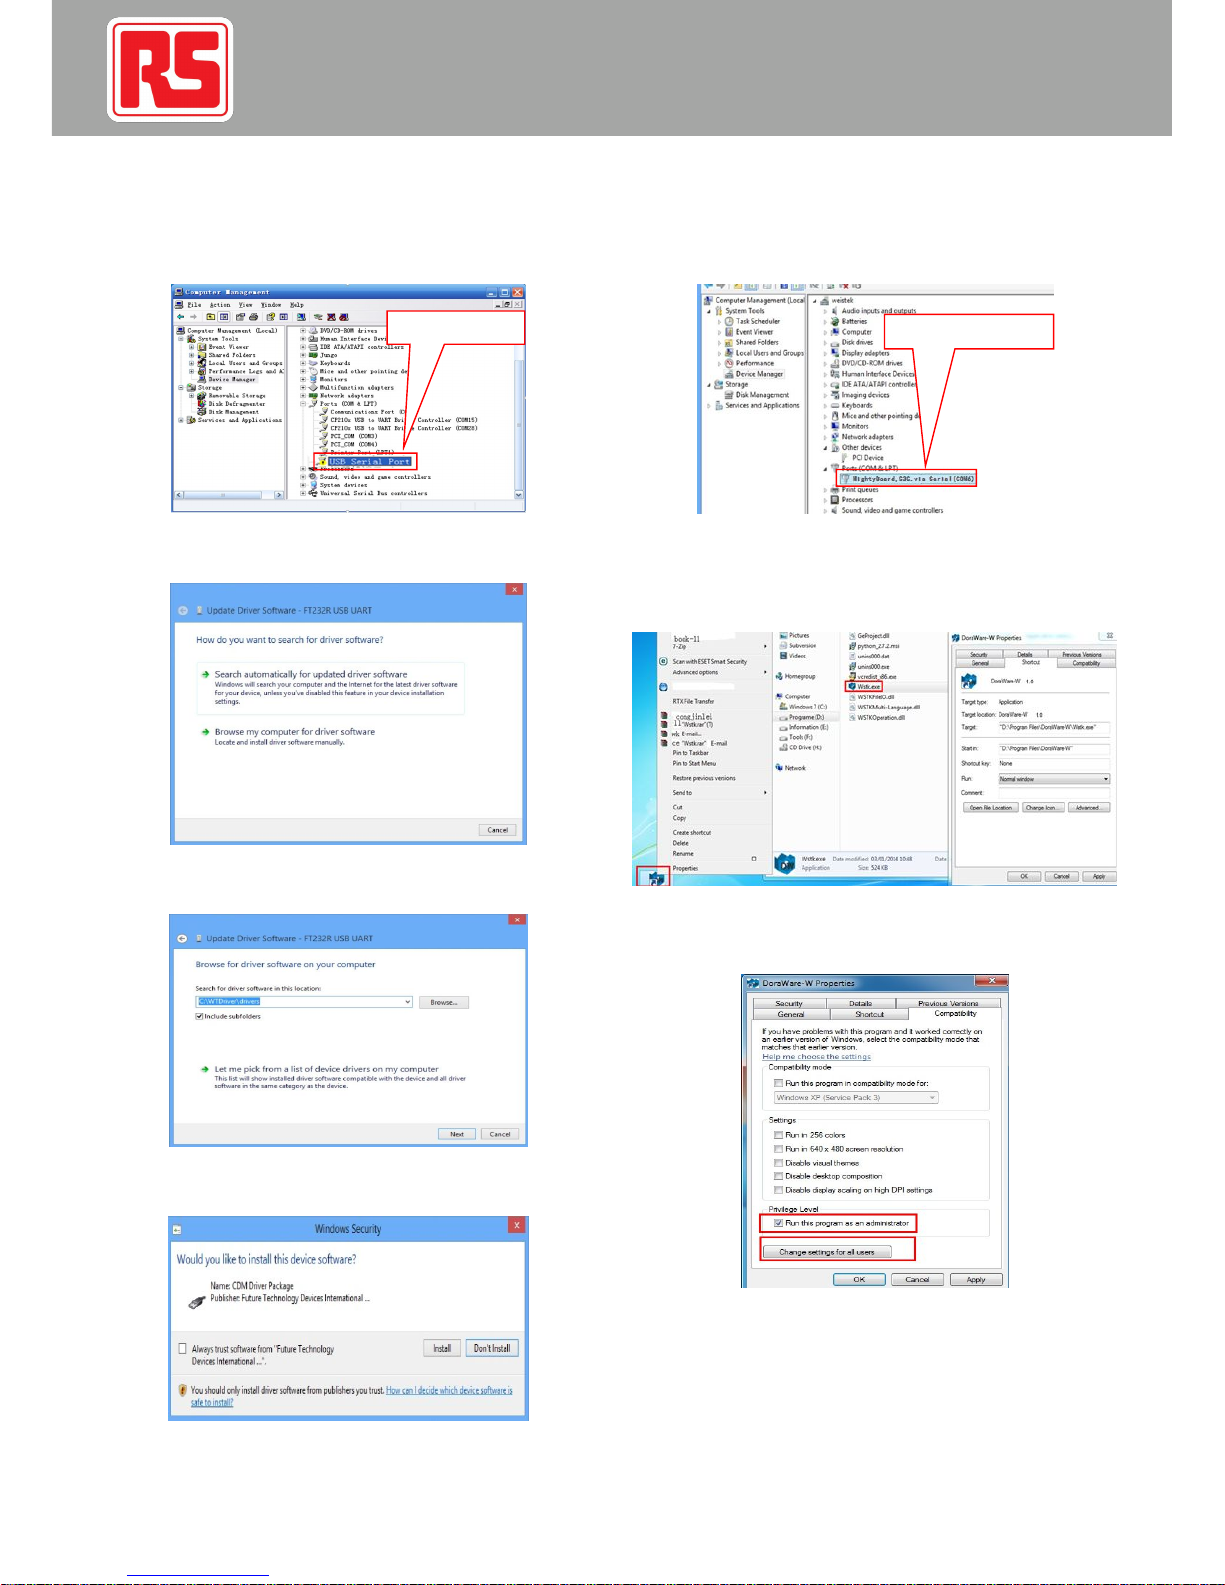
5.3.1 Right click「Computer」, select「Manage」,andthen select「Device
Manager」.(Pic 5.3-01)
(Pic 5.3-01)
5.3.2 Select [Ports (COM&LPT)], no [?] or [!]icon aheadof [USB SerialPort]
means the driver is installed successfully. (Pic 5.3-02)
(Pic 5.3-02)
Installationsucceeded
3
Page 5
3D Printer/English
10/03/2015 Version No. 002
5.3.3 If failed, right-click [Ports (COM & LPT)],and select[Scan for hardware
changes]. (Pic 5.3-03)
(Pic 5.3-03)
5.3.4 Select [Browse my computer for driver software].
(Pic 5.3-04)
5.3.5 Select [Browse]. (Pic 5.5-05)
(Pic 5.3-05)
5.3.6 Select [Install] to re-install the driver.(Pic 5.3-06)
(Pic 5.3-06)
5.3.7 Click [+] ahead of [Ports(COM&LPT)].A serialport means thedriver is
installed successfully. (Pic 5.3-07)
(Pic 5.3-07)
5.4 Run as an administrator for Windows7, 8 or8.1
5.4.1 Right-click the desktop icon or Wstk.exe under installationdirectory. (Pic
5.4-01)
(Pic 5.4-01)
5.4.2 Select [Run this program as an administrator]and [change settings for all
users], then [Apply], and then select [OK]. (Pic 5.4-02)
(Pic 5.4-02)
6) PREPARATION FOR PRINTING
Notice: Please insert the SD card into RS 3D Printer before printing, otherwise
the software will not be able toconnect RS 3DPrinter. If RS 3D Printer is
disconnectedwith yourpc dueto interruption, please pull out and re-insert the
USB cable.
6.1 Building plate Calibration and Z-height Measurement
Installation failed
Installationsucceeded
4
Page 6
3D Printer/English
10/03/2015Version No. 002
Each RS 3D Printer is pre-calibrated,while the buildingplate and theZ-height
may be affected during transportation.
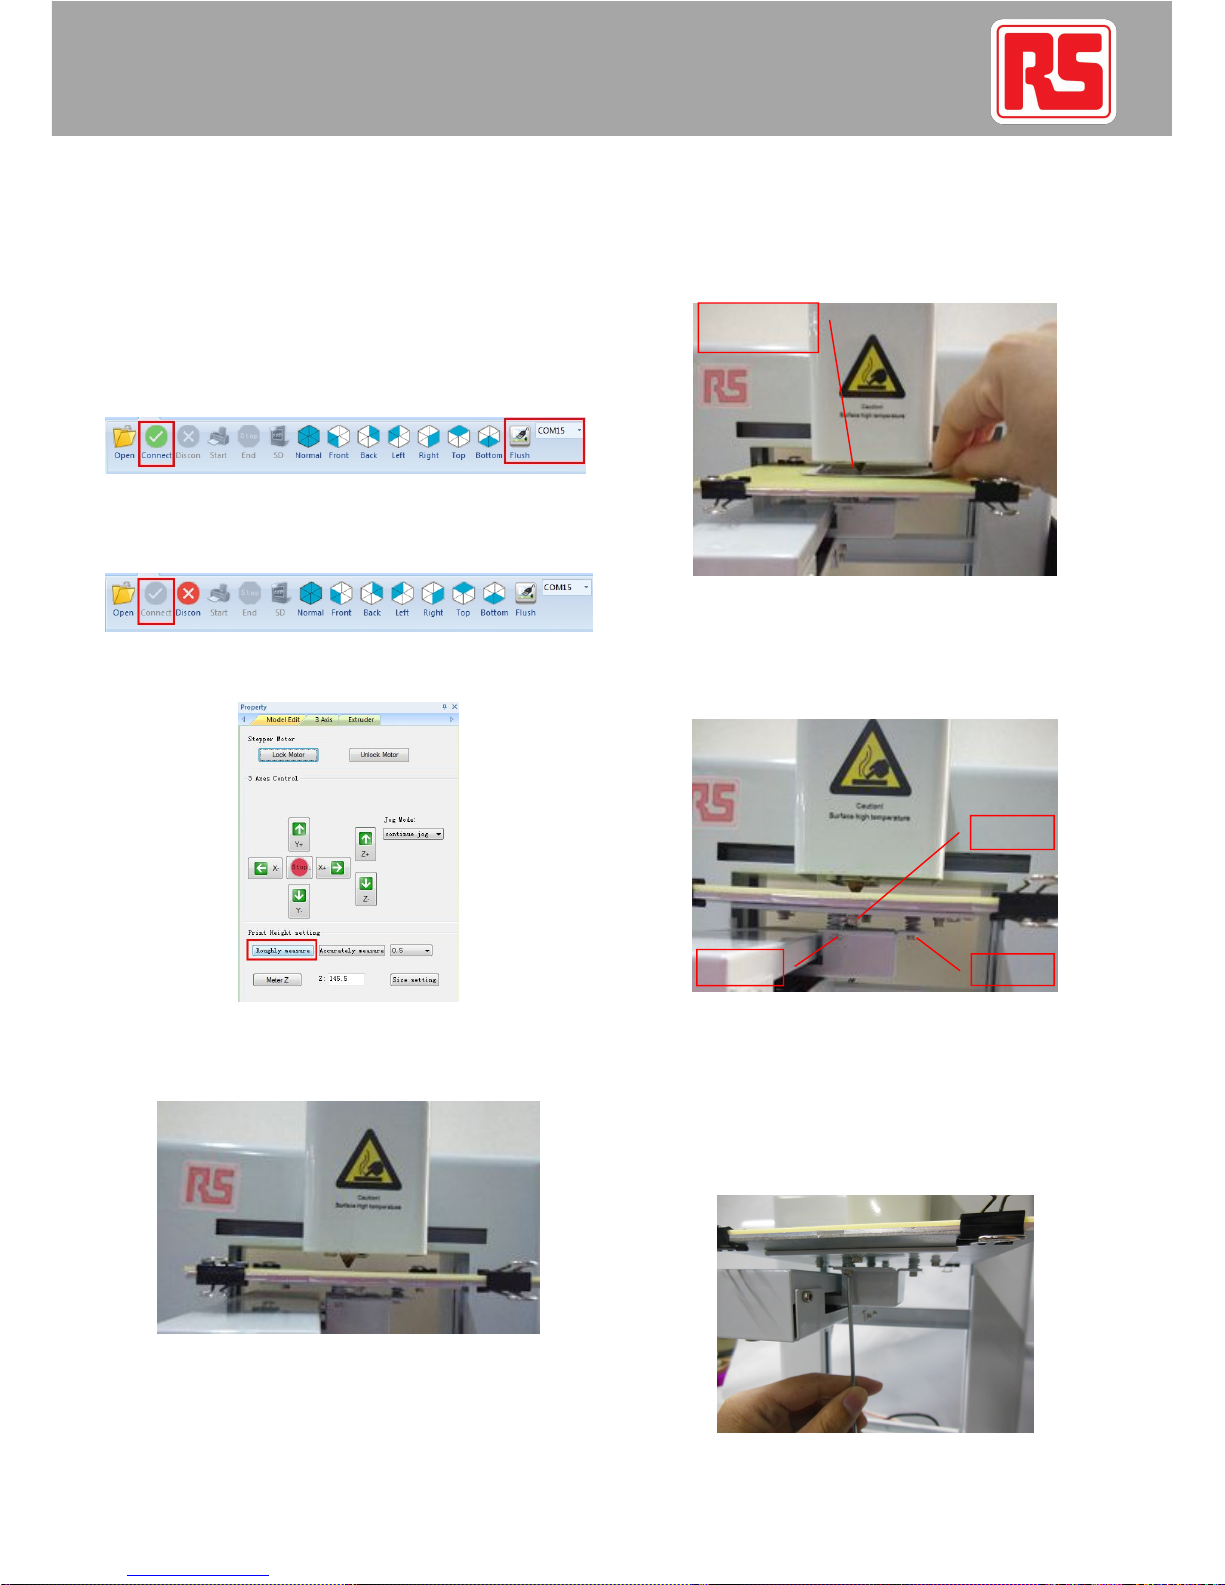
6.1.1 Turn on the Power Switch ofRS 3D Printer,and connect yourpc withRS
3D Printer by the USB cable.Open DoraWare-W1.0, click [Flush] and select the
Combo, then click [Connect] to connect RS 3DPrinter.
Notice: each RS 3D Printer has a differentCombo Number. In thiscase, the
Combo Number is COM15. The Combo Number can alsobe traced inthe Device
Manager.(Pic 6.1-01)
(Pic 6.1-01)
6.1.2 The [Connect] Icon turns grey whenthe connection is succeeded.(Pic 6.1-
02)
(Pic 6.1-02)
6.1.3 Click [3 Axis] and thenclick[Roughly measure]. (Pic 6.1-03)
(Pic 6.1-03)
6.1.4 The building plate should be calibratedto horizontal before printing to
guaranteeprinting quality.
(Pic 6.1-04)
6.1.5 Select accurately measurement value on the right of the [Accurately
measure]button,then click [Accurately measure] to move the building plate
step by step, until there is only 0.3mm between the buildingplate andthenozzle.
Choose the parameter and click the direction you wantto move.
6.1.6 Put a business card between the nozzleand the buildingplate. The correct
height is that no room leftbetweenthe nozzle and the building plate, while not
damagingthebusiness card. (Pic 6.1-05)
(Pic 6.1-05)
6.1.7 Keep the extruder still, move thebuilding plate forward and backward,
and adjust the screw A orscrewB (theones withspring) beneath the building
plate, to ensure the same distance (0.3mm)between the nozzle and thebuilding
plate at different points. Click [Accurately measure] to adjustthe Z-height when
the distance is not 0.3mm. (Pic 6.1-06)
(Pic 6.1-06)
Use the Allen Wrench in the toolbox to adjustthe buildingplate by tightening
or loosening the screws beneath the building plateto adjustZ-height. (Pic 6.1-
07)
Twist the screw clockwise: to increase the distancebetween the nozzle and
the building plate.
Twist the screw anticlockwise: to reduce the distancebetween the nozzle and
the building plate.
(Pic 6.1-07)
Put a business
cardhere
ScrewA
Screw B
ScrewC
5
Page 7
3D Printer/English
10/03/2015 Version No. 002
(Pic 6.1-08)
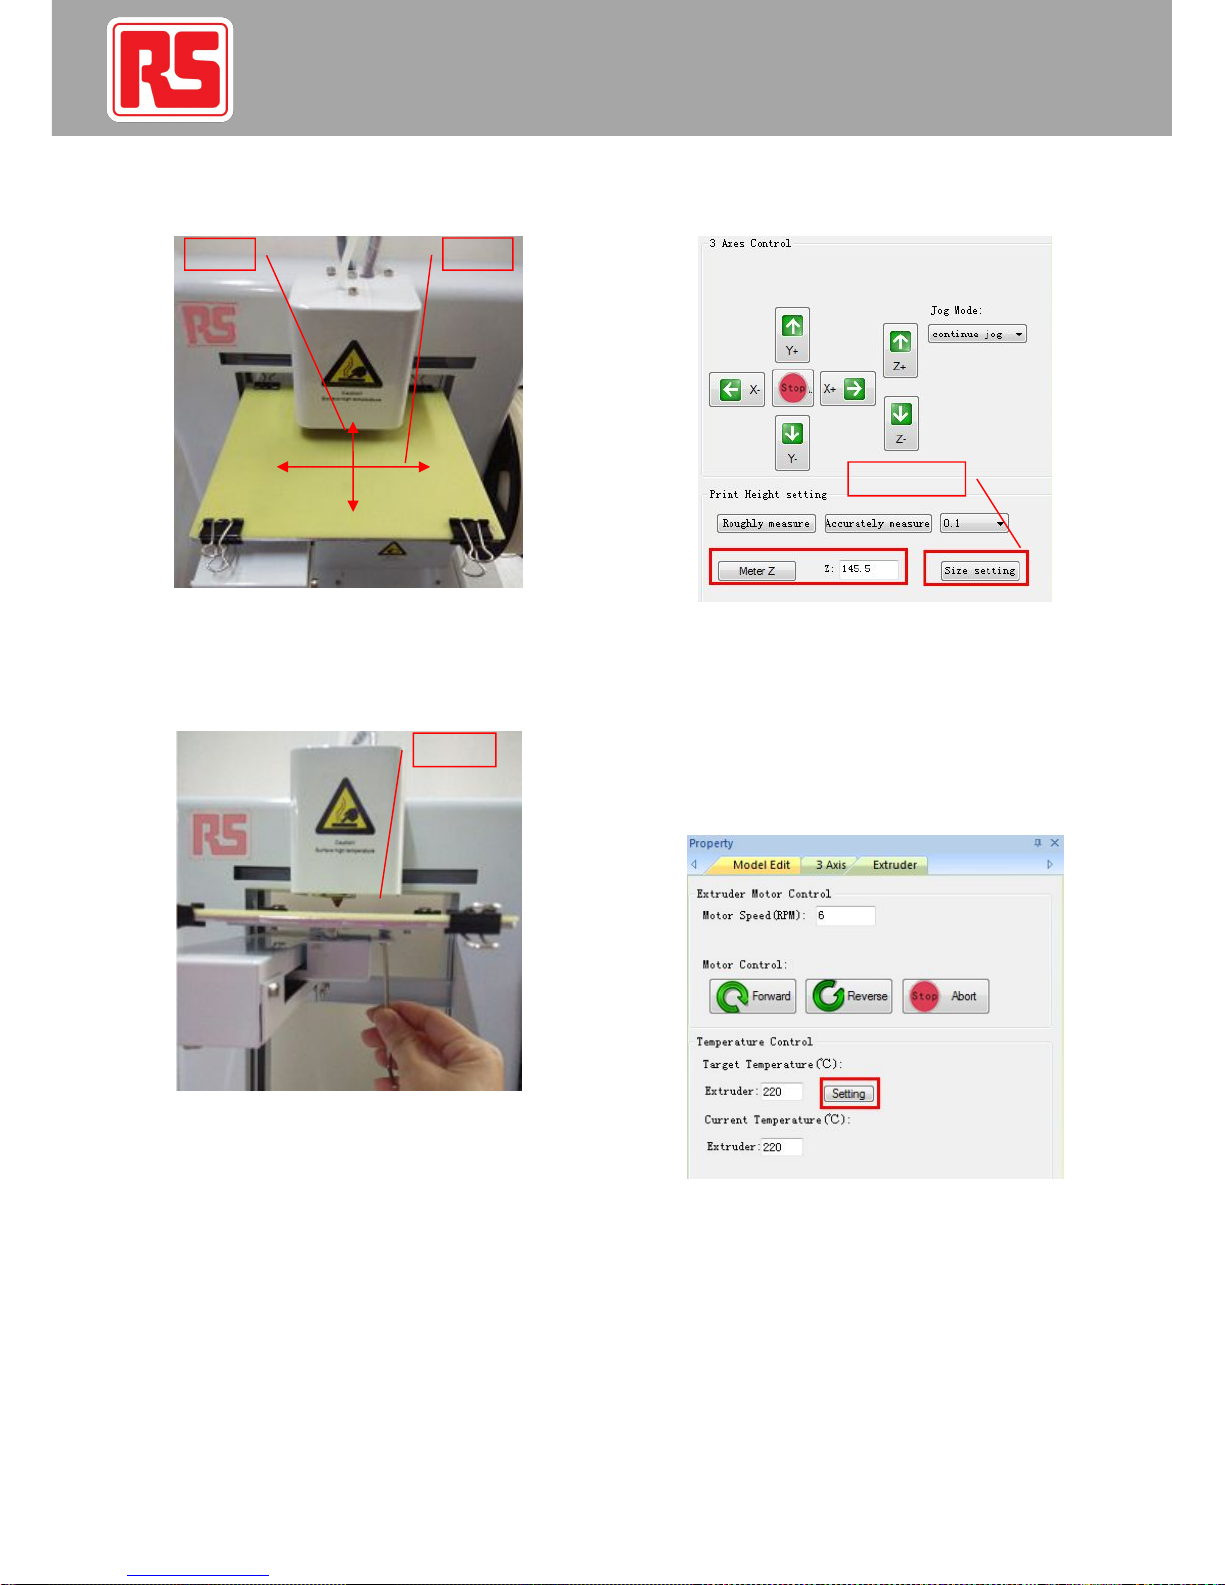
6.1.8 Move the building plate and theextruder head to placethe nozzle inthe
center of the building plate, and keepthebuilding plate still. Move the extruder
from left to right, and adjustScrew C (theonewith spring) beneath, to ensure
the same distance (0.3mm). Click [Accurately measure] to adjustthe Z-height
when the distance is not 0.3mm.(Pic6.1-09)
(Pic 6.1-09)
6.1.9 After adjusting the building plate, click [MeterZ], and thebuilding plate
will go down again and stopwhen touchingthe Limit Switch.
Click [Size setting], new data will besaved on theprogram.
Notice: each RS 3D Printer may have different Z-height. In this case, it is
145.5mm. Please followthis User Manual andsave theZ-height of RS 3D Printer.
(Pic 6.1-10)
(Pic 6.1-10)
Print the models in the SD cardto test theZ-height. If theZ-height is toolow
(too much distance between the nozzle and the buildingplate), please add
0.2mm. Likewise, please minus 0.2mm if the Z-heightis too high (too less
distance between the nozzle and the building plate).
When Z-height is changed, re-generating Gcode is not requiredfor online
printing; re-generatingGcode and re-saving x3g are required for offlineprinting.
6.2 Temperature Setting
6.2.1 Set target temperature at 220℃ and click[Setting]. (Pic 6.2-01)
(Pic 6.2-01)
7) FILAMENT
7.1 Feed the filament
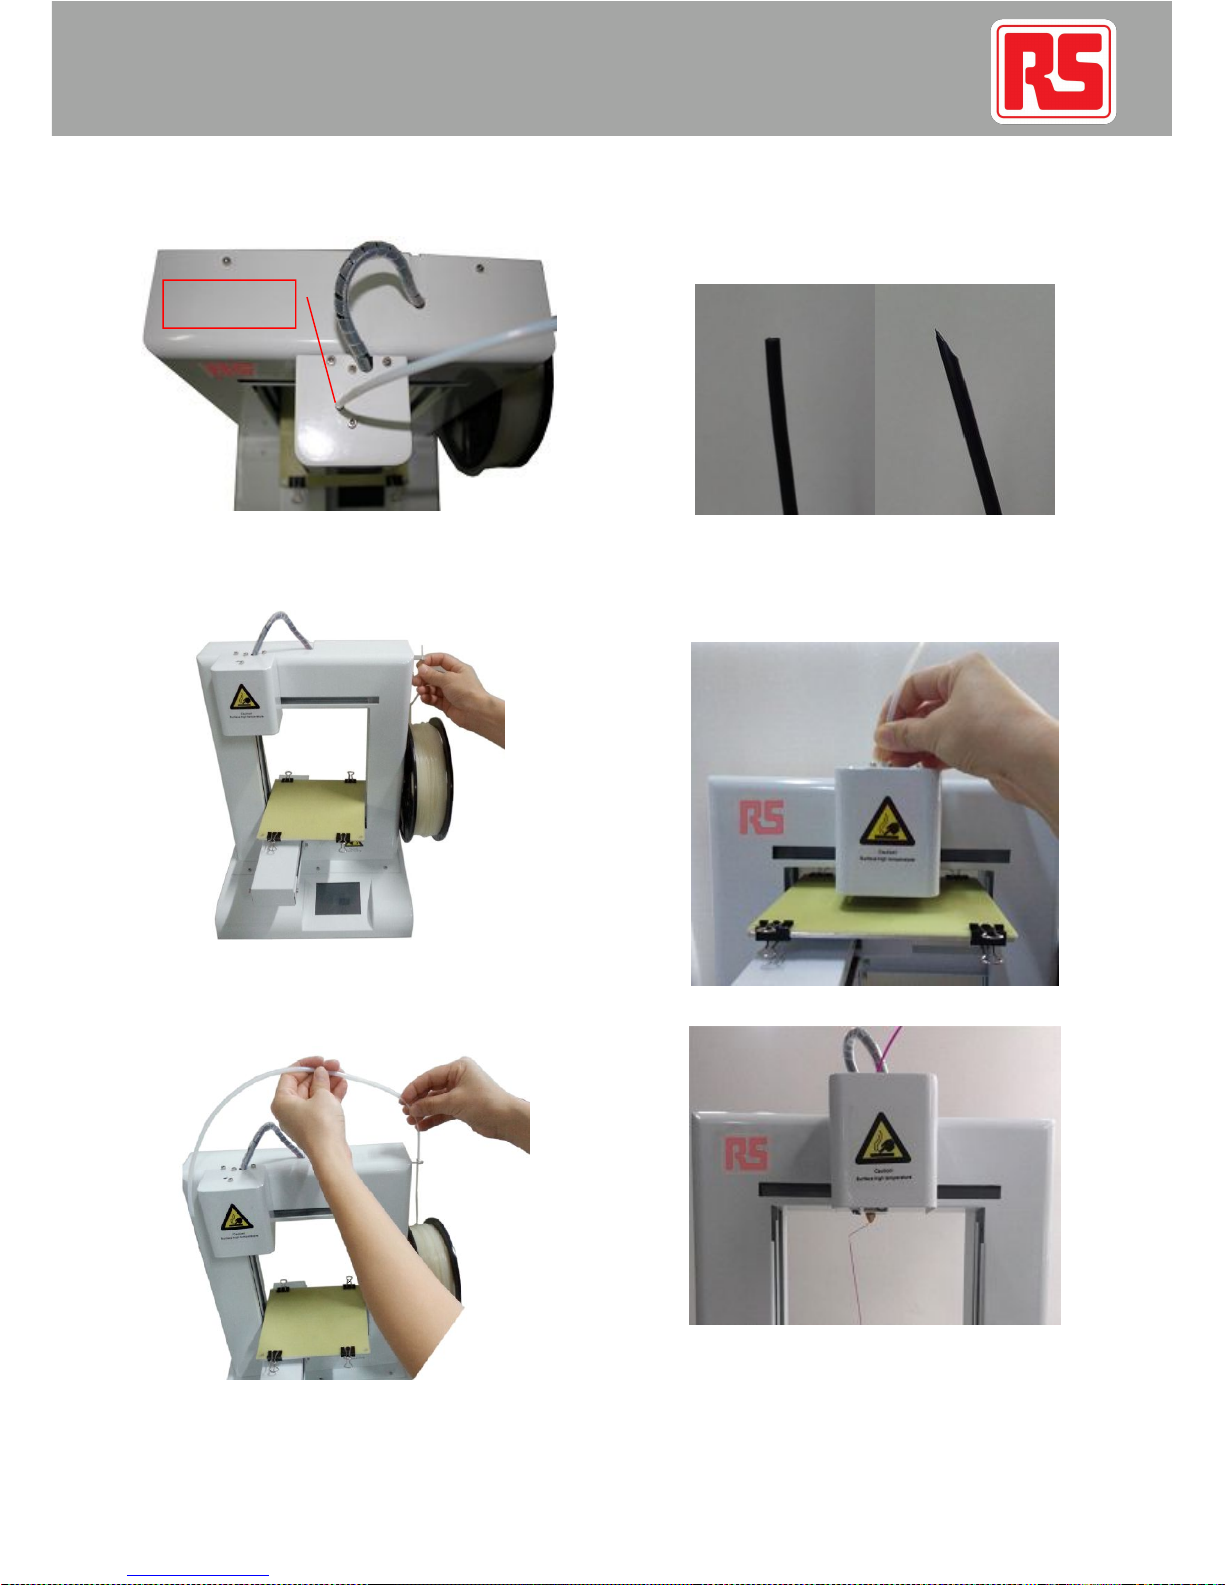
Notice: To avoid blocking the extruder, please make surethe filament isfed
through the center of the hole. (Pic7.1-01)
Y Axis
X Axis
Screw C
Z height value
6
Page 8
3D Printer/English
10/03/2015Version No. 002
(Pic 7.1-01)
7.1.1 Load the filament spool on thespool holder, and installthe filamenttube
guide in the tool box onRS 3D Printerby a screw.(Pic 7.1-02)
(Pic 7.1-02)
7.1.2 Pass the filament through the filamenttubeguideandload the filament
through the Teflon tube filament guide. (Pic 7.1-03)
(Pic 7.1-03)
7.1.3 Straighten the free end of thefilament and cutthe filament vertically with
the Cut pliers. (Pic 7.1-04) Put thefree end ofthe filamentinto thehole in the
middle of the extruder head, and feedthefilament until it submerges into the
hold.
(Pic 7.1-04)
7.1.4 After reaching the Target Temperature (220℃, see 4.2.1), click
「Forward」untilthe filamentemerges from the nozzle.Click「Stop」to
discontinuetheprocess or it will stop automaticallyafter 10 seconds. (Pic 7.105 to Pic 7.1-06)
(Pic 7.1-05)
(Pic 7.1-05)
7.2 Change the filament
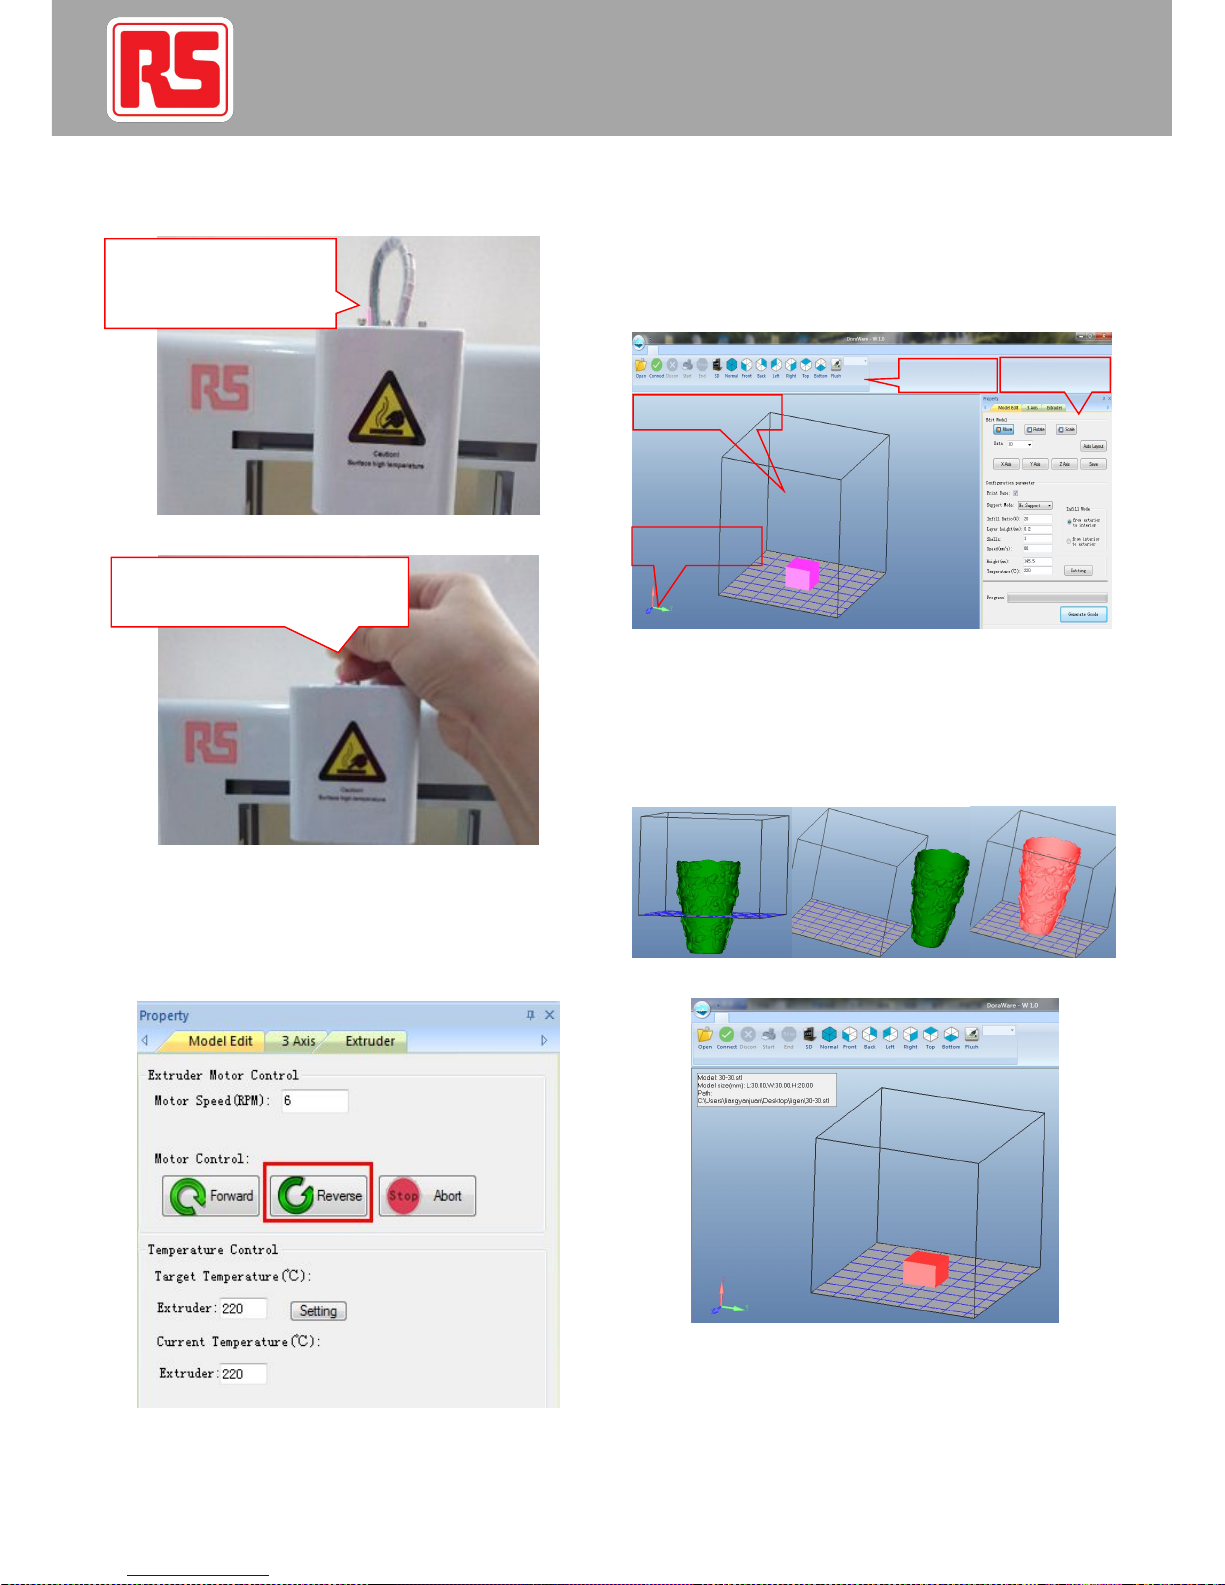
7.2.1 When the filament is about exhaustedbut your model hasnot finished yet,
changing filamentis required to continue the printing. Thefree end of the
filament should be cut vertically (Pic 7.2-01) andthen feed thefree end of the
new filament until the new filament emerges fromthe nozzle.
Feeding hole
√
×
7
Page 9
3D Printer/English
10/03/2015 Version No. 002
(Pic 7.2-01)
(Pic 7.2-02)
7.3 Reverse the filament
To reverse filament, the extruder should be heatedup to 220℃.Thenclick
[Reverse]until the filament is totally reversed fromthe extruder. Click [Stop] to
discontinuetheprocess or it will stop automaticallyafter 10 seconds. (Pic 7.3-
01)
(Pic 7.3-01)
8) MAINTENANCE INSTRUCTION
8.1 Functions
8.1.1 Software interface(Pic 8.1-01)
(Pic 8.1-01)
8.1.2 Click the model before editing. When themodel is selected,the name, size
and route of the model will displayon the topof theleft side. (Pic 8.1-02/03)
Red Model: selected
Pink Model: unselected
Green Model: out of printing size
(Pic 8.1-02)
(Pic 8.1-03)
8.1.3 Left click property and drag. Theediting icon can be placed anywhere
within the software interface. (Pic 8.1-04)
1.Cut the end to be flatand hold
the left filament straight.
2. Bended filament will block the
extruder.
Keepingpushingdownthe leftover filament
untilthe filament get stuck into thegear.
Then relax your hands after 20 seconds.
Editingmenu
Model display area
3-axis reference
Main menu
8
Page 10
3D Printer/English
10/03/2015Version No. 002
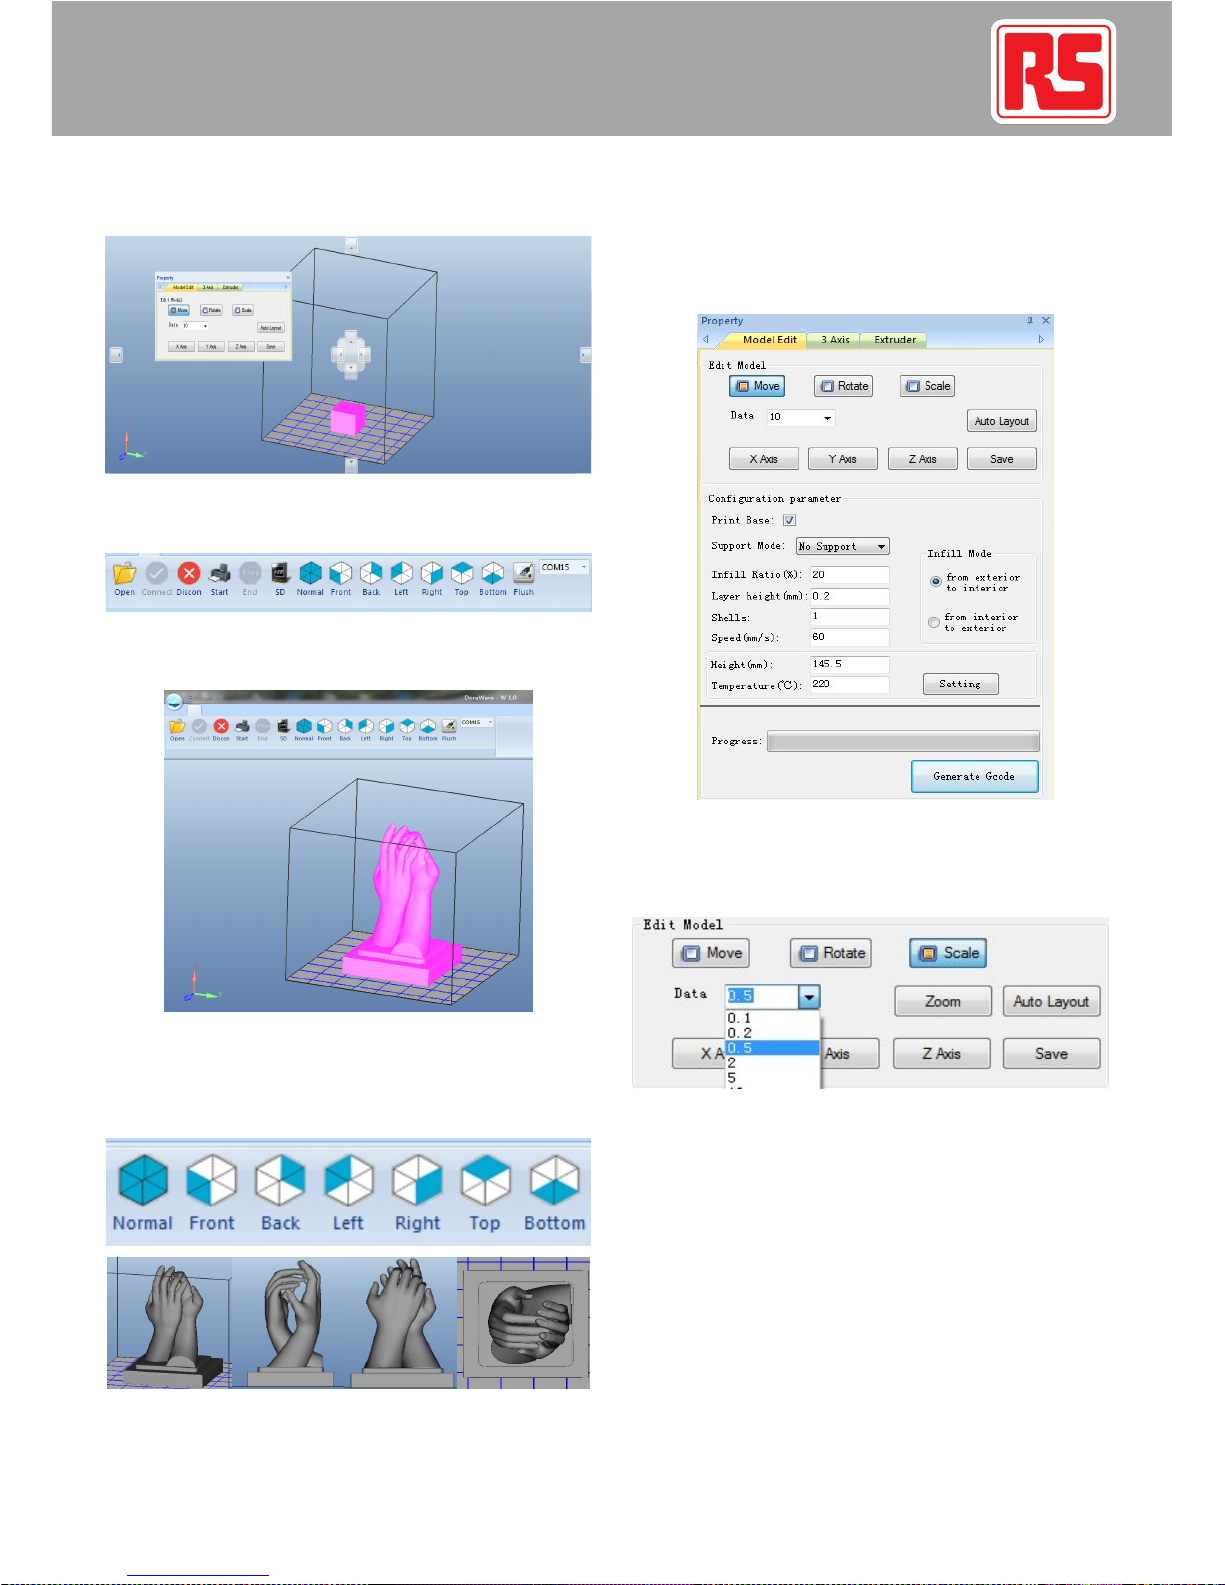
(Pic 8.1-04)
8.1.4 There are 14 function icons in total in the menu. (Pic 8.1-05)
(Pic 8.1-05)
8.1.5 Open a STL file in your pc. (Pic 8.1-06)
(Pic 8.1-06)
8.1.6 Adjust the viewingdirectionof the model byclicking theseven view icons.
(Pic 8.1-07)
[Normal], [Front], [Back], [Left], [Right], [Top], and [Bottom].
Normal Front Left Top
(Pic 8.1-07)
8.1.7 The Property on the right sidecontains: [Model Edit], [3Axis], and
[Extruder].Model Edit includes: [Edit Model], [Configuration parameter] and
[GenerateGcode].(Pic 8.1-08)
(Pic 8.1-08)
8.1.8ModelEdit
In the [Data] column, you can selector enter a numberfor [Move],[Rotate] or
[Scale]. (Pic 8.1-09)
(Pic 8.1-09)
1. Move: before generating Gcode, the model should becentered and placed on
the bottom of the printing area.
Click [Move] to move the model by X/Y/ZAxis orclick [Auto Layout].
AutoLayout:to place the lowest points of themodel to thebottom of thebuilding
area. It may not work forsome models because such models have no horizontal
bottom surface.
2. Rotate: click [X Axis], [YAxis] or [ZAxis] to rotatethe model by X\Y\Z axis.
3. Scale: click [Zoom] to resize themodel proportionally or click [XAxis], [Y
Axis] or [Z Axis] to resizethe model byX\Y\Z axis.
If you are not satisfied with youredition, right clickand select [Reset]. After
edition,please click [save].
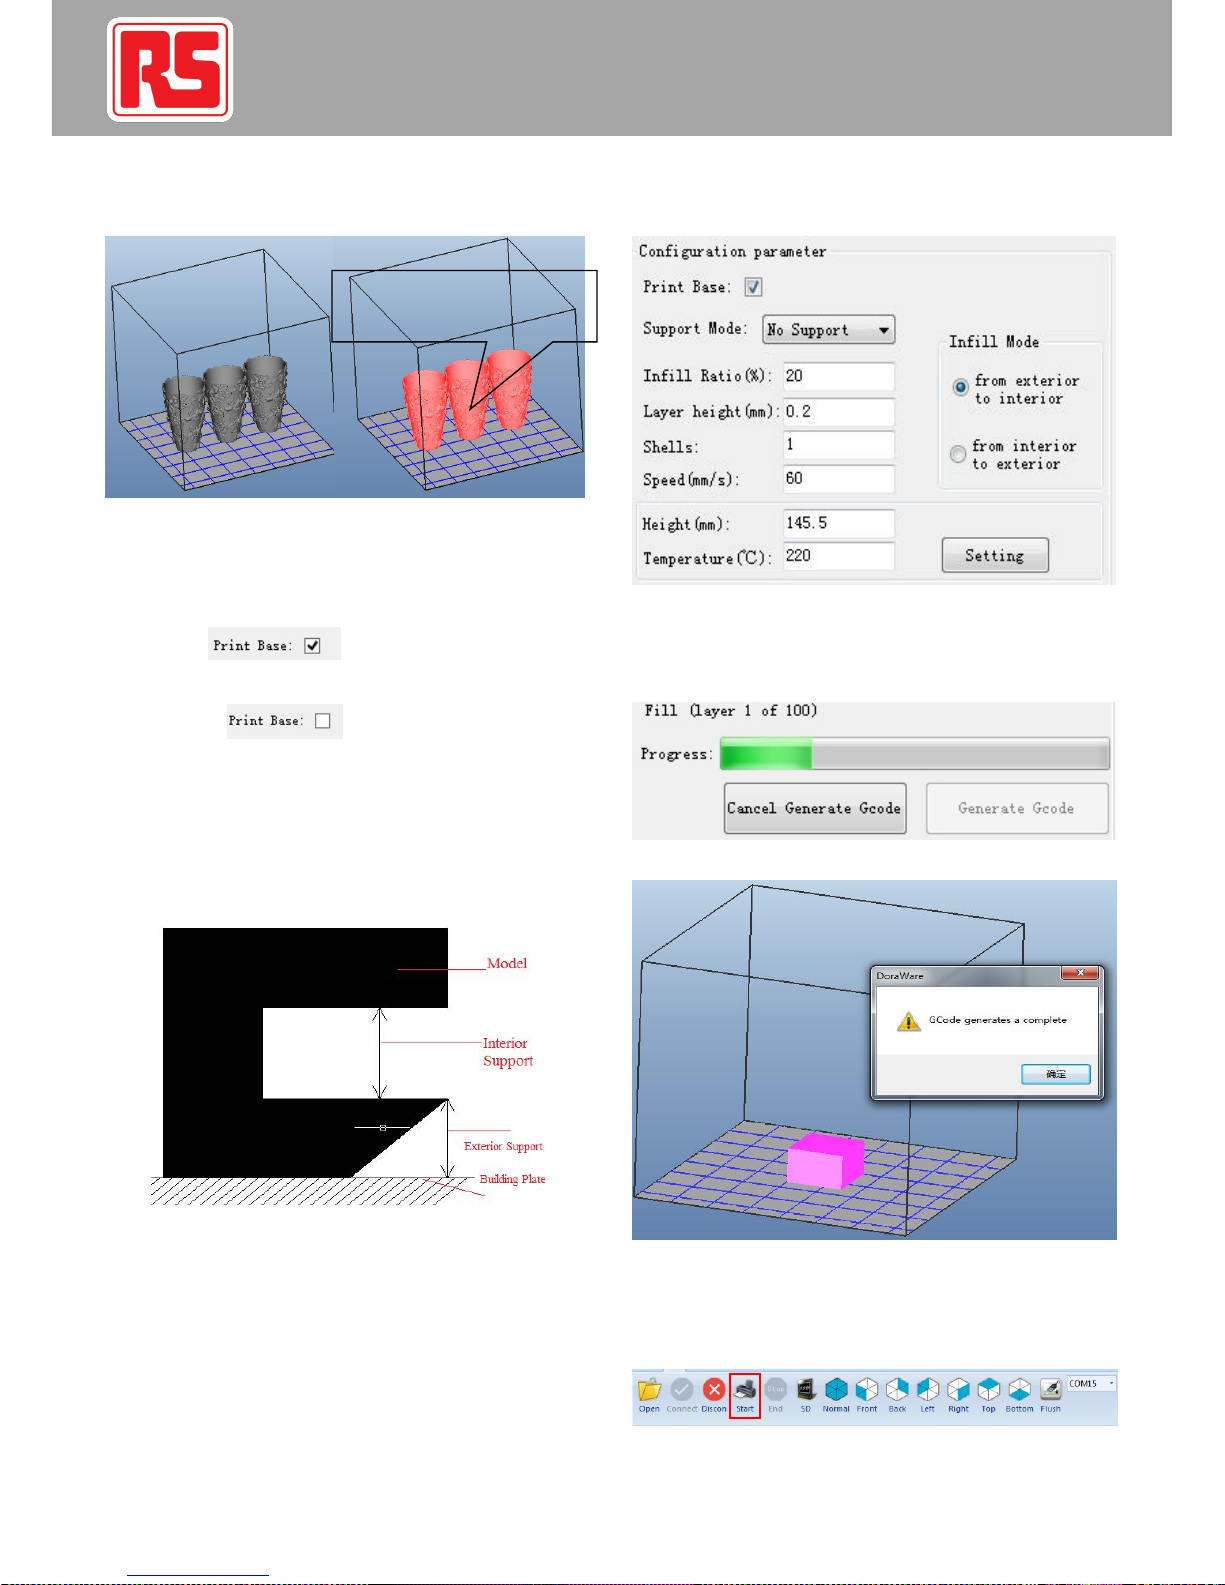
To print multiple models at one time,click [Ctrl] onyour keyboardand your left
mouse at the same time tochoosemultiple models. (Picd andPic e)
9
Page 11
3D Printer/English
10/03/2015 Version No. 002
Pic d Pic e
8.2Setting
Set the parameter according to the structureand sizeof model.
8.2.1 Print Base
With Print Base:
We recommend printing with print base for mostmodels.
Without Print Base:
For printing without print base, an extremely flatbuilding plate and correctZ-
height are required, as well as themodel is within8cm*8cm (x axis *y axis).
The models without print base will havethe extra smooth bottom surface.
8.2.2 Support Mode: No Support, Exterior Support and InteriorSupport. (Pic 8.2-
01)
Exterior Support: support between building plate and the model.
Interior Support: support inside the model.
(Pic 8.2-01)
8.2.3 Infill Ratio
For solid model: 95%-100%. 95% is recommended because of the dilation of PLA
during printing.
For other model: 10%-30% is the commonchoice to save filament.
8.2.4 Shells: the outer layers of themodel.
8.2.5 Speed: normally from 30-80. Optimum speed is 60. (Pic 8.2-02)
(Pic 8.2-02)
8.3 Generate Gcode
When the parameter is set, click [Generate Gcode]and a greenprogressbar
will appear. Please wait until the processis finished. (Pic 8.3-01to Pic 8.3-02)
(Pic 8.3-01)
(Pic 8.3-02)
8.4 Start printing
After generating Gcode, printing is available either online oroffline.
8.4.1 For online printing, click [Start] to printafter generatingGcode. (Pic 8.4-01)
(Pic 8.4-01)
Click Ctrl and left mouse
to choose more models.
10
Page 12
3D Printer/English
10/03/2015Version No. 002
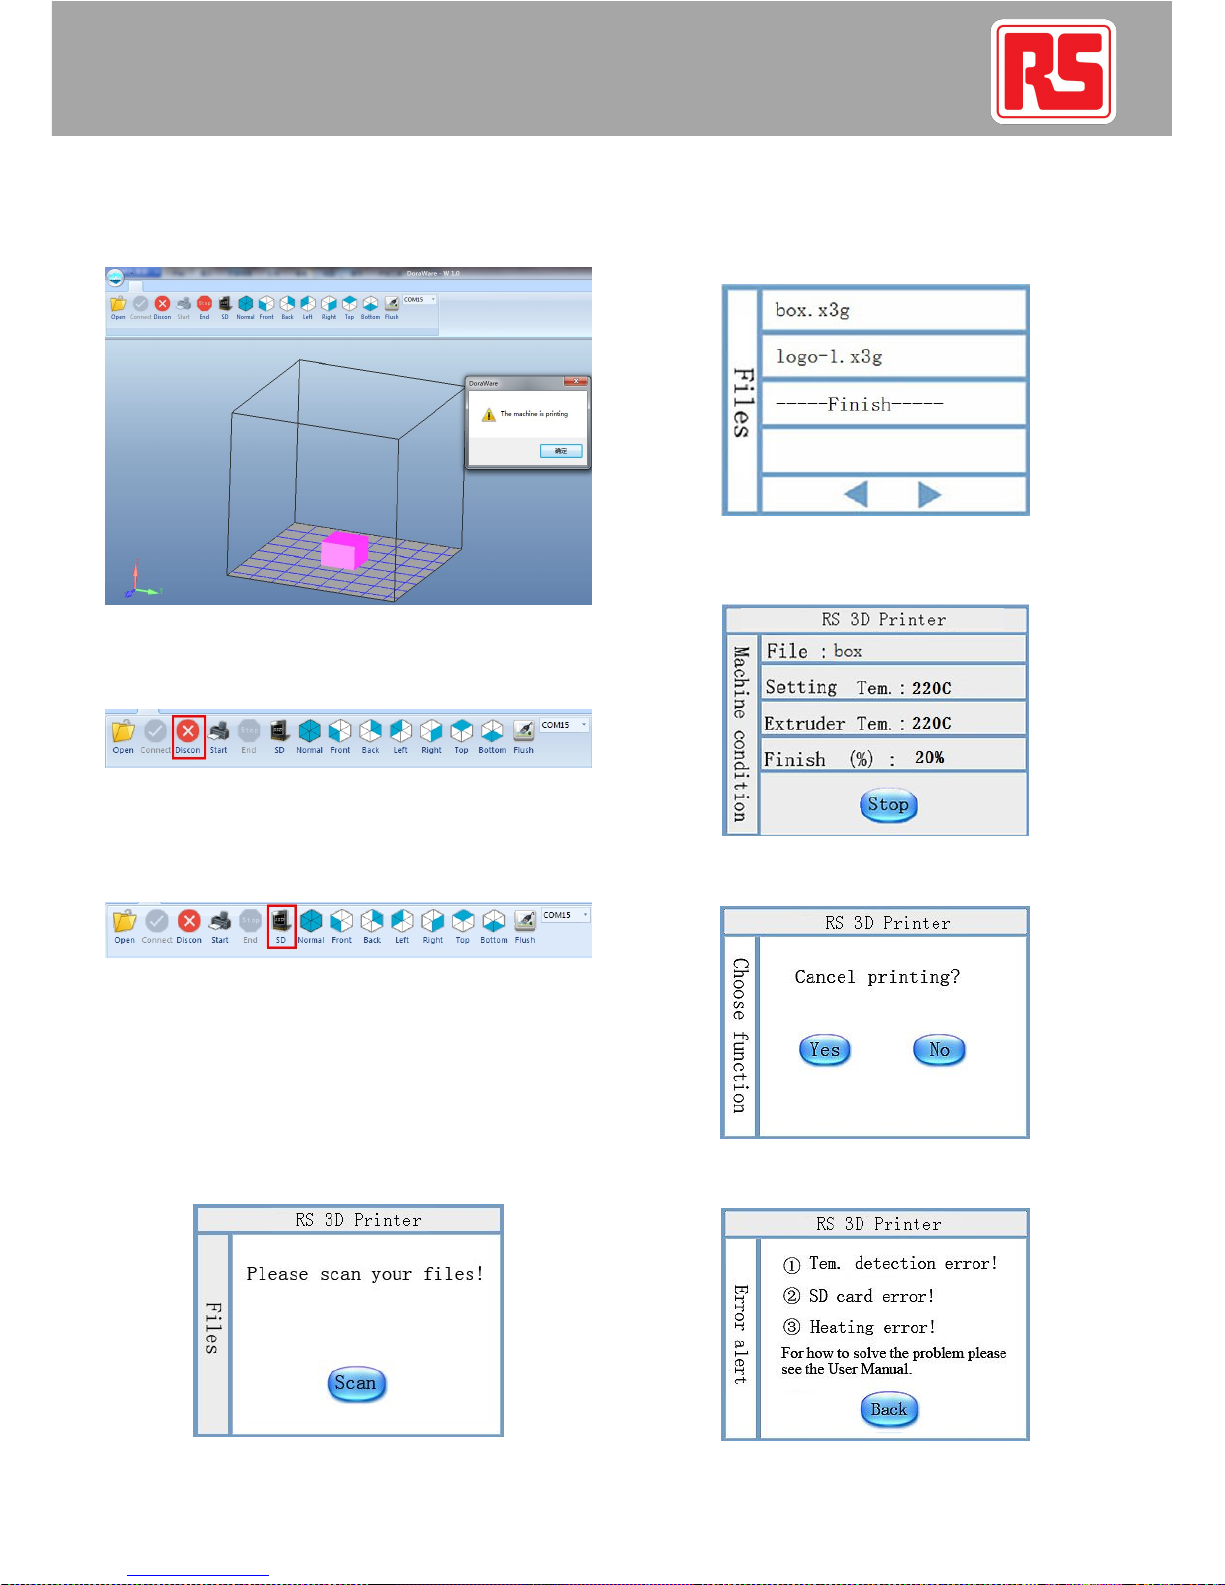
During online printing, the interface in the rightcannot be edited.(Pic 8.4-02)
(Pic 8.4-02)
When the printing process is abnormal, click [Discon] or[End] to stopprinting.
(Pic 8.4-03)
(Pic 8.4-03)
8.4.2 For offline printing, please click [SD]to save x3g file, and copy thex3g file
to your SD card by theSD card reader, and then insert yourSD card intoRS 3D
Printer to select printing file. (Pic 8.4-04)
(Pic 8.4-04)
Notice:
RS 3D Printer recognizes SD card of2GBonly;
Please use English alphabet or number within 20digits as x3gfile name;
Please DO NOT place any x3g filein a subfolderof theSD card;
Please wait until [Save the x3g filesuccessful] shows. Please DONOT
close the software during [saving x3g file].
Select the files to print onthe touch screen,forofflineprintingonly.(Pic 8.4-05)
(Pic 8.4-05)
You can save multiple x3g files untilthe storage reaches 2GB. Touch any file to
start print. (Pic 8.4-06)
(Pic 8.4-06)
The touch screen will display file name,settingTemperature,Extruder
Temperatureandprinting process. Touch [Stop] to stop printing. (Pic8.4-07)
(Pic 8.4-07)
Click [Yes] or [No] to discontinueor continueprinting.
(Pic 8.4-08)
Error alert will show up ifanything wrong during printing. (Pic8.4-09)
(Pic 8.4-09)
11
Page 13
3D Printer/English
10/03/2015 Version No. 002
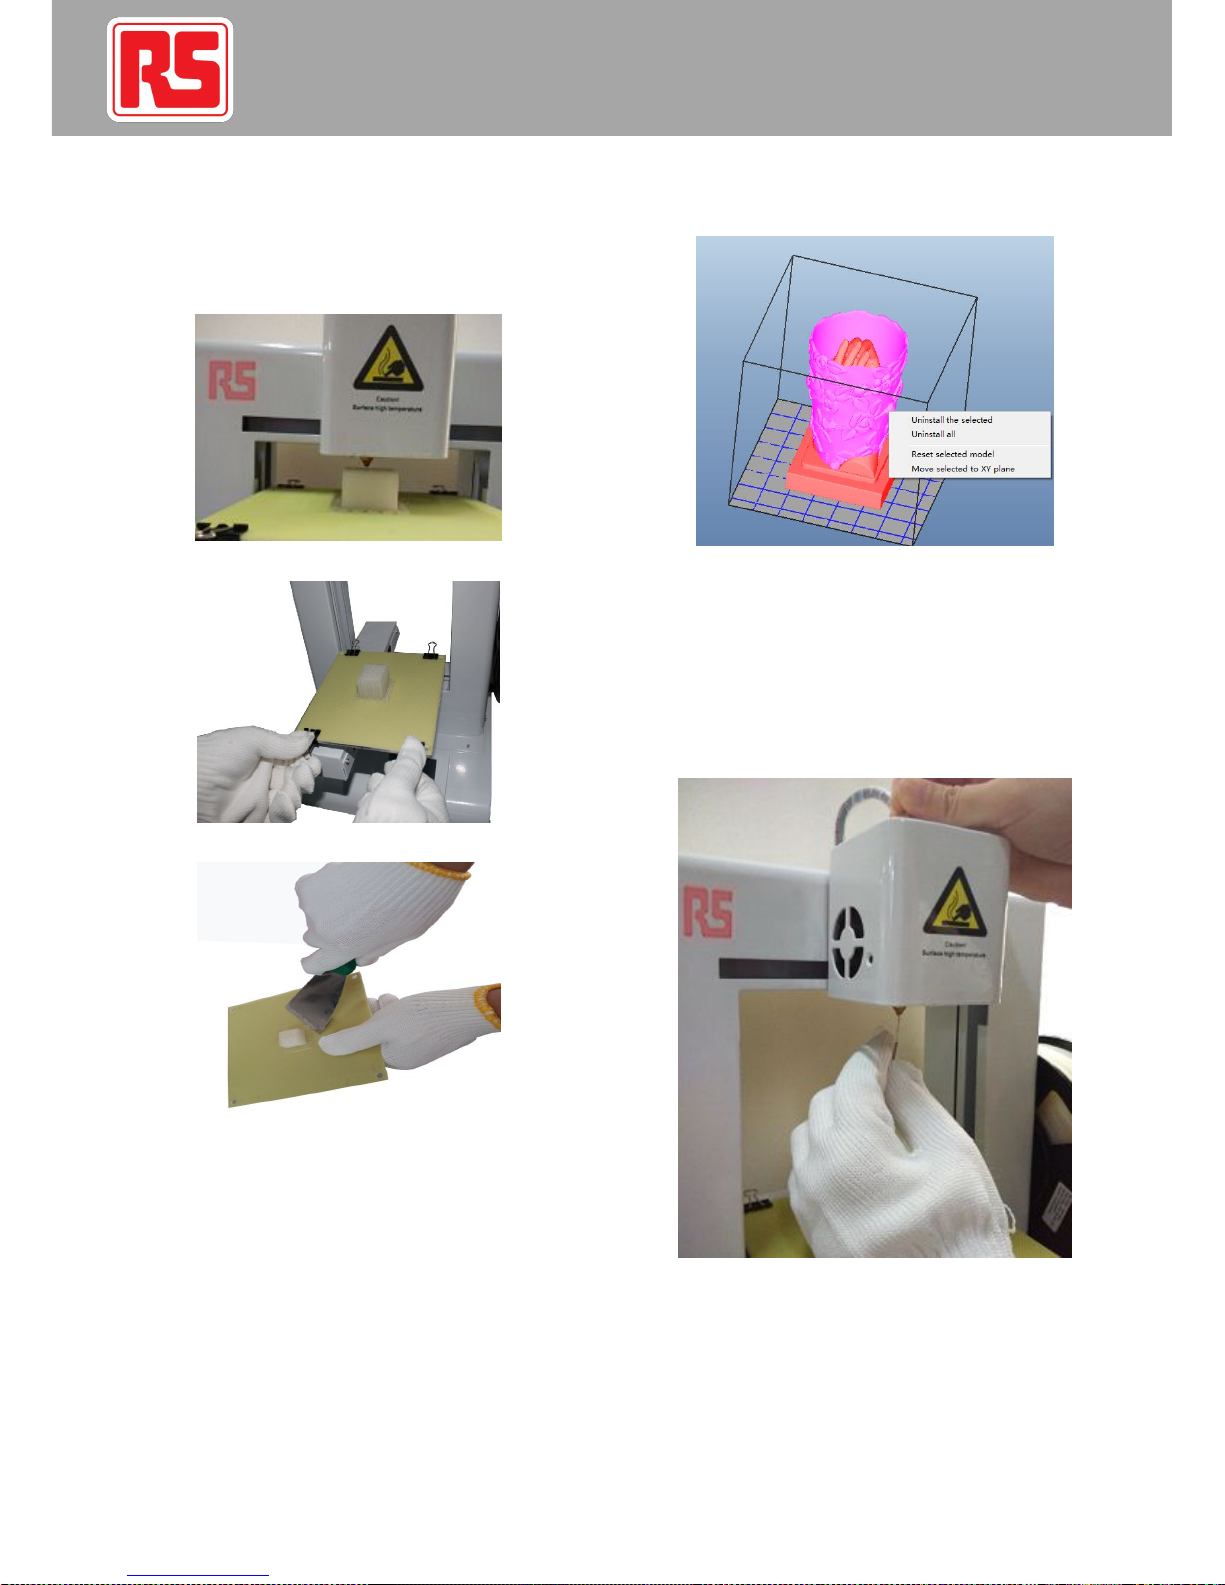
8.5 Printing is finished
Wear gloves to remove the model byhands. Shovel, cut pliersand other tools
are very useful. (Pic 8.5-01 and 8.5-03)
(Pic 8.5-01)
(Pic 8.5-02)
(Pic 8.5-03)
To print another model, choose the model andright click the mouse to remove
the former one. Otherwise, two or more modelswill be displayedin the printing
area. (Pic 8.5-04)
(Pic 8.5-04)
9) MAINTENANCE INSTRUCTION
ExtruderBlocking
9.1.1 Connect RS 3D Printer with your pc, increase the extruder temperature
from 220℃ by 5-10℃ each time, click [Forward]and push thefilament by hand
to extrude the filament until the filamentemerges from the nozzle.(Pic9.1-01)
9.1.2 If the nozzle is coatedby filament, please heatup the extrudertemperature
at 220℃ and clean up thenozzle by clean towel.
(Pic 9.1-01)
9.1.3 Heat up the extruder temperature to 220°C.Click [Forward] to extrudethe
filament, use the Acupuncture Needle in the tool boxto insert intothe hole of
the nozzle to clean up thenozzle up and down.
Notice: MUST wear gloves in the tool box.(Pic 9.1-02)
12
Page 14
3D Printer/English
10/03/2015Version No. 002
(Pic 9.1-02)
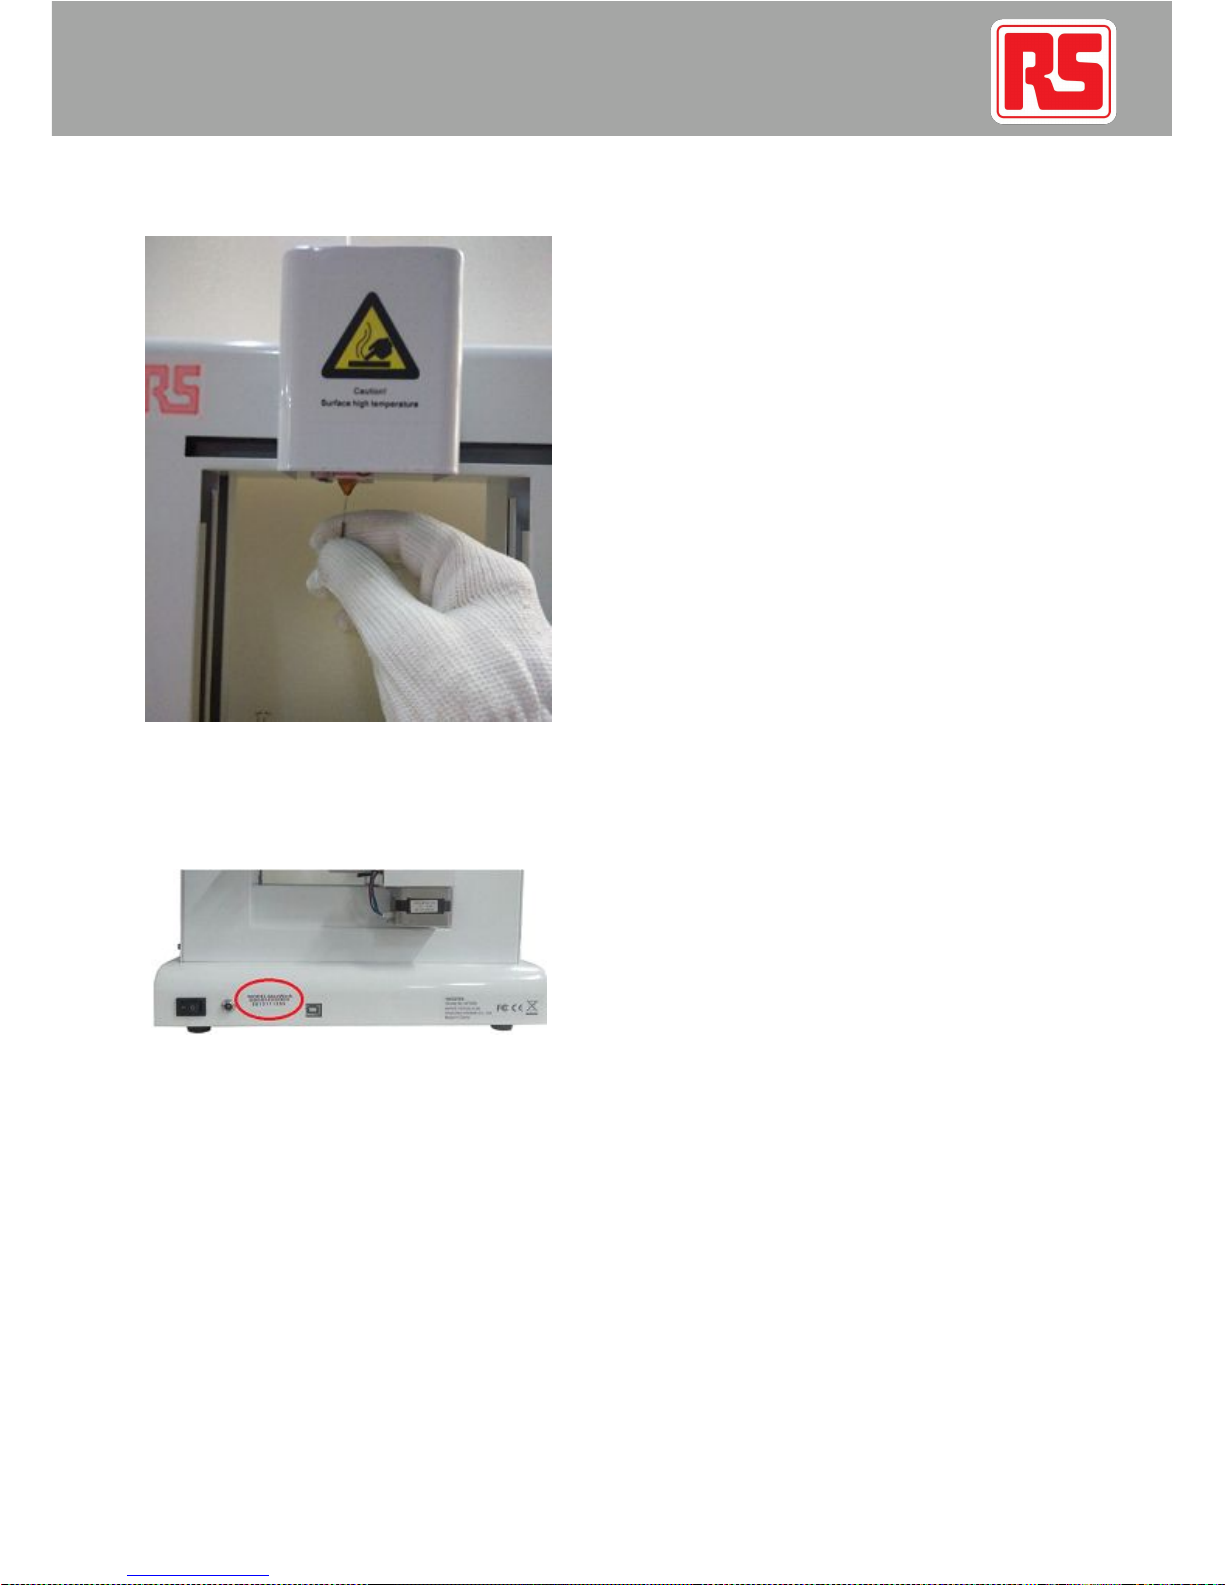
10) AFTER SALES SERVICE
Each RS 3D Printer has a uniqueidentifier, which is an11 digitsseries number.
(Pic 10-01) Please provide this number with pictures/videosof your problem for
after sales service.
(Pic 10-01)
13
 Loading...