

Page 1

ROYALTON CONVECTION OVENS
RECOMMENDATIONS FOR:
• SLOW ROASTING
• COOKING
• BAKING
Page 2

9981 York-Theta Drive, North Royalton, Ohio 44133
440-237-0806 FAX: 440-237-1694 1-800-662-8765
VENTING
IN GENERAL, THIS APPLIANCE DOES NOT NEED TO BE PLACED
UNDER A HOOD. CONSULT YOUR LOCAL HEALTH AND FIRE CODES
FOR REQUIREMENTS IN YOUR AREA
DO NOT LOCATE APPLIANCE UNDER AN OVERHEAD VENT HOOD
CLOSE TO OTHER COOKING EQUIPMENT BECAUSE:
1. Fumes and grease particles generated by other cooking equipment
would possibly be drawn by the cooling fans into the control
compartment of the top mounted heating module.
2. Fumes and deposition of grease particles within the control
compartment must be avoided in order to assure top performance
and long product life.
*** VERY IMPORTANT ***
IN ORDER TO ASSURE AIR FLOW THROUGH HEATING MODULE, DO
NOT POSITION OVEN FLUSH AGAINST ANY WALLS. MAINTAIN A
MINIMUM GAP OF 2 INCHES BETWEEN OVEN CABINET AND WALLS.
IF YOU PLACE OVENS SIDE BY SIDE, MAINTAIN A MINIMUM OF
A 4 INCH GAP BETWEEN CABINETS.
Page 3
1. After removing product from carton, Make sure ALL packing material
STACKING UNITS:
NOTE: Stacked units have 2 power cords.
STACKING UNITS
RRH SERIES
OMI • RRH 9 • 1 • 92
9981 York-Theta Drive, North Royalton, Ohio 44133
OPERATING & MAINTENANCE INSTRUCTIONS
440-237-0806 FAX: 440-237-1694 1-800-662-8765
.
Set upper cabinet (no casters) on top of lower
cabinet (with casters).
Remove 3 screws on each side from bottom of
upper cabinet and 3 screws on each side of lower
cabinet.
Place one stacking adapter on each side of upper
and lower cabinets and replace all screws.
STACKING
ADAPTER
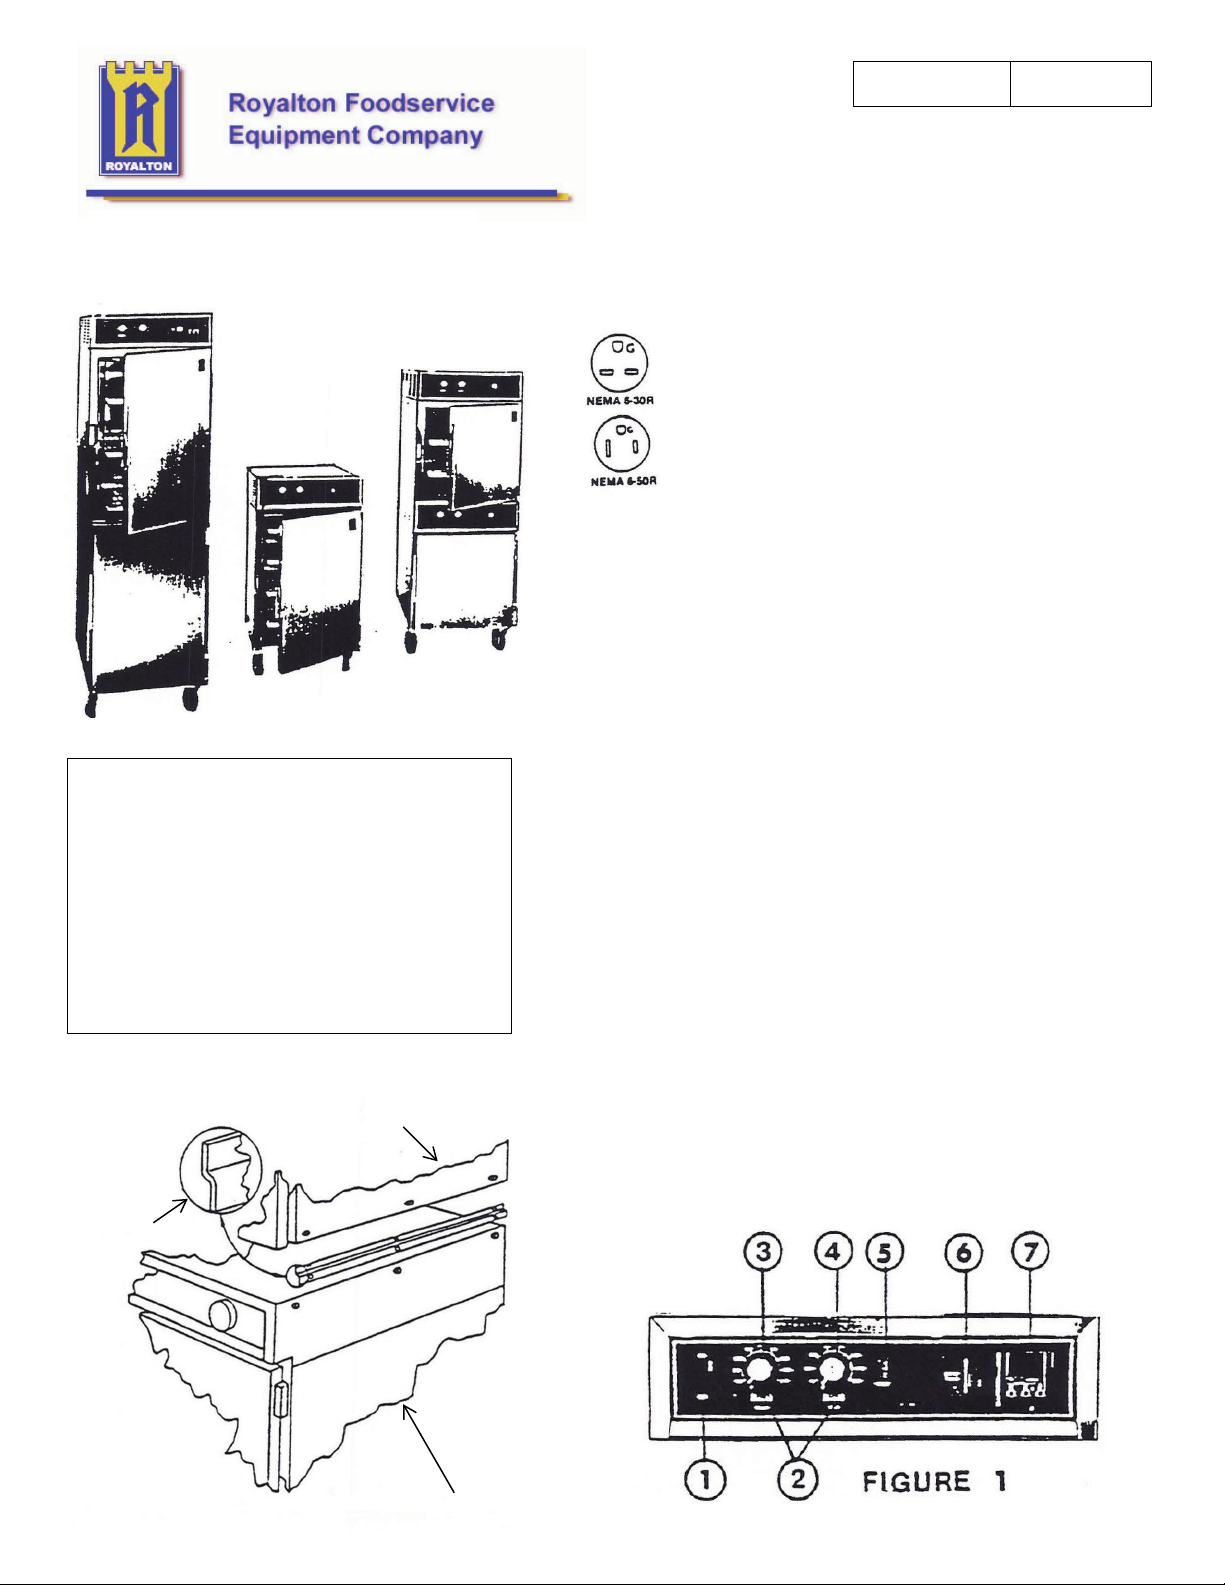
2. RRH Series Ovens are manufactured to operate on:
TO START UNIT: - (See Figure 1)
A. Make sure unit is plugged into proper outlet.
B. Push rocker switch (1) to "ON" position. "ONOFF" switch, "HOLD" switch
C. Rotate "ROAST" (3) temperature control to desired roasting temperature.
D. Rotate "HOLD" (4) control to desired holding temperature.
E. Select roasting tine by turning blue centrals (7) on digital timer. Numbers
F. Depress "ON - OFF" switch to "OFF" position and open doors. Cooking
NOTE: On initial start- up, unit should be run on 250˚ for approximately one
hour to burn off all metal cleaning solutions
TO CLEAN UNIT: Disconnect power source. DO NOT allow any electrical
components to get wet.
has been removed from "exterior & interior of product.
Voltage 208-240 VAC
Circuit 2 0 Amps (RRH-4135)
3 0 Amps (RRH-6135)
HZ 60
Heater 2/3 1900 W each
AMPS 19.7 (RRH-4135)
29.3 (RRH-6135)
Receptacle NEMA-6-30R (RRH-4135)
Required NEMA-6-50R (RRH-6135)
NOTE: When 2 units are stacked, each unit requires its own outlet.
and Heat Indicator Pilot Light (5) will light up. (When Heat Indicator light
goes off internal oven temperature has been reached)
appearing to the right of the decimal point represent 1/10th of 1 hour.
Each 1/10th hour equals 6 minutes.
EXAMPLE: .1 = 6 minutes .3 = 18 minutes
.2 =12 minutes .4 = 24 minutes
Numbers to the left of the decimal point represent full hours.
EXAMPLE: Roasting time is 11 hours & 30 minutes.
- Rotate the controls to the left of the decimal point until
11 appears in the display window.
- Rotate the control to the right of the decimal point until 5
appears in the display window.
fans will continue operating until unit cools . 00 NOT disconnect unit
from power source while cooling fans are still operating.
Page 4
Page 5

Page 6

ELECTRICAL
REQUIREMENTS
RRH-4135-C2/C1
RRH-6135-C4W/C4US/C4
POWER
208-240
MJDEL
RH-2025
RH-2025
HH-1000
HH-1000
RH-2035
RH-2035
RH-4125
RH-4125
HH-2000
Volts,
VOLT
208
240
208
240
208
240
208
240
208
-100B
HH-2000
240
-100B
RH-4135
RH-4135
RH-6125
RH-6125
RH-6135
208
240
208
240
208
RH-6135 240
SOURCE
Single
AMPS
9.8
8.5
5.2
4.5
9.8
8.5
19.7
17.8
11.0
9.6
19.7
17.8
29.3
25.7
29.3
25.7
REQUIREMNTS
Phase,
PHASE
1
1
1
1
1
1
1
1
1
1
1
1
1
WATTS
2000
2000
llOO
llOO
2000
2000
4100
4100
2300
2300
4100
4100
6100
1 6100
1
1
6100
6100
ARE:
AC
Service
HERI'Z
60
60
60
60
60
60
60
60
60
60
60
60
60
60
60
60
HEATING
1.
Rerrove
certain
inserted
2.
Connect power
Push
3.
IXJWer
"ON"
that
into
"OFF"
MODULE
nodule
duct
extension
duct
opening
cord
to
rocker
INSTALLATION
from
power
switch
VERY
BEFORE
OPERATE
ANY
TO
TAKING
UNIT
ROAST & HOLD
FOR
RESIDUAL OILS
COOL
DOWN
UNIT,
30
MINUTES
WHICH
OPEN
NOTICE A SLIGHT EMISSION
THIS
PROCEDURE,
OVEN
IS
carton
located
of
source
IMPORTANT
OVEN
AT
MAY
ADHERE
DOORS
OF
SMOKE,
READY
and
install
at
cabinet.
as
to
"ON"
INTO
250°
FOR
TO
SERVE
AND
CABINET
rear
specified
p:>sition.
REGULAR
F.
TO
INSIDE
ABOUT
WHICH
YOU.
on
top
of
heating
THE
15
MINUTES.
IS
START
of
cabinet
m:xlule
above.
Units
are
SERVICE,
HEAT
WILL
METAL
NORMAL.
UP
I!Eking
is
now
OJ:::erational.
PLEASE
REMOVE
SURFACES.
YOU
MAY
AFTER
Page 7

Page 8

HOW TO ROAST AND HOLD
9981 York-Theta Drive, North Royalton, Ohio 44133
440-237-0806 FAX: 440-237-1694 1-800-662-8765
1. Use raised wire grid in 18” X 26” X 1” pan and place product to
be roasted in center of grid.
2. Load oven, making certain that pans are equally spaced.
3. Close doors, set timers and temperatures as required.
“Roast” timer light will remain on through complete roasting
cycle. When oven switches to “Hold” cycle, “Hold” pilot light will
remain on until unit is manually switched off.
REMEMBER: Roasting will continue for about 43 minutes
to one hour after oven switches from “Roast”
to “Hold” mode.
4. To maximize tenderness of product, a three hour holding time at
a temperature of 145˚F is recommended.
5. If more crispiness or browning is desired, increase temperature
and decrese roasting time.
REMEMBER” Frequent door openings will affect temperature
and roasting time.
Page 9

Page 10

Page 11

Page 12

Page 13

 Loading...