

Page 1

Cinema on–the–GO !
RMP-8200
User’s Manual
Page 2

2
Table of Contents
Introduction........................................................................................3
What is inside the box:
Overview.............................................................................................................3
System Requirement:.......................................................................................4
.......................................................................
Getting Started.................................................................................
Insert the battery...............................................................................................4
Power adaptor...................................................................................................5
Connections.......................................................................................
Connecting to a Notebook or Perosonal Computer ..................................7
Via Micro SD card/T Flash card......................................................................9
Connecting to a Composite Video Device....................................................9
Remote control................................................................................................10
Intended Use....................................................................................................10
Powering Off....................................................................................................12
Adjusting Image Size......................................................................................11
Control the Brightness...................................................................................12
Control Volume................................................................................................13
Using ....................................................................................................
Main Menu........................................................................................................15
Video and Audio File Support
Photo View .................................................................................................18
Settings .......................................................................................................19
A/V in ...........................................................................................................22
Office Viewer
..............................................................................................23
...........................................................16
3
4
7
15
Product Specification...................................................................28
Trouble Shooting.............................................................................29
Support................................................................................................30
Page 3

3
Introduction
Thanks for purchasing RoyalTek’s product.
What is inside the box:
l RMP-8200 CINEMA ON-THE-GO
l AC/DC Power adaptor(EU/UK/US plugs)
l Rechargeable battery
l USB cable
l A/V cable
l Tripod
l Remote control
l Carry Pouch
Overview
System Requirement:
l Windows 7, Vista (32bits & 64bits), XP (32bits & 64bits)
l USB port (1.1 or above, 2.0 recommended)
Page 4
4
Getting Started
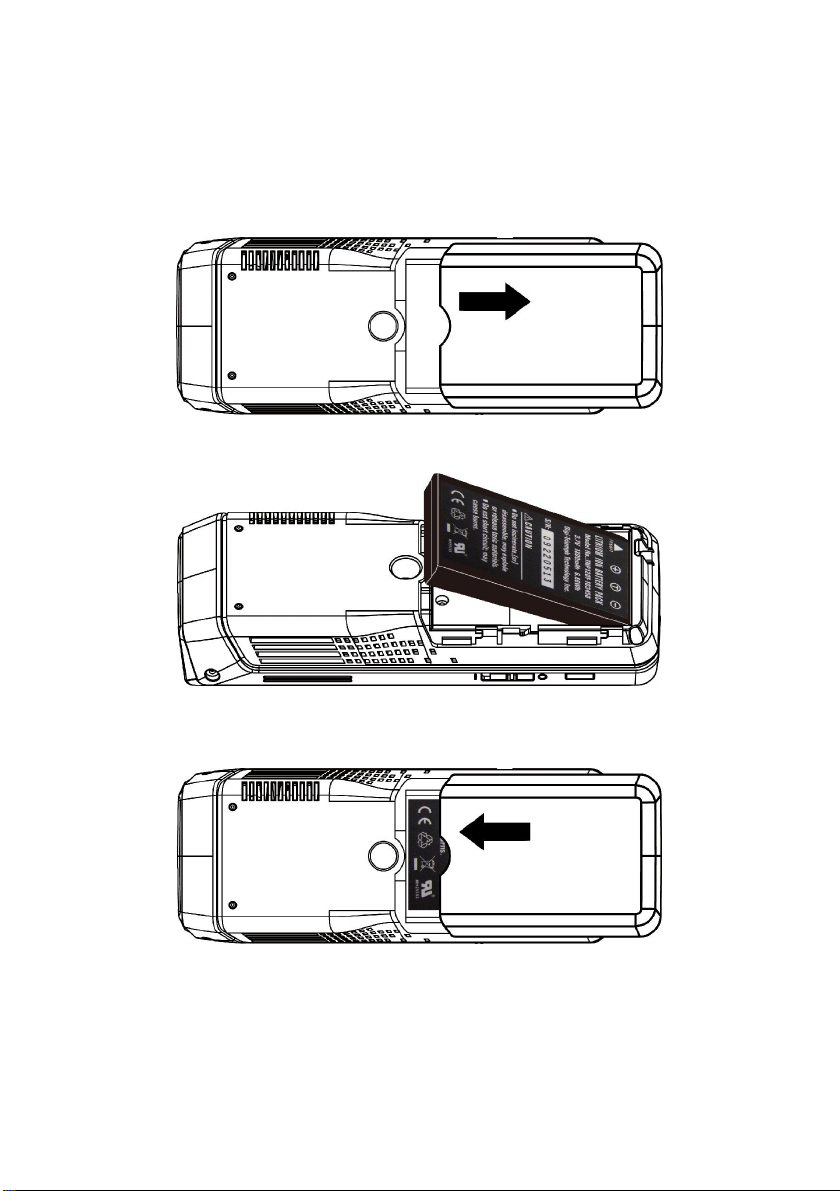
Insert the battery
1. Slide the battery cover.
2. Insert the battery.
3. Replace the battery cover and slide it up gently until hearing a click.
Page 5
5
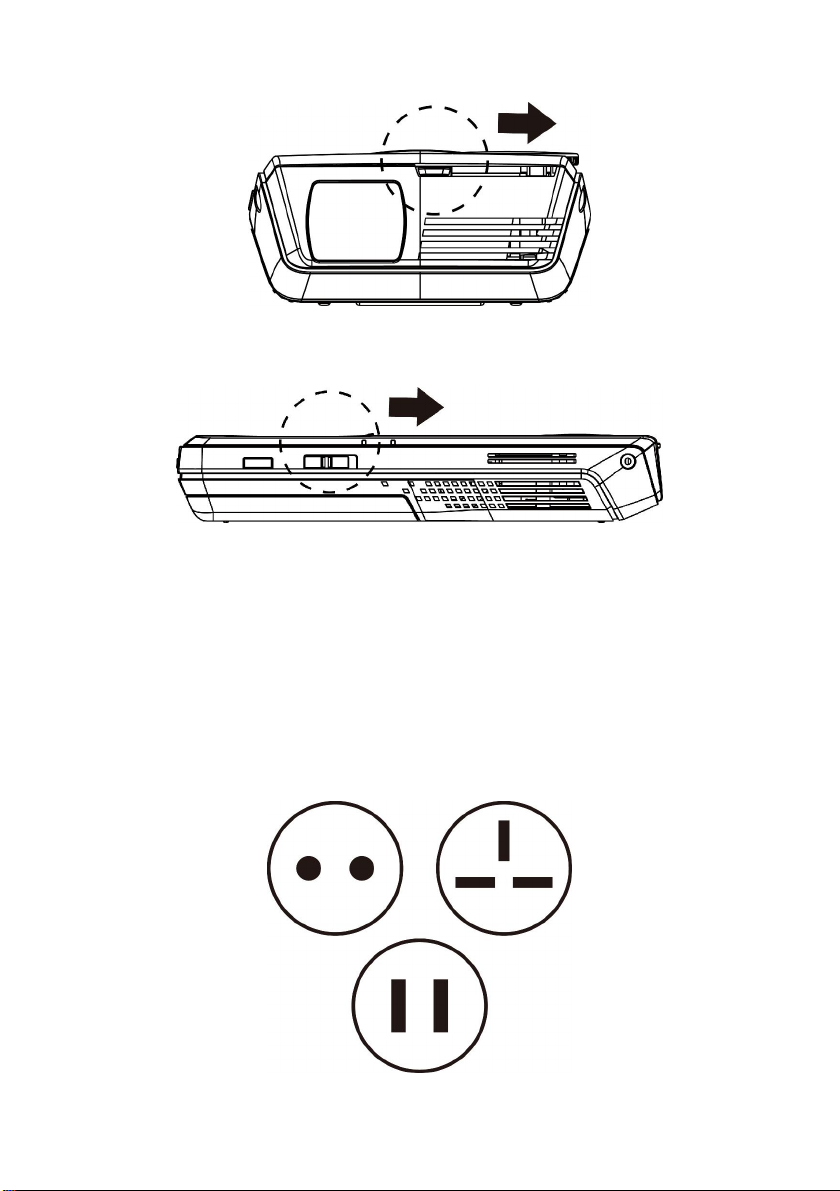
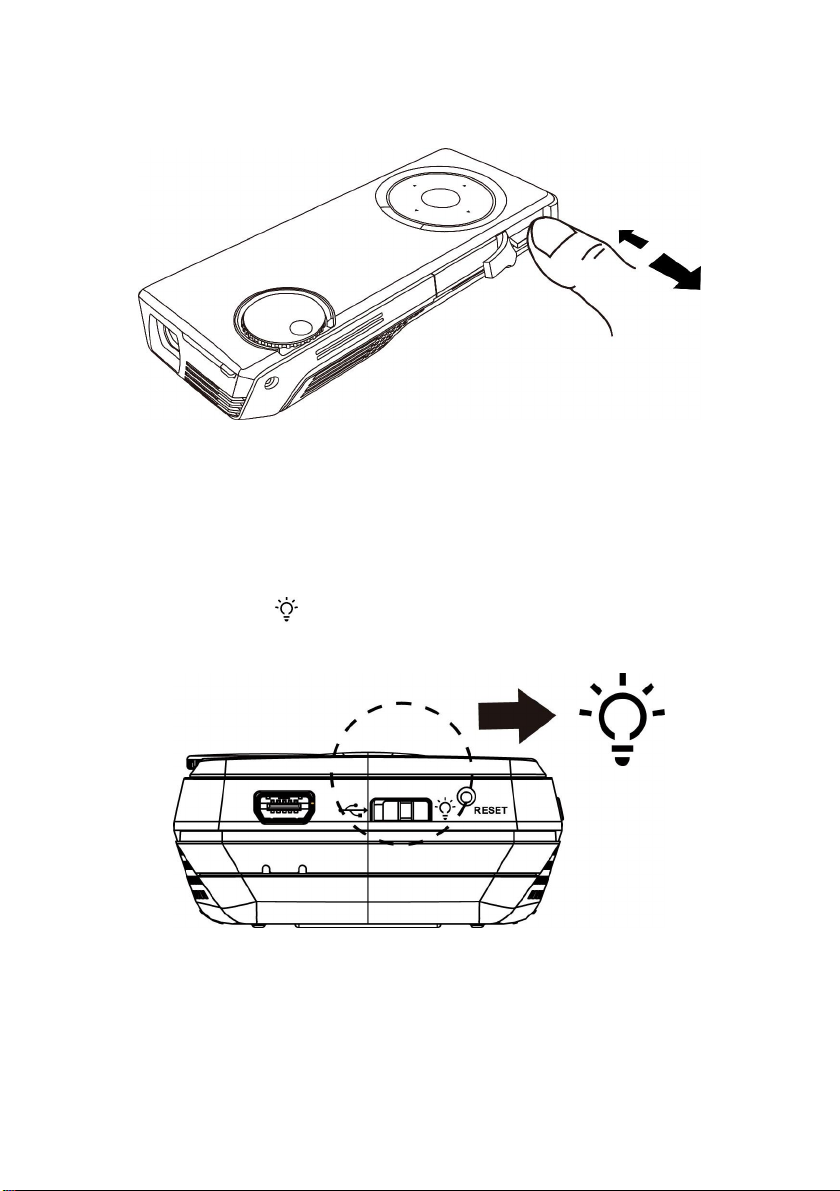
Slide the lens cover to the other side
Switch on the power button. From “O” side to “I”.
Before you use, we suggest you to fully charge the battery.
It will take around 2.5 hours for battery charging.
Power adaptor
1. Select the correct plug for your environment.
Page 6
6
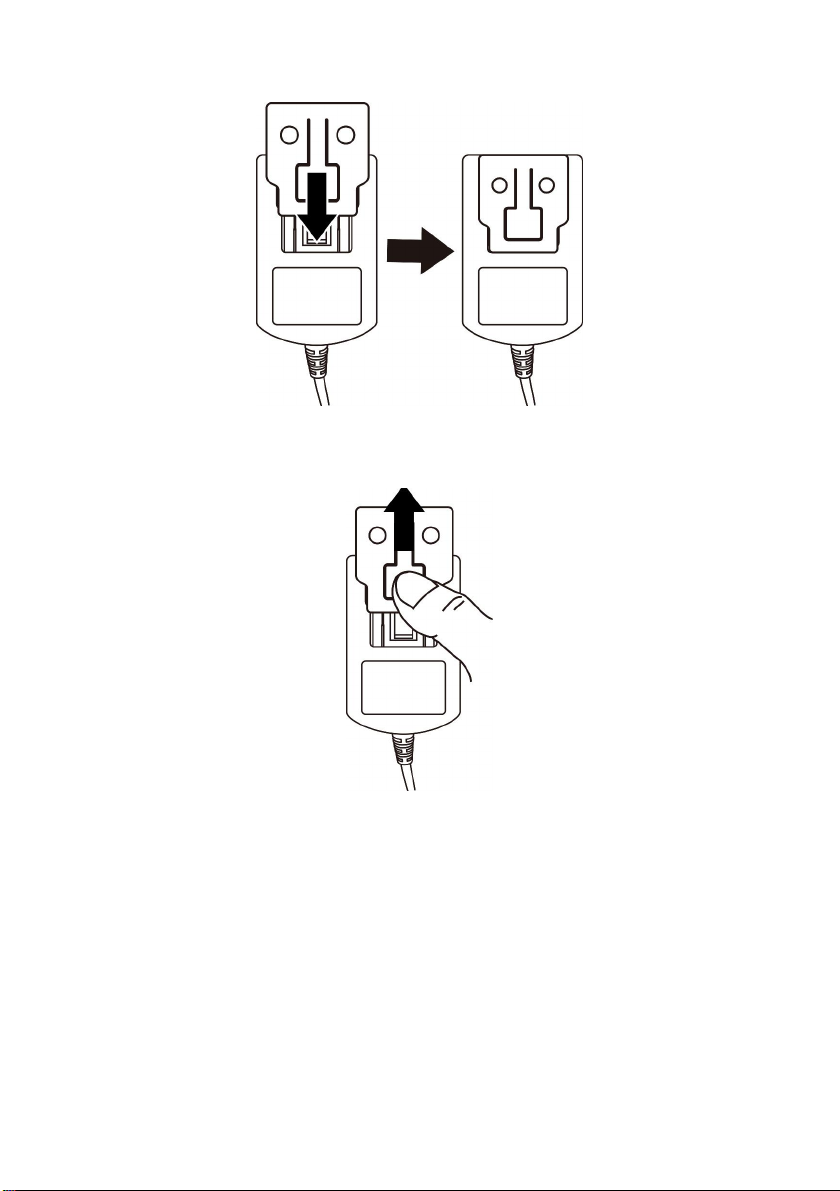
2. Connect the plug to the power adapter.
To disconnect, please push the button and push out the plug.
Notes:
If The RMP-8200 CINEMA ON-THE-GO power is off, allow 3 hours for the
battery to fully recharge. The battery will stop charging if The RMP-8200
CINEMA ON-THE-GO power is on to avoid damage caused by high operating
temperature. The battery can also be charged by connecting The RMP-8200
CINEMA ON-THE-GO to a computer USB port. This method will fully charge
the battery in six hours. The battery has a lifespan and ages every time it is
fully charged and discharged. The battery will gradually loose charge capacity
as it ages. Therefore, as the battery ages the battery life will decrease due to
natural loss.
Page 7
7
Connections
The RMP-8200 CINEMA ON-THE-GO is designed to project with built-in memory
or via expandable Micro SD card slot or connecting to other media devices.
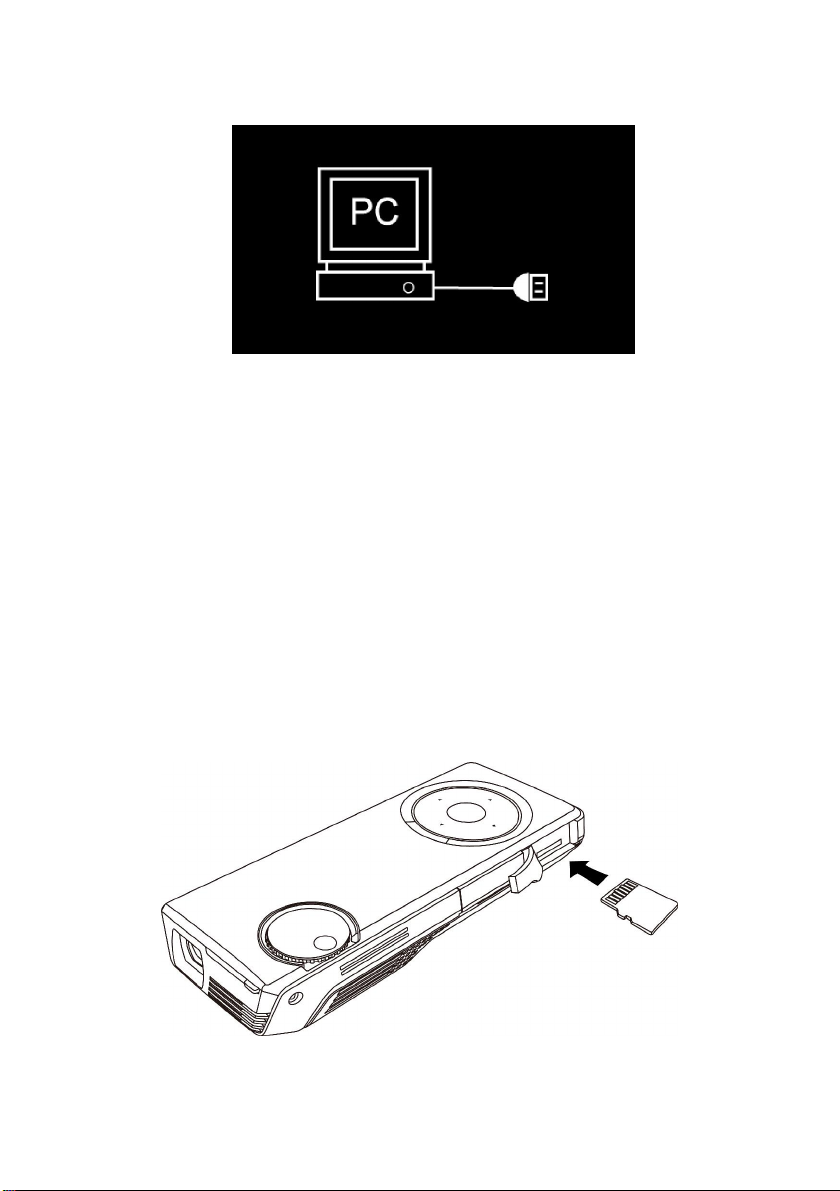
Connecting to a Notebook or Personal Computer
Use the USB cable to connect The RMP-8200 CINEMA ON-THE-GO to
desktop computers, laptop computers, ultra-portable computers for data
transfer.
Turn on the power and read the main menu as follows:
Push the switch to side. Connect USB cable to your PC
Page 8
8
When the main menu disappears, the connection succeeded and home screen
shows.
You can proceed with the data transfer.
Note:
To conserve power, The RMP-8200 CINEMA ON-THE-GO will stop projecting
an image while connected to a computer USB port.
Via Micro SD card/T Flash card
Store the files you wish to project in a Micro SD or T/F card.
l Insert the Micro SD Card/T Flash card
Pull back the cover and insert the memory card.
The memory card's electrical contacts should face up.
Page 9
9
l Remove the memory card
Pull back the cover and push to release the memory card.
When the main menu disappears, the connection succeeded and you can
proceed with the data transfer.
Note:
To conserve power, The RMP-8200 CINEMA ON-THE-GO will stop projecting
an image while connected to a computer USB port.
To project, switch to side as and unplug USB cable.
The main menu will show.
Page 10

10
Connecting to a Composite Video Device
Use the A/V cable to input video from camcorders, digital cameras, DVD
players, smart phone with TV-out function and digital media players into the
AV input on The RMP-8200 CINEMA ON-THE-GO .
a. Connect the AV cable to The RMP-8200 CINEMA ON-THE-GO ’s AV input.
b. Connect the other end of the AV cable to the video device’s audio
and video outputs.
Some video devices do not have the standard audio and video connections
and may require an AV cable specified by the vendor. The AV cable allows you
to connect your video device to your TV monitor or your projector. Also may be
purchased from the video device vendor. When you have the AV cable, use
the cable adapter to connect the video device cable and The RMP-8200
CINEMA ON-THE-GO cable.
Page 11

11
Remote control
Intended Use
The RMP-8200 CINEMA ON-THE-GO is designed to operate with the
ROYALTEK-specified battery and power adapter in normal office or home
environments.
0˚–30˚C (32˚–86˚F)
10–40% RH (without condensation)
0–1829 m (0–6000 feet) above sea level
The operating environment should be free of airborne smoke, grease, oil and
other contaminants that can affect the operation or performance of The
RMP-8200 CINEMA ON-THE-GO.
Page 12

12
Powering Off
Switch off the power button. From “I” side to “O”.
Status Indicator Light
The status indicator light provides information about The RMP-8200 CINEMA
ON-THE-GO ’s state.
Green:The RMP-8200 CINEMA ON-THE-GO is powered on
Amber:The RMP-8200 CINEMA ON-THE-GO is charging the battery
Red:Low battery
Blue:Key pad
Adjusting Image Size
The RMP-8200 CINEMA ON-THE-GO can project a diagonal image of 8 to 60
inches (203–1524 mm).
Note:
As increases the size of the projected image, you will need to decrease
(darken) the room lighting.
Adjusting the Focus
Page 13

13
Control the Brightness
The brightness mode can be accessed in setting menu . Press the right or
the left button for medium or high.
Control Volume
While playing music or video files, push the ▲ button for volume up and ▼for
volume down when connected to a video or music source during video or song
playback.
Page 14

14
Checking the Battery Level
The amount of charge currently in the battery displays in the status bar battery
icon at the top right of the screen.
Attaching the Tripod
The RMP-8200 CINEMA ON-THE-GO includes a table-top tripod that mounts
to the bottom of the.
Tip: RMP-8200 CINEMA ON-THE-GO will attach to most camera tripods.
Using the Micro SD Card Slot
The RMP-8200 CINEMA ON-THE-GO has a Micro SD card slot for expanding
up to 32 GB card. You can either place files on the card before you insert it into
The RMP-8200 CINEMA ON-THE-GO ’s card slot or while The RMP-8200
CINEMA ON-THE-GO is connected to a USB port on a computer.
Insert Micro SD Card
Insert the Micro SD Card/T Flash card
Pull back the cover and insert the memory card. The memory card's electrical
contacts should face up.
Page 15

15
Using
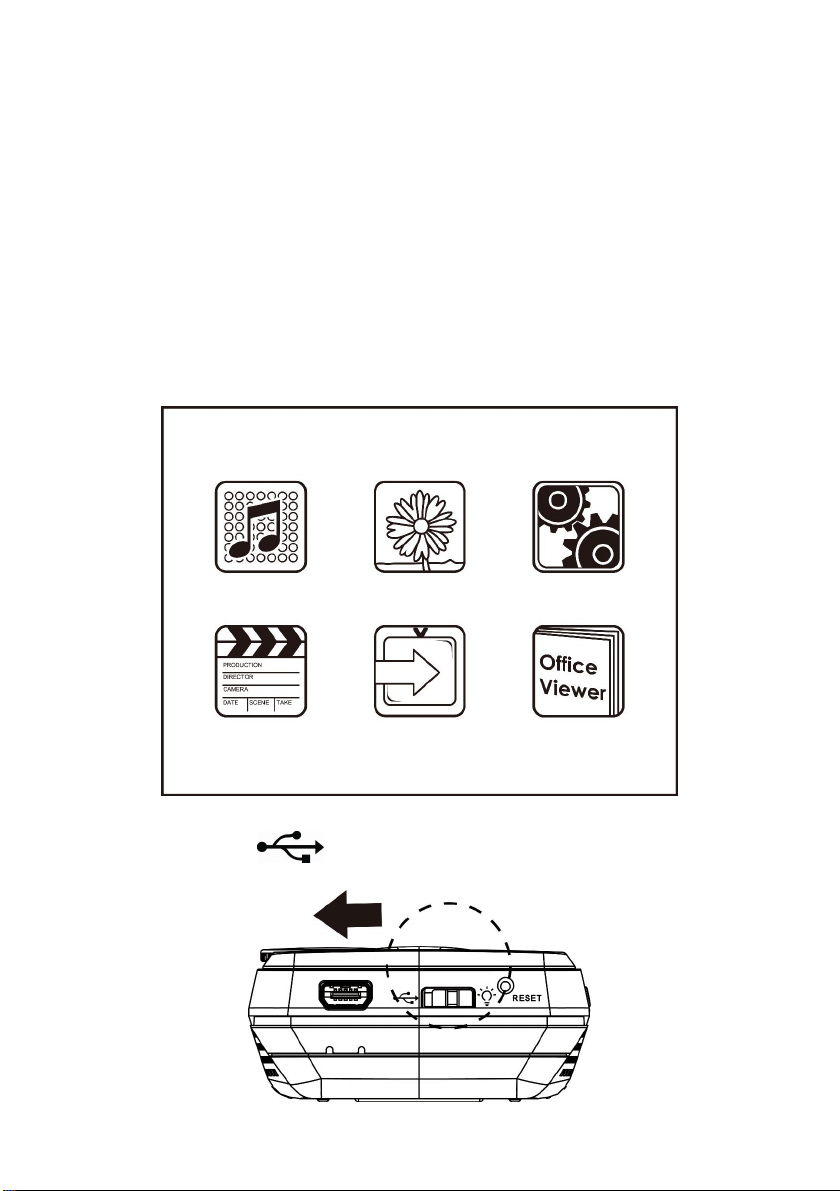
Main Menu
At power on, the main menu will display for choice. The RMP-8200 CINEMA
ON-THE-GO provides an easy way to view all functions with their own icon.
Each file list icon, when chosen, displays a listing of all files in the internal
memory or Micro SD card. For example, when you choose the document file
list, The RMP-8200 CINEMA ON-THE-GO will display all *.doc and *.pdf files.
Main MENU
1. MP3
2. Photo files
3. Settings
Audio Option
Display Option
Timer Mode
System Option
Languages
Information
System Upgrade
4. Video files
5. AV in
6. Office Viewer
Micro SD Card: When a Micro SD card is installed in the slot, this icon will
Page 16

16
display in the list. Select icon to display the contents of the Micro SD card.
Video and Audio File Support
There are many video and audio file formats. They contain various types of
encoded video and audio. The table below shows the file type and video and
audio codecs that the RMP-8200 CINEMA ON-THE-GO can read the decode.
The table shows the file containers and video and audio formats that the
RMP-8200 CINEMA ON-THE-GO supports. Because of differences in video
and audio encoders, some of these files that are listed may still not play.
Video Files Support
Video
Decoder
H.264 BP, L3 D1, 30fps 2Mbps
MPEG4 ASP, SP, AVC D1, 30fps 2Mbps
Audio or
Speech
Decoder
MP3
Container Video Decoder
*.avi H.264, MPEG4 MP3
*.mp4 H.264, MPEG4
*.mov H.264, MPEG4
*.3gp H.264, MPEG4 AMR-NB or AMR-WB
Image
Container
*.jpg JPEG 7MB
*.bmp Bitmap 2MB
Profile, Level Max. resolution & fps Max. Bitrate
Layer, Version,
or Mono/Stereo
MPEG-1 layer 1,
2, and 3 Audio
Audio Format Max. MPixels
Sampling Frequency Max. Bitrate
48kHz 320kbps
Audio or Speech
Decoder
MP3 or AMR-NB or
AMR-WB
MP3 or AMR-NB or
AMR-WB
Setting
Operation
Page 17

17
Play the music; the music is playing
Pause the music; the music is paused
Stereo sound is on
left channel is on
right channel is on
next - skip the music for next one
previous - back to previous one
Play all Once; This plays all music once on either the MicroSD card or internal
memory and then returns to the media file list. The play location depends on the
first song played
Shuffle play: plays music at random
Repeat this one; Plays the selected file one time and returns to the media file list
Repeat All: This plays all music continuously on either the MicroSD card or
internal memory. The play location depends on the first song played
Pause Playback
1. Press the MENU button to pause video and audio playback.
2. Press the MENU button again to resume playback.
Skip to Previous or Next File During Playback
1. Press the BACK
back to file list.
2. Press the NEXT
previous file.
Return to File List
and choose button and press to be
button to skip or Press the PREVIOUS to the
Page 18

18
Press the BACK button to return to the Main Menu.
Photo View
The photo view displays thumbnails of files in the internal memory or the Micro
SD card. You can show one picture at a time or a slideshow, with or without
background music in the photo view
Photo File Support
The RMP-8200 CINEMA ON-THE-GO can open and display bitmap (.bmp),
gif and jpeg (.jpg) files. The RMP-8200 CINEMA ON-THE-GO supports up
to a 2M (two megapixel) bitmap file or a 7M (seven megapixel) jpeg file.
View a Photo
1. Use the key pad buttons to select a photo as wished to view. The
RMP-8200 CINEMA ON-THE-GO will display up to 35 photo thumbnails
at a time. Press the DOWN button to see other thumbnails further down
the file list.
2. Press the MENU button to view the photo.
Skip to the Next or Previous Photo
Press the BACK button on the key pad and press the NEXT button
to skip to the next file in the file list or Press the PREVIOUS to the
previous in the file list.
Start and Pause a Photo Slideshow
Page 19

19
1. Once the thumbnails is on, press button to start the photo slideshow.
2. During a photo slideshow, press BACK to pause the slideshow. Move
to and press to resume playback.
3. During a photo slideshow, press button to turn on background music
from the files in music files and press back
for turning off background music during slideshows.
Return to File List
Press the BACK (in amber) button to return to the photo thumbnail
view.
button back to Setting
Settings
Audio Option – press UP and Down to select
Equalizer – Press MENU and move UP and DOWN to select your
preferred sound field from Normal, Classical, Jazz, Pop, Rock &
Bass and press Menu to confirm
Background music – Move
Track – Press or to select from Left, Right to Stereo
Display Option – Press UP and Down to select
Brightness – Press
Gamma – Press or to select from MODE 0 TO 15
Timer Mode – Photo Slide Interval
Press
System Option – Press UP and Down to select
Load Default Setting – Press Yes or No to load your default Settings
Format Memory – Press “Yes” or “No” to format internal memory
or to select from High to Medium
or to select from 5, 10, 20, 30 or 60 Seconds
press “Yes” will format memory which will lead your
files deleted.
to turn on and to turn off.
Page 20

20
Format MicroSD Card – Press “Yes” or “No” to format memory
press “Yes” will format memory of Micro SD card
which will lead your files deleted.
Languages – Press MENU and move UP and DOWN to select your
preferred language from English, Traditional Chinese, Simplified
Chinese, French, German, Spanish, Portuguese, Italian, Turkish
or Japanese.
Information – Shows model name, SW version, Manufacture Date, and
memory sizes
System Upgrade – If a software update becomes available, ROYALTEK
will post the file and instructions on the ROYALTEK
website.
The following instructions will guide you to upgrade the RMP-8200 CINEMA
ON-THE-GO.
For update, you need to
1. Copy and paste the folder (Folder name: upgrade) into the root of your
Micro SD card.
2. Insert the Micro SD card into RMP-8200 CINEMA ON-THE-GO and plug in
AC adaptor.
3. Switch on the power and find the screen as below then select setting icon.
Page 21

21
4. Select “System Upgrade”.
5. Then your will see the message as below. Please wait around 10 minutes.
6. If you want to upgrade the system, please select “Yes”.
7. You will find the flicker of screen while upgrading. When the progress
finished, the system will reboot automatically. While it shows the start up
Page 22

22
screen, the system upgrade is complete.
When the main menu disappears, the connection succeeded and home screen
shows
You can proceed with the data transfer.
Note:
To conserve power, The RMP-8200 CINEMA ON-THE-GO will stop projecting
an image while connected to a computer USB port.
To project, switch to side as and unplug USB cable.
The main menu will show.
When the update is performed, all files on RMP-8200 CINEMA
ON-THE-GO will be deleted. Please back up your files on the internal
memory before performing the update.
A/V in
See Page “Connecting to a composite Video Device”
Page 23

23
Once a video source device is on, RMP-8200 CINEMA ON-THE-GO projects
the video. Press the BACK button to return to the main menu.
Office Viewer
Selecting a File and Opening It
1. Navigate to a file by pressing the up or down button on the key pad.
2. Press the MENU button to the open the file.
Document and PDF Files
The RMP-8200 CINEMA ON-THE-GO uses the Picsel File Viewer to open
and view Microsoft® Word files and Adobe PDF files.
Document File Support
Supported Versions
The office viewer supports Microsoft® Word 95, Microsoft® Word 97,
Microsoft® Word 2000, Microsoft® Word 2003, Microsoft® Word 2007 doc
and docx files, and and Adobe® PDF versions 1.0 to 1.4..
Font Support
The RMP-8200 CINEMA ON-THE-GO has limited font support and the
office viewer will automatically try to substitute unsupported fonts. Font
substitutions may lead the document page layout to look different on The
RMP-8200 CINEMA ON-THE-GO. If no font substitutions are available, the
text will display as blanks. The office viewer supports embedded fonts in
PDF documents but not Microsoft® Word documents. The office viewer will
use the embedded font rather than The RMP-8200 CINEMA ON-THE-GO's
system fonts.
Note:
If the office viewer runs out of memory, some of the last pages in the file
may display as blank pages.
Tip: If the document file contains special fonts or formatting, save the file in
PDF file format and embed the fonts. The embedded fonts will be part of
the file and eliminate font substitutions.
Page 24

24
Embedded Objects Support
The office viewer supports autoshape, lines, and Microsoft® Excel® and
PowerPoint® objects. Some objects have limited or no support and will be
substituted or left blank.
Viewing a Document; word, excel, presentation and pad file
1. Choose
wish to view. The RMP-8200 CINEMA ON-THE-GO will display seven
files at a time. Press the DOWN button to see other files further down the
file list.
2. Press the MENU button to display the document.
3. Zoom in and Pan around a page
Once the document is open, press the MENU button on the keypad to
zoom in the document page. The page will magnify each time you press the
MENU button. The zoom in levels are: 1x (normal), 2x, 4x and 8x, then
back to the normal. You can pan around the page which is magnified by
using the key pad buttons UP
and press MENU on the key pad to select the document as
, DOWN , RIGHT & LEFT
Scrolling Through Pages
press the UP and DOWN buttons on the key pad to scroll through
the document pages while the page is normal.
Return to File List
Press the BACK button to return to the main menu.
Office Files Support
Supported Versions of Microsoft® Excel®
The office viewer supports Microsoft® Excel® 95, Microsoft® Excel® 97,
Microsoft® Excel® 2000, Microsoft® Excel® 2003, and Microsoft® Excel®
2007 xls and xlsx files.
Font and Number Support
The RMP-8200 CINEMA ON-THE-GO has limited font and number support
and the office viewer will automatically substitute unsupported fonts or
numbers.
Page 25

25
Viewing a Spreadsheet File
1. Use the UP and DOWN buttons on the key pad to select the
document as wish to view. The RMP-8200 CINEMA ON-THE-GO will
display seven files at a time. Press the DOWN
files further down the file list.
2. Press the MENU button to open the document.
3. Zoom in and Pan around a page
Once the document is open, press the MENU button on the keypad to
zoom in the document page. The page will magnify each time you press the
MENU button. The zoom in levels are: 1x (normal), 2x, 4x and 8x, then
back to the normal. You can pan around the page which is magnified by
using the key pad buttons UP
, DOWN , RIGHT & LEFT
button to see other
Scrolling Through Pages
Press the UP and DOWN buttons on the key pad to scroll through
the document pages while the page is normal,
Return to File List
Press the BACK
Note:
During magnify and pan operation in a spreadsheet, the image quality will
degrade for a brief moment and then return to normal.
button to return to the main menu.
Select Another Spreadsheet
When the page is not magnified, press the UP and DOWN buttons
on key pad to select another worksheet in the workbook.
Return to File List
Press the BACK
button to return to the main menu.
Page 26

26
Presentation Files
The RMP-8200 CINEMA ON-THE-GO uses the Picsel FileViewe to open
and view Microsoft® PowerPoint files.
File Support
Supported Versions Of Microsoft® PowerPoint® The office viewer supports
Microsoft® PowerPoint® 95, Microsoft® PowerPoint® 97, Microsoft®
PowerPoint® 2000, Microsoft® PowerPoint® 2003, and Microsoft®
PowerPoint® 2007 ppt and pptx files.
Font Support
The RMP-8200 CINEMA ON-THE-GO has limited font support and the
office viewer will automatically substitute unsupported fonts. Font
substitutions may lead the presentation slide layout to look differently on
The RMP-8200 CINEMA ON-THE-GO.
Embedded Objects Support
The office viewer supports autoshape, lines, and Microsoft® Excel® and
Word objects. Some objects have limited or no support and will be blank.
Viewing a Presentation
1. Use the UP and DOWN buttons on the key pad to select the
document as wish to view. The RMP-8200 CINEMA ON-THE-GO will
display seven files at a time. Press the DOWN button to see other
files further down the file list.
2. Press the MENU button to open the document.
3. Zoom in and Pan around a page.
Once the document is open, press the MENU button on the keypad to
zoom in the document page. The page will magnify each time you press the
MENU button. The zoom in levels are: 1x (normal), 2x, 4x and 8x, then
back to the normal. You can pan around the page which is magnified by
using the key pad buttons UP
, DOWN , RIGHT & LEFT
Scrolling Through Pages
Page 27

27
Press the UP and DOWN buttons on the key pad to scroll through
the document pages while the page is normal,
Return to File List
Press the BACK button to return to the main menu.
Note:
save the file in pdf file format and embed the fonts if the document file
contains special font or format. The embedded fonts will eliminate font
substitutions.
Cleaning The RMP-8200 CINEMA ON-THE-GO
1. Turn off The RMP-8200 CINEMA ON-THE-GO and disconnect power and
other cables.
2. Use a soft cloth to wipe off dust.
3. Never use cleaning chemicals or solvents to clean the device which may
cause the plastic parts off-colored.
Page 28

28
Product Specification
Technology LCOS
Resolution 640 X 480 (VGA)
Brightness Up to 15 lumens
Language
Contrast Ratio 200:1
Image Size 8 ~ 60" (203 - 1524mm)
Projection Distance 22 ~ 200 cm
Aspect Ratio 4:3
Zoom & Focus Manual
Internal memory 2GB
External memory Micro SD/T-Flash
USB Data transfer, Battery charging
Input source AV IN
Speaker Stereo(0.5W)
Power Supply 5V,2A, 110 – 240V
Weight 145g (with battery)
Dimension 132 x 53 x 23 mm
Battery 3.7V, 1800 mAh
Charge time 2.5 hours(by Power adaptor)
Operating Temp. of
battery
English/Traditional Chinese/Simplified Chinese/French/ German/
Spanish / Portuguese/Italian /Turkish/Japanese
Charge:0 ~ 45°C
Discharge:-20 ~ 60°C
Operating Time
Operating Temp. 0 ~ 30°C
Storage Temp. -20 ~ 60°C
Temp. protection
Video:80min(high brightness)
Music:4.5 hours
OSD display:
Warring: 100°C @light source NTC temp.
Or 80°C @ panel
Shut down:110°C @light source NTC temp.
Or 82°C @ panel
Page 29

29
Green:Power
*LED indicator
File format
Right after Red LED light is on, plug in with attached power adaptor immediately
is recommended. If not, the system will automatically shut-off to protect battery
from over-discharge. To solve the shut-off, plug in with the power adapter in place,
switch off and then switch on. The system should work properly.
Amber:Charge
Red:Low battery
Blue:Key pad
Video:H.264, MPEG4, AVC
Audio:MP3
Picture:JPG, JPEG, BMP
Other:Word, Power Point, Excel, Text, PDF reader
Trouble Shooting
Q: The device will not turn on.
A: • The battery is installed in the wrong orientation. See “Insert the battery” on
page 4
Try to remove and replace the battery.
• The battery is not properly installed, or the power adapter is not connected to
the device and a working wall outlet. Test the electrical outlet by plugging
another electrical device (like a CD,DVD player) into the wall outlet to confirm
that the wall outlet works.
Q: The status indicator is red or no light
A: • The battery needs to be charged or reinstalled.
Q: The image is not visible or is very dim.
A: The ROYALTEK RMP-8200 CINEMA ON-THE-GO is a battery-operated device
and requires in controlled lighting conditions for good performance. The image
may appear very dim in brightly lit rooms.
• Project the image on a flat, white surface.
• Decrease the light on the surface where the image is being projected.
• Decrease the size of the image.
Q: My video device is connected to the device but the device will not display
Page 30

30
the video.
A: Unplug the AV cable from the device and the home screen will display.
Plug the AV cable into the device and the icon in the upper-left corner of the
image will display the “AV cable” icon. The video output on some devices is
turned off by default. Please refer to the device’s documentation for details on
enabling the video output.
Q: We tried to play iPhone's photos, but pictures couldn't be showed up
through RMP-8200 Cinema-on-the-GO.
A: • Choice the iPod / iPhone TV OUT function, but iPod/iPhone only can output
photo and video. Others function can't output.
• for iPod
Settings -> video -> TV Out Widescreen -> ON.
Q: Why use RMP-8200 then mobile have flicker problem in the main icon
txt?(Nokia supoort Tv-out function mobile)
A: • Please follow the below procedure to setting.
Tools->Setting->General->Enhancement->TV-Out->Flicker filter (Select "ON")
Support
Need help?
For the latest firmware updates, User’s Manuals & Trouble Shooting please visit
www.royaltek.com or contact the local distributor
© 2010 RoyalTek Company Limited. All rights reserved. RoyalTek reserves the
right to make technical changes. RoyalTek assumes no liability for damages
incurred directly or indirectly from errors, omissions or discrepancies between this
product and the documentation. Other brands or logos are trademarks or
registered trademarks of their respective companies.
 Loading...