

Page 1
RoyalTek GPS Receiver RGM-2101/RGM-3000/REB-12R REV-2000 Operational Manual
RoyalTek Evaluation Kit REV-2000 Operational Manual
QUICK START::::
RS-232(P1) USB(P3)
SW2 SW4 SW3 SW4 SW3 SW5
REB-12R((((3.3V、、、、TTL、、、、HA)))) → ↑ ↑ ↓ ↑ →
REB-12R((((5.0V、、、、TTL、、、、HA)))) ← ↑ ↑ ↓ ↑ →
REB-12R((((3.3V、、、、TTL、、、、HS)))) → ↑ ↑ ↓ ↑ ←
REB-12R((((3.3V、、、、RS232、、、、HS)))) → ↑ ↓
REB-12R((((5.0V、、、、TTL、、、、HS)))) ← ↑ ↑ ↓ ↑ ←
REB-12R((((5.0V、、、、RS232、、、、HS)))) ← ↑ ↓
REB-2101、、、、RGM-2101 → ↑ ↑ ↓ ↑
RGM-3000
→ ↑ ↑ ↓ ↑
←
←
1
SW4
SW3
SW2
SW5
Page 2
RoyalTek GPS Receiver RGM-2101/RGM-3000/REB-12R REV-2000 Operational Manual
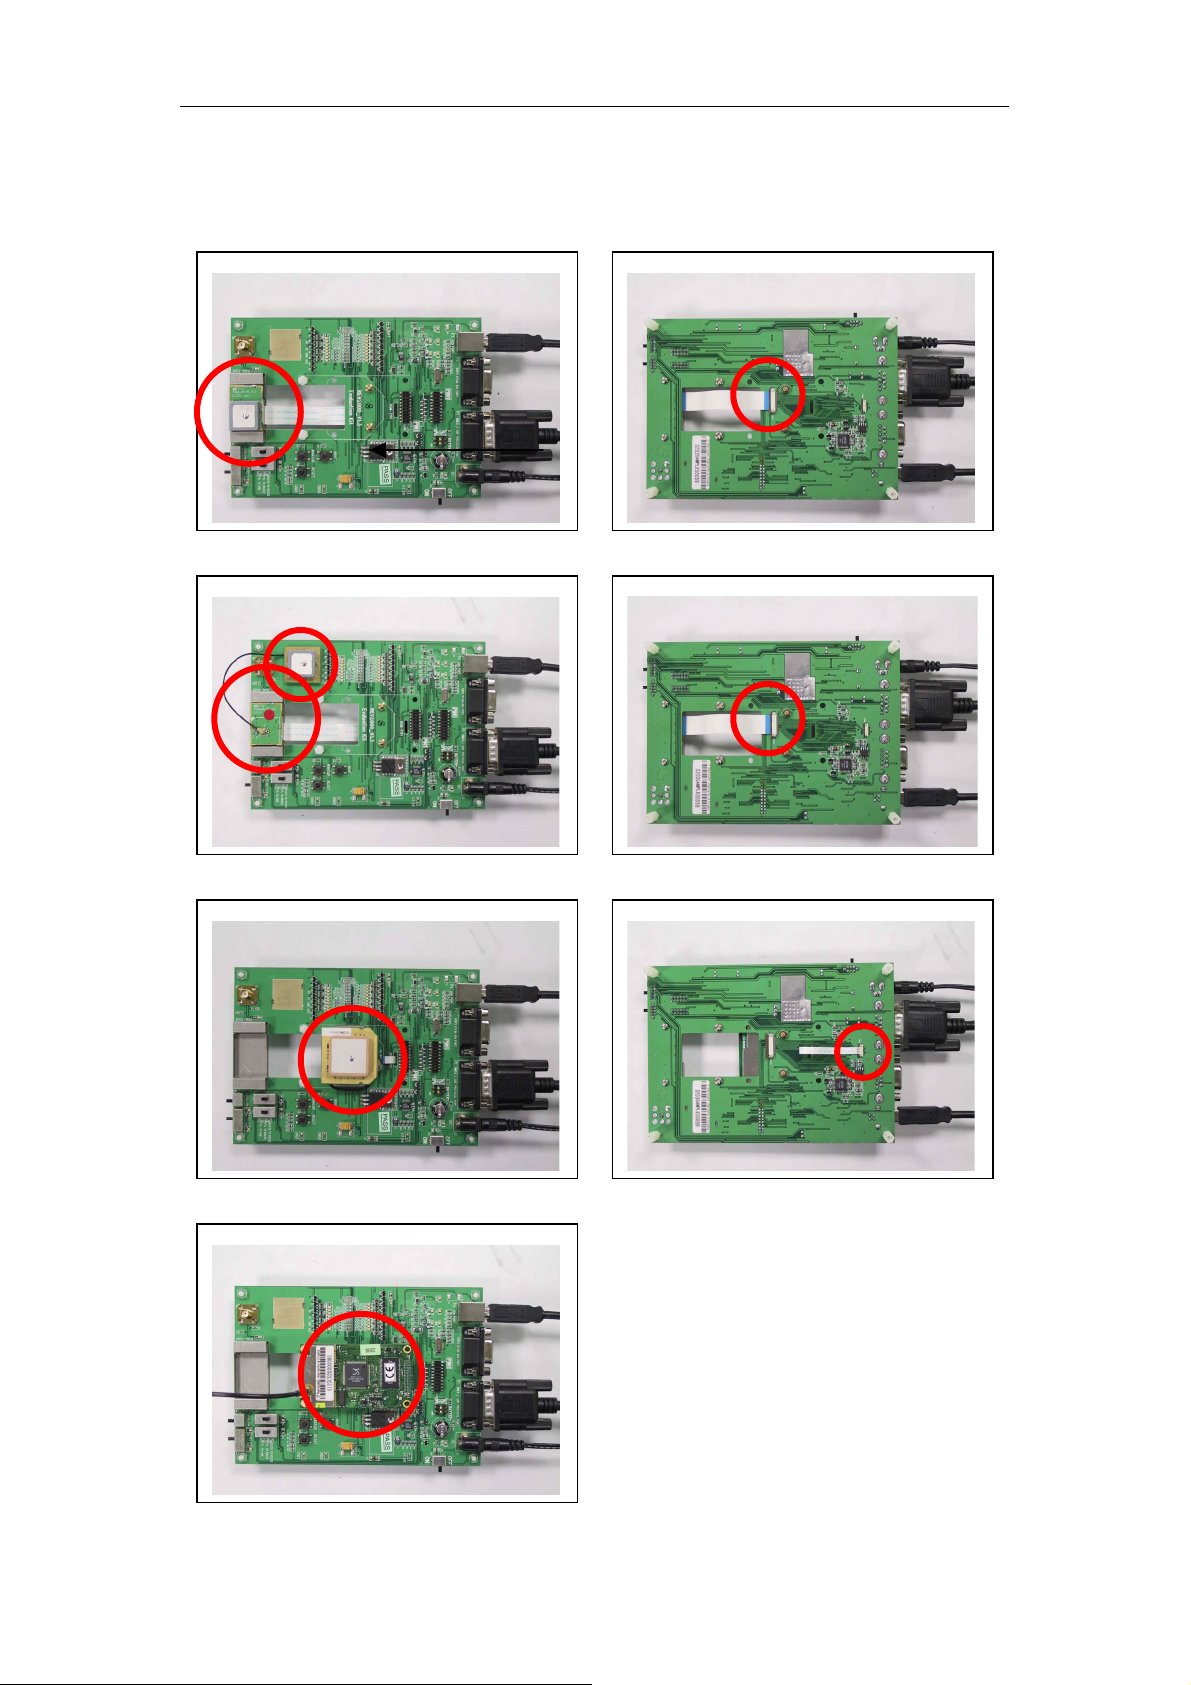
Installation Photo
RGM-3000M ( TOP )
RGM-3000E
( BOTTOM )
RGM-2101M
REB-12R
2
Page 3

RoyalTek GPS Receiver RGM-2101/RGM-3000/REB-12R REV-2000 Operational Manual
Introduction
REV-2000 is an evaluation kit for Royaltek GPS
series, RGM-2101/ RGM-3000/ REB-12R /
REB-2101。It is convenient to test the GPS
performance、cold start / warm start / hot start、
position update and so on by using the REV-2000.
REV-2000 helps you understand the operation and
performance of Royaltek’s GPS in a couple of
minutes. It can also provide you to design the OEM
products that use RoyalTek’s GPS .
Packing list
The evaluation kit contains as follows:
2. Power Adapter
No. Items Specification Quantity Description
1
2 Power adapter
3 RS232 Cable 9pin/1.5M 1
4 USB Cable A to B type/1.5M 1
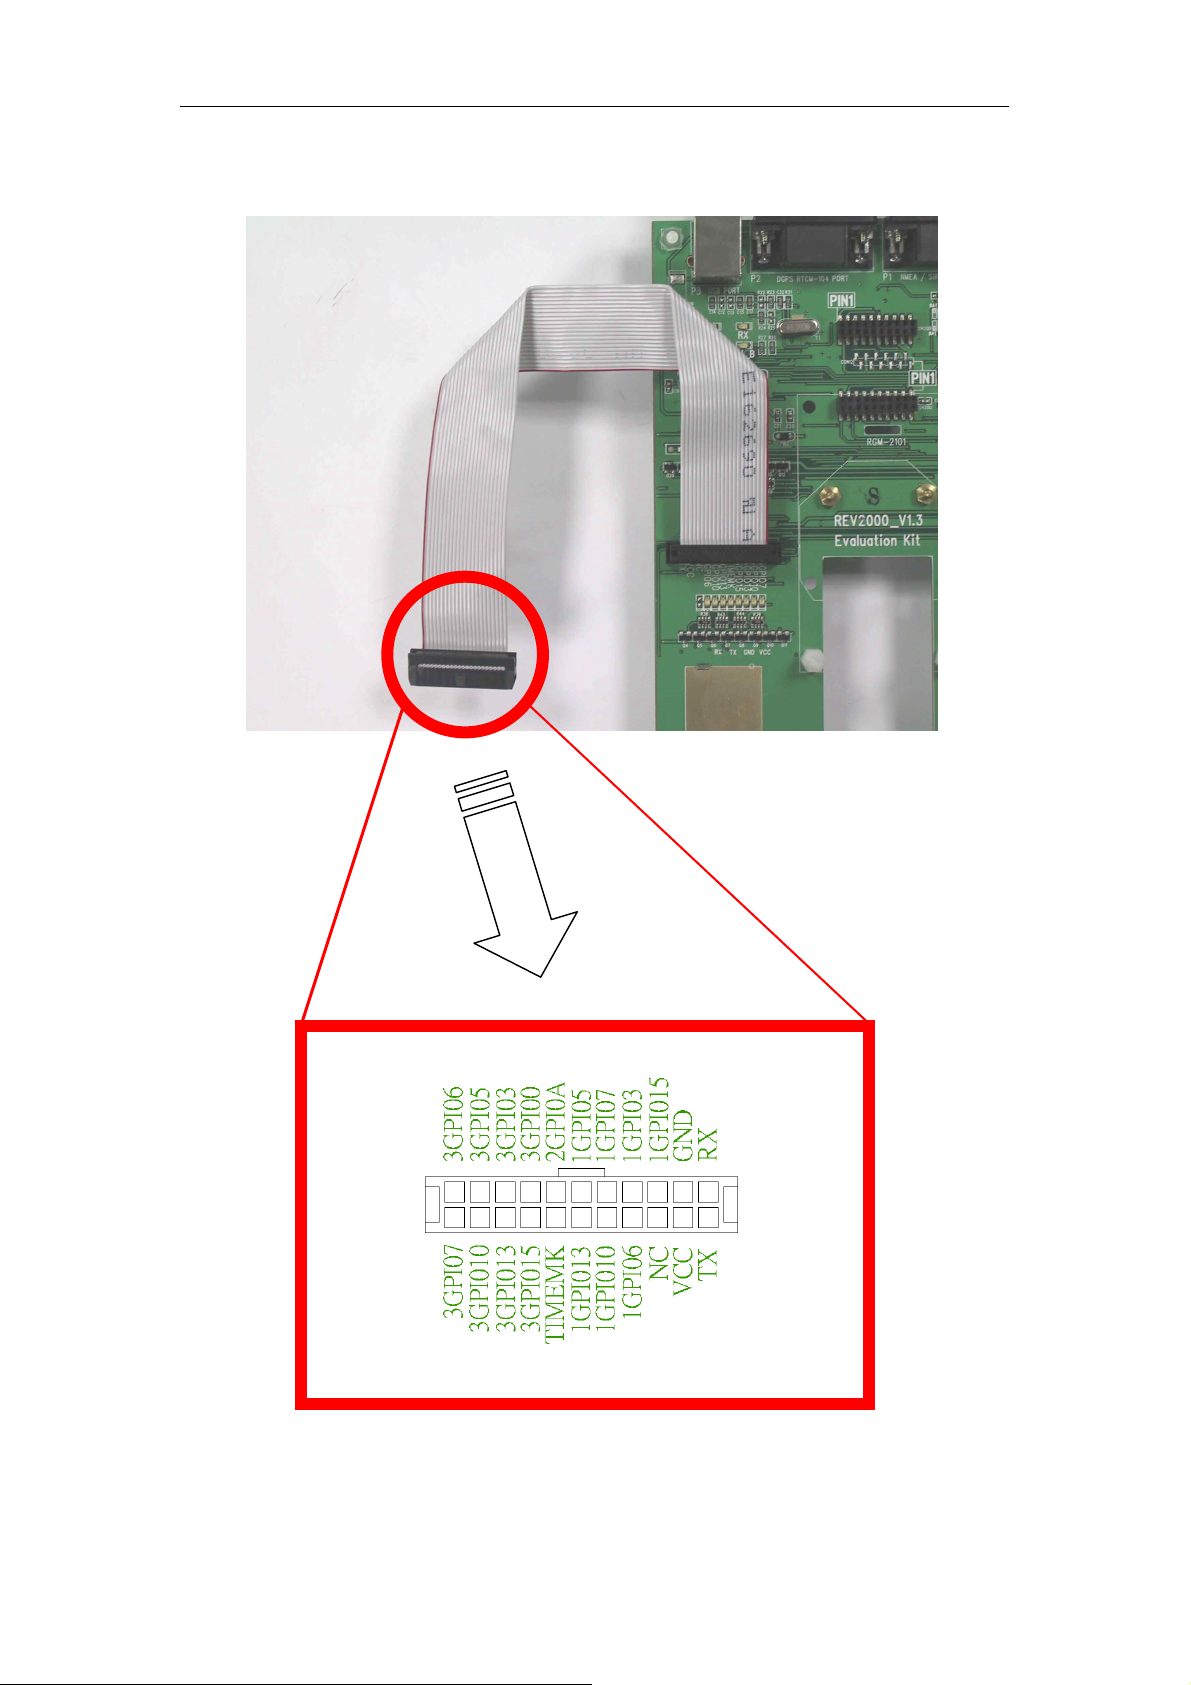
5 Test Cable FLAT cable 22P 200mm 1
REV-2000
Evaluation Board
3. RS232 Cable
4. USB Cable
115*160mm 1
AC 110V or AC 220V
7.5V/1.0A/2.5mm/1.8M
5. Test cable
1. REV-2000 Evaluation board
Provide power for GPS and convert the
signal from TTL to RS-232 or USB
connecting to PC.
1 AC/DC adaptor
RS-232 cable connecting evaluation
board with PC.
USB cable connecting evaluation board
with PC.
FLAT cable connecting evaluation board
with User’s Machine.
3
Page 4
RoyalTek GPS Receiver RGM-2101/RGM-3000/REB-12R REV-2000 Operational Manual
Getting started
To Setup REV-2000
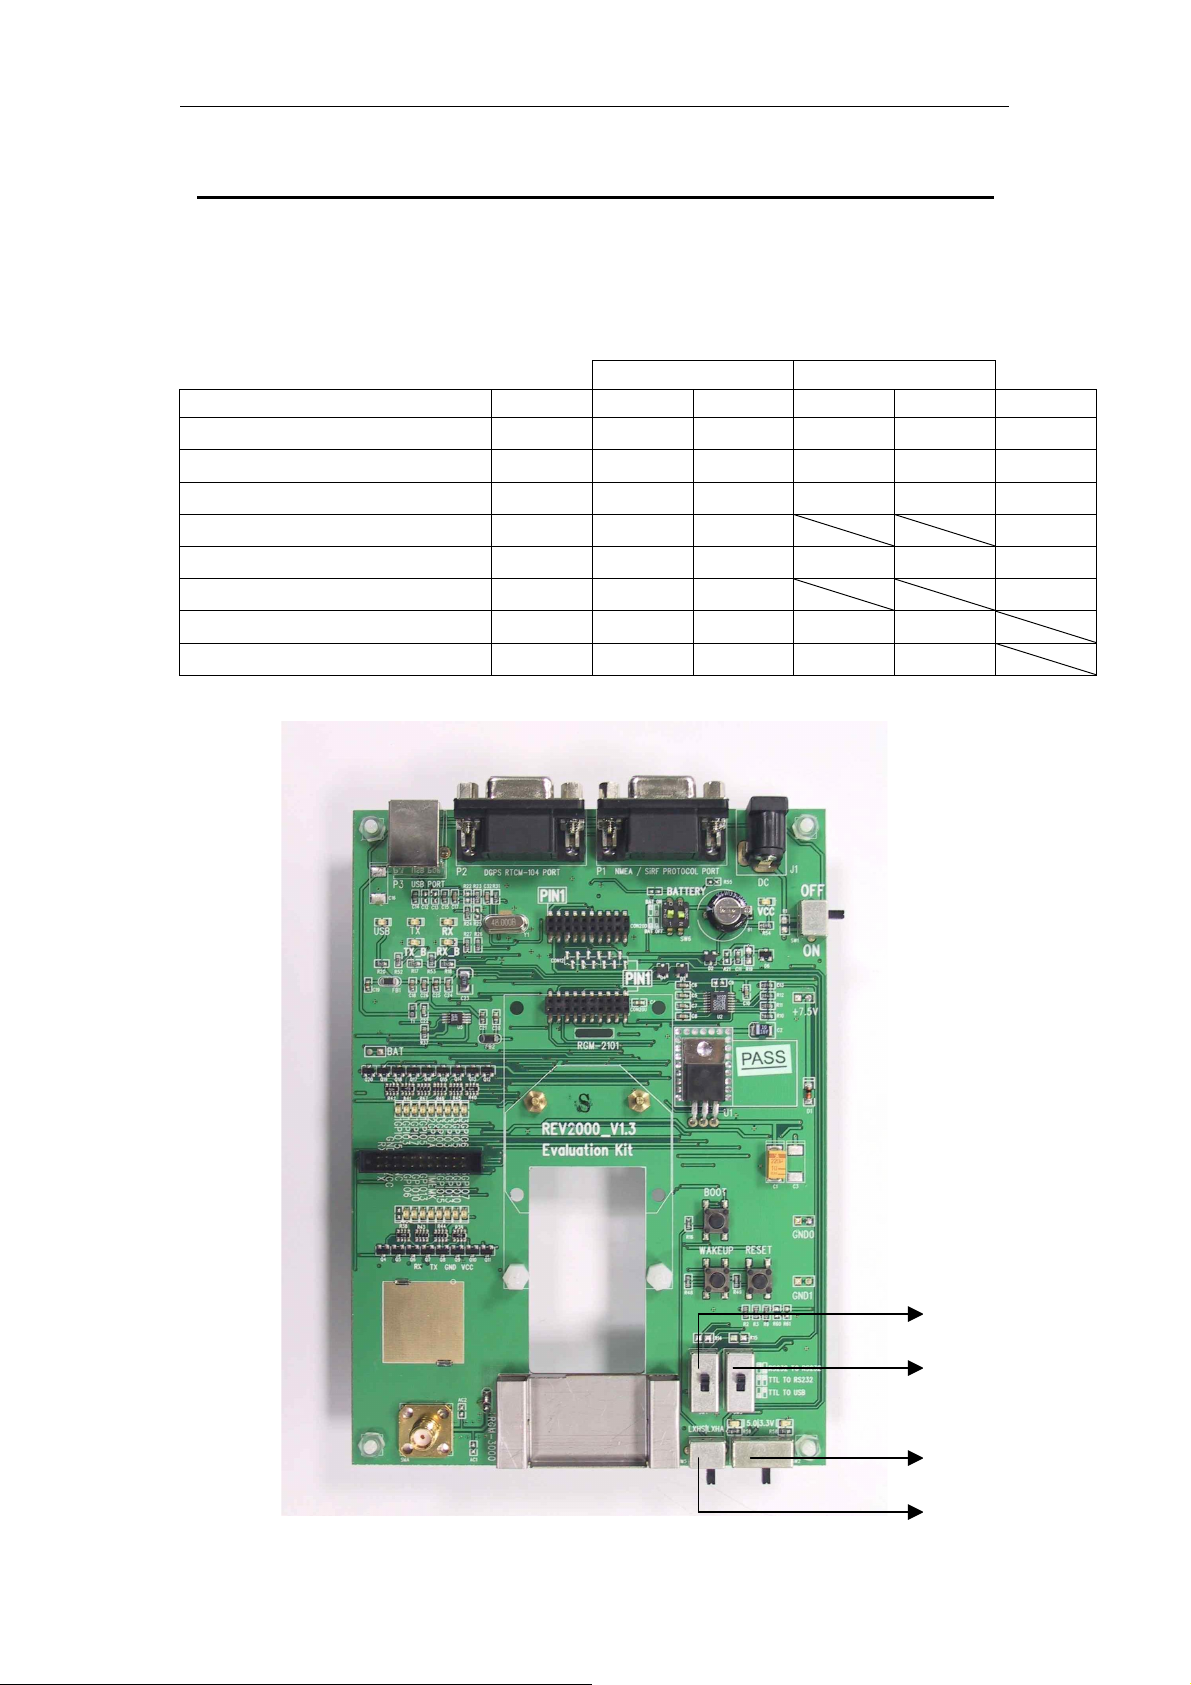
The interface of REV-2000 is shown as follows:
Test IO connector
LXHS/LXHA switch
Power swutch
REB-12R socket
P3 USB port
P2 DGPS RTCM-104
port
P1 NMEA / SiRF port
Connecting to PC/Laptop
Power adapter
Transmitting
switch
WAKEUP
switch
RESET
switch
BATTERY
BOOT
switch
RGM-3000
socket
switch
Power
switch
RGM-2101/REB-2101
socket
4
Page 5
RoyalTek GPS Receiver RGM-2101/RGM-3000/REB-12R REV-2000 Operational Manual
5
Page 6

RoyalTek GPS Receiver RGM-2101/RGM-3000/REB-12R REV-2000 Operational Manual
Power switch ( SW1 )
The Power switch is for power ON or OFF .
Power mode switch ( SW2 )
The power adapter of REV-2000 is 110V AC/ 7.5V
DC adaptor. It converts the 110 AC to DC.
RoyalTek can also provide you 220V AC power
adapter. Beware of the AC power of your office and
tell RoyalTek’s sales person for preparing the
correct power code for you.
REV-2000 provides 2 power modes on borad, 3.3V
and 5V. SW2: Left for +5V, Right for 3.3V. The
3.3V is for RGM-2101/ RGM-3000 / REB-2101.
The 5V is for REB-12R.
Transmitting switch ( SW4 、、、、SW3 )
RS232 TO RS232 : convert the signal from RS232
to RS-232 connecting to PC use P1.
TTL TO RS232 : convert the signal from TTL to
DC input is from 6.5V ~ 12V. We suggest you
use +7.5V as the DC input.
Reset switch
It is used for external reset.
Wakeup switch
It is used for external wakeup.
P1
This is NMEA/SiRF protocol output/input port.
Please connect it to PC or Laptop RS-232 port.
P2
This is DGPS input port.
P3
This is NMEA/SiRF protocol output/input port.
Please connect it to PC or Laptop USB port.
CON20D/CON20U
This is the socket for REB-12R. Please refer the
RS-232 connecting to PC use P1. TTL TO USB :
convert the signal from TTL to USB connecting to
PC use P3.
LXHS/LXHA switch ( SW5 )
It can choice the LXHS or LXHA of REB-12R.
BATTERY switch ( SW6 )
Enable: The battery will supply the power to engine
board or module.
Disable: The battery disconnected with engine
board or module.
BOOT switch
The BOOT switch is for program upgrade. When
push the BOOT switch, the GPS engine board is
waiting for program upgrade and output nothing
when running SiRF demo program.
Please refer the program upgrade session for
program update.
hardware interface section for the pin
assignment.
CON8
This is the socket for RGM-2101 or REB-2101.
Please refer the hardware interface section for the
pin assignment.
CON22
This is the socket for RGM-3000. Please refer
the hardware interface section for the pin
assignment.
RS-232 setup procedure
(1) Plug the REB-12R on the CON20D /
CON20U or Plug the RGM-2101 / REB-2101
on the CON8 or Plug the RGM-3000 on the
CON22
(2) Plug the active antenna into the external
DC input
The power input can be DC input instead of
using AC power adapter. The input range of the
antenna connector. The suitable view angle of
the active antenna is necessary. Caution:
Please do not put any metal stuff on the
antenna.
6
Page 7
RoyalTek GPS Receiver RGM-2101/RGM-3000/REB-12R REV-2000 Operational Manual
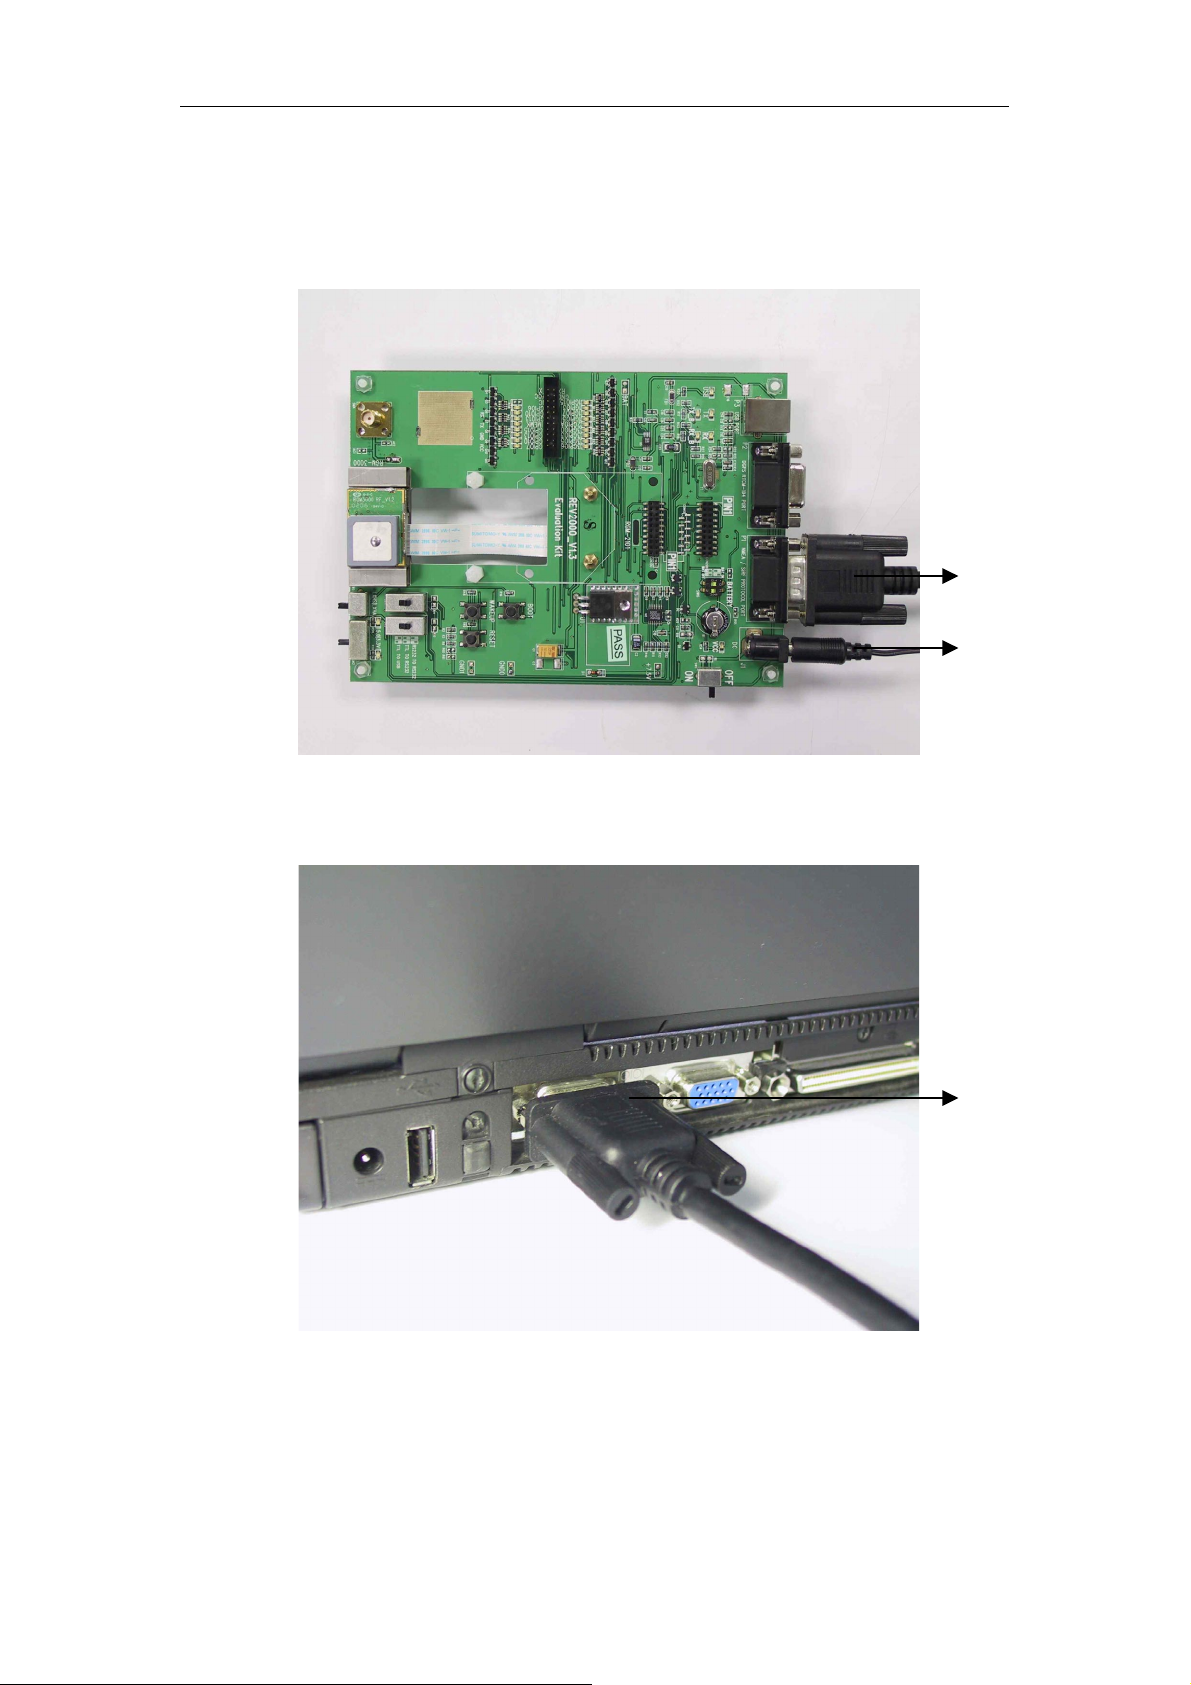
(3) Connecting the RS-232 cable between
REV-2000 P1 and PC.
(4) Plug the power adapter. (or connecting the
DC power input, 6.5V ~ 12V)
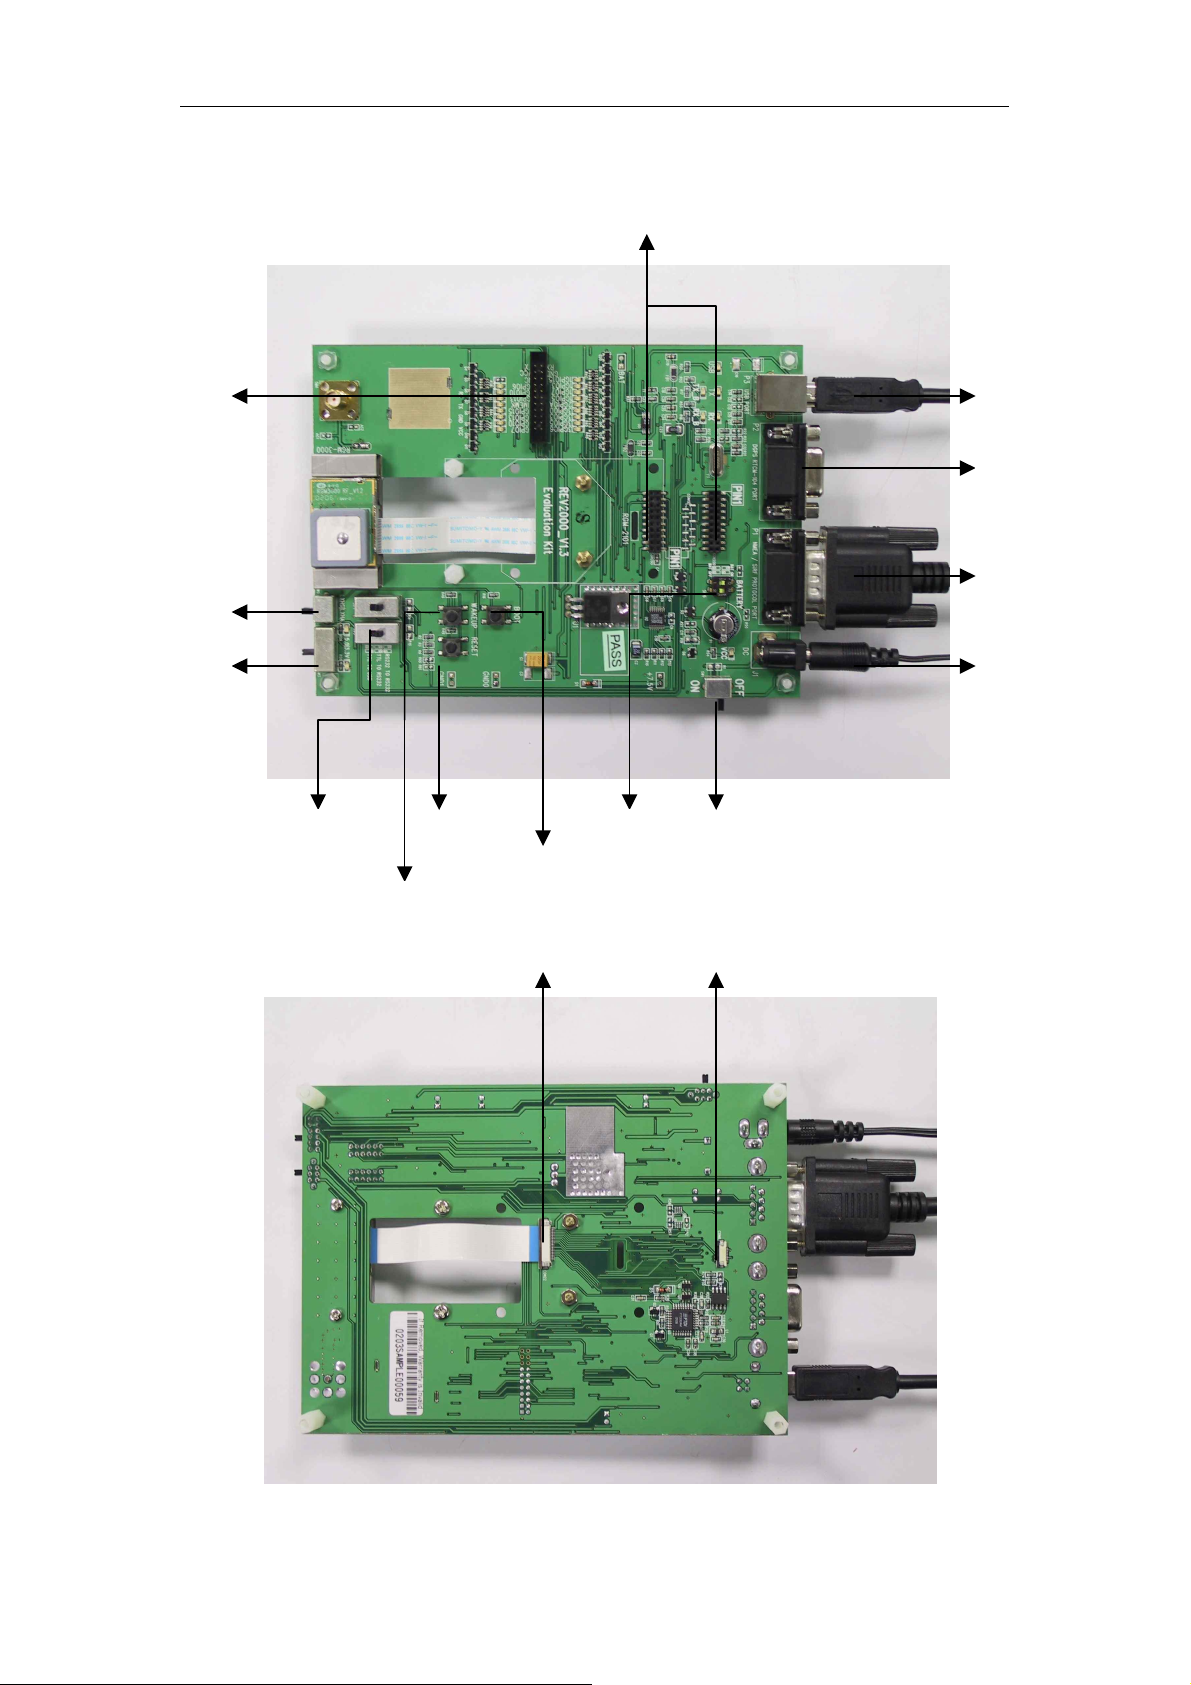
After you finish setup, it is like as follows:
COM port
AC power
COM port
7
Page 8

RoyalTek GPS Receiver RGM-2101/RGM-3000/REB-12R REV-2000 Operational Manual
USB setup procedure
(5) Plug the REB-12R on the CON20D /
CON20U or Plug the RGM-2101 / REB-2101
on the CON8 or Plug the RGM-3000 on the
CON22
(6) Plug the active antenna into the external
antenna connector. The suitable view angle of
the active antenna is necessary. Caution:
Please do not put any metal stuff on the
antenna.
(7) Connecting the USB cable between
REV-2000 P3 and PC.
After you finishing setup, it is as like as follows:
USB port
8
Page 9

RoyalTek GPS Receiver RGM-2101/RGM-3000/REB-12R REV-2000 Operational Manual
USB port
How to Install & Operate USB for
Windows ?
Getting Started
Step 1:Plug USB connector to REV-2000 P3.
Step 2: After plug to USB connector to your
Notebook PC or Handheld PC, it will automatically
detect the hardware and show up pop-up dialog as
follows. Click “Next>” button.
Assert the “Search for the best driver for your device”.
Click “Next>” button.
9
Page 10

RoyalTek GPS Receiver RGM-2101/RGM-3000/REB-12R REV-2000 Operational Manual
Please assert the “Specify a location” and
select the correct directory of the driver,
”\USB_DRIVER” in CD-Disc. Click the “Next>”
button.
It will find the driver from the CD-Disc
automatically. Click “Next>” button
10
Page 11

RoyalTek GPS Receiver RGM-2101/RGM-3000/REB-12R REV-2000 Operational Manual
The USB Serial converter driver is installed now.
You can check the COM port number
from the System properties now.
11
Page 12

RoyalTek GPS Receiver RGM-2101/RGM-3000/REB-12R REV-2000 Operational Manual
The default COM port is COM3 in this example.
Step 3:Choose the correct COM port for running the
map or navigation software.
12
Page 13

RoyalTek GPS Receiver RGM-2101/RGM-3000/REB-12R REV-2000 Operational Manual
To operate REV-2000
Install the SiRFDemo.exe
Copy the SiRFDemo.exe from the CD-ROM
\Toolkit\SiRFDemo to the destination path, e.g.
“c:\RoyakTek\REV-2000\Demo”. Add a shortcut of
SiRFdemo.exe on the desktop of Windows 98.
To use Sirfdemo.exe
(1) Double click the SiRFdemo.exe.
(2) Choose the “Supplied Data” radio button.
Click the “Instrument(Measured Data)” check
box.
(3) Select the serial port, e.g. COM1. The default
baud rate of Reb-12R is 9600bps. Click the
OK.
(4) There are 6 menus on the menu bar: Setup,
View, Action, Navigation, Poll and Window.
13
Page 14

RoyalTek GPS Receiver RGM-2101/RGM-3000/REB-12R REV-2000 Operational Manual
Data source
setup
Signal Level
Tracking
Connect/
Disconnect
Toggle button
Map
Signal Level
view
Tracking view
Save
(5) Click the “Signal level”, “Tracking”, “Map”
Development view
buttons of the tool bar to enable the “Signal
Map view
level view”, “Tracking view” and “Map view”.
(6) Check the View / Messages / Development to
enable the development view.
14
Page 15

RoyalTek GPS Receiver RGM-2101/RGM-3000/REB-12R REV-2000 Operational Manual
(7) Click the to start testing.
(8) The other buttons of tool bar are explained as
follows:
: Pause the data reception.
:Log the data as a *.log file.
: Initialize Data Source
(9) After you click the , you can see the
NMEA output on the development view.
To switch from NMEA to SiRF protocol
Check Action / Switch to SiRF Protocol.
You could see the following screen after you switch to SiRF protocol.
15
Page 16

RoyalTek GPS Receiver RGM-2101/RGM-3000/REB-12R REV-2000 Operational Manual
12-Channel Signal Level Data:
Information Displayed Description
Satellite Number (SV) GPS satellite PRN number
Status (St) Satellite status
Azimuth (Az) Satellite azimuth (in degrees)
Elevation (EI) Satellite elevation (in degrees)
C/No Signal level (in dB-Hz)
Signal Level (-5 sec) 5-second history
Tracking view:
Green: Satellite is tracked and used to
calculate the navigation solution.
Blue: Satellite is tracked but is not used to
calculate the navigation solution.
Red: Satellite is lost tracked.
Development data view: It is for
development purpose not for user.
Map View: Demonstrate the GPS time,
Latitude, Longitude, Altitude and
Navigation mode etc.
Initialize Data Source
Click the
It provides the cold start, warm start and hot
start test functions. The receiver initialization
view is like follows:
button to initialize data source.
16
Page 17

RoyalTek GPS Receiver RGM-2101/RGM-3000/REB-12R REV-2000 Operational Manual
The definition of cold start, warm start and hot start is described as following table:
Option
Hot Start The Evaluation Unit restarts by using values stored in the internal of the GPS receiver.
Warm Start (No init) This option has the same functionality as Hot Start except that Ephemeris data and
Warm Start (init) This option clears all initialization data in the GPS receiver and subsequently reloads the
Cold Start This option clears all data that is currently stored in the internal memory of the GPS
Description
retains all other data.
data that is currently displayed in the GPS receiver initialization is cleared.
receiver including position, almanac, ephemeris, time, and clock drift.
To switch from SiRF protocol to NMEA protocol
(1)Select the “Action/Switch to NMEA Protocol” like follows.
(2) After you select the “Switch to NMEA Protocol”, it will show up a “Select NMEA Messages” dialog. Select
the NMEA Messages that you want to use.
17
Page 18

RoyalTek GPS Receiver RGM-2101/RGM-3000/REB-12R REV-2000 Operational Manual
(3) Determine the update rate for each NMEA
message
(4) Select the baud rate that you want to use from
the Baud Rate pull down menu.
(5) Click the OK button to save or Cancel button to
exit
(6) It will switch to NMEA protocol.
To Synchronize Protocol
When you don’t know what the protocol/baud
rate is set , you can use this option to synchronize
protocol. Select the Action/Synchronize Protocol
and Baud Rate. It will synchronize the protocol
and Baud Rate.
To Switch Trickle Power Parameters
from SiRFDemo.exe
There are two modes of low power operation:
(1) Trickle power: In TricklePower mode, the
power to is cycled periodically, so that it
operates only a fraction of the time.
(2) Push to fix: In Push-to-Fix mode, the receiver
is generally off, but turns on frequently enough
to collect ephemeris. So that, upon user
request, a position fix can be provided quickly
after power-up.
To enable trickle power mode from SiRFdemo.exe,
please select the “Action/Set TricklePower
Parameters” like following picture.
18
Page 19

RoyalTek GPS Receiver RGM-2101/RGM-3000/REB-12R REV-2000 Operational Manual
Then, it will show a “TricklePower parameters”
dialog for parameters setting. There are two
parameters of Trickle power that needs to be set,
“Update Rate and On Time”. The “Update Rate”
means the navigation update frequency. For example,
“1 sec” means output once per second and “2 sec”
means output once per 2 seconds. The “On time”
means running time in the output period. For
example, “200 ms” means the running time is 200
ms per navigation update. The duty cycle of trickle
power is determined by setting of “Update Rate” and
“On Time”. For example, if the “Update Rate” is 1
sec and “On time” is 200ms, the duty cycle is
200ms/1000ms = 20%. If the “Update Rate” is 2 sec
and “On Time” is 300 ms, the duty cycle is
300ms/2000ms = 15%. The duty cycle is limited to
5% ~ 50%. Since it will do some estimation in
trickle power, please tune the proper duty cycle that
can compromise the power consumption and
acceptable navigation performance. The
“ricklePower Prameters” dialog is shown as
following picture.
19
Page 20

RoyalTek GPS Receiver RGM-2101/RGM-3000/REB-12R REV-2000 Operational Manual
To change TricklePower parameters
from 12 pins interface.
Since it is NMEA output default, it needs to change
to SiRF protocol before change TricklePower
parameters. The procedure is described as follows:
(1) Use “Set Serial Port” command of SiRF
NMEA input messages.
$PSRF100,0,9600,8,1,0*0C<CR><LF>
It will switch from NMEA to SiRF protocol.
(2) Use “Set Trickle Power Parameters - Message
I.D. 151” to set the trickle power parameters.
(3) Use “Switch To NMEA Protocol – Message
I.D. 129” to switch back to NMEA protocol.
To upgrade GPS engine board program
(2) Run the SiRFProg.exe.
(3) Select the Target Loader File. Select dltarget.s
for STAR1. Select dlgsp2.bin for STAR2.
(4) Select the Ta rget file that need to be
programmed into flash memory.
(5) Select the COM port. Keep the Baud rate at
4800 for RGM-2101/3000 REB-2101 and
9600 for REB-12R.
(6) If you want to upload program to REB-2101,
please assert the GSP2 check box. But leave it
unasserted for REB-12R.
(7) Click Upload to begin programming flash
memory.
(8) Release the BOOT button.
(9) Now it will run the new program that uploaded
(1) Push and hold the BOOT button.
into flash memory.
20
Page 21

RoyalTek GPS Receiver RGM-2101/RGM-3000/REB-12R REV-2000 Operational Manual
NOTE::::
1. When you use USB to
2. Before you turn on the
3. REB-12R series have
Transmitting signal you
don’t need to plug the
power adapter because
USB can support power
to the evaluation kit .
power you must check
the voltage and
Transmitting signal
function if correct for the
product .
different connection type
so you should check if it
4. While you use USB port
to connect evaluation
kit,please be sure that
connection icon is
disconnected before you
do some adjsutment on
the dip sw or switch off
the power.Otherwise, the
USB port will hang & can't
be used .
was correctly mounted or
not by PIN1.
21
 Loading...