

Page 1
Navi@Mouse
GPS Receiver
User Manual
Page 2

RGM-1000
1
Contents
Contents.................................................................................................................1
What Is Navi@Mouse? ..........................................................................................2
What Have Inside the Package?............................................................................ 2
What Is GPS ? .......................................................................................................2
How to Install & Operate Navi@Mouse ( RS-232 ) ? .............................................3
How to Install & Operate Navi@Mouse ( USB ) for Windows 98?........................5
How to Install & Operate Navi@Mouse ( USB ) for Windows Me?..................... 11
How to Install & Operate Navi@Mouse ( USB ) for Windows 2000?..................15
How to test your Navi@Mouse.............................................................................24
Specifications.......................................................................................................28
Position update rate ............................................................................................. 29
Software Data ......................................................................................................30
Troubleshooting ...................................................................................................35
Appendix : Connector Interface............................................................................ 36
Limited Warranty..................................................................................................37
Page 3

RGM-1000
2
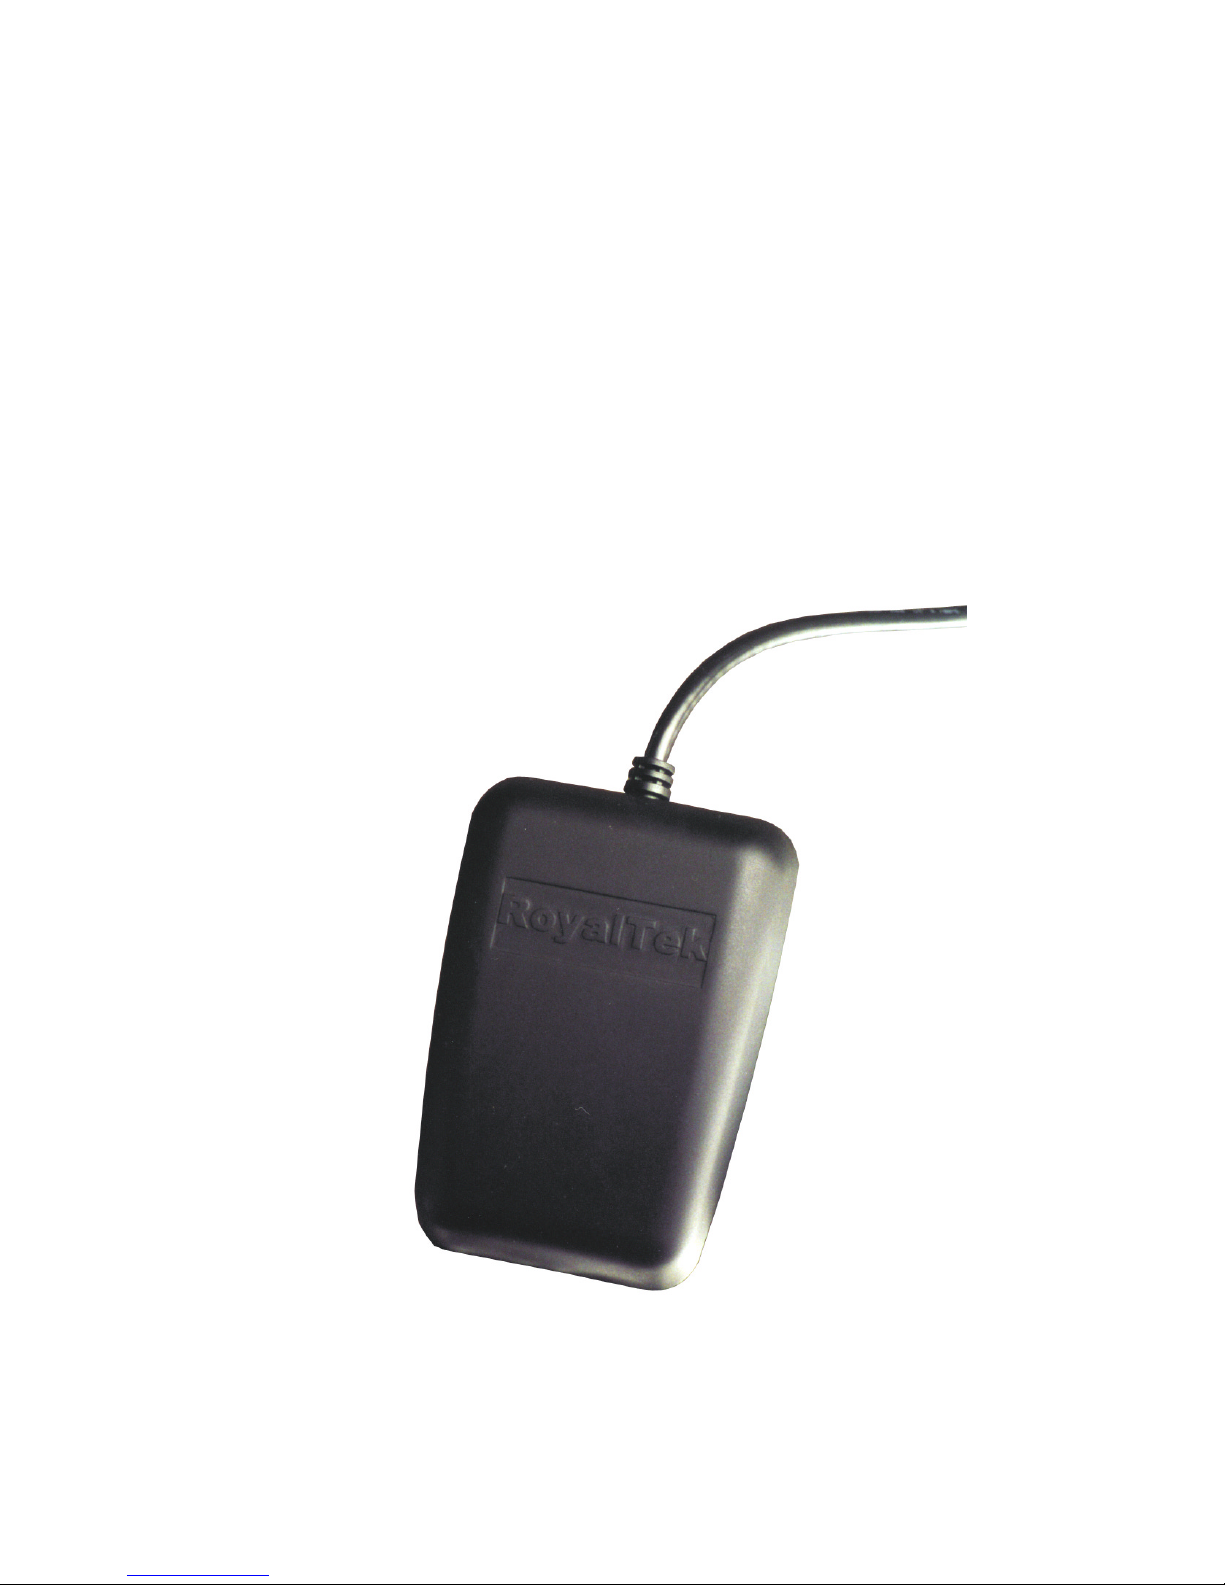
What Is Navi@Mouse?
Congratulations on your purchase of Navi@Mouse, a GPS (Global Positioning System) receiver for
a variety of applications. Navi@Mouse incorporates the latest GPS technology from the leading GPS
receiver manufacturer.
By connecting it to a notebook PC with the map or navigation software, Navi@Mouse helps you
locate places and points of interest, conduct personal & vehicle navigation, or conduct geographical
survey activity.
What Have Inside the Package?
Before you start up, make sure your package includes the following items. If any item is missing or
damaged, contact your dealer immediately. Please refer to the contact information on the last page of this
manual.
◆ GPS Receiver ◆ Application CD
◆ Cable for RS232 or USB (depending on what you buy
)
What Is GPS ?
In 1974 the USA Department of Defense started development of the Global Positioning System
(GPS), a constellation of 24 satellites that orbit 12,000 miles above the Earth. By triangulating the signals
from four of the satellites, a receiving unit on Earth can pinpoint its current location to within a few
meters. A GPS device receives the data from satellites and then converts the longitude, latitude, and
altitude (LLA) data into a location point. Position and navigation information is vital to a wide range of
professional and recreational activities including surveying, search and rescue, tracking, hiking,
navigating, and so forth.
Page 4
RGM-1000
3
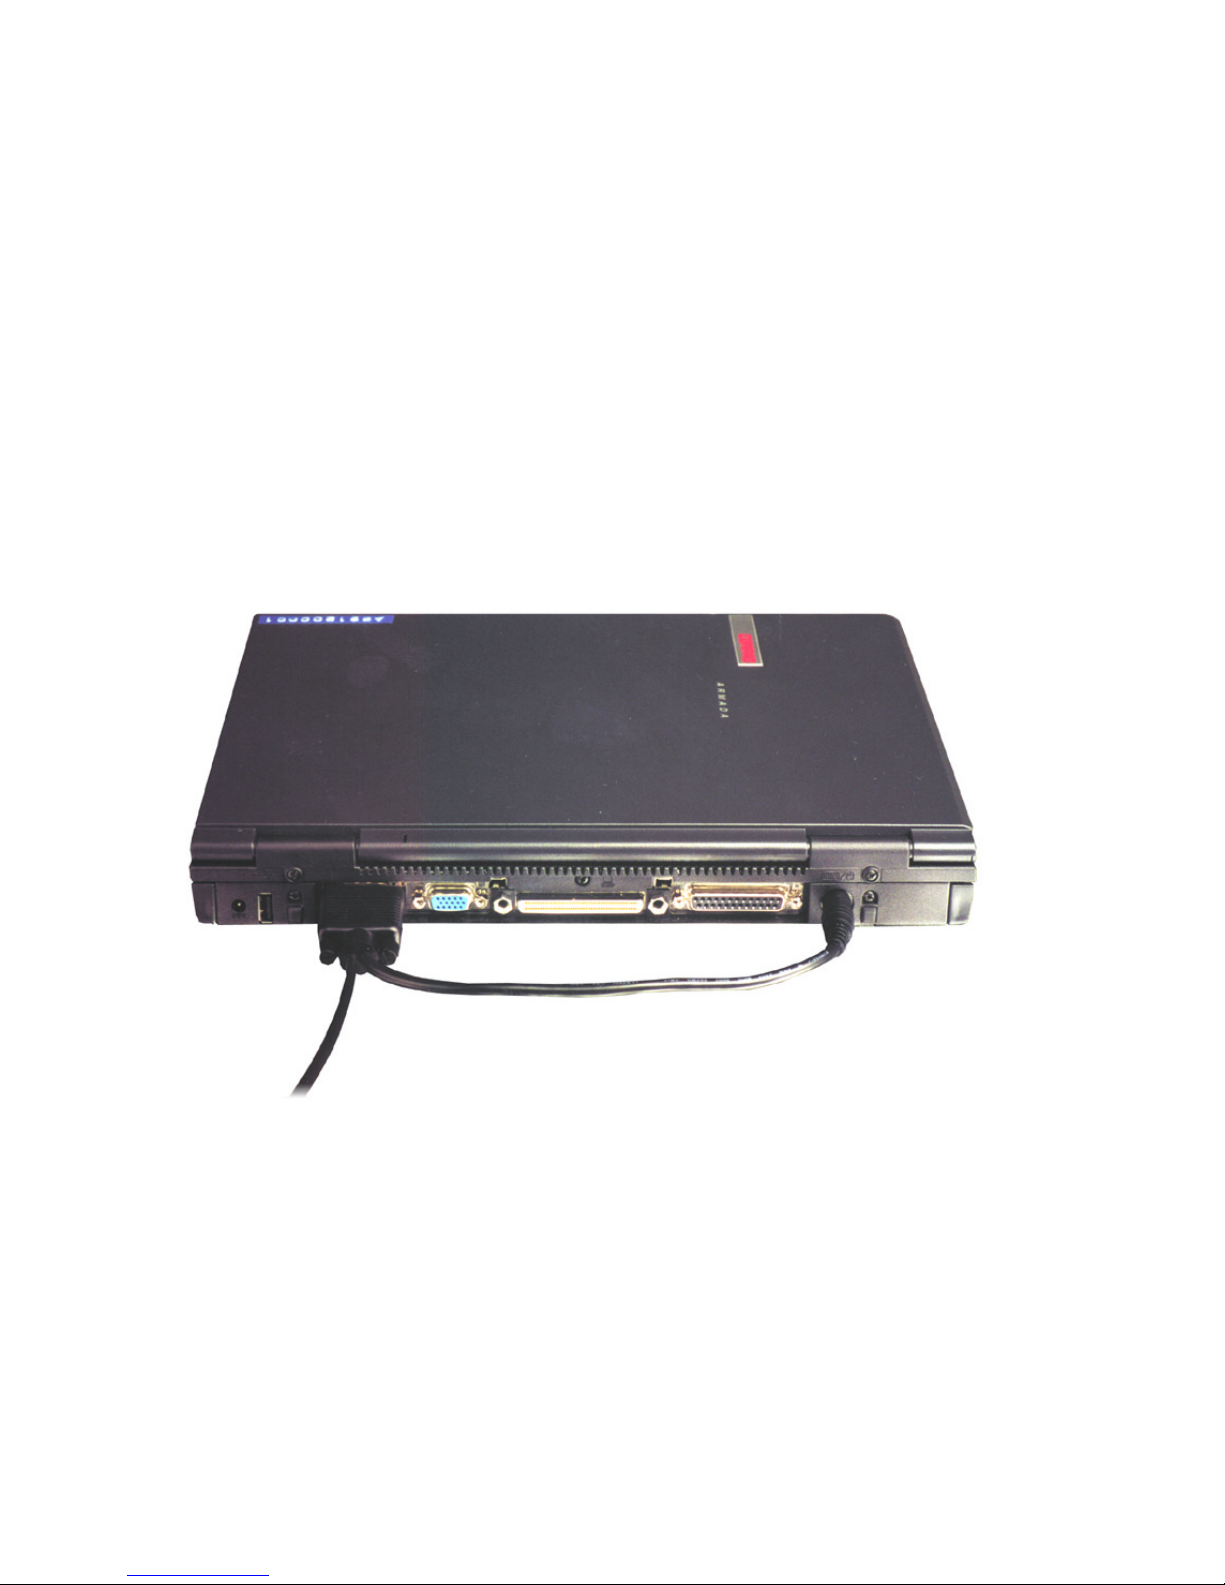
How to Install & Operate Navi@Mouse ( RS-232 ) ?
Getting Started
Step 1:Plug RS-232 (➀) to COM port of your Notebook PC or Handheld PC.
Step 2:Plug PS2 connector (➁) in the PS2 mouse outlet of your Notebook PC or Handheld PC.
Step 3:Place your Navi@Mouse on the outside roof of your vehicle with magnetic base.
Figure 1 Installation of PS2/RS-232
Step 4:Power on your Notebook PC or Handheld PC. If you have ordered a cigarette adaptor, please plug
the cigarette adaptor into the cigarette outlet of the car.
Step 5:Choose the correct COM port for running the map or navigation software.
Step 6:Run the Navi@mouse test program. Please refer to “
How to test your Navi@mouse
”.
➁
PS2
➀
RS-232
Page 5

RGM-1000
4
Figure 2 Installation of car cigarette power adaptor
Notice:
(1) Make sure the power is off before started.
(2) For safety reason, please do not install RGM-1000 while driving.
(3) To receive NMEA0183 navigational data, please use the Hyper Terminal program of Windows
95/98. Please setup the COM port connected with Navi@Mouse to:
Baud rate : 4800
Data bit : 8
Parity : None
Stop bit : 1
Flow control : None.
(4) The formats of NMEA messages are illustrated on Software Data section.
(5) To prevent from the poor contact, the 4-pin mini din connector was designed as good fitting. It is
strongly recommend that user doesn’t plug and unplug this connector frequently.
➀
RS-232
➁
PS2
➂
Cigarette
power adaptor
Page 6
RGM-1000
5
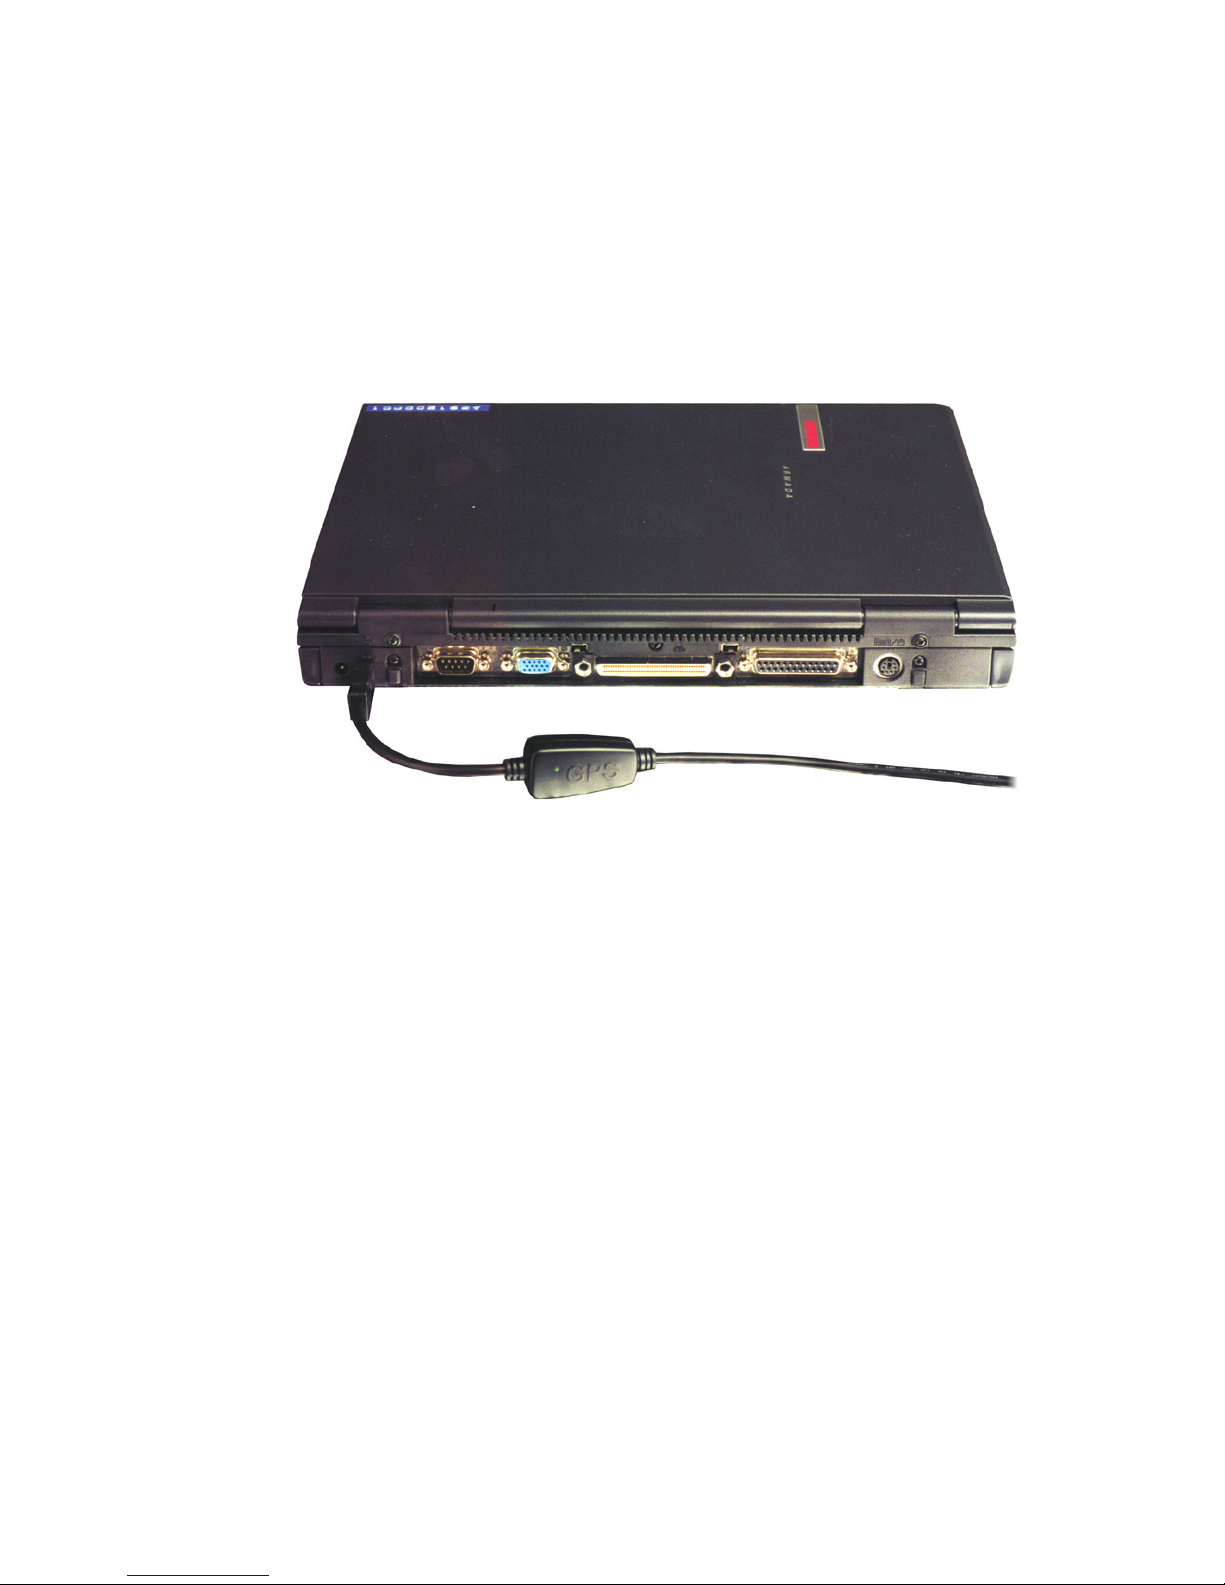
How to Install & Operate Navi@Mouse ( USB ) for
Windows 98
?
Getting Started
Step 1:Plug USB connector (➀) to USB port of your Notebook PC or Handheld PC.
➀
USB
Page 7
RGM-1000
6
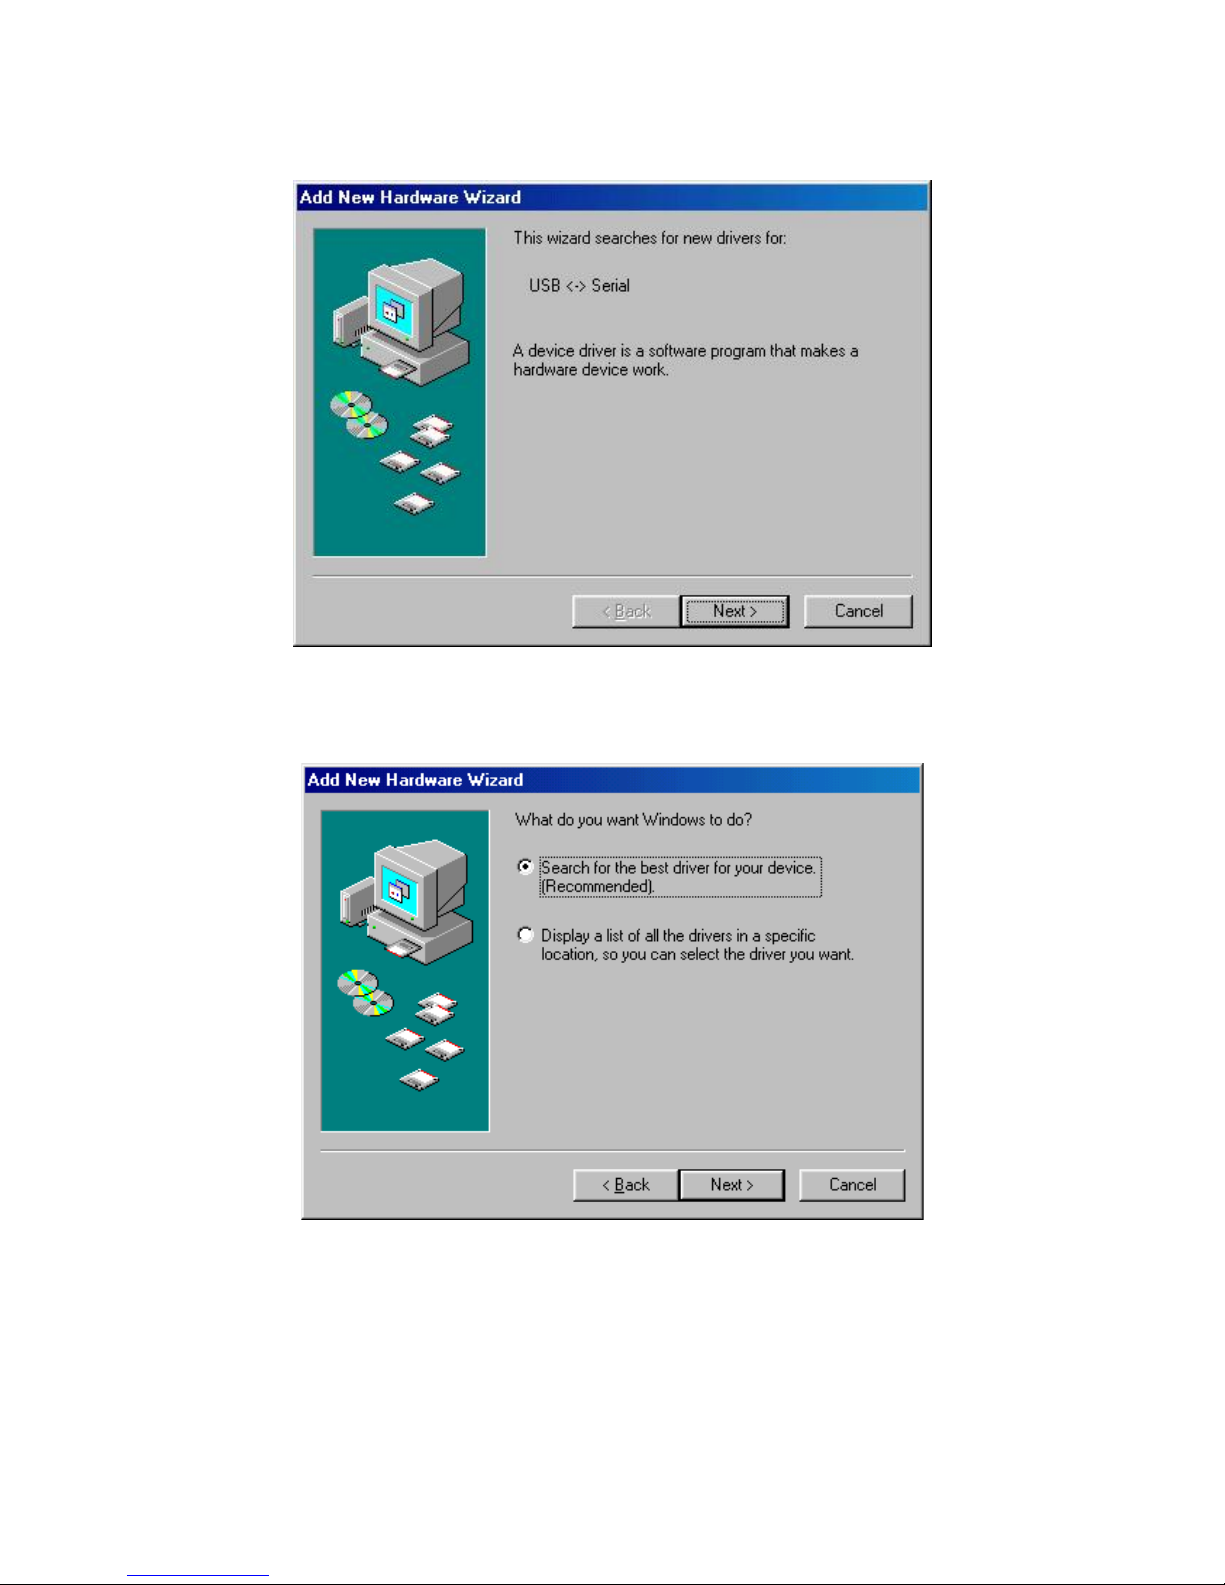
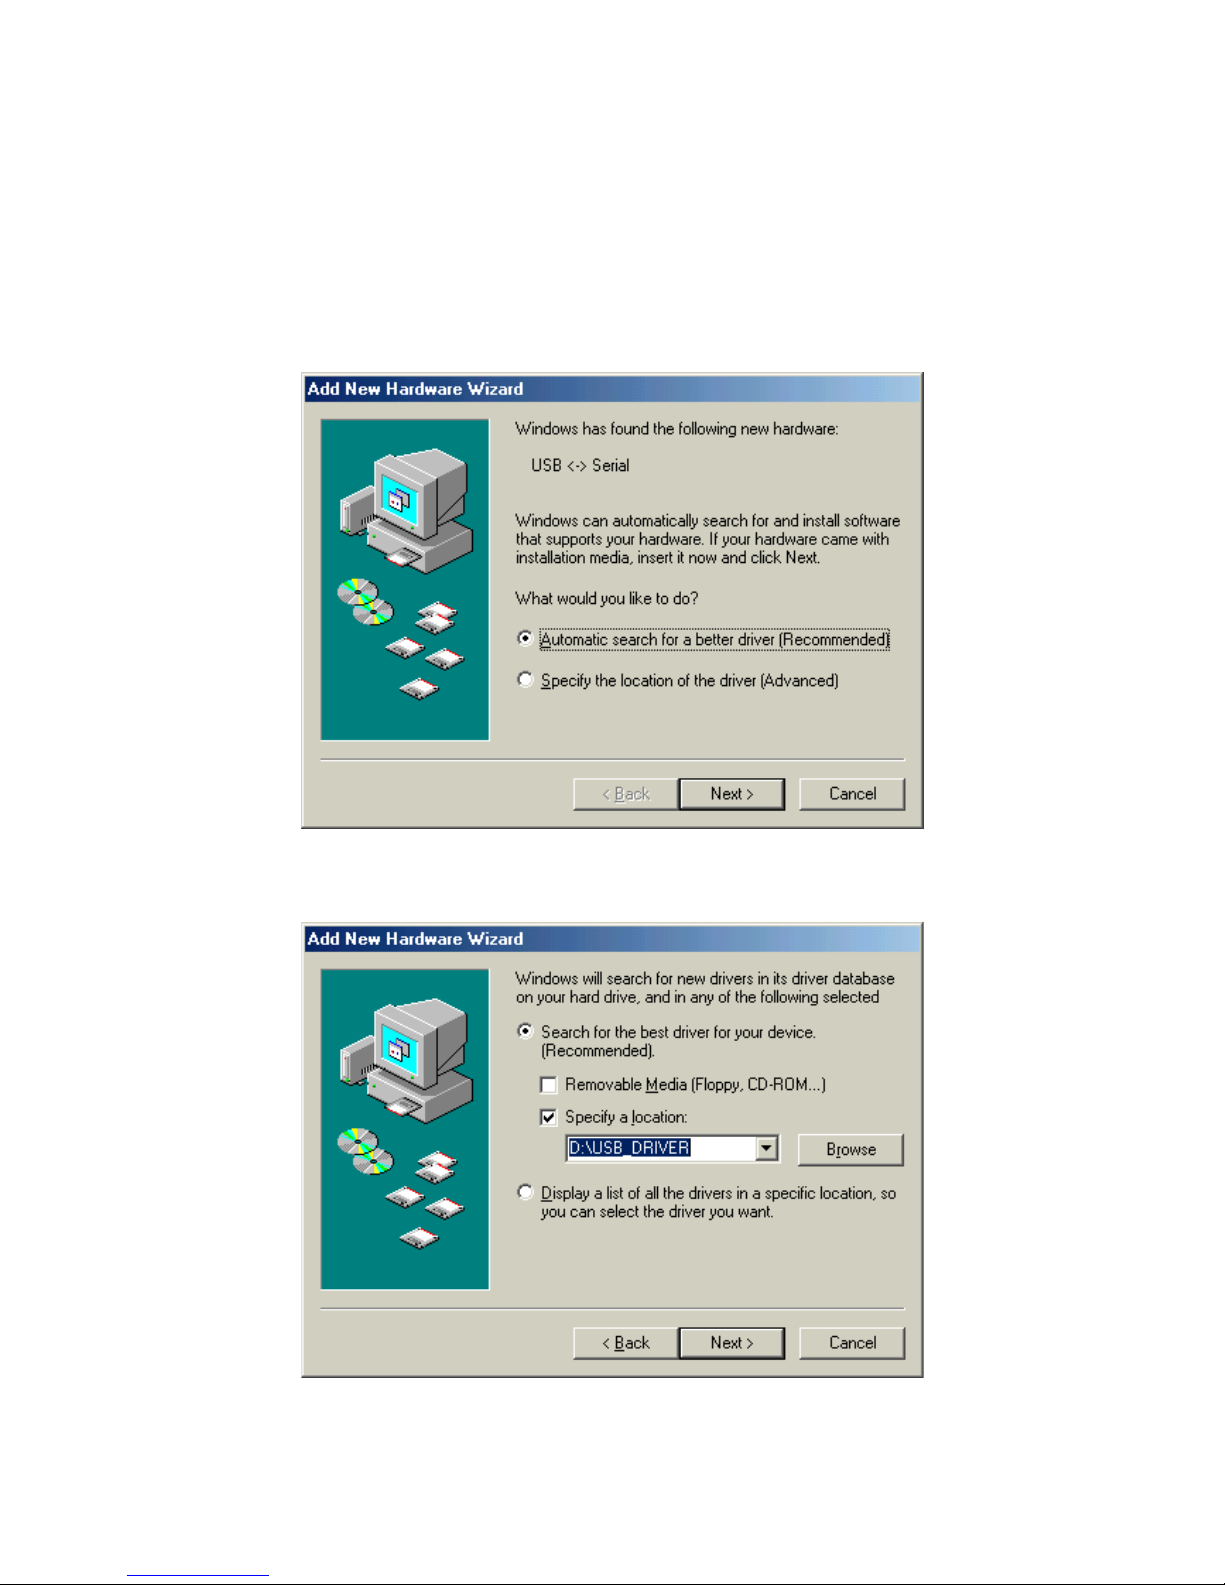
Step 2: After plug in the Navi@Mouse, it will automatically detect the hardware and show up pop-up
dialog as follows. Click “
Next>
” button.
Assert the “Search for the best driver for your device”. Click “
Next>
” button.
Page 8
RGM-1000
7
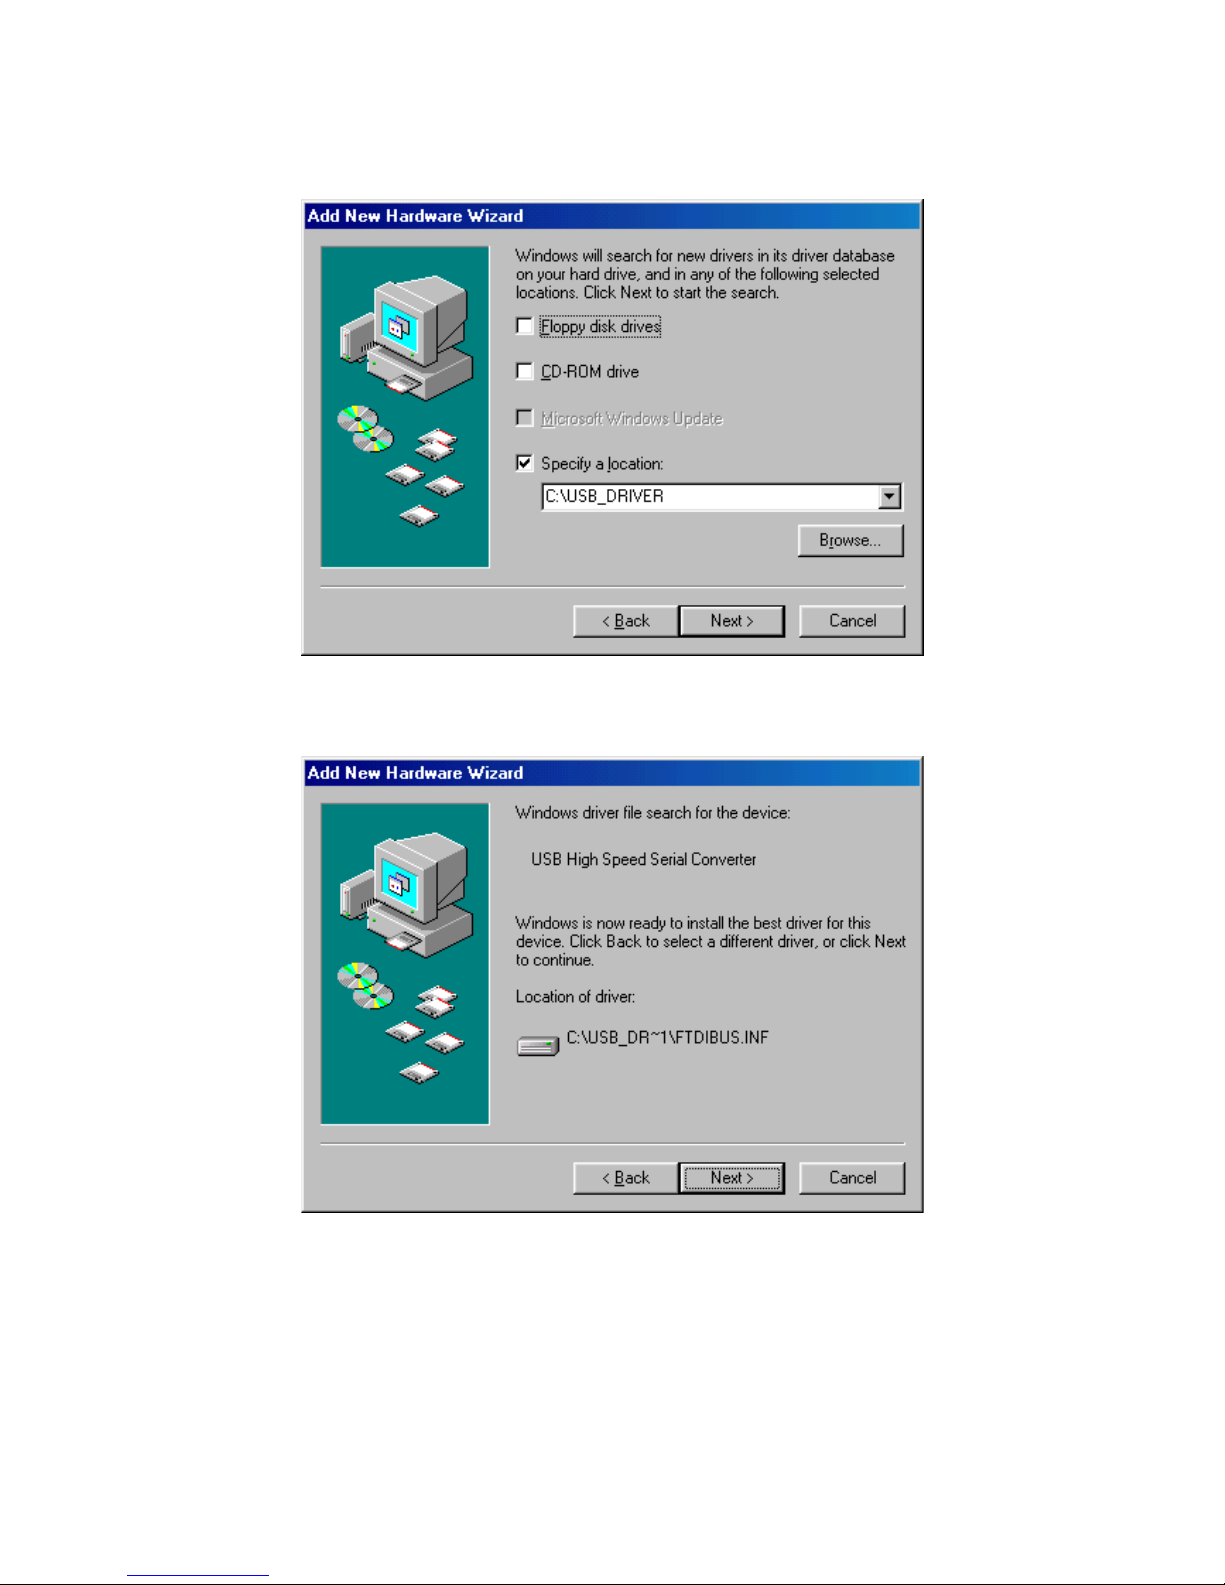
Please assert the “Specify a location” and select the correct directory of the driver,
”\USB_DRIVER” in CD-Disc. Click the “
Next>
” button.
It will find the driver from the CD-Disc automatically. Click “
Next>
” button.
Page 9
RGM-1000
8
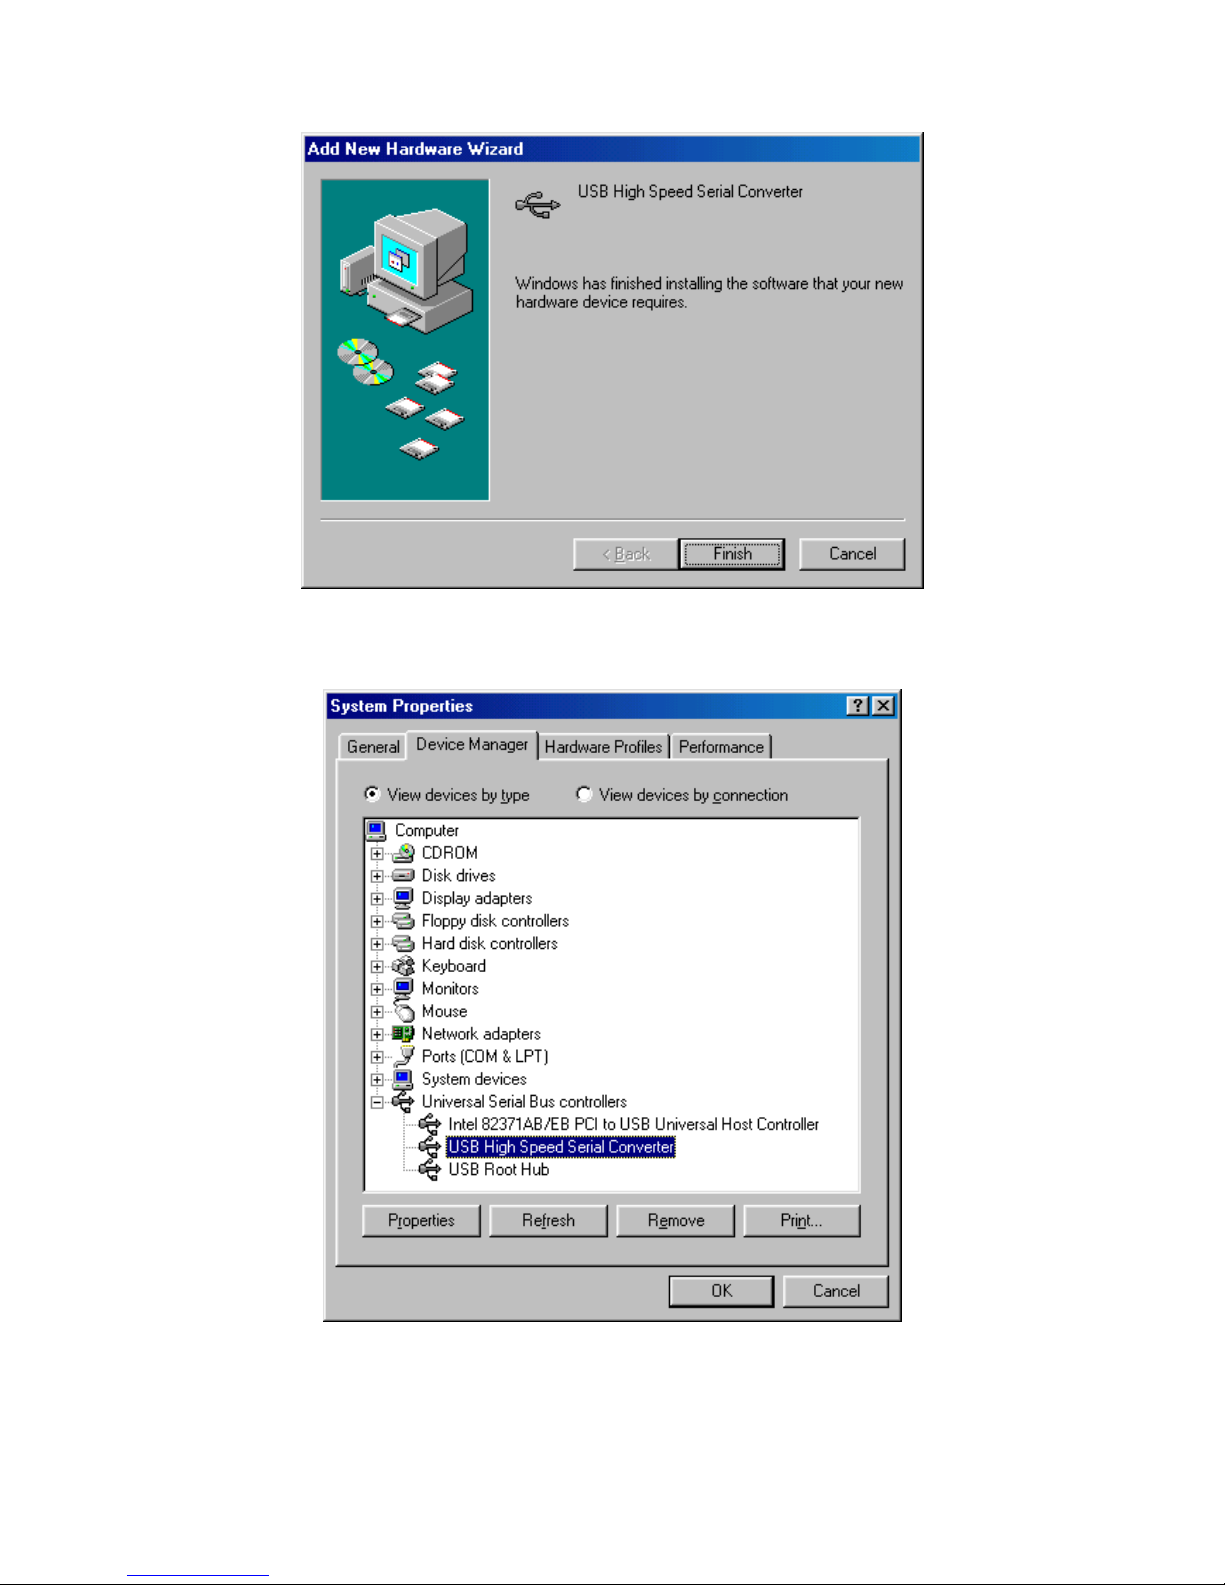
The USB Serial converter driver is installed now.
You can check the COM port number of Navi@Mouse from the System properties now.
Page 10
RGM-1000
9
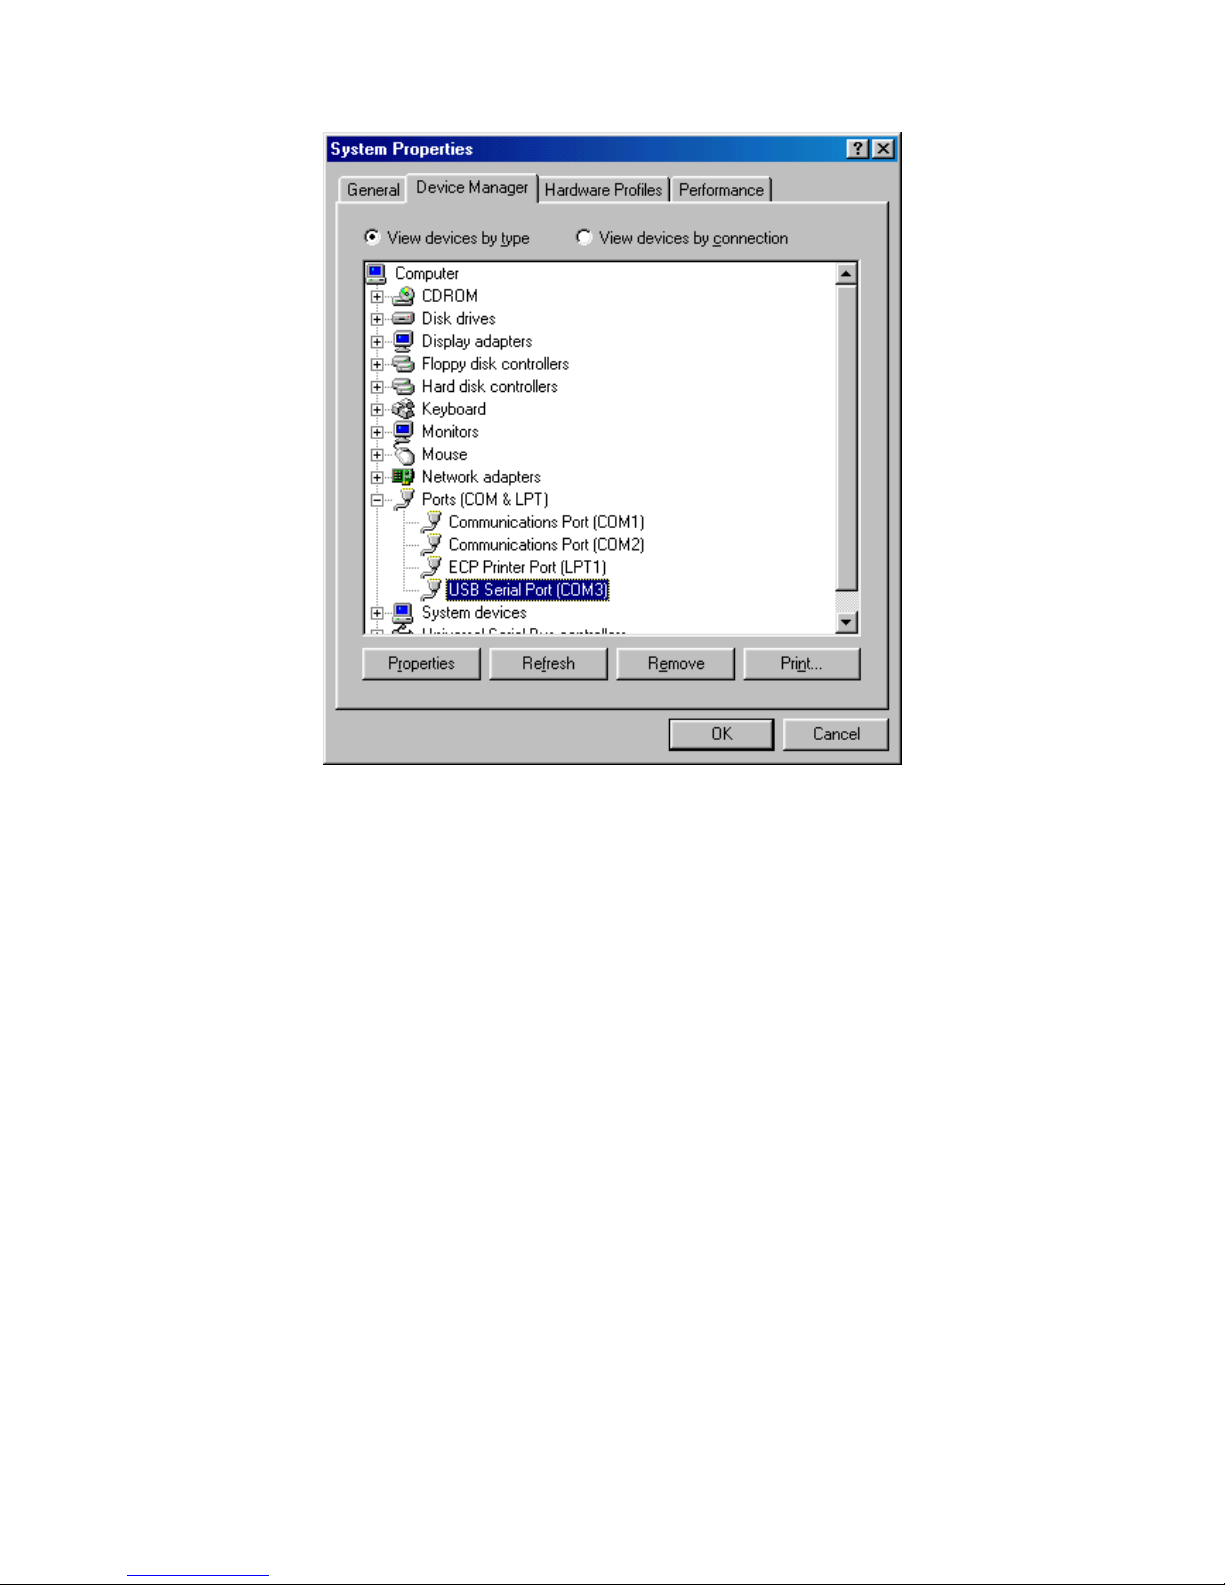
The default COM port is COM3 in this example.
Step 3:Place your Navi@Mouse on the outside roof of your vehicle with magnetic base.
Step 4:Power on your Notebook PC or Handheld PC.
Step 5:Choose the correct COM port for running the map or navigation software.
Step 6:Run the Navi@mouse test program. Please refer to “
How to test your Navi@mouse
”.
Notice:
(1) Make sure the power is off before started.
(2) For safety reason, please do not install RGM-1000 while driving.
(3) To receive NMEA0183 navigational data, please use the Hyper Terminal program of Windows
95/98. Please setup the COM port connected with Navi@Mouse to:
Baud rate : 4800
Data bit : 8
Parity : None
Stop bit : 1
Flow control : None.
Page 11

RGM-1000
10
(4) NMEA 0183 data formats are illustrated on Software Data section.
(5) To prevent the poor contact, the 4-pin mini din connector was designed as good fitting. We strongly
recommend user that do not plug and draw this connector frequently.
Page 12
RGM-1000
11
How to Install & Operate Navi@Mouse ( USB ) for
Windows Me
?
Step 1:Plug USB connector (➀) to USB port to your Notebook PC or Handheld PC.
Step 2:After plug in the Navi@Mouse, it will detect the hardware automatically. Click the “
Next>
”
button.
Please assert the “Specify a location” and select the correct directory of the driver in CD-Disc,
”\USB_DRIVER”. Click the “
Next>
” button.
Page 13

RGM-1000
12
Windows Me will search and find the USB serial driver. Click “
Next>
” button.
The USB Serial converter driver is installed now.
You can check the COM port number of Navi@Mouse from the System properties now.
Page 14

RGM-1000
13
Step 3:Place your Navi@Mouse on the outside roof of your vehicle with magnetic base.
Step 4:Power on your Notebook PC or Handheld PC.
Step 5:Choose the correct COM port for running the map or navigation software.
Step 6:Run the Navi@mouse test program. Please refer to “
How to test your Navi@mouse
”.
Notice:
(1) Make sure the power is off before started.
(2) For safety reason, please do not install RGM-1000 while driving.
(3) To receive NMEA0183 navigational data, please use the Hyper Terminal program of Windows Me
.
Please setup the COM port connected with Navi@Mouse to:
Baud rate : 4800
Data bit : 8
Parity : None
Stop bit : 1
Flow control : None.
Page 15

RGM-1000
14
(4) NMEA 0183 data formats are illustrated on Software Data section.
(5) To prevent the poor contact, the 4-pin mini din connector was designed as good fitting. We strongly
recommend user that do not plug and draw this connector frequently.
Page 16

RGM-1000
15
How to Install & Operate Navi@Mouse ( USB ) for
Windows 2000
?
Step 1:Plug USB connector (➀) to USB port to your Notebook PC or Handheld PC.
Step 2:After plug in the Navi@Mouse, it will detect the hardware automatically. Click the “
Next>
”
button.
Please select “Search for a suitable driver for my device”. Click “
Next>
” button.
Page 17

RGM-1000
16
Please select the “Specify a location”. Click “
Next>
” button.
Please browse the CD-Disc and select the directory, “\USB_DRIVER”. Click “OK” button.
Page 18

RGM-1000
17
Page 19

RGM-1000
18
Windows 2000 will find the USB Serial converter device. Click the “
Next>
” button.
The USB Serial driver is installed in Windows 2000 now.
Page 20

RGM-1000
19
It will setup the USB Serial port driver for Navi@Mouse. Please click “
Next>
” button.
Please select the “Search for a suitable driver for my device”. Click “
Next>
” button.
Page 21

RGM-1000
20
Please select the “Specify a location”. Click “
Next>
” button.
Please select the directory of the Navi@Mouse, “\USB_DRIVER”. Click “OK”.
Page 22

RGM-1000
21
It will find the driver and install it.
The USB Serial Port driver is installed in Windows 2000 now.
Page 23

RGM-1000
22
You can check the Com port number of the Navi@Mouse from Device Manager. It is COM3 in
this example.
Step 3:Place your Navi@Mouse on the outside roof of your vehicle with magnetic base.
Step 4:Power on your Notebook PC or Handheld PC.
Step 5:Choose the correct COM port for running the map or navigation software.
Step 6:Run the Navi@mouse test program. Please refer to “
How to test your Navi@mouse
”.
Notice:
(1) Make sure the power is off before started.
(2) For safety reason, please do not install RGM-1000 while driving.
(3) To receive NMEA0183 navigational data, please use the Hyper Terminal program of Windows 2000
.
Please setup the COM port connected with Navi@Mouse to:
Baud rate : 4800
Data bit : 8
Parity : None
Stop bit : 1
Flow control : None.
Page 24

RGM-1000
23
(4) NMEA 0183 data formats are illustrated on Software Data section.
(5) To prevent the poor contact, the 4-pin mini din connector was designed as good fitting. We strongly
recommend user that do not plug and draw this connector frequently.
Page 25

RGM-1000
24
How to test your Navi@Mouse
1. Run the setup program by double clicking the \Test programs\Demo\Navi@mouse\setup.exe file. Then
the test program will automatically install into your computer.
2. Run the testing program by clicking the shortcut on your Window’s program group.
3. Testing program will display as follow:
Page 26

RGM-1000
25
4. Before running the test program, make sure you have connected Navi@Mouse to the PC correctly.
5.Click the icon on toolbar or click the Start test on the Setup menu. Then the program will
automatically detect the serial port and start testing.
Page 27

RGM-1000
26
6.When finish the test, there is a message box showing the test result. If the test is successful, it will
show the following message:
If the test fails, it will show the following message:
If it cannot open the COM port, it will show the following message:
Page 28

RGM-1000
27
7.If the GPS connection is successful, you can see the satellite tracking diagram and the updated data of
longitude, latitude, altitude, date time etc.
Page 29

RGM-1000
28
Specifications
Physical characteristics
Dimension: 100 mm (L) x 68 mm (W) x 29 mm (H)
Weight 180 grams
Temperature characteristics
Storage temperature: -20℃ ~ +70℃.
Operating temperature: -20℃ ~ +80℃.
General
Sensitivity -141 dBm
Channels 12 channels
L1 1575.42 MHz.
C/A code 1.023MHz chip rate.
Accuracy
Position accuracy:10m, 90% without SA.
Velocity accuracy:0.1 meter / second without SA
Page 30

RGM-1000
29
Datum
WGS-84.
Position update rate
Once per second.
Dynamic conditions
Altitude :18000 meters (60000 feet) max.
Velocity :514 meters / second max.
Jerk :20 meters / second3, max.
Acceleration :4 G, max.
Power
PS2/USB input power: DC 5V ± 5 %, 210mA, typical
Car cigarette power adaptor: +9V ~ +16V.
Certification
FCC/CE compliant
Page 31

RGM-1000
30
Software Data
NMEA V2.2 Protocol
It is the RS-232 interface:4800 bps, 8 bit data, 1 stop bit and no parity.
NMEA Output Messages
The Navi@Mouse outputs the following messages as shown in Table 1:
Table 1 NMEA Output Messages
NMEA Record Description
GGA Global positioning system fixed data
GSA GNSS DOP and active satellites
GSV GNSS satellites in view
RMC Recommended minimum specific GNSS data
GGA
----
Global Positioning System Fixed Data
Table 2 contains the values of the following example:
$GPGGA, 161229.487, 3723.2475, N, 12158.3416, W, 1, 07, 1.0, 9.0, M, , , ,0000*18
Table 2 GGA Data Format
Name Example Units Description
Message ID $GPGGA GGA protocol header
UTC Position 161229.487 hhmmss.sss
Latitude 3723.2475 ddmm.mmmm
N/S Indicator N N=north or S=south
Longitude 12158.3416 dddmm.mmmm
E/W Indicator W E=east or W=west
Position Fix Indicator 1 See Table 5-1
Satellites Used 07 Range 0 to 12
HDOP 1.0 Horizontal Dilution of Precision
MSL Altitude 9.0 meters
Units M meters
Geoid Separation meters
Units M meters
Age of Diff. Corr. second Null fields when DGPS is not used
Diff. Ref. Station ID 0000
Checksum *18
<CR><LF>
End of message termination
Page 32

RGM-1000
31
Page 33

RGM-1000
32
Table 2-1 Position Fix Indicator
Value Description
0 Fix not available or invalid
1 GPS SPS Mode, fix valid
2 Differential GPS, SPS Mode, fix valid
3 GPS PPS Mode, fix valid
GSA
----
GNSS DOP and Active Satellites
Table 3 contains the values of the following example:
$GPGSA, A, 3, 07, 02, 26, 27, 09, 04, 15, , , , , , 1.8,1.0,1.5*33
Table 3 GSA Data Format
Name Example Units Description
Message ID $GPGSA GSA protocol header
Mode 1 A See Table 3-2
Mode 2 3 See Table 3-1
Satellite Used1 07 Sv on Channel 1
Satellite Used1 02 Sv on Channel 2
…. ….
Satellite Used1 Sv on Channel 12
PDOP 1.8 Position Dilution of Precision
HDOP 1.0 Horizontal Dilution of Precision
VDOP 1.5 Vertical Dilution of Precision
Checksum *33
<CR><LF>
End of message termination
Page 34

RGM-1000
33
Table 3-1 Mode 1
Value Description
1 Fix not available
2 2D
3 3D
Table 3-2 Mode 2
Value Description
M
Manual-forced to operate in 2D or 3D mode
A
Automatic-allowed to automatically switch 2D/3D
GSV
----
GNSS Satellites in View
Table 4 contains the values of the following example:
$GPGSV, 2, 1, 07, 07, 79, 048, 42, 02, 51, 062, 43, 26, 36, 256, 42, 27, 27, 138, 42*71
Table 4 GSV Data Format
Name Example Units Description
Message ID $GPGSV GSV protocol header
Number of Messages1 2 Range 1 to 3
Messages Number1 1 Range 1 to 3
Satellites in View 07
Satellite ID 07 Channel 1(Range 1 to 32)
Elevation 79 degrees Channel 1(Maximum 90)
Azimuth 048 degrees Channel 1(True, Range 0 to 359)
SNR (C/No) 42 dBHz Range 0 to 99, null when not tracking
…. ….
Satellite ID 27 Channel 4(Range 1 to 32)
Elevation 27 degrees Channel 4(Maximum 90)
Azimuth 138 degrees Channel 4(True, Range 0 to 359)
SNR (C/No) 42 dBHz Range 0 to 99, null when not tracking
Checksum *71
Page 35

RGM-1000
34
<CR><LF>
End of message termination
RMC
----
Recommended Minimum Specific GNSS Data
Table 5 contains the values of the following example: $GPRMC, 161229.487, A, 3723.2475, N,
12158.3416, W, 0.13, 309.62, 120598, ,*10
Table 5 RMC Data Format
Name Example Units Description
Message ID $GPRMC RMC protocol header
UTC Position 161229.487 hhmmss.sss
Status A A=data valid or V=data not valid
Latitude 3723.2475 ddmm.mmmm
N/S Indicator N N=north or S=south
Longitude 12158.3416 dddmm.mmmm
E/W Indicator W E=east or W=west
Speed Over Ground 0.13 knots
Course Over Ground 309.62 degrees True
Date 120598 ddmmyy
Magnetic Variation degrees E=east or W=west
Checksum *10
<CR><LF>
End of message termination
Page 36

RGM-1000
35
Troubleshooting
Problem Reason Solution
Test fail Poor connection Check the RS232 and PS2 connector or USB connector to
make sure they are well connected.
Wrong BIOS setting
for PS2
Check the BIOS setting to make sure the PS2 port is enable.
If you still get the testing fail message, contact your local
distributor.
Open com port fail All the serial COM
port have been used
for other application
program
Close all the other application programs and rerun the
Navi@Mouse Testing program.
There is nothing
showing on the
tracking diagram
even if the test
result is success.
Navi@Mouse can
not receive the GPS
signal on the testing
area.
Move Navi@Mouse to somewhere there is exposed to
outdoors.
Note: normally we cannot receive the GPS signal indoors.
No position output
but timer is
counting
1.Weak or no GPS
signal can be
received at the place
Navi@Mouse are.
2.At outdoor space
but GPS signal is
block by buildings
Go outdoor place without high building to block the signal
and retest the Navi@Mouse again.
Page 37

RGM-1000
36
Appendix : Connector Interface
9 pin D-SUB
Pin NO Sign al
Name
I/O Description Characteristics
1 No connect
2 TX O Serial Data Output High: -3V ~ -15V
Low: +3V ~ +15V
3 RX I Serial Data Input High: -3V ~ -15V
Low: +3V ~ +15V
4 No connect
5 GND G Ground
6 No connect
7 No connect
8 No connect
9 No connect
6 pin mini din
Pin NO Signal
Name
I/O Description Characteristics
1 No connect
2 No connect
3 GND G Ground
4 VCC I +5V DC Power
Input
DC +5V ± 10%.
5 No connect
6 No connect
USB A Type Connector
Pin NO Sign al
Name I/O
Description Characteristics
1 GND - Ground Ground
2 D+ I/O Data plus Data plus
3 D- I/O Data Minus Data Minus
4 VCC + +5V DC Power
Input
+5V DC Power
Input
Notice: The Navi@Mouse is a USB device.
15
69
234
78
1569234
78
Page 38

RGM-1000
37
Limited Warranty
RoyalTek Company Ltd. grants a warranty for this product for one year starting from the date of
purchasing of the product. Please retain the sales receipt as proof of purchase. During the warranty period,
the product is eligible for replacement in case of defects in material and workmanship. In such case, the
defective unit will be repaired or replaced according to an assessment by RoyalTek. However this
warranty does not cover damages caused by improper use or from unauthorized modifications by third
parties. In addition, this warranty does not cover expendable materials and defects, which constitute as
normal wear or tear. Please contact us as following:
RoyalTek
1071 Chung Cheng Rd.,Suite 9F-1,Tao Yuan City,Taiwan,R.O.C.
Tel: 886-3-3569666
Fax: 886-3-3580050
Http://www.royaltek.com
e-mail: service@royaltek.com
 Loading...