

Page 1
Royal Sovereign International Inc.
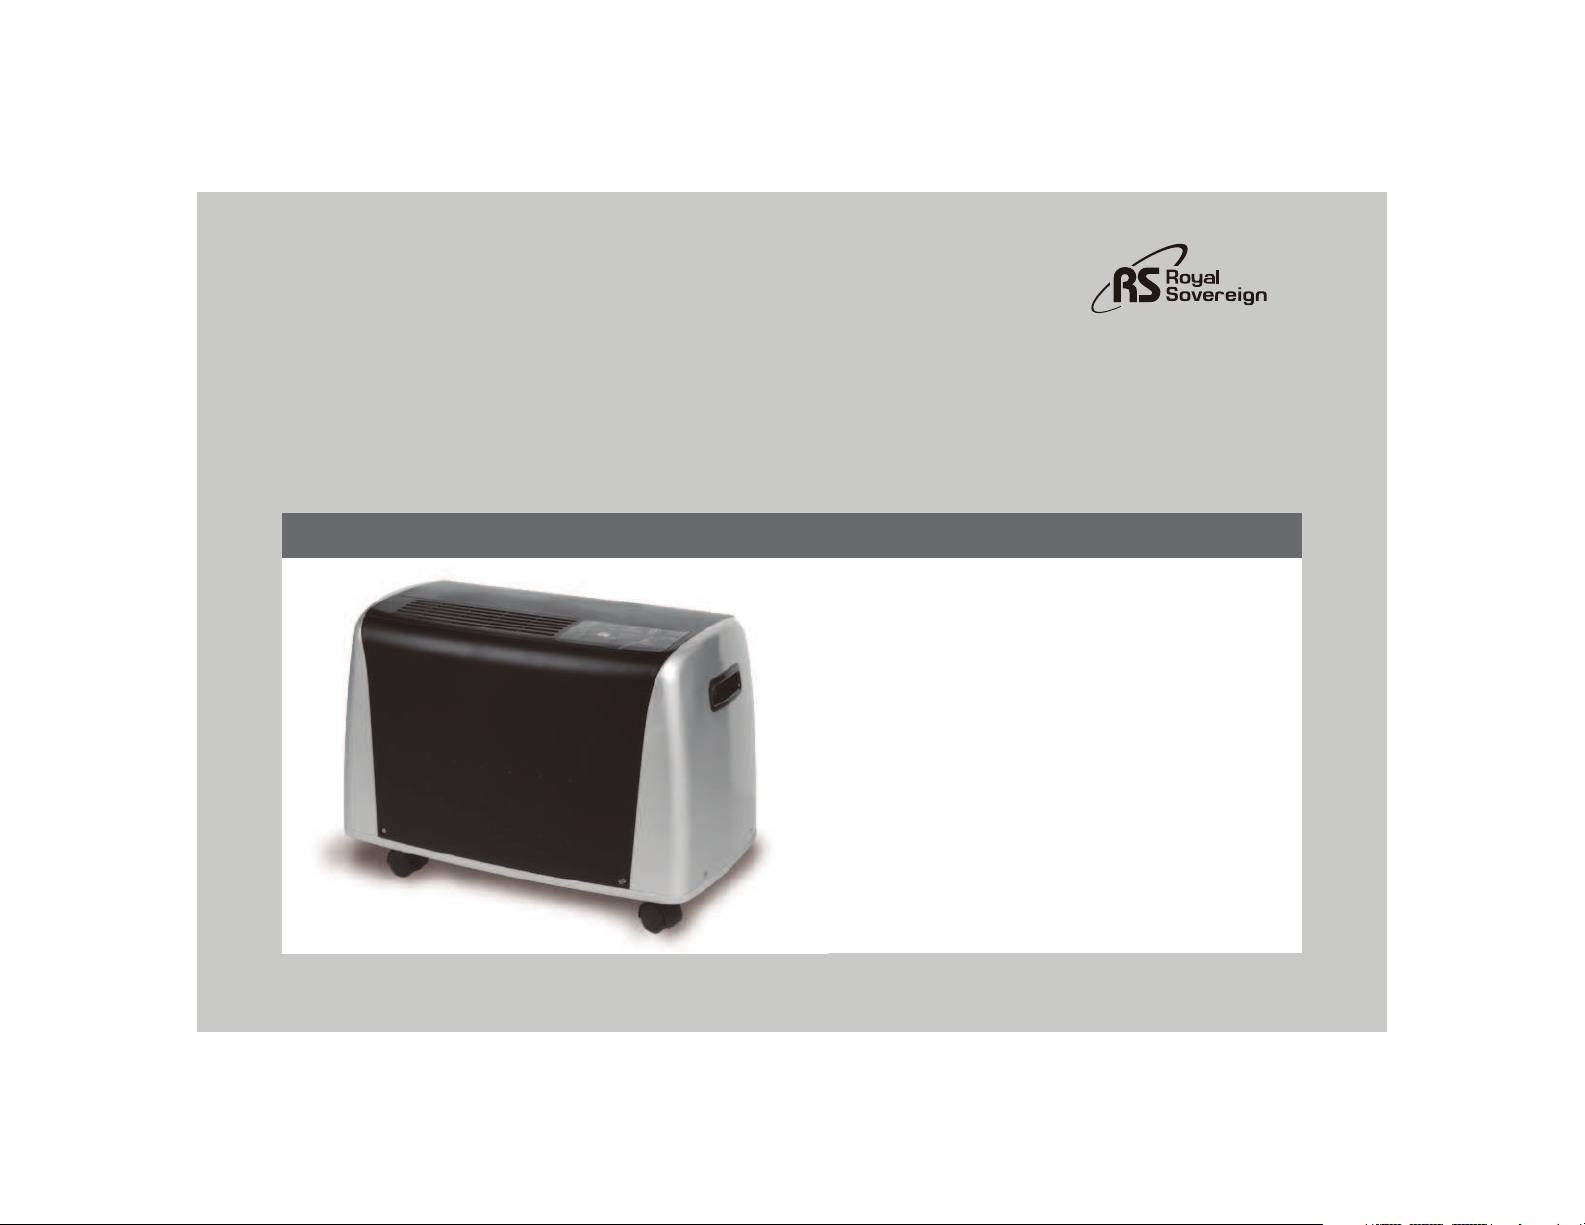
BUCKETLESS DEHUMIDIFIER
Please read and retain these instructions.
To register your product, please go to www.royalsovereign.com USA.
Click the customer Support Tab, then Registration Tab.
www.royalsovereign.com
BDH-450 / BDH-550
OWNER’S MANUAL
Page 2

BUCKETLESS DEHUMIDIFIER
Model BDH-450 / BDH-550
INTRODUCTION
Thank you for choosing Royal Sovereign to provide you and your family with premium “Air Comfort” solutions for your home, apartment, or office.
This dehumidifier can be set-up in just minutes and if properly maintained, will give you many years of smooth operation.
This manual will provide you with valuable information necessary for the proper care and maintenance for your new appliance.
Please take a few moments and read the instructions thoroughly.
Why Dehumidify?
Moisture in the air can lead to mold and mildew leaving a room smelling musty.
Dehumidifiers remove the moisture in the air making it better quality to breathe and protect the furnishings in a room from being damaged.
Page 3

Page
SAFETY INSTRUCTIONS ∙∙∙∙∙∙∙∙∙∙∙∙∙∙∙∙∙∙∙∙∙∙∙∙∙∙∙∙∙∙∙∙∙∙∙∙∙∙∙∙∙∙∙∙∙∙∙∙∙∙∙∙∙∙∙∙∙∙∙∙∙∙∙∙∙∙∙∙∙∙∙∙∙∙∙∙∙∙∙∙∙∙∙∙∙∙∙∙∙∙∙∙∙∙∙∙∙∙∙∙∙∙∙∙∙∙∙∙∙∙∙∙∙∙∙∙∙∙∙∙∙∙∙∙∙∙∙∙∙∙∙ 4
BOX CONTENTS ∙∙∙∙∙∙∙∙∙∙∙∙∙∙∙∙∙∙∙∙∙∙∙∙∙∙∙∙∙∙∙∙∙∙∙∙∙∙∙∙∙∙∙∙∙∙∙∙∙∙∙∙∙∙∙∙∙∙∙∙∙∙∙∙∙∙∙∙∙∙∙∙∙∙∙∙∙∙∙∙∙∙∙∙∙∙∙∙∙∙∙∙∙∙∙∙∙∙∙∙∙∙∙∙∙∙∙∙∙∙∙∙∙∙∙∙∙∙∙∙∙∙∙∙∙∙∙∙∙∙∙∙∙∙∙∙∙∙∙∙∙∙ 5
PARTS ∙∙∙∙∙∙∙∙∙∙∙∙∙∙∙∙∙∙∙∙∙∙∙∙∙∙∙∙∙∙∙∙∙∙∙∙∙∙∙∙∙∙∙∙∙∙∙∙∙∙∙∙∙∙∙∙∙∙∙∙∙∙∙∙∙∙∙∙∙∙∙∙∙∙∙∙∙∙∙∙∙∙∙∙∙∙∙∙∙∙∙∙∙∙∙∙∙∙∙∙∙∙∙∙∙∙∙∙∙∙∙∙∙∙∙∙∙∙∙∙∙∙∙∙∙∙∙∙∙∙∙∙∙∙∙∙∙∙∙∙∙∙∙∙∙∙∙∙∙∙∙∙∙∙∙ 5
SET- UP ∙∙∙∙∙∙∙∙∙∙∙∙∙∙∙∙∙∙∙∙∙∙∙∙∙∙∙∙∙∙∙∙∙∙∙∙∙∙∙∙∙∙∙∙∙∙∙∙∙∙∙∙∙∙∙∙∙∙∙∙∙∙∙∙∙∙∙∙∙∙∙∙∙∙∙∙∙∙∙∙∙∙∙∙∙∙∙∙∙∙∙∙∙∙∙∙∙∙∙∙∙∙∙∙∙∙∙∙∙∙∙∙∙∙∙∙∙∙∙∙∙∙∙∙∙∙∙∙∙∙∙∙∙∙∙∙∙∙∙∙∙∙∙∙∙∙∙∙∙ 5~6
OPERATION ∙∙∙∙∙∙∙∙∙∙∙∙∙∙∙∙∙∙∙∙∙∙∙∙∙∙∙∙∙∙∙∙∙∙∙∙∙∙∙∙∙∙∙∙∙∙∙∙∙∙∙∙∙∙∙∙∙∙∙∙∙∙∙∙∙∙∙∙∙∙∙∙∙∙∙∙∙∙∙∙∙∙∙∙∙∙∙∙∙∙∙∙∙∙∙∙∙∙∙∙∙∙∙∙∙∙∙∙∙∙∙∙∙∙∙∙∙∙∙∙∙∙∙∙∙∙∙∙∙∙∙∙∙∙∙∙∙∙∙∙∙∙∙∙∙∙∙∙ 7
MAINTENANCE ∙∙∙∙∙∙∙∙∙∙∙∙∙∙∙∙∙∙∙∙∙∙∙∙∙∙∙∙∙∙∙∙∙∙∙∙∙∙∙∙∙∙∙∙∙∙∙∙∙∙∙∙∙∙∙∙∙∙∙∙∙∙∙∙∙∙∙∙∙∙∙∙∙∙∙∙∙∙∙∙∙∙∙∙∙∙∙∙∙∙∙∙∙∙∙∙∙∙∙∙∙∙∙∙∙∙∙∙∙∙∙∙∙∙∙∙∙∙∙∙∙∙∙∙∙∙∙∙∙∙∙∙∙∙∙∙∙∙∙∙∙∙∙ 8
TROUBLESHOOTING∙∙∙∙∙∙∙∙∙∙∙∙∙∙∙∙∙∙∙∙∙∙∙∙∙∙∙∙∙∙∙∙∙∙∙∙∙∙∙∙∙∙∙∙∙∙∙∙∙∙∙∙∙∙∙∙∙∙∙∙∙∙∙∙∙∙∙∙∙∙∙∙∙∙∙∙∙∙∙∙∙∙∙∙∙∙∙∙∙∙∙∙∙∙∙∙∙∙∙∙∙∙∙∙∙∙∙∙∙∙∙∙∙∙∙∙∙∙∙∙∙∙∙∙∙∙∙∙∙∙∙∙∙∙∙∙ 9
SPECIFICATIONS ∙∙∙∙∙∙∙∙∙∙∙∙∙∙∙∙∙∙∙∙∙∙∙∙∙∙∙∙∙∙∙∙∙∙∙∙∙∙∙∙∙∙∙∙∙∙∙∙∙∙∙∙∙∙∙∙∙∙∙∙∙∙∙∙∙∙∙∙∙∙∙∙∙∙∙∙∙∙∙∙∙∙∙∙∙∙∙∙∙∙∙∙∙∙∙∙∙∙∙∙∙∙∙∙∙∙∙∙∙∙∙∙∙∙∙∙∙∙∙∙∙∙∙∙∙∙∙∙∙∙∙∙∙∙∙∙∙∙∙ 10
WARRANTY ∙∙∙∙∙∙∙∙∙∙∙∙∙∙∙∙∙∙∙∙∙∙∙∙∙∙∙∙∙∙∙∙∙∙∙∙∙∙∙∙∙∙∙∙∙∙∙∙∙∙∙∙∙∙∙∙∙∙∙∙∙∙∙∙∙∙∙∙∙∙∙∙∙∙∙∙∙∙∙∙∙∙∙∙∙∙∙∙∙∙∙∙∙∙∙∙∙∙∙∙∙∙∙∙∙∙∙∙∙∙∙∙∙∙∙∙∙∙∙∙∙∙∙∙∙∙∙∙∙∙∙∙∙∙∙∙∙∙∙∙∙∙∙∙∙∙∙ 11
CONTACT INFORMATION ∙∙∙∙∙∙∙∙∙∙∙∙∙∙∙∙∙∙∙∙∙∙∙∙∙∙∙∙∙∙∙∙∙∙∙∙∙∙∙∙∙∙∙∙∙∙∙∙∙∙∙∙∙∙∙∙∙∙∙∙∙∙∙∙∙∙∙∙∙∙∙∙∙∙∙∙∙∙∙∙∙∙∙∙∙∙∙∙∙∙∙∙∙∙∙∙∙∙∙∙∙∙∙∙∙∙∙∙∙∙∙∙∙∙∙∙∙∙∙∙∙∙∙∙∙∙∙∙ 12
PÁGINA EN ESPAÑOL ∙∙∙∙∙∙∙∙∙∙∙∙∙∙∙∙∙∙∙∙∙∙∙∙∙∙∙∙∙∙∙∙∙∙∙∙∙∙∙∙∙∙∙∙∙∙∙∙∙∙∙∙∙∙∙∙∙∙∙∙∙∙∙∙∙∙∙∙∙∙∙∙∙∙∙∙∙∙∙∙∙∙∙∙∙∙∙∙∙∙∙∙∙∙∙∙∙∙∙∙∙∙∙∙∙∙∙∙∙∙∙∙∙∙∙∙∙∙∙∙∙∙∙∙∙∙∙∙∙∙∙∙ 13
CONTENTS
Page 4

SAFETY INSTRUCTIONS
The safety recommendations outlined in this section should be read and understood before operating this machine. When using this machine follow these basic safety precautions
to reduce risk of fire, electric shock or injury. Keep this information for future reference.
WARNING
1. Do not place the power cord near a heater.
2. Do not use the power cord near flammable of combustible materials such as gasoline, benzene, paint thinner, etc.
3. Do not disassemble or modify products.
4. Plug in the power plug properly. Otherwise, it will cause electric shock or fire.
5. Do not operate or stop the unit by inserting or pulling out the power plug.
6. Always remove the plug from the socket before performing cleaning or maintenance operations and when not in use.
7. Do no damage or use an unspecified power cord. It will cause electric shock or fire.
8. Do not modify power cord length. It will cause electric shock or fire.
9. Do not share the outlet with other appliances. It will cause electric shock or fire.
10. Always plug into a grounded outlet. No grounding may cause electric shock.
11. Unplug the unit if strange sounds, odors, or smoke come from it. Otherwise it may cause a fire or an electric shock.
12. Do not use the socket if it is loose or damaged. It may cause fire and electric shock.
13. Do not operate with wet hands or in damp environment. It may cause electric shock.
CAUTION
1. Do not block the inlet or outlet. It may cause failure of appliance or performance deterioration.
2. Hold the plug by the head when taking it out. It may cause electric shock and damage.
3. Turn off the main power switch when not using the dehumidifier for a long time.
4. Do not use this appliance for preserving precision devices, foods, pets, plants, and art objects. It is a general use appliance, not precision equipment.
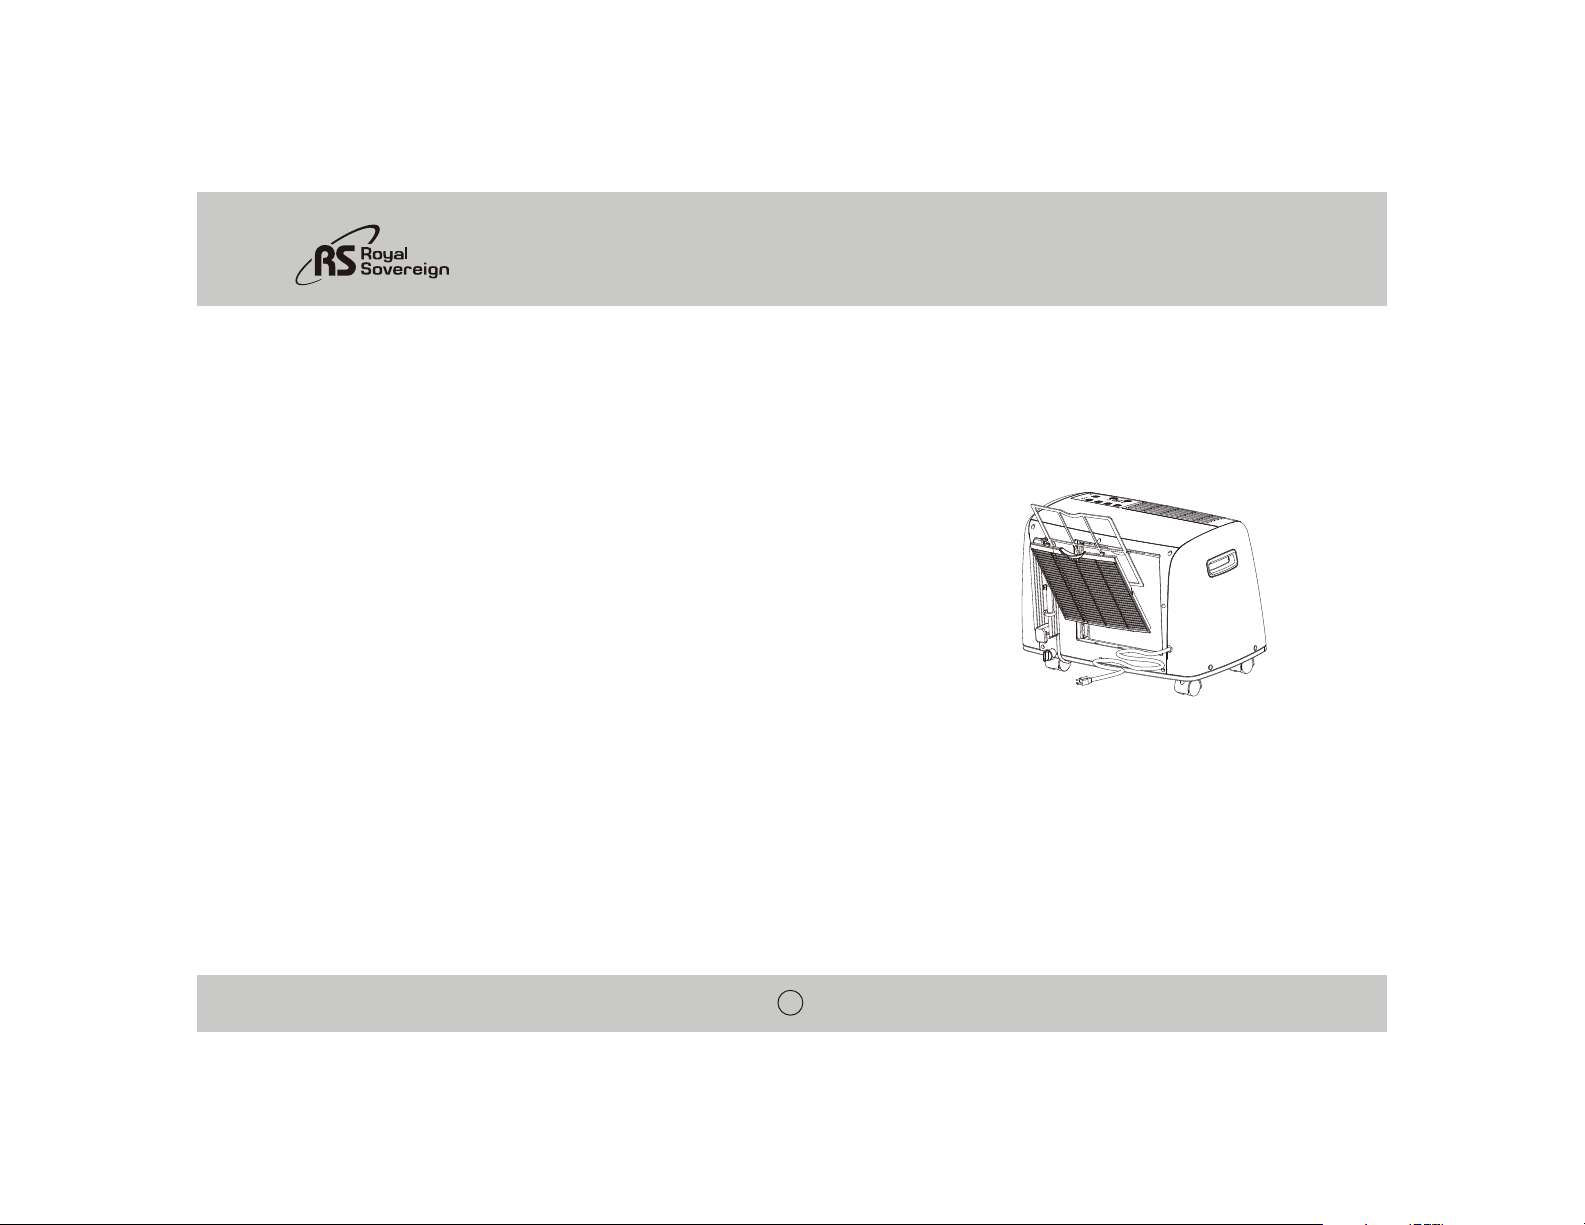
5. Clean filter approximately every 3 months.
6. Do not move the unit while it is operating.
7. The appliance must always remain upright or laid on one side during transportation. Remember to drain the tank before transporting the appliance.
4
Page 5
BDH-450 / BDH-550
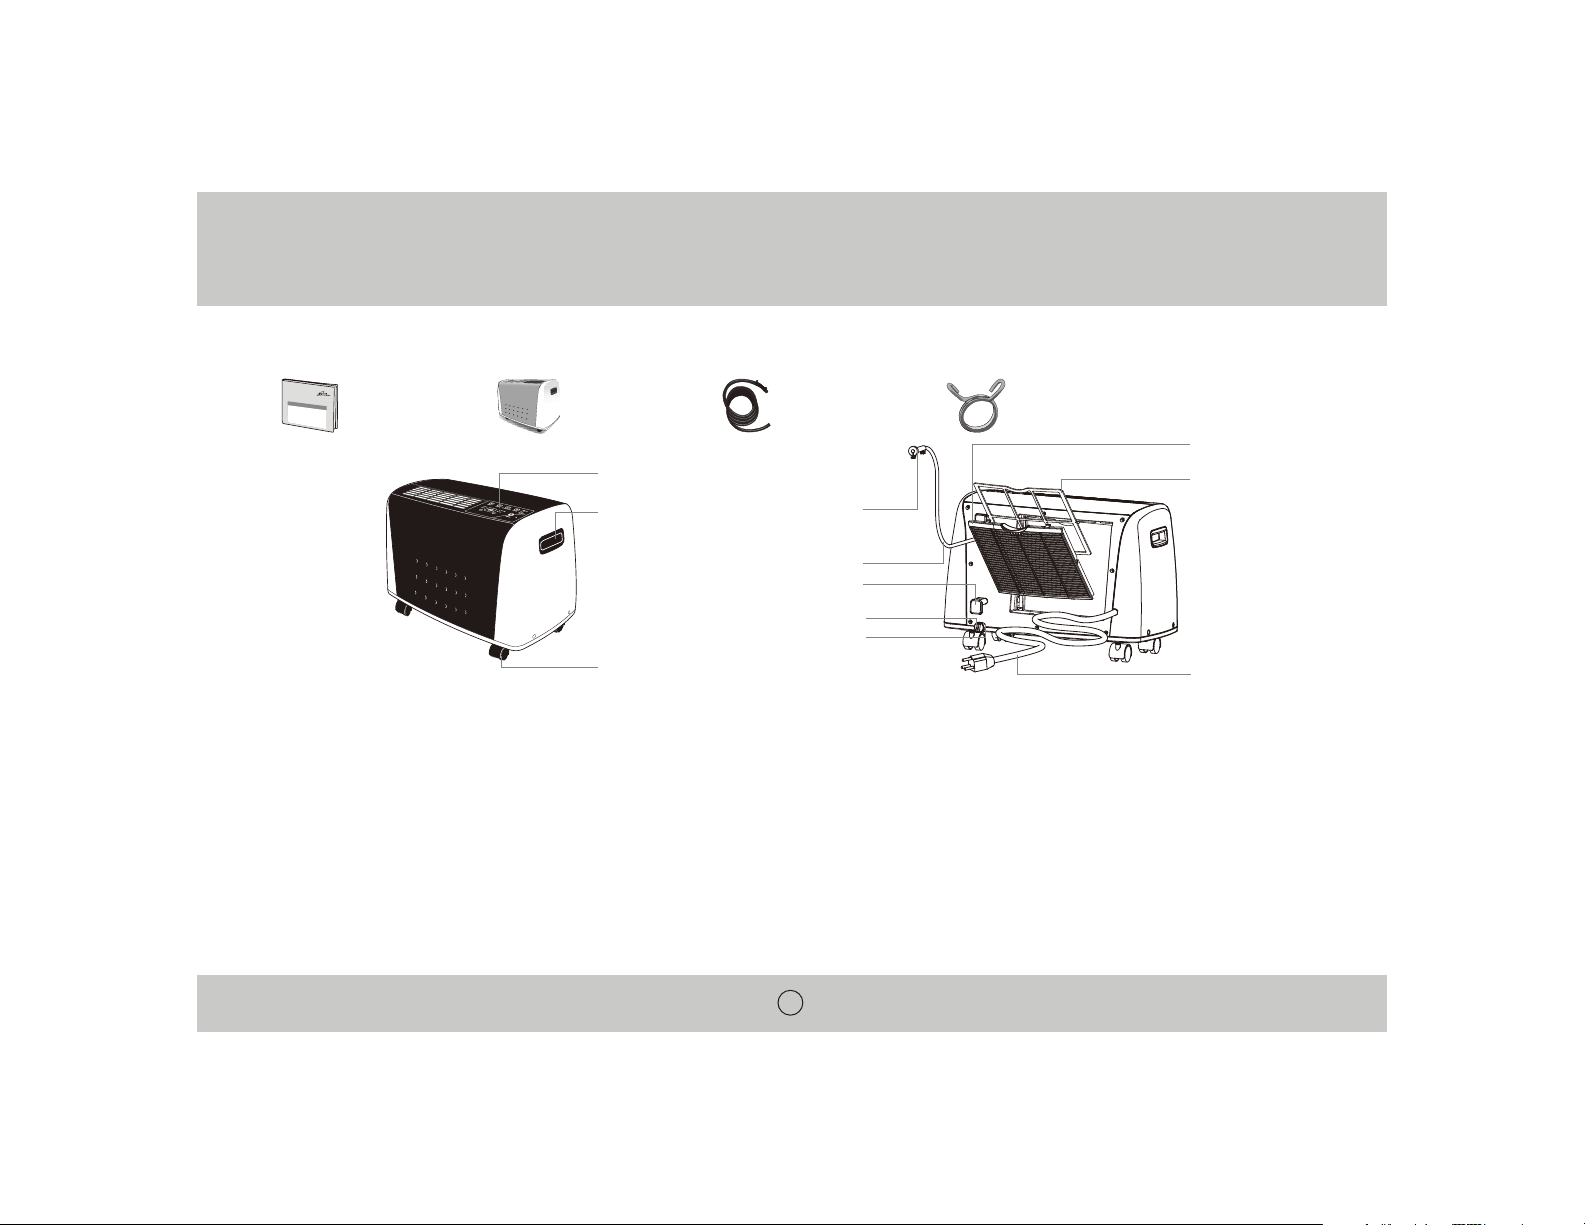
BOX CONTENTS
PARTS
AUTO-PUMP SYSTEM
1. Put the hose clamp over the end of the auto-pump drainage hose by squeezing the 2 tabs of the clamp together, this will open the clamp to slide onto the hose.
2. Push the drainage hose over the auto-pump drainage outlet.
3. Push the hose clamp over the outlet to secure the hose.
4. Put the draining end of the hose over any suitable area where water can be emptied: a sink, drain or window. Be sure the water flows away from the building or any other
objects that could be damaged.
Note: The draining hose must not be put more than 10 feet above the floor on which the unit is standing.
5
Handles
Caster wheels
Control panel
Hose protector
Filter grille
Filter
Electrical plug
Drainage hose
Storage hooks
Rubber drain plug
Manual drain hose outlet
User manual Dehumidifier
Auto-pump
drainage hose
Hose clamp
Page 6
6
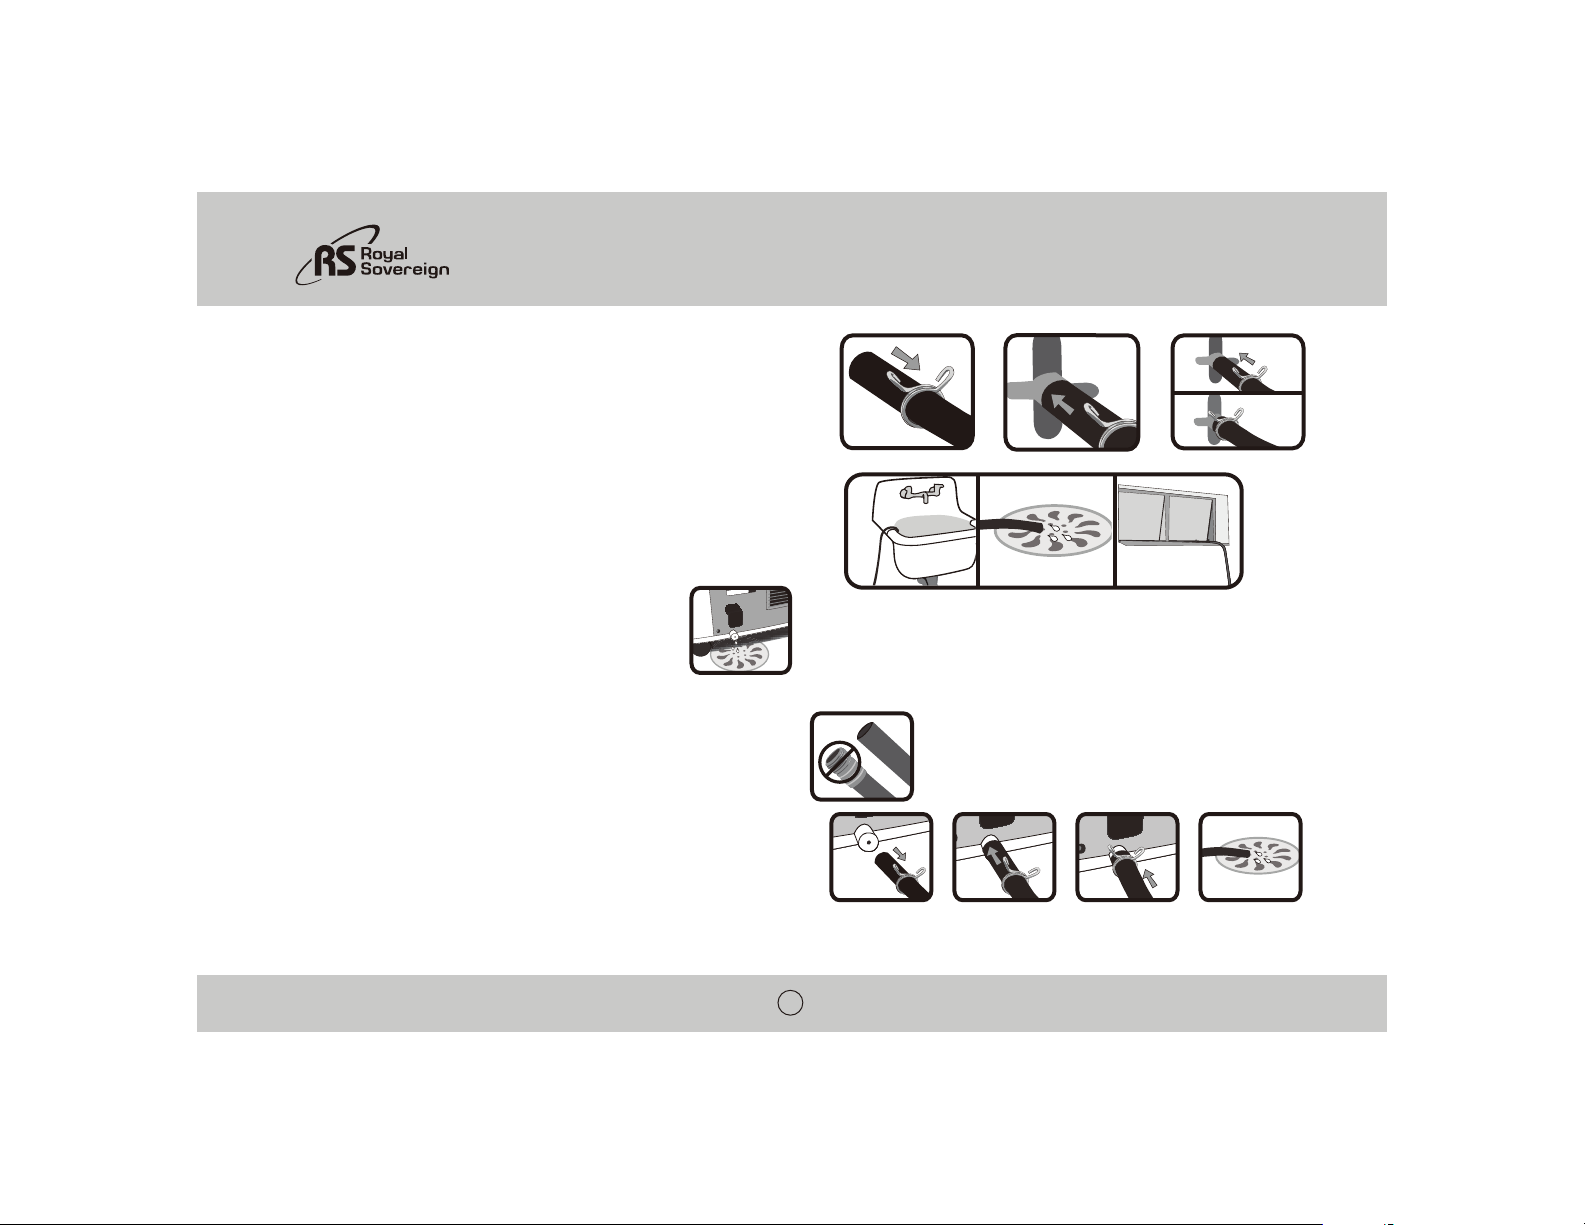
MANUAL DRAINING
1. Take out the rubber stopper on the manual drain hose outlet.
2. Position the manual drain outlet directly above a floor drain if possible. If not, use a 1/2-inch diameter hose to drain into a place lower than the unit.
Installing 1/2-inch diameter hose:
If there is a steel or plastic tip on you 1/2-inch diameter hose, it should be removed.
1. Put a 11/16-inch diameter hose clamp over the hose
2. Then, push the hose over the manual drain outlet.
3. Push the clamp over the outlet to secure the hose
4. Put the draining end of the hose over a drain or suitable place for water to empty.
Note: Manual drain hose and 11/16-inch hose clamp not included.
1.
2.
3.
A B C
4.
AUTO-PUMP SYSTEM
1. Put the hose clamp over the end of the auto-pump drainage hose by squeezing the 2
tabs of the clamp together, this will open the clamp to slide onto the hose.
2. Push the drainage hose over the auto-pump drainage outlet.
3. Push the hose clamp over the outlet to secure the hose.
4. Put the draining end of the hose over any suitable area where water can be emptied:
a sink, drain or window. Be sure the water flows away from the building or any other
objects that could be damaged.
Note: The draining hose must not be put more than 10 feet above the floor on which the
unit is standing.
1.
2.
3.
4.
Page 7
BDH-450 / BDH-550
7
OPERATION
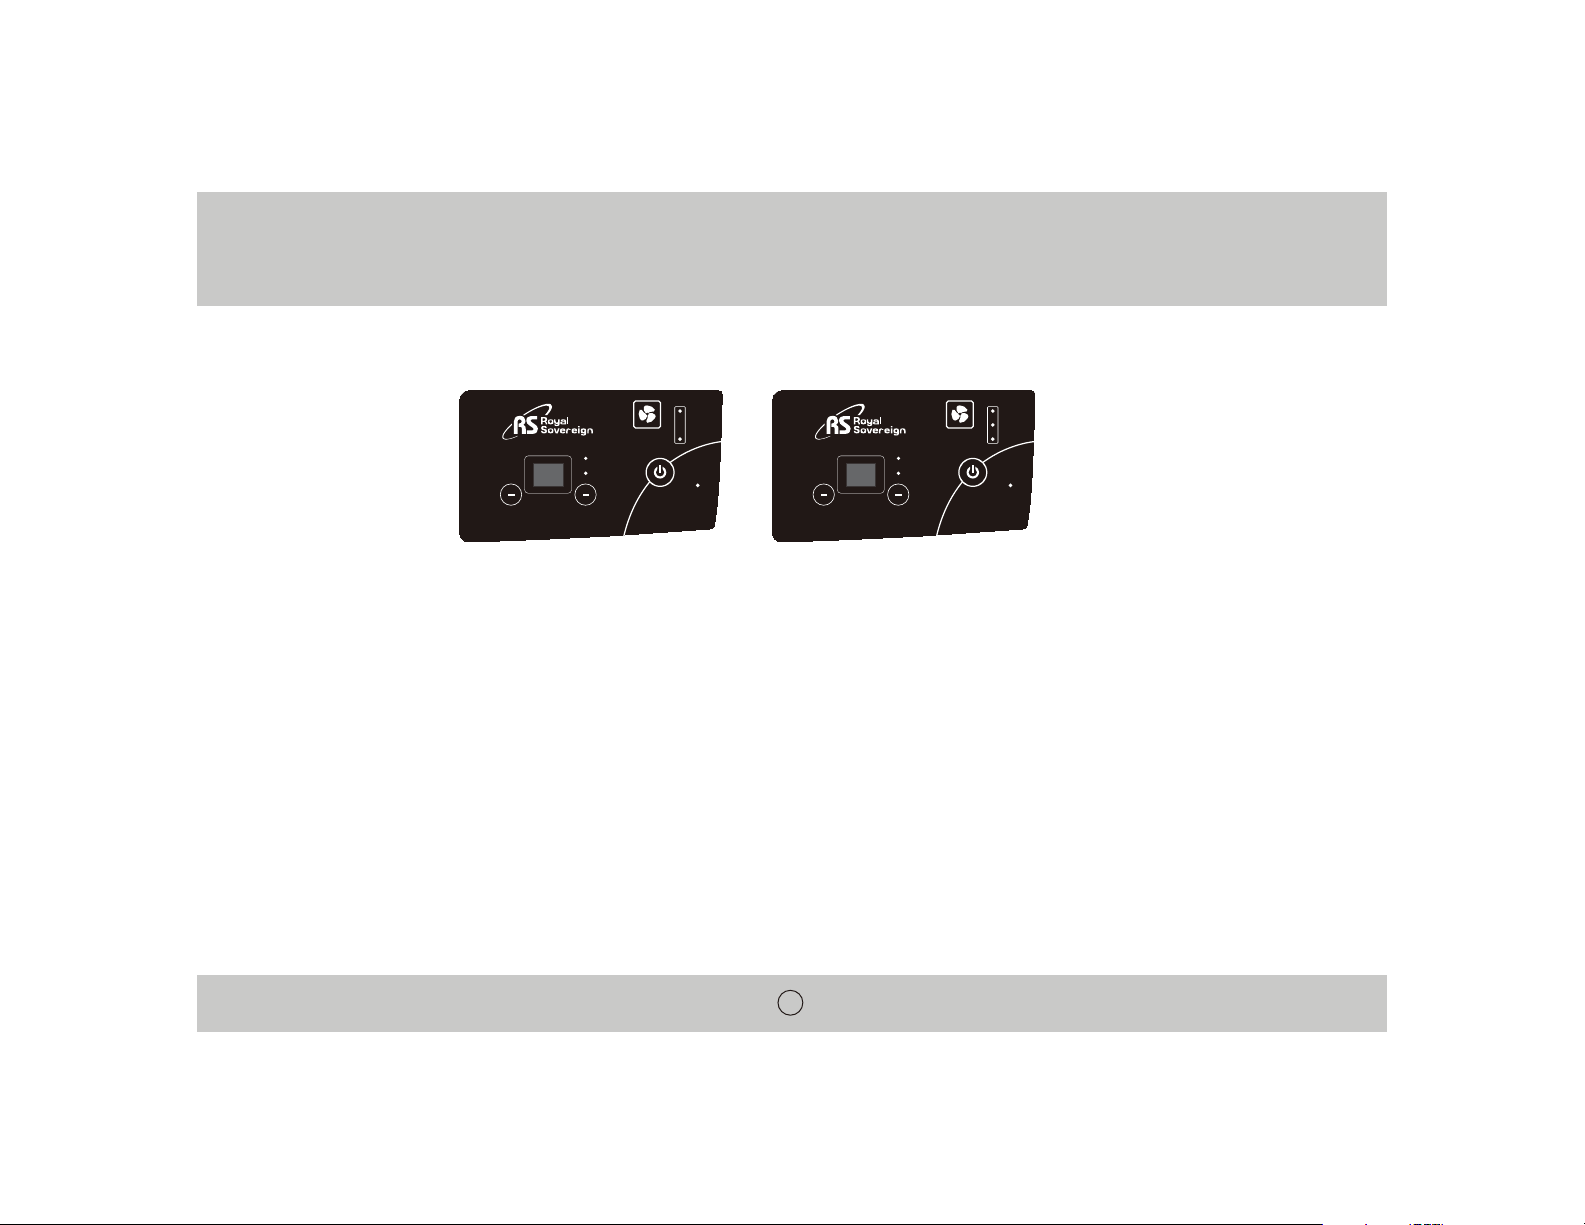
Control Panel
Power Button
The power button turns on and off. When you press the button, the unit begins to operate and the light will illuminate.
Humidity
The humidity function will allow you to set the desired level of humidity you would like for the room. To set it, use the “-” or “+” button to set your desired level. The unit will turn on automatically
when the room humidity is higher than the selected level.
The humidity level may be set between level 30-80. The operational temperature for this unit is between 40 °F and 95 °F. If the temperature of the room falls below 40 °F, the unit will stop. This
helps to protect the compressor inside the unit.
Note: The selected humidity may vary +,- 5%
Fan Speed
Press the fan button to change the fan speed.
Defrost Light
If ice forms on the internal coils, the defrost light will light up. The dehumidifier will automatically go into auto defrost mode. The defrosting light will remain on until defrosting is complete. Once the
defrosting is complete, the unit will operate again.
Water Light
If for any reason the water is restricted from exiting the unit, the water light will be lit. Review the troubleshooting section of this manual for possible solutions.
FAN SPEED
HUMIDITY LEVEL
POWER
HIGH
LOW
DEFROST
WATER
FAN SPEED
HUMIDITY LEVEL
POWER
HIGH
LOW
MEDIUM
DEFROST
WATER
BDH-450 BDH-550
Page 8
8
MAINTENANCE
Warning: Always unplug the unit from the wall outlet before cleaning!
If the filter is dirty, air circulation is compromised and the efficiency of the dehumidifier decreases.
We recommend cleaning the filter approximately everything 3 months, or when conditions make it necessary.
This unit is equipped with a washable filter. Follow the instructions below to remove and clean it.
Cleaning the Air Filter
1. On the back of the unit, remove the filter grille by gently pulling the handle towards yourself. Then pull out the filter.
2. If the filter is very dirty, wash in warm water. You can also gently use a vacuum cleaner to remove the dust that has collected.
3. Allow filter to dry completely, then insert back into the back of the dehumidifier.
4. Slide the filter grille back onto the back of the unit.
Storage
The dehumidifier should be drained before long term storage.
1. Turn off and unplug the dehumidifier.
2. Drain any remaining water in the unit through the manual drain outlet. ( see manual draining section for details)
3. Wrap the hose and/ or plug around the storage hooks on the back of the unit.
Page 9

BDH-450 / BDH-550
TROUBLESHOOTING
Trouble Cause Solution
The unit does not work.
1. No power supply.
2. Unit is not turned on.
3. Humidity is set higher than the room humidity.
4. The power was shut off and automatically turned back on.
1. Plug power cord firmly into outlet and check fuse for that room.
2. Turn the unit on.
3. Set the humidity level on a lower percentage.
4. If a unit was turned off and turned on automatically the
compressor will take 5 minutes to start.
Water light is lit. 1. There is blockage of the flow of water in the unit.
1. Check the hose for crimps or blockage.
2. Make sure the height of the hose is below 10ft.
The air in the room is still humid.
1. Air filter is dirty and or blocked.
2. The room temperature is below 40 °F.
3. Poor air circulation or obstructions.
4. Humidity is set higher than the room humidity.
1. Clean the filter.
2. Raise the room temperature.
3. Improve the airflow by moving unit away from anything that
obstructs the airflow.
4. Set the humidity percentage to a lower percentage.
Relative humidity setting not being reached after
a long period of operation.
1. There are windows or doors opened.
2. Area is to large for the capacity of the dehumidifier.
1. Check to see the windows and doors are closed.
2. Change the location of the dehumidifier with-in room.
Defrost light is on.
1. The temperature in the room is below 40 °F.
2. Air filter is dirty.
1. Raise the room temperature above 40 °F.
2. Remove and clean the air filter.
9
Page 10

10
SPECIFICATIONS
Electrical waste products should not be disposed of with household waste.
Please recycle where facilities exist. Check with your local authority or retailer for recycling advice.
Description of product Bucketless Dehumidifier
Model BDH-450 BDH-550
Dehumidifying Capacity (Pints / Day) 45 Pints / 21.3 Liters 55 Pints / 26 Liters
Power Consumption (W) 550
Variable Fan Speeds 2 3
Unit Dimensions 21.3 x 12.6 x 15(in) / 541 x 320 x 381(mm)
Unit Weight 39.7 (lbs) / 18(kg)
Page 11

BDH-450 / BDH-550
FULL ONE YEAR WARRANTY
Royal Sovereign warrants each Dehumidifier to be free from defects in material and workmanship. Our obligation under this warranty is limited to the repair or
replacement, free of charge, when delivered to an authorized Royal Sovereign service center, of any defective part(s) thereof, other than parts damaged in transit. This warranty is
in effect to the original purchaser, for a period of one year from the date of purchase and is not transferable. This warranty shall apply only if the dehumidifier is used on
Alternating Current (AC) circuit, in accordance with the factory provided instructions which accompany it.
LIMITED FIVE YEAR WARRANTY (COMPRESSOR)
For a period of five years from the date of purchase, when this Royal Sovereign Dehumidifier is operated and maintained according to the instruction manual provided
with the product, Royal Sovereign will supply a replacement compressor (parts only), free of charge, if the original compressor is determined to be defective in workmanship or
material. If repair becomes necessary, please contact our customer service center. You will be responsible for all freight, insurance, and any other transportation charges to get the
unit to our factory or service center. If shipping is required, be sure to pack the unit properly to avoid shipping damages, as we will not be responsible for such damages.
EXCLUSIONS
This warranty excludes and does not cover defects, malfunctions or failures of your Royal Sovereign Dehumidifiers, caused by repairs by unauthorized persons or service
centers, mishandling, improper installation, modification or unreasonable use including incorrect voltage, acts of God, or failure to provide reasonable and necessary maintenance.
This warranty is in lieu of any and all expressed warranties. In no event shall Royal Sovereign be liable for consequential or incidental damages. This limitation would not apply if you
live in a location that does not permit the exclusion of limitation of incidental or consequential damages. This warranty gives you specific legal rights and you may also have other
rights which vary from state to state.
11
www.royalsovereign.com
Page 12

ROYAL SOVEREIGN INTERNATIONAL, INC.
2 Volvo Drive Rockleigh, NJ 07647 USA
TEL : +1) 800-397-1025 FAX : +1) 201-750-1022
ROYAL SOVEREIGN INC.
1001, World Meridian II, 426-5, Gasan-dong, Geumcheon-gu, Seoul, 153-759, KOREA
TEL : +82)2-2025-8800 FAX : +82)2-2025-8830
RS INTERNATIONAL AUSTRALIA PTY. LTD.
30 Prime Drive, Seven Hills, NSW 2147, AUSTRALIA
TEL : +61) 2-9674-2127 FAX : +61) 2-9674-2027
RS CANADA INC.
1025 Westport Crescent, Mississauga On L5T 1E8 CANADA
TEL: +1) 905-461-1095 FAX: +1) 905-461-1096
TF: +1) 866 961-6673
RS HOLLAND B.V.
Industrieweg 6K, 4104AR, Culemborg, The Netherlands
Tel: +31 (0)345 473 097 Fax: 31 (0)345 519 811
www.royalsovereign.com
Page 13

Royal Sovereign International Inc.
DESHUMEDECEDOR SIN CUBETA
Por favor lea y conserve estas instrucciones.
Para registrar su producto, visite el sitio web www.royalsovereign.com USA.
Haga clic en la pestaña de “Customer Support” y después en la pestaña de “Registration”.
www.royalsovereign.com
BDH-450 / BDH-550
MANUAL DEL PROPIETARIO
Page 14

DESHUMEDECEDOR SIN CUBETA
Modelo BDH-450 / BDH-550
INTRODUCCIÓN
Gracias por elegir Royal Sovereign para brindarles a usted y a su familia soluciones de “comodidad de aire” de primera calidad para su hogar,
departamento u oficina. Este deshumidificador se puede configurar en sólo minutos y si se mantiene de forma apropiada, tendrá muchos años
de buen funcionamiento. Este manual le proporcionará la información valiosa necesaria para el cuidado y el mantenimiento apropiado de su
nuevo artefacto. Tómese un momento y lea atentamente las instrucciones.
¿Porqué deshumidificar?
La humedad en el aire puede originar moho, provocando en la habitación un olor desagradable.
Los deshumidificadores eliminan la humedad del aire haciendo que tenga una mejor calidad para respirar y protegen de daños a los muebles
de la habitación.
Page 15

Página
INSTRUCCIONES DE SEGURIDAD ∙∙∙∙∙∙∙∙∙∙∙∙∙∙∙∙∙∙∙∙∙∙∙∙∙∙∙∙∙∙∙∙∙∙∙∙∙∙∙∙∙∙∙∙∙∙∙∙∙∙∙∙∙∙∙∙∙∙∙∙∙∙∙∙∙∙∙∙∙∙∙∙∙∙∙∙∙∙∙∙∙∙∙∙∙∙∙∙∙∙∙∙∙∙∙∙∙∙∙∙∙∙∙∙∙∙∙∙∙∙∙∙∙∙∙∙∙ 16
CONTENIDO DE LA CAJA ∙∙∙∙∙∙∙∙∙∙∙∙∙∙∙∙∙∙∙∙∙∙∙∙∙∙∙∙∙∙∙∙∙∙∙∙∙∙∙∙∙∙∙∙∙∙∙∙∙∙∙∙∙∙∙∙∙∙∙∙∙∙∙∙∙∙∙∙∙∙∙∙∙∙∙∙∙∙∙∙∙∙∙∙∙∙∙∙∙∙∙∙∙∙∙∙∙∙∙∙∙∙∙∙∙∙∙∙∙∙∙∙∙∙∙∙∙∙∙∙∙∙∙∙∙∙∙∙ 17
PARTES ∙∙∙∙∙∙∙∙∙∙∙∙∙∙∙∙∙∙∙∙∙∙∙∙∙∙∙∙∙∙∙∙∙∙∙∙∙∙∙∙∙∙∙∙∙∙∙∙∙∙∙∙∙∙∙∙∙∙∙∙∙∙∙∙∙∙∙∙∙∙∙∙∙∙∙∙∙∙∙∙∙∙∙∙∙∙∙∙∙∙∙∙∙∙∙∙∙∙∙∙∙∙∙∙∙∙∙∙∙∙∙∙∙∙∙∙∙∙∙∙∙∙∙∙∙∙∙∙∙∙∙∙∙∙∙∙∙∙∙∙∙∙∙∙∙∙∙∙∙∙∙ 17
INSTALACIÓN ∙∙∙∙∙∙∙∙∙∙∙∙∙∙∙∙∙∙∙∙∙∙∙∙∙∙∙∙∙∙∙∙∙∙∙∙∙∙∙∙∙∙∙∙∙∙∙∙∙∙∙∙∙∙∙∙∙∙∙∙∙∙∙∙∙∙∙∙∙∙∙∙∙∙∙∙∙∙∙∙∙∙∙∙∙∙∙∙∙∙∙∙∙∙∙∙∙∙∙∙∙∙∙∙∙∙∙∙∙∙∙∙∙∙∙∙∙∙∙∙∙∙∙∙∙∙∙∙∙∙∙∙∙∙∙∙∙∙ 17~18
FUNCIONAMIENTO ∙∙∙∙∙∙∙∙∙∙∙∙∙∙∙∙∙∙∙∙∙∙∙∙∙∙∙∙∙∙∙∙∙∙∙∙∙∙∙∙∙∙∙∙∙∙∙∙∙∙∙∙∙∙∙∙∙∙∙∙∙∙∙∙∙∙∙∙∙∙∙∙∙∙∙∙∙∙∙∙∙∙∙∙∙∙∙∙∙∙∙∙∙∙∙∙∙∙∙∙∙∙∙∙∙∙∙∙∙∙∙∙∙∙∙∙∙∙∙∙∙∙∙∙∙∙∙∙∙∙∙∙∙∙∙∙ 19
MANTENIMIENTO ∙∙∙∙∙∙∙∙∙∙∙∙∙∙∙∙∙∙∙∙∙∙∙∙∙∙∙∙∙∙∙∙∙∙∙∙∙∙∙∙∙∙∙∙∙∙∙∙∙∙∙∙∙∙∙∙∙∙∙∙∙∙∙∙∙∙∙∙∙∙∙∙∙∙∙∙∙∙∙∙∙∙∙∙∙∙∙∙∙∙∙∙∙∙∙∙∙∙∙∙∙∙∙∙∙∙∙∙∙∙∙∙∙∙∙∙∙∙∙∙∙∙∙∙∙∙∙∙∙∙∙∙∙∙∙∙∙∙ 20
IDENTIFICACIÓN Y SOLUCIÓN DE PROBLEMAS∙∙∙∙∙∙∙∙∙∙∙∙∙∙∙∙∙∙∙∙∙∙∙∙∙∙∙∙∙∙∙∙∙∙∙∙∙∙∙∙∙∙∙∙∙∙∙∙∙∙∙∙∙∙∙∙∙∙∙∙∙∙∙∙∙∙∙∙∙∙∙∙∙∙∙∙∙∙∙∙∙∙∙∙∙∙∙∙∙∙∙∙∙∙∙∙∙ 21
ESPECIFICACIONES ∙∙∙∙∙∙∙∙∙∙∙∙∙∙∙∙∙∙∙∙∙∙∙∙∙∙∙∙∙∙∙∙∙∙∙∙∙∙∙∙∙∙∙∙∙∙∙∙∙∙∙∙∙∙∙∙∙∙∙∙∙∙∙∙∙∙∙∙∙∙∙∙∙∙∙∙∙∙∙∙∙∙∙∙∙∙∙∙∙∙∙∙∙∙∙∙∙∙∙∙∙∙∙∙∙∙∙∙∙∙∙∙∙∙∙∙∙∙∙∙∙∙∙∙∙∙∙∙∙∙∙∙∙∙ 22
GARANTÍA ∙∙∙∙∙∙∙∙∙∙∙∙∙∙∙∙∙∙∙∙∙∙∙∙∙∙∙∙∙∙∙∙∙∙∙∙∙∙∙∙∙∙∙∙∙∙∙∙∙∙∙∙∙∙∙∙∙∙∙∙∙∙∙∙∙∙∙∙∙∙∙∙∙∙∙∙∙∙∙∙∙∙∙∙∙∙∙∙∙∙∙∙∙∙∙∙∙∙∙∙∙∙∙∙∙∙∙∙∙∙∙∙∙∙∙∙∙∙∙∙∙∙∙∙∙∙∙∙∙∙∙∙∙∙∙∙∙∙∙∙∙∙∙∙∙∙∙ 23
CONTACTOS ∙∙∙∙∙∙∙∙∙∙∙∙∙∙∙∙∙∙∙∙∙∙∙∙∙∙∙∙∙∙∙∙∙∙∙∙∙∙∙∙∙∙∙∙∙∙∙∙∙∙∙∙∙∙∙∙∙∙∙∙∙∙∙∙∙∙∙∙∙∙∙∙∙∙∙∙∙∙∙∙∙∙∙∙∙∙∙∙∙∙∙∙∙∙∙∙∙∙∙∙∙∙∙∙∙∙∙∙∙∙∙∙∙∙∙∙∙∙∙∙∙∙∙∙∙∙∙∙∙∙∙∙∙∙∙∙∙∙∙∙∙∙∙∙∙ 24
CONTENIDO
Page 16

INSTRUCCIONES DE SEGURIDAD
Se deben leer y comprender las recomendaciones de seguridad detalladas en esta sección antes de utilizar esta máquina. Cuando utilice esta máquina, siga estas precauciones de
seguridad básicas para reducir el riesgo de incendios, descargas eléctricas o lesiones. Conserve esta información para consultas futuras.
ADVERTENCIA
1. No coloque el cable de alimentación cerca de un calefactor.
2. No utilice el cable de alimentación cerca de materiales inflamables o combustibles, como gasolina, benceno, disolventes de pinturas, etc.
3. No desmonte ni modifique los productos.
4. Enchufe el cable de alimentación adecuadamente. De lo contrario, causará una descarga eléctrica o incendio.
5. No opere ni detenga la unidad insertando o extrayendo el enchufe de alimentación.
6. Siempre quite el enchufe de la toma de corriente antes de realizar tareas de limpieza o mantenimiento y cuando no esté en uso.
7. No dañe o utilice un cable de alimentación que no se especifique. Causará una descarga eléctrica o incendio.
8. No modifique la longitud del cable de alimentación. Causará una descarga eléctrica o incendio.
9. No comparta el tomacorriente con otros artefactos. Causará una descarga eléctrica o incendio.
10. Siempre enchúfelo en un tomacorriente con conexión a tierra. Si no tiene conexión a tierra podría provocar una descarga eléctrica.
11. Desenchufe la unidad si aparecen sonidos extraños, olores o humo. De lo contrario, puede provocar un incendio o una descarga eléctrica.
12. No utilice el tomacorriente si está flojo o dañado. Puede provocar un incendio o una descarga eléctrica.
13. No lo opere con las manos mojadas o en un ambiente húmedo. Puede provocar una descarga eléctrica.
PRECAUCIÓN
1. No bloquee la entrada de energía ni el tomacorriente. Puede provocar fallas en el artefacto o deterioro del rendimiento.
2. Sostenga el enchufe por el cabezal cuando lo retire. Puede provocar una descarga eléctrica o daños.
3. Apague el interruptor de alimentación principal cuando no utilice el deshumidificador durante un período de tiempo prolongado.
4. No utilice este artefacto para conservar dispositivos de precisión, alimentos, mascotas, plantas y objetos de arte. Es un artefacto de uso general, no un equipo de precisión.
5. Limpe o filtro de aproximadamente a cada 3 meses.
6. No mueva la unidad cuando esté en funcionamiento.
7. El artefacto debe permanecer siempre de forma vertical o de costado durante su transporte. Recuerde drenar el tanque antes de transportar el artefacto.
16
Page 17

BDH-450 / BDH-550
CONTENIDO DE LA CAJA
PARTES
INSTALACIÓN
UBICACIÓN
• El deshumidificador debe tener como mínimo 12 pulgadas de espacio a cada lado para una buena circulación.
• Mantenga todas las puertas y ventanas cerradas en el área donde está ubicado el deshumidificador.
• Mantenga la unidad lejos de fuentes de suciedad, polvo o cualquier equipamiento de carpintería.
OPCIONES DE DRENAJE
El sistema de la bomba automática en este deshumidificador está diseñado para comenzar a bombear el agua fuera del reservorio interno cuando el nivel de agua alcance la
mitad del recipiente.
O, si cuenta con un drenaje de piso u otro lugar para expulsar el agua que esté en un punto más bajo al de la unidad, para que el agua drene por gravedad, puede utilizar la
salida de drenaje manual.
Nota: La bomba automática no funcionará si está configurado el drenaje manual.
17
Manijas
Ruedas giratorias
Panel de control
Protector de la manguera
Parrilla de filtro
Filtro
Enchufe eléctrico
Manguera de drenaje
Ganchos de almacenamiento
Tapón de desagüe de goma
Salida de la manguera de
drenaje manual
Manual del usuario Deshumidificador
Manguera de drenaje de
la bomba automática
Grampa de la
manguera
Page 18

18
BOMBA AUTOMÁTICA
1. Coloque la grampa de la manguera sobre el extremo de la manguera de drenaje de la bomba
automática apretando las dos lengüetas de la grampa a la vez, esto abrirá la grampa para deslizarla
en la manguera.
2. Coloque la manguera de drenaje en la salida de drenaje de la bomba automática hasta que esté
segura.
3. Empuje la grampa de la manguera sobre la salida para asegurar la manguera.
4. Coloque el extremo de drenaje de la manguera en cualquier área adecuada donde se pueda vaciar
el agua: un fregadero, un desagüe o una ventana. Asegúrese de que el agua fluya lejos de la
construcción o de cualquier otro objeto que se pueda dañar.
Note: La manguera de drenaje no debe estar a más de 10 pies (3 metros) por encima del suelo en donde se encuentre la unidad.
DRENAJE MANUAL
1. Quite el amortiguador de goma de la salida de la manguera de drenaje manual.
2. Ubique la salida de drenaje manual directamente sobre un drenaje de piso si es posible. Si no lo hace, utilice una manguera de 1/2 pulgada de diámetro para drenar en un
lugar que esté más bajo que la unidad.
Instalar una manguera de media pulgada de diámetro
Si hay una punta de acero o plástico en la manguera de 1/2 pulgada de diámetro, debe quitarla.
1. Coloque una grampa de manguea de 11/16 pulgadas (17,8 cm.)
de diámetro en la manguera.
2. Luego, coloque la manguera sobre la salida de drenaje manual.
3. Empuje la grampa sobre la salida para asegurar la manguera
4. Coloque el extremo de drenaje de la manguera en un desagüe o
lugar adecuado para vaciar el agua.
Nota: la manguera de drenaje manual y 11/16 pulgadas de diámetro de la abrazadera de manguera no incluido. A 1 / 2 pulgadas de diámetro y la manguera de 11/16
pulgadas abrazadera de manguera debe utilizarse si es necesario.
1.
2.
3.
A B C
4.
1.
2.
3.
4.
Page 19

BDH-450 / BDH-550
19
FUNCIONAMIENTO
Panel de Control
Este botón
Este botón de encendido prende y apaga la unidad. Cuando usted presiona este botón la unidad comienza a funcionar y la luz se prende.
Humedad
La función de humedad le permitirá configurar el nivel deseado de humedad para la habitación. Para configurarlo, utilice los botones “-” o “+”para establecer el nivel deseado. La unidad se
encenderá automáticamente cuando la humedad de la habitación sea mayor al nivel seleccionado.
El nivel de humedad se puede configurar entre 30 y 80. La temperatura operativa para esta unidad está entre 40 °F (4,4 °C) y 95 °F (35 °C). Si la temperatura de la habitación es inferior a los
40°F (4,4 °C), la unidad se detendrá. Esto ayuda a proteger el compresor dentro de la unidad.
Nota: La humedad seleccionada puede variar en +, - 5%
Velocidad del ventilador
Presione el botón fan (ventilador) para cambiar la velocidad del ventilador.
Luz de descongelación
Si se forma hielo en los serpentines internos, se encenderá la luz de descongelación. El deshumidificador entrará automáticamente en el modo de descongelación automática. La luz de
descongelación permanecerá encendida hasta que se complete la descongelación. Una vez que la descongelación se completó, la unidad funcionará nuevamente.
Luz del agua
Si por cualquier razón el agua no puede salir de la unidad, se encenderá la luz del agua. Revise la sección de solución de problemas de este manual para conocer las posibles soluciones.
FAN SPEED
HUMIDITY LEVEL
POWER
HIGH
LOW
DEFROST
WATER
FAN SPEED
HUMIDITY LEVEL
POWER
HIGH
LOW
MEDIUM
DEFROST
WATER
BDH-450 BDH-550
Page 20

20
MANTENIMIENTO
Advertencia: ¡Siempre desenchufe la unidad del tomacorriente de la pared antes de limpiarla!
Si el filtro está sucio, afecta la circulación de aire y la eficiencia del deshumidificador disminuye.
Recomendamos la limpieza del filtro cada tres meses aproximadamente, o cuando las condiciones la indiquen necesaria.
Esta unidad está equipada con un filtro lavable. Siga las instrucciones a continuación para quitarlo y limpiarlo.
Limpieza del filtro de aire
1. En la parte trasera de la unidad, quite la parrilla del filtro tirando suavemente de la manija en dirección hacia usted.
Luego saque el filtro.
2. Si el filtro está muy sucio, lávelo con agua tibia. También puede utilizar con suavidad un aspirador para eliminar el
polvo que ha acumulado.
3. Déjelo secar completamente, luego vuelva a insertarlo en la parte trasera del deshumidificador.
4. Deslice la parrilla del filtro nuevamente hacia la parte trasera de la unidad.
Almacenamiento
El deshumidificador debe drenarse antes de un almacenamiento a largo plazo.
1. Apague y desenchufe el deshumidificador.
2. Drene toda el agua que pueda haber quedado en la unidad a través de la salida de drenaje manual. ( vea la sección de drenaje manual para obtener más detalles)
3. Enrosque la manguera y/o el enchufe alrededor de los ganchos de almacenamiento en la parte trasera de la unidad.
Page 21

BDH-450 / BDH-550
IDENTIFICACIÓN Y SOLUCIÓN DE PROBLEMAS
Problema Causa Solución
La unidad no funciona.
1. No hay electricidad.
2. La unidad no está prendida.
3. El nivel de humedad establecido es mas alto que el nivel de
humedad de la habitación.
4. La energía se apagó y se volvió a encender automáticamente.
1. Enchufe el cable de electricidad al tomacorriente y verifique el
funcionamiento de los fusibles de esa habitación.
2. Prenda la unidad.
3. Establezca el nivel de humedad a un porcentaje más bajo.
4. Si una unidad se apagó y luego volvió a encenderse
automáticamente, el compresor demorará 5 minutos para
arrancar.
La luz de agua esta prendida. 1. El flujo del agua esta bloqueado.
1. Verifique que la manguera no este doblada o atracada.
2. Asegúrese de que la altura a la que va la manguera es menos
de 10 pies por encima de la posición del deshumedecedor.
El aire en la habitación todavía está húmedo.
1. El filtro de aire esta sucio o bloqueado.
2. La temperatura de la habitación está por debajo de los
40 °F.
3. La circulación de aire es pobre o hay obstrucción.
4. El nivel de humedad está establecido mas alto que el
nivel de humedad actual en la habitación.
1. Limpie el filtro.
2. Suba la temperatura en la habitación.
3. Mejore la circulación de aire moviendo la unidad hacia
un lugar en donde nada obstruya la entrada y salida de
aire.
4. Establezca el porcentaje de humedad a un nivel más
bajo.
La Humedad Relativa no puede ser alcanzada
después de un largo periodo de funcionamiento.
1. Hay ventanas o puertas abiertas.
2. El área/habitación es muy grande para la capacidad del
deshumedecedor.
1. Verifique que las ventanas y puertas estén cerradas.
2. Mueva el deshumedecedor a otra parte de la habitación.
La luz de descongelamiento esta encendida.
1. La temperatura de la habitación está por debajo de los
40 °F.
2. El filtro de aire está sucio.
1. Suba la temperatura de la habitación por encima de los
40 °F.
2. Quite y limpie el filtro de aire.
21
Page 22

22
ESPECIFICACIONES
Los desperdicios eléctricos no deben botarse juntamente con la basura doméstica. Por favor,
recicle cuando sea posible. Contacte a las autoridades locales por consejos referentes al reciclaje.
Descripción del Producto Deshumedecedor sin Cubeta
Modelo BDH-450 BDH-550
Capacidad Deshumedecedora
(Pintas/Día)
45 Pintas / 21.3 Liters 55 Pintas / 26 Liters
Consumo de Electricidad (W) 550
Sincronizador 24 horas
Velocidades del Ventilador 2 3
Velocidades del Ventilador 21.3 x 12.6 x 15(pulgadas) / 541 x 320 x 381(milímetros)
Peso 39.7 libras / 18 kilos
Page 23

BDH-450 / BDH-550
GARANTÍA COMPLETA POR UN AÑO
Royal Sovereign garantiza que cada deshumedecedor está libre de defectos en cuanto a materiales y fabricación. Nuestra obligación bajo esta garantía está limitada a la
reparación o sustitución, sin costo, de cualquier parte(s) defectuosa(s) que no se haya dañado en el transporte, cuando el producto sea entregado a un Centro de Servicio de
Royal Sovereign. Esta garantía cubre al comprador original por un año desde la fecha de compra y no es transferible. Esta garantía se aplica sólo si el deshumedecedor se usa en
un circuito de Corriente Alterna, de acuerdo a las instrucciones de fábrica que acompañan al producto.
GARANTÍA LIMITADA POR CINCO AÑOS (COMPRESOR)
Por un periodo de cinco años desde la fecha de compra, siempre y cuando este Deshumedecedor Royal Sovereign sea operado y mantenido de acuerdo al manual de instrucciones
provisto con el producto, Royal Sovereign suplirá un compresor de reemplazo (solamente la parte), sin costo, si se determina que el compresor original tiene una falla en cuanto
a mano de obra o materiales. Si es necesaria la reparación, por favor contacte a nuestro centro de servicio al cliente. Usted será responsable por el envío, seguro y cualquier otro
gasto de transporte para hacer llegar la unidad a nuestra fabrica o centro de servicio. Si es necesario el envío, asegúrese de empacar la unidad correctamente para evitar daños
en el transporte, pues nosotros no seremos responsables por aquellos daños.
EXCLUSIONES
Esta garantía excluye y no cubre defectos, malfuncionamiento o fallas de su Deshumedecedor Royal Sovereign causadas por reparaciones hechas por personas o centros
de servicio desautorizados, manejo inadecuado, instalación inapropiada, modificación o uso irrazonable de voltaje incorrecto, fuerzas de la naturaleza, o dejar de hacer el
mantenimiento razonable y necesario. Esta garantía es en lugar de todas y cada una de las garantías expresas. En ninguna eventualidad Royal Sovereign será responsable por
daños incidentales o consecuentes. Esta limitación no se aplica si usted vive en un lugar en donde no es permitida la limitación de daños incidentales o consecuentes. Esta garantía
le da derechos legales específicos y usted puede tener otros derechos los cuales varían de estado a estado.
23
www.royalsovereign.com
Page 24

ROYAL SOVEREIGN INTERNATIONAL, INC.
2 Volvo Drive Rockleigh, NJ 07647 USA
TEL : +1) 800-397-1025 FAX : +1) 201-750-1022
ROYAL SOVEREIGN INC.
1001, World Meridian II, 426-5, Gasan-dong, Geumcheon-gu, Seoul, 153-759, KOREA
TEL : +82)2-2025-8800 FAX : +82)2-2025-8830
RS INTERNATIONAL AUSTRALIA PTY. LTD.
30 Prime Drive, Seven Hills, NSW 2147, AUSTRALIA
TEL : +61) 2-9674-2127 FAX : +61) 2-9674-2027
RS CANADA INC.
1025 Westport Crescent, Mississauga On L5T 1E8 CANADA
TEL: +1) 905-461-1095 FAX: +1) 905-461-1096
TF: +1) 866 961-6673
RS HOLLAND B.V.
Industrieweg 6K, 4104AR, Culemborg, The Netherlands
Tel: +31 (0)345 473 097 Fax: 31 (0)345 519 811
www.royalsovereign.com
 Loading...