

Page 1
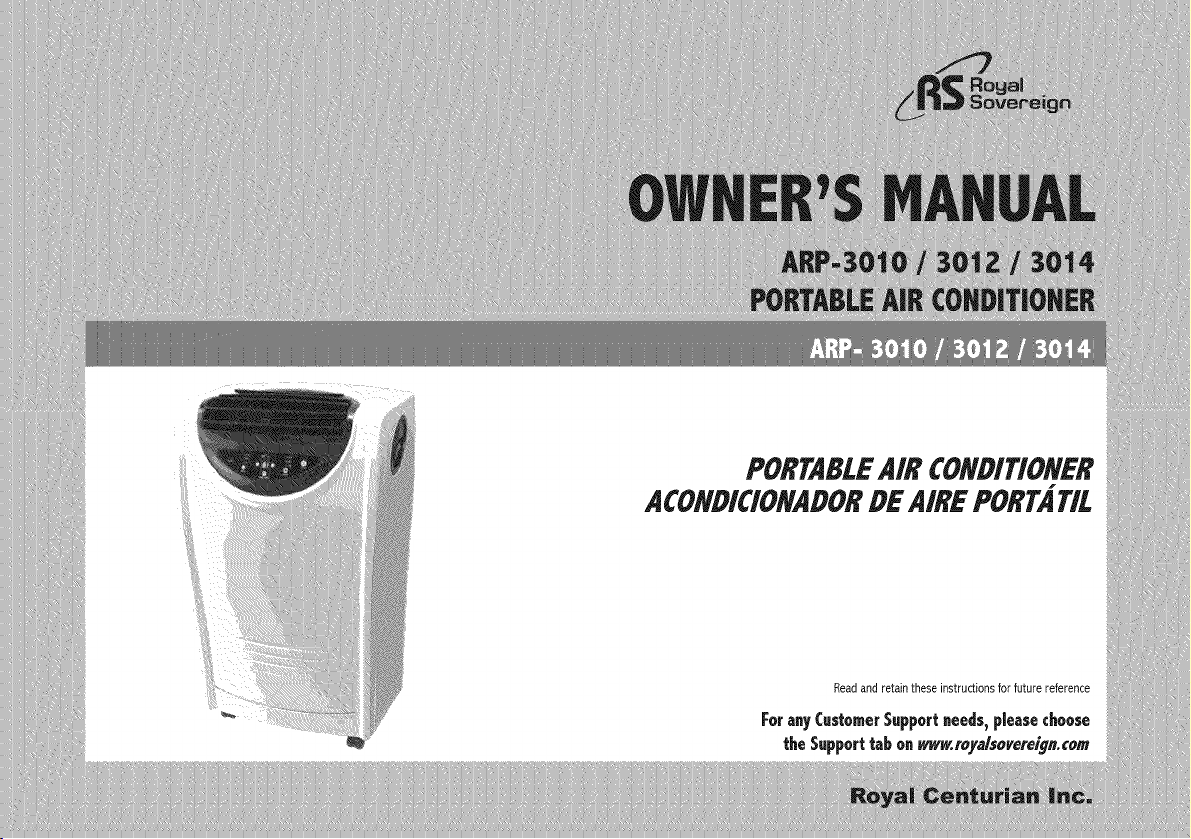
PORTABLEAIR CONDITIONER
ACONDICIONADORDEAIREPORTATIL
Page 2
[qodelARP_3010/ 3012 / 3014
Page 3
Page
Precautionsfor use........................................................................................................................................ 4
Noteson operation and identificationof parts.................................................................................................. 5
Installation instructions............................................................................................................................... 6-7
Operation.................................................................................................................................................. 8-9
Remotecontrol ...................................................................................................................................... 10-11
Maintenance................................................................................................................................................ 12
Troubleshooting........................................................................................................................................... 13
Specifications............................................................................................................................................... 14
Warranty...................................................................................................................................................... 15
Contactinformation...................................................................................................................................... 16
P{iginaen Espafiol....................................................................................................................................... 17
Page 4
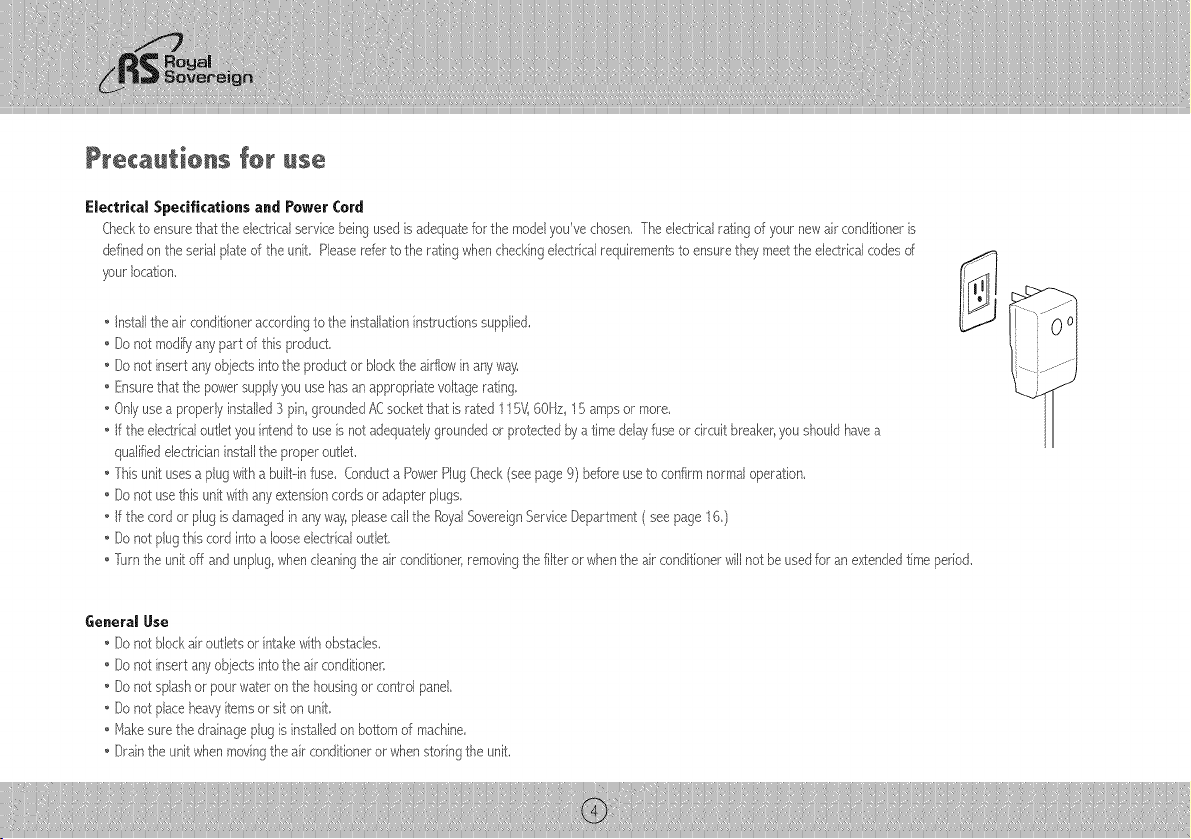
Precautionsfor use
Electrical Specifications and Power Cord
Checktoensurethattheelectricalservicebeingusedis adequatefor themodalyou'vechosen,Theelectricalra%gof yournewairconditioneris
definedontheserialplateofthe unit, Pleasereferto the ratingwhencheckingelectricalrequirementsto ensuretheymeetthedectricalcodesof
yourlocation,
• Installtheair conditioneraccordingtothe installationinstructionssupplied.
• Do notmodi_/antspart of this product.
• Do notinsertantsobjectsintothe produdor blocktheair%win antsway.
• Ensurethatthepowersupplypu usehasanappropriatevoltagerating
• Onlyusea properlyinstalled:3pin groundedACsocketthatisrated11r:i_60Hz 1r:iarnpsor more.
• If theelectricaloutletyouintendto useisnotadequatelygroundedorprotectedbyatimedelayfuseor circuitbreaker,youshouldhavea
qualifiedelectridaninstalltheproperoutlet.
• Thisunit usesaplugwithabuilt--infuse. Conducta PowerPlugCheck(seepage9) beforeuseto confirmnormaloperation.
• Do notusethisunitwithanyextensioncordsoradapterplugs.
• If thecord or plugisdamagedinanyway_pleasecallthe %yalSovereignServiceDepartment(seepage 16.)
• Do notplugthiscordintoa looseelectricaloutlet.
• furn the unitoff andunplugwhencleaningthe airconditioner]removingthefilteror whentheairconditionerwillnotbeusedforan extendedtime period.
General Use
Donot blockairoutletsor intak_withobstacles.
Donot insertanyobjectsintotheair conditioner.
Donotsplashor pourwateronthe housingorcontrolpanel.
Donot placeheavyitemsor siton unit.
Makesurethe drainageplugisinstalledonbottomof machine.
[)raintheunitwhenmovingthe airconditioneror whenstoringtheunit.
Page 5
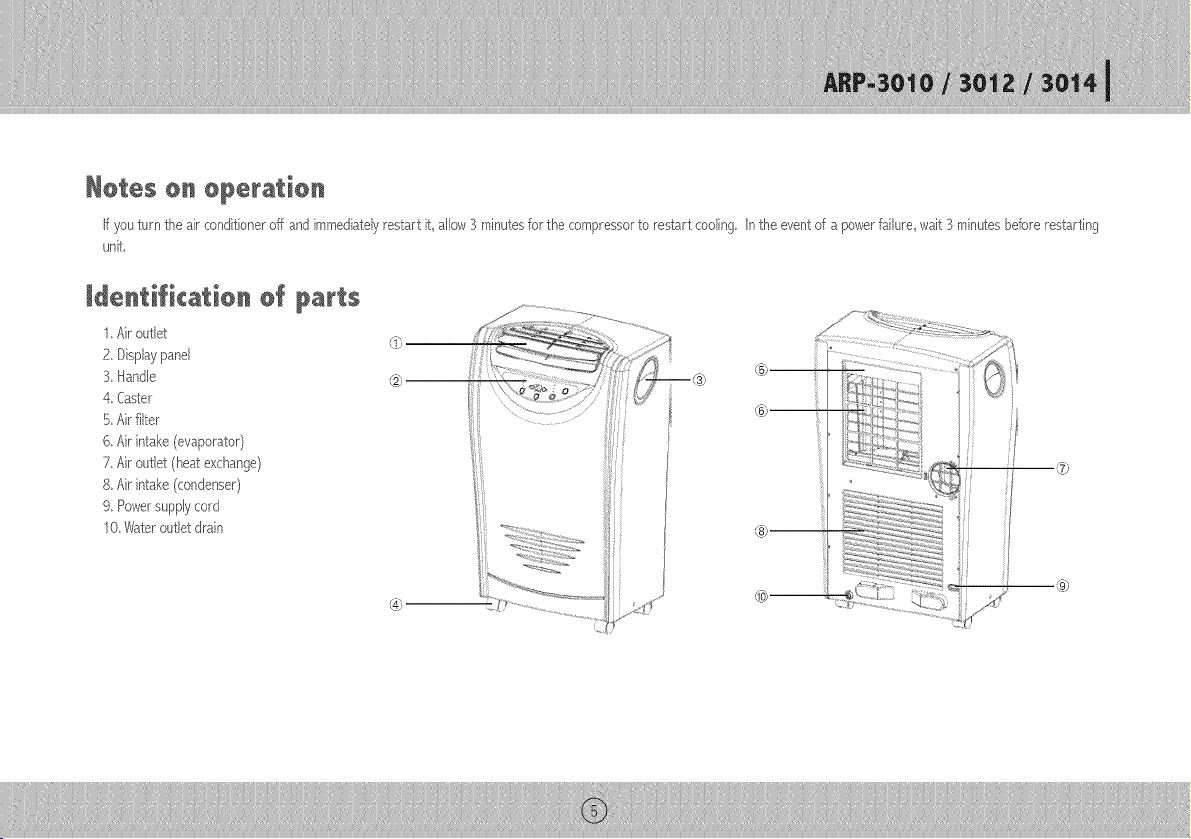
Hotes oH operation
if youturn the airconditioneroff andimmediatelyrestart it,allow3 minutesfor thecompressorto restartcooling,in theeventof a powerfailure,wait 3minutesbeforerestarting
unit,
laenti(icatien o( parts
1,Airoutbt
2.Displaypanel
3,Handle
4,Caster
_.i,Airilter
6,Air intake(evaporator)
7,Airoutlet(heatexchange)
8,Air intake(condenser)
9,Powersupplycord
10,Wateroutletdrain
®
u®
®
Page 6
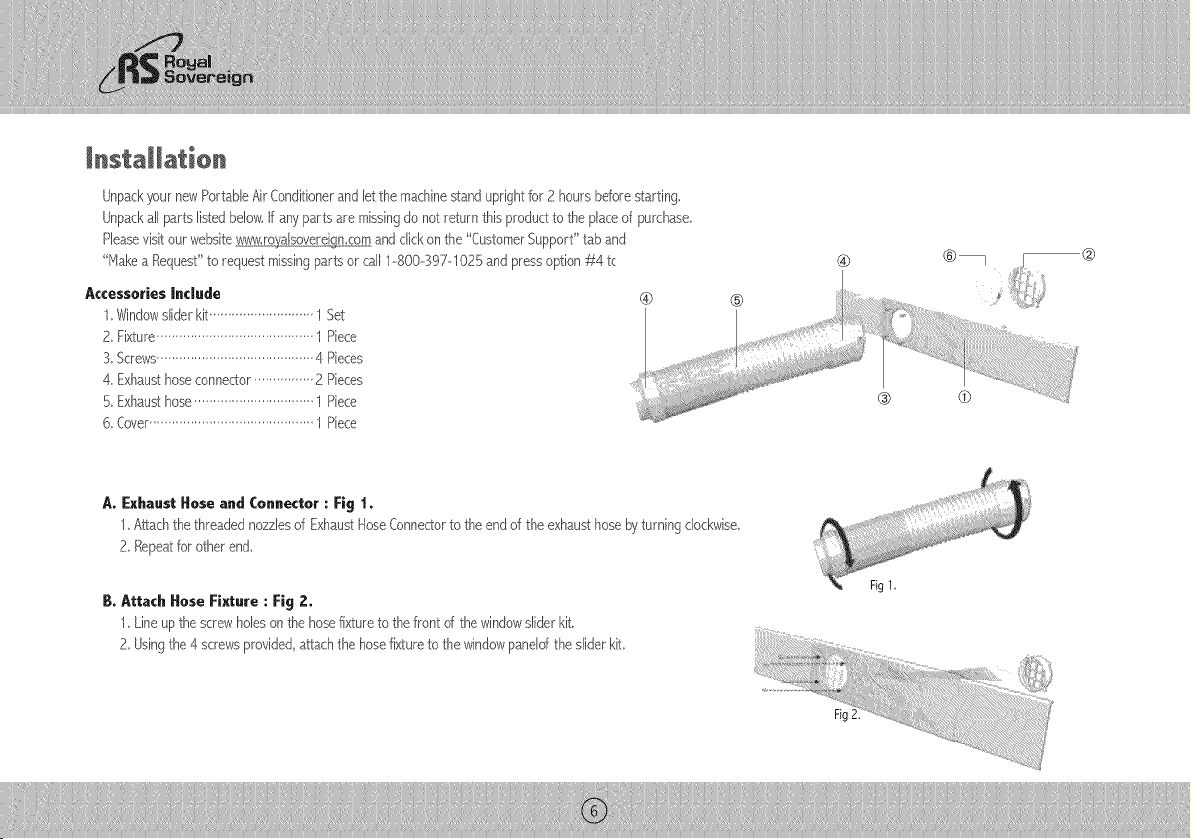
Unpackput newPortableAirConditionerand letthe machinestanduprightfor2 hoursbeforestarting.
Unpackallparts listedbelow.I anyparts aremissingdo not returnthisproducttothe placeof purchase.
Pleasevisitourwebsite_,t¢,_,r ncom andclickon the"CustomerSupport' taband
"ltake a,Request'to requestmissingpartsor call1-800-S97-1025andpressoption¢44tc
Accessories Indude
1 Windowsliderkit 1Set
2,Fixture..........................................1 Piece
3,Screws..........................................4 Pieces
4 Exhausthoseconnector................2 Pieces
5,Exhausthose................................1Piece
6,Cover............................................/ Piece
A, Exhaust Hose and Connector : Fig 1,
1,Attachthethreadednozzlesof ExhaustHoseConne<_orto theend ofthe exhausthosebyturningclockwise,
2,Repeatforotherend,
B. Attach Hose Fixt-re : Fig 2,
1,Lineupthescrewholesonthehosefixtureto thefront d the windowsliderkit.
2,Usingthe4screwsprovided,attachthehosefixtureto thewindowpaneldthesliderkit
Fig2
Page 7
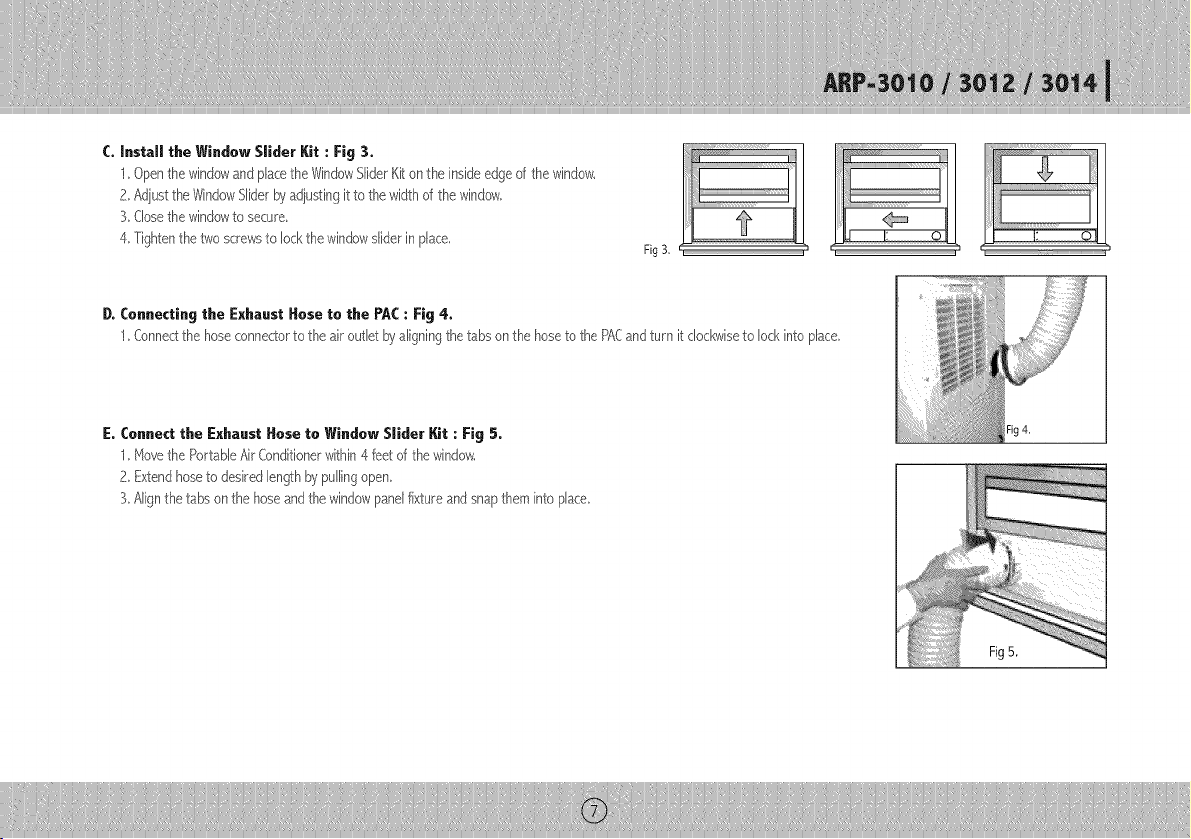
C. Install the Window Slider Kit : Fig 3.
1 Openthe windowandplacetheWindowSliderKiton theinsideedgeof thewindow,
2,Adjust_heWindowSliderbyadjustingit to thewidthofthe window,
3,Closethe windowto secure
4,Tightenthetwoscrewsto lockthe windowsliderin place,
D, Connecting the Exhaust Hose to the PAC: Fig 4,
1,Connersthe hoseconne(Sortothe airoutld byaligningthetabsonthehoseto thePA,Candturn it clockwisetolockinto pJace,
E. Connect the Exhaust Hose to Window Slider Kit : Fig 5.
1 Move,thePortableAirConditionerwithin4feet ofthewindow.
2,Extendhoseto desir_,dlengthbypullingopen
3,Alignthetabs onthehose,andthewindowpandfixtureandsnaptheminto place,
Fig4.
FigB.
Page 8
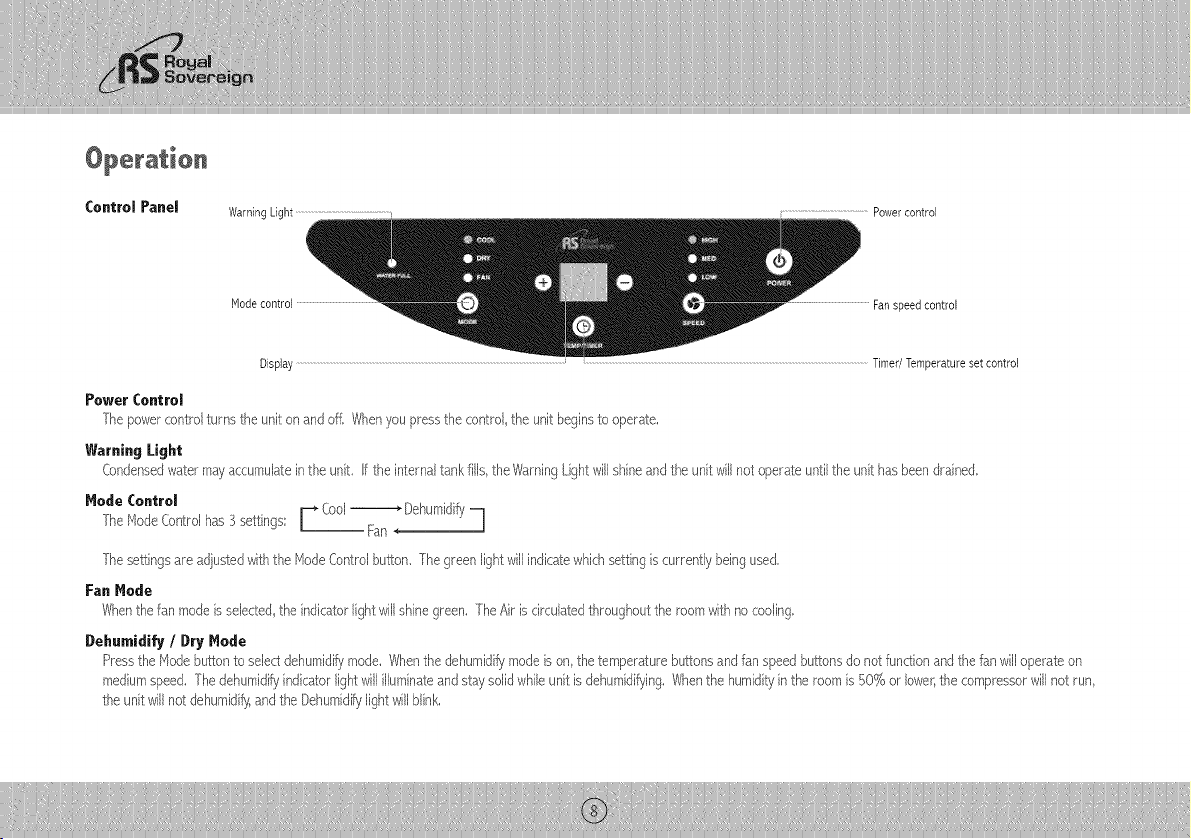
Co.trol Panel WarningLight Power control
Mode control Fan speed control
Display ..............................................................................................................................................................................................................................................................................................................................................................................................Timer/Temperature set control
Power Control
Thepowercontrolturnsthe uniton andoff, Whenyoupressthecontrol,the unitbeginsto operate,
Warning Light
Condensedwatermayaccumulateinthe unit. f the internaltankfills,theWarningIJghtwillshineandthe unitwillnotoperateuntilthe unithasbeendrained.
Hode Control
[he ModeControlha 3 settings [
Cool
_ Dehumidi_
-- Fan ,
q
[he settingsareadjustedwiththe ModeControlbutton. Thegreenlightwillindicatewhichsettingiscurrentlybeingused.
Fan Hede
Whenthe fanmodeis selected,the indicatorlightwillshinegreen.TheAiriscirculatedthroughoutthe roomwithnocooling
Dehumidify / Dry Hode
Pressthe Modebuttonto selectdehumidi_/mode./_Jhenthedehumidifymodeison thetemperaturebuttonsandfanspeedbuttonsdo notfunctionandthefanwill operateon
mediumspeed.[he dehumidi_/indicatorlightwillilhminateandstaysolidwhileunitisdehumidifying.Whenthe humidityinthe roomis 50%or lower,the compressorwillnot run
theunitwill notdehumidify,andtheDehumidi_slightwillblink,
Page 9
CoolMode
WheninCoolmodetheindicatorlightwillshinegreen.
1.Duringoperatingtheunitdisplays_'presentroomtemperature._
Z.Whensettingthetemperaturetheunitwilldisplaythetemperatureset.1-emperaturerangeis61°Fto89%
XInCodmodeusethe"÷' or "%uttontoadjustandsetthedesiredtemperaturefor the room./Vter5secondsthe displaywill revertbackto thecurrentroomtemperature.
femperaturecanonlybe adjustedin Coolmode.Thetimeisadjustabbbetween1-_24 hours.
Fan Speed Control
TheFanspeedhas3 settings:_igh,Mediumand Low
Changin 9 Temperature Readin9 from Celsius to Fahrenheit
Pressthe Timerand lemperaturesetbuttonsatthesametimeto displaythetemperaturereadingyouwouldliketo use,
Timer
fhere are2 differenttimer programs,Youcansetthe numberof hoursbeforetheairconditionerautomaticaB/turnsOFForyoucansetthe numberof hoursthatwillelapse
beforethe unitturns ON.
Whenthe air conditioner is turned off, you canchoose to turn it on in one hour intervals,
1,Press the G button on the remote to turn on the timer fundion
2, Press the + or --button on the remote to set the desired hour,
3, The unitwill turn on when the set time elapses,
Whenthe air conditioner- is turned on you can choose to turn it off in one hour intervals,
1,Press the (_ button on the remote to turn on the timer function
2, Press the + or --button on the remote to set the desired hour,
3, The unitwill turn off when the set time elapses,
Automatic Restart:
n the event of a power failure: The settings ,/viiireturn to the previously set operating modes once the power is restored.
Power Plug Chech
1.Press the %%[ button.
2. Insert the power plug into the electrical outlet.
3. Press the ESI- button. If the circuit breaker is working youll hear a click.
4. Press the RESETbutton until you hear another click. The circuit breaker in the plug is now activated.
5. Do not use the air conditioner if the above procedure cannot be successfully pe_orme&
After switching the air conditioner off_ wait 3 minutes before switching it bacl_ on again,
Page 10
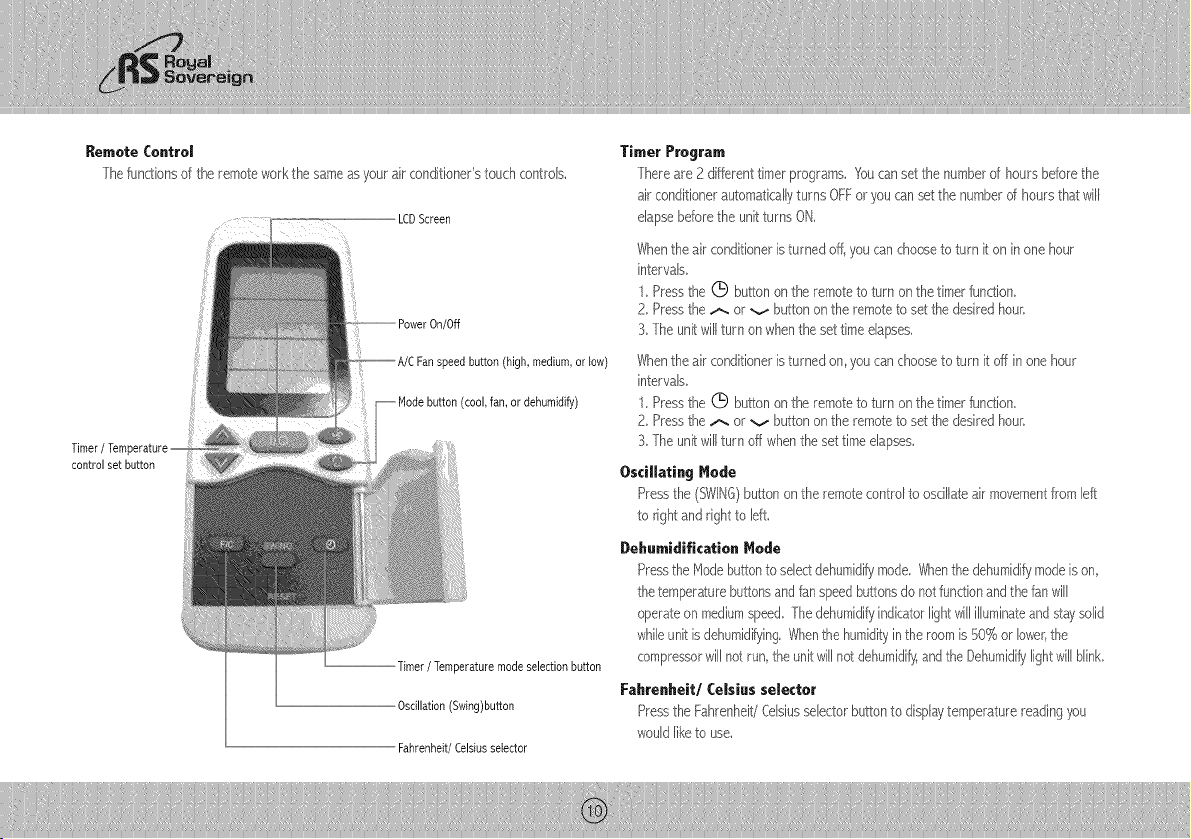
Remote Control
Thefun(£ionsof the remoteworkthe sameasyourair conditionerstouchcontrols,
LCDScreen
/off
peedbutton(high,medium,or low)
(cool,fan, ordehumidify)
Timer
control set button
rimer / Temperature mode selection button
Oscillation (Swing)button
Fahrenheit/Celsius selector
Timer Program
Thereare 2differenttimerprograms, Youcansetthenumberof hoursbeforethe
airconditionerautomaticallyturns OFFor youcansetthe numberd hoursthat will
elapsebeforetheunitturnsON,
Whenthe airconditioneristurned off,youcanchooseto turn it oninone hour
intervals,
1,Pressthe (_ buttononthe remoteto turn onthetimerfunction,
2, Pressthe t-. or v buttononthe remoteto setthe desiredhour.
3,TheunitwiI[turnonwhentheset timeelapses,
Whenthe airconditioneristurned on,youcanchoosetoturn it off inonehour
in_ervaJs
1,Pressthe (_ buttononthe remoteto turn onthetimerfunction,
2, Pressthe t-. or v buttononthe remoteto setthe desiredhour.
3,TheunitwiI[turnoff whenthesettimeelapses,
Oscillalin 9 I_lede
Pressthe(SWING)buttononthe remotecontrolto osci%teairmovementfromleft
to rightand rightto left
Deh.midifkation Mode
Pressthe Modebuttonto selectdehumidifymode. Whenthe dehumidifymodeison,
thetemper_Zurebutlonsandfanspeedbuttonsdo notfunctionandthefanwill
operateon mediumspeed Thedehumidifyindicatorlightwillilluminateandstaysolid
whileunitisdehumidifyingWhenthehumi@yinthe roomis%% or lowershe
compressorwillnot run,theunitwillnotdehumidify,andtheDehumidifylightwill blink
Fahrenheil/Celsius selecler
PresstheFahrenheit/Celsiusselectorbuttonto disphytemperaturereadingyou
wouldliketo use.
Page 11

Remote Control Operation
- Theremotecontrolusestwo ,_¢&(IECROf-_1,5V)batterieswhichhavebeenincludedforyourconvenience,
- Removethe batterycoveron backof theremote,
- nsert the batteriesmakingsure the(_--)and (_-)polarityisalignedcorrectly,
--Replacethe batterycover:
tto_es:
--Whenreplacingbatteries,alwayschangeboth batteriesatthesametime.
--Removethebatteriesifthe remotecontrolis notusedfor amonthor longer,
--Donotdisposeof batteriesina fire.
Balt_eryrepJa_eme_
Removethe coveronthebackofthe remotecontrolandinsertthe batterieswith (+) and (--)polespointingintheproperdirection.
f,j
L Battery compartment lid
'X"_"L Battery compartment
Page 12

Drainage
Occasionally_youmayneedtodrainthe unit.
1.[)rainthe unitif theWarningLightonthedisplaypanelof theair conditionerison.
2.7urnoffthepowerto theunitand unplug.
3.Placeashallowdishunderthedraina% plugto collectwater:
4,Removethe drainageplug
5,Replacetheplug whendrainagewaterstopsflowing
Cleaning the filter
Thefiltershouldbecleanedevery2weeksor 100 hoursof useinorderto maintainproperair%w,
1.Removethefilter:Gentlypullthe filterassemblyfromthebackof the unitandthenremovethefilterfromthe assembly,
2.Cleanthefilter byvacuumingor a softcloth. If thefilterisverydirty,it canbeeasilywashedwitha milddeter%ntandrinsedthoroughlywithcleanwater, Drythefilterbefore
replacement.
3.Reinstallthefilter inthe filterassembly,
4.Replacethefilter assemblyonthe backof the machine.
Hot÷ : Neveroperatetheair conditionerwithoutthefilterin place. Thismaydamagetheunit.
Cleaning and maintaining the air conditioner
[urn the air conditioner off and remove the eledrical plug. Wipe with a soft, dry, or damp cloth. A mild detergent can be used. Be sure to remove any residue and dry completely,
Do not use harsh chemicals abrasive cleaners or volatile substance (such as gasoline). Avoid splashing water on the air conditioner as this can seriously dama% the unit.
Storing the air conditioner
Ifthe unitwillnotbeusedfor alongtime,besureto drainthe aircon@ioner_cleantheair filtel;pulloutthepowersupplyplug and removethe batteriesfromthe remotecontrol
beforestorage.Afterdraining keepthe airconditionerrunningon %Nmodefor atleast8 hoursto drythe unitcompletelyto preventmold.
Page 13

AirConditionerdoesnotoperate
AirConditionerrunsbutdoesnotcool
- Checkand reset the power plug,Wait3 minutes and try to run the unit again,
--The batterbs in the remote may need to be replaced, Replace the batteries and try to run the unit again,
--Make sure the plug is properly plugged into the outlet,
--The set temperature may be too close to room temperature, Lower-the set temperature,
--The air outlet may be blocked, Checkthe air outlet and remove any items that may be found,
- Checkthe roomforopendoorsor windowsandclosethem,
- Theremaybeanotherapplb,nceinthe roomgivingoff heat, Checkthe roomandturn offthe app%nce,
- Theair filtermaybedirty, Checkthe filterandcban if necessary,
--Theair exhaustor intakemaybe blocked.
--Thesettemperaturemaybetoo high. Checkthesettemperatureandreduceit if necessary,
AirConditionerdoesnotrun
andwaterfullindicatorislit
- Theremaybeexcesswaterin theunit,Draintheunit.
Page 14

--Figuresnotedinthecontentsareforreferenceonly;variationmayresultduetotheapplicationindifferentcountriesorregions,andshallbebasedonpracticaloperation,
Model ARP-3010 ARP-3012 ARP-3014
Voltage/Frequency AC115V-_60/-_z
Inputpower 1200W 1500W 1500W
Current 11A 13A 13A
CoolingCapacity 10,O00B_U/hr 12 O00B[U/hr 14 O00B[U/hr
Dehum}dif}/ingCapacity 30 pints/hr 3,3 pints/hr 3,3pints/hr
Coolant R-22
Timer 24 hour
Dimension(w)X (h) x (d) 20,3 x 34,5 x 14,6 inches
Weight 771bs
ElectricalNasteprodudsshouldnotbedisposedof withhouseholdwaste,
Pleaserecyclewherefaclitiesexist,Checkwithyourlocalauthorityo retaibrfo recyclingadvice,"
Page 15

FULLONEYEARWARRANTY
%yalSovereignwarrantseachPortableAirConditionerto befree fromdefectsinmaterialandworkmanship,Ourobligationunderthiswarrantyislimitedto therepairor
replacementfreeof chargewhendeliveredto anauthorized%yalSovereignservicecenter;of anydefectivepart(s) thereofotherthanparts damagedintransit,Thiswarrantyis
ineffectto the originalpurchase_for a periodof oneyear fromthedateof purchaseandis nottransferable,Thiswarrantyshallapplyonlyif theairconditionerisusedon
AlternatingCurrent(AC)circuitinaccordancewiththefactory providedinstructionswhichaccompanyit,
LiMiTEDFIVEY£ARWARRANTY(COMPRESSOR)
_oraperiodof fiveyearsfromthedateof purchase,whenthis%yalSovereignPortableAir Conditionerisoperatedandmaintainedaccordingtothe instrudionmanualprovided
withtheproduct %yalSovereignwillsupplya replacementcompressor(partsonly) freeof chargeif theoriginalcompressorisdeterminedto be defectivein workmanshipor
material,f repairbecomesnecessari_pleasecontactourcustomerservicecentei:Youwill beresponsibleforallfreight insuranceandanyothertransportationchargesto getthe
unittoourfactory orservicecenter:f shippingisrequired besureto packtheunitproperlyto avoidshippingdamagesaswewillnotbe responsibleforsuchdamages,
Thiswarrantyexcludesand doesnotcoverdefectsmalfunctionsor failuresof yourRoyalSovereignPortableAirConditioner;causedbyrepairsbyunauthorizedpersonsorservice
centersmishandlingimproperinstallationmodificationor unreasonableuseincludingincorrectvoltageactsof God orfailureto providereasonableandnecessarymaintenance.
fhis warrantyisin lieuof anyand allexpressedwarranties.Inno eventshall%yalSovereignbeliablefor consequentialor incidentaldamages.Thislimitationwouldnotapplyif you
liveina locationthasdoesnotpermitthe exclusionof limitationof incidentalor consequentialdamages,Ibis warrantygivesyouspecificlegalrightsandyoumayalsohaveother
rightswhichvaryfromstateto state,
Page 16

Page 17

ACONDICIONADORDEAIREPORTATIL
Leay guarde estas instrucciones para referencia en el futuro,
Para_rvicio al Clientepot favordirijase a ,uestra p_ginaweb
wwv.royalsovereign.comy seleccione_Support Tab"
Page 18

HodeloARP-3010/ 3012 / 3014
,n,Esun:siStemade:c6moda:ventilad6n:muiti-fund0naiqueleofrecemodosde AireAcondiciOnado;Deshumedecedory Circulaci6nde
i_informaci6iivalUabl_ " _propiadoy mantenimientode::Sunuevo
m_stico_PotfaVOr,: _lealasinstrucdonesp,
:: muchosa_oSde0i_eraci6n:librede pr0blema3:.::::::
propiadamente;su electrOdom_sticoledar_.
Page 19

Pagina
Precaucionesde Uso................................................................................................................................... 20
NotasSobreel Funcionamientoe Identificaci6nde lasPartes.......................................................................... 21
Instruccionespara la Instalaci6n............................................................................................................ 22_23
Funcionamiento...................................................................................................................................... 24_25
ControlRemoto...................................................................................................................................... 26_27
klantenimiento ............................................................................................................................................ 28
Identificaci6ny Soluci6ndeProblemas........................................................................................................... 29
Especificaciones........................................................................................................................................... 30
Garantia ..................................................................................................................................................... 31
Contactos.................................................................................................................................................... 32
Page 20

Precaudonesde @so
Especificaciones El_ctrkas y Cable de Electrkidad
\!erifiquequeelservidod6ctricoenusoes eladecuadoparaelmoddoque hadegido,Elvoltajed6ctricode sunuevoacondidonadordea.ireesta.
descritoen[aplacadeseriedelaunidad,Porfavor_reviseelvoltajed@tricocuandoverifiquelosrequerimientosd_,_ctricospa.raasegurarsede
quecorrespondana.losc6digosdee[ectriddaddesu[ocalidad,
• nstaJeeJacondicionadordeaimde acuerdoa lasinstruccionesdeinstaJaci6npmvistas,
• No modifiqueningunapartedeesteprodudo,
• No inserteningOnobjeto dentrodelproductoo bloqueeel%jo de a.irede ningunamanera,
• Asegtiresede queel tomacorrienteen usotieneelvoltajecorrecto,
• Usesdamenteuntomacorrientede 3tomasconconexi6na%rra de 115vdtios 60Hzconindicede 15amperioso mas,
• Sieltomacorrientequewe.a usarnotieneconexi6na tierrao esta.protegidopor undrcuitode fusiblescontiemporetardadousteddebe
contactara unelectricistacalificadoparainstalareltomacorrientecorrecto.
• Estaunidadusaun enchufeconfusibleinchido.Hagaunapruebade corrienteyenchufe(verPa.g9) antesde usarparaconfirmarelfuncionamientonormal.
• No useestaunidadconningOncabledeextensi6noenchufesadaptadores.
• Sielcableoel enchufeesta.ndafiadosdecualquierforma porfavor Ilameal Departamentode Servidode RoyalSovereign(vetPa.g.16).
• Noenchufeesteproductoen untomacorrienteque est@sudto.
• {uandovayaa limpiarelacondicionadordeaire,removerelfiltroo elacondicionadorde airenovayaaset usadoporun largotiempo,apaguelaunidady desenchOfda_
Uso General
• No bloqueelaentradaosaJidadeaim.
• No inserteobjetosdentrodel acondicionadordeaire.
• Noderrameo salpiqueaguaenel paneldecontrolo elexteriordelaunidad.
• No pongaobjetospesadosnise sienteenla unidad.
• Aseg@esedequeel tap6ndedren_e est6instaladodebaiode lamaquina.
• I)renelaunidadantesdetransportar oguardarel acondidonadordeaire.
Page 21

Notas $obr÷ ia Op÷ra¢i6n
Si usted apaga el acondidonador de aire y Io endende de nuevo de inmediato, deje pasar 3 minutos para que el cornpresor reinide el enfriado, En la eventualidad de que haya un
corte de energia el6ctrica espere tres rninutos antes de reinidar la unidad,
Ja÷ntifica¢i_n ae _as Partes
1,SaHdadeAire
2,PantaJla
3,Manija
4,Ruedas
b,FiltrodeAire
6,EntradadeAire(Evaporador)
7,SalidadeAire (Intercambiode Calor)
8,EntradadeAire(Condensador)
9.Cablede Electricidad
10.SalidaParael Drena:iedeAgua
Page 22

DesempaquesunuevoAcondicionadordeAimPort£tilydqequelamgquinadescanseenposici6nverticalpotdoshora_santesdeprenderla,
Desempaquetodaslaspartesquesemuestranenlalistaacontinuaci(_nSifaltaraalgunapartenodevuelvaesteproductoalhgardecompra,
Potfavorvisite,nuestrapgginawebwww.royalsovereigncornyscleccione"Consume_,rSupport'v"MakeaRe_uest'Datao
rd_,narlasparte,squcfaltenoIlameal1--800--397--1025y presionelaopci6n-/_4paraord_
A¢cesorios Incluidos
1.(1)JuegoCorredizoparaVe,ntana..............1jue9o
2, (1)Acct_,sorioparaManguera 1pieza
3, (1)Torrtilk_s..............................................4 piezas
4 (1/Conectorde1'4anguerade,Escape........2 piezas
5, (1)MangueradeEscape...........................1pieza
6, (1)Cubierta.............................................1pieza
A, Hanguera de Escape y Conectores: Fig. 1
1,Adjuntarla parteroscadade unodelosConectoresdeManguera(4) a unode lose×tremosde laManguerade
Escape(5) girS_ndolohada laderecha
2,Repetirenel otroe×tremo,
B, _,€ljuntar el Accesorio para Hanguera: Fig. 2
1.Alineelosorificiosde lostornillosdelAccesorioparaManguera(2) conelfrentedelJue9oCorredizo
paraVentana(1).
2.Usandolos4 tornillosprovistos,adjunteelAccesorioParaManguera(2) alfrentedelJuegoCorredizo
paraVe,ntana(1).
Fig
Page 23

C. Instalar el Juego Corredizo para ventana: Fig. 3
1,Abrala,ventana,y ponga,elJuegoCorredizoparaVerlta,na,(1) dentrode laoriHadela
ventana
2,AjusteelJuegoCorredizoa,just_ndoba[anchodelaventana
Fig3, _
3,Cierrelaventanaparaasegurarlo
4,A]tlstelosdostornillosparaasegura_rel ]uegoCorredizoensulugar,
D. Conectando la Hanguera de Escapeal Acondidonador de Aire Port_itil (AAP) : Fig. 4
1,Conecteelcone(_orde larnangueraalheandolasufietasdela rnangueraal AAPy presionehastaquequedeensu luga_
E, Cone_ar la Hanguera de Escape al Juego Corredizo para Ventana: Fig, 5
1 Acerqued Acondidorm,dor deAirePort_ti[a,4 piesdela ventanao merlos
2,Abra[a rnangueray estirelahastalaIongitudnecesaria
3.Alineelasu_ietasdela mangueraconlasdel paneldeventanaypresionehastaquequedeensu hgar,
Fig4,
Fig 5,
Page 24

Fun¢ionamiento
Panel de Control Luzde Advertencia
Control de Modo Control de Velocidad del Ventilador
Pantalla .........................................................................................................................................................................................
i.............................................Bot6n de Encendido/Apagado
Control de Tiempo/Temperatura
Botdn de Encendido/Apagado
Estebotdnendendey apagala unidad,Cuandoustedpresionaestebotdnlaunidadcombnzaafundonan
Luz de Advertenda
Puedeacumularseaguaenla unidaddebidoacondensaddn.Sieltanqueinternose %na,laluzdeadvertendaseprende@_y launidadnofuncbnara_hastaqueeltanquehaya
sidovaciado.
Control de Modo
Elcontroldemodotbne 3 funcbnes _| Enfriar_ Deshumedecer/--
La fund6n se determina presionando el bot6n de Control de Modo, La luz verde indicara_qu6 fund6n esta en uso,
Vent[lador_
Modo de Ventilador (_Fan')
Cuandoel mododeventiladoressebcdonado la[uzindicara_"Fan"encolorverde.Elairedela habitad6nesdrculadosinenfriarse.
Deshnmedecer/Modo Seco (_Dry')
Presione el bot6n de control de modo para sebcdonar el modo Deshumedecer ("Dry"), Cuando el modo deshumedecedor esta.operando, los botones de temperatura y los
botones de veloddad del ventilador @jan de fundonar y el ventilador fundona a veloddad media. La luz indicadora se ihminara_en "Dry" y se mantendra_prendida mbntras la
unidad estb,deshumededendo, Cuando la humedad de la habitad6n sea de 50% o menos, el compresor dejarg,de fundonar, la unidad dejarg,de deshumedecer y la luz indicadora
comenza@,a parpadean
Page 25

Modo Enfriar('_Cool")
Cuando[aunidadestaen rnodoEnfriar[a[uzindicadoraestara,verdeindicando"Cool',
1,Mientrasla unidadestg.enfuncionamientolapantallarnostrara,latemperaturaadualde [ahabitad6n,
2,Hientrasustedest6ajustandolatemperaturala unidadmuestralatemperaturasiendoestablecida,Eltangode[atemperaturaes de61°Fa 89 %
3,EnrnodoEnfriar("Cool') uselosbotones"+' o "--_'paraestablecerlatemperaturadeseadaenlahabitaci6n,5segundosdespu@sel indicadorregresara,amostrarla
temperaturaadualde lahabitaci6n,LatemperaturasolarnentepuedesetajustadaenmodoEnfriai:Eltiempoesajustableentre1 y24 horas,
Control de Veloddad del VentJla¢lor
Elventiladortiene3veloddades:Alta Mediay Baja
Cambiar la Lectnra de la Temperatnra de Celsius a Fahrenheit
Presioneel losbotonesde _"Timer' (Sincronizador/ if "Iemperature' (Temperatura)alrnisrnodempoparamostrary cambiar[adasede [ectura,
Sincronizador
Haydosformasdeprogramarel sincronizadonUstedpuedeprogramareln_merode horashastaque elacondidonadordeaire seapagueautoma_%amenteoel n_merode horas
hastaqueel acondidonadordeairese prendaautoma_ticamente,
Cuandoel acondidonadordeaire esta_apagado ustedpuedeprogramar[oparaqueseprendaen intervalosde 1hora,
1,Presioneelbot6n (_ en elcontrolrernotoparaactivarlafund6nde sincronizador,
2,Presionelosbotonesde -f-o --hastaquesemuestreel n@nerode horasdeseado,
3,Elacondicionadorde aireseprendera,cuandoel nQmerodehorasindicadohayatranscurrido,
Cuandoel acondidonadordeaire esta_prendidoustedpuedeprogramar[oparaqueseapagueenintervalosde 1hora_
1,Presioneelbot6n (_ en elcontrolremotoparaactivarlafund6ndesincronizador,
2,Presionelosbotonesde -f-o --hastaquesemuestreel nQmerodehorasdeseado,
3,Elacondidonadordeaire seapagara,cuandoelnQmerodehorasindicadohayatranscurrido,
EncendJdo Antorn_tko
En laeventuaJidad de un corte de energia eJ_ctrica;la programad6n regresara_a los modos estabJecidospreviamente cuando Jaenergia sea reestabJecida,
Comprobad6ndel Enchnfe
1,Presioneelbot6n"RESET'
2, nserteelenchufeeneltomacorriente,
:'_,Presioneelbot6n_'TEST',Sieldrcuitoesta_funcionandoustedoirS_unsonidode_'clic,'
4,Presioneelbot6nde"RESET'basraqueescucheotro"dic',EldrcuitodeJenchufehasidoactivado,
5,1touseelacondidonadordeairesiesteprocesonopuedeserHevadoacabo,
Despu_s de apaqar el acondidonador de aire_ espere 3 minntos para encenderlo de nuevo,
Page 26

Control Remoto
La,s fundonesenelcontrolre_motofundonanigua[que[asde loscontrdesdel
acondidonadorde aire,
Pantalla LCD
pagado
(Enfriar, Ventilador o Deshumedecer)
Bot6n de Encendidc
Apagado del
Sincronizador
-- Bot6n de Control de Tiempo y Termostato
Oscilador
Pregramad6ndel SincronJzador
HaydosformasdeprogramarelsincronizadonUstedpuedeprogramarel numerode
horashastaqueelacondicionadorde aireseapagueautom_ticamenteoelnumerode
horashastaqueelacondicionadorde aireseprendaautornaticarnente.
Cuandoela(ondicionadordeaireestAapagado,us.tedpuedeprogramarloparaquese
prendaenintervalosde 1hora.
1 Presioneel bot6nG enel conrolremotoparaactivarlafunci6ndesincroniza@:
2.PresionelosbotonesdeA o v hastaquesemuestreelnOmerodehorasdese_do
3.Elacondicionadordeaireseprender_cuandoeln_imerode horasindicadohaya
transcurrido.
Cuandoelacondicionadordeairee4Aprendido,u¢¢:edpuedeprogramarloparaquese
apagueenintervalosde1 hora.
1 Presioneel bot6n(_ enel conrolrernotoparaactivar[afunci6ndesincronizadon
2.PresionelosbolonesdeA o v ha4aquesemuestreelnumerodehorasdeseado
3.Elacondicionadordeaireseapagar_cuandoeln_imerodehorasindicadohaya
transcurrido.
Osdlador
Presioneel bot6n"Swing"enel controlremotoparahaterqueelflu]odeaireosciiede
izquierdaaderechay dederechaa izquierda.
Medo Desh.medecedor("Dry")
Presioneel bot6nde Hodo"llodd' paraseleccionarelmododeshumedecedor("Dry"}.
Cuandod mododest_umedecedoresL_operando,bs botonesdetemperaturay bs
botonesdevelocidadddventihdor@jandefuncionaryelvenlihdorfuncionar_a
vdocidadmedia.La[uzindicadorademododeshumedecedor('Dry'} seman_endr_
iluminadamienlraslaunidadest_deshumedeciendo.Cuandolahumedaddela
habitaci6nseade !i0%omenos,elcompresordejar_deBncionar,la unidaddejar_de
deshumedecery lahz indicadoracomenzar_aparpadean
Seleccionador de grados Celsius oFahrenheit
Page 27

Fun¢ionamiento del Control Remoto
--Elcontrolremotousadosbateriasdpo;'_A(IECROf_1,5V)lascualesesta_nincluidasparasuconveniencL
- Saquelatapa delasbateriasenlaparte dearraysdelcontrolremoto,
- nserte lasbateriasasegura_ndosedeque lospolos(e) y (-) esta_nalineadosdebidamente,
--Repongalatapa,
He, as:
--{uando reemplace las baterias, cambie siempre arnbas baterias al rnismo tiempo,
--Saque las baterias si el control remoto no es usado por un rnes o ma.s,
--No bote las baterias usadas enel fuego,
Reempla£o de Baf_e_as
Saque latapa que cubre las hater as en la parte de atra.s del control rernoto e inserte las nuevas baterias asegura.ndose de mantener los polos (+) y (--) en la direcd6n correcta_
LTapa del compartimiento para baterias
Page 28

Drelllaje
OcasionaJmenteustedpuedenecesitardrenar[aunidad,
1,Drenela unidadsi [a[uzdeadvertendadeJapantaJJade[acondidonadorde aireesta_prendida,
2,Apague[aunidadydesench_fela,
3,Rernueva[atapa dedrenaje,
4,CuandoeJaguadrenadaparede fJuir,repongaJatapadedrenaje,
JimpJeza deJ Filtro
Elfiltro debe Hmpiarsecada dos semanas o 1O0 horas para mantener el fh]o de aire apropiado,
1,Remueva el filtro, Cuidadosamente jab el ensamblaje del fiJtrodes@ la parte posterior de la unidad, y luego remueva el filtro dd ensamblaje,
2, Lirnpb el fiJtro con una aspiradora o con un trapo suave, S}el fiJtroe£a rnuy sudo puede Javarb ft_£iJrnentecon detergente y erljuagal-JocornpJetarnente con agua_Dqelosecar
antes de reponerJo,
3, Reinstale eJfiJtro eneJensarnblaje,
4, Reponga eJensarnblaje deJfiJtroen la parte po£erior de la maquina,
HOTA: Nunca haga funcionar eJacondicionador de aire sin eJfiltro en su Jugal:Podria daiiarlo,
LimpJando y Hanteniendo el acondidonador de aJre
Apagueelacond[cbnadorde airey desench0feb,/..irnpbloconuntrapo suave,secoo mojado,Puedeusarun detergenteIigero,Aseg0resede Iirnpb_rcuaJqubrresiduoy secarJa_
unidadcompletamente,Nousequirnicosfuertes lirnpiadoresabrasivoso substanciasvola.tiles(comogasolina),Evitesalpicaraguaen elacondicionadorde aireporqueesto
puededa_arlaunidadseriamente,
Guardando el A¢ondkionador de Aire
Sinova ausarla unidadpotunlargoperiododetiempo,aseg0resede drenarialimpiarelfiltro,desenchufariay sacarielasbateriasalcontrolremotoantesdeguardarel
acondidonadorde aire,Despu6sdedrenar,hagafundonarel acondidonadordeaire enmodoVentilador("Fan') porIomenospor8 horasparasecarla unidadcompletamentey
prevenirlaformad6ndemoho,
Page 29

II÷ntiIca¢i n y 5olu¢i n I÷ Probi÷mas
- Revisey presione el bot6n "RESET" del enchufe, Espere 3 minutos y trate de encencler la unidad nuevarnente,
--Las baterb.s del controJ rernoto pueden necesitar set reemplazadas, Reemplace las baterias e intente encender la
Elacondidonadorde airenofundona
EIacondidonadorde aireprendeperonoenffia
unidad de nuevo,
--_segOrese de que el enchufe esta conectado debicBrnente altornacorriente,
--La temperatura establecicla puede estar casi a la rnisma ternperatura de la habitaci6n, Baje la ternperatura establecida,
--La salida de aire puede e£ar bloqueada, Revisela salida deaire y rernueva cualquier objeto,
- Verifique que todas las ventanas y puertas de la habitaci6n esti_n cerradas,
--Puede haber otto electrodom6stico en la habitaci6n que esta.produciendo talon: Revise la habitaci6n y @ague el otto
electroclorn6stico,
--Elfiltro de aire puecleestar sucio, Reviseel fltro y lirnpielo si es necesario,
--La entrada o salda de aire puede estar bloqueada
--La ternperatura establecida puede set muy alta, Verifique la ternperatura establecida y red£zcala si es necesario,
Elaconcfdonadorde aimno fundonay
la luzindLaque eltanquedeaguaesta_teno,
- Puede haber demasiada agua en la unidad, Drene la unidad,
Page 30

-Lasmedidasqueaparecensonsoloparareferendapuedenhabervariadonesdebidoalasdiferendasentrepaisesyregionesy@benserbasadasenfundonamientopraxtico,
ModeJo ARP-3010 ARP-3012 ARP-3014
Voltaje/Frecuenda AC115V--60/qz
EntradadeElectricidad 1200W 1500W 1500W
Corrente 11A 13A 13A
Capacdad deEnffiamiento IO,O00BTU/hr 12 O00BTU/hr 14 O00BTU/hr
Capacidadde Deshumededmiento 30 pints/hr 3,3 pints/hr 3,3pints/hr
Enfrador R-22
ControldeTiempo 24 horas
Dimensiones(ancho)x (altura)x (profunddad) 203 x 34,5 x 14,6pulgadas
Peso 771ibras
"LosdesperdkioseBctrkosno@benbotarse}untamenteconlabasuradom6stica.Potfavor;recicb
cuandoseaposbb Contadea as autoddadesocabs paraobtenernformad6ny consejosreferentes
Page 31

Garant a Comp eta pot Un A os
RoyaJSovereign garantiza que cada Acondidonador de Aire Portg_ti[estg_[ibre de defectos encuanto a materiaJesy fabricad6n, Nuestra ob[igad6n bajo esta garantia estg_[imitada
a la reparad6n o sustitud6n sin costo de cuaJqubr parte(s) defectuosa(s) que nose haya dafiado en el transporte cuando el producto sea entregado a un Centro de Servido de
Ro3/aJSovereign, Esta garantia cubre aJcomprador original por un afios des@ [afecha de compra y no es tranc¢_rib[e,Esta garantia se aplica sob si el acondicionador de aire se
usa en uncircuito de {orriente AIterna de acuerdo a [as instrucciones de faSrica que acompafian al producto,
Garant a Limitada p@r Cin¢@ A @s (C@mpres@r)
Por un periodo de cinco a_os desde la _cha de cornpra siernpre y cuan8o este Acondicionador de Aire Port£iJ RoyalSovereign sea operado y rnanteni8o de acuerdo aJrnanuaJde
instrucciones provisto con el producto RoyalSovereign suplira_un cornpresor de reernplazo (soJarnente la parte) sin costo si se 8eterrnina que el cornpresor originaJ tiene una
faJJaen cuanto a rnano de obra o materiales, Si es necesaria Jareparaci6n por favor contacte a nuestro centro de servicio al diente, Listed sera_responsabb pot eJenvio seguro y
cualquier otto ga4o de transporte para hacer JlegarJa unidad a nue£ra fabrica o centro de servido, Sies necesario eJenvio aseg@ese de ernpacar Jaunidad correctarnente para
evitar 6aiios en el transporte pues nosotros no serernos responsabbs pot aqueJJos8afios,
Esta garantia exchye y no cubre defectos, maJfundonambnto o faJlas desu Acondidonador de Aire Porta_tilRoyal Sovereign causadas por reparadones hechas por personas o
centros de seMdo desautorizados manqo inadecuado instalad6n inapropiada modificad6n o use irrazonabJe devoltaie incorrecto fuerzas de la naturaJeza o @jar de hacer el
mantenirnbnto razonable y necesario, Esta garantia es en hgar de todas y cada una de las garantias expresas, En ninguna eventuaJidad RoyalSovereign sera.responsable por
daiios inddentaJes o consecuentes, Esta lirnitad6n no se apJicasi usted rive en un lugar en donde no es perrnitida la limitad6n de dafios inddentabs o consecuentes, E£a garantia
le da derechos JegaJesespecificos y usted puede tener otros derechos los cuales varian de e£ado a estado,
Page 32

 Loading...