

Royal Sovereign ARP-1000DE, ARP-1000E, ARP-1000M, ARP-1000DM Owner's Manual
Royal Centurian Inc.
PORTABLE AIR CONDITIONER
AIRE-CONDICIONADO PORTABLE
Read and retain these instructions for future reference
Lea y tenga presente estas instrucciones para futuras consultas
ARP-1000M / ARP-1000DM / ARP-1000E / ARP-1000DE
OWNER’S MANUAL
MANUAL DEL PROPIETARIO
MANUEL D'UTILISATION
BETRIEBSANLEITUNG

PORTABLE AIR CONDITIONER
Model ARP-1000M / ARP-1000DM / ARP-1000E / ARP-1000DE
BEFORE USE
GENERAL SAFETY
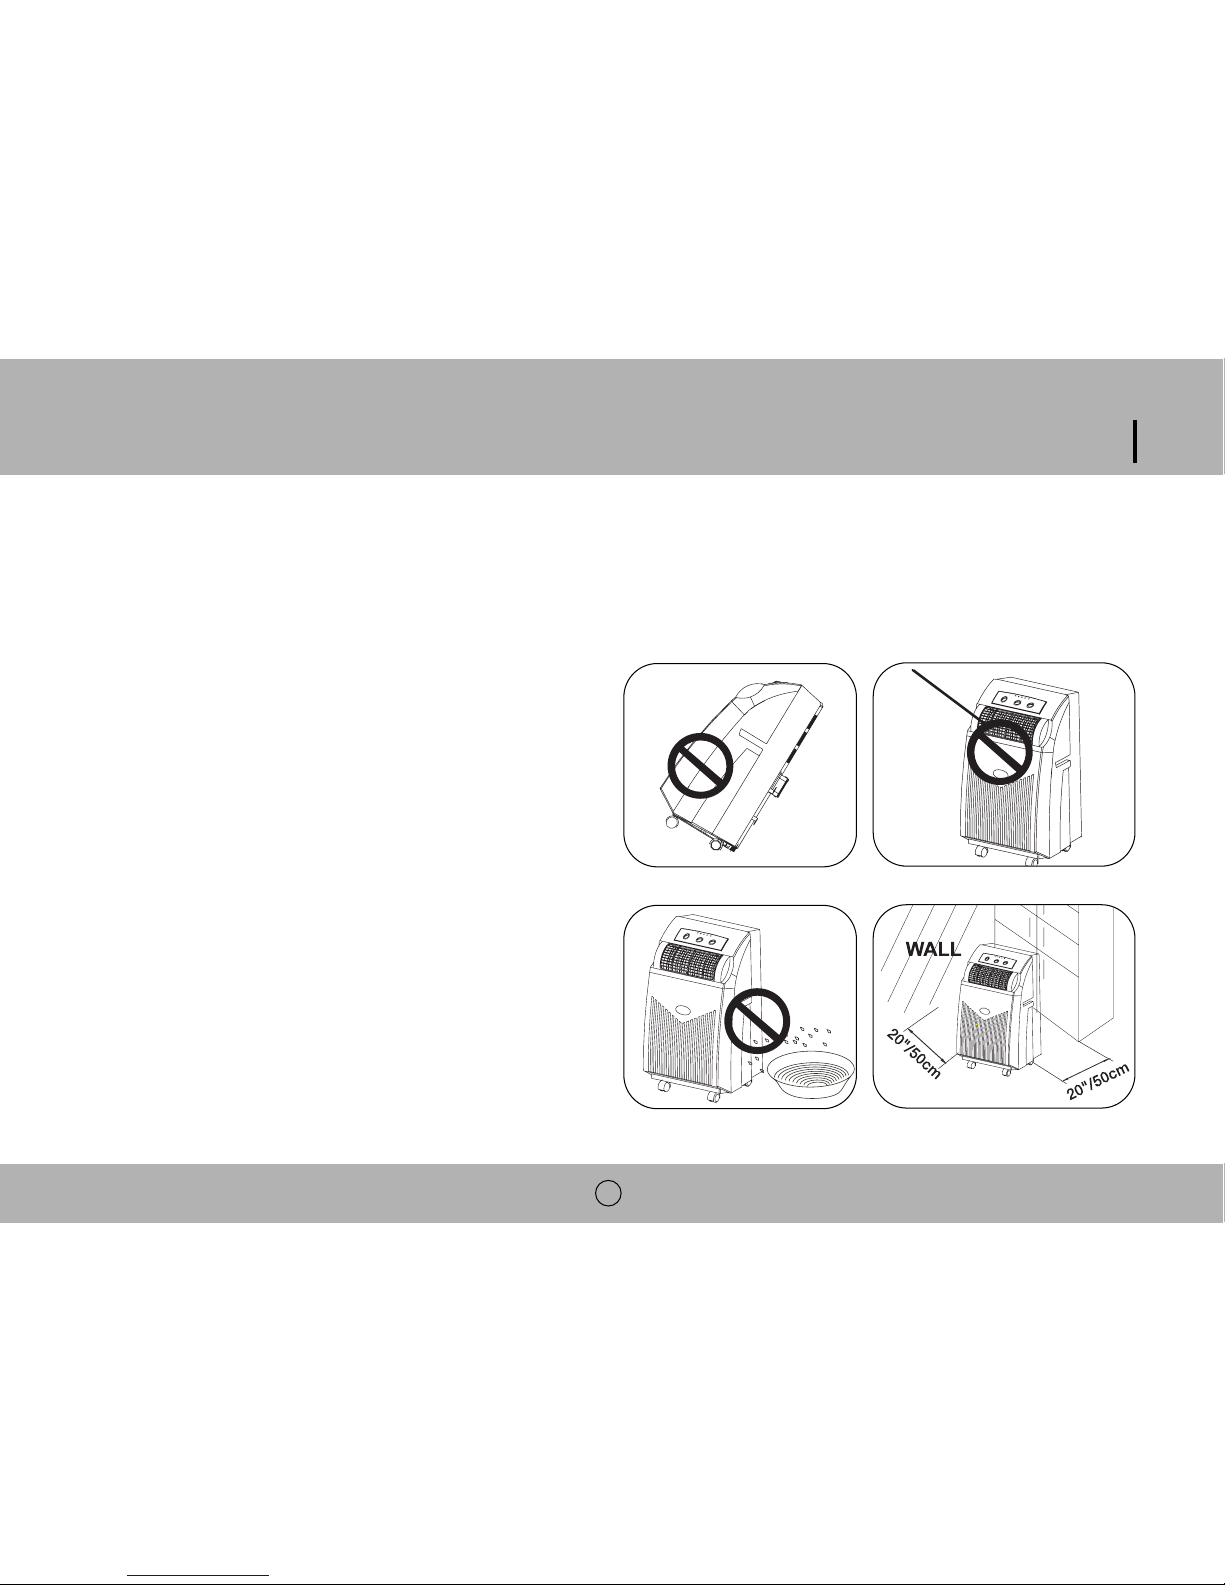
• ONLY USE IN THE UPRIGHT POSITION ON A FLAT, LEVEL SURFACE AT LEAST 20”/50cm FROM ANY OBJECT (Fig 1 & 4).
• DO NOT PLACE OBJECTS ON THE UNIT OR RESTRICT AIR INLET / OUTLET (FIG. 2).
• CLOSELY SUPERVISE CHILDREN AND PETS WHILE UNIT IS IN USE.
ELECTRICAL SAFETY
• FOR INDOOR USE ONLY.
• TURN OFF AND UNPLUG THE UNIT WHEN IT IS
NOT IN USE.
• DO NOT USE IN WET ENVIRONMENTS (FIG 3).
• DO NOT PULL THE UNIT BY THE CORD.
• IF THE SUPPLY CORD IS DAMAGED, IT MUST BE
REPLACED BY AN ELECTRICIAN OR
QUALIFIED PERSON, TO AVOID HAZARD OR INJURY.
FOR MAXIMUM EFFICENCY
• Do not exceed the recommended room size 164 cubic
feet /50m3 (typically 66 square feet / 20m2 floor area).
• Close doors and windows.
• Keep curtains or blinds closed during
the sunniest part of the day.
• Keep filters clean.
• Once room has reached the desired conditions, reduce
temperature and ventilation settings.
3
ARP-1000M / ARP-1000DM
ARP-1000E / ARP-1000DE
FIG.3
FIG.1 FIG.2
FIG.4
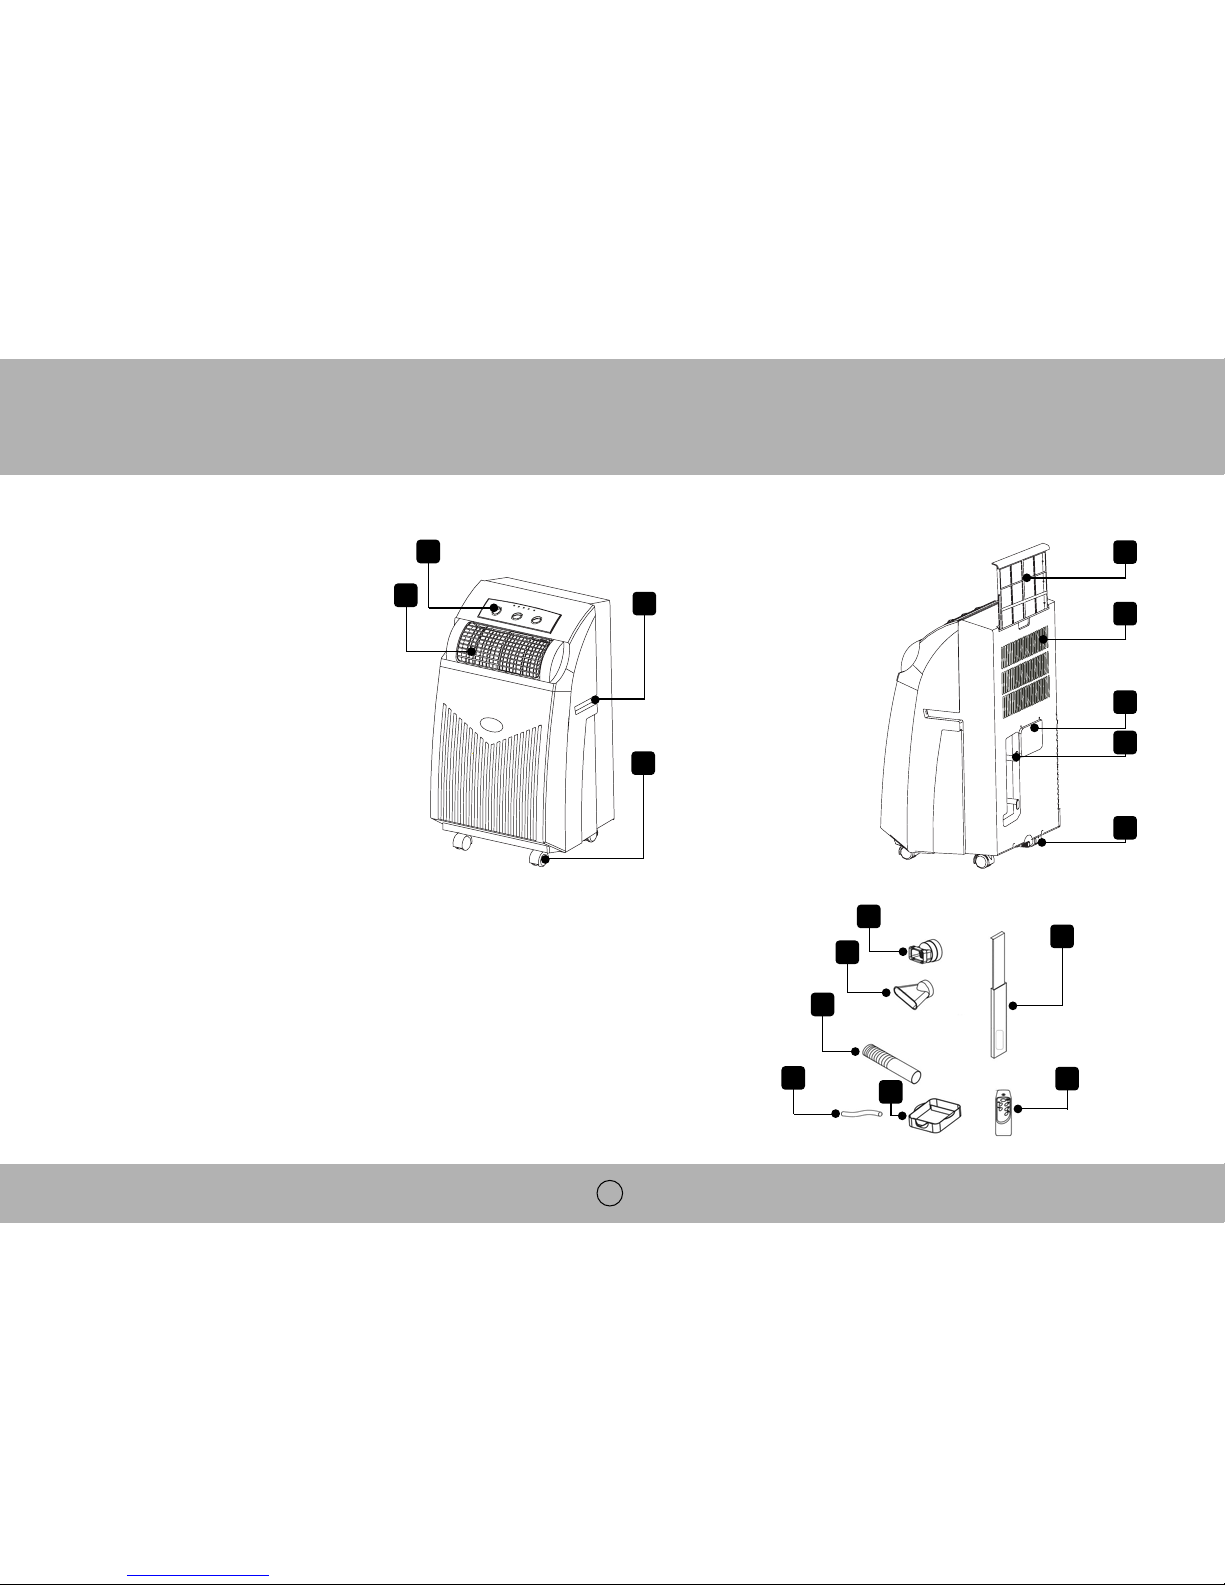
Accessories
10. Air Conditioner adaptor - for insertion over hose and into back of the air
conditioner.
11. Window adaptor - for insertion over hose and into window spacer.
12. Exhaust hose
13. Extendable window spacer.
14. Drain tube for continuous drainage
15. Water tray
16. Remote control (for electronic type only)
4
1
2
3
5
6
7
8
9
4
Front
1. Control Panel (see page 5 for
picture of panel)
2. Air outlet
3. Carrying handle
4. Caster
Back
5. Air filter
6. Air inlet
7. Exhaust air outlet
8. Cord storage &
power cord with
LCDI breaker plug
and reset buttons.
9. Water stopper /
drainage point
14
12
11
10
15
13
16
PARTS
INSTALLATION
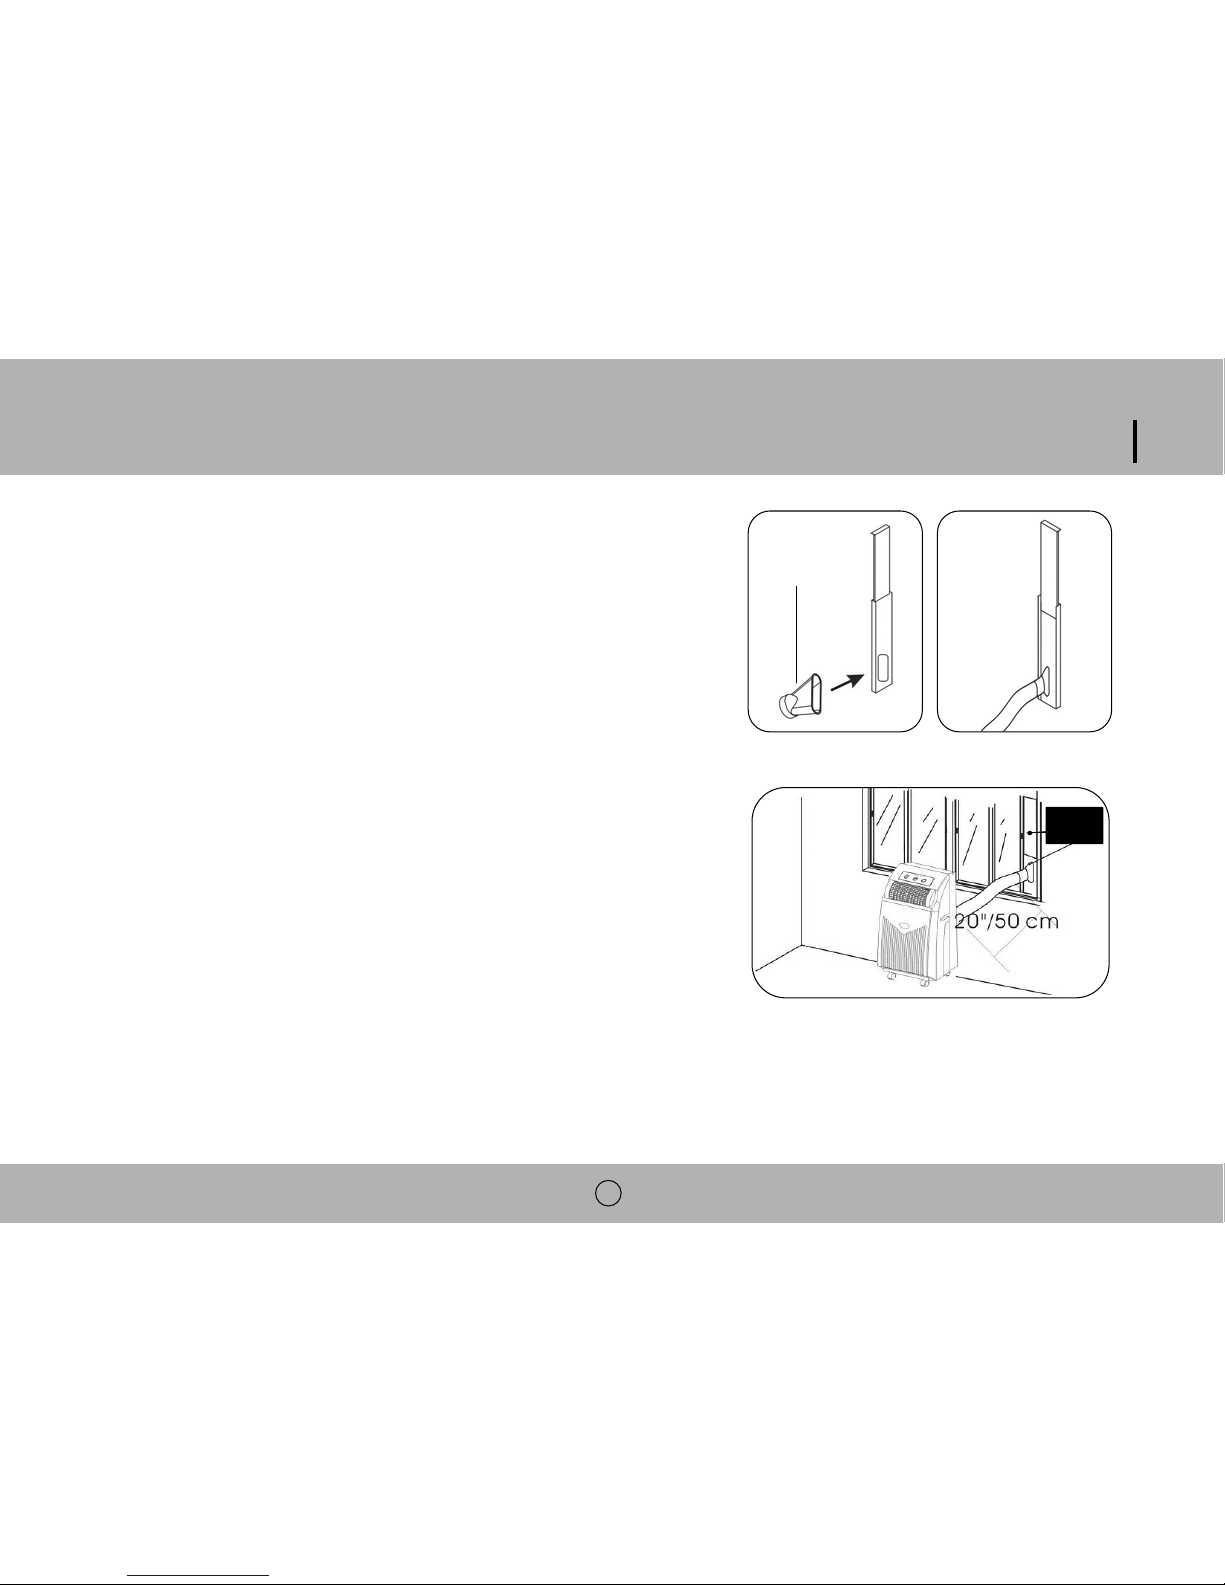
Installation of the exhaust pipe
This unit is portable and may be moved from room to room. Please follow
the steps for proper installation:
1. Feed the outward adapter through the extendable window spacer.
2. Screw the exhaust hose into the outward adapter.
3. Insert the window spacer into the window gaps as shown. Adjust its
length if necessary.
4. Slide window across so that the spacer is held securely.
Window Spacer may be cut to fit. If window spacer does not fill opening
completely a custom made spacer from your local home improvement store can
be made.
NOTE: Install window vent vertically or horizontally depending on window style.
Window Spacer may be cut to fit. If window spacer does not fill opening
completely a custom made spacer from your local home improvement store
can be made.
5
Extendable
window
spacer
FIG.5
FIG.6
FIG.7
ARP-1000M / ARP-1000DM
ARP-1000E / ARP-1000DE
Outward Adapter
6
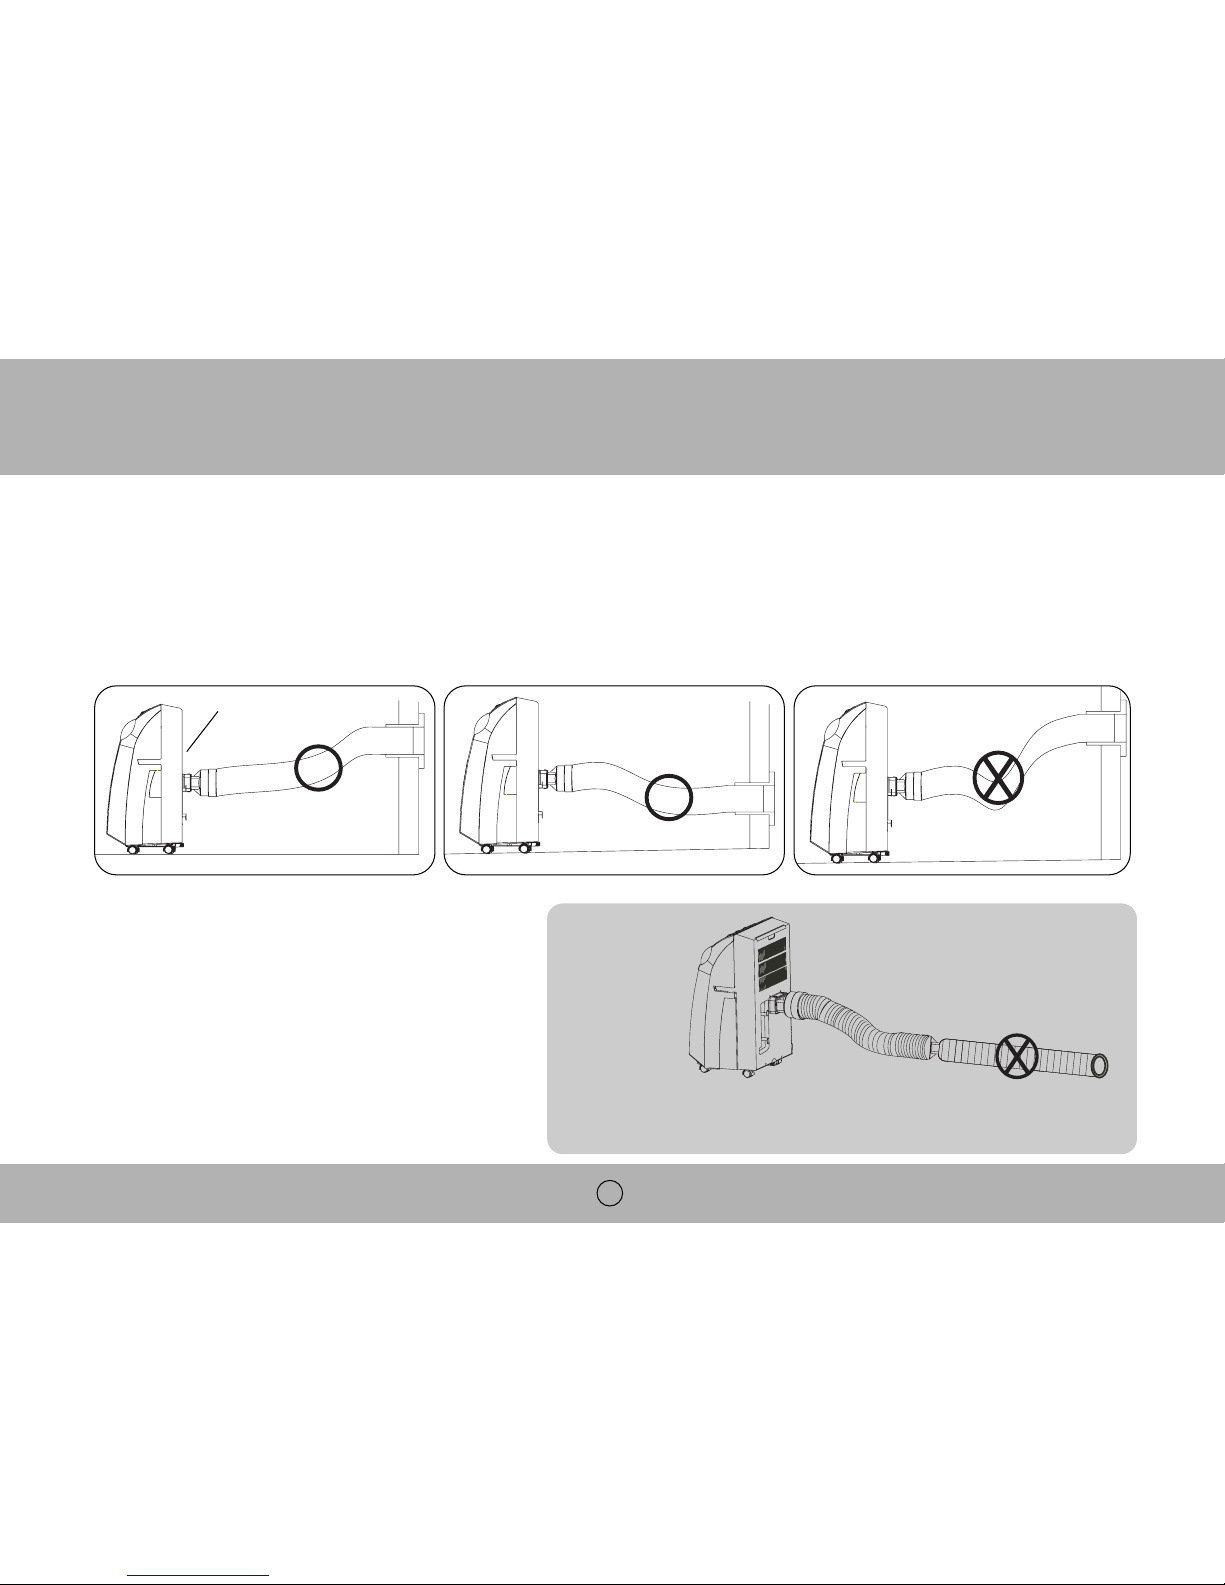
WARNING
The length of the exhaust pipe is specially designed
according to the specification of this product. Do not replace or lengthen it
with your own hose as this will cause the unit to malfunction.
FIG.8 FIG.9 FIG.10
FIG.11
Unit Adapter
Mounting of the exhaust pipe
• Using only the hose provided, screw unit adapter to exhaust hose then clip the unit adaptor to the back of the air conditioner.
• Avoid kinks and bends in the exhaust hose as this will cause expelled moist air to build up causing the
unit to overheat and shut down. (Fig 8 & 9 show correct position).
NOTE: For best results do not exceed a 45º angle.( Fig 10)
• The hose may be extended from 1-5 ft /300mm -1500mm but for maximum efficiency use the shortest straightest length possible.
It is not recommended to exceed 5 feet for this will diminish the efficiency of the unit. See WARNING Figure 11
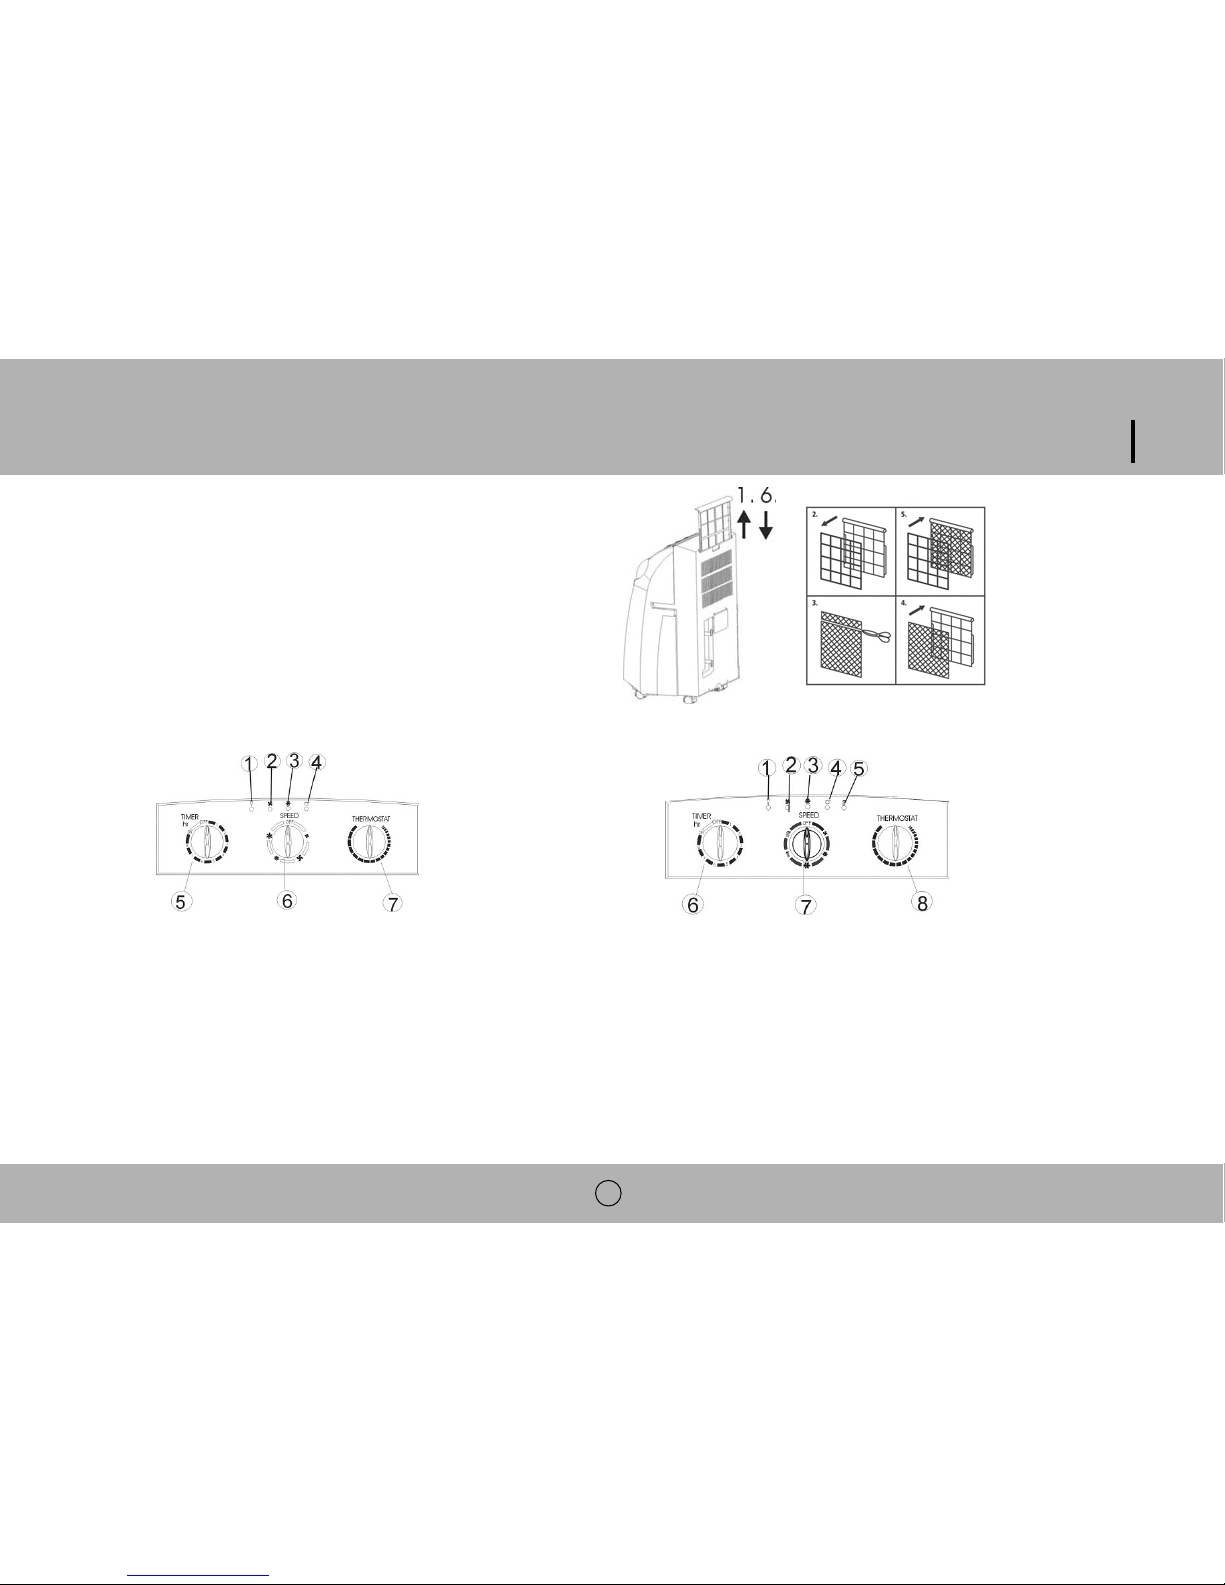
Installation of the carbon filter
1. Remove the filter frame from the unit.
2. Separate the filter fixer from the filter frame.
3. Remove the active carbon filter from its plastic bag.
4. Insert the active carbon filter into the filter frame.
5. Fix the filter by reassembling the fixer to the filter frame.
6. Re-fit the filter frame inside the unit.
7
1. Power indicator
2. Fan operating indicator
3. Cooling operating indicator
4. 'Full water' indicator
5. Timer (1-8 hours) as well as ON/OFF switch
6. Speed switch with options for - LOW FAN,
HIGH FAN, LOW COOL, HIGH COOL
7. Thermostat
1. Power indicator
2. Fan operating indicator
3. Cooling operating indicator
4. 'Full water' indicator
5. Heating operating indicator
6. Timer (1-8 hours) as well as ON/OFF switch
7. Speed switch with options for - FAN, LOW COOL, HIGH COOL,
LOW HEAT, HIGH HEAT.
8. Thermostat
OPERATION for mechanical unit
ARP-1000M ARP-1000DM
FIG.12 FIG.13
ARP-1000M / ARP-1000DM
ARP-1000E / ARP-1000DE
8
Turning ON/OFF
Set the TIMER to the ON for continuous operation (the unit will operate as long as it is not turned off).
Power indicator comes on.
To turn off the unit, turn the TIMER to the OFF position.
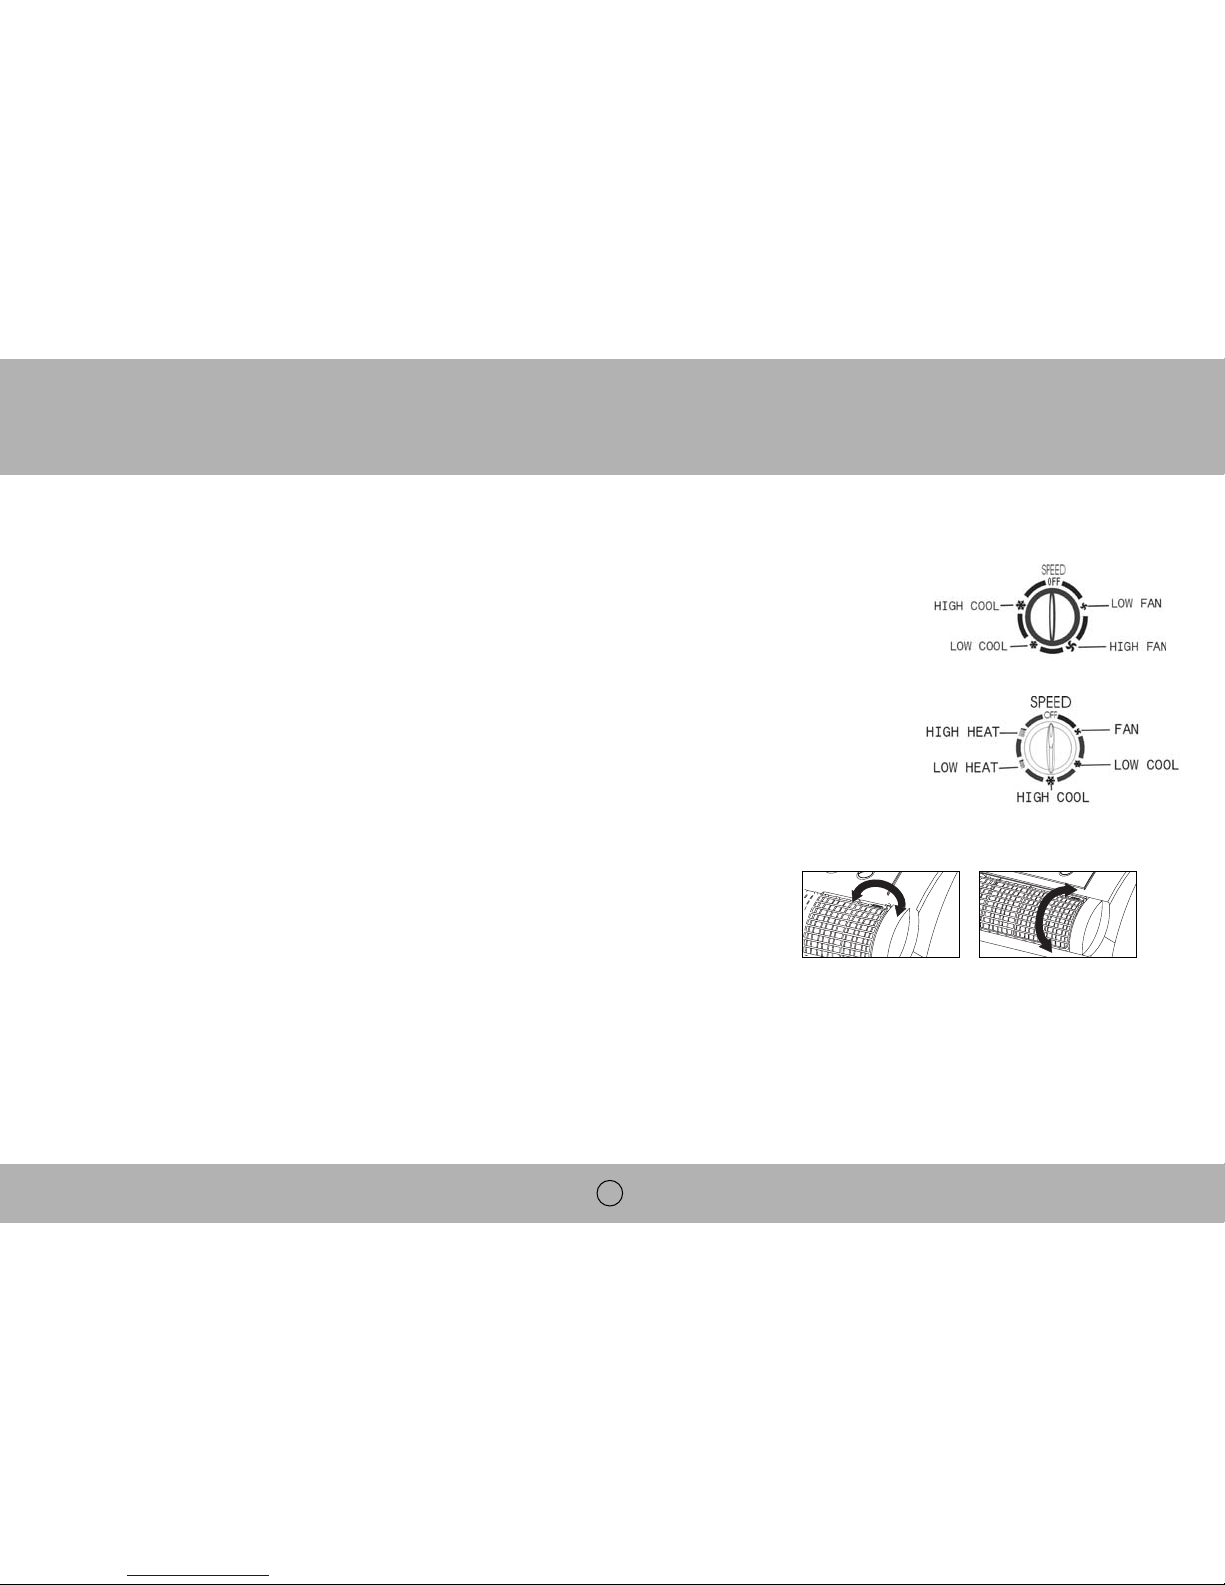
Setting function / ventilation speed
Cooling only models (ARP-1000M and ARP-1000E)
Turn the speed switch to select required setting: LOW FAN, HIGH FAN, LOW COOL, HIGH COOL
Cooling & heating models (ARP-1000DM and ARP-1000DE)
Turn the speed switch to select required setting: FAN, LOW COOL, HIGH COOL, LOW HEAT, HIGH HEAT
Setting temperature
Turn the THERMOSTAT to regulate the temperature desired: The cooling intensity increases clockwise.
Set timer
Set the TIMER to the desired operating time (1 to 8 hours). When the set time has been reached, the machine will shut off automatically.
Regulating air flow direction
Turn the roller on the air vent to control the air flow direction of the vertical louvers.
Move the air vent directly to adjust the air flow direction of the horizontal louvers.
NOTE: 1. To lengthen the compressor's life, when the unit is turned off wait at least 3 minutes before turning it back on.
2. The cooling system will turn off if the ambient temperature is lower than the set one. The ventilation, however,
keeps workingon the set level. If the ambient temperature rises above the selected level, the cooling function will resume.
3. On the contrary, the heat will turn off if the ambient temperature is higher than the set one (still, the ventilation
keeps working on the set level). As the ambient temperature drops below the selected level, the heating function will resume.
4. This machine is equipped with an ANTI-FROST function. While using the heating function in low temperatures,
sometimes the heat will stop for a while in order to melt the frost. As this occurs, just wait for the heating function to resume.
FIG.14
FIG.15
FIG.16 FIG.17
9
Turning ON/OFF
Press ON/OFF button, the unit will start automatically. If the ambient temperature is
- Higher than 75 oF / 24 oC, the unit will work in cooling mode.
- Higher than 68 oF / 20oC, but below or equal to 75 oF / 24 oC, the unit will work in ventilation mode.
- Below 68 oF / 20oC, the unit will work in heating mode (Only for units ARP-1000 DM/DE and ARP-900 DM/DE)
Indicators of the functions in progress will be lit. *NOTE: The COMPRESSOR indicator will only light up when the compressor is in operation.
The display window shows the ambient room temperature.
To turn the unit off, press the ON/OFF button again.
Setting mode/function
Press MODE button to select required working mode: automatic, cooling, fan or heating,
(heating is only available for units ARP-900DE and ARP-900DM). The indicator of your selected mode will be lit.
Auto mode is factory preset at 75 degrees. When in auto mode(auto and cool light illuminated) the temp up and temp down buttons are
disabled and you cannot set a desired temperature. If you want a desired temperature above or below 75 run unit in cool mode and set your
desired temperature by pressing the temp up or temp down buttons.
OPERATION for electronic unit
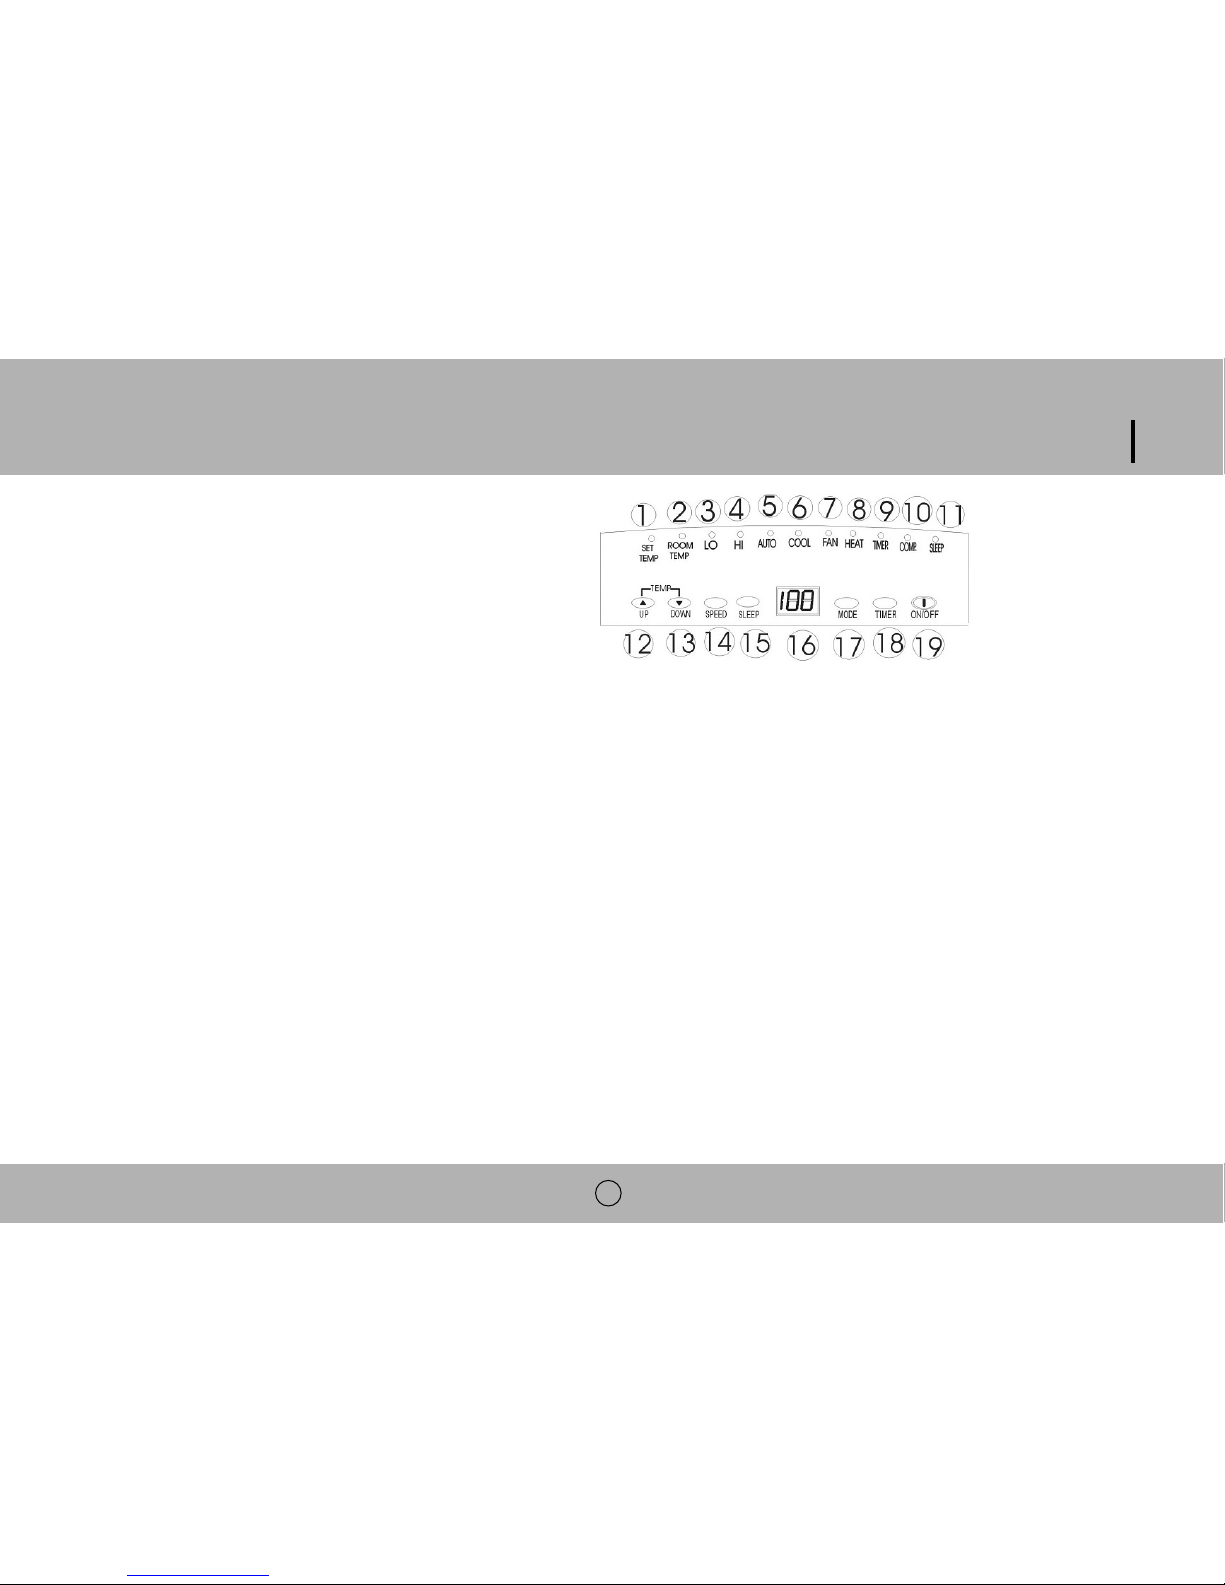
Control panel
1. 'Set temperature' indicator
2. 'Room temperature' indicator
3. Low ventilation indicator
4. High ventilation indicator
5. Automatic mode indicator
6. Cooling mode indicator
7. Fan mode indicator
8. Heating mode indicator
(For ARP-1000DE and ARP-1000DM models only)
9. Timer operation indicator
10. Compressor operation indicator
11. Sleep function indicator
12. 'Temperature up' button
13. 'Temperature down' button
14. Speed (ventilation)button
15. Sleep button
16. Display window
17. Mode (function) option button
18. Timer button
19. ON/OFF (power) button
FIG.18
ARP-1000M / ARP-1000DM
ARP-1000E / ARP-1000DE
Setting temperature
Press the 'Temperature up' or 'Temperature down' button to regulate the temperature desired.
The display window will show the temperature which you have set as you press the 'Temperature up' or 'Temperature down' button.
Otherwise, it will always show the ambient temperature.
The preset temperature of this machine is: 75 oF / 24 oC / for cooling, 68 oF / 20oC for heating.
Setting ventilation speed
1. Press the SPEED button to choose the ventilation speed needed, high or low. The indicator of high or low
ventilation will light up at the same time.
2. If the unit is in AUTO mode, it will choose the ventilation speed automatically according to the ambient temperature (the related
indicators will light up: at this time, the speed switch is invalid).
Setting timer
1. Press the TIMER button to set the operating hours desired (1 to 12 hours, the timer indicator will light on).
When the set time has been reached, the machine will turn off automatically. The display window will show the hour(s) you set as you
press the TIMER button. If the timer button is not pressed, the unit will work continuously.
2. By pressing the timer but without turning on the other functions, you can PRESET the time for the machine to start.
For example, if you press the timer to '2', the unit will start automatically after 2 hours.
Sleep function
1. By pressing the SLEEP button, the set temperature will increase 2 oF /1 oC / in the 1st hour, another 2 oF / 1 oC in the second hour,
then remains at that temperature.
2. By pressing the SLEEP button again, the temperature setting will return to the pre-selected one.
3. The unit will automatically turn off after the SLEEP function runs for 12 hours.
All the above functions can also be performed with the supplied remote control.
The remote control requires 2 AAA batteries to operate.
10
FIG.19
 Loading...