

Page 1
IMPORTANT: Read and Save these Instructions.
Questions or Comments: 1-800-279-3373 8am- 5pm Central Standard Time
USE & CARE MANUAL
™
WATER FILTRATION SYSTEMS
MODELS FP6000CT/FP6000UC
Page 2
(pre-installed)(pre-installed)
INTRODUCTION . . . . . . . . . . . . . . . . . . . . . . . . . . . . 1
IMPORTANT USE GUIDELINES . . . . . . . . . . . . . . . . . . . . . 1
DRINKING WATER SYSTEM SPECIFICATIONS . . . . . . . . . . . . . 3
REPLACEMENT PARTS DIRECTORY . . . . . . . . . . . . . . . . . . 4
GETTING STARTED . . . . . . . . . . . . . . . . . . . . . . . . . . . 5
INSTALLATION: COUNTERTOP SYSTEM
(Model: FP6000CT) . . . . . . . 5
REPLACING THE CARTRIDGE: COUNTERTOP SYSTEM . . . . . . . . 6
INSTALLATION: UNDER-COUNTER SYSTEM
(Model: FP6000UC) . . . . . 9
DRILLING A HOLE IN A STAINLESS STEEL SINK . . . . . . . . . . . . . . 10
DRILLING A HOLE IN A PORCELAIN/CERAMIC SINK . . . . . . . . . . . 11
FAUCET INSTALLATION . . . . . . . . . . . . . . . . . . . . . . . . 12
SYSTEM INSTALLATION . . . . . . . . . . . . . . . . . . . . . . . . 13
REPLACING THE CARTRIDGE: UNDER-COUNTER SYSTEM . . . . . . 15
TROUBLESHOOTING . . . . . . . . . . . . . . . . . . . . . . . . . . 18
WARRANTY. . . . . . . . . . . . . . . . . . . . . . . . . . . . . . . 20
TABLE OF CONTENTS
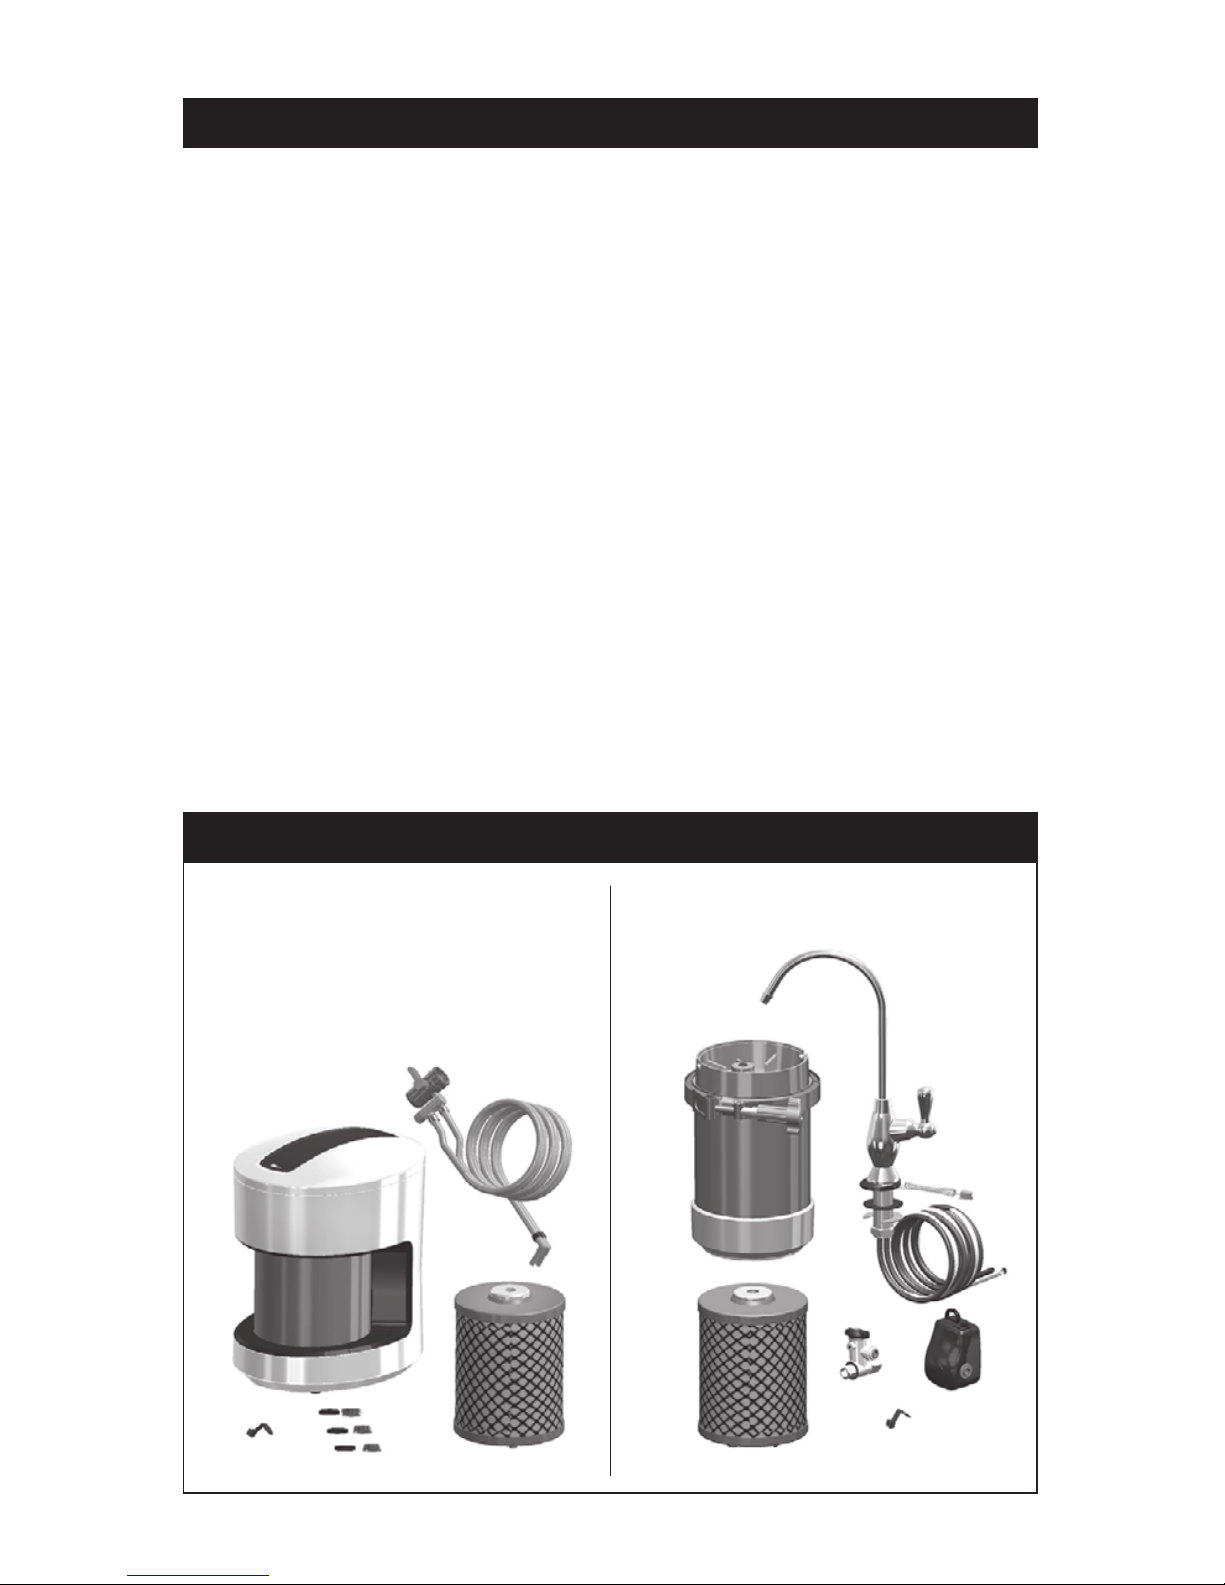
WHAT’S IN THE BOX
FRESCAPURE™ COUNTERTOP
SYSTEM (MODEL: FP6000CT)
FRESCAPURE™ UNDER-COUNTER
SYSTEM (MODEL: FP6000UC)
Page 3

FRESCAPURE™ 1
INTRODUCTION
Congratulations on the purchase of your new FrescaPure™ Drinking Water
System! You have taken an important step toward improving the quality of
your drinking and cooking water.
This System will serve you reliably for many years to come when operated
and maintained according to the instructions in this manual. You have made
a wise investment. Now, please take a few additional minutes to complete
reading this manual, so that you may realize all the benefits your new
FrescaPure
™
Drinking Water System has to offer!
IMPORTANT USE GUIDELINES
1. Read this manual completely before attempting to install or use this product.
2. Actual capacity of your System may vary from the rated capacity. This may
be due to the volume of contaminants actually present in your water supply.
To insure best results, replace Filter Cartridge when the first of the
following occurs:
– Annually
– When the Display begins flashing RED (indicating the rated capacity
has been reached)
– When the flow rate diminishes
– When you notice a taste or odor recurrence
3. Do not use with water that is microbiologically unsafe or of unknown
quality without adequate disinfection before or after the System.
4. Systems certified for cyst reduction may be used with disinfected water
that may contain filterable cysts.
5. Individuals requiring specific microbiological purity should consult their
physician.
6. This System is not intended to convert waste water or raw sewage into
drinking water.
7. DO NOT mistake Red Collars and Tubes as a “hot” water feed line. This
system is for use on cold potable water supplies only. Color coding is only
to insure proper connections to the System “Inlet” and “Outlet” ports.
8. For this System to continue to perform as tested and represented, use only
Genuine, WQA Certified, Royal Prestige Filter Cartridges.
9. Genuine, Royal Prestige Filter Cartridges may be purchased from your
Independent Royal Prestige Representative. For additional purchase
information, please contact the Royal Prestige Customer Service Center
at:
1-800-279-3373.
Page 4

2 FRESCAPURE™
10. After set-up and installation, DO NOT remove the Battery Shuttle except
when replacing the Filter Cartridge. Removing the Battery Shuttle
prematurely may result in a loss of stored data.
11. Be sure to replace the Battery Shuttle each time a new Filter Cartridge is
installed. For your convenience, a new Battery Shuttle is included with the
purchase of each new, replacement Filter Cartridge.
12. Do not allow System to sit for extended lengths of time without being
used (10 days or more). If System must be left unused for more than 10
days, drain all water from the System and use sanitary gloves to remove
the Filter Cartridge. Place Cartridge into clean plastic bag, seal and
refrigerate. Once you return, re-install the Cartridge per the Replacement
Instructions and continue to use.
13. This System must be protected from freezing. Failure to do so may result
in loss of performance, damage to the parts and water leakage. If System
will be exposed to freezing temperatures, drain water from Housing and
remove the Filter Cartridge.
14. The FP6000UC Under-Counter System is designed to work only with the
special vented faucet provided. Use with a standard non-vented faucet
may cause the System to malfunction and will void your warranty.
15. Installation of this product must comply with all state and local laws and
regulations. Refer to your local agencies for details.
Page 5

FRESCAPURE™ 3
See included performance data sheet for individual contaminants and reduction performance.
COUNTERTOP SYSTEM (MODEL: FP6000CT)
Installation ...............................................Countertop
Rated Capacity.....................................750 Gallons (2,839 L)
Replacement Filter Cartridge....................................WF0705
Monitor................................................Electronic LED
Rated Service Flow @ 60 psi ......................0.75 Gal/min (2.84 L/min)
Housing Construction ..........................316 Surgical Stainless Steel
Lid Construction.......................................High Impact ABS
Maximum Working Pressure ..........................100 psig (689.5 kPa )
Minimum Working Pressure ............................30 psig (206.8 kPa)
Maximum Operating Temperature
(for cold water use only) ..........100º F/38º C
Minimum Operating Temperature ..............................40º F/4º C
Particle Retention Size ........................20 Nanometers (0.02 micron)
EPA Establishment Number................................63018-NV-001
UNDER-COUNTER SYSTEM (MODEL: FP6000UC)
Installation ............................................ Under-Counter
Rated Capacity.....................................750 Gallons (2,839 L)
Replacement Filter Cartridge....................................WF0705
Monitor................................................Electronic LED
Rated Service Flow @ 60 psi ......................0.75 Gal/min (2.84 L/min)
Housing Construction ..........................316 Surgical Stainless Steel
Lid Construction.......................................High Impact ABS
Maximum Working Pressure ..........................100 psig (689.5kPa )
Minimum Working Pressure .............................30 psig (206.8kPa)
Maximum Operating Temperature
(for cold water use only) ..........100º F/38º C
Minimum Operating Temperature ..............................40º F/4º C
Particle Retention Size ........................20 Nanometers (0.02 micron)
EPA Establishment Number................................63018-NV-001
DRINKING WATER SYSTEM SPECIFICATIONS
Patent Pending
Patent Pending
System Tested and Certified by WQA against NSF/ANSI 42 (Aesthetics) for the reduction
of Chlorine Taste and Odor, Chloramine and Particulate Class 1; NSF/ANSI 53 for the
reduction of Cysts, Turbidity, VOCs and MTBE; NSF P231 for Microbiological Water Purifier
based on the recommendations set forth in the USEPA Guide Standard and Protocol for
Microbiological Water Purifiers for the reduction of Bacteria, Viruses and Cysts.
Page 6
4 FRESCAPURE™
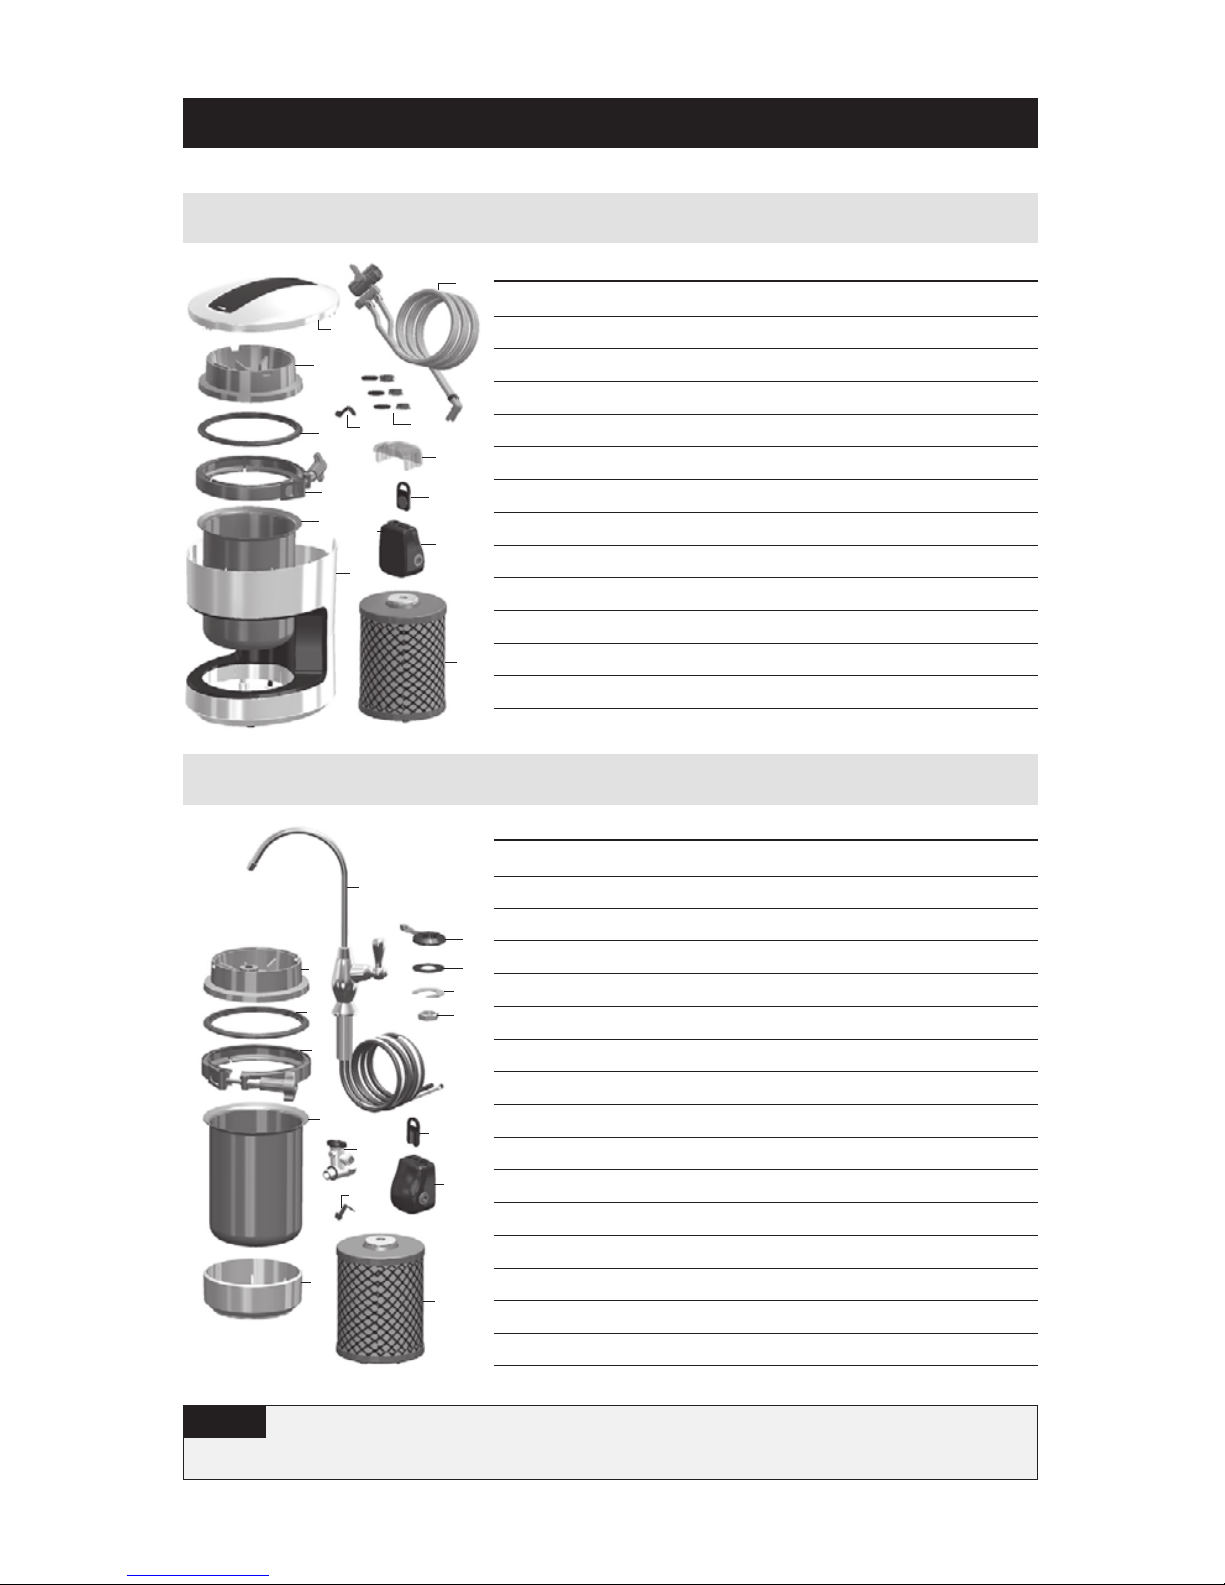
ITEM PART NUMBER DESCRIPTION
1 RP6150 Enclosure Cover
(with LED Display)
2 RP6152 Housing Lid
3 RP6153 Gasket
4 RP6154 Housing Clamp
(includes Knob & T-Bolt)
5 RP6155 Stainless Steel Filter Housing
6 RP6151 Enclosure
7 RP6156 Diverter Valve Assembly
8 RP0160 Faucet Adapter Kit
(3 pieces)
9 RP6157 Collar Release Tool
10 RP6158 Battery Cover
11 RP4547 Battery Shuttle
(includes Battery)
12 RP6159 Flow Monitor
(includes Battery & Shuttle)
13 WF0705 Filter Cartridge
ITEM PART NUMBER DESCRIPTION
1 RP6152 Housing Lid
2 RP6153 Gasket
3 RP6154 Housing Clamp
(includes Knob & T-Bolt)
4 RP6155 Stainless Steel Filter Housing
5 RP6160 Base
6 RP6161 Faucet Kit
(includes)
:
7 - -
Dedicated Water Faucet
8 - - Monitored Beauty Ring
9 - - Rubber Washer
10 - - C Washer
11 - - Nut
12 RP6162 T-Valve
13 RP4547 Battery Shuttle
(includes Battery)
14 RP6159 Flow Monitor
(includes Battery & Shuttle)
15 RP6157 Collar Release Tool
16 WF0705 Filter Cartridge
REPLACEMENT PARTS DIRECTORY
Components that are included with this System are capitalized throughout this
manual to distinguish between System Components and existing plumbing connections.
NOTE
1
2
3
4
5
6
7
8
9
11
10
12
13
9
1
2
3
4
5
14
13
15
12
16
7
8
9
10
11
FRESCAPURE™ COUNTERTOP SYSTEM (Model: FP6000CT)
FRESCAPURE™ UNDER-COUNTER SYSTEM (Model: FP6000UC)
Page 7
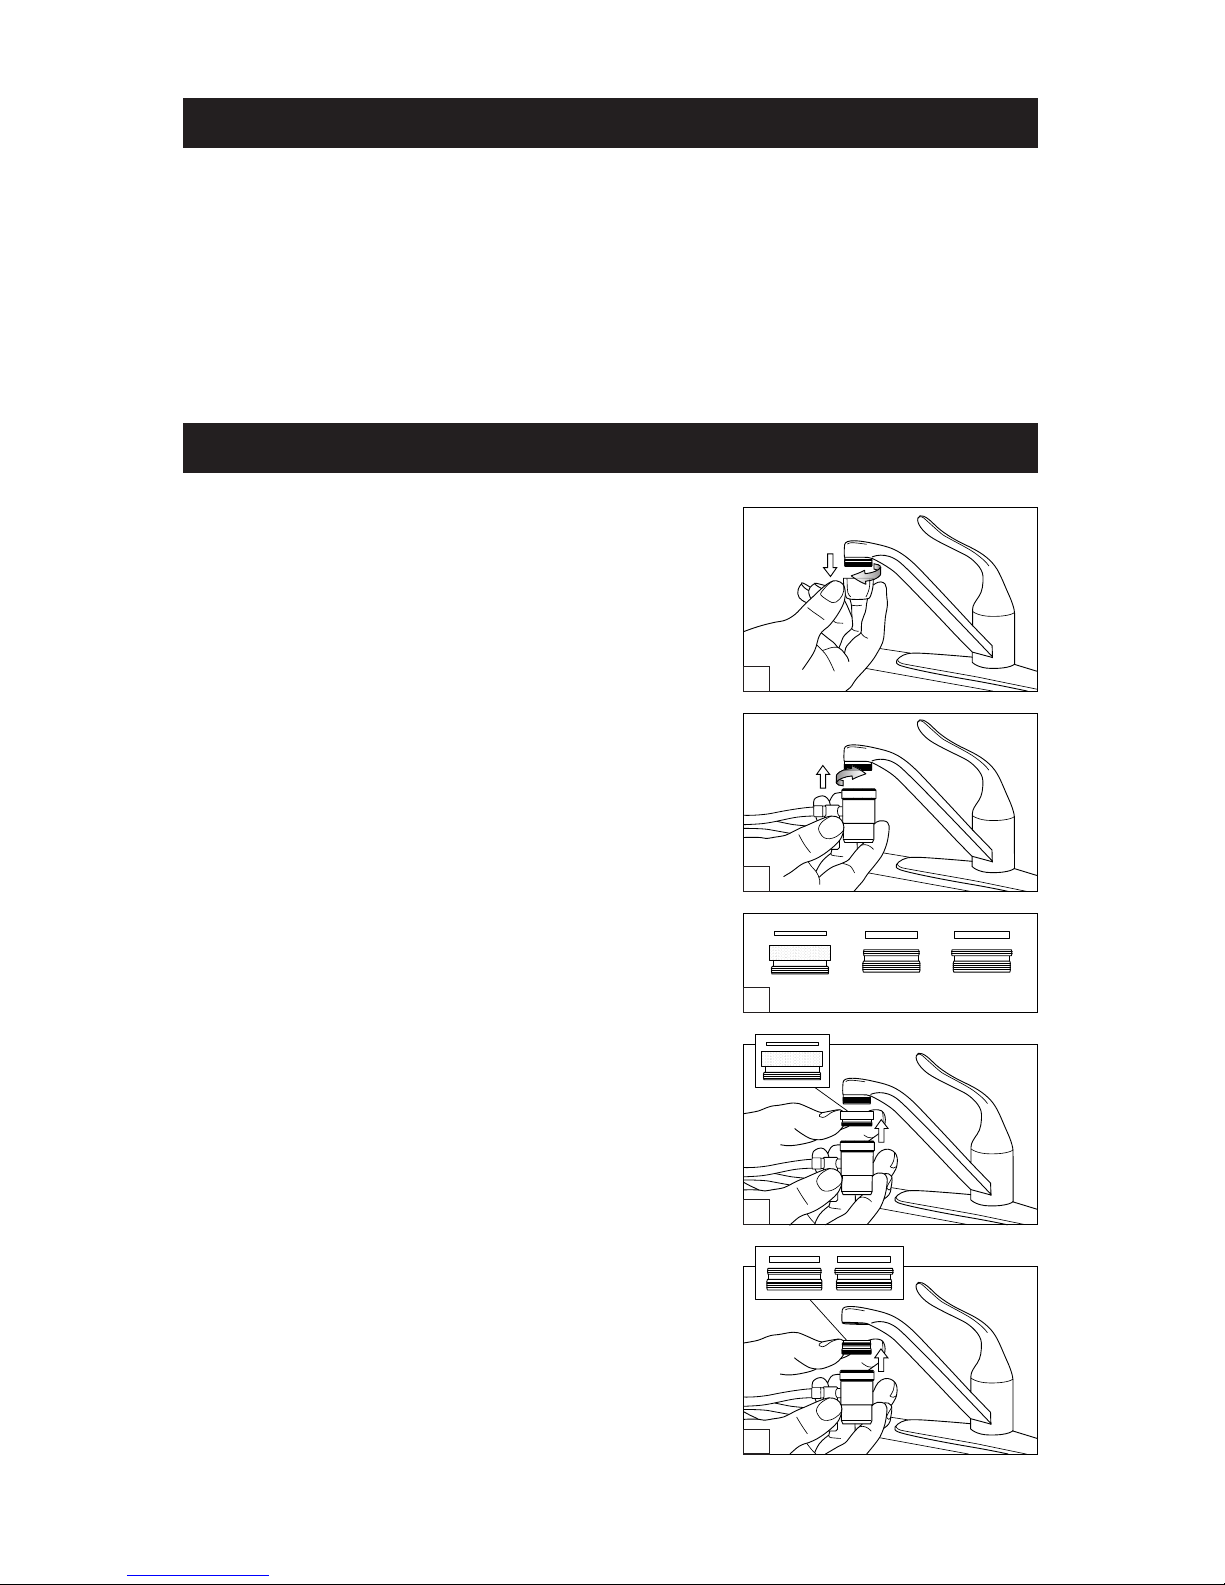
INSTALLATION: COUNTERTOP SYSTEM (Model: FP6000CT)
1. Unthread and remove the aerator from the
end of your kitchen faucet if it has one.
2. Thread the Diverter Valve directly onto your
kitchen faucet. Do NOT over-tighten.
3. If the threads to the Diverter Valve do not
directly attach to your kitchen faucet, use
one of the three Adapters provided.
4. Most kitchen faucets with external threads will
directly attach to the Diverter Valve. In some
instances the Diverter Valve may be smaller
than your kitchen faucet. In this case use the
Adapter with internal threads and thread it
directly to your kitchen faucet. Next, thread
the Diverter Valve to the Adapter.
5. If your kitchen faucet has internal threads,
thread one of the two Adapters with external
threads directly to your kitchen faucet. Next,
thread the Diverter Valve to the Adapter.
6. If your kitchen faucet does not have threads,
measure the inside diameter of your
faucet and provide this information to your
Independent Royal Prestige Representative
or to the Royal Prestige Customer Service
Center (1-800-279-3373). Be sure to request
an Expandable Adapter.
7. If your kitchen faucet does not fit any of the
Adapters provided, send your threaded
aerator to your Independent Royal Prestige
Representative or to the Royal Prestige
Customer Service Department. Include a note
requesting an adapter that fits your threads.
FRESCAPURE™ 5
GETTING STARTED
1. Determine which model you have.
2. Open the shipping carton, remove all FrescaPure
™
Drinking Water System
parts and place them on your kitchen counter.
3. Compare them with the parts shown on the “What’s In the Box” section on
the inside front cover to familiarize yourself with the System.
4. Follow the instructions for the FrescaPure
™
model that you have.
1
2
3
4
5
Page 8

6 FRESCAPURE™
8. Push the Blue and Red Tube ends on Diverter
Valve Assembly into Blue “Outlet” and Red
“Inlet” Collars located on the back of System
Enclosure. Lightly tug on Tubes to insure they
are securely connected.
9. Position the System next to your sink. Turn
the cold water “ON”, and turn the Lever on
Diverter Valve “UPWARD”. Water will begin
filling the System. Upon initial start-up, the
Display will begin blinking GREEN, YELLOW
and RED five (5) times before continuing to
blink GREEN, indicating peak operational
performance.
Check that all hose, clamp and
housing connections are tight and do not leak.
10.
When using the System for the first time, or whenever a new Filter Cartridge
is installed, allow the System to flush into the sink for fifteen (15) minutes.
This will expel trapped air and condition the Cartridge for normal use.
(This water may be used to water your plants.)
CONGRATULATIONS! Your new FrescaPure
™
System is ready for use!
REPLACING THE FILTER CARTRIDGE: COUNTERTOP SYSTEM
The most important part of maintaining your FrescaPure™ Drinking Water
System is replacing the Cartridge on a regular service interval. To insure best
results, the Cartridge should be replaced upon the first occurrence of one
of the following conditions:
– Annually
– When the Display begins flashing RED (indicating the rated capacity
has been reached)
– When the flow rate diminishes
– When you notice a taste or odor recurrence
1.
Place a towel or other soft cloth in sink.
2. With Faucet “OFF”, lightly depress back of
Enclosure Cover and lift upward to remove.
Set Cover on counter. It is not necessary to
disconnect the black Monitor Cable that is
attached to the Cover.
Insist on Genuine, WQA Certified, Royal Prestige Filter Cartridges.
Only Genuine, Royal Prestige Cartridges have been tested and certified by the Water
Quality Association to insure the performance represented in the Performance Data
Sheet. Failure to use Royal Prestige Filter Cartridges and replacement components
will invalidate your warranty.
IMPORTANT
9
2
8
Red Blue
Page 9

FRESCAPURE™ 7
3. Depress the Red “Inlet” Collar on Lid while
pulling Fitting upward to remove. Repeat
this procedure to remove fitting from Blue
“Outlet” Collar.
4. Grasp Clamp and lift upward to remove Filter
Housing from Enclosure. Set Filter Housing
on towel in base of sink.
5. Turn Knob counterclockwise to loosen Clamp.
Push Knob forward to unlatch T-Bolt from
Clamp. Once Clamp is removed, lift Lid
upwa
rd.
This step will expose the Filter Cartridge.
6. While holding Lid, turn Cartridge counter-
clockwise to remove.
Wrap in newspaper
and discard with normal refuse.
7. Wash the inside of the Housing and Lid with
warm water and a mild dishwashing detergent.
Rinse well and dry with a clean cloth.
8. Remove the sanitary plastic wrap from the
new Filter Cartridge. Thread the new
Cartridge clockwise onto Lid until you feel
resistance. Make an additional quarter turn.
DO NOT over-tighten.
9. Make certain Gasket is firmly seated onto Lid.
With new Cartridge connected to Lid, lower
Cartridge into Housing and align with Housing.
10. Place Clamp around Lid and Housing. Push
Knob forward to latch T-Bolt. Tighten Knob.
RECOMMENDATION
Rubber gloves should be worn
to avoid direct contact with contaminants removed by
this System.
ONLY REMOVE BATTERY SHUTTLE
AT TIME OF CARTRIDGE REPLACEMENT. Removing
Battery Shuttle prematurely may result in a loss of
stored data. A new Battery Shuttle is included with
every Genuine, WQA Certified, Royal Prestige
Filter Cartridge.
IMPORTANT
CAUTION
Do not use abrasive pads or abrasive
cleaners (including cleaners containing bleach) as this
will result in scratching and damage to your System.
NOTE
To release Tubing Fittings from Collars, a Collar
Release Tool has been provided for your convenience.
4
6
10
5A
5B
3
Collar Release Tool
9A
9B
Gasket
Page 10

11. To access the Battery Shuttle, slide Battery
Cover upward and set on counter. Remove
old Battery Shuttle from Monitor and discard.
Insert new Battery Shuttle and re-install the
Battery Cover.
12. Orient Tubing and Monitor Cable in Enclosure
so that the Filter Housing can be lowered
into the Enclosure without interference.
13. As you lower the Filter Housing into the
Enclosure, be certain to orient the Knob
towards the back of the Enclosure.
14. Push the Blue Tubing end into Blue “Outlet”
Collar located on Lid. Push the Red Tubing
end into Red “Inlet” Collar located on Lid.
Tug both Tubes lightly to insure they are
securely in place.
15. Tuck the Monitor Cable inside the Enclosure.
Hinge Cover to front of Enclosure as shown,
then press rear portion of Cover into place.
Position the System next to your sink.
16. Slowly turn the cold water “ON” and turn
the Lever on Diverter Valve “UPWARD”.
Water will begin filling the System. Upon
initial start-up, the Display will begin blinking
GREEN, YELLOW and RED five (5) times
before continuing to blink GREEN, indicating
peak operational performance. Check that
all hose, clamp and housing connections are
tight and do not leak.
17. When using your System for the first time,
or whenever a new Cartridge is installed,
allow the System to flush into the sink for
fifteen (15) minutes. This will expel trapped
air and condition the Filter Cartridge for
normal use. (This water may be used to water
your plants.)
8 FRESCAPURE™
11A
15A
15B
11B
14
16
12
13
Battery
Cover
Page 11

INSTALLATION: UNDER-COUNTER SYSTEM (Model: FP6000UC)
If your sink has an existing hole at least 1” in diameter that is being used
for a spray attachment or soap dispenser, you may decide to remove it and
use the existing hole to continue your installation. (Skip the next section and
go to “Faucet Installation” on page 12.)
If your sink DOES NOT have an existing hole at least 1” in diameter, a new
hole will need to be drilled.
The type of plumbing that you have in your home will determine the method
of installation and the type of hardware to be used. Below is a list of common
tools required for most under-counter installations:
Drilling a Hole in a Porcelain/Ceramic Sink:
- 3/8” Variable-Speed Electric Drill
- Relton
™
1” Porcelain Cutter Kit (PC-16)
(Visit www.relton.com for purchase information.)
- Masking Tape
Drilling a Hole in a Stainless Steel Sink:
- 3/8” Variable-Speed Electric Drill
- 1/8” Drill Bit
- 1” Hole Saw
- Masking Tape
- Hammer
- Punch
Installing the T-Valve and Dedicated Drinking Water Faucet:
- 5/8” and 3/4” Open End Wrenchs or Adjustable Wrench
- Tubing Cutter or sharp Utility Knife
CAUTION
Using power tools near water may result in electrical shock or even death. Be
certain that sink area is dry prior to using any power tool.
If you are experienced in this type of installation and choose to install
yourself, please proceed with extreme caution. If you have any doubts about doing
this yourself, please consult a licensed plumber.
The Universal Plumbing Code, and other state and county codes prohibit
the use of saddle valves. We also do not recommend their use. You must adhere to
your state and local plumbing codes. If you are uncertain, consult a licensed plumber.
IMPORTANT
WARNING
FRESCAPURE™ 9
Relton™ Porcelain Cutter
Kit includes:
Carbide-Tipped Pilot Drill
Spring-Loaded Porcelain Saw
Finish Hole Saw
Page 12

10 FRESCAPURE™
TYPICAL UNDER-COUNTER SYSTEM INSTALLATION
DRILLING A HOLE IN A STAINLESS STEEL SINK:
1. Locate an area on your sink to install the
Dedicated Drinking Water Faucet. (Make
certain there are no support ribs under the sink
in that area.) Cover the designated location
for the faucet installation on sink with masking
tape. Use the punch and hammer to make
a light indentation at the designated faucet
installation location.
2. Using a 1/8” high speed drill bit, drill a pilot
hole in the sink.
3. Use a 1” hole saw to enlarge the pilot hole
to final size.
This type of sink can be scratched very easily. Use extreme care.
If you have any doubts about doing this yourself, consult a licensed plumber.
CAUTION
2 3
1
Dedicated
Drinking Water
Faucet
Monitor
Filter
Housing
RED
Tubing
WHITE
Tubing
T-Valve
BLUE
Tubing
Cable
Hot
Cold
Page 13

FRESCAPURE™ 11
DRILLING A HOLE IN A PORCELAIN/CERAMIC SINK:
1. Locate an area on your sink to install the
Dedicated Drinking Water Faucet. (Make certain
there are no support ribs under the sink in that
area.) Cover the designated location for the
Faucet installation on sink with masking tape.
2. Using the carbide-tipped pilot drill supplied
with the Relton Cutter Kit and a variable
speed drill, slowly drill a pilot hole completely
through the porcelain or enamel and metal
base material.
3. The plastic sleeve supplied on the pilot drill is
to be positioned against the drill chuck after
the pilot drill has been inserted. This prevents
the drill chuck from contacting the porcelain
after the pilot hole has been completed.
4. Change to the spring-loaded porcelain saw
bit. Be sure the pilot guide supplied is inserted
tightly into the porcelain saw. With light
pressure applied to the porcelain saw, start the
drill motor turning as slowly as possible; after
the initial cut has started in the porcelain, the
drill motor’s R.P.M. may be increased. (Avoid
high R.P.M.s during the initial penetration
of the porcelain.) Three to four minutes may
be necessary to cut the porcelain; a faster
penetration rate could result in excessive
chipping. Continue drilling until a complete
ring has been cut through to the metal base.
5. Change to the finish hole saw bit. Be sure the
pilot guide is inserted tightly. Begin to cut with
slow speed and light pressure until porcelain
(inside the ring cut by porcelain saw in Step 4)
has been penetrated to the metal underneath.
At that point, remove the hole saw from the
hole and clean all chips from the porcelain surface. Reinsert the hole saw
into the hole and cut through the remaining material.
CAUTION
This type of sink can chip very easily. If you have any doubts about doing
this yourself, consult a licensed plumber.
RECOMMENDATION
Experiment on discarded porcelain to familiarize yourself with
the action and performance of the porcelain cutter kit.
3
4A
2A
5A
1
4B
2B
5B
Plastic Sleeve
Page 14

12 FRESCAPURE™
IMPORTANT
FAUCET INSTALLATION:
1.
Slide the Monitored Beauty Ring through the
Red, White and Blue Tube ends and onto the
Faucet Stem.
2. Insert the Red, White and Blue Tube ends
(including the Monitor Cable) through the
hole in sink. Insert Faucet shank into hole.
3. From under the sink, insert the Red, White
and Blue Tube ends (including the Monitor
Cable) through Rubber Washer and slide
firmly onto Faucet Stem.
4. Insert the Red, White and Blue Tube ends
through Nut and thread Nut onto Faucet Stem.
Insert the C Washer between Nut and Rubber
Washer, and hand tighten. Align Monitored
Beauty Ring to face the front of Dedicated
Drinking Water Faucet before using 1” or
adjustable wrench to tighten Nut.
RECOMMENDATION
When tightening Nut, two
people may be required to insure proper alignment
of Faucet and Monitored Beauty Ring.
DO NOT slide the Monitor Cable
through Nut.
1
2
3
4A
4B
Rubber
Washer
C Washer
Nut
Page 15

FRESCAPURE™ 13
SYSTEM INSTALLATION:
Read these instructions completely before starting System Installation.
Make a determination whether you will be able to make a “Typical” installation
(as shown in the illustration on page 10) after looking at your under-sink
cabinet area.
If the configuration of your under-sink area does not permit a “Typical”
installation, it will be necessary to develop one of your own. Be sure to
take into consideration where the System will be permanently located in
relationship to the cold water supply line and Dedicated Drinking Water Faucet.
Make generous allowances for estimating the Tubing lengths required to
make these connections. (Two Velcro Strips have been provided should you
decide to mount the Monitor to the cabinet wall.)
1. Before starting this installation, be certain to
turn “OFF” the cold water supply located under
your sink. If a shut-off valve is not located on
the cold water supply line, shut off the main
water supply to your home.
2. Locate an area under sink to place the Base.
The Base should be located directly under
the area where the Dedicated Drinking Water
Faucet is installed.
3. Locate the shut-off valve on the existing cold
water supply line. Using a 5/8” open ended
wrench, unthread compression nut located
on top of the shut-off valve by turning the
wrench counterclockwise.
4. Thread the T-Valve onto shut-off valve using
a 3/4” wrench to tighten, then thread
compression nut onto T-Valve using 5/8”
wrench to tighten (clockwise).
5. Before pushing the White Tubing (which is
attached to the Dedicated Drinking Water
Faucet) into the “Outlet” Collar located on
T-Valve, determine whether it is necessary
to shorten Tubing. If so, shorten to desired
length before inserting.
4
3
5
WARNING
DO NOT use copper tubing with the Collars installed on this System.
Although it may appear that copper tubing will fit, water leaks will develop over time.
If copper tubing is required, you must use copper compression fittings that must be
purchased separately and adapted accordingly.
Page 16

14 FRESCAPURE™
6. Cut a 6 in. length from the 5 ft. of Blue Tubing
provided. Take this short piece of Blue Tubing
and insert one end into the Blue “Outlet” Collar
on Lid. Take the remaining Blue Tube end and
push it into the “Inlet” Collar on Monitor.
7. Before pushing the Blue Tubing (which is
attached to the Dedicated Drinking Water
Faucet) into the “Outlet” Collar on Monitor,
determine whether it is necessary to shorten
Tubing. If so, shorten to desired length
before inserting.
8. Before pushing the Red Tubing (which is
attached to the Dedicated Drinking Water
Faucet) into the Red “Outlet” Collar on Lid,
determine whether it will be necessary to
shorten Tubing. If so, shorten to desired
length before inserting.
9. Insert Monitor Cable Connector into Cable
Port located on Monitor.
10. Slowly turn cold water supply “ON” and
turn the Lever on Dedicated Drinking Water
Faucet downward. Water will begin filling the
System. Upon initial startup, the Monitored
Beauty Ring will begin blinking GREEN,
YELLOW and RED five (5) times before
continuing to blink GREEN, indicating peak
operational performance. Check that all hose,
clamp and Housing connections are tight
and do not leak.
11. When using your System for the first time, or
whenever a new Cartridge is installed, allow
the System to flush into the sink for fifteen
(15) minutes. This will expel trapped air and
condition the Filter Cartridge for normal use.
(This water may be used to water your plants.)
CONGRATULATIONS! Your new FrescaPure
™
System is now ready for use!
Give all Tubes a gentle tug at the point
where they make a connection. This will insure they
are firmly seated and will not come out.
IMPORTANT
7
8
9
10
6A 6B
Blue
Red
Blue Tubing
from Faucet
Monitor
Page 17

FRESCAPURE™ 15
REPLACING THE FILTER CARTRIDGE: UNDER-COUNTER SYSTEM
The most important part of maintaining your new FrescaPure™ Drinking
Water System is replacing the Cartridge on a regular interval. To insure best
results, the Cartridge should be replaced upon the first occurrence of the
following conditions:
– Annually
– When the Monitored Beauty Ring begins flashing RED
(indicating the rated capacity has been reached)
– When the flow rate diminishes
– When you notice a taste or odor recurrence
1. Turn “OFF” the cold water supply. Using
the Tool provided, depress Red Collar on
Lid, while pulling upward on the Red Tubing
at the same time. Repeat this procedure to
remove the Blue Tubing from Lid.
2. Place System in sink. Turn Knob counter-
clockwise to loosen Clamp. Press Knob
forward to unlatch T-Bolt from Clamp. Once
Clamp is removed, lift Lid upward. This step
will expose the Filter Cartridge.
3. While holding Lid, turn Cartridge counter-
clockwise to remove. Wrap in newspaper and
discard with normal refuse.
4. Wash inside of Housing and Lid with warm
water and a mild dishwashing detergent.
Rinse well and dry with a clean cloth.
Rubber gloves should be worn
to avoid contact with contaminants removed by System.
RECOMMENDATION
CAUTION
Do not use abrasive pads or abrasive
cleaners (including cleaners containing bleach) as this
will result in scratching and damage to your System.
Insist on Genuine, WQA Certified, Royal Prestige Filter Cartridges.
Only Genuine, Royal Prestige Cartridges have been tested and certified by the Water
Quality Association to insure the performance represented in the Performance Data
Sheet. Failure to use Royal Prestige Filter Cartridges and replacement components
will invalidate your warranty.
IMPORTANT
3
2A
2B
NOTE
To release Tubing Fittings from Collars, a Collar
Release Tool has been provided for your convenience.
1
Collar Release Tool
Page 18

5. Remove sanitary plastic wrap from the new
Filter Cartridge. Thread new Cartridge
clockwise onto Lid until you feel resistance.
Make an additional quarter turn. DO NOT
over-tighten.
6. Make certain Gasket is firmly seated onto
Lid. With new Cartridge connected to Lid,
lower Cartridge into Housing and align Lid
with Housing.
7. Place Clamp around Lid and Housing. Push
Knob forward to latch T-Bolt. Tighten Knob.
8. Push the Blue Tube end into Blue “Outlet”
Collar located on Lid. Push the Red Tube end
into Red “Inlet” Collar located on Lid. Tug
both Tubes lightly to insure they are securely
in place. Re-position System under sink.
9. Remove Battery Shuttle from Monitor and
discard. Insert new Battery Shuttle.
10. Slowly turn cold water supply “ON” and turn
the Lever on Dedicated Drinking Water Faucet
downward. Water will begin filling the System.
Upon initial startup, the Monitored Beauty
Ring will begin blinking GREEN, YELLOW
and RED five (5) times before continuing to
blink GREEN, indicating peak operational
performance. Check that all hose, clamp and
housing connections are tight and do not leak.
11. When using your System for the first time, or
whenever a new Cartridge is installed, allow
the System to flush into the sink for fifteen
(15) minutes. This will expel trapped air and
condition Filter Cartridge for normal use.
(This water may be used to water your plants.)
16 FRESCAPURE™
ONLY REMOVE BATTERY SHUTTLE
AT TIME OF CARTRIDGE REPLACEMENT. Removing
Battery Shuttle prematurely may result in a loss of
stored data. A new Battery and Battery Shuttle is
included with every Genuine, WQA Certified, Royal
Prestige Filter Cartridge.
IMPORTANT
5
7
8
9
6B
Gasket
6A
10
RedBlue
Monitor
Page 19

FRESCAPURE™ 17
NOTES
Page 20

18 FRESCAPURE™
TROUBLESHOOTING
CONDITION: Water continues to run from the Dedicated Drinking
Water Faucet even after turning the water “OFF”.
REASON: The Dedicated Drinking Water Faucet does not shut off like
a standard faucet. It has a valve that shuts off pressure in front of the
System, and like a garden hose, the residual pressure will take time
to drain.
SOLUTION: This condition is normal and no action is required. However,
to minimize the “run on” effect, follow the flushing instructions for a
minimum of 15 minutes when your System is new and each time a new
Filter Cartridge is installed.
CONDITION: Water is flowing slowly from the System, yet the
Monitored Beauty Ring is still flashing GREEN.
REASON: Excessive amounts of particles in the water supply may have
caused premature plugging of the Filter Cartridge.
SOLUTION: The Cartridge and Battery Shuttle must be replaced due
to poor water conditions in your area.
CONDITION: White sediment is in my filtered water.
REASON: There is a presence of calcium carbonate in your main
water supply. This will occur any time the filter water is boiled or
frozen and then melts.
SOLUTION: This condition is normal and no action is required
CONDITION: The YELLOW lamp on the Monitored Beauty Ring
is flashing.
REASON: The Cartridge is reaching the end of its rated capacity
and will need to be replaced soon. Order a Genuine, WQA Certified,
Royal Prestige Filter Cartridge now so that you will have it when the RED
lamp begins flashing, signaling it is time to replace the Cartridge.
SOLUTION: Replace Cartridge and Battery Shuttle when RED lamp on
Monitored Beauty Ring begins flashing.
Page 21

FRESCAPURE™ 19
TROUBLESHOOTING
CONDITION: Water is leaking between a tube or fitting and a Collar.
REASON #1: The tube or fitting is not completely inserted into Collar.
SOLUTION: Press tube/fitting firmly into Collar.
REASON #2: Tube end has been damaged, elongated or not cut
squarely.
SOLUTION: Depress Collar using the Tool provided and pull Tube at
the same time to remove. Observe the end of the tube to determine
condition. Cut a short section of the tube end off to correct condition.
Re-install Tube into Collar by pressing firmly into place.
Page 22

Exclusively distributed by:
HY CITE ENTERPRISES, LLC
333 Holtzman Road, Madison, WI 53713
www.RoyalPrestige.com
•
© Hy Cite Enterprises, LLC • Printed in USA
Reproduction of this printed material is prohibited.
Due to continuing product development
and research, final specification and/or
appearance may vary.
R13.02 1-400-0118
LIMITED WARRANTY
for Royal Prestige® Brand Products
Hy Cite Enterprises, LLC (“Hy Cite”) provides the following warranties on its product line to the original
consumer owner of the product, whether obtained by purchase or by gift. The following warranties may
be transferred to immediate family members.
Water Treatment Systems: Hy Cite warrants that the base assembly, housing and spout assembly of your
FrescaPure
™
Water Treatment Systems will be free from defects in material and workmanship for 15 years
from the date of purchase. Hy Cite also warrants that your Water Treatment Systems cartridges will not
become clogged for 90 days from the date of purchase. Electrical parts are warranted to be free from
defects in material and workmanship for 1 year from date of purchase.
Note: Maintenance parts for your Water Treatment Systems (including diverter valve and hose assembly,
and rubber o-rings) may need replacement, not because of defects, but because hard-water minerals
may clog valves; and harsh chemicals in tap water can cause rubber o-rings and hoses to become brittle.
Maintenance parts may be replaced at one-half (50%) of the current retail price during the 15 year
warranty period.
Limitations on Coverage: The Hy Cite warranties cover only normal household use, meaning, for
example, the warranties shall be void if your covered product has been damaged by neglect or improper
assembly, maintenance, or servicing, or repair by unauthorized persons or used for commercial purposes.
Implied Warranties: ANY IMPLIED WARRANTIES WHICH THE PURCHASER MA
Y HAVE ARE LIMITED
IN DURATION TO THE SAME DURATION AS THE WRITTEN WARRANTY DESCRIBED ABOVE FOR
YOUR COVERED PRODUCT. Some states do not allow limitations on how long an implied warranty
lasts, accordingly, the above limitation may not apply to you.
Warranty Performance: Should your covered product not comply with our warranty, return it to Hy Cite
postage prepaid and Hy Cite will, at its option, either repair or replace the product. Hy Cite may replace
the product with any equivalent product or with a product incorporating a new technology or design.
Return of Product: To obtain warranty service, return the product to our Service Center:
Hy Cite Enterprises, LLC
Royal Prestige Service Center
2115 Pinehurst Drive
Middleton, WI 53562
1-800-279-3373
Damage in Shipment: Hy Cite will replace any cover
ed product damaged in shipment free of charge
if you notify Hy Cite within 30 days after your receipt of the product. Simply contact the Royal Prestige
Service Center. As a condition to replacement, Hy Cite may require you to make the damaged product
available for pick-up at Hy Cite’s expense.
Purchase Option: If your covered product is damaged by fire or storm, or is stolen, you may purchase
new replacement product at one-half (50%) of current retail price. A valid police or fire report is required
for discounted purchase.
Limitation of Remedies: No representative or other person is authorized to assume for Hy Cite any other
liability in connection with the sale of covered products. Repair or replacement, at Hy Cite’s option, shall be
your remedy under this warranty and in no event shall Hy Cite be liable for any incidental or consequential
damages, losses or expenses. Some states do not allow the exclusion or limitation of incidental or
consequential damages, accordingly, the above limitation or exclusion may not apply to you.
Legal Rights: This warranty gives you specific legal rights, and you may also have other rights which
vary from State to State.
For more information on Hy Cite’s Royal Prestige brand products, visit our web site: www.royalprestige.com
Legal.388v19
 Loading...