


1
RELOADED
Get ready for the adventure of a lifetime. Reengineered. Redesigned. Revitalized.
The all-new Bullet Electra 350 UCE features a modern Unit Construction engine with 5 gears on
the left. Easier to ride, more torque and no maintenance trouble. It’s the Bullet Reloaded.
This manual is designed to give you complete control over your motorcycle. It contains important
information on efficient operation and maintenance. We’ve also included tips on riding safely, as
well as suggestions to enhance your motorcycling experience.
Your safety is of prime concern to us and we urge you to be a responsible rider. Please select
your riding gear carefully in accordance with your terrain, style and weather conditions. And ensure
the same for your pillion rider as well. Respect the law of the land and ride safe.
Finally, we welcome you to the Royal Enfield community. You can locate your nearest club or sign
up for the next big ride at www.royalenfield.com
The legend rides on.

2
N O T I C E
All information in this manual is based on the latest product information available at the time of
publication. Due to continues improvements or other changes, there may be discrepancies between
information in this manual and your vehicle. Royal Enfield reserves the right to make production
changes at any time without prior notice and without incurring any obligation to make same or
similar changes to vehicles previously built or sold.
All images shown are for reference to explain and need not to be exactly the same on the model you
own. Technical specification are subject to change without prior notice.
“© Copyright 2006 Royal Enfield. All Rights Reserved. No part of this manual shall be copied,
distributed or otherwise dealt without the express permission in writing of Royal Enfield.
Part No. 592579/a / Qty. 1000 / Oct. ‘10

3
C O N T E N T S
Personal and vehicle information .................. 4
Free service record ........................................... 5
Specifications .................................................... 6
Safety Definitions ............................................ 9
Safe and happy riding ................................... 10
Vehicle identification numbers ..................... 11
Location of key parts .................................... 12
Operation of controls .................................... 15
Pre-Operational Checks ................................. 21
Running in ...................................................... 22
Starting ........................................................... 23
Gear Shifting, Riding & Stopping ................ 25
Parking ........................................................... 26
Tools & First Aid kit ...................................... 27
Periodical maintenance chart ....................... 28
Recommended lubricants ............................... 31
Do it yourself .................................................. 32
Washing procedure ........................................ 45
Storage precautions ....................................... 46
Long trip precautions .................................... 48
Caring for Mileage ......................................... 49
Complete Wiring diagram-Kick Start .......... 52
Complete Wiring diagram-Electric Start ..... 53
Trouble shooting ............................................ 54
Warranty terms & conditions ....................... 61
Emission Warranty ........................................ 63
All India Road Signs ...................................... 67
Regional & Area Offices ................................ 68
Log Book ......................................................... 69
Free Service coupons ...................................... 70
Paid Service & Maintenance Record ............. 79
Notes. .. ........... ........... ......... ........... .. .........
Anne xu res
Vehicle Installation Form
Pre-Delivery Inspection Report
Bike Installation Confirmation By Customer
Form 22

4
P E R S O N A L & V E H I C L E
I N F O R M A T I O N
Name
Door No./Street
Locality
City State Pin
Contact Nos. Res: Off: Mobile : Email :
Engine No. Battery No.
Frame No. Battery make
Reg. No. Licence No.
Date of Sale Valid till dt.
Model Key No. :
Tyre make Colour
Sold by Dealer Code
Vehicle Installation Form (VIF) No.
5
F R E E S E R V I C E
R E C O R D
It is our endeavour to provide excellent service to your Bullet Electra 350 UCE at all times. Towards
this we provide four free services at specific intervals.
Please avail these services at the specified time, in any of the Royal Enfield Dealerships / Authorised
service centres nearest to you and as a token of satisfactory services, kindly return the free service
coupon duly filled in and signed, to the service outlet.
Availing the free services in the specified time is a prerequisite for warranty consideration.
The cost of fuel, oil, oil filter element, grease etc. used for all free services are chargeable to the
customer.
1st Service 4th Service2nd Service 3rd Service
Date of Service
Kms Covered
Se rvici ng
Dealer’s Name
Add r e ss
Note : Please ensure that the free service details are recorded in this sheet immediately after the
service is carried out.
6
S P E C I F I C A T I O N S
ENGINE AND ENGINE SYSTEMS
Engine Type ................... Single Cylinder
........................................ 4 Stroke, OHV,
........................................ SI Engine,
........................................ air cooled, Twinspark
Bore ................................ 70mm
Stroke ............................. 90mm
Swept volume ................. 346cc
Compression ratio ......... 8.5:1
Max Power BHP @ RPM 19.8@5250
Max Torque in NM@ RPM 28@4000
IDLE RPM ...................... 1050+200
Starting .......................... Kick Start/E-Start
Air filter element ........... Paper element
Lubrication .................... Wet sump, Forced
........................................ lubrication
Engine oil capacity ....... 2.75 Litres
Carburator ..................... UCAL, BS29
Engine oil grade ............ Motul 3000 4T Plus
........................................ 15W50API, SL Grade
........................................ JASO MA
Cooling ........................... Natural air flow
TRANSMISSION
Clutch ............................. Wet multiplate
Primary drive ................ Duplex chain drive
Primary ratio ................. 2.15 : 1
Gear box ......................... Constant Mesh
........................................ 5 Speed
Gear Ratio ...................... 1
........................................ 2
........................................ 3
........................................ 4
........................................ 5
st
3.06:1
nd
2.01:1
rd
1.52:1
th
1.21:1
th
1:1

7
S P E C I F I C A T I O N S
Final drive ...................... 15 Teeth (Sprocket)
Final Ratio ..................... 2.533:1
CHASSIS
Frame .............................. Tubular
Suspension :Front ......... Telescopic, hydraulic
........................................ damping,
........................................ Stroke 130 mm
Rear ........... S w i n g ar m with
........................................ gas shock absorbers
........................................ stroke 80mm
Fr. Fork oil capacity ..... 195 ml per leg
Front fork oil ................ 1F (Endurance fork oil)
Front Brake : Disc Brake Hydra u l i c 280m m
........................................ ventilated disc.
Rear ........... Foot operated 153 mm
........................................ single lead, internal
........................................ expanding
Brake oil Capacity ......... 60 ml
Brake oil grade ............. DOT 3 or DOT 4
Tyre size : Front ...... 3.25×19 4/6 PR
Rear ........ 3.25×19 4/6 PR
TYRE PRESSURE
Solo Front ....... 20 psi/1.41 kg/cm
Rear ......... 30 psi/2.11 kg/cm
With Pillion Front ....... 22 psi/1.55 kg/cm
Rear ......... 32 psi/2.20 kg/cm
Steering lock .................. In built
Fuel tank capacity ........ 13.5 litres (Min.)
Reserve ........................... 2 Litres approx.
ELECTRICALS
Generation ..................... Alternator
System : E-Start .......... 12V - DC
Kick Start ..... 12V - AC / DC
2
2
2
2

8
S P E C I F I C A T I O N S
Ignition .......................... Digital TCI
Battery : E-Start ......... 12V - 14 AH MF
Kick Start .... 12V - 5 AH
Head lamp MFR ............ 12V, 35/35 W
Tail lamp ........................ 12V, 5W
Brake lamp ..................... 12V, 21W
Parking lamp ................. 12V,2W - 2 Nos
Speedometer lamp .......... 12V, 3.4W
Hi beam indicator .......... 12V, 2W
Turn Signal Tell Tale .... 12V, 2W
Turn signal .................... 12V, 10W
Horn ............................... 12V,2.5 Amp(Max.)
Starter Motor (for E-Start) 12V, 0.7KW
WEIGHTS
Kerb weight (90% fuel & Oil) .
E-Start ......... 183 Kgs
Kick Start .... 180 Kgs
Max pay load .................. 350 Kgs.
DIMENSIONS
Length ............................ 2140 mm
Width .............................. 810 mm
Height ............................ 1120 mm
Wheel base ..................... 1370 mm
Ground clearance .......... 140 mm
Saddle height ................. 800mm
Values given above are for your guidance only.
In vi ew of continuous improvements being do ne on our pr oducts, th e speci fica tion s ar e
likely to change without prior notice.
9
S A F E T Y
D E F I N I T I O N S
The information given unde r the titles : Warning, Caution and Note are for your safety and for
the c are and safety to your motorcycle and others. Please read these carefully and if disregarded
may result in injury to yourself or others and damages to the motorcycle.
WARNING
Indicates a potentially hazardous situation.Disregarding this message may result in injury to
rider or other persons.
CAUTION :
This message if disregarded may result in damage to the vehicle.
NOTE :
Indicates important and useful messages for clearer understanding.
All Images shown are for reference to explain and need not to be exactly the same on the model
you own. Technical specification are subject to change without prior notice.

10
S A F E A N D
H A P P Y R I D I N G
RIDING DRESS
A proper riding apparel
NOTE :
A li g h t coloured sh i r t enables gr e ater
visibility to other road users specially during
nights.
CAUTION :
Loose clothing may get caught on moving
parts of your motor-cycle.
A pair of riding boots or shoes.
Soft leather gloves.
Goggles or spectacles to safe guard eyes.
An ISI certified helmet. Affix light reflecting
strips of stickers at the front and rear.
SITTING POSTURE
Correct sitting postur e is a pre-requisite for
stable and safe riding :
Sit Straight with your shoulders completely
relaxed.
Keep your elbows close to your body.
Keep your toes in straight ahead direction.
Slightly press the petrol tank with the knees.
Hold the handle grip close to its inner end.
Look extensively, including rear view mirror,
without turning the head.
BRAKING
Use both, front and rear brakes together for
maximum braking efficiency.
WARNING
Applying any one of the brakes suddenly may
cause the vehicle to skid.
While riding on wet or bad road conditions
use brakes cautiously.

11
V E H I C L E I D E N T I F I -
C A T I O N N U M B E R S
FRAME NUMBER
Punched on steering head tube RH side.
ENGINE NUMBER
Punched on top of the engine LH side.

12
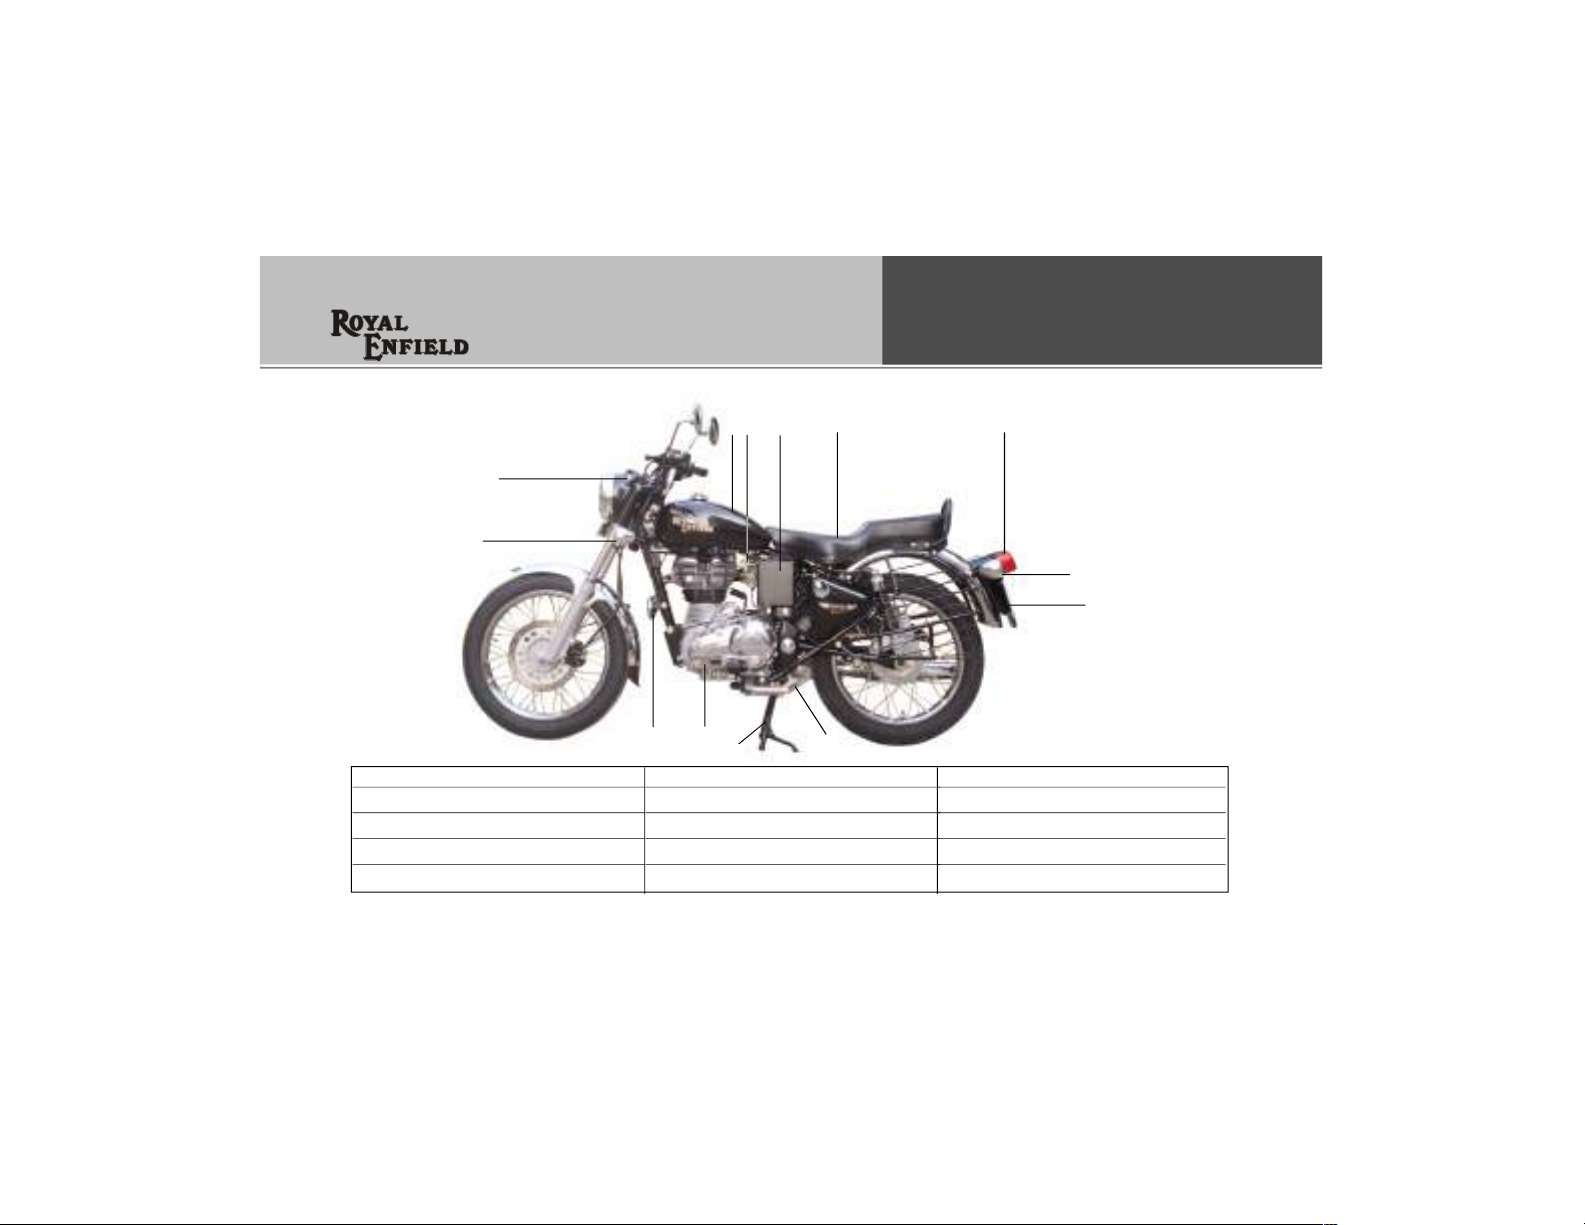
L O C A T I O N O F
K E Y P A R T S
TOP VIEW
3
6 7 8 9
4
5
2
1
1. Horn Button
2. Turn Signal Switch
3. Cluth Lever LH
4. Head Lamp Dip Switch
5. Ignition Switch
6. Speedo Meter
7. Ammeter
8. Engine Kill Switch
10
11
12
9. Brake Lever RH
10. Pilot & Head Lamp Switch
11. E-Start Switch
12. Petrol Tank Cap
13
LEFT SIDE VIEW
1
L O C A T I O N O F
K E Y P A R T S
3
4
6
5
7
8
9
1. Front Trafficator LH
2. Pilot Lamp LH
3. Fuel Tank
4. Fuel Tap
5. Battery Box Cover
13212
11
10
6. Seat
7. Tail Lamp
8. Rear Trafficator LH
9. Number Plate Rear
10. Side Stand
11. Centre Stand
12. Gear Shift Lever
13. Horn

14
L O C A T I O N O F
K E Y P A R T S
RIGHT SIDE VIEW
1
1. Rear Trafficator RH
2. Tool box
3. Air filter box
4. Carburetor
5. Pilot Lamp RH
2
12
6. Head Light
7. Front Number Plate
8. Front Trafficator RH
9. Steering lock
10. Brake Pedal
11
43
5
6
7
8
9
10
11. Kick Start Lever
12. Shock Absorber (Gas filled)

15
O P E R A T I O N O F
C O N T R O L S
IGNITION SWITCH
OFF
ON
FUEL TANK CAP
l Turn Key
Clockwise to
open
l Turn Key Anti
Clock wise to
close.

16
O P E R A T I O N O F
C O N T R O L S
SIDE BOX
Turn anti clockwise
to open
BATTERY BOX
Turn anti clockwise
to open
NOTE :
Key is c ommon for ignition, petrol tank cap,
steering lock, and tool boxes.
Ke y f or fu el tan k a nd to ol bo xes can be
re m o v e d f r o m t h e l o c k o n l y i n l o c k e d
position.
STEERING LOCK
Turn Clockwise to
lock
Turn Anticloc kwise
to Unlock
NOTE :
Tur n ha ndle bar to extr e m e left, bef o r e
attempting to lock steering.

17
O P E R A T I O N O F
C O N T R O L S
HORN
Press
ELECTRIC START SWITCH
E-START BUTTON
Presss fully to start
NOTE :
Press E-Start
Button fully till
engine develops
cranking speed.
Not to make half
hearted attempt.
HEAD LIGHT
SWITCH
OFF
Pilot ON
Head lamp ON

18
O P E R A T I O N O F
C O N T R O L S
ENGINE STOP SWITCH
ON
OFF
DIMMER SWITCH
High beam
Low beam
Day flash

19
O P E R A T I O N O F
C O N T R O L S
TURN SIGNAL
SWITCH
Left turn signal ON
OFF (Push to off)
Right turn signal ON
CHOKE
ON
Pull Out
OFF
Press
CAUTION :
Choke should be used only to start a cold
engine. Riding the motorcycle with the choke
‘ON’ will increase pollution and result in high
fuel consumption and loss of power.

20
O P E R A T I O N O F
C O N T R O L S
FUEL TAP
OFF
Main ON
Reserve ON
CHECK FOR :
1. Petrol level in the tank and leakage if any.
2. Ope rat e a nd free pla y of front and rear
brakes.
Front Brake
Rear Brake
Bra ke P ed al
3. Free play and smoothness of all operating
cables.
4. Free movement of steering
21
P R E O P E R A T I O N A L
C H E C K S
5. Battery electrolyte level.
6. Any cuts, cracks in the tyre and correct tyre
pressure.
7. Operation of all electrical parts.
8. Brake fluid is above the ‘min’ level in the master
cylinder.
MIN
9. Lub oil level should be in between “MAX “ &
“MIN” Level. Top up if necessary. Do not overfill
above maximum level.
MAX
MIN
NOTE :
Start engine, run for 2 minutes before checking
oil level

22
R U N N I N G I N
The Bullet Electra 350 UCE, as you would be
experiencing, is capable of consistent high speeds.
However as with any new motorcycle, a “runningin” is essential during the first 2000 kms to achieve
optimum performance subsquently.
The following tips will help in proper bedding of a
new motorcycle.
1. During the first 2000 Kms of run, do not exceed
the following speed limits.
Vehicle
Gear
Speed
1 15 KMPH 20 KMPH
2 25 KMPH 30 KMPH
3 30 KMPH 40 KMPH
4 45 KMPH 55 KMPH
5 60 KMPH 70 KMPH
First 500 kms 501 - 2000 kms
2. Do not exceed maximum pay load as specified.
3. Warm up the engine for a few minutes to allow
oil for all engine parts before riding the bike.
4. Do not ride in con stan t throt tl e for long
distances. Vary the speed by 10%.
5. Avoid sudden revving and racing starts.

23
S T A R T I N G
USING KICK START
Turn fuel tap to
‘ON’
Use choke if required
(E.g.. When starting
a cold eng ine in
winter season).
Switch on ignition.
Pull Out
Ensure gear is in neutral position.
NOTE :
Neutral position is indicated by neutral light
on the cockpit.
To shift into neutral, move the motorcycle
back and forth gently, while shifting the gear.
CAUTION :
1. Attempting to shift gears without moving the
motorcycle back and forth, may damage gears.
2. Slightly crank engine further till compression
eases over.
Start the motor-
cycl e wit h a
p o w e r f u l
swinging kick.
Re l e a s e the
chok e , if
applied.

24
S T A R T I N G
USING ELECTRIC START
Press the clutch lever and press starter button
and release once the engine starts.
NOTE :
If the engine does not start, wait for 30 seconds
before pressing the starter button again.
CAUTION :
Please ensure that the gears are in neutral
before starting the motorcycle.
Press Starter button and release starter switch
once the engine starts.
A Clutch switch is provided in the system for
the safety of the rider. When the vehicle is in
gear, the vehicle cannot be started - To start
in gear operate the clutch lever, press Starter
button and release starter switch once the
engine starts.
Warm up engine for 2 minutes - till idling is
consistent.
Operate clutch lever.
Press gear pedal with toe to engage 1stgear.
Gently open throttle
an d rel eas e clu tch
si m ultane ously. If
clut c h is re l e ased
suddenly, the engine
may stall and cause
the m otorc y c l e to
move with a jerk.

25
To shift to 2nd and
higher gears, close
throttle, operate the
clut c h lev e r a nd
press the gear pedal
with heel.
NOTE :
Ge a r sh i f t pe dal is on th e le f t side of the
motorcycle.
To st op the ve h icle ,
cl ose thr ott le, apply
front brake with right
hand and rear brakes
wi t h righ t leg
simultaneously. Shift
gear s i n to n e utral
before the motorcycle
jus t co m es to a
complete stop.
Turn the
ignition
switch to
‘OFF’
position.
Tur n fue l
tap ‘OFF’
G E A R S H I F T I N G ,
R I D I N G & S T O P P I N G

26
P A R K I N G
PARKING VEHICLE ON CENTRE STAND PARKING VEHICLE ON SIDE STAND
Select a firm, flat surface.
Hold handle bar straight.
Lower centre stand, such that, both the legs
of the stand are resting on firm ground.
Apply pressure on the fulcrum lever on the
centre stand and pull vehicle backward.
Select a firm, flat surface.
Extend side stand. Tilt the motorcycle to
the left, till it is supported firmly.
WARNING
Ensure both the stands are retracted fully before
riding the motorcycle.
Please exercise extreme care while parking and
ensure it is parked firmly to avoid the motorcycle
from falling over and causing injury to you or to
others and damage to the motorcycle parts.

27
T O O L S &
F I R S T A I D K I T
1 2 3 4 5 6
S.No. Description Qty.
1. Tool bag 1
2. Screwdriver 1
3. Tommy bar 1
4. Tubular spanner 1
5. Tool- Spark plug 1
6. Double end spanner 10 X 12 2
4
2
6
5
7
1
3
S.No. Description Qty.
1. Antiseptic cream 5 gms 1
2. Wash proof plaster 1.9 cm x 7.2 cm 2
3. Gauze bandage 5 cm x 2 cm 1
4. Sterilized Gauze Swab 5 cm x 5 cm 2
5. Sterilized elastic plaster 7 cm x 6 cm 1
6. Elastic Gauze bandage 8 cm x 1 mtr. 1
7. First aid kit pouch 1

28
P E R I O D I C A L
M A I N T E N A N C E
The maintenance schedule detailed here will help you maintain your Bullet Electra 350 UCE meticulously
and to get a long trouble free service. The schedule provided herein is based upon average riding
conditions and indicates the Kms at which regular inspections, adjustments, replacements and
lubrications are to be carried out. The frequency of the maintenance must be shortened depending
upon the severity of the driving condition or if the motorcycle is used in a very dusty environment.
Contact the nearest Royal Enfield Authorised service centre for expert advice and to carry out the
required maintenance.
S.
No.
1 Engine Oil R I R I R I R I R I R
2 Engine oil filter element R R R R R R
3 Engine suction filter and Secondary drain magnetic plug C C C C C C
4 Spark plug - 2nos. A A A A A R A A A A R
5 HT leads for crack I I I I I I I I I I I
6 Air filter element C C C C R C C C R C C
7 Carburetor (C.V. Type) Clean, Inspect and Tune at every 6000 Kms. of run
DESCRIPTION
Kms (x 1000) 0.5 3 6 9 1 2 15 18 21 24 2 7 3 0
Months 1.5 3 6 9
FREE SERVICE
whichever is earlier
Check level at every 500 Kms or earlier as required
PAID SERVICE
A : Adjust C : Clean D : De-carbonise I : Inspect L : Lubricate R : Replace

29
P E R I O D I C A L
M A I N T E N A N C E
S.
No.
8 Fuel Tap Filter C C C C C C C C C C C
9 Fuel tank C C C C
10 Fuel hose / Pipe I I I R I I I R I I
11 Accelerator and carburetor cable play Adjustment A A A A A A A A A A A
12 Rubber hose, Air filter to Carburetor I I I I R I I I R I I
13 Rubber hose, Inlet manifold I I I I R I I I R I I
14 Inlet / Exhaust valve seating I I
15 Cylinder head D
16 Exhaust system D
17 Clutch free play Adjust every 1000 Kms or earlier as required
18 Rear brake pedal pivot L L L L L L L L L L L
19 Battery terminals (apply petroleum jelly) C C C C C C C C C C C
20 Battery Electrolyte level I I I I I I I I I I I
21 Earth wire eyelet (behind battery carrier) I I
DESCRIPTION
Kms (x 1000) 0.5 3 6 9 1 2 15 18 21 24 2 7 3 0
Months 1.5 3 6 9
FREE SERVICE
whichever is earlier
PAID SERVICE
A : Adjust C : Clean D : De-carbonise I : Inspect L : Lubricate R : Replace

30
P E R I O D I C A L
M A I N T E N A N C E
S.
No.
22 Rear Chain
23 Front Fork oil I R I R I
24 Hand levers & kick starter pivot Lubricate every 1000 Kms or earlier as required
25 Rear brake play Adjust every 1000 Kms or earlier as required
26 Rear brake cam L L L L L
27 Steering ball races / Play Adjustment A L A L A
28 Spokes tightness & Wheel rim run out front / rear I I I I I I I
29 Swing Arm spacer & pivot bush L L L R
30 Tyre wear Front / Rear I I I I I I I I I I
DESCRIPTION
Kms (x 1000) 0.5 3 6 9 1 2 15 18 21 24 2 7 3 0
Months 1.5 3 6 9
FREE SERVICE
whichever is earlier
Lubricate &Adjust every 1000 Kms or earlier as required
Clean, Adjust & Lubricate every3000 Kms or earlier as required
Check level every 3000 Kms or earlier as required
PAID SERVICE
R
A : Adjust C : Clean D : De-carbonise I : Inspect L : Lubricate R : Replace
NOTE : For Maintenance after 30,000 Kms, Please repeat the same frequency specified above, in
consultation with a Royal Enfield Authorised Service Centre.

31
R E C O M M E N D E D
L U B R I C A N T S
Engine Oil
Grade MOTUL 3000, 4 T Plus ,15 W 50 API SL Grade, JASO MA
Capacity 2.75 Litres
Front Fork Oil
Grade Royal Enfield Front Fork Oil (Endurance-1F grade Fork Oil)
Capacity 195 ml/leg
Brake Fluid
Grade DOT 3 or DOT 4
Capacity 60 ml
CAUTION :
Use of Wrong grade oil can reduce the life of the moving parts and seriously affect performance.
NOTE :
Recommendation subject to change without notice.
* Common oil for Engine, Gear box & Clutch

32
D O I T Y O U R S E L F
The following simple maintenance activities will
help in maintaining your motorcycle. However
for an elaborate maintenance, we recommend
you to get in touch with an Authorised Service
Centre.
CONTROL CABLES
Lubricate after using the motorcycle in rain,
after waterwash or if used in dusty conditions.
HAND LEVER & KICK STARTER PIVOTS
Wipe the area free of dirt / grease.
Apply a few drops of oil on the pivots.
CENTRE / SIDE
STAND PIVOTS
Apply a few drops of oil
on t h e p i v o t s afte r
clea n i ng t he area o f
dirt.

33
D O I T Y O U R S E L F
DRIVE CHAIN
Clean the drive c hain carefully of dirt. Apply
few drops of 90 grade oil while simultaneously
rotating the rear wheel. Wipe off the excess oil.
OIL LEVEL INSPECTION
Place motorcycle on its centre stand on a firm
surface.
Warm up engine for a few minutes & switch
off before checking oil level.
The level is correct if the oil level is in the
middle of the oil level window.
Top up with recommended oil if required.
CAUTION :
Use of wrong grade
or spurious oil can
seriously affect
m o t o r c y c l e
performance &
damage to moving
parts
M AX
MI N
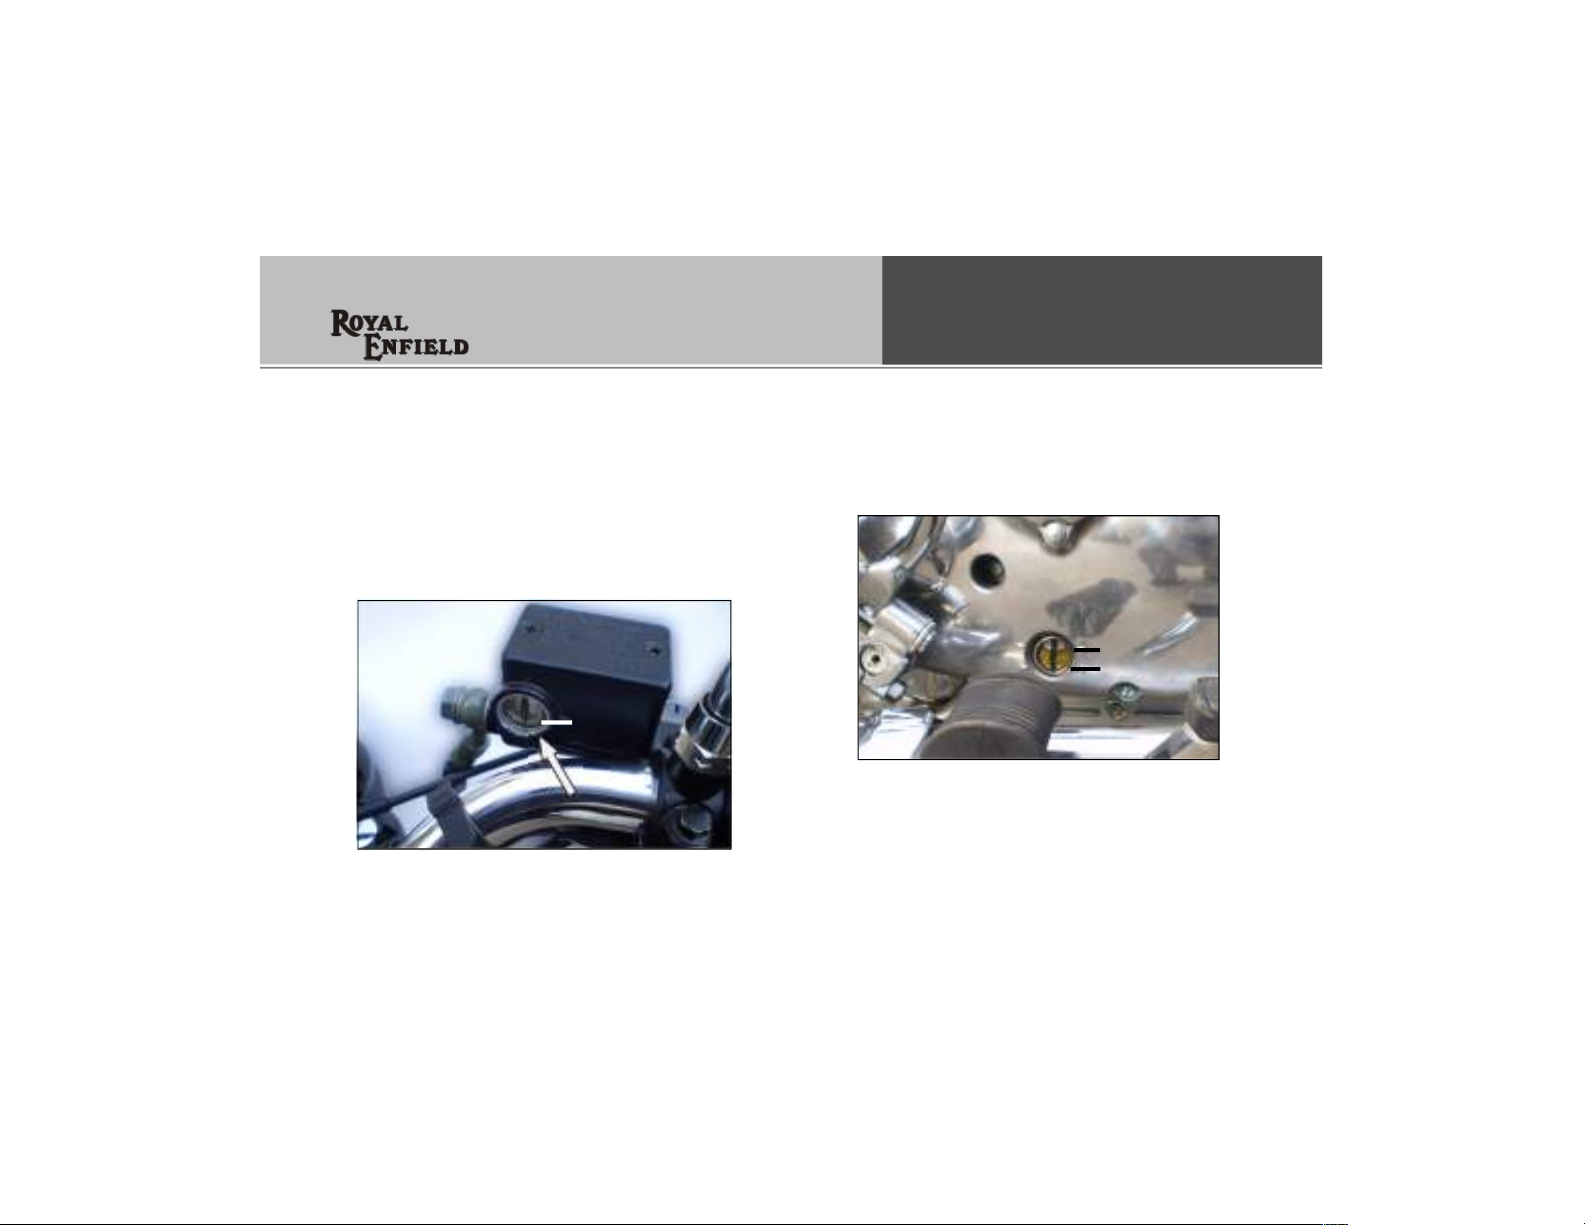
BRAKE FLUID
Check if oil is below
‘MIN’ level. To top up,
Re m o v e c o v e r a n d
diaphragm.
Top up with DOT 3 or
DOT 4 as specified.

34
D O I T Y O U R S E L F
SPARK PLUG
Cleaning and adjusting Plug gap
Two spark plugs are
prov i d ed in you r
vehicle
Remove s pa rk plug
usin g the p l ug
spanner and tommy
bar.
Clean the insulator
tip and electrodes of
the plu g car e f ully
usin g a poi n t ed
scraper or spark plug
cleaner.
Refit the spark plug
on the cylinder head.
Repeat the above procedure for the secondary
sparkplug.
Set the gap between 0.7 to 0.8 mm.
INSPECTION OF TYRES AND WHEELS
Inspect the tyres periodically for tread wear,
cracks and cuts.
Minimum tread depth :
Front tyre : 1mm Rear tyre : 2 mm
Check and remove stone, splinters, nails or
other particles embedded in the tyre treads.
Bal d spots / swell i ng ma y be caus e d by
internal da m a g e . Re p l a c e the ty r e s , if
defective .
Pe r i o d i c a l l y in s p e c t wheels fo r spokes
breakage and wheel rim run out.
Check proper seating of the tyre beading on
the rim whenever the tyre is reassembled.
Whenever a new tyre is installed, ensure rim
and spokes do not get damaged on account
of using wrong levers.
Use only standard tyres & tubes inflated to
correct pressure.

35
D O I T Y O U R S E L F
Tyre Pressur e
Front Rear
Solo 1.41 kg/cm2(20 PSI) 2.11 kg/cm2(30 PSI)
With Pillion 1.55 kg/cm2(22 PSI) 2.20kg/cm2(32 PSI)
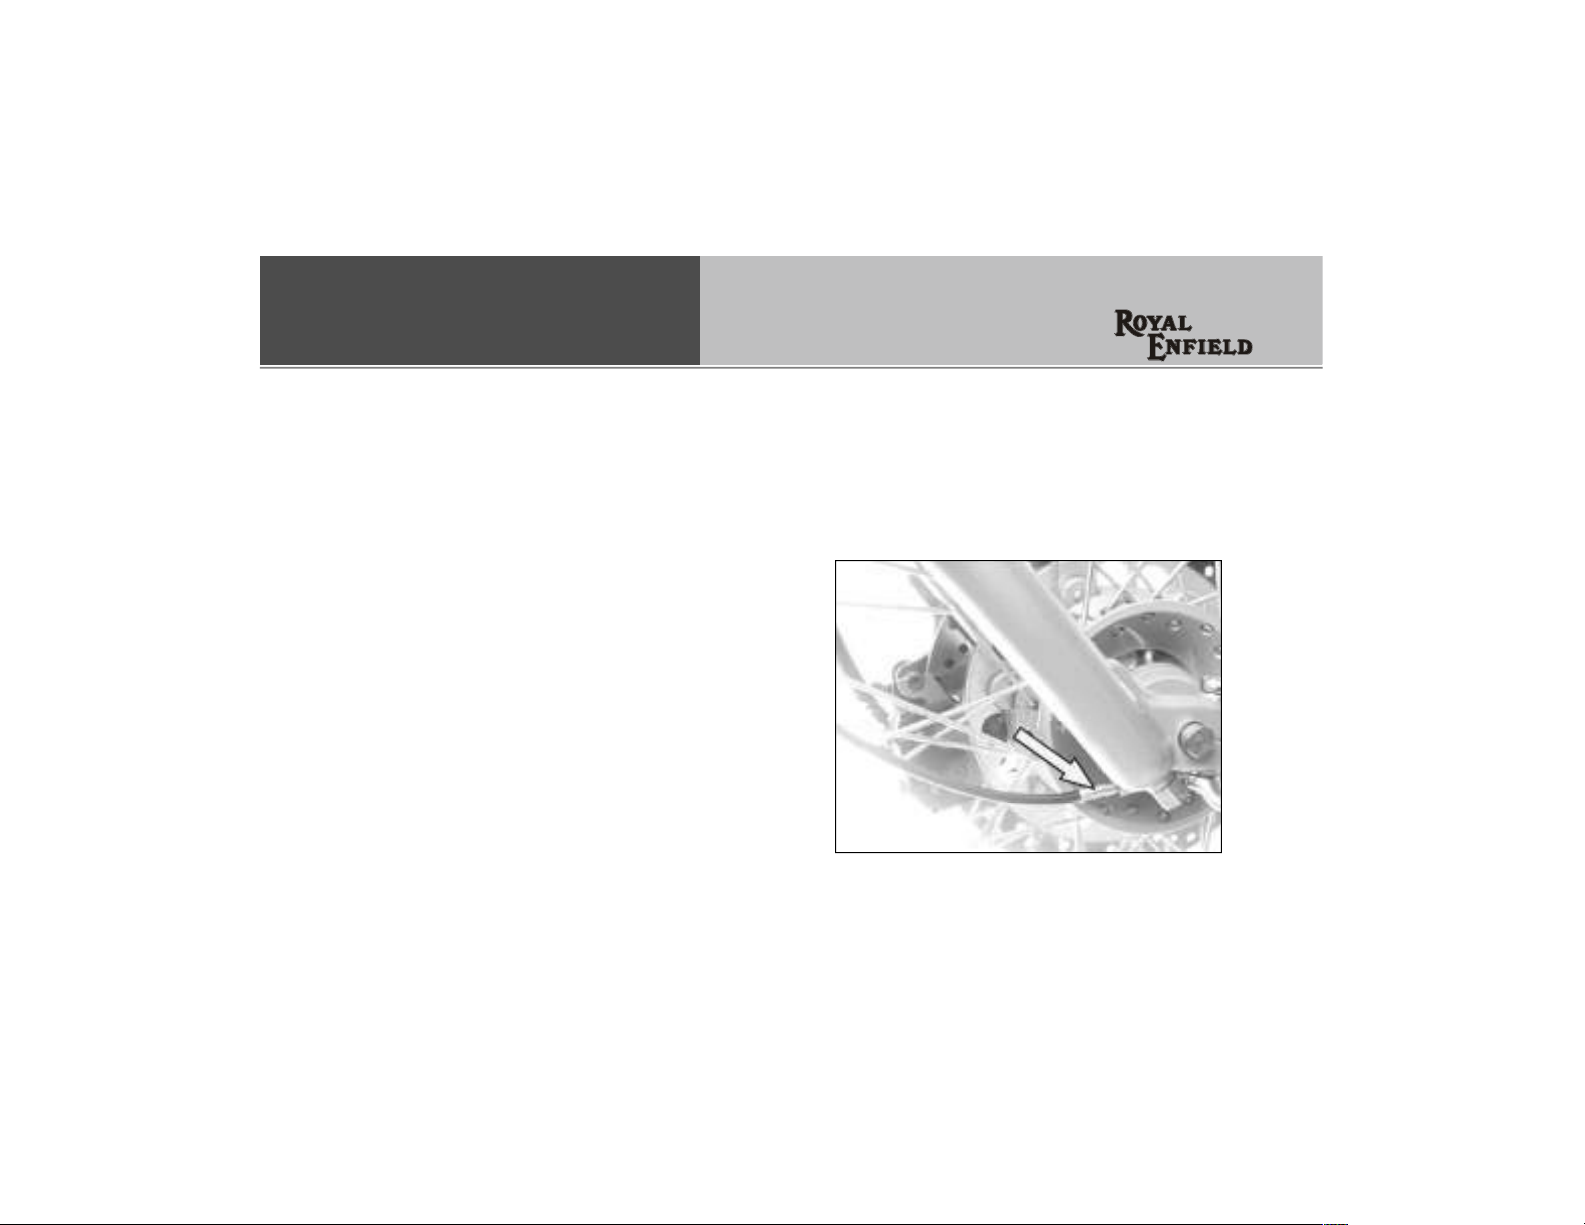
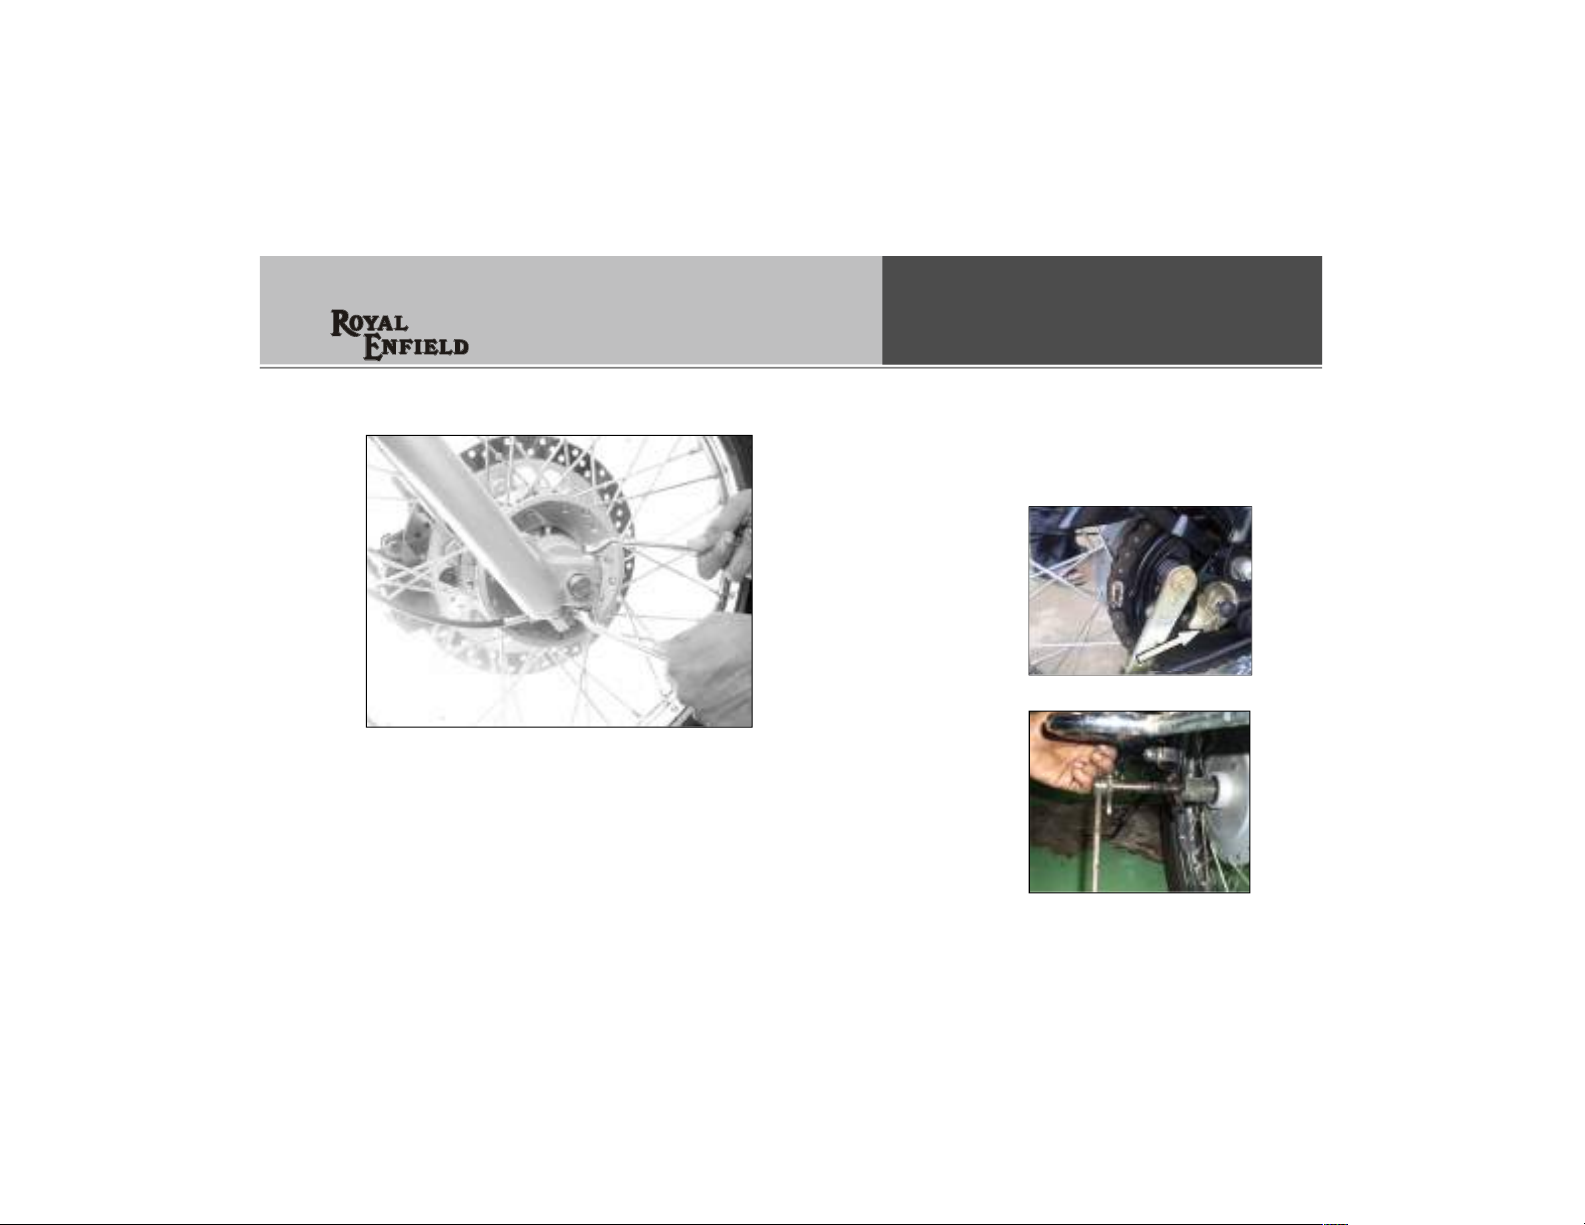
FRONT WHEEL REMOVAL
Place the vehicle on center stand
Place a wooden block the front end of engine
to support the vehicle.
Disconnect speedo cable.
Loosen the pinch bolt on the RH fork guide.
Remove the axle nut along with washer.
Tap and remove the front wheel spindle
Tilt the vehicle to RH Side and take out the
wheel along with speedo drive and RH side
spacer.
Take out Speedo drive and bush on the RH
side.
36
D O I T Y O U R S E L F
Place a 4 mm thick wooden piece or cardboard
sheet between the brake pads to avoid brake
pads getting locked.
CAUTION :
Do not press the front brake lever when wheel is
removed as this will result in brake pads getting
locked.
FRONT WHEEL REASSEMBLY
Remove the wooden piece / card board sheet
placed between the brake pads.
Place the speedo drive bush in position and
place speedo drive over it.
Insert the wheel along with speedo drive and
RH space r be twe e n t he front fork en ds
ensuring that the brake disc is located between
the brake pads.
Insert and tap the front wheel axle gently
inside.
Refit the washer and tighten the nut firmly.
NOTE :
Ensure that the speedo drive is correctly located
such that the cable can be connected without
difficulty.
37
D O I T Y O U R S E L F
Tighten the pinch bolt on the RH fork guide.
Ro tate the whee l and che c k for sm o oth
rotation.
Connect the speedo cable to speedo drive and
check for proper working of speedo meter.
REAR WHEEL REMOVAL
Place vehicle on center stand on a firm and
flat surface.
Note and mark the p ositi on of the chain
ad j us t e r b u tting
with the stopper on
the right side.
Remove split pin
and castle nut on
the RH side.
R e m o v e whee l
sp i n d l e f r o m LH
si d e along wi th
ch a i n a d j u s t e r ,
taking care not to
dr o p the w h e e l
co l lar and spa cer
from the RH side of
the wheel.
Ti lt vehic le to LH
side and sli de out
rear wheel.

38
D O I T Y O U R S E L F
REAR WHEEL REASSEMBLY
Ensure the four cush rubbers are in position
inside the rear wheel
hub.
Ti lt vehicle to rig ht
and i n s e rt w h e e l
assembly between the
swing arms.
P o s i t i o n t h e rea r
wheel w i t h c u s h
rubber on the r e a r
chain sprocket.
Hold wheel collar and spacer in position.
Insert the wheel spindle along with chain
adjust er fro m the LH side of ve hicle and
gently tap it through the wheel.
Ensure that the mark on the chain adjuster
notch butts with the stopper.
Tighten the castle nut firmly and ensure that
the hole on axle shaft and the slot on castle
nut are aligned to enable split pin fitment.
Fit the split pin.
CAUTION :
Do not force the spindle into the wheel as
the threads may get damaged. Tap it through
the wheel gently.
REAR BRAKE PEDAL HEIGHT
Loosen the lock nut
Turn in or out the
pedal stop pin till
the brake pedal and
front foot rest are
in the same height
as shown in fig.
Ti ghte n t he loc k
nut
Ch e c k f o r f r e e
rota t ion of r e a r
wheel.
20 to 30 mm

39
D O I T Y O U R S E L F
REAR BRAKE
Turn in or out the adjuster nut at the brake
rod end. The recommanded brake pedal travel
is 20 - 30 mm.
Check that the brake is not binding and the
rear wheel rotates freely.
DRIVE CHAIN TENSION (Play 25-30mm)
R e m o v e r e a r
wheel split pin.
Loosen castle
nut, spindle
nut, a n c hor
nut and brake
rod nut.
Turn the adjuster cams on both sides, till 25
to 30 mm slackness is achieved.
Check and ensure that the number of notches
from the punch mark on the cam to the notch
resting on the pin are equal on both sides.
Apply brake and tighten all nuts.

40
D O I T Y O U R S E L F
WHEEL ALIGNMENT
Hold the vehicle upright off the stand on a
level ground.
Stre tch a string about 100 mm above th e
ground along the wheels.
If the string touches two points on the rear
whee l and two points on the front whe el
(4 point contact) then the wheels are aligned.
If the string touc hes only three points on
the two wheels, the alignment is incorrect.
Adju s t the rear wheel, us i n g the c hain
adjuster cams till the string touches four
points.
ADJUSTMENT OF REAR GAS SHOCK
ABSORBER
The rear gas shock absorber is of adjustable
type i.e., the spring tension can be increased
or reduced.
I n c r e a s e the
spr i ng te n sion
for high speed,
hig h l o ad
operation.
R e d u c e th e
spr i ng te n sion
for lo w sp e e d ,
low lo a d
operation.
The adjuster provided on the bottom of the
spring has five notches.
To ca r ry o ut th e adju s tme n t p roce e d as
follows :

41
D O I T Y O U R S E L F
Insert ‘C’ type spring adjuster tool in the
shocker shot a n d ro t a t e in requi r e d
direction.
Turn the adjuster such that the adjuster
moves up to increase the spring tension
and v i c e versa to re d u c e the s p r ing
tension.
Adj ust bot h lef t ha nd and right han d
shock absorbers so that the same notch
rests on the pin in both.
WARNING
Riding the motorcycle with the notches adjusted
in different positions can cause loss of control
and may lead to an accident.
REMOVAL OF BATTERY FROM THE
VEHICLE
I n s e r t t h e key
into the b at tery
co v e r l o c k , L H
Sid e t u r n
ant ic l o c k w i se
and hold it there.
R e m o v e t h e
ba tte r y c o v e r
o u t w a r d s
br in g i n g down
off from the lock
peg on top.
Dis conne ct bot h
the t e r m i n a l
wires . (posit i v e
and negative)
Remo ve the bolts on either side and ope n
cover. Then take out the Battery

42
D O I T Y O U R S E L F
BATTERY &
MAINTENANCE
T h e v e h i c l e i s
pro v i d e d wi th
12V - 14 AH (for
E-Sta r t ) a n d
12V - 5 AH (for
Kick Start)
P e r i o d i c a l l y
check the Battery for
- Cleanliness and corrosion free terminals.
- Electrolyte level in each cell.
If electrolyte level is low, top up with distilled
water.
CAUTION :
Electrolyte shall be filled only between minimum
& maximum levels indicated in battery as “min”
& “max” respectively. Usage of battery wi th
electrolyte below the minimum level will damage
ba tter y int erna ls and elect rolyte ab ove the
maximum level will result in spillage of acid.
Use only distilled water meant for use in batteries
to avoid damage to battery.
REASSEMBLY OF BATTERY ON VEHICLE
Con nect the posit ive te rmi nal (Both Red
wire).
Connect the negative terminal (Green & Black
wire).
Smear the terminals with petroleum jelly.
Close the battery cover and tighten the bolt
Position the battery cover over the battery
such that it engages with the lock peg on
top.
Push the lock assembly inside the locator.
Turn the key clock wise to lock the battery
cover. Then release the key.
CAUTION :
Do not use battery with low electrolyte level
as the battery internals will get damaged.
Do not overfill the battery electrolyte as it will
spill ot through the over flow pipe and cause
corrosion to vehicle parts.

43
Use only distilled water meant for use in
batteries to avoid damage to battery.
Clean the wire terminals free of corrosion and
keep the terminals coated with petroleum jelly.
CHANGING ELECTRICAL COMPONENTS
HEAD LAMP BULB
CAUTION :
Never touch the bulb with your finger. Finger
prints will etch the glass and decrease bulb life.
Hence, it is recommended to grab the bulb with
paper or clean dry cloth during handling.
REMOVING THE HEADLAMP
Loosen the rim holding screw on top and take
out the headlight reflector.
Unscrew and remove the bulb holder.
D O I T Y O U R S E L F
Pull out the bulb.
Replace bulb and assemble in the reverse order.

44
D O I T Y O U R S E L F
TAIL LAMP BULB
Remove the
tail lamp
cover screws.
Unscrew and
pull out the
bulb.
Replace bulb
and as semble
in the reverse
order.
TRAFFICATOR BULB
Re mo ve the screws & take out trafficator
glass cover.
Press bulb gently & Turn anticlockwise to
take out the bulb.
Position the new bulb inside holder, ensuring
that the holder, ensuring that the pins in the
bulb, match with the slots in the holder.
Press the bulb
and tu r n
cl oc k w i s e t o
lo ck the bul b
in the holder.
R e f i t the
t r a f f i c a t o r
co v e r a n d
screws.
FUSE
Open the LH
tool box
Open the fuse
carrier
Replace fuse
and close the
Tool box.

45
W A S H I N G
P R O C E D U R E
PRECAUTIONS
Wash vehicle when the engine is cold.
Cover the silencer, tail pipe, carburator, horn
and control switch es with suitable plastic
bags and tie it firmly to prevent water entry.
Remove ignition key and seal key hole using
adhesive tape.
Brush engine area with kerosene / die sel to
remove dirt or grease.
Use low pressure jet of water to clean the
vehicle or engine.
Never spray water with great force on head
lamp, speedometer, flasher lights, front and
rear wheel hubs, electrical connections and
wires, control cables, carburettor, sparkplug,
battery etc.
Do not apply kerosene or diesel on painted
parts or rubber parts.
Use luke warm water and mild detergent on
the painted components to remove dirt, etc.
Rinse vehicle thoroughly with plain water to
remove the detergent and wipe vehicle dry.
If possible, use compressed air and blow off
water particles from the obscure areas of the
vehicle, electrical connections etc.
AFTER WASHING
Ens ure , the vehicle is thro ugh ly dr y b y
wiping with a clean soft absorbent cloth or
chamois leather.
Remove all plastic bags and adhesive tapes.
Lubricate control cables, pivot and rear chain
with lube oil
Polish the painted and plated surfaces using
polishing wax.
Start engine and allow to run at idling speed
for a few minutes to warm up engine.
Drive the motorcycle slowly, applying both
brakes intermittently to dry up the brake
shoes.
Test brakes for its efficiency.

46
S T O R A G E
P R E C A U T I O N S
Incase your Motorcycle is not going to be used
for a month or more, we advice the following
precautions to the taken.
Carryout required repair / adjustments on the
motorcycle.
W a s h t h e m o t or c y c l e thoroug h l y a n d
lubricate as per the maintenance chart.
Drain fuel tank, fuel line and carburettor.
Keep the fuel tap in closed position and spray
motor oil inside the fuel tan k to pre vent
rusting.
Remove spark plug. Pour in about 25ml of
clean engine oil through spark plug hole.
Close the hole and crank engine several times
and refit sparkplug.
Clean rear chain thoroughly and apply a thin
film of lub oil.
Re move ba ttery fro m the bike. Clean the
terminals free of corrosion.
Maintain electrolyte level between max or min
mark, by adding distilled water and wipe the
battery dry.
St ore the batte ry in a cool, dry and wel l
ventilated place.
Do not place the battery in direct sun light,
near open flame or where temperature is
above 40oC or below 0oC
Cover the silencer with plastic bags to prevent
moisture entry. Set the motorcycle on its
center stand.
Apply a thin film of oil on the engine barrel
fins, cylinder head fins and other painted
parts.
Apply anti rust solutions on all plated parts.
Take care not to apply this solution on rubber
or painted parts.
Store motorcycle in a clean covered area free
- of moisture and keep it covered to prevent
dust settling on it.

47
S T O R A G E
P R E C A U T I O N S
PREPARING THE MOTORCYCLE FOR
REUSE
Remove the anti rust solution from all plated
parts and clean the motorcycle well.
Inflate the tyres to the correct tyre pressure.
Ensure battery is fully charged and proper
electrolyte level is maintained.
Connect the battery.
Lubricate all control cables and pivots.
Check proper level of oil in engine.
Clean and remove the motor oil from tank
and fill tank with fresh petrol.
Clean carburettor and air filter.
Remove plastic covering from the silencer.
Remove spark plug on cylinder head and pour
in a few drops of engine oil. Crank engine a
fe w times to lubri cate cyli nder walls and
piston. Clean spark plug and refit.
Switch on ignition switch.
Start vehicle and warm up engine for a few
minutes before riding the vehicle.
NOTE :
Do not raise the engine rpm the moment it is
star ted, allow the engine to run at idling
speed.

48
L O N G T R I P
P R E C A U T I O N S
Checks prior to the commencement of
long journey
Service the motorcycle thoroughly a Royal
Enfield authorised service centre as per
periodical maintenance chart.
Sufficient quantity of petrol in the fuel tank
for the journey planned.
Correct tyre pressure.
Checks after every 1500 kms of run
Tightness of all fasteners.
Tyre tread condition and wear of tyres.
Battery condition and electrolyte level.
Working of all lights and horn.
Correct oil level in engine.
Proper chain tension.
Items to be carried
Tool kit
First aid kit.
Bulbs for Headlight, Trafficator light, Rear
Tail Lamp and Fuse.
Accelerator, Clutch and Speedo Cable.
Rear chain link master lock assembly.
Spare tube, tyre puncture repair kit - cold
vulcanising type.
Foot operated air pump.
Insulation tape.
Spark plug, spark plug cap, fuel hose.

49
C A R I N G F O R
M I L E A G E
STOP THE DROP THAT LEAKS
Petrol leak at a rate of one drop per minute
accumulates to 5,25,600 drops a YEAR! That
is, 35 ltrs of Petrol.
Petrol leaks cause raw petrol smell. Get the
leaks arrested immediately.
USE RECOMMENDED FUELS AND OILS
ONLY
Wrong grade or adulterated petrol does not
burn fully and results in heavy smoke, high
rate of carbo n deposition in cylinder and
exhaust system and low mileage.
Wrong grade and inferior quality oils do not
lubrica te we l l. Th e moving pa r t s wear
prematurely.
Always use recommended fuels and oils only.
RIDE AT COST EFFECTIVE SPEED
Cost effective speed (in top gear) is 45 to 50
Km per hour.
Both lower and higher road speeds cause low
kilometers per litre of petrol.
PERFORM PREVENTIVE MAINTENANCE AS
PER RECOMMENDATIONS
REGULAR PREVENTIVE MAINTENANCE
ENSURES :
Correctly inflated tyres.
Fasteners tightened to correct torques.
F r e e l y m o v i n g e n g i n e & tr a n s mi s s i o n
components.

50
C A R I N G F O R
M I L E A G E
Properly tuned and adjusted engine.
CUT OFF NEEDLESS LOW IDLING
Ten minutes of low idling wastes 70 ml. of petrol.
So cut off the engine when you know you have
to wait for one minute or more.
STOP
Revving : Ten revvings wastes 20 ml. of
petrol
Ra cing starts : Ten racing starts wastes
150 ml. of petrol.
Sud den acce l era tio n : Ten sudde n
accelerations wastes 100 ml. of petrol.
STOP BRAKE RIDING
Brake riding pushes the brake shoes / pads
to come in contact with revolving drum / disc.
To overcome the resulting fric tional load,
engine burns additional petrol.
Result : Low mileage, loss of power, faster
wear of brake shoes / pads and drum / disc.
NEVER CLUTCH RIDE
Clutch riding slips the clutch & engine drive
does not get totally transferred to the rear
wheel. Besides low mileage, clutch ridi ng
ends up with burnt friction plates of clutch,
loss of power and engine overheating.

51
C A R I N G F O R
M I L E A G E
AVOID FREQUENT BRAKING
Braking arrests the road speed. Motorcycle
mo me ntum is reduc ed. Add itional fuel is
burnt for subsequent acceleration.
For better mileage, use front and rear brakes
only when absolutely needed. Control vehicle
speed with throttle and gear like smart riders
always do.
AVOID OVER LOADING
Over loading tires the engine, wears the parts
faster and reduces mileage.
PARK YOUR VEHICLE IN SHADE WHEN
NOT IN USE
Petrol is highly volatile. It evaporates under
nor m a l a t m o s p h e r ic t e m pera t u r e . T h e
evapo r t i o n increases with t e m peratur e .
Prevent this loss by always parking your
vehicle under shade.
Too few Kms. running per day allows more
time for evaporation affecting the mileage.

52
COMPLETE WIRING DIAGRAM
K I C K S T A R T

53
COMPLETE WIRING DIAGRAM
E L E C T R I C S T A R T

54
T R O U B L E
S H O O T I N G
CAUSES REMEDIES
I. ENGINE FAILS TO START
1) Ignition switch in ‘OFF’ Position ............................ Switch on ignition.
2) Stop switch in ‘OFF’ Position .................................. Push stop switch to ‘ON’ position.
3) Clogged fuel line / tap .............................................. Clean the fuel line / tap.
4) Vent hole clogged in fuel tank cap ......................... Clean vent hole.
5) Carburetor passage & jets blocked ....................... * Dismantle carburetor & clean jets
.................................................................................. / passages
6) Carburetor float stuck in closed position ............... Ensure correct movement of float
7) Spark plug cap / lead not connected ........................ Fix cap / lead firmly
8) Loose HT connections .............................................. Fix connections firmly
9) HT Lead Damaged .................................................. * Replace HT Lead
10) Spark plug electrode dirty / fouled .......................... Clean spark plug & Reset gap.
11) Spark plug insulation cracked ................................ Replace spark plug
12) Poor compression :
- Auto Decompressor not working ........................ * Ensure free motion of flyweight in exhaust
.................................................................................. cam gear assembly
* Contact Dealer / Authorised Service Centre

55
T R O U B L E
S H O O T I N G
CAUSES REMEDIES
- Loose spark plug ................................................. * Tighten spark plug.
13) Clutch slipping ....................................................... * Adjust clutch cable free play
II. ENGINE MISFIRING
1) Water in petrol tank/carburetor ............................ * Clean carburetor / petrol tank. Fill tank
.................................................................................. with fresh petrol.
2) Leak through intake hose ....................................... Tighten rubber hose suitably.
.................................................................................. Replace if necessary
3) Loose spark plug cap ............................................... Fix cap / lead firmly
4) Spark plug fouled/insulation broken ...................... Clean / reset gap or, replace.
5) Poor Compression .................................................. * Auto decompressor sticky or
.................................................................................. not working
III. ENGINE STARTS, BUT RUNS IRREGULARLY & STOPS
1) Faulty fuel supply ................................................... Clean the fuel line / tap / vent hole
2) Very low idling speed ............................................... Increase idling speed
* Contact Dealer / Authorised Service Centre

56
T R O U B L E
S H O O T I N G
CAUSES REMEDIES
IV. POOR PICKUP
1) Accelerator cable free play excessive ...................... Adjust cable free play
2) Faulty fuel supply .................................................... Clean the fuel line / tap / vent hole
3) Choked air filter ....................................................... Clean / Replace air filter
4) Loose carburetor mounting ..................................... Tighten clamps firmly
5) Brakes adjusted too tight ...................................... * Re-adjust properly
6) Rear chain adjusted too tight ............................... * Re-adjust properly
7) Clutch Slipping ....................................................... * Adjust clutch cable free play
8) Under inflated tyres ............................................... * Inflate to correct pressure
9) TPS setting ............................................................. * Retard / Wrong setting
V. WHITE/BLUE SMOKE
1) Oil level in RH Crankcase cover window ................
above “MAX” line .................................................. * Check and drain excess oil
* Contact Dealer / Authorised Service Centre

57
T R O U B L E
S H O O T I N G
CAUSES REMEDIES
VI. ENGINE OVERHEATING
1) Cylinder fins not clean ............................................ Clean the cylinder fins at
.................................................................................. regular intervals
2) Clutch slipping ....................................................... * Check and correct
3) Suction leakage ...................................................... * Check and correct
4) Incorrect carburetor adjustments ......................... * Check and correct
5) TPS setting ............................................................. * Advance / wrong setting
VII. EXCESSIVE FUEL CONSUMPTION
1) Fuel leakage ........................................................... * Check and rectify
2) Worn out carburetor jets ....................................... * Change the defective jets
3) Incorrect carburetor adjustments ......................... * Check and adjust correctly
4) Choked air filter ....................................................... Clean / Replace
5) Poor compression ................................................... * Auto decompressor sticky or
.................................................................................. not working properly
6) Under inflated tyres ................................................. Inflate to correct pressure
7) TPS setting ............................................................. * Over advance / wrong setting
* Contact Dealer / Authorised Service Centre

58
T R O U B L E
S H O O T I N G
CAUSES REMEDIES
VIII. IGNITION KNOCK
1) Carburetor adjusted too lean ................................ * Check and readjust
2) Suction leakage ...................................................... * Check and correct
IX. BRAKES POOR
1) Not adjusted properly ............................................ * Adjust properly
2) Oil / grease on lining or drum or disc .................. * Clean and refit
3) Linings worn / uneven worn ................................. * Replace lining / pad
4) Drum scored / uneven wear ................................... * Rectify or replace drum
X. VEHICLE WOBBLES
1) Wheel rim runout ................................................... * Rectify
2) Loose / Broken spokes ........................................... * Tighten / Replace spokes
3) Tyres not fitted correctly ....................................... * Refit tyres correctly
4) Wheels misaligned ................................................. * Ensure proper alignment
5) Under inflated tyres ................................................. Inflate to correct pressure
* Contact Dealer / Authorised Service Centre

59
CAUSES REMEDIES
XI. Electricals
Bul bs do not l ight
1) Loose / improper connection .................................. * Check and correct
2) Bulb fused .............................................................. * Replace bulb
3) Fuse blown ............................................................. * Replace fuse
4) Switch defective ...................................................... * Replace switch
Horn not working
1) Loose connections .................................................. * Check and correct
2) Requires tuning ..................................................... * Tune horn
3) Switch Defective ..................................................... * Replace
Trafficators not working
1) Loose / improper connections .................................. Check and correct
2) Bulb fused ................................................................ Replace
3) Switch defective ...................................................... * Replace
4) I.C. Flasher defective ............................................. * Replace
Brake light remains on
(1) Switch not adjusted properly ................................ * Adjust switch properly
(2) Switch sticky .......................................................... * Replace switch
* Contact Dealer / Authorised Service Centre
T R O U B L E
S H O O T I N G

60
T R O U B L E
S H O O T I N G
CAUSES REMEDIES
XII. ELECTRIC START
Ve h i c l e no t st arting
(1) Neutral indicator not glowing ................................ Bring the vehicle in neutral
(2) If vehicle is without neutral indicator ................... Press the clutch lever & start switch together
(3) Loose Connection ................................................... * Check & Correct
(4) Starter relay not working ..................................... * Check & Replace
(5) Malfunctioning of clutch switch ........................... * Check & Replace
(6) Malfunctioning of Starter switch ......................... * Check & Replace
(7) Battery discharge .................................................. * Check & Recharge
(8) Motor not working ................................................ * Check & Replace
(9) Battery not fully charged ...................................... * Check & charge
(10)Failure of sprag clutch .......................................... * Check & replace
* Contact Dealer / Authorised Service Centre

61
W A R R A N T Y T E R M S &
C O N D I T I O N S
Royal Enfield Motor Cycles are manufactured by following best Quality practices in respect of the
material and workmanship.
Royal Enfield (RE) warrants Bullet Electra 350 UCE motor cycle to be free from manufacturing and
material defect under normal use subject to following conditions.
1. RE will replace or repair defective part / parts at their authorised Dealers, Service point, free of
charge within a period of 12 months from the date of sale (date of Installation) or 10,000 kms
whichever occurs earlier.
2. The warranty is applicable only to first registered owner.
3. The warranty shall be applicable only if all the free services are availed at the respective period /
kilometer range as per the schedule given in the owner’s manual from RE Dealers/ authorised
service points.
4. During the warranty period, RE’s obligations shall be limited to repairing / replacing free of charge
such part or parts of the vehicle, which on examination to have manufacturing defect. Such defective
part / parts which have been replaced become property of RE.
5. Cost of oil, oil filter, fuel and other consumables are chargeable to the customer.
6. Claims on proprietary items like tyres, tubes, spark plug, battery etc. should be taken up with
respective manufacturer or their authorised agents in the area directly by customer. RE shall not
be liable in any manner to replace them though their Dealers will provide assistance in preferring
such claims on their manufacturer.
7. Warranty shall not apply to:
(a) Normal ageing, detoriation or rusting of plated parts paints coat, rubber parts, soft items,
glass items, plastic parts etc.

62
W A R R A N T Y T E R M S &
C O N D I T I O N S
(b) Components like fuel filter, oil filter element, control cables, brake pads, brake shoes, clutch
plates, which are subjected to normal wear and tear.
(c) Damages due to use of lubricant / oil / grease etc. other than specified by RE.
(d) Damages due to use of non-genuine parts.
(e) Damages due to lack of proper maintenance of the vehicle.
(f) Damages due to incorrect driving or riding habits.
(g) Parts damaged due to accidents, collision, abuse etc.
(h) Irregularities not recognized as affecting the quality or function of the vehicle such as slight
vibration, oil leakage, blue discoloration of exhaust bent pipe / silencer / soft, hard shock
absorber etc.
(i) Defects arising from fitment of unauthorised / additional Electrical loads.
(j) Vehicle serviced / repaired at unauthorised service points.
(k) Vehicle used for competition / racing.
(l) Electrical component likes bulbs, fuses etc.
(m) Normal maintenance operations like adjustment of brakes, cleaning fuel system , engine tune
up and other such adjustments
8. RE reserves the right to finally decide on all warranty claims
9. RE reserves the right to make changes in Design of the vehicle without any obligation to install
these changes on previously supplied vehicles.

63
E M I S S I O N
W A R R A N T Y
In compliance with the provisions of Rule 115(2) of the Central Motor Vehicle Rules, 1989, Royal
Enfield certifies that the following warranty is applicable to those components liable to affect the
emission of the gaseous pollutants in its range of motorcycles, in normal use to which it may be
subjected to.
This emission warranty comes into force from 01st July 2001 and is valid for a period of 30,000 Kms.
or 36 months, whichever occurs earlier, from the date of sale to the first customer and is in addition to
and parallel to the warranty policy, conditions and obligations laid down in the Owner’s Manual.
Royal Enfield further warranty that if on examination by its authorised service center, the motorcycle
fail to meet the specified emission standards, then the authorised service center shall take necessary
corrective measures and shall at its sole discretion, repair or replace free of charge such components of
the emission control system to meet the required emission standards.
The method/s of examination to determine the warranty conditions of the emission warranty related
components will be at the sole discretion of Royal Enfield and / or our authorised service centers and
results of such examination will be final and binding. If on examination the warranty conditions of the
part/s is/are not established, Royal enfield will have the right to charge all, or part of the cost of such
examination to the customer in addition to the cost of the components.
In case of acceptance of the component/s under Emission warranty, Royal Enfield will replace free of
charge, the component/s as required. However, the consumables like fuel, lubricants, solvents, etc
shall be chargeable to the customer as per actuals.
In case any of the components covered under emission warranty or the associated parts, are not
independently replaceable, Royal Enfield will have the sole discretion to replace either the entire assembly
or parts of the assembly, through suitable repairs.
Royal Enfield reserves the right to carry out necessary consequential repairs to the motorcycle or

64
E M I S S I O N
W A R R A N T Y
replace any part, in addition to the repair or replacement of the components covered under emission
warranty, to establish compliance to in-use emission standards. Such repairs / replacements will be
chargeable to the customer.
All parts removed for replacement under warranty will become the property of Royal Enfield.
Royal Enfield will not be responsible for the cost of transportation of the motorcycle to the nearest
authorised service center OR for any loss due to non availability of the motorcycle during the period of
examination and repairs by Royal Enfield and / or their Authorised Service centres.
Royal Enfield will not be responsible for any penalties that may be charged by statuatory authorities
on account of failure to comply with the in-use emission standards.
That cost/s incurred to check emission of the motorcycle will have to be borne by the customer.
Emission warranty will be applicable irrespective of the change of ownership of the vehicle provided
all the conditions as laid down in this document are met from the date of original sale of the motorcycle.
The warranty shall apply if the customer :
Observes all the important instructions and any other precautions listed in the owner’s manual.
Under all circumstances uses lubricants and fuel as recommended by Royal Enfield.
Regularly obtains and carries out maintenance in accordance with Royal Enfield guidelines and
enters the details in the Log book.
Immediately approaches the nearest authorised service centre upon discovery of failure to comply
with the IN-USE emission standard inspite of having maintained and used the vehicle in accordance
with the instructions in the owner’s manual and having carried out such repairs and adjustments
as may be required with a view to establish such compliance.
Produces the ‘Pollution Under Control’ certificate valid for the period immediately preceding the

65
E M I S S I O N
W A R R A N T Y
test during which the failure is discovered, the test having been carried out either for obtaining a
new certificate or pursuant upon being directed by an officer as referred to in sub rule (2) of rule
116 of the Central Motor Vehicles Rules (CMVR).
Produces the owner’s manual and Log book for verification details.
Produces receipts covering maintenance of the motorcycle is specified in the owner’s manual from
the date of original purchase of the vehicle.
Produces valid certificate of Insurance and R T O registration certificate.
The Emission warranty shall not apply IF :
A valid “Pollution under control” certificate is not produced.
The motorcycle is not serviced by authorised service centers as per the service schedule described in
the maintenance chart.
The motorcycle has been subjected to abnormal use, abuse, neglect and improper maintenance or
has met with an accident.
Replacement parts not specified and approved by Royal Enfield have been used.
The motorcycle, or parts thereof, has been altered, tampered with or modified or replaced in an
unauthorised manner.
The odometer is not functioning or the odometer and / or its reading has been changed / tampered
with, so that the actual distance covered cannot be readily determined.
The motorcycle has been used for competitions, races, and rallies or for the purpose of establishing
records.
On examination by Royal Enfield or its authorised service centers, if the motorcycle shows that any

66
E M I S S I O N
W A R R A N T Y
of the conditions stipulated in the Owner’s manual with regard to use and maintenance have been
violated.
The motorcycle has been run on adulterated / leaded fuel or lubricant other than those specified by
Royal Enfield in the Owner’s manual or any other document given to the customer at the time of
sale of the motorcycle.
The emission related components are tampered with.
All service and parts related bills and vouchers incurred during the tenure of the emission warranty
is not produced.
All maintenance activities carried out on the vehicle during the tenure of the emission warranty is
not entered in the log book.
Tips to be on the right side of Law
Always get your vehicle checked to meet the emission regulations through and authorised emission
checking center.
Always carry a valid ‘Pollution Under Control’ certificate with you at all times during the validity
of the emission warranty (30,000 Kms / 3 years from the date of first sale)
Tips to reduce pollution
1. Ensure that the periodical maintenance is carried out as stipulated in the owner’s manual through
a Royal Enfield authorised service center.
2. Use only Unleaded petrol (> 87 Octane) from reputed fuel pumps.
3. Ensure the fuel used is not adulterated.
4. Use correct spark plug as recommended in the owner’s manual.
5. Use lubricants as per recommendations given on grade / brand in the owner’s manual.

 Loading...