


Congratulations on becoming the proud owner of a legendary Royal Enfield motorcycle.
The new Bullet 500 is a motorcycle with the timeless handcrafted design of the legendary Bullet, now fitted with a
solid 500cc Unit Contruction Engine with twin-spark ignition for better combustion, superior power delivery and
improved fuel economy.
Do read this manual thoroughly before you begin riding to ensure that you operate your motorcycle the right
way, are aware of the terms and conditions of warranty, and know how to maintain it properly.
We ur ge you to avail of the fou r free se rvi c es we offer, at the righ t tim e, at any of our Au tho r ise d
Dealer / Service Point to keep your motorcycle in peak condition.
Pl e a s e log o n to ww w. r o yalen f i e l d . com to kn o w more ab o u t the h i s t o r y of t h e w o r ld’s o l d e st
motorcycle brand, our other products, and for exciting news of riding tours and events organised for Royal Enfield
motorcycle owners.
Welcome to motorcycling the Royal Enfield way. Ride safe and enjoy the trip!

2
IMP ORTAN T NOTICE
n Keep this manual in a convenient place for easy
referenc e.
n If any information is not understood in the manual
contact your Authorised Dealer / Ser vice Point for
assistance.
n If t he motorc ycle is being used by any friend,
relatives, or others it is responsibility of the owner
to make certain that the owner’s manual is read
and fully understood prior to usage and has been
instructed on it’s safe and proper use.
n The motorcycle is designed for normal on road
use only. Operation in off-road usage in some
areas may be ille gal and could be dangerous.
Obey local law and regulations.
n In the event of motorcycle being resold, it is the
responsibility of the owner of the motorcycle to
hand over the manual along with the motorcycle
and it’s documents.
n Becaus e of contino u s imp r o v e m e n t s in the
pr oduc t and ch ang es tha t may oc cur in the
manufacturing process, subsequent to printing of
th i s manual , it is po s sib l e som e inst r uct i ons ,
illustrations, pictures or designs found within this
ma n ual may di f fer fro m th ose foun d on th e
vehicle.
n However the technical information found within
this manual wa s correct at the ti m e it w a s
approved for publication.
n Roy a l E nfie l d re s e r ves t h e r i gh t t o m a k e
production changes at any time without prio r
notice and without i ncurring any obligation to
ma k e sam e or si milar chang e s to vehic l e s
previously built or sold.
“© Copyright 2013 Eicher Limited, Royal Enfield Unit. All Rights Reserved. No part of this manual shall be copied,
distributed or otherwise dealt without the express permission in writing of Eicher Motor Limited, Royal Enfield Unit.”
Part N o. 584639/a / Qty.1000 / Mar. ‘13

3
IMP ORTAN T NOTICE
SAFE TY DEFI NIT ION S
Statements in this manual preceded by the following
words are of special significance :
WARN ING
War n i ng in d icat e s a po tent i a lly ha zard o u s
situation, which if not avoided, could result in serious
injury.
CAUTIO N
Caution indicated a protentially hazardous situation,
which if not avoided, may result in property damage,
in minor or moderate injury.
NO TE
Indicates important and useful messages for clearer
understanding.
All Ima ges show n are for re fe re nc e to expla in and
need not to be e xac tly the sa me on t he mod el
you own.
Ho weve r if yo u hav e any qu eri e s, cla rif i cat i on,
suggestions/feedback, please write to us or e-mail at
“customerservice @royalenfield.com”.
SERVICE HEAD QUARTERS
Royal Enfield, A Unit of Eicher Motors Limited,
Thiruvottiyur High Road, Thiruvottiyur,
Chennai - 600 019.
Phone : 044 - 4223 0400, Fax : 044 - 4201 1719
E-mail : customerservice@royalenfield.com
Website : www.royalenfield.com

4
CONTENTS
PERSONAL & VEHICLE INFORMATI ON ........................ 7
FREE SERVICE RECORD .................................................. 8
SAFE OPERATING RULES ................................................ 9
RULES OF THE ROAD ...................................................... 15
TECHNICAL SPECIFICATIONS ....................................... 17
- Engine .................................................................... 17
- Ignition System ..................................................... 18
- Transmission ......................................................... 18
- Elec tricals .............................................................. 19
- Chassis ................................................................... 20
- Dimensions ............................................................ 21
- Weights ................................................................... 21
VEHICLE IDENTIFICATION NUMBER ............................ 22
KEY PARTS LOCATION .................................................... 23
- Top View ................................................................. 23
- Right Side View ..................................................... 24
- Left Side View ........................................................ 25
OPERATION OF CONTROLS ........................................... 26
- Ignition Switch ...................................................... 26
- Steering lock ......................................................... 26
- Fuel tank cap ........................................................ 27
- Side Box .................................................................. 27
- Head lamp switch ............................................... 28
- Dip Switch .............................................................. 28
- Head lamp Day flash ......................................... 28
- Engine Kill Switch ................................................ 29
- Horn ........................................................................ 29
- Turn Signal Switch ............................................... 29
- Engine Start Switch ............................................. 30
- Battery Box ............................................................. 30
- Fuel Tap ................................................................. 30
PRE OPERATIONAL CHECKS .......................................... 31
RUNNING IN .................................................................... 32
STARTING ......................................................................... 33

5
CONTENTS
GEAR SHIFTING ............................................................... 35
PARKING ........................................................................... 36
- Center Stand ......................................................... 36
- Side Stand ............................................................. 36
TOOLS AND FIRST AID KIT ............................................ 37
RECOMMENDED LUBRICANTS ...................................... 38
PERIODICAL MAINTENANCE ........................................ 39
MINOR MAINTEN ANCE TIPS ......................................... 43
- Control Cables, Handle bar lever,
Pivots, Ce nter / Side Stand Pivots ..................... 43
- Engine Oil Level Inspection .............................. 43
- Engine Oil Change .............................................. 44
- Spark Plug ............................................................. 45
- Brake fluid ............................................................. 46
- Inspection of tyres and wheels ........................ 46
- Tyre pressure ........................................................ 47
- Front Wheel removal ........................................... 47
- Front Wheel assembly ........................................ 48
- Rear wheel removal ........................................... 49
- Rear wheel assembly ......................................... 50
- Adjustment - Clutch ............................................. 51
- Drive Chain tension ...................................... 51
- Checking Rear Brake Pedal height .......... 52
- Rear Brake Pedal height Adjustment ....... 53
- Chain Lock Fitment ....................................... 53
- Adjustment of Gas Filled Shockabsorber ..... 54
- Removal of Battery on Vehicle ......................... 55
- Battery Maintenance .......................................... 55
- Assembly of Batte ry on Vehicle ........................ 56
- Changing Electric al Components ................... 57
- Head Lamp bulb r eplacement .................. 57
- Tail Lamp bulb replacement ..................... 59
- Trafficator bulb replacement .................... 59
- Fuse ................................................................... 60
- Blade Fuse usage List ................................... 60
- Air Filter element cleaning / replacement .... 61

6
CONTENTS
WASHI NG PROCEDURE .................................................. 62
- Precautions ........................................................... 62
- After Washing ....................................................... 62
STORAGE PRECAUTION ................................................. 63
- Preparing the motorcycle for reuse ................ 64
LONG TRIP PRECAUTIONS ............................................. 65
- Checks prior to the commencement .............. 65
- Checks after e very 1500 kms ............................ 65
- Items to be carried .............................................. 65
CARING FOR MILEAGE .................................................. 66
COMPLETE WIRING DIAGRAM - BULLET 500 ............. 68
TROUBLE SHOOTING ...................................................... 69
- Engine fails to start ............................................. 69
- Engine misfiring ................................................... 70
- Engine starts, but runs irregularly & stops .......... 71
- Poor pickup ........................................................... 71
- Whit e / blu e smoke .............................................. 72
- Engine over heating ........................................... 72
- Excessive fuel consumption .............................. 72
- Igni tion knock ...................................................... 73
- Brakes poor ........................................................... 73
- Vehicle wobbles ................................................... 74
- Elec tricals .............................................................. 74
- Electric Start .......................................................... 76
WARRANTY TERMS & CONDITIONS ............................. 77
EMISSION WARRANTY .................................................... 79
AL L INDIA RO AD SIG N S ... . .... . .... . ... . .... . ... . .... . ... . 83
FREE SERVICE COUPONS ............................................... 84
PAID SERVICE / MAINTENANCE RECORD ................... 93
REGIONAL & AREA OFFI CE S ... .. .. .. .. .. .. ...... .. .. .. .. .. .1 01
LOG BOOK ............................................................... 102
NO TES .... ... . ... ... ... ... ... ... . ... ... ... ... .... ... ... ... . ... ... ... .10 7
ANNE XU RES
- Vehicle Installat ion Form
- Pre-Delivery Inspection Report (PDI)
- Bike Installation Confirmation By Customer
- Form 22
7
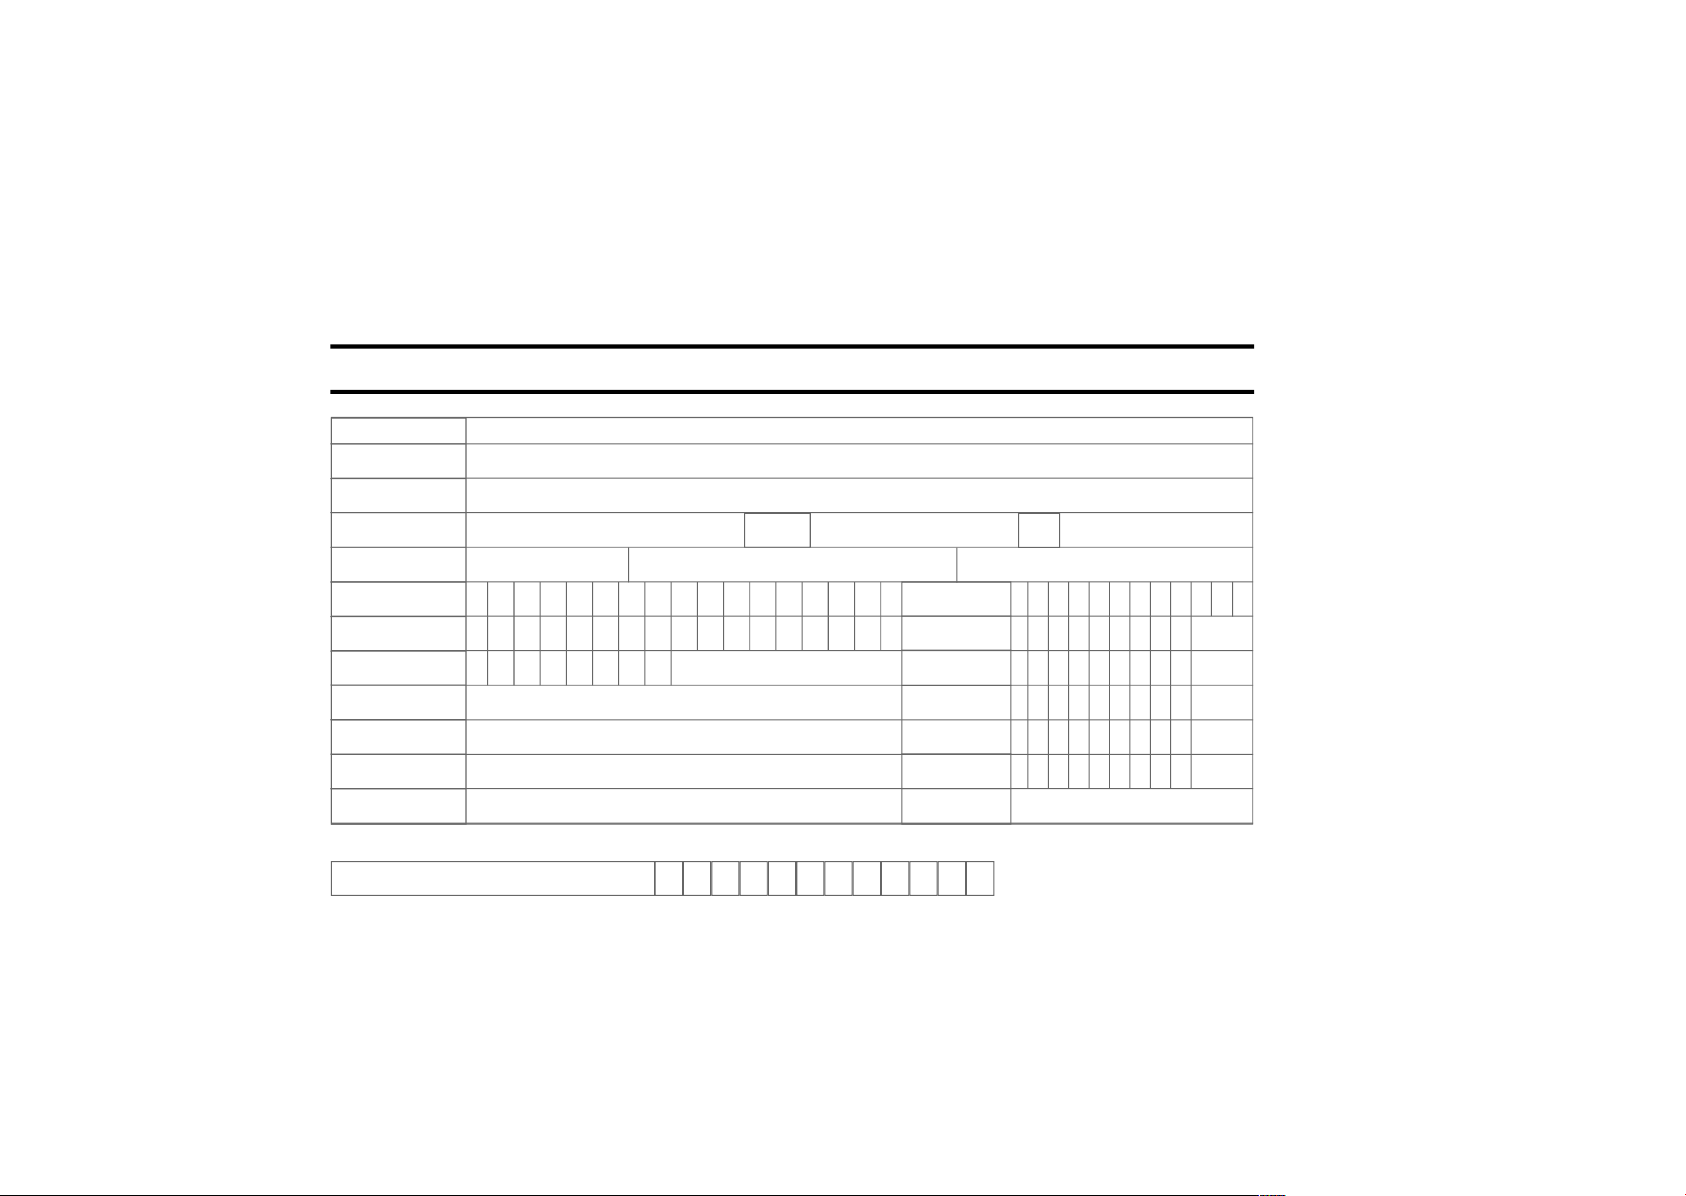
PERSONAL & VEHICLE INFORMATION
Name
Door No./Street
Locality
City State Pin
Contact Nos. Res: Off: Mobile: Email:
Engine No. Battery No.
Frame No. Battery make
Reg. No. Licence No.
Date of Sale Valid till dt.
Model Key No. :
Tyre make Colour
Sold by Dealer Code
Vehicle Installation Form (VIF) No.
8
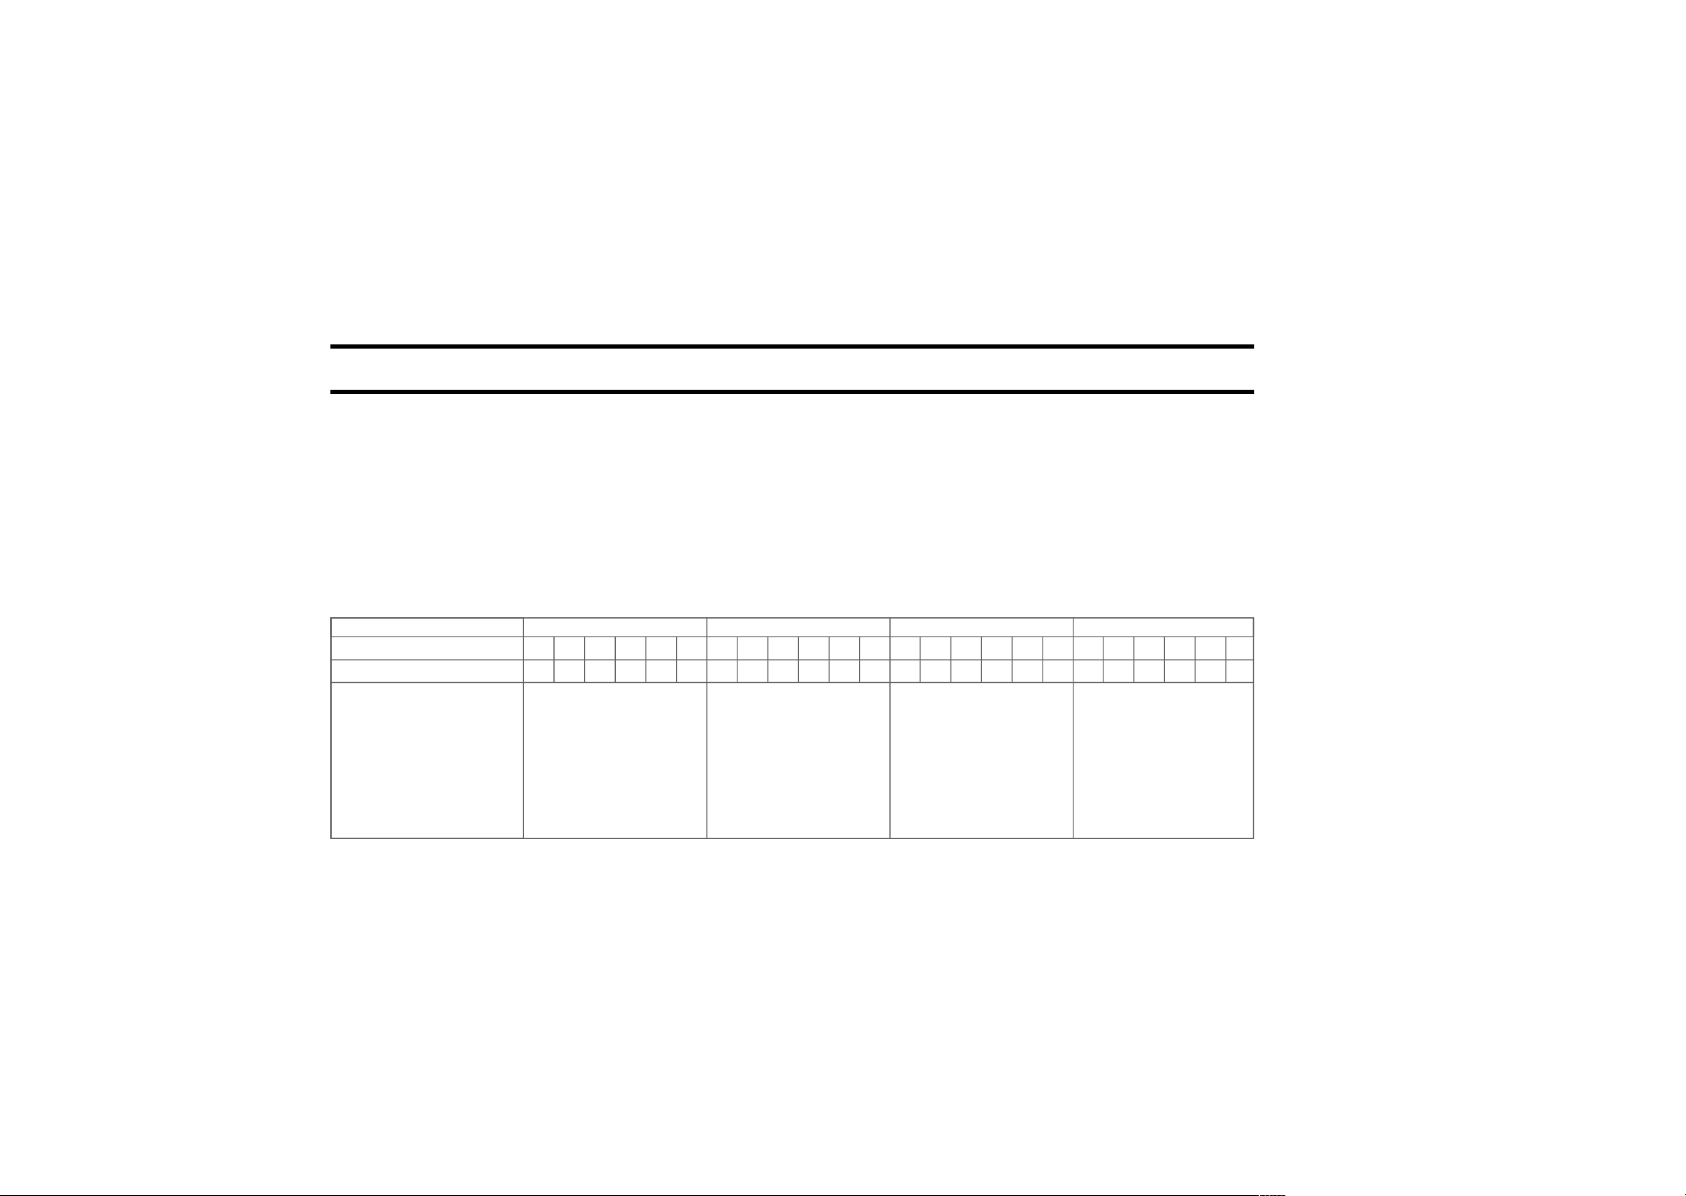
FREE SERVICE RECORD
It is our endeavour to provide excellent service to your Bullet 500 at all times. Towards this we provide 4 free
services at specific Intervals.
Please avail these services at the specified time, in any of the Royal Enfield Authorised Dealer / Service Point
nearest to you and as a token of satisfactory services, kindly return the free service coupon duly filled in and
signed, to the service outlet.
Availing the free services in the specified time is a prerequisite for warranty consideration. The cost of fuel, oil,
grease etc. used for all free services are chargeable to the customer.
1st Service 4th Service2nd Service 3rd Service
Date of Service
Kms Covered
Servicing
Dealer ’s / ASP
Name, Address
Dealer / ASP
Rubber Stamp
NO TE
Please ensure that the free service details are recorded in this sheet immediately after the service is carried out.
Dealer / ASP
Rubber Stamp
Dealer / ASP
Rubber Stamp
Dealer / ASP
Rubber Stamp

9
SAFE OPERATING RULES
n Before operating your new motorcycle, it is your
respons ib il it y to caref ul ly read and follow the
operating and mainte nance instr uctions detailed
in t h i s m an ua l f o r y o ur o w n s afe t y, y our
motorcycle and that of others.
n Know and respect the rules of the road. Be a safe
rider for your own safety and for other road users.
n Before starting the motorcycle, check for proper
operation of brakes, clutch, gear shifter, handle
bar controls, tyre pressu res, fuel and oil levels.
WARN ING
Royal Enfield cautions you against the use of
certain nonstandard parts such as aftermarket and
custom made extended front forks or suspensions,
whic h may ad ver sely af f e c t pe r f o r m a n c e an d
handling. Removing or altering original parts may
adversely affect perfo rmance and could result in an
accident causing serious injury.
n Use only genuine Royal Enfield spare parts and
approved accessories. Use of other manufacturer’s
performance parts may affect the performance of
your motorcycle and render the motorcycle void of
warranty. See your Royal Enfield dealer for details.
n Whene ve r ref uel lin g your moto rcyc le, ple ase
exercise utmost caution and carefully observe the
following rules :
H DO NOT smoke and please ensure that there
are no op e n f l a m e s o r sp a rks nea r t h e
motorcycle, when refuelling OR ser vicing the
fuel system.
H Switch OFF mobile phones and othe r hand
held electronic devices / gadgets.
H Open the fuel filler cap slowly.
H Refuel in a well ventilated area with the engine
turned off.

10
SAFE OPERATING RULES
H DO NOT fill the tank to its brim. Please fill fuel
only till the bottom of the filler neck insert, so
as to leave air space in the fuel tank to allow
for fuel expansion (for Spec. Ref. Page No. 20).
WAR NING
Pe t r o l is ex t r e m e l y f l a m mable an d hi ghly
explosive. Use care when handling Petrol. Always stop
the engi ne whe n refu ellin g or ser vicin g the fuel
system. Do not smoke or allow open flames or sparks
near Petrol. Do not store motorcycle with Petrol in
the tank, within the home or garage where open
flames , pilot light s, spark s or elec tric mot or s are
present. Inadequate safety precautions could cause
an explosion or fire which could result in damage to
property, serious injury.
n A new motorcycle must be operated according to
the special break-in-procedure. See BREAK-IN-THE
FIRST 500KM section.
n Operate motorcycle only at moderate speeds and
out of traffic until you have become thoroughly
fam i l i a r w i t h it s o p era t i o n a nd h andl i n g
characteristics under all conditions.
n DO NOT exc eed the legal speed limit or drive too
fast for existing conditions. Always reduce speed
when poor driving conditions exist. High speed
inc reases the influen ce of any other condition
affecting stability and increases the possibility of
loss of control.
NO TE
If you are an inexperienced rider we recommend that
you obtain formal training on correct motorcycle
riding techniques and become thoroughly familiar
with the operation of your particular motorcycle. New
ri d e r s s h o u ld ga in exp e r i e nce und e r v a r i o u s
conditions while driving at moderate speeds.

11
SAFE OPERATING RULES
WARN ING
Avoid overspeeding and never travel over the
speed limit. Excessive speed may cause loss of control
and coul d re su lt in an acciden t causing serious
injury.
n DO NOT exceed >110 km/h solo riding.
n DO NOT exceed >90 Km/h when carrying a pillion
or c argo.
n Pay strict attentio n to road surfaces and wind
co ndi t ion s. An y two wh eel e r veh icle may be
subject to the following upsetting forces :
H Wind blasts from passing trucks.
H Rough uneven road surfaces.
H Slippery road surfaces.
These forces may affec t the handling characteristics
of your motorcycle. If this happens, reduce speed and
gu i d e th e mo t o rcycl e wi t h a rela x e d gr i p to a
controlled condition. Do n ot brake abruptly or force
the handlebar.
n Operate your motorcycle defensively. Remember,
a motorcycle does not afford the same protection
as an automobile in an accident. One of the most
comm on acc ide nt situa tions occ urs when the
driver of the other vehicle fails to see or recognize
a mo t o r c yc le an d tu r n s into th e o n c o m i n g
motorcyclist.
n Wear an approved helmet, clothing, and foot gear
suited for riding a motorcycle. Bright OR light
colo rs are bes t fo r greater visibil it y in traffic ,
especially at night. Avoid loose, flowing garments
and scarves.
n Whe n ca r r y i n g a p i l l ion r ide r, i t i s y o u r
responsibili ty to instr uct them on proper riding
procedures.
n DO NOT allo w oth e r in d i v idual s , un d e r an y
circumstances, to operate your motorcycle unless
you know they are experienced, licensed riders
and are thoroughly familiar with the operating
conditions of yo ur motorcycle.

12
SAFE OPERATING RULES
WARN ING
Ma i n t ain t he re comme n d e d ty r e pre ss u r e .
En sure the fr o nt and re ar whee l s are corr e ctly
aligned and the tyres are seate d evenly & properly
in the rims. Check for correct tightness of the spokes
in the ri ms. Insp e ct yo u r tyr es per iod ical ly an d
replace tyres with approved tyres only. Failure to do
so can lead to improper balance, abnormal tread
we ar, poor hand li ng and could res ult in ser ious
injury.
WARN ING
Royal Enfield recommends replacement of any
tube / tyre punctured or damaged. In some cases
small punctures in the tread area may be repaired
from within the demounted tyre by your Royal Enfield
dealer. Speed should not exceed 60 km/h for the first
24 hours after repair and the repaired tyre should
Never be used over 90 km/h (applicable tube less tyre)
In emerg en cy situations, if a tem po rary repair is
made ride slowly with as light a load as possible until
the tyre is permanently repaired or replaced.
Failure to heed this warni ng could result in serious
injury.
n Safe motorcycle operation requires alert mental
judgement combined with a defens ive driv ing
attitude. DO NO T allow fatigue, alc ohol or drugs
to endanger your safety or that of others.
n Maintain your motorcycle in proper oper at ing
condition as per Periodical Maintenance Chart
(Re f Pa g e No.4 0 ) . Pa r t i c ular l y im por t a n t t o
motor c yc l e s t ability is pr o p e r tyre i n f l ation
pressure, tread condition. Pay strict attention to
loose and / or broken spokes, free movement of
steering system.

13
SAFE OPERATING RULES
WARN ING
DO NOT operate motorcycle with a loose, worn
or damaged steering system, including the front and
re ar susp ensio n syste m. Cont act you r deale r for
repair of steering or suspension system. Damaged
steering or suspension components may adversely
affect handling which c ould result in serious injur y.
WARN ING
Reg ul arly i ns pect rear shock absorbers and front
forks and look for leaks. Replace worn parts. Worn
parts c an adversely affect stability and handling.
WARN ING
For your personal welfare, all the liste d ser vice
an d maint e n anc e re c o mme n d atio n s shoul d be
pe rfo rme d . La ck of regula r maint ena nce at the
suggested intervals may affect the safe operation of
your motorcycle, which could resu lt in serious injury.
WARN ING
Avoid any contact with the exhaust system. Wear
clo th ing that w ill comp letely cover the legs whil e
riding. The exhaust system gets very hot when the
engine is running and remains too hot, even after
the engine is turned off (due to catalic converter).
Failure to wear proper or protective clothing could
result in serious injury.
WARN ING
Exhaust ga s e s contains poison o u s carbon
mo nox ide (CO.) and che mic als , known to cause
serious health hazards.
WARN ING
Mo to rcycle bat t er ies con tain lead and lea d
components, acids and chemicals known to cause
seriou s hea lt h hazards. Exe rcise extr em e caution
while h andling a battery. Wash hands tho rough ly
whenever a battery is handled.
14
SAFE OPERATING RULES
WARN ING
Consult your Royal Enfield Dealer regarding any
questions or problems that occur in the operation of
your motorcyc le. Failure to do so may aggravate an
initial problem, cause costly repairs, jeopardize your
personal safety and could result in serious injury.
WARN ING
Use only genu ine Royal Enfield replac ement
fasteners tightened to the proper torque. We caution
you against the use of certain non standard parts
such as after ma rket and cus to m made faste ne rs
which may not have specific strength, finish and type
req uirements to per form properly in the assembly
and its environment . The use of any nonstandard
parts, including faste ne rs , cou ld result in serious
injury.
WARN ING
DO NOT exceed the Gross Vehicle Weight Rating
of your motorcycle. The Gross Vehicle Weight Rating
(GVWR) is shown on the information plate, located
on the frame Down tube. (GVWR is the sum of the
we i g ht of the mo t o rcyc l e , ac cess o ries, an d th e
maximum weight of the rider, passenger and cargo
that may be safely carried.) Exceeding GVWR may
lea d to instab ility of the motorcycle, which could
cause an accident and result in se rious injury.
WARN ING
DO NOT tow a disabled motorcycle. The steering
and hand ling of the dis ab le d motorcycle will be
impaired due to the force of the towline. If a disabled
mot or cycle must be transported, use a truck or a
trailer. Towing a motorcycle may cause loss of control
of the motorcycle in the front, leading to an accident
resulting in serious injury .
WARN ING
DO NOT pull a tr ail er behi nd a mot o rcycl e.
Tow in g a t r a i l e r ma y c a u s e r e d u c ed br ak ing
efficiency, tyre overloading and unstable handling.
Towing a trailer may cause loss of control of the
mo torc ycle in the fr ont , lea ding to an ac cid e nt
resulting in serious injur y.

15
RULES OF THE ROAD
n Be sure front & rear nu mber plates is installed in
the position specified by law and is clearly visible
at all times.
n Ride at a safe speed that is consistent with the type
of road surface you are on. Pay strict attention to
whether the surface is :
H Dry H Oily
H Icy H Wet
n Watch for loose debris, such as leaves, slippery
substances or loose gravel that can hamper the
stability of your vehicle.
n DO NOT exceed the legal spe ed limit or drive too
fast for existing conditions. Always reduce speed
when poor driving conditions exist. High speed
inc reases the influen ce of any other condition
affecting stability and increases the possibility of
loss of control.
WARN ING
Avoid exce ssive speed and never travel at a
speed faste r than the speed limit. Excessive speed
may c au se los s of contr ol of vehicle, w hich could
result in death or serious injur y.
n Keep to the correct side of the road centre line
when meeting oncoming vehicle.
n Always sound your horn, actuate your turn signals,
and e x e r c i s e C A U T I O N w h e n pa s s i n g other
vehicles going in the same direction. Ne ver try to
pass another vehicle going in the same direction
at street inter sections, on curves, or when going
up/or dow n a hill.
n At street intersec tion giv e the right- of-way to the
vehicle on your left or right. DO NOT presume you
have the right- of-way.
n Alw ays signal when preparin g to stop , turn or
pass.
n Wh i l e tu r n i n g ei ther ri ght or le ft, watch fo r
pedestrians, animals as well as vehicles.
n All traff ic signs , inc luding man ua l cont ro ls at
intersections, should be obeyed promptly. SLOW
DOWN at traffic signs near schools and CAUTION
signs at railroad c rossings.
16
RULES OF THE ROAD
n When intending to turn, signal at least 100 feet
(30.5 meters) before reaching the turning. Be close
to th e cent er lin e (un l ess lo cal ru les re quir e
otherwise), slow down and then turn carefully.
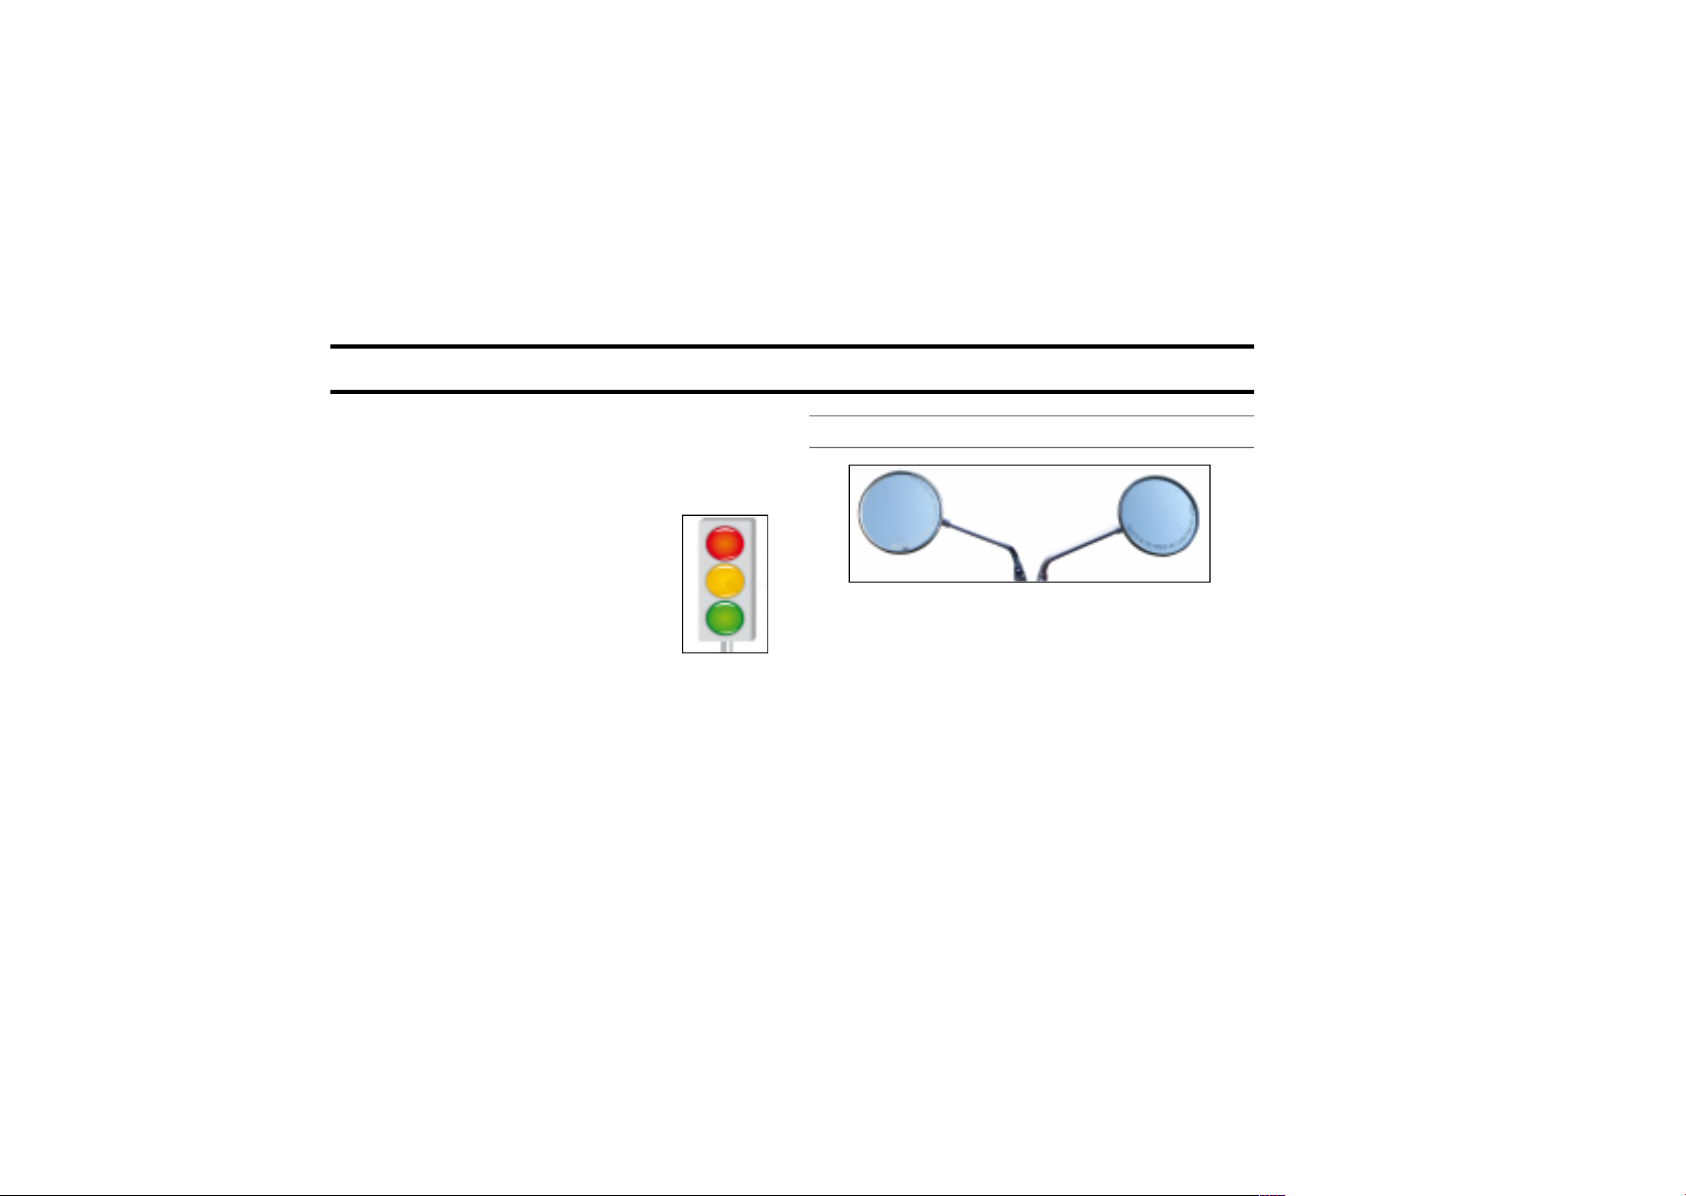
n Never jump a traffic light. When a
change is imminent from GO to STOP
(or vice versa) at intersections, slow
Red
Yellow
down and wait for the light to change
to green. Never run through a yellow
Green
or r ed traffic light.
n DO NOT leave the curb or parking area without
si gna ling. Be sur e you r way is cl ear to ent er
moving traffic. A moving line of traff ic always has
the right-of-way.
n Park your motorcycle on a firm and flat surface to
prevent it from falling over.
n Pr o t e c t y our mo t o r c y c l e ag a i n s t the f t . Aft e r
parking your mot or cycle, rem ov e Ignition key
from switch and lock the stee ring head.
SIDE VIEW MIRRORS
Your motorcycle is equipped with convex mirrors and
have a curved surface. This type of mirror is designed
to give a much wider view t o the rear than a flat
mirror; however, c ars and other objects seen in this
type of mirror will look smaller and fart her away than
when se en in a flat mirror.
Use care when judging the size or distance of objects
seen in these mirrors.
NO TE
To help you establish the relative distance of vehicles
behind your motorcyc le, adjust each mirror in such
a way, that a small portion of your shoulder is visible
and a large portion behind your motorcycle is seen
clearly.

17
TECHNICAL SPECIFICATIONS
ENGINE
Engine ........................................................ Single Cylinder, 4 Stroke, Twinspark, Aircooled
Capacity ..................................................... 499 cc (Displacement)
Bore ............................................................. 84 mm
Stroke .......................................................... 90 mm
Compression ratio .................................... 8.5 : 1
Max. Power @ RPM ................................... 26.1 BHP @ 5100 rpm
Max. Torque @ RPM ................................. 40.9 Nm @ 3800 rpm
Air Filter Element ...................................... Corrugated Paper Element
Fuel Supply ................................................ Carburetor with Throttle Position Sensor (TPS)
Engine Start ............................................... Electric / Kick
Engine Oil Capacity ................................. 2.75 Litres.
Lubrication ................................................ Wet Sump, Forced Lubrication
Engine Oil Grade ...................................... Royal Enfield 15W50 API SL Grade Engine Oil (JASO MA)
Cooling system .......................................... Natural Air Flow
Carburetor ................................................ UCD 33

18
TECHNICAL SPECIFICATIONS
IGNITION SYSTEM
Ignition syste m ......................................... TCI Unit, Multi Curve (Variable Ignition Timing)
Spark plug ................................................ WQR8DC (Bosch Super) M14 & UR6DC (Bosch Super) M10
Spark plug Ele ctrode gap ..................... WQR8DC 0.80 to 0.90 mm
.............................................................. UR6DC 0.70 to 0.80 mm
TRANSMISSION
Clutch ......................................................... Wet Multiplat e (7 Plates Clutch)
Primary drive ............................................ Duplex Chain
Primary Drive Ratio ................................. 2.15 : 1
Gear box .................................................... 5 Speed Constant Mesh
Gear shift pat tern .................................... 1 - N - 2 - 3 - 4 - 5
Gear Ratios ............................................... 1st-3.06:1 2nd-2.01:1 3rd- 1.52:1 4th-1.21:1 5th-1:1
Secondary Drive (F.D. Sprocket) ........... 18 Teeth
Final Ratio ................................................. 2. 11 : 1
Drive C hain links ..................................... 102 links

19
TECHNICAL SPECIFICATIONS
ELECTRICALS
Generation ................................................ Alternator
System ........................................................ 12V DC
Battery ........................................................ 12V - 14 AH
Head lamp ................................................ 12V, 60/55 W, Halogen
Position lamp ............................................ 12V, 4W
Brake / Tail lamp ..................................... 12V, 21/5 W
Turn signal ................................................ 12V, 10W - 4 nos.
Pilot lamp .................................................. 12V, 2 W - 2 nos.
Speedometer lamp ................................. 12V, 3.4 W - 1 no.
Turn signal / High beam indicator ...... 12V, 1.7 W - 2 nos.
Neutral Indicator ..................................... 12V, 1.7 W - 1 no.
Horn (Dual) ............................................... 12V, 2.5 Amp (Max.) X2
Starter Motor ............................................. 12V, 0.9 KW
WAR NI N G
Using bul bs / other electrica l
gadgets other than specif ied r ating
may lead to over load in g / errati c
be h avi o ur / pre matu r e fai l ure of
electri cal sys tem.
Mod ific ations on the b ike which ar e
not approved b y Royal Enfield ma y
not only disqualify for warranty, but
also affects perf ormance of the bike .

20
TECHNICAL SPECIFICATIONS
CHASSIS
Frame ......................................................... Tubular Frame
Tyre size ..................................................... Front: 90 / 90 - 19” - 52 P Rear: 120 / 80 - 18” - 62 P
Tyre pressure ............................................ Front- Solo: 1.41 Kg/cm2 (20 PSI) Pillion: 1.55 Kg/cm2 (22 PSI)
.............................................................. Rear- Solo: 2.11 Kg/cm2 (30 PSI) Pillion: 2.25 Kg/cm2 (32 PSI)
Fuel tank capacity .................................. 13.5 Litres ***
Reserve capacity ..................................... 2 Litres (approx.)
Dead stock of petrol (unusable fuel) .. 0.75 Litres (approx.)
Suspension ................................................ Front: Telescopic, 130mm Travel
.............................................................. Rear: Twin gas charged shock absorbers, 80mm travel
Front fork oil capacity ............................ 195 ml per leg
Front fork oil .............................................. 1F Endurance (or Royal Enfield) fork oil
Brakes ......................................................... Front : Hydraulic 280 mm Ventilated Disc
.............................................................. Rear : Foot Operated 153mm Single Lead Internal expanding
Brake oil capacity ................................... 60 ml
Brake oil grade ........................................ DOT 3 or DOT 4
***Fu e l ta n k i s no t a me a s u r i n g
inst rument. The capacity of tank may
var y sl ightly from specifie d value.

21
TECHNICAL SPECIFICATIONS
DIMENSIONS
Length ........................................................ 2140 mm
Width .......................................................... 810 mm (Without Mirror)
Height ......................................................... 1110 mm (Without Mirror)
Wheel base ............................................... 1370 mm
Saddle height ........................................... 800 mm
Ground clearanc e ................................... 135 mm
WEIGHTS
Kerb Weight (with 90% Fuel) .................. 193 Kg
Max pay load ........................................... 172 Kg
NO TE
1. Values / Dimensions given above are for your guidelines only.
2. In view of continuous improvements being done on our products, the specifications are subject to change
without notice.
22
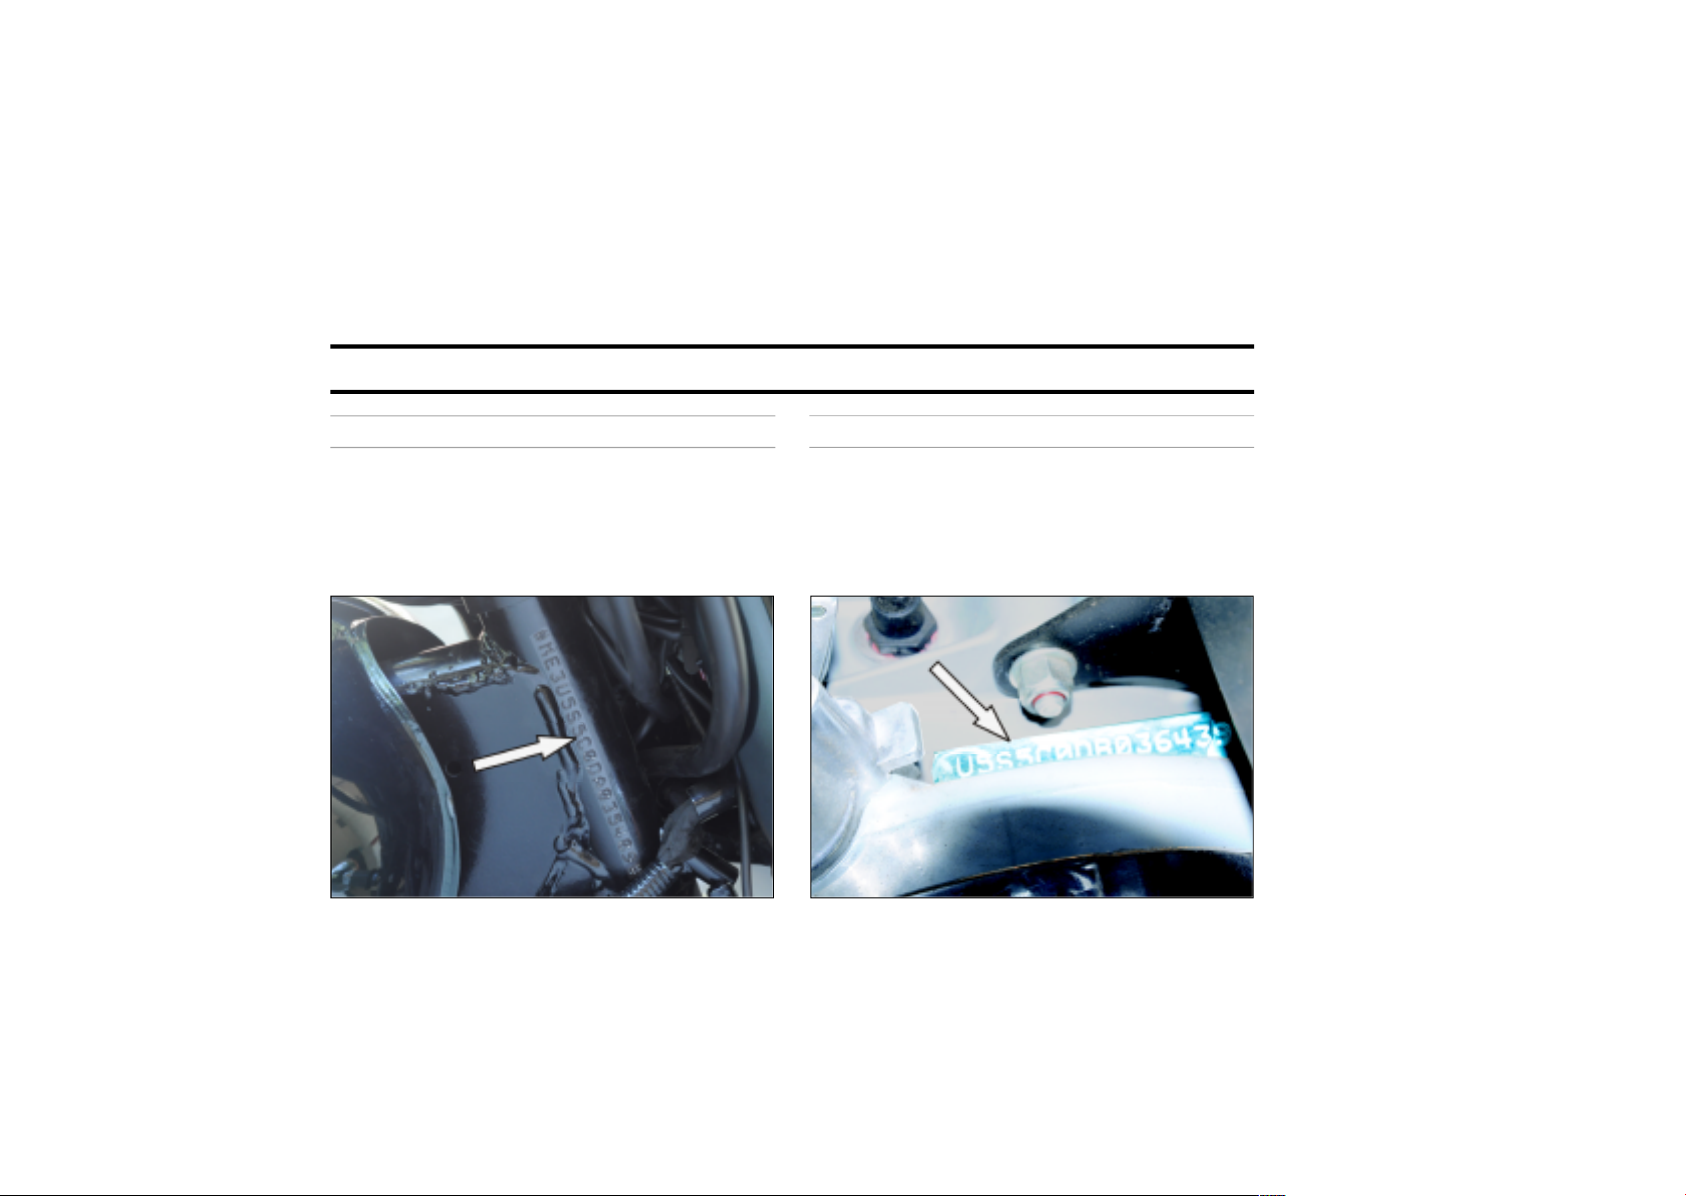
VEHI CLE IDENTIFICATION NUMBER - DETAILS
FRAME NUMBER
Punched on steering head tube RH side.
ENGINE NUMBER
Punched on top of the engine LH side.

23
KEY PARTS LOCATION
12
12
7
4
3
6
TOP VIEW
1. Turn signal switch
2. Horn button
3. Clutch lever
4. Day flash switch
5. Head lamp dip switch
8
6. Ignition switch
7. Speedometer
8. Front brake lever
1
9. Accelerator
10
2
5
11
9
10. E-Start Switch
11. Fuel tank cap
12. Rear View Mirror

24
KEY PARTS LOCATION
5
6
RIGHT SIDE VIEW
1. RH Trafficator Front
2
2. Starter Motor
1
3. Brake Pedal
4. Kick Starter Lever
5. Airfilter Box
4
3
6. RH Trafficator Rear

25
KEY PARTS LOCATION
2
3 4 5
LEFT SIDE VIEW
1. Trafficator Front LH
2. Spark Plug
3. Battery Cover
1
9
10
8
7
4. Electricals Box LH
5. Rear Shock Absorber
6
6. Trafficator Rear LH
7. Side Stand
8. Centre Stand
9. Gear Change Lever
10. Horn

26
OPERATION OF CONTROLS
IGNITION SWITCH
OFF
ON
STEERING LOCK
Turn key clockwise to lock.
Lock the steering when leaving
bike parked.
Turn key ant i clockwise to u nlock.
CAUTIO N
Prot ect yo ur motorcycle against theft.
After parking your motorcycle, remove
the ignition key from switch and lock
the steering head.
Turn handle b ar to extreme left, before attem pting to lock
steering.
Do NOT lubricate barrel locks with petro leum based lubricants
or graphite. Inoperative locks may re sult in damage to your
vehicle.
27
OPERATION OF CONTROLS
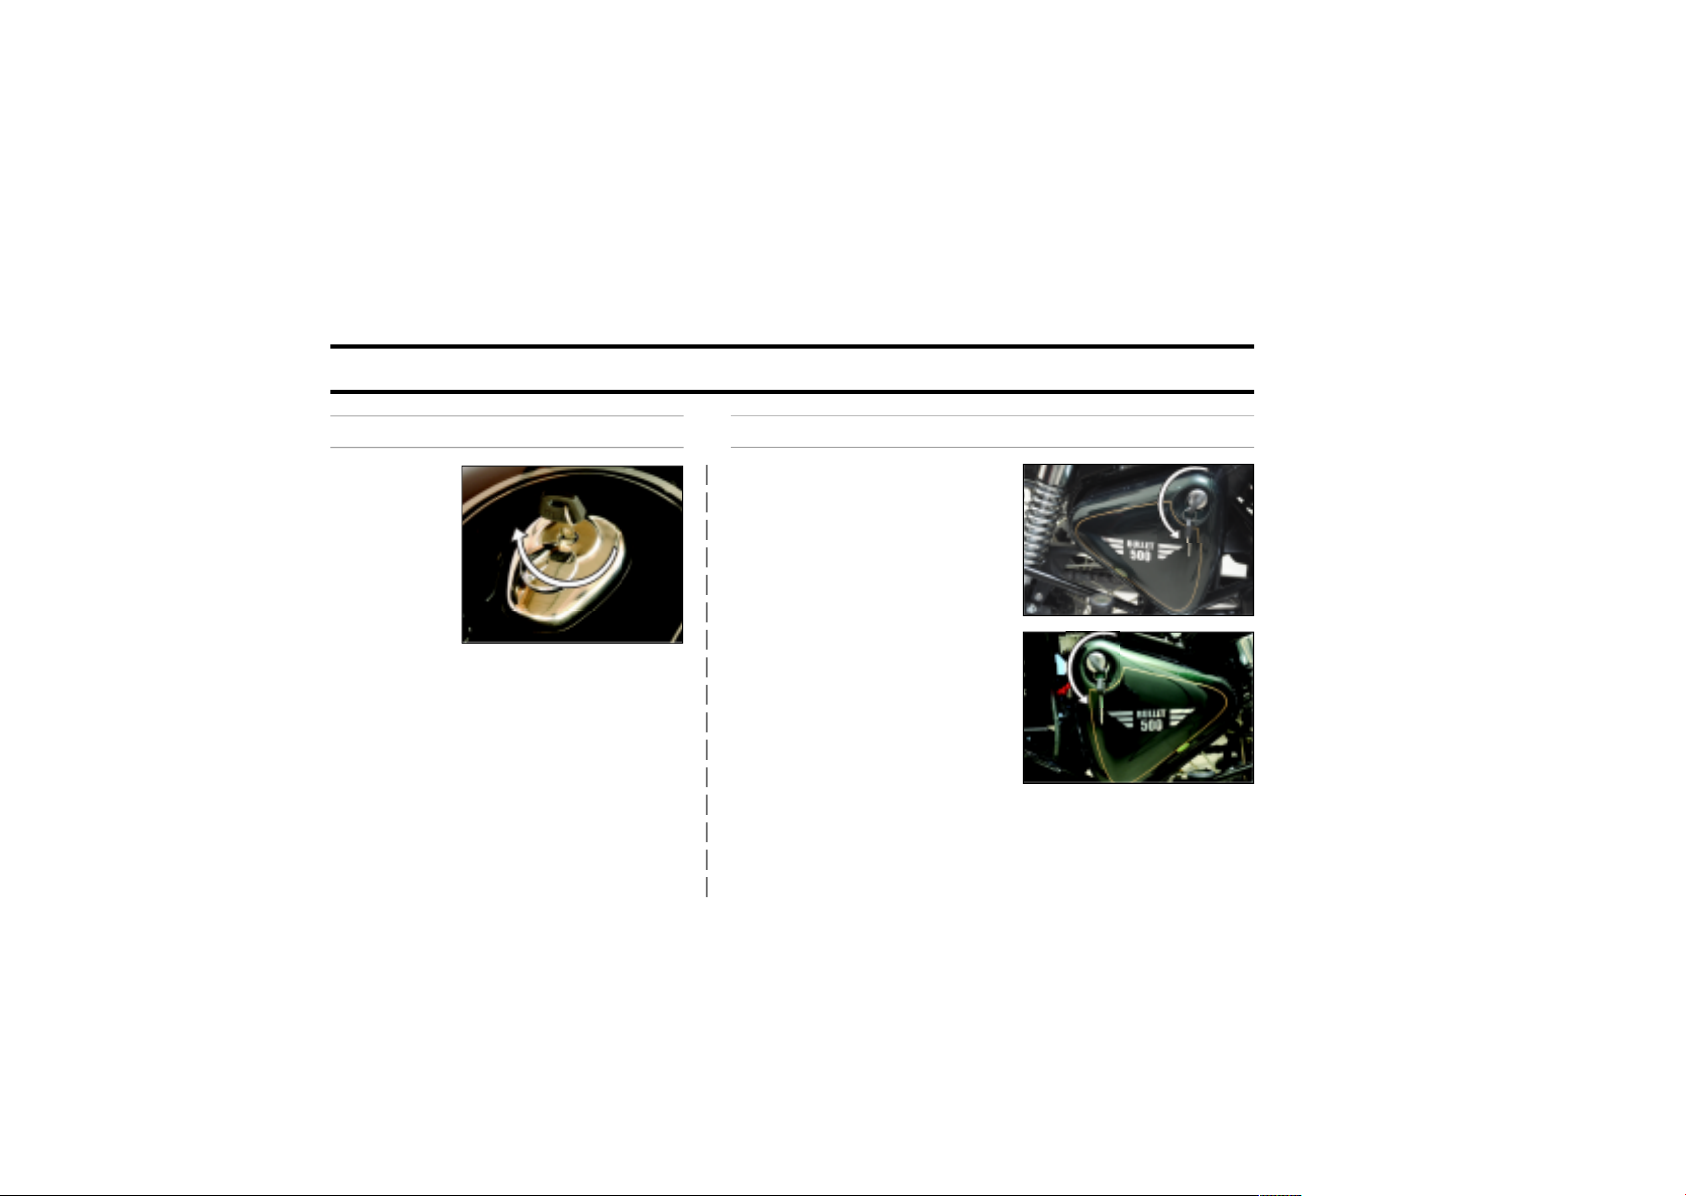
FUEL TANK CAP
n Turn key
clockwise
to open
n Press cap to lock with key in position
NO TE
Ke y c a n be remov e d onl y in l o c k e d
position.
SIDE BOX
AIR FILTER BOX RH
Turn Key anti-clockwise to open
SIDE BOX LH
Turn Key anti-clockwise to open,
it c ontains Tools Kit & Fuse
NO TE
n Key is common for ignitio n, petrol tank cap, steering lock,
side boxes and battery cover.
n Key for fuel tank and tool boxes can be removed from the
lock only in locked position.

28
OPERATION OF CONTROLS
HEAD LAMP SWITCH
OFF
l
Pilot Light ON
Head Light ON
DIP SWITCH
Low beam
High Beam
HEAD LAMP DAY FLASH
Press for
Headlight Flash
29
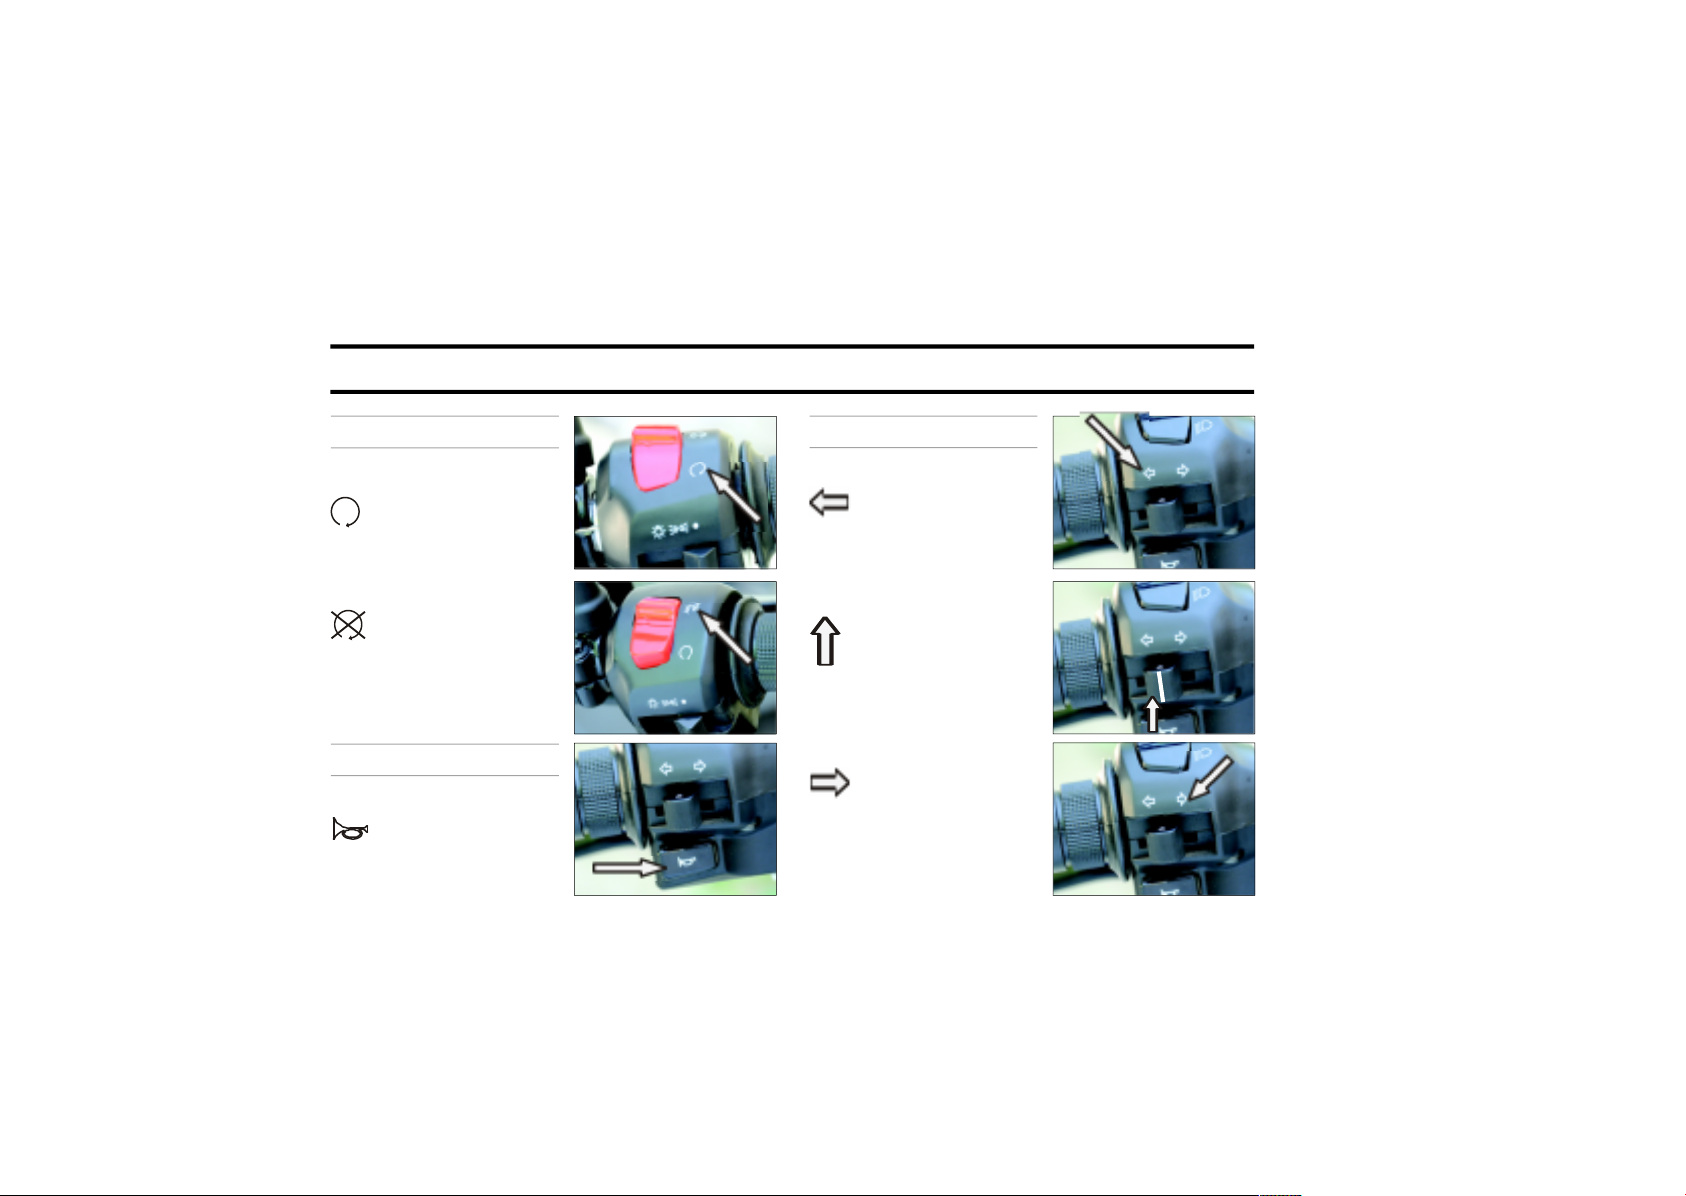
OPERATION OF CONTROLS
ENGINE KILL SWITCH
Run
Stop
HORN
Press
TURN SIGNAL SWITCH
Left
OFF (Push to off)
Right

30
OPERATION OF CONTROLS
ENGINE START SWITCH
Press
BATTERY BOX
Turn ant i clockw is e
to open
FUEL TAP
OFF
Turn knob to
horizontal position
Main ON
Turn knob
downward position
Reserve ON
Turn knob upward
position

31
PRE OPERATIONAL CHECKS
A careful c heck of the following must be carried out
eve ry time before rid ing and speciall y after long
per i o d s o f sto r a g e to de t e r m i n e if ad d i t i o n a l
maintenance is necessary.
1. Tyres for cor rect pressure, abrasions or cuts.
2. Rear chain for proper tension.
Drive Chain
Clutch
3. B r a k e s , s t e e r in g
a n d t h r ot tl e f o r
responsiveness.
4. Cable for fraying or
cr im p i ng and fr e e
operation.
5. Engine oil level.
MAX
MIN
6. Wh e e l sp o k e f o r
proper tightness, no
breakage .
Spokes
7. Headlamp, tail lamp, brake lamp and indicator
lamps for proper operation.
WARN ING
For you r personal welfare and safety, all the
poin t s mentione d above sh o u l d be performed
per i o d i c a l l y. Fa i lure to do so, ma y af f e c t saf e
operation and damage you r motorcycle and could
result in an accident causing serious injury.

32
RUNNING IN
Proper running-in i s ver y important for obtaining
maximum life and performance of a new motorcycle.
The following guidelines explain proper running-in
procedures.
Since the engine is brand new, it should not be loaded
excessively for the first 2,000 kms. During the first few
hundred kms, the various parts in the engine wear and
polish themselves to the correct operating clearances.
Driving with prolonged full throttle operation, or any
high speed conditions might result in excessive heating
of the engine and cause abnormal wear of the moving
parts and hence must be avoided.
1. 0 - 500 Kms :
The reco mme nde d speeds for the first 500 Kms is
be l o w 5 0 K m p h . D u r ing this per i o d a v o i d
oper at i n g the mo t o r c ycle wi t h full t h r o t t l e
opening. Stop the motorcycle for about 5 to 10
minu tes to let it cool down, after every hour of
ru n n i n g. Var y th e sp e e d of the motorcycl e
regularly d uring running but avoid using the
motorcycle above ½ throttle opening position.
2. 501 - 2000 Kms.
The reco mm e nd ed spee d is below 80 Kmph .
Avoid d ri ving the motorcycle with full throttle
op e n i ng. Vary the speed of the mo t orcyc le
regularly but avoid using the motorcycle abo ve
3/4 throttle opening position.
3. 2,001 kms and above
Avoi d prolo ng ed fu ll- th rot t le ope r ati on. Vary
speed occasionally.
CAUTIO N
After cove ring the first 500 kms. please replace the
engine oil and oil filter element.
Royal Enf i e l d en g i nes are air- c o o l e d and
consequently require forced air cooling over the
cylinders and heads to maintain proper operating
temperature. Extended periods of idling may over
heat the engine, resulting in serious engine damage.
DO NOT run the engine at e xtremely high RPM with
clutch disengage d or transmission in neutral as it can
cause serious engine damage.
An engine running long distances at high speed must
be given close attention to avoid over heating and
possible engine damage.

33
STARTING
STARTING PROCESS (KS / ES)
n Turn fuel tap to
‘ON’
n Use ch o k e in co l d
condition
n Switch on ignition.
n En s u r e Engi n e st o p
sw i t c h is i n “RUN ”
position
n Ensu re the sid e and
main stands ar e in
released position
n Ensure that gears are
in neutral and neutral
lamp i s gl o w i ng i n
cluster box.
CAUTIO N
N
Do not force the gear lever while attempting to shift
to neutral . Move t he mot orcycle back & forth and
simultaneously press gear lever to c ome to neutral.
Ensure neutral indica to r light com es “ON”’ in the
Speedometer.
WARN ING
Before starting engine, always shift gears into
neutral.

34
STARTING
USING KICK START
n Sligh t l y c r a n k t h e
en gi n e f u r the r t i ll
compression ea s e s
over.
n Start the motorcyc le
wi t h a p ow e r f u l
swinging kick.
n Rele ase the choke, if
applied
USING ELECTRIC START
n Press Clutch Lever.
n Pr e ss St arter Bu t ton
and r elease as soon
as engine starts.
n Release the choke, if
applied
NO TE
n A clutch switch is provided in the system for the
safety of the rider. This is to prevent the vehicle from
starting when the vehicle is in gear. To start the
engine when it is in gear, pull clutch lever, press
starter button and release as soon as the engine starts.
n Pre ss starter button and rel ease starter switch
once the engine starts.
n If the engine does not start on the first attempt in
cold climate, release the star ter button, wait for
30 se co nds before pressi ng the star ter butto n
again.

35
GEAR SHIFTING
n Warm up engine
for 2 minutes - till
idling is consistent /
stable
GE A R SHI F T PATTER N
1 N 2 3 4 5
n Press clutch lever towards the hand grip.
n Press gear pedal with to e to engage 1st gear.
n Ge nt l y ope n th rot t l e and r ele a s e cl u t c h
simultaneously. If clutch is released suddenly, the
engine may stall and cause a jerky start.
CAUTIO N
The clu t c h m u st be fu l l y d i s e n g a g e d be f o r e
attempting a gear shift. Failure to fully disengage the
clutch may cause a jerky s tart and / OR stalling the
engi ne besi de s causing dam ag e to transmis sio n
parts.
l Press t h e g e a r
pedal with heel to
enga g e 2nd a nd
higher gear.
l Follow the same
procedure for 3rd, 4th
and 5th gear.
NO TE
Always move the motorcycle in first gear position only.
When engine spe ed decreases, whil e cli mbing a
gradient or running at a reduced speed, shift to the
appropriate lower gear to prevent the engine from
stalling or straining to pull.

36
PARKING
PARKING VEHICLE ON CENTER STAND
n Select a firm, flat surface
n Hold handle bar straight
n Lower center stand, and ensure that both the legs
of the stand are resting evenly on firm ground.
n Apply pressure on the fulcrum lever on the center
st and and pull vehi cle bac kwards , gently as
shown in pic.
PARKING VEHICLE ON SIDE STAND
l Select a firm, flat surface
l Lower Side Stand and gently tilt motor cycle to the
left till it rests firmly.
WARN ING
Always park the motor cycle on a firm and flat
surface. Parking in a soft ground may cause stand to
sink and the motorcycle to fall, causing injury to you
or t o others and damage to the motorcycle parts.

37
TOOLS & FIRST AID KIT
1
S.No. Description Qty.
1. Tool bag 1
2. Screw driver 1
3. Tommy bar 1
4. Tubular spanner 1
5. Tool Spark plug 1
6. Double end spanner 10 X 12 2
2
3 4 5 6
5 6
7
1
4
S.No. De scription Qty.
1. Antiseptic cream 5 gms 1
2. Gauze bandage 5 cm x 2 cm 1
3. Elastic Gauze bandage 8 cm x 1 mtr. 1
4. Wash proof plaster 1.9 cm x 7.2 cm 2
5. Sterilized Gauze Swab 5 cm x 5 cm 2
6. Sterilized elastic plaster 7 cm x 6 cm 1
7. First aid kit pouch 1
3
2
NO TE
This Tool Kit is kept in Tool box. Refer Page No. 27.

38
RECOMMENDED LUBRICANTS
Engine Oil
Grade Royal Enfield 15 W 50 API SL Grade
Engine Oil
(JASO MA)
Front Fork Oil
Grade Royal Enfield
Front Fork Oil
(or 1F Grade
Endurance)
Capacity 195 ml/leg
Brake Fluid
Grade DOT 3 or DOT 4
Capacity 60ml
ISO 14001 – EMS
Operation Control Process
1. All customers are advised timely replacement of
Engine Oil, Fork Oil & Brake Oil at the dealership
/ASP. In case done privately, it is advise to reach
old/used Oil to our authorised vendor through RE
Capacity 2.75 Ltrs. (with oil filter)
2.50 Ltrs. (during oil replacement)
Dealer/ASP
2. Similarly we advise for disposal of old/ use d
Battery, Tube & Tyres as mentioned in above point
No.1.
WARN ING
DO NOT sw itch oil br ands indis crim ina tel y bec a use some oil inter act ch emi cally wh en mix ed.
Use of inferior oils or non-detergent o ils can damage the engine.
DO NOT Mix DOT 3 & DOT 4 brake fluid together.

39
PERIODICAL MAINTENANCE
The maintenance schedule detailed here will help you to maintain your Royal Enfield motorcycle meticulo usly
and to get a long trouble free service. The sche dule provided herein is based upon average riding conditions
and indicates the mileage at which regular inspections, adjustments, replacements and lubrications must be
carried out.
The frequency of the maintenance must be shortened d epending upon the severity of the driving condition
OR if the motorcycle is used in a very dusty environment, severe climatic cold and hot conditions, bad roads,
stagnant water etc., Contact a nearest Royal Enfield Authorised Dealer / Service Point for expert advice and to
carry out the periodical maintenance.
WARN ING
For your personal welfare, all the listed service and maintenance recommendations should be performed.
Lack of regular maintenance at the suggested intervals may affe ct the saf e oper ation of your motorcycle
causing the motorcycle to malfunction and stall abruptly resulting in an accident and cause se rious injury.

40
PERIODICAL MAINTENANCE
S.
No.
Kms (x 1000) 0.5 3 6 9 12 15 18 21 24 27 30
Months 1.5 3 6 9
1 Engine Oil R I R I R I R I R I R
2 Engine oil filter paper element R R R R R R
3 Engine suction filter & secondary drain magnetic plug C C C C C C
4 Spark plugs (2 nos.) C,A C,A C,A C,A C,A R C,A C,A C,A C,A R
5 HT leads for crack I I I I I I I I I I I
6 Carburetor
7 Fuel Tap / Filter C C C C C C
8 Fuel tank C C C C C
9 Fuel hose / pipe I I I R I I I R I I I
10 Accelerator & Carburetor cable play adjustment A A A A A A A A A A A
11 Rubbe r hose, Air filter to Carburetor I I I I R I I I R I I
A : Adj ust C : Cle an D : D e-c arb on ise I : Inspe ct L : Lubri cat e R : Re place
DESCRIPTION
FREE SERVICE
whichever is earlier
Check level every 1000 Kms or earlier as required
Clean, Inspect and Tune at every 6000 Kms. of run
PAID SERVICE
Replace with
minor kit

41
PERIODICAL MAINTENANCE
S.
No.
Kms (x 1000) 0.5 3 6 9 12 15 18 21 24 27 30
Months 1.5 3 6 9
12 Rubber hose, Adaptor I I I I R I I I R I I
13 Exhaust system D
14 Air filter eleme nt C C C C R C C C R C C
15 Inlet / Exhaust valve seating I I
16 Clutc h lever free play Check & Adjust every 1000 Kms or earlier as required
17 Cylinder head (Combustion chamber) D
18 Hand levers & kick starter lever pivot Lubricate every 1000 Kms or earlier as requ ired
19 PAV pipes & hose clip I I C I C I C I C I C
20 Rear brake pedal pivot L L L L L L L L L L L
21 Battery terminals (apply petroleum jelly) C C C C C C C C C C C
22 Battery Electrolyte level I I I I I I I I I I I
23 Earth wire eyelet (behind batter y carrier) I I
24 Front Fork oil / leak I R I R I
A : Adj ust C : Cle an D : D e-c arb on ise I : Inspe ct L : Lubri cat e R : Re place
DESCRIPTION
FREE SERVICE
whichever is earlier
PAID SERVICE

42
PERIODICAL MAINTENANCE
S.
No.
Kms (x 1000) 0.5 3 6 9 12 15 18 21 24 27 30
Months 1.5 3 6 9
25 Rear Wheel Drive Chain
26 Rear brake pedal free play Adjust every 1000 Kms or earlier as required
27 Rear brake c am L L L L L
28 Steering ball races / play adjustment A L A L A
29 Spokes tightness & Wheel rim run out I I I I I I
30 Swing Arm pivot bush & spacer L L L R L
31 Tyre wear (Front & Rear) I I I I I I I I R I
32 Brake Fluid (Disc brake) I I I I R I I I R I I
33 Pivot-Side Stand, Center Stand, Pillion foot rest
A : Adj ust C : Cle an D : D e-c arb on ise I : Inspe ct L : Lubri cat e R : Re place
DESCRIPTION
Adjust for every 1000 Kms / Cle an, Lubricate &
FREE SERVICE
whichever is earlier
Adjustever y 3000 kms or earlier as required
L L L L L L L L L L L
PAID SERVICE
NO TE
For maintenance after 30,000 Kms, please repeat the same frequency levels specified above, in consultat ion
with a Royal Enfield Authorised Dealer / Service Point.

43
MIN OR MAINTENANCE TIPS
The following minor maintenance can be carried out
easily with simple tools. However, In case, if it is felt
that the adjustme nts are best done by an expert, we
recommend that the motorcycle be taken to a nearest
Royal Enfield Authorised Dealer / Service Point.
CONTROL CABLES, HANDLE LEVER, PIVOTS,
CENTER / SIDE STAND PIVOTS
Main & Side
Stand Pivot
Lever Pivot
n Lubricate after using the motorcycle in rain, after
water wash or if used in dusty c onditions.
n Wipe the area free of dirt / grease.
n Apply a few drops of oil on the pivo ts.
ENGINE OIL LEVEL INSPECTION
MAX
MIN
n Place motorcycle on its cent er stand on a firm
surf ace.
n Warm up engine for a few minutes & switch off.
n The level is correct if the oil level is in the middle
of the oil level window.
n Top up with recommended oil if required.

44
MIN OR MAINTENANCE TIPS
ENGINE OIL CHANGE
Seco nda ry
Drai n Plu g
Primary
Drai n C ap
Primary
Drai n Bol t
(Refer Periodical Maintenance Chart for frequenc y)
n Place motorcycle on its center stand on a firm flat
surf ace.
n Start e ngine and warm up for 2 minutes.
n Keep a clean tray below the engine.
n Remove primary drain cap, to drain oil & clean
suction filter, magnet.
n Then remove secondary drain plug to drain oil &
clean the magnet.
n Finally remove primay drain bolt to drain the
complete oil.
TILT VEHICLE
RH & LH
n Remove the oil filter element on the Crankcase
Cover RH.
n Assembly 3 bolts and tighten them. Ensure ‘O’ Ring
and gaskets are taken seat properly.
n Allow the oil to drain by tilting the motorcycle to
both sides.

45
MIN OR MAINTENANCE TIPS
n Wash the primary and sec ondary drain plugs
along with suction filter thoroughly and refit on
the crankc ase after all the oil is drained out.
n Soak a new oil filter element in the oil and refit
on the Crankcase Cover RH.
n Fill recommendedoil
to engine till the oil
le vel is upto “M AX”
level mark in the oil
win d o w i n C rankcase Cover RH.
Max
Min
NO TE
Re pla ce oil filt er el eme nt when eve r oil is bein g
replaced.
CAUTIO N
Filling up oil over MAX mark may cause smoke and /
or loss of power. Do NOT allow oil level to fall below
MIN m ark. Doing so may result in engine internal
damage or malf uncton.
SPARK PLUG
Clea n i n g and adjusting gap (R efer Periodic al
Maintenance Chart for frequency)
n Remove HT Lead and
th e spar k plu g from
M10
the c y l i n der h e a d
us i n g the pl ug
sp ann er an d tom my
bar as shown in pic.
n Clean the insulator tip
and elect rodes of the
M14
plug carefully using a
po i n t e d s c r a pe r o r
spark plug cleaner.
n Set the gap between
0.70 to 0.80 mm for
UR6DC & 0.80 to 0.90
mm for WQR8DC
n Refit the spark plug on
the cylinder head and
connect H.T. Lead.

46
MIN OR MAINTENANCE TIPS
MIN
MAX
BRAKE FLUID
Check if oil is above ‘min’ leve l. To top up, remove
cover with diaphragm and top up with either DOT 3
or D OT 4 as specified.
CAUTIO N
Please take care that it does not spill over any other
parts of the motorcycle. Please wipe the spille d brake
fluid immediately, if there is any spill over, using a
soft cloth (preferably a wet cloth) to avoid damage
to paint work or other parts.
Don’t mix DOT 3 & DOT 4 Brake fluid together.
INSPECTION OF TYRES AND WHEELS
n Insp ect the tyre pe rio dic all y for tre a d wea r,
cracks and cuts.
Minimum tread depth :
Front tyre : 1mm Rear tyre : 2 mm
n Check and remove stone, splinters, nails or other
particles embedded in the tyre treads.
n Bald spots / swelling may be caused by internal
damage. Replace the tyres, if defective.
n Replace tyres when the tread depth has reached
the minimum as specif ied.
n Periodically inspect wheels for spokes breakage
and wheel rim run out.
n Check prope r seating of the tyre beading on the
rim whenever the t yre is reassembled.
n Whenever a new tyre is installed, ensure rim and
spokes do not get damaged on acco unt of using
wrong levers.

47
MIN OR MAINTENANCE TIPS
n Use only standard tyres & tubes inflated to correct
pressure.
TYRE PRESSURE
Frontt
Solo 1.41 kg/cm2 2.11 kg/cm2
(20 PSI) (30 PSI)
With Pillion 1.55 kg/cm2 2.25 kg/cm2
(22 PSI) (32 PSI)
Rear
WARN ING
Tyres, rims and air valves must be corr ec tly
matched to wheel rims. See your Royal Enfield Dealer.
Mismatching tyre, tubes, rims and air valves may
result in damage to the tyre bead during mounting,
allow tyre slippage on the rim and cause tyre failure.
FRONT WHEEL REMOVAL
n Place the vehicle on center stand
n Place a wooden block
the f r o n t e n d o f
engine to support the
vehicle.
n Dis c o n n e ct s p e e d o
cable.
n Loosen the pinch bolt
on the RH fork guide.
n Ho l d f ron t a x l e b y
sp ann e r and loose n
axle nut then remove
nut along with washer.

48
MIN OR MAINTENANCE TIPS
n Tap and remove the fr ont wheel spindle
n Tilt the vehicle to RH Side and take out the wheel
along with speedo drive with bush & LH side spacer.
n Take out Speedo drive
and bush on the RH
side as shown in pic.
CAUTIO N
Do not press the front brake lever when wheel is
removed as this will re sult in the brake pads coming
too far out of the brake caliper.
n Place a 4 mm thick wooden piece or cardboard
sheet bet we en the bra ke pads to avoid pads
activation in the event the front brake lever is
accidently pressed.
FRONT WHEEL ASSEMBLY
n Remove t he woo den piece / card board sheet
placed betwe en the brake pads.
n Pl a c e the bu sh
sp e e d o d r i v e i n
po s iti o n and pl ace
speedo drive over it.
n Ins e r t t he w h e e l
al o n g wi t h sp e e d o
drive assembl y and
LH space r bet wee n
th e fr o n t fork end s
en sur ing the brak e
disc is lo c a t e d in
be t ween the bra ke
pads.
n Insert an d ta p t h e
fro n t wh e e l a x l e
gently inside.
n Refit the washer and
tighten the nut firmly.

49
MIN OR MAINTENANCE TIPS
n Tighten the pinch bolt on the RH fork guide .
n Rotate the wheel and che ck for smooth rotation.
n Connect the speedo cable t o speedo drive unit
and rotate the wheel to check for proper working
of speedo meter.
n Press brake lever 2 or 3 times to check front brake
efficiency.
NO TE
Ensure that the speedo drive is correctly located such
that the cable can be connected without dif ficulty.
REAR WHEEL REMOVAL
n Place the vehicle on center stand on a firm and
flat surface.
n Note and mark the position of the chain adjuster
but t i n g w i t h th e
stop per on the right
side.
n Remove split pin and
cas tle nut on the RH
side.
n Remove wheel spindle
fro m LH side al o n g
wi th chai n adjust er,
ta ki n g ca r e n o t t o
drop the wheel collar
and spacer from the
LH side of the wheel.
n Tilt vehicle to RH side
and s l ide o u t r e a r
wheel.

50
MIN OR MAINTENANCE TIPS
REAR WHEEL ASSEMBLY
n Ensure the four cush rubbers are in position inside
the rear wheel hub.
n Tilt vehicle to right
an d ins e r t wheel
assembly betwee n
the swing arms.
n Po s i t ion th e re ar
wh e e l wi t h cu s h
rubber on the rear
chain sprocket.
n Hold whe el coll ar
and s p a c e r i n
position.
n Ass e m b l e th e
whe e l sp i n d l e
al ong with ch a in
ad jus ter fro m the
LH side of veh icle
an d gent ly ta p it
through the wheel.
n Ensure that the chain adjuster knotch butts with
the stopper as appropriate when both the front
& rear w heels are aligned.
n Ti g hten the ca st le
nu t fi r m l y a nd
ensure that the hole
on ax l e sh a f t an d
the slot on castle nut
ar e al i g n e d to
enab l e s p lit p i n
fitment.
n Fix the split pin.
CAUTIO N
Do not force the spindle into the wheel as the threads
may get damaged. Tap it through the wheel gently.
WARN ING
Ensure the vehicle does not come off centre stand
wh i l e a s s e mbli n g / dis a s s e m b ling t he w h e e l
assembly. Failure to adhere could result in damage
or serious injur y.

51
MIN OR MAINTENANCE TIPS
ADJUSTMENTS - CLUTCH
2 to 3 mm
B
Clutch Lever (free play 2 to 3 mm)
A
CLUTCH FREE PLAY ADJUSTMENT
n Loosen the cable outer lock nut (A).
n Turn the Nut (B) Clockwise to reduce the play or
Anticlockwise to inc rease the free play.
n Check free play 2 t o 3 mm at Clutc h lever pivot
on handle bar end.
n Tighten lock nut ( A) after adjustment is do ne.
DRIVE CHAIN FREE PLAY (PLAY 25 - 30 MM)
n Remove rear wheel
split pin.
n Lo o sen cas t le nut,
spindle nut, anchor
nut and brake rod
nut.
n Turn the RH adjuster
cam a s a ppr o priately, t ill 25 to 30
mm s l a c k n e ss i s
achieved on the top
run of the chain.

52
MIN OR MAINTENANCE TIPS
n Check brake pedal free play, If necessary adjust.
n Check that the front
and rear wheels are
correc tly aligned.
n Turn the LH adjuster
cam appro pr iately,
to a l i g n b o t h t h e
wheels.
n Ch e ck an d ens u re
that the knotches on
the cam are resting
on t h e p i n i n the
swi ng arm on both
sides.
n Ap p l y b r ake a n d
tighten all nuts.
n Fi n all y Torq u e th e
anchor Nut.
CHECKING REAR BRAKE PEDAL HEIGHT
n Loosen the lock nut.
n Turn in or out the pedal stop pin bolt till the brake
pedal and front f ootrest are in the same he ight /
level as shown in above pic.
n Tighten the lock nut
n Check for free rotation of rear wheel.

53
MIN OR MAINTENANCE TIPS
REAR BRAKE PEDAL PLAY ADJUSTMENT
20 - 30 mm
l Turn in or out the adjuster nut at the brake rod end.
The recommended brake pedal travel is 20-30 mm.
l Check that the brake is not binding and the rear
wheel rotates freely.
WARN ING
Please ensure brakes are adjusted to their maximum
efficiency. Inefficient brakes can cause an accident.
Please ensure adequate caution while applying brakes.
Sudden application OR pressing the levers fully can caused
the wheels to lock. This may cause the motorcycle to skid
with possible los s of control and result in an accident
causing. Brake shoes must be inspected for wear every 4000
Kms. If you ride under adverse conditi ons, (steep hills,
heavy traffic, etc.) a more frequent inspection at 1600 Kms
or less, is required.
CHAIN LOCK FITMENT
The open end of the chain link master lock to face
opposite to normal direction of chain rotation as
shown pic.
WARN ING
The fitment in wrong dir ection lock can lead to
falling off of chain link thus disengaging the drive.
Th is will lead to pot e nti all y ha zar dou s sit u ati on
which, if not avoided, could result in serious injury.

54
MIN OR MAINTENANCE TIPS
ADJUSTMENT OF GAS FILLED SHOCKABSORBER
RH
LH
n The rear gas shock absorber is adjustable type i.e.,
the spring tension can be increased or reduced.
n Increase the spring tension for high load operation.
n Reduce the spring tension for low load operation.
n The adjuster provided on the bottom of the spring
has five knotches.
n Insert special ‘C ’ spanner on the bottom adjuster
and rotate to change knotch position.
n Turn the adjuster such that the adjuste r moves
up to increase the spring tension and vice versa
to reduce the spring tension.
n Ad just both le ft ha nd an d righ t han d sho c k
absorbers so that the same knotch rests on the
pin in both sides.
WARN ING
Ri d i n g t h e m o t o r cy c l e wit h t h e kn o t c h e s
ad ju sted in dif fer ent pos iti ons can cau se los s of
control and may lead to an accident.
Regularly inspect shock absorbers and front forks for
leaks. Replace worn parts. Worn parts can adversely
affect stability and handling.
NO TE
Ensure no fouling of any accessories with rear shock
ab s o r b er. Ch e c k for su ffici e n t ga p av ailab i l i ty
bet ween the shock absorber and the attachments
when the rear end of the motorcycle is fully loaded
and the shock absorbers are fully compressed.

55
MIN OR MAINTENANCE TIPS
REMOVAL OF BATTERY ON VEHICLE
n Th e ve h i c l e i s
provided with 12V 14 AH batt ery.
n Unlock (turn the key
anti clockwise) and
remove the battery
cover.
n Remove t he batter y
holding two rubber
straps gently.
n Pull out t he batte ry
and t urn , th e n
disconnect both the
te r m i n a l wire s
(neg a t i v e a n d
positive respectively)
n Take out the battery.
BATTERY MAINTENANCE
n The battery must be
periodically checked
for
H Cle anline ss and
co r r o s io n fr e e
terminals.
H Elec t r o l y t e level
mus t b e a b o ve
“MIN” level.
H If electrolyte level
is l o w, remo v e
caps and top up
with distilled water
only.
n Apply petroleum jelly
ove r t h e b a t ter y
terminals to avo i d
sulphation.

56
MIN OR MAINTENANCE TIPS
WARN ING
Always disconnect the negative (-) battery cable
fi r st and th e n the Re d po siti ve (+) ca ble whi l e
removing the battery connections.
NO TE
For chec king the batter y voltage and elec trolyte
specific gravity, contact author ised Royal Enfi el d
service or battery service centre.
CAUTIO N
n Do not use battery with low electrolyte level as
the bat tery internals cells w ill get damaged.
n Do not overfill the batter y elec trolyte level as it
will spill out through the overflow pipe and cause
corrosion to vehicle parts.
n Use only distilled water meant for use in batteries
to avoid damage to battery.
n Elec trolyte should not be filled when the level is
betwee n minimum & maximum levels indicated
in battery as “MIN” & “MAX”.
ASSEMBLY OF BATTERY ON VEHICLE
n Position the battery in the battery carrier such that
the negative terminal of the batter y is towards
fuel tap.
n Ensure ignition switch is in ‘OFF ’ condition.
n Connect the positive terminal (Red wire) first.
n Connect the negative terminal (Black wire) next.
n Smear the terminals with petroleum jelly. (Do not
use grease).
n Refit the rubbe r strap bracket to hold the battery.
n Refit LH side panel.
NO TE
Clean the wire terminals free of corrosion and keep
the terminals coated with petroleum jelly.
CAUTIO N
Connec t the +ve and -ve cables to the respective
batt e ry ter min als. Failu re to do so may result in
damage t o the motorcycle electric al system.

57
MIN OR MAINTENANCE TIPS
CHANGING ELECTRICAL COMPONENTS
HEAD LAMP BULB REPLACEMENT
n Loos e n th e he a d lam p
holdin g top scr ew. Then
pu l l o u t he a d l a m p
assembly.
n De tac h botto m lu g from
th e head lamp ho u sin g
body.
n Dis c o n n e c t he a d l a m p
wi r e co n n e c tors Green,
Ora n g e and Blue co l o r
terminals.
n Remove rubber grommet
from t h e r e f l e c t o r
Asse mb ly.
n Gent l y p r e s s t h e b u l b
holding ‘U’ clip from both
the sides downwards and
re lease it from refl ecto r
slot as shown.
n Pull out head lamp bulb
and inspect its filament for
fuse.
CAUTIO N
Ne ver to uch th e bul b with
your fingers, Finger prints will
etch the glass and decrease
bu l b li fe. Alway s ho ld th e
bulb with paper or clean dry
cloth during handling.

58
MIN OR MAINTENANCE TIPS
ASSEMBLING THE HEADLAMP
n Refix the new head lamp
halo g e n bulb in t o
reflector unit by locating
the wide protrude on top
side mounting.
n Fix bulb holding U clip into
re f l e c tor b o dy k n otc h ,
then press the both ends of
clip and lock in its slot.
n Fit the rubber grommet.
n Connect the wire couplers
as mentioned below.
TOP SIDE: GREEN COLOUR
RI G H T S I D E : B LU E C O LO UR
LEF T SIDE: ORANGE COLOUR
n Position the reflector ring
bottom lug into head lamp
ca sing slo t and sl ide it ,
the n t i g hte n t h e top
mounting screw.
NO TE
After connecting above said procedure, turn ignit ion
switch to “ON” condit ion and then check, ensure that
flash light w orking in HIGH BEAM mode.
If you use the bulb other than specified rating (12V
55/60W) may result in over loading electrical system
lead to premature fa i l u r e or fr e q u e n t batte r y
discharge.
59
MIN OR MAINTENANCE TIPS
TAIL LAMP BULB REPLACEMENT
n Remove the two nuts each
from RH & LH side of the
rear number plate holder.
n Pu l l o u t Ta i l L a m p
as se m b l y a l o n g wi t h
bracket and twist the bulb
holder in anticlockwise to
rem o v e bul b h old er
assembly.
n Turn old bulb to remove
and replace with a new
bulb.
n Refit the bulb holder and
turn clockwise to lock the
bulb holder.
n Re f i t t h e t ai l la mp
wi t h b r a c k e t on t he
reverse order of removal
process.
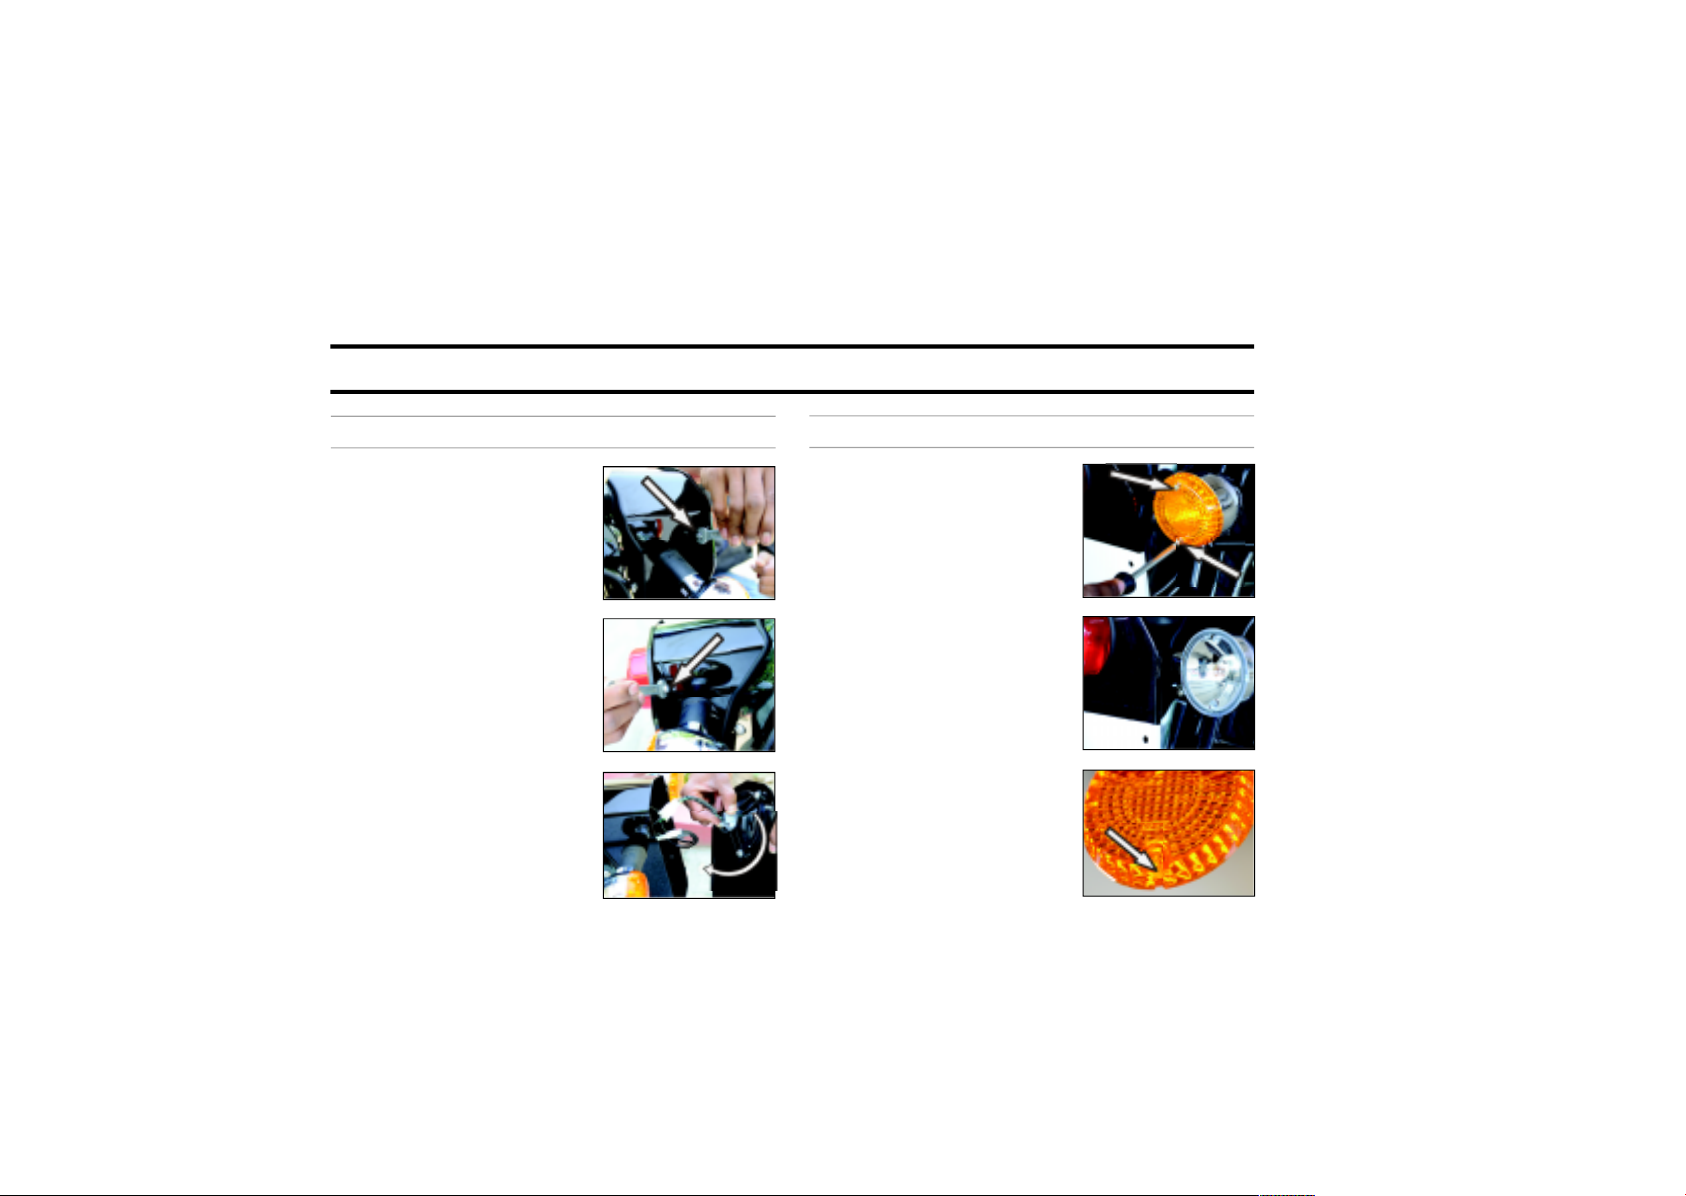
TRAFFICATOR BULB REPLACEMENT
n Re m ove th e 2 scr e ws &
take out trafficator glass
cover.
n Press bulb gently & Turn
anticlockwise to take out
the bulb.
n Po s i t ion t h e new b u l b
insi d e th e ho l der,
ensuring t hat the pins in
the bulb, match with the
slots in the holder.
n Pre ss the bulb and tu rn
clockwise to lock the bulb
in the holder.
n Refit the trafficator cover
cut s l o t m a r k f acin g
downwards and tight en
the 2 screws.
Cut Mark

60
MIN OR MAINTENANCE TIPS
1
2
3
4
FUSE
n Open the LH tool box.
n Take out tool kit.
n Remove fuse holder
ru b b e r & l i f t fus e
carrier top cover.
l Rep la ce the required fuse with the spar e fus e
available in the fuse carrier.
NO TE
Please e nsure to replace a spare fuse in the holder
at the earliest opportunity.
BLADE FUSE USAGE LIST
Fuse No.
1 Blue Main Fuse (15A)
2 Red Ignition Fuse (10A)
3 Red Spare Fuse (10A)
4 Blue Spare Fuse (15A)
Color
Remarks

61
MIN OR MAINTENANCE TIPS
AIR FILTER ELEMENT CLEANING / REPLACEMENT
n Insert the key, turn
anti c l o k w i se to
remove RH side air
filter box lid.
n Lo o sen th e fi l ter
ho l d i n g n u t by
10mm spanner as
shown in pic.
n Re m o v e t h e nut,
washer and cover
air filter to take out
air filter element.
n Tap the filter element
to re m o v e d u s t a s
sh o w n a n d c lea n
tho r o u g h ly b e f o r e
assembly.
Clean both intake
adaptors and duct as
shown in pic.
n As sem ble the fil ter
element and cover in
the reverse order of
dismantling process.
n Please ensure proper
sealing of cover plate
agai nst air fil ter
element.

62
WASHING PROCEDURE
PRECAUTIONS
n Wash vehicle when the engine is cold.
n Cover the silencer tail end and control switches with
suitable plastic bags and tie it firmly to prevent
water entry into them.
n Remove igni ti on key and seal key hole us ing
adhesive tape.
n Use a suitable engine degreaser, available with
your local parts store, to remove dirt or grease from
the engine external parts if required. Follow the
directions in the label carefully before using the
degreaser.
n Use low pressure jet of water to clean the entire vehicle.
n Never spray water with great force on head lamp,
speedometer, trafficator lights, front and rear wheel
hubs, electrical connections and wires, control
cables, sparkplug, battery, etc.
n Use luke warm water and mild detergent on the
painted components to remove dirt, etc.
n Rinse vehicle thoroughly with plain water to remove
the detergent and wipe vehicle dry.
n If possible, use compressed air and blow off water
particles from the obscure areas of the vehicle,
electrical connections etc.
AFTER WASHING
n Ensure, the vehicle is thoroughly dry by wiping with
a clean soft absorbent cloth or chamois leather.
n Remove all plastic bags and adhesive tapes.
n Lubricate control cables, pivot and rear chain with
lube oil
n Polish the painted and plate d surfaces using
polishing wax.
n Start the bike allow engine to idle and warm up.
n Drive the motorcycle slowly, applying both brakes
intermittently to dry up the brake shoes.
n Test brakes for full efficiency.
WARN ING
Observe warnings and cautions given on labels
of cleaning compounds.
When washing your motorcycle, be careful not to get
the brakes, engine, mufflers or air cleaner etc., too
wet.

63
STORAGE PRECAUTIONS
Incase you r Motorcycle is not going to be used for a
month or mor e, we advise the following precautions
to the taken.
n Carryout required repair / adjus tments on the
motorcycle.
n Wash the motorcycle thoroughly and lubricate as
per the maintenance chart.
n Start the engine, warm up for a few minutes and
switch off.
n Drain out the fuel comple tely from the fuel tank
and fuel lines.
n Remove spark plug. Pour in about 25ml of clean
engine oil through spark plug hole. Close the hole
and cra n k en g i n e s e v e r a l ti me s and re f i t
sparkplug.
n Clean rear chain thoroughly and apply a thin
film of lu be oil.
n Re m o v e b a t ter y f r o m t h e bi k e . C l e an the
terminals fre e of corrosion.
n Maintain electrolyte level between max or min
mark, by adding distilled water and wipe the
batter y dry.
n Sto r e t h e ba tte r y i n a c o ol, dr y a n d w e ll
ventilated place.
n Do not place the battery in direct sun light, near
open flame or where temperature is above 40oC
or below 0oC
n Cover the silencer with plastic bags to prevent
moisture entr y. Set the motorcyc le on its center
stand.
n Apply anti rust solutio n on al l chrome plated
part s. Take care not to apply this solution on
rubber or painte d parts.
n Store motorcycle in a clean covered area free -
of moisture and keep it covered to prevent dust
settling on it.

64
STORAGE PRECAUTIONS
PREPARING THE MOTORCYCLE FOR RE USE
n Remove anti rust solution from al l chrome plated
parts and clean the motorcycle.
n Inflate the tyres to the correc t tyre pressure.
n En s u re bat t e r y is fully cha rged an d pr oper
electrolyte level is maintained.
n Connect the battery.
n Lubricate all c ontrol cables and pivots.
n Check proper level of oil in engine.
n Fill fuel tank with fresh petrol.
n Check fuel line / hose for any cracks or cuts.
n Clean the air filter.
n Remove plastic covering from the silencer.
n Remove spar k plug on cylinder head and pour
in a few drops of engine oil. Cr ank engine a few
ti mes to lubr ica te cyli nde r walls and pis ton .
Clean spark plug and refit.
n Switch “ON” ignition switch.
n St ar t vehic le and war m up eng ine for a fe w
minu tes before riding the vehicle.
NO TE
Do not raise the engine rpm the moment it is started,
but allow the engine to ru n at idling speed.
CAUTIO N
Proper long-term storage is important for the safe ,
tro u b l e -f r e e o p er at i o n o f y ou r R o y a l E n fie l d
motorcycle.

65
LONG TRIP PRECAUTIONS
CHECKS PRIOR TO THE COMMENCEMENT OF
LONG JOURNEY
n Se r v ice the mot o r c ycle thor o u ghly at Ro y al
Enfield Authorised Dealer / Service Point as per
periodical maintenance chart. (Ref. Page No. 40,
41 & 42)
n Sufficient quantity of petrol in the fuel tank for
the journey planned.
n Check and correct tyre pressure if necessar y.
CHECKS AFTER EVERY 1500 KMS OF RUN
n Tightness of all fasteners.
n Tyre tread condition and wear of tyres.
n Battery condition and elect rolyte level.
n Correct oil level in engine.
n Working of all lights and horn.
n Proper drive chain tension.
ITEMS TO BE CARRIED
n Tool kit.
n First aid kit.
n Bulbs for Headlight, Trafficator light , Rear Tail
Lamp and Fuse (10 & 15 Amps).
n Accele rator, Clutch and Speedo Cable.
n Rear chain master link lock assembly.
n Spare tube, puncture repair kit - cold vulc anising
type.
n Foot operat ed Air Pump.
n Insulation tape.
n Spark plugs (M14 & M10), Fuel hose.

66
CARING FOR MILEAGE
STOP THE DROP THAT LEAKS
n Petrol leak at a rate of one dro p per min ute
accumulates to 5,25,600 drops a YEAR! That is, 35
ltrs of Petrol.
n Petrol leaks cause raw petrol smell. Get the leaks
arrested immediately.
USE RECOMMENDED FUELS AND OILS ONLY
n Wrong grade or adulterated petr ol does not burn
fully and resu lts in heav y smoke , high r ate of
ca r b on deposi t i on in cyl i n der an d ex h a ust
system and low mileage.
n Wrong grade and inferior quality oils do not
lub r i c a t e we l l . T h e movi n g p a r t s wear
prematurely.
n Always use r ecommended fuel (unleaded > 87
octane petrol) and oils only.
RIDE AT COST EFFECTIVE SPEED
n Cost effective speed (in top ge ar) is 45 to 50 Km
per hour.
n Both lower and higher road speeds cause low
kilometers per litre of pe trol.
PERFORM PREVENTIVE MAINTENANCE AS PER
RECOMMENDATIONS
REGULAR PREVENTIVE MAINTENANCE ENSURES
n Correc tly inflated tyres.
n Fasteners tightened to correct torques.
n Freely moving engine & transmission components.
n Properly tuned and adjusted engine .
CUT OFF NEEDLESS LOW IDLING
Ten minutes of low idling wastes 70 ml. of petrol. So
cut off the engine when you know you have to wait
for one minute or more.
STOP
n Revving : Ten revvings wastes 20 ml. of petrol
n Rac in g s tart s : Ten racing starts wastes 150 ml.
of petrol.

67
CARING FOR MILEAGE
n Sudden accel er ation : Ten sudden accelerations
wastes 100 ml. of petrol.
STOP BRAKE RIDING
n Brake riding pushes the brake shoes to come in
contac t with revolving drum. To overcome the
resulting frictional load, engine burns additional
petrol.
Result : Low mileage, loss of power, faster wear
of brake shoes and drum.
NEVER CLUTCH RIDE
n Clutch riding slips the clutch & engine drive does
not get tota lly transferre d to the rear wheel.
Besides low mileage, clutch riding ends up with
burnt friction plates of clutch, loss of power and
engine overheating.
AVOID FREQUENT BRAKING
n Br a king ar r ests th e ro a d spee d . Mo torc y c le
momentum is reduced. Additional fuel is burnt
for subsequent acc eleration.
n For better mileage, use front and rear brakes
simultaneously when absolutely needed. Control
vehicle speed with throttle and gear like smart
riders alw ays do .
AVOID OVER LOADING
n Over loading tyres the e ngine, wears the part s
faster and reduces mileage.
PARK YOUR VEHICLE IN SHADE WHEN NOT IN USE
n Pet rol is hi ghly vola tile . It evap ora tes unde r
no r m a l atm o s p h e r ic tem p e r a t ure . T he
evaportion increases with temperature. Pre vent
this loss by alw ays parking your vehicle under
shade.
n Too few Kms running per day allows more time
for evaporation affecting the mileage.

68
COMPLETE WIRING DIAGRAM - BULLET 500
NOTE : Co mplete Wiring D iagram is att ached on this pa ge.
VEHICLE STARTING PROCEDURE
BA SI C GUIDELINES TO BE FOL LO WED “ FOR ALL EL EC TRIC START V EHICLES”
1. In cold condition of the engine or for initial start, it is advised to use electric start (ES) only.
2. Apply choke in c old start condition. (ambient temperature <25° C)
3. DO NOT ATTEMPT – “HALF START” BY CASUALLY PRESSI NG ELECTRIC START BUTTON.
4. PLEASE P RESS AND HOLD ELECTRI C START BUTTON FOR ATLEA ST 3 SECO ND S CONTINUO USLY FOR
THE CRANKI NG OR UNTIL THE ENGINE FIRE S AND SUSTAINS, WHICHEVER IS EARLIER.
5. If engine doesn’t start in the first attempt, rele ase the ES button and repeat the above Procedure.
6. It is advised no t to apply ex cessive throttle during starting.
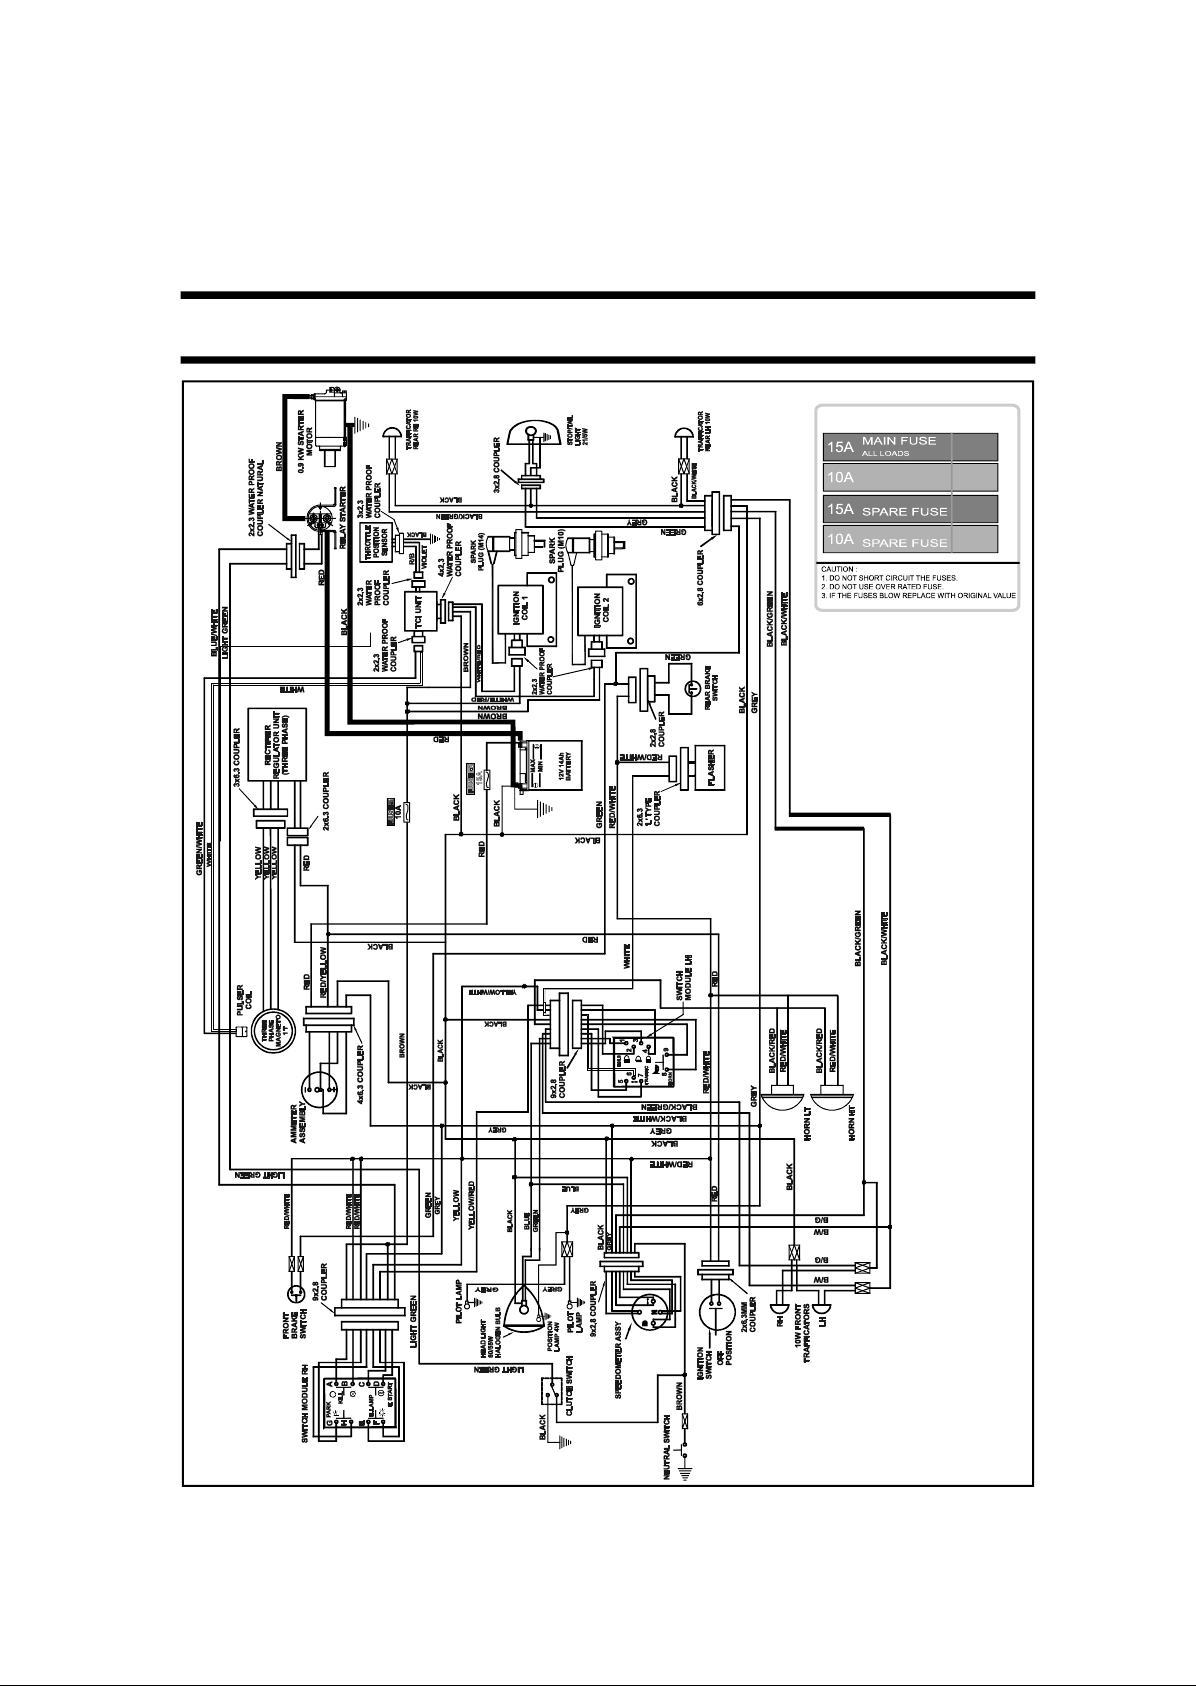
COMPLETE WIRING DIAGRAM - BULLET 500
COMPLETE WIRING DIAGRAM
BLA DE FUS E L IST
Fuse 1
T C I F U S E
IG N I T IO N L O A D S
Fuse 2
Fuse 3
Fuse 4

69
TROUBLE SHOOTING
CAUSES REMEDIES
I. E NGINE FAI LS TO STA RT
1) Ignition switch in ‘OFF’ Position ............................................ Switch on ignition.
2) Engine Stop switch in ‘OFF’ Position ..................................... Push stop switch to ‘ON’ position.
3) Clogged fuel line / tap ........................................................... Clean the fuel line / tap.
4) Vent hole clogged in fuel tank cap ..................................... Clean vent hole.
5) Fuse blown ............................................................................... Check and Replace (Ref. Page No. 60)
6) Carburetor passage & jets blocked ..................................... *Dismantle carburetor & clean jets
.................................................................................................... / passages
7) Carburetor float stuck in closed position ........................... Ensure correct movement of float
8) Spark plug cap / lead not connected ................................. Fix cap / lead firmly
9) Loose HT connections ............................................................. Fix connections firmly
10) HT Lead Damaged ................................................................. *Replace HT Lead
11) Spark plug electrode dirty / fouled ..................................... Clean spark plug & Reset gap.
12) Spark plug insulation cracked ............................................. Replace spark plug
* Contact Authorised Dealer / Service Point

70
TROUBLE SHOOTING
CAUSES REMEDIES
13) Poor compression
- Auto Decompressor not working ........................................ *Ensure free motion of flyweight in exhaust
.................................................................................................... cam gear assembly
- Loose spark plug .................................................................. *Tighten spark plug.
14) Clutch slipping ........................................................................ *Adjust clutch cable free play
II. EN GINE MI SFIRING
1) Water in petrol tank/carburetor ........................................... *Clean carburetor / petrol tank. Fill tank
.................................................................................................... with fresh petrol.
2) Leak through intake hose ..................................................... Tighten rubber hose suitably.
.................................................................................................... Replace if necessary
3) Loose spark plug cap ............................................................ Fix cap / lead firmly
4) Spark plug fouled/insulation broken .................................. Clean / reset gap or, replace.
5) Poor Compression ................................................................... *Auto decompressor sticky or not working
6) Loose electrical connections / coupler ............................... *Battery cable / fuse carrier / coils / TCI unit / Switch
* Contact Authorised Dealer / Service Point

71
TROUBLE SHOOTING
CAUSES REMEDIES
III. ENGINE STARTS, BUT R UNS I RREGULARLY & STOPS
1) Faulty fuel supply ................................................................... Clean the fuel line / tap / vent hole
2) Very low idling speed ............................................................. Increase idling speed
IV. PO OR PICKUP
1) Accelerator cable free play excessive ................................ Adjust cable free play
2) Faulty fuel supply .................................................................... Clean the fuel line / tap / vent hole
3) Choked air filter ...................................................................... Clean / Replace air filter
4) Loose carburetor mounting .................................................. Tighten clamps firmly
5) Brakes adjusted too tight ....................................................... *Re-adjust properly
6) Rear chain adjusted too tight ............................................... *Re-adjust properly
7) Clutch Slipping ........................................................................ *Adjust clutch cable free play
8) Under inflated tyres ................................................................ *Inflate to correct pressure
* Contact Authorised Dealer / Service Point

72
TROUBLE SHOOTING
CAUSES REMEDIES
V. WHI TE/BLUE SMO KE
1) Oil level in tank above the middle line in the ................... *Check and drain excess oil
oil level window
2) Worn out valve oil seal ........................................................... *Check / Replace
3) Worn out piston ring / cylinder ............................................. *Check / Replace
VI. EN GINE OV ERH EATI NG
1) Cylinder fins not clean ........................................................... Clean the cylinder fins at regular intervals
2) Clutch slipping ........................................................................ *Check and correct
3) Suction leakage ...................................................................... *Check and correct
4) Incorrect carburetor adjustments ........................................ *Check and correct
VII. E XCESS IVE F UEL CON SUM PTION
1) Fuel leakage ............................................................................ *Check and rectify
* Contact Authorised Dealer / Service Point

73
TROUBLE SHOOTING
CAUSES REMEDIES
2) Worn out carburetor jets ........................................................ *Change the defective jets
3) Incorrect carburetor adjustments ........................................ *Check and adjust correctly
4) Choked air filter ...................................................................... Clean / Replace
5) Poor compression .................................................................... *Auto decompressor sticky or
.................................................................................................... not working properly
6) Under inflated tyres ................................................................ Inflate to correct pressure
VIII. IGNIT ION KNOC K
1) Carburetor adjusted too lean ............................................... *Check and readjust
2) Suction / intake system leakage ........................................... *Check and correct
IX. BR AKES POOR
1) Not adjusted properly ............................................................ *Adjust properly
2) Oil / grease on lining or drum or disc ................................. *Clean and refit
* Contact Authorised Dealer / Service Point

74
TROUBLE SHOOTING
CAUSES REMEDIES
3) Linings worn / Uneven wear ................................................. *Replace linings
4) Drum scored / Uneven wear ................................................. *Rectify or Replace drums
X. VEHICLE WO BBL ES
1) Wheel rim runout .................................................................... *Rectify
2) Loose / Broken spokes ............................................................ *Tighten / Replace spokes
3) Tyres not fitted correctly ........................................................ *Refit tyres correctly
4) Wheels misaligned ................................................................. *Ensure proper alignment
5) Under inflated tyres ................................................................ Inflate to correct pressure
XI. ELECTRICAL S
Bulbs do not glow
1) Loose / improper connection ................................................ *Check and correct
2) Bulb fused ................................................................................. *Replace bulb
3) Fuse blown ............................................................................... Replace fuse
4) Switch defective ...................................................................... *Replace switch
* Contact Authorised Dealer / Service Point

75
TROUBLE SHOOTING
CAUSES REMEDIES
Horn not working
1) Loose connections .................................................................. *Check and correct
2) Requires tuning ....................................................................... *Tune horn
3) Switch Defective ...................................................................... *Replace
4) Fuse blown ............................................................................... Replace fuse
Trafficators not working
1) Loose / improper connections .............................................. Check and correct
2) Bulb fused / Fuse blown ......................................................... Replace
3) Switch defective ...................................................................... *Replace
4) I.C. Flasher defective .............................................................. *Replace
Brake light remains “ON”
(1) Switch not adjusted properly ................................................ *Adjust switch properly
(2) Switch sticky ............................................................................. *Replace switch
* Contact Authorised Dealer / Service Point

76
TROUBLE SHOOTING
CAUSES REMEDIES
XII. ELECTRIC START
VEHICLE NOT STARTING
(1) Neutral indicator not glowing .............................................. Bring the vehicle in neutral
(2) If vehicle is without neutral indicator ................................. Press the clutch lever & start switch together
(3) Loose Connection ................................................................... *Check & Correct
(4) Starter relay not working ....................................................... *Check & Replace
(5) Malfunctioning of clutch switch ........................................... *Check & Replace
(6) Malfunctioning of Starter switch .......................................... *Check & Replace
(7) Battery discharge .................................................................... *Check & Recharge
(8) Motor not working .................................................................. *Check & Replace
(9) Battery not fully charged ....................................................... *Check & charge
(10) Failure of sprag clutch ........................................................... *Check & replace
* Contact Authorised Dealer / Service Point

77
WARRANTY TERMS & CONDITIONS
Royal Enfield Motor Cycles are manufactured by following best Quality practices in respect of the material and
workmanship.
Royal Enfield (RE) warrants Bullet 500 Motorcycle to be free from manufacturing and material defect under normal
use subject to following conditions.
1. RE will replace or repair defective part / parts at their Authorised Dealer / Service point, free of charge within
a period of 12 months from the date of sale (date of Installation) or 10,000 kms whichever occurs earlier.
2. The warranty is applicable only to first registered owner.
3. The warranty shall be applicable only if all the free services are availed at the respective period / kilometer
range as per the schedule given in the owner’s manual from Authorised Dealer / Service Point.
4. During the warranty period, RE’s obligations shall be limited to repairing / replacing free of charge such part
or parts of the vehicle, which on examination to have manufacturing defect. Such defective part / parts which
have been replaced becomes property of RE.
5. Cost of oil, oil filter, fuel and other consumables are chargeable to the customer.
6. Claims on proprietary items like tyres, tubes, spark plug, battery etc. should be taken up with respective
manufacturer or their authorised agents in the area directly by customer. RE shall not be liable in any manner
to replace them though their Dealers will provide assistance in preferring such claims on their manufacturer.
7. Warranty shall not apply to:
(a) Normal ageing, detoriation or rusting of plated parts paints coat, rubber parts, soft items, glass items,
plastic parts etc.

78
WARRANTY TERMS & CONDITIONS
(b) Components like fuel line, oil filter element, control cables, brake pads, brake shoes, clutch plates, which
are subjected to normal wear and tear.
(c) Damages due to use of lubricant / oil / grease etc. other than specified by RE.
(d) Damages due to use of non-genuine parts.
(e) Damages due to lack of proper maintenance of the vehicle.
(f) Damages due to incorrect driving or riding habits.
(g) Parts damaged due to accidents, collision, abuse etc.
(h) Irregularities not recognized as affecting the quality or function of the vehicle such as slight vibration, oil
leakage, discoloration of exhaust bent pipe / silencer / soft, hard shock absorber etc.
(i) Defects arising from fitment of unauthorised / additional Electrical loads.
(j) Vehicle serviced / repaired at unauthorised service points.
(k) Vehicle used for competition / racing.
(l) Electrical component like bulbs, fuses etc.
(m) Normal maintenance operations like adjustment of brakes, cleaning fuel system, engine tune up and
other such adjustments
8. RE reserves the right to finally decide on all warranty claims
9. RE reserves the right to make changes in Design of the vehicle without any obligation to install these changes
on previously supplied vehicles.

79
EMISSION WARRANTY
In compliance with the provisions of Rule 115(2) of the Central Motor Vehicle Rules, 1989, Royal Enfield certifies
that the following warranty is applicable to those components liable to affect the emission of the gaseous pollutants
in its range of motorcycles, in normal use to which it may be subjected to.
This emission warranty comes into force from 01st July 2001 and is valid for a period of 30,000 Kms. or 36 months,
whichever occurs earlier, from the date of sale to the first customer and is in addition to and parallel to the
warranty policy, conditions and obligations laid down in the Owner ’s Manual.
Royal Enfield further warranty that if on examination by its Authorised Dealer / Service Point, the motorcycle fail to
meet the specified emission standards, then the Authorised Dealer / Service Point shall take necessary corrective
measures and shall at its sole discretion, repair or replace free of charge such components of the emission control
system to meet the required emission standards.
The method/s of examination to determine the warranty conditions of the emission warranty related components
will be at the sole discretion of Royal Enfield and / or our Authorised Dealer / Service Point and results of such
examination will be final and binding. If on examination the warranty conditions of the part/s is/are not established,
Royal enfield will have the right to charge all, or part of the cost of such examination to the customer in addition
to the cost of the components.
In case of acceptance of the component/s under Emission warranty, Royal Enfield will replace free of charge, the
component/s as required. However, the consumables like fuel, lubricants, solvents, etc shall be chargeable to the
customer as per actual.
In case any of the components covered under emission warranty or the associated parts, are not independently
replaceable. Royal Enfield will have the sole discretion to replace either the entire assembly or parts of the assembly,
through suitable repairs.
Royal Enfield reserves the right to carry out necessary consequential repairs to the motorcycle or replace any
part, in addition to the repair or replacement of the components covered under emission warranty, to establish
compliance to in-use emission standards. Such repairs / replacements will be chargeable to the customer.

80
EMISSION WARRANTY
All parts removed for replacement under warranty will become the property of Royal Enfield.
Royal Enfield will not be responsible for the cost of transportation of the motorcycle to the nearest Authorised
Dealer / Service Point OR for any loss due to non availability of the motorcycle during the period of examination
and repairs by Royal Enfield and / or their Authorised Dealer / Service Point.
Royal Enfield will not be responsible for any penalties that may be charged by statuatory authorities on account
of failure to comply with the in-use emission standards.
That cost/s incurred to check emission of the motorcycle will have to be borne by the customer.
Emission warranty will be applicable irrespective of the change of ownership of the vehicle provided all the
conditions as laid down in this document are met from the date of original sale of the motorcycle.
THE WARRANTY SHALL APPLY IF THE CUSTOMER
n Observes all the important instructions and any other precautions listed in the owner’s manual.
n Under all circumstances uses lubricants and fuel as recommended by Royal Enfield.
n Regularly obtains and carries out maintenance in accordance with Royal Enfield guidelines and enters the
details in the Log book.
n Immediately approaches the nearest Authorised Dealer / Service Point upon discovery of failure to comply
with the IN-USE emission standard inspite of having maintained and used the vehicle in accordance with the
instructions in the owner’s manual and having carried out such repairs and adjustments as may be required
with a view to establish such compliance.
n Produces the ‘Pollution Under Control’ certificate valid for the period immediately preceding the test during
which the failure is discovered, the test having been carried out either for obtaining a new certificate or

81
EMISSION WARRANTY
pursuant upon being directed by an officer as referred to in sub rule (2) of rule 116 of the Central Motor
Vehicles Rules (CMVR).
n Produces the owner’s manual and Log book for verification details.
n Produces receipts covering maintenance of the motorcycle is specified in the owner’s manual from the date
of original purchase of the vehicle.
n Produces valid certificate of Insurance and R.T.O Registration Certificate (RC Book).
THE EMISSION WARRANTY SHALL NOT APPLY IF
n A valid “Pollution under control” certificate is not produced.
n The motorcycle is not serviced by Authorised Dealer / Service Point as per the service schedule described in
the maintenance chart.
n The motorcycle has been subjected to abnormal use, abuse, neglect and improper maintenance or has met
with an accident.
n Replacement parts not specified and approved by Royal Enfield have been used.
n The motorcycle, or parts thereof, has been altered, tampered with or modified or replaced in an unauthorised
manner.
n The odometer is not functioning or the odometer and / or its reading has been changed / tampered with, so
that the actual distance covered cannot be readily determined.
n The motorcycle has been used for competitions, races, and rallies or for the purpose of establishing records.
n On examination by Royal Enfield or its Authorised Dealer / Service Point, if the motorcycle shows that any of
the conditions stipulated in the Owner ’s manual with regard to use and maintenance have been violated.

82
EMISSION WARRANTY
n The motorcycle has been run on adulterated / leaded fuel or lubricant other than those specified by Royal
Enfield in the Owner’s manual or any other document given to the customer at the time of sale of the motorcycle.
n The emission related components are tampered with.
n All service and parts related bills and vouchers incurred during the tenure of the emission warranty is not
produced.
n All maintenance activities carried out on the vehicle during the tenure of the emission warranty is not entered
in the log book.
TIPS TO BE ON TH E R IGHT SIDE OF LAW
n Always get your vehicle checked to meet the emission regulations through and authorised emission checking
center.
n Always carry a valid ‘Pollution Under Control’ certificate with you at all times during the validity of the emission
warranty (30,000 Kms / 3 years from the date of first sale)
TIPS T O RED UCE POLLUTI ON
1. Ensure that the periodical maintenance is carried out as stipulated in the owner’s manual through a Royal
Enfield Authorised Dealer / Service Point.
2. Use only Unleaded petrol (> 87 Octane) from reputed fuel pumps.
3. Ensure the fuel used is not adulterated.
4. Use correct spark plug as recommended in the owner’s manual.
5. Use lubricants as per recommendations given on grade / brand in the owner’s manual.

83
ALL INDIA ROAD SIGNS
MANDATORY SIGNS
INFORMATION SIGNS
CAUTIONARY SIGNS

84
FREE SERVICE COUPONS
It is our endeavour to provide exce lle nt service to your Royal Enfield Motor Cycle at all times. Towards this we
provide four free services at specific Intervals.
Please avail these se rvices at the specified time, in any of the Royal Enfield Authorised Dealer / Service Point
nearest to you and as a token of satisfactor y service, kindly retu rn the free service coupon duly filled in and
signed, to the service outlet.
Availing the free ser vic es in the specified time is a prerequisite to warranty consideration.

85
1ST FREE SERVICE
ST
1
FREE
SERVICE
500 Kms
or
45+8 days
whichever is
earlier from the
date of sale
Enter the Details
in Free Service
Record
(Cost of oil,
oil filter element
and other
consumables
used are
chargeable to
the customer)
500 KMS OR 45+8 DAYS WHICHEVER IS EARLIER FROM DATE OF SALE
Customer Name : Dealer Code :
Address :
Frame No:
Engine No:
Vehicle Installa tion Form No.
ODO Reading :
Sold by (Dealer’s Name & Ad dress)
Received the above vehicle after the service having been done to my entire satisfaction.
Customer ’s Signature : ................................. Date :
Contact Phone / Mobile No.:
Regn. No:
Sale Date:
Serviced Date:
Serviced by
(Dealer’s/ASP Name & Address)

86
1ST FREE SERVICE ACTIVITIES
1. Water wash the vehicle and dry it with a clean cloth
2. Electrolyte .................................................... Check level & top-up
3. Battery terminals ........................................ Clean and apply petroleum jelly
4. Drive chain free play ................................. Check, clean, lubricate & adjust
5. Rear brake pedal pivot ............................. Lubricate
6. Rear brake .................................................. Adjust
7. Wheel rims front & rear ............................. Check spokes tightness
8. Front & Rear brake ..................................... Check & Adjust
9. Front fork oil leak ....................................... Check for leakage
10. Air filter ........................................................ Clean
11. Spark plugs (2 Nos) .................................... Check, clean & adjust gap
12. H.T. Leads .................................................... Inspect for cracks
13. Carburetor ................................................... Drain & Tune
14. Fuel filter ...................................................... Clean
15. Fuel hose ...................................................... Inspect for cracks
16. Rubber hose, Air filter to carburetor ....... Inspect for cracks
17. Accelerator cable ....................................... Check & adjust play
18. Clutch cable ................................................ Adjust play
19. Engine oil sump strainer ........................... Clean
20. Engine oil ..................................................... Replace
21. Engine oil filter element ............................ Replace
22. Hand levers & kick starter pivot ............... Lubricate
CUSTOMER
COPY
Job Card No:
Date :
Odo Reading :
Name of Dealer/
ASP with Code:
..........................
..........................
ASP / Dealer’s
Stamp &
Signature
87
2ND FREE SERVICE
ND
2
FREE
SERVICE
3000 Kms
or
90+15 days
whichever is
earlier from the
date of sale
Enter the Details
in Free Service
Record
(Cost of oil,
oil filter element
and other
consumables
used are
chargeable to
the customer)
3000 KMS OR 90+15 DAYS WHICHEVER IS EARLIER FROM DATE OF SALE
Customer Name : Dealer Code :
Address :
Frame No:
Engine No:
Vehicle Installa tion Form No.
ODO Reading :
Sold by (Dealer’s Name & Ad dress)
Received the above vehicle after the service having been done to my entire satisfaction.
Customer ’s Signature : ................................. Date :
Contact Phone / Mobile No.:
Regn. No:
Sale Date:
Serviced Date:
Serviced by
(Dealer’s/ASP Name & Address)

88
2ND FREE SERVICE ACTIVITIES
1. Water wash the vehicle and dry it with a clean cloth
2. Electrolyte .................................................... Check level & top-up
3. Battery terminals ........................................ Clean and apply petroleum jelly
4. Drive chain free play ................................. Check, clean, lubricate & adjust
5. Rear brake pedal pivot ............................. Lubricate
6. Rear brake .................................................. Adjust
7. Wheel rims front & rear ............................. Check spokes tightness
8. Front & Rear brake ..................................... Check & Adjust
9. Front fork oil / leak ..................................... Check for leakage
10. Air filter ........................................................ Clean
11. Spark plugs (2 Nos) .................................... Check, clean & adjust gap
12. H.T. Leads .................................................... Inspect for cracks
13. Carburetor ................................................... Drain & Tune
14. Fuel filter ...................................................... Clean
15. Fuel hose ...................................................... Inspect for cracks
16. Rubber hose, Air filter to carburetor ....... Inspect for cracks
17. Accelerator cable ...................................... Check & adjust play
18. Clutch cable................................................ Adjust play
19. Steering free play ....................................... Check & Adjust
20. Engine oil ..................................................... Check level & top-up
21. Hand levers & kick starter pivot ............... Lubricate
CUSTOMER
COPY
Job Card No:
Date :
Odo Reading :
Name of Dealer/
ASP with Code:
..........................
..........................
ASP / Dealer’s
Stamp &
Signature

89
3RD FREE SERVICE
RD
3
FREE
SERVICE
6000 Kms
or
180+15 days
whichever is
earlier from the
date of sale
Enter the Details
in Free Service
Record
(Cost of oil,
oil filter element
and other
consumables
used are
chargeable to
the customer)
6000 KMS OR 180+15 DAYS WHICHEVER IS EARLIER FROM DATE OF SALE
Customer Name : Dealer Code :
Address :
Frame No:
Engine No:
Vehicle Installa tion Form No.
ODO Reading :
Sold by (Dealer’s Name & Ad dress)
Received the above vehicle after the service having been done to my entire satisfaction.
Customer ’s Signature : ................................. Date :
Contact Phone / Mobile No.:
Regn. No:
Sale Date:
Serviced Date:
Serviced by
(Dealer’s/ASP Name & Address)
90
3RD FREE SERVICE ACTIVITIES
1. Water wash the vehicle and dry it with a clean cloth
2. Electrolyte .................................................... Check level & top-up
3. Battery terminals ........................................ Clean and apply petroleum jelly
4. Drive chain free play ................................. Check, clean, lubricate & adjust
5. Rear brake pedal pivot ............................. Lubricate
6. Rear brake .................................................. Cam clean, lubricate & Adjust play
7. Swing Arm Bush & Spacer ......................... Lubricate
8. Wheel rims front & rear ............................. Check spokes tightness
9. Front & Rear brake ..................................... Check & Adjust
10. Tyres front & rear ........................................ Check wear and tread depth
11. Air filter ........................................................ Clean
12. Spark plugs (2 Nos) .................................... Check, clean & adjust gap
13. H.T. Leads .................................................... Inspect for cracks
14. Carburetor ................................................... Clean, O/H & Tune
15. Fuel filter ...................................................... Clean
16. Fuel hose ...................................................... Inspect for cracks
17. Rubber hose, Air filter to carburetor ....... Inspect for cracks
18. Accelerator cable ....................................... Check & adjust play
19. Clutch cable ................................................ Adjust play
20. Engine oil sump strainer ........................... Clean
21. Engine oil ..................................................... Replace
22. Engine oil filter element ............................ Replace
23. Hand levers & kick starter pivot ............... Lubricate
24. PAV System ................................................... Check & Clean
CUSTOMER
COPY
Job Card No:
Date :
Odo Reading :
Name of Dealer/
ASP with Code:
..........................
..........................
ASP / Dealer’s
Stamp &
Signature

91
4TH FREE SERVICE
TH
4
FREE
SERVICE
9000 Kms
or
270+15 days
whichever is
earlier from the
date of sale
Enter the Details
in Free Service
Record
(Cost of oil,
oil filter element
and other
consumables
used are
chargeable to
the customer)
9000 KMS OR 270+15 DAYS WHICHEVER IS EARLIER FROM DATE OF SALE
Customer Name : Dealer Code :
Address :
Frame No:
Engine No:
Vehicle Installa tion Form No.
ODO Reading :
Sold by (Dealer’s Name & Ad dress)
Received the above vehicle after the service having been done to my entire satisfaction.
Customer ’s Signature : ................................. Date :
Contact Phone / Mobile No.:
Regn. No:
Sale Date:
Serviced Date:
Serviced by
(Dealer’s/ASP Name & Address)

92
4TH FREE SERVICE ACTIVITIES
1. Water wash the vehicle and dry it with a clean cloth
2. Electrolyte .................................................... Check level & top-up
3. Battery terminals ........................................ Clean and apply petroleum jelly
4. Drive chain free play ................................. Check, clean, lubricate & adjust
5. Rear brake pedal pivot ............................. Lubricate
6. Rear brake .................................................. Adjust
7. Wheel rims front & rear ............................. Check spokes tightness
8. Front & Rear brake ..................................... Check & Adjust
9. Front fork oil / leak ..................................... Check level & replace oil
10. Air filter ........................................................ Clean
11. Spark plugs (2 Nos.) ................................... Check, clean & adjust gap
12. H.T. Leads .................................................... Inspect for cracks
13. Carburetor ................................................... Drain & Tune
14. Fuel filter ...................................................... Clean
15. Fuel hose ...................................................... Inspect for cracks
16. Rubber hose, Air filter to carburetor ....... Inspect for cracks
17. Accelerator cable ...................................... Check & adjust play
18. Clutch cable................................................ Adjust play
19. Engine oil strainer ...................................... Clean
20. Engine oil ..................................................... Check level & top-up
21. Hand levers & kick starter pivot ............... Lubricate
22. Steering free play / system ........................
23. Tyres ............................................................. Check wear and tread depth
Check and Lubricate Steering Balls & Adjust
CUSTOMER
COPY
Job Card No:
Date :
Odo Reading :
Name of Dealer/
ASP with Code:
..........................
..........................
ASP / Dealer’s
Stamp &
Signature

93
PAID SERVICE / MAINTENANCE RECORD
CU ST OME R COP Y
12,000 + 250 Kms. Ser vic e
Job Card No :.................Date : .........................
Odo Reading : ................. Dealer Code : .............
Brief Work Done :
Dealer ’s Stamp & Signature
CU ST OME R COP Y
15,000 + 250 Kms. Ser vic e
Job Card No :.................Date : .........................
Odo Reading : ................. Dealer Code : .............
Brief Work Done :
Dealer ’s Stamp & Signature
DEAL ER / ASP C OPY
12,000 + 250 Kms. Ser vic e
Job Card No :.................Date : .........................
Odo Reading : ................. Dealer Code : .............
Brief Work Done :
Dealer ’s Stamp & Signature
DEAL ER / ASP C OPY
15,000 + 250 Kms. Ser vic e
Job Card No :.................Date : .........................
Odo Reading : ................. Dealer Code : .............
Brief Work Done :
Dealer ’s Stamp & Signature

94
PAID SERVICE / MAINTENANCE RECORD
DEAL ER / ASP C OPY CUSTO MER C OPY
12,000 + 250 Kms. Ser vic e
12,000 + 250 Kms. Ser vic e
Brief Work Done :
Dealer ’s Stamp & Signature
Brief Work Done :
Dealer ’s Stamp & Signature
DEAL ER / ASP C OPY CU ST OME R COP Y
15,000 + 250 Kms. Ser vic e
Brief Work Done :
Dealer ’s Stamp & Signature
Brief Work Done :
Dealer ’s Stamp & Signature
15,000 + 250 Kms. Ser vic e

95
PAID SERVICE / MAINTENANCE RECORD
CU ST OME R COP Y
18,000 + 250 Kms. Ser vic e
Job Card No :.................Date : .........................
Odo Reading : ................. Dealer Code : .............
Brief Work Done :
Dealer ’s Stamp & Signature
CU ST OME R COP Y
21,000 + 250 Kms. Ser vic e
Job Card No :.................Date : .........................
Odo Reading : ................. Dealer Code : .............
Brief Work Done :
Dealer ’s Stamp & Signature
DEAL ER / ASP C OPY
18,000 + 250 Kms. Ser vic e
Job Card No :.................Date : .........................
Odo Reading : ................. Dealer Code : .............
Brief Work Done :
Dealer ’s Stamp & Signature
DEAL ER / ASP C OPY
21,000 + 250 Kms. Ser vic e
Job Card No :.................Date : .........................
Odo Reading : ................. Dealer Code : .............
Brief Work Done :
Dealer ’s Stamp & Signature

96
PAID SERVICE / MAINTENANCE RECORD
DEAL ER / ASP C OPY CUSTO MER C OPY
18,000 + 250 Kms. Ser vic e
18,000 + 250 Kms. Ser vic e
Brief Work Done :
Dealer ’s Stamp & Signature
Brief Work Done :
Dealer ’s Stamp & Signature
DEAL ER / ASP C OPY CU ST OME R COP Y
21,000 + 250 Kms. Ser vic e
Brief Work Done :
Dealer ’s Stamp & Signature
Brief Work Done :
Dealer ’s Stamp & Signature
21,000 + 250 Kms. Ser vic e

97
PAID SERVICE / MAINTENANCE RECORD
CU ST OME R COP Y
24,000 + 250 Kms. Ser vic e
Job Card No :.................Date : .........................
Odo Reading : ................. Dealer Code : .............
Brief Work Done :
Dealer ’s Stamp & Signature
CU ST OME R COP Y
27,000 + 250 Kms. Ser vic e
Job Card No :.................Date : .........................
Odo Reading : ................. Dealer Code : .............
Brief Work Done :
Dealer ’s Stamp & Signature
DEAL ER / ASP C OPY
24,000 + 250 Kms. Ser vic e
Job Card No :.................Date : .........................
Odo Reading : ................. Dealer Code : .............
Brief Work Done :
Dealer ’s Stamp & Signature
DEAL ER / ASP C OPY
27,000 + 250 Kms. Ser vic e
Job Card No :.................Date : .........................
Odo Reading : ................. Dealer Code : .............
Brief Work Done :
Dealer ’s Stamp & Signature

98
PAID SERVICE / MAINTENANCE RECORD
DEAL ER / ASP C OPY CUSTO MER C OPY
24,000 + 250 Kms. Ser vic e
24,000 + 250 Kms. Ser vic e
Brief Work Done :
Dealer ’s Stamp & Signature
Brief Work Done :
Dealer ’s Stamp & Signature
DEAL ER / ASP C OPY CU ST OME R COP Y
27,000 + 250 Kms. Ser vic e
Brief Work Done :
Dealer ’s Stamp & Signature
Brief Work Done :
Dealer ’s Stamp & Signature
27,000 + 250 Kms. Ser vic e
 Loading...