

Royale Limousine, Cadillac DTS, Lincoln Town Car, Lincoln Navigator, Ford Expedition Owner's Manual
Royale Limousine Owner’s GuideRoyale Limousine Owner’s Guide
Cadillac DTS • Lincoln Town Car • Lincoln Navigator • Ford Expedition
W C C ™
www.royalelimo.com
W C C ™
www.royalelimo.com
C
o r p o r a t e He a d q u a r t e r s
- 99 Newark Street, Haverhill, MA 01832
ph. 800.544.5587 • fx. 978.521.5425
2003-2007 TC/NAV rev. 9.15.08

Table of Contents
Contents
Congratulations on Your Purchase of a Royale Limousine
Manufactured Where Craftsmanship Counts! 1
Have Questions? A Royale Team Member is Ready to Help. 2
Helpful Hints and Recommendations 3
Control Panel Users Guide - Driver (Standard Equipment) 4
Control Panel Users Guide - Passenger (Standard Equipment) 6
Audio Video System Users Guide 8
Driver’s Touch Control Operation Guide (Optional Equipment) 9
Passenger’s Touch Control Operation Guide (Optional Equipment) 11
Mobile Hot Spot (Optional Equipment) 15
Mobile Computer (Optional Equipment) 15
Advanced Lighting and Fan Speed Features 16
Intercom Adjustments 17
Operating The LED Fiber Illuminator 18
DIP Switch Functions 19
Main Circuit Board Photo 20
Fuse Values 20
Circuit Board Pin Location · Color · Function 21
Main Board Trigger Wire Location – Color – Factory Fuse Location 22
Wire and Harness Location · Color · Function 23
Wire and Harness Location · Color · Function 24
Power Distribution Module – Town Car 25
Power Distribution Module – DTS and Navigator 26
Wire Routing Extension · Town Car 27
Wire Routing Main Harness · Town Car 28
Wire Routing Extension · DTS 29
Wire Routing Main Harness · DTS 30
Wire Routing Extension · Navigator 31
Wire Routing Main Harness · Navigator 32
Heater Control Valve Operation 33
Manual Heater Control Valve Locations · Town Car · Navigator · DTS 34
Dual Battery Schematics · Town Car and DTS · Optional Equipment 35
Dual Alternator Location · Town Car · Optional Equipment 36
Dual Alternator Schematics · Town Car · Optional Equipment 37
Dual Battery and Alternator Schematics · Navigator 38
New Vehicle Limited Warranty · United States Only 39
New Vehicle Limited Warranty · International 40
© 2003-2007 Cabot Coach Builders, Inc
Congratulations on Your Purchase of a Royale Limousine
Manufactured Where Craftsmanship Counts!
Since 1983 Royale has been manufacturing the nest limousines in the world and
backing each with exceptional service. It is my true belief that Royale’s exceptional
service will encourage you to purchase your future limousines from us. That is why we
have compiled this comprehensive manual; to help you with questions you may have
concerning your new limousine.
Please take a few minutes to review this manual which is full of useful tips, operational
instructions, and wiring schematics. The Table of Contents allows you to easily quickly
navigate to the section of interest by using the built-in links. There are also embedded
quick links so you can contact us should you have any questions.
I welcome your comments as we are constantly striving to improve our processes,
products and service.
Congratulations and enjoy your new limousine hand-crafted and manufactured
by Royale.
Best Regards,
Cabot Smith
President
1

Have Questions? A Royale Team Member is Ready to Help.
Managers
Please feel free to contact the following Managers
with any questions or concerns.
Cabot Smith, President
ph. 978.374.4530 x 19
e-mail: cabot.smith@royalelimo.com
Steve Edelmann, Director of Sales
ph. 978.374.4530 x16
e-mail: steve@royalelimo.com
Jeff DeMarco, Director of Operations
ph. 978.374.4530 x 25
e-mail: jeff@royalelimo.com
Warranty
For questions regarding warranty service please
contact our Warranty Department.
Ask for Service
ph. 978.374.4530 x30
e-mail: service@royalelimo.com
Parts
If you need replacement parts for your limousine
call the number below. We ship parts daily all
over the world and accept Visa and Master Card
for your convenience.
Ask for Parts
ph. 978.374.4530 x15
e-mail: parts@royalelimo.com
Sales
If you have a sales question or would like copies
of your sales documents you can contact your
salesperson by calling or e-mailing them directly.
If you misplaced your salespersons e-mail
address you can nd it at:
www.royalelimo.com/company/consultants.
aspx
Ask for Sales
ph. 978.374.4530
e-mail: sales@royalelimo.com
A representative will be able to help you locate a
regional authorized service facility for limousine
repairs or your regional Cadillac or Lincoln dealers.
Also our web site offers a list of your regional
authorized service facilities at:
www.royalelimo.com/service/dealers.aspx
Warranty service must be authorized in advance
before Royale will accept any charges.
2
Helpful Hints and Recommendations
Here are some helpful hints to help you maintain
your Royale limousine and avoid some of the
problems that might arise.
Watch the tire pressure closely, rotate tires frequently
every 5,000 miles or as recommended in OEM
manual. Royale recommends the following tire
pressures for your limousine unless otherwise
indicated on the vehicle label.
Tire Pressure
• 42 lbs. for Lincoln 60-inch to 120-inch
• 41 lbs. for Cadillac 45-inch
• 64 lbs. for Cadillac 70-inch to 130-inch
• 40 lbs. for Navigator 140-inch
Other
You can save fuel by keeping your idling time to
a minimum. According to the California Energy
Commission “vehicle idling burns about a half mile
of gasoline for every minute of idling.”
• When using the air conditioner in warm weather,
keep the engine idle up if stopped and waiting.
• Keep the battery cables clean and tight.
• Change the oil and grease every 3,000 miles
including drive shaft grease ttings.
• Align the front end at recommended intervals,
realign after rst 5,000 miles.
• Keep extra fuses in glove box. Keep a spare set of
keys available.
• Wash the vehicle with proper products. Do not
wax the car for 90 days. Read the Paint Guide Lines.
• Clean and sanitize cooler drains and drink dump
drain frequently to insure proper draining.
• Have only qualied mechanics work on
your limousine.
• Worn or broken trunk weather strips may cause
trunk water leaks, inspect trunk weather strips
frequently.
• Follow the original manufactures recommended
maintenance program for your vehicle. It is
additionally recommended by Lincoln that the
Navigator outer tie rod ends be replaced at every
30,000 mile interval.
• Clean and lubricate moon roof cables and slides
weekly and blow out moon roof drains frequently.
• Please read your Royale Limousine U.S.
New Vehicle Limited Warranty. We offer a
60-month/150,000 mile limited warranty on our
structural modications and a 24-month/50,000 mile
limited warranty on the conversion components.
NOTE: It is important that you contact our Warranty Department before
Contact the Warranty Department for your authorization at 978.374.4530 or service@royalelimo.com
3
any warranty repair work is performed.
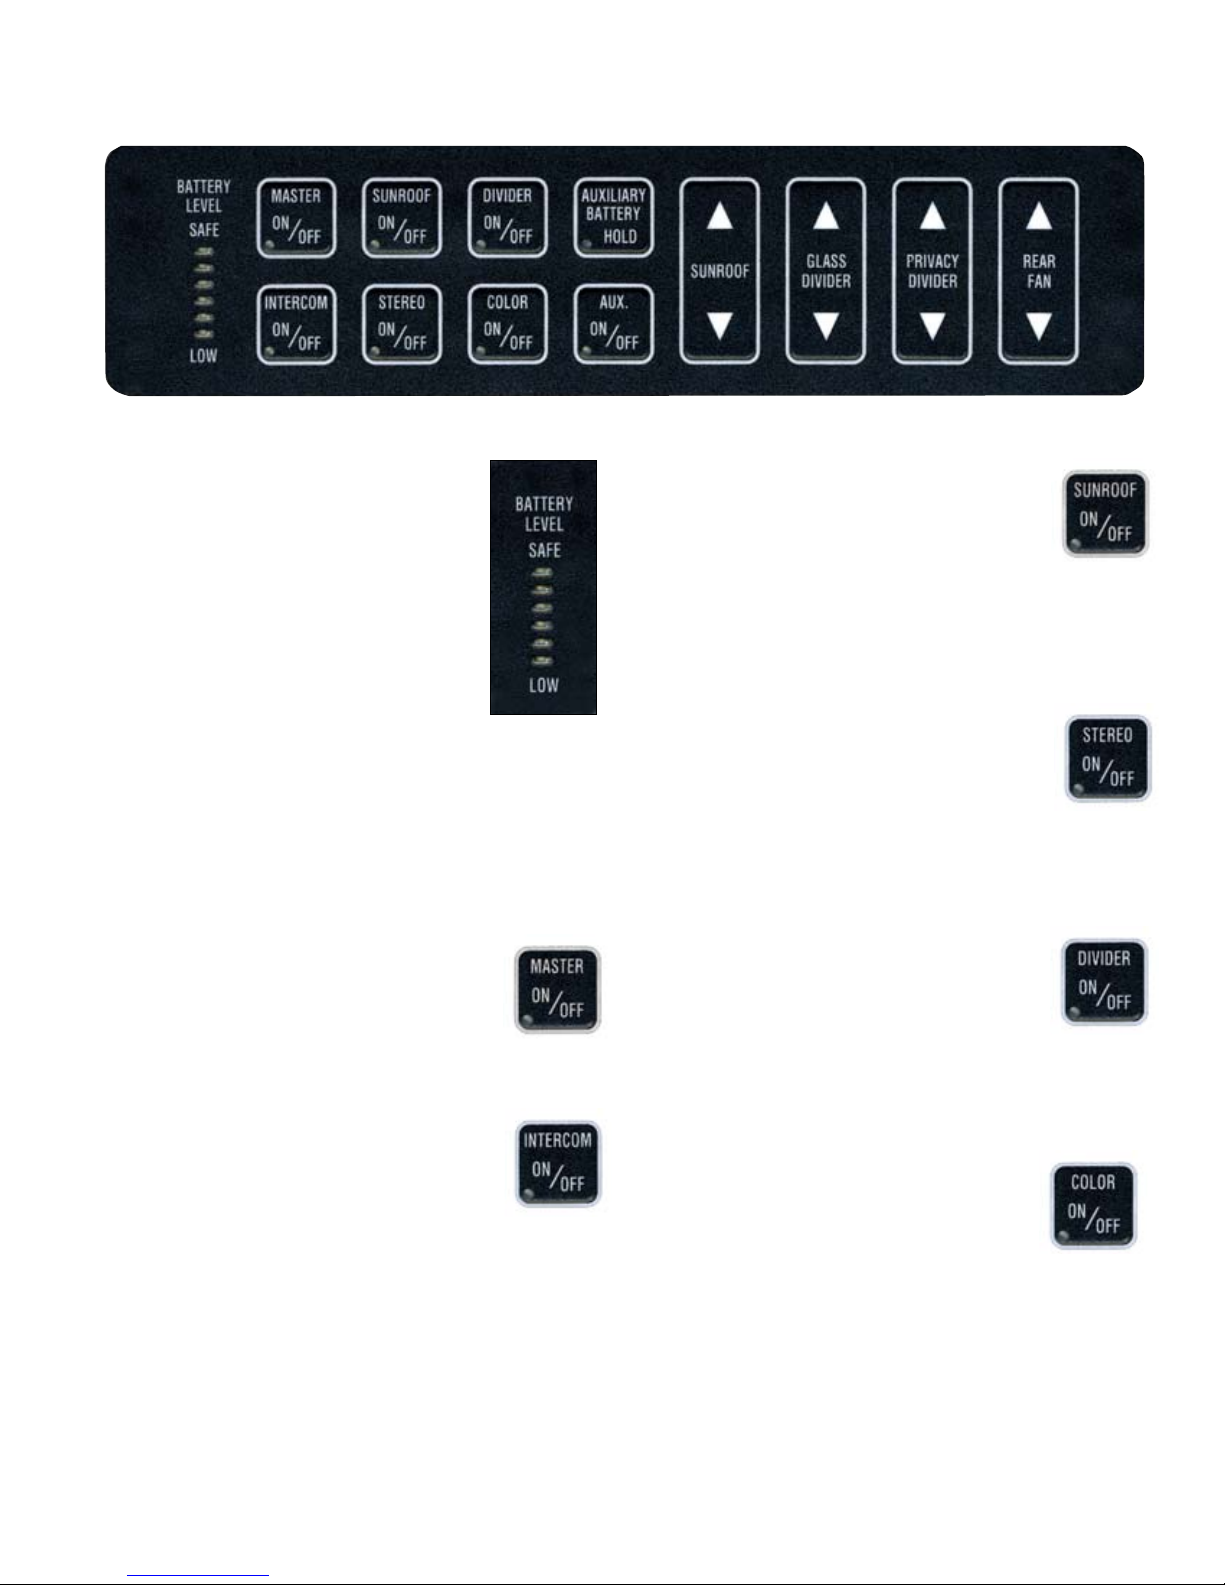
Control Panel Users Guide - Driver (Standard Equipment)
Driver’s Control Panel
Battery Level Indicator
These indicator lights notify you of
the charging condition of your battery.
When the battery voltage is high green
lights are lit, which indicates a normal
operating condition. When the voltage
drops the yellow lights come on notifying
you that the voltage is low. You should
try to run up the idle if in park or shut off
rear features to bring the battery voltage
up to green. The red lights indicate that voltage is
low, stalling may occur if this condition continues,
the driver should increase the idle if possible or shut
off rear features. If the driver does not act then the
rear cabin air conditioning fans will be shut down
automatically until the system returns to normal
levels.
Master Switch
This switch controls the power to the entire
system. Press this switch to activate power
to the controls and rear features including
TV, Stereo, Lighting and Air Conditioning.
Intercom On/Off
Sun Roof On/Off
This button controls power to rear cabin
sunroof so the rear passenger will not be
able to open or close the sunroof. Press to activate
the sunroof, the indicator light will show green. Press
to deactivate or turn off the sunroof and indicator
light will be off.
Stereo On/Off
This button controls the power to the rear
stereo so the rear passenger will not be
able to use the rear stereo system. Press
to activate rear stereo system and the indicator light
will show green. Press again to deactivate the rear
stereo system and the indicator light will be off.
Divider On/Off
This button controls power to the dividers
so the rear passengers will not be able to
control the dividers. Press to activate the
divider system and the green light indicates divider
power is active. Press again to deactivate turn off the
dividers and the indicator light will be off.
This button turns on the front-to-rear hands
free intercom. Pressing the button will
activate the intercom and will illuminate
the green indicator light. With the light on speak
freely toward the button to communicate with the
rear passengers. Press the button again to shut off the
two-way intercom.
4
Color On/Off
This button controls the color effects of
the accent lighting system. Press this
button to change the color effects, there
are multiple effects depending upon the initial set
up of the system. Refer to page 18 of this manual
“Operating the LED Fiber Illuminator” to change
your systems setup.
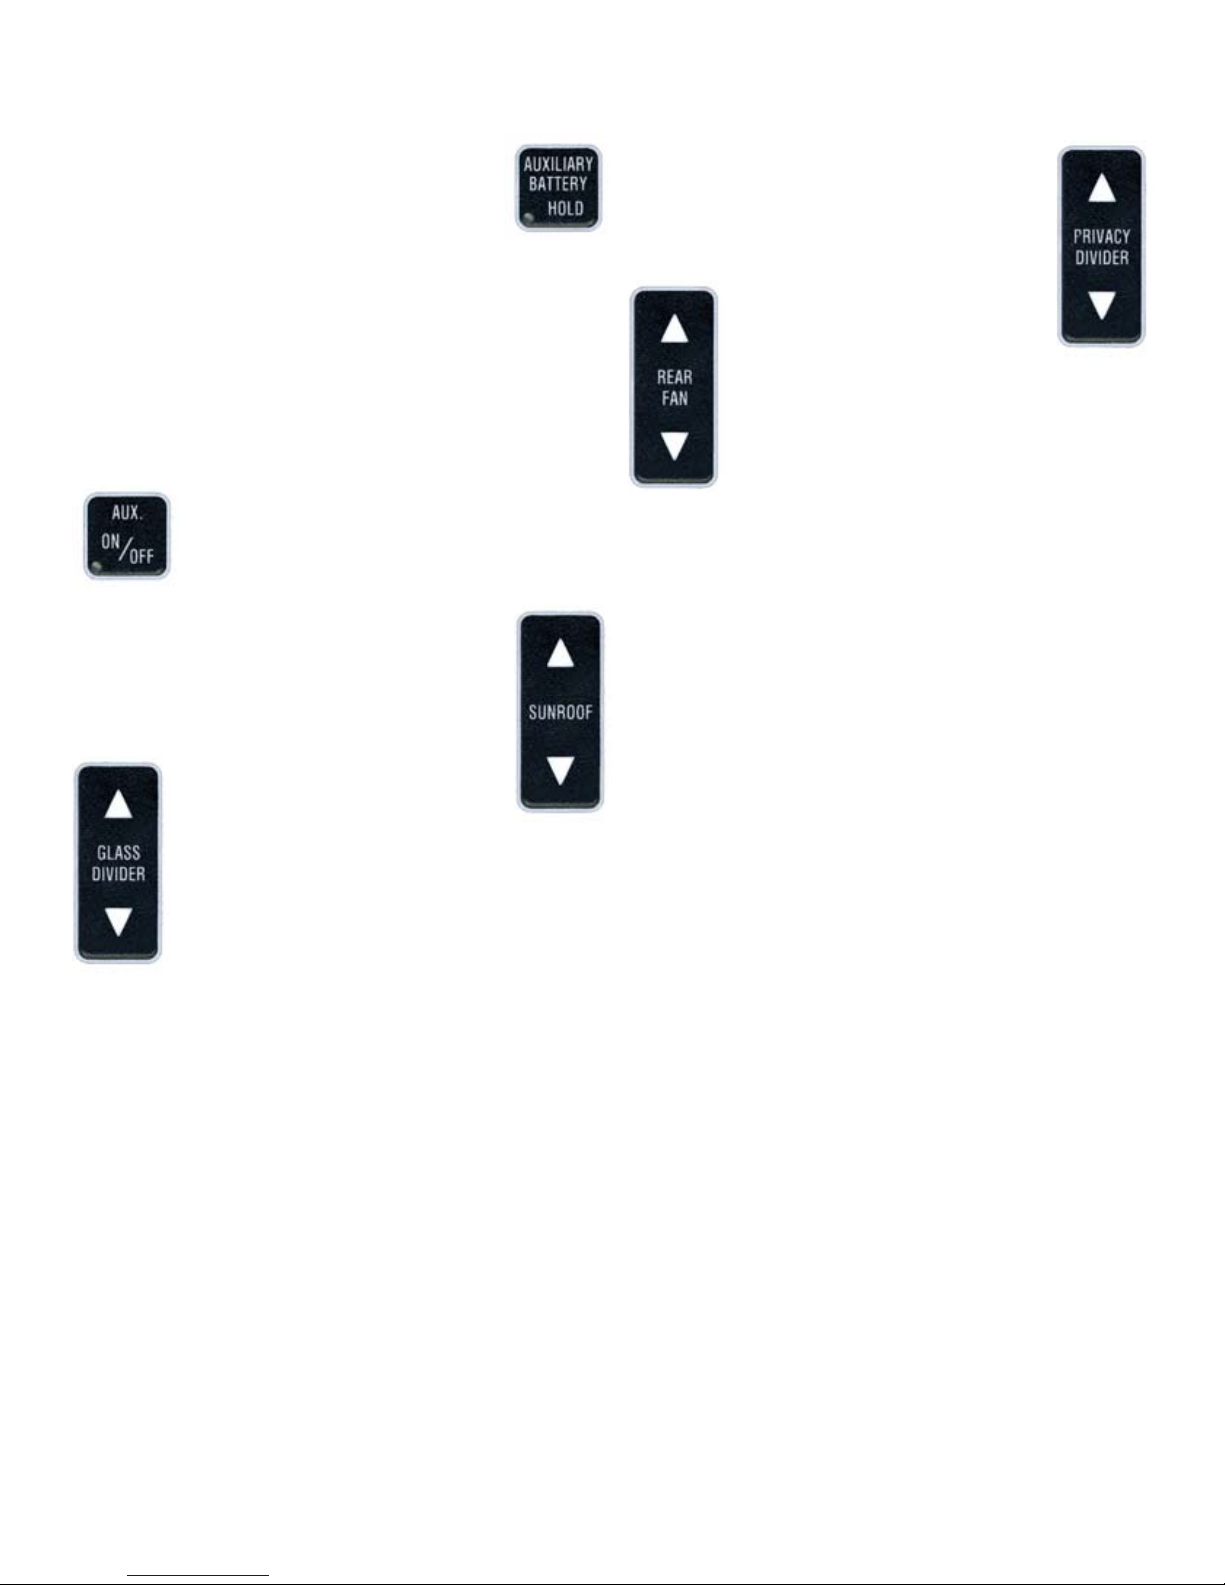
Auxiliary Battery
Privacy Divider
This button operates the auxiliary battery
system in your limousine. If the main
battery is dead press and hold this button
then turn the ignition key to start vehicle. Once the
vehicle is running, release the button and continue
with normal operation. In extreme cases you may
need to hold the auxiliary battery button down for
a few minutes to keep your engine running while
your main battery charges. As soon as possible have
your main battery and charging system checked to
determine the cause of the main battery failure.
Auxiliary On/Off (Aux)
This button is reserved for future or
additional features.
Sun Roof
This button operates rear cabin sunroof.
Press and hold up to open and press and
hold down to close.
Glass Divider
This button operates the solid privacy
divider. Press and hold up to raise and
press and hold down to lower.
Rear Fan
This button operates the rear
fan for climate control in
rear compartment. Once rear system is
activated, the rear fan velocity can be
adjusted from the driver control panel.
Press up to increase airow, down to
decrease airow. The A/C or heat is set
from it’s last position and can only be changed from
the rear.
This button operates the clear
glass divider. Press and hold up
to raise and press and hold down to lower.
5
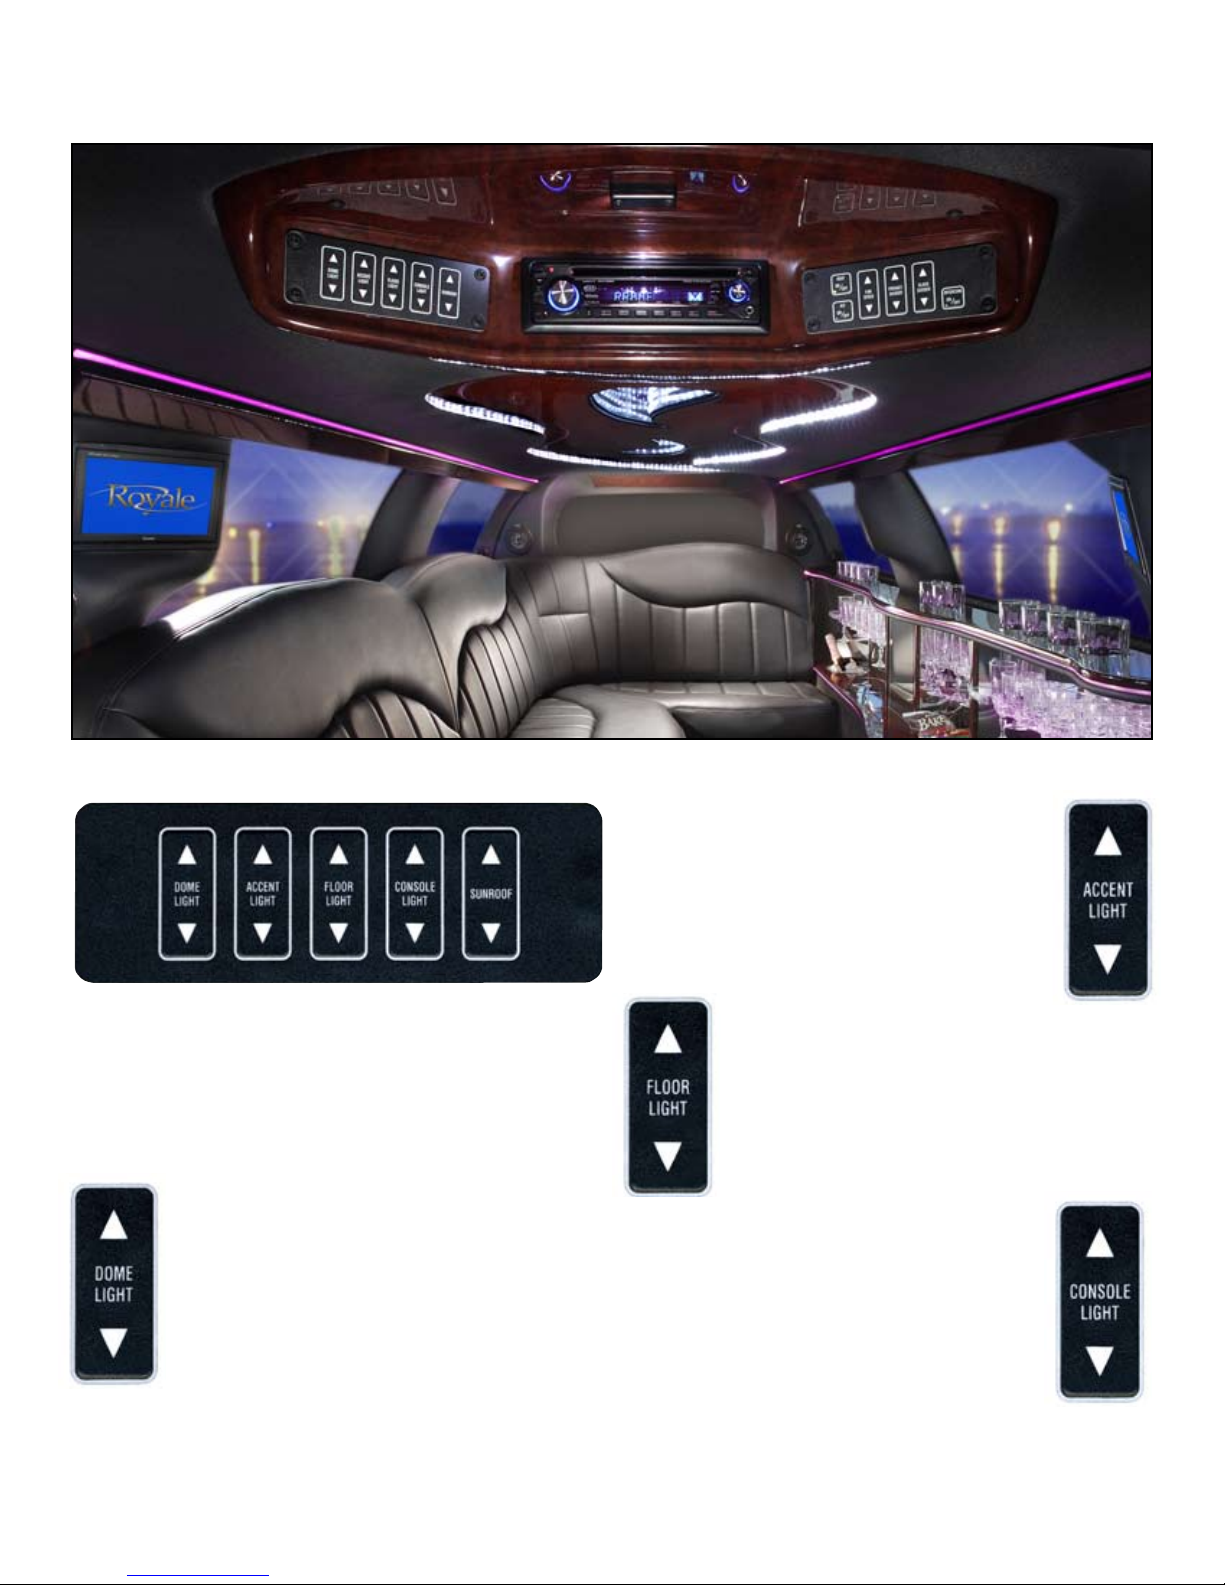
Control Panel Users Guide - Passenger (Standard Equipment)
Passenger’s Control Panel
Passenger’s Lighting Control Panel
Rear control panel features indicated with * are
overridden by the drivers master control panel
located in the front compartment. These features
as well as the rear stereo may be deactivated at the
driver’s discretion.
Dome Light
This button controls the rear dome lights.
Press and hold up and the dome light(s)
come on and press and hold down to turn
the dome light(s) off.
Accent Lights
This button controls the accent or ber
optic lights in the console and above
the windows. These lights are dimmed
when the down button is pressed and
brightened when the up button is pressed.
Floor Lights
This button controls the rear oor lights.
Press up and the oor lights come on and
down to turn the oor lights off. The oor
lights also come on automatically when the
rear doors are open.
Console Lights
This button controls the lights in the
console to provide light for easy viewing
of glassware and coolers at night. These
lights are dimmed when the down
button is pressed and brightened when
the up button is pressed.
6
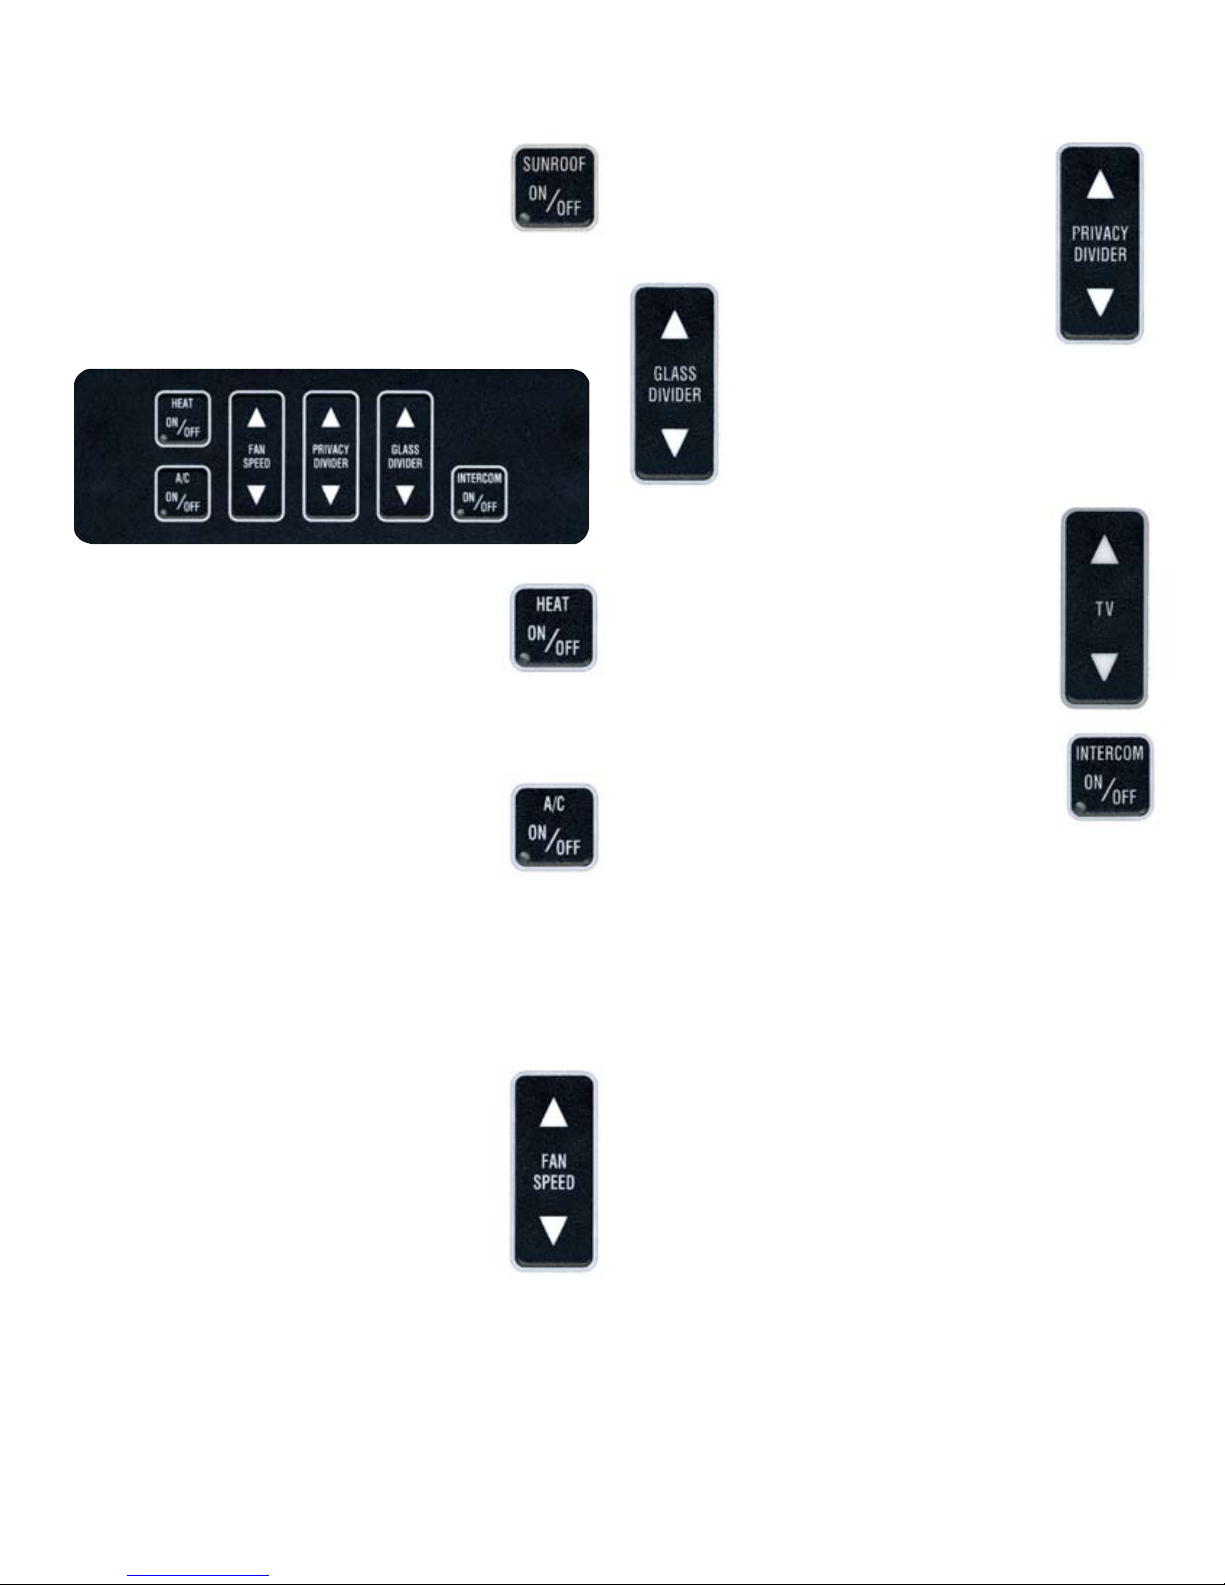
Sunroof*
Privacy Divider*
This button controls the sunroof, pressing
the up arrow will open the sunroof and
pressing the down arrow will close the
sunroof. Be sure to completely close the sunroof for a
tight seal to avoid water leaking in to the limousine.
Passenger’s Cimate Control Panel
Heat On/Off
This button activates the rear heat. Press
this button to activate the rear heat, press
it again to turn the heat off. You may also
switch directly to A/C by pressing the A/C button
and the heat will automatically turn off.
This button adjusts the privacy divider,
pressing up will raise the divider and
pressing down will lower the divider.
Glass Divider*
This button adjusts the glass
divider, pressing up will
raise the divider and pressing down will
lower the divider. Glass dividers are not
available in some models.
TV *
This button is an optional button that
replaces the glass divider button when the
limousine is equipped with the retractable
TV. Pressing the up button will raise the at
panel TV and pressing the down button
conceals the TV.
Intercom On/Off*
A/C On/Off
This button activates the rear air
conditioning. Press this button to activate
the rear air conditioning, press it again to
turn the air conditioning off. You may also switch
directly to heat by pressing the heat button without
turning off the heat. It may take the system a few
minutes to completely circulate the heat out of the
system when switching from heat to A/C.
Fan Speed*
This button adjusts the rear fan speed.
Pressing the up button adjusts the fan
speed faster for more passenger cooling
or heat and pressing the down button
adjusts the fan speed lower for less
cooling or heat.
This button turns on the rear to front hands
free intercom. Pressing the button will
activate the intercom and will illuminate
the green indicator light. With the light on speak
freely toward the button to communicate with the
driver. Press the button again to shut off the twoway intercom.
7
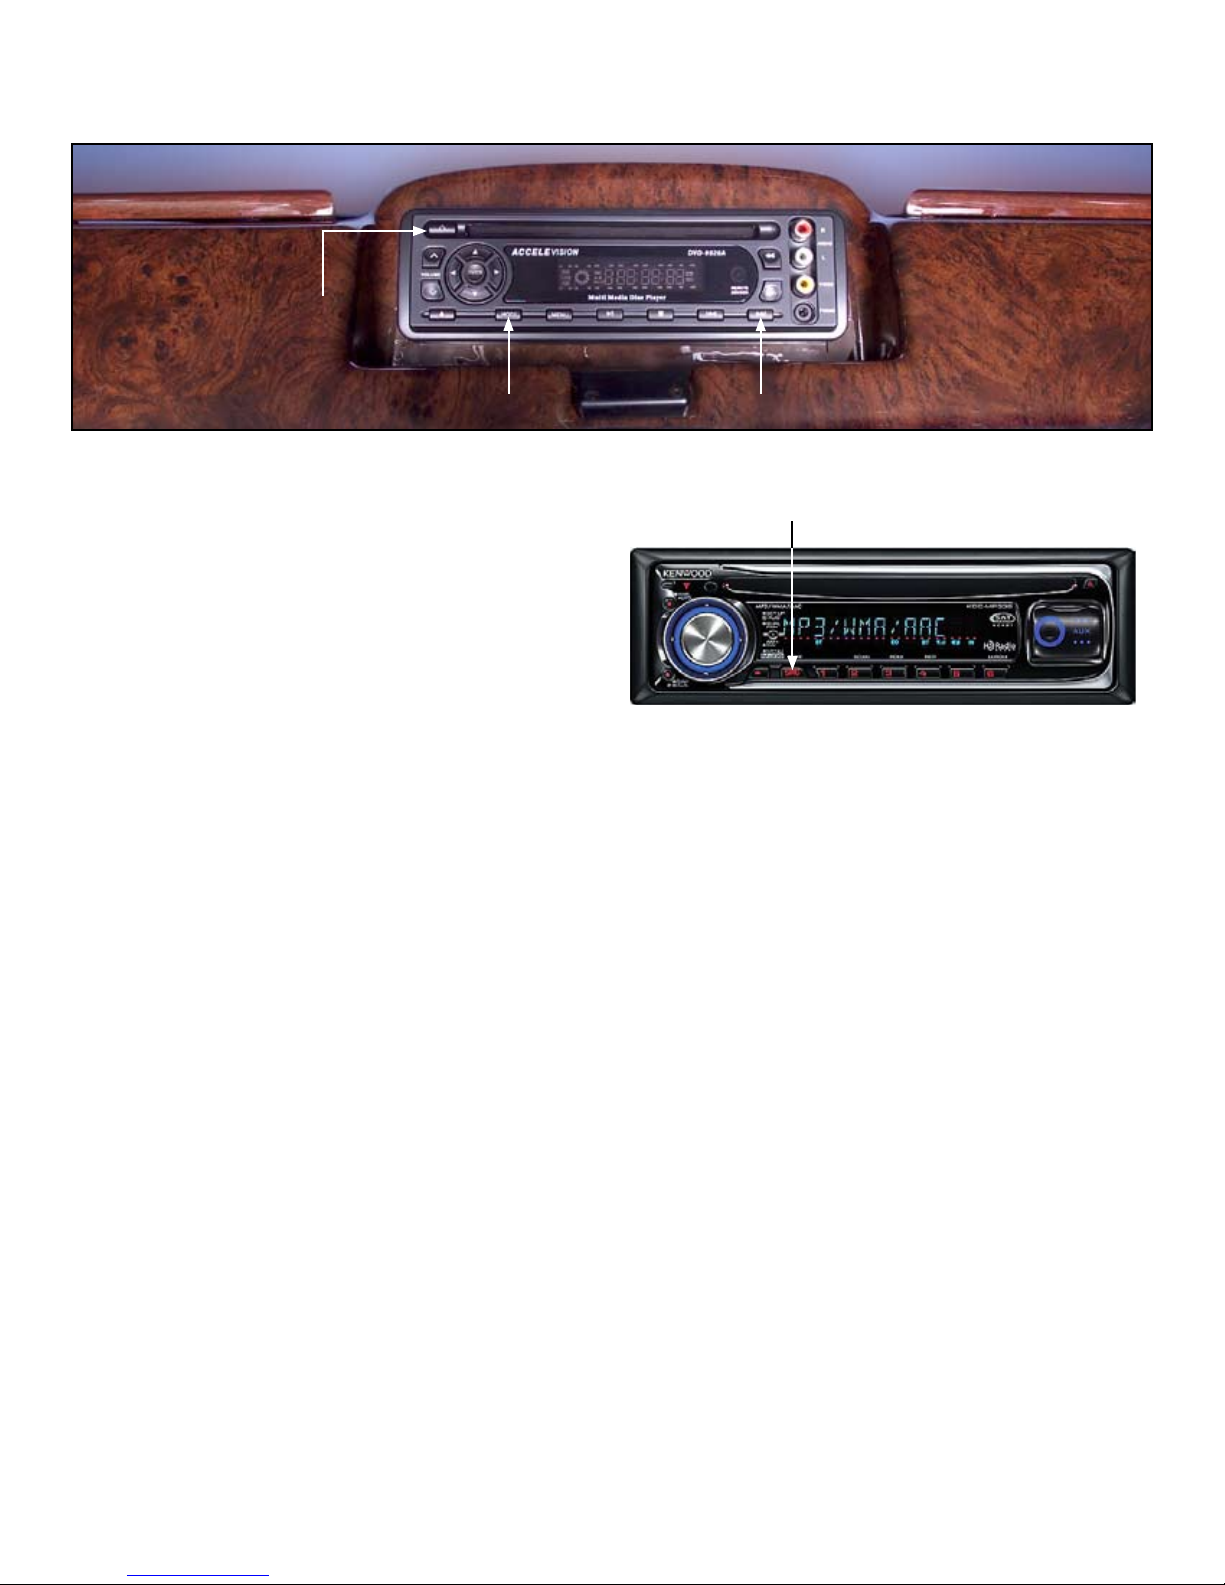
Audio Video System Users Guide
power button
mode button
DVD player is located in rear package tray
To Activate the TV
Press power button (i) on the DVD Player and the
main screen will appear on the monitors.
To select a different input source on the DVD Player
press the mode button.
The DVD player defaults to the DVD source on start
up, insert a DVD after powering up the unit. To
select a different source press the mode button. TV
tuner is the second source in the sequence, to auto
scan for the strongest TV stations once in the tuner
source press the fast forward button on the DVD
player. To select optional auxiliary input sources
press the mode button once more for Line 1; the
input jacks on the front of the DVD player and press
mode again for auxiliary input Line 2. These inputs
sources are reserved for auxiliary inputs such as VCP,
computer, gaming system or video i-pods
fast forward button
source (SRC) button
rear stereo
TV and DVD sound is played through the Stereo.
To activate TV sound or audio set the rear Stereo
to AUX by pressing the SRC or source button.
TV volume can then be controlled through the
rear stereo.
The rear Stereo has several input sources available;
AUX is generally the last source in the sequence.
The normal sequence for Stereo sources is as follows;
Standby or Off, Sirius or Satellite Radio, Tuner or
AM/FM, Disc Changer and Auxiliary or TV.
8
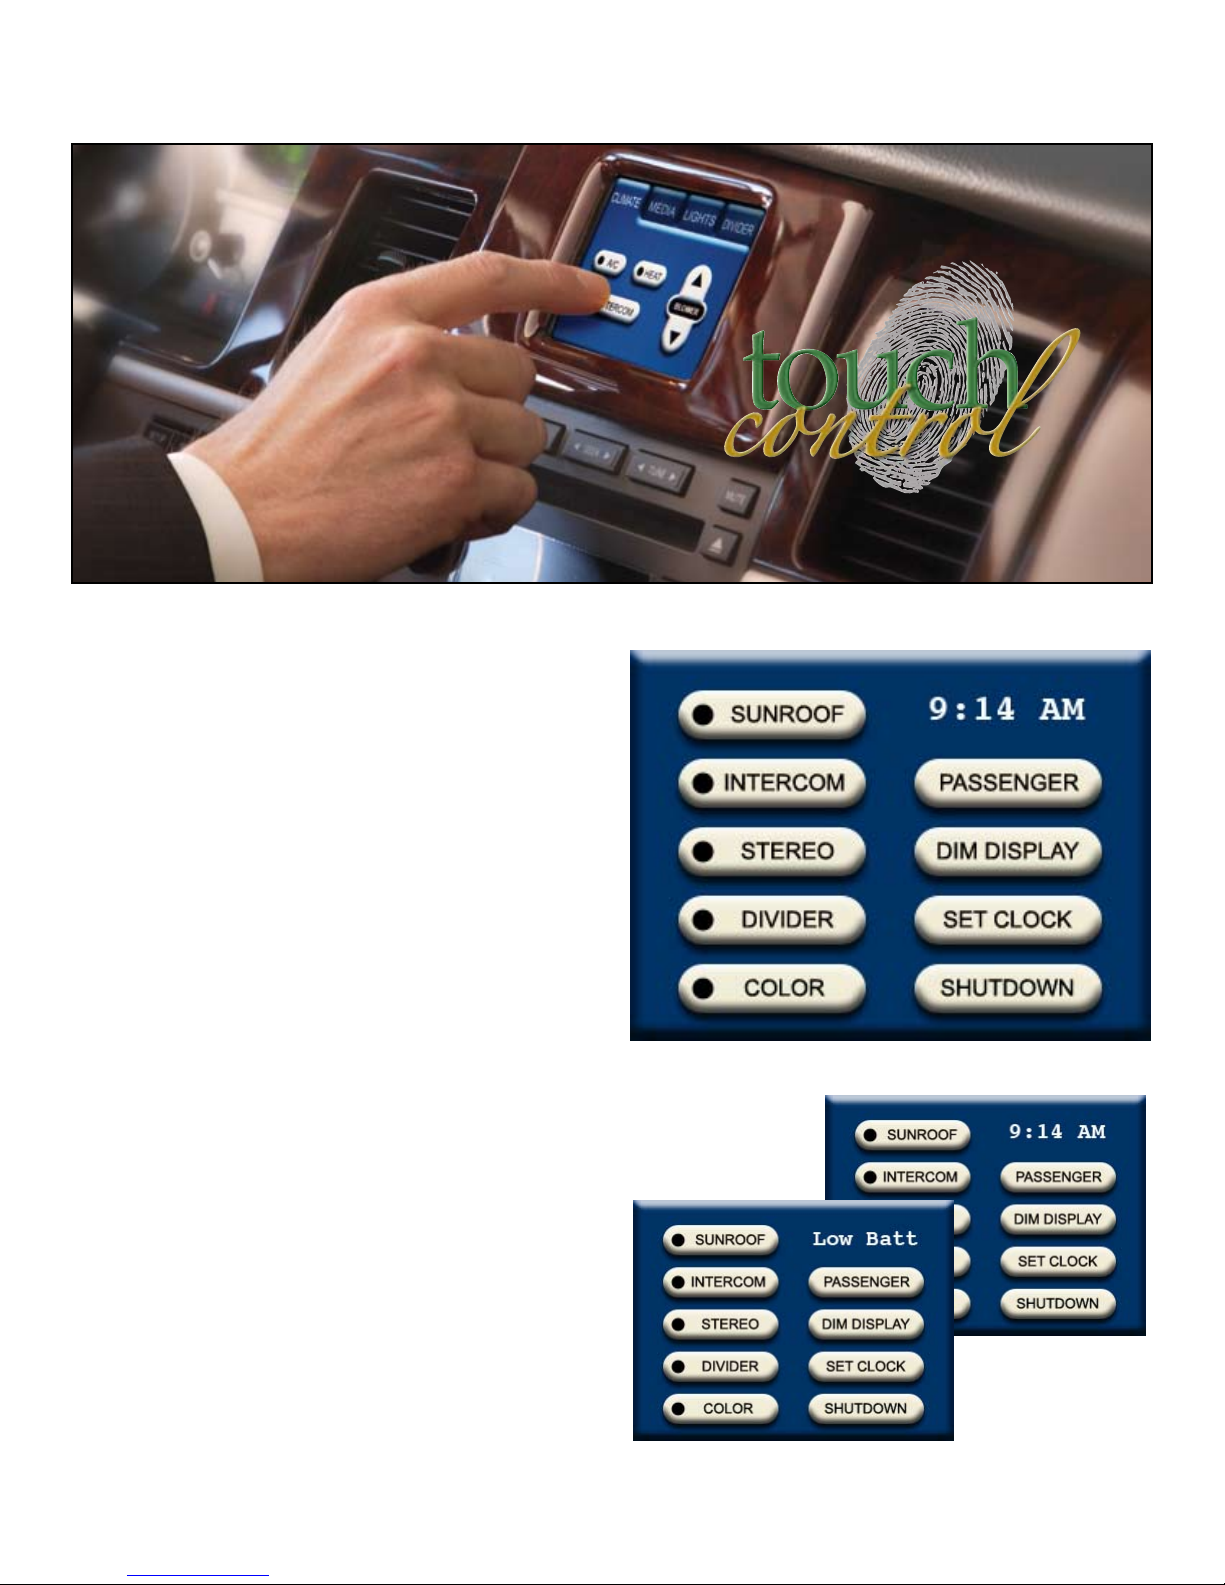
Driver’s Touch Control Operation Guide (Optional Equipment)
Driver’s Touch Control
Driver Panel Overview
The Driver Touch Control Panel offers the ability
to hide features from the passenger menu by
deactivating the feature and hiding the button from
the passenger when necessary. It also allows full
access to all of the passenger control features through
the passenger menu button.
To power the system the driver must accept the
responsibility by pressing yes on the Driver Control.
After a few seconds the main board and rear control
panel will be active.
The Clock is replaced by a battery level indicator to
notify the driver of a low voltage condition. When
the battery is low the clock will be replaced by LOW
BATT indicator requesting the driver to act. If this
condition continues stalling may occur, the driver
should increase the idle if possible or shut off rear
features until a normal level is reached, if the driver
does not act then the rear cabin air conditioning fans
will be shut down automatically until the system
returns to normal levels.
Driver’s Main Menu
9
The Clock is replaced by a battery level indicator
to notify the driver of a low voltage condition.
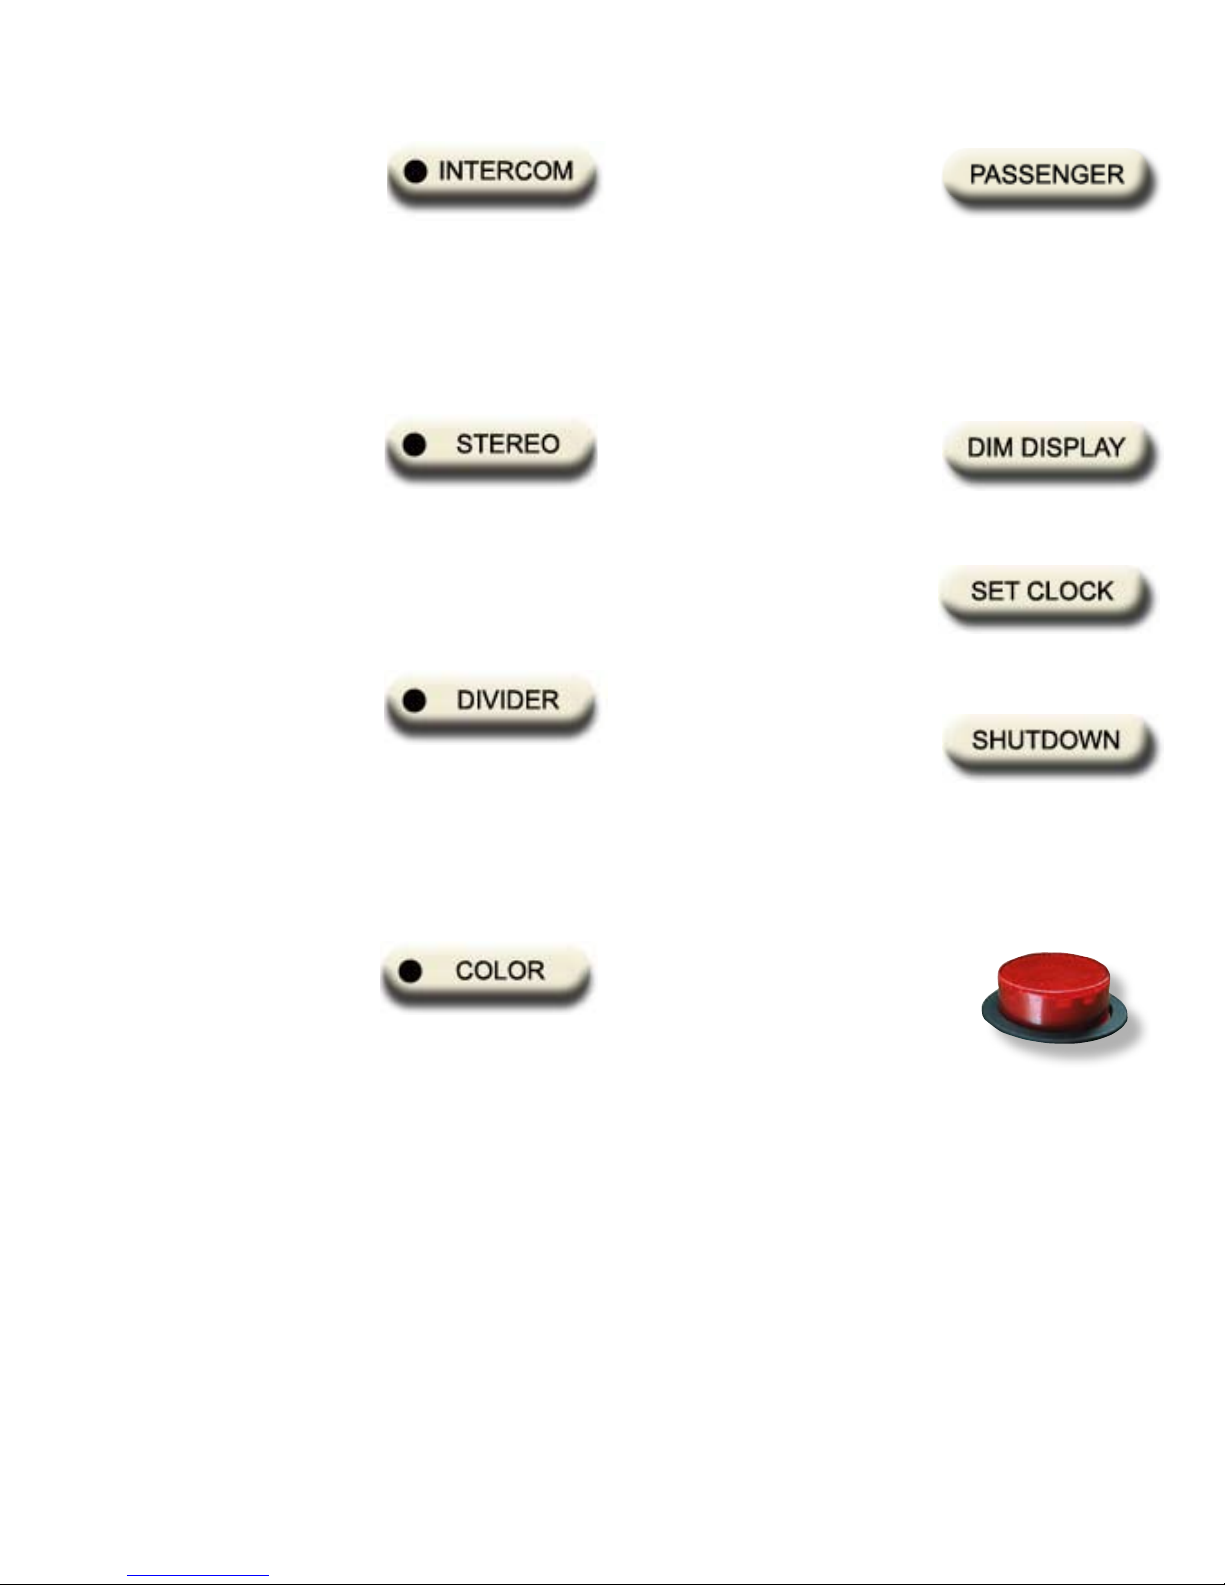
Intercom
Passenger
This button turns on the front
to rear intercom. Pressing the
button will activate the intercom and will illuminate
the green indicator light. With the light on speak
freely toward the button to communicate with the
rear passengers. Press the button again to shut off
the two-way hands free intercom.
Stereo
This on/off button allows the
driver to shut off passenger
control of the rear Stereo. By
selecting off the rear Stereo will be shut off and the
button will be deleted from the passengers menu.
Select on and the rear Stereo is returned to normal
and the button reappears on the passenger display. A
green light indicates the rear Stereo is active.
Divider
This on/off button allows the
driver to shut off passenger
control of the Dividers. By selecting off the Dividers
will be shut off and the button will be deleted from
the passengers menu. Select on and the Dividers
are returned to normal and the button reappears on
the passenger display. A green light indicates the
Dividers are active.
This button allows the driver to
control all passenger functions
please refer to passenger functions reference guide on
page 11 for details. When the driver presses a button
in this menu the rear passenger control will follow
along allowing the driver to assist the passenger in
navigating through the menus.
Dim Display
This button allows the driver
to dim or brighten the display.
Follow the easy to read menu to
adjust the display.
Set Clock
This button allows the driver
to reset the clock. Follow the
easy to read menu to reset the clock.
Shut Down
This button allows the driver
to shut down the entire system
when not in use. This is always
a good idea to conserve resources and charge the
battery. The clock will still display in shut down
mode.
Color
This on/off button allows the
driver to shut off passenger
control of the ber optic color system. By selecting
off the ber optic color system will be shut off and
the button will be deleted from the passengers menu.
Select on and the ber optic color system is returned
to normal and the button reappears on the passenger
display. A green light indicates the rear system is
active. The actual function of this button is affected
by the set up of the LED illuminator (see page 18)
“Operating the LED ber Illuminator.”
Red Button
This button operates the auxiliary
battery system in your limousine.
If main battery is dead press and
hold this button then turn the
ignition key to start the vehicle. Once the vehicle is
running, release the button and continue with normal
operation. In extreme cases you may need to hold
the auxiliary battery button down for a few minutes
to keep your engine running while your main battery
charges. As soon as possible have your main battery
and charging system checked to determine the cause
of the main battery failure.
10
Passenger’s Touch Control Operation Guide (Optional Equipment)
Passenger Panel Overview
The driver has full access to the passenger controls
from the driver panel. When the driver adjusts
passenger features his/her actions will be displayed
on the rear controls. This is to assist the passengers
with navigating the Touch Control’s many features.
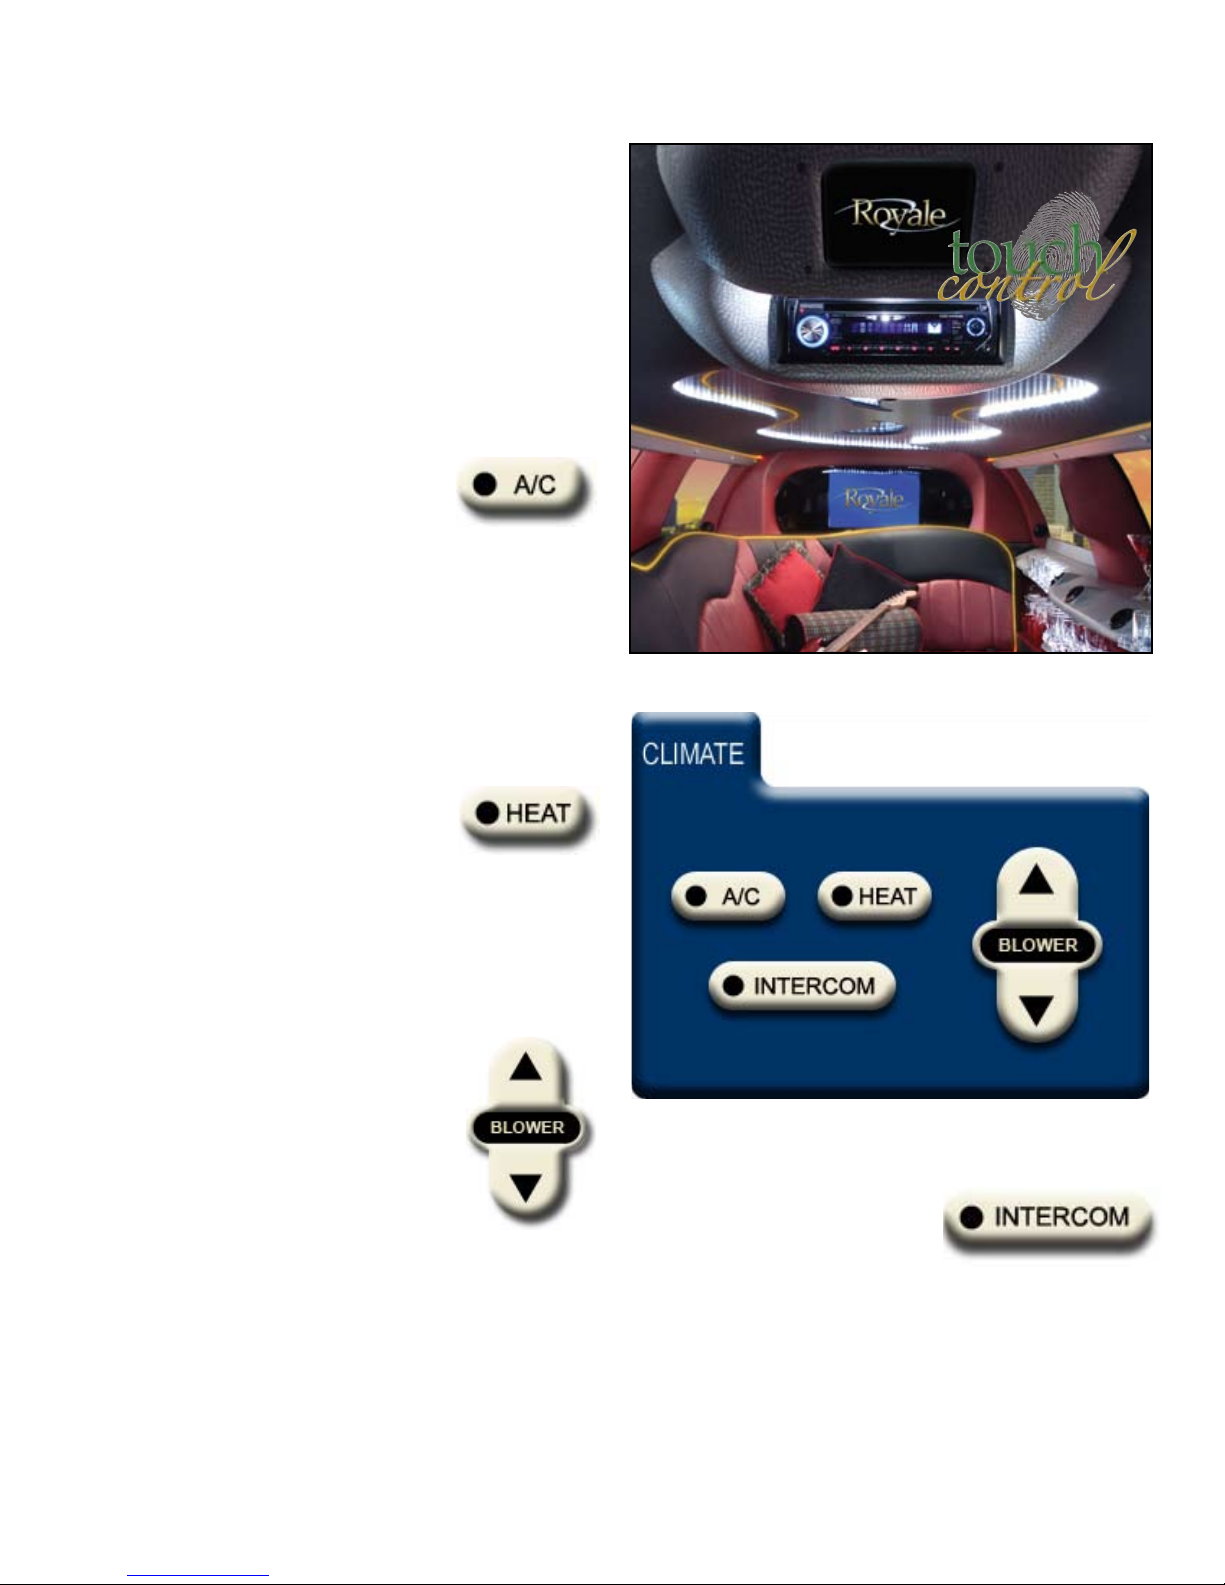
Climate Control Menu
The Climate Control Menu adjusts the climate in the
rear cabin and activates the intercom.
A/C
This button activates the rear air
conditioning. Press this button to
activate the rear air conditioning, press it again to
turn the air conditioning off. The green light indicates
air conditioning is on. You may also switch directly
to heat by pressing the heat button which will
automatically turn off the air conditioning. It may
take the system a few minutes to completely circulate
the heat out of the system when switching from heat
to A/C.
Passenger’s Touch Control panel
Heat
This button activates the rear heat.
Press this button to activate the
rear heat, press it again to turn the heat off. The
green light indicates heat is on. You may also switch
directly to A/C by pressing the A/C button which
will automatically turn off the heat.
Blower
This button adjusts the rear fan speed.
Pressing the up button adjusts the
fan speed faster for more passenger
cooling or heat and pressing the down
button adjusts the fan speed lower for
less cooling or heat.
Passenger’s Climate menu
Intercom
This button turns on the rear
to front intercom. Pressing the
button will activate the intercom and will illuminate
the green indicator light. With the light on speak
freely toward the button to communicate with the
driver. Press the button again to shut off the twoway hands free intercom.
11
 Loading...