

Royal RGPRO, RG2000, RG3000, RG5000VS, RG1000 Owner's Manual
...
WOOD PELLET GRILL
OWNER’S MANUAL
DESIGNED FOR RESIDENTIAL OUTDOOR USE ONLY. USE FOOD GRADE WOOD PELLETS.
MODEL: RGPRO (Front Loading Hopper)
CAUTION DO NOT USE OR STORE NEAR COMBUSTIBLE MATERIALS
INCLUDING GASOLINE, THINNER, OIL, PAINTS OR FLAMABLE LIQUIDS
www.royallgrills.com 325 South Park Street Reedsburg, WI 53959 Phone 608-768-8508

Thank you for selecting ROYALL for your wood pellet grill
purchase. Your grill is proudly made in America and is
designed to provide years of grilling enjoyment.
SPECIAL FEATURES
- EXTRA LARGE GRILLING SURFACE
- TALL SMOKE CHAMBER PROFILE WITH EXTENDED GRILL LID
ACCESS
- UNIQUE SMOKE BAFFLE PLATE FOR ENHANCED
CIRCULATION
- SOLID WELD CONSTRUCTION FOR STRENGTH AND
DRUABILITY
- OPTIONAL 2 OPTIONAL GRATE LOCATION AVAILABLE
Your new grill has been shipped with some assembly required.
Follow the simple instructions and you’ll be ready to start
grilling in minutes.
TOOLS REQUIRED:
- 7/16 wrenches to secure wheels and support bars to legs
- 1/2 wrench to secure legs to grill base
- 1/4 wrench to attach inducer fan bracket assembly to
grill base
STEP#1: Carefully remove packaging material and free unit
from shipping skid. (use cardboard or cloth under
the grill base during assembly to prevent scratches)
STEP#2: Check the packaging for the following items
- (4) Legs
- (4) Wheels [2 swivel & 2 locking swivel]
- (1) Hopper Cover Plate
- (1) Hardware Bag
- (1) Grill Grate
- (1) Directional spatter plate
- (1) Combustion Deflector Cover
- (1) Drip Pail
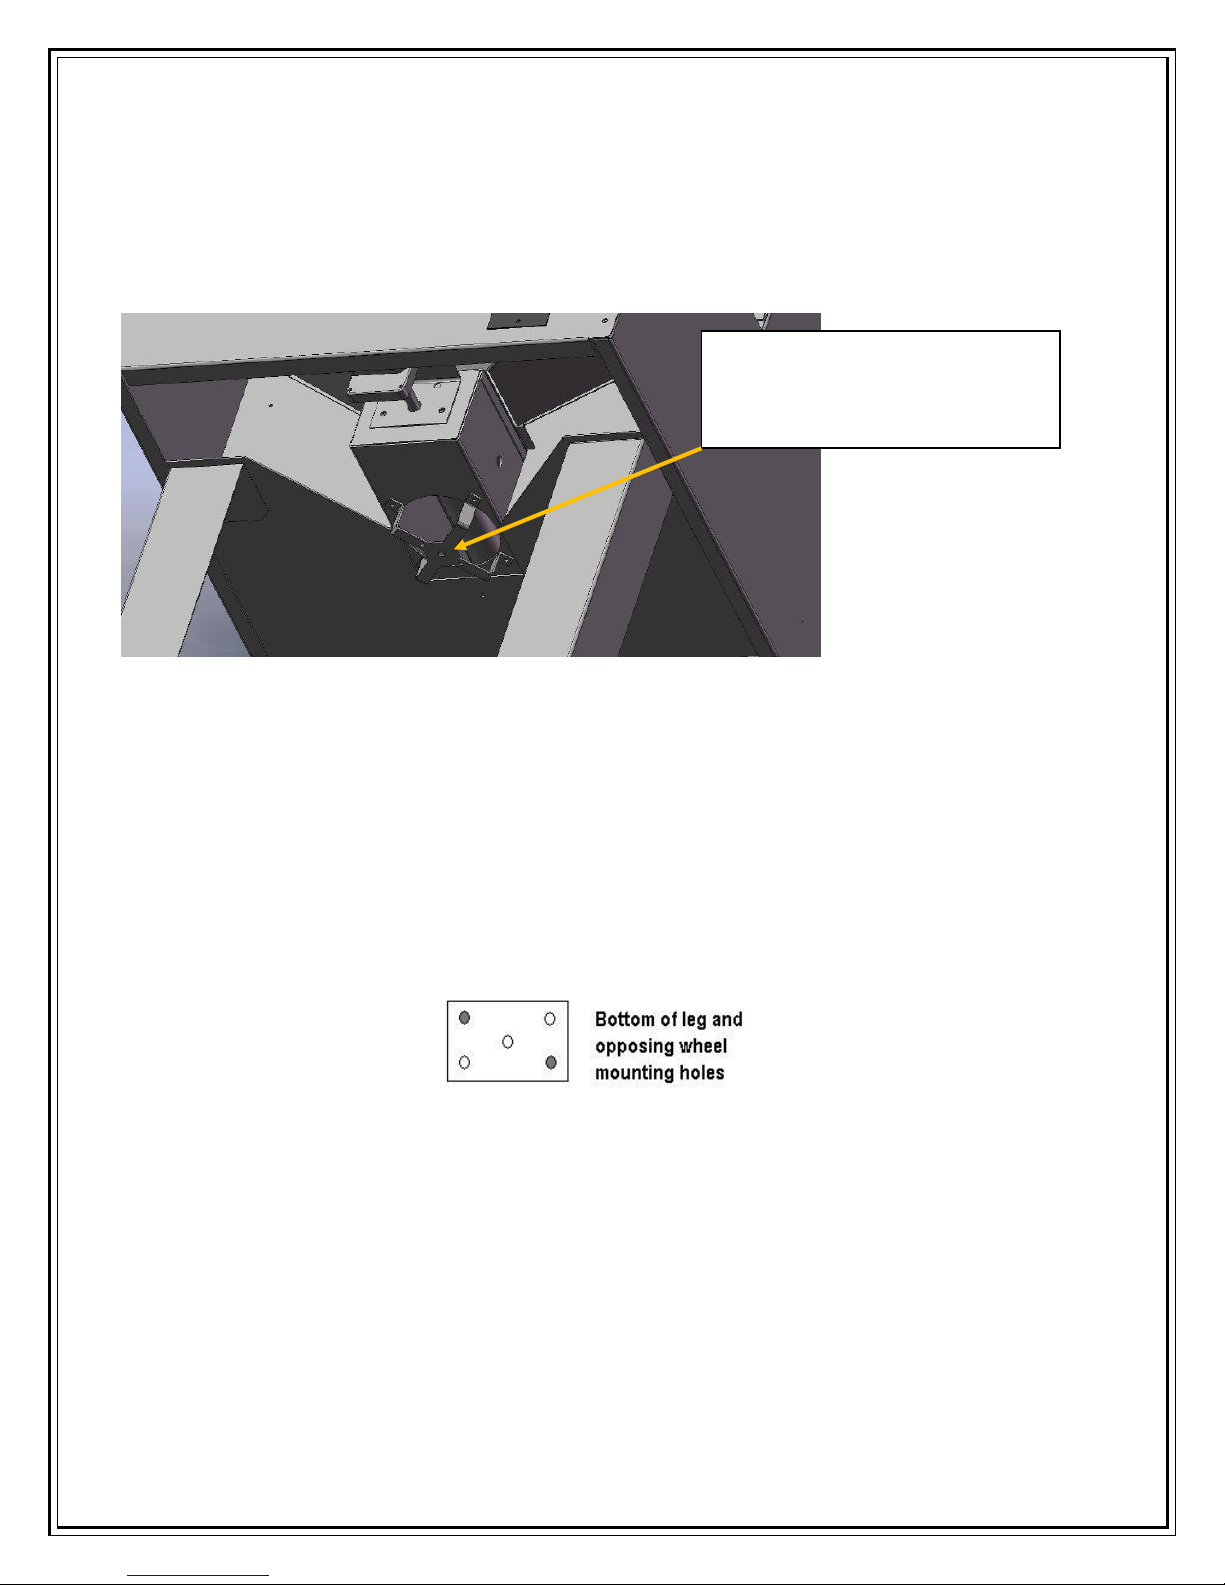
STEP#3: Lay Grill on it’s back. Unwrap COMBUSTION FAN ASSEMBLY
Locate fan motor
assembly with bracket
over auger box opening
& MOUNTING BRACKET. Locate 4 legs of bracket over 4-1/4” hole in
bottom of auger box. Line up with (4) mounting holes and
secure to base with (4) small self drilling screws. NOTE: check
blade after installation to ensure that it spins without rubbing when
mounted.
STEP#4: Plug combustion fan into receptacle with orange
and white wire coming from the control board wire
harness.
STEP#5: Attach swivel wheels to legs using (2) 1/4-20 screws
and flange nuts for each leg. NOTE: locking swivel
wheels & legs are place on the hopper side of the
grill.
STEP#6: Attach the legs to the grill base using 5/16 bolt, and
washer by sliding washer over bolt, then slid bolt
though the single hole in the leg. Move the leg to
the mounting position and thread the screw into
weld nut on the grill base (only finger tight for now).
(Note: locking wheels should be positioned on the
front lid side of the grill base.) Repeat for each leg.

STEP#7: Attach each of the 4 leg supports to the bottom of
the legs using (4) 1/4-20 screws and flange nuts.
Then final tighten with wrench.
STEP#8: Check all the leg connections to ensure all
hardware is tight. Final tighten 4 leg bolts in bottom
of grill. Then use a helper to stand the grill on it’s
legs.
STEP#9: Move the grill and remaining components out
doors near a grounded 110V electrical outlet.
STEP#10: Place the power switch in the off position and plug
in the unit. Inspect the auger tube by looking into
the hopper to see that no foreign objects are
present.
STEP#11: Turn the power switch to the on position. Visually
check to see that the auger is turning.
STEP#12: Check to see that air is blowing around the circular
fire pot.
CAUTION: THE HOT ROD IS WARMING UP AT THIS POINT, DO NOT PUT
FINGERS IN THE FIRE POT.
STEP#13: Visually watch to see that the HOT ROD in the fire
pot glows faintly red after a couple of minutes.
STEP#14: Charge the pellet auger. Add food grade wood
pellets to the hopper and observe fire pot until
pellets appear. (takes approx. 5 minutes)
STEP#14: Turn the power switch to the off position. Then
install the COMBUSTION DEFLECTOR COVER.
STEP#15: Install the DIRECTIONAL SPATTER PLATE with one end
sloping towards the catch drain. NOTE: for easy clean
up, place a layer of aluminum foil over the spatter plate.
STEP#16: Place the GRILL GRATE onto the grill supports.

FIRST USE: WE RECOMMEND RUNNING THE GRILL
FOR 20 MINUTES ON HIGH TO SEASON THE GRILL
CAUTION: Locate your new grill such that all surfaces are at least 12”
from any combustible material. Also consider winds and proximity to
windows so that exhaust is not directly entering your home.
YOU ARE READY TO START YOUR GRILL !
(always with the lid open)
WHEN YOU TURN THE POWER SWITCH ON, THE HOT ROD WILL
HEAT FOR ABOUT 2 MINUTES AND SHUT OFF. NORMALLY THIS IS
ENOUGH TIME TO IGNITE THE PELLTS. ONCE SMOKE IS STARTING
TO SHOW YOU CAN SELECT THE DESIRED GRILL SETTING. IF IT
DIDN’T START, TURN IT OFF AND ON AGAIN.
OPERATING DO’S and DON’TS
EACH TIME YOU START YOUR GRILL:
CHECK PELLET HOPPER TO ENSURE PELLETS ARE DRY AND
READY TO USE. (Wet pellets can swell and damage the auger
or shear the pin)
Apply a new foil to the spatter plate for easy clean up.
Check for and remove any excessive drippings build up to
avoid flare ups and fires.
If the auger has been previously charged as described
above, you should be able to turn the power switch on with
the cook setting on Medium to ignite the pellets. Smoke
should appear with in 2 minutes. It’s usually good to leave the
grill run for 10 minutes prior to adjusting the control or adding
food.
Always leave lid open until pellets are ignited.

COOKING MODE SELECTION: Note – always cook with lid closed
HIGH MODE: Allows the auger to run continuously and
creates temperatures of 400 to 500 degrees depending on
outside temperature. Allow grill to run at least 15 minutes to
obtain this temperature. This setting is normally used for short
cooking times of select meats and searing meat surfaces.
MEDIUM MODE: ALLOWS AUGER TO STOP AND START IN 2
MINUTE INTERVALS. Temperature will vary depending type of
pellets and outside air temperature(250 to 350 ). This mode is
normally used following HIGH MODE searing of meat or for
slightly longer cooking times that promote more smoke
flavoring.
LOW / SMOKE MODE: ALLOWS auger to run and stop at a
1 : 3 ratio. (160 to 225) This MODE is normally selected for
longer cooking times of larger cuts of meats. This tends to
promote smoke flavoring and tender servings. It may also be
used to keep faster cooked items warm for a period of time.
GRILL MAINTENANCE
Wipe cool grill exterior down with warm soapy water just as
you would any interior cooking appliance. High quality car
wax can be applied a couple of times a year to maintain the
finish.
Monitor grease build up on the grill interior and drip rail and
remove when any surfaces builds up exceeding 1/8 to 1/4 of
an inch to avoid grease fires.
Before lighting the grill, occasionally check ash build up in and
around the fire pot. Excessive ash can get distributed to food
and can reduce the efficiency of the fire pot. To remove ash,
use a shop vacuum on dry ash and brush with soapy water
where grease has helped to stick it to the surface.
Cover the grill with a water proof cover when not in use. Or
store under roof. Controls should not be exposed to the
elements for long periods
DANGER: DO NOT STICK FINGERS INTO MOVING AUGER
TROUBLE SHOOTING
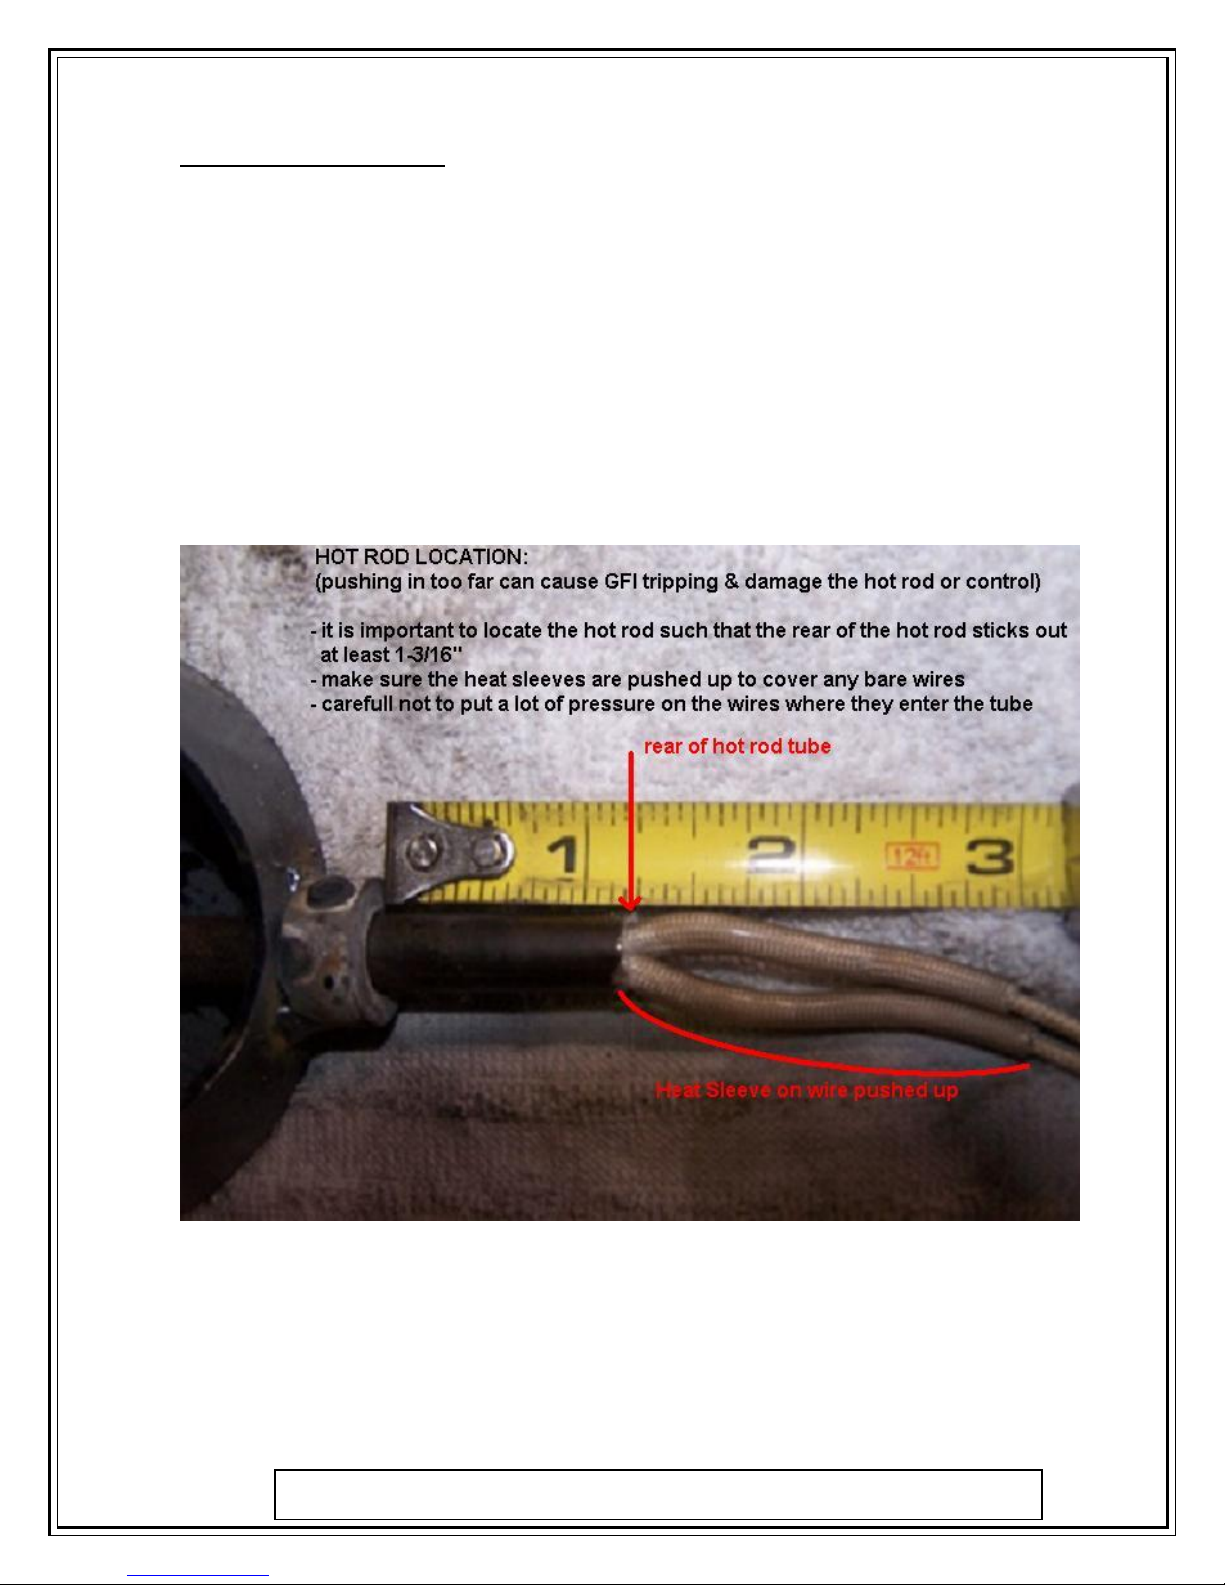
GROUND FAULT ON OUTLET TRIPS:
- Turning the unit off and back on while cooking will restart
the hot rod timer and may provide too much resistance
to the circuit causing a fault. (avoid returning to the off
position while cooking). Hot rods need to be installed
with at least 1.25 inches protruding out the rear of the
lock collar on the fire pot. This tends to minimize
resistance to the system if the control is accidently
turned to off and back on during cooking.
PELLETS DID NOT IGNITE:
- CHECK to make sure pellets are dry and being delivered
to the burn pot
o If pellets are not being delivered, make sure hopper
is full and auger is not jammed (is turning)
 Loading...