

Page 1
USER
MANUAL
PT-300
Thermal Printer
Page 2

Please contact the
ROYAL CONSUMER PRODUCT SUPPORT HOTLINE
for operational assistance and problem resolution. Call toll-free.
Customer Service:
1-800-832-6522 (USA)
52-559-138-3300 (in Mexico)
Monday through Friday during normal business hours.
To Order Supplies:
1-888-261-4555
Page 3

INDEX
\\ INTRODUCTION 2
Safety warning 2
Safety notice 2
Unpacking 3
Printer parts 3
\\ MAIN FEATURES 4
Technical specifications 4
\\ SET UP 5
Battery installation 5
Paper roll installation 5
Battery charging 6
Indicator, beeper and buttons 7
\\ DRIVER / APP 8
USB 8
BLUETOOTH 9
WIFI 10
\\ FIRMWARE 14
\\ PARTS LIST 14
Paper Roll 14
Battery 14
Page 4

2
ROYAL Thermal Printer PT-300
INTRODUCTION
Safety warning
Safety notice
Only use the supplied AC power adapter and lithium battery. Using
another product will damage the device.
Keep the battery away from heat to avoid damage to the device.
DO NOT disassemble the battery. It will damage the unit and void the
warranty.
The battery’s liquid is corrosive. If there is leakage, wash with plenty of
soap and water. If it gets into your eyes, immediately rinse your eyes
with warm water and seek medical advice.
DO NOT touch the paper tear-off knife.
DO NOT touch the print head or the parts around it during or
after printing since that area will be hot.
DO NOT open the top cover when printing. Doing so may cause
printer failure.
DO NOT print when it’s out of paper. This could damage the
print head and rubber roller.
Keep all liquids away from the unit. If liquid should get into the
unit, turn the power off immediately.
Make sure to charge the battery a minimum of 60%. Then remove the battery from the printer and store it away if the printer
will not be used for a long period of time.
Please save this manual for future reference.
In order to maintain a high print quality and extend the life of
the product, we recommend using ROYAL brand 2 1/4” (57mm)
thermal paper roll, Part # 013127.
Page 5
3
ROYAL Thermal Printer PT-300
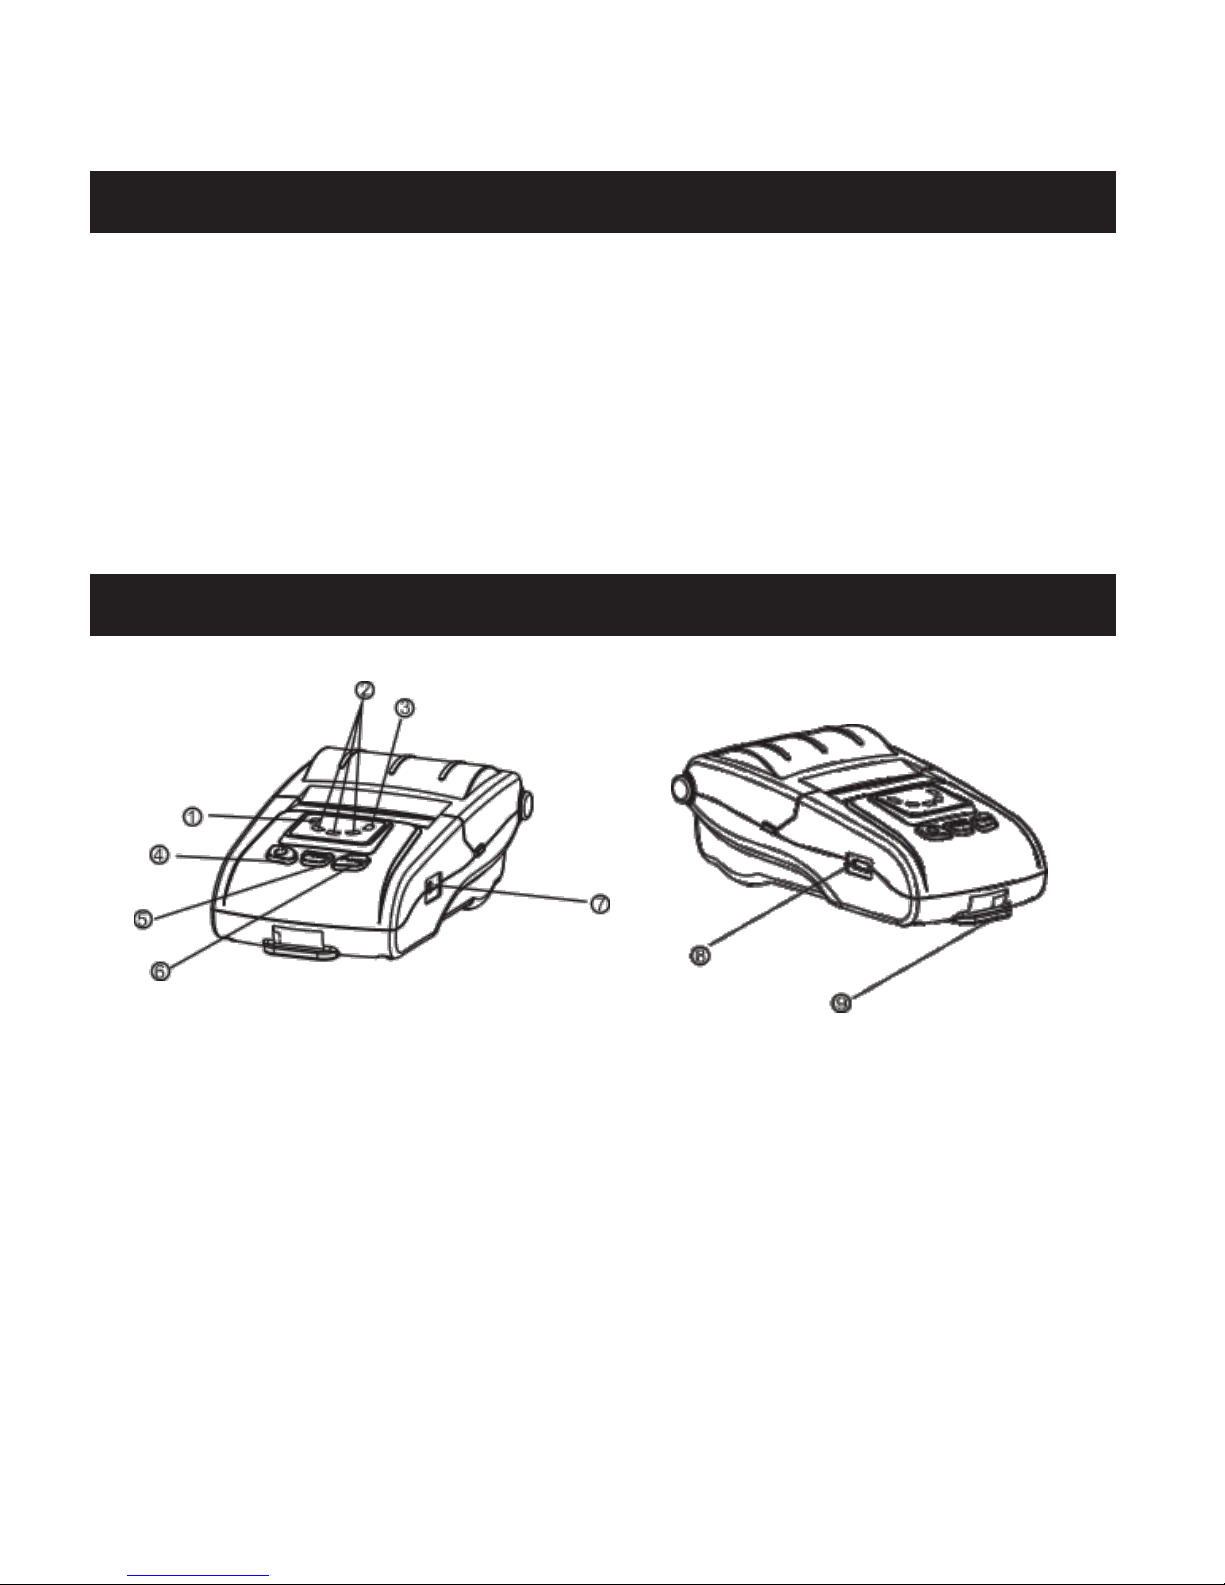
Unpacking
Printer parts
After unpacking the unit, please check that all the necessary
accessories are included in the package.
• 1X User’s manual
• 1X Printer
• 1X Lithium battery
• 1X USB cable
• 1X Power adapter
1. Error indicator (red)
2. Battery status indicator (Green)
3. Status indicator (Blue)
4. Power button
5. Feed button
6. Function key button
7. Power port
8. USB port
9. Hook
Page 6

4
ROYAL Thermal Printer PT-300
Technical specifications
• Streamlined design: Small and lightweight
• Auto paper loading structure, easy to use and maintain
• High print quality
• Low-noise and high-speed printing
• Low power consumption
• Low operating costs (no ribbons, ink cartridges): thermal printing
technology
MAIN FEATURES
Print method Direct thermal line
Print width
48mm / 1
57
⁄64in
Dot density 384dot/line
Print speed
60mm/s (max) / 2
23
⁄
64
in (max)
USB
Bluetooth3.0/BLE4.0 (support Android and iOS)
WIFI (AP/STA/AP+STA mode to set up the networks)
Support USB virtual COM port for developing and testing by developer
Paper width
58mm / 2
9
⁄32in
Paper diameter
50mm (max) / 1
31
⁄32in (max)
Paper thickness 0.06~0.08mm
Print commands Compatible with ESC/POS
Other features Support NV logo download printing
Fonts GB18030, Big5, Korean
ANK Font: Font A: 12*24dots
Font B: 9*17dots
Simplified/Traditional Chinese Character, Korean: 24*24dots
UPC-A/UPC-E/EAN (JAN) 13/EAN (JAN) 8/
CODE39/CODABAR/ITF/CODE93/
CODE128/QR code
Data 4K bytes
NV Flash 60K bytes
Dimension
148.5*86*58.5mm/ 5
27
⁄32*325⁄64*219⁄64in
Weight (including battery) 288g/ 10.16oz
Power adapter Input: AC100-220V output: DC 9V/1A
Lithium battery 2200mAh/7.4V
Charge period 2.5h-3.5h
Other features Automatic sleep mode function
Work Environment
Temperature: 5~45°C, Humidity: 10~80%
Storage Environment
Temperature: -10~45°C, Humidity: 10~90%
Reliability Mechanism 50km/ 31miles
Environment
Physical Properties
Power
Printing
Interface
Barcode
Character size
Barcode
Buffer
Page 7

5
ROYAL Thermal Printer PT-300
Battery installation
Paper roll installation
1. Unpack the battery.
2. Install the battery as pictured, following the direction of the arrow.
3. Push the battery into the slot until it snaps into place.
1. Open the top cover as shown in the picture.
2. Install the paper roll as shown in the picture, following the direction
of the arrow.
3. Pull the edge of the paper 5mm through the outside of the slot.
4. Close the top cover.
NOTE: In order to maintain a high print quality and extend the life of
the device, we recommend using ROYAL brand 2 1/4” (57mm) paper
roll, Part # 013127.
NOTE: The printer cannot print without the battery.
SET UP
1.
1.
2.
2.
3.
3. 4.
Page 8

6
ROYAL Thermal Printer PT-300
Battery charging
1. Turn off the printer power.
2. Plug the supplied power adapter into the printer’s power input
socket and connect the adapter to an AC outlet.
3. Turn on the printer power. The battery will start to charge.
NOTE: To charge the battery, the printer must be turned on.
Page 9

7
ROYAL Thermal Printer PT-300
Indicator, beeper and buttons
OFF OFF OFF No Printer power off.
Blinking ON OFF Yes
Printer power on, but
out of paper.
OFF ON OFF No
Printer is powered on
and in normal print
mode.
OFF ON ON No
Bluetooth/Wi-Fi
connected.
Printer power ON/OFF.
Paper feed
Interface information
Hexadecimal Dumping
Factory data reset
Print Self-test page
Beeper Status
Long press the power button for 3 seconds.
Press the POWER button and FUNC button simultaneously, wait for the green lights light
in turn, then release the POWER button firstly. The red light and blue light lights up in turn,
after the blue light is off, release the FUNC button; red light is off, the printer motor will
vibrate.
To feed paper manually, press the FEED button.
Press the FEED button and the POWER button simultaneously, wait for all the lights are
bright, then release the POWER button firstly, wait for STATUS indicator (blue light) is off,
then release the FEED button.
ERROR Indicator
(Red)
STATUS Indicator (Blue)
BATTERY STATUS
Indicator (Green)
Press the FEED button and the POWER button simultaneously, wait for all the lights are
bright, then release the POWER button firstly; after the blue light and red light is off in
turn, then release the FEED button, meanwhile the printer prints out "Hexadecimal Dump"
page, then printer is changed to Dump mode.
Turn on the printer, press the function button.
Page 10

8
ROYAL Thermal Printer PT-300
DRIVER / APP
USB
To set up the printer through Royal POS software follow the
next steps:
1. Connect the printer with USB interface to POS and go to
Setup/Peripherals from the Main menu in Royal POS software.
2. Choose a USB port in the “Connection type” field to add a
new kitchen printer.
3. Make sure the following information appears in the following fields:
When finished, press the “SELF-CHECK” button. A notice asking if you would allow the Royal system’s app to access the
USB device will appear. Answer “OK”.
If you want to know more details about the printer’s driver,
you can download online manual in www.royal.com in section
Support/Drivers and Manuals.
Android / iOS
FIELD INFO
Device USB 2"/57mm Thermal Printer
Port Vendor Gprinter
Speed 9600 bps
Page 11

9
ROYAL Thermal Printer PT-300
BLUETOOTH
To set up the printer through Royal POS software follow the
next steps:
1. Connect the PT-300 to the hardware. If you are using
an android device, go to Settings/Wireless & Networks/
Bluetooth from the Main menu. If you are using an iOS
device, go to Settings/Bluetooth.
NOTE: If you are not sure of the printer’s name, check by
pressing the FUNC button. In the interface information, the
BLUETOOTH NAME and BLUETOOTH PIN are listed, though
you may have to enter the password.
2. Enter to Royal POS software and go to Setup/Peripherals
from the Main menu
3. Add a new kitchen printer and choose BLUETOOTH in the
“Connection type” field.
4. Make sure the information below appears in the following
fields:
5. When finished, press the “SELF-CHECK” button and the
printer will print a test page.
Android / iOS
FIELD INFO
Device USB 2"/57mm Thermal Printer
Port Vendor Gprinter
Speed 9600 bps
FIELD INFO
Device
USB 2"/57mm Thermal
Bluetooth Printer
Port
(the BLUETOOTH NAME of the
printer)
Page 12

10
ROYAL Thermal Printer PT-300
1. To change the IP via the Royal PT-300 App:
NOTE: Check the interface information to see if you can print by
pressing the “FUNC” button in the printer.
a. Download the Royal PT-300 App from Google Play and
install it.
b. Connect the POS to the printer though the Wi-Fi
interface.
c. Open the Royal PT-300 App and enter “Connect to
printer”.
d. Choose “Printer 001” and write the IP address and port
number.
e. Click “Connect”.
f. Once the printer is connected, go back to the Main
menu and press the “WIFI settings”.
g. Refresh and then click on the device.
h. Enter the wireless router details, set the static IP
address and then click “Setup”. When setting the IP
address, make sure the following information is entered:
FIELD (in STA MODE) INFO
SSID
The name of the Wi-Fi network that the POS
usually connects to
Password The SSID WI-FI used earlier
IP address
Write an IP address that is similar to the router's
address (but not the same IP)
IP Gateway
You can set any Gateway IP but avoid conflict to
any current computer's IP
WIFI
Android
Page 13

11
ROYAL Thermal Printer PT-300
i. Restart the printer and AP/STA setting is successful.
j. Go to Setup/Peripherals from the Main menu.
k. To add a new kitchen printer, choose WiFi/Network in
the “Connection type” field.
l. Write the IP address (the new one) followed by the port
number in the “Port” field. Example: 192.168.x.x:xxxx.
The port number is usually 9100 (you can verify this in
the Interface information).
m. Make sure the information below appears in the
following fields:
n. Press the “SELF-CHECK” button and the printer will
print a test page.
NOTE: If you don’t remember the printer’s name, check by
pressing the FUNC button. In the interface information, the IP
ADDRESS is listed.
2. Connect the printer to the POS (these steps depend on what
software you are using. In this example, we will describe
how to connect the PT-300 to the Royal POS software).
FIELD INFO
Device USB 2"/57mm Thermal Printer
Port Vendor Gprinter
Speed 9600 bps
FIELD INFO
Device
USB 2"/57mm Thermal
Bluetooth Printer
Port
(the BLUETOOTH NAME of the
printer)
FIELD INFO
Device
Thermal LAN/WIFI Printer 80mm /
3"
Page 14

12
ROYAL Thermal Printer PT-300
1. To change the IP via the Royal PT-300 App:
NOTE: Check the interface information to see if you can print by
pressing the “FUNC” button in the printer.
a. Download the Royal PT-300 App from AppStore and
install it. F
b. Connect the POS to the printer though the Wi-Fi
interface.
c. Open the Royal PT-300 App and enter the ip address
and port of the printer. Then click in “Connect”.
d. Once the printer is connected, go the “WIFI settings”.
e. Enter current IP address and press “connect”, later
“done”, “Wmode” and “Query info”.
f. Choose STA mode and enter the wireless router
details, set the static IP address and then click “Do it”.
When setting the IP address, make sure the following
information is entered:
FIELD (in STA MODE) INFO
SSID
The name of the Wi-Fi network that the POS
usually connects to
Password The SSID WI-FI used earlier
IP address
Write an IP address that is similar to the router's
address (but not the same IP)
IP Gateway
You can set any Gateway IP but avoid conflict to
any current computer's IP
iOS
Page 15

13
ROYAL Thermal Printer PT-300
i. Restart the printer and AP/STA setting is successful.
j. Go to Setup/Peripherals from the Main menu.
k. To add a new kitchen printer, choose WiFi/Network in
the “Connection type” field.
l. Write the IP address (the new one) followed by the port
number in the “Port” field. Example: 192.168.x.x:xxxx.
The port number is usually 9100 (you can verify this in
the Interface information).
m. Make sure the information below appears in the
following fields:
n. Press the “SELF-CHECK” button and the printer will
print a test page.
NOTE: If you don’t remember the printer’s name, check by
pressing the FUNC button. In the interface information, the IP
ADDRESS is listed.
2. Connect the printer to the POS (these steps depend on what
software you are using. In this example, we will describe
how to connect the PT-300 to the Royal POS software).
FIELD INFO
Device USB 2"/57mm Thermal Printer
Port Vendor Gprinter
Speed 9600 bps
FIELD INFO
Device
USB 2"/57mm Thermal
Bluetooth Printer
Port
(the BLUETOOTH NAME of the
printer)
FIELD INFO
Device
Thermal LAN/WIFI Printer 80mm /
3"
Page 16

14
ROYAL Thermal Printer PT-300
PARTS LIST
FIRMWARE
Paper Roll
Battery
This printer uses a standard 2 ¼ inch (57mm) paper roll for
customer receipts.
NOTE: It is recommended to use ROYAL brand 2 1/4” (57mm)
paper, which will help prevent dust deposits on the printer
mechanism caused by inexpensive paper rolls. Replace with
standard bond quality calculator paper, ROYAL Part # 013127.
To order, call the Royal Supply Center toll free at: 1-888-261-
4555.
PT-300 firmware can be upgraded, you have to download the
driver from www.royal.com in section Support/Drivers and
Manuals.
To order, call the Royal Supply Center toll free at: 1-888-261-
4555.
Page 17

WARRANTY, REGISTRATION & TECHNICAL SUPPORT
PLEASE FILL OUT AND RETURN THE PRODUCT REGISTRATION CARD INCLUDED WITH YOUR
NEW ROYAL PRODUCT OR FILL OUT THE PRODUCT REGISTRATION FORM ON THE ROYAL WEB
PAGE AT: http:// www.royal.com.
BE SURE TO KEEP A COPY OF YOUR SALES RECEIPT!
STANDARD WARRANTY
ROYAL CONSUMER INFORMATION PRODUCTS, INC. (“Royal”), at 1160 U.S. Highway 22 East, Suite
301 Bridgewater, NJ 08807 USA WARRANTS that your NEW Product is free of defects of workmanship
and materials. If there is a defect or malfunction of this product, Royal will repair it free of charge as
follows:
This warranty does not apply to persons who purchased this product second-hand or used.
This warranty does not include adjustments, parts and/or repairs required by circumstances beyond
the control of Royal, including but not limited to fire or other casualty, accident, neglect, abuse, misuse,
abnormal use or battery leakage damages.
THERE ARE NO OTHER EXPRESSED WARRANTIES EXCEPT AS STATED HEREIN. AFTER THE
PERIOD OF EXPRESSED WARRANTY SET FORTH HEREIN, THERE ARE NO EXPRESSED OR
IMPLIED WARRANTIES AND THOSE EXCLUDED INCLUDE THOSE OF MERCHANTABILITY AND
FITNESS FOR PARTICULAR PURPOSE. Royal shall NOT be held liable for CONSEQUENTIAL
DAMAGES resulting from any failure, defect or malfunction of this product. Some States do not allow
limitations on how long an implied warranty lasts and some States do not allow the exclusion or limitation
of incidental or consequential damages, so the above limitations may not apply to you.
WARRANTY PROCEDURES
TO OBTAIN SERVICE UNDER THE TERMS OF THIS WARRANTY:
Please do the following:
PARTS:
LABOR:
New or comparable rebuilt parts in exchange for defective parts for ONE (1) YEAR from
date of customer purchase.
Royal provides labor warranty for ONE (1) YEAR from date of end-user purchase. Product
must be sent postage prepaid and insured to Royal in accordance with the warranty
procedures outlined below. At completion of the repair, the consumer will be responsible
for return shipping charges from Royal, and for any parts or services no longer covered
under warranty.
1. Send a copy of your original sales receipt showing original purchase date along with your
mailing address and a note describing the nature of the problem to:
Royal Consumer Information Products, Inc.
Warranty Processing
50 Hilton Street
Easton, PA 18042-7391 USA
2. You will receive a return authorization number within 7-12 business days from the date your
return request is received if it is determined that there is a basis for a replacement product. The
return authorization form you receive will list the return procedures, applicable charges, if any,
and the correct shipping address for the returned product.
Do Not Return the Product to This Address!
Page 18

1-800-272-6229 {US}
1-888-266-9380 {Canada}
01-800-849-4826 {Mexico}
PT-300
Thermal Printer
PT-300
1-800-832-6522
Page 19

State of California Proposition 65 Warning
The following statement is required by the State of California.
Warning: This product may contain chemicals known to the State of California to cause cancer, birth
defects, or other reproductive harm. Wash hands after handling
FEDERAL COMMUNICATIONS COMMISSION (FCC) RADIO FREQUENCY INTERFERENCE
STATEMENT INFORMATION TO THE USER:
CAUTION: Changes or modifications to this unit not expressly approved by the party responsible for
compliance could void the user’s authority to operate the equipment.
NOTE: This equipment has been tested and found to comply with the limits for a Class B digital device,
pursuant to Part 15 of the FCC Rules. These limits are designed to provide reasonable protection against
harmful interference in a residential installation. This equipment generates, uses and can radiate radio
frequency energy and, if not installed and used in accordance with the instructions, may cause harmful
interference to radio communications. However, there is no guarantee that interference will not occur in a
particular installation. If this equipment does cause harmful interference to radio or television reception,
which can be determined by turning the equipment off and on, the user is encouraged to try to correct the
interference by one or more of the following measures:
1. Reorient or relocate the receiving antenna.
2. Increase the separation between the equipment and receiver.
3. If applicable, connect the equipment into an outlet on a circuit different from that to which the
receiver is connected.
Consult the dealer or an experienced radio / TV technician for assistance.
Connection of peripherals to this unit requires the use of grounded, shielded cables to
ensure compliance with the Class B FCC limits.
IN CANADA:
This digital apparatus does not exceed the Class B limits for radio noise emissions from digitalapparatuses
set forth in the Radio Interference Regulations of the Canadian Department of Communications.
Le present appareil numerique n’emet pas de bruits radioelectriques depassant les limites applicables
aux appareils numeriques de la Class B prescrites dans le Reglement sur le brouillage radioelectrique
edicte par le ministere de Communications du Canada.
Page 20

PT-300
Thermal Printer
© Copyright
Royal Consumer Information Products, Inc.
2018, All Rights Reserved.
1160 U.S. Highway 22 East
Suite 301
Bridgewater, NJ 08807
Made in China
Consumer Information Products, Inc.
 Loading...