

Page 1
\ , r
ROYAL
t '
Page 2
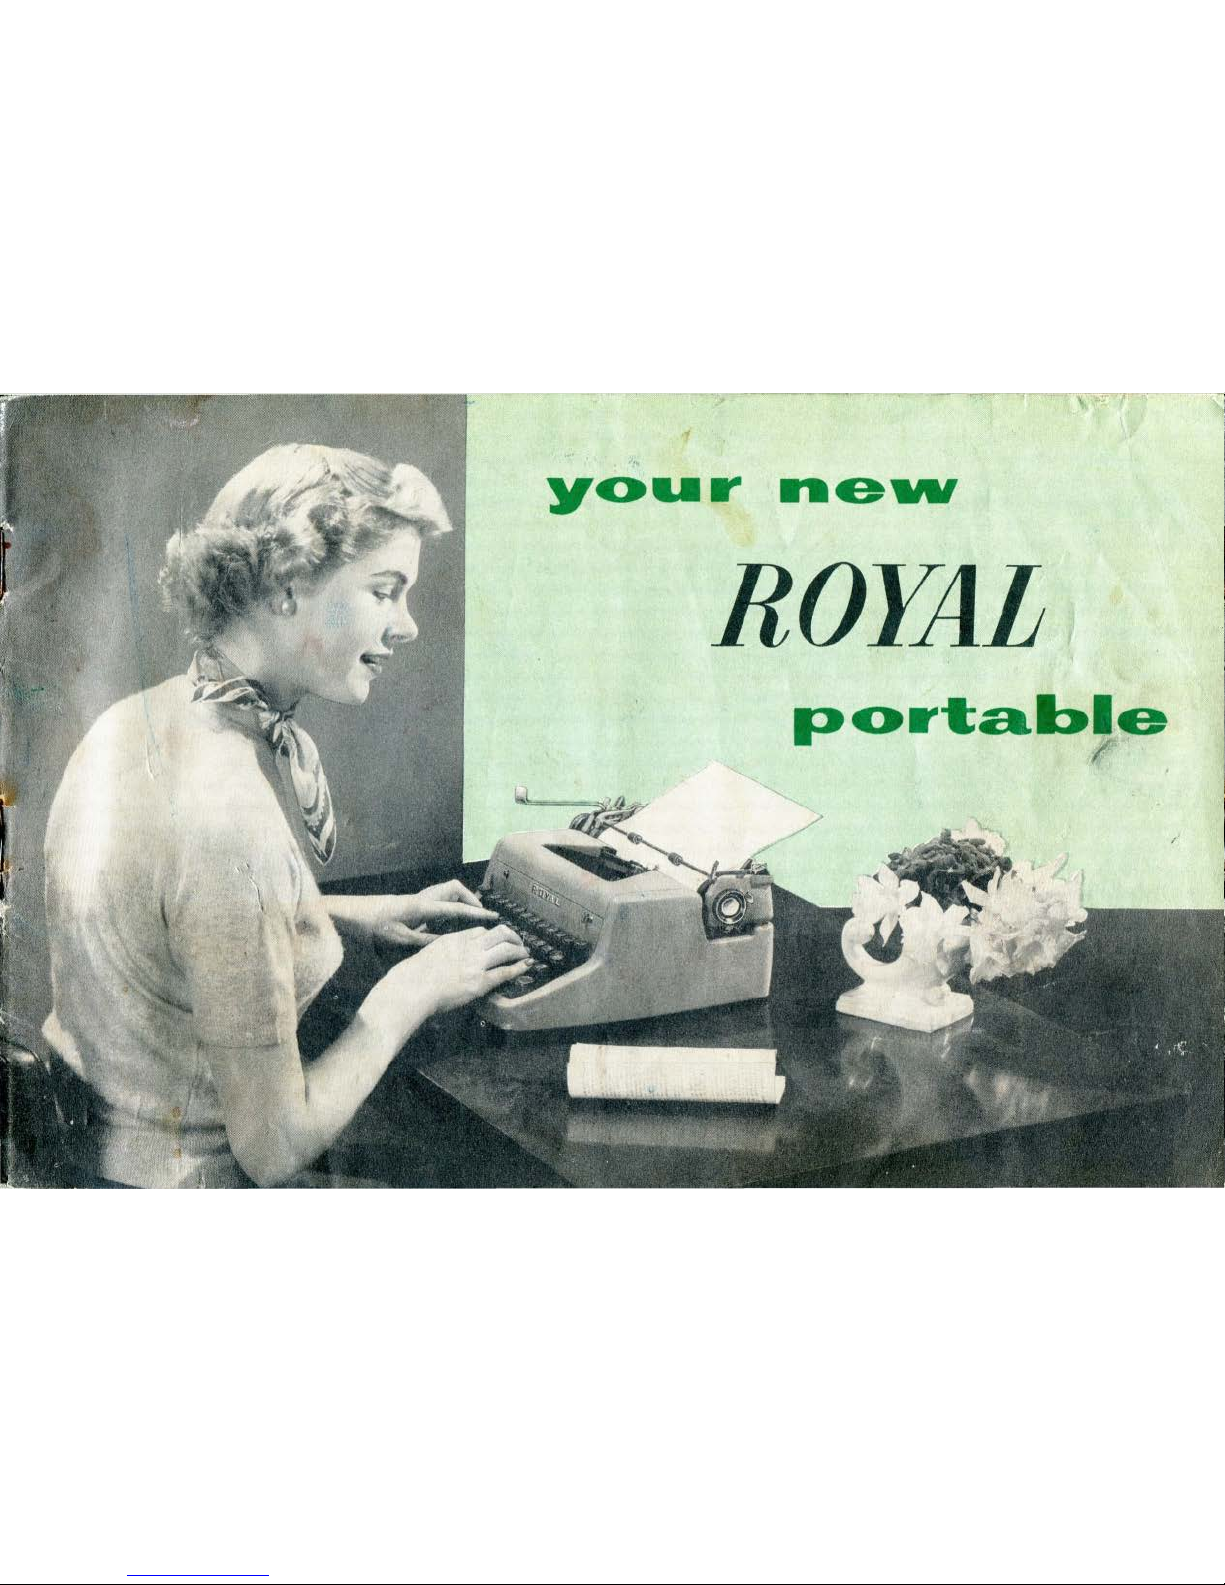
your
newvROJJtL
portable
combines precision
workmans
hi]
J,
found only on
the
finest office
typewriter,
with
spar
kling
new
features that
make
it
the
most
modern
and durable
portable
typewriter·
in
the world.
It's
tr·
uly
an
office
typewriter·
in
portable size.
Your
Roya
l is the only portable t
ypewriter
that
can be
tuned
to
your
own
typing
leve
l.
*Speed Selector enab l
es
you
to
synchronize
the act
ion
of the carriage and
keys
to y
our
own
typing
speed.
"Touch
Control"
permits
you to tailor the
sensitivity
of
the
keys
to
your
own
indi
,uidual touch. ':
'The
Line
Meter
automatically
tells
you
how
many
lines
of
typing
space you have
left
when
you
near
the
bottom
of
a page.
"Magic"
Margin
permits
you to
set
mar·gins
instantly,
easily
and
automatically. T hese featur·es, as well as
*Visible Tab
Set,
Push
Button
Top, ':'Automatic Paper Lock,
gr·eater
pcLper
capacity and
many
others,
help
you
to
type
faster, better,
with
less error.
Read
this
booklet carefully.
Its
complete
instructions
on the use
of
Roya
l's convenience featur·
es
will help you to get the
most
out
of your·
new
Portable T
ypewriter.
You will
also find
some he lpful
tips on touch
typing
beginning on page 14.
*Not
o·u
Keysto11e
Model
Copyright
lf)5~
hy
lloyal Typewriter Comp
any,
l nr.
'
'1\Jagic''
and
..
'J'
Ollf'h
Cont
rol
''
are rcg·islcred
'J'
radc-:\larkl;
of
the
Hu.ral Typewrilcr
('ornpan.v. I nc.
index
1.
Inserting & Removing Paper
2. Line
Spacing
3. Using the
Scales
4.
Ca
rri
age Spacing
5. Keyboard & Ribbon" Controls
6.
"Magic" Margin
7.
*
Speed
Selector
8. *Line Me
te
r
9.
"Touch/Control"
10.
*Tabulating
1
1.
Push Button Top
12. Ribbon Changing
13. Care
of
Portabl e- Portable Cas e
·
14.-
20. Typing th e Easy Way
20.- 21. Portable
Fea
ture Chart
*N
ot on
K
c y~t
o n
e
Model
Page 3
inserting
paper
A.
Pull
forward
*Automatic
Paper
Lock a
nd
drop
paper
behind
cylind
er
onto
Royal's
singl e
wide
rear
feed roll
which
acts
as a straight
edge,
g
uiding the left
edge
of
paper
against
paper
guide.
B.
Turn
either
cylinder
knob
until
paper
comes up
und
er
the
Automatic
Paper
Lock.
The
roller
s on
the
Paper
Lock should be
spaced
to
divide
the
paper
in
thirds.
Flip
back
the
lock
with
the
right
thumb.
*Lift
"Pap
er Uail"' on
Kcyt>tonc
Model
Adjusting
and
Removing
Paper
If
it
is neces:oary
to
adjust
the
paper
after
it
has
been inserted
into
the
machine,
pull
forward
the
Paper
Lock
and
the
Paper
Release
Lever
located
to
the
right
of
the
Paper
Lock
Lever.
Adjust
the
paper,
then
push
back
the
Paper
Lock
and
the
Paper
Release
Lever.
Remove
paper
by
pulling
forward
these
same
two
levers
or
by
rolling
it
out
by
means
of
either
cylinder
knob.
1.
Page 4
' 2.
I
Line
Finder. To
change
the
line
spacing
to a fraction
of
a line
temporarily,
as
when
typing
chemical
or
mathematical
formulae
(A~+B~
or H20)
, move
the
Line
Finder
forward
and
rotate
the
cylinder
to
the
desired
position.
To
return
to
the
exact
original
spacing,
move
the
Line
Finder
to
its
rearward
position.
2 Line Space Selector. You
have
your
choice
of
single,
double
or
triple
spacing
between
the
lines
by
moving
the
Line
Space
Selector
to
the
desired
number.
3 Variable
Line
Spacer. To
make a permanent
change
in
the
line
spacing,
press
in
the
Variable
Line
Spacer
button
while
rotating
the
Cylinder
Knob.
Locate
the
work
exactly
where
you
want
it,
then
release
the
button.
The
spacing
is now
permanently
changed
to
the
new
set-up.
4 Line Space Lever.
Line
spacing
and
carriage
return
are
accomplished
simultaneously
with
a single,
brisk
sweep
of
the
left
hand
against
the
Line
Space
Lever.
Royal's
specially
designed
finger-piece
brings
increased
comfort
and
ease
to
this
operation.
_
____
_ _I_
Page 5
r
t
i
-
~
.
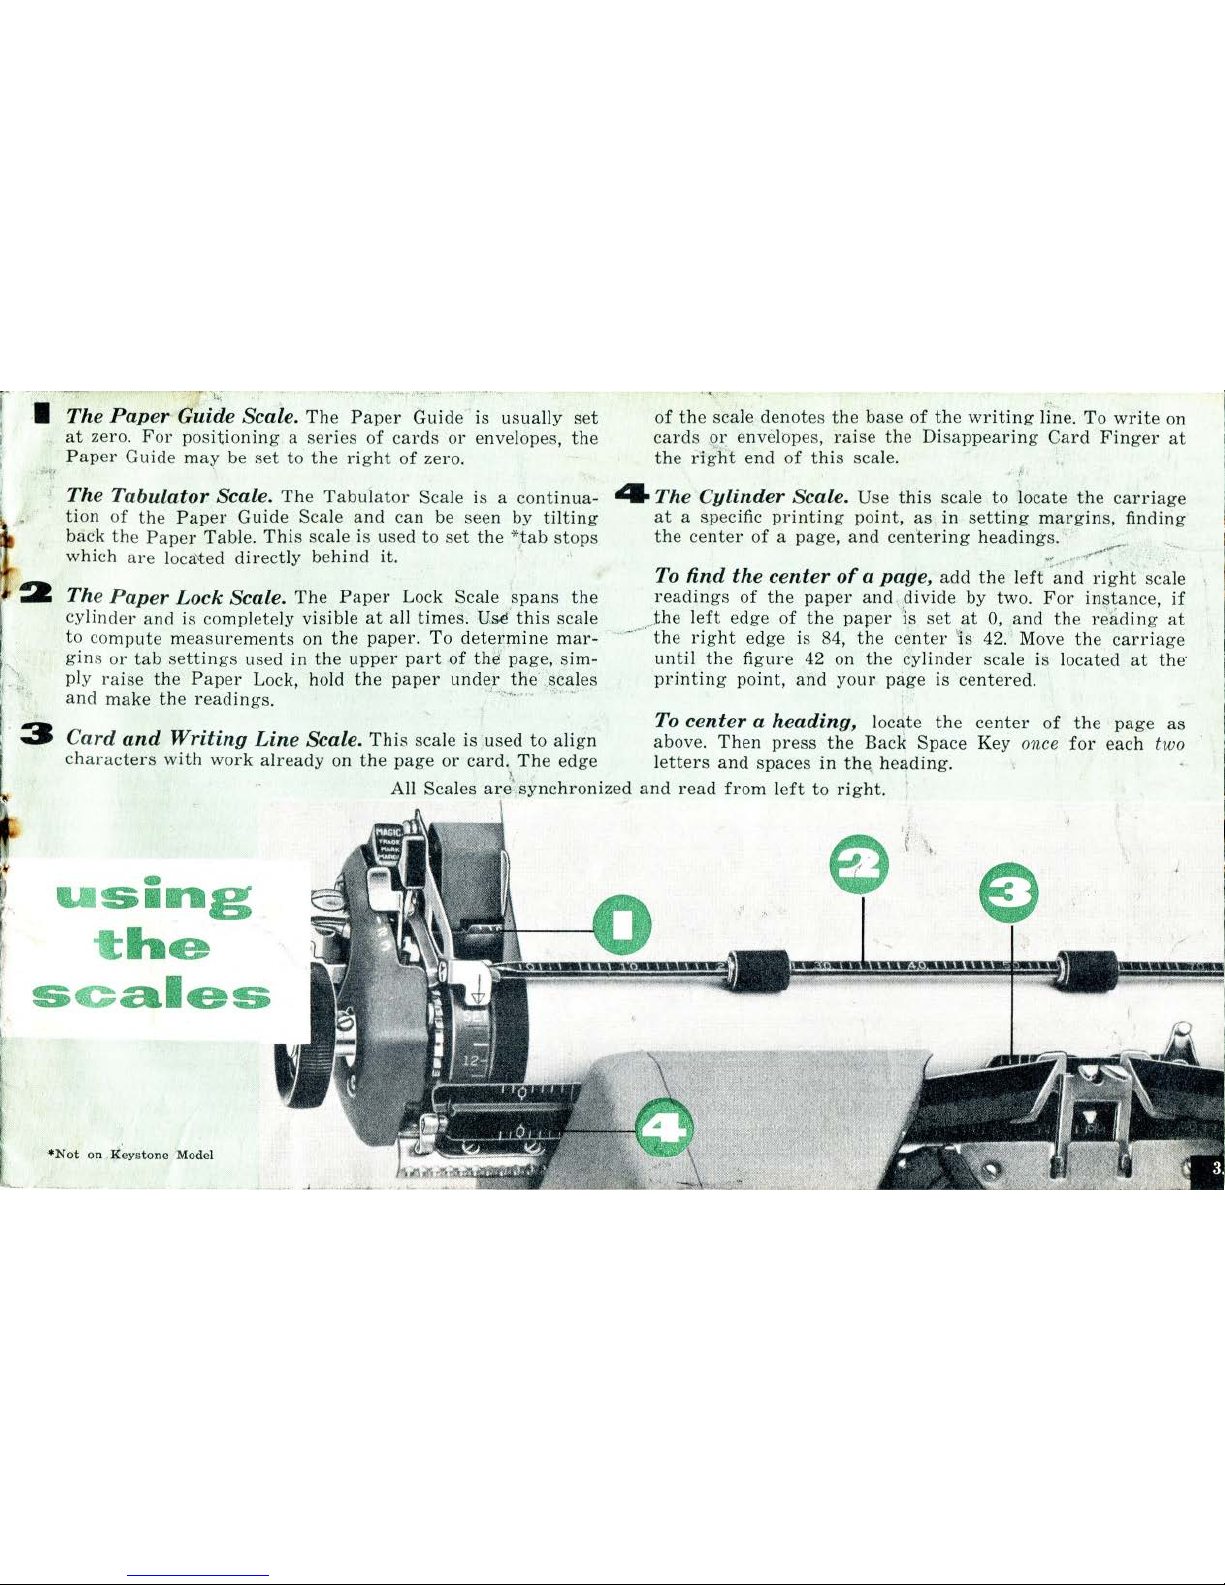
. 1 The
Paper
Guide Scale.
The
Paper
Guide
· is u
sually
set
at
zero.
For
positioning a series
of
cards
or
envelopes,
the
,,,
Paper
Guide rna{' be
set
to
the
right
of
zero.
The
Tabulator
Scale.
The
Tabulator
Scale is a
continua-
tion
of
the
Paper
Guide Scale
and
can be seen by
tilting
back
the
Paper
Tabl
e.
This
scale is used to
set
the *,tab
stops
which
are
loca'ted
directly
behind
it.
The
Paper
Lock
Scale.
The Paper
Lock Scale
spans
the
cylinder
and
is compl
ete
ly visible
at
all times.
Usi
this
scale
of
the
sca
le
denot
es
the
base of
the
writing
lin
e.
To
write
on
cards
or
envelopes,
raise
the
Disappearing
Card
Finger
at
the
dght
end
of
this
scal
e.
'r
4 The
Cylinder
Scale.
Use
this
scale
to
locate
the
carriage
at
a spec
ific printing
point,
as
in
setting
margins,
finding
the
center of
a page,
and
cen
teri
ng
headings.
·:
........•
.,
........
.
~:-
-
...
,:
To
find
the
center
of a page,
add
the left
and
right
scale
readings
of
the
paper
and
..
divide
by
two. For
instance,
if
to compute
measurements
on the
paper.
To
determine
mar-....
gins or
tab
settings
used in
the
upper
part
of
thii page,
sim-
ply ra
ise
the
Paper
Lock, ho
ld
the
paper
under
the .sca
les
,{4_
....... _-.•
,-.,
Jhe left
edge
of
the
paper
is
set
at
0,
and
the
reading
at
the
right
edge is 84,
the
center 'is
42. · Move
the
carriage
until
the figure
42 on
the cylinder
scale is located
at
the·
printing
point,
and
your
page
is
centered.
and
make
the
readings.
. ·
..
· ·
To
center a heading,
locate
the
center
of
the
page
as
Card
and
Writing
Line
Scale.
Thi
s scale is used
to
align
above.
Then
press
the
Back
Space
Key once
for
each two
characters
with
work
already
on
the
page
or
card. The edge l
etters
and
spaces
in
th<> headi
ng.
-
U
Sing
t
he
s c
ales
·
•N
ot
on , I(eystone
Model
)
~
'
All Scales
are',synchronized
and
read
from left
to
right.
,,
[
..
Page 6
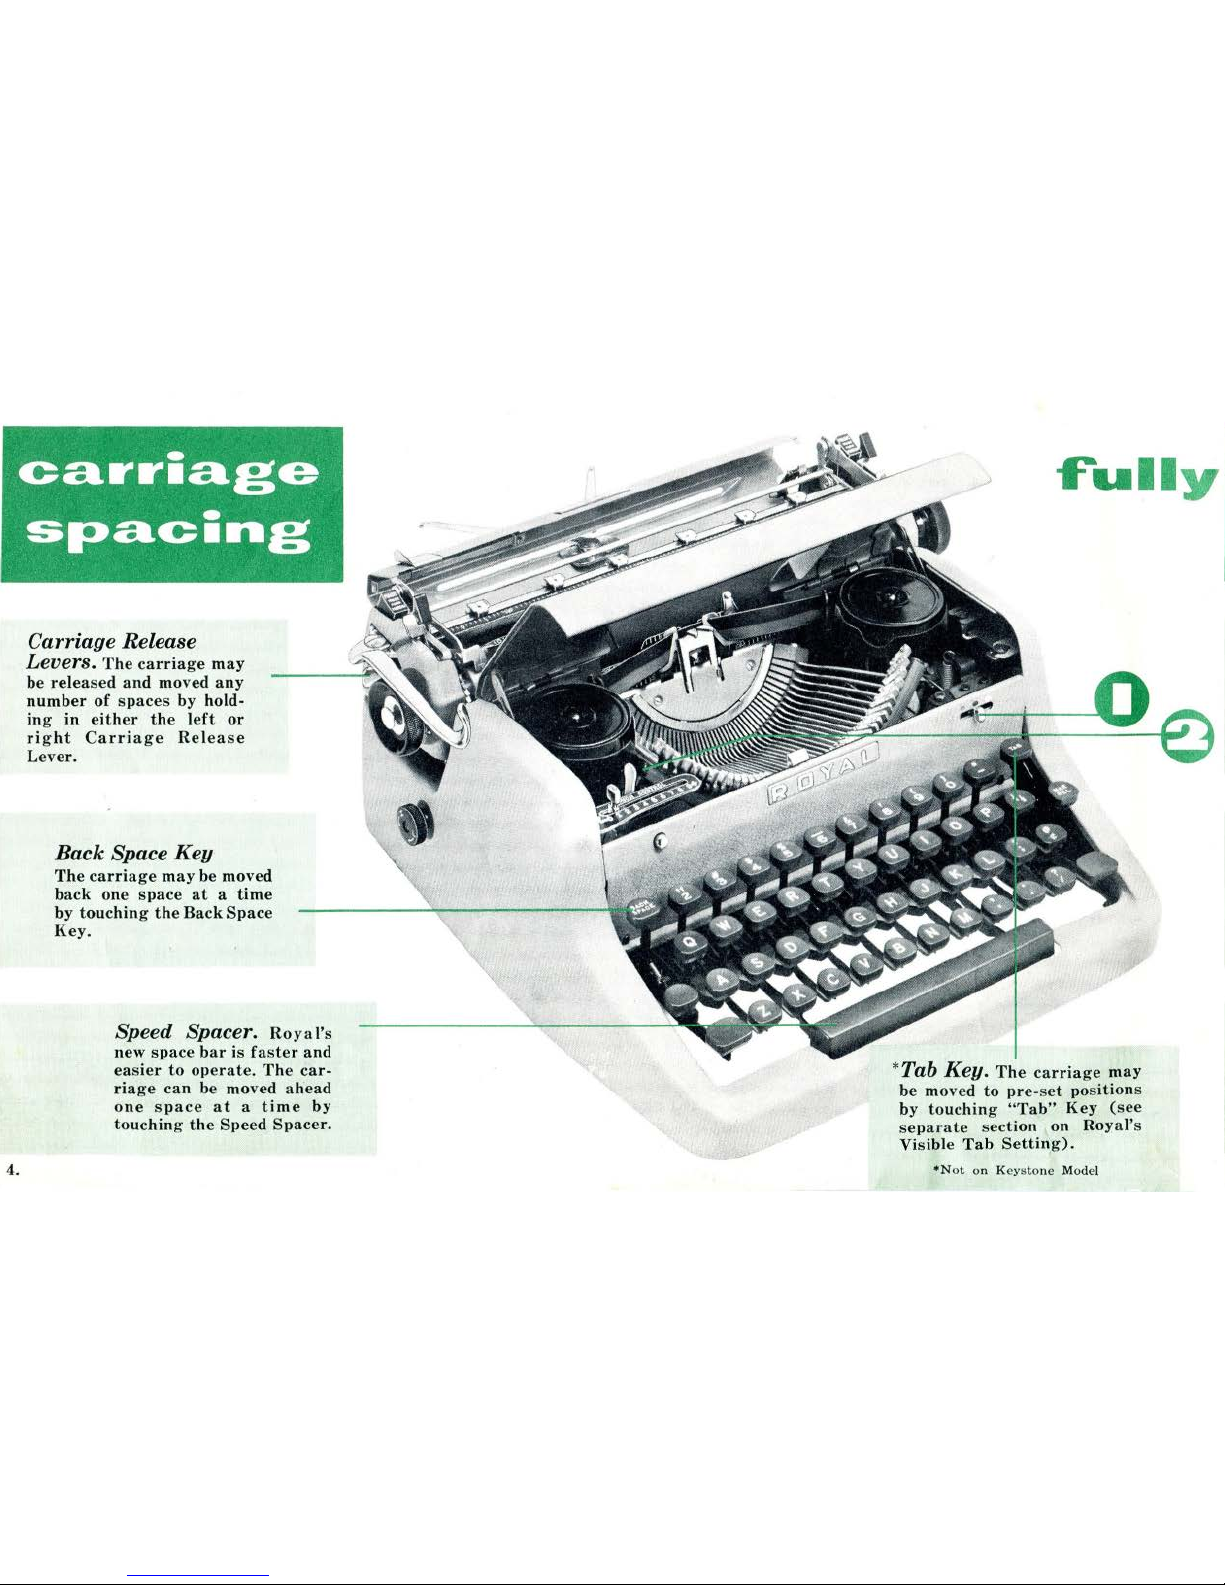
4.
Carriage Release
Levers.
The
carriage
may
be
released
and
moved
any
number
of
spaces
by hold-
ing
in
either
the
left
or
right
Carriage
Release
Lever.
Back
Space
Key
The
carriage
may
be
moved
back
one
space
at a time
by
touching
the
Back
Space
Key.
Speed
Spacer.
Roy
a I's
new
space
bar
is
faster
and
easier
to
operate.
The
car-
riage
can
be
moved
ahead
one
space
at a time
by
touching
the
Speed
Spacer.
~ull
y
*Tab Key.
The
carriage
may
be
moved
to
pre-set
pos
ition
s
by
touching
"Tab"
Key
(see
separate
sec
tion
on
Roy
al's
Visible
Tab
Setting).
•N
ot on K
eys
tone
Mod
el
Page 7

standard
keyboard
Th
e Key
board
and control
s on
your Royal ar
e like a
stan
dard offi
ce type
writ
er . . . designed
for
natur
al ease in ty
pin
g.
New pla stic keys are
Finger-Fl
ow in shap
e. Ther e's no obs
tructing
semi-c
irc
le in
front
of the key to
bru
sh fingers or
cau
se untidy
work.
L
ett
er s are
inlaid rig
ht
thr
ough the keys
and cann
ot
rub
off; they
sta
y clean, too, beca use t hey are exactly
flu
sh
with
key s
urfac
e.
To t
ype
capitals
or
upper
case
characters
pr
ess e
ith
er
Shift
Key at the extre
me ends
of the lowest ba
nk
of lett
er keys, holdin g
it
down while you use the letter key.
To t
ype
capitals
or
upper
case
characters
in
sequence
press the S
hift
Lock Key, just abo ve the le
ft Shift
Key,
which
holds
th
e se gme
nt
in the
upper case
until
you press e
ith
er
Shift
Key.
Warning
Bell
and
Margin Release.
Wh
en in ty
pin
g you
ap-
pr
oach
the
right
mar
gin, y
our
warnin
g be
ll
will
rin
g. A
fte
r you
hav
e
typ
ed seve
ral
mor
e cha racters, the line lock will take effect, lockin g
th
e type bars to preve
nt
you from typing
one ch aracter over
anoth
er.
To
type
past
the
right
margin
line lock,
or
to type
with
in
y
our left
ha nd margin, press the Ma rgin Release Key.
ribbon
color
change
and
reverse
The Ribbon Color
Change
Lev
er
(1)
pe
rmit
s you to use e
ith
er the
upp
er
or
lower halfs
of the
ribbon.
To ty
pe using
the
lower,
or red,
half
of a two-color
rib-
bon, move
the
lever to the red
dot
. To
use
the upper,
or
black,
half
of
the rib-
bon, move
th
e lever to
the black
dot. To
make the ribbon
inope
rative for
stencil
writing,
move
the
lever to the
whit
e dot.
The
ribbon
reverses
itself
automati-
cally when the
end
of
the
ribbon
is
re
ached.
However,
it
may
be
reversed
at
any
time
by
moving
the
Ribbon
Reverse
Lever
(2)
to its opposite position.
When purchasing new ribbons,
be sure to
get
a ribbon
made
~
..
expressly
for the
Royal~Portable.
5.
Page 8
''
e
II
·~a.g·~
-
•~a.rg•n
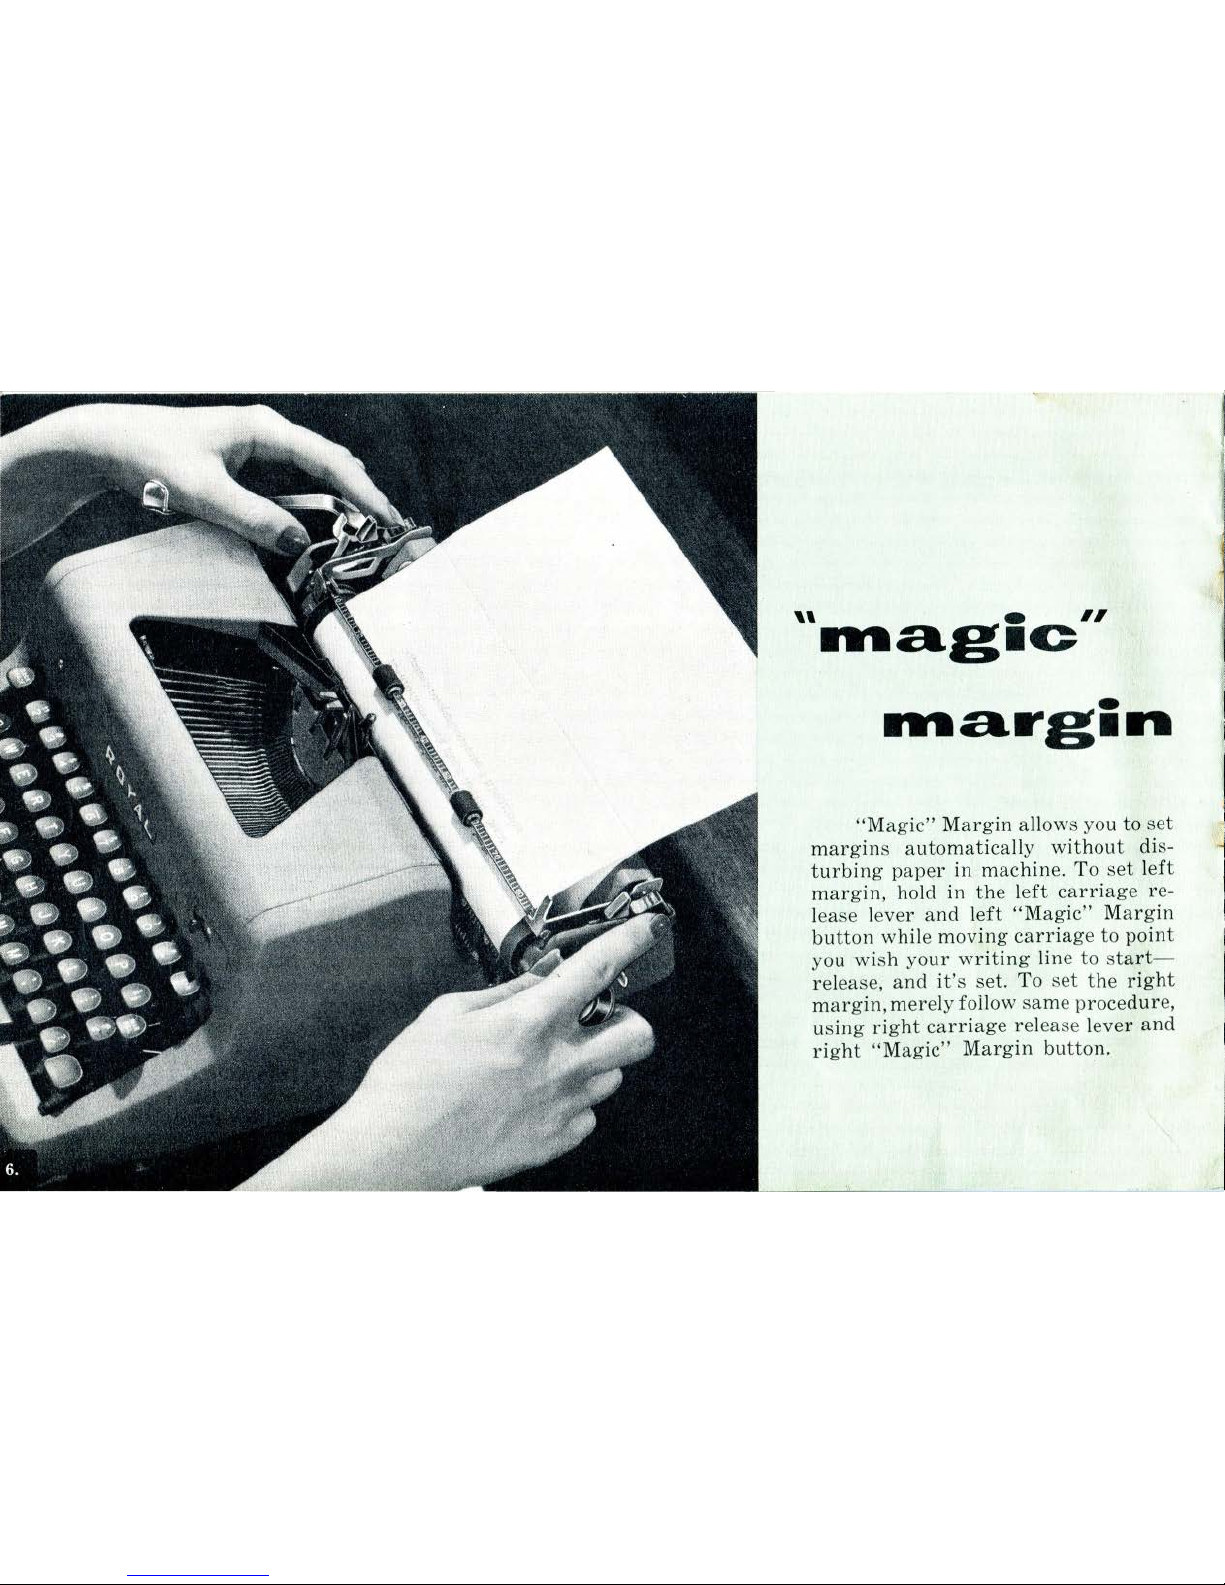
"Magic"
Margin
allows you
to
set
margins
automatically
without
dis-
turbing
paper
in
machine.
To
set left
margin,
hold in
the
left
carriage
re-
l
ease lever
and
left
"Magic"
Margin
button
while
moving
carriage
to
point
you
wish
your
writing
line to
start-
release,
and
it's
set.
To set
the
right
margin,
merely
follow
same procedure,
using
right
carriage
release lever
and
right
"Magic"
Margin
button.
Page 9

*speed
selector
Now,
for
the
first
time
on a
portable
typewriter,
you
can
tune
your
portable
to
your
individual
speed
preference with
Royal's
amazing
new
Speed Selector.
Move
the
carriage
to
the
extreme
right
and
you will see
the
Speed
Selector
Dial.
By
turning
the
knob you will
be able to
change
the
setting
on
this
dial
and
synchronize
the
speed
of
the· carriage
and
keys to
your
individual
typing
level.
As
you use
your
new
Royal
Portable,
you will be
able to
determine
which
setting
is
best
for
you.
*Not
on
Ke ysto n e Model
Page 10

*line
.neter
I
Thi
s amazing new device a
utomatically
te
ll
s you how many lines yo u have le
ft
when
yo u
are
typing
nea
r the
botto
m of a page.
Simply inse
rt
pape
r in regul
ar
mann
er and
turn
either cy linde r knob until
the red S
ET
lin e on the Line M
eter
appears dire
ctly be-
n
eat
h the
arrow. Th
en ho
ld
the
Var
iable
Lin
e
Sp
ace
r bu
tto
n a
ll
the w
ay
in while turnin
g
th
e right cylinder knob
until
the
bac
k ed
ge
of t he
paper
is aligne
d w
ith
the
two red d
ots
on t he
Pape
r S
upport. (Be certain
to
raise
the
Pape
r Supp
ort
to i
ts uppermost
posi-
tion.) Rel
ease
the Variable Line Space
r bu
t-
to
n,
then t
urn
the cylinder to the de
sir
ed
typ
in g position. As you near the bottom
of
the page, the numbers on t he Li
nemeter
will
au
tomatically indi
cate
exact
ly how m
any
lines
of
typ
ing
space
you h
ave left.
If
you
type
on a
paper
or card
that
is
too
short
to
be
align
ed
with
the
red dots
on the
Pap
er
Support
, use the s
ame
dir
ec-
tions
as
abov
e,
but
align
it
with
the
red
lines
directly behind
the
cylinder
inst
ead
of the red
dot
s on the
Pap
er
Support
.
*Not
o n
Kt!ystonc Mode
l
Page 11

This
feature, made
famous
on
Royal
Office
Typ
e-
writers,
adjusts
the
sens
itivity of
the
keys
to
your
own touch. Move the
"Touch
Control"
Lever
toward
the
high
numbers and
the
keys
automati-
cally
adju
st
themselves
for
a firm
or
heavy
touch.
If
you
hav
e a lig
ht
touch
move
the
lever
to
the
low
numb
ers.
"touch
control"
Page 12

.)
*tabula
ti
ng
Royal's
Visible
Tab
stops
are
made
instantly
accessible by
simply
tilting
back
the
Paper
Table.
These
tab
stops
are
used
to
mark
off
various
indentations
and
to
halt
the
carriage
at
these
points. To
set a tab
stop, note
the
reading
on
the
cylinder
sca
le
where
you wish
the
carriag~
to
halt,
then
press
down on
the
tab
stop
and
move
it
till
the
red line on
it
is
aligned
with
the
same
reading
on
the
Tabulator
Scale. To
tabu-
late-that
is, to move
automatically
from
one column
or
indentation
to
the
next, hold
down
the
Tab
Key
until
the
carriage halts.
*Not
on I<c_.vs
tonc
Model
-
---
- _
___.._
___
_ _
,l
Page 13

Press
the
button
convenient
ly located
directly
over
the
left
side
of
the
key
board,
and,
"presto,"
the
Push
Button
Top
automatically
sp
ring
s wid e open
making
the
interior
of
your
Royal ·
Purtabl
e
compl
ete
ly
accessib
le
for
adjusting
"Touch Contro
l"
or
for
type
cleaning
and
rapid
ribbon
changing.
Ill
Page 14

4
step
ribbon
change
12.
I
Press
Shift
Lock Key
and
move Color
Control
lever
to
red
dot.
Then
depress
any
two
central
keys
at
the
same
time
so
that
the
type
bars
stand
up
and
the
Ribbon
Carrier
is
raised.
Disengage
the
ribbon
from
the
Ribbon
Carrier.
2
Raise
the
Push
Button
Top
and
wind
ribbon
as
far
as
possible on
either
spool. Slip
the
ribbon
out
of
the
small
guides
beside each
ribbon
cup.
Lift
off both spools, unhook
and
discard
used
ribbon
from
empty
spool.
3 Hook
the
new
ribbon
to
the
empty
spool
and
replace
both
spools on
their
hubs,
making
sure
the
ribbon
travels
from
the
back
of
each spool as
shown
in
the
illustration.
4
Feed
ribbon
through
small
guides
and
replace m
Ribbon
Carrier.
Flick
back
the
type
bars
and
release
the
Shift
Lock.
Take
up
ribbon
slack by
turning
either
spool.
Lower
the
Push
Button
Top
and
you
are
ready
to type.
Page 15

To in
crease
your
typing satisfaction,
follow
these
simp
le
rules:
•
From
time
to time, dust
the
outside
and
accessible
parts
with a brush
or
dry
cloth.
• Cl
ean
the
type
frequent
ly
with
the
dry
bristle
brush
furnished
with your
Royal
Portable.
•
Wipe
the
carriage
rails
and
other
nickel
parts
occa-
sionally with a cloth s
li
ghtl y moistened
with a very
little oil.
•
Don't era
se
directly
over
the
printing
point. Move
the
carriage
to e
ith
er side,
then
erase.
• Keep
your
Portable
covered when
not
in use.
Reco
rd your
Royal
Portable ser
ial
numb
ers on
your
bill of
sa
le,
thi
s ins
truction
book,
or
in some
other safe place. You
will find it by
moving
the
carriage
to
the extreme
right
and
looking do wn
at
rear l
eft corner.
Your Royal Portable
can
always be identified by its se
rial
numb
er.
royal
portable
case
Your
Ro
y~!
Portable
comes in a highly-
styled
fiberglas
carry
ing
case
that
is light• ·
weight
and
very
durable.
Clips inside
the
top
of
the
case
are
designed to hold
paper
and
envelopes
as
well
as
the
type
clean-
ing
brush.
If
you like , use
your Royal Portable
in
it
s case.
Simply
open
the
cover
and
you
are
ready
to type. Or,
remove
the
top
of
the
case by
holding
the
Hinge
Lock
toward
you
and
slide off
the
top
to
the
right.
For
the
quietest
typing
of
all,
remove
the
Portable
from
the
case. To do
this,
re-
l
ease
the
four
base
clamps
and
lift
the
Portable
from
the
base
of
the
case. To
replace
the
Portable
in
case,
set
it
on
the
feet
pins and
re-engage
the
clamps.
Posi-
tion
the
carriage
at
the
center
and
close
the
case.
13.
Page 16

14.
The
Speed
Typing
Chart
is designed to help
the
beginn
er
quickly
learn
the
proper
positioning
and
use
of
the
finge
rs
for
typing
by touch.
Detach
the
chart
from
the
guarantee
card
and
place
it
to
the
right
of
your
typ
e-
writer.
Always
use
the
chart
as
your
guide-never
th
e
typewriter
keyboard.
Sit
erect,
feet
fiat on
the
floor.
Plac
e
the
fingers on
the
HOME
KEYS:[,
d,
s, a
for
the left
hand;
j,
k,
l,
and ; for
the
right
hand.
From its
HOME
KEY,
a
finger
may strike
any letter
indicated
for
that
finger
in
the
chart,
and
then
return
to
its
HOME
position.
Strik
e
the
keys
crisply
with a staccato
stroke.
Strive
for
accuracy.
Speed in
touch
typing
will follow.
Practice each
of
the
following lessons
until
you can
type
them
without
look
ing
at
the
chart.
Page 17

lesson
I
First
Finger
Vowels
and
Consonants
Type
each
exercise
through
without
stopping;
repeat
each
exercise
only
once:
1.
JU
JU JU
JU
JUg
jug
JUg
JUg
fu
fu
fu fu
fur
fur
fur fur
gu
gu
gu
gu
gum
gum
gum gum
hu
hu
hu hu
hut hut
hut
hut
2.
ru
ru
ru
ru
run
run
run
run
mu mu mu
mu
mug
mug mug
mug
tu
tu
tu
tu
tub
tub
tub
tub
nu
nu
nu
nu
nut
nut
nut
nut
~
'
3.
bu
bu bu
bu
bug
bug
bug
bug
by by
by by
buy buy
buy
buy
hy
hy hy
hy
thy
thy
thy
thy
ry
ry
ry
ry
fry
fry
fry
fry
4.
j
u7
fr4
ju7
fr4
ju7
fr4
ju7
fr4
ju7
fr4
ju7
fr4
ju7
fr4
5.
j7
j
f4f
j7 j f4f
j7
j
f4f
j7 j f4f
j7
j
f4f
j7 j f4f
j7 j f4f
6.
j6j
f5f
j6j
f5f
j6j
f5f
j6j
f5f
j6
j
f5f
j6
j
f5f
j6j
f5f
7.
Type
one
lin
e
of
e a c
h:
thug
bury
numb
turn
funny
buggy
8.
Type one
lin
e
of
ea
ch:
746
547
567
546
657 645
546
475
I./
-tn
Page 18

16.
Page 19

lesson3
First,
Second,
and
Third
Finger
Vowels
and
Consonants
1.
jo
JO
JO
JO
J 0 g
JOg
JOg
JOg
ho
ho
ho
ho
who
who
who
who
lo
lo lo
lo
low
low
low
low
so
so
so so
sow
sow sow sow
2.
bo
bo bo
bo
box
box
box
box
wo
wo wo wo
won
won won won
no
no no
no
now
now now
now
do
do do
do
dot
dot
dot
dot
3.
fo
fo
fo
fo
for for for for
co
co co
co
cow
cow
cow
cow
to
to
to
to
toy
toy
toy toy
yo
yo
yo
yo
you
you
you
you
4.
lo9
sw2
lo9
sw2
lo
9
sw2
lo9
sw2
lo
9
sw2
lo9
s
w2
lo9
sw2
5.
191
s2s
191
s2s
191
s2s
191
s2s
191
s2s
191
s2s
191
s2s
6.
Type
one
line
of
each:
down
kind
more
give
swing
vowel
7.
Type
one
line
of
each:
191
214
189
531
419
791
916
2
81
8.
Type
one
copy
of
each;
repeat:
Think
before
you
write.
Mr.
Orval
Brock,
New
York
City
17.
Page 20

lesse>
...
4-
All
Fin~ers
All
Vowels
and
Consonants
1.
Ja Ja
Ja
ja
Jar
Jar
Jar
Jar
pa
pa
pa pa
pay
pay
pa y
pay
rna
rna
rna
rna
map
map
map
map
ta
ta
ta
ta
tag
tag
t a g
tag
2.
ha
ha
ha
ha
hat
hat
hat
hat
la
la
la
la
lap lap lap
lap
ba ba
ba
ba
bay
bay bay
bay
wa wa wa
wa
wax wax wax
wax
3.
sa sa sa
sa
saw
saw saw
saw
ca
ca
ca
ca
car
car
car
car
pa
pa
pa
pa
pan
pan
pan
pan
la
la la
la
law
law
law
law
4 .
;pO
aqa ; pO
aqa
;pO
aqa
;pO
aqa
;pO
aqa
;pO
aqa
;pO
a c1a
5.
;
0; ; 0;
;
0; ; 0; ; 0; ; 0; ; 0; ; 0; ; 0;
;
0;
;
0;
;
0;
;
0;
;
0;
6.
Type
one
line
of
each:
aqua
vary
lake
loaf
quiz
marine
7.
Type
one
line
of
each:
190
2
09
106
305
807
406
605
160
8.
Type
one
copy;
indent
five
thumb
spaces:
In
the
best
books,
great
men
talk
to
us,
give
us
their
most
precious
thoughts,
and
pour
their
souls
into
ours.
Page 21

~.........___._
__
lesson&
1.
First
and
Second
Finger
words;
type
one
line
of
each:
mink
this
vice
cent
tiny
city
deck
either
rhythm
rung
nine
duck
much
tree
Junk
thud
thence
either
2.
3.
First,
Second,
and
Third
Finger
words:
work
rule
oxen
from
whim
meow
those
which
lion
busy
from
foxy
meow
oven
while
often
All
Finger
words:
quiz
pyre
wall
peek
pave
iota
lake
zinc
racy
thaw
waxy
pyre
peony
gypsy
extra
yacht
swings
smooth
zephyr
wizard
4.
Words
of
high
frequency;
type
through
without
stopping:
be
with
have
not
as
is
will
it
was
for
you
that
in
to
I
a
the
of
and
your
so
at
me
we
all
are
on
he
from
dear
which
his
this
my
but
by
at
her
there
would
or
she
been
were
very
has
had
they
one
if
no
more
letter
thank
work
5.
Speed
Sentences:
It
is
a
duty
of
a
man
to
do
me
a
turn
and
if
he
can
he
is
to
do
it.
Probably
my
oxen
will
haul
a
dozen
loads
of
new
gravel.
6.
Common
words;
type
through
without
stopping:
which
his
this
my
but
work
thank
letter
more
would
dear
be
with
have
not
as
is
will
it
was
for
you
that
in
to
I
from
he
are
on
all
we
me
at
so
your
and
there
would
by
19.
Page 22

20.
lesson&
Keyboard
Characters
Typewrite
one
line
of
eac
h:
0 1 D a y $ 9 . 7 5 P
au
1 1 s c a r #7
Do
i t n o w . J u
ne
3 , 1 9 4 0 2 5 %
2 x 3 = 6
Dear
Sir:
"
Star
" 8 - 4 + 2 = 2
Alas!
3
7/8
Dear Mary,
(very
informal-
-
followed
by
a comma ) .
Typewri
t e
the
alphabet
once
in
small
letters
following
each small
letter
by
its
capital
letter;
repeat
and
fol
-
low
eac
h
by
a comma ;
by
a
colon;
by
a
semicolon;
by
a
das
h ;
by
a
question
mark; by
a
period.
1. "M
agic"
Marg
in Le
ft
2. Pa per Guide
3. P
ap
er Gu ide
Sca
le
4.
P
aJ>
er
Tabl
e
5. t A
utornat
ic PaJ>
er
Lock
6. Paper
Lock Rolls
7. Wri
tin
g Lin e Scale
8.
*A
djustable
Pap
er
Sup
port
9. Carri
age
Position In
dicator
10
. Ribbon C
arri
er
11.
Disappearin
g C
ard
Fing
er
12. Cylinder Scale
13. Vis ible
Tab
Stop
s
14.
Ta
bula tor Scale
15.
"Ma
gic"
Margin Righ
t
1
6.
Paper
Release
Lev
er
17.
Right
Carriage
Rele
ase
18.
Cylinder
19.
Right
Cylind
er
Knob
Page 23

20. Ribbon
Color
Change
Lever
21. *T
abular
Key
22.
Margin
Rel
ease
Key
23. Right
Shift
Key
24.
SJ>eed
Spacer
25.
Left
Shift
Key
26.
Shift
Lock Key
27.
Fully
Sta
ndard
Keyboard
28. Back
Space
Key
2
9.
Push
Button
Top
30.
Tou
ch Co
ntrol
31. Ribbon
Reverse
3
2. *Spe
ed Sel
ector
Knob
33.
Line
S1>ace
Lever
34.
Left
Cy
Iinder
Knob
35. Variable Spacer
36. *Line
Meter
37.
Left
Carriage
Relea
se
38.
Line
Space
Selector
39.
Line
Finder
!Pa
per
Bail
on
Keystone
Model
*Not on K
eys
tone Model
21
Page 24

''
Portable
Division
royal
typewvrite
r
2
Park
Aven
ue
New
York
16, N. Y.
A-825-AC-4/53
Pr\.nt
ed
in U.S.
)...,
 Loading...