

Page 1
OWNER'S MANUAL
Operating and Servicing Instructions
Please read these
instructions
carefully before
using your
hand vacuum.
Let us help you
put your vacuum
together or answer
any questions, call
1-800-321-1134.
Page 2
This information has been compiled by the Vacuum Cleaner Manufacturer's Association
working with government and private sources, concerned with product safety. These
basic guidelines are for your protection and convenience.
.THIS VACUUM IS INTENDED FOR HOUSEHOLD USE ONLY
IMPORTANT SAFETY INSTRUCTIONS
SAVE THESE INSTRUCTIONS
When you use an appliance, basic precautions should always be followed, including the
following:
READ ALL INSTRUCTIONS BEFORE YOU USE THE APPLIANCE.
ALWAYS FOLLOW THESE SAFETY INSTRUCTIONS.
WARNING: TO REDUCE THE RISK OF
FIRE, ELECTRIC SHOCK OR INJURY:
Look on your vacuum cleaner and follow all
label and marking instructions.
Do not let children play with the vacuum
cleaner. Watch closely when the vacuum
cleaner is used by or near children.
Do not touch the plug or the vacuum cleaner
with wet hands.
Unplug the vacuum cleaner if you leave the
room. Unplug it when it is not in use and
before you service it.
Turn all controls to "OFF" before unplugging
the vacuum cleaner.
Do not pull on the cord to unplug the vac-
uum cleaner. Grasp the plug instead.
Do not use the power cord to pull or carry
the vacuum cleaner. Do not use the power cord
as a handle. Do not shut any door on the cord
or pull the cord around sharp edges or cor-
ners. Keep the cord away from heated sur-
faces. Do not run the vacuum cleaner over the
cord.
Do not use vacuum cleaner with a damaged
cord or plug. Do not use vacuum cleaner if
working improperly, dropped, damaged, left
outdoors or dropped in water. First, send to
service center for check and repair.
Always turn off the vacuum cleaner before
connecting or removing hose.
Do not use an extension cord with this
cleaner.
Electric shock could occur if used outdoors
or on wet surfaces.
Keep end of hose, wands and other openings
away from your face and body. Keep your
hands, feet, hair and clothing away from moving parts.
Only use attachments and hoses recommended by the manufacturer. Use the vacuum
cleaner only as stated in this manual.
Do not pick up anything that is hot, smoking
or burning. Do not pick up cigarettes, hot
ashes or matches.
Do not put any object into the vacuum
cleaner vent or other openings. Do not turn the
vacuum cleaner on if something is blocking an
opening. Keep vents free of things that slow
air flow, such as dust, lint and hair.
Do not use the vacuum cleaner without
dustbag or filters in place.
Be most careful when vacuum cleaning on
stairs.
Do not use the vacuum cleaner to pick up
flammable or combustible liquids or fumes,
such as gasoline, or use in areas where they
may be present.
o
Store the vacuum cleaner indoors. Put the
vacuum cleaner away after use to prevent
tripping accidents.
For grounded model:
properly grounded outlet only. See Grounding
Instructions.
3-501,
connect to a
Approved
by
the Vacuum Cleaners Manufacturers Association Executive Committee, April
2
29,
1987.
Page 3
WARNING:
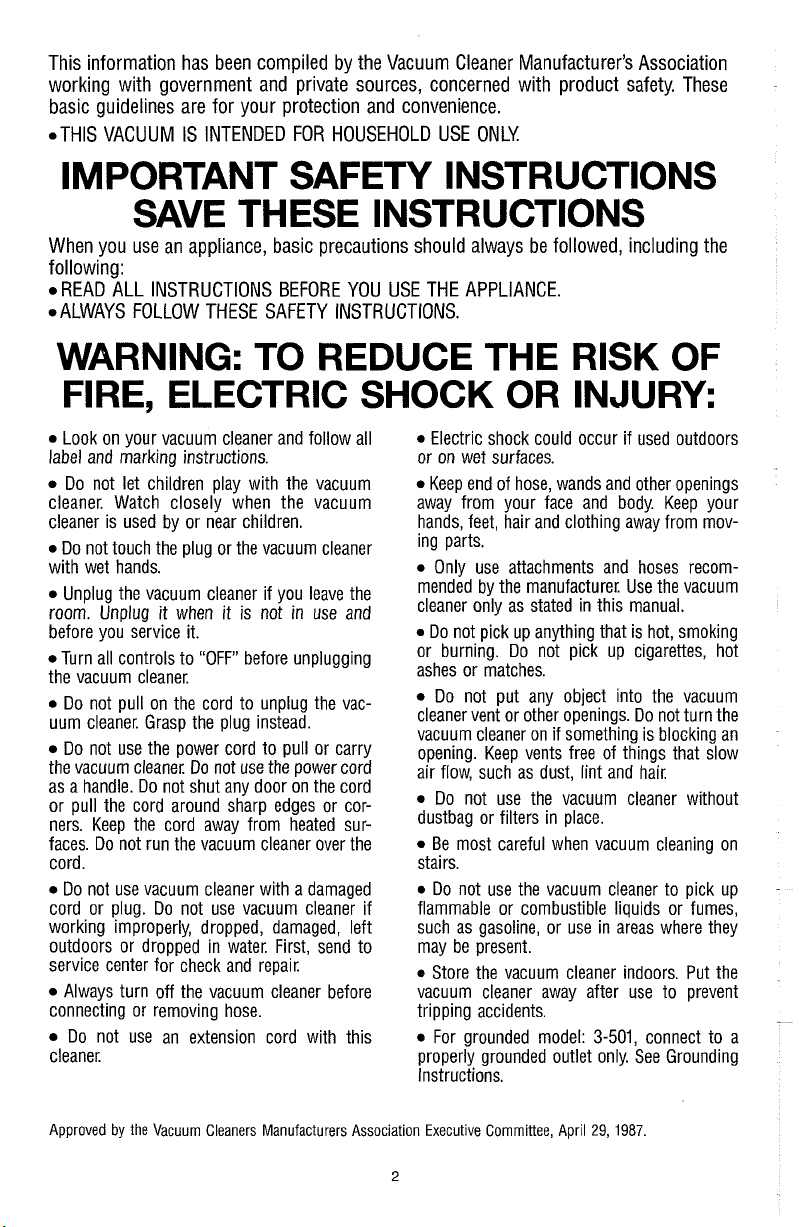
"To reduce the risk of electric shock, this appliance has a polarized plug (one blade is wider than
the other). This plug will fit in a polarized outlet only one way. If the plug does not fit fully in the
outlet, reverse the plug. If it still does not fit, contact a qualified electrician to install the proper
outlet. Do not change the plug in any way."
GROUNDING INSTRUCTIONS
(only for 3-wire models, those that include 2 blades and 1 grounding pin)
This appliance must be grounded. If it should malfunction or breakdown, grounding provides a
path of least resistance for electric current to reduce the risk of electric shock. This appliance is
equipped with a cord having an equipment-grounding conductor and grounding plug. The plug
must be plugged into an appropriate outlet that is properly installed and grounded in accordance
with all local codes and ordinances.
GROUNDED
i,,
GROUNDING
DANGER
a risk of electric shock. ~heck'with a qualified electrician or service person if you are in doubt as
to whether the outlet is properly grounded. Do not modify the plug provided with the appliance
if it will not fit the outlet, have a proper outlet installed by a qualified electrician.
This appliance is for use on a nominal 120-volt circuit and has a grounding plug that looks like the
plug illustrated in sketch. Make sure that the appliance is connected to an outlet having the same
configurations as the plug. No adapter should be used with this appliance.
-
Im~ro~er connection of the eouioment-orounclino conductor can result in
/
PIN
-GROUNDING
OUTLET BOX
-
SAFETY PRECAUTIONS
WARNING:
1.
ELECTRIC SHOCK COULD
OCCUR IF USED OUTDOORS
OR ON WET SURFACES.
2. USING IMPROPER VOLTAGE
MAY RESULT IN DAMAGE TO
THE MOTOR AND POSSIBLE
INJURY TO THE USER. PROPER
VOLTAGE IS LISTED ON CLEANER
PLATE. THE ROYAL PRINCE
OPERATES ON 120 VOLTS A.C.
60 CYCLES POWER.
3.
DO NOT OPERATE THIS UNIT
NEAR FLAMMABLE GASES OR
LIQUIDS. TO PREVENT FIRE, DO
NOT PICK UP HOT OBJECTS SUCH
AS CIGARETTE BUTTS, ETC.
Page 4
This vacuum cleaner will operate best
when serviced with genuine parts. To
be sure that you receive genuine parts
and service at fair prices, have your
cleaner serviced at an Authorized Royal Dealer or see your Yellow Pages for a
dealer near you.
Should you experience any difficulties
in operating this vacuum cleaner, report it immediately to the Dealer from
whom it was purchased. Costs of any
transportation to and from any place
repair are to be paid by the owner. The
of
NOTE:
REGISTER YOUR CLEANER
TO VALIDATE WARRANTY.
service parts used in this unit are easily
replaced and readily available from your
Authorized Royal Dealer or see your
Yellow Pages for a dealer near you.
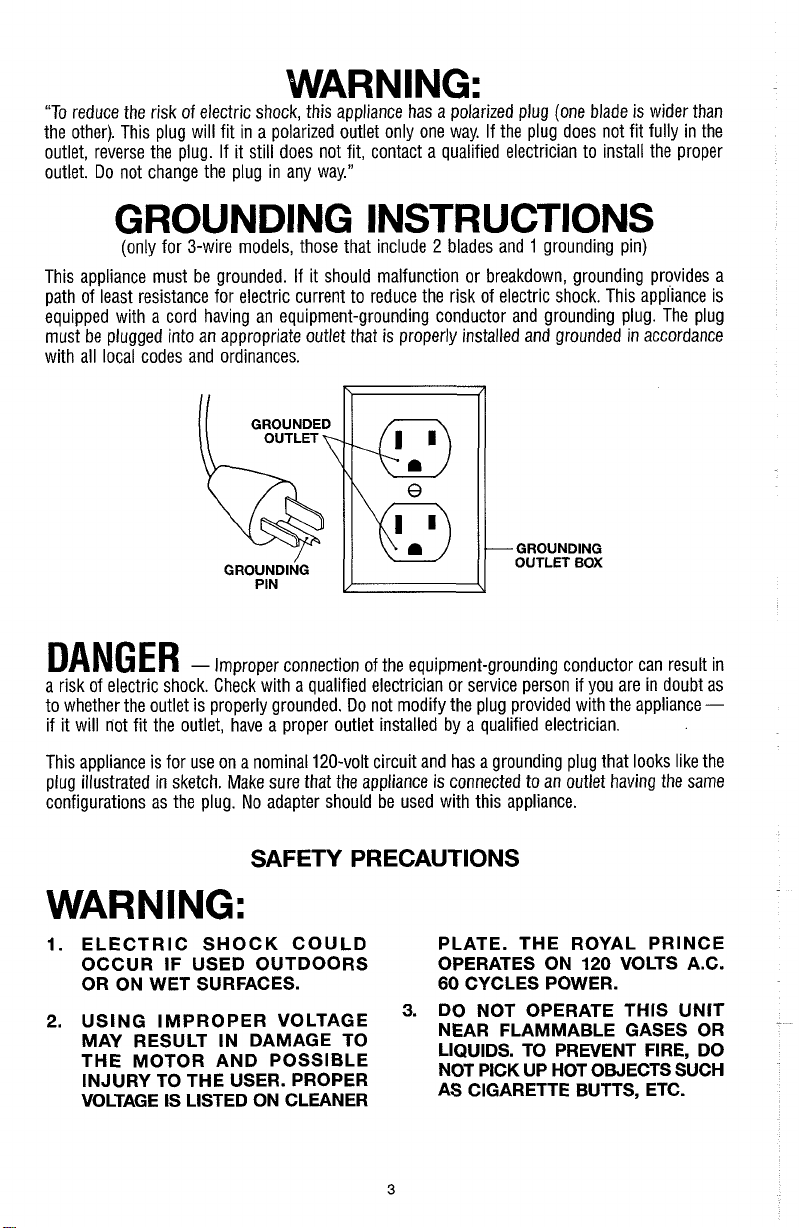
You have purchased the finest hand
vacuum cleaner available. This minicleaner with revolving brush action has
most features found only on upright
cleaners.
Follow the instructions enclosed and it
will give you years of efficient service.
Page 5

OPERATING INSTRUCTIONS
A. BELT INSTALLATION AND REMOVAL
NOTE:
THE UNIT MUST NOT BE PLUGGED IN
WHEN INSTALLING OR REMOVING THE BELT.
1.
Remove the plug on the face
of the cleaner.
NOTE:
PLUG MUST BE ON WHEN
ATTACHMENTS ARE NOT
IN USE.
3.
Center and raise the belt with
your left hand as
shown. Using your right hand,
dip the belt lifter in and hook
the belt around the lip of the
belt lifter. Slip the belt onto the
motor shaft
until the belt lifter base meets
the shaft.
Page 6

4.
To insure proper belt placement, gently turn belt lifter
clockwise and remove.
Make sure belt is pushed
back on shaft.
5.
Pictorial of belt installed prop-
erly. (right side of belt should
be closest to you).
NOTE:
THE BELT WILL
COME OFF IT NOT
INSTALLED PROPERLY.
6.
To remove the belt, hold belt
lifter as shown in photo
Hook the belt on the right
side of the motor shaft,
turn counterclockwise and
pull the belt towards you
to release.
2.
BELT
STYLE:
1
Page 7

B.
BAG REMOVAL AND INSTALLATION
UNPLUG CLEANER WHEN
REMOVING AND INSTALLING BAG.
1.
Grasp metal bag ring as shown.
Twist to the left to remove.
NOTE:
KEEP BAG OPENINGS
POINTED TOWARDS
CEILING TO AVOID
SPILLING DIRT.
NOTE:
2.
Empty bag in trash receptacle
(no inner liners are required).
3.
To
replace bag, place metal
bag ring, with !'top" label
up,
facing
housing as shown. Twist to
the right for secure fit.
BE SURE METAL PIN ON
MOTOR HOUSING AND EYELET
ON METAL BAG RING ARE
against the motor
NOTE:
LOCKED TOGETHER.
Page 8

C.
ATTACHMENT INSTALLATION
1.
Remove the plug and belt, as
described in Section
A.
NOTE:
THE BELT MUST BE
REMOVED FOR
ATTACHMENT USE.
2.
Depress spring clip on hose
(as shown). Insert hose into
cavity.
NOTE:
SPRING CLIP MUST LINE UP
WITH GROOVE AT BOTTOM
OF THE CAVITY OPENING.
Pull gently on hose to insure
a secure fit. When removing
hose, depress spring clip
and pull hose up and out
gently.
Hose attachment is in place
and ready for use. Crevice
tool, extension wand, and
dusting brush slip easily onto
hose end.
Page 9

D.
PAPER BAG INSTALLATION
You now have the option to use convenient disposable inserts on your
Prince hand cleaner. It's easy, convenient, and sanitary. Additional paper
inserts can be purchased at participating dealers or by completing the
HANDY QUICK PARTS MAILER provided. (Part No. 3-050247-001)
2.
Drop paper bag into cloth
dust bag. Plastic rim should
lie flat against rubber seal.
I
F";",:
H
I
3. To replace bag, place metal
bag ring against the motor
housing as shown. Twist to
the right for secure fit.
NOTE:
KEEP BAG OPENING POINTED
UPWARD TO AVOID
SPILLING DIRT. ARE LOCKED TOGETHER.
NOTE:
BE SURE METAL PIN ON
MOTOR HOUSING AND
EYELET ON METAL BAG RING
Page 10

E. SHOULDER STRAP INSTALLATION
(strap included with certain models: Available as optional
accessory to all models
1.
Place the shortest free-hanging
ends of the shoulder strap, with
snaps, around the handle. The
single clasp should be resting on
top of the handle.
2.
Pull the free-hanging end which
has two snaps on it through the
loop above the handle.
3.
Press the first connecting snap
over the mating snap below. The
strap should now be firmly
attached around the handle.
(disregard the second snap on
the free-hanging end. This mat-
ing snap is for use with a differ-
ent model).
4.
Smooth out the strap so it is not
twisted.
5.
Now place the longest free-
hanging end of the shoulder
strap with snaps around the nozzle. It should be placed under
and behind the nozzle and continue up in front of the handle
where the second connecting
snap will press over the mating
snap below. Be sure the clasps
are snapped tightly together. (Dis-
regard the first connecting snap
on the free-hanging end; this
connecting snap is for use with a
different model'.)
6.
The strap should be tight around
both the handle and the nozzle.
-
part no. 3-503600-601)
Page 11

F.
TO REPLACE BELT OR TO ADJUST BRUSH FOR WEAR
Your revolving brush has three settings to compensate for bristle wear.*
After considerable use, when the Royal Prince stops picking up threads
and lint, you should make your first brush adjustment. This unique revolving brush feature is designed to give long brush life.
If your belt fails to drive brush, it needs to be replaced.
1.
Remove the grey plug and belt, as
described in Section
2.
To remove metal nozzle guard,
A.
place thumb under metal tab as
shown. Push against tab until
nozzle guard comes free from
cleaner. Grasp belt and brush
assembly in the center of the
wooden brush roll. Pull straight
out.
Replace belt and or brush,
necessary, at this time.
3.
When the brush has become
slightly worn or where heavy
brushing is desired, replace brush
in holders with number
"2"
on caps at end of brush (as
shown). For further brush wear,
move brush roll to position
NOTE:
ARROWS ON BRUSH ROLL
AND METAL NOZZLE GUARD
MUST BE POINTING IN
THE SAME DIRECTION.
THIS ASSURES PROPER
BRUSH ROTATION.
4.
When installing a new brush,
number "1" should be visible on
caps at end of brush.
*not available on all models.
if
visible
"3".
Page 12

STORAGE OF YOUR ROYAL PRINCE
G.
You can store your Royal Prince in the closet, laundry room, or any other
convenient location.
,HANG WANDS
HERE
1. Place wall mounting bracket
against wall as shown. Use screws
provided to mount bracket.
Now that you have a
meet the rest of the family.
01994
Royal Appliance
all
rights
reserved
Mfg.
Co
2.
Hang cleaner and attachments as
'
shown.
ROYAL APPLIANCE
MFG.
CO.
650 Alpha Drive
Cleveland, Ohio 44143-2172
1-800-321 -1134
 Loading...