

Page 1

CHAPTER 1 – INTRODUC TIO N................................................................................................................3
NOTICE........................................................................................................................................................3
FEDERAL COMMUNICATIONS COMMISSION (FCC) RADIO FREQUENCY INTERFERENCE
STATEMENT INFORMATION TO THE USER: .......................................................................................3
SAFETY TIPS..............................................................................................................................................4
CHAPTER 2 - WORKING WITH YOUR PDA...........................................................................................4
USING THE AC/DC ADAPTER.................................................................................................................4
USING BATTERIES - PDA WITH BUILT-IN MODEM.........................................................................4
USING BATTERIES - PDA WITHOUT BUILT-IN MODEM..................................................................4
USING RECHARGEABLE BATTERIES
AAA B
RESET INITIALIZATION...........................................................................................................................5
HOME AND WORLD TIME.......................................................................................................................6
SETTING DATE AND TIME......................................................................................................................6
DAILY ALARM...........................................................................................................................................7
SETTING DATE AND TIME FORMAT.....................................................................................................7
SCREEN CONTRAST.................................................................................................................................7
AUTO-POWER OFF....................................................................................................................................7
SCREEN CALIBRATION...........................................................................................................................7
CHAPTER 3 – GETTING TO KN O W YOU R PDA...................................................................................8
PART NAMES AND FUNCTIONS............................................................................................................. 8
APPLICATION BAR TOUCH MENU........................................................................................................8
APPLICATION BAR TOUCH MENU........................................................................................................8
APPLICATION TOOL BAR ICONS...........................................................................................................9
SCROLLING STATUS INDICATOR..........................................................................................................9
OPENING AN APPLICATION ...................................................................................................................9
THE PDA CRADLE...................................................................................................................................10
ROYAL GLO .............................................................................................................................................10
ATTERY INSTALLATION AND REPLACEMENT
CONTENTS
..........................................................................................................5
................................................................................5
CHAPTER 4 – TOOLS MENU............................................................................................................11
USING THE ‘NEW RECORD’ FEATURE ...............................................................................................11
FINDING RECORDS.................................................................................................................................12
USING ‘SEARCH RECORD’ FUNCTION.........................................................................................12
USING ‘DELETE RECORD’ FUNCTION................................................................................................12
CHAPTER 5 - ON-SCREEN KEYBOARD DATA ENTRY.....................................................................13
USING THE ON-SCREEN VIRTUAL KEYBOARD...............................................................................13
INTERNATIONAL CHARACTERS.........................................................................................................13
NATURAL HANDWRITING INPUT.......................................................................................................13
CHAPTER 6 – PHONE BOOK...................................................................................................................15
FINDING PHONE RECORDS...................................................................................................................15
VIEWING PHONE RECORDS..................................................................................................................15
CREATING, EDITING AND DELETING CONTACT RECORDS..........................................................15
CHAPTER 7 - PLANNER ...........................................................................................................................16
CALENDAR FUNCTION..........................................................................................................................16
1
Page 2

SCHEDULE FUNCTION...........................................................................................................................17
CREATING, EDITING AND DELETING SCHEDULED RECORDS.....................................................17
ANNIVERSARY FUNCTION...................................................................................................................17
CHAPTER 8 - TODO LIST........................................................................................................................18
CREATING, EDITING AND DELETING TODO RECORDS.................................................................18
CHAPTER 9 – EMAIL...............................................................................................................................19
READING EMAIL.....................................................................................................................................19
NEW EMAIL..............................................................................................................................................19
EMAIL HEADING INFORMATION........................................................................................................19
USING EMAIL ADDRESSES STORED IN THE PHONE BOOK...........................................................20
TO REPLY OR FORWARD EMAIL.........................................................................................................20
SEARCHING FOR E-MAIL ......................................................................................................................20
DELETE E-MAIL......................................................................................................................................21
SENDING AND RECEIVING EMAIL......................................................................................................21
PDA WITHOUT A MODEM...................................................................................................................21
PDA WITH A MODEM ...........................................................................................................................21
USING ROYALNET..................................................................................................................................21
SENDING AND RECEIVING EMAIL WITH ROYALNET....................................................................21
USING ANOTHER POP3 INTERNET SERVICE PROVIDER (ISP).......................................................21
CONNECTING TO AN ISP OTHER THAN ROYALNET.......................................................................21
SENDING EMAIL USING AN ISP OTHER THAN ROYALNET...........................................................22
RECEIVING EMAIL USING AN ISP OTHER THAN ROYALNET.......................................................22
CHAPTER 10 - CALCULATOR.................................................................................................................23
METRIC CONVERSION...........................................................................................................................23
CURRENCY CONVERSION....................................................................................................................23
CHAPTER 11- MENU FUNC TIONS .........................................................................................................24
MENU........................................................................................................................................................24
CONTENT..................................................................................................................................................24
SKETCH.....................................................................................................................................................24
FINANCE...................................................................................................................................................24
MEMO (N
MEMORY............................................................................................
PC SYNCRONIZATION ...........................................................................................................................25
SYSTEM SETUP.......................................................................................................................................26
ASSIGNING A PASSWORD.....................................................................................................................26
APPENDICES...............................................................................................................................................27
A. UNDERSTANDING EMAIL............................................................................................................... 27
B. CONFIGURING FOR ROYALNET EMAIL.......................................................................................27
C. CONFIGUREING EMAIL SETTINGS FOR OTHER ISP...................................................................27
B. PDA FOLDABLE KEYBOARD INSTRUCTIONS............................................................................29
OTE BOOK
).................................................................................................................................24
RROR
E
OOKMARK NOT DEFINED
! B
.
2
Page 3

CHAPTER 1 – INTRODUCTION
Thank you for purchasing this PDA. Please read this manual carefully to become familiarized with
your PDA’s many features and to ensure years of reliable operation.
NOTICE
We assume no responsibility for any damage or loss resulting from the use of this manual.
We strongly recommend that separate, permanent printed records be kept of all data. Under
certain circumstances, such as exposure to an electrostatic discharge, data may be lost or altered,
or the unit may become inoperative until reset. Therefore, we assume no responsibility for data lost
or otherwise rendered unusable, whether as a result of improper use, repair, battery replacement,
or use after the specified battery life has expired from similar causes.
We assume no responsibility, directly or indirectly, for financial losses or claims from third persons
resulting from the use of this product and all of its functions, such as stolen credit card numbers, the
loss or alteration of stored data, etc.
This product was not designed to bend or survive extreme pressure or temperatures. Do not
carry it in your trouser or pants pockets. When in a bag or briefcase, make sure that it is stationary
and well padded and protected. Do not leave or store the PDA in environments where temperature
ranges can be extreme.
To provide a longer product life, a flip-top cover is provided with the PDA. This should prevent
scratches to the display. Do not apply harsh chemicals or water to the display.
The information provided in this manual is subject to change without notice.
FEDERAL COMMUNICATIONS COMMISSION (FCC) RADIO FREQUENCY INTERFERENCE
STATEMENT INFORMATION TO THE USER:
This device complies with Part 15 of the FCC Rules. Operation is subject to the following two
conditions: (1) This device may not cause harmful interference, and (2) This device must accept
any interference received, including interference that may cause undesired operation.
Warning: Changes or modifications to this unit not expressly approved by the party responsible for
compliance could void the user’s authority to operate the equipment.
NOTE: This equipment has been tested and found to comply with the limits for a Class B digital
device, pursuant to Part 15 of the FCC Rules. These limits are designed to provide reasonable
protection against harmful interference in a residential installation. This equipment generates, uses
and can radiate radio frequency energy and, if not installed and used in accordance with the
instructions, may cause harmful interference to radio communications.
However, there is no guarantee that interference will not occur in a particular installation. If this
equipment does cause harmful interference to radio or television reception, which can be
determined by turning the equipment off and on, the user is encouraged to try to correct the
interference by one or more of the following measures:
• Reorient or relocate the receiving antenna.
• Increase the separation between the equipment and receiver.
• Connect the equipment into an outlet on a circuit different from that to which the receiver is
needed.
• Consult the dealer or an experienced radio/TV technician for help.
3
Page 4

Notes: Shielded cables must be used with this unit to ensure compliance with the
Class B FCC limits.
The Responsible party information:
Royal Consumer Information Products, Inc. – 379 Campus Drive, 2
nd
Floor, Somerset, NJ 08875,
USA
TEL: 732-627-9977
IN CANADA:
This digital apparatus does not exceed the Class B limits for radio noise emissions from digital
apparatus as set forth in the radio interference regulations of the Canadian Department of
Communications.
AU CANADA:
Cet appareil digital respecte les normes de la Classe B pour les émissions de fréquences radio
telles qu´indiquées dans la loi sur les interférences radio et mises en application par le département
canadien des communications.
SAFETY TIPS
• Be careful not to scratch the touch screen. Use only the supplied stylus or other plastic-tipped
pens designed for a touch-sensitive screen. Never use an actual pen or pencil, fingernails or
other sharp objects on the surface of the touch screen.
• The PDA should be protected from rain and moisture. Treat the PDA as you would other
electronic devices.
• Do not drop your PDA or subject it to strong impacts.
• Protect your PDA from extreme temperatures.
• The touch screen can be cleaned with a soft cloth lightly moistened with a window cleaning
solution. Commercial cleaners are sold separately.
• You can use screen protectors to prolong the life of the touch screen.
MNF3268MOOE
CHAPTER 2 - WORKING WITH YOUR PDA
USING THE AC/DC ADAPTER
Your new Royal PDA is equipped with a rich feature set and large memory for storing data. As with
all PDA’s, which offer this level of performance and large data storage capability, the power
demands are greater than traditional entry-level PDA’s or organizers. For this reason, Royal
includes an AC adapter accessory, which can be the primary power source for your Royal PDA.
Note: Always turn the PDA off before unplugging or plugging in the AC/DC adapter.
USING BATTERI ES - PDA WITH BUILT-IN MODE M
PDA with a built-in modem comes standard with a sealed rechargeable battery. When this PDA is
Royal’s
being used for the first time you must fully charge the batteries by plugging in the AC adapter for a
minimum of 5 hours before using the PDA.
USING BATTERI ES - PDA WITHOUT BUILT-IN MOD EM
PDA without the built-in modem can run on (2) AAA alkaline batteries. Battery life will vary
Royal’s
depending on usage. Additionally, Royal offers a rechargeable battery pack accessory for the unit. We
strongly suggest you consider purchasing the Royal rechargeable battery pack from your retailer or by
contacting Royal directly at 888-261-4555.
4
Page 5

Using Rechargeable Batteries
Your Royal PDA unit without built-in modem can only use the Royal rechargeable battery pack that
is sold separately. This battery pack is a sealed, self-contained cartridge. This cartridge replaces
the AAA alkaline cartridge which is factory-installed in your PDA. To use the Royal rechargeable
battery pack, remove the AAA alkaline cartridge and replace it with the Royal rechargeable
cartridge.
Before using the rechargeable battery pack for the first time, you must fully charge the batteries.
Please see the instructions that come with the Royal rechargeable battery pack for charging
requirements.
Before using the rechargeable battery cartridge for the first time, you must charge it for 5 hours..
Note: The unit will not charge any other battery.
AAA Battery Installation And Replacement
To insure the maximum protection of data stored in the PDA, we recommend the following
procedure be followed when replacing the AAA batteries.
1. Turn the PDA off.
2. Plug in the AC adapter to maintain data during battery replacement.
3. Remove the battery cover, located on the back of the unit, by pressing the hinge down and
pulling the battery cover open.
Insert the two new AAA batteries, following the signs inside the battery cartridge compartment.
3.
Carefully place the battery cover in its place and press the cover gently into its location until
4.
cover is locked in position
Note: Always turn the PDA off before unplugging or plugging in the AC/DC adapter.
DO NOT APPLY UNNECCESARY FORCE WHEN REMOVING OR REPLACING THE BATTERY
COVER. THE COVER SHOULD EASILY FIT INTO ITS PLACE IN THE BACK OF THE UNIT.
Note: Do not try to operate or synchronize the PDA with a low battery; this data can be corrupted
or lost.
Note: Battery voltages are constantly monitored. A low battery warning message will show when
the power level gets too low. Replace the AAA batteries or recharge the rechargeable batteries
when this message is displayed.
The data that has been synchronized to the computer can be restored to the PDA by synchronizing
again. For detailed software use instructions, see the “Instruction Files” provided with the
synchronization software.
RESET INITIALIZATION
1. Insert the writing end of the stylus into the reset opening on the backside of the unit.
2. The PDA calibration screen is displayed.
5
Page 6
Carefully tap the dot at the tip of each arrow located in the top left and bottom right corner without
touching any other part of the screen.
3. Following the calibration screen, the language selection screen will be displayed.
4. Select the desired language and touch OK.
5. Tap YES to clear all data (this is necessary when using the PDA for the first time or when all
memory must be cleared) or tap NO to keep data.
NOTE: TAPPING “YES” AFTER RESET WILL CLEAR THE MEMORY OF ALL DATA AND
SETTINGS.
When the language selection is complete, the display switches to the clock screen.
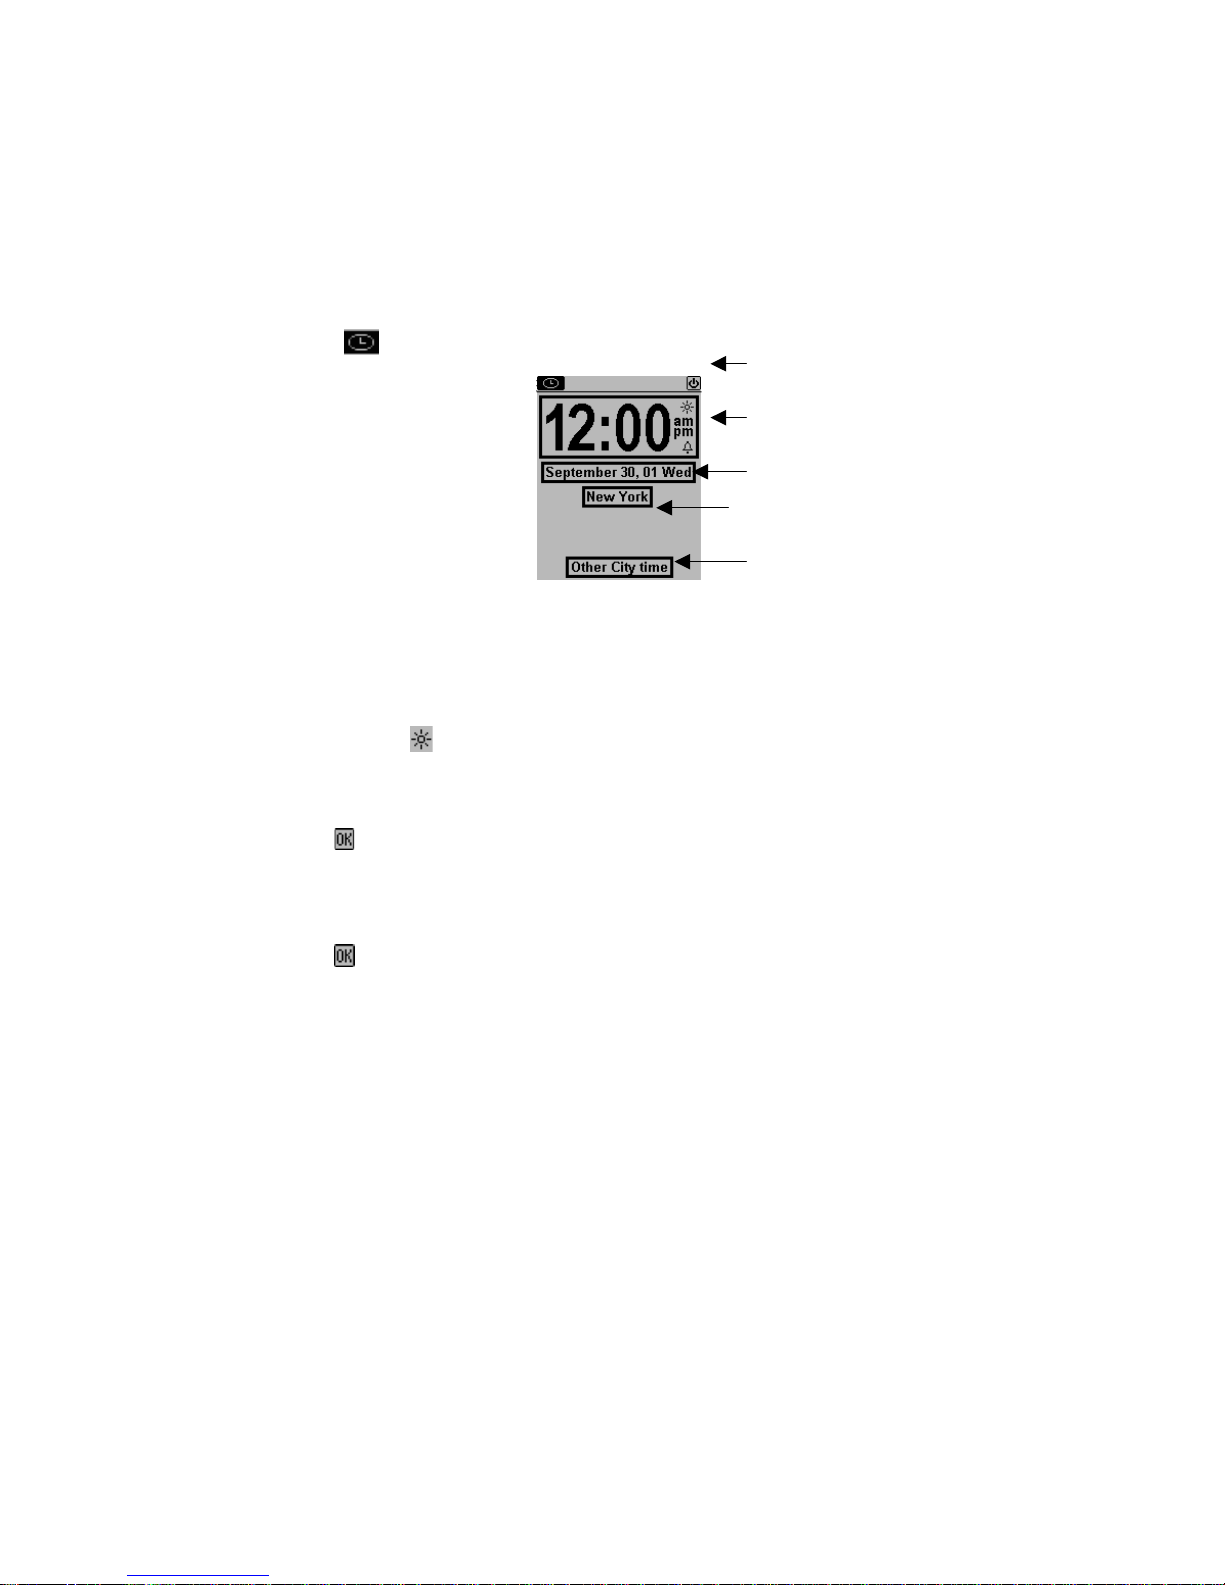
HOME AND WORLD TIME
This screen is used to select and set the Home Time and World City. Display this screen at anytime
by tapping
on the application bar.
Application bar
Home time frame
Home Date frame
Home City Frame
World City frame
Note: The upper half of the display indicates Home Time. The lower half can be set to display the
time in another city of your choosing.
SETTING D ATE AND TIME
Tap the date, time or city frames to change that information shown.
Editing time
1. Tap DST icon
to turn Daylight Savings on or off.
2. Tap the Home time frame for the time selection view.
3. Select the desired hour and minute from the lists. If in 12-hour clock mode, tap AM or PM as
preferred. In the minute field, tap the up or down arrows for one-minute increments.
4. Verify that the time at the upper part of the display shows the desired time.
5. Tap
to confirm.
Editing Date
1. Tap the Home date frame for the date selection view.
2. Change the year by tapping on the right or left arrows next to the year.
3. Select the desired month and date from the provided lists.
4. Tap
to confirm.
Selecting Home City
To select a country and city for Home Time:
1. Tap on the city name frame, which is preset at New York U.S. A., to enter the Country and
City list selection.
6
Page 7

2. Use the up/down touch arrows on the scroll bar to scroll through the country and city list. Tap
the City tab on the upper right to sort world cities alphabetically. Tap the Country tab on the
upper left to sort the Countries alphabetically.
3. Tap the selected city in the list to make it the city showing in the Home Time.
4. Tap
to confirm.
Setting World City
1. Tap the world city frame “Other city time”.
2. Follow the same procedure used for selecting home city to select a world city.
DAILY ALARM
To set the daily alarm:
1. Tap the bell icon
on the time menu for the daily alarm screen.
2. Touch the time frame.
3. Select the alarm time as in Editing Time above.
4. Tap the On/ Off icon
( ● )
(
) to activate/deactivate the alarm time.
(A bell is displayed beside the time when alarm is on.)
When the alarm is set to “On” it will sound if the PDA is off or on. When home time reaches
the time set for the daily alarm, the alarm tone will beep for 1 minute and the alarm reminder screen
will come up. Tap anywhere on the screen to stop the sound.
SETTING D ATE AND TIME FORMAT
1. Tap Menu ic on , S ystem Setup, Date / Time form at.
2. Tap the frame showing the desired date format and Time format.
MM/DD/YYYY
DD/MM/YYYY
YYYY/MM/DD
24 hour clock
12 hour clock
3. Tap
to confirm.
SCREEN CONTRAST
1. Tap the Menu icon, System Setup and click Screen Contrast.
2. Slide the control to the desired contrast.
3. Click
to confirm.
AUTO-POWER OFF
1. Tap Menu icon, System Setup and then Auto-power off.
2. Tap the desired number of minutes that the unit should remain on at idle before automatically
turning off. Then tap
.
Note. If “Never” is chosen, the unit will not power off automatically but it will enter the desktop clock
function automatically when it is idle in any other application for over 5 minutes. This setting is
useful if you are using your PDA at your desk and have the PDA running under AC power.
SCREEN CALIBRATION
You can, and should, recalibrate the screen any time you feel that the PDA is not responding
correctly to the selections you are making with your stylus.
1. Tap the menu icon, System Setup, Calibration.
2. Tap the dot at the tip of each arrow located in the top left and bottom right corner.
3. The unit has been recalibrated.
7
Page 8

CHAPTER 3 – GETTING TO KNOW YOUR PDA
PART NAMES AND FUNCTIONS
APPLICATION BAR TOUCH MENU
The PDA has a variety of built-in applications that can be instantly selected by using the stylus to
tap the application icon on the touch menu at the top of the screen.
Phone book is a database of contact information, including name, address, phone
numbers, etc. Information of each person will be stored as a record. Phone records can
be grouped into Business or Personal categories for easy access.
ToDo is used to store a list of tasks, recorded by description, priority and deadline of the
task. ToDo tasks can be grouped into Business and Personal categories.
Calendar allows you to plan your scheduled activities with appointments, anniversaries,
and ToDo tasks with the flexibility of planning with reference to monthly calendars and
daily times.
Email inbox can be used to create, send and receive emails.
Calculator is a full function 12-digit calculator with currency and metric conversion
features.
Clock checks the time and date at home and other world cities with one tap. Set up a
daily alarm and use the PDA as a desk clock when the PDA is in its cradle using the
AC/DC power adapter.
Menu displays the above functions and additional functions that can be selected by
tapping the icon that represents that function. Additional functions include: Content,
Sketch, System Setup, Finance, Matching Game and PC Synchronization. See Chapter
11 for use of these additional functions.
OFF Touch this icon to turn the PDA off.
8
Page 9

APPLICATION TOOL BAR ICONS
This bar is displayed just below the Application icon bar. These control touch keys can be shown in
each application:
App This far left symbol specifies which application is currently active. Tap it to turn the backlit
on/off for low light or night viewing.
Battery Located to the right of the application symbol you will see the battery indicator. This
indicates the remaining power level of the battery.
- Escape – to return to the last operation.
- Change display font size – toggle among small/medium/large font sizes.
- Input new record – to enter editing state for the operating function.
- Category of data on display.
- Search record – to enter searching parameter for record search.
- Function toolbox – to access available tools for operating function.
- Enter/Save – to confirm the inputted record or parameter.
- Server is not connected – tap to connect to server.
- Server is connected – tap to disconnect from server.
- 2-month calendar – Tap to toggle between monthly, weekly and daily calendar view.
- Weekly calendar view.
- Daily timeline view.
- Boldface – to change highlighted characters to bold face.
- Italic – to change highlighted characters to italic.
- Underline – to change highlighted characters to underline.
- Cut – to cut out the highlighted characters.
- Copy – to copy the highlighted characters.
- Paste – to paste the cut out characters at the cursor position.
SCROLLING STATUS INDICATOR
If the scrolling bar appears to the right side of the screen, it indicates there is more to see in the
direction of the arrow. To see the hidden area, use the stylus and tap the up/down double arrows
on the scroll bar to move the screen a page at a time or press the up/down si ngle arrow s to move
the screen information one line at a time.
OPENING AN APPLICATION
To open an application, tap its corresponding icon on the application bar Touch Menu at the top of
the screen or from the Menu screen. The application selected will open showing the list of records
stored for that application. Each application has a List view, Edit view and Data view mode.
9
Page 10

List View Mode
Whenever an application icon is tapped the records index list will be shown. The index shows each
record in list format. The exception to this is the Calendar function when it is displayed in a month
view.
Edit View Mode
After highlighting a record in List View Mode or viewing a record in Data View Mode, tapping Tools,
New Record, or Tools, Edit Record puts the screen in Edit view mode. The on-screen keyboard
will appear enabling data entry and editing.
Data View Mode
Tap a listed record to switch to the record data view screen showing the details of the selected
record.
THE PDA CRADLE
The PDA cradle is designed to hold the PDA at a comfortable viewing angle on your desktop and to
provide a connection to your PC. To place the PDA into its cradle, remove the rubber cover at the
bottom of the PDA and slide the PDA down into the cradle.
NOTE: Pay special attention to properly fitting the sync connector of the PDA to the cradle
connector.
For more information about using the cradle for PC synchronization, see Chapter 12: MENU and go
to section PC SYNCHRONIZATION.
ROYAL GLO
To turn on the Royal Glo backlight for low light or night viewing conditions, press the status
application symbol located on the top left side of the screen.
Royal Glo will turn off automatically after 10 seconds.
10
Page 11

CHAPTER 4 –
TOOLS MENU
When in the List View mode for Phone, ToDo, Planner, Notes or the Anniversary applications, tap
this option for the Tools menu. The Tools menu includes:
New record
Edit record
Search record
Delete record
USING THE ‘NEW RECORD’ FEATURE
The ‘New Record’ feature puts the application selected into Edit View mode, which allows you to
create a new entry.
Creating a New Record:
Select the application for the new record by tapping its icon.
1. Tap the New record icon
.
2. A cursor is displayed in the first data field of your selected application. Use the on-screen
virtual keyboard, handwriting area or the optional external folding keyboard to enter data and
to navigate between fields until all record information is complete.
3. Note that the field name (e.g., Last Name, First Name, Company, etc.) will disappear when the
first character is inserted into the field. Use the directional arrows to navigate between and
within the fields or tap the desired field with the stylus.
4. Tap
to save the record.
USING ‘EDIT RECORD’ FEATURE
To modify an existing record, use the Edit feature.
Editing a Record:
1. Select the desired application. You will be in List mode.
2. Tap on the specific record you wish to edit and then tap Tools, Edit record.
3. Make appropriate changes to the record.
4. Tap ok to save the information.
Saving Changes
to save the changes to the record.
Tap
If any other application is tapped, the unit will prompt “Quit? OK, Cancel”. Tap Cancel to return to
the Record Edit mode, then tap OK to save the changes.
Insert Mode - Use the stylus to tap and locate the cursor at the insert location. Characters will be
entered and displayed to the left of the blinking cursor.
Font Format - The PDA comes with 3 font options: bold, italic and underline
. You can
select them when in the Edit mode. You can also increase or decrease the size of the fonts.
The Cut and Paste Functions
The PDA comes with Copy, Cut and Paste functions that are available in the Edit mode so you can
easily make changes in your entry.
1. Highlight the desired text by dragging your stylus over the text. Tap Copy
2. Tap Cut
if you want to copy and delete the highlighted text.
.
3. Move your cursor to the location to paste the copied text by tapping that location.
4. Tap the Paste icon
.
11
Page 12

FINDING RECORDS
There are several ways to find records in the applications. They are as follows:
• Press the Up/Down arrows on the scroll bar to scroll through a long list.
• Press the Up/Down double arrows to scroll each page of the list at a time.
• Tap
• Use the search option in the Tools menu.
Select this function when looking for a specific record. The fields to be searched are different
depending on which application is searched.
1. Tap
2. Enter the desired text for the search.
3. Enter start and stop date if required.
4. Tap
5. Tap the desired record in the Search Result list.
USING ‘DELETE RECORD’ FUNCTIO N
Once a record has been highlighted in the Applications List mode, or in the Records View mode,
you can delete it from memory.
To Delete a Record in the List Mode:
1. Select the List mode for the desired application.
2. Tap on the record you wish to delete.
3. Tap Tools, Delete record.
4. The PDA will prompt,
5. Tap YES if you wish to delete the record, tap NO if you wish to cancel the deletion.
on the application menu to select the Business or Personal category to be viewed. Tap
Business to see records stored under the Business category. Tap Personal to see records
stored under the Personal category. Tap All to see records stored under both categories.
USING ‘SEARCH RECORD’ FUNCTION
To use the Search option:
to start Search record.
. A list of records is displayed that match the search text.
”Delete?
YES, NO”.
12
Page 13

CHAPTER 5 - ON-SCREEN KEYBOARD DATA ENTRY
You can use the virtual on-screen keyboard, natural handwriting input or the optional PDA external
folding keyboard for data entry. For more information about data entry using the external folding
keyboard – see Appendix.
USING THE ON-SCREEN VIRTUAL KEYBOARD
When entering the Edit mode of any application the virtual keyboard will automatically appear on
the bottom of the touch-sensitive screen ready for instantaneous input. Tap the character keys to
input each character.
CAP (caps lock), ↑ (shift key), INS (insert), ← (back space), Return symbol (return key) work the
same as a PC keyboard.
INTERNATIONAL CHARACTERS
1. Touch the Int’ key on the on-screen virtual keyboard to activate the international character
keyboard.
2. Touch the Int’ key again to return to the normal character keyboard.
NATURAL HANDWRITING INPUT
This PDA includes handwriting recognition. Tap the Pen key on the virtual keyboard to show the
handwriting template.
The writing strokes are designed to closely resemble natural handwriting. This makes it easy to
learn and remember. Writing characters in the left area (ABC) will result in upper case (CAPITAL)
letters. Using the same natural handwriting strokes on the right area (abc) will result in lower case
letters. This means you do not have to learn separate ways to write upper and lower case letters.
The handwriting reference guides are shown on the following pages.
Writing Alphabet Characters
1. Tap where you want to insert your text. The cursor blinks at the insertion point.
2. Use the Reference Guide to find the stroke shape for the character you wish to enter.
3. Place your stylus inside the writing area (left side for capitol characters and right side for lower
case characters).
4. Based on the reference guide, start your stroke at the heavy dot and draw the stroke as it
appears on the table. (The dot only indicates the starting point of the stroke, don’t draw it).
5. Lift the stylus from the screen at the end of the stroke shape.
6. If there is more than one stroke per character don’t hesitate between strokes.
13
Page 14

When you finish a character the unit recognizes the character and the character is displayed at the
insertion point of the screen. You can then begin the writing stroke for the next character.
14
Page 15

CHAPTER 6 – PHONE BOOK
Tap this icon to activate the Phone List. The Phone List shows the list of last names and
home phone numbers, sorted alphabetically according to the last name stored in the
record’s name field.
To view the Phone List sorted by company name, tap ‘Name’ at the top left of the display list. The
list changes to show “Company” names and business phone number. Tap “Company” to return to
the last name list.
FINDING PHONE RECORDS
In addition to the steps shown in finding records, Phone List adds the following functions to help
find records.
• Tap the alphabet tabs on the bottom of the list to quickly move to the beginning of that group
of letters.
VIEWING PHONE RECORDS
Switch from the Phone List view to see the details of an individual record:
1. Tap the corresponding record in the list.
Record detail view
(A phonebook record can consist of any or all of the following: Last Name, First Name, Company,
Title, Home, Work, Fax, Mobile, Pager, Email/Web Address, Address, City, State, Zip, Note)
2. Touch the Up/Down arrows on the scroll bar to see more fields.
3. To go back to the List view, touch
.
CREATING, EDITING AND DELETING CONTACT RECORDS
Add a new record
1. Tap the new record icon
.
2. The cursor and virtual keyboard are ready for you to start entering characters in the last name
field.
Note: As soon as you touch the field to position the cursor, the field name disappears leaving
the icon at the beginning of the line. Use the stylus to select a new input location. Use the
Up/Down scroll bar arrows to view additional lines one line at a time. Tap the Return key if
more than one line of text is required.
3. Tap the category icon
4. Tap
to save the information and return to the List mode.
to assign the record to the business or personal category.
15
Page 16

CHAPTER 7 - PLANNER
Tap this icon to select the Planner mode. Planner has four functions: Calendar, Schedule,
Anniversary and ToDo.
CALENDAR FUNCTION
The Calendar function is used to view 2 months of Schedules, Anniversary and ToDo activities.
Icons next to a specific date indicate the type of events specified for that date:
• A dot on the upper right of a date indicates an existing morning schedule event for that
date. A dot on the lower right of a date indicates an existing afternoon schedule event for
that date.
• A bar on the right of a date indicates an existing anniversary event for that date.
• An underscore on the date indicates an existing ToDo event for that date.
Finding the Desired Date in the Calendar
• Tap the single Up/Down arrows on the scroll bar to navigate one month at a time.
• Tap the double Page up/Page down arrows to scroll two months at a time.
• To view details of appointments, ToDo or anniversary items for the date indicated, tap
that date. Then Tap any listed event to view its details.
The day’s records will be listed in the following order:
1. Anniversary
2. ToDo
3. Appointment records with time specified
, and to toggle between weekly, monthly and daily views as shown below:
Tap
Tools Options in Calendar
You can add a planner record using the Tools menu in the Planner. Tap the desired type of record.
Add appointment
Add ToDo Task
Add anniversary
Edit highlighted record
Delete highlighted record
16
Page 17

SCHEDULE FUNCTION
Schedule shows a list of appointments, ToDo’s and anniversary for that date. Tap a desired date in
the calendar to go to that date’s list view. Tap
in the Schedule List view to go back to calendar.
In the Schedule List view, tap the event to see the details for that event. View more items for that
date by tapping the corresponding scroll arrows. Tap any detailed event to go to the Record view
mode for that event.
CREATING, EDITING AND DELETING SCHEDULED RECORDS
Add a New Record
1. In the Calendar view, tap the Tools, Add Appointment or in the Schedule list view, tap
Tools, Add appointment.
2. To adjust the start or end date of an appointment record, tap the date field, select the desired
date, then tap
3. To adjust the start or end time, tap the time field and select the desired time. Tap
.
to go
back to the schedule event.
4. Tap
to select the category.
5. Enter the details of the schedule event.
6. Tap
. Save? OK Cancel is displayed.
7. Tap OK to save or Cancel.
Edit Record and Delete Record
Follow the procedures used in editing and deleting Telephone records.
Finding and Viewing Schedule Records
Follow the procedures used in finding and viewing Telephone records.
Schedule Alarm Time Actions
If the unit is off or running another application, when the scheduled alarm date and time equals the
home date and time, the alarm will sound for 1 minute.
ANNIVERSARY FUNCTION
This function shows the list of anniversary records. You can access the Anniversary function from
the Menu or by tapping the anniversary event details in the Calendar or Appointment views.
Finding Anniversary Records
Follow the procedures used in finding Telephone records.
Viewing Anniversary Records
Anniversary records are sorted by date. Tap the detail at the upper right side of the display to sort
the anniversary list by alphabetical order. Use the Search feature to find the desired anniversary
record. The Search feature follows the same procedures as in searching Telephone records.
Create, Edit and Delete Records
Follow the procedures used in adding new appointment records above.
17
Page 18

CHAPTER 8 - TODO LIST
Tap this icon to activate and view the ToDo list. This application allows you to keep track of
important tasks.
To switch from the ToDo list view to details of an individual record:
1. Tap the corresponding record in the list.
The ToDo record consists of:
1. Status of the task: Done/Pending
2. Due Date
3. The details of the task
4. Priority ranking from 1 to 5
(The left column shows if the task is done
or pending, the second column shows the due date,
the third contains details of the tasks and the fourth contains the priority).
To change the sorting order for the ToDo list:
• Tap Due to sort by due date.
• Tap P to sort by the list priority.
CREATING, EDITING AND DELETING TODO RECORDS
Follow the procedures used in creating, editing and deleting records.
To use the Search option:
1. Tap
to Search for a record.
2. Enter the date or desired text to search in the corresponding field.
3. Tap the desired record in the Search Result List.
18
Page 19

CHAPTER 9 – EMAIL
Tap this icon to activate and view the Email Inbox List. This application allows you to keep track of
email that has been received by the PDA.
Inbox list email details
READING EMAIL
Tap on any listed email to see its details.
NEW EMAIL
When viewing the email inbox, tap the tool icon
to view the tool menu.
New email
Reply
Forward
Delete email
Tap: New email
new Send Done
To:
CC:
Subject:
Content:
EMAIL HEADING INFORMATION
The following items are part of the heading information:
To: The Email address of the person you want to send the email.
CC: The Email address of another person that you want to receive a copy of the email.
Sbj: Title of the message.
Content Icon: This is the text: what you want to say in the message.
19
Page 20

USING EMAIL ADDRESSES STORED IN THE PHONE BOOK
To retrieve Email Addresses from the Phone Book:
1. Tap
or
Names and email address that are in the address book are displayed.
2. Tap the name you want to send or copy the email to. The screen returns to the new email
screen with the email address placed in the selected field.
When Finished Typing The New Email:
3. Tap Done to place the email into the draft box.
or
4. Tap Send to place the email into the outbox, if not connected or directly send the mail if
connected
TO REPLY OR FORWARD EMAIL
While viewing email listings or viewing any particular email, tap the tool icon
mail icon
to send that email to other person, or tap the reply mail icon to
and the forward
reply to the sender.
In the case of forwarding an email, you need to enter the To; or CC: email address by using an
email address stored in the phone book or by typing it manually.
In the case of replying to an email, the sender’s address will be automatically placed into the To:
address with the same subject and content. You only need to type your answer at the beginning or
end of the content field.
SEARCHING FOR EMAIL
Your PDA has four ways to search for email:
Tap
to list emails in one of the 4 different email boxes: Inbox, Sent, Draft and Outbox.
1. Search the list of emails by scrolling through the list one at a time using the up /down arrows
or use the double up/down arrows to move a page at a time.
2. To sort the email list by received date tap
3. To sort the email list by the sender’s name tap
4. Tap search icon
and input the searching parameter.
.
.
The unit will search through all emails in the email box being viewed.
A list of emails that match the search will be displayed. Tap the desired email to view its details.
20
Page 21

DELETE EMAIL
1. Search for the desired email as explained in Searching For Email.
2. Tap the desired email to highlight it.
3. Tap the tool icon
.
4. Select delete record to delete the highlighted email.
5. Tap Yes to confirm delete or
to abort.
SENDING AND RECEIVING EMAIL
PDA WITHOUT A MO D EM
If your PDA does not have a built-in modem you can compose email on your PDA and copy it to
your PC, which will send that email. To do this you will need to download additional software from
the internet at http://www.royalinfo.com
.
PDA WITH A MODEM
USING ROYALNET
Internet connection settings have been set at the factory, which makes setting up a RoyalNet
account a simple task. First call and obtain a user ID and password from the HomeRelay Customer
Service at the phone number listed in your Quick Start Guide. Then:
1. Tap Menu, System Setup, Email Setup.
2. Tap “Use RoyalNet Email Service” button.
3. Follow the instructions to input your user ID and password and numbers to dial If you need to
dial an outside line like a 9 or other numbers.
4. When finished inputting this information, tap OK. The unit dials a toll free number then
receives and automatically makes all the settings needed.
5. When finished, your PDA will display a screen that says it is ready to send and receive email.
Tap email icon to begin.
6. If there is a problem with your RoyalNet setup call Homerelay customer support:
1-888-289-7312.
All other problems should be directed to Royal customer support: 1-732-563-0044
SENDING AND RECEIVING EMAIL WI TH ROYALNET
1. Tap the check email button
shows
when connected.) and check for new email. All emails sent to your RoyalNet email
. The unit will dial, connect, (the connection icon
address are downloaded from the Royalnet server to the unit and listed in the email inbox. The
unit will send all email located in the outbox. When all Royalnet emails have been received
and all emails in the outbox are sent, the unit will disconnect automatically (with the
connection icon changing to show
when disconnected).
USING ANOTHER POP3 INTERNET SERVICE PROVIDER (ISP)
When using ISP’s other than Royalnet, the DIALUP, TCP/IP, SMTP and POP settings must be
changed to match the setting used by the other ISP. See the appendix for instructions to change
these settings.
CONNECTING TO AN ISP OTHER THAN ROYALNET
1. Tap the email icon on the application menu bar to view the inbox list.
2. Tap the connection
icon changes to show
and the unit will dial and make the connection to ISP. The connection
when the unit is connected.
3. The PDA will stay connected until you tap the connection icon to disconnect. While it is
connected you can follow the steps to send and receive email.
21
Page 22

SENDING EMAIL USING AN ISP OTHER THAN ROYALNET
Make sure the connection icon shows it is connected (
). If it is not connected, use the steps
CONNCTION TO OTHER ISP’s.
1. Tap
to list email boxes.
2. Tap Outbox or Draft box
3. Tap to highlight one selected email.
a. Tap
or
b. Tap send all to send all email in the Outbox or Draft box.
4. When finished sending and receiving, tap
The connection icon changes to show
to disconnect the unit.
when disconnected.
RECEIVING EMAIL USING AN ISP OTHER THAN ROYALNET
Make sure the connection icon shows it is connected (
). If it is not connected, use the steps
CONNCTION TO OTHER ISP’s.
shows the unit is not connected, but will change to this when the unit is connected to send
and receive email.
1. Tap the Check Email button
.
2. The PDA will download and display the list and subject of the all emails on the server giving
you a choice of which email to retrieve.
Selecting the Email to Downlo ad or Del ete from the S erver
Emails larger than 3K will not be retrieved. They will appear in every Check Email List until they are
deleted or retrieved and deleted by a PC.
3. Tap the box
once to put a checkmark to the left of each listed email you want to
download to the PDA.
4. Tap the box
twice to put an to the left of each listed email you want to delete from the
server.
6. Tap
to download or delete the selected email. The screen switches to the inbox list to
show the downloaded email.
7.. When finished sending and receiving, Tap
changes to show
when disconnected.
to disconnect the unit. The connection icon
22
Page 23

Note:
1. The unit will stay connected until you tap the connection icon
2. To put checkmarks
for all listed email tap , then tap to download all the email
to disconnect it.
listed.
3. To put cross marks
for all listed email tap , then tap to delete all email listed.
4. Email retrieved, but not deleted from the server, will be listed every time you check email.
Email marked deleted after retrieval will be deleted from the mail server forever after being
retrieved.
To Check if the Unit is Set To “
delete email after retrieve”
Tap Menu, System Setup, Email setup, mail server. Tap the box to add or remove the check
mark.
CHAPTER 10 - CALCULATOR
Tap this
icon to activate a full function 12-digit calculator. Functions include arithmetic
operations (+, -, x, ÷ and %). Memory storage operations such as MR, MC, M+, M-, are also
available. Calculations are performed in the order of the entry, not by algebraic conversion.
• “M” on the display indicates a number is stored in memory.
• “E” on the display indicates an error: a number longer than 12 digits or when divided by 0. Tap
[AC] to clear the error.
• [C] – Clear the last entered value. Tap twice to cancel calculation.
• [AC] – Cancel all by pressing once.
• [M+]/[M-] – Adds/subtracts the calculated result to/from the current memory contents.
• [MR] – Recall the numbers stored in memory.
• [MC] – Clear the number after recall from the memory.
• [+/-] – Switches the sign between positive and negative.
The top row keys of the calculator view include all the conversion functions.
CONVERSIONS
Conversions are treated as calculator functions. The amount to be converted has to be entered in
the calculator mode before selecting the desired conversion function.
METRIC CONVERSION
For Converting Physical Measurements:
1. Enter the amount to be converted in the calculator mode.
2. Tap the Metric Conversion box.
3. Tap the arrow corresponding to the desired metric conversion and conversion direction.
4. Result is displayed in the calculator mode.
CURRENCY CONVERSION
In order to use the currency conversion, first set the exchange rate:
1. Tap the Set Rate box in the Calculator mode.
2. Tap the line of a currency to be set.
3. Enter the value amount of $1 (or one home currency unit if other than a dollar) using the digit
keypad on the lower part of the display. Use the backspace arrow to correct entries.
4. When all currencies are set, tap tick to confirm.
Currency Conversion
To convert an amount from one currency to another:
1. Enter the amount to be converted in the calculator mode.
2. Tap the Currency Conversion key.
23
Page 24

3. Tap the arrow corresponding to the desired currency and conversion direction.
4. Result is displayed in the calculator mode.
CHAPTER 11- MENU FUNCTIONS
MENU
Tap this icon to see all applications and functions in the PDA. In addition to the applications on the
Application icon bar, the following additional functions can only be selected from the menu screen.
CONTENT
If you are using RoyalNet as your ISP, select this function to see current news, weather and sports
information.
SKETCH
Draw pictures and save them as bit map images.
FINANCE
Keep track of personal or business expenses.
Finance List
Tap: Menu, Finances to view the Finance list. Each Finance record consists of the following
fields: date, type of expense (each can be edited), type of payment and the amount of the expense.
The list view also shows a total amount for the records listed.
New Finance Record
1. Tap the new record icon
to add new expense record.
2. Date shows the clock date setting. This date can be changed by taping the date shown.
3. Tap the corresponding field To change the expense type, and Payment.
(Expense Type can be selected from 20 categories, each category name can be edited to fit
your budget needs. To edit the category field go to the Type of Expense list, tap the word
describing that field and then tap “Edit Type” at the bottom of the list. Type a word to describe
the expense category (up to 13 characters) and then tap OK. The new word replaces the old
description.
MEMO (Note Book)
Take notes using the virtual keyboard or handwriting.
1. To view the memo list, tap the Memo icon.
Note: The clock date should be set correctly to use the date feature in memo
Memo List
A note or memo record consists of:
1. Date
2. Details
Tap Date to view the memo list sorted by date.
Tap Detail to view the Note list, which is sorted alphabetically.
Entering a New Memo
1. Tap the menu icon to view the menu screen.
2. Tap the Memo icon to view the memo list.
3. Tap the new record icon. The date shown is the clock’s date.
4. Type the details of the new memo.
5. Tap
24
Page 25

MATCH GAME
Match symbols hidden under each square in the fastest time to win1.
1. Select the game level by tapping LEVEL, tap the radio button of the level desired, then Tap !.
2. Tap a square to view the hidden symbol, tap a second square that matches the first symbol.
The game is finished when all matching symbols pairs are found.
MEMORY
This function allows you to keep track of the number of records in each application and memory
space used/left in the PDA. Usable memory capacity is shown as percentage free.
1. Select menu, sync
2. Tap the memory icon located on the top right corner of the screen.
PC SYNCHRONIZATION
In order to perform PC synchronization, you must first connect the PDA cradle to your PC. To
connect the PDA cradle to your PC, turn off your computer and plug the cradle’s cable into the
serial communication port on the PC. We recommend using AC power while synchronizing.
Note: The PDA requires a dedicated serial port. It cannot share a port with an internal
modem, hand held or any other device. If you are unsure about the exact location of the
serial port on your computer, refer to the user's manual supplied with the computer.
The CD-ROM included with your unit contains two different software synchronization programs.
You do not need to install both programs on your PC. The CD-ROM will automatically show a menu
for you to select the program to meet your needs.
PDA Desktop is a PC Personal Information Manager (PIM) software program that is supplied with
your unit. If you are not already using a PIM program, PDA Desktop will give you the ability to add
and edit contacts, calendar and ToDo information for your PDA.
CompanionLink is the PC software to install if you are using Microsoft Outlook or another PC PIM
compatible with the PDA and you wish to continue using that program with your new PDA.
Installing the Synchronization Software on Your PC
Place the CD-ROM provided with the PDA into your CD drive and follow the instructions on the PC
screen. If the auto-install is disabled on your PC, you will have to manually launch the setup
program provided on the CD-ROM as follows:
1. Tap Start, Run and then Browse.
2. Locate your CD-ROM drive and select the Setup.exe file.
3. Tap OK to run the installation program.
PDA Desktop Synchronization Instructions
On the PC
1. Verify that the cradle is connected to the serial port.
2. Turn on the PC.
3. If running PDA Desktop for the first time, you need to make sure that the SmartSync icon is
running in the Windows System tray. If it is not running, select Programs, PDA Desktop, then
SmartSync from your Start menu.
4. You can right click on SmartSync to bring up a menu and to edit options for the
synchronization.
On the PDA
5. Make sure that the unit is well placed into the cradle.
6. Tap on the “Menu” icon in the title bar.
7. Select “Sync”.
8. Tap on “OK”.
25
Page 26

SYSTEM SETUP
System setup defines the general settings of the PDA; these settings are:
• Email Setup - Configure with RoyalNet or another ISP.
• Outside Line Access – Used to dial a number to access an outside line.
• Screen Contrast – Lighten or darken the screen.
• System Language – Selects the prompt language. Options are: English, Spanish, French,
German, Italian, Portuguese and Dutch.
• Date and Time Formats – View dates and time in selected format. Dates: mm/dd/yyyy,
dd/mm/yyyy, yyyy/mm/dd. Time: 24hr. or 12 hr.
• Auto Shut-off – Select from 1,2,3,4 or 5 minutes of idle use.
• Calendar Beginning of the Week - Pick Sunday or Monday.
• Key Tone – Tap off to cancel the key tap tones.
• Password - You can assign a password to the PDA. For security purposes, the entire unit can
be locked from normal view or use unless the proper password is entered. Keep a record of
your password!
IF YOU FORGET YOUR PASSWORD THERE IS NO WAY TO ACCESS ANY HIDDEN
RECORDS. THERE IS NO "BACK DOOR" INTO THE SYSTEM. YOU MUST RESET THE PDA
AND CLEAR ALL MEMORY.
ASSIGNING A PASSWORD
1. Tap the menu icon
, System Setup, Set Password.
2. Use the virtual number keyboard to enter the password. The characters will be shown as **
during entry.
3. Enter the password pin in both locations to activate password protection
Or
4. Clear the password and blank the field to deactivate password protection.
Changing a Password
1. Tap the menu icon
, System Setup, Set Password.
2. Use the virtual keyboard backspace ← key to remove the password in both locations.
3. Follow instructions for Assigning a Password.
26
Page 27

APPENDICES
A. UNDERSTANDING EMAIL
Electronic mail is one of the fastest and most powerful ways to share information with people
everywhere and to keep you informed. It has become one of the most widely used and practical
aspects of the internet today.
In order to connect your PDA or PC to the Internet you must make a connection to the Internet
through an Internet Service Provider (ISP). The ISP has local phone numbers that can be dialed by
your PDA and when it connects the PDA can send and receive messages (email).
Messages exchanged on the Internet are handled by three standard protocols:
• SMTP (Simple Message Transfer Protocol) which is used for sending messages.
• POP3 (Post Office Protocol version 3) which is used to receive messages.
• TCP/IP (Transmission Control Protocol/Internet Protocol) which is used for transporting data,
ensuring that information is sent and received correctly between two machines. The TCP/IP
implementation for reaching ISPs in dialup situations is called PPP (Point-to-Point Protocol).
The software in this PDA takes care of working with all three protocols once you input information
that identifies you and your internet address to the internet.
These settings are all taken care of automatically when you set up a Royalnet account.
If you already have Internet access and your PC is using this information, all you need to do is view
it on your PC and copy it into the PDA. If you don’t know what the settings are, contact your ISP to
find out.
B. CONFIGURING FOR ROYALNET EMAIL
Tap: Menu, Email setup, Royalnet
Follow the instructions on the screen to enter your User ID and password.
The PDA will dial the Royalnet 800 number. Once connected, all settings required for email will
automatically be placed into your PDA, including the local numbers you selected with the service
representative. Once it completes the settings, the PDA hangs up and is ready to start sending and
receiving email.
C. CONFIGUREING EMAIL SETTINGS FOR OTHER I SP
To configure the PDA to send and receive email you will need to know the following information:
ISP connection settings:
1. ISP phone number.
2. Your login ID (this may be called your username).
3. Your password.
This information is necessary to connect your PDA to the Internet. You will need additional
information to send and receive email. This information is stored under the heading “Server
Settings.” The additional information you will need is as follows:
1. Your email address and email password.
2. Your POP3 address (the name of your incoming mail server)
3. Your SMTP address (the name of your outgoing mail server).
27
Page 28

TO INPUT I SP CONNECTIO N SETTINGS:
1. Tap Menu, Email Setup, Dial Up.
2. Then tap
, Input Phone Number 1:
a. Input Number 1:
__________________________
You can enter up to three phone numbers. The PDA will dial the first phone number; if it fails it will
dial the 2
nd
and then the third.
3. Tap the forward arrow to enter or leave blank, Phone numbers 2 and 3.
4. Tap the forward arrow, then enter the Login ID:
_________________________
5. Tap the forward arrow, then enter the password:
_____________ ____________
6. Use the back and forward arrows to check each input. When finished, tap OK.
TO INPUT S ERVER SETTIN G
1. Tap Menu, Email Setup, Mail Server.
2. Tap
, then input the POP3 address (incoming email). Tap the forward arrow to enter the
SMTP, email address (outgoing email), email login ID and email password. POP3 port or
SMTP port are already set to the correct Internet defaults.
3. When finished, tap OK (you can use the back and forward arrows to check each input before
finishing).
28
Page 29

B. PDA FOLDABLE KEYBOARD INSTRUCTIONS
Installation
1. Turn the PDA unit off before connecting the foldable keyboard.
2. Gently insert the keyboard connector into its place.
Features
Keyboard Left Side Keyboard Right Side
Shift (Press
and
Relea
se)
2nd (Press
and
releas
e)
2nd (Press
and release)
+ digit key
(Press and
release)
Θ = A minus sign in calculator
“Shift” + letter keys = capital
letters (CAPS Lock
enabled)
“Shift” + letter keys = small letters
(CAPS Lock disabled)
“Shift”+1 = “tel.”, Telephone
“Shift”+2 = “anniv”, Anniversary
“Shift”+3 = “ToDo”, ToDo
“Shift”+4 = “schd”, Schedule
“Shift”+5 = “memo”, Memo
“2nd”+”Q”= +
“2nd”+”W”= “2nd”+”E”= x
“2nd”+”R”= /
“2nd”+”T”= &
“2nd”+”A”= ~
“2nd”+”S”= *
“2nd”+”D”= (
“2nd”+”F”= )
“2nd”+”G”= #
“2nd”+”Z”= £
“2nd”+”X”= ¥
“2nd”+”C”= $
“2nd”+”V”= ¢
“2nd”+”@”= @
“2nd”+1 = ∅
“2nd”+2 = ç
“2nd”+3 +A = Â /*
“2nd”+4 +A = À /*
“2nd”+5 +A = Á /*
mode; a dash in other modes
“Shift”+6 = “clock”, Clock
“Shift”+7 = “calc”.
Calculator
“Shift”+8 = “menu”, Menu
“Shift”+9 = “B/P”, Select
Category (Business
or Personal)
“Shift”+0 = Off
“2nd”+”Y”= %
“2nd”+”U”= ±
“2nd”+”I”= “ce”
“2nd”+”O”= “=”
“2nd”+”P”= “ac”
“2nd”+”H”= “
“2nd”+”J”= ‘
“2nd”+”K”=;
“2nd”+”L”=:
“2nd”+”B”= <
“2nd”+”N”= >
“2nd”+”M”= _
“2nd”+ “,” =!
“2nd”+”.”=?
“2nd”+”enter”= “↵”, return
“2nd”+6 +A= Ã /*
“2nd”+7 +A= Ä /*
“2nd”+8 = β
“2nd”+9 +A= Å /*
“Tools” = Tools Menu
= “Back Space”
←
*Other letters with accents include A, a, E, e, I, i, O, o, U, u
29
 Loading...