

Page 1
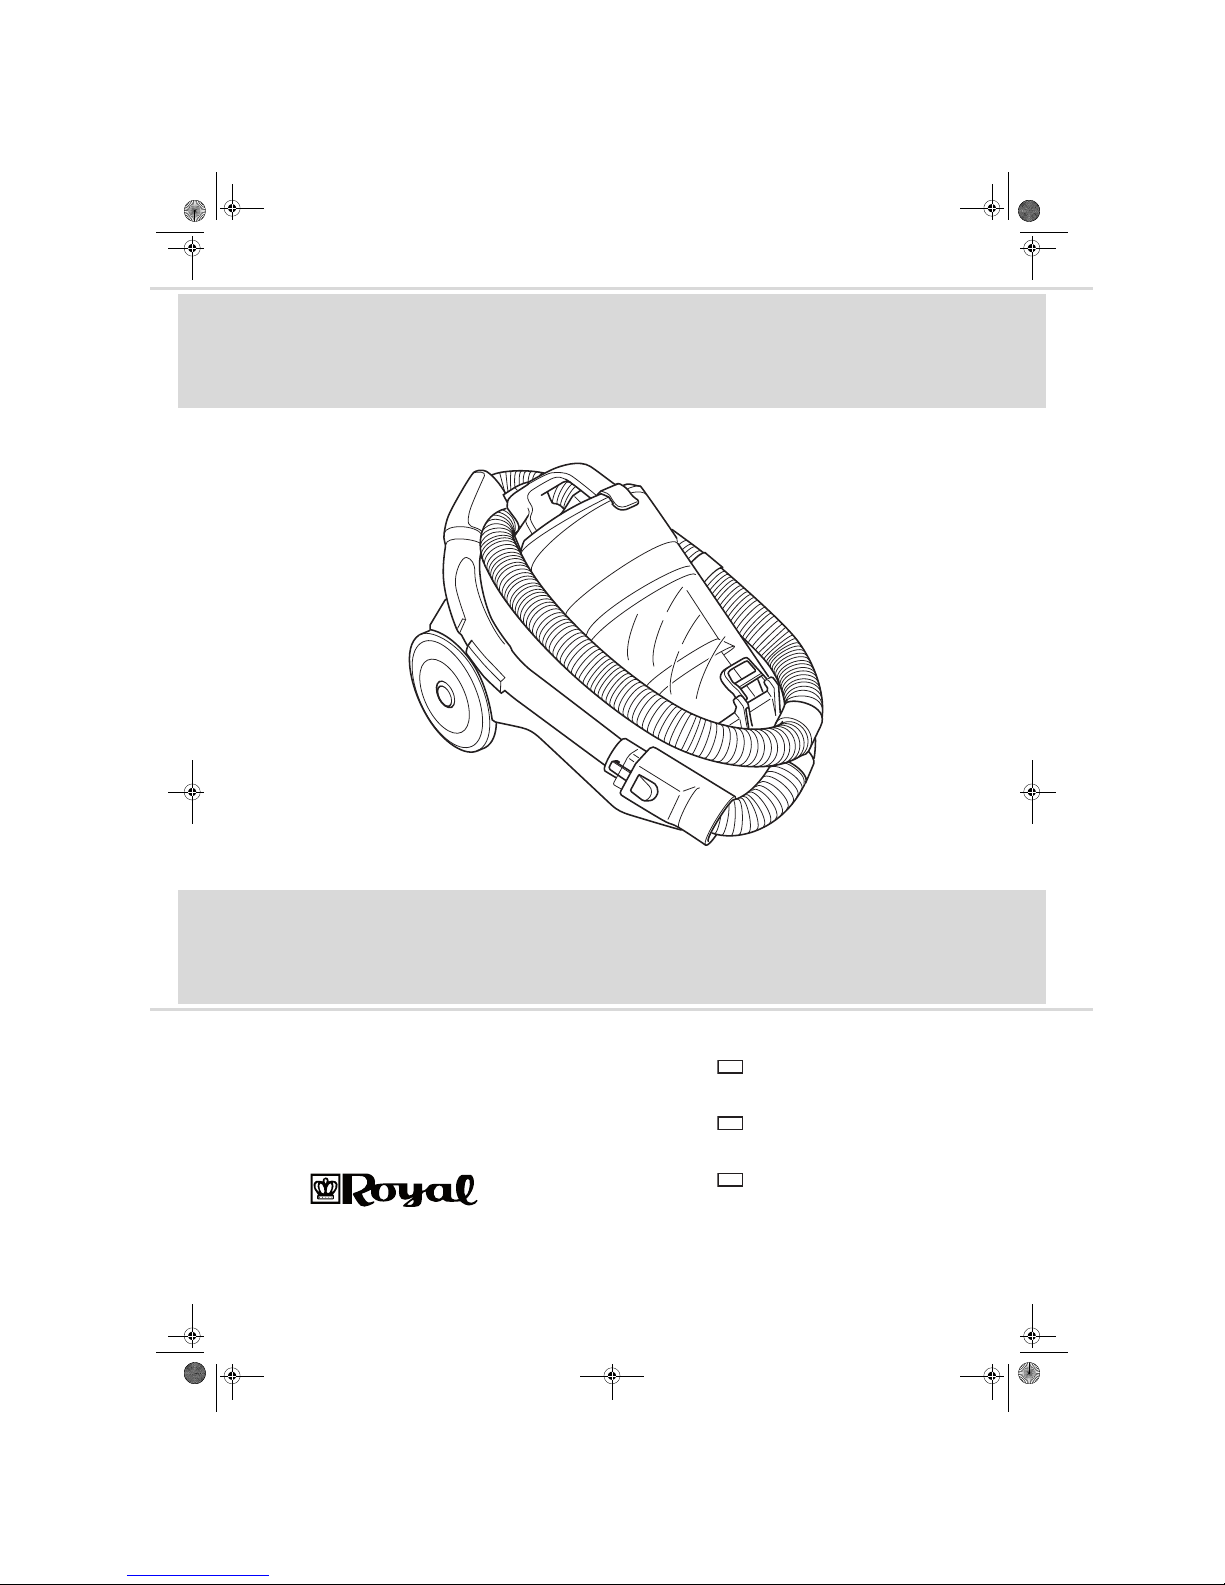
Infinity VS8 Loop
Operating Manual .................. 4 - 8
Cyclone cylinder vacuum cleaner
Manual de instrucciones...... 9 - 13
Aspiradora rodante ciclón
Royal Appliance International GmbH
Itterpark 5-7
40724 Hilden
Germany
℡ +49 (0) 2103 - 20 07 10
+49 (0) 2103 - 20 07 77
info@dirtdevil.de
Instruções de uso .............. 14 - 18
Aspirador centrífugo de piso
Roya-10806 • A4 • 24.05.2009
GB
ES
PT
00 Titel.fm Seite 1 Montag, 8. Juni 2009 11:48 11
Page 2

2
GBESPT
Operating Manual ............................................................................................................ 4 - 8
Manual de instrucciones ................................................................................................. 9 - 13
Instruções de uso ............................................................................................................ 14 - 18
Infinity VS8 Loop_3-sprachig.book Seite 2 Donnerstag, 4. Juni 2009 3:00 15
Page 3
Infinity VS8 Loop
3
1
1
2*
3*
2
B
A
1
3 4
1
2
1
2
3
5
Infinity VS8 Loop_3-sprachig.book Seite 3 Donnerstag, 4. Juni 2009 3:00 15
Page 4
4
Safety notices
Infinity VS8 Loop
Thank you!
Thanks for your purchase of the Infinity VS8
and your confidence in us.
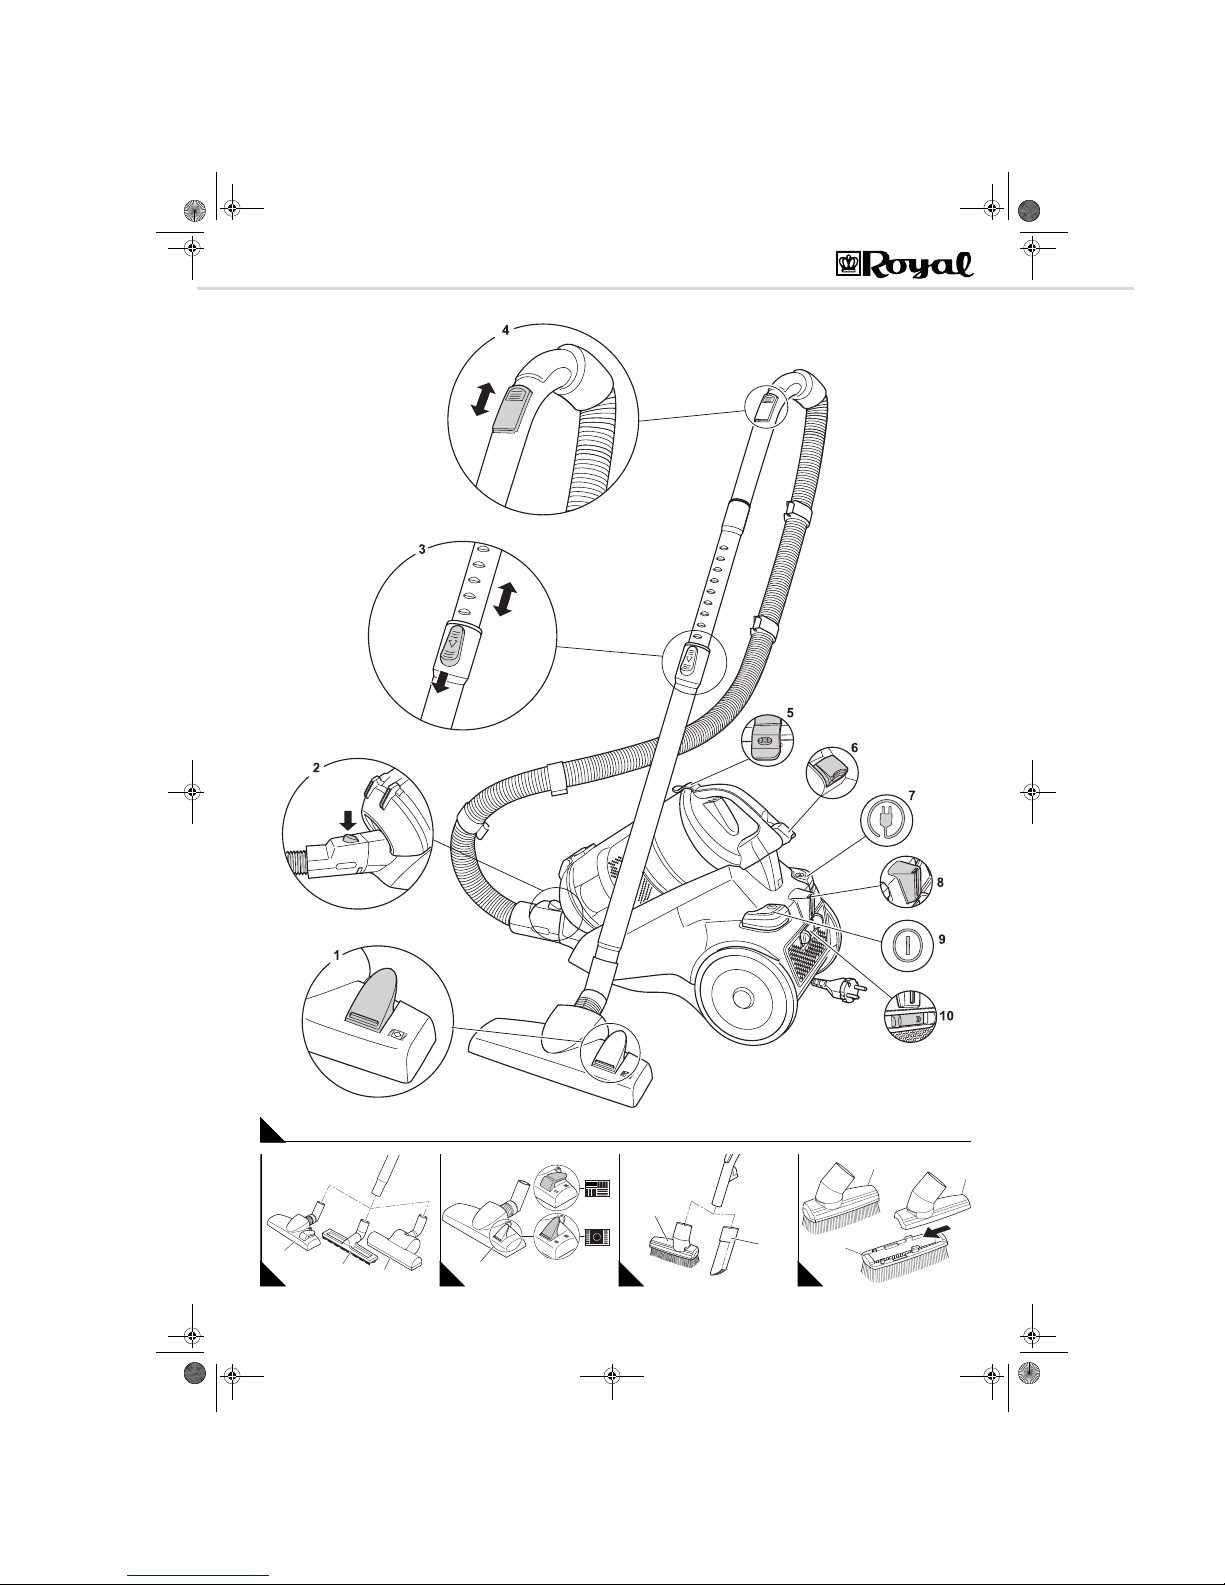
Parts of the appliance
Fig. 1:
1 "Carpet/hard floor" switch
2 Suction hose release catch
3 Telescopic tube catch
4 Bypass vent
5 Motor protection filter cover catch
6 Dust container release catch
7 Cable retraction button
8 Parking bracket
9 On/Off switch
10 Exhaust filter cover release catch
Fig. 2:
1 Floor nozzle (standard)
* optional accessories:
2 *parquet brush:
for vacuuming delicate surfaces
(e. g. laminate, parquet)
3 *Turbo brush:
for thoroughly deep cleaning of carpets with
the rotating brush head
Fig. 3:
1 "Carpet/hard floor" switch
for deep- and short-pile carpets,
runners
for hard floors, e.g. laminate, tiles,
PVC, etc.
Fig. 4:
1 2-in-1 combi nozzle (loosely packed in the
carton) (see also Fig. 5)
2 Crevice nozzle (loosely packed in the
carton)
Fig. 5:
The 2-in-1 combi brush can be used as:
1 Furniture brush
2 upholstery nozzle,
you only have to remove the
3 brush attachment
as shown.
Technical data
Technical and design specifications may be
changed in the course of continuous product
improvement.
© Royal Appliance International GmbH
1 Safety notices
1.1 Re: Operating Manual
Read this operating manual completely before
working with the appliance.
Keep the operating manual for reference.
Include the operating manual if you pass the
appliance on to someone else.
Non-compliance with these instructions
can lead to serious injuries or damage to
the appliance.
We take no responsibility for damages due to
violations of these operating instructions.
1.2 Re: The Notices Given
Important notes for your safety are especially
marked. Always observe these notices to avoid
accidents and damage to the appliance.
1.3 Re: Children
This appliance is not intended to be used by
persons (including children) with impaired
physical, sensorial or mental abilities and/or
insufficient experience or knowledge, unless
they are supervised by a person responsible
for their safety or have been instructed in the
proper use of the appliance by this person.
Keep the appliance out of reach of people of
these groups.
Children should be supervised in order to
make sure that they don’t play with the
appliance.
Packing material must not be used to play
with. There is danger of suffocation.
1.4 Re: Appropriate Use
The cylinder vacuum cleaner is intended for
home use only. It is not suitable for commercial
use.
Use the cylinder vacuum cleaner only for
cleaning normally soiled floors, rugs and
curtains.
Any other use is considered inappropriate and
is prohibited.
It is especially forbidden:
To vacuum-clean:
- Hair, fingers and other parts of the body.
They could be sucked in and injured.
- Pieces of clothing (e. g. shoe laces,
scarves, etc.). They could be sucked in
and cause injuries.
- water and other fluids, especially damp
carpet cleaning agents. Moisture inside
the appliance can cause a short-circuit.
- Toner dust (for laser printers, copyingmachines, etc.) There is danger of fire or
explosion.
- hot ash, burning cigarettes or matches.
This could cause a fire.
- pointed objects such as glass shards,
nails, etc. Such objects could damage the
filters.
- Construction rubble. plaster, cement,
finest drilling-dust, makeup, etc. This
might damage the appliance.
To use the appliance near explosive or
easily flammable substances. There is danger
of fire or explosion.
Outdoor use. There is danger of rain and
dirt destroying the appliance.
Sticking objects into the appliance's
openings. It could overheat.
1.5 Re: Power supply
The appliance runs on electricity -- that
means there is a general risk of electric shock.
So please especially observe the following:
- Never touch the plug with wet hands.
- Always pull directly at the plug if you want
to disconnect the appliance from the
mains. Never pull the power cord, it might
break.
- Take care that the power cord is not bent,
pinched, rolled over or gets in contact
with heat sources.
- Only use extension cords of a capacity
sufficient for the power requirement of the
appliance.
- Never immerse the appliance in water or
other liquids. Keep it away from rain and
moisture.
- Only operate the appliance if your mains
voltage is the same as that indicated on
the appliance's nameplate. Wrong
voltage can destroy the appliance.
1.6 If the appliance is defective
Never use a defective appliance or operate
an appliance with a defective power cord. If the
power cord of this appliance is damaged it
must be replaced by the manufacturers, their
authorised service representative or a similarly
qualified person to avoid danger.
Refer a defective appliance to an
authorised dealer or the Royal Appliance
service for repair. Address: Zpage 8,
„Warranty“.
Type of
appliance
: Cyclone cylinder vacuum
cleaner
Model : Infinity VS8 Loop
[M5038-0]
Voltage : 220-240 V ~ 50 Hz
Power : 1.400 W nom - 1.600 W max
Dust
container
capacity
: approx. 1.5 litres
Filters : Dual motor protection filter
(washable), exhaust filter
Power cord
length
: approx. 6 m
Weight : approx. 5.5 kg
WARNING:
Warning concerning health hazards
describing possible risks of injury.
ATTENTION:
Warning concerning possible dangers to the
appliance or other objects.
NOTE:
Highlights tips and information for you.
Infinity VS8 Loop_3-sprachig.book Seite 4 Donnerstag, 4. Juni 2009 3:00 15
Page 5
5
GB
Operation
Infinity VS8 Loop
2 Operation
2.1 Unpacking
1. Unpack the appliance with all its
accessories.
2. Check the contents for completeness and
possible damages. For scope of delivery
see figs. 1–5.
2.2 Assembly
1. Push the end of the suction hose into the
socket (Fig. 6/A) as shown until the catch
snaps into place. Make sure that the catch
is on the upper side.
2. Insert the handle into the upper end of the
telescopic tube (Fig. 6/B).
3. Push the nozzle onto the lower end of the
telescopic tube (Fig. 7/A).
4. Adjust the length of the telescopic tube. To
do this, press the telescopic tube lock down
(Fig. 7/B). Then extend the telescopic tube
to your desired length. To engage the lock
of the telescopic tube, release the catch
while pulling. You will hear a distinct click.
Your vacuum cleaner is now ready for use.
2.3 Vacuum cleaning
1. Attach the desired nozzle to the suction
tube or according to the surface to be
cleaned (Fig. 2 or Fig. 4).
2. Pull out the power cord by the plug up to the
yellow mark (Fig. 8/4).
3. Insert the mains plug into a socket with
ground/safety contact.
4. Switch on the cylinder vacuum cleaner with
the on/off switch (Fig. 8/2).
5. Set the carpet/hard floor switch (Fig. 3/1)
according to the type of flooring:
for deep- and short-pile carpets,
runners (Fig. 3/2)
for hard floors, e.g. laminate, tiles,
PVC, etc. (Fig. 3/B).
6. When working with the cylinder vacuum
cleaner, pull if after you like a sleigh. Follow
the respective recommendations of the
flooring manufacturers.
2.4 Switching off
1. Switch off the cylinder vacuum cleaner with
the on/off switch (Fig. 8/2) and pull the plug
from the mains socket.
2. Keep the plug in your hand.
3. Push the cord retracting button (Fig. 8/1) to
retract the power cord.
2.5 Transportation
For transportation you can carry the
cylinder vacuum cleaner by the handle of the
dust container.
2.6 When interrupting your work
To park the appliance or during work
breaks, you can hang the parking hook into the
parking hook holder (Fig. 9).
It is recommended to first retract the telescopic
tube (Fig. 1/5).
NOTE:
Immediately contact your dealer if you have
found damage resulting from transport.
ATTENTION:
Always transport or ship the appliance in its
original packaging to avoid damage. Keep
the packaging for such an event.
Dispose of no longer needed packaging
material properly.
WARNING:
Danger of injury! Only assemble the
appliance if it is not connected to the power
supply. Otherwise the machine might start up
and parts of your body, hair or pieces of
clothing might be sucked in.
AB
6
AB
7
WARNING:
Danger of injury! A damaged appliance must
never be used. Check the cylinder vacuum
cleaner and the power cord before each use.
WARNING:
Danger of injury! Especially when vacuumcleaning stairs make sure that you are
always higher up than the appliance.
ATTENTION:
Only use the cylinder vacuum cleaner with
all filters intact, in dry condition and correctly
placed. Make sure that the openings of the
vacuum cleaner are not clogged. Otherwise
the vacuum cleaner might be damaged.
WARNING:
Danger of electric shock! If the red mark
(Fig. 8/3) shows, retract the cord by pressing
the retract button (Fig. 8/1) to pull in the
cable up to the yellow mark again. Otherwise
the cord might break.
NOTE:
With the bypass vent (Fig. 1/4) you can
quickly reduce the suction power if less
power is needed, e. g. to release objects
accidentally sucked in.
1
3
4
2
8
WARNING:
Danger of injury! During uncontrolled
retraction the power cord can whip around,
become an obstacle or overthrow objects.
Therefore keep the plug in your hand and
guide it during retraction of the power cord.
WARNING:
Danger of injury! Switch off the appliance
when not working with it and observe the
notices under Zchapter 2.4, „Switching off“.
ATTENTION:
Take care that you don't accidentally press
the dust container release catch when
carrying the vacuum cleaner.
ATTENTION:
Never store the appliance next to heat
sources (e.g. stoves or radiators). Avoid
exposing it to direct sunlight. Heat can
damage the appliance.
9
Infinity VS8 Loop_3-sprachig.book Seite 5 Donnerstag, 4. Juni 2009 3:00 15
Page 6
6
Storage
Infinity VS8 Loop
3Storage
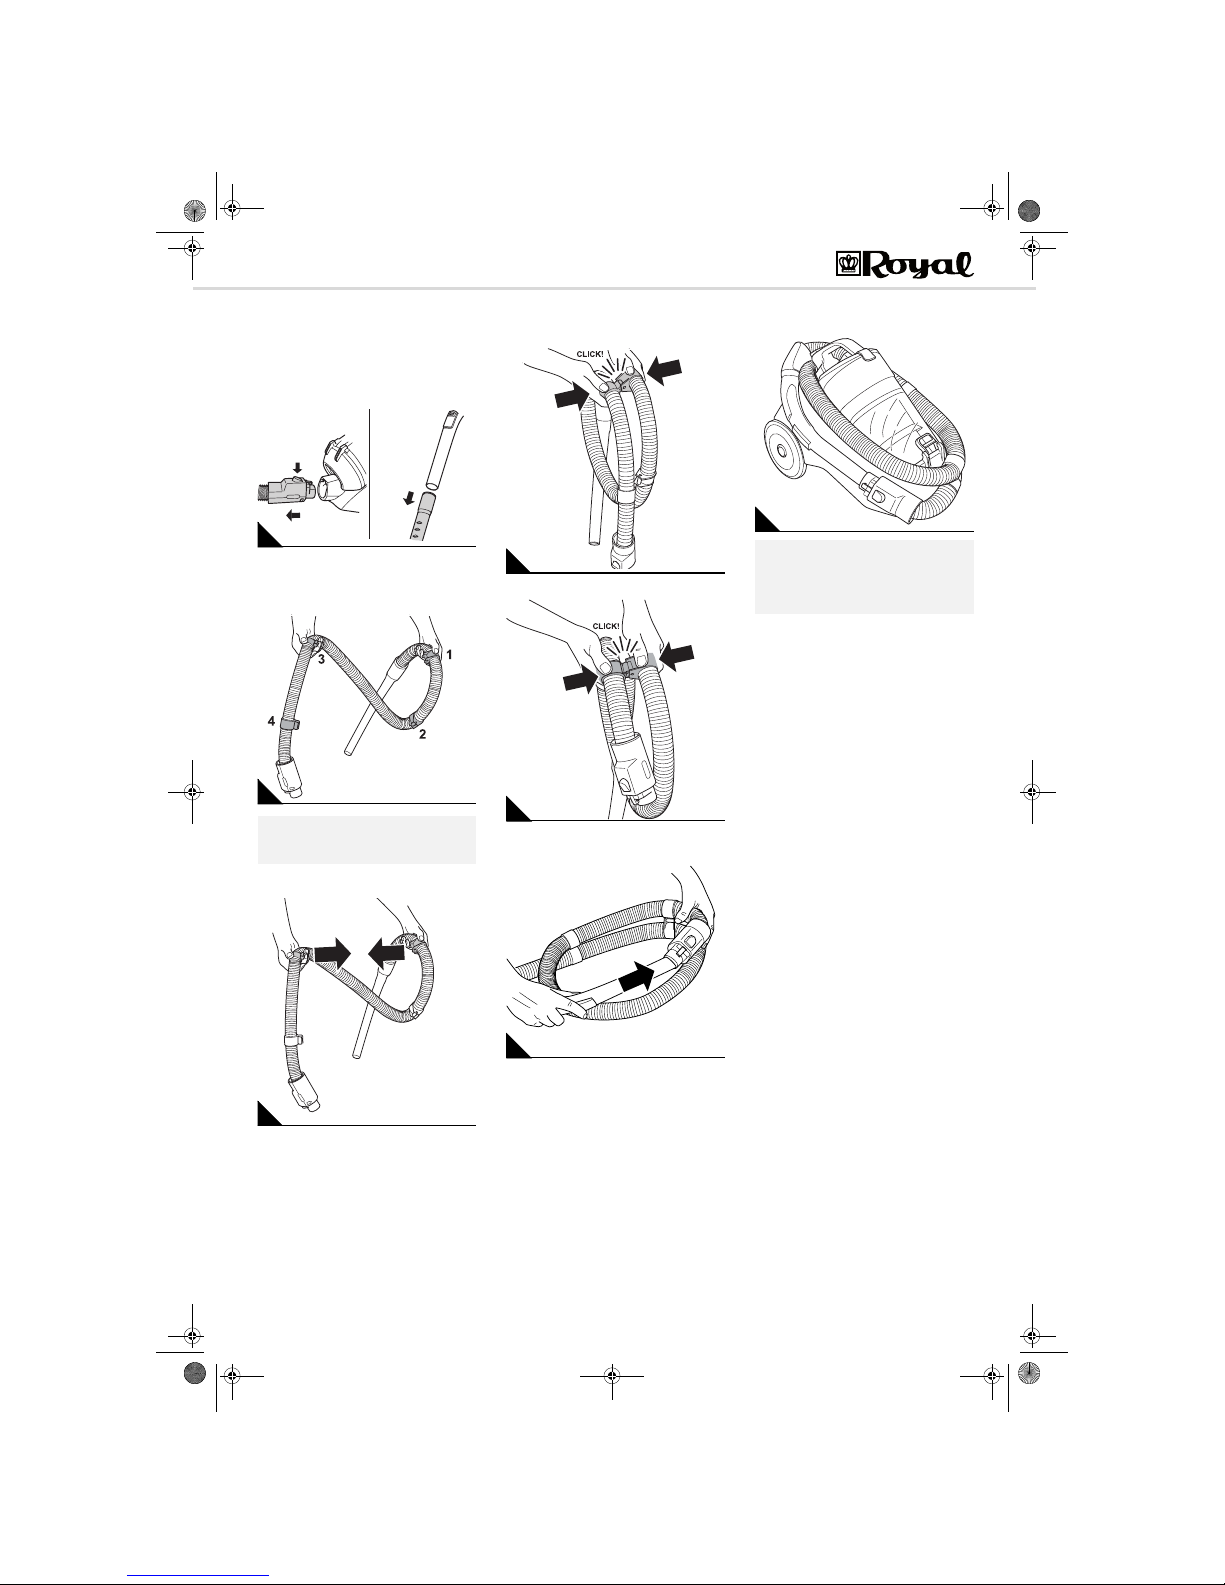
3.1 Coiling the suction hose
1. Release and remove the suction hose as
shown (Fig. 10/A).
2. Disconnect the telescopic tube from the
suction hose (Fig. 10/B).
Four clips are attached to the suction hose
(Fig. 11) – two of which engage the other two.
3. Hold the suction hose as shown by clips 1
and 3.
4. Bring the pairs together in position
(Fig. 12).
5. The hose must be coiled twice at this stage
(Fig. 13). Now first join the pair of clips you
are still holding.
6. Then join the other pair of clips (Fig. 14).
7. Finally, stick the end of the handle into the
opening of the suction hose latch (Fig. 15).
8. Lay the coiled suction hose on top of the
dust container (Fig. 16).
3.2 Storing the appliance for a
longer period
For long-time storage empty the dust
container Zchapter 4.1, „Emptying the dust
container“ and dispose ot its contents properly.
Always store the appliance in a cool, dry
place and keep it out of reach of children.
NOTE:
Clips 1 & 3 and 2 & 4 connect to become two
pairs.
AB
10
11
12
13
14
15
NOTE:
If you don't succeed in coiling the suction
hose free-handedly, lay it on a table and
perform steps 2 to 8. Then, you will surely
succeed.
16
Infinity VS8 Loop_3-sprachig.book Seite 6 Donnerstag, 4. Juni 2009 3:00 15
Page 7
7
GB
Maintenance
Infinity VS8 Loop
4 Maintenance
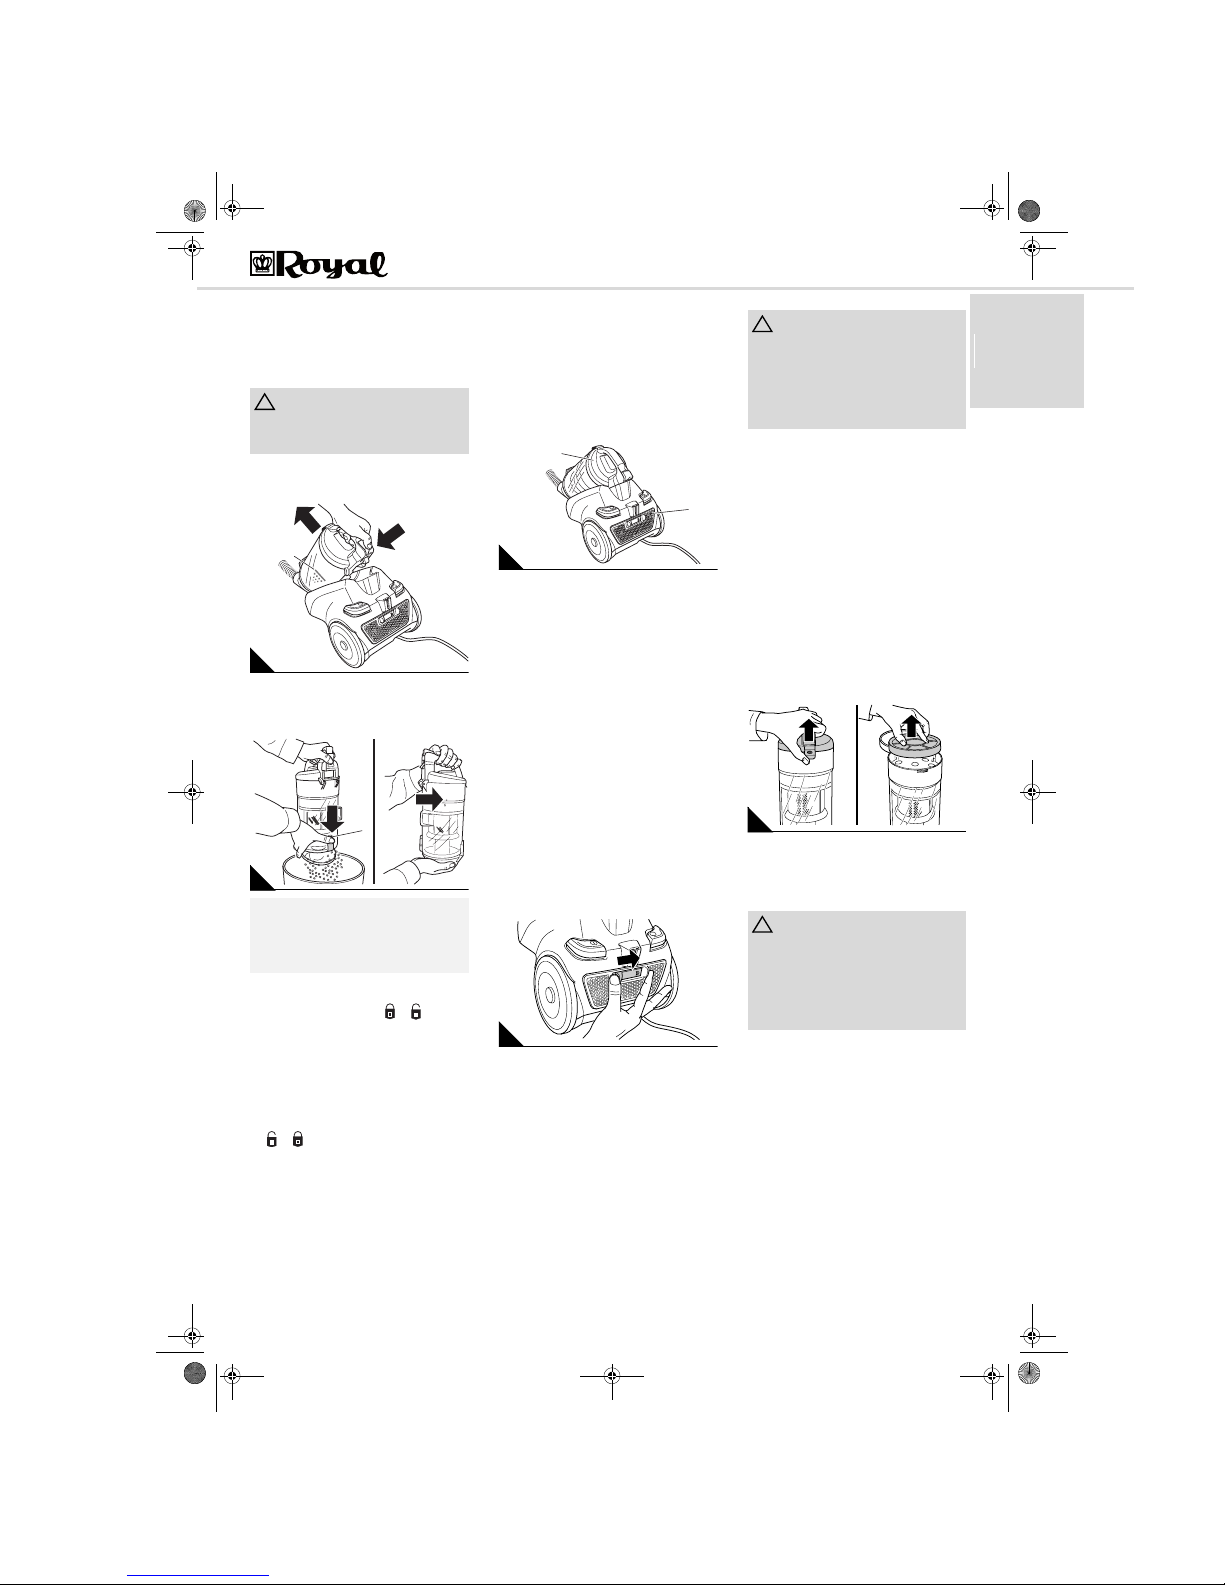
4.1 Emptying the dust container
Empty the dust container after each
vacuuming session, but at the latest when the
"MAX" mark (Fig. 17/1) has been reached.
1. Remove the dust container by pushing the
release button (Fig. 17) and then remove
the dust container from its console.
2. Empty the dust container by holding it low
over a dust bin and only then push the
release catch of the bottom plate (Fig. 18/
A1).
3. On this occasion, also take out the cyclone
unit by unlatching it as shown (Fig. 18/B,
the arrow will move from to ).
4. Remove any residual dust that may have
collected in the dust compartment.
5. Clean the cyclone unit by wiping it with a
dry cloth or by brushing it with a dry soft
brush, e.g. the furniture brush supplied with
the appliance.
6. Replace the cyclone unit and secure it by
turning clockwise (the arrow will move from
to ).
7. Fold the bottom plate back up.
8. Also check the dual motor protection filter
on this occasion. Clean it if necessary,
Zchapter 4.4, „Cleaning the dual motor
protection filter“.
9. Put the dust container back into its holder.
You must feel and hear it click into place.
4.2 Overview of the filters
The filters can get dirty during use and
therefore must be checked regularly:
Keep the checking and cleaning intervals
given below.
Clean the filters as described below.
Damaged or deformed filters, however,
must be replaced immediately.
The following 2 filters are installed:
Dual motor protection filter (Fig. 19/1)
- Checking: Check the dual motor
protection filter for dirt and possible
damage every time you empty the dust
container.
- Cleaning If during checking you see that
the filter is dirty, clean it as described
below (Zchapter 4.4, „Cleaning the dual
motor protection filter“). However, the
filter should be cleaned at least every 3 –
6 months.
Exhaust filter (Fig. 19/2)
- Checking: Check the exhaust filter
regularly for dirt and possible damage, at
least every 3 – 6 months.
- Cleaning: If during checking you see that
the filter is dirty, clean it as described
below.
4.3 Cleaning the exhaust filter
1. Switch off the appliance.
2. Push the release catch of the exhaust filter
cover to the side and fold down the exhaust
filter cover (Fig. 20).
3. Remove the exhaust filter.
4. Clean the hygienic exhaust filter by tapping
out the dirt over a dustbin. Should this be
insufficient, clean the the filter with a soft
brush, e.g. the furniture brush supplied with
the appliance.
If this dry cleaning is still insufficient, then
rinse the filter in clear cold water.
5. If the filter is damaged or deformed, replace
it. (Zchapter 6, „Spare parts“).
6. Put the clean exhaust filter back into its
holder.
7. Attach the exhaust filter cover at the bottom
side first and then fold it shut.
8. To secure it you must guide the latch by
hand as during unlatching until you hear
and feel it snap into place.
4.4 Cleaning the dual motor
protection filter
1. Switch off the appliance, remove the dust
container and empty it Zchapter 4.1,
„Emptying the dust container“.
2. Open the latch of the motor protection filter
cover and take out the dual motor
protection filter (Fig. 21).
3. Hold the dual motor protection filter deep
inside a dustbin and only then separate the
filter elements from each other.
4. Thoroughly rinse both filter elements by
hand with clear cold water.
5. If a filter element is damaged or deformed,
replace it by a new one. (Zchapter 6,
„Spare parts“).
6. Put the filter elements back together again.
7. Close the motor protection filter cover by
folding it shut. The latch must snap shut.
8. Put the dust container back into the
appliance. It must catch with a click.
ATTENTION:
Switch off the appliance before emptying the
dust container. This will prevent dust from
damaging the appliance.
NOTE:
You can dispose of the dust filter bag with
your regular domestic trash as long as it
contains no waste materials prohibited in
domestic trash.
MAX
1
17
1
AB
18
1
2
19
20
ATTENTION:
The filter is washable, but not suitable for
cleaning in washing machines or
dishwashers. Also, do not use cleansers for
cleaning the filters. Leave the filter element
to dry after cleaning (approx. 24 hours at
room temperature). Only put it back into the
appliance when it is completely dry.
ATTENTION:
The filter elements are washable, but not
suitable for cleaning in washing machines or
dishwashers. Also, do not use cleansers for
cleaning the filters. Then leave the filter
elements to dry (approx. 24 hours at room
temperature). Only put them back into the
appliance when they are completely dry.
21
Infinity VS8 Loop_3-sprachig.book Seite 7 Donnerstag, 4. Juni 2009 3:00 15
Page 8

8
Troubleshooting
Infinity VS8 Loop
5 Troubleshooting
Before contacting your authorised Royal dealer, Royal service partner or appliance market, first follow the procedure in the following table to check if you
can handle the problem yourself
6 Spare parts
6.1 List of consumable parts
6.2 Sources
Z see last page.
6.3 Disposal
The filters used are made of environmentfriendly materials and can de disposed of with
your domestic trash.
When the appliance has reached
the end of its usefulness,
especially if dysfunctions recur,
disable the appliance by pulling
the mains plug out of the socket
and cutting off the power cord.
Dispose of the appliance in
compliance with environmental protection laws
of your country. Electrical waste must not be
disposed of together with domestic waste.
Consult your local authorities or your dealer for
advice on recycling.
7 Warranty
7.1 Conditions of warranty
We grant a warranty of 24 months from the
date of purchase for the appliance distributed
by us. Within this period we will either repair or
replace the appliance or accessory (damages
to accessories do not automatically cause a
replacement of the complete appliance) all
defects due to manufacturing or materials at no
cost. Damages due to inappropriate use
(operation on wrong voltage or type of current,
connecting to unsuitable power supplies,
breakage, etc.) are exempt from warranty, as
are normal wear and minor defects that only
negligibly influence the appliance's
serviceability.
Intrusions by unauthorised parties and the use
of spare parts not supplied by Royal Appliance
invalidate the warranty. Consumable parts are
not included in the warranty and must be paid
for!
The warranty is only valid if the date of
purchase has been acknowledged by the
dealer's stamp and signature on the warranty
card or if a copy of the invoice or sales slip is
included with the sent-in appliance. Warranty
work does not extend the warranty period nor
does it constitute a claim for a new warranty!
7.2 In case of a warranty claim
Send us the appliance with its dust container
empty and a short description of the fault in
printed letters. Head your accompanying letter
with the notice "warranty claim". Send it to the
following address, including the warranty card
or a copy of the purchase slip:
Z see last page.
WARNING:
Danger of injury! Never use a defective appliance! Always switch off the appliance and disconnect it from the mains before starting troubleshooting
Zchapter 2.4, „Switching off“.
Problem Possible cause Solution
The appliance will not start The power cord is not plugged in. Insert the plug into a mains socket and switch on the appliance
Zchapter 2.3, „Vacuum cleaning“.
The socket does not carry current. Test the cylinder vacuum cleaner at another socket which you are
sure carries current.
Power cord is damaged. Have the cord replaced by the Royal Appliance Customer Service,
address Zchapter 7, „Warranty“.
The vacuum cleaner stops
suddenly.
The overheating protection has tripped (possibly due
to blocked suction channels, filters, or similar).
Switch the appliance off and pull the plug out of the socket.
Eliminate the cause of overheating (e.g. blocked suction channels,
filters, etc.). Wait for about 45 minutes. After the appliance has cooled
off, you may switch it on again.
The results are
unsatisfactory in spite of the
appliance working correctly.
Dust container is overfilled. Empty / clean the dust container.
Nozzle, telescopic tube or suction hose are blocked. Remove the obstacle. If necessary, use a long wooden stick (e.g. a
broomstick) to do this.
The filter is dirty. Clean the respective filter, Zchapter 4.3, „Cleaning the exhaust filter“
or Zchapter 4.4, „Cleaning the dual motor protection filter“.
Bypass vent (Fig. 1/4) is open. Close the bypass vent (Fig. 1/4).
The nozzle you are using does not suit the flooring. Change the nozzle (Fig. 2 or Fig. 4).
The "carpet/hard floor" switch (Fig. 3/1) is in the
wrong position for the particular type of floor.
Set the "carpet/hard floor" switch to the correct position for the type
of floor (Fig. 3).
The appliance makes
unusual noises.
Sucked-in objects are obstructing the air stream. Remove the objects. If necessary, use a long wooden stick (e.g. a
broomstick) to do this.
NOTE:
If you cannot solve the problem following these instructions, contact our service hotline or the Royal customer service.
Item number Description
5030001 Dual motor protection filter
5030002 Exhaust filter
Infinity VS8 Loop_3-sprachig.book Seite 8 Donnerstag, 4. Juni 2009 3:00 15
Page 9

9
ES
Indicaciones de seguridad
Infinity VS8 Loop
¡Muchas gracias!
Le agradecemos la compra de la Infinity VS8 y
la confianza depositada en nosotros.
Piezas del aparato
Fig. 1:
1 Conmutador "alfombra/suelo duro"
2 Desbloqueo de la manguera de aspiración
3 Inmovilizador del tubo telescópico
4 Regulador de aire adicional
5 Cierre de la tapa del filtro de protección del
motor
6 Desbloqueo del depósito de polvo
7 Pulsador para enrollar el cable
8 Fijación de estacionamiento
9 Interruptor de conexión / desconexión
10 Desbloqueo de la cubierta del filtro de
evacuación
Fig. 2:
1 Tobera de suelo (estándar)
* Accesorios opcionales:
2 *Cepillo para parqués: para aspirar
superficies delicadas (p. ej. laminados,
parqués)
3 *Cepillo turbo: para limpieza profunda de
alfombras mediante cabezal giratorio de
cepillado
Fig. 3:
1 Conmutador "alfombra/suelo duro"
para alfombras de pelo largo y corto,
alfombrillas
para suelos duros como laminados,
baldosas, PVC, etc.
Fig. 4:
1 Cepillo combinado 2 en 1 (suelto en el
cartón) (ver también fig. 5)
2 Tobera para ranuras (suelta en el cartón)
Fig. 5:
El cepillo combinado 2 en 1 puede ser usado como:
1 cepillo para muebles
2 tobera para tapicerías y cojines,
para ello sólo deberá quitar el
3 complemento de cepillo
como se ilustra.
Datos técnicos
Nos reservamos el derecho a realizar cambios técnicos y de
diseño en el marco de la mejora permanente de nuestros
productos. © Royal Appliance International GmbH
1 Indicaciones de seguridad
1.1 sobre el manual de
instrucciones
Lea este manual de instrucciones por completo
antes de utilizar el aparato.
Guarde bien las instrucciones. En caso de que
ceda este aparato a un tercero, entréguele
también el manual de instrucciones.
La inobservancia de este manual puede ser
origen de graves lesiones o de daños en el
aparato.
No asumimos ningún tipo de responsabilidad
por los daños causados debido a la
inobservancia de este manual de
instrucciones.
1.2 sobre las indicaciones
utilizadas
Las advertencias importantes para su
seguridad están marcadas de forma especial.
Es imprescindible tener en cuenta estas
advertencias para evitar accidentes y daños en
el aparato:
1.3 sobre los niños
Este aparato no está destinado para ser
usado por personas (incluidos niños) con
capacidad física, sensorial o mental restringida
o con falta de experiencia y/o de
conocimientos, a no ser que sean
supervisadas por una persona responsable de
su seguridad o hayan recibido de ella
instrucciones de cómo usar el aparato. Guarde
el aparato de modo inaccesible para este
círculo de personas.
Los niños deben ser supervisados para
asegurarse de que no jueguen con el aparato.
El material de embalaje no debe ser
utilizado para jugar. Existe peligro de asfixia.
1.4 sobre el uso conforme
La aspiradora rodante está destinada sólo
al uso doméstico. No es adecuada para un uso
comercial.
Emplee la aspiradora rodante
exclusivamente para limpiar suelos, alfombras
y cortinas con un grado normal de suciedad.
Cualquier otra utilización se considera no
conforme y está prohibida.
Queda especialmente prohibido lo siguiente:
Aspirar:
- Cabellos, dedos u otras partes del
cuerpo. Pueden ser aspirados y sufrir
lesiones.
- Prendas de ropa (por ejemplo, cordones
de zapatos, chales, etc.). Pueden ser
aspirados y causar lesiones.
- Agua y otros líquidos, en especial
productos para la limpieza en húmedo de
alfombras. La humedad en el interior del
aparato puede provocar un cortocircuito.
- Polvo de tóners (para impresoras láser,
fotocopiadoras, etc.). Existe el riesgo de
incendio y explosión.
- Rescoldos, cigarrillos y cerillas encendidas. Pueden provocar un incendio.
- Objetos puntiagudos, como cristales
rotos, clavos, etc. Por ello pueden ser
dañados los filtros.
- Escombros, yeso, cemento, polvo
finísimo de taladrado, maquillaje, etc.
Con ello el equipo podría resultar
dañado.
El uso en las cercanías de materiales
explosivos o fácilmente inflamables. Existe
riesgo de incendio o explosión.
El empleo al aire libre. Existe el riesgo de
que la lluvia y la suciedad dañen el aparato.
La introducción de objetos en las aberturas
del aparato. Se podría sobrecalentar.
1.5 sobre la alimentación de
corriente
El aparato funciona con corriente eléctrica,
por tanto existe en general el peligro de una
descarga eléctrica. Por esta razón, tenga
especialmente en cuenta lo siguiente:
- Jamás toque el enchufe con las manos
mojadas.
- Quite siempre el enchufe de la
correspondiente caja tirando de aquél.
Jamás tire directamente del cable
eléctrico porque podría romperse.
- Procure que el cable eléctrico no se
doble ni quede enganchado y evite que
se pase por encima de él o esté en
contacto con fuentes de calor.
- Utilice sólo cables de prolongación que
estén previstos para el consumo de
potencia del aparato.
- Jamás sumerja el aparato en agua u
otros líquidos y manténgalo alejado de la
lluvia y de la humedad.
- Emplee el aparato únicamente si la
tensión eléctrica indicada en la placa de
características se corresponde con la
tensión de su caja de enchufe. Una
tensión equivocada puede destruir el
aparato.
1.6 en caso de aparato defectuoso
Jamás utilice un aparato defectuoso o un
aparato con un cable de corriente averiado.
Para evitar riesgos, si la línea de conexión de
este aparato está dañada, deberá ser
reemplazada por el fabricante o por su servicio
de asistencia al cliente o por una persona
igualmente calificada.
Entregue un aparato defectuoso para su
reparación a un distribuidor especializado o al
Servicio de Atención al Cliente de Royal
Appliance. Dirección ZPágina 13, „Garantía“.
Tipo de aparato:Aspiradora ciclónica rodante
Modelo : Infinity VS8 Loop
[M5038-0]
Tensión : 220–240 V~, 50 Hz
Potencia : 1.400 W nom - 1.600 W máx
Capacidad del
depósito
: aprox. 1,5 litros
Filtros : Filtro dual de protección
(lavable) del motor, filtro de
evacuación
Longitud del
cable eléctrico
: aprox. 6 m
Peso : aprox. 5,5 kg
AVISO :
Advierte sobre peligros para su salud y
muestra posibles riesgos de lesión.
ATENCIÓN:
Indica la posibilidad de que el aparato u
otros objetos corran peligro.
A
DVERTENCIA:
Destaca consejos e informaciones.
Infinity VS8 Loop_3-sprachig.book Seite 9 Donnerstag, 4. Juni 2009 3:00 15
Page 10

10
Manejo
Infinity VS8 Loop
2 Manejo
2.1 Desembalaje
1. Saque el aparato junto con los accesorios
de su embalaje.
2. Compruebe que el contenido está
completo e intacto. Sobre el alcance del
suministro ver fig. 1–5.
2.2 Montaje
1. Introduzca el extremo de la manguera de
aspiración, como se ilustra, en la abertura
(fig. 6/A), hasta que el cierre encaje
perceptiblemente. Cerciórese de que al
mismo tiempo el bloqueo indique hacia
arriba.
2. Introduzca el asidero en el extremo
superior del tubo telescópico (fig. 6/B).
3. Introduzca la tobera de suelo en el extremo
inferior del tubo telescópico (fig. 7/A)
4. Ajuste la longitud del tubo telescópico. Para
ello presione el inmovilizador del tubo telescópico hacia abajo (fig. 7/B). A continuación tire el tubo telescópico hasta la longitud
deseada. Para bloquear, suelte el inmovilizador del tubo telescópico al tirar de éste.
Escuchará claramente como encaja.
Su aspiradora rodante está ahora lista para ser
utilizada.
2.3 Aspirar el polvo
1. Enchufe la tobera deseada (según el fondo
a ser aspirado (fig. 2 o fig. 4).
2. Extraiga el cable de corriente hasta la
marca amarilla (fig. 8/4).
3. Enchufe la clavija en una caja de enchufe
con contacto de protección.
4. Conecte la aspiradora rodante en el
interruptor de conexión / desconexión
(fig. 8/2).
5. Ajuste el conmutador "alfombra/suelo duro"
(fig. 3/1) según el revestimiento del suelo:
para alfombras de pelo largo y corto,
alfombrillas (fig. 3/A)
para suelos duros como laminados,
baldosas, PVC, etc. (fig. 3/B).
6. Para aspirar arrastre la aspiradora rodante
a modo de trineo por detrás de usted.
Tenga en cuenta las recomendaciones de
los fabricantes de revestimientos de
suelos.
2.4 Desconexión
1. Desconecte la aspiradora rodante
mediante el interruptor de conexión /
desconexión (fig. 8/2) y desenchufe la
clavija de la caja de enchufe.
2. Sostenga la clavija en la mano.
3. Para recoger el cable de corriente presione
el pulsador (fig. 8/1) para enrollarlo.
2.5 Transportar
Para el transporte usted puede llevar la
aspiradora rodante del asa del depósito de
polvo.
2.6 Durante pausas de trabajo
Para estacionar o durante las pausas de
trabajo, Ud. puede colgar el gancho de
estacionamiento en el soporte de
estacionamiento (fig. 9).
Se recomienda retraer previamente el tubo
telescópico (fig. 1/5).
A
DVERTENCIA:
En caso de descubrir algún daño debido al
transporte, diríjase inmediatamente a su
distribuidor.
ATENCIÓN:
Por principio, transporte o envíe el aparato
en su embalaje original para que no resulte
dañado. Para ello guarde el embalaje
original. Elimine como es debido el material
de embalaje que ya no sea necesario.
AVISO :
¡Peligro de lesiones! Monte el aparato sólo
cuando la clavija esté desenchufada. De lo
contrario el aparato puede arrancar y ser
aspirados partes del cuerpo, cabellos o
prendas de ropa.
AB
6
AB
7
AVISO :
¡Peligro de lesiones! Un aparato dañado no
debe ser utilizado. Antes de cada uso
compruebe la aspiradora rodante y el cable
eléctrico.
AVISO :
¡Peligro de lesiones! Preste atención
especialmente al aspirar escaleras que
usted siempre se encuentre por encima del
aparato.
ATENCIÓN:
Emplee la aspiradora rodante únicamente si
todos los filtros están intactos, secos y
colocados correctamente. Asegúrese de que
no esté obstruida ninguna abertura. En caso
contrario la aspiradora podría resultar
dañada.
AVISO :
¡Peligro de una descarga eléctrica! En caso
de que se vea la marca roja (fig. 8/3) vuelva
a introducir el cable con ayuda del pulsador
para enrollar el cable (fig. 8/1) hasta la
marca amarilla. En caso contrario se puede
romper el cable.
A
DVERTENCIA:
Con el regulador de aire adicional (fig. 1/4)
usted puede reducir rápidamente la potencia
de aspiración, en caso de que fuese
requerida menor potencia, p. ej. para liberar
nuevamente objetos aspirados.
1
3
4
2
8
AVISO :
¡Peligro de lesiones! Si el cable eléctrico se
enrolla incontroladamente, puede dar
bandazos, hacer que se tropiece o producir
la caída de objetos. Por ello sostenga la
clavija en la mano y condúzcala durante el
enrollamiento del cable de corriente.
AVISO :
¡Peligro de lesiones! Durante las pausas de
trabajo, desconecte el aparato y observe las
indicaciones bajo ZCapítulo 2.4,
"Desconexión".
ATENCIÓN:
Mientras lleve la aspiradora rodante del asa
de transporte, preste atención de no pulsar
involuntariamente el desbloqueo del
depósito de polvo.
ATENCIÓN:
Jamás deje el aparato en la proximidad
inmediata de fuentes de calor (p. ej. de la
calefacción o del horno). Evite la incidencia
directa de rayos solares sobre el aparato. El
calor puede dañar el aparato.
9
Infinity VS8 Loop_3-sprachig.book Seite 10 Donnerstag, 4. Juni 2009 3:00 15
Page 11

11
ES
Guardar
Infinity VS8 Loop
3 Guardar
3.1 Enrollar la manguera de
aspiración
1. Desbloquee y extraiga la manguera de
aspiración como se representa (fig. 10/A).
2. Separe el tubo telescópico de la manguera
de aspiración (fig. 10/B).
En la manguera de aspiración hay aplicados
cuatro clips (fig. 11) – dos de ellos con
alojamientos para recibir a los otros dos.
3. Sostenga la manguera de aspiración de los
clips 1 y 3 como se representa.
4. Coloque los pares de clips entre sí en
posición (fig. 12).
5. En este momento la manguera deberá
estar doblemente enrollada (fig. 13). A
continuación conecte primero el par de
clips que todavía esté tocando.
6. Después enchufe entre sí el otro par de
clips (fig. 14).
7. Finalmente enchufe el extremo del asidero
en la abertura del bloqueo de la manguera
de aspiración (fig. 15).
8. Coloque la manguera de aspiración
enrollada sobre el depósito de polvo
(fig. 16).
3.2 Guardar el aparato durante un
tiempo prolongado
Para guardar el aparato durante un tiempo
prolongado vacíe el depósito de polvo
ZCapítulo 4.1, "Vaciar el depósito de polvo" y
elimine su contenido correctamente.
Guarde el aparato siempre en un lugar
fresco y seco e inaccesible para los niños.
A
DVERTENCIA:
Los clips 1 y 3 así como 2 y 4 crean después
respectivamente un par de clips.
AB
10
11
12
13
14
15
A
DVERTENCIA:
Si usted no lograse enrollar la manguera de
aspiración "en el aire", colóquela sobre una
mesa y ejecute los pasos 2-8. En este caso
lo logrará con toda seguridad.
16
Infinity VS8 Loop_3-sprachig.book Seite 11 Donnerstag, 4. Juni 2009 3:00 15
Page 12

12
Mantenimiento
Infinity VS8 Loop
4 Mantenimiento
4.1 Vaciar el depósito de polvo
Vacíe el depósito de polvo después de
cada aspiración, pero a más tardar, cuando se
haya alcanzado la marca „MAX“ (fig. 17/1) en
el depósito de polvo.
1. Quite el depósito de polvo oprimiendo el
pulsador de desbloqueo (fig. 17) y a
continuación extráigalo de su consola.
2. Vacíe el depósito de polvo, colocándolo
profundamente sobre un cubo de basura y
pulsando recién entonces el desbloqueo de
la placa de fondo (fig. 18/A1).
3. En esta oportunidad extraiga al mismo
tiempo la unidad de ciclón, desbloqueando
como se ilustra (fig. 18/B, la flecha se
mueve de hacia ).
4. Elimine los restos de polvo que aún se
encuentren eventualmente en el depósito
de polvo.
5. Limpie la unidad de ciclón con un trapo
seco o cepillándola con un cepillo blando,
p.ej. con el cepillo para muebles
suministrado.
6. Coloque nuevamente la unidad de ciclón y
bloquéela girando en sentido horario (la
flecha se mueve de hacia ).
7. Vuelva a fijar la placa de fondo.
8. En esta oportunidad revise asimismo el
filtro dual de protección del motor . En caso
necesario límpielo ZCapítulo 4.4, "Limpiar
el filtro dual de protección del motor".
9. Vuelva a colocar el depósito de polvo en su
consola. Debe encajar de modo audible y
perceptible.
4.2 Resumen sobre los filtros
Los filtros se pueden ensuciar después de
algún tiempo y por ello deben ser controlados
periódicamente:
Observe los intervalos de revisión y
mantenimiento indicados abajo.
Elimine la suciedad como se describe a
continuación.
Por otra parte sustituya sin demora los
filtros dañados o deformados.
Están instalados los siguientes 2 filtros:
Filtro dual de protección del motor
(fig. 19/1)
- Control: Controle las suciedades y
posibles deterioros en el filtro dual de
protección del motor cada vez que vacíe
el depósito de polvo.
- Limpieza: Si durante el control usted
reconociese que el filtro está sucio,
límpielo como se describe a continuación
(ZCapítulo 4.4, "Limpiar el filtro dual de
protección del motor"). Sin embargo, el
filtro debiese ser limpiado a más tardar
cada 3 – 6 meses.
Filtro de evacuación (fig. 19/2)
- Control: Controle periódicamente las
suciedades y posibles deterioros en el
filtro de evacuación, a más tardar, sin
embargo, cada 3 – 6 meses.
- Limpieza: Si durante el control usted
reconociese que el filtro está sucio,
límpielo como se describe a
continuación.
4.3 Limpiar filtro de evacuación
1. Desconecte el aparato.
2. Oprima el desbloqueo de la cubierta del
filtro de evacuación hacia el costado y
rebata la cubierta (fig. 20).
3. Extraiga el filtro de evacuación.
4. Limpie el filtro de evacuación higiénica
golpeándolo suavemente sobre un cubo de
basura. Si esto no fuese suficiente, cepille
la suciedad con un cepillo blando, por
ejemplo con el cepillo para muebles
suministrado. Si la limpieza en seco no
fuese suficiente, enjuague a continuación
el filtro con agua clara y fría.
5. Si el filtro está deteriorado o deformado,
sustitúyalo (ZCapítulo 6, "Piezas de
recambio").
6. Vuelva a colocar el filtro de evacuación
limpio en su consola.
7. Primero aplique abajo la cubierta del filtro
de evacuación y a continuación rebátala.
8. Para bloquear deberá conducir
manualmente el desbloqueo, del mismo
modo que al desbloquear, hasta que
encaje de manera audible y perceptible.
4.4 Limpiar el filtro dual de
protección del motor
1. Desconecte el aparato, extraiga el depósito
de polvo y vacíelo ZCapítulo 4.1, "Vaciar el
depósito de polvo".
2. Suelte el cierre de la tapa del filtro de
protección del motor y extraiga el filtro
(fig. 21).
3. Coloque profundamente el filtro dual de
protección del motor sobre un cubo de
basura y sólo entonces separe los dos
elementos filtrantes uno del otro.
4. Enjuague manualmente a fondo ambos
elementos filtrantes con agua clara y fría.
5. Si uno de los elementos filtrantes hubiese
sido dañado o deformado, reemplácelo por
uno nuevo (ZCapítulo 6, "Piezas de
recambio").
6. Vuelva a juntar los elementos filtrantes.
7. Cierre la tapa del filtro de protección del
motor rebatiéndola nuevamente. El cierre
debe encajar de manera audible.
8. Vuelva a colocar el depósito de polvo.
Debe encajar de modo audible.
ATENCIÓN:
Antes de vaciar el depósito de polvo,
desconecte el aparato. Así evitará que el
polvo dañe el aparato.
A
DVERTENCIA:
El contenido del depósito de polvo puede ser
eliminado con la basura doméstica, en tanto
no contenga ninguna suciedad que esté
prohibida para la eliminación con la basura
doméstica mencionada.
MAX
1
17
1
AB
18
1
2
19
20
ATENCIÓN:
El filtro es lavable pero no es apto para
lavavajillas ni para lavadoras. Además, no
use ningún producto de limpieza. Después
de la limpieza deje que se seque el elemento
filtrante (aprox. 24 horas a temperatura
ambiente). Introdúzcalo de nuevo recién
cuando esté totalmente seco.
ATENCIÓN:
Los elementos filtrantes son lavables pero
no son aptos para lavavajillas ni para
lavadoras. Además, no use ningún producto
de limpieza. A continuación deje secar los
elementos filtrantes (aprox. 24 horas a
temperatura ambiente). Introdúzcalos de
nuevo recién cuando estén totalmente
secos.
21
Infinity VS8 Loop_3-sprachig.book Seite 12 Donnerstag, 4. Juni 2009 3:00 15
Page 13

13
ES
Solución de problemas
Infinity VS8 Loop
5 Solución de problemas
Antes de contactar a su concesionario oficial Royal‚ al socio de servicio Royal o a su mercado especializado, verifique con la siguiente tabla si usted puede
solucionar el problema por sí mismo.
6 Piezas de recambio
6.1 Lista de piezas de desgaste
6.2 Distribuidores
Z ver última página.
6.3 Eliminación
Los filtros utilizados están fabricados de
materiales compatibles con el medio ambiente
y pueden ser eliminados con la basura
doméstica.
Cuando el aparato haya
alcanzado el fin de su vida útil, en
especial cuando aparezcan
problemas de funcionamiento,
inutilícelo desenchufando la clavija
y cortando el cable eléctrico.
Elimine el aparato de acuerdo con
las normas medioambientales vigentes en su
país. Los residuos eléctricos no deben ser
desechados con los residuos domésticos.
Diríjase a su ayuntamiento o a su proveedor en
caso de dudas sobre el reciclaje.
7 Garantía
7.1 Condiciones de la garantía
Para el aparato distribuido por nosotros nos
hacemos cargo de la garantía legalmente
prescrita de 24 meses a partir de la fecha de
compra.
Durante este plazo de garantía eliminaremos
gratuitamente todas las fallas que se deban al
material o a errores de fabricación. Esta
eliminación se efectuará a nuestra elección,
por la reparación o el cambio del aparato o del
accesorio (los daños a piezas de accesorios no
conducen automáticamente a un cambio de
todo el aparato). Quedan excluidos de la
prestación de garantía, los daños que sean
consecuencia de un uso inadecuado
(operación del aparato con un tipo de corriente/
tensión equivocados, conexión a fuentes
inadecuadas de alimentación, rotura, etc.), el
desgaste normal y las deficiencias que influyan
de modo irrelevante sobre el valor o la utilidad
del aparato.
En caso de que intervengan establecimientos
no autorizados por nosotros o se utilicen
piezas de recambio que no sean las originales
de Royal
Appliance se extinguirá la garantía.
¡Las piezas de desgaste no están incluidas en
la garantía y por lo tanto no son gratuitas!
La prestación de garantía sólo entrará en
vigencia si la tarjeta de garantía está provista
de la fecha de compra, validada por el sello y
la firma del vendedor, o si se adjunta una copia
de la factura de compra del aparato enviado.
¡Los servicios de garantía no generan una
prolongación del período de garantía, ni
comienza por ello el derecho a una nueva
garantía!
7.2 En el caso de garantía
Envíe el aparato con el depósito de polvo vacío
y una breve descripción del fallo en letra de
imprenta. Indique en la carta de
acompañamiento la observación "Para
garantía". Envíelo junto con la tarjeta de
garantía o con una copia de la factura de
compra a la siguiente dirección:
Z ver última página.
AVISO :
¡Peligro de lesiones! ¡Jamás utilice un aparato defectuoso! Antes de ponerse a localizar el problema, desconecte el aparato y desenchufe la clavija,
ZCapítulo 2.4, "Desconexión".
Problema Posible causa Solución
El aparato no se deja
conectar
La clavija no está enchufada. Introduzca la clavija en una caja de enchufe y conecte el aparato,
ZCapítulo 2.3, "Aspirar el polvo".
La caja de enchufe no tiene corriente. Compruebe el funcionamiento de la aspiradora rodante con otra caja
de enchufe de la que esté seguro que conduce corriente.
El cable de corriente está dañado. Haga reemplazar el cable por el Servicio de Atención al Cliente de
Royal Appliance, dirección ZCapítulo 7, "Garantía".
El aparato deja súbitamente
de aspirar
Ha disparado la protección contra
sobrecalentamiento (posiblemente debido a
tuberías o similares obstruidos).
Desconecte el aparato y desenchufe la clavija.
Elimine la causa del sobrecalentamiento (p. ej. conductos o similares
obstruidos). Aguarde aproximadamente 45 minutos. Una vez que el
aparato se haya enfriado podrá conectarlo nuevamente.
El resultado de la aspiración
no es satisfactorio a pesar de
un funcionamiento correcto.
El depósito de polvo está excesivamente lleno. Vacíe / limpie el depósito de polvo.
La tobera, el tubo telescópico o la manguera de
aspiración están obstruidos.
Elimine la obstrucción. Si fuese necesario, utilice para ello una vara
larga de madera (p.ej. un palo de escoba).
El filtro está sucio. Limpie el filtro correspondiente, ZCapítulo 4.3, "Limpiar filtro de
evacuación" o bien ZCapítulo 4.4, "Limpiar el filtro dual de protección
del motor".
El regulador de aire adicional (fig. 1/4) está abierto. Cierre el regulador de aire adicional (fig. 1/4).
La tobera insertada no es apropiada para el fondo a
ser aspirado.
Cambie la tobera (fig. 2 o fig. 4).
El conmutador "alfombra/suelo duro" (fig. 3/1) no
está en la posición apropiada para el revestimiento.
Adapte la posición del conmutador "alfombra/suelo duro" al
revestimiento del suelo, (fig. 3).
El aparato hace ruido
desacostumbrado
Partículas aspiradas obstruyen el paso de aire. Elimine las partículas. Si fuese necesario, utilice para ello una vara
larga de madera (p.ej. un palo de escoba).
A
DVERTENCIA:
Si con la ayuda de esta tabla usted no pudo solucionar el problema, contacte la línea directa de asistencia o al Servicio de Atención al Cliente de Royal.
Nº de artículo Descripción
5030001 Filtro dual de protección del
motor
5030002 Filtro de evacuación
Infinity VS8 Loop_3-sprachig.book Seite 13 Donnerstag, 4. Juni 2009 3:00 15
Page 14

14
Avisos de segurança
Infinity VS8 Loop
Muito obrigado!
Muito obrigado por ter optado pelo Infinity VS8
Loop e pela confiança depositada no nosso
produto.
Comandos
Fig. 1:
1 Botão de selecção “Tapete/Piso duro”
2 Desengate da mangueira de aspiração
3 Travamento do tubo telescópico
4 Regulador de ar secundário
5 Fecho da tampa do filtro de protecção do
motor
6 Botão para destrancar o depósito de pó
7 Botão para enrolamento do cabo
8 Suporte de arrumação
9 Interruptor ligar/desligar
10 Botão deslizante para destrancar a tampa
do filtro de sopro
Fig. 2:
1 Bocal de piso (padrão)
* acessórios opcionais:
2 * Escova de parquet: Para aspirar superfí-
cies sensíveis (p. ex. soalhos laminados)
3 * Escova turbo: Para a limpeza em
profundidade de tapetes e alcatifas
mediante cabeça de escova rotativa
Fig. 3:
1 Botão de selecção “Tapete/Piso duro”
(A) Para pisos duros, i.e. laminado,
tijoleira, PVC etc.
(B) Para tapetes e alcatifas de véu
curto ou longo, passadeiras etc.
Fig. 4:
1 Escova combinação 2-em-1 (fornecida
solta na embalagem - ver também Fig. 5)
2 Bocal para aspirar fendas (fornecido solto
na embalagem)
Fig. 5:
A escova combinação 2-em-1 pode ser usada
como:
1 Escova para móveis
2 Bocal para almofada
Para tal apenas e necessário retirar o
3 Adaptador de escova
como mostra a ilustração.
Dados técnicos
No âmbito da contínua melhoria do produto
reservamos o direito a alterações técnicas e de
desenho. © Royal Appliance International GmbH
1 Avisos de segurança
1.1 Acerca das instruções de uso
Leia estas instruções de uso com atenção
antes de começar a trabalhar com o aparelho.
Guarde as instruções de uso em bom estado.
Quando vender ou ceder o aparelho a
terceiros, não se esqueça de entregar também
as instruções de uso.
A não observância das instruções de uso
pode causar graves danos corporais ou
materiais.
Não nos responsabilizamos por danos que
resultam de uma não observância das
presentes instruções de uso.
1.2 Acerca dos avisos
Os avisos importantes para a sua segurança
estão especialmente assinalados. Por favor
respeite estes avisos sem quaisquer
excepções para prevenir acidentes e a
danificação do aparelho.
1.3 Crianças
Este aparelho não se destina a ser usado
por pessoas (crianças incluídas) com
capacidades físicas, sensoriais ou mentais
limitadas, ou pessoas que não possuem a
experiência e/ou os conhecimentos suficientes
para usar este aparelho, salvo se as
acompanhar outra pessoa que zela pela sua
segurança, que as vigia ou as possa instruir
sobre como usar o aparelho. Guarde o
aparelho por esta razão fora do alcance deste
colectivo de pessoas (e das crianças).
As crianças devem ser vigiadas para evitar
que brinquem com o aparelho.
Os materiais de embalagem não devem
ser usados para brincar. Existe perigo de
asfixia.
1.4 Utilização conforme os fins
previstos
O aspirador de piso só deve ser usado para
fins domésticos. O aparelho não serve para a
exploração comercial.
Utilize o aspirador de piso exclusivamente
para limpar soalhos, tapetes, alcatifas ou
cortinados com um grau de sujidade normal.
Qualquer outra utilização é considerada não
conforme os fins previstos e está, portanto,
interdita.
É nomeadamente proibido:
A aspiração de:
- Cabelos, dedos e outros membros do
corpo. Estes podem ser absorvidos e
lesionados.
- Peças de roupa (p. ex. atacadores de
calçado, cachecóis etc.). Estas podem
ser absorvidas e provocar ferimentos.
- Água e outros líquidos, nomeadamente
produtos de limpeza de tapetes húmidos.
A entrada de humidade no interior do
aparelho pode provocar curto-circuitos.
- Toner (para copiadoras a laser,
fotocopiadoras etc.). Existe perigo de
incêndio ou explosão.
- Cinza quente, cigarros ou fósforos
acesos. Existe perigo de incêndio.
- Objectos pontiagudos e/ou cortantes,
tais como cristais, pregos etc. Estes
objectos podem danificar os filtros.
- Escombros, gesso, cimento, poeira de
perfuração, cosméticos etc. Existe perigo
de danificação do aparelho.
A utilização na proximidade de substâncias
explosivas ou facilmente inflamáveis. Existe
perigo de incêndio ou explosão.
A utilização no exterior. Existe o perigo de
o aparelho ficar danificado pela chuva e pela
sujeira.
Introduzir objectos nas aberturas do apare-
lho. Isto pode provocar o sobreaquecimento do
aparelho.
1.5 Alimentação eléctrica
O aparelho é alimentado com corrente eléc-
trica. Portanto existe sempre o risco de electrocussão. Preste especial atenção ao seguinte:
- Nunca pegue com as mãos molhadas na
ficha de alimentação.
- Se deseja tirar a ficha de alimentação da
tomada, puxe sempre directamente da ficha. De maneira nenhuma puxe do cabo
eléctrico, porque este pode rebentar.
- Tenha o cuidado de não dobrar, entalar
ou calcar o cabo de alimentação, e de
protegê-lo de fontes de calor.
- Utilize somente extensões de cabo compatíveis com o consumo do aparelho.
- Nunca mergulhe o aparelho em água ou
em outros líquidos. Mantenha-o afastado
da chuva e da humidade.
- Utilize o aparelho somente depois de ter
verificado se a tensão eléctrica indicada na
placa de identificação corresponde à tensão eléctrica disponibilizada pela rede de
alimentação eléctrica. Uma tensão diferente ou errada pode destruir o aparelho.
1.6 Aparelho danificado
Nunca use um aparelho defeituoso ou um
aparelho com cabo de alimentação defeituoso.
Em caso de danificação do cabo de alimentação do aparelho, este cabo deve ser substituído, para evitar perigos, apenas pelo fabricante,
seu serviço de assistência técnica ou por uma
pessoa com qualificação equivalente.
Entregue o aparelho para reparação a um
concessionário autorizado ou ao serviço de
assistência técnica da Royal Appliance.
Endereço ZPágina 18, „Garantia“.
Tipo de
aparelho
: Aspirador centrífugo de piso
Modelo : Infinity VS8 Loop
[M5038-0]
Tensão eléctrica: 220–240 V~, 50 Hz
Potência : 1.400 W nom–1.600 W máx.
Capacidade do
depósito de pó
: Aprox. 1,5 litros
Filtro : Filtro dual de protecção do
motor (lavável), filtro de sopro
Comprimento
do cabo
: Aprox. 6 m
Peso : Aprox. 5,5 kg
ADVERTÊNCIA:
Alerta para perigos para sua saúde e
assinala possíveis riscos de aleijamento.
ATENÇÃO:
Alerta para potenciais perigos para o
aparelho ou outros objectos.
NOTA:
Destaca dicas e informações para o
utilizador.
Infinity VS8 Loop_3-sprachig.book Seite 14 Donnerstag, 4. Juni 2009 3:00 15
Page 15

15
PT
Comando
Infinity VS8 Loop
2 Comando
2.1 Desembalar
1. Desembale o aparelho e todos os
acessórios.
2. Verifique se foram fornecidas todas as
peças e se estão intactas. Todos os itens
do fornecimento constam das figuras 1- 5.
2.2 Montagem
1. Encaixe a ponta da mangueira de
aspiração conforme mostra a imagem no
orifício (Fig. 6/A) do aspirador, deixando-a
engatar de forma perceptível. Tenha o
cuidado de manter o travamento apontado
para cima ao encaixar a mangueira.
2. Encaixe a pega no extremo superior do
tubo telescópico (Fig. 6/B)..
3. Encaixe o bocal de piso no extremo inferior
do tubo telescópico (Fig. 7/A).
4. Ajuste o comprimento do tubo telescópico.
Prima para isso o botão para travar o tubo
telescópico (Fig. 7/B) para baixo. Ajuste
então o tubo telescópico ao comprimento
desejado. Para travar o tubo telescópico,
solte o botão de travamento enquanto
puxar do tubo. Deverá ouvir um ruído de
engate bem audível.
O seu aspirador de piso agora está pronto para
usar.
2.3 Aspirar
1. Coloque o bocal desejado (selecção em
função do piso a aspirar, Fig. 2 ou Fig. 4).
2. Puxe o cabo de alimentação até à marca
amarela (Fig. 8/4) para fora.
3. Encaixe a ficha de alimentação numa
tomada eléctrica com contacto de
segurança.
4. Ligue o aspirador de piso através do botão
de ligar/desligar (Fig. 8/2).
5. Em função do acabamento do piso, altere a
posição da tecla "Tapete/Piso duro" (Fig. 3/1):
Para pisos duros, i.e. laminado,
tijoleira, PVC etc. (Fig. 3/A).
Para tapetes e alcatifas de véu curto
ou longo, passadeiras etc. (Fig. 3/b).
6. Aspire o piso fazendo seguir o aspirador de
piso atrás de si, como se fosse um atrelado. Observe por favor também as recomendações dos respectivos fabricantes de
soalhos ou tapetes.
2.4 Desligar
1. Desligue o aspirador de piso através do
botão de ligar/desligar (Fig. 8/2) e puxe a
ficha de alimentação para fora da tomada.
2. Mantenha a ficha de alimentação na mão.
3. Prima o botão para enrolar o cabo (Fig. 8/
1) para enrolar o cabo de alimentação.
2.5 Transportar o aparelho
Para transportar o aspirador de piso deve
agarrar na pega do depósito de pó.
2.6 Durante intervalos de trabalho
Para pousar o aspirador ou durante
intervalos de trabalho pode encaixar o gancho
de fixação no suporte previsto (Fig. 9/2).
Aconselha-se reduzir antes o tubo telescópico
(Fig. 1/5).
NOTA:
Caso detectar um dano de transporte, dirijase imediatamente ao seu revendedor de
produtos Royal.
ATENÇÃO:
Para transportar/enviar o aparelho use por
princípio sempre a embalagem genuína,
para que o seu aparelho não possa sofrer
danos. Por esta razão, guarde a embalagem
original. Deite o material de embalagem
correctamente separado ao lixo.
ADVERTÊNCIA:
Perigo de aleijamento! Monte o aparelho
somente com a ficha de alimentação desligada da tomada. Caso contrário o aparelho
pode ficar ligado e começar a aspirar membros do corpo, cabelos ou peças de roupa.
AB
6
AB
7
ADVERTÊNCIA:
Perigo de aleijamento! Um aparelho
danificado não deve ser usado. Inspeccione
o aspirador de piso e o cabo de alimentação
antes de cada uso.
ADVERTÊNCIA:
Perigo de aleijamento! Especialmente
quando estiver a aspirar escadas, tenha o
cuidado de posicionar-se sempre num
escalão superior ao aparelho.
ATENÇÃO:
Utilize o aspirador de piso somente com
todos os filtros intactos, secos e
correctamente inseridos. Assegure-se que
não haja aberturas entupidas. Caso
contrário o aspirador pode ficar danificado.
ADVERTÊNCIA:
Perigo de electrocussão! Quando a marca
vermelha (Fig. 8/3) ficar visível, enrole o
cabo outra vez até à marca amarela,
actuando para isso no botão para enrolar o
cabo (Fig. 8/1). Caso contrário pode
provocar a ruptura do cabo.
NOTA:
O regulador de ar secundário (Fig. 1/4)
permite-lhe diminuir rapidamente a força de
aspiração quando menos potência for
necessária, p. ex., para soltar objectos
aspirados não intencionalmente.
1
3
4
2
8
ADVERTÊNCIA:
Perigo de aleijamento! A ficha pode começar
a cambalear quando enrolar o cabo de
forma descontrolada, convertendo-se numa
armadilha para tropeçar ou fazer tombar
objectos. Por esta razão, agarre com a mão
na ficha enquanto estiver a enrolar o cabo
de alimentação.
ADVERTÊNCIA:
Perigo de aleijamento! Desligue o aparelho
durante intervalos de trabalho e observe os
avisos em ZCapítulo 2.4, „Desligar“.
ATENÇÃO:
Quando estiver a transportar o aspirador de
piso tenha o cuidado de não actuar sem
querer no desengate do depósito de pó.
ATENÇÃO:
Nunca guarde o aparelho directamente ao
lado de fontes de calor (p. ex., radiadores,
fornos). Evite a exposição solar directa. O
calor pode danificar o aparelho.
9
Infinity VS8 Loop_3-sprachig.book Seite 15 Donnerstag, 4. Juni 2009 3:00 15
Page 16

16
Arrumar o aparelho
Infinity VS8 Loop
3 Arrumar o aparelho
3.1 Enrolar a mangueira de
aspiração
1. Destrave e remova a mangueira de
aspiração conforme mostra a ilustração
(Fig. 10/A).
2. Separe o tubo telescópico da mangueira de
aspiração (Fig. 10/B).
Na mangueira de aspiração estão colocados
quatro abraçadeiras (Fig. 11): Duas destas
abraçadeiras possuem um suporte para
engatar as respectivas outras duas.
3. Pegue na mangueira de aspiração através
das abraçadeiras 1 e 3, tal como mostra a
ilustração.
4. Coloque os dois conjuntos de abraçadeiras
em posição (Fig. 12).
5. A mangueira neste momento já deveria ter
recebido duas voltas (Fig. 13). Una
primeiro o par de abraçadeiras que ainda
tiver nas mãos.
6. A seguir, junte o outro par de abraçadeiras
(Fig. 14).
7. Encaixe, finalmente, o extremo da pega no
orifício do travamento da mangueira de
aspiração (Fig. 15).
8. Pouse a mangueira de aspiração enrolada
sobre o depósito de pó (Fig. 16).
3.2 Guardar o aparelho durante um
período mais longo de tempo
Para arrumar o aparelho durante um
período de tempo mais longo, esvazie o
depósito de pó ZCapítulo 4.1, „Esvaziar o
depósito de pó“ e elimine o seu conteúdo
correctamente.
Arrume o aparelho sempre num local
fresco e seco, de forma inacessível para as
crianças.
NOTA:
As abraçadeiras 1 e 3, e 2 e 4,
respectivamente, formam depois um
conjunto de abraçadeiras.
AB
10
11
12
13
14
15
NOTA:
Se não conseguir enrolar a mangueira de
aspiração suspensa no ar, coloque a
mangueira de aspiração numa mesa para
executar os passos 2 – 8. Assim conseguirá
enrolar a mangueira sem quaisquer
problemas!
16
Infinity VS8 Loop_3-sprachig.book Seite 16 Donnerstag, 4. Juni 2009 3:00 15
Page 17

17
PT
Manutenção
Infinity VS8 Loop
4 Manutenção
4.1 Esvaziar o depósito de pó
Esvazie o depósito de pó sempre no fim do
trabalho mas, ao mais tardar, quando for
atingida a marca "MAX" (Fig. 17/1).
1. Retire o depósito de pó premindo no botão
para destravá-lo (Fig. 17) e tire o depósito
de pó a seguir para fora da consola.
2. Esvazie o depósito de pó colocando-o
sobre um caixote de lixo e premindo, à
continuação, o botão para destravar a
placa de fundo (Fig. 18/A1).
3. Aproveite a oportunidade para remover o
grupo de centrifiguação, destravando este
como mostra a ilustração (Fig. 18/B. A seta
passa de para ).
4. Remova os restos de pó que se encontram
eventualmente no depósito de pó.
5. Limpe o grupo de centrifugação passando
um pano seco ou limpando-o com uma
escova, p. ex., a escova para móveis
juntamente fornecida.
6. Volte a inserir o grupo de centrifugação, e
trave-o girando em sentido dos ponteiros
do relógio (a seta passa de para ).
7. Volte a fechar a placa de fundo.
8. Aproveite a oportunidade para
inspeccionar também o filtro dual de
protecção do motor. Se necessário, limpeo, ZCapítulo 4.4, „Limpar o filtro dual de
protecção do motor“.
9. Volte a colocar o depósito de pó na sua
consola. O depósito deve engatar de forma
audível e perceptível.
4.2 Relação dos filtros.
Os filtros podem ficar sujos após algum tempo
e portanto deverão ser controlados com
regularidade:
Cumpra por favor os intervalos de
inspecção e limpeza abaixo indicados.
Elimine a sujidade como a seguir descrito.
Não obstante, substitua os filtros
danificados ou deformados de imediato.
O aparelho possui 2 filtros:
Filtro dual de protecção do motor
(Fig. 19/1)
- Controlo: Inspeccione o filtro dual de
protecção do motor por sujidade e
eventual danificação sempre quando
esvaziar o depósito de pó.
- Limpeza: Se durante o controlo do filtro
constatar que este está sujo, limpe-o
como a seguir descrito (ZCapítulo 4.4,
„Limpar o filtro dual de protecção do
motor“). O filtro deveria ser limpo, ao
mais tardar, cada 3 – 6 meses.
Filtro de sopro (Fig. 19/2)
- Controlo: Controle o filtro de sopro
regularmente por sujidade e eventual
danificação, mas ao mais tardar cada 3 –
6 meses.
- Limpeza: Se durante o controlo do filtro
constatar que este está sujo, limpe-o
como a seguir descrito.
4.3 Limpar o filtro de sopro
1. Desligue o aparelho.
2. Empurre o botão para desengatar a tampa
do filtro de sopro para o lado e destaque a
tampa do filtro de sopro (Fig. 20).
3. Retire o filtro de sopro.
4. Limpe o filtro de sopro higiénico dando
batidelas no filtro colocado sobre o caixote
de lixo. Se isto não for suficiente, use uma
escova macia, por exemplo, a escova para
aspirar móveis juntamente fornecida, para
limpar o filtro.
Caso a limpeza a seco não for suficiente,
lave o filtro à continuação com água fria
limpa.
5. Se o filtro estiver danificado ou deformado,
substitua-o (ZCapítulo 6, „Peças
sobressalentes“).
6. Coloque o filtro de sopro limpo outra vez na
sua consola.
7. Aponte a tampa do filtro de sopro primeiro
em baixo e feche-a depois.
8. Para travar a tampa deve accionar o botão
com a mão (tal como fez para abrir a
tampa), até a tampa engatar de forma
audível e perceptível.
4.4 Limpar o filtro dual de
protecção do motor
1. Desligue o aparelho, remova e esvazie o
depósito de pó ZCapítulo 4.1, „Esvaziar o
depósito de pó“.
2. Solte o fecho da tampa do filtro de
protecção do motor e retire o filtro dual de
protecção do motor (Fig. 21).
3. Coloque o filtro dual de protecção do motor
sobre um caixote de lixo e comece só
agora a separar os dois elementos do filtro.
4. Lave ambos os elementos filtrantes
profundamente à mão, com água fria limpa.
5. Se um dos elementos filtrantes estiver
danificado ou deformado, substitua-o por
uma unidade nova (ZCapítulo 6, „Peças
sobressalentes“).
6. Volte a juntar os elementos do filtro.
7. Feche a tampa do filtro de protecção do
motor. A tampa deve engatar de forma
audível.
8. Volte a inserir o depósito de pó. Este deve
engatar de forma audível.
ATENÇÃO:
Antes de esvaziar o depósito de pó, desligue
o aparelho. Assim evita a danificação do
aparelho por causa do pó.
NOTA:
O conteúdo do depósito de pó pode ser
deitado ao lixo doméstico desde que não
contenha substâncias interditas para o lixo
doméstico.
MAX
1
17
1
AB
18
1
2
19
20
ATENÇÃO:
O filtro é lavável mas não deve ser colocado
em máquinas de lavar roupa ou lava-loiça.
Não use detergentes para a limpeza.
Quando acabar a limpeza, deixe secar o
elemento filtrante (aprox. 24 h a temperatura
de ambiente). Volte a instalar o filtro só
quando este estiver totalmente seco.
ATENÇÃO:
Os elementos filtrantes podem ser lavados,
mas não devem ser metidos em máquinas
de lavar roupa ou lava-loiça. Não use
detergentes para a limpeza. A seguir, deixe
secar os filtros (aprox. 24 h a temperatura de
ambiente). Volte a instalar as peças só
quando estas estiverem totalmente secas.
21
Infinity VS8 Loop_3-sprachig.book Seite 17 Donnerstag, 4. Juni 2009 3:00 15
Page 18

18
Correcção de problemas
Infinity VS8 Loop
5 Correcção de problemas
Antes de contactar o seu concessionário Royal, um parceiro de assistência técnica da Royal ou o estabelecimento comercial onde comprou o aparelho,
verifique com base no quadro seguinte se consegue eliminar o problema por meios próprios.
6 Peças sobressalentes
6.1 Lista de peças
sobressalentes
6.2 Onde comprar?
Z ver última página.
6.3 Eliminação de resíduos
Os filtros usados são fabricados a partir de
materiais compatíveis com o meio ambiente e
podem ser deitados ao lixo doméstico.
Quando o aparelho atingir o fim da
vida útil, nomeadamente quando
apresentar falhas de
funcionamento, inutilize-o tirando
a ficha de alimentação para fora
da tomada e cortando depois o
cabo de alimentação. Elimine o
aparelho em conformidade com a legislação
em matéria de protecção ambiental em vigor
no país onde reside. Os resíduos eléctricos
não devem ser deitados ao lixo doméstico. Se
tiver dúvidas em relação à reciclagem,
contacte as autoridades locais competentes ou
o seu revendedor.
7 Garantia
7.1 Termos e condições da
garantia
Conforme previsto na Lei, garantimos a
qualidade do aparelho por nós comercializado
durante um prazo de 24 meses após a data da
compra.
Durante a garantia corrigimos, segundo o
nosso critério de escolha e sem encargos para
o cliente, mediante reparação ou substituição
do aparelho ou seus acessórios (Nota: Um
eventual defeito de um acessório não implica
automaticamente o direito à troca do aparelho
inteiro), todas as avarias originadas por
defeitos de material ou de fabrico. Não
cobertos pela garantia são quaisquer danos
que resultam de uma utilização incorrecta
(operação com tensão/ tipo de corrente
eléctrica errada, ligação a fontes de
alimentação impróprias, quebra etc.) ou de
desgaste normal do aparelho. A garantia
igualmente não poderá ser accionada para
corrigir defeitos que diminuem o valor e a
funcionalidade do aparelho apenas
insignificativamente.
O direito de garantia cessa se o produto for
reparado por entidades não autorizadas ou em
caso da utilização de peças sobressalentes
não genuínas, não provenientes da Royal
Appliance. As peças de desgaste não são
cobertas pela garantia, ficando a sua
substituição portanto sujeita a encargos para o
cliente!
A garantia só entra em vigor quando a data de
compra estiver certificada mediante carimbo e
assinatura do revendedor no certificado de
garantia, ou quando uma cópia da factura
acompanhar o aparelho enviado à reparação.
Os serviços prestados ao abrigo da garantia
não implicam uma extensão do prazo da
garantia nem constituem a base para uma
garantia nova!
7.2 Para beneficiar da garantia
Envie o aparelho com o depósito de pó
esvaziado e uma curta descrição do defeito em
letras legíveis. Faça na carta a referência "Ao
abrigo da garantia". Envie o aparelho
juntamente com o certificado de garantia ou
uma cópia da factura ao seguinte endereço:
Z ver última página.
ADVERTÊNCIA:
Perigo de aleijamento! Nunca use um aparelho defeituoso! Desligue o aparelho e tire a ficha de alimentação da tomada antes de pesquisar e corrigir
eventuais problemas ZCapítulo 2.4, „Desligar“.
Problema Possível causa Medidas a tomar
O aparelho não se deixa ligar Ficha de alimentação não encaixada na tomada. Encaixe a ficha de alimentação numa tomada eléctrica e ligue o
aparelho, ZCapítulo 2.3, „Aspirar“.
A tomada está sem corrente eléctrica. Teste o aspirador de piso noutra tomada, da qual tem a certeza que
tem corrente eléctrica.
O cabo de alimentação está danificado. Deixe substituir o cabo pela assistência técnica da Royal Appliance,
endereço ZCapítulo 7, „Garantia“.
O aparelho pára de repente
de aspirar
A protecção contra sobreaquecimento ficou activada
(provavelmente por causa de vias de aspiração
entupidas ou problemas semelhantes).
Desligue o aparelho e puxe a ficha de alimentação para fora da
tomada. Elimine a causa do sobreaquecimento (p. ex., vias de
aspiração entupidas, etc.). Aguarde durante aprox. 45 minutos.
Passado este tempo pode voltar a ligar o aparelho arrefecido.
O resultado da aspiração é
insatisfatório, apesar de o
aparelho funcionar
correctamente
O depósito de pó está demasiado cheio. Esvazie/limpe o depósito de pó.
O ajuste de ar secundário (Fig. 1/4) está aberto. Feche o ajuste de ar secundário (Fig. 1/4).
Bocal, tubo telescópico ou mangueira de aspiração
entupidos.
Remova o entupimento. Se necessário, faça-se ajudar por um pau
comprido (p. ex., cabo de vassoura).
Filtro está sujo. Além disso deve limpar o respectivo filtro, ZCapítulo 4.3, „Limpar o
filtro de sopro“ e/ ou ZCapítulo 4.4, „Limpar o filtro dual de protecção
do motor“.
O bocal montado não é apropriado para a superfície. Troque o bocal (Fig. 2 ou Fig. 4).
Selector "Tapete/Piso duro" (Fig. 3/1) não se
encontra na posição adequada.
Altere a posição do selector "Tapete/Piso duro" em função do tipo da
superfície a aspirar (Fig. 3/1).
O aparelho causa ruídos
estranhos
Partículas de pó aspiradas obstruem o fluxo de ar. Remova as partículas. Se necessário, faça-se ajudar por um pau
comprido (p. ex., cabo de vassoura).
NOTA:
Caso não conseguir resolver um problema com ajuda da informação do quadro, telefone para a linha de apoio técnico ou contacte a assistência técnica
da Royal.
Ref. nr. Descrição
5030001 Filtro dual de protecção do
motor
5030002 Filtro de sopro
Infinity VS8 Loop_3-sprachig.book Seite 18 Donnerstag, 4. Juni 2009 3:00 15
Page 19

19
PT
Garantia
Infinity VS8 Loop
Infinity VS8 Loop_3-sprachig.book Seite 19 Donnerstag, 4. Juni 2009 3:00 15
Page 20

20
Infinity VS8 Loop
Infinity VS8 Loop_3-sprachig.book Seite 20 Donnerstag, 4. Juni 2009 3:00 15
Page 21

21
Infinity VS8 Loop
Infinity VS8 Loop_3-sprachig.book Seite 21 Donnerstag, 4. Juni 2009 3:00 15
Page 22

International Service
D
International Service
Famatécnica
Rua António Enes 20 C
1050-025 LISBOA
PORTUGAL
Phone: +351 - 21 - 3 14 35 10
Fax: +351 - 21 - 3 54 35 10
www.dirtdevil.de
Royal Appliance Espana, SL
Royal, Dirt Devil, Stellar
C/ Jazmin, 66 - 3°
28033 MADRID
ESPAÑA
Tel: +34 - 902 - 43 06 63
www.dirtdevil.de
PT
ES
Warranty Card Tarjeta de garantía Certificado de garantia
Infinity VS8 Loop
Stamp and sign of dealer / Sello y firma del vendedor / Carimbo e assinatura do estabelecimento de comércio
Description of fault / Descripción del fallo / Descrição da falha
Date of purchase / Fecha de compra / Data de aquisição
Infinity VS8 Loop_3-sprachig.book Seite 22 Donnerstag, 4. Juni 2009 3:00 15
 Loading...