

Page 1
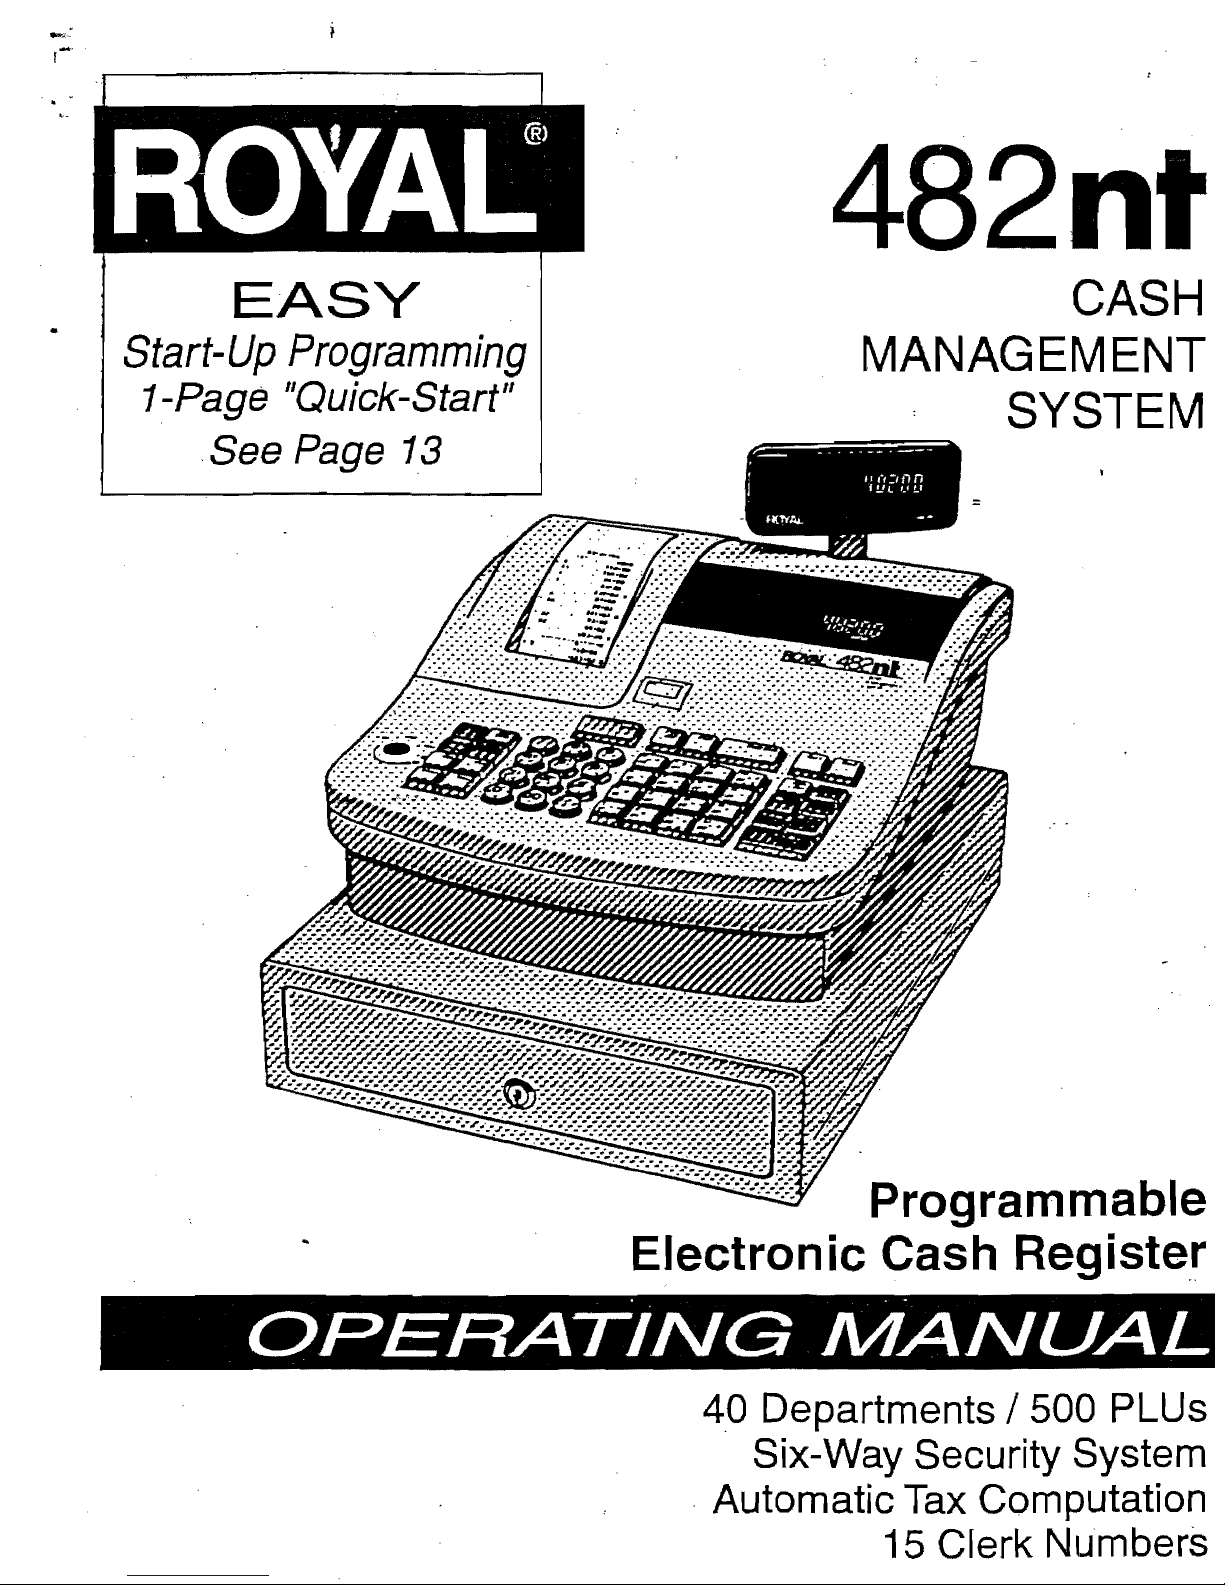
482nt
See Page
13
CASH
EASY
Start-Up
Programming
MANAGEMENT
1-Page "Quick-Start"
SYSTEM
Programmable
Electronic Cash Register
. . .
OPERATING
MANUAL
4.0
Departments / 500 PLUs
Six-Way Security System
.
Automatic Tax Computation
15 Clerk Numbers
Page 2
TABLE OF CONTENTS
UNPACKING
YOUR
CASH
REGISJ"ER and
SET
UP
............................................................
1
Preparation
................•••..••.
'
...••...•....•.•
,
.•.•.........•.•.................•............
1 '
,=---'
-~ard·/l;cceSSOfies"';--":-:-'-';'-'-·.':"'.-7'i
'.-
•• ~ ..................................................
~
......••....
-;--1---'"---
&way
Security System
••.•••••••.•••••.•••••.•.••.••••••••.•••.....•.•......••......•.••.••...•••••.
3'
Operator Display . • . . . . • . . • • . . . • . . . • • • • • . . • • . • • . • • • • • . • • . • • • • . . . . • . . . • . . . . • . • . • • • • • • • • • • . . • . . • . . • •
..
B
To Use Clerk
Numbers
.......•........•.............•.................•........•...................
'9
TAX RATES
••••..••..••.•••••..•.••••••••.•••••••••••••••••••••••••••••••••••••••••••••••••••••
,.
23·25
DEPARTMENT
LAYOUT
CONVERSiON
•••••••••••••••••••••••••
_
••.••••••.•••••••••••••••••••••••••••••
27.28
Initial Set
Up
•.•..••••...•••••••••••••••••••••••••••.•....••.••••••••••••
: • • • • • • . • • • • • . • • . • • • • . • •
•.
1
Maintenance
of
your Register
.•.••••••.•..
~
• • • • . • . • . . . • . . • • . . . • . . . . . . . . . • . . .
..
. . . . . . . . . . . • . . . . . . . . . .
..
1
GETTING
TO
KNOW
YOUR
CASH
REGISTER
••••••••••••••••••••••••••••••••••••••••••••••••••••••••••••
,
••
2
Using the
Manual
.••.••••••••••••••••••••••••••••••.••••••.•...•••••••....•...••..•••.••••••.••••.•
2
How to
Get
Started
.......•..••••••.••••••••••.••.•...••.•••.......•.••....................•........
2
SECURITY
SYSTEM
and
ERROR
CONOmONS
••••••••••••••••••••••••••••••••••••••••••••••••••••••••••••••
3
Error
Condition
Explanation • • • . . . • • . • • . • . . • • . • • • • . . . • • . • . . . • • . • . • . . • . • . . . . • . . • . • . • . . • . • . . • . . . • • • • • • • • • 3
Register Tone
••••••••••
;
••••••••••••••••••.••••••••••••••••••••••••••••••••••••••••••••.••••••••••
3
Entry Error
Alarm
•••••••••••••••••••••••••••••••••••••••••••••••••••••.•..•••••••••••••••••••••••••
3
Maximum
Entry Lpck-Out
•••••.••••••.••••••••.••••••••••••••••..•••••••••..•••••••••.••••••••••••••••
3
Clear
Key·
..•..••••.••••.....••.•••..•••.
,
••.•••.•.•.......
'"
...•...•.•....••••..••••....••••••••
3
PE-Printer Error
...••..•••.•.....••.••..•..••...•
'
...••••...........••.••.....•.
-:
••••••••
_. • • . • • • • •
•.
3
System
Clear Information
.........••..•.•••.....•....••••.•.......••...••••...............•••.•••.•••
3
CONTROL
LOCK
SYSTEM
•••••••••••••••••••••••••••••••••••••••••••••••••••••••••••••••••••••••••••••
.'
4
Control Keys
.....................................................
-
...•......•••.•.•.......•....•.•..
4
Removable Cash Drawer
.••••
'"
•••••••••••••...••••••...•.••.••..•••••.•.•••.•.
,
•. , •..
.",.
.••••••.••••••
4
ADDITIONAL
SAFETY DEPOSIT DRAWER
••••••••••••••••••••••••••••••••••••••••••••••••••••••••••••••••••
4
KEYBOARD
FUNCTIONS
.,...........................................................................
5-7
DISPLAY
WINDOWS
....................................................................................
8
Customer
Display
...••.....•.••.•.•••..•.••..••••••..••..•••....•.••.•••••.•.•.•••••...•..••.•..•...
8
BATTERY
SYSTEM
••••••••••••••••••••••••••••••••••••••••••••••••••••••••••••••••••••••••••••••••••.•
9
Installing
or
Replacing the Back·Up Batteries
..•.....
,
••••....•...
, ,
..••.. , .• , •. , ...•..............••......
9
Extending Usage
of
the Back-Up Batteries
.. " •.•...•..•...........••.........
,
.........
,
................
9
INSTALLING
THE PAPER ROLL
...• _••.••••••.•••••••••••••••••••••••••••••...•••..•..•••.•••.••••••..•.
10
INSTALLING
THE
RIBBON
•••. _•••••••••••••••••••••••••••••••.••••.•.
'
•••••.•.•••••••••••
;
•••••.•••.••.
11
RE·INKING
THE
THANK
YOU
STAMP
••••••••••••••••••••••••.••••.••..••••••.
"
•••.••.••••••••••••.•..••
:
12
QUICK
START
........••...•
_
......••.......
'.'
.. _........•..............
_
..
13-14
AFTER
QUICK
START
••••.•••••
_'" .'••••••••••••••••••.••.••.•.•..•.•.•••.....•.••.•••••••...•.••..•••
15
Quick
Start
Program Confirmation Report
.........................................•....
;
.....•..........
15
BEFORE
GOING
TO
REGISTER
MODE
•••••••.•••••••••..•.••••••••.••.•.•••••••••••.••••••••••••••••••••
16
ADVANCED
PROGRAMMING
•..•••••••••••••••••••.•••••••••.•••.•••.•.••.•••...•.••••••••••.••••••.•.•
18
CLERK
NUMBERS
•••••••••••••.••••
_
•••••••••••••••.••••••••..•••••••••••.••.•••.•••.••••••••••••
,
•••
19
To Program Clerk
Numbers
.•.......•........•.................•......•......•....•.........•....•...
19
PASSIt/ORDS
•••..••••••.••••.•••••••••••.•••.••..••••••.•.••.....•...••.•.••.••••••••••••••••••••••
20
X
and
PRG/Z
Manager
Passwords
......................................................•..............
20
To Program Manager Passwords
.............................•.....
:
•........•...•...........•..•.
20
To
Use
Manager
Passwords.
. . . . . • . . • . . . . . . . . .
.. . .•.................•....................•....•.
20
DATE
••.......•...•..•.••
:
••••••.•••••••••••••.••••.••••••••••••.•.••••••••••••••••••••••••••••••••
21
TIME
CLOCK
..••••..•.•••
_
••.•••••••••••.•••••••••..••••••••..••.•.•
,
••••••••••.•••••••••••••••••
'
••
21
MACHINE'NUMBER
.•.•...•••••••••••••••••••••••.•••••••.••••••••••.••••••••••••••••••••••••••••••••
21
DECIMAL
POINT
...••••..•.••••••••••••••••••••••••••••••••••••••••••••••••••••••••••••••••••••••••••
22
ROUNDING
•....•.....•••••••
_
•.•••••••••••••••••••••••••••.••••••••••••••••••••••••••••••••••••
:
•••
22
Fixed Tax Rate
.....................••...............•.....
.'
......•....•..•.••..•..•••••.•.•.••••.
23
Tax Table Rate
..............•...•..........•..•.....•.....•...........
~
.•..•......••.•...••..••..
24
VAT Tax Rate
........•.............•...•........••..•..............•............•...........••••.
25
DEPARTMENT
STATUS
.•••••••••••••••••••••••••••••••.•••••••••••••.••••••.••••••••••••••••••••••
29-31
COUPON
DISCOUNT
•~ • • • • • • • • • • • • • • • • • • • • • • • • • • • • • • • • • • • • • • . . • • • • . • • • . • • • • • • • • • • • • • • • • • • • • • • • • •
••
32-34
MINUS
PERCENTAGE
DISCOUNT
(-'%/RA)
•••••••••••...•••••••••••.•••••..•.•.•.....•.•..•••••.•••••.••••
35
PLUS
PERCENTAGE
(+'%/PO)
.• _•••..•••••.•.••.•••••.•...••.••.•..•.•..••..•.•••••••••.•••••••••.••.•••
36
PRICE
LOOK·UP
(PLU)
.••••.••••••••••••••••••••••••••••••••••••••••••••••••••••••.•••••••••••••••••••
37
TRAINING
MODE
••••.•..•••••••••••••••••••••••••••••••••••••••••••••••..•.•••••••••••••••••••••••••
38
GRAND
TOTAL
PRESET
•••••••••••••••••••••••
_
••••.•••••••••••••••••••••••••••••••••••••••••••••••••••
39
TRANSACTION
NUMBER
PRESET
.•••••••••••••••••••••••••••••••••••••••.••••••••••••••••••••••••••••••
40
Z1
and
Z2
COUNTER
PRESET
•••••••••••••••••••••
,
••••••••.•••••••••••••••.•••••••••••••••••••••••••••
41
FLAG
OPTIONS
•••••••••.•••••••
-
••••••••••••••••••.••••••••••••••••••••••.•••••••••••••••••••••••
,
42-43
PROGRAM
CONFIRMATION
REPORT
•••••.••••••••.•••••..••••••.•...•••••••••••••••••••••••••••••••••••
44
PLU
CONFIRMATION
REPORT
•.••••••••••••••••.•.•.•••••••••••••••••.•••••••••••••••••••••••••••••••••
45
Page 3
:'\0:.
(Continued) TABLE OF CONTENTS
TRANSACTION EXAIt.;PLES FOR OPERATlNG
TIiE
CASH'REGISTER
.........................................
46-62
Sample Receipt
••••'.••••...•••..•
'
..•••..•••..••.•.••••
,
.•
: • • • • • • • . • . . • • . • • • • • . . . . . . . • . • . • • • • • . • • .
••
46
T ransac:l:ion Symbols . • • • . • • • . • • • • • • . • • • • • • . • . • • • : • • • • • • • • • . • ; • • • • • . • • • • . . . • • • • • • . . • • • . . • • • . . • • • • •
..
46
Example
1:
Cash
.Sale Without Tendering Change
••••••••••••••••••••••.••••••••••.••••••.•••••••.•••
" 47
Example 2: Cash Sale With Tendering Change
•••.•...••••••••••••.••••••••••••••••••.••••••••••••••••..
47
Example 3: Using the Dept
Shift
Key
•.••••••••.•••••••••••••••••••••.••..•••••.••••..•..•••••.•••••
'-..
47
Example
4:
Charge Sale
••••••.•••••••••••.••••••••••...••••.•••••••••..•••••••..••.••••••••••.••.
4B
Example 5: Check Sale
•••••••••••••••••••••••••..•••.••••••••••.•••••••••••••••••.•••...•••••••.
4B
Example 6:
Spfrt
Tendering Sale
•••••••••••••••••••••••.•••••••••••••••••.••••.•••••••.•••••.••••••
4B
Example 7: No-Sale Function
••••.••••••••••••••.•••••••.•.•••••••••••••.••••••••••.•.••••.•
.-. • • •
••
49
Example 8: Registering a Reference
Number
• • • • • • • • • • • • • • • . . • • • • . • • • • • • • • . • . • •
••
• • • • • • . . • • • • • • • • . • •
••
49
Example 9:. Multiplying
by
a Fraction
•••••••••••••••••••
• • • • • • • • • . • • • • • • • • • • • • • • • • • • • • • • • • . • •
•.•
• • • .
..
49
Example 10: Multiplication Sale " • • • • • • • • • • • • • • • • • • • • • • . . • • • • . • . • • • • • • . • • • • • •
..
• • • • • • • . • . . • • • • • • • • •
••
50
Example 11: RegislBring a DepartJnent Unit Price
••...•••••••••••••••••••.••..•••••••••.•••••••••••
,....
50
Example 12:
Mu~plication
of
a OepartJnent Unit Price
••••••••••••••••••••••.•••••
':
• • • • • • . • • • • • • • • • • • • • •
.•
50
Example 13: Exempting
Tax
on
an
IIBm
••••••••••••••••••..••••••..•••••••••••••••••••••••••••••.•.••
Sl
Example 14: Exempting Tax
on
the Entire Sale •
.-
•••••••••.•••..•••••••••••••••••••••••.•••••••.••••••
;.
S~
Example 15: Adding Tax to a Non-Taxable Department
•.••••••••
"
••.••••••••.•••••••••••••..••••.••••.
"
51
Example 16: Received..Qn..Account
l;)aIe
••••••.••••••••••••••.••••••••••••••••••.••••
F
•••••••••••••
,
•••
52
Example 17: Paid-Out Sale
••••..••••••••••••••••••••••.•••••••••••••••••••••••••••.••.••••••..••..
52
Example 18: Retum Sale
•••••.
' • • • • . • • • • • • • • • • • • • • • • • • • . • • • • • • • . • • • • • • • • • • • • • • . • • • • • • • • . • • • • • • . • .
..
52
Example 19: . Coupon Discount Sale
.• : •..• .-.••••••
','
••••••••••••••••••••••••.•••••••••.••.•.•.•.••••
" 53
Example 20: Minus Percentage Discount Sale
•..••••••••••••••••••.••••••••.•••.•.•..•••••..•.•..••.
,..
54
Example 21: Plus Percentage Sale
••••••.•••.•••.•••..•..••••..••••.••..•
:
••.
','
• . • • . • • . . • . . . . • . . • • .
•.
55
Example 22: Use
of
Error-Correct (VOID) Key
•••••••••.•••.•.•••••••...•.•••...••••••••..•.....••..•••
" 56
Example 23: Voiding a Sale
•.••.•.••••..•••.•••
'
•.••.•.•....•••.
" • • . . . . . • • . • . • • . • . • • • • . • • . . • • • • • • • .
56
Example 24: Voiding a Multiplication Sale
.•..•••...•••.......
..•...•.•....•......•.......•.•.•..••••.
56
Example 25: Voiding a Coupon Sale
.•.••••.•••.••••.••••.•...•••..••••..•.•..••......•.......•.•....
57
Example 26: Voiding a Minus Percentage Discount Sale
.......••...•.•.
.
....••....••••...
;
.....•...•••.
,
57
Example 27: Voiding a Plus Percentage Sale
•....•.•
;
•.• : .. ; •.•....
,
.,
••.•....••..•..•.•..•....•....
,.
57
Example 28: Voiding a Department Preset Price
.....••...•..•..•.•..............
,......................
58
Example
.29;
Voiding a Multiplication
of
a Department Preset Price
••...•.. , ................................
, , . . . .
58
Example 30: Voiding a Department Preset with a Minus Percentage
Discount,
. ,
..•....••.•..•......
, . . . . . . . . . . .
59
Example 31: Voiding a Department Preset with a
Coupon
Discount
.•••• , •.•..••..••..•.......••.•.........
,.
59
Example 32: PLU Sale
•••••••••.....•.•....•••••••..•....•.•.
, • . • . • . . . . • . • . • • . . . • • . . • • . . . . . . . . . .
..
60
Example 33: Voiding a
PW
Sale
•••••.•••.•••..••••..•••.•••..•••..•.•..••.•••.••••..••••.••.•..•.
. .
60
. Exam pie 34: Voiding a
PW
Multiplication Sale
.•••••.•.•••.....•••..•••.•.••.•••••.•...•••...•.•••...•.
60
Example 35: Voiding a PLU Sale with a
Coupon
Discount
•..••••.•••.••••..•••.•••.•••...•....•.....•.....
61
Example 36: Voiding a PLU Sale with a Minus·Pen:entage Discount
...........................................
61
Example 37: Voiding a PLU Sale with a Plus Percentage Rate
•.....................•.•......•..............
61
Example 38: Cancer Operation
..•...••..•.•.••••.•.••.......•...•.•.
,
•••...•..••..•..•..•...
,......
62
Example 39: Gallonage Sales Transaction
•••..••••••••••••.•....•..•..••••.•••.•••...••.••••••••.••...
62
XfZ
MANAGEMENT
REPORTS
•••••••••••••••••••••••••••••••••••••••••••••••••••••••••••.••••••••••••..
63
Cash-In-Drawer Report
•••.....•••..••••...•.••••.•••••••••••••...••••••••••••••..••••.•.•.••.......
64'
Hourly R!:lport
.••...••.•..•.••...•••..
,
•••.••...••••.••••.•
~
• • • . . . . . . • • • • • • • • • • • . . . . . . • • • . . . • • • . . .
64
Oerk
Report :
....•••••
:
•.••••...•••••.....•.•.•••.••••.••••......••••.•••••..•.•••••.••.•..
: • : . . . 65
PW
Report and. Weekly/Monthly Report
.••••.......•..•.•..•.•..•••...•••.••••....••••..•.•...•..•.•...
66
Cash Declaration Report
....•• .-....................................................................
~.
67
Full Z/End-of-Oay Report and
Weekly/Monthly
Report
•••
; . . . . . • • • . . • • • . . • . • • • • • • • • • • • . • • • • • • • • • • • • • • . • • . . • .
68
Full Report Ulustration
•..•..•.•
'.'
. • • • • . • . • • . • • . . • • • • . . • • • . • • • • • • • . • • • • . • • • • • • • • • • • • • • . • • • • • . • • . • • • • •
69
Balancing
X/Z
Reports
.....•••••..••••••••••••.•...••••.••..••••.••.•..•••••••••..•••.••••••••.••••
70
TROUBL.ESHOOTlNG
••••••••••••.••••••••••••••••••••••••••••••••••••••••••••••••••••••••••••••••••••
71
In Case of
an
Error Tone
.•••••••••.••••••••••••.•.••••••....••••••••...••.••••••.•••••••••••••.•.••.
71
In
Case PE-Printar Error Displays
•..•••••••••....•••••••••••••••.••••.•••••••
; . • • • • • • • • . • • • • • • • • • • • ...
.•
71
H
Cash
Register
is
Malfunctioning
•.•••••••••••••.•••••••••••••••••.••••••••••••••••••••••••••••.•.••••
71
Half System
Oear
.....................................
'.'
•••.•••••.••..•••••••.••••.••••••••.••••••••
71
Full System
Oear
•..•...••••••..•••••••.•••••.•••.••.•..•••..••••••••..••••..•••••••.•••••
;
•••••••
71
Service Center Information
••.•••.•••••.•••.•••••••••••••.••
'
••••.•..••••.•••••.••••••••••••••••.•••.•
71
SPECIFICATlONS Bnd SAFETY
•••••••••••••••••••••••••••••••••••••••••••••••••••••••••••••
~
••••••••••••
72
UMITED
WARRANTY
•••••••••••••••••••••••••••••••••••••••••••••••••••••••••••••••••••••••••••••••••
73
APPENDIX I - STATE TAX
TABLE
CODES
••••••••••.•••••••••••••••••••••.•••••••••••••••••••••••••••••••••
la-If
APPENDIX
11-
CALCULATlNG STATE
TAX
TABLE
CODES.
• • •
••••
• • • •
•• • ••
• •
••
• • • • •
••
••
• • • • • • • • • •
••
• • •
•••
••
lie-lie
APPENDIX III -
GST
/PST
SYSTEM FOR CANADA • • • • • • • • • • • • • • • • • • • • • • • • •
..
••
...
• • • • • • • • •
..
• • • •
..
• • • • •
••
lIIa-lIIb
ii
Page 4
UNPACKING YOUR CASH REGISTER
and
SET~UP
PREPARATION
When your cash register is new in its factory packaging, you will find the various
ite~s
for the register packaged
separately. Look for and unwrap the following: 1 paper roll, black journal winder spindle and duplicate key sets
for
the Control Lock and Cash Drawer/Journal Lock.
,STANDARD ACCESSORIES
.
The following are included in the box with
your
cash register:
• Instruction manual.
• 1 black plastic journal winder spindle.
• 1 starter roll of standard paper tape, Royal Reorder Number 013129 (57mmj for single ply; 013130
(57mm)
for
2-ply. '
• 1 purple ribbon (already installed), Royal Reorder Number 013090. The ribbon is also available in the
color
black. Royal Reorder Number 013094. '
• 4 standard •
M"
batteries
for
battery back-up system.
• Keys:
(2)
Cash Drawer/Journal
Lock
keys
'(515).
(2)
Program keys
(PRG.
58-090004).
(2)
Register keys
(REG.
58-090001).
INITIAL
SET
UP
IT
IS IMPORTANT THAT YOU READ THE INITIAL SET-UP AND
MAiNlENANCE
INSTRUCTIONS BEFORE
ATTEMPTING TO
OPERAlE
THE CASH REGISTER.
1.
Locate on level surface - Before operating,the cash register, be sure it is placed on a level
surface
to
permit smooth operation of the register cash drawer .
.
2.
IMPORTANT: THE
C~SH
REGISTER MUST BE PLUGGED IN BEFORE INSTALLING THE
BACK-UP BATTERIES. This cash register operates on any standard three-hole electrical outlet
(115-120 volt, 60 hertz). It is recommended that the
Cash
register be connected
to
an electrical
circuit where no other electrical device
or
appliance is connected which may overfoad the circuit
or
cause electrical interference with the cash register. It is best that a single circuit be provided
'for
register operations.
3.
Be sure the cash register is plugged in and install the 4 standard
OM"
batteries provided. Refer
to
Page 9 for battery installation instructions.
4.
Install paper - Refer
to
Page 10 for paper installation instructions.
MAINTENANCE
OF YOUR REGISTER
Your register must remain uncovered when turned on; this will allow proper
COOling
of electronic
components.
Use a dust cover when the register is
not
in operation
to
protect mechanical components from
dust
Take care
to
keel'
beverages and other liquids away from the machine
to
avoid spills which may
damage electronic components (use optional protective keytop cover
to
prevent damage
to
machine).
To clean. use a soft dry cloth. Do not use harsh solutions containing alcohol.
Your machine should be kept in areas free from dust. dampness or extreme temperatures (hot
or
cold).
After storage in extreme temperatures (below 32 degrees fahrenheit or above 104 degrees
fahrenheit). allow the temperature inside the machine enough time
to
reach room temperature
before switching on.
Never pull the paper tape through the printhead. To prevent damage, always use the electronic
paper feed keys.
Should electronic service be needed. a
Royal
authorized service center is recommended.
Page 5
GEroNG
TO
KNOW YOUR CASH REGISTER
USING THIS MANUAL
Your cash register manual
is
organized for easy reference. The front portion contains general information
on
all
features and functions
of
the cash register. Instructions for setting the programs are
next
TransaCtion
examples for operating the register are at the back of the manual, along
with
information on troubleshooting.
Use
the
TABLE
OF
CONTENTS
to
locate a particular section you are interested in .
•
Throughout this manual references
to
the Keypad are shown in bold and in parenthesis. References
to
the
Numeric Keypad are preceded by the word "1YPE-; for example: TYPE the number (1). References to the
Operational
Keys
are preceded
by
the word ·PRESS-; for example: PRESS the (AMT TENDfTOTAL)
Key.
HOW TO GET STARTED
,
Before you begin
to
program
or
use your new
Royal
Cash Register, you should spend some time becoming
familiar with the Control Lock System, Keyboard Functions and the Display. Review setting
up
and basic
maintenance information. Then proceed
by
installing the paper roll. Follow the easy Quick Start program.
Finish by practicing the transaction examples
previd.ed.
PROGRAMMING THE CASH REGISTER
Simple
step-by~step
instructions are provided
to
help you quickly program your register for standard
operations; Please refer
to
the Quick Start programming on Pages
13
and
14.
OPERATING THE CASH REGISTER
Transaction examples are provided for registering various operations. such as a cash, check.
or
charge
sale;
tendering change; multiple item sale;
PLU
sale; split tendering; voiding; refunding;
discounting; coupon reduction and more. For details see Pages 4&{)2.
PROBLEMS WITH USAGE OF THE CASH REGISTER
If
you are having technical difficulties or if your cash register
is
malfunctioning. refer to the
Troubleshooting section
on
Page
71.
2
Page 6
..
'
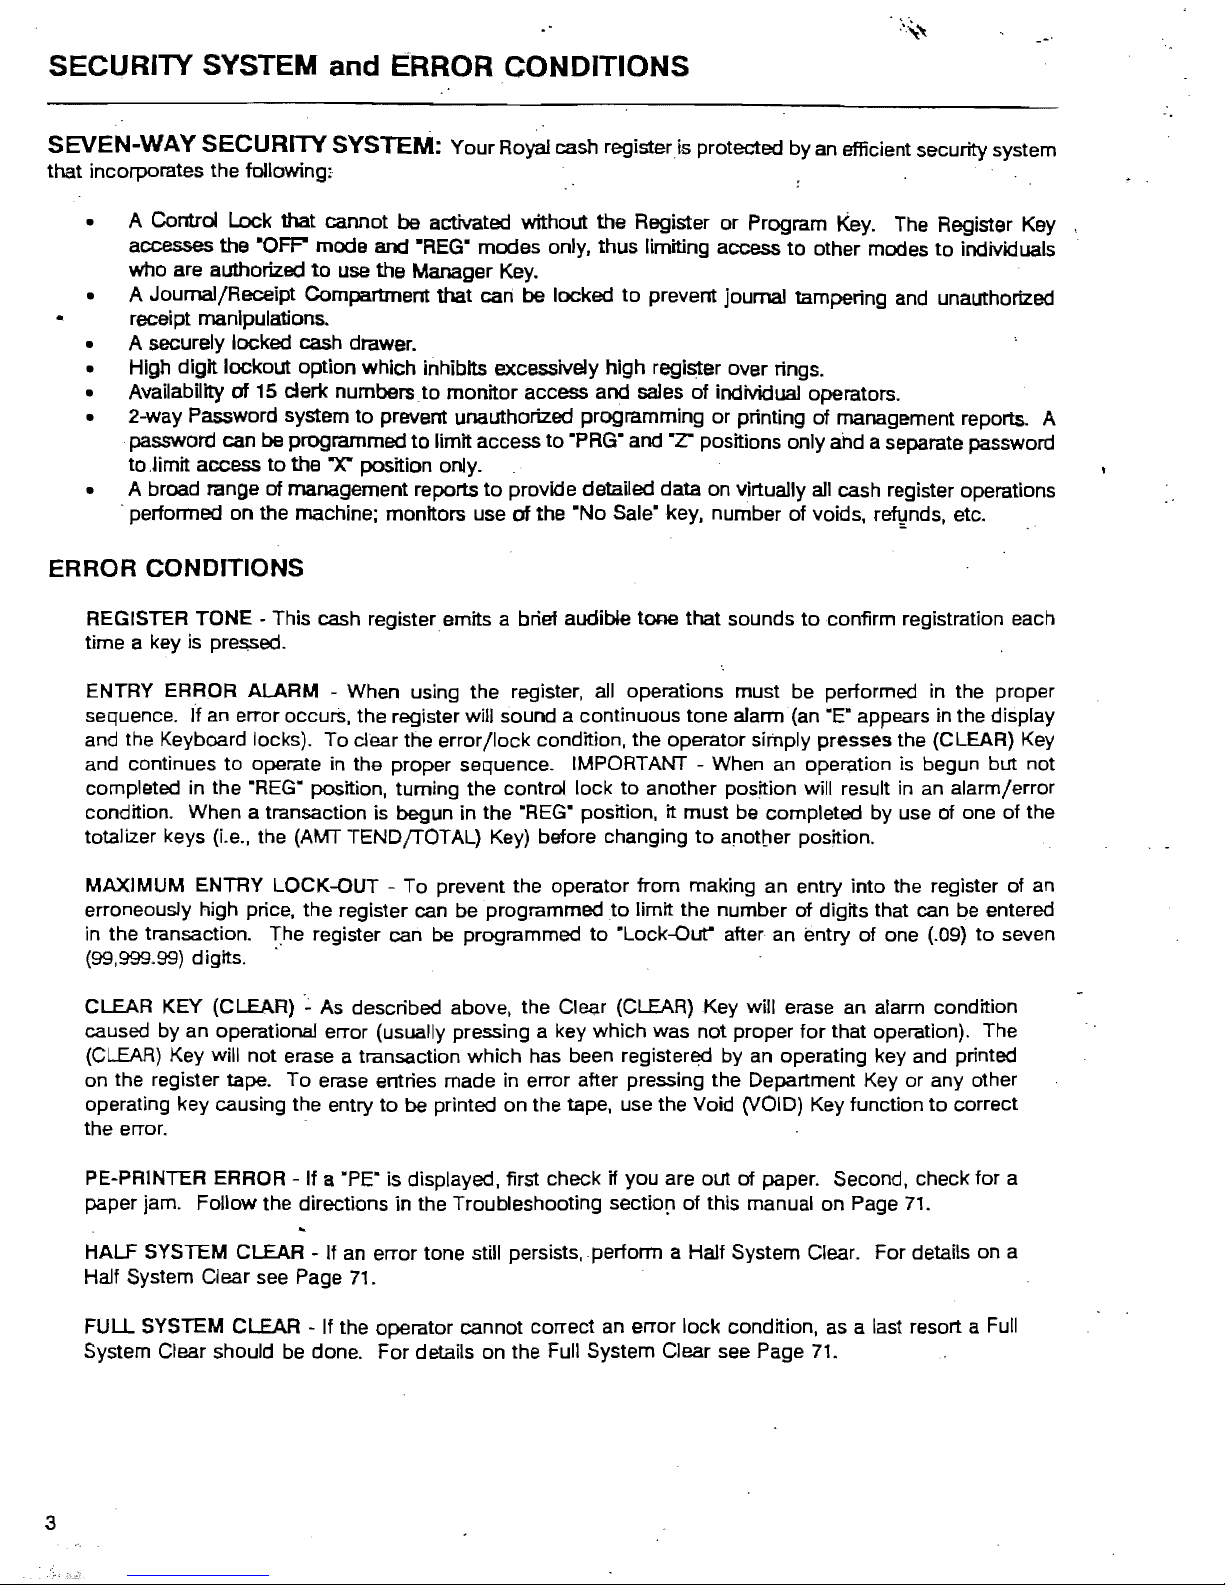
SECURllY
SYSTEM
and
~RROR
CONDITIONS
SEVEN-WAY SECURITY SYSTEM: Your Roy.!l cash register is protected by an efficient security system
that incorporates the following,
• A
Control Lock that cannot be activated without the Register
or
Program
Key.
The Register Key
accesses the
·OFP
mode and "REG· modes only, thus limiting access
to
other modes
to
individuals
who are authorized
to
use the Manager Key.
• A Journal/Receipt Compartment that can be locked
to
prevent journal tampering
and
unauthorized
'"
receipt manipulations.
• A securely locked cash drawer.
• High digit lockout option which inhibits excessively high register over rings.
• Availability
of 15 clerk numbers
to
monitor access and sales of individual operators.
• 2-way Password system
to
prevent unauthorized programming
or
printing of management reports. A
,password can be programmed
to
limit access
to
"PRG· and "Z' positions only ahd a separate password
to.limit access
to
the T position only.
• A broad range of management reports
to
provide detailed data on virtually all cash register operations
, performed on the machine; monitors use
of the "No Sale· key. number of voids.
r~nds,
etc.
ERROR CONDITIONS
REGISTER TONE - This cash register emits a brief audible
tOO9
that sounds
to
confirm registration each
time a key
is
pressed. '
ENTRY ERROR ALARM - When using the register,
all
operations must be performed
in
the proper
sequence. If
an
error occurS, the register will sound a continuous tone alarm'
(an
"E"
appears in the display
and the Keyboard locks). To clear tne error/lock condition, the operator simply presses the (CLEAR) Key
and continues
to
operate in the proper sequence. IMPORTANT - When
an
operation
is
begun but not
completed in the
"REG"
position, turning the control lock
to
another position will result
in
an
alarm/error
condition. When a transaction is begun in the
"REG"
position,
it
must be completed by use of one of the
totalizer keys
(Le.,
the (AMT TENDfTOTAL)
Key)
before changing
to
anotber position.
MAXIMUM ENTRY LOCK-OUT - To prevent the operator from making an entry into the register of
an
erroneously high price. the register can be programmed
to
limit the number of digits that can be entered
in
the transaction.
rhe
register can
be
programmed
to
"Lock-Out" after an entry of one (.09)
to
seven
(99,999.99) digits, '
CLEAR KEY (CLEAR)
'~
As
described above. the Clear (CLEAR) Key will erase an alarm condition
caused by an operational error (usually pressing a key which was not proper for that operation). The
(CLEAR)
Key will not erase a transaction which has been registered by an operating key and printed
on the register tape. To erase entries made in error after pressing the Department Key or any other
operating key causing the entry
to
be
printed on the tape, use the Void (VOID) Key function
to
correct
the error.
PE-PRINTER ERROR - If a ·PE" is displayed. first check
if you are out of paper. Second, check for a
paper jam. Follow the directions
in
the Troubleshooting sectio[l of this manual on Page
71.
HALF SYSTEM CLEAR - If
an
error tone still persists, perform a Half System Clear. For details on a
Half System Clear see Page
71.
FULL SYSTEM CLEAR -
If
the operator cannot correct an error lock condition.
as
a last resort a
Full
System Clear should be done. For details on the Full System Clear see Page
71.
3
Page 7
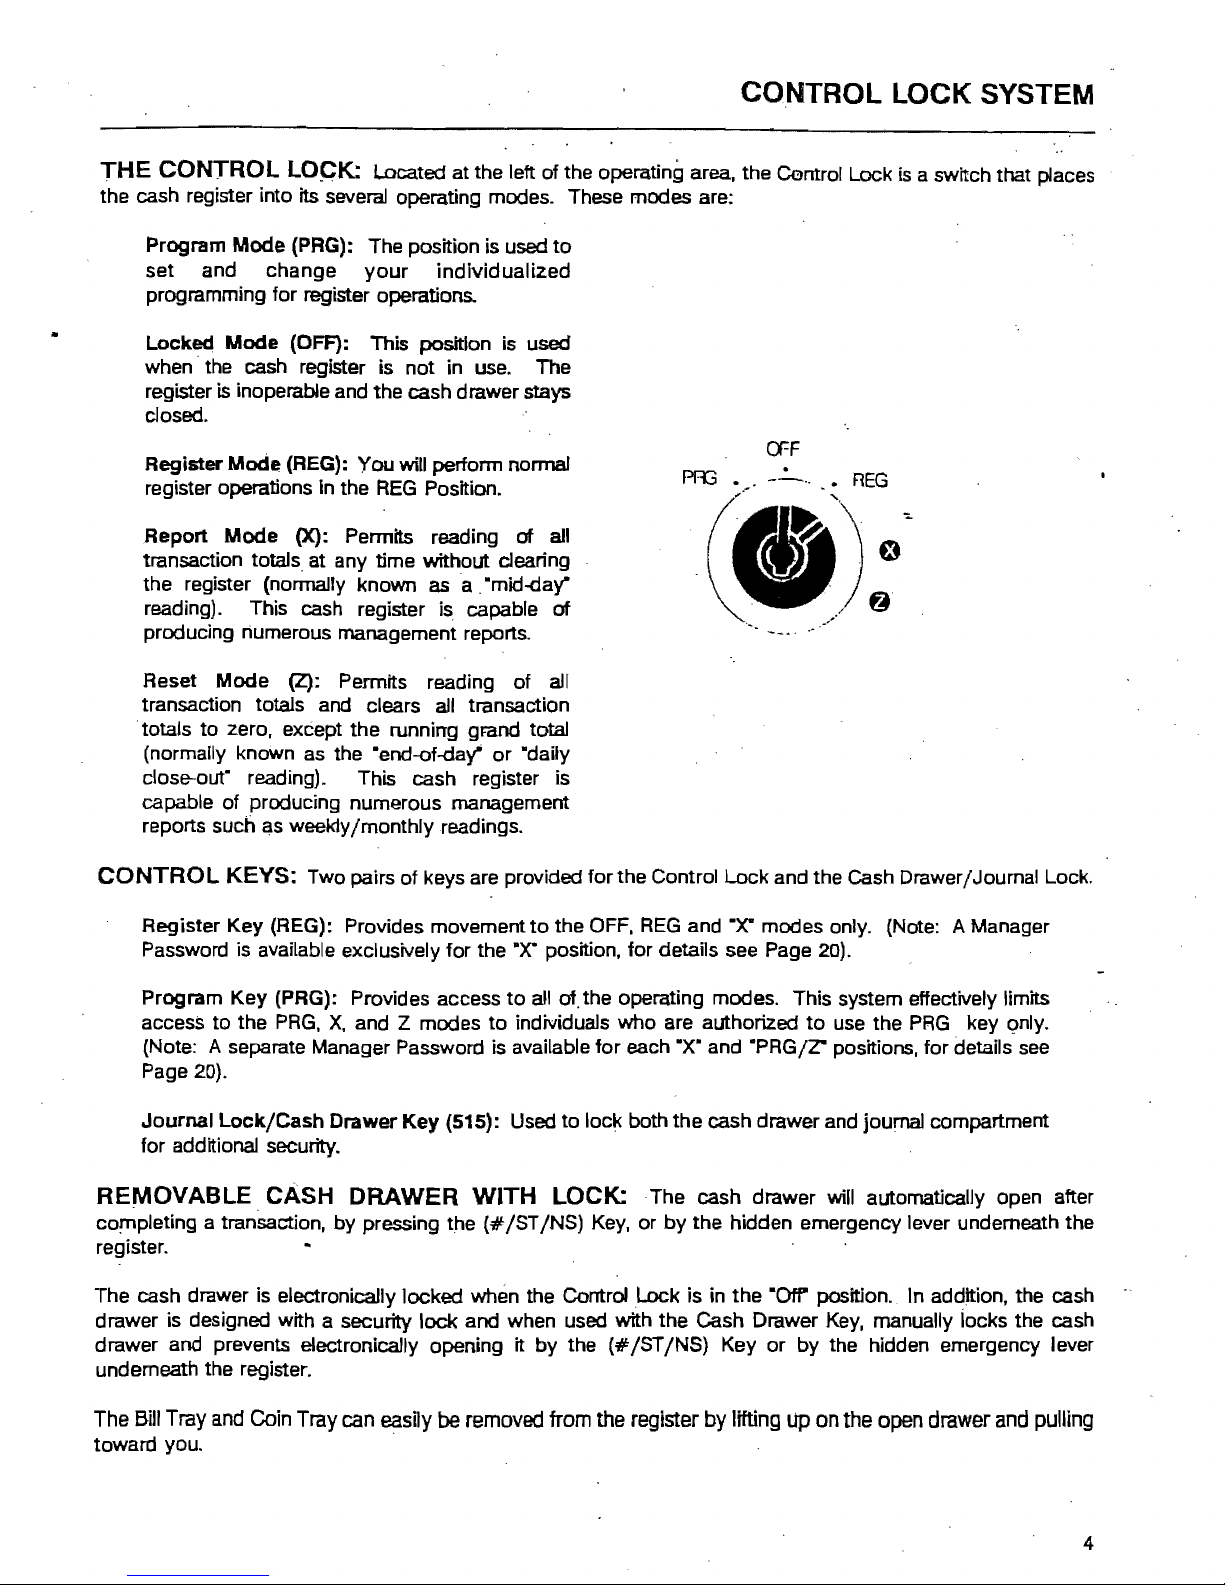
CONTROL LOCK SYSTEM
THE
CONTROL
lOCK:
Located at the left of the operating area. the Control Lock is a switch that places
the cash register into
its
several operating modes. These modes are:
Program
Mode
(PRG): The position is used
to
set
and
change
your
individualized
programming for register operations.
Locked
Mode
(OFF): This position is used
when· the cash register is not in use. The
register
is inoperable and the cash drawer stays
closed.
Register
Mode
(REG):
You
will perfonn normal
register operations in the
REG
Position.
Report
Mode
(X): Pennits reading
of
all
transaction totals at any time without clearing
the register (nonnaJly known as a
"mid...cJay"
reading). This cash register is capable
of
producing numerous management reports.
a=F
PR3
•.
-~
..•
REG
(I»);'
....
.~~
Reset
Mode
(Z): Permits reading of all
transaction totals and clears all transaction
. totals
to
zero. except the running grand total
(normally known as the "end-of-day"
or
"daily
close-out" reading). This cash register is
capable of producing numerous management
reports such as weekly/monthly readings.
CONTROL
KEYS: Two pairs
of
keys are provided for the Control Lock and the Cash Drawer/Journal Lock.
Register Key (REG): Provides movement
to
the OFF.
REG
and .X" modes only. (Note: A Manager
Password is available exclusively for the
"X· position,
for
details see Page 20).
Program
Key
(PRG): Provides access
to
all
of.
the operating modes. This system effectively limits
accesS
to
the
PRG,
X,
and Z modes
to
individuals who are authorized
to
use the
PRG
key
c::mly.
(Note: A separate Manager Password is available
for
each ·X· and "PRG/Z" positiOns. for details see
Page 20).
Journal
LocklCash
Drawer
Key
(515): Used
to
lock both the cash drawer and journal compartment
for additional security.
REMOVABLE. CASH DRAWER WITH lOCK.: The cash drawer
will
automatically open after
completing a transaction,
by
pressing the
(#
1ST INS) Key.
or
by
the hidden emergency lever underneath the
register.
The cash drawer is electronically locked when the Control
Lock
is in the
"Otr
position. In addition, the cash
drawer is designed with a security lock and when used with the Cash Drawer Key. manually locks the cash
drawer and prevents electronically opening
it
by
the
(#
1STINS) Key
or
by
the hidden emergency lever
underneath the register.
The
Bill
Tray
and
Coin
Tray
can
easily
be
removed
from
the
register
by
lifting
Up
on
the
open
drawer
and
pulling
toward you. .
4
Page 8
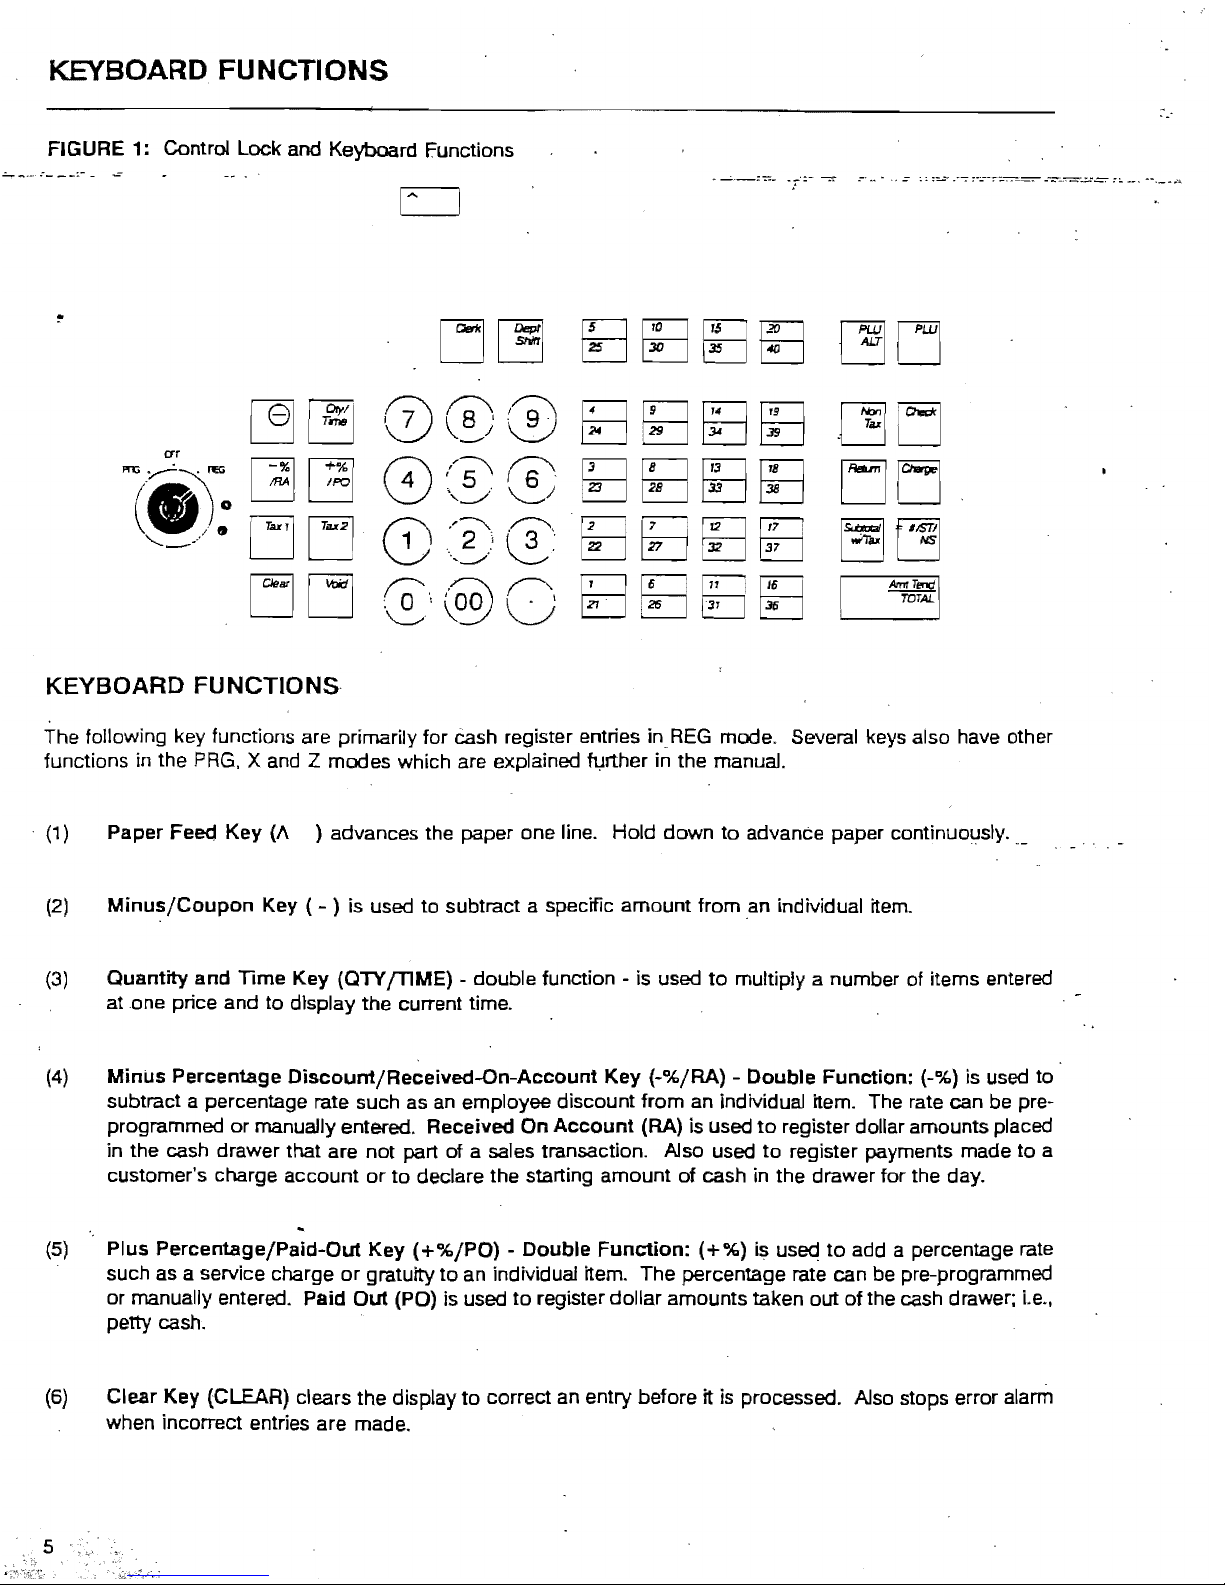
KEYBOARD FUNCTIONS
FIGURE 1: Control Lock and Keyboard Functions
.:....,.
....
--
.~-
--:-
-
..:
crr
~TeNl
TOTAL
KEYBOARD
FUNCTIONS
The following key functions are primarily for
Cash
register entries inREG
mode. Several keys also have other
functions in the
PRG,
X and Z modes which are explained further in the manual .
. (1) Paper Feea Key (/\ ) advances the paper one line. Hold down
to
advanCe paper continuoljsly.
(2)
Minus/Coupon
Key ( - ) is used
to
subtract a specific amount from an individual item.
(3)
Quantity and Time Key (QTY
[TIME)
- double function - is used
to
multiply a number of items entered
atone
price and
to
display the current time.
(4)
Minus
Percentage
Oiscount/Received-On-Account
Key
(-%/RA) - Double Function: (-%) is used
to
subtract a percentage rate such
as
an employee discount from an individual item. The rate can be pre-
programmed
or
manually entered. Received
On
Account
(RA) is used
to
register dollar amounts placed
in the cash drawer that are not part of a sales transaction. Also used
to
register payments made
to
a
customer's charge account
or
to
declare the starting amount of cash in the drawer for the day.
(5)
Plus Percentage/Paid-Out Key
(+%/PO)
- Double
Function:
(+%)
is
used
to
add a percentage rate
such as a service charge or gratuity to an individual item. The percentage rate can
be
pre-programmed
or manually entered. Paid
Out
(PO) is used
to
register dollar amounts taken out
of
the cash drawer;
i.e.,
petty cash.
(6)
Clear Key (CLEAR) clears the display
to
correct
an
entry before it is processed. Also stops error alarm
when incorrect entries are made.
Page 9
KEYBOARD FUNCTIONS
(7)
Void/Error
Correction
Key
(VOID) - double
fun~ion
-yoid)s
u~ed
for
.9gn:~tQ9
~.par:ticula~el)try
after
it is processed
andpiihtedcif'-as
the Error
Q)iTeCt
runctlo-n,-itls-
used
lo;'-deieting the
h:ist
Item entered.
(8)
Clerk
Key
(CLERK) is used
for
entering clerk numbers.
(9)
PLU
/Release
Key
(PW
AL
1)
is used
to
temporarily override a price which was preset
to
a PLU' number. -
(10) PLU
Key
(PLU) allows the numbers from 1
to
430
to
be used as codes
for
pre-programming merchandise
prices,
to
maintain a tally
of
cost and quantity
of
the
merchandise sold.
(11) Tax 1 Key (TAX 1) adds a
tax
amount
to
the sales figure according
to
the tax rate programmed for this
key. -Tax 1 Key is normally used
to
program a single tax rate required
by
a particular area
or
state. It
can also be used
to
override
the
pre-programmed
tax
on
a I;!epartment key.
(12) Tax 2
Key
(TAX 2) adds a
tax
amount
to
the sales figure
according
to
the
tax
rate programmed for this
key. Tax 2 key is normally used
to
program a second tax rate required
by
a particular area
or
state. It
can also be used
to
overripe the pre-programmed
tax
on a department key.
(13)
Numeric
Input
Keys
(0-9/00/.)
are used
to
input dollar amounts
of
merchandise sold,
to
indicate
how
many times a particular item repeats,
to
add and subtract percentages in conjunction with the -% and -+%
keys,
to
input department code numbers,
to
handle figures
that
require a decimal point and
for
other·
numeric value-related entries. Double Zero
(00)
allows for quick entry
of
numbers with
two
or
more zeros.
Decimal Point
(.)
is used
to
enter fractional quantity
of
items being sold.
In
all modes, the Decimal Point
is
not
to
be used when entering a price.
(14)
Department
Keys
(1-20)/{21-40*)
are used
to
specffy which department the transaction is for. Each
department can represent a category of merchandise sold and can be programmed as taxable
or
non-
taxable.
'*
If the qepartment Conversion
Kit
is
used, the department keys are labeled (1-12) (13-24). -
(15)
Department
Shift
Key
(DEPT SHIFl1 is used
to
make entries
for
departments 21-40 (with
Kit,
Departments 13-24). Press Shift before each department entry
for
departments 21-40. The register goes
back
to
the non-shift mode after each department entry.
(16)
Non
Tax
Key
(NON TAX)
is
used when
no
tax is
to
be registered for a department that
is
programmed
for
tax.
(17)
Check
Key (CHECK) is used
to
finalize a transaction paid
by
a check.
(18) Return Key (RETURN) is used
for
issuing refunds
for
retumed merchandise.
(19)
Charge
Key (CHARGE) is used
to
finalize a transaction paid by a credit card
or
can be used
to
denote
an in-house charge.
6
Page 10
KEYBOARD FUNCTIONS
(20) , Subtotal
With Tax Key {SUBTOTALfWfTAX> displays the total sales amount. including sales
tax
It is
not
printed on
the
register
receipt
until the sale is finalized
by
pressing either the (CHECK),
(CHAR.GE)
,
or
(AMT TEND /TOTAL) Key. .
,(21)
Subtotal,
No-Sale
and
Non-Add
Key
(#/ST/NS)
- triple function - As the No-Sale key, it opens
the
drawer without registering any amourd:s; for example,
to
give change. The Non-Add Key function allows
entering, up
to
10
digits. a reference number which prints on sales receipts. As the Subtotal Key, It .
displays and prints the subtotal
of
a sale without sales tax.
(22)
Amount
Tender
Total
Key
(AMT
TENDfTOTAL)
is used
to
finalize a transaction paid
by
cash and
calculates the amount
of
change required from the cash received.
Time
Display: Press the (QTY
/TIME)
Key
in
the register mode
to
show the time. The1ime display does
not need
to
be canceled because It is automatically replaced by a figure when the next transaction
is
performed. The (QTY /TIME) Key
is
a double function key where, during a transaction, it is used
to
perform multiplication where an Item is repeated.
LEAVING THE REGISTER PLUGGED IN: Keep the register plugged in and at the
·OFP'{Locked)
piosition when not in use. The keyboard is then inoperable and the cash drawer
is
electronically locked,
but a minimum amount of power maintains the programs and transaction data totals.
7
Page 11
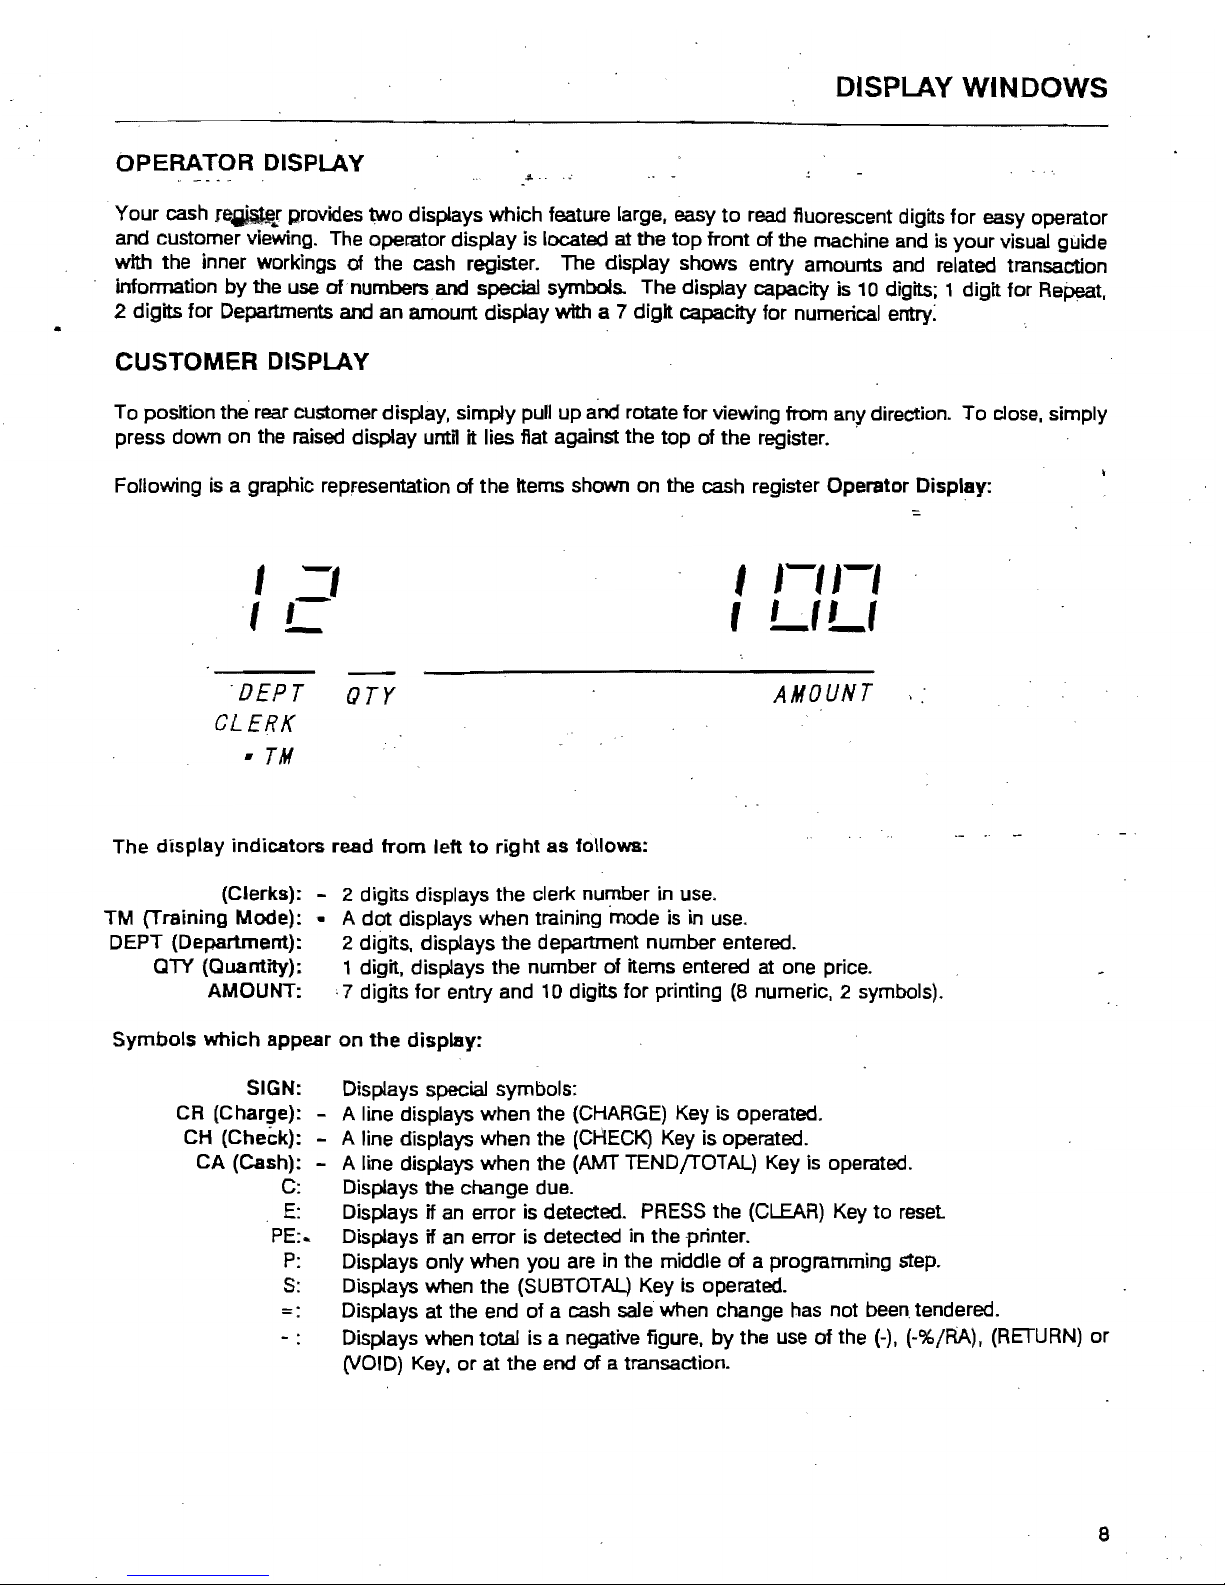
DISPlAY
WINDOWS
OPERATOR DISPLAY
.....
Your cash
r~..r
provides
two
displays which feature large. easy
to
read
fluorescent digits for easy operator
and customer viewing. The operator display is located
at the
top
front
of
the machine and
is
your visual guide
with the inner workings
of
the cash register. The display shows entry amounts and related transaction
infonnation
by
the use of numbers and special symbols. The display capacity is
10
digits; 1 digit for Repeat,
2 digits for Departments
and an amount display with a 7 digit capacity for numerical entry:
CUSTOMER
DISPLAY
To position
the'
rear customer display, simply pull up and rotate for viewing from any direction. To dose, simply
press down on the raised display
untH
it lies flat against the
top
of
the register. '
Following
is
a graphic repfesentation
of
the Items shown on the cash register Operator Display:
,
-,
I
1-'1-'
:::.
Ie
,
LILt
'DEPT
orr
AMOUNT
CLERK
•
TM
The display indicators read
from
left
to
right
as follows:
(Clerks): - 2 digits displays the clerk number in use.
TM (Training Mode): .. A
dot
displays when training mode is in use.
DEPT (Department): 2 digits, displays the department number entered.
QTY (Quantity): 1 digit. displays the number of items entered at one price.
AMOUNT:
,7
digits
for
entry and 10 digits for printing
(8
numeric, 2 symbols).
Symbols
which
appear on
the
display:
SIGN: Displays special symbols:
CR (Charge): - A line displays when the
(CHARGE)
Key is operated.
CH
(Check): - A line displays when the
(CHECK)
Key is operated.
CA (Cash): - A line displays when the
(AMT
TEND{rOTAL) Key is operated.
C:
Displays the change due.
E:
Displays if an error is detected.
PRESS
the (CLEAR) Key to reset
PE:..
Displays if an error is detected in the printer.
P:
Displays onty when you are in the middle of a programming step.
S:
Displays when the (SUBTOTAL) Key
is
operated.
-.
Displays at the end
of
a cash sale when change has not
been.
tendered.
Displays when total is a negative figure.
by
the use
of
the
(-).
(-%/RA),
(RETURN)
or
(VOID)
Key,
or
at
the end of a transaction.
8
Page 12
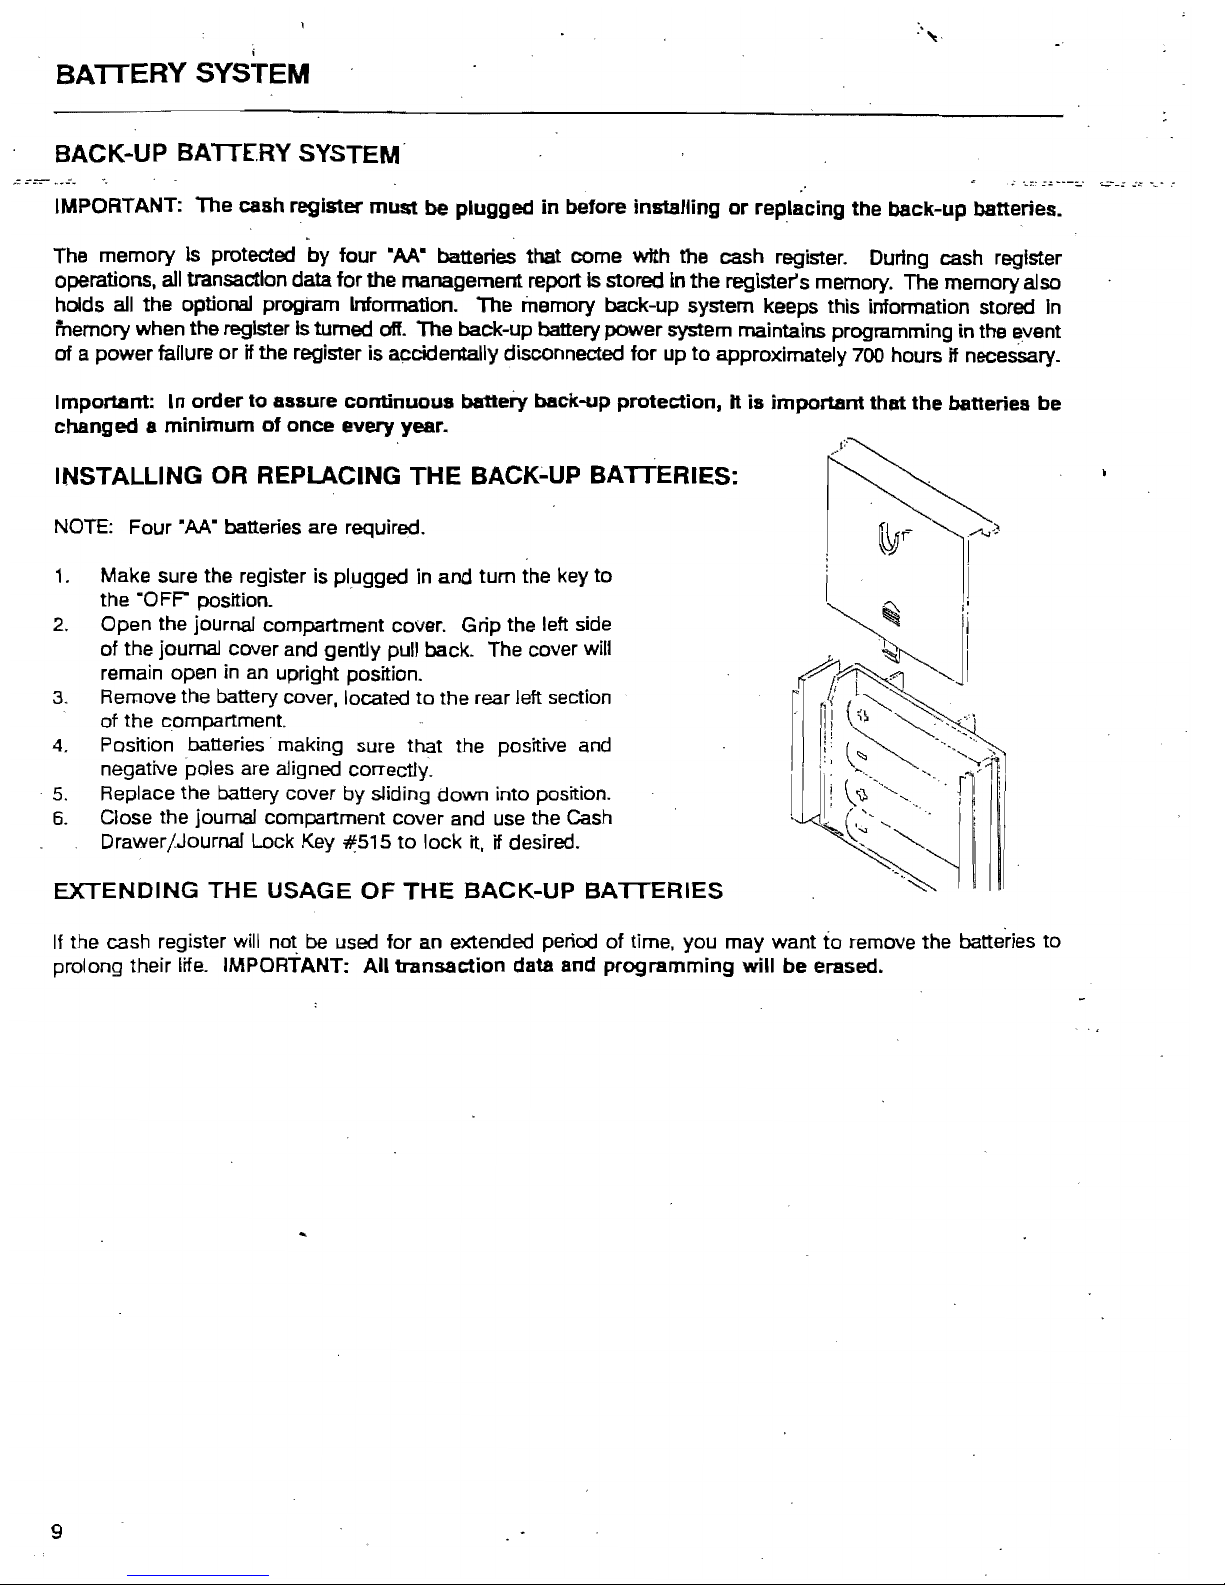
BATTERY SYSTEM
BACK-UP BATTERY SYSTEM"
IMPORTANT:
The
cash
register
must
be
plugged
in
before
installing
or
replacing
the
back-up
batteries •
.
The
memory
Is
protected
by
four
"M." batteries that come
With
the cash register. During cash register
operations. all transaction data
for
the management report
Is
stored in
the
register's memory. The memory also
holds all
the
optional program Information. The memory back-up system keeps this information stored In
memory when the register
Is
turned off.
The
back-up battery
power
system maintains programming in the event
of
a power failure
or
if the register is accidentally disconnected
for
up
to
approximately
700
hours if necesSary.
Important:
In
order
to
aasure
continuous
battery
back-up
protection, H is
important
that
the
batteries
be
changed 8 minimum
of
once
every year.
INSTALLING OR REPLACING
THE
BACK;'UP BATTERIES:
NOTE: Four
OM"
batteries are required.
1.
Make sure the register is plugged in and
tum
the key
to
the ·OFF" position.
2.
Open the journal compartment cover. Grip the left side
of
the journal cover and gently pull back. The cover will
remain open in an upright position.
3.
Remove the battery cover, located
to
the rear left section
of
the compartment.
4.
Position batteries" making sure that the positive and
negative poles are aligned correctly.
"
5.
Replace the battery cover
by
sliding
down
into position.
6.
Close the journal compartment cover and use the Cash
Drawer/Journal Lock Key
~515
to
lock
it, if desired.
EXTENDING
THE
USAGE
OF
THE
BACK-UP
BATTERIES
If the cash register will not be used
for
an
extended period
of
time, you may want to remove the batteries to
prolong their life. IMPORTANT:
All
transaction
data and
programming
will
be
erased..
9
Page 13

DISPLAY WINDOWS
OPERATOR DISPLAY
-S.
..
. Your cash
r~!
provides
two
displays which feature large. easy
to
read fluorescent digits for easy operator
and customer viewing. The operalor display is located at the
top
front of the machine
and
is your visual guide
with the inner workings of the cash register. The display shows entry amounts
and
related transaction
infonnation
by
the use of numbers and special symbols. The display capacity
is
10
digits; 1 digit for
Re~t.
2 digits for Departments and an amount display with a 7 digit capacity for numerical entry:
CUSTOMER DISPLAY
To position the rear customer display, simply pull up and rotate for viewIng from any direction. To close, simply
press down on the raised display until It lies flat against the
top
of
the register. "
Following
is
a graphic representation
of
the Items shown on the cash register Operator Display:
I
-,
I
1-'1-'
Ie
,
LtLt
"DEPT
OTr
AMOUNT
CLERK
•
TM
The display indicators read
from
left
to
right
as follows:
(Clerks): - 2 digits displays the
derk
number in
use.
TM
(Training
Mode):-
A
dot
displays when training mode
is
in
use.
DEPT (Department): 2 digits, displays the department number entered.
CTY (Quantity): 1 digit. displays the number of items entered at one price.
AMOUNT: ' 7 digits for entry and
10
digits for printing
(8
numeric. 2 symbols).
Symbols
which
appear
on
the display:
SIGN: Displays special symbols:
CR
(Charge): - A line displays when the
(CHARGE)
Key is operated.
CH
(Check): - A line displays when the
(CHECK)
Key is operated.
CA (Cash): - A line displays when the
(AMT
TENDfTOTAl) Key is operated.
C:
Displays the change due.
E:
Displays if an error is detected.
PRESS
the
(CLEAR)
Key to reset
PE:..
Displays if
an
error is detected in the -printer.
P:
Displays only when you are in the middle of a programming step.
S:
Displays when the
(SUBTOTAL)
Key is operated.
=: Displays at the end of a cash
sale
when change has not
been
tendered.
Displays when total
is
a negative figure,
by
the use of the
(-).
(-%/RA).
(RETURN)
or
(VOID)
Key.
or
at the end
of
a transaction.
8
Page 14
---
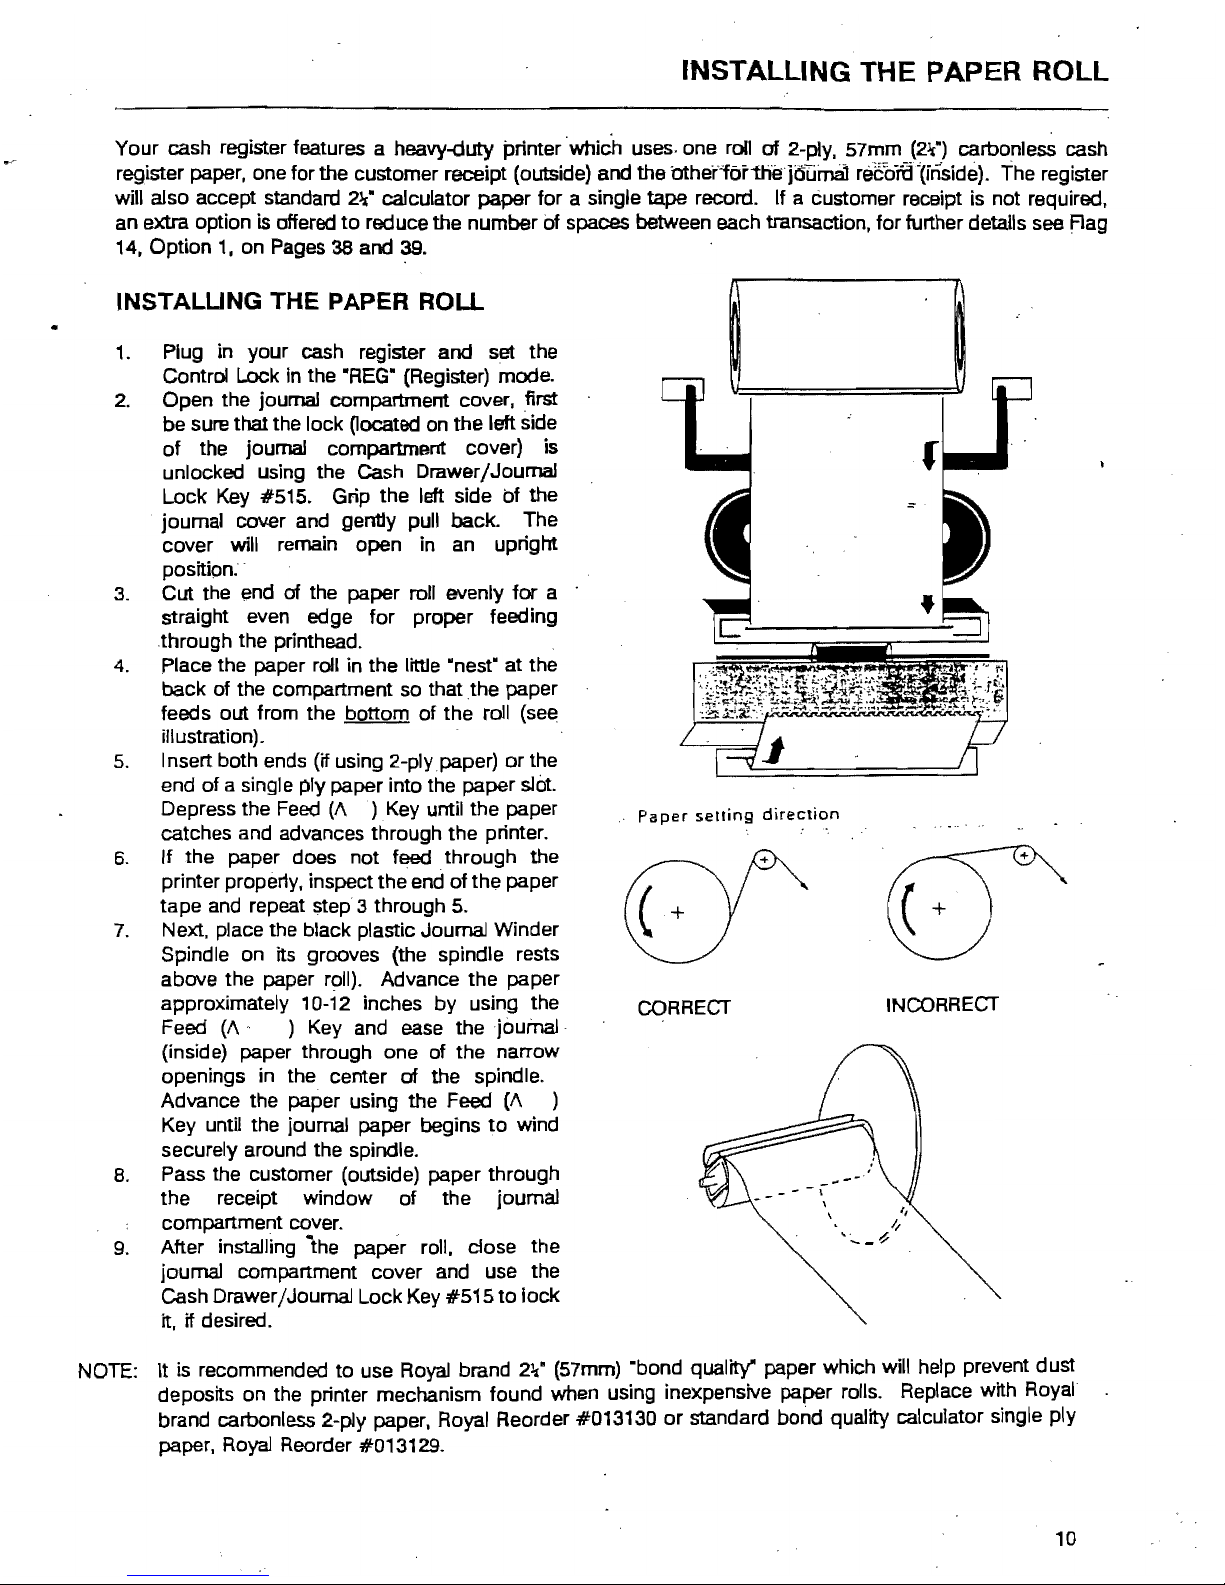
INSTALLING THE PAPER ROLL
Your cash register features a heavy-duty printer "which uses· one roll
of
2-ply, 57mm (2lt) carbonless cash
register paper, one for the customer receipt (outside) and the OthsriorthE!jdTIin8! reeorti'(inside). The register
will also accept standard
2%"
calculator paper for a single tape record. If a customer receipt is not required,
an extra option
is
offered
to
reduce the number of spaces between each transaction, for further details see Rag
14,
Option
1,
on
Pages
38
and
39.
INSTALUNG THE PAPER ROLL
•
1.
Plug in your cash register and set the
Control Lock
In
the
"REG"
(Register) mode.
2.
Open the journal compartment cover, first
be sure that the lock
Oocated
on the left side
of the journal compartment cover) is
unlocked using the Cash Drawer/Journal
Lock
Key
#515. Grip the left side of the
joumal cover and gently pull back. The
cover
will remain open in an upright
position.
3. Cut the end
of
the paper roll evenly for a
straight even edge for proper feeding
through the printhead.
4. Place the paper roll in the little "nest" at the
back of the compartment so that
the
paper
feeds out from the bottom of the roll (see
illustration).
5. Insert both ends (if using 2-plypaper)
or
the
end of a single ply paper into the paper
slot.
Depress the
Feed
(A ) Key
until the paper
catches and advances through the printer.
6.
If the paper does not feed through the
printer propeny, inspect the end of the paper
tape
and
repeat step 3 through
5.
7.
Next. place the black plastic Journal Winder
Spindle on its grooves (the spindle rests
above the paper
r~II).
Advance the paper
approximately 10-12 inches by using the
Feed
(A'
)
Key
and ease thejoufna.l"
(inside) paper through one of the narrow
openings in the center
of
the spindle.
Advance the paper using the Feed
(A
)
Key until the journal paper begins
to
wind
securely around the spindle.
8. Pass the customer (outside) paper through
the receipt window of the journal
compartment cover.
9. After installing
the
paper roll, close the
journal compartment cover and use the
Cash Drawer jJournal Lock Key #515
to
lock
it, if desired.
NOTE:
It
is
recommended to use Royal brand
2~·
(57mm) "bond quality" paper which will help prevent dust
deposits on the printer mechanism found when using inexpensive paper rolls. Replace with
Royal
brand carbonless
2-p1y
paper. Royal Reorder #013130
or
standard bond quality calculator single ply
paper.
Royal
Reorder #013129.
Paper
setting
direction
INCORRECT
CORRECT
- \
\
10
Page 15
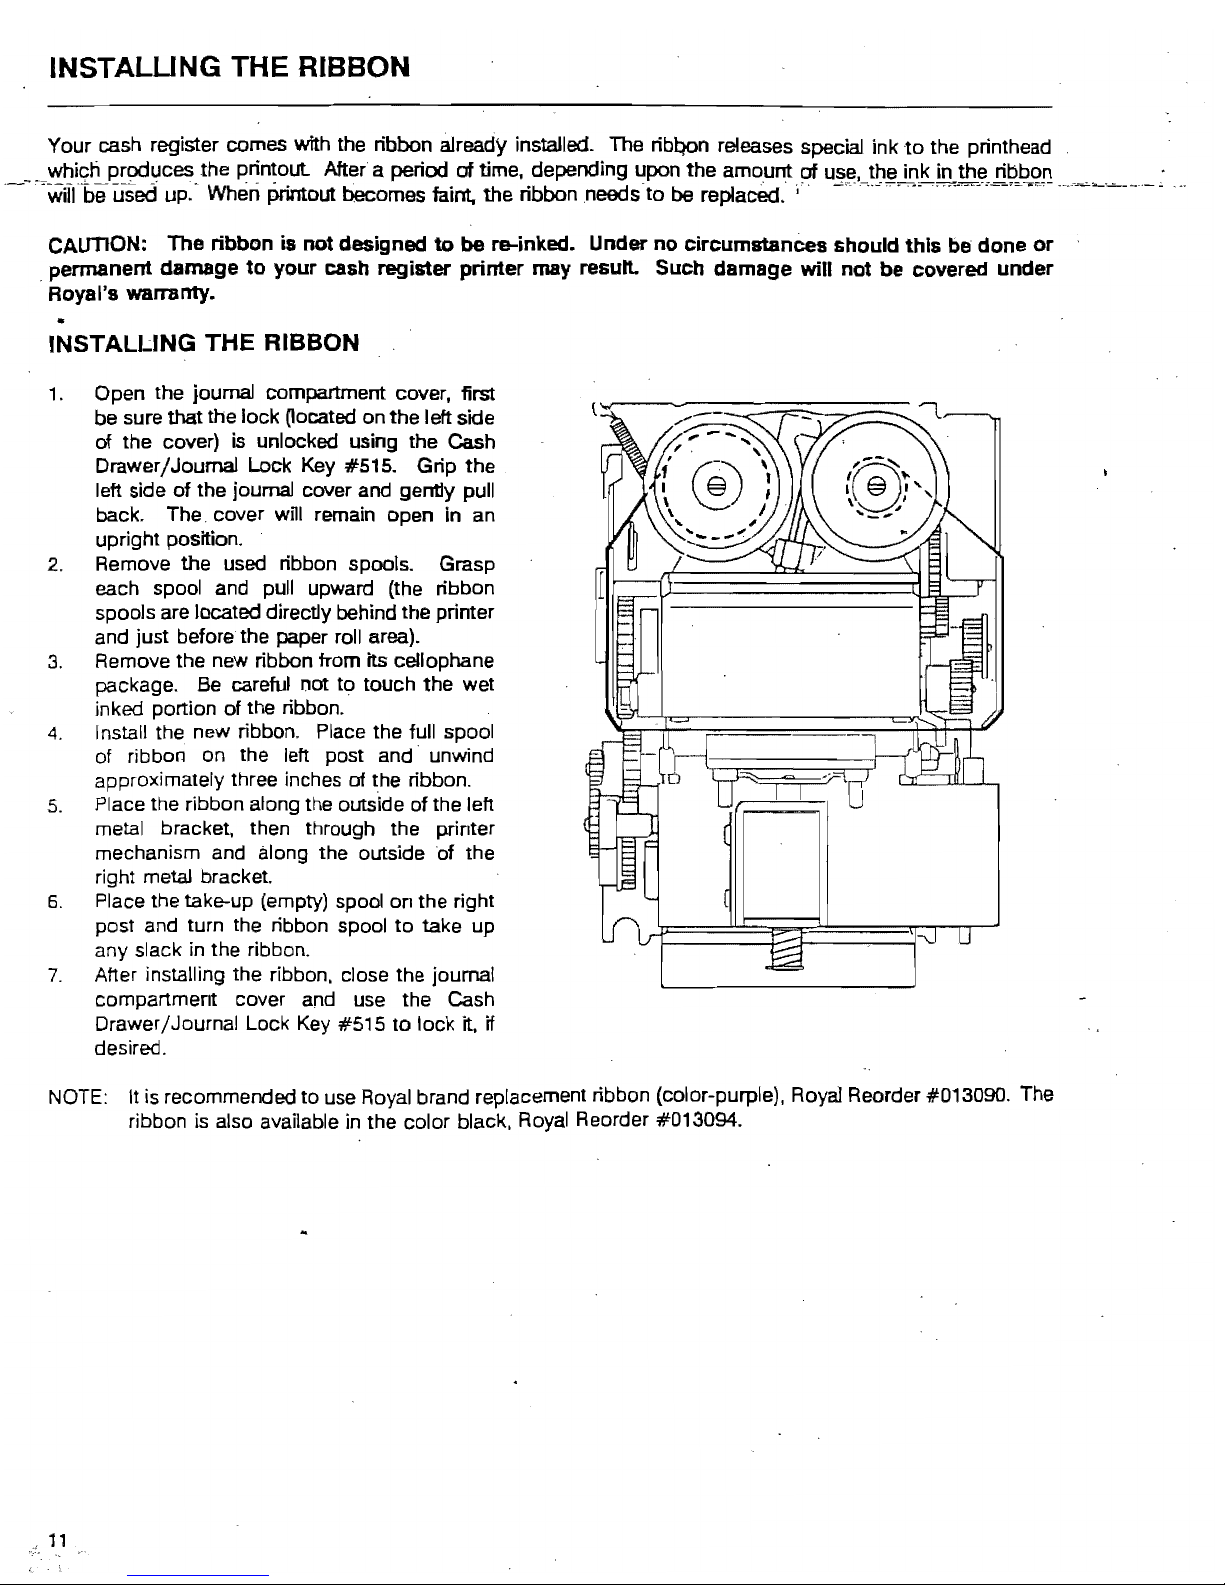
INSTALUNG
THE RIBBON
Your cash register comes with the ribbon already installed. The ribQon releases special ink
to
the printhead
__
which produces the printout After a period of time, depending upon the amount of use, the ink in the ribbon .
.
--.
'will'beuied
up:- When Printout becomes faint, the ribbon needs-to be replaced. i'
'-';-.-.-'.-''-'-~~~~=-:~'=C'T''''-
---~='-'"-.~
••• --.-
CAUTION: The
ribbon
is
not designed
to
be
re-inked. Under no
circumstances
should
this
be
done
or
. permanent
damage
to
your
cash register
printer
may resutt. Such
damage
will
not
be covered
under
Royal's warranty.
INSTALLING
THE
RIBBON
1.
Open the journal compartment cover, first
be sure
that
the lock
Oocated
on the left side
of the cover) is unlocked using the Cash
Drawer /Journal Lock Key #515. Grip
the
left side
of
the journal cover and gently pull
back. The. cover will remain open in an
upright position.
2.
Remove
the
used ribbon spools. Grasp
each spool and pull upward (the ribbon
spools are located directly behind the printer
and just before the paper roll area).
3.
Remove the new ribbon from its cellophane
package. Be careful not
to
touch the wet
inked portion of the ribbon.
4.
Install
the.
new ribbon. Place the full spool
of ribbon on the left post and unwind
approximately three inches
of
the ribbon.
5.
Place the ribbon along the outside of the left
metal bracket, then through the printer
mechanism and along the outside of the
right metal bracket.
6.
Place the take-up (empty) spool
on
the right
post and turn the ribbon spool
to
take up
any slack
in
the ribbon.
7.
After installing the ribbon, close the journal
compartment cover and use the Cash
Drawer/Journal Lock
Key
#515
to
lock it, if
desired.
NOTE:
It
is
recommended
to
use Royal brand replacement ribbon (color-purple), Royal Reorder #013090. The
ribbon
is
also available in the color black, Royal Reorder #013094.
11
Page 16
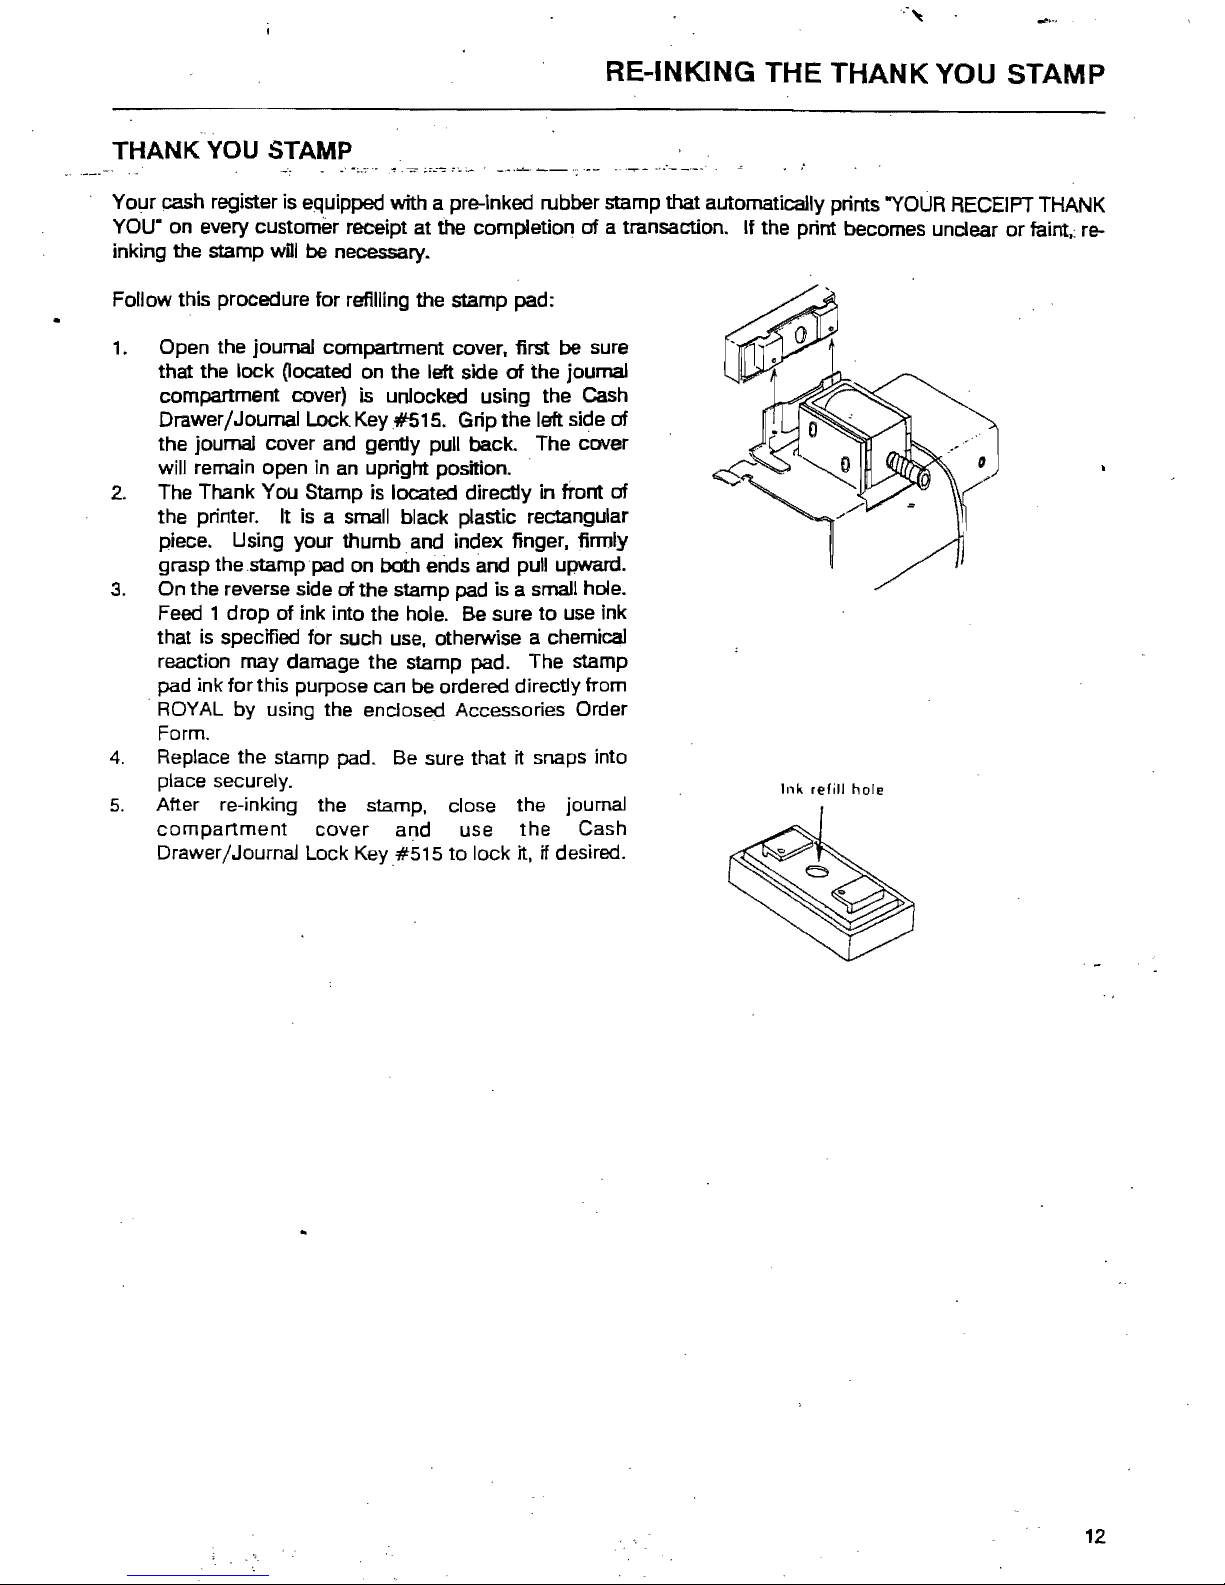
RE-INKING THE THANK YOU STAMP
THANK YOU STAMP
Your cash register is equipped with a pre-Inked rubber stamp that automatically prints
"YOUR
RECEIPT THANK
YOU· on every customer receipt at
the completion
of
a transaction. If the print becomes unclear or
faint.:
re-
inking the stamp
wDl
be necessary.
Follow this procedure for refilling the stamp pad:
1.
Open the journal compartment cover, first be sure
that the lock
~ocated
on the left side
of
the journal
compartment cover) is unlocked using the Cash
Drawer/Journal
Lock Key #515. Grip the left side
of
the journal cover and gently pull back. The cover
will remain open in
an
upright position. .
2.
The Thank You Stamp is located directly
in
tront
of
the printer. It is a small black plastic rectangular
piece. Using your thumb and index finger, finnly
grasp the .stamppad on both ends
and
pull upward.
3.
On the reverse side of the stamp
pad
is a small hole.
Feed 1 drop
of
ink into the hole.
Be
sure
to
use
ink
that
is
specified for such
use.
otherwise a chemical
reaction may damage the stamp pad. The stamp
pad ink for this purpose can be ordered directly from
ROYAL by using the enclosed Accessories Order
Form.
4.
Replace the stamp pad. Be sure that it snaps into
place securely.
Ink
refill
hole
5.
After re-inking the stamp, close the journal
compartment
cover
and use
the
Cash
Drawer/Journal Lock Key#S1S to lock it.
if desired.
12
Page 17
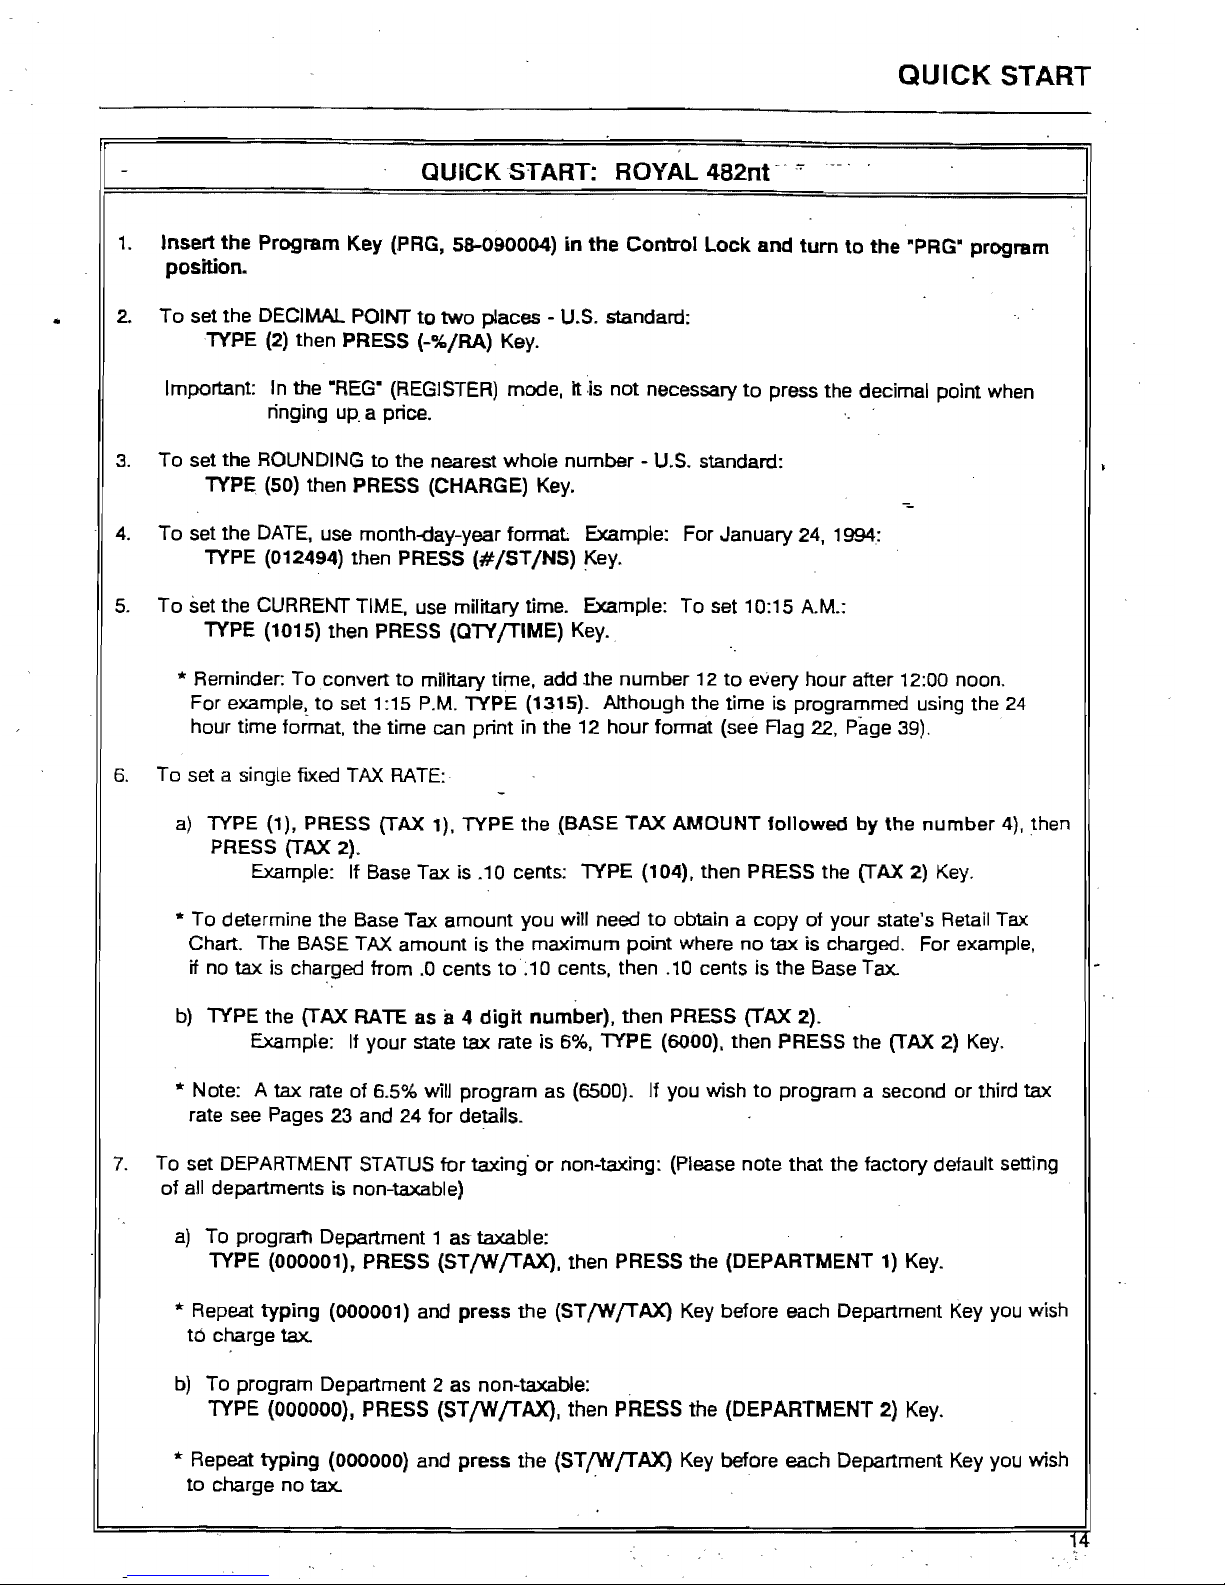
QUICK
START
The Quick Start program is designed
to
help you quickly
·get
started" with the basics you need
to
run your cash
register
..
It covers progr;amming.the Qecimal Point, Rounding, Date, Time, Tax Rate
anc;!
Department Status fpr
taxing
or
non-taxing. The "Thank You· stamp is a feature accompanying your cash register which will
automatically print
on
all
sales
receipts. Follow the Quick Start straight through. however. skip any steps which
are not required
by
your business needs. Quick Start is done in a non-print mode and will not print any step
. performed during programming. Once the Quick Start is completed. a program confirmation report can be taken
to
review your results.
As
you go through the Quick Start. if an error tone sounds, PRESS the (CLEAR) Key
af'ld
continue
by
repeating the step you are attempting
to
program.
NOTE:
It
is
not
necessary
to
repeat the entire
Quick
Start program
if
you
wish
to
update
or
change a step
at any time. Therefore, maintain your
owner's
manual
in
a safe place
for
all future programming.
The word --rYPE- refers
to
the numeric keypad (the numbers 0 through
9)
The word ·PRESS· refers
to
the operational keys on the machine.
IMPORTANT: Read Unpacking Your Cash Register and Set Up (Page 1). Getting
To
Know Your Cash Register
(Page 2), Control Lock System (Page 4). Keyboard Functions (Pages 5-7), Display Windows (Page 8), Installing
the Battery System (Page
9)
and Paper Roll (Page 10).
FOLLOW THE QUICK
START
ON THE NEXT
PAGE.
13
Page 18
QUICK
START
QUICK
START: ROYAL
482nt--·
..
1.
Insert
the
Program Key (PRG, 58-090004)
in
the
Control
Lock
and
tum
to
the
·PRG" program
position.
2.
To
set the DECIMAL POINT
to
two
places - U.S. standard:
TYPE (2) then PRESS (-%/RA) Key.
Important: In the
"REG"
(REGISTER) mode, It
·is
not
necessary
to
press the decimal point when
ringing
up_
a price. .
3.
To set the ROUNDING
to
the nearest whole number - U.s. standard:
TYPE,
(50) then PRESS (CHARGE)
Key.
4.
To set the
DATE,
use month-<tay-year
format
Example: For January 24, 1994:
TYPE (012494) then PRESS
(#/ST/NS)
Key.
5.
To
set the CURRENT TIME, use military time. Example:
To
set 10:15 A.M.:
TYPE (1015) then PRESS (QTYJTIME) Key.
* Reminder:
To
convert
to
military time, add .the number 12
to
every
hour
after 12:00 noon.
For example,
to
set 1 :15
P.M.
TYPE (1315). Although the time is programmed using the
24
hour time format, the time can print in the 12
hour
format (see
Rag
22,
Page 39).
6.
To set a single
fIXed
TAX
RATE:
a)
TYPE (1), PRESS (TAX 1), TYPE the (BASE
TAX
AMOUNT follOWed
by
the
number
4), then
PRESS (TAX
2).
Example: If Base Tax is .10 cents: TYPE (104), then PRESS the (TAX 2)
Key.
* To determine the Base Tax amount you will need
to
obtain a
copy
of
your
state's Retail Tax
Chart. The BASE TAX amount is the maximum point where no
tax
is charged. For example,
if no
tax
is charged from
.0
cents
to ~ 10
cents. then .10 cents is
the
Base Tax.
b) TYPE the (TAX RATE as
a 4
digit
number). then PRESS (TAX 2).
Example: If your state
tax
rate is
6%,
TYPE (6000), then PRESS the (TAX 2)
Key.
* Note: A
tax
rate of 6.5% will program as (6500). If you wish
to
program a second
or
third
tax
rate
see
Pages 23 and 24
for
details.
7.
To set DEPARTMENT STATUS
for
taxing'
or
non-taxing: (Please note that the factory default setting
of all departments is non-taxable)
a)
To progrartl Department 1 as taxable:
TYPE (000001), PRESS (STfWJTAX). then PRESS the (DEPARTMENT
1)
Key.
* Repeat
typing
(000001) and
press
the (STfWJTAX) Key before each Department Key you wish
to
charge tax.
b)
To program Department 2 as non-taxable:
TYPE
(OOOOOO),
PRESS (STfWfTAX.). then PRESS the (DEPARTMENT 2)
Key.
* Repeat
typing
(OOOOOO)
and
press
the
(STfWfTAX)
Key before each Department Key you wish
to
charge no tax. .
l~
Page 19
AFTER
QUICK
START
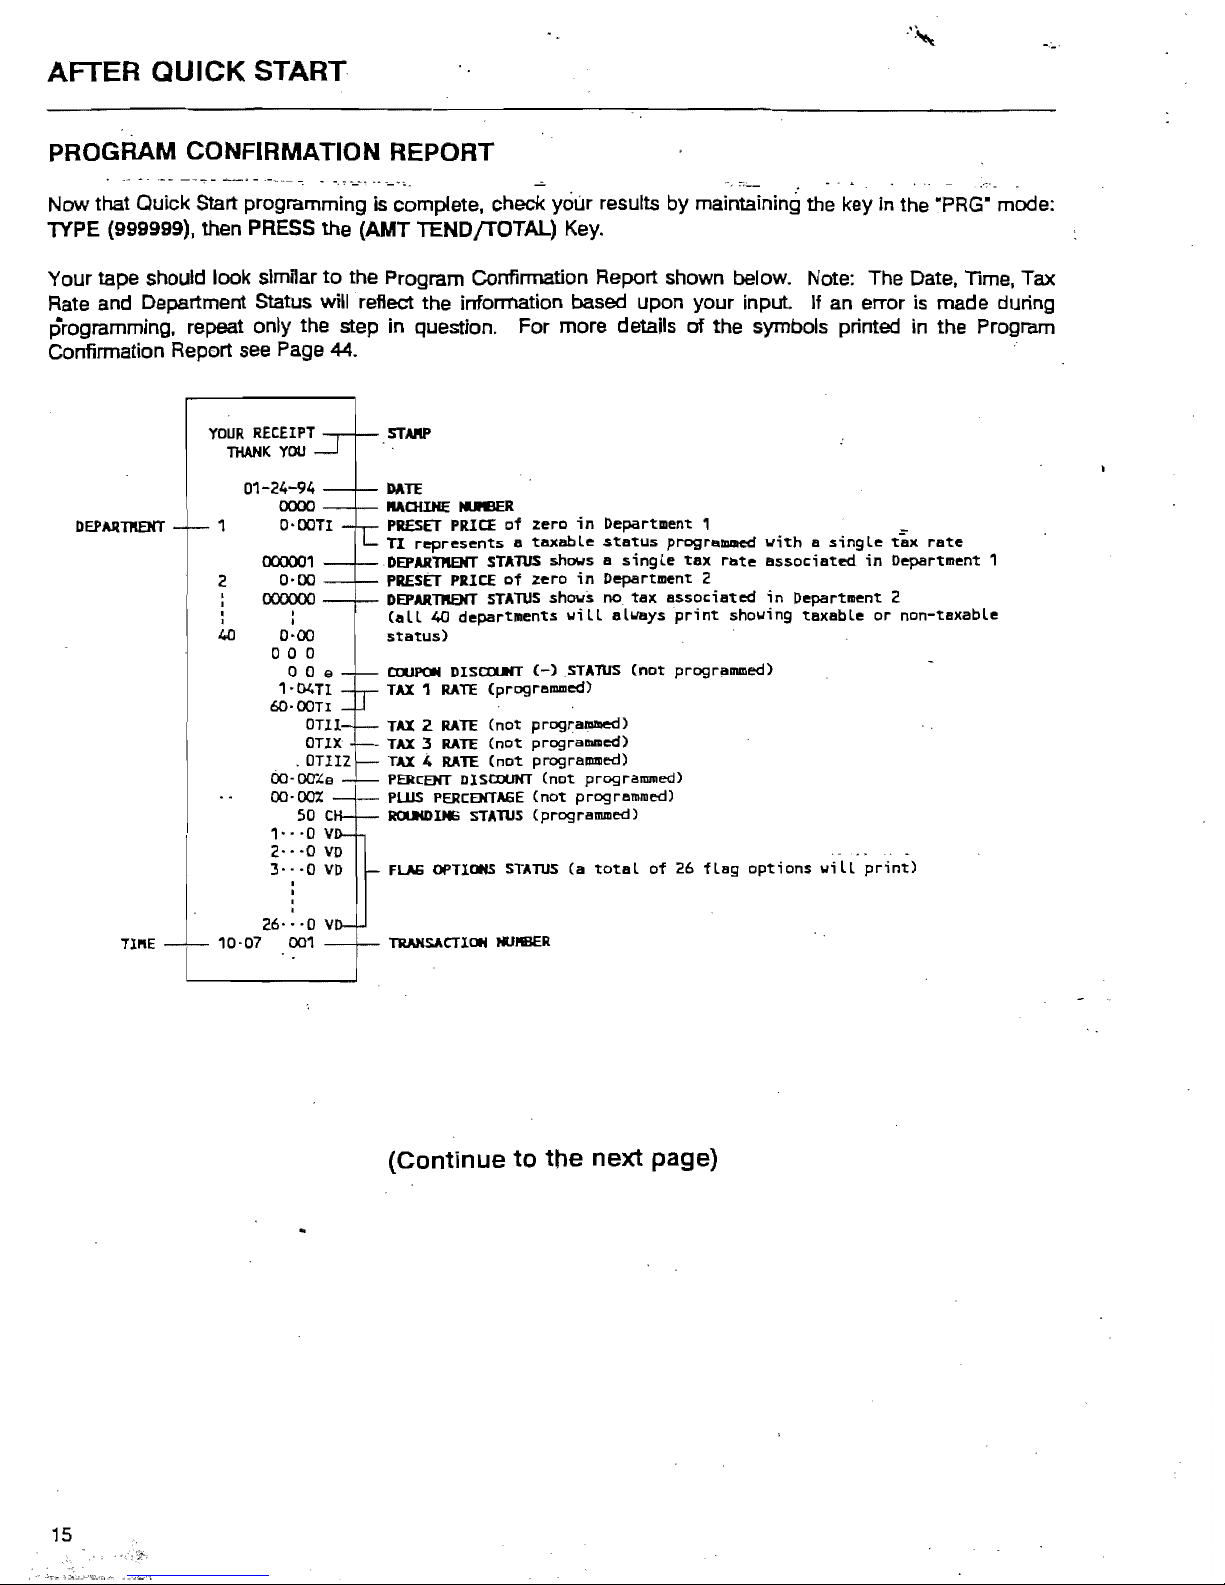
PROGRAM CONFIRMATION REPORT
Now that Quick Start programming is complete, check your results by maintaining the key in the ·PRG" mode:
1YPE (999999), then
PRESS
the (AMT TENDfTOTAL)
Key_
Your tape should look similar
to
the Program Confirmation Report shown below. Note: The Date, Time, Tax
Rate
and Department Status will reflect the information based upon your
input
If
an
error
is
made during
programming, repeat only the step
in
question. For more details
of
the symbols printed
in
the Program
Confirmation Report
see
Page
44.
YOUR
RECEIPT
THANK
YOU
STARP
DATE
MOUHE
!DEER
PRESET
PRICE
of
zero
in
Department
1 _
TI
represents a taxable
status
programmed
with a single
tax
rate
DEPARntarr STAlUS shows a
single
tax
rate
associated
in
Department
1
PRESET
PRICE
of
zero
in
Department
2
DEPARTPIENT
STAlUS
shows
no
tax
associated
in
Department
2
(all
40
departments
will
always
print
showing
taxable
or
non-taxable
status)
c.rtJPON
DISaufT
(-)STAlUS
(not
programmed)
TAX
1
RATE
(prograllUlled)
TAX
2
RATE
(not
programmed)
TAX
3
RATE
(not
progralllllled)
TAX
.4
RATE
(not
progrslllllled)
PERCEHT
DISCOUNT
(not
programmed)
PlUS
PERCEHTAGE
(not
programmed)
ROUKDlH6
STATUS
(programmed)
. .
FLAG
OPTIONS
STATUS
(a
total
of
26
flag
options
will
print)
TlUlHSACTIOH
HUflBER
(Continue
to
the
next
page)
1
2
DEPARntarr
,
I
I
I
40
01-24-94
0000
o-oon
000001
0-00
00000o
•
I
0-00
a a 0
a 0 e
'-04Tl
6O-00TI
OUI
OUX
.OUIZ
OO·ocr"e
00-00%
50 C
,-
-·0
v
2·_·0
VD
3·-·0
VD
26·
-
-0
v
10-07
001
TlI'lE
Page 20

BEFORE GOING TO THE REGISTER MODE
Your Royal cash register offers many additional features not covered in the Quick Start programming. Please
note that
all
programming options are"covered
inthe
A-dvanc~'Programming
section of this manual, even those
singled out for use
in
the Quick
Start..
Please review a few
of
the additional programming options available on
this register described below which you may choose
to
add
to
your basic Quick Start set up.
For
quick
reference, the page numbers are noted
by
each feature presented:
DEPARTMENT CONVERSION KIT (Pages 27-28): A kit is included with your register which gives you
the option of using larger size department keys
to
help speed up sales transactions.
TRAINING MODE (Page
38): Designed
to
help you get acquainted with the register mode and allows
a place for practiCing transaction exam pies without affecting machine totals. Since the Training Mode
does not record any transactions performed while in the register mode, it is ideal for beginners. Once
activated, no activity can
be performed in the ·PRG", ·X· or"Z" modes unless you exit the training mode .
. TRANSACTION EXAMPLES (Pages
4EH)2): Simple transaction examples are provided
for
use in the
register mode. This section will cover a cash sale, check sale, charge sale, tendering change. multiple
items,
PLU
sale, split tendering. voiding. as well as other frequently used functions.
Be
sure
to
have the
key
in
the
"REG"
(register) mode
WhEm
following the transaction examples. Suggestion: Practice the.
transaction examples
after
activating
the
Training
Mode
described
above.
CLERK NUMBERS (Page 19): Clerk numbers can be used
to
monitor sales
of
15 individual
employees. ;
MANAGER PASSWORDS (Page 20): A password can be assigned for the
"PRG"
and
"Z"
modes; and
a .different password can be assigned for
the
·X· mode.
FLAG OPTIONS (Pages
42-43):
A total of
26
system programming options are offered on this cash
register. They are preset
by
the factory
to
accommodate many of the most commonly used selections.
These options can
be
changed
to
meet your individual needs.
16
Page 21
ADVANCED PROGRAMMING
The options provided
by
the Advanced Programming are
d~igned
to
let .you customize your
cash.
register
operations,
sales
-entrfprlmours;'anclma-nagemerrr
-repo-itSiO-
meet
your-illdMdual business reqUirements. The
Advanced Programming can
be
used
to
further add options
not
covered
by
the Quick Start Program. Skip any
or
all sections which are not required in setting up
your
cash register. Note: During the programming, if an
error tone sounds, PRESS the (CLEAR) Key then continue
by
repeating the step you are attempting
to
program.
Note: It is not necessary to reprogram all options when you wish
to
update
or
change a step at any time.
Therefore, maintain your owner's manual in a safe place
for
all future programming. .
The programming of the cash register consists of
the
following features:
Oerks Numbers
Minus Percentage Discount (-%/RA)
2 Manager Passwords
Plus Percentage
(+%/PO)
Date
Price Look-Up (PLU)
TIme
Oock
Training Mode
Machine Number
Grand Total Preset
Deciffial Point
Transaction Number Preset
Rounding
Z1
and
Z2
Counter Preset
4 Tax Rates
Rag
Options
Department Conversion
Kit
Programming Confirmation Report
Department Status
PLU
Confirmation Report
Coupon Discount
(-)
Management Reports (X/Z)
Note: The letter
.p.
will display during the programming
of
the Clerk Numbers, Manager Passwords,
Department Status, Tax Rates and PLUs to indicate you are in the middle of a programming step.
All
programs are done in a non-print mode and will
not
print any step performed during programming. Once
programming
is
completed, there are
two
Confirmation Reports available
to
check your results. A programming
Confirmation Report lists all options that are programmed and a Program
PLU
Confirmation Report lists all the
PLUs which are programmed.
18
Page 22
CLERK NUMBERS
A total
of
15
Clerk Numbers are available for monitoring sales
of
individual employees. The Clerk Numbers are
designed
to
be used in the ·REG"
(REGISTER)
mode only. To obtain sales totals
of
each clerk. a Clerk Report
is
available
in
both
the
·X· and '7" modes. Note: If Clerk Numbers are not programmed, the cash register will
still print Clerk One's number on
every transaction receipt Extra Security Option:
.If
desired. a procedure is
offered
to
require entry of a Clerk Number before every transaction, for details see Rag
12,
Option
1.
Pages 42-
43.
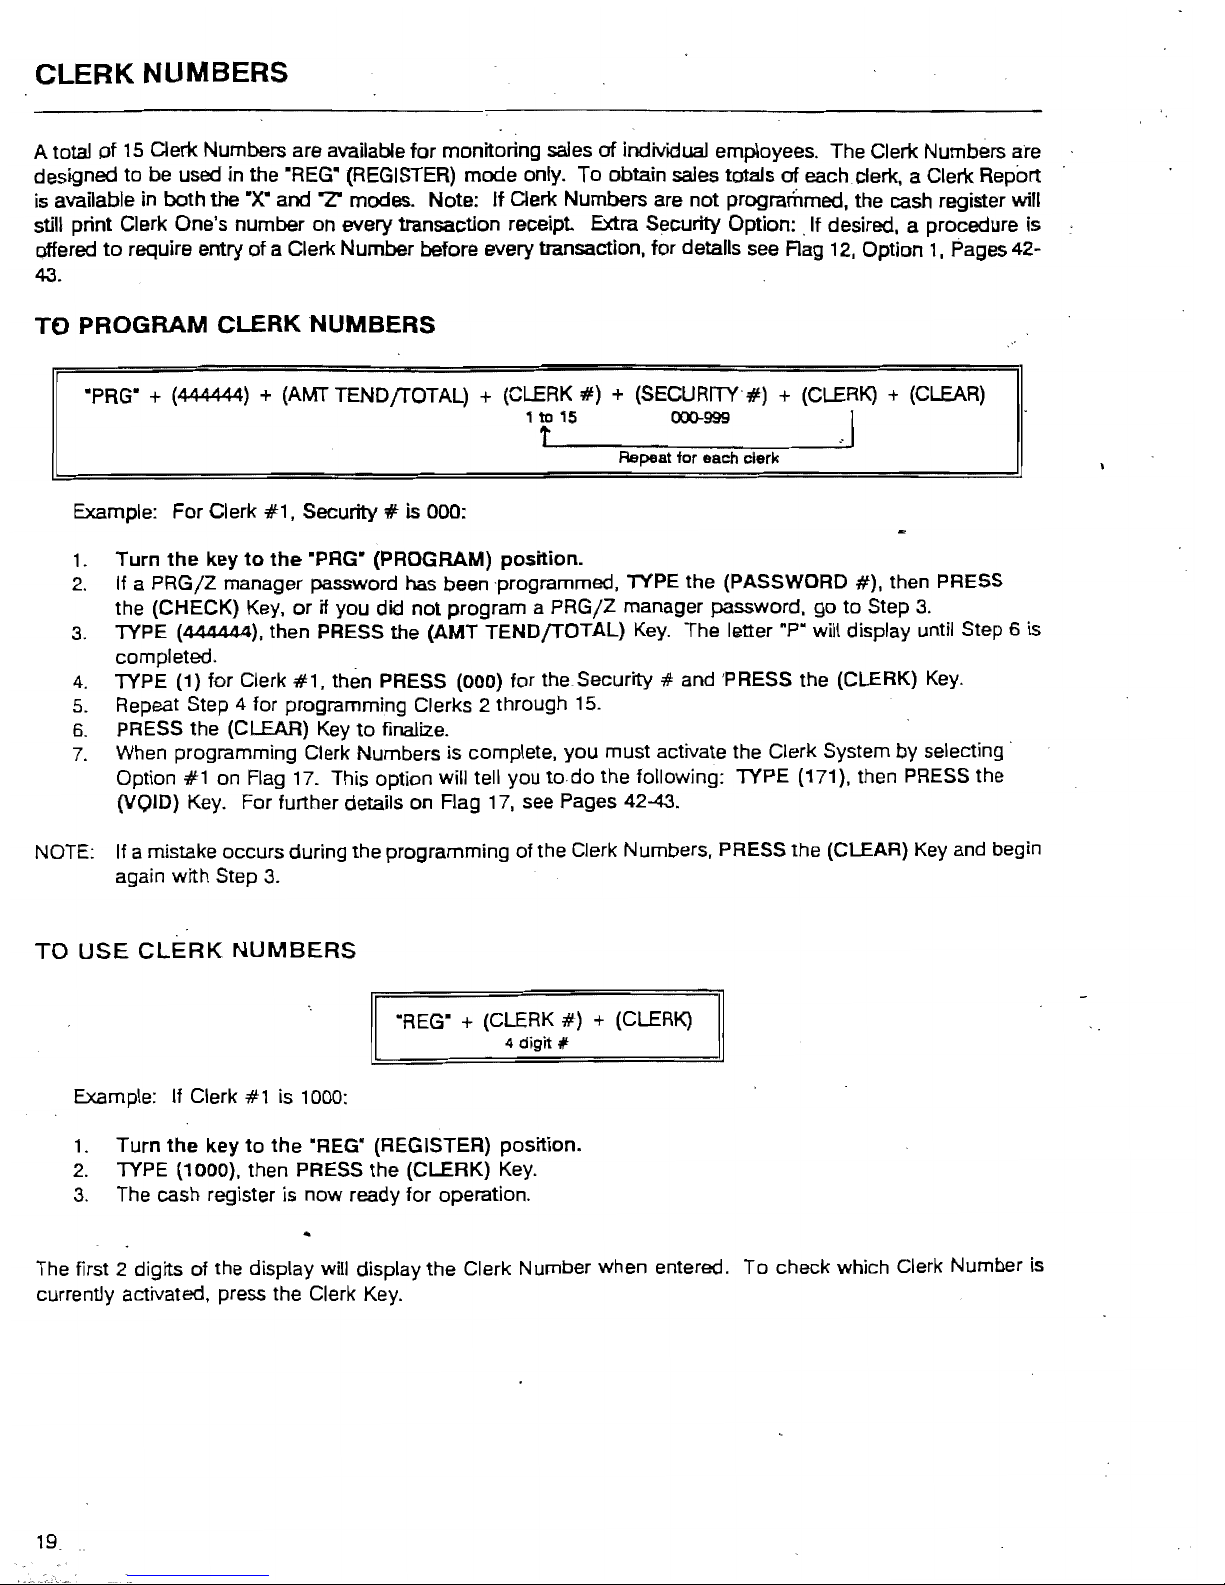
TO PROGRAM CLERK NUMBERS
·PRG" + (444444) +
(AMT
TENDfTOTAL) +
(CLERK
#)
+ (SECURITY#) +
(CLERK) + (CLEAR)
I 1 to
15
Cl(X)-999
t
'.
Repeat for each clerk
Example: For Clerk
#1.
Security # is 000:
1.
Turn
the
key
to
the
"PRG" (PROGRAM) position.
2.
If a PRG/Z manager password has been programmed.
"TYPE
the (PASSWORD
#).
then
PRESS
the (CHECK)
Key.
or
if you did not program a PRG/Z manager password, go to Step
3.
3.
TYPE
(444444),
then PRESS the (AMT TENDjTOTAL)
Key.
The letter ·P" will display until Step 6 is
completed.
4. TYPE (1) for Clerk
#1,
thEm
PRESS (000) for the Security # and 'PRESS the (CLERK)
Key.
5.
Repeat Step 4 for programming Clerks 2 through
15.
6.
PRESS the (CLEAR)
Key
to
finalize.
7.
When programming Clerk Numbers is complete. you must activate the Clerk System by selecting'
Option
#1
on
Flag
17.
This option will tell you
to
do the following: TYPE (171), then PRESS the
(vQID)
Key.
For further details on Flag
17,
see Pages 42-43.
NOTE: If a mistake occurs during the programming of the Clerk Numbers, PRESS the (CLEAR)
Key
and begin
again with Step
3.
TO
USE
CLERK
NUMBERS
"REG'
+
(CLERK
#)
+ (CLERK)
4
digit"
Example: If Clerk #1 is 1000:
1.
Turn
the
key
to
the
"REG" (REGISTER) position.
2.
TYPE (1000). then PRESS the (CLERK)
Key.
3.
The cash register is now ready for operation.
The first 2 digits of the display will display the Clerk Number when entered. To check which Clerk Number is
currently activated, press the Clerk
Key.
19
Page 23
MANAGER PASSWORDS
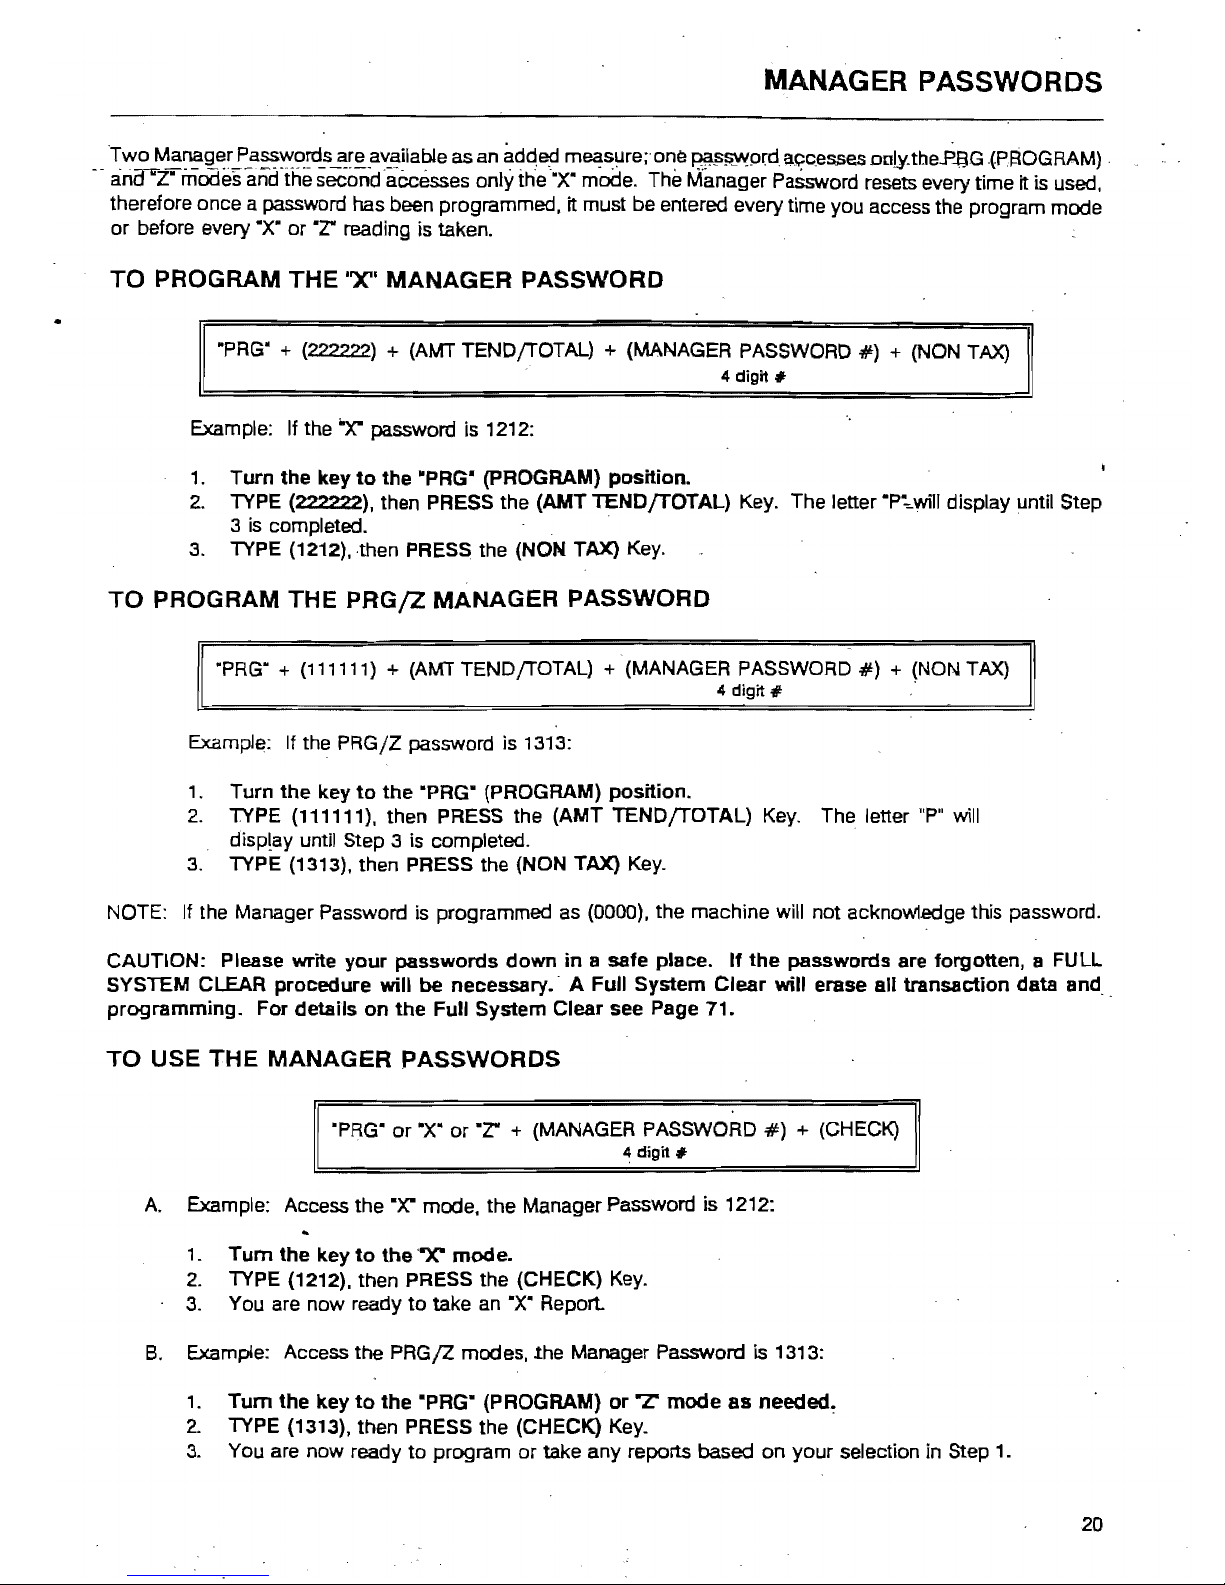
Two Manager Passwords are available as an adqed
m~sure;
ona
~~~p~d
apcesses
oD)y,tbeF-aG
-(PI!tOGRAM)
_
--
ana"Z--ri1Odesand'the secondaecesses
onlyttie'X'
mode. The Manager
PaSsword
resets every time it is used,
therefore once a password has been programmed, it must be entered every time you access the program mode
or before every
·x·
or
"r
reading is taken.
TO
PROGRAM THE "Xli
MANAGER
PASSWORD
·PRG"
+ (222222) +
(AMT
TENDjTOTAL) + (MANAGER
PASSWORD
#)
+
(NON
TAX)
4
digit"
Example: If the
"X"
password is 1212:
1.
Turn the key
to
the
·PRG" (pROGRAM) position.
2.
TYPE
(222222), then PRESS the (AMT TENDJTOTAL) Key. The letter
·P~wi"
display until Step
3
is
completed. -
3.
TYPE
(1212), then PRESS the (NON TAX)
Key.
TO
PROGRAM THE
PRG/Z
MANAGER
PASSWORD
·PRG" + (111111) + (AMT
TENDjTOTAL) + (MANAGER
PASSWORD
#)
+
(NON
TAX)
4
digit"
-
Example:
If
the PRGjZ password is
1313:
1. Turn
the
key
to
the
'PRG" (PROGRAM) position.
2.
TYPE (111111), then PRESS the (AMT TENDfTOTAL)
Key.
The letter
"P"
will
disp!ay until Step 3
is
completed.
3.
TYPE (1313), then PRESS the (NON TAX)
Key.
NOTE:
If
the Manager Password
is
programmed
as
(DOOD),
the machine will not acknowledge this password.
CAUTION: Please write
your
passwords
down
in a safe place.
If
the
passwords are forgotten, a FULL
SYSTEM CLEAR procedure will
be
necessary. - A Full System
Clear
will
erase all transaction data and_
programming. For details
on
the
Full System Clear see Page 71.
TO
USE
THE
MANAGER PASSWORDS
'PRG" or ·X·
or·r
+
(MANAGER
PASSWOR.D
#)
+ (CHECK)
4
digit"
A.
Example: Access the
0Y:
mode, the Manager Password is 1212:
1,
Tum
the key
to
the
'''X''
mode.
2.
TYPE (1212), then PRESS the (CHECK)
Key.
3.
You are now ready
to
take
an
"X·
Report
B.
Example: Access the PRG/Z modes, the Manager Password is 1313:
1.
Tum
the
key
to
the
·PRG" (PROGRAM)
or L mode
as
needed~
2.
TYPE (1313), then PRESS the (CHECK)
Key.
3.
You are now ready
to
program or take any reports based on your selection in Step
1.
20
Page 24
.'
't
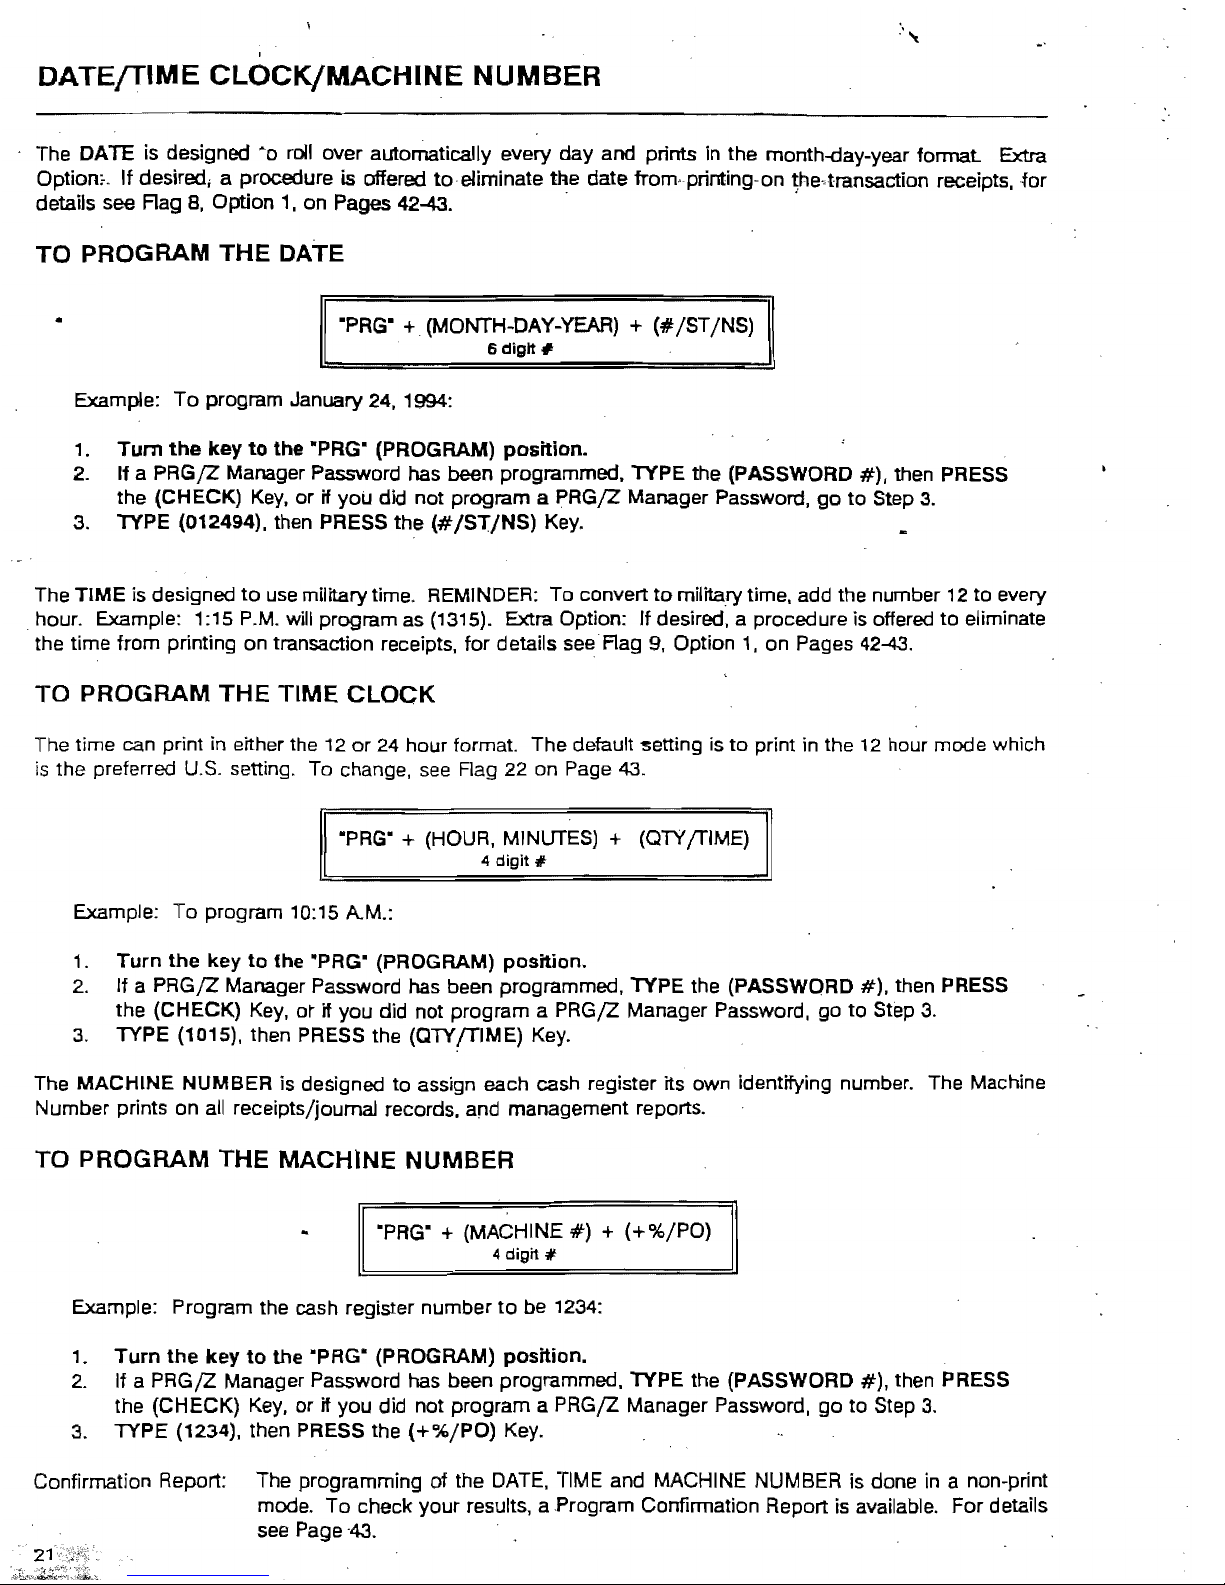
DATEfTlME
CLOCK/MACHINE
NUMBER
The DATE is designed
~o
rollover
automatically every day and prints in the month-day-year
format
Extra
Option;.. It desired; a procedure is offered toe/iminate the date from· printing· on
~he,transaction
receipts. ·for
details see Rag 8, Option 1. on Pages
42-43.'
.
TO
PROGRAM
THE
DATE
•
"PRG"
+ (MONTH-DAY-YEAR) +
(#/ST/NS)
. 6 digit #
Example: To program January 24, 1994:
1.
Tum
the
key
to
the "PRG" (PROGRAM) position.
2.
If a
PRGjZ
Manager Password has been programmed, TYPE the (PASSWORD
#).
then PRESS
the (CHECK)
Key,
or
if
you did not program a PRGjZ Manager Password.
go
to
Step 3.
3. TYPE (012494). then PRESS the (#/ST/NS)
Key.
The TIME is designed
to
use
military time. REMINDER: To convert
to
military time. add the number 12 to every
. hour. Example: 1:15
P.M.
will program as (1315). Extra Option:
If
desired. a procedure is offered
to
eliminate
the time from printing on transaction receipts. for details see Rag 9. Option 1. on Pages 42-43.
TO
PROGRAM
THE
TlME
CLOCK
The time can print
in
either the
12
or
24
hour
format
The default
'Setting
is
to
print in the
12
hour mode which
is the preferred
U.S.
setting. To change.
see
Flag
22
on Page
43.
·PRG" + (HOUR, MINUTES) + (QTY/TIME)
4
digit
'"
Example:
To
program 10:15 A.M.:
1. Turn
the
key
to
the 'PRG" (PROGRAM) position.
2. If a PRG/Z Manager Password has been programmed, TYPE the (PASSWORD
#).
then PRESS
the (CHECK)
Key.
or
if
you did not program a PRGjZ Manager Password. go
to
Step 3.
3. TYPE (1015). then PRESS the (QTYJTIME)
Key.
The MACHINE NUMBER is designed to assign each cash register its own identifying number. The Machine
Number prints on
all
receipts/journal records, and management reports.
TO
PROGRAM
THE
MACHINE
NUMBER
"PRG"
+ (MACHINE
#)
+ (+ok/PO)
4
digit
'"
Example: Program the cash register number
to
be 1 234:
1. Turn
the
key
to
the ·PRG" (PROGRAM) position.
2. If a PRG/Z Manager Password has been programmed. TYPE the (PASSWORD
#),
then PRESS
the (CHECK)
Key,
or
if
you did not program a PRG/Z Manager Password,
go
to
Step
3.
3. TYPE (1234). then PRESS the
(+%/PO)
Key.
Confirmation Report: The programming of the
DATE.
TIME and MACHINE NUMBER is done
in
a non-print
mode.
To
check your results, a Program Confirmation Report
is
available. For details
see Page '43.
Page 25
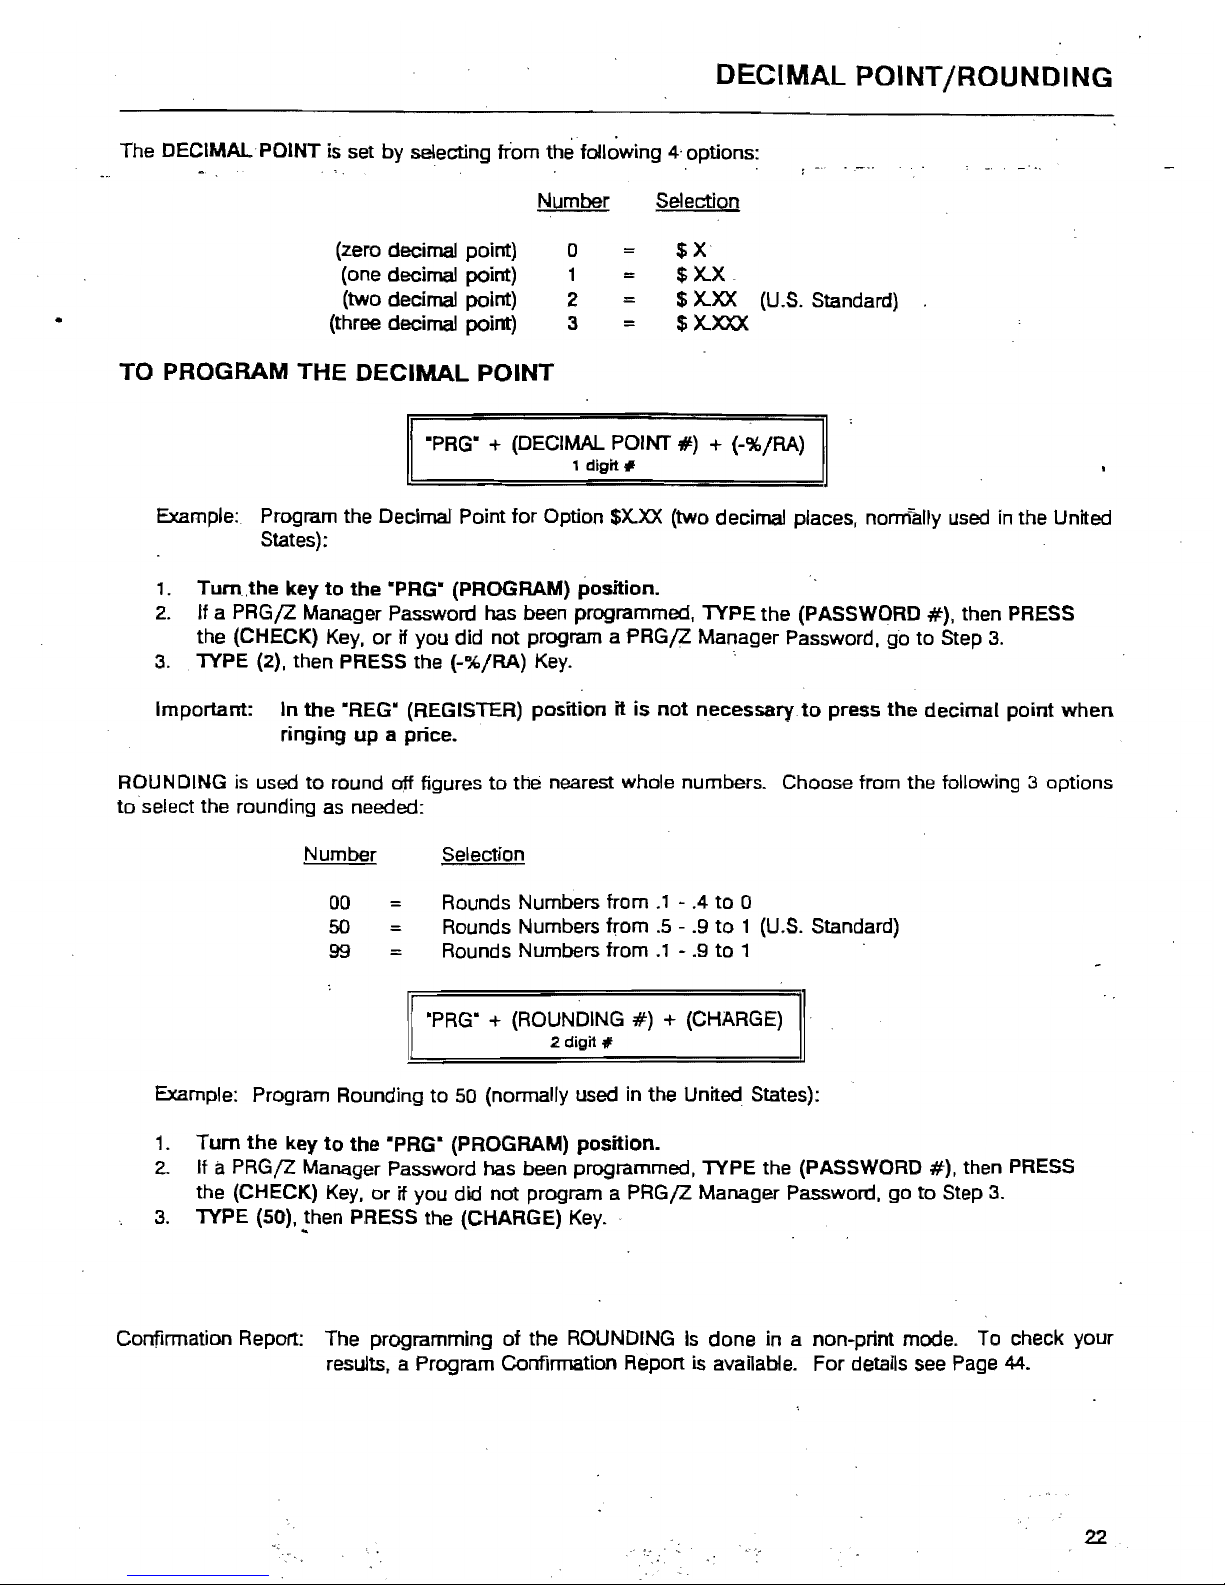
DECIMAL
POINT/ROUNDING
The DECIMAL-POINT is set by selecting tram the
foll~wing
4' options:
.
~..
,
Number
Selection
(zero decimal point)
(one decimal point)
(two decimal point)
(three decimal point)
o
1
2
3
=
=
=
$X
$
X.X.
$
X.XX
(U.S.
Standard)
$
X.XXX
TO PROGRAM
THE
DECIMAL
POINT
·PRG" + (DECIMAL POINT
#)
+ (-%/RA)
1
digit
#
Example: Program the Decimal Point
for
Option
$X.XX
(two decimal places, normally used
in
the United
States):
, .
Tum
,the key
to
the
·PRG" (PROGRAM)
position.
2. If a PRG/Z Manager Password has been programmed, TYPE the (PASSWORD
#),
then PRESS
the (CHECK) Key, or
if you did not program a
PRG/Z
Manager Password, go to Step 3.
3.
TYPE (2), then PRESS the (-%/RA)
Key.
.
Important: In
the
"REG" (REGISTER) position
it
is
not
necessary
to
press
the
decimal
paint
when
ringing
up
a price.
ROUNDING
is
used
to
round
off
figures
to
the nearest whole numbers. Choose from the following 3 options
toselect
the rounding
as
needed:
Number Selection
00
=
Rounds Numbers
from.'
- .4
to
0
50
::.
Rounds Numbers from
.5
- .9
to 1 (U.S.
Standard)
99
=
Rounds Numbers
from.'
- .9
to
1
"PRG"
+ (ROUNDING
#)
+ (CHARGE)
2 digit #
Example: Program Rounding
to
50 (normally used in the United States):
1.
Tum
the
key
to
the
·PRG" (PROGRAM)
position.
2.
It a PRG/Z Manager Password has been programmed, TYPE the (PASSWORD
#),
then PRESS
the (CHECK)
Key,
or
if you did not program a PRG/Z Manager Password. go
to
Step
3.
3.
TYPE (50), then PRESS the (CHARGE) Key .
..
Confirmation Report: The programming
of
the ROUNDING
Is
done in a non-print mode. To check your
results. a Program Confirmation Report is
avaUabie.
For details see Page
44.
22
Page 26

TAX RATE
Four
different tax rates can
be.
programmed on
your
cash register. Each
tax
rate can be linked directly
to
a
Department Key
or
by
pressing the
(fAX
1)
or
(fAX
2) Keys before ringing
up
an entry. Extra Option:
If
desired.
a proceciure- is offered
to
eliminate
the
taxrafe
tTom--'printing-
on
transcictiOn -receipts.
for
details see Flag
6.
Option 1. on Pages 42-43.
Each
Tax
Rate
can
be
programmed as follows:
•
a.
As an ADD-ON RATE (used in
the
USA) -
which
means
the
tax
amount
prints separately on the receipt.
Add-on
Tax
is
most
common
in
the
United States. Add-on
Tax
can be programmed as either a fixed-
rate
which
charges tax based
on
a percentage.
or
using
the
tax table codes. which is a calculation
based
on
an approved tax chart issued by
your
local
or
state government.
b. VAT (Value Added Tax)
which
means that the tax
amount
is included
in
the price
of
the item.
c.
CANADIAN TAX SYSTEM - allows
the
programming
of
GST
/PST
tax
system required in Canada.
For
. Canadian tax programming, see Appendix III.
ADD-ON
TAX
- FIXED
TAX
RATE
To
begin programming
the
FIXed
Tax
Rate.
you
must first determine the BASE TAX AMOUNT.
Note:
To
determine the BASE TAX AMOUNT,
you
will need
to
obtain a
copy
of
your
state's Retail Tax Chart
from
your
local Tax Office. The BASE TAX AMOUNT is
the
minimum
point
where
no
tax is charged. For
example. if
no
tax
is charged
from
.0 cents
to
.10 cents,
then.
10. cents is
the
BASE TAX AMOUNT.
TO
PROGRAM A SINGLE
FIXED
TAX
RATE
"PRG"
a)
+ TAX # (1-4) +
(fAX
1)
b) + BASE TAX AMOUNT
(2
digit
#)
+ (4) +
(fAX
2)
c) +
(fAX
RATE) + (fAX
2)
4
digit;;
Example: If the Base Tax
Amount
is .10 cents and the
Tax
Rate is
6"1,,:
.
,.
Turn
the
key
to
·PRG" (PROGRAM)
position.
2.
If a PRGjZ
Manager Password has been programmed,
TYPE
the
(PASSWORD
#),
then PRESS
the (CHECK) Key.
or
if
you
did
not
program a
PRGjZ
Manager
Password,
go
to
Step
3.
3.
TYPE (1), then PRESS the (TAX
1)
Key. The letter
.p.
will
display
until Step 5 is completed.
4. TYPE (104). then .PRESS
the
(TAX 2) Key.
5.
TYPE (6000). then PRESS the (TAX 2) Key.
TO
PROGRAM A SECOND
FIXED
TAX
RATE
·PRG"
a)
+ TAX # (1-4) +
(fAX
1)
b)
+ BASE TAX AMOUNT
(2
digit
#)
+ (4) +
(fAX
2)
c) + (fAX
RATE) + (fAX
2)
4
digit;;
Example:
If
the Base Tax
Amount
is .10 cents and
the
Tax Rate is 7%:
1.
Turn
the
key
to
·PRG" (PROGRAM)
position.
2.
If a
PRGjZ
Manager Password has been
p~ogrammed,
TYPE
the (PASSWORD
#).
then PRESS'
the
(CHECK)
Key.
or
if
you
did
not
program a
PRGjZ
Manager Password,
go
to
Step
3.
3.
TYPE (2), then PRESS the (TAX
1)
Key. The letter
.p"
will display until Step 5 is completed.
4. TYPE (104). then PRESS the (TAX 2) Key.
5.
TYPE (7000), then PRESS the (TAX 2) Key.
Page 27

(Continued) TAX RATE
ADD~ON
TAX TABLE RATE (an alternative t()
using
the
Fix~d
Rate Procedure)
Re!er
to
Appendix I
to
locate
the
tax
table
codes
listed
for
your
particular
state. If your state's tax rate
is
not listed
in
Appendix
1,-
refer to Appendix
II
for instructions
on
calculating your own state's tax table codes.
TO PROGRAM A SINGLE TAX TABLE RATE
"PRG" + (TAX
#) + (TAX
1) + (STATE TAX TABLE CODE) +
(TAX
2)
1-4
t I
Repeat tor each code
Example: The tax code for Arizona's tax rate of 4% is: 121-24009&13-19-23-27-27-1029-25-25-25-1025.
To program: .
1.
Turn
the
key
to
the
"PRG" (PROGRAM)
position.
2.
If a
PRGjZ
Manager Password has been programmed, TYPE the (PASSWORD
#),
then PRESS
the (CHECK)
Key,
or
if you did not program a
PRGjZ
Manager Password,
go
to
Step
.3.
3.
TYPE (1), then PRESS the (TAX
1)
Key.
The letter ·P" will display until Step 6 is completed.
4.
TYPE (121). then PRESS the (TAX 2)
Key.
5.
TYPE (240096), then PRESS the (TAX 2)
Key.
6.
Continue typing the State Tax Table Codes mentioned and' PRESS the (TAX
2)
Key after each
code until finished.
Note: If
amistake occurs during programming the State Tax Table Codes, PRESS the (CLEAR) Key and
begin again with Step
3.
TO
PROGRAM A SECOND
TAX
TABLE
RATE
RPRG"
+
(TAX
#) + (TAX
1) + (STATE TAX TABLE CODE) +
(TAX
2)
1-4
1 I
Repeat for each code
Example: The tax code for Arizona's tax rate of
5%
is: 101-190095-11-17-20·21-1021-20-20-20-20-1020".
To program:
1.
Turn
the
key
to
the
·PRG" (PROGRAM)
position.
2.
If a PRG/Z Manager Password has been programmed, TYPE the (PASSWORD
#),
then PRESS
the (CHECK)
Key,
or
if you did not program a PRG/Z Manager Password.
go
to
Step 3.
3.
TYPE (2), then PRESS the (TAX 1)
Key.
The letter
.p.
will display until Step 6 is completed.
4.
TYPE (101), then PRESS the (TAX
2)
Key.
5.
TYPE (190095). then PRESS the (TAX 2)
Key.
6.
Continue typing the State Tax Table Codes mentioned and PRESS the (TAX
2)
Key after each
code until finished.
Note: If a mistake occurs during programming the State Tax Table Codes. PRESS the (CLEAR) Key
and·
begin again with Step
3.
Confirmation Report: The programming
of
the State Tax Table Code is done in a non-print mode. To check
your results, a Program Confirmation Report is available. For details
see
Page 44.
24
Page 28

TAX RATE (Continued)
.
VAT
TAX
RATE
(commonly
used
in
E~rope)
·PRG" +
{TAX
#)
+
(TAX
1)
+
(TAX
RATE)
+ {TAX 2)
1-4 0 - 99.999%
J.
TAX 1 .. VAT 1
TAX 2 .. VAT 2
•
TAX 3
..
VAT 3
TAX 4
..
VAT 4
Example:
10%
Tax
Programming.
1.
Tum
the
key
to
the
·PRG" (PROGRAM) position.
2.
If a PRGfZ Manager Password has been programmed, TYPE the (PASSWORD
#),
then PRESS
the (CHECK)
Key,
or
if you did not program a PRGfZ Manager Password, go to Step
3.
3.
TYPE (1),
PRESS
the (TAX
1)
Key, TYPE (10000). then PRESS the (TAX 2)
Key_
TO
PROGRAM A SECOND
VAT
TAX RATE:
Example:
5%
1.
Turn the key
to
the ·PRG" (PROGRAM) position. ,
2.
If a PRGjZ Manager Password has been programmed.
lYPE
the (PASSWORD
#).
then PRESS
the (CHECK)
Key,
or
if you did not program a
PRGjZ
Manager Password,
go
to
Step
3.
\
3.
TYPE
(2).
PRESS the (TAX
1)
Key,
TYPE (5000), then PRESS the (TAX
2)
Key.
Page 29

CONVERTING TO 24 DEPARTMENTS
.
~
- --
..
-.
-: -
.--
--
~.
26 "
Page 30

CONVERSION OF DEPARTMENT LAYOUT
Your cash register
is
shipped from the factory with the maximum number
of
department keys 40 (see Figure
1). ' ,
:
...
-
..
--
.....
-........-
......-....-....
,
~
,
, .
, .
~~
~JPWl
LJLJ
: , tB
BE
I:
II:
1 :
.
uLJ
.
'.
·
·
,
Ttme
34
39" .
@]
[!]
000!~
~
tE
.
tE
,
FIGURE 1:
~
/PO
33
i
+%1'
1!8
38 i
~
000i~
l
fE
sa
.-
·
·
-
:
w/Tax
NS
l~o~11
#IST/I··
32
37
L:]u
C0001~~
tfj
sa
·
·
.
·
·
AmtTend
[
Clear!
I
~bidl
:
TOTAL
:
21
• 26
,~
36
@@)Oi
f8~~B8
·
"
...........................................
","
............
"'
........
-
...............
A department Conversion Kit
is
included with your register which allows a 24 department key layout using large
size department keys
{see
Figure 2). This kit includes key top labels, key tops and key caps used to change
the department keys on the register (Department keys
9,
10,
11
and
12
will remain the standard size).
21
22
23
24
tBBBBBHB
16
20
-4
II
8
15
19
3
II
7
2 6
14
18
FIGURE 2:
II
13
17
1
II
5
27
Page 31

(Continued)
CONVERSION OF DEPARTMENT LAYOUT
CONVERTING TO 24 DEPARTMENTS
IMPORTANT: Make sure
the
back-up
batteries have been installed
to
insure any programming
or
data
will
not
be lost when unplugging
the
register. It is recommended
to
convert the departments either
bEidore
programming the register;
or
at
the
beginning
or
close of the
business
day. '
1.
Tum the Control Lock
to
the OFF position and unplug the cash register.
2.
Remove the department keys: Insert the head
of
a small screwdriver under the key
and
lift
off.
(Be
careful
not to let the paper label fall into the keyboard mechanism). See Figure 3 (Page 26).
3.
Locate the key top label sheets with the 24 department key layout.
See
Figure
2.
4.
Write the description of the department key on the label
if
desired and place each label on one of the gray
key tops
and
cover with a clear plastic key cap. Snap the cap into place
to
secure.
5.
Repeat Step 4 for each of the department keys. Please note that the key top sheets must
be
replaced for
all
department keys
to
show the correct 24 key layout (including Departments
5,
10,
15
and
20).
See
Figure
~
.
6.
Place each department key on a post in the order shown in Figure
2.
Press down"'to secure.
To program the
cash
register for this new 24 Department
Key
Layout you must program
Flag
24
following the
procedure below
..
This flag setting can be done before or after changing the department
keys.
Please refer to Pages
29-31
for Department Status programming
to
set the tax status, pre-set pricing, etc.
as
needed. . .
AT
"PRG"
(PROGRAM) POSITION:
1.
Example:
To
select
20/40
department layout:
II
(PRG)
+ (2}{4) +
(0)
+ (VOID)
II
2.
Example:
To
select 15/30 department layout:
\1
(PRG)
+ (2)(4) +
(1)
+ (VOID)
1\
28
Page 32

DEPARTMENT
STATUS
A maximum
of
40 Departments are available on your cash register.
If,
the Department Conversion Kit is used,
the maximum number of departments will be 24. Each department can represent a category of merchandise.
For example, Department One can represent sales of beverages, Department
Two
sandwiches, -'Department
Three candy, etc. Each Department can be programmed as taxable
or
non-taxable.
The programming of the departments consists of six steps: Activating/Deactivating the Department
Key,
Selecting the Standard or Gallonage Function, Selecting Multiple/Single Entry and Normal
or
Negative
Department Mode, Selecting the High
Digit
Lock Out (HDLO) Number, Tax Status Number plus Assigning a
Department Preset Price.
1.
ACTIVATING/DEACTIVATING
THE
DEPARTMENT
KEY: The default setting of each
department key is automatically activated. However, you
may
deactivate a specific department key
whk:h will lock out any function or sales entry using that department key.
Number
Condition
o
=
Department
Key
is
Activated
Department Key is Deactivated
2.
STANDARD/GALLONAGE
DEPARTMENT:
Each department can be set for either
Standard Mode or Gallonage Mode. Gallonage Mode allows the entry of a price with 3 deCimal
places, representing the cost per gallon, i.e., 1.419 per gallon. Standard Mode enters the price
using the normal 2 decimal place setting.
Number
Condition
o
=
Standard
Department
1
. Gallonage Department
3.
MULTIPLE
ITEM
SALE/SINGLE
ITEM
SALE: Multiple Entry allows you to ring up two
or more items into a department. Single Entry allows you
to
ring up only one item
in
a department.
Positive/Negative determines whether the price entered is registered as a normal positive amount
or a negative/minus amount. The negative setting for a department
is
useful for registering deposit
returns, bottle returns, etc.
Number
Condition
o
Multiple
Item
Sale/Positive
=
1
Multiple Item Sale/Negative
2
Single Item Sale/Positive
3
Single Item Sale/Negative
4.
THE
HIGH
DIGIT
LOCK
OUT
(HOLD)
number is used
to
limit the number of digits that
can be rung up in an entry. This function
is
helpful in safeguarding against large over rings. If
an
excess number of liigits
is
entered, the error tone sounds and the keypad locks up. For example,
to
limit ring ups of more than $99.99, set the HDLO
to
4.
Page 33

.j
(Continued) DEPARTMENT STATUS
5.
THE
TAX.STATUS
is
used
to
I.ink
no
tax, a single
taxJl~te
(T~
1)
or
multiple tax rates (Tax
2, 3 or
4)
to
a department key. .
Tax Status Number Condition
00
=
Non-Taxable (used when you
do
not wish
to
charge tax)
01
Taxable
by
TAX 1 Rate .
02
=
Taxable
by
TAX 2 Rate
03
Taxable
by
TAX 3 Rate
04
Taxable
by
TAX 4 Rate
05
Taxable
by
TAX 1 and TAX 2 Rates
==
06
Taxable
by
TAX 1 and TAX 3 Rates
.07
Taxable
by
TAX 1 and TAX 4 Rates
08
:c:
Taxa.ble
by
TAX 2 and TAX 3 Rates
09
=
Taxable
by
TAX 2 and TAX 4 Rates
10
=
Taxable
by
TAX 3 and TAX 4 Rates
11
Taxable
by
TAX
1,
TAX 2 and TAX 3 Rates
12
Taxable
by
TAX
1,
TAX 2 and TAX 4 Rates
13
Taxable
by
TAX
1.
TAX 3 and TAX 4 Rates
14
=
Taxable
by
TAX
2.
TAX 3 and TAX 4 Rates
15
Taxable
by
TAX
1,
TAX 2. TAX 3 and TAX 4 Rates
6.
DEPARTMENT PRESET PRICE: Note: If you
do
not wish
to
preset a price, simply skip
this option. Department Preset Price
is used
to
program a price in a department
to
save time when
ringing up an entry. The price will automatically ring up each time
the
appropriate (DEPARTMENT)
Key
is
pressed.
Note: If you wish
to
ring up a zero price on this cash register. it can only be done
by
presetting
azero price
to
a department key.
(The Department
Programming
continues
on
the
next page)
30
Page 34

DEPARTMENT STATUS
(Continued)
TO PROGRAM DEPARTMENTS AS
TAXABLE
"PR(>' .; (Ai::l.MIle/Oea<:tivale)
.;
(St.andan:!/Gallonage Oorpl.) + (Multiple/Single
Entry) + (\"101..0
#)
+ (Tax
Sla!us
#) +
r.:rr
fW
fT~
1
elign
f 1 dlgn # 1 dlglt # 1
el19~
#
:2
digtt #
+ II"rice') + (Dept.)
7 dlglt #
ImllJlimum)
• Optional: If
no
preset price is desired, skip entering
the
price.
Example: Program Department 1
to
charge a single tax rate
(TAX
1); HDLO of ·0· and Multiple.
Entry/Positive Price and' preset price of $1.00:
1.
Turn
the key
to
the
·PRG" (PROGRAM) position.
2.
. If a PRGjZ Manager Password has been programmed, TYPE the (PASSWORD
#).
then
PRESS
the (CHECK)
Key,
or if you did not program a
PRGjZManager
Password, go
to
Step
3.
3.
TYPE (0)(0)(0)(0)(0)(1), PRESS the (ST
fWfTAX)
Key.
4.
TYPE (100), then PRESS the (DEPARTMENT 1)
Key.
If you
do
not wish
to
preset a price, only
PRESS the (DEPARTMENT 1) Key on this Step.
Important: It is not necessary
to
press the decimal point when entering a price,
*
Repeat Steps 3 and 4 before every Department Key you wish
to
charge tax.
TO
PROGRAM
DEPARTMENTS
AS
NON-TAXABLE
Although the factory default setting of all departments
is
non-taxable, you may need to program certain
department
keys
for the non-tax setting.
'PAG'
.;
IAt::livale/Deacti""'el
,
digh
t
..
ISland"'d/GaJlonag~
Oorp!.j
.;
1
dig"
t
jMuhlpl~/Slngl.
Entry) +
(HDLO
#)
+ (Tax SlalUS #) +
(:;rfWfT~
+ IPrice') ..
1 digit # 1
digit'
:2
dig"
#-
7 digit "
lmaximum)
(Dept)
• Optional:
If
no preset price is desired, skip entering the price.
Example: Program Department 2
as
non-taxable, HOLD of ·0", and Multiple Entry/Positive Price and
preset price of $1.00:
1. Turn
the
key
to
the
·PRG" (PROGRAM) position.
2.
If
a PRG/Z Manager Password has been programmed, TYPE the (PASSWORD
#),
then PRESS
the (CHECK)
Key,
or if you did not program a PRGjZ Manager Password,
go
to
Step
3.
3.
TYPE (0)(0)(0)(0)(0)(0), PRESS the
(STjWfTAX)
Key.
4.
TYPE (100), then PRESS the (DEPARTMENT
1)
Key.
If you
do
not
wish
to
preset a price, only
PRESS the (DEPARTMENT
1)
Key on this Step.
Important: It is not necessary
to
press the decimal point when entering a price .
..
*
Repeat Steps 3 and 4 before every Department
Key
you wish
to
charge
no
tax.
Confirmation Report: The programming of the Departments
is
done in a non·print mode. To check your
results, a Program Confirmation Report is available. For details
see
Page
44.
Page 35

COUPON DISCOUNT (-)
The Coupon Discount
(-)
Key is used
to
suotract a specific amount from an individual item. This function can
be performed in the middle of a transaction
or
by
itself in a
transaction.":
---
- .
..
. .
The programming
of
the Coupon Discount
(-)
Key consists
of
two
steps; seleCting a High Digit Lock Out (HDLO)
number and Tax Status.
1.
The
HIGH DIGIT LOCK
OUT
(HOLD) number is used
to
limit the number of digits that can be
rung
up
in a coupon
discount
This function is helpful in safeguarding against accidently subtracting
a large
amount
If
an excess number
of
digits Is entered an error tone sounds and the keypad locks
up. For example:
To
limit ringing
up
of
more than $99.99 on
the
Coupon Discount Key, set the HDLO
~~
. .
Number
Dollar Range
0
=
$.01
-
$99,999.99
(Standard Setting)
1
=
.01
.09
2
.01
.99
3
=
.01
9.99
4
=
.01
99.99
~
5
.01
999.99
6
.01
9,999.99
2.
The
TAX STATUS is primarily used
to
determine where you want the
tax
rate
to
be charged when using
the Coupon Discount Key. The options are: .
'.
a.
To
charge tax on the original amount of
anitem
(the amount before the coupon is deducted).
b.
To
charge tax on the discounted amount
of
an item (the amount after the coupon discount
is deducted).
The following Tax Status numbers are used
to
link the Tax Status
to
the Coupon Discount
(-)
Key.
Note:
If you have no tax rate programmed in the cash register, simply choose ·00" on the Tax Status Number
listed below: .
Tax Status Number
Conditions
00
==
Non-Taxable
a.
Used if
no
tax is programmed in the cash register;
or
b .
Used if you want
to
charge
tax
on the original amount of an
. item (the amount before the coupon is deducted).
01
==
Taxable
by
TAX 1 Used
to
charge the TAX 1 rate on the discounted amount of an
item (the amount after the coupon is deducted).
02
Taxable by TAX 2 Used
to
charge the TAX 2 rate on the discounted amount of an
item (the amount after the coupon is deducted).
03
==
Taxable
by
TAX 3 Used
to
charge TAX 3 rate
on
the discounted amount of an item
(the amount after the coupon is deducted).
04
==
Taxable
by
TAX 4 Used
to
charge TAX 4 rate
on
the discounted amount of
an
item
.(the amount after the
coupon
is deducted).
05
==
Taxable by TAX 1 and TAX 2 Used
to
charge TAX 1 ano TAX 2 rates on the discounted
amount of an item {the amount after the coupon is deducted}.
(The Coupon piscount programming continues
on
the next page)
32
Page 36

.'~
(
COUPON
DIS~OUNT
(-)
(Continued)
TAX
STATUS (Corr.inued)
TaxStatys
Number
06
::
Taxable by
TAX
1 and
TAX
3
..
07
Taxable by
TAX
1 and TAX 4
=
08
=
Taxable by
TAX
2 and TAX 3
09
=
Taxable by
TAX
2 and
TAX
4
10
Taxable by
TAX
3 and
TAX
4
11
Taxable by
TAX
1,
TAX
2 and
TAX 3
12
Taxable by
TAX
1,
TAX
2 and
TAX
4
13
Taxable by
TAX
1,
TAX 3 and
TAX
4
14
=
Taxable by
TAX
2,
TAX
3 and
TAX 4
15
=
Taxable by
TAX
1.
TAX
2,
TAX
3 and
TAX
4
Conditions
Used
to·
charge
TAX
1 and TAX 3 rates on the discounted
amount
of
an
item (the amount after the coupon is deducted) .
Used
to
charge TAX 1 and TAX 4 rates on the discounted
amount
of an item (the amount after the coupon is deducted).
Used
to
charge TAX 2 and TAX 3 rates on the discounted
amount
of an item (the amount after the coupon is deducted).
Used
to
charge TAX 2 and TAX 4 rates on the discounted
amount
of an item (the amount after the coupon
is
deducted).
Used
to
charge
TAX
3 and TAX 4 rates on=the discounted
amount
of an Item (the amount after the coupon
is
deducted).
Used
to
charge
TAX
1 , TAX 2 and TAX 3 rates
on
the discounted
amount of an item (the amount after the coupon is deducted).
U sed
to
charge
TAX
1, TAX2
and TAX 4 rates on the discounted
amount of
an
item (the amount after the coupon is deducted).
Used
to
charge
TAX
1,
TAX 3 and TAX 4 rates
on
the discounted
amount
of
an
item (the amount after the coupon
is
deducted).
Used
to
charge TAX
2,
TAX 3 and TAX 4 rates on the discounted
amount of an item (the amount after the coupon
is
deducted).
Used
to
charge TAX 1 , TAX
2,
TAX 3 and
TAX
4 rates on the
discounted amount of an item (amount after coupon is deducted).
(The
Coupon
Discount
programming
continues
on
the
next
page)
33
Page 37

(Continued) COUPON DISCOUNT (-)
TO
PROGRAM
THE
COUPON
(w)
'KEY~
·PRG" +(HOLD
#)
+ (TAX STATUS
#)
+
(.)
, digit # 2 digit #
The following
two
examples list the most commonly used options in programming the Coupon Discmmt
(-)
Key.
VERSION 1: Select
if
no
tax:
is
programmed
in
the
cash
register
or
if
you
want
to
charge
the
tax:
rate
on
the
original
amount
of
an
item
(the
amount
before
the
coupon,
is
deducted).
Example: If HOLD is selected
for
·0·, and
the
Tax
Status
Number
is selected
for
·0'
(non-taxable):
,
1.
Turn
the
key
to
the
·PRG- (PROGRAM)
position.
"'
2. If a
PRGjZ
Manager Password
has
been programmed, TYPE the (PASSWORD
#),
then
PRESS
the
(CHECK)
Key,
or
if you did .not program a
PRGjZ
Manager Password,
go
to
Step 3.
3.
TYPE (0)(00), then PRESS
the
(-)
Key_
Note: See Transaction Example 19 on Page 53
to
ring
up a coupon
sale programmed with Version
1.
VERSION
2:
Select
if
you
want
the
tax:
rate
to
be
charged
on
the
discounted
amount
of
an
item
(the
amount
after
the
coupon
is
deducted).
Example: If HDLO is selected
for
'0',
and the Tax Status is selected for
"1"
(taxable
by
TAX
1):
1.
Turn
the
key
to
the
·PRG" (PROGRAM)
position.
2.
If a
PRGjZ
Manager Password has been programmed, TYPE the (PASSWORD #),-then
PRESS
the
(CHECK) Key,
or
if you did not program a
PRGjZ
Manager Password, go
to
Step
3.
3.
TYPE (0)(01), then PRESS the (-) Key.
Note: See Transaction Example 19 on Page 53
to
ring up a
coupon
sale programmed with Version
2.
Confirmation Report: The programming
of
the Coupon Discount (-) is done in a non-print mode. To check
your
results, a Program Confirmation Report is available.
For
details see Page 44.
34
Page 38

MINUS PERCENTAGE DISCOUNT
Minus Percentage Discount (-%/RA)is used
to
subtract a percentage rate such as an employee discount from
an.individual item. The rate can
be pre-prOgrammed
or
manually entered..
<;"'-'-_-.
-.
_-=.,'-
___
....•......
,._
..
_._.---"-.
:
Extra Option: If desired, a procedure is offered so that. the Minus Percentage Discount amount
is
not
subtracted from the department totals on the Management Reports, for details see Rag
13.
Option
1,
Pages 42-43.
Thl! programming of the Minus Percentage Discount Key consists
of presetting the Minus Percentage Discount
rate
(if
desired).
TO
PROGRAM
A
MINUS
PERCENTAGE
DISCOUNT
(-%/RA)
"PRG"
+ (MINUS PERCENTAGE DISCOUNT
RATE
#)
+
(D)
4
digit
#
+ (-%/RA)
Example: Program the Percentage Discount rate of
10%.
1.
Turn
the
key
to
the
·PRG" (PROGRAM)
position.
2.
If a PRG/Z Manager Password has been programmed, TYPE the (PASSWORD
#),
then
PRESS the (CHECK) Key,
or
if you did not program a
PRGjZ
Manager Password, go
to
Step
3.
3.
TYPE
(1000),
TYPE (0). then PRESS the (-%JRA)
Key_
Note:
See
Transaction Example 20 on Page 50
to
ring up a Minus Percentage Discount
sale_
Confirmation Report: The programming of the Minus Percentage Discount Rate is done in a non-print mode.
To check your results. a Program Confirmation Report is available. For details
see
Page
44.
35
Page 39

PLUS PERCENTAG,E
Plus Percentage {+ %/PO) is
l,Ised
to
add a percentage rate such as a service charge
or
gratuity
to
an individual
- item. The rate can be pre-programmed
or
manually entered. '
Extra Option: If desired, a procedure
is
offered so that the Plus Percentage amount is not added
to
the
department totals on the Management Reports, for details
see
Flag
13,
Option
1,
Pages 42-43.
The programming
of
the Plus Percentage (+ %/PO)
Key
consists of presetting the
Plus
Percentage
Rate.
TO PROGRAM A PLUS PERCENTAGE RATE
(+%/PO)
·PRG" +
(PLUS
PERCENTAGE
RATE
#)
+
(0)
+ (+%/PO)
4
digit
#
Example: Program the Plus Percentage rate of
10%.
, .
Tum
the
key
to
the ·PRG" (PROGRAM) position.
2.
If a PRGjZ Manager Password has been programmed, TYPE the (PASSWORD
#),
then
PRESS the (CHECK)
Key,
or if you did not program a PRG/Z Manager Password, go to
Step
3.
3.
TYPE (1000), TYPE (0), then PRESS the
(+%/PO)
Key.
Note:
See
Transaction Example
21
on Page
51
to
ring up a Plus Percentage
sale.
_. < _.
.,'
w
~
••
~
Confirmation Report: The programming of the Plus Percentage Rate is done in a non-print mode. To check
your results, a Program Confirmation Report is available. For details
see
Page
44.
36
Page 40

PR.CE LOOK-UP (PLUl
A total
of
500 Price
look
Up codes (PLUs) are available on this cash register. The
Price-look
Up system allows
for
fast; accurate entry
of
an item and automatically records
the
number
of
items sold. The first step in
programming PLUs is
to
assign a
Pl.::l:l
number between 1 and
SOD
to
each sales'itetrr; Second;
the
PlU
Number-
must
then
be
linked
to
a Department Key which has the appropriate Tax Status needed for that
PlU.
For
example,
if
PlU
#1
is required
to
charge tax, then link it
to
a Department Key which
is
set up for tax. Whereas,
if
PlU
#2
is not required
to
charge
tax,
then link
it
to
a Department Key which is programmed for no tax.
TQ
PROGRAM PLUs
·PRG" +
(aTY
/TIME) +
(PlU
#)
+
(PlU)
+ (PRICE) + (Df;PARTMENT) +
(aTY
/TIME)
l'r
7 digits (Maximum} I
Repeat for each
PLU*
* NOTE: If
you
are programming PLUs using consecutive numbers (starting at
1,
2,
3,
etc.). it is not
necessary
to
enter the
PlU
number each time - simply enter
the
price. and
the
department,Y0u are linking
the
PlU
to. The register display automatically prompts you with the next
PlU
number.
Example: Set
PlU
#1 with a $2.99 price, linked
to
Department 1:
1.
Turn
the
key
to
the
·PRG" (PROGRAM)
position.
2.
If a
PRG/Z
Manager Password has been programmed, TYPE the
(PA~SWORD
#),
then PRESS the
(CHECK) Key,
or
if
you
did not program a
PRG/Z
Manager 'Password,
go
to
Step 3.
3.
PRESS the
(aTY
/TIME)
Key
to
begin programming of. PLUs. The letter "P" will display.·until Step 7 is
completed.
4.
TYPE (1), then PRESS the
(PlU)
Key.
5.
TYPE (299). then PRESS the (DEPARTMENT 1) Key. Important: It is
not
necessary
to
press the
decimal point when entering a price.
6.
Repeat Step 4 and Step 5
to
program other PLUs.
7.
PRESS the
(aTY
/TIME)
Key
to
end programming
of
PLUs.
Note: If you wish
to
eliminate a
PlU
number that
is
programmed. follow Steps
1.
2 and 3 above if
necessary. TYPE the
(PlU
NUMBER), PRESS the
(PlU)
Key.
PRESS the (DEPARTMENT) Key
and finalize by PRESSING the
(aTY
/TIME)
Key (skipping the price deletes the
PlU
#).
Confirmation Report: The programming of the PLUs is done in a non-print mode.
To
check your results, a
PlU
Confirmation Report is available.
For
details see Page 45.
37
Page 41

TRAINING MD.DE
..
The
option~
Training Mode is designecLtq
~elp
Y9L1.b~ome
Qetter acquainted with the register mode and offers-
ariideal place ·for "beginners'
to
practice transaction examples. Once the Training Mode
is
activated, there
is
no access
to
any operations in the ·PRG", "X·,
or'Z"
mooes. Also note, the transaction numbers
do
not count
up in the Register Mooe until you
exit the Training Mooe. The Training Mode can be activated
at
any time since
it does not record any activity in the machine totals.
TO
TURN ON
THE
TRAINING
MODE
II
~PRG'
+ (666666) + (AMT TENDfTOTAL)
II
1.
Tum
the key
to
the
'PRG'
(PROGRAM)
position.
2.
If a PRGjZ manager password has been programmed, TYPE the (PASSWORD
#),
then PRESS
the (CHECK)
Key,
or
if you did not program a
PRGjZ
manager password, gcrto Step
3.
3. TYPE (666666), then PRESS the (AMT TENDfTOTAL)
Key.
4. Tum the key
to
the "REG' (REGISTER) pOsition
to
resume nonnal register operations.
NOTE: The Training Mode indicator light will be displayed in the 10th position (the last position
to
the far rightj
when the Training Mode is in use.
TO
SHUT
OFF THE TRAINING
MODE
II
·PRG- + (555555) + (AMT TENDfTOTAL)
II
1.
Turn
the
key
to
the
·PRG" (PROGRAM)
position.
2.
If a PRGjZ manager password has been programmed, TYPE the (PASSWORD
#).
then PRESS
the (CHECK)
Key.
or
if you did not program a
PRGjZ
manager password, go to Step
3.
3.
TYPE (555555), then PRESS the (AMT TENDfTOTAL)
Key.
4.
Turn the key to the position desired.
38
Page 42

"
..
.;.
GRAND
TOTAL
PRESET
"
The Grand Total
is
located at the bottom of your ·Z" Report, just above the Time and Transaction Number. The
Grand Total' is
the
only figure
that
does
notresetback-to
zeroafter..taking-a-7.Rep9rt,
-It iscommonly-k.nown
as
the
-running grand total". However, if you wish
you
can reset the Grand Total
to
zero
or
assign it a specific
value. The procedure used
to
assign a value
to
the Grand Total may be helpful after a Full System Clear is
performed; since
it automatically resets
the
Grand Total back
to
zero.
Extra Option: If desired, a procedure is offered
to
have the Grand Tota/reset after every
.Z'
Reading,
for
details
..
see Rag
1,
Option 1, on Page 39.
TO
SET
THE
GRAND
TOTAL
TO
ZERO
·PRG" +
(0)
+ (RETURN)
Note: It is necessary
to
take a T reading prior
to
setting the Grand Total
to
zero.
1.
Turn the
key
to
the
'T'
position.
2.
If a
PRG/Z
Manager Password has been programmed, TYPE the (PASSWORD
#),
then PRESS
the (CHECK) Key,
or
if
you
did not program a PRG/Z Manager Password,
go
to
Step
3.
3.
PRESS the (AMT TENDfTOTAL) Key,
4.
Turn the key
to
the ·PRG" (PROGRAM) position.
5.
If a
PRG/Z
Manager Password has been programmed, TYPE the (PASSWORD
#),
then PRESS
the (CHECK)
Key,
or if you did not program a PRG/Z Manager Password,
go
to
Step
3.
6.
TYPE (0), then PRESS the (RETURN) Key. The Grand Total
is
now set
to
zero. To check your
results, a
·Z·
Reading can be taken by following Steps 1 through 3 above.
TO
ASSIGN A VALUE
TO
THE
GRAND
TOTAL
·PRG" + (GRAND TOTAL VALUE) + (RETURN)
12
digit
# (Maximum)
Example Set the
Gral!.d
Total for $15,000.00:
1. Turn
the
key
to
the
"PRG" (PROGRAM) pOSition.
2.
If a
PRGjZ
Manager Password has been programmed, TYPE the (PASSWORD
#),
then PRESS
the (CHECK)
Key,
or if you did not program a
PRG/Z
Manager Password, go
to
Step
3.
3.
TYPE (1500000), then PRESS the (RETURN) Key. The Grand Total is now set at the value of
$15,000.00. To check your .results, a "Z· Reading can be taken by following Steps 1 through 3 in
the explanation,above "To Set The Grand Total To Zero·.
Confirmation Report: The programming
of
the Grand Total Option is done in a non-print mode. To check your
results, a Program Confirmation Report is available. For details see Page
44.
Page 43

TRANSACTION NUMBER PRESET
..
. .
Transaction Number Preset allows you
to
choose a beginning transaction number of your own. The
TF'?nSG.'.ction
Number normally begins with the number
001
and counts
up
conseclI"tlVely'ufltil
a-wi!
Report
Is
taken;
thereafter
it resets back
to
001. Tra:lsaction Number Preset can also be used
to
re-enter the last transaction number
in
the event information is lost.
Extra Option: The register
is
programmed
to
have the Transaction Number reset
to
zero after a T Report is
taken.
If
desired, a procedure is offered
not
to
have the TransactiOrl Number reset
to
zero after
a
"r
Report is taken,
for
detaUs
see
Flag
10.
Option
1,
on Pages 42-43.
TO
PROGRAM THE TRANSACTION NUMBER
·PRG
W
+ (TRANSACTION
#)
+ (PLU
ALl)
3 digit #
Example: To program the Transaction Number
to
be 100:
1. Turn
th~
key
to
the
"PRG" (PROGRAM) position.
2.
If a PRG/Z Manager Password has been programmed. TYPE the (PASSWORD
#).
then PRESS
the (CHECK)
Key,
or
if you did not program a PRG/Z Manager Password,
go
to
Step
3.
3.
lYPE
(100). then PRESS the (PLU
ALl)
Key.
40
Page 44

Z1
and
Z2 COUNTER PRESET
Z1
and
Z2
COUNTER
PRESET
. •
r".,..
• _
Z1
: Represents
the
End-of-Day reading.
Z2: Represents -the End-of-Week/Month reading.
Allows
you
to
select the beginning number
for a Z1
Counter.
The·Z'
Counter is programmed
by
the factory
to
count
up
consecutively after each .Z' reading. Itprovides a tally of the
number
of
'7."
readings taken from the
, first
..
"Z'
reading taken on the cash register
to
the
present
In the event a Full System Clear procedure is
performed (which resets all data
to
zero),
the
'7."
Counter Preset feature
will
also allow you
to
re-enter the
previous
.Z'
Counter Number.
Extra Option: The register is programmed
to
have the
Z1
and Z2 Counter Numbers
not
to
reset after a
Z1
or
Z2 Report. If desired. a procedure is offered
to
have
the
Z1
and Z2 Counter Numbers reset
after a
Z1
or
Z2 Repon.
for
details see Aag-5, Option
1,
on
Pages 42-43.
TO
PROGRAM
THE
Z1
COUNTER
NUMBER
·PRG" + (1) +
(Z1
COUNTER
#)
+ (AMT TEN DfTOTAL)
4 digit #
Example:
To
program the
Z1
Counter
for
the number 0098:
1.
Turn
the
key
to
the
·PRG" (PROGRAM)
position.
2.
If a
PRGjZ
Manager Password has been programmed, TYPE
the
(PASSWORD
#),
then PRESS
the (CHECK)
Key,
or
if you did
not
program a
PRGjZ
Manager Password, go
to
Step
3.
3.
TYPE (1), then TYPE (0098), then PRESS the (AMT
TENDfTOTAl)
Key.
TO
PROGRAM
THE
Z2
COUNTER
NUMBER
. ·PRG", +
(2)
+ (Z2 COUNTER
#)
+ (AMT TENDfTOTAL)
4
digit"
Example:
To
program the Z2 Counter
for
the number 0099:
1.
Turn
the
key
to
the
'PAG" (PROGRAM)
position.
2.
If a
PRGjZ
Manager Password has been programmed, TYPE
the
(PASSWORD
#),
then PRESS
the (CHECK) Key,
or
if you did
not
program a
PRG/Z
Manager Password. go
to
Step
3.
3.
TYPE (2), then TYPE (0099), then PAESS the
(AMT
TENDfTOTAl)
Key.
41
Page 45

i
FLAG
OPTIONS
A total of
26
Syst&m
Programming Options (known
as
FLAGS)
,a!e~~!,f~<.t
0IL~'2i!>
~~I~~~r,-~I.tJe¥..a(e"preseL.,,"
- bY"tl'ieractory to aCCorilmooaliHhEfniost commonly used selections. Each Rag Option
can
be changed or
updated at any time
as
needed. Note:
All
Rags have been factory preset at
·OR.
They only need to
be
programmed Hyou wish to change any option from ·0"
to
·1".
The options are
as
follows:
·0·
= Represents the
option
preset
by
the
factory.
·1" =Represents
an
alternative option.
FLAG NUMBER
OPTION NUMBER
1
o = The Grand Total does
not
reset after a "Z' Reading.
1 = The Grand Total resets after a
.Z"
Reading.
2
o =Subtotal Will print on sales receipts when
(#/ST/NS)
Key is depressed.
1 = Subtotal
wRl
not print
on
sales receipts when (#/ST INS)
Key
is
depressed.
3
o =Tendering
of.
change is
not
required
..
1 = Tendering of change
is
required.
4
o =The Date Will print as Month-Day-Year.
1 = The Date will print
as
Day-Month-Year.
5
o = "Z1· and 72." Counter Numbers will
not
reset after a
"Z1"
or
"1.2"
Reading.
1 =
·Z1·
and
"22"
Counter Numbers will reset after a "21· or
-Z2"
Reading.
6
o = Tax Rate
Amount
will print
on
sales receipts.
1 = Tax
Rate
Amount will not print on sales receipts.
7
o = Skips amounts equaling zero
on
financial reports.
1 = Does not skip amounts equaling zero
on
financial
·reports.
8
a = The Date will print on sales receipts and management reports.
1 = The Date will not print
on
sales receipts and management reports.
9
a =The Time will print on sales receipts and management reports.
1 = The
TIme
will not print
on
sales receipts and management reports.
-
10 a
"=
The Transaction Number will reset after a "21" Reading.
1 =The Transaction Number will not reset after a "Z1-
Reading.
11
o =The Item Counter will print on sales receipts.
1 = The Item
Co~ntE!r
will not print on sales receipts.
12
o =A Clerk Number is not required before each transaction.
1 = A Clerk Number
is
required before each transaction.
13
o =
~%
is
subtracted and + %
is
added
to
department totals on
"XfZ'
Readings.
1 = -% is not subtracted
and
+%
is not added to department totals on
·X(Z"
Readings.
14
o = Receipt Mode (used
for
journal and
customer
receipts).
1 =Journal Mode (used if customer receipt is not needed).
15
o =Cash declaration
is
not
compulsory
before a "21" Reading.
1 = Cash declaration is compUlsory before a ·Z1" Reading.
16
a =Cash drawer will open upon finalizing a sale With the (AMT TENDfTOTAL),
(CHECK)
or
(CHARGE -
including
Charge 2 or
Charge
3)
Keys.
1
= Cash drawer will not open upon finalizing a sale with the
(CHECK)
or
(CHARGE ~ including Charge 2
or
Charge
3)
Keys.
(Flag Options are continued
on
the
next
page)
42
Page 46

FLAG OPTIONS
(Continued)
."
.
_
....
-.
".
FLAG NUMBER
..
--
-~
. .
--
-.
-,- -
OPTION NUMBER
17
o =Clerk System
is
OFF.
1
=
Cieri<
System is ON.
18
o =TAX
amounts
will
print
separately
on
sales receipts.
1
==
TAX
amounts
wl1i
print as one figure
on
sales receipts.
(The
letters
'is''
will print
to denote the total of
tax).
19
o = Setting non-taxable
limit
without
GST
tax
for
Canadian Tax Mode.
1
==
Setting non-taxable limit with GST
tax
for Canadian Tax Mode.
20
21
o =USA Tax Mode.
1
= Canadian Tax Mode.
2
=
VAT
Tax Mode (Value Added Tax).
~
o =Department
Key
Layout either
Type 1 (20/40
keys)
or
Type 2 (12/24 keys) -
all keys used as deSignated
department
keys. .
1
= Department key 20/40 (Department
12/24*)
will be the Credit 2
Key.
2 = Department key 15/35 (Department 11/23*) will
be
the Credit 3
Key.
3 = Department key 20/40 (Department
12/24*)
will be the Credit 2
Key
and
Department 15/35 (Department
11/23*
will be the Credit 3
Key).
I
...
This
reflects
the
department
number
if
the
Department Conversion Kit with
larger size keys
is
used.
22
o =Time
will
display
and
print
in
12
hour
(am/pm)
mode.
1
= Time will display and print in 24 hour mode.
23
o = Duplicate
'7:
Report will print.
1
==
Duplicate .Z" Report will not print.
24
o = Department
Key
Layout (Figure 1
on
Page 27) 40 Departments.
1
= Department Key Layout (Figure 2 on Page 27) 24 Departments .
Note: .
This
flag
must
be
selected
when
using
the
Department Conversion Kit.
-
:
TO
PROGRAM FLAG
OPTIONS
·PRG" + (FLAG
#)
+ {OPTION
#}
+ (VOID)
1
digit
It
1
digit
#
Example: Select Option 1
for
Rag 2 (The subtotal will not print on the sales receipt when the
(#
/ST
/NS) Key is depressed):
1.
Turn
the key
to
the
"PRG" (PROGRAM)
position.
2.
If
a PRG/Z Manager Password has been programmed, TYPE the (PASSWORD
#),
then PRESS
the (CHECK)
Key,
or if you did not program a
PRGjZ
Manager Password, go to Step
3.
3. TYPE (2)(1), then PRESS the (VOID}
Key.
Rag
#2
has
now
been set with Option
1.
Note: After the Full System Clear, all options revert
to
the default setting of ·0·.
Confirmation Report: The programming of Rag Options is done in a non-print mode. To check your results,
a Program Confirmation Report is available. For details see Page
44.
43
Page 47

PROGRAM CONFIRMATION REPORT
. The Program Confirmation Report allows you to check your programming results. .
__
'.
..
..:.-.:.:...__-._
_
•• __":
~-_.
___
,-:-.,: . _:"_
.....
~___
_
,_';_--=-~'-::::;'~:..;-:.::.:='••_.;;..~.~.'._-
.
..,.;;:
••
:,~~:"".;:x:.v-:
•.
_~~~!.?l....
~_#.---"'!"'
____
-_
TO
TAKE
A PROGRAM CONFIRMATION REPORT
·PRG" + (999999) + (AMT TEND {TOTAL)
1.
Tum
the key
to
the
·PRG" (PROGRAM)
position.
2_
If a PRG/Z Manager Password has been programmed. TYPE the (PASSWORD
#),
then PRESS
the (CHECK) Key, or
if you did not program a PRG/Z Manager Password, go to Step
3.
3.
TYPE (999999). then PRESS the (AMT TENDJTOTAL)
Key.
.
,
The following illustrates the Program Confirmation Report. The figures shown in this example are randomly
chosen:
DEPARTftBIT
YOUR
RECEIPT
THANK
YOU
01-24-94
1234
O-OOTI
STAftP
DATE
ltAOIDtE
NI.JII8ER
,
PRESET
PRICE
(of
zero
;n
Department
1)
00000.
1
---t-
DEPARTKENT
STATUS
shows
a singLe
tax
rate
associated
in
Department 1
2 O-OOTll-t-
PRESET
PRICE
(of
zero
in
Department
2)
000002
,3
0-00
010000
4
O-OOTS
-
000005
•
,
40
O-tlO
00000o
001
a
1-04Tl
60-00Tl
1
-04Tll
70-00Tll
O·OOTIX
00000o
O-OOTllZ
00000o
10·00lCa
10·007.
SO
CH
1
..
·0
VD
2"'0
VO
3· --0
VD
26
..
·0
VO
10-07
001
TII'IE
TI
TIl
-
TI X -
TIl
Z -
TS
-
'DEPARTKENT
STATUS
shows
negative
Department
Status
and
Tax
2
PRESET
PRICE
(of
zero
;n
Department
3)
DEPARTKENT
STATUS
shows
GaLLonage
setting
for
Departments 3 and
no
tax
PRESET
PRICE
(of
zero
in
Department
4)
DEPARTKENT
STATUS
shows both
Tax
1 and
Tax 2 rates
(aLL
40
departments
wiLL
always
print
whether
they
are
taxabLe
or
non-taxable)
COUPON
(-)
STATUS
(set
at
Option
1)
TAX
1
RATE
(single
fixed
tax
rate
programmed)
TAX
2
RATE
(second
fixed
tax
rate
programmed)
TAX
:3
RATE
TAX
4
RATE
PERCBIT
DISCOUNT
(set
at
10%)
PLUS
PERtENTAGE
(set
at
10%)
ROUNDlHG
STATUS
(set
at
SO)
FlAG
OPTION
STATUS
(a
total
of
26
FLag
options
will
print
at
Option
o unLess any
FLag
has been changed
to
Option
1)
TRANSACTION
N.ftIER
Represents
a
Represents
a
Represents
a
Represents
a
Represents
a
taxable
status
programmed
with a single
tax
rate.
taxable
status
programmed
with
a second
tax
rate.
taxable
status
programmed
with
Tax 3 rate.
taxabLe
status
progrll/llllled
with
Tax 4 rate.
taxable
status
programmed
with
more
than 1 tax
rate.
44
Page 48

PLU CONFIRMATION REPORT'
. The
PLU
Confirmation Rpport allows you
to
check all
PWs
programmed,
-"=--
-;:..!.....-.-~ -.~.
- • ::,;
TO TAKE A PLU CONFIRMATION REPORT
II
·PRG" +
(PW)
II
1.
Tum
the
key
to
the
·PRG" (pROGRAM)
position.
2.
If a
PRGjZ
Manager Password has been programmed, TYPE the (pASSWORD
#).
then PRESS
the (CHECK)
Key,
or
if you did not program a
PRGjZ
Manager Password, go
to
Step
3.
3.
PRESS the (PLU)
Key.
The following illustrates the
PLU
Confirmation
Report
The figures shown
in
this example are ra'ndomly chosen:
DEPARntarr ,
THE
PUl
IS
LlHKED
TO
PUl
,
.
YOUR
RECEIPT STNIP
THANK
YOU
01-24-94
DATE
1234
JlllAOilHE
IUElER
001
1
1'OOT1
PUl
PRICE
of
$1.00
is
associated
with
(TAX
1)
single
tax
rate
002
2
1'25Tl1
PUl
PRICE
of
$1.25
is
associated
with
(TAX
2)
second
tax
rate
003
3 1·50T1 X
PLU
PRICE
of
$1.50
;s
associated
with
(TAX
3)
third
tax
rate
004
4 1·75T1IZ
PLU
PRICE
of
$1.75
is
associated
with
(TAX
4)
fourth
tax
rate
005
5 2·99TS
PLU
PRICE
of
$2.99
is
associated
with
more
than
one
tax
rate
10-07 002
TRANSACTION
tUI3ER
TIME
45
Page 49

TRANSACTION EXAMPLES
fOR
OPERATING THE CASH REGISTER
The
~mpl~sinthls_
s
•.
:r;tio~
show
how
to
ring
up
different
.~
of,--!~n~~.!.()f1~-~_~A}I~~i.lVl!E!L9!LP~!t~_m?Y"
'.~~:_
;c:
---b:efllst::I.J
to
etitertq:>nce:--------
. .
NOTE:
Tum
the
key
to
the
-REG" (REGISTER)
position
for
registering
sales
transactions.
IMPORTANT: It is
not
necessary
to
press the Decimal Point when ringing
up
a price.
REMINDER: If Clerk Numbers are programmed.
be
sure
to
TYPE the (CLERK #), then PRESS
the (CLERK) Key before ringing
up
a sale.
SAMPLE RECEIPT
The sample receipt below Ulustrates general transaction infonnation you will see printed on a receipt:
DEPARTI'IBiT
IUB3t
2
DEPARTIIEHT
IUB3t
1
Cl.EJII(
IUB3t
YOUR
RECEIPT
THANK
YOU
01-24-94
·1·
1234
'----+
1
1·ooTI
'-------+
21·ooTIl
2·00
ST
Q·06TI
0-07TII
2-13
TL
5-00CA
2-87
CG
002
,--+
10·15
001
TDIE
SIMP
DATE
Mo{INE tI.I'IBER
TAX 1 tax
rat~
applied
TAX 2 tax
rate
applied
SUBTOTAL
(not
including
tax)
TAX 1 (single
tax
rate)
AMOUNT
TAX
2 (second
tax
rate)
AMOUNT
lOTAL
OF
SALE
CASH
TENDERED
CHAHGE
alIlPIITATION
ITER
COUNTER
- #
of
items
purchased
TRANSACTION
tIJIIIBER
TRANSACTION
SYMBOLS:
The following symbols
wi!!
appear
on
transac~jon
receipts:
.,.
to
-'5·
- , Through 15 Clerks
CA - Cash Transaction Total
CK - Check Transaction Total
CH
- Charge Transaction Total
ST
- Subtotal (Excludes Tax)
TL - T ota! of Sale
CG
- Change
X - Number of Items Being Multiplied
@ - Amount Being Multiplied
Tl - Tax 1 Rate Applied
to
a Sale
Til - Tax 2-Rate Applied
to
a Sale
TI
X - Tax 3 Rate Applied
to
a Sale
Til Z - Tax 4 Rate Applied
to
a Sale
AT
%9
_.
%
NS
#
e
VD
RT
RA
PO
- Overriding
of a PLU
Price
- Minus Percent Discount
- Plus Percent
- No-Sate Function
or
Open Cash Drawer
- Reference Number
- Coupon
- Void
- Retum (Refund)
- Received
on
Account
- Paid Out
TS
Represents
Tax
Total [If Option 1 is selected on
Rag
18, Page 38)
3 digit
# (to far left
of
receipt) - Represents ~ PLU
#
46
Page 50

TRANSACTION EXAMPLES FOR OPERATING
THE
CASH REGISTER
NOTE:
Tum
the
key the' "REG' (REGISTER)
position
for registering sales transactions.
-IMF'ORTANT:
It
is
not necessary
to
press
the Decimal Point when ringing lipa-price-:-
REMINDER: If
aerk
Numbers are programmed, be sure
to
TYPE the (CLERK
#),
then PRESS
the (CLERK) Key before ringing up a sale.
In the examples below, Department
1 is programmed as taxable with a 5% (TAX 1) rate and
aerk
#1
is used.
EXAMPLE
1: CASH ,SALE WITHOUT TENDERING CHANGE - (Ring up a $1.00
item
in Department 1):
1.,
TYPE (100), then PRESS the (DEPARTMENT 1) Key.
2. PRESS the (SUBTOTAL) Key. The Subtotal Key does not
need
to
be
depressed if you
do
not want the subtotal
of
a
sale
to
print.
3. PRESS the (SlIBTOTALfWJTAX) Key.
4. PRESS the (AMT TENDJTOTAL)
Key.
Note: The 9th position will light on the display when the
(AMT TEND/TOTAL) Key
is
operated.
·{)1-24-94
·1·
1234
1
'1·00
Tr
1·00
ST
0'"06
Tr
1·06CA
001
10·16
001
compute change from $5.00 cash tendered):
1.
TYPE (100), then PRESS the (DEPARTMENT 1)
Key.
2. PRESS the (SUBTOTAL) Key. The Subtotal
Key
does not
need
to
be depressed if you
do
not want the subtotal
of
a
saJe
to
print.
3.
PRESS the (SUBTOTALfWJTAX)
Key.
4.
TYPE (500). then PRESS the (AMT TENDfTOTAL)
Key.
EXAMPLE
3:
USING THE DEPT SHIFT KEY AND TENDERING CHANGE -
EXAMPLE
2: CASH SALE WITH TENDERING CHANGE - (Ring up a $1.00 item in Department 1 and
01-24-94
.,.
1234
1 1'OOTI
1·00 ST
0·06
TI
1·06
TL
5·00
CA
3-94
CG
001
10·17
002.
(Ring up a $1.00 item
in
Department
1.
$2.00 in Department 17 and $3.00 in Department 1 and compute change from
$10.00 cash tendered):
1.
TYPE (100). and then PRESS the (DEPARTMENT
1)
Key.
2.
TYPE (200).
PRES~
the (DEPT
SHIFf)
Key.
then PRESS
the (DEPARTMENT 17) Key.
3.
TYPE (300). then PRESS the (DEPARTMENT
1)
Key.
4.
PRESS the (SUBTOTALfWJTAX)
Key.
5.
TYPE (1000). then PRESS the (AMT TENDJTOTAL) Key.
Note: The register returns
to
the Non-Shift Mode after
each department entry.
01-24-94
·1·
1234
1 1-00
TI
17
2·00
1 3·00
TI
0'24TI
6·24
TL
10·00'CA
3·76
CG
003
10·18
003
Page 51

TRANSACTION EXAMPLES FOR OPERATING THE CASH REGISTER
. NOTE:
Tum
the
key
the
"REG" (REGISTER)
position
for
regiStering
S8les~tr8nSactioris-."
IMPORTANT: It is
not
necessary
to
press the Decimal Point when ringing up a price.
REMINDER: If
aerk
Numbers are programmed, be sure
to
TYPE the (CLERK
#),
then PRESS
the (CLERK) Key before ringing up a sale.
In the examples below, Department 1 is programmed as taXable with a
6%
(TAX
1)
rate and Clerk
#1
is used.
EXAMPLE 4: CHARGE SALE - (Ring
up
a $1.00 item in Department 1 and finalize the sale with the CHG Key):
1.
TYPE (100), then PRESS the (DE,PARTMENT
1)
Key.
2. PRESS the (CHARGE)
Key.
It is
not
necessary
to
enter
any amounts before pressing the Charge
Key.
. Note: The 7th position will
light
on the display when
the (CHARGE) Key is operated. .
01-24-94
-1·
1234
1 1-00
TI
0-06TI
1-06
CH
001
10·19
004
EXAMPLE 5: CHECK SALE - (Ring
up
a $1.00 item in Department1 and finalize the sale with the Check Key):
1.
TIPE
(100). then PRESS the (DEPARTMENT 1) Key.
2.
PRESS the (CHECK)
Key.
When needing
to
tender
change with the Check
Key,
enter the amount of the
check before pressing the Check Key.
Note: The 8th position
will light on the display when
the (CHECK) Key
is
operated.
01-24-94
·1
1234
1 1·00
TI
0·06TI
1·06
CK
001
10·20 005
EXAMPLE 6: SPLIT TENDERING SALE - (Ring up a $15.00 ,item
in
Department
1.
split the total of the sale
between $5.00 in cash payment and $10.90 in charge payment):
1.
TIPE
(1500). then PRESS the (DEPARTMENT 1) Key.
2.
PRESS the
(SUBTOTALfWfTAX)
Key.
3.
TIPE
(50D), then PRESS the
(AMTTENDfTOTAL)
Key.
4.
PRESS the (CHARGE) Key.
Note: In using the Split Tendering function, the amount in
cash must always be registered first.
Split Tendering
can also be finalized with the Check Key. Simply
subs~ute
the Check Key in Step 4 of this example.
01-24-94
·1·
1234
1
15'00-11
0-90TI
15-90
TL
5-00CA
10·90
CH
001
10·21 006
48
Page 52

TRANSACTION EXAMPLES FOR OPERATING THE CASH REGISTER
NOTE:
Tum
the
key
the
"REG- (REGISTER)
position
for
registering
sales
trltnsactions.--
rMPORTANT: It is not necessary
to
press
the
Decirnc:ll
Point when ringing
up'~a
'price. ' -
REMINDER: If Clerk Numbers are programmed, be sure
to
TYPE the (CLERK
#),
then PRESS
the (CLERK) Key before ringing
up
a sale.
'In
the examples below, Department 1 is programmed
as
taxable with a
6%
(TAX 1) rate and Clerk
#1
is used.
EXAMPLE 7: NO-SALE FUNCTION - (Used primarily
to
open the drawer without ringing up a sale. For
example,
to
give change):
1.
PRESS the
(#/ST/NS)
Key.
01-24-94
·1·
1234
Note: The number of times the No-Sale Key is used
':.
NS
will be monitored on the Management Reports.
10·22
007
EXAMPLE
8:
REGISTERING A REFERENCE NUMBER - (Used
to
print a number, up
to
10 digits,
to
identify
an invoice number, credit card number
or
any other number on receipts. Ring up the number
1234567 in a standard sale):
01-24-94
1. TYPE (1234567), PRESS the
(#jSTjNS)
Key.
·1·
1234
2.
TYPE (100), PRESS the (DEPARTMENT 1)
Key.
1234567
#
3.
PRESS the (AMT TENDfTOTAL)
Key.
1·00TI
0'06TI
Note: The
use
of the reference number is not recorded
l'06CA
in
any activity counter
or
sales totals on the
001
Management Reports.
10·23
008
EXAMPLE 9: MULTIPLYING BY A FRACTION - (Multiply the quantity
of
1.25, Le.,
13:l
yards of fabric at $1.00
in Department 1):
01-24-94
1.
TYPE (1.25), then PRESS the (QTY
fTIME)
Key.
·1·
1234
Note: When multiplying
by
a fraction it is 1·25 X
necessary
to
use the decimal
point
1·00
@
2.
TYPE (100), then PRESS the (DEPARTMENT 1) Key. 1 1·25TI
0·08TI
1·33CA
Note: The range of numbers from
.01
to
999.99 can
3.
PRESS the (AMT
TENDfTOTAL)
Key.
001
be used when riDging
up
the quantity
of
an
item.
10·23
009
Page 53

TRANSACTION EXAMPLES FOR OPERATING THE CASH REGISTER
__ NOTE: Turn the key·
the
~REG·-(REGISTER)
position-fonegisterfng
sales transactions.
IMPORTANT: It
is
not necessary
to
press the Decimal Point when ringing up a price.
REMINDER: If Clerk Numbers are programmed. be sure
to
lYPE
the (CLERK #). then PRESS
the (CLERK) Key before ringing
up a sale.
In
the examples below. Department 1
is
programmed as taxable with a
6%
(TAX
1)
rate
and
Clerk #1 is used .
•
EXAMPLE
10: MULTIPUCATION SALE - (Ring up a $1.00 Item 3 times in Depanment
1):
1.
lYPE
(3), then PRESS the
(OlY
fTlME)
Key.
2.
lYPE
(100). then PRESS the (DEPARTMENT
1)
Key.
3.
PRESS
the (AMT TENDfTOTAL)
Key.
.
Note: The range
of numbers from
.01
to
999.99 can b
used when ringing up the quantity of an item.
EXAMP~
11: REGISTERING A DEPARTMENT UNIT PRICE
$1.00. Ring up this price):
1.
PRESS
the (DEPARTMENT
1)
Key_
2.
PRESS the (AMTTENDJTOTAL)
Key_
Note: Up
to
40
prices can
be
accessed by the
use
of the
40
Depanment
Keys
for quick ring-ups.
01-24-94
-1·
1234
3 X
1·00
@
1 3-00
TI
0·18
TI
3·18CA
003
10·24 010
(Assume Depanment 1
is
pre-programmed for
01-24-94
-,.
1234
1 ·-1·00TI
0-06
Tl
1-b6CA
001
10-25
011
EXAMPLE
12: MULTIPUCATION OF A DEPARTMENT UNIT PRICE - (Assume the Depanment 1
Key
is
prei--
programmed for $1.00. Ring up this price three times):
1.
lYPE
(3), then PRESS the
(OlY
fTlME)
Key.
2.
PRESS the (DEPARTMENT 1)
Key.
3.
PRESS
the (AMT TENDfTOTAL)
Key.
Note: Up
to
40
prices can be accessed by the use
of
t~e
40
Depanment
Keys
for quick ring-ups.
01-24-94
·1·
1234
3 X
1·00
@
3·00TI
0-18TI
3·18CA
003
10·26 012
50
Page 54

:.~'\
TRANSACTION EXAMPLES FOR OPERATING
THE
CASH REGISTER
'. . 1-
NOTE:
Tum
the key
the
"REG" (REGISTER) position
for
registering sales transactions.
IMPORTANT: It is not necessary
to
press
the
Decimal Point when ringing-up a
price."
'.
REMINDER: If
Oerk
Numbers are programmed. be sure
to
TYPE the (CLERK
#).
then PRESS
the. (CLERK) Key before ringing up a sale.
In
the examples below, Department 1
is
programmed
as
taxable with a
6%
(TAX
1)
rate and Department 2
is
prl!grammed for no tax and Clerk #1 is used.
EXAMPLE
13: EXEMPTING TAX
ON
AN
ITEM ~ (Assume the Department 1 Key is programmed
as
a taxable
department
Ring
up a $1.00 item in Department 1 without charging tax):
1.
PRESS the (NON TAX)
Key.
2.
TYPE (100), then PRESS the (DEPARTMENT 1) Key.
3.
PRESS the (AMT TENDfTOTAL)
Key.
01-24-94
.,.
1234
1
1-60
1'00CA
001
10·27
013
EXAMPLE
14: EXEMPTING TAX
ON
AN
ENTIRE SALE - (Assume the Department 1 Key
is
programmed
as
a taxable department.
Ring
up a $1.00 item and a $1.50 item in Department 1 without charging
tax):
01-24-94
'1-
1234
1. TYPE (100). then PRESS the (DEPARTMENT 1) Key.
1·00
TI
2.
TYPE (150), then PRESS the (DEPARTMENT
1)
Key.
1-50
TI
3.
PRESS the (NON TAX) Key.
2·50
CA
002
.1.0'28
0.14
4. PRESS the (AMT TENDfTOTAL)
Key.
EXAMPLE
15: ADDING TAX TO A NON TAXABLE DEPARTMENT - (Assume the Department 2
Key
is
programmed for no
tax and the Department 1 Key is programmed with a
6%
TAX
1 tax rate.
Ring
up a $1.00 item
in
Department
2,
charging the
6%
tax rate):
1.
PRESS the (TAX 1)
Key.
2.
TYPE (100). then PRESS the (DEPARTMENT
2)
Key.
3.
PRESS the (AMT TENDfTOTAL) Key.
01-24-94
-,.
1234
2
1·00TI
0-06TI
1-06CA
001
10-29
015
51
Page 55

TRANSACTION EXAMPLES FOR OPERATING THE CASH REGISTER
NOTE:
Tum
the
key
tt1e
"REG" '(REGiSTER) positfc)'iiTor-regiSterihg'sales
transactions.
IMPORTANT: It is
not
necessary
to
press the Decimal Point when ringing
up
a price.
REMINDER: H Clerk Numbers are programmed,
be
sure
to
lYPE
the
(CLERK
#),
then PRESS
the (CLERK) Key before ringing
up
a sale.
In the examples below, Department 1 is programmed as taxable
with
a 6% (TAX 1) rate and Clerk
#1
is used.
EXAMPLE 16: RECEIVED-ON-ACCOUNT SALE - ("Indicates money
put
in the cash drawer". Ring
up
$50.00
to
show
the
beginning cash-in-clrawer
amount
for
the
day):
1.
lYPE
(5000), then PRESS
the
(-%/RA)
Key. 01-24-94
2.
PRESS the
(AMT
TENDfTOTAL)
Key.
·1·
:-
1234
50-00
RA
50·00CA
Note: A Received-On-Account Sale can also
be
10·30
016
finalized with
the
CHARGE
and
CHECK Keys.
This function can
not
be performed in the
middle
of
any
,sales transactions.
EXAMPLE
17: PAID-OUT SALE - ("Indicates money taken out
of
the cash drawer". Ring
up
$10.00
to
show
money paid
out
of
the
cash drawer):
01-24-94
·1·
1234
1.
lYPE
(1000). then PRESS the
(+%/PO)
Key.
-10'00PD
-10·00
CA
Note: A Paid-Out sale can also
be
finalized with
the
2.
PRESS the
(AMT
lEND{TOTAL)
Key.
10·31 017
CHARGE and CHECK Keys. This function can not
be
performed in the middle
of
any
sales transactions.
-
EXAMPLE 1
B:
RETURN SALE - (Refund a $1.00 item in
Department'
and
refund a $1.50 item three times in
Department'):
' ,
01-24-94
1.
PRESS the (RETURN) Key.
-,.
1234
2.
lYPE
(100), then PRESS the (DEPARTMENT 1) Key.
RT
3.
PRESS the (RETURN) Key.
-1-00
TI
4.
lYPE
(3), then PRESS
the
(QlY
{TIME)
Key.
3 X
5.
lYPE
(150). then PRESS the (DEPARTMENT 1) Key.
6.
PRESS the
(AMT
TEND
{TOTAL)
Key.
'-50
@
RT
1
-4-50TI
of
any sales transactions
or
by
itsetf in a transaction.
Note: The Return function can
be
performed in
the
middle
-0-33
TI
-5·83CA
-004
10-32 018
52
Page 56

TRANSACTION EXAMPLES FOR OPERATING
THE
CASH REGISTER
NOTE:
Tum
the
key
the
"REG" (REGISTER)
position
fOr
registering
sales transactions.
- --'lMPURTANT:c--lf
is
not
-iiecessarytcr press the DeCimal Point when ringing;iirJ'a price:-~ .. - "
""-~";--
=-=--"'c
_=
__
,=-=CC-=-_1
REMINDER: If Clerk Numbers are programmed. be sure
to
TYPE the (CLERK
#).
then PRESS
the (CLERK) Key before ringing
up
a sale. -
In the examples below. Department 1 is programmed as taxable with a 6% (TAX
1)
rate and Department 2 is
programmed
for
no
tax and
Oerk
#1
is used.
EXAMPLE
19: COUPON DISCOUNT SALE:
There are various versions
of
ringing up a Coupon Discount sale. Based on
the
-option selected
for
the
~AX
STATUS NUMBER" (refer
to
Pages 27-28
for
details
on
programming). choose the
example below which best serves your needs:
VERSION
1:
In
the
following
two
examples.
the
TAX STATUS NUMBER
programmed
for
the
option
"0":
a.
If no tax
is
programmed in
your
cash register. ring up
a
$1
;00 item in Department 2 and then
deduct
the 20¢
coupon:
1.
lYPE
(100).
then
PRESS the (DEPARTMENT 2)
Key.
2.
lYPE
(20). then PRESS the (-)
Key.
3.
PRESS the (AMT
TENDfTOTAL)
Key.
b. If you want to charge the
tax
rate on the original amount
of
an
item (the amount before the coupon is deducted),
ring up a
$1.00 item in Department 1 and
thEm
deduct the
20¢ coupon:
1.
lYPE
(100). then PRESS the (DEPARTMENT 1)
Key_
2.
lYPE
(20), then PRESS the (-)
Key.
3.
PRESS the
(AMT
TENDfTOTAL)
Key.
for
the
Coupon
Key
is
01-24-94
·1·
1234
2
',00
-0-20 e
a'BOCA
001
10-33
019
01-24-94
·1·
1234
1
1'00T!
-0·20
e
O·OST!
O'86CA
001
10·34
020
VERSION
2:
In
thefoJiowing
example.
the
TAX STATUS NUMBER
for
the
Coupon
Key
is
programmed
for
the
option
"1":
If you want
to
charge the
tax
rate on the discounted 01-24-94
.,.
1234
deducted), ring up a $1.00 item
in
Department 1 and
amount
of
an
item (the amount after the coupon is
1 1'00TJ
"
..
then deduct the 20¢ coupon:
-0·20
e
0·05
TI
1.
lYPE
(100). then PRESS the (DEPARTMENT 1) Key. O·SSCA.
2.
lYPE
(20). then PRESS the (-) Key.
001
10·35
021
3.
PRESS the (AMT
TENDfTOTAL)
Key.
53
Page 57

TRANSACTION EXAMPLES FOR OPERATING THE CASH REGISTER
..
-NOTE:-
Tum
the
key'the
....
REG···(REGISTER) poSition for regiStenng-ioalestransactions.
IMPORTANT:
It is not necessary
to
press the Decimal Point when ringing up a price.
REMINDER:
WCler!<
Numbers are programmed, be sure
to
TYPE the (CLERK
#).
then
PRESS
the (CLERK) Key before ringing up a
sale.
In
the
exampJes
below, Department 1 is programmed
as
taxable with
6%
(TAX
1)
rate and Department 2
is
..
programmed for no tax and Clerk #1 is
used.
.
EXAMPLE
20:
MINUS PERCENTAGE DISCOUNT SALE:
VERSION
1:
If
no
tax is programmed
in
your
cash register, ring up a $1.00
item
in Department 2
an'd
apply
a pre-grogrammect discount rate
of
10%:
1.
TYPE (100). then PRESS the (DEPARTMENT
2)
Key.
2. PRESS the (-%/RA) Key. If the Minus Percentage
Discount
Rate
is
NOT programmed. type in the
discount rate before pressing the
(-%/RA)
Key.
3.
PRESS the (AMT TENDfTOTAL)
Key.
01-24-94
·1·
1234
2 1·00
10·00%e
-0·10
0·90
CA
001
10·36 022
VERSION
2: When ringing a taxable item with a percentage
diSCOUnt,
tax
will automatically be charged
on
the
discounted
amount
(the
amount
after .the percentage
discount
is deducted).
1.
TYPE (100). then PRESS the (DEPARTMENT 1)
Key.
2.
PRESS the (-%/RA)
Key.
If the Minus Percentage
Discount
Rate
is NOT pre-programmed. type in the
discount rate before pressing the
(-%/RA)
Key.
3.
PRESS
Jhe
(AMT TENDfTOTAL) Key.
01-24-94
·1·
1234
1
1·00
TI
10-00%e
-0-10
o-OSTI
o-95CA
001
10-38 024
54
Page 58

TRANSACTION EXAMPLES FOR OPERATING
THE
CASH REGISTER
1----
---._,----
NOTE:
Tum
the key
the
"REG" (REGISTER)
position
for
registering sales transactions.
--rMPORTANT: It
is
not necessary
to
press the Decimal Point when ringing- upll. pnce.
--
REMINDER: If Clerk Numbers are programmed.
be
sure
to
TYPE the (CLERK
#).
then PRESS
the (CLERK) Key before ringing up a sale.
-
In
the examples below. Department 1 is programmed
as
taxable with a
5%
(TAX
')
rate and Department 2 is
programmed
for
no
tax and Clerk
#1
is used.
EXAMPLE 21: PLUS PERCENTAGE SALE:
VERSION 1:
If
no
tax
is
programmed
in
your
cash register; ring
up
a $1.00 item
in
Department 2
and
apply
a pre-programmed
Plus
Percentage Rate
of
10%:
01
-24"'94-
.,.
1234
1. TYPE (100), then PRESS the (DEPARTMENT 2)
Key.
2 1
-DO
is NOT pre-programmed. type in the plus percentage
2.
PRESS the
(+%/PO)
Key.
If the Plus Percentage Rate
10·00%
rate before pressing the
(+%/PO)
Key.
0·10
3.
PRESS the (AMT TENDfTOTAL)
Key_
1·10CA
001
10-39 025
VERSION
2:
When ringing a taxable item
with
a Plus Percentage
the
tax
will
automatically be charged
on
th'e
amount
after
the
plus
percentage
is
added.
01-24-97
,_
TYPE (100), then PRESS the (DEPARTMENT 1)
Key.
-1'
1234
1-00
TI
is NOT pre-programmed. type in the Plus Percentage
2.
PRESS the
(+%/PO)
Key. If the Plus Percentage
Rate
10-00%
Rate
before
preSSing
the
(+
'Yo/PO)
Key.
0-10
0-07
TI
1-17CA
3.
PRESS the (AMT TENDfTOTAL)
Key.
001
10·41 027
Page 59

TRANSACTION ,EXAMPLES FOR OPERATING THE CASH REGISTER
,
'-'NOTE:
Tum
the
key
the--REG"--(REG'ISTER)
'posltion
fo(
registeririg
sales'
transactions.
IMPORTANT: It is not necessary
to
press the Decimal Point when ringing up a price.
REMINDER: If Clerk Numbers are programmed,
be
sure
to
TYPE
the
(CLERK
#),
then PRESS
the (CLERK) Key before ringing up a sale. .
In the examples below, Department 1 is programmed as taxable with a 6%
(TAX
1)
rate and Clerk #1
is
used.
EXAMPLE
22:
USE OF
THE
ERROR-CORRECT (VOID) KEY:
Corrects the last entry run up during a sale. Ring
up
a
$1
.00
item in Department
1,
then use the (VOID) Key
to
cancel this entry and ring up a $10.00 in Department 1
to
register a new entry:
1.
TYPE (100), then PRESS the (DEPARTMENT 1) Key.
2.
PRESS the (VOID) Key.
3. TYPE (1000), then PRESS the (DEPARTMENT 1) Key.
4.
PRESS the (AMT
TEND{TOTAL)
Key.
. EXAMPLE
23:
VOIDING A SALE - (Void a $1.00 item in Department 1):
1. TYPE (100), PRESS the (VOID) Key, then PRESS
the (DEPARTMENT 1) Key. .
2.
PRESS the (AMT
TEND{TOTAL)
Key.
01~24~94
.,.
1234
1
1-00
TI
YO
1
-1·00
TI
,
10·00
TI
0·60
TI
10'60CA
001
10·42 028
01-24-94
·1· 1234
VD
1
~1'00
TI
-0·06
TI
-1·06CA
-001
10·43
029
EXAMPLE 24: VOIDING A MULTIPLICATION SALE ~ (Void a $1.00 item in Department 1 three times):
1.
TYPE (3), then PRESS the (OTY
{TIME)
Key.
2.
TYPE (100), PRESS the (VOID) Key, then PRESS
the (DEPARTMENT
1)
Key.
3.
PRESS the (AMT
TEND{TOTAL)
Key.
o1·24~94
·1·
1234
3 X
',00
@
YO
-3·00TI
-O·18n
-3'18CA
-003
10·44
030
56
Page 60

':"
TRANSACTION iEXAMPLES FOR OPERATING
THE
CASH
REGISTER
'. NQTE:
Tum
the
l.<ey
the "REG" (REGISTER)
position
for
registering sales transactions.
-IMPORTANT:
It
Is not necessary
to
press
the
Decimal Point when ringinirLiP'a
price.~=·--
--~--"
I=,;:.=,-,-~~=~
REMINDER: If Clerk Numbers are programmed.
be
sure
to
TYPE
the
(CLERK
#).
then PRESS
the (CLERK) Key before ringing
up
a
sale.
In
the
examples below, Department 1 is programmed as taxable with a 6% (TAX 1) rate and Clerk
#1
is uSed.
EXAMPLE 25: VOIDING A COUPON
SALE·
(Void a $1.00 item in Department
1,
void a
20¢
coupon):
1.
TYPE
(10,0),
PRESS the (VOID) Key, then PRESS
the
(DEPARTMENT 1) Key.
vo
2.
TYPE (20), PRESS the (VOID) Key, then PRESS
1 -1·00TI
the
(-) Key. '
~
vo
3.
PRESS the (AMT
TEND{TOTAL)
Key.
0·20 6
-O'06T1
-O·86CA
-001
10·45
031
EXAMPLE 26: VOIDING A MINUS PERCENTAGE DISCOUNT SALE - (Void a $1.00 item in Department 1 and
void a pre-programmed Minus Percentage Discount Rate
of
10%):
1.
TYPE (100). PRESS the (VOID) Key. then PRESS
the (DEPARTMENT'1) Key.
2.
PRESS the (-%JRA) Key. If
the
Minus Percentage
Discount Rate is NOT pre-programmed,
type
in
the discount rate before pressing the
(-%JRA)
Key.
3.
PRESS the
(AMT
TEND{TOTAL)
Key.
01-24-94
·1·
1234
vo
1 ·1·00·rI
10·00%6
0·10
-O·06TI
-O·96CA
-001
.
10·46 032
EXAMPLE 27: VOIDING A PLUS PERCENTAGE SALE - (Void a $1.00 item in Department
1 and void a per-
programmed Plus Percentage Rate of 10%):
1.
TYPE (100), PRE!:iS
the
(VOID) Key, then PRESS
the
(DEPARTMENT
1)
Key. '
2.
PRESS the (+%JPO) Key. If
the
Plus Percentage
Rate
is NOT pre-programmed, type in
the
Plus
Percentage Rate before pressing
the
(+
%/PO)
Key.
3. PRESS the
(AMT
TEND
(TOTAL)
Key.
01-24-94
·1·
1234
vo
-1·ooTI.
10·00%
-0·10
-O·06TI'
-1·16CA
-001
10·47
033
Page 61

--
-----
--
TRANSACTION EXAMPLES FOR OPERATING THE CASH REGISTER
- NOTE:
Tum
the
key-the-
III
REG"-(REGISlER) -position
for
registering
sales transactions:
IMPORTANT: It is not necessary
to
press the Decimal Point when ringing up a price.
REMINDER: If Clerk Numbers are programmed, be sure
to
TYPE the (CLERK
#),
then PRESS
the (CLERK) Key before ringing up a sale.
In the examples below. Department 1 is programmed as taxable with a
6%
(TAX
1)
rate-
and Department 2 is
..
programmed for no
tax and Clerk
#1
is used .
EXAMPLE
28:
VOIDING A DEPARTMENT PRESET PRICE.;. (Assume Department 1
is
programmed for the
price
of
$1.00 and Department 2 Is programmed for the price of$2.00. Ring up Department 1
and Department 2 prices. then void the Department 1 entry):
-- 01-24-94
1.
PRESS the (DEPARTMENT 1) Key.
-1- 1234
2.
PRESS the (DEPARTMENT'2)
Key.
1
1-00
TI
3.
' PRESS the (CLEAR)
Key.
2
2-00
Key_
4.
PRESS the (VOID), then PRESS the (DEPARTMENT 1)
VD
-1-00
TI
2-00CA
001
10-48 034
S.
BRESS the (AMT
lEND[TOTAL)
Key.
EXAMPLE 29:
VOIDING MULTIPUCATION OF A DEPARTMENT PRESET PRICE - (Assume Department 1
is programmed for the price of
$1.00 and Department 2
is
programmed for the price of $2.00.
Ring up Department 1 three times and Department 2
two
times. then void the Department 1
entry rung
up
three times):
1.
TYPE (3), then PRESS the (OTY
[TIME)
Key_
2.
PRESS the (DEPARTMENT 1) Key.
3_
TYPE (2), then PRESS the (OTY {TIME) Key.
4.
PRESS the (DEPARTMENT 2)
Key.
S.
PRESS the (CLEAR) Key.
6.
PRESS the (VOID)
Key_
7.
TYPE (3), then PRESS the (OTY
[TIME)
Key.
8.
PRESS the (DEPARTMENT 1)
Key_
9.
PRESS the (AMT TEND
[TOTAL)
Key_
01-24-94
-,
.
1234
3
X
1-00
@
3-00TI
2
X
2·00
@
2
4·00
3
X
,·00
@
VD
1
-a·00
TI
4'00CA
002
10·49 035
58
Page 62

TRANSACTION EXAMPLES FOR OPERATING THE CASH REGISTER
NOTE:
Tum
the
key
the
"REG" (REGISTER)
position
for
registering
sales
transactions.
IMPORTANT: It is not necessary
to
press the Decimal Point when ringing
up
a price..
.C
REMINDER: If Clerk Numbers are programmed, be sure
to
TYPE the (CLERK
#),
then PRESS
the
(CL,J:RK)
Key before ringing up a sale.
I n the examples below, Department 1 is programmed
as
taxable
With
a
6%
(T
PIX.
1) rate and Department 2
is
programmed
for
no
tax
and Clerk #1 is used.
EXAMPLE 30: VOIDING A DEPARTMENT PRESET PRICE WITH A MINUS PERCENTAGE DISCOUNT -
(Assume Department 1 is programmed for $1.00, Department 2 is programmed for $2.00, and
the (-%/RA) Key is pre-programmed for 10%. Ring up Department 1 and deduct
10%,
ring up
Department 2 and deduct 10%, then void the Department 1 entry with the
10%
discount):
1.
PRESS the (DEPARTMENT
1)
Key, then PRESS the
, (-%/RA)
Key.
2.
PRESS the (DEPARTMENT 2)
Key,
then PRESS the
(-%/RA)
Key_
3.
PRESS the (CLEAR) Key.
4.
PRESS the (VOID)
Key,
PRESS the (DEPARTMENT
1)
Key, ,then PRESS the (-%/RA) Key. If the Minus
Percentage Discount Rate
is
NOT pre-programmed,
type
in
the discount rate before pressing the (-%/RA)
Key.
5.
PRESS the (AMT TENDfTOTAL) Key.
,01-24:94
-1· 1234
1'00TI
10·00%6
-0·10
2 2-00
10·00%6
-0-20
VD
-1'00
TI
10-00%6
0-10
1·80
CA
001
10-50
036
EXAMPLE 31: V()IDlNG A DEPARTMENT PRESET PRICE WITH A COUPON DISCOUNT - (Assume
Department 1
is
programmed for $1.00 and Department 2 is programmed for $2.00.
Ring
up
. Department 1,and deduct
20¢,
ring up Department 2 and
deduct
20¢,
then void the Department
1 entry with the
20¢
coupon discount):
1.
PRESS the (DEPARTMENT
1)
Key.
2.
TYPE (20), then PRESS the (-) Key.
3.
PRESS the (DEPARTMENT 2)
Key.
4.
TYPE (20), then PRESS the (-) Key.
5.
PRESS the (CLEAR) Key.
6.
PRESS the
(VOIDt
Key,
then PRESS the
(DEPARTMENT 1) Key.
7.
TYPE (20), PRESS the (VOID) Key,
then PRESS the (-) Key.
8. PRESS the (AMT
TENDfTOTAL)
Key.
' 01-24-94
·1·
1234
1
1-00
TI
-0-20 6
2 2-00
-0-20 6
VD
1
-1-00
TI
VD
0-20 6
1·80
CA
001
10·51 037
Page 63

TRANSACTION EXAMPLES FOR OPERATING THE CASH REGISTER
-NOTE:
Turn
the
key'tfle
loREG"'(REGlSTER}
positiotf
for
regiSfenrig
sales'
tra-nsaCtions_
IMPORTANT: It is not necessary
to
press
the
Decimal Point when ringing
up
a price.
REMINDER: If Clerk Numbers are programmed.
be sure to TYPE the (CLERK
#),
then PRESS
the
(CLERK) Key before ringing
up a sale_
In
the
examples below, Department 1 is programmed as taxable with a 6%
(TAX
1)
rate and Clerk
#1
is
used_
•
EXAMPLE 32: PLU SALE ~ (Assume
the
PW
# is preset
for
the price
of
$1_00
in Department
1.
Ring up the
PLU
#1):
1.,
TYPE (1).
then
PRESS the (PLU) Key.
01-24-94
-1'
,1234
~01
1·00TI
Note: PLUs follow the same procedure
for
ringing up
2.
PRESS the
(AMT
TENDfTOTAL)
Key.,
0-06TI
Coupons. Refunds, Minus Percentage Discounts; ,
1-06CA
-Plus Percentages, etc. as described throughout
001
the section
for
Transaction Examples
For
10·52
038
Operating The Cash Register.
Temporarily overriding a PLU PRICE: If you would like
to
enter a different price than what
is
programmed into
a PLU
#:
TYPE the (DESIRED PRICE), PRESS the (PLU
ALl)
Key, TYPE the (PLU
#),
then PRESS the (PLU)
Key. The letters
"AT' will appear above the price
of
the PLU #
to
indicate the overriding of a
PLU
price.
EXAMPLE 33: VOIDING A PLU SALE - (Assume PLU #1 is
presetforthe
price
of$1.00
in Department
1.
Void
-PLU
#1):
1.
TYPE (1), PRESS the (VOID) Key, then PRESS
the (PLU) Key.
2.
PRESS the
(AMT
TENDfTOTAL)
Key_
01-24-94
·1·
1234
VD
001
-1-00
TI
-0-06
TI
-1-06CA
-001
10-53 039
EXAMPLE 34: VOIDING A PLU
MULTIPUCATION
SALE
- (Assume FLU #1 is preset for the price
of
$1.00
in Department
1.
Void PLU #1 three times):
1.
2.
3.
TYPE
(3.).
then PRESS the
(QTYfTIME)
Key.
TYPE (1), PRESS the (VOID) Key, then PRESS
the
(PLU) Key.
PRESS the
(AMT
TEND
fTOTAL)
Key_
01-24-94
-1'
1234
3 X
1-00
@
VD
001
-3-00
TI
-0·18
TI
-3-18CA
-003
10-54
040
60 "
Page 64

TRANSACTION
EXAMPLES FOR OPERATING
THE
CASH REGISTER
. .
NOTE:
Tum
the
key
the
-REG- (REGISTER)-
position
for
registering
saleS
transactions.
IMPORTANT:
It
is
not
necessary
to
press
the
Decimal Point when ringing
up'a
price.
REMINDER:
If
Clerk Numbers are programmed.
be
sure
to
TYPE the
(CLERK
#),
then PRESS
the (CLERK) Key before ringing
up
a sale.
1n
the examples below, Department 1 is
programmed
as taxable with a
6%
(TAX 1) rate and Clerk #1 is used .
..
EXAMPLE 35: VOIDING
APLU
SALE
WITH A COUPON
DISCOUNT-
(Assume PLU #1 is preset
for
the price
of
$1.00 in Department 1 and
deduct a 204.
coupon. Void this entry): .
1. TYPE (1), PRESS the (VOID) Key. then PRESS
the (PLU) Key.
2. TYPE (20), PRESS the (VOID) Key, then PRESS
the (-) Key.
3. PRESS the (AMT
TENDfTOTAL)
Key.
01-24-94-
-1· 1234.
VD
001
-1·00
TI
VD
0·20
9
-o·06TI
-o-86CA
-001
10-55
041
EXAMPLE 36: VOIDING A PLU SALE
WITH A MINUS
PERCENTAGE
DISCOUNT
- (Assume
PLU
#1 is preset
for
the price of $1.00 in Department 1 and the (-%/RA) Key is pre-programmed for 10%. Ring
up
PLU
#1,
deduct 10%, then
void
this entry):
1.
TYPE (1), PRESS the (VOID) Key. then PRESS the
(PLU) Key.
2.
PRESS the
(-%/RA)
Key_
If
the
Minus Percentage
Discount Rate is NOT pre-programmed,
type
in the
discount
rate before pressing
the
(-%/RA) Key.
3.
PRESS the (AMT
TENDfTOTAL)
Key. .
01-24-94
·1·
1234
VD
001
-1-00
TI
10-00%9
0-10
-0·06
TI
-o'96CA
-001
10-56 042
EXAMPLE 37: VOIDING A PLU SALE WITH A PLUS PERCENTAGE
RATE
- (Assume PLU
#1
is
preset for
the price
of
$1.00 in Department 1 and the
(+%/PO)
Key is pre-programmed
for
10%. Ring up
PLU
#1,
add 10%. then
void
this entry):
01-24-94-
·1-
1234
(PLU) Key.
1.
TYPE (1). PRESS the (VOID) Key. then PRESS the
VD.
2.
PRESS
the
(+%/PO)
Key.
If
the
Plus Percentage Rate
001
-1'00TI
is NOT pre-programmed,
type
in
the
discount
rate
10·00%
before pressing the
(+
%/PO)
Key.
-0·10
-0-06
TI
-1·16CA
-001
10-54 043
3.
PRESS the
(AMT
TEN
DfTOTAL)
Key.
61
Page 65

TRANSACTION EXAMPLES FOR OPERATING THE CASH REGISTER
L
-NOTE: Tum thekey1he-lOfCEG"-(AEGtSTER)
position
for
registering--sales transactions.
IMPORTANT:
It
is not necessary
to
press the Decimal Point when ringing up a price.
REMINDER: If Clerk Numbers are programmed. be sure
to
lYPE
the (CLERK
#).
then PRESS
the (CLERK) Key before ringing up a sale .
..
EXAMPLE 38: CANCEL OPERATION - This
is
to
cancel the operation in the middle of a sales transaction.
Sales data that was input before the cancel operation is made will not
be
retlected in the sales
reports. etc. A cancel counter in the Full
"21" Report shows the number
of
times the cancel
function
was
used. Ring
upa
$10.00 sale
in
Department 1 and a $20.00 sale in Department 2,
then cancel the transaction:
1.
2:
3.
lYPE
(1000). then PRESS the (DEPARTMENT 1) Key.
lYPE
(2000), then PRESS the (DEPARTMENT
2)
Key.
PRESS the (RETURN)
Key.
then PRESS the
(AMT TENDfTOTAL) Key
to
cancel the transaction.
01~24-94
·1·
1234
=1
1o·00TI
2
20·00
Til
EXAMPLE 39: GALLONAGE SALES TRANSACTION - In this example, Department 1 has been
pr~grammed
for Gallonage Mode and
is
non-taxable. Ring 10.759 gallons at $1.149 per gallon: .
1.
TYPE (10.759). then PRESS the
(aTY
f11ME)
Key.
2.
TYPE (1149). then PRESS
the
(DEPARTMENT 1) Key.
3.
PRESS the (AMT TENDfTOTAL) Key.
01-24-94
-1· 0000
10·759 x
1-149
@
1
12·36
12-36
CA
010
2·37
003
62
Page 66

Xfl
MANAGEMENT
REPORTS
The cash register
is
designed
to
maintain totals of all transaction data. ,Transaction data
is
maintained in the
memory
of
the cash register as long as the battery back-up system is in
effect
This data can. be obtained in .
the ·X·
or
'7:' positions. The read-out
for
the Management Reports is the same whether it
is
taken in the ·X·
or
·Z·
positions, the only difference is that the totals are reset
to
zero after a
.Z"
position reading.
"Xli
POSITION READING
Thete are
two
types of readings that can
be
taken in the .X" position; an ·X1· reading
and
an
"X2"
reading. Note:
To
prevent accidental printing of the
OX"
reading, an
"X"
Manager Password can
be
set
Once the password'is
set, an ·X" report will not print 'untll the password
Is
typed,
for
details see Page 20.
• "X1' READING -
Commonly
known
as
a "mid-day" reading; prints an accumulation of transaction data
and is
not
reset to zero unless a
.~Z1·
reading is taken. Use this position
to
print· periodic readings of
transaction totals during the course of the day.
• "X2" READING -
Commonly
known
8S
8 "mid-week"
or
"mid-month"
reading; prints an accumulation of
transaction data and
is
not reset to zero unless a "Z2" reading is taken. Use this position
to
print periodic
readings of transaction totals during the course of several days. -
"Z"
POSITION READING
There are
two
types
of readings that can be taken in the "Z: position; a ·Z1· reading and a "Z2" reading. Note:
To prevent accidental printing of
the"Z:
reading, a
PRGjZ
Manager Password can
be
set.
Once the password
is
set, a
·Z·
report will
not
print until the password is typed,
for
details see Page 20.
"Z1" READING -
Commonly
known as a "end-of-dayjdaily-closeoUf:" reading; prints transaction data and
resets
atl
transactIon totals
to
zero except the Running Grand Total. The machine will, however, still
accumulate totals. in memory until a
"Z2" reading is taken. To clear the Running Grand Total,
see
Page 39.
It
is
also possible to print a duplicate "Z1" Report. This
is
useful if the register runs out of paper or if there
is
a power outage during the printing of a "Z1" Report. This feature can also be tumed off by Flag setting
23 (see Page 43).
•
"Z2"
READING -
Commonly
known as a ·weekly" or "monthly" reading; prints transaction totals either on
a weekly
or monthly basis (not both) and resets all transaction totals
to
zero except the Running Grand
Total.
MANAGEMENT
REPORTS
AVAILABLE
There are a total of five different kinds of reports available on the cash register:
• FULL REPORT - Includes totals
of
departments, tax, net sales, voids, returns, coupons, refunds, minus
percentage, plus percentage, receipts-on-account, paid out, cash, check, charge, and the running grand
total (only present on '7:' Reports).
• PLU REPORT - Usts quantity and cost of each
PLU
Number rung up.
CLERK REPORT - Exclusively prints total sales amounts of each Clerk Number operated.
• HOURLY REPORT - Provides total sales amounts rung up each hour.
• CASH-tN-DRAWER REPO,flT - Only available in the -X· position simply tells you how much cash
is
in the
drawer at the time of the report.
• SELECTIVE PLU REPORT - Only available in the -X· position; allows you
to
print the
PLU
Report for a
specific range of PLUs, which saves both time and paper.
• SELECTIVE DEPARTMENT REPORT - Only available in the ·X· position; allows you
to
print the Department
Report for a specific department or range of departments.
• CASH DECL4RATION - Only available in the
-z:
position; allows you
to
declare the actual amount of cash
in the drawer and automatically generates the
"·Z1·
(End-of-DayjDaily-Close-out) Report.
63
Page 67

. (Continuec1) ,X/Z MANAGEMENT REPORTS
The following lists the different Management Reports
t~t
are
offered in the ·X· and
'Z'
positions:
. .- .
Key
Posttions
Report
Symbols
RepoFt$ Known
As
Management
Reports
Avallilble
X
X1
Mid-Day
Full.
PLU, Clerk, Hourly, Cash-in-OrIlwer
X
X2
Mid-Week
Dr
Mid-Month
FuU,
PLU. Selective PLU, Selective Dept.
Z
Z1
End..Qf-Day
or
DaiIy-CIose-out Full. PLU, Clerk. Hourly, Cash OecIaI'ation
Z
'Z2
Weekly
or
Morithly Full, PLU
..
., .
TO TAKE A CASH-tN-DRAWER REPORT
II
ox"
.+ (OTY /TIME)
II
1.
Turn
the
key
to
the
"X"
position.
2.
If
an
·X· Manager PasSword has been programmed, TYPE the (PASSWORD
#),
then PRESS the
(CHECK) Key
now~
or if you did NOT program
an
"X· Manager Password. go
to
Step
3.
3.
PRESS
the (OTY /TIME)
Key.
01-24-94
1234
50·00CO
-,--
Shows S5O.00
cash-In-Drawer
'tOtaL
12·00
001
TO
TAKE
AN
HOURLY
REPORT
or·Z'
+.
(11)
+ (AMT TEND{TOTA
1. Turn the key
to
the
"X"
or
.Z'
positions
as desired.
2.
If
an
·X· or a
PRGjZ
Manager Password
has
been programmed, TYPE the (PASSWORD
#),
then
PRESS
the (CHECK)
Key,
or
if
you did NOT program an ·X· or a PRGjZ Manager Password, go
to Step
3.
3.
TYPE (11), then PRESS the (AMT TENDfTOTAL) Key.
Important
An
hourly reading must be closed out in the
.Z'
position.
..
01-2"-94
1234
x-
I--
lOr
READING
(If
Ii
"Z·
reading
was
taKen;
the
Letter
liZ"
wi
II
print)
-
f-
12·-·
001
ACTIYITY
c:otJNTER
.
10-60
SALES
TOTAL
(including
tax)
at
12:00
p.lI
.
13···
. 003
53-00
SALES
TOTAL
(including
tax)
at
1:00
p.m.
23··-
010
.
110·00
SALES
TOTAL
(including
tax)
at
'1:00
p.IIl
.•
12-01
001
64
Page 68

XfZ
MANAGEMENT REPORTS
(Continued)
TO
TAKE A
CLERK
REPORT
II
A
or
'T
+ (CLERK)
II
,.
Turn the key
to
the
"X"
or
rz:
position
8S
desired.
2.
If
an A
or
a PRGJZ Manager Password has been programmed,
lYPE
the (PASSWORD
#),
then PRESS the (CHECK) Key,
or.
if
you
did NOT program
an
.X"
or a PRGjZ
Manager
Password,
go
to
Step
3_
3_
PRESS the (CLERK)
Key_
Important: A Clerk Reading must be closed out in
the
'T
position.
01-24-94
1234
X
-r-
-x-
READIJIIi
.CIf
It
"Z·i Read;ng
;s
tak.en,
the
letter
"z
..
\/;
II
print)
CLERK
11
-f---1-
- - - ·001
-f-
ACTIVITY
a:urTER
(II
of
transactions
rung up
by
each
clerk.)
'-06
-f-
SALES
TOTAl
OF
CLERK
11
(includes
tax)
2·
....
011
'-33
:;·····003
1'59
4··
..
·001
1·86
5· •..
·007
2·12
6····
·010
2·39
7·
...
-001
2·00
8····
·003
4·00
9···
'-002
3·00
10·
..
·004
10-00
29·35
TL
12·02
001
Page 69

(Continued)
XjZ
MANAGEMENT REPORTS
TO
TAKE
A PLU
REPOijT
II
·X·
or
az:
+ (PLU)
II
1.
Tum
the
key
to
the
ax"
or
'X
position
as desired.
2.
If an
ax"
or
a PRG/Z Manager Password has been programmed, TYPE the (PASSWORD
#),
then PRESS the (CHECK)
Key,
or
if you did NOT program an
-X"
or
a PRG/Z Manager
Password,
go
to
Step 3.
3.
PRESS the (PLU) Key.
Important: A
PLU
Reading must be closed out in the
-z:
position.
01-24-94
'1234
X -x-
PLU
READING
(If
a
HZ·
PUl
Reading
was
taken,
the
letter
aza
will
print)
PUl ,
00'1
001
ACTIVITY
OJUNTER
(II
of
PUl ;telllS
t:118t:
were
rung
up)
'1·00
SALES
TOTAL
IN PUl n .
002
002
2·00
003
00'1
5·00
8'00
TL
SALEs
TOTAL
OF
ALL
PLUs
12·03
001
TO
TAKE
A (WEEKLY
OR
MONTHLy)
PLU
REPORT
1. Turn the key to the
"X·
or
-z:
position
as
desired.
2.
If an "X'
or a PRGjZ
Manager Password has been programmed, TYPE the (PASSWORD
#),
then PRESS the (CHECK)
Key,
or
if you did NOT program an ·X" or a PRGjZ Manager
Password,
go
to Step
3.
3.
TYPE (99), then PRESS the (PLU)
Key.
Note: The printout of the weekly
or
monthly PLU Report will be identical
to
..
that of
the.
PLU
Report illustrated
above, except the
PLU
Reading symbol will be
"99X"
instead
of
-X".
TO
TAKE
A SELECTIVE PLU
REPORT
(STARTING
PLU
#)
+ (OTY /TIME) + (ENDING
PLU
#) + (PLU)
3 digits (Maximum). 3
digits
(Maximum)
Example: Print a
PLU
Report for PLU #1-50:
1.
Turn
the
key
to
the
ax"
position.
2.
TYPE (1), PRESS the (QTY{TlME)
Key,
TYPE (50), then PRESS the (PLU)
Key.
3.
The report will print.
66
Page 70

X/Z
MARAGEMENT REPORTS
(Continued)
TO
TAKE
A CASH DECLARATION REPORT
·r
+ (VOID) + (Ouantity
of
Money)
+ (OTY/TIME) + (Amount
of
Money) + (-%/RA) + (AM! TENDJTOTAL)
CALITION: The Cash Declaration feature
wDI
not allow any corrections of miscalculated or incorrect entries
of the cash declared. Therefore, please double check and verify all moneys before getting started .
.
Example:. Declare the following money in the drawer: 3 fNe dollar bills, 7 one dollar
bOIs
and 4
quarters:
1.
Tum
the
key
to
the
T position.
2.
If a PRGjZ Manager Password has been programmed, TYPE the (PASSWORO
#),
then PRESS
the (CHECK)
Key,
or
if you did NOT program a
PRGjZ
Manager Password go
to
St~p
3.
3.
PRESS the (VOID)
Key.
4.
TYPE (3). PRESS the (QTY
/TIME)
Key.
PRESS (500), then PRESS the (-%/RA) I(ey.
5.
TYPE (7). PRESS the (QTY/TIME)
Key.
PRESS (100). then PRESS the (-%/RA)
Key.
6.
TYPE (4). PRESS the (QTY
/TIME)
Key, PRESS (25), then PRESS the (-%/RA)
Key.
7.
PRESS the (AMT TENDfTOTAL) Key
to
finalize,
Note: The cash register will automatically produce a ·Z1" (End-of Day or Daily-Close-out) Reading
when the Cash Declaration feature is used.
Extra Option: If desired, the Cash Declaration feature can be made compulsory, for details
see
Flag
15,
Option
1,
on Pages 42-43.
01-24-94
1234
0001 1
3
5·00
Declared 3
five
dollar
bi
ll$
15·00
7
1·00
Declared 7 one
dollar
bills
7·00
4
0·25
Declared 4
quarters
1·00
23·00
TL
Declared
~t
frc.
'the
dMllller
23'OOCD
talc:uUrted
,...,t
0·00
--+-
The
difference
between
'the Declared
~t
and
the
talc:uUrted
~t_
Note:
The
Zero
dollar
alllOlomt
002
indicates
that
the
Declared
~nt
and
Calculated
23'00T!
~nt
both balance. A
negative
dollar
amount·
002
would
indicate
less
.aney
is
in
the
drawer
than
23-00
ST
what
was
collected.
Any
amount
greater
than
SO.OO
002
would
indicate
more
money
is
in
the
drawer
than
23·00NS what
was
collected
..
23·00
TL
0Q2
23·00CA
23'OOCD
O'OOCK
1041.26GT
12-04
001
FOR
AN
EXPLANATION
ON
TIlE RB\UHI)ER
OF
TIlE
·Z1··
TAPE,
REFER
TO
PASE
64.
67
Page 71

(Continued)
X/Z
MANAGEMENT REPORTS
to
TAKE A (Z
or ENO-OF-DA
Y)
HJLL REPORT
\1
·X·
or·Z"
+ (AMT TEND {TOTAL)
II
1. Turn the key
to
the
"X"
or
7:
position
as
desired.
2.
If
an
·X·
or
a PRG/Z Manager Password has been programmed, "NPE the (PASSWORD
#),
then PRESS the (CHECK)
Key.
or if you did NOT program an ·X·
or
a PRG/Z Manager
Password,
go
to
Step
3.
3.
PRESS
the (AMT
lEND(TOTAL)
Key.
To issue a duplicate ·Z· Report, press the # 1ST
INS
Key and the AMT TEND {TOTAL
Key.
If other keys are
pressed atter the first "Z" Report printing, the duplicate
"Z"
Report will
not
print. To disable the duplicate
HZ"
. Report printing featyre. Rag
23
must be changed (see Page 43). •
Important: A
Full
Reading mustbecJosed out in the ·Z· position.
SEE
ILLUSTRATION OF A FULL REPORT
ON
THE NEXT PAGE.
TO
TAKE A (WEEKLY
or
MONTHLy)
FULL
REPORT
II
·x·
or ·Z· +
(99) + (AMT
TEND {TOTAL)
11
1. Turn
the
key
to
the
·X· or
·Z'
position as desired.
2.
If
an
"X·
or a PRG/Z Manager Password has been programmed, "NPE the (PASSWORD
#),
then PRESS the {CHECK}
Key,
or if you did NOT program an ·X·
or
a PRG/Z Manager
Password, go
to
Step
3.
3.
"NPE (99), then PRESS the (AMT TENDfTOTAL)
Key.
SEE
ILLUSTRATION OF A (WEEKLY
or
MONTHLy)
FULL REPORT
ON
THE NEXT PAGl::.
II
68
Page 72

XjZ
MANAGEMENT REPORTS
(Continued)
FULL REPORT
III
.uSTRATION
Reminder. TAX 1 STATUS represents a single tax rate_'
TAX 2 STATUS represents a second
tax
rate_
TAX 3 STATUS represents a third tax
rate_
NON TAX STATUS represents
no
tax rate is programmed_
0'1-24-94
l'IIIc:hi
he
tIuIiber
1234
X1
Reeding
Taken
CIf
Z1
X1
Count
et"
0001 1
x--
W-
or'
Z2
Readings
are
taken,
Act;V1
-ty
Counter
12
or
2Z
wilL
print)
CIncI;
cates
the
II
;-
r-1
2S-10Tl
004
Tax 1
Status
of
it
ISS
rang
up
00'
in a Departllent)
Tax
2
Status
Depart.nts
2
'-OOTII
001
3
'·OOTI
X.-
I--
Tax. 3
S1:atus
001
l
t
"-
r-4
1-00
Non Tax
Status
Counter
007
31-10ST
ALL
Depart.ent
Totals
"74Tl
Tax 1 Tax
Ibrte.
Total
O'14TlI
Tax 2 Tax
Ibrte
TotaL
eCounter
001
-0-20
Coupon
DiSCCU'lt 6
Total
-%
Coun
tel'
001
-o-1OX6
-%
Total
+%
Cou-t
ter
001
-.
0-2OX
+%
Total
Met
Sa
les
Cou-tter
008
Met
Sales
Total
CoI.ITter
32-78NS
001
-'-00
RT
-
I--
Return
Void
Cou-tter
001
-1-00
VD
-
I--
Void
Total
35-08
TL
-
t--
Gross
Sales
Total
Sales
Cou-tter
006
6·28CA
Cash
Sales
Total
Sales
Counter
001
10·6QCK
Check
Sales
Total
Charge
Sa
les
Counter
001
Charge
2-Sales
Charge
Sales
Total
Coun
tel'
15'90
CH
000
Charge
3
Sales
O·OOTlCH
-
I--
Charge
2
Sales
Total
Coun
ter
000
Reeel
-ved-On-AcCCU'lt
Charge
3
Sales
Total
.
Coun
tel'
O-OOTIICH
I--
001
10-00RA
Reeeived-On-AcCCU'lt
Total
Paid
Out
Counter
001
-S-OOPO
Paid
Out
TotaL
No
Sa
le
Cou-tter
-
002
1/
CIInce l
Counter
001
11-28CD
tash-ln-Drewer
Total
10-6QCK
Check-
In-Df"l!lWler
Total
1041.26GT
R1n1ing
Gnrd
Total
I
12-04
001
TMIr'I58cticn
Counter
(Indicates
how
.any
-
transactions
were
performed
for
the
day)
69
Page 73

(Continued)
X/Z
MANAGEMENT R,EPORTS
The following illustrates
how
totals are calcUlated for the Management Reports.
'-~.'
.
NET
SALES TOTAL (NS) - Represents the true sales
for
the
day. The
NS
sales total Includes
department total (ST).
tax total
(TI,
Til, TIX. TIIZ). and less the coupon discount (e).
Note: Minus percentage discount (%e) , voids
(VO)
and returns/refunds
(RT)
are all deducted
from the department totals and the plus percentage (
•.
%)
is added
to
the department
totals.
GROSS SALES
TOTAL
(TL) - Represents the total of all sales registered. The Gross Sales Total
includes net sales total (NS).
coupon
discount(e),
minus percentage discount (%e), return/refund
(RT), and void
(VO).
SYSTEM BALANCE:
DEPARTMENT 1
(+)
28.10
DEPARTMENT 2
(+)
1.00
DEPARTMENT 3
(+)
1.00
DEPARTMENT 4
(+)
1.00
DEPARTMENT TOTAL
(=)
31.10
DEPARTMENT TOTAL
(+)
31.10
TAX TOTAL
(+)
1.88
COUPON DISCOUNT
( -)
.20
NET SALES TOTAL
(=)
32.7~
NET SALES TOTAL
(+)
32.78
COUPON DISCOUNT
(+)
.20
MINUS PERCENTAGE
(+)
.10
RETURN/REFUND
(+)
1.00
VOID
(+)
1.00
GROSS SALES
(=)
35.08
MEDIA
BALANCE:
NET SALES TOTAL
(+)
32.78
CHECK TOTAL
( -)
10.60
CHARGE TOTAL
( -)
15.90
RECEIVED-ON-ACCOUNT
(+)
10.00
PAID OUT
( -)
5.00
CASH-IN-DRAWER
(=)
11.28
Exception: If
RA
or
PO is used in conjunction with the
check
or
charge key. the Cash-In-Drawer
Total
will not balance using the formula just described above.
NOTE: The Percentage Discount (-%) must
be
done
after each Item
for
the formula given
to
balance
as shown.
70
Page 74

TROUBLESHOOTING
Please select and follow the procedure which best describes the cash register condition:
1.
IN
CASE OF
AN
ERROR TONE:
a.
PRESS the (CLEAR)
Key.
b.
Turn
the
key
to
the last
position
(PRG, REG, X
or
Z)
you were in prior
to
receMng the error. If
the last position you were in was ·REG·,
turn
the
key
to
the
"REG"
position
and PRESS the
(CLEAR) Key, then PRESS the (AMT TENDfTOTAL). (CHECK).
or
(CHARGE)
Key
to
complete a
pending sale
or
if your last position was ·PRG",
tum
the
key
to
the
·PRG"
position
and PRESS
the
(CLEAR) Key.
c.
Double check and repeat the procedure you are trying
to
perfonn.
d. If error still persists. perfonn a HALF SYSTEM CLEAR procedure (see below).
e.
As a last resort. perform a FULL SYSTEM
CLEAR
procedure (see below).
2.
IN
CASE PE-PRINTER ERROR DISPLAYS:
a.
Check if you are out of paper.
b.
Check for a paper jam. If so. carefully remove any paper obstructing the printer. CAUTION: Do not
manually pull the paper, always use the paper feed key
to
remove
or
advance the paper.
IMPORTANT: Do
not
use
sharp
or
pOinted
instruments
in
the
printer
area. This
may
cause
serious
damage
to
your
printer.
c.
Once the paper jam has been successfully removed. if
OPE"
still displays
turn
the
key
to
the
·OFF"
pOSition, unplug the cash register (pause
for
10
seconds),
and
replug.
d.
If.an
"EM
displays. PRESS the (CLEAR) Key.
e.
If an
"E"
continues
to
display.
tum
the
key
to
the
last
position
(PRG, REG, X or
Z)
you were in
prior to receiving the error. If the last position you were
in
was "REG",
turn
the
key
to
the
"REG"
position
and PRESS the .(CLEAR) Key. then PRESS the (AMT TENDfTOTAL). (CHECK). or
(CHARGE) Key
to
complete a pending sale or if your last position was
"PRG",
turn
the
key
to
the
·PRG"
position
and PRESS the (CLEAR)
Key.
f.
As
a last resort, follow the directions for a FULL SYSTEM CLEAR procedure
(see
below).
3.
IF THE CASH REGISTER
IS
MALFUNCTIONING:
a.
Be
sure the cash register
is
plugged into a working electrical outlet and no other electrical device is
using the same power source. Another electrical motor on the same circuit could cause interference
with register operations.
b.
Perform a HALF
SYSTEM
CLEAR procedure (see below).
c.
As
a last resort. follow the directions for a FULL SYSTEM
CLEAR
procedure (see below).
d.
If
needed. contact
the.
Royal Customer Support hotline at 9OB-429-HELP {4357} for additional assistance. -
4.
OPENING THE DRAWER IN AN EMERGENCY:
Push the drawer opening lever
to
the left Oocated at the rear of the bottom of the cash register)
to
open
the drawer in
an
emergency in case
of
a power failure or a cash register malfunction.
R.
Tum
the
key
to
the
·OFF"
poatuon.
HALF SYSTEM CLEAR
b.
Unplug
the
cash
register
from
the
power
source
(pause
for
10
PROCEDURE:
seconds)
and
reptug
the
cash
register.
c.
Continue
wtth nonnaJ
operations.
FULL SYSTEM CLEAR
PROCEDURE:
Note: This procedure will erase all transaction
totals and programming.
a.
b.
c.
d.
e.
1.
g.
Tum
the
key
to
the
'OFF"
Postuon.
Remove
one
battery.
Unplug
the
cash
register
from
the
power
source
and
walt 5 minutes.
Replug
the
cash
register.
Replace
the
battery.
Re-program
the
cash
register.
Continue
with
nonnal
operations.
If a problem still persists. contact a Royal Authorized Service Center. For the location of the one nearest you,
call toll free at 888-261-3888 (E.S.T.).
Page 75

SPECIFICATIONS AND SAFETY
MODa
Royal
482nt
TYPE:
Bectronic cash register with printer and
40
departments.
DISPLAY:
Auorescent 14mm.
Symbols
for error, change, subtotal, minus, total and item count.
CAPACnY:
7 digit Input and
10
digit readout.
PRINTER:
ECR exclusive serial printer.
INK
SOURCE:
Ribbon {Royal brand PCUA #013090 (Purple) or #013094 (Black».
PAPER
SUPPLY:
57mm
(2~'
Two Ply Register Tape, Royal brand
PCU~
#013130).
MEMORY
BATTERY
PROTECTION: Approximately 30 days after power interruption.
TECHNOLOGY:
CMOS
RAM
POWER CONSUMPTION: Standby -2BW, Operating - 47W
OPERATING
TEMPERATURE:
0-40 Degrees Centigrade
(32-104
Degrees Fahrenheit).
DIMENSIONS:
10l:i;"
x
1~'
x
1M"
WEIGHT:
15.8Ibs.
SAFETY NOTICE
The main outlet for this cash register must be located near the unit and easily accessible: _
Do
not use this cash register outdoors in the rain or near any source of liquid.
WARNING
-rhis
equipment generates, uses
anp
can radiate radio frequency energy and
if
not
installed and used in accordance with the instructions manual,
may
cause interference to
radio communications. It has been tested and found to comply with the limits for a Class
. A computing device pursuaTrt to Subpart
J
of
Part
15
of
FCC Rules, which are designed
to provide reasonable protection against such interference when operated in a
commercial environment. Operation of this equipment in a residential area is likely to
cause interference in which case the user at his own expense will
be
required to correct
the interference.
YOUR BACK-UP POWER SYSTEM: When you are not using your cash register,
you should keep
it plugged in with the
cornrollock
in the
·OFP
position. Back-up
power
is
provided via battery, but this should not be used for sustained periods of
time.
72
Page 76

LIMITED WARRANTY
ROYAL ELECTRONIC CASH REGISTER LIMITED WARRANTY
Royal Consumer Business Products. 765 U.S. Highway 202. P.O. Box 6945, Bridgewater, New Jersey 08807
warrants that your NEW Royal Cash Management System is free
of
defects
of
workmanship and materials. If
there is a defect
or
malfunction
of
this cash register, Royal will repair the cash register free of charge as follows:
PARTS:
New
or
comparable rebuilt parts in exchange for defective parts for ONE
YEAR
from the date of
purchase.
LABOR:
All
labor charges incurred
for
90
DAYS
are covered from the date of purchase. Cash register must
be sent postage prepaid
C!.nd
insured
to
Royal. Royal will pay return postage, during labor warranty period only.
This warranty does not apply
to
persons who purchase this product second hand or used.
This warranty does not include adjustments, parts,
or
repairs required
by
circumstances
beyonCi
the control of
Royal, including but not limited
to
fire
or
other casualty, accident, neglect, abuse, abnormal
use,
or
battery
leakage damages.
THERE
ARE
NO OTHER
EXPRESSED
WARRANTIES EXCEPT
AS
STATED
HEREIN.AFrER
THE PERIOD
OF
EXPRESSED
WARRANTY
SET
FORTH
HEREIN, THERE
ARE
NO
EXPRESSED
OR
IMPLIED
WARRANTIES AND THOSE EXCLUDED INCLUDE THOSE
OF
MERCHANTABILITY AND
FITNESS
FOR
A
PARTICULAR PURPOSE. Royal shall NOT be liable for CONSEQUENTIAL DAMAGES resulting from any failure,
defect, or malfunction
of
this cash register. Some states
do
not allow limitations
on
how long
an
implied
warranty lasts and some states do not allow the exclusion or limitation of incidental or consequential damages,
so the above limitations
or
exclusions may not apply
to
you.
TO
OBTAIN
SERVICE
UNDER
THE TERMS OF THIS WARRANTY:
• . Pack your cash register in the original carton or equivalent.
• Enclose a copy of the bill of sale
or
other documentation showing original purchase date.
• Enclose a card or note describing the difficulty your have had with the cash register.
Be
sure
to
include your complete name and address.
• Mail the above prepaid and insured
to
the nearest authorized service location. The Service Center cannot
be held responsible for any loss
or
damage in transit.
For Authorized Service Centers within your local area, please call 1
(888)
261·3888.
Please retain proof of purchase
to
establish date of original purchase.
Your warranty starts wlth the date of original purchase. This warranty gives you specific legal rights, and you
may also have other rights which vary from State to State.
• This warranty
is
valid only
on
cash registers purchased, delivered and used in the United States.
Page 77

Appendix
II
CALCULATING STATE TAX TABLE CODES
-·--~CAt:CUtATING
STATE
TAX
TABLE
CODES
State Tax Code: Represents a series
of
codes which are derived from your State's Retail Tax Chart
to
give
you the highest level of accuracy
in
charging tax. .
Important: This section of the manual will give you instructions for figuring your own tax code if your specific
state's tax code
is
not listed in Appendix
I.
Please take the time
to
follow the "EXAMPLE TAX
CHARr
given
on (Page II-d) and familiarize yourself with the method of determining the
tax
code. Then using
!HE
WORKSHEIT
on (Page
11008),
duplicate
the
method
of
calculating your state tax code
by
the steps described
in this section (to
do
this you will need
to
obtain a
copy
of
your state's Retail Tax Chart from your local Tax
Office). Once completed write
down
the
tax
code and save
the
information for future reference.
STEP A: For
the
follOwing, please observe "EXAMPLE TAX
C':IARr,
Step A, (Page II-d):
Every tax table consists
of
tax brackets. Each consecutive tax bracket is assigned a tax which
is
exactly one cent higher than that assigned
to
the previous tax
bracket
In our "EXAMPLE TAX
CHARr a sale
from .00
to
.12 is not taxed. However, in the next tax bracket a sale
from.
13
to
.31
is
taxed one
cent
Ukewise,
in
the next tax bracket a sale from .32
to
.54
is
taxed
two
cents. The tax table progresses in a similar pattem.
Using "THE
WDRKSHEEr,
fill
in
Step A with
the
appropriate
amounts
from-your
state's Retail
Tax Chart
as
described. .
STEP B: For
the
following, please observe "EXAMPLE TAX
CHARr,
Step
B,
(Page II-d):
(1)
The difference between the starting amounts of each consecutive tax bracket
is
called a
"breakpoinf. Every tax table consists
of
a particular sequence
of
breakpoints. In our
"EXAMPLE
TAX
CHARr
the difference between .00 and .13
is
.13 cents. This 13
is
the first
breakpoint. likewise. the difference between
.13 and .32
is
.19 cents.
Thus.
19
is
the second
breakpoint The breakpoints continue
in
a particular sequence through
the
entire tax table. It
is
this particular sequence
of
breakpoints that
is
used
to
determine the programming code.
Using "THE
WDRKSHEEr,
fill
in
Step B
by
calculating
the
breakpoints based
on
your
state's
Retail Tax Chart
as
described.
(2)
The sequence of breakpoints
is
divided into "Regular- and "Irregular- patterns.
All
tax tables
repeat a pattern of irregular breakpoints that lead into a pattern of regular breakpoints.
To
determine the breakpoint pattern, continue calculating the breakpoints in Part B until you have
found the "Regular- repeat breakpoint pattern.
Note the following from
our
example:
Br~kpoints·-
13, 19, 23, 27,
27,29
- represent the "Irregular- breakpoint pattern.
Breakpoints - 25,
25, 25,
25
- represent the "Regular- repeat breakpoint pattern.
The "Regular- repeat breakpoint pattern is a point where you will first see a repetition of one
or
more numbers which must then add up evenly
to
(Le.
100,200,300,
etc.). In our programming
example the 'Regular- breakpoint pattern
(25,
25,
25, and 25) add up
to
100.
USing "THE
WDRKSHEEr,
determine
the
"Regular"
breakpoint
pattern based
on
your
state's
Retail Tax Chart as described.
ll-a
Page 78

"'It"
CALCULATING STATE
TAX
TABLE
CODES
Appendix
II
Step C:
For
the
follOl.ving, please observe
"~MPLE
TAXCHARr,
Step C, (Page II-d):
The first number
to
be
programmed consists of the Base Tax followed by the number "1".
In
·PRG· position,
type
your
Base Tax number,
followed
by
the
number
·1',
then
press
the
(TAX SHIFT) Key.
..
(1)
The Base Tax - A base tax is defined
by
local
or
state government and refers
to
the minimum
point where no
tax
is
charged. If no tax is charged from .0 cants
to
.12 cents, then .12 cents
is
your base tax. .
(2)
The Number ·1· - The programming mode for a tax table is ·1·. When programming any tax
table code this number
wHi
not change.
Example: If the base
tax is .12 cents: Type (121), then press
(TAX
SHIFT).
The
display will
show 1.21.
Using "THE
WORKSHEEr,
complete
Step A
by
using
toe
method
described.
Step
0:
For
the
following. please observe "EXAMPLE TAX
CHARr,
Step D. (Page. II-d):
The second number
to
be programmed is a six digit number: Follow the instructions and
examples below
to
determine your six digit nllmber. In
uPRG"
position.
type
the six
digit
number,
then
press
the
(TAX SHIFT) Key.
Example:
(4% State Tax Table):
(2)
100
(1)
4 (4% Tax Table
Rate)
x
24
x
24
(Multiplier)
2400
96
(Result: The six digit number
to
be programmed
is
240096)
(1)
You must first
det~rmine
the multiplier*. The multiplier is the number which when multiplied by
the percentage rate equals a whole number as close as possible
to
the number 100 and still
remaining a 2 digit. number. In the example above, the multiplier is 24. The number 4 (the
percentage
rate)
ismuJtiplied by
24
to
determine the.number
96
which is the last two digits
of
the 6 digit number
to
be programmed: (24 x 4 = 96).
* The easiest way
to
determine the multiplier
is
to
divide the number
100
by the percentage
rate until the result is a whole number as close
to
100
as possible and still remaining a 2 digit
number.
(2)
The first four digits of the 6 digit number (2400) are determined by multiplying the number
24
by 100 (24 x 100 = 2400). The final resulting 6 digit number
to
be programmed
is
240096.
-
Using "THE
WORKSHEEr.
complete
Step 0
by
using
the
method
described.
Page 79

GST
/PST
SYSTEM FOR CANADA
Appendix
III
STEP
1:
To select the Canadian Tax System, you must first pragram Rag 20 as follows:
1.
Tum
the key
to
the 'PRG" (program) position.
2. If a PRGjZ Manager Password has been programmed, TYPE the {PASSWORD
#),then
PRESS the (CHECK)
Key,
or
If
you did not program a
PRGjZ
Manager Password, go
to
~a
.'
3. TYPE (20){1). then PRESS the (VOID)
Key.
STEP 2: This cash register includes the following functions for taxation in Canada.
CANADIAN TAX PROGRAMMING PROCEDURE:
"PRG" +
(TAX#) + (TAX
1) + (MAXIMUM NON-TAXABLE PRICE*) + (NON-TAX) + (TAX
RATE)
+ (TAX2)
1-4 (up
to
6 digits)
0-99.~
* The non-taxable limit is used in certain areas where tax is exempted below a certain .
amount, for example. any amount below
$4.00
is
exempted from tax. If there
is
no
non-taxable limit, simply skip the step in brackets in the procedure above.
METHOD
1:
GSTTax: 7%
PST
Tax:
B%
GSTjPST Tax:
Both
7% and
B%
calculated on net amount
1. Program Tax ,
as
7%:
"PRG" + (1) + (TAX 1) + (7000) + (TAX 2)
2.
Program Tax 2
as
B%:
'PRG" + (2) + (TAX 1) + (8000) + (TAX 2)
3.
a.
Unk Tax , (7%
GST)
to
the desired Department key:
"PRG"
+ (000001) + (STfWJTAX) + (DEPT KEY)
b.
Unk Tax 2 (8%
PST)
to
desired Department key:
"PRG"
-+-
(000002) + (STfWJTAX) + (DEPT KEY)
c.
Unk both Tax 1
(GST)
and Tax 2
(PST)
to
desired Department key:
'PRG"
+ (000005) + (ST
fW
JTAX) + (DEPT KEY)
METHOD
2:
GST
Tax:
7%
PST
Tax:
8% .
GST
JPST
Tax:
Both
7% and 8% as tax on
tax
- piggyback calculation
,.
Program Tax 1
as
7%:
"PRG" + (1) + (TAX 1) + (7000) + (TAX 2)
2. Program Tax 2 as 8%:
'PRG" + (2) + (TAX 1) + (8000) + (TAX 2)
3. Program Tax 3 as 8%:
'PRG" + (3) + (TAX 1) + (8000) + (TAX 2)
III-a
Page 80

Appendix
II
CALCULATING
STATE
TAX TABLE CODES
TAX
"THE WORKSHEET"
Write down your results as you go.
!:!:Ef...!
STEP
c:
SALE
AHOUNT
!m..!
STEP
0:
B
reakpoints
STEP
E:
r--
r--
r--
r---
r--
STEP
F:
'--
r---
r---'
•
~
I
r--
STEP
G:
r--
r--
-
-:--
-
from
to
MOUNT
Il-e
.'-
..
-.,
Page 81

Appendix:
II
CALCULATING STATE TAX TABLE CODES
Step
E:
'-For
thefollo~ng,please
observe
-EXAMPLE TAX
CHAAr,
Step E, (Page H-d):
In ·PRG- position, type
the
individual
breakpoints
of
the
"Irregular"
breakpoint
pattern
and
the
press (TAX SHIFT)
Key
after each
breakpoint.
Place
the
number
"10· before
the
last
breakpoint
entry
•
..
Example:
Irregular breakpoint sequence:
13,
19,23,27,27,
1029:
TYPE
PRESS
DISPLAYED
13
(TAX
SHIFT)
0.13
19
(TAX
SHIFT)
0.19
23
(TAX
SHIFT)
0.23
27
(TAX
SHIFT)
0.27
27
(TAX
SHIFT)
0.27
'"
1029
(TAX
SHIFT)
10.29
Using "THE
WORKSHEEr,
complete
Step E
by
using
the
method
described.
Step F: For the fol/owing, please observe "EXAMPLE
TAX
CHARr,
Step F, (Page 1I-d):
In
~PRG·
position,
type
the
individual
breakpoints
of
the
"Regular" breakpoint pattern
and press
the
(TAX SHIFT)
Key
after
each breakpoint. Place
the
number
"10·
before
the
last breakpoint entry.
Example: RegUlar breakpoint sequence
25,25,25,
1025:
PRESS
DISPLAYED
25
(TAX
SHIFT) 0.25
25
(TAX
SHIFT)
0.25
25
(TAX
SHIFT)
0.25
1025
(TAX
SHIFT)
10.25
Using "THE
WORKSHEEr,
complete
Step F
by
using
the
method
described.
Step G: For
the
following,
please observe "EXAMPLE TAX
CHARr',
Step G, (Page II-d):
To summarize the steps taken
in
calculating and programming the State Tax Table Code,
combine Steps A through F and maintain for future reference.
NOTE: I;rogramming of the State Tax Table Code is done
in
the ·PRG" position.
121
(TAX
SHIFT), 240096
(TAX
SHIFT),
13
(TAX
SHIFT), 19
(TAX
SHIFT),
23
(TAX
SHIFT),
23
(TAX
SHIFT), 27
(TAX
SHIFT). 27
(TAX
SHIFT), 1029
(TAX
SHIFT), 25
(TAX
SHIFT), 25
(TAX
SHIFT). 25
(TAX
SHIFT), 1025
(TAX
SHIFT).
Using "THE WORKSHEET".
complete
Step G
by
using
the
method
described.
II-c
Page 82

CALCULATING STATE TAX TABLE CODES
Appendix.
II
"EXAMPLE
TAX
CHARr'
STEP
c:
Enter
the
bese
tax
a~t
(the
aini.u.
point
where
no
tax
is
charged)' followed
by
the
Humber
"1".
Then
press
the
(TAX
SHIm
Key
.
TAX
froa
to
AMOUNT
STEP
D: Enter
the
6
digit
number
(see
Page
Brealqxlints
~
0
II-b)
(i.e.
4%
= 240096
).
0 12
~
13
31
~
I
-
STEP
E:
Enter
the
individual
MlrreguL
arK
32
54 2
breakpoint
pattern.
Press
the
(TAX
SHIFT) Key
-
55
81
3
-
after
each breakpoi
nt.
PlBce
the
number
·"1
0"
108 4
before
the
last
"Ir
regular"
breBkpoi
nt.
82
-
109 137
5
(13, 19, 23, 27,
27
, 1029)
f---
.
'-
138 6
162
f---
STEP
F:
Enter
the
i nd; vi dual brealqxli
nts
of
-
187
163 7
the
"Regular" break
point
pattern.
Press
the
(TAX
Slum
f---
8
Key
after
eBch
brea
kpoint.
P
lace
the
number
"1
0"
before
188 212
f---
213
237 9
the
last
"Regular"
breakpoint.
(25, 25, 25, 1025)
f---
'-
238 10
i
f---
STEP
G:
To
sUllllllari
:te,
r---
combine
the
Steps A through
F and maintain
the
information
f---
for
future
use.
i
f---
121
(TAX SHIFT)
240096
(TAX SHIFT)
-
13 (TAX SHIFT)
NOTE:
13
19
23
27
27
29
25
25
25
25
19 (TAX SHIFT)
-
23
(TAX SHIFT)
27
(TAX SHIFT)
27
(TAX SHIFT)
1029 (TAX SHIFT)
25
(TAX SHIFT)
25
(TAX SHIFT)
25
(TAX SHIFT)
1025 (TAX SHIFT)
A total
of
63
breakpoints
can
be
programmed
on
this
cash register.
Page 83

Appendix
III
GST
/PST
SYSTEM FOR CANADA
4. a Unk Tax 1 (7% GSl1
to
the desired Department
key:c ,__
"PRG-
+ (000001) +
(STfWrrAX)
+ (DEPT KEY)
b.
Unk Tax 3 (8% PSl1
to
the desired Department key:
"PRG-
+ (000003) +
(STfWrrAX)
+ (DEPT KEY)
c.
Unk
both Tax 1 (7% GSl1 and Tax 2
(8%
PSl1
to
the
desired Department key:
..
·PRG- +
(DOOOOS) + CSTfWrr
AX) + (DEPT KEY)
d. Program
for
piggyback (tax
on
tax) calculation
for
Canada:
-PRG"
+
(25) + (1)
+ (VOID)·
* For other options
of
Rag
25,
see
Page 43.
For special calc:ulations
of GST and
PST
Tax, please refer
to
Rag 26 on Page
43
for pro.9ramming options.
For customer assistance in Canada, please call 416-492..s250, extension 217.
III-b .
 Loading...